
A Step-by-Step Guide to Making a WordPress Website
- By
- Last updated:
- Leave your thoughts
Looking for a complete and easy-to-follow guide on how to get started with WordPress?
WordPress is by far the most popular way to make a website, so you’ve definitely made a great decision. It powers well over 40% of all websites — and that number is only going up!
People love WordPress because of its flexibility and community. It’s free, open-source and has tens of thousands of extensions that let you customize your site’s look and functionality without requiring any special technical knowledge.
But when you’re just getting started with your first WordPress site, it can be tough to know what you need to do to get it up and running.
The good news is, with our step-by-step guide setting up a website can be done quickly, cheaply and easily, whatever your level of knowledge. To make things as simple as possible, we’re going to walk you through exactly how to get started with WordPress in eight easy-to-follow steps. We’ll guide you through the process and give you tips and advice, as well as recommendations for useful plugins and quality themes, and much more!
Here are some key details on what to expect from this guide:
- ⏱️ Time commitment — you can have a working (albeit basic) WordPress site within the first 30 minutes or so. From there, you’ll need to spend some time adding content and customizing the design.
- 💰 Cost commitment — following this tutorial will cost you ~$60 for a basic site, which will cover running your WordPress site for an entire year. You may want to spend more for premium extensions, but those are 100% optional.
- 📖 Knowledge level — you don’t need any special technical knowledge to follow this guide — all you need to do is click a bunch of buttons and follow our instructions.
Ready to begin? Let’s get you a working WordPress site!
Note: This guide is about how to get started with a self-hosted WordPress site powered by the free, open-source WordPress software found at WordPress.org. This is different from WordPress.com — you can learn more in our full WordPress.org vs WordPress.com comparison.
How to Get Started With WordPress: Step-by-Step Guide
Here’s a summary of how to get started with WordPress — keep reading for the full guide:
- Choose a domain name — your domain name is your WordPress site’s permanent address on the Internet. Ours is winningwp.com.
- Purchase web hosting — web hosting is the ‘engine’ that powers your WordPress site and makes it accessible to visitors around the world.
- Install WordPress — most WordPress hosting companies give you convenient tools to install the free WordPress software.
- Configure basic WordPress settings — you’ll want to make some simple one-time decisions to control how your site works.
- Pick your WordPress theme — your WordPress theme controls how your website looks. It lets you personalize your site without requiring any special knowledge.
- Install must-have WordPress plugins –– while themes are about style, WordPress plugins are all about adding new functionality to your WordPress site.
- Add your content — you have some options for how you add your content.
- Consider other plugins as needed — beyond must-have WordPress plugins, there are tens of thousands of other plugins you may want to use.
Now, let’s go through everything in more detail…
STEP 1: CHOOSE YOUR DOMAIN NAME
Your domain name will be your WordPress site’s permanent address on the internet — e.g. yoursite.com.
👉 Action Steps:
- Choose a domain name for your WordPress site. E.g. yoursite.com.
- Check your domain name is available for purchase.
- Purchase your domain name using Google Domains or another domain registrar.
Your domain name is your site’s permanent address on the web — every website needs one so people can access it. Ours is winningwp.com.
In addition to being your site’s address, your domain name also plays an important role in branding, so you’ll want to put some thought into getting it right.
So, what’s a good domain name? It depends…
If you’re building a personal portfolio, you may want to use your own name, such as keanureeves.com. Or, if your business already has a name, you’ll probably want to use that, such as walmart.com.
Otherwise, you’ll need to do some brainstorming to come up with the perfect name — we have tons of tips on how to choose a domain name — or you can use a domain name generator to jumpstart the process with some ideas.
There are two parts to your domain name:
- The name itself — e.g.
winningwp. - The domain name extension — e.g.
.com,.org,.io, and so on.
There are tons of different domain name extensions and, while .com is still the most popular by a good margin, it’s becoming more and more acceptable to use a different extension.
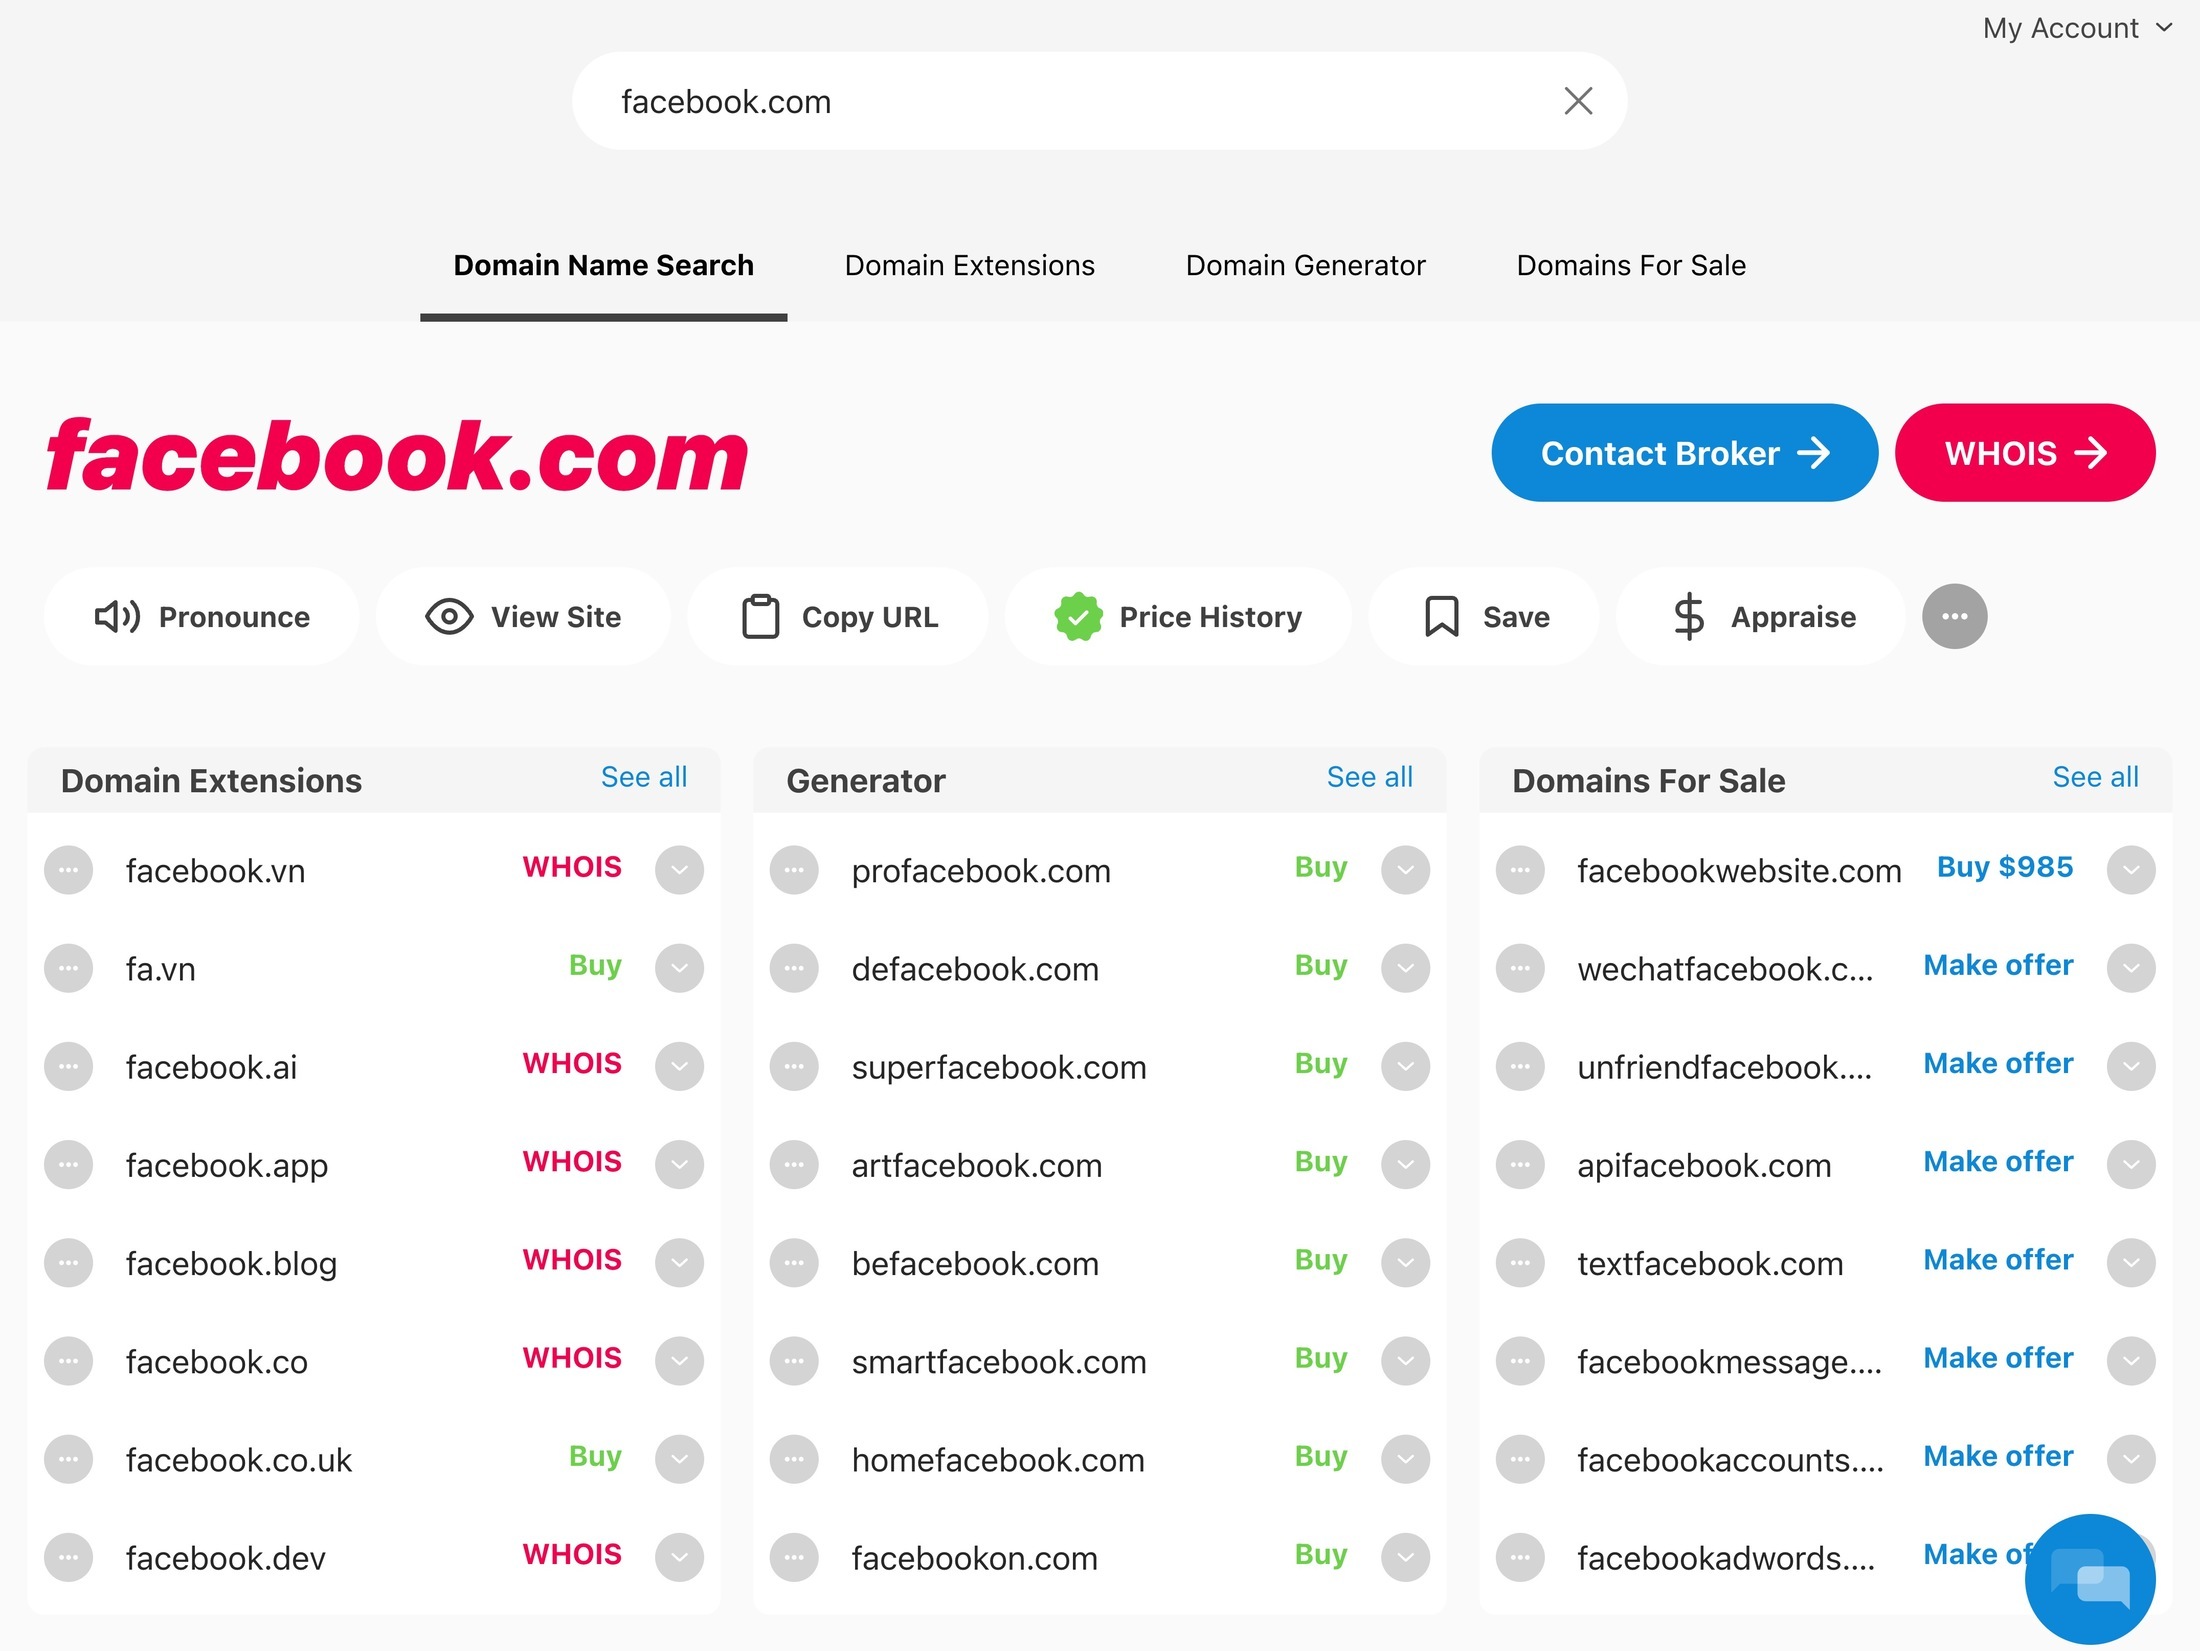
The tricky thing, though, is that a specific domain name can only be owned by one person at a time. Once that domain is registered, no one else can register it (unless that person lets the registration lapse). For example, you can’t go out and buy facebook.com.
For that reason, you may find that a lot of the names you think of are already taken — you can test this with Instant Domain Search. If that happens, you can either try a different extension (such as .net instead of .com) or use a different name:
Once you find the perfect domain name, you need to register it via a domain name registrar.
The registration price will depend on the registrar, but, typically, it’s around $10 to $15 a year.
There are a lot of quality domain registrars, but we recommend Google Domains because it offers free privacy protection, has transparent pricing and won’t surprise you with a big price jump when you renew your domain next year (watch out for this with GoDaddy).
Here’s how to purchase your domain name:
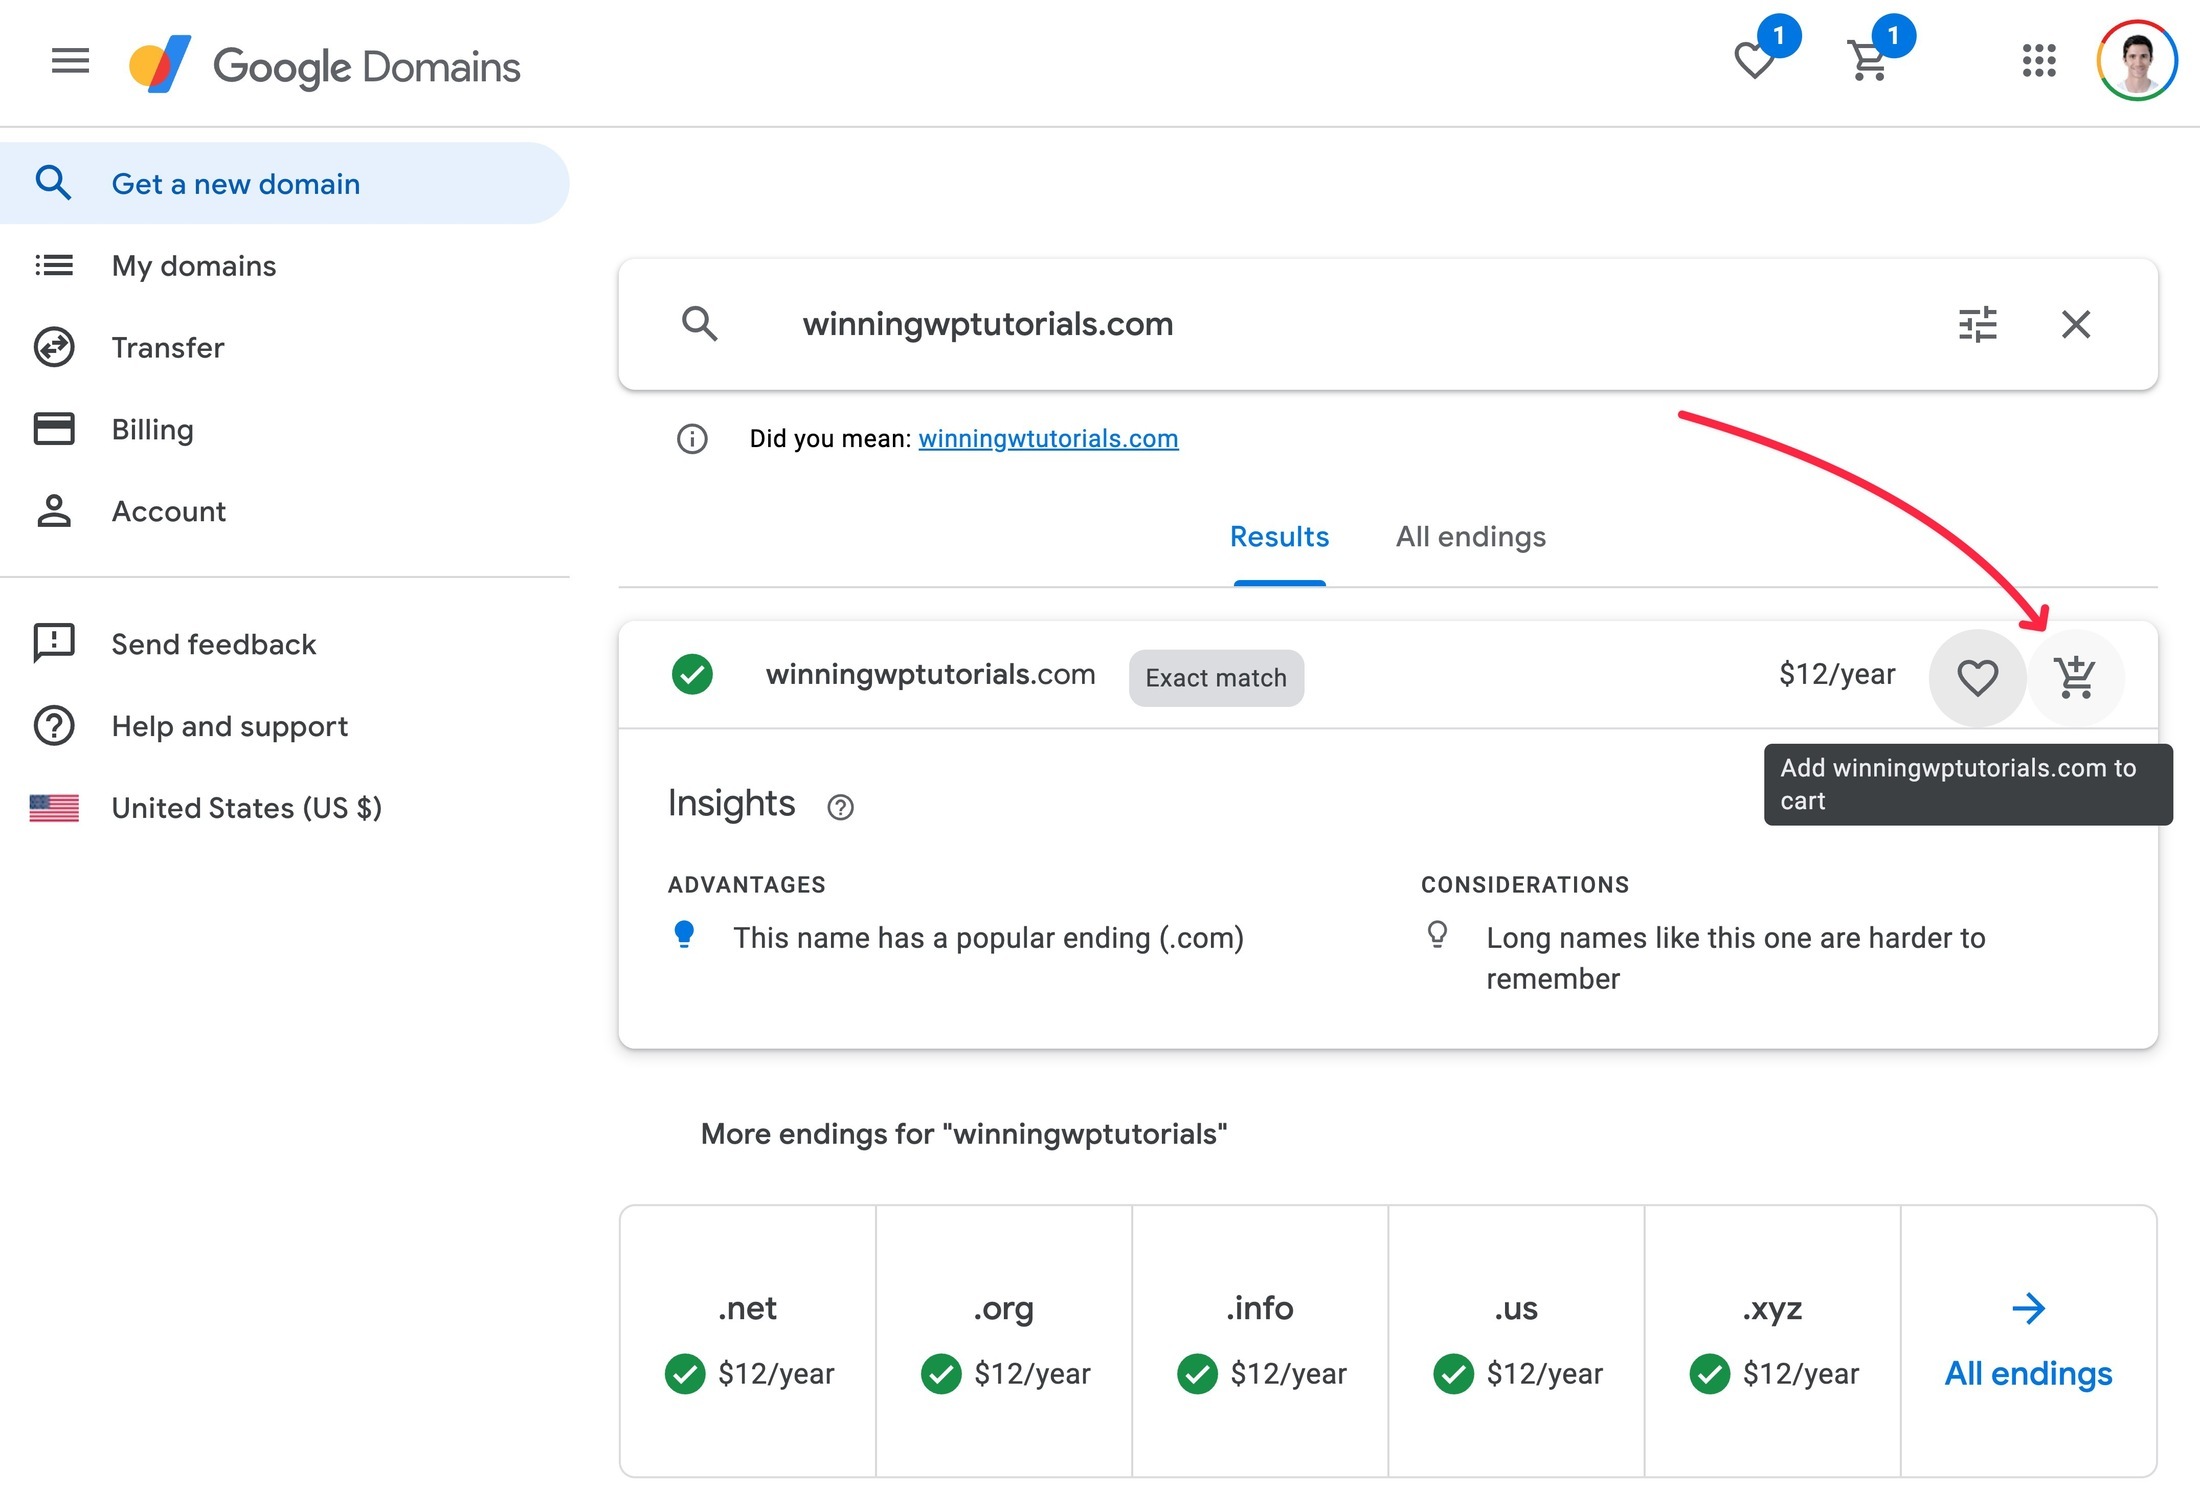
- Go to Google Domains.
- Enter your domain name in the search box.
- Click the cart icon to add it to your cart.
- Complete the checkout process to finalize your purchase (you can use your existing Google account).
STEP 2: PURCHASE WEB HOSTING
Your web hosting is what powers the WordPress software and makes your website available to visitors.
👉 Action Steps:
- Choose a WordPress host — we recommend SiteGround for beginners.
- Purchase a hosting plan — it will cost around ~$48 for an entire year of hosting from SiteGround.
- Connect your domain name to your web hosting (instructions below).
To power the WordPress software and make your website accessible when someone visits your domain name, you need web hosting.
With web hosting, you’re basically renting space on a computer to power your website.
You’ll find hosting at all price points, from a few bucks a month up into the hundreds of dollars a month.
When you’re just getting started with WordPress, it’s totally fine to choose cheap WordPress hosting , as you can always upgrade later as your site grows.
For cheap WordPress hosting that doesn’t skimp on quality or service, we recommend SiteGround (read our SiteGround review).
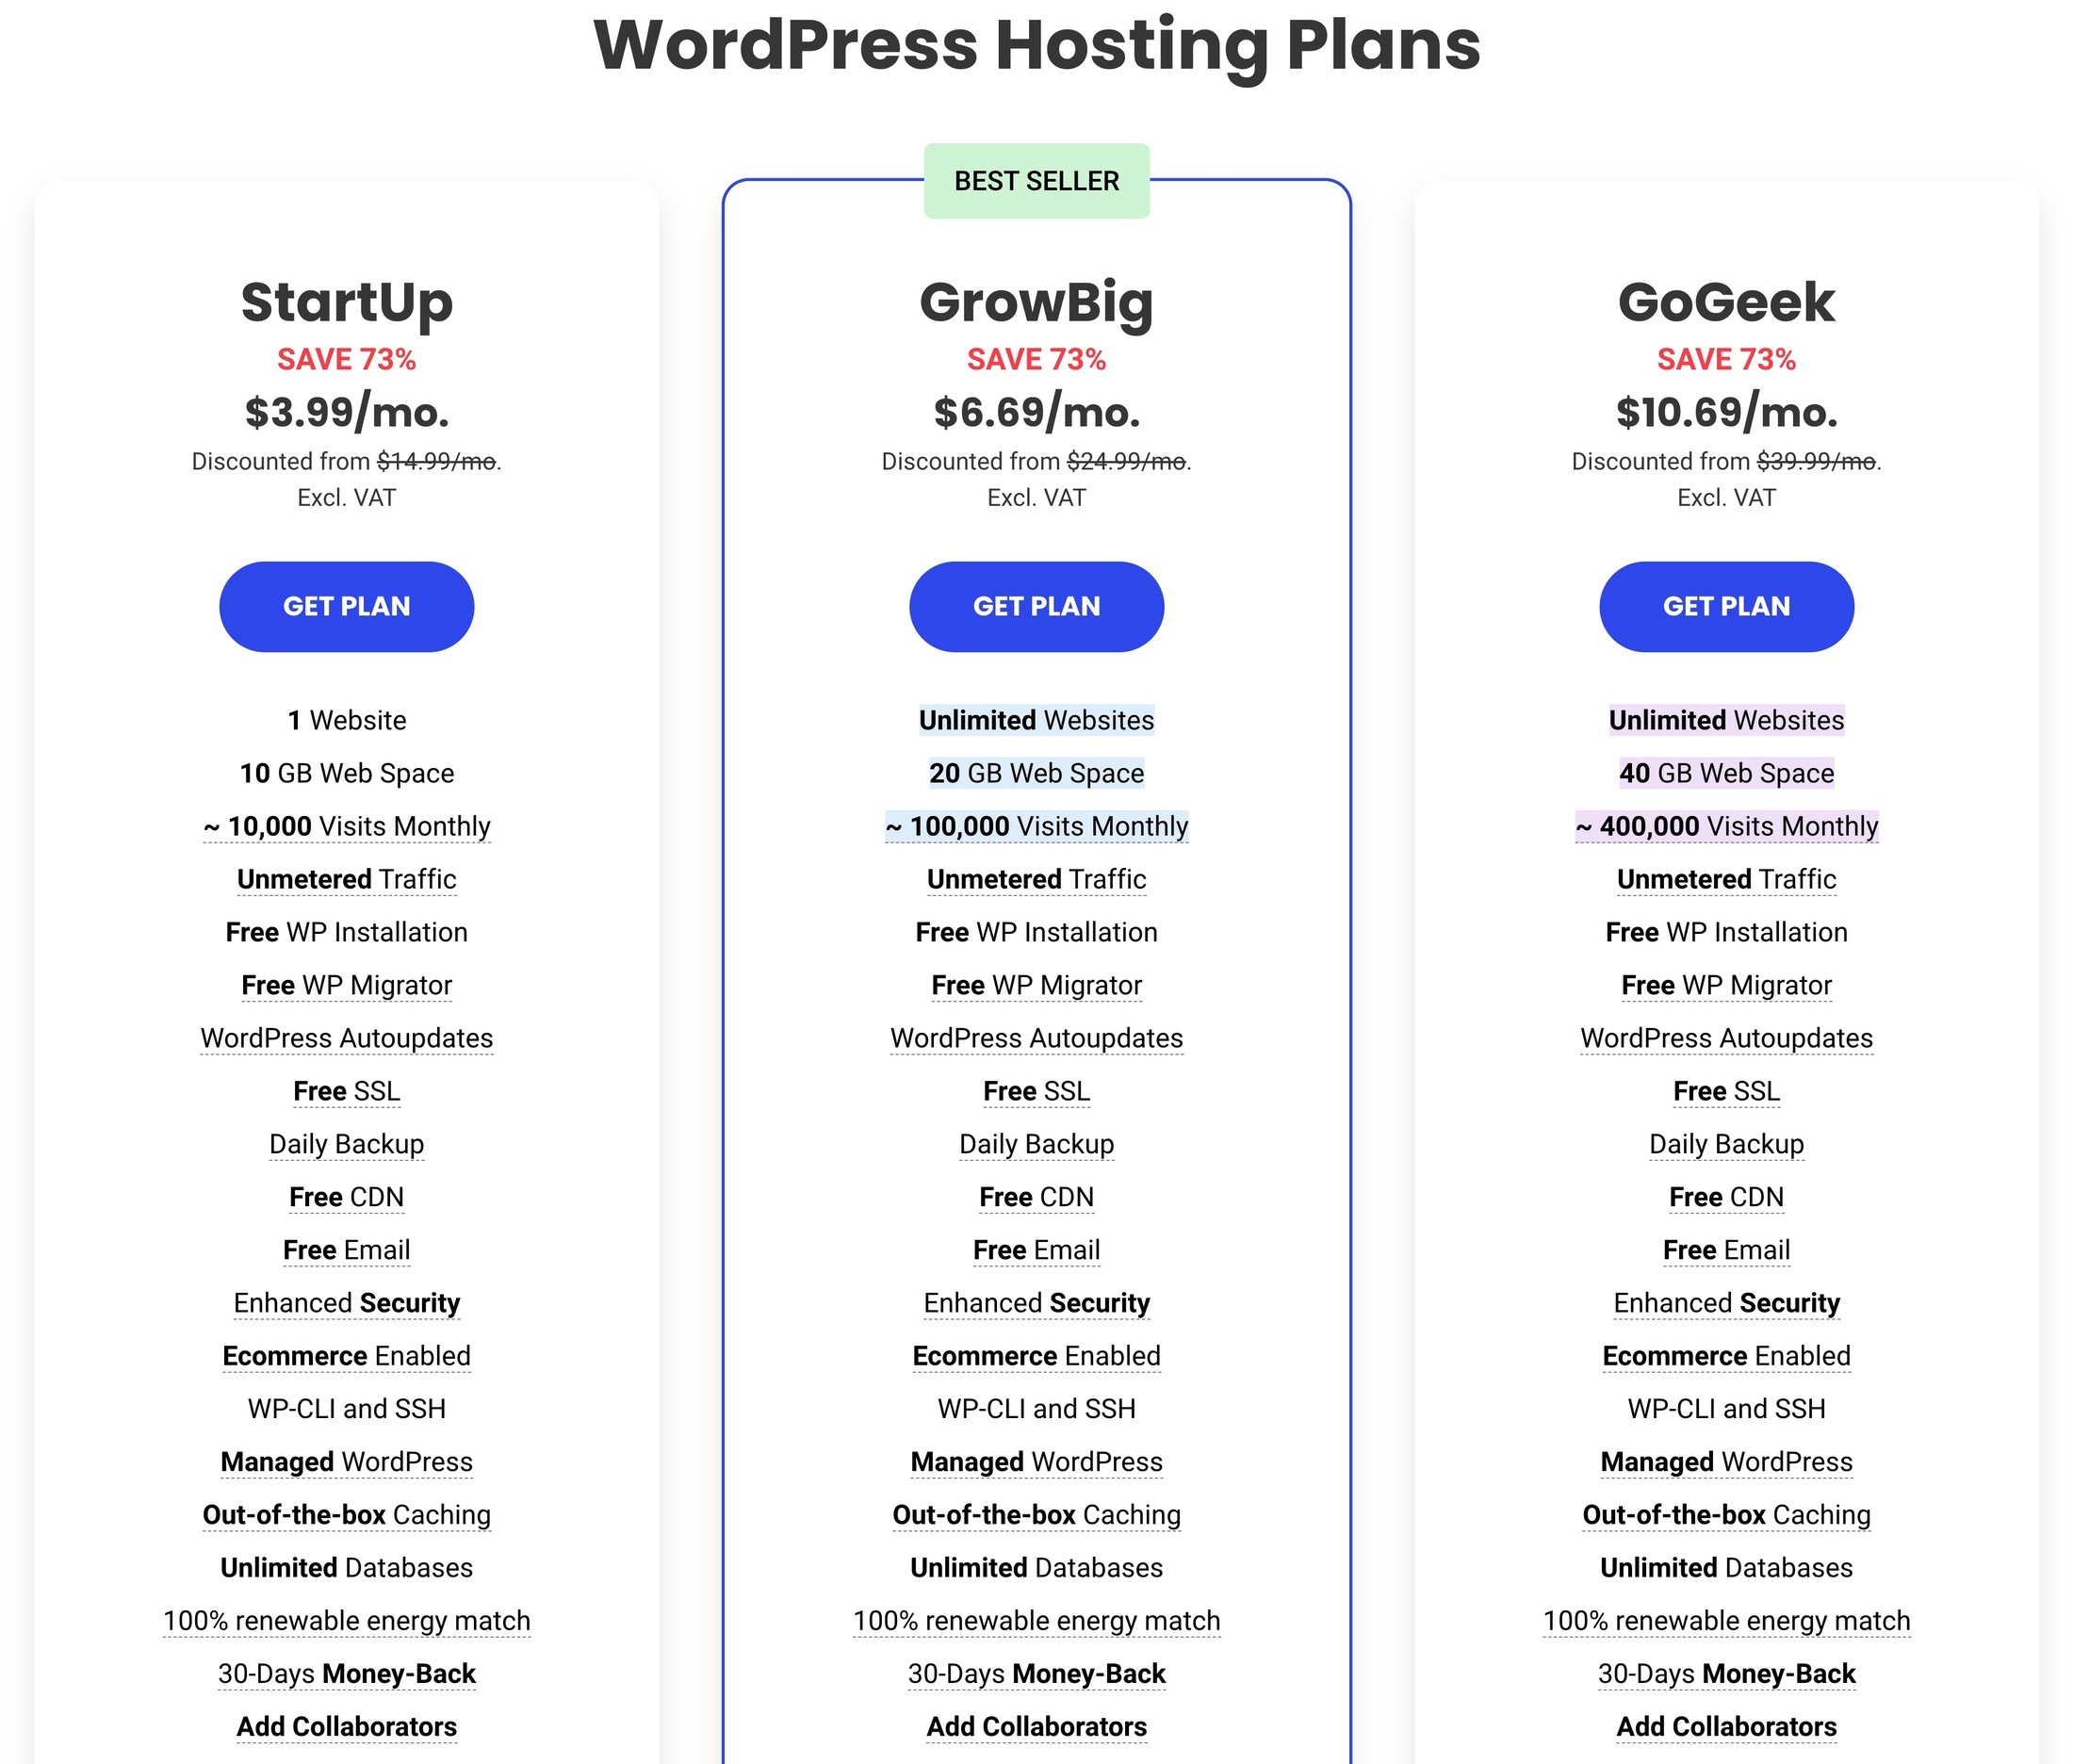
To get started, go to SiteGround and choose your plan — StartUp or GrowBig are both good options. You can use StartUp if you know you’re only building one site, or GrowBig if you think you may want to launch multiple sites.
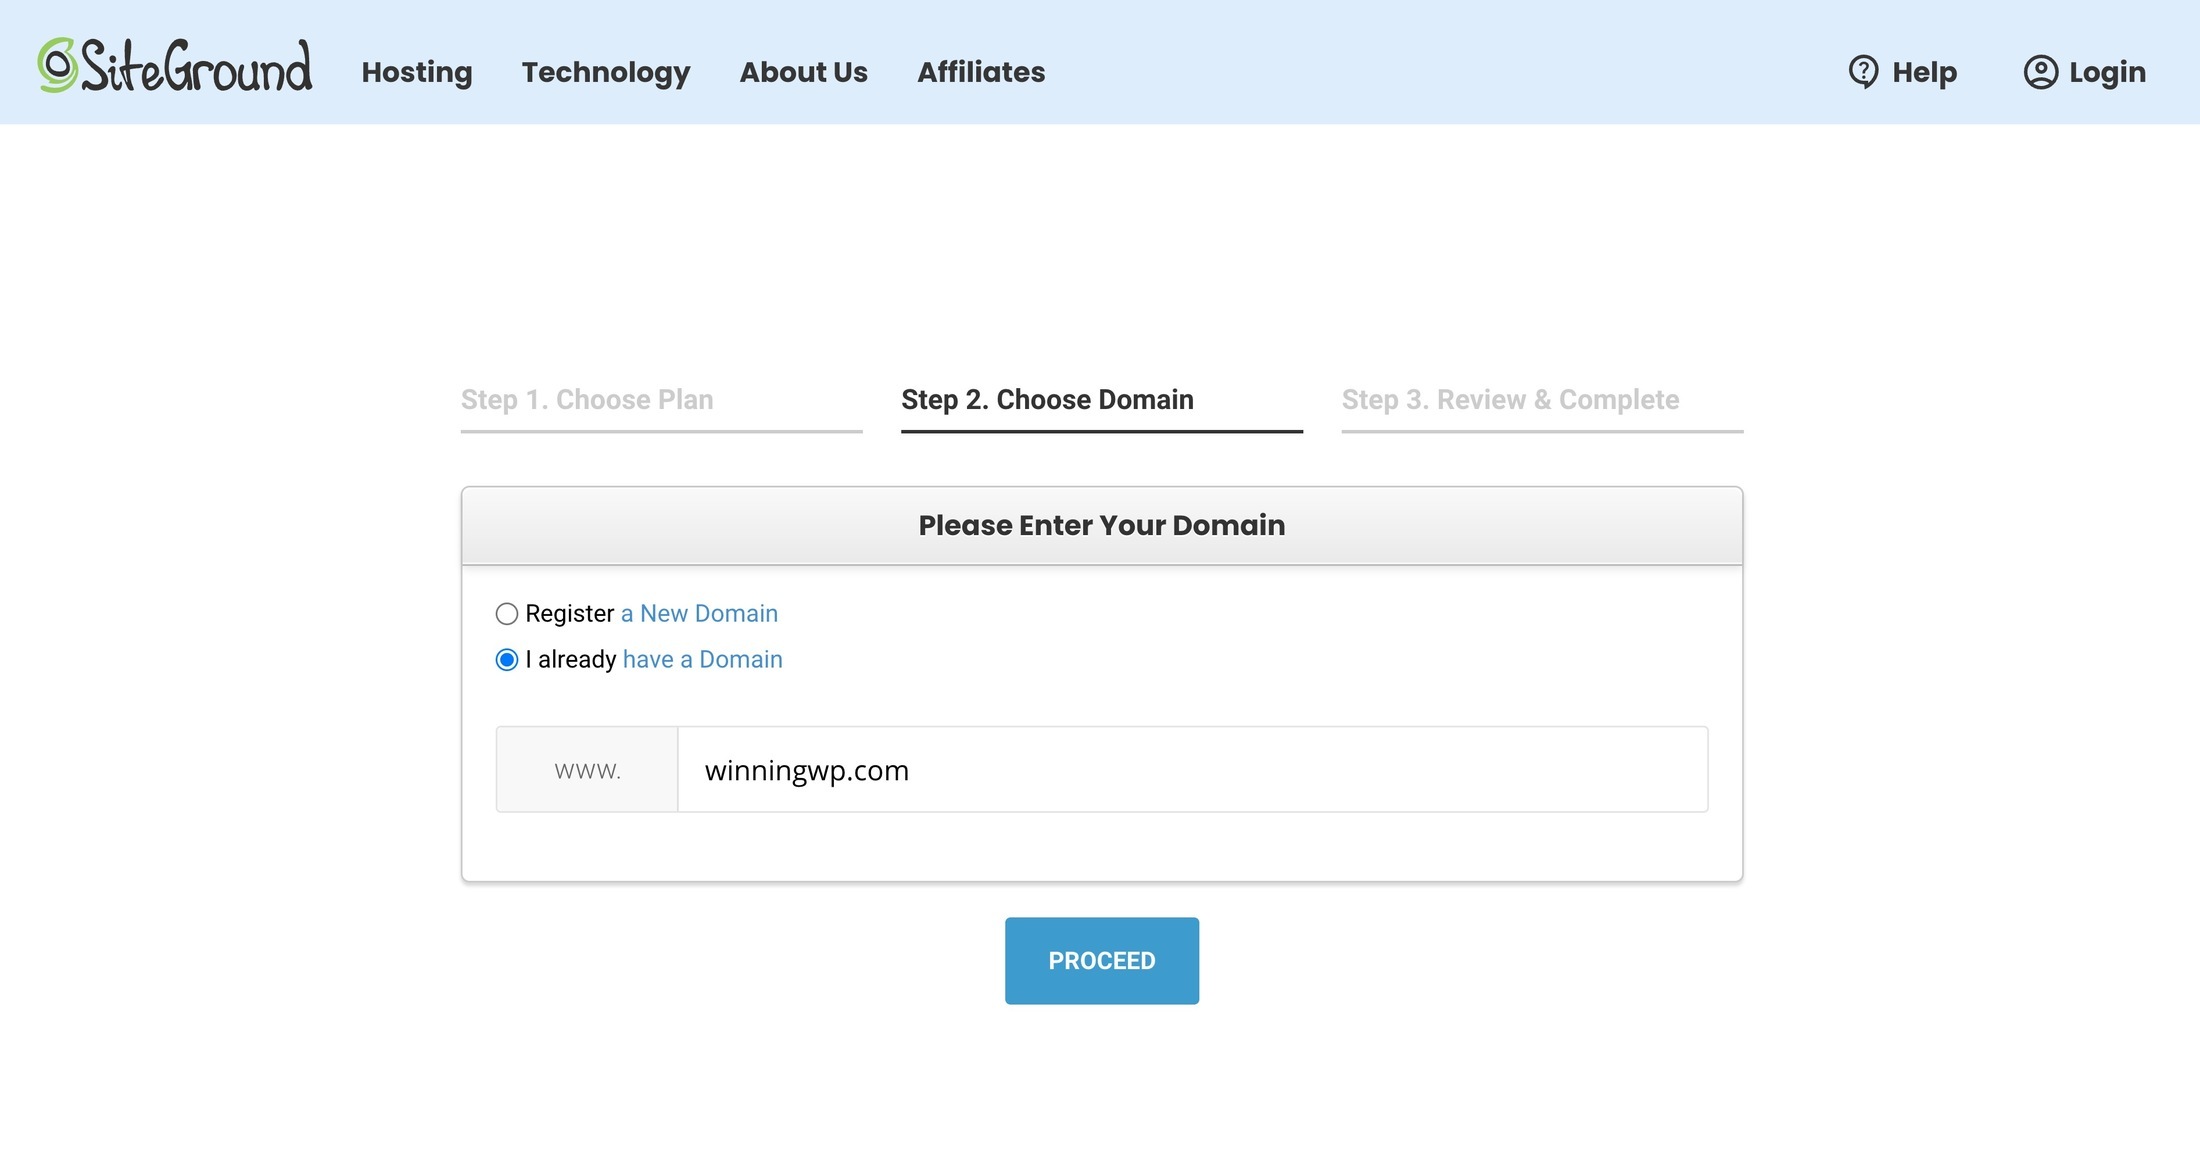
On the next screen, choose I already have a Domain and enter the domain name you purchased in the previous step:
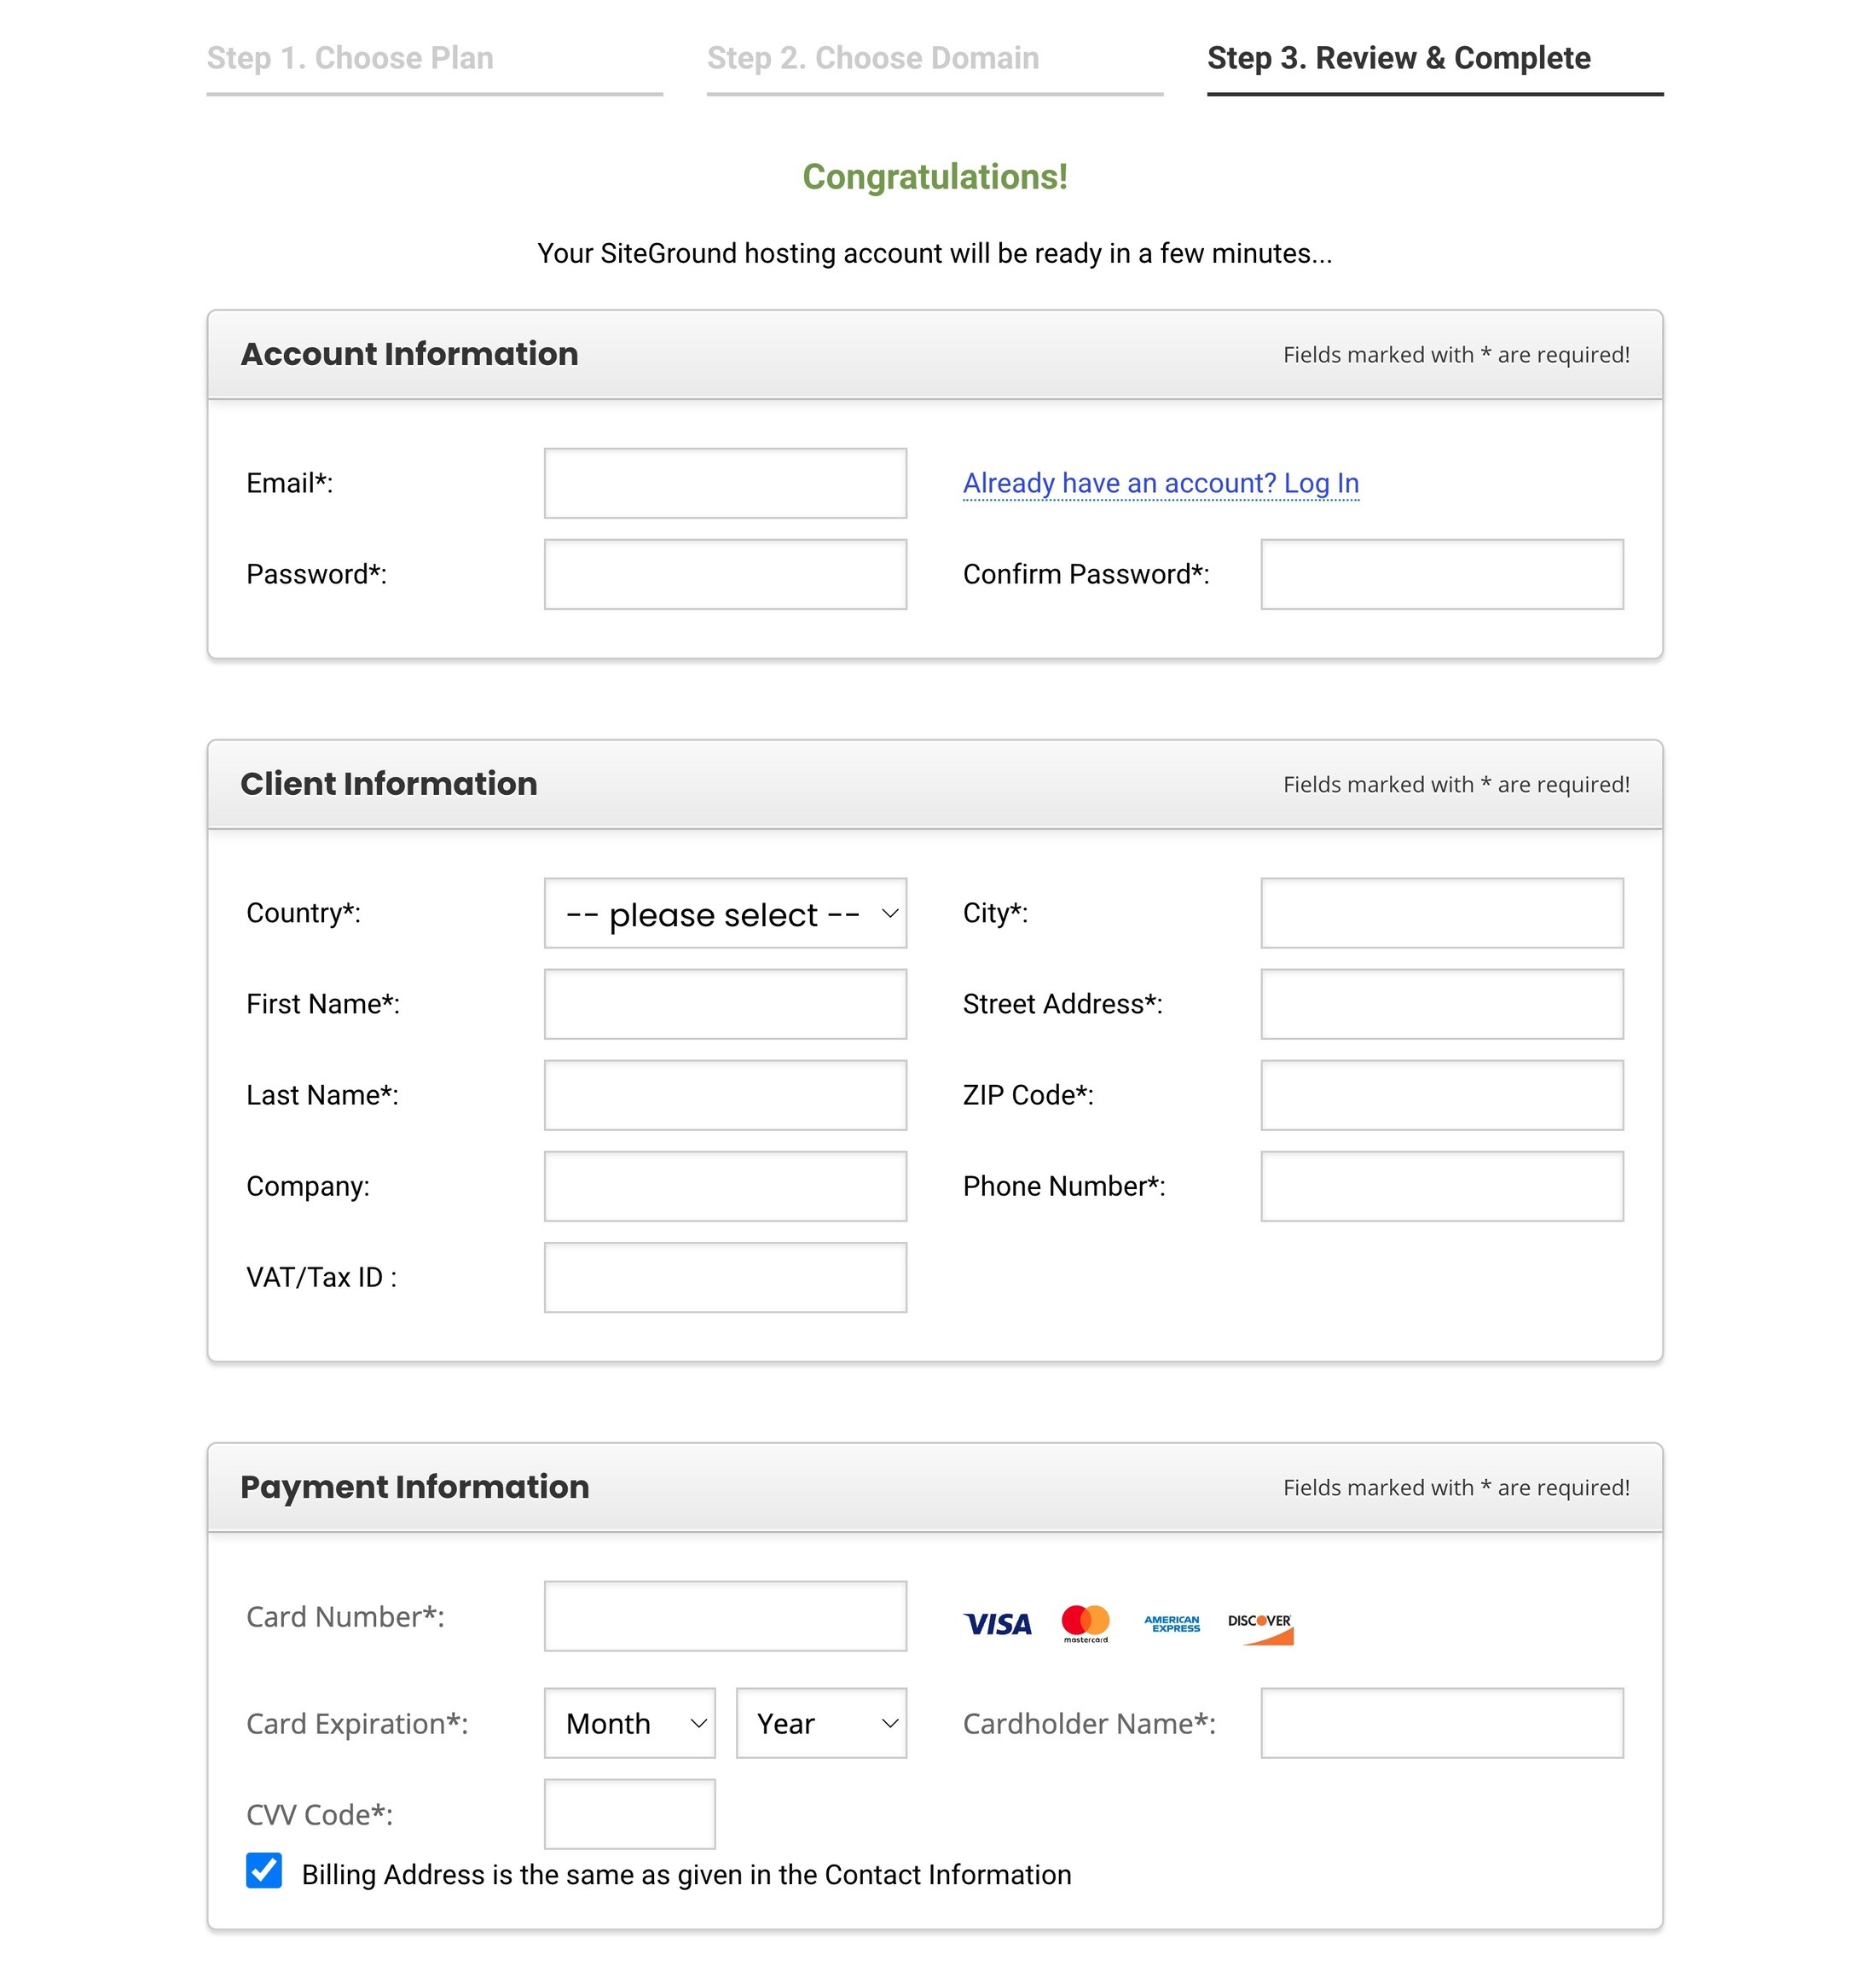
Then, fill out your account information and pay for your hosting plan:
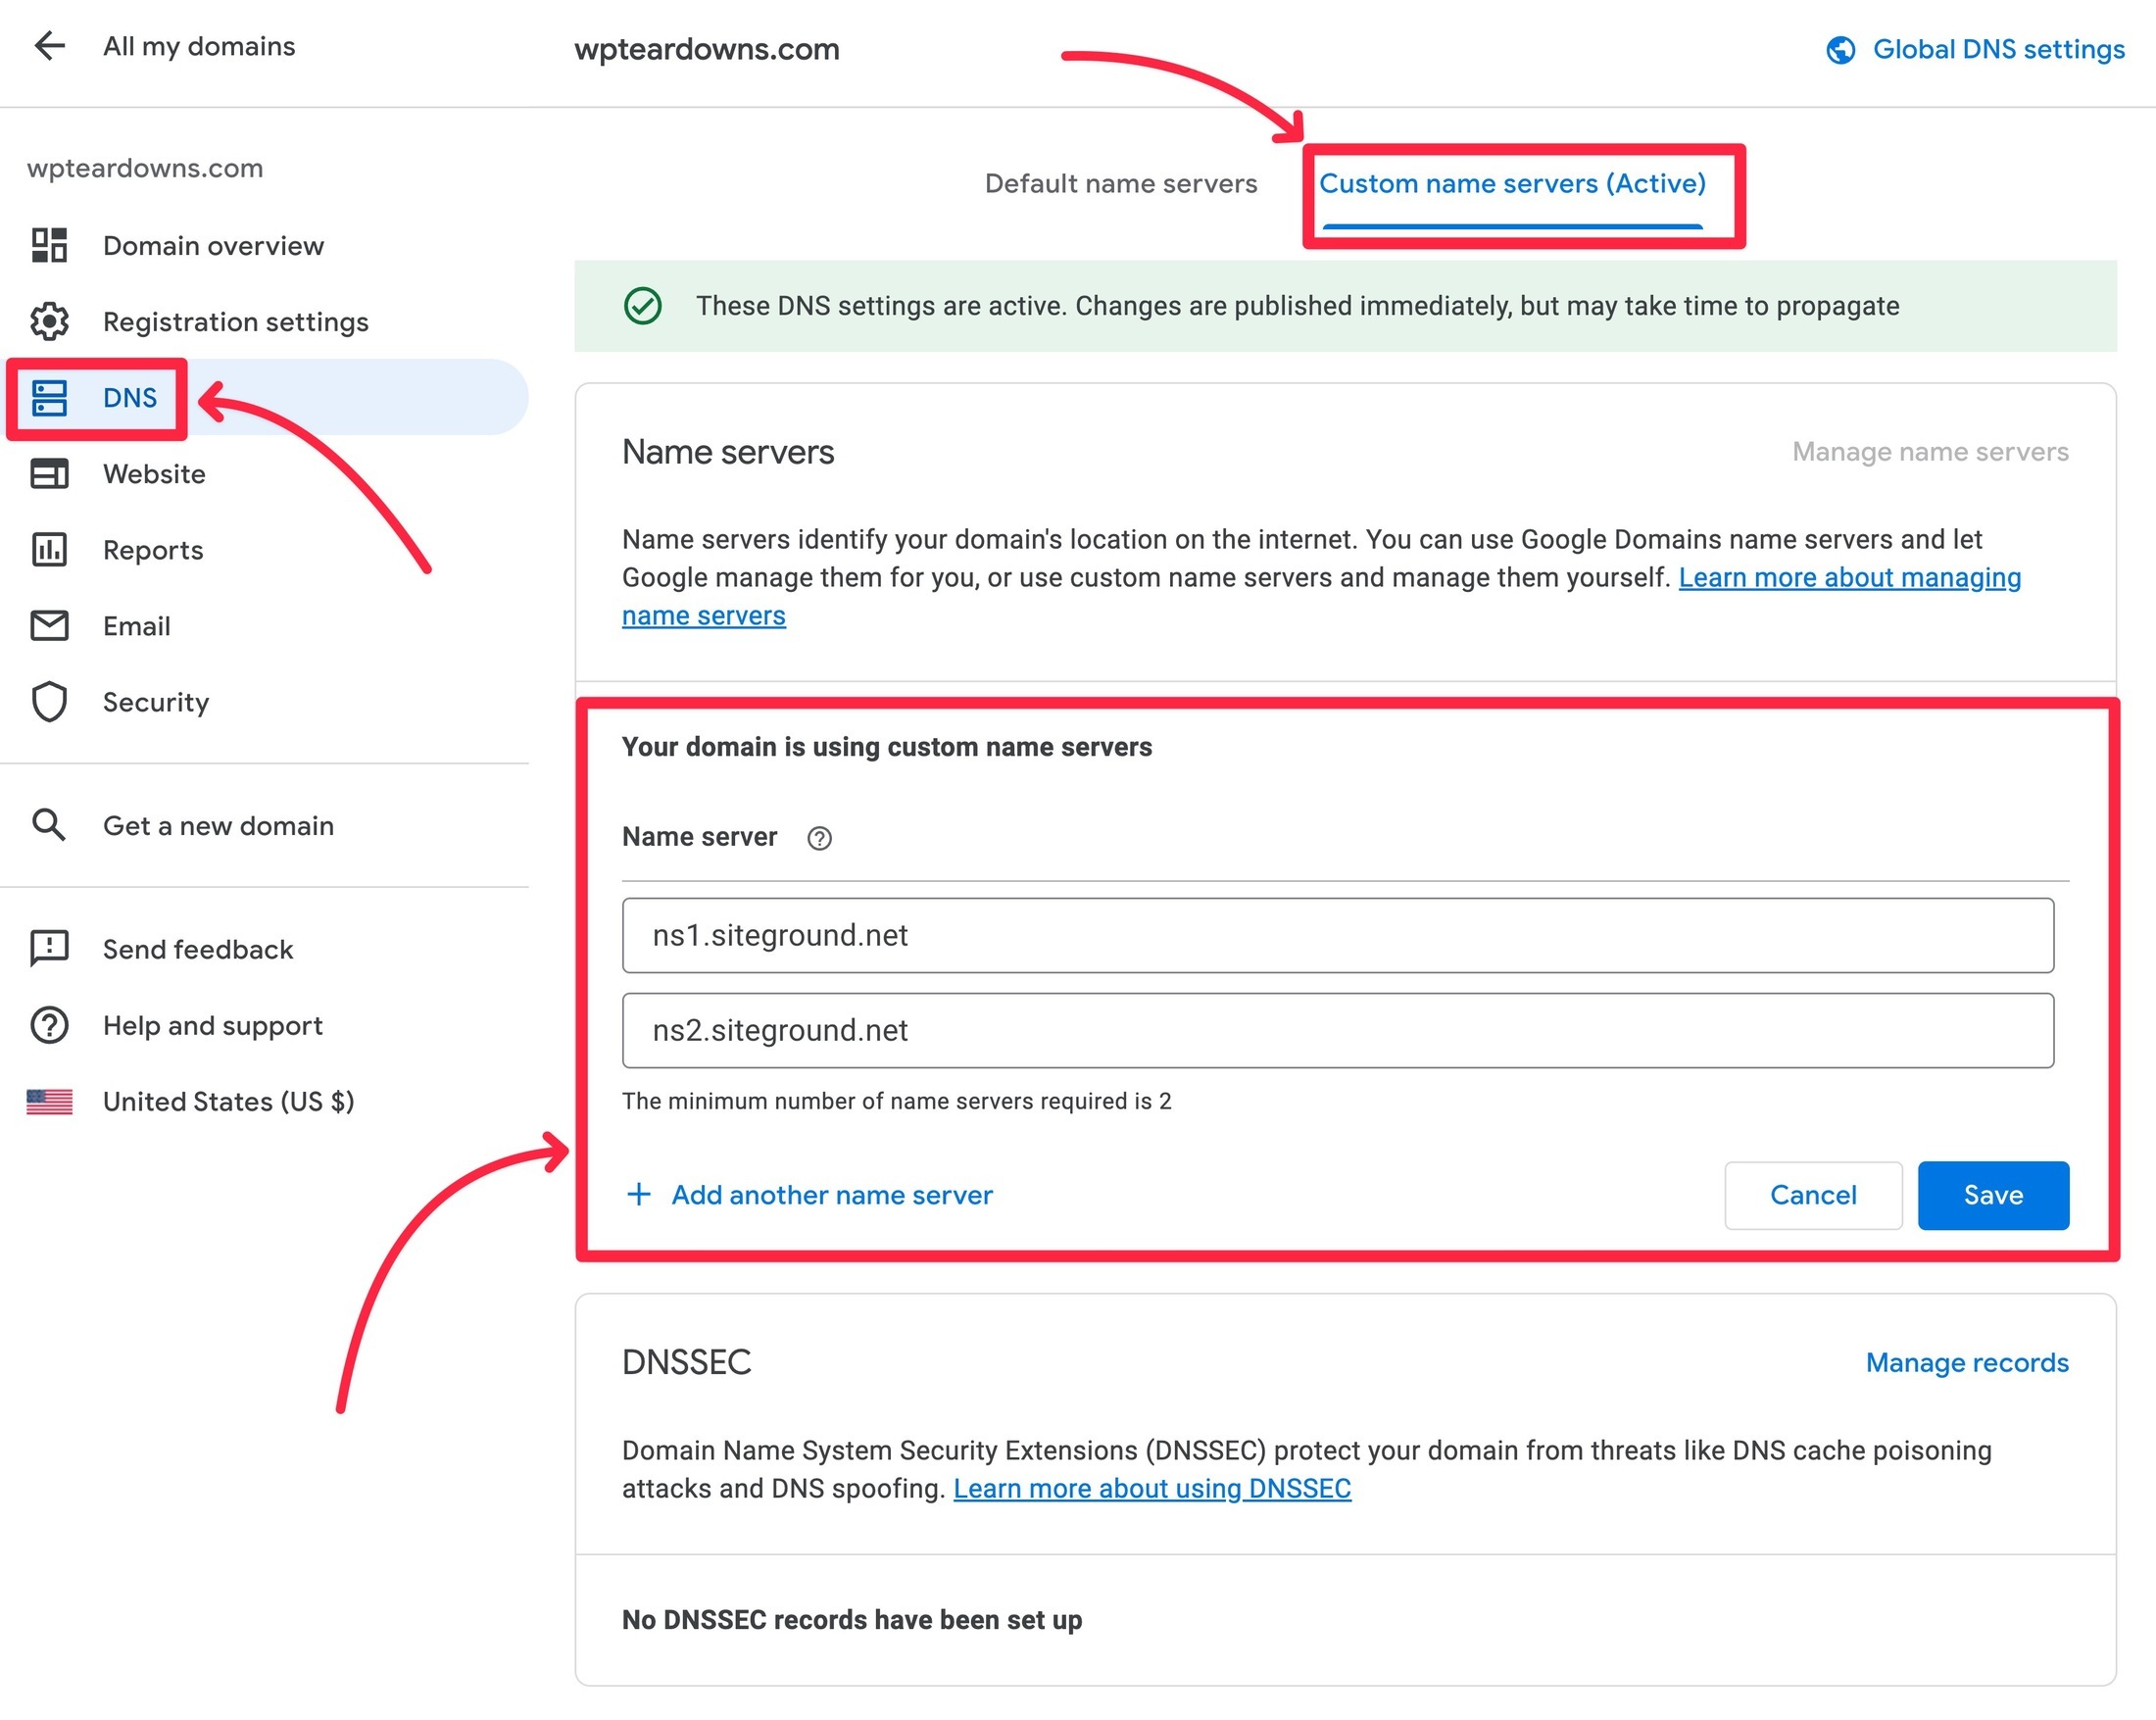
Once you purchase your hosting, you’ll need to ‘point’ your domain name to your SiteGround hosting by editing your domain’s nameservers. While that sounds complicated, it’s really just a matter of changing the values in two boxes.
If you used Google Domains and SiteGround, here’s how to connect the two:
- Open your domain in Google Domains.
- Go to the DNS tab of the domain’s settings.
- Choose the Custom name servers tab (and activate it if needed).
- Click Manage name servers in the Custom name servers tab.
- Add these two nameservers if you’re using SiteGround —
ns1.siteground.netandns2.siteground.net. - Click Save.
- Wait a few minutes for the changes to apply — it can technically take up to 24 hours, but your domain will usually start working within 15 minutes.
If you want more detailed instructions, here are direct links to documentation from SiteGround and Google Domains:
If you need more of a helping hand, you can reach out to SiteGround’s support and they’ll be happy to assist you.
STEP 3: INSTALL WORDPRESS
Once you purchase your web hosting, you can install the WordPress software on your hosting using your host’s installer tool.
👉 Action Steps:
- Log in to your SiteGround hosting account.
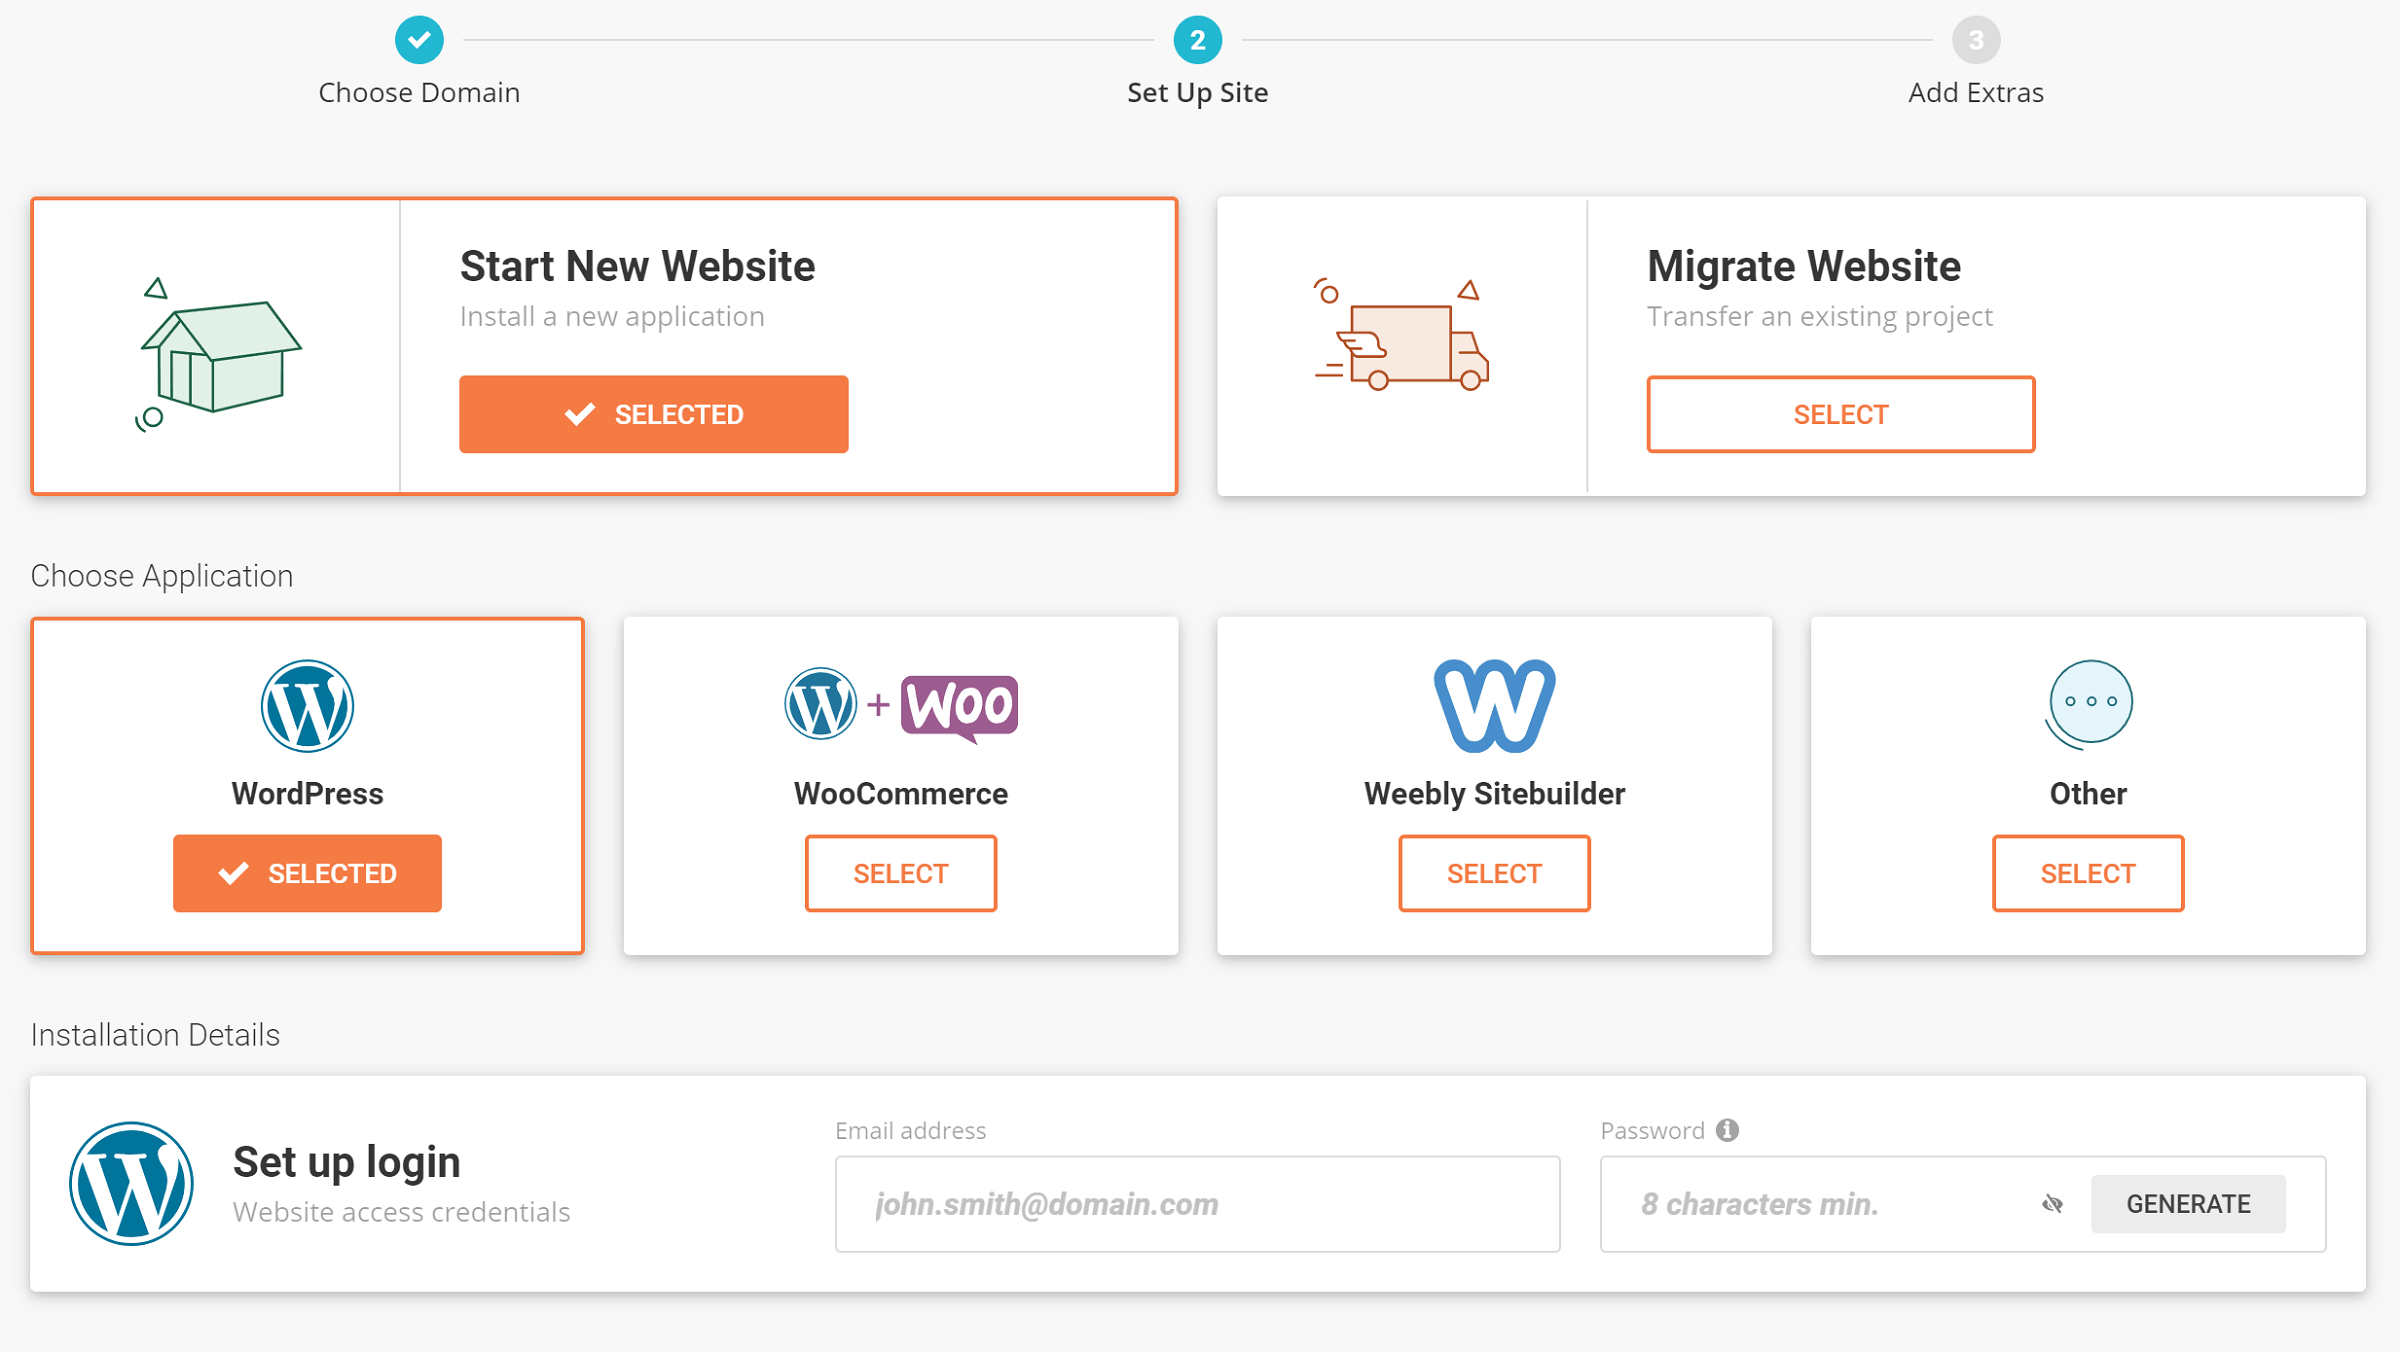
- You should see the WordPress installer right away. If not, click the button to add a new website.
- Choose WordPress as your site’s ‘Application’ and follow the install wizard.
- Log in to your WordPress website dashboard using the credentials from the WordPress installer tool.
Once you have your hosting, you need to install the basic WordPress software.
Beyond its affordable price, one of the nice things about SiteGround is it makes it super easy to do this via a dedicated website installer.
When you log in to your SiteGround dashboard for the first time after purchasing your hosting, SiteGround will give you a simple wizard to install the WordPress software.
Or, you can always manually access this wizard at a later date from the Websites area in your SiteGround dashboard:
We also have a detailed guide on how to install WordPress if you want to see other methods.
Once you install WordPress, you can access your WordPress dashboard by visiting yourdomain.com/wp-admin and logging in with the username and password that you entered in the WordPress installer wizard.
Now, it’s time to make your WordPress site your own…
STEP 4: CONFIGURE BASIC WORDPRESS SETTINGS
Before you go any further, it’s important to configure a few basic WordPress settings in an optimal way.
👉 Action Steps:
- Choose your site’s URL structure (AKA permalinks).
- Make sure your site is publicly accessible.
- Configure blog post comments.
- Choose your website timezone.
- Set up a static homepage (optional).
When you first log in to your WordPress dashboard, it should look something like this:
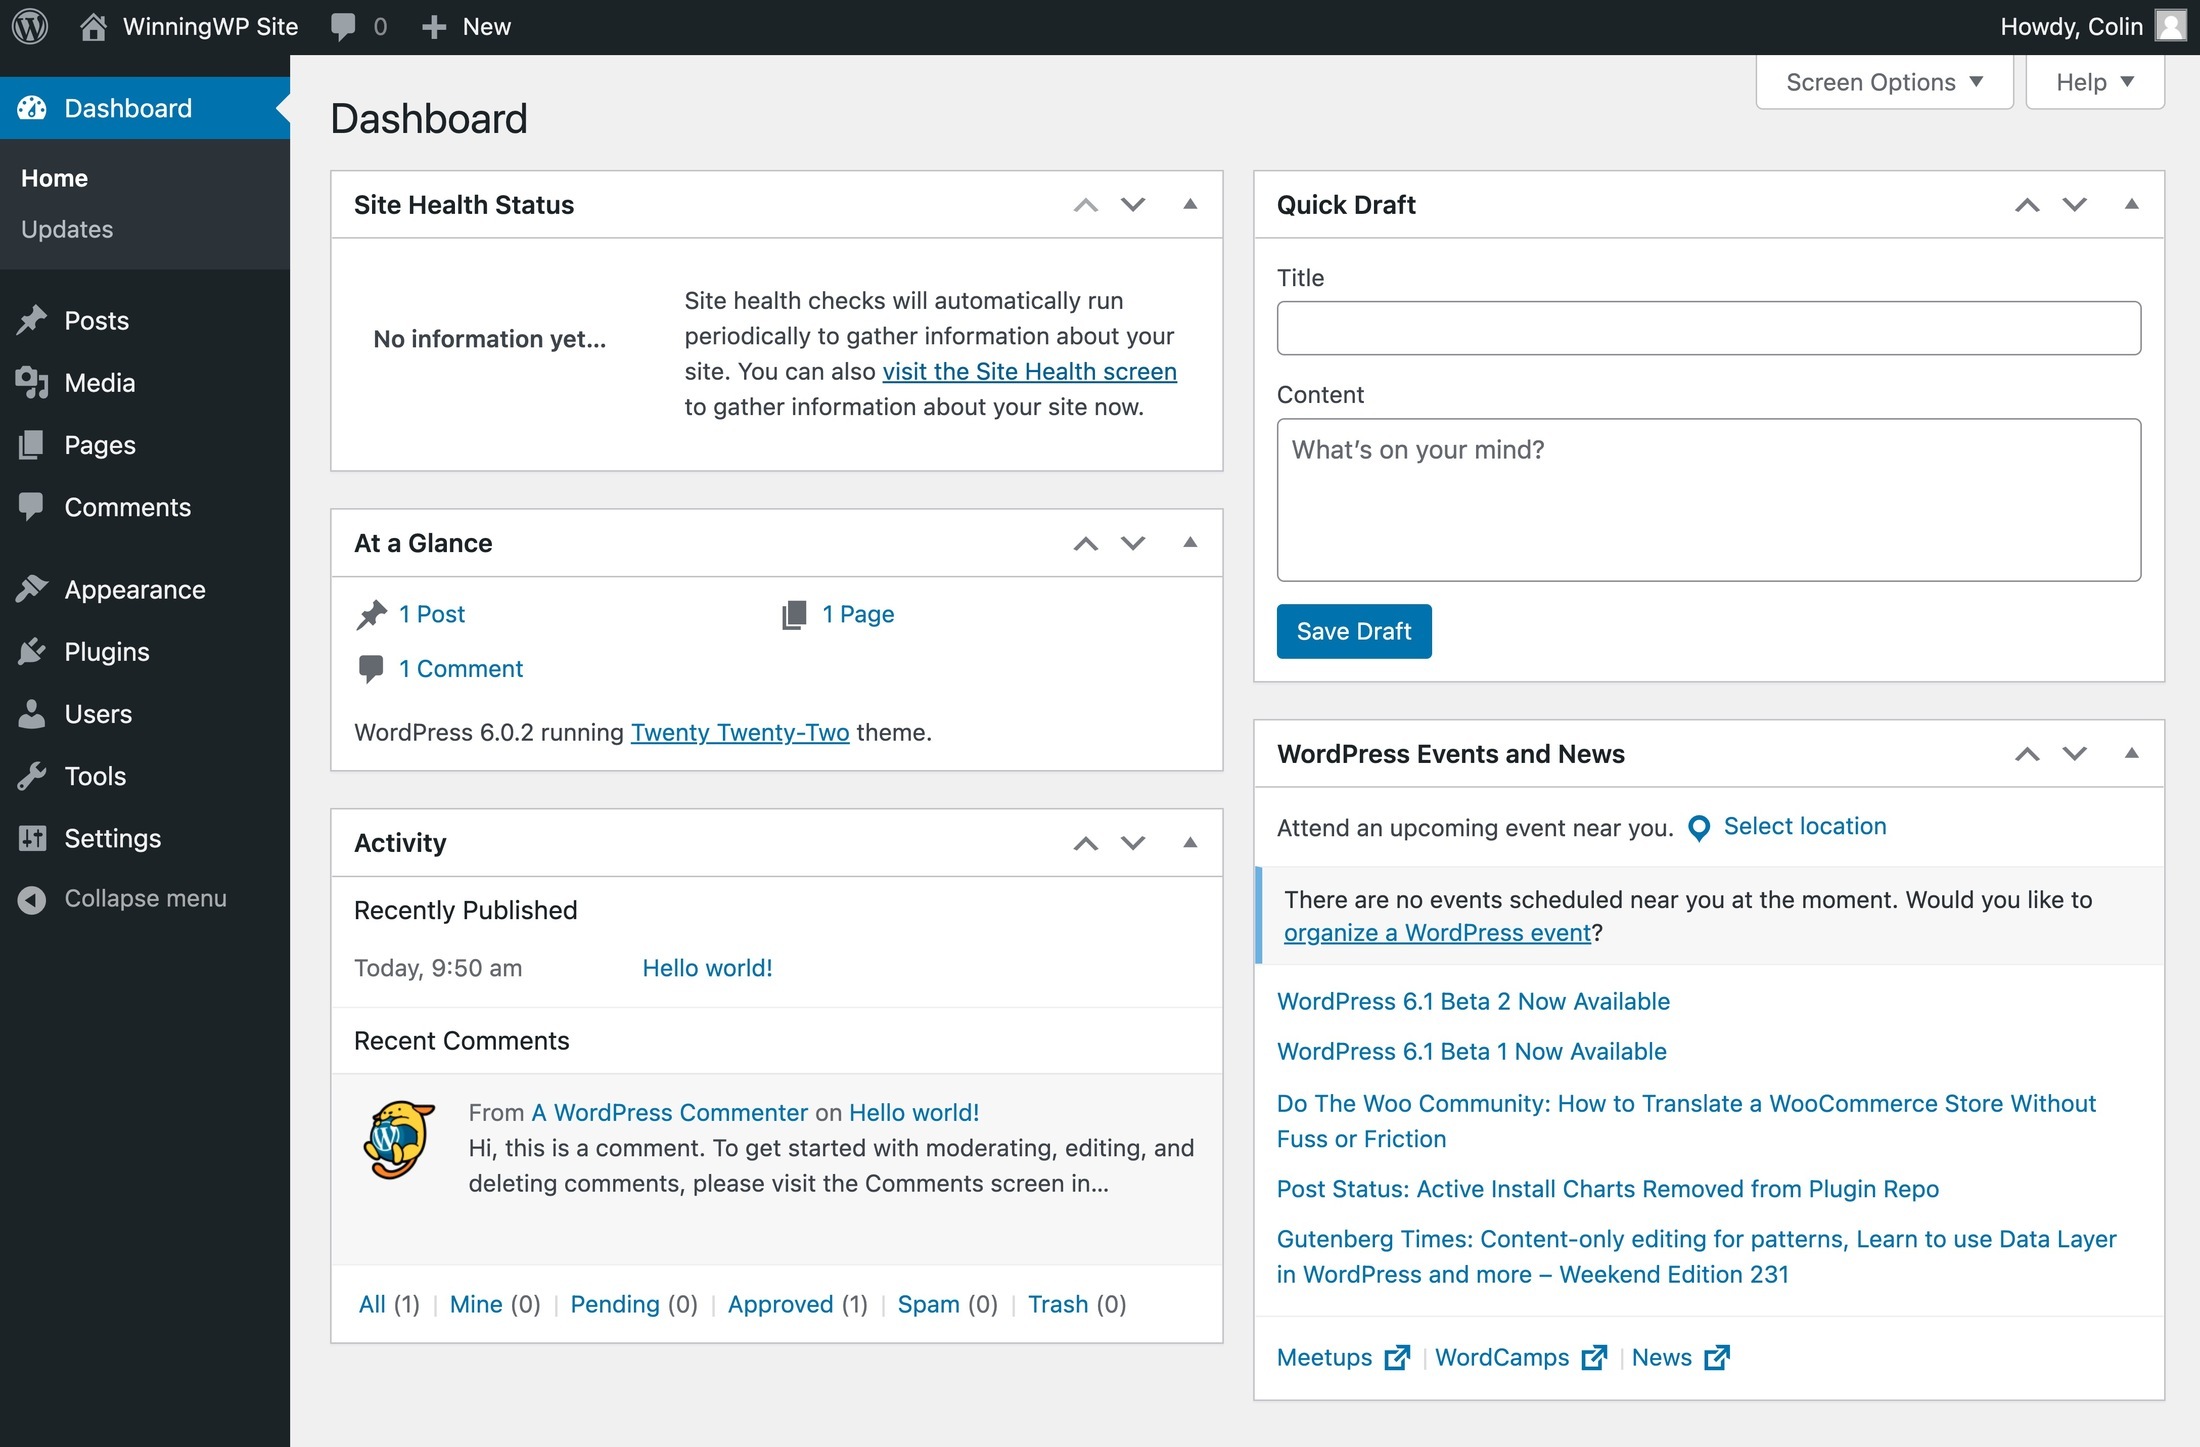
While we’ll talk about customizing your site’s design and features over the next few sections, you’ll first want to configure a few basic settings to set your WordPress site up for success.
These are all one-time choices, so, once you go through these settings, you’ll pretty much never have to think about them again.
Set Your Site’s Permalinks (URL Structure)
Your WordPress permalink settings control the URL structure of your WordPress content.
For example, permalinks control whether a blog post is located at yoursite.com/2/8/cool-blog-post (with the day/month in the URL) or just yoursite.com/cool-blog-post.
To set these up, go to Settings → Permalinks in your dashboard.
For most WordPress sites, we recommend using the Post name option, which creates a clean, simple structure.
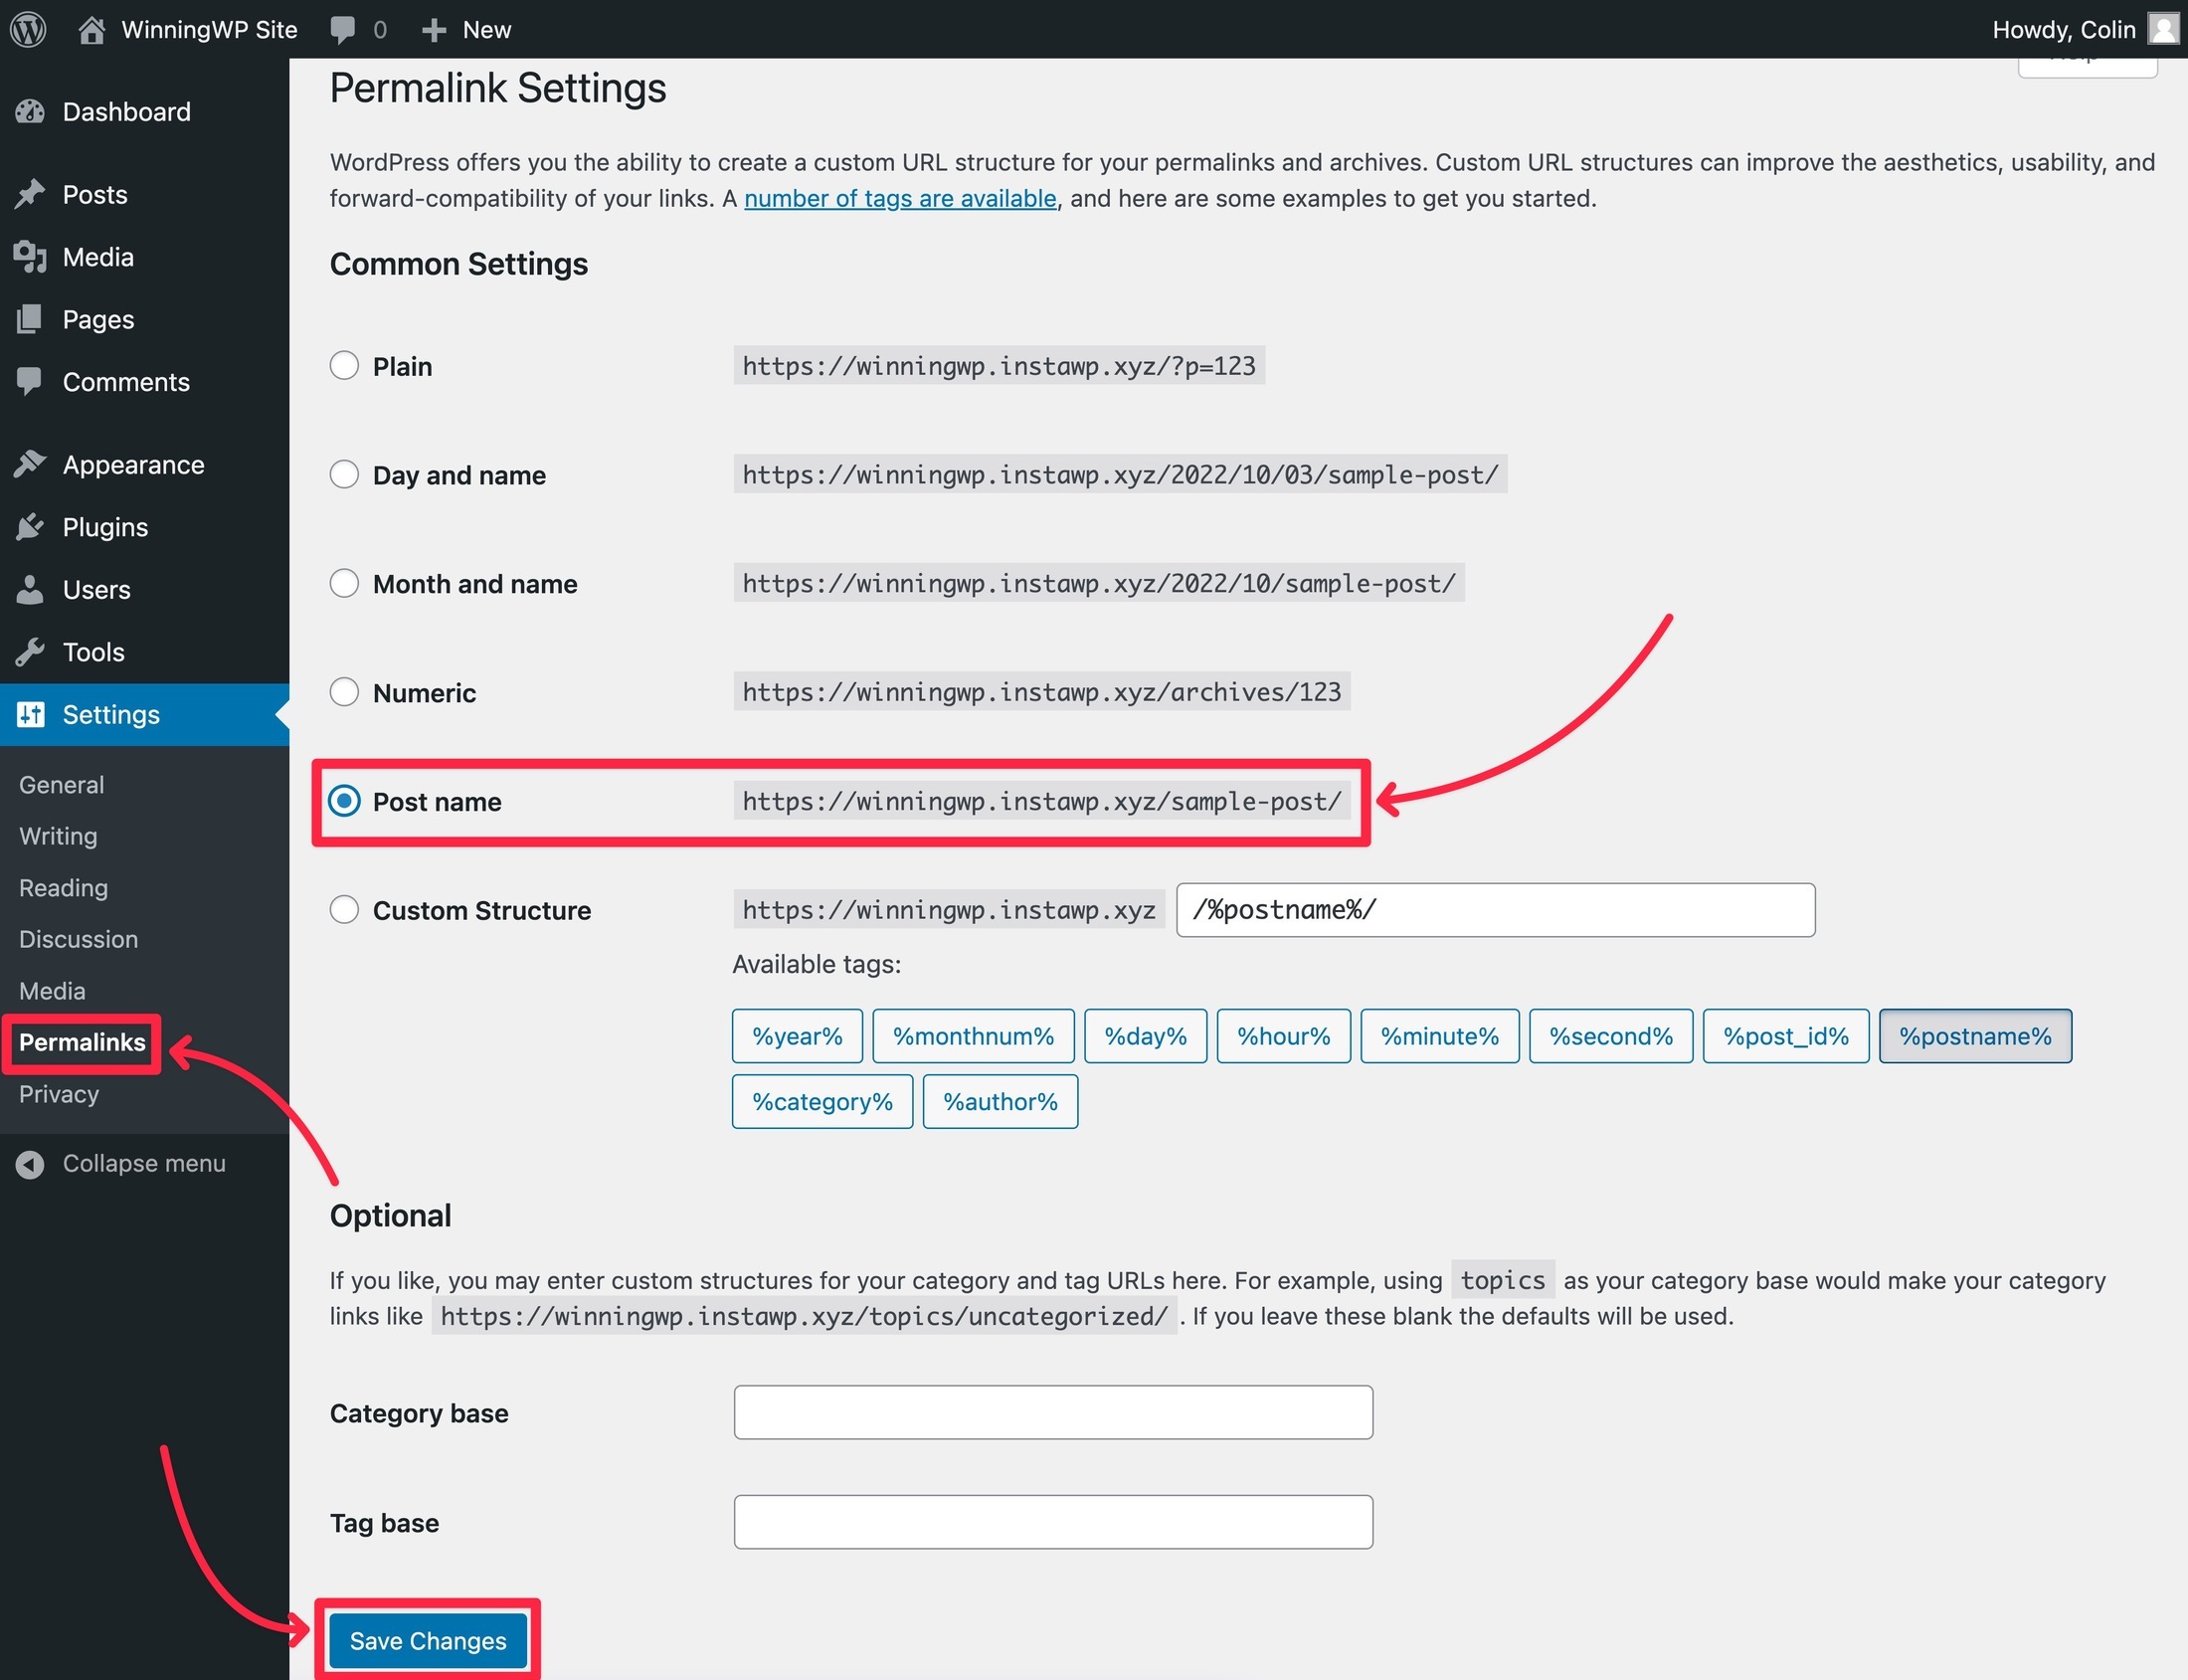
We recommend avoiding having dates in URLs unless you’re creating a news site that only publishes time-sensitive news.
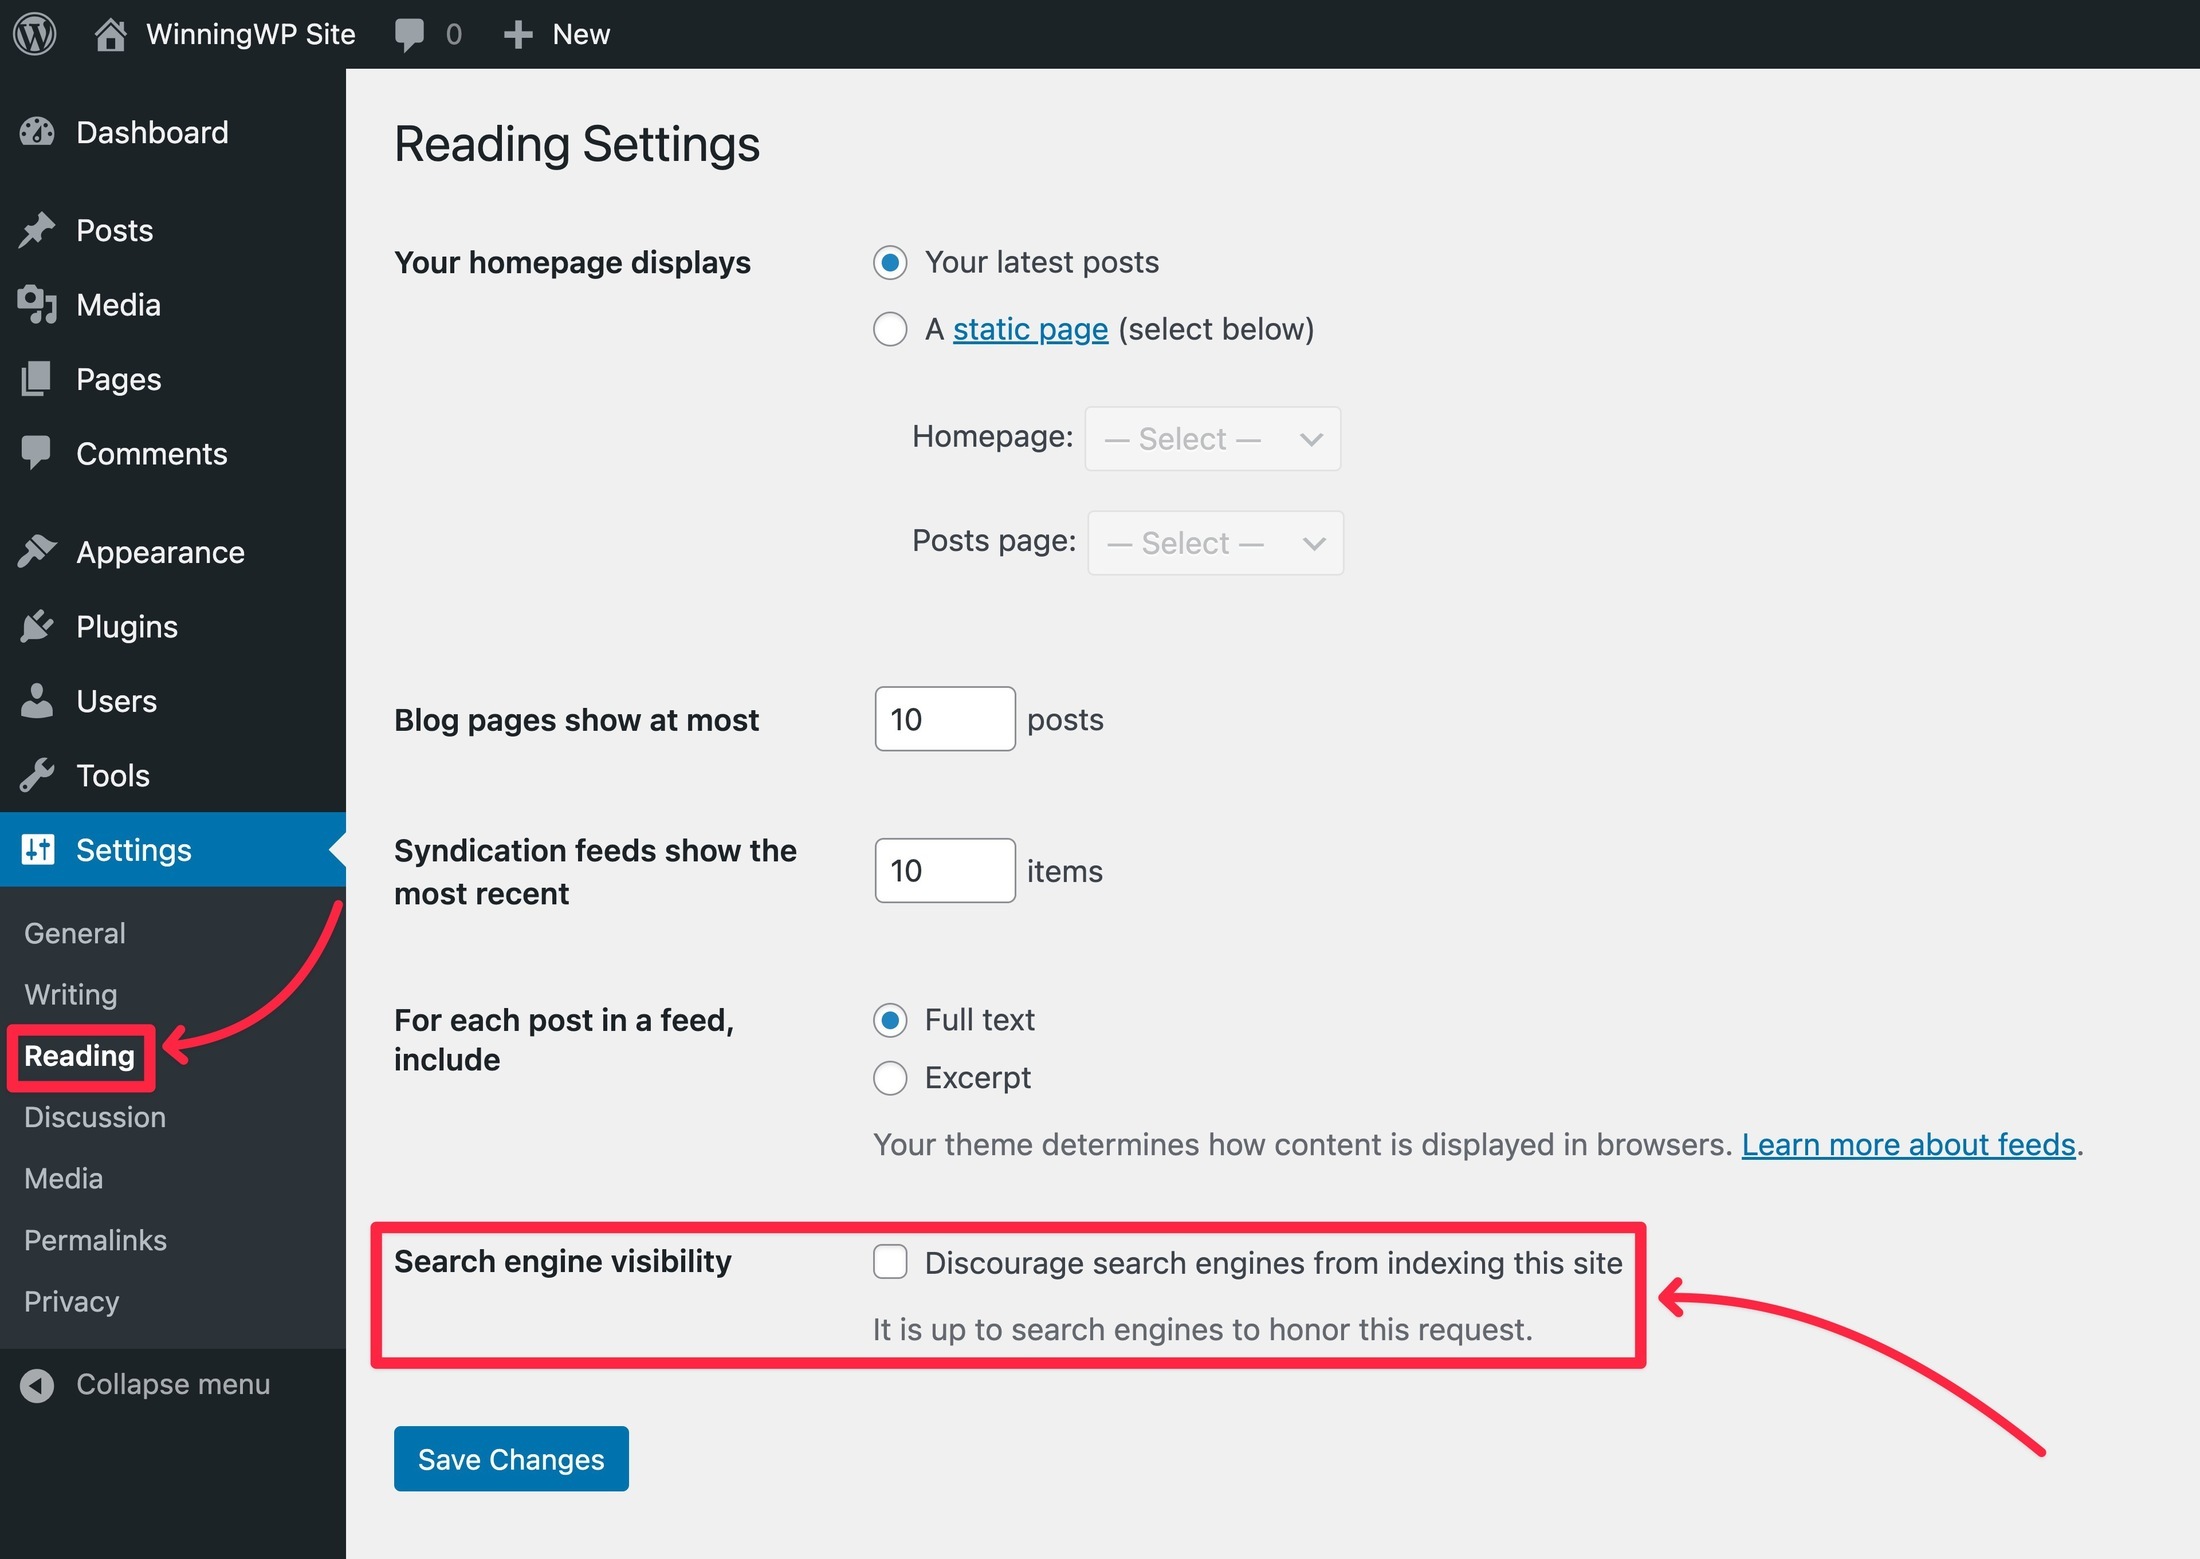
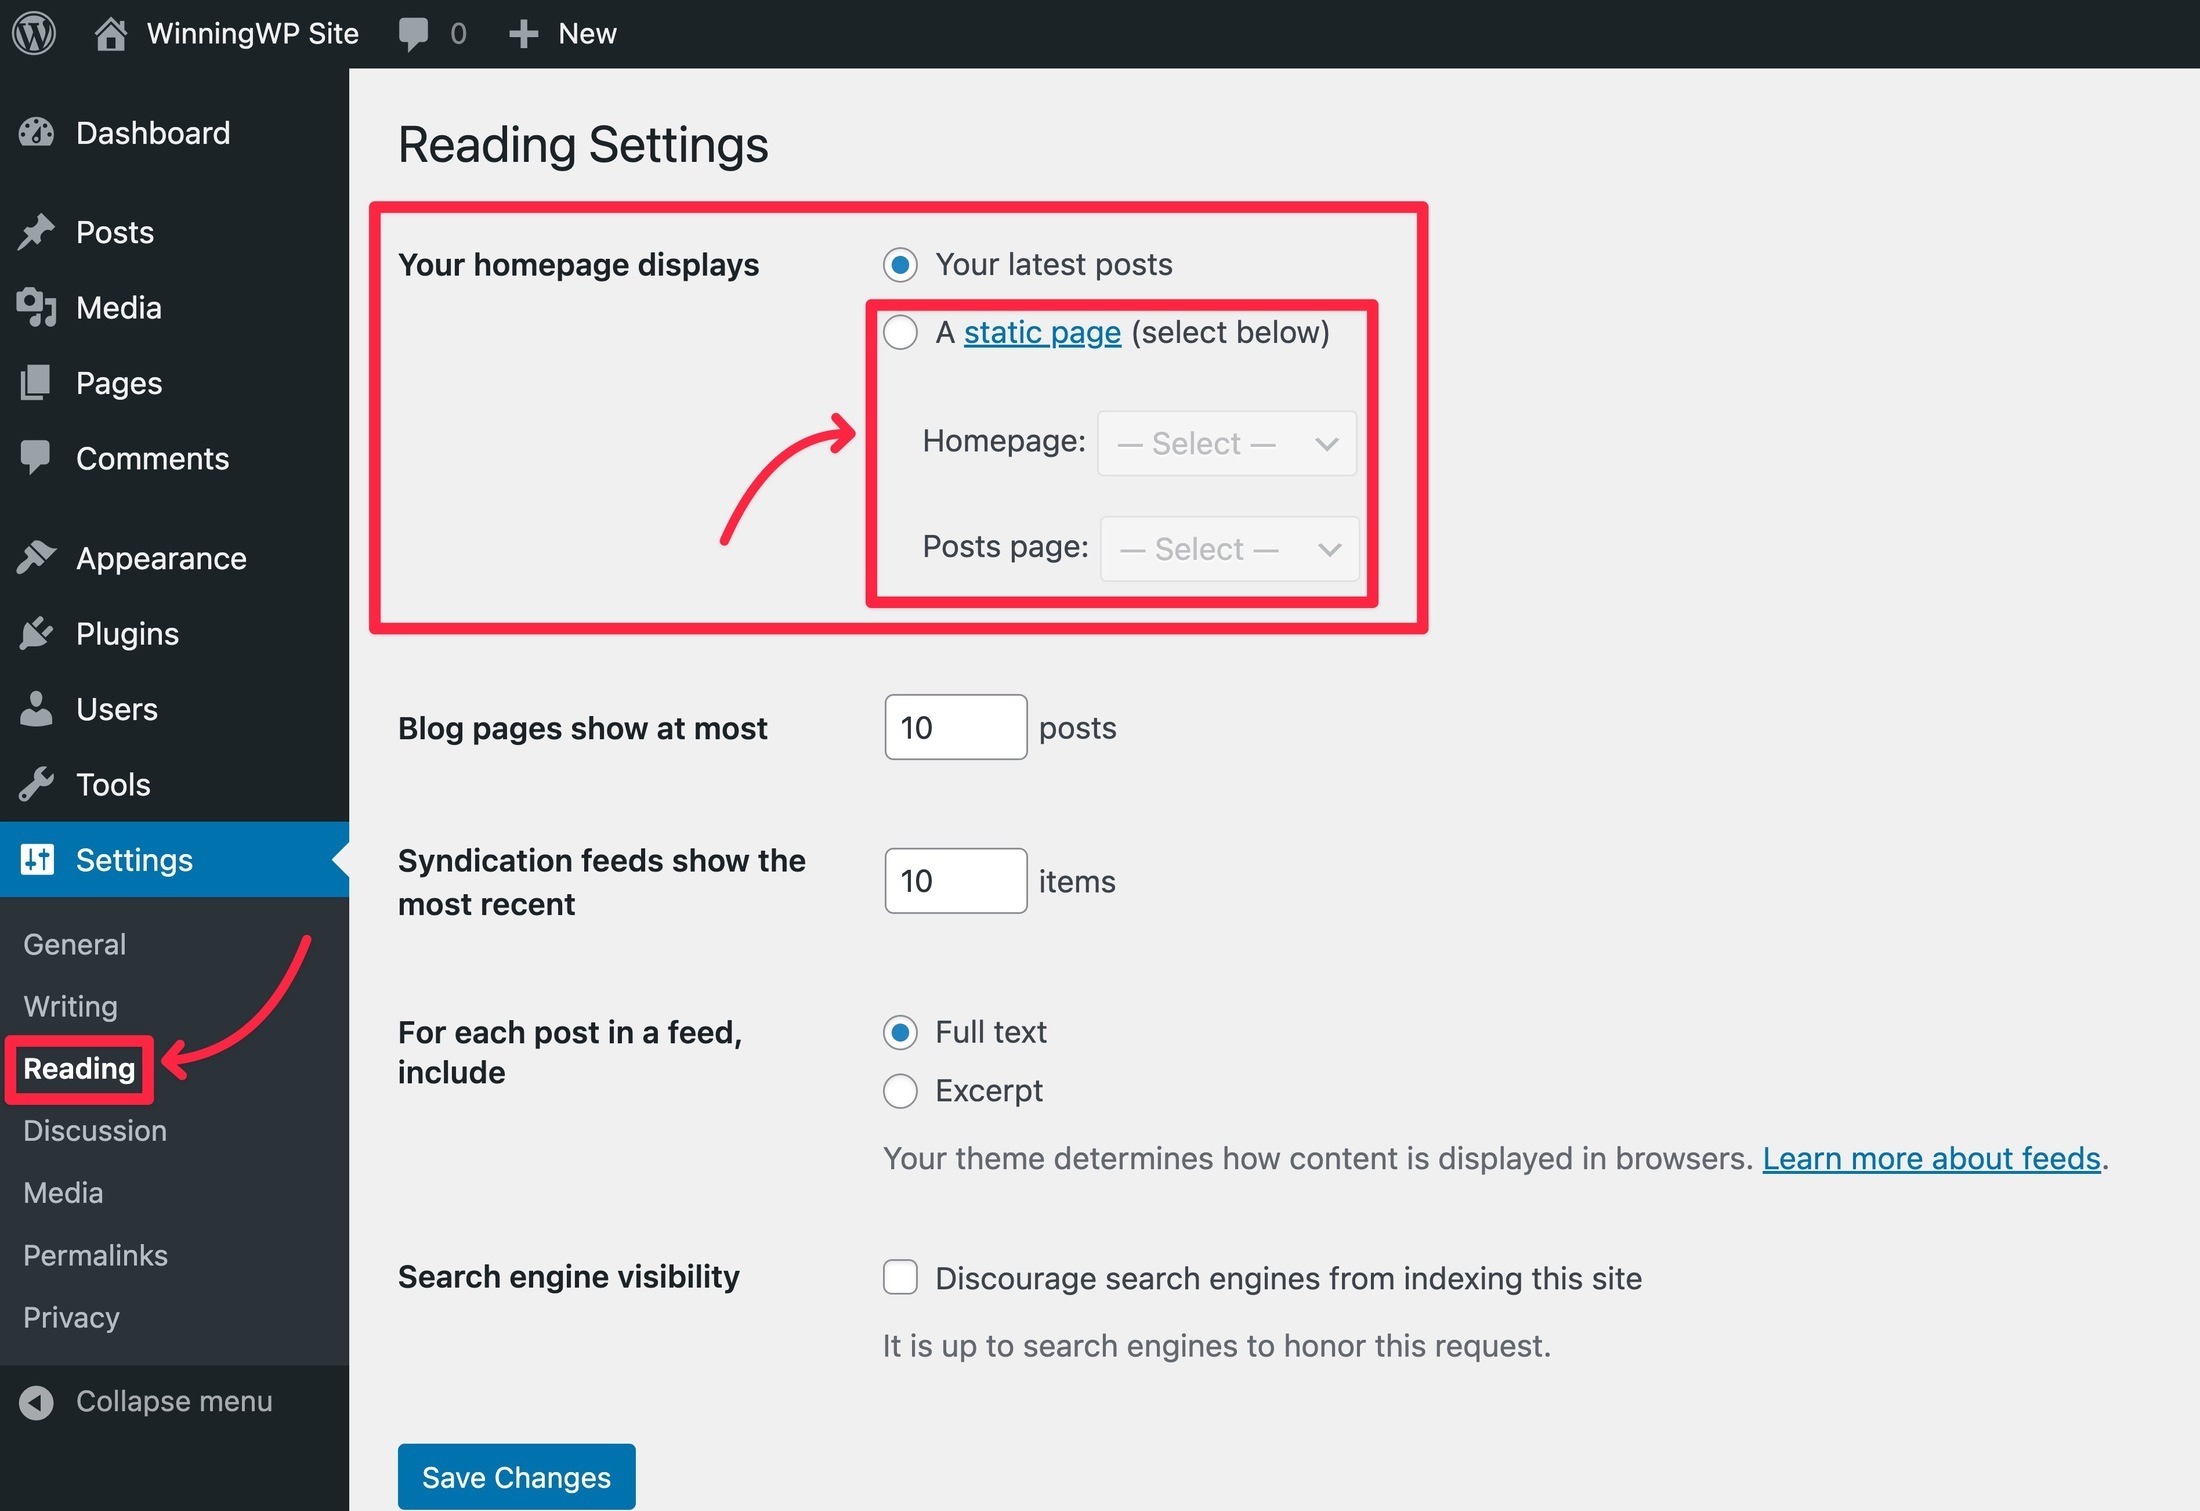
Make Sure Your Site Is Publicly Accessible
If you want other people to be able to find your site in search engines such as Google, it’s important to make sure your site is publicly accessible.
It should be by default, but this is such an important setting that it’s always worth double-checking!
To do this, go to Settings → Reading and make sure the ‘Discourage search engines…’ box is not checked.
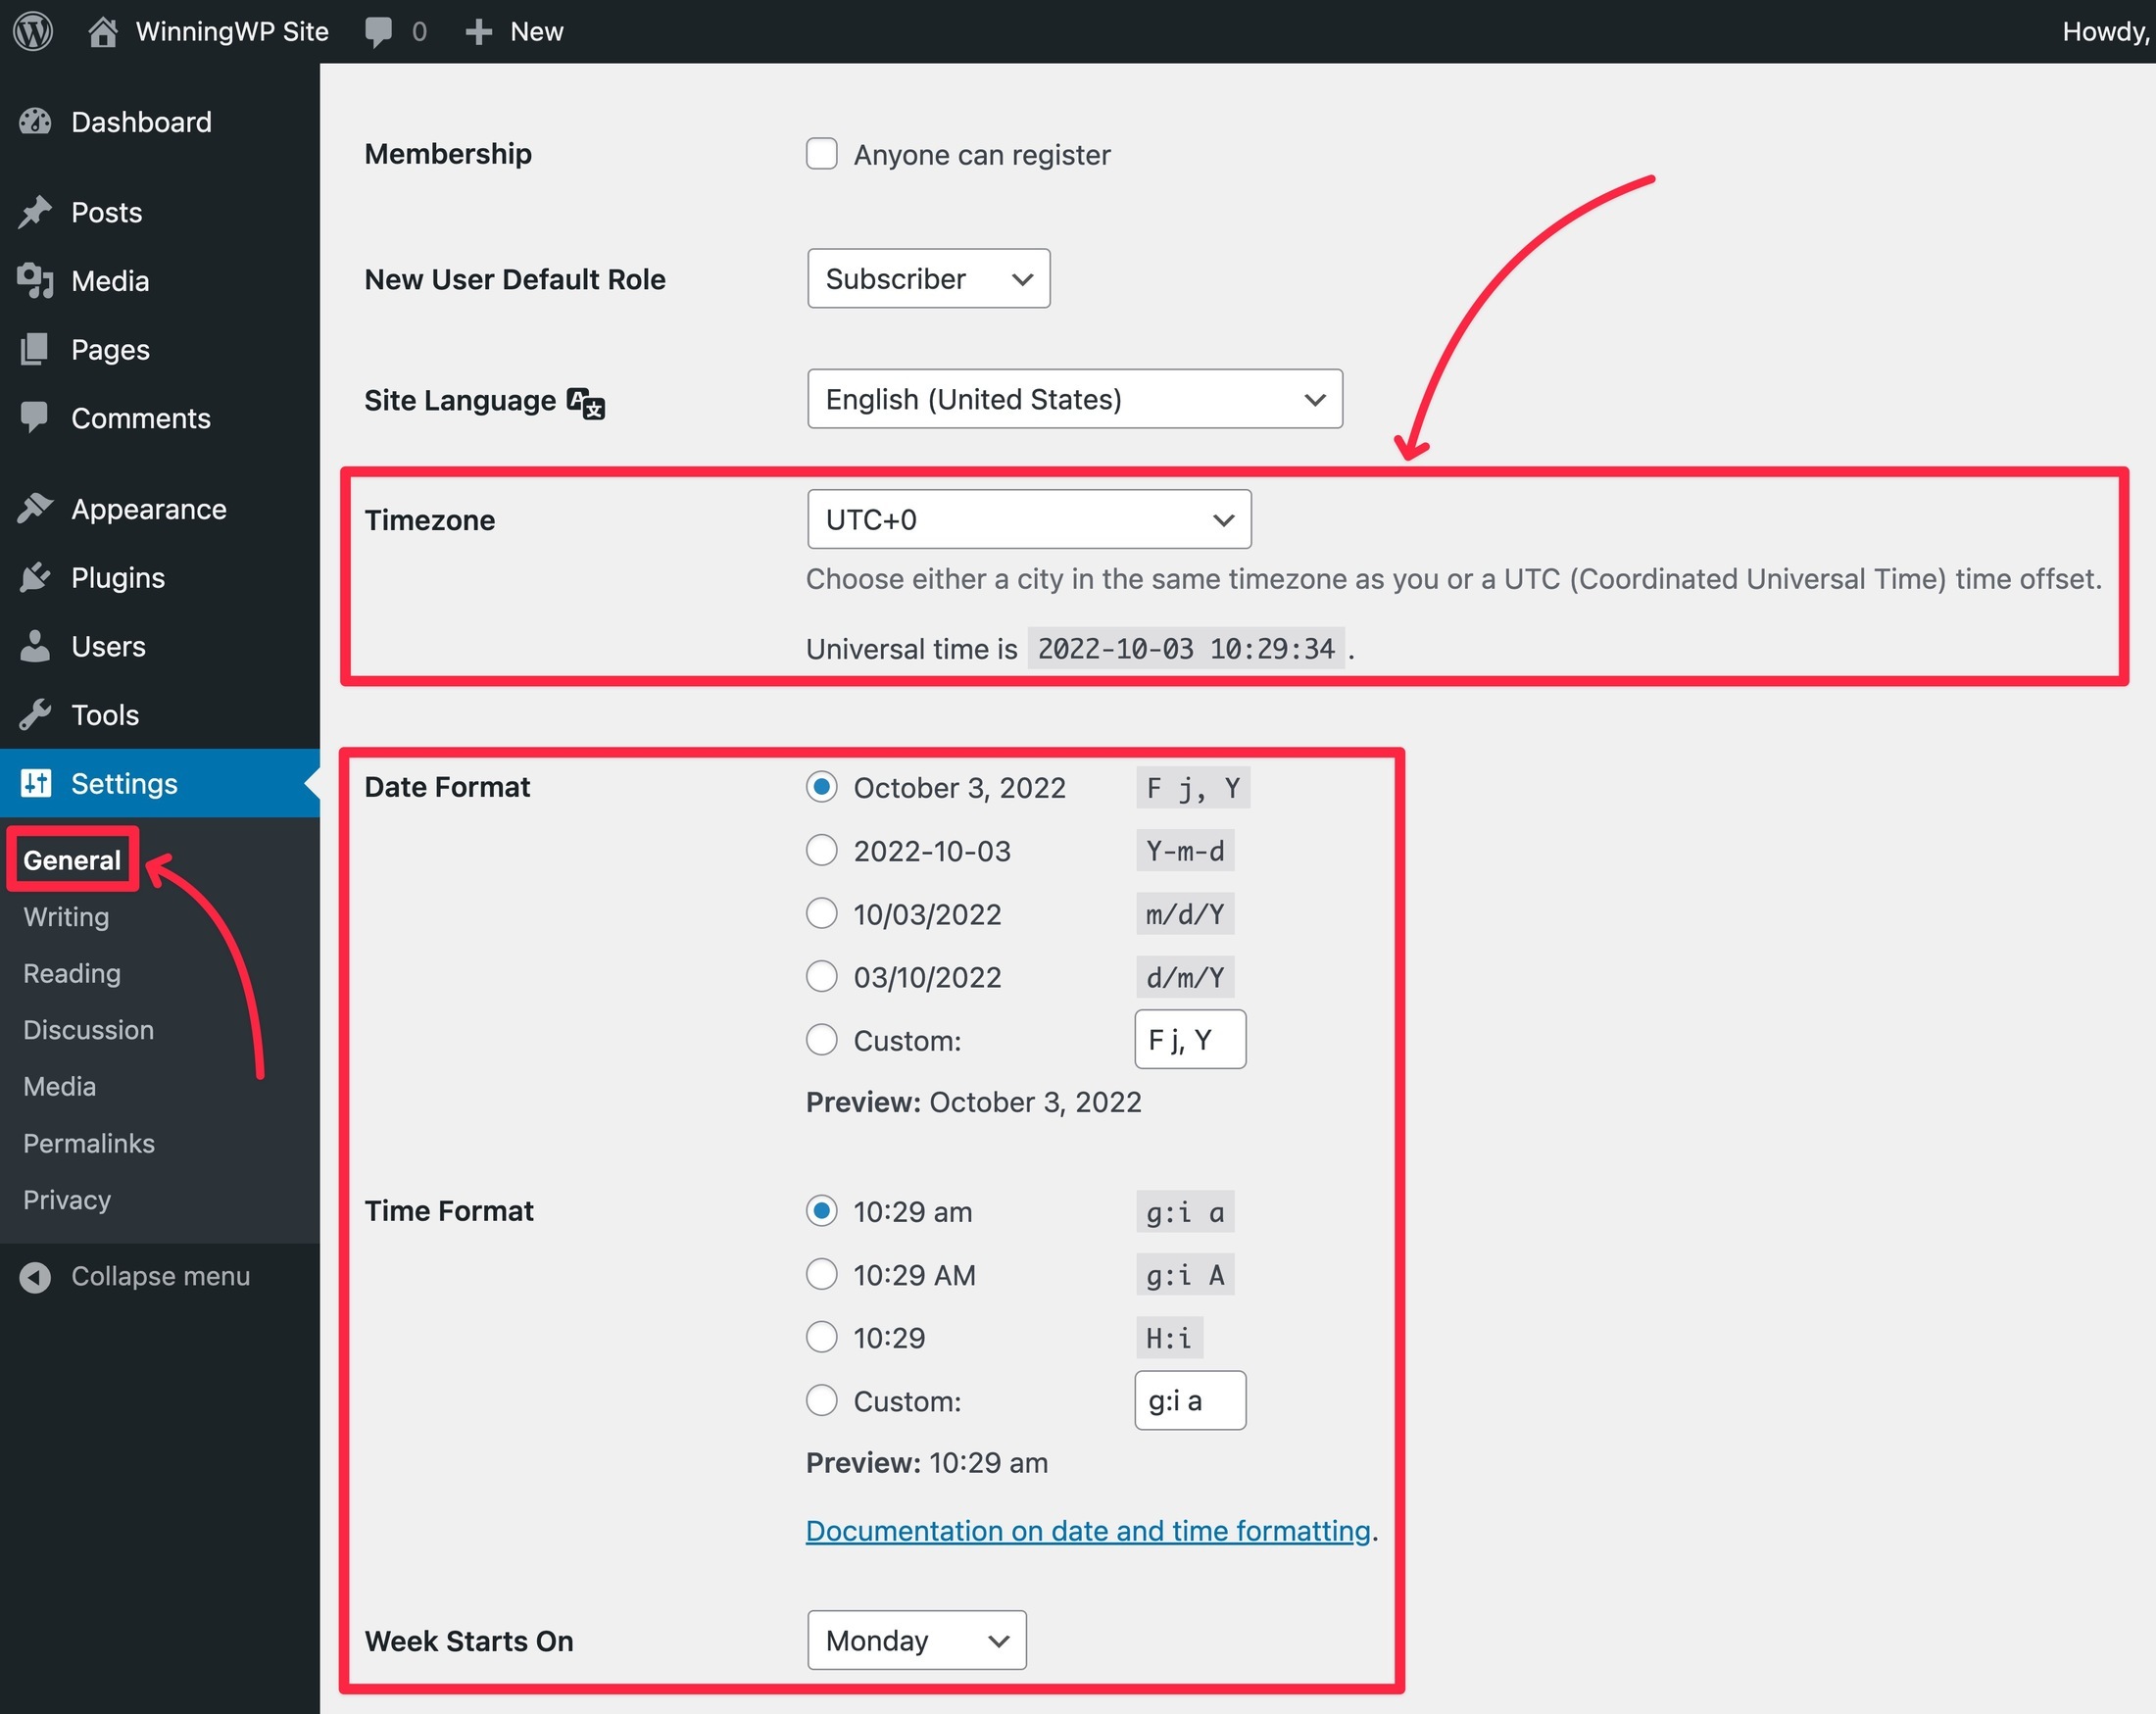
Choose Your Website Timezone
Your website’s timezone will affect scheduling, blog post publish dates, and so on, so you’ll want to make sure it’s set properly.
There are two approaches here — you can pick the one that works best for you:
- Use your own time zone.
- Use the time zone of your primary audience area.
To choose your timezone, go to Settings → General and use the Timezone dropdown to choose your preferred timezone.
Below that, you can also adjust the date and time formats if needed.
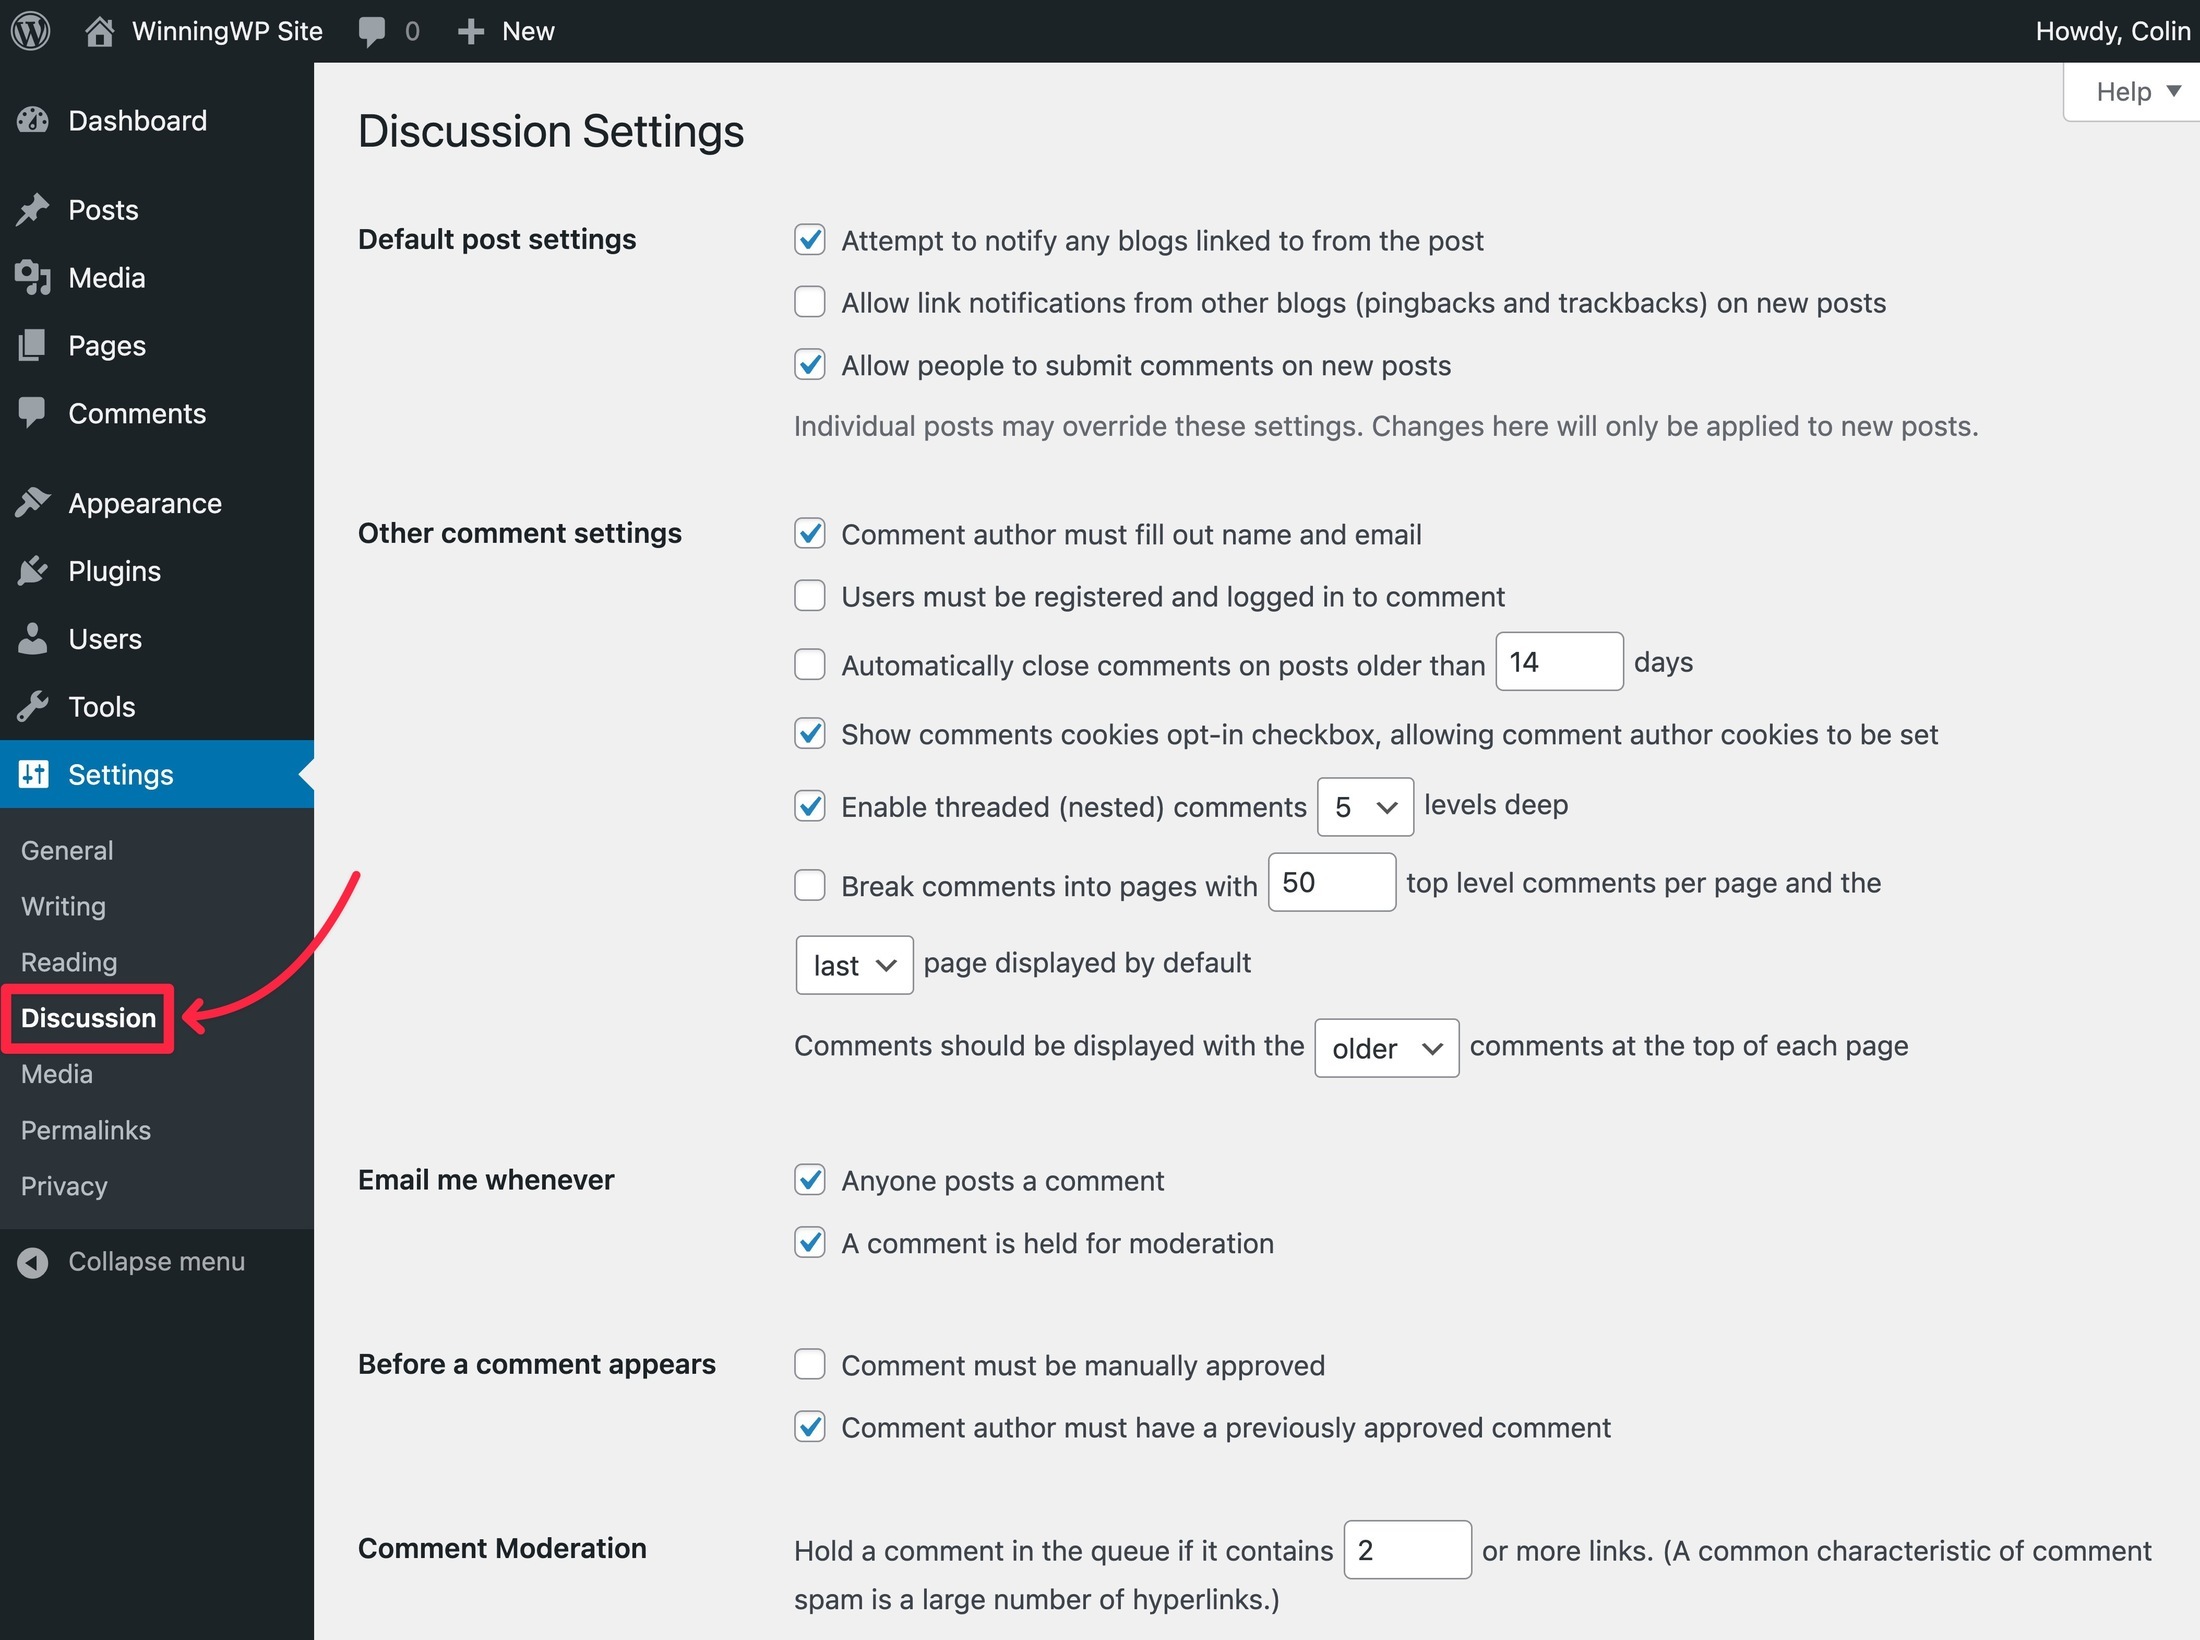
Configure Your Blog Post Comments
By default, WordPress allows anyone to comment on your site’s blog posts.
If you want to adjust this behavior, you can go to Settings → Discussion. If you want to disable comments, you can uncheck the box for ‘Allow people to post comments…’.
We also recommend unchecking the box for ‘Allow link notifications from other blogs…’ as this feature can be abused by spammers. These are called pingbacks.
You may also want to explore the other settings, because you get more advanced control over your blog’s comment sections.
Create a Static Homepage Instead of Listing Blog Posts (Optional)
By default, WordPress will show a list of your most recent blog posts on your site’s homepage. However, a lot of webmasters prefer to create a dedicated homepage and then list the blog posts on a separate page — e.g. at yoursite.com/blog.
To control which page is your homepage and which page is your blog page, you can go to Settings → Reading.
Not sure how to create a page? Don’t worry! We cover that in step seven of this guide, so you can always come back to this section later.
STEP 5: SET UP YOUR WORDPRESS THEME
Your WordPress theme controls the design and appearance of your site.
👉 Action Steps:
- Choose a WordPress theme — we recommend the Astra theme for beginners. It has a functional free version and a paid version with more features.
- Install your chosen WordPress theme by going to Appearance → Themes → Add New.
- Import one of your theme’s pre-built starter sites (optional).
- Customize your theme using its code-free options.
- Create your primary navigation menu.
Your WordPress theme controls the design and appearance of your website.
It’s an important consideration, because you want your website to look professional and be easy to navigate.
You’ll also want it to match the purpose of your WordPress site, which is why you’ll find tons of ‘niche’ WordPress themes.
For example, if you’re creating a portfolio website, you can find dedicated portfolio themes. Or, if you’re launching a food blog, you can find dedicated food blog themes… and on and on for tons of different niches.
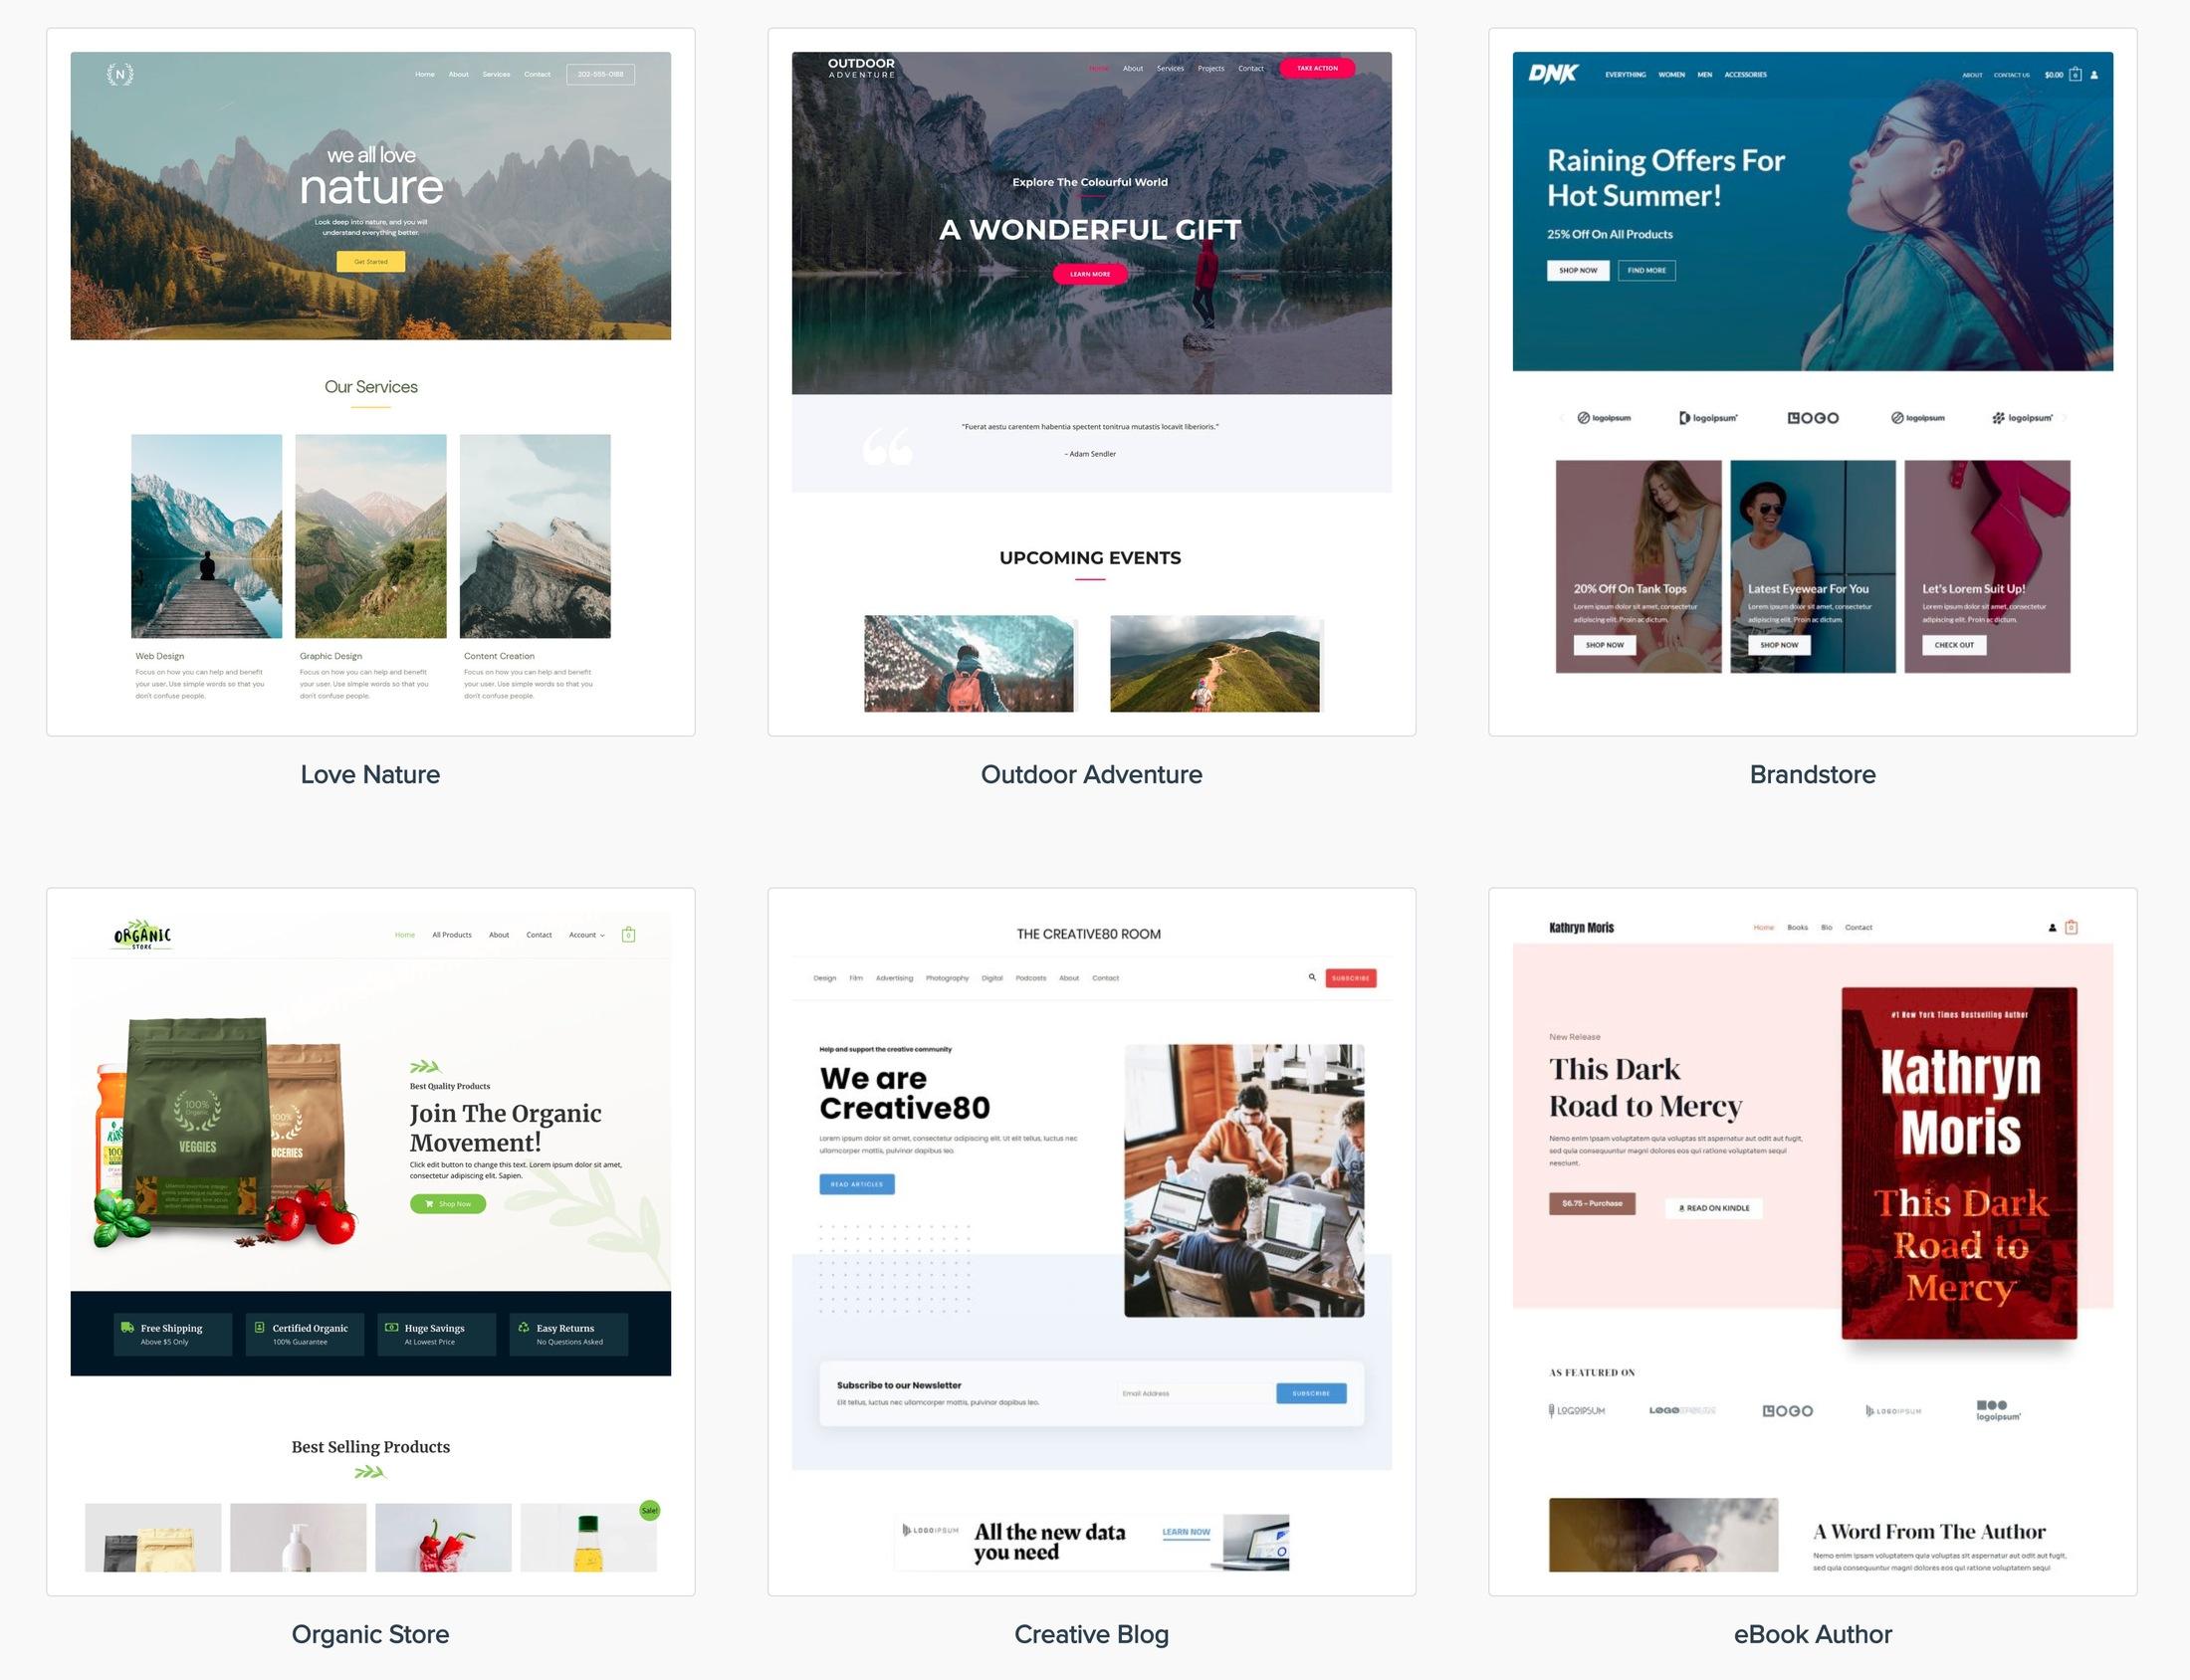
Another option is to choose a ‘multipurpose’ theme that you can adapt to a variety of niches. In 2023 and beyond, we actually recommend this multipurpose approach instead of trying to find a niche-specific theme.
Why is that? Well, most quality multipurpose themes include hundreds of importable starter sites that you can use. So ‘one’ multipurpose theme could offer 200+ different designs for you to choose from, which gives you a lot of flexibility.
Here are some top multipurpose themes that we recommend:
For example, Astra comes with 230+ pre-made starter sites for various niches you can import with just a few clicks.
For that reason, we’re going to use the Astra theme for the rest of our guide on how to get started with WordPress. However, the same basic principles apply to other themes.
Choose Your WordPress Theme
If you’d like to check out different themes, two good places to look are:
- WordPress.org theme directory for free WordPress themes.
- ThemeForest for premium WordPress themes (read our ThemeForest buying guide).
You can also find lots of great premium themes that developers sell directly.
However, if you’re not sure where to get started, we highly recommend just using Astra.
Not only is it free and incredibly popular, but it will also let you follow the rest of our tutorial step-by-step instead of adapting the instructions to a different theme (though that will still work).
Install Your WordPress Theme
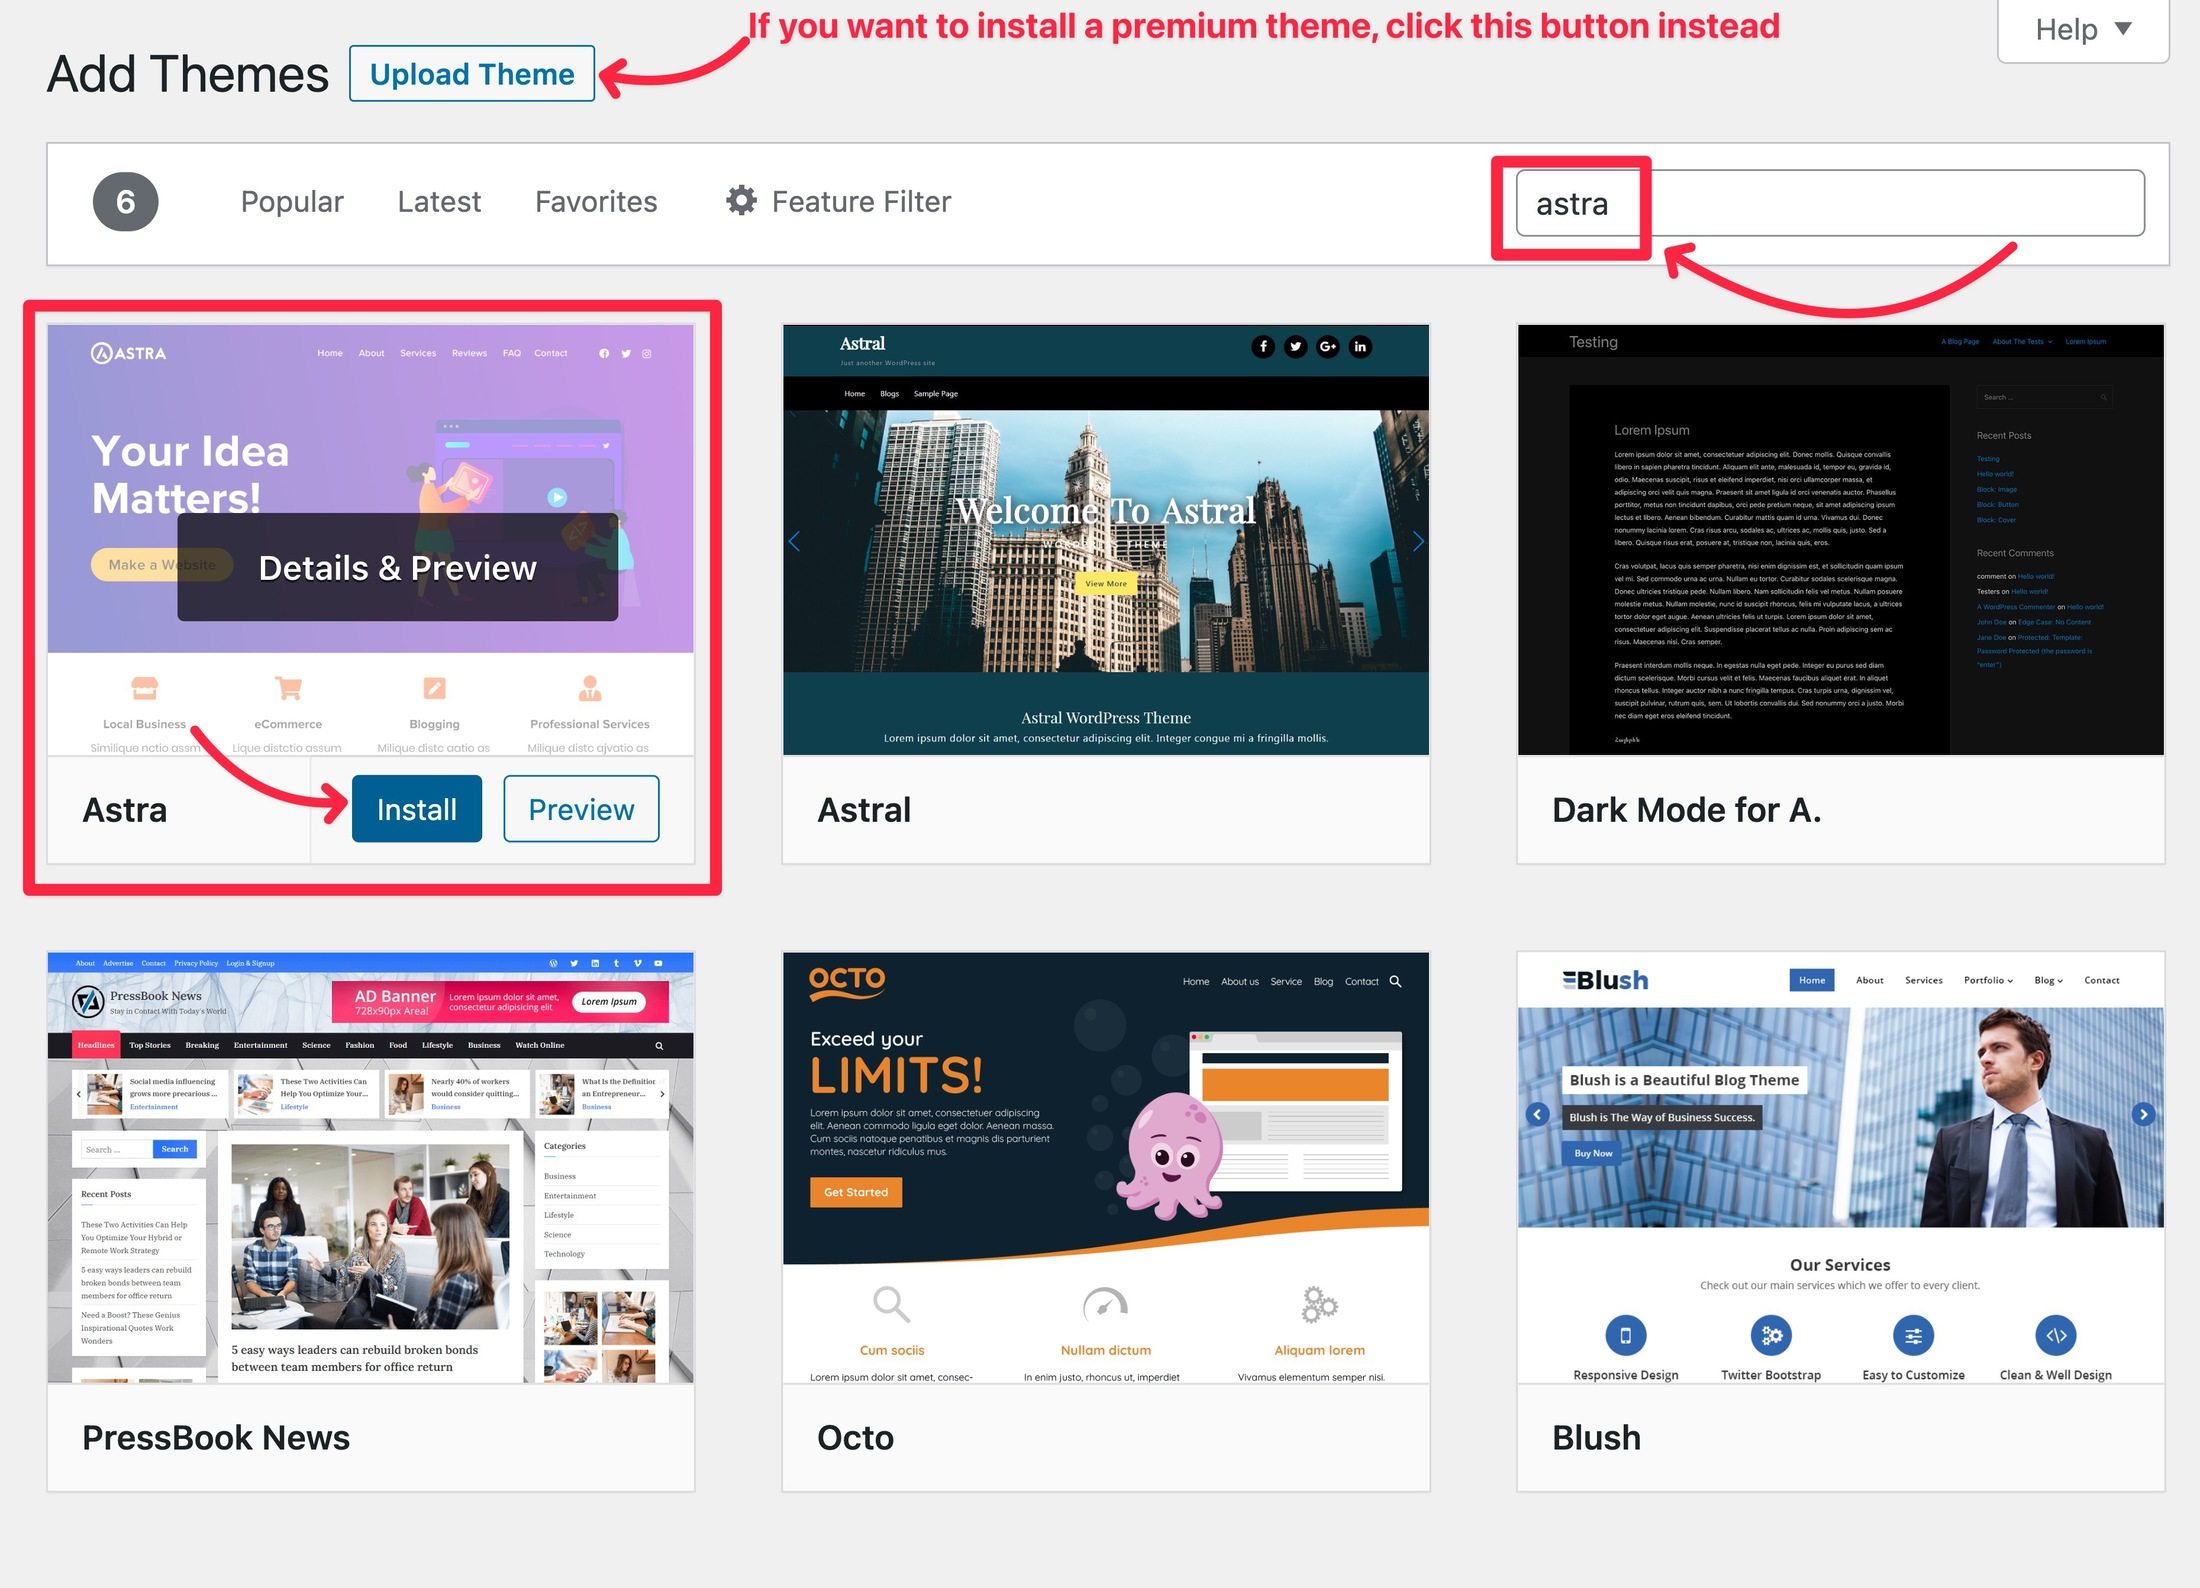
Once you pick the perfect WordPress theme, you can install it on your site by going to Appearance → Themes → Add New and either:
- Searching for the theme if it’s available for free at WordPress.org.
- Uploading a zip file if you purchased a premium theme.
For the free Astra theme, here’s what you would do:
- Search for ‘Astra’.
- Hover over the Astra result and click Install.
- After a short wait, click the Activate button (which will replace the Install button).
Want more detailed instructions? Check out our full guide on how to install a new WordPress theme.
Import a Pre-Built Starter Site
This step is optional, but it can be a great way to save time when setting up your site.
If you use one of the themes from above (Astra, GeneratePress, Kadence Theme, Divi, and so on), they offer dozens or hundreds of pre-built starter sites that you can import to use as the base of your site.
After importing the starter site, all you need to do is go in and tweak the content and design to match your needs.
Basically, you’ll start off with a professionally designed site from day one.
While you can always skip this and customize your site’s design from scratch, we recommend going with one of these starter sites, especially if this is your first website.
Here’s how it works with the Astra theme (but most other themes use a similar approach)…
When you install and activate the theme, you should see a prompt to install the companion starter site plugin (more on plugins later, but they’re basically a way to add features to your site).
ℹ️ If you don’t see this prompt right away, you can access it by going to Appearance → Astra and clicking the prompt in the sidebar.
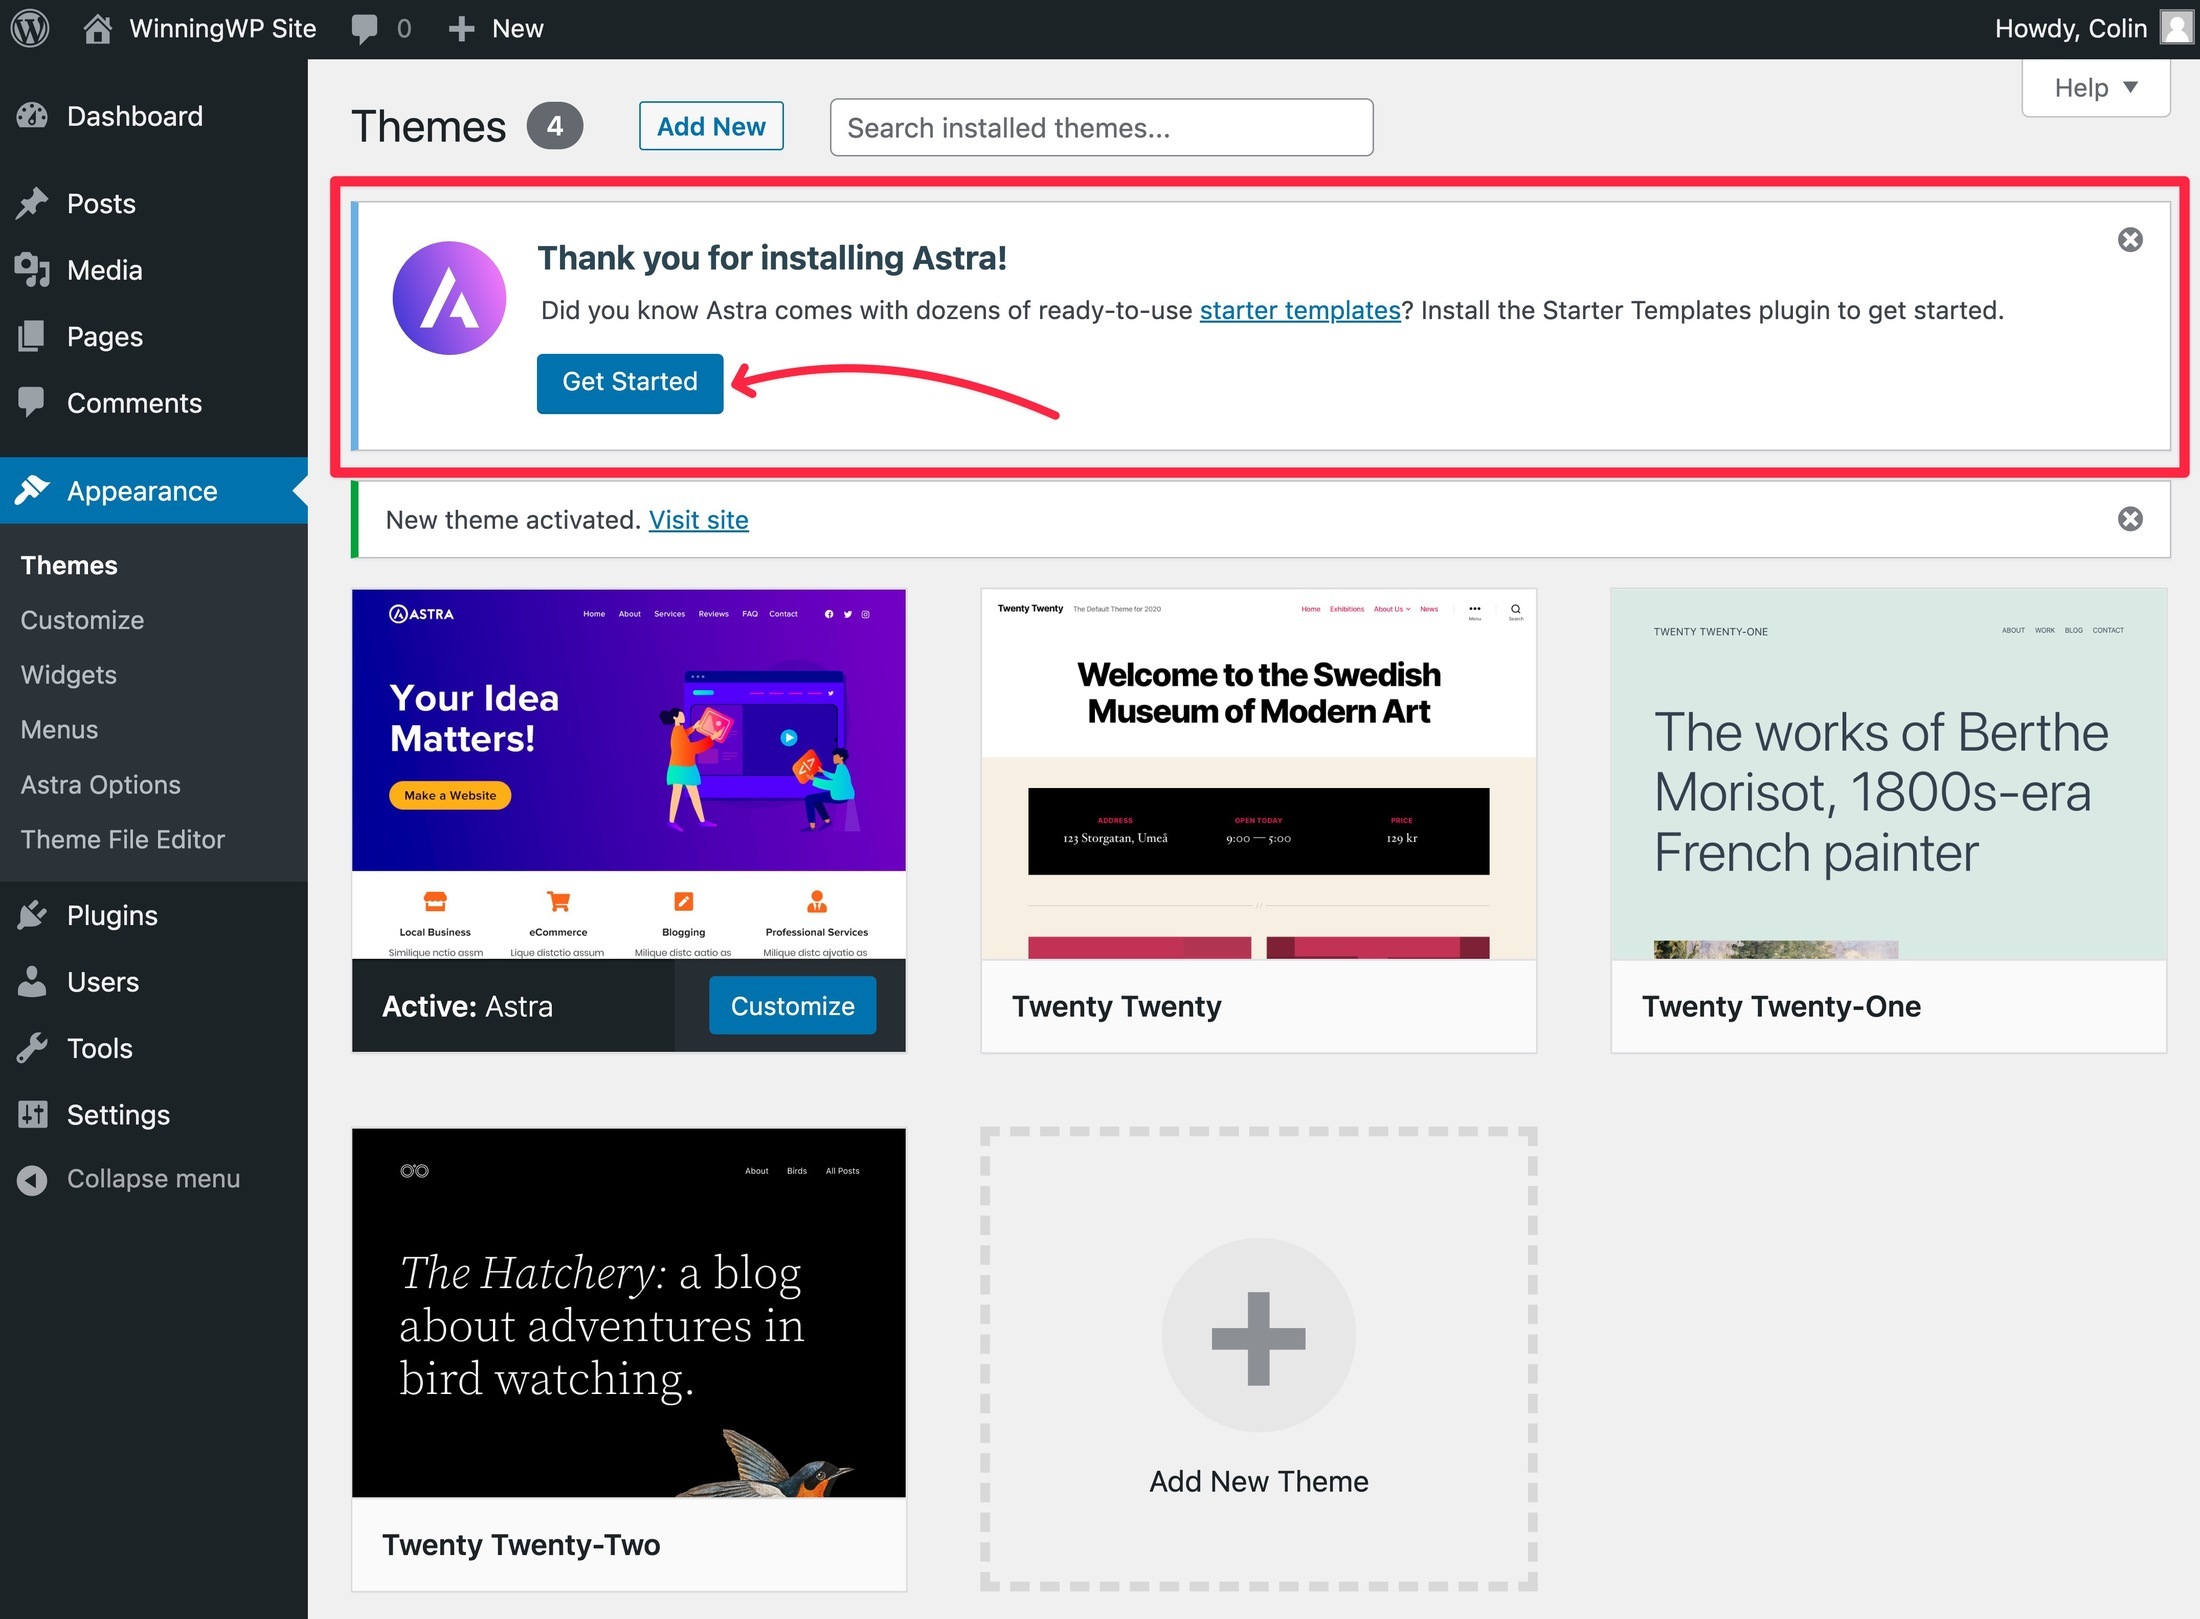
Once you install this plugin (which should happen automatically after clicking the button), it should automatically launch the starter site import interface. If not, you can access it by going to Appearance → Starter Sites.
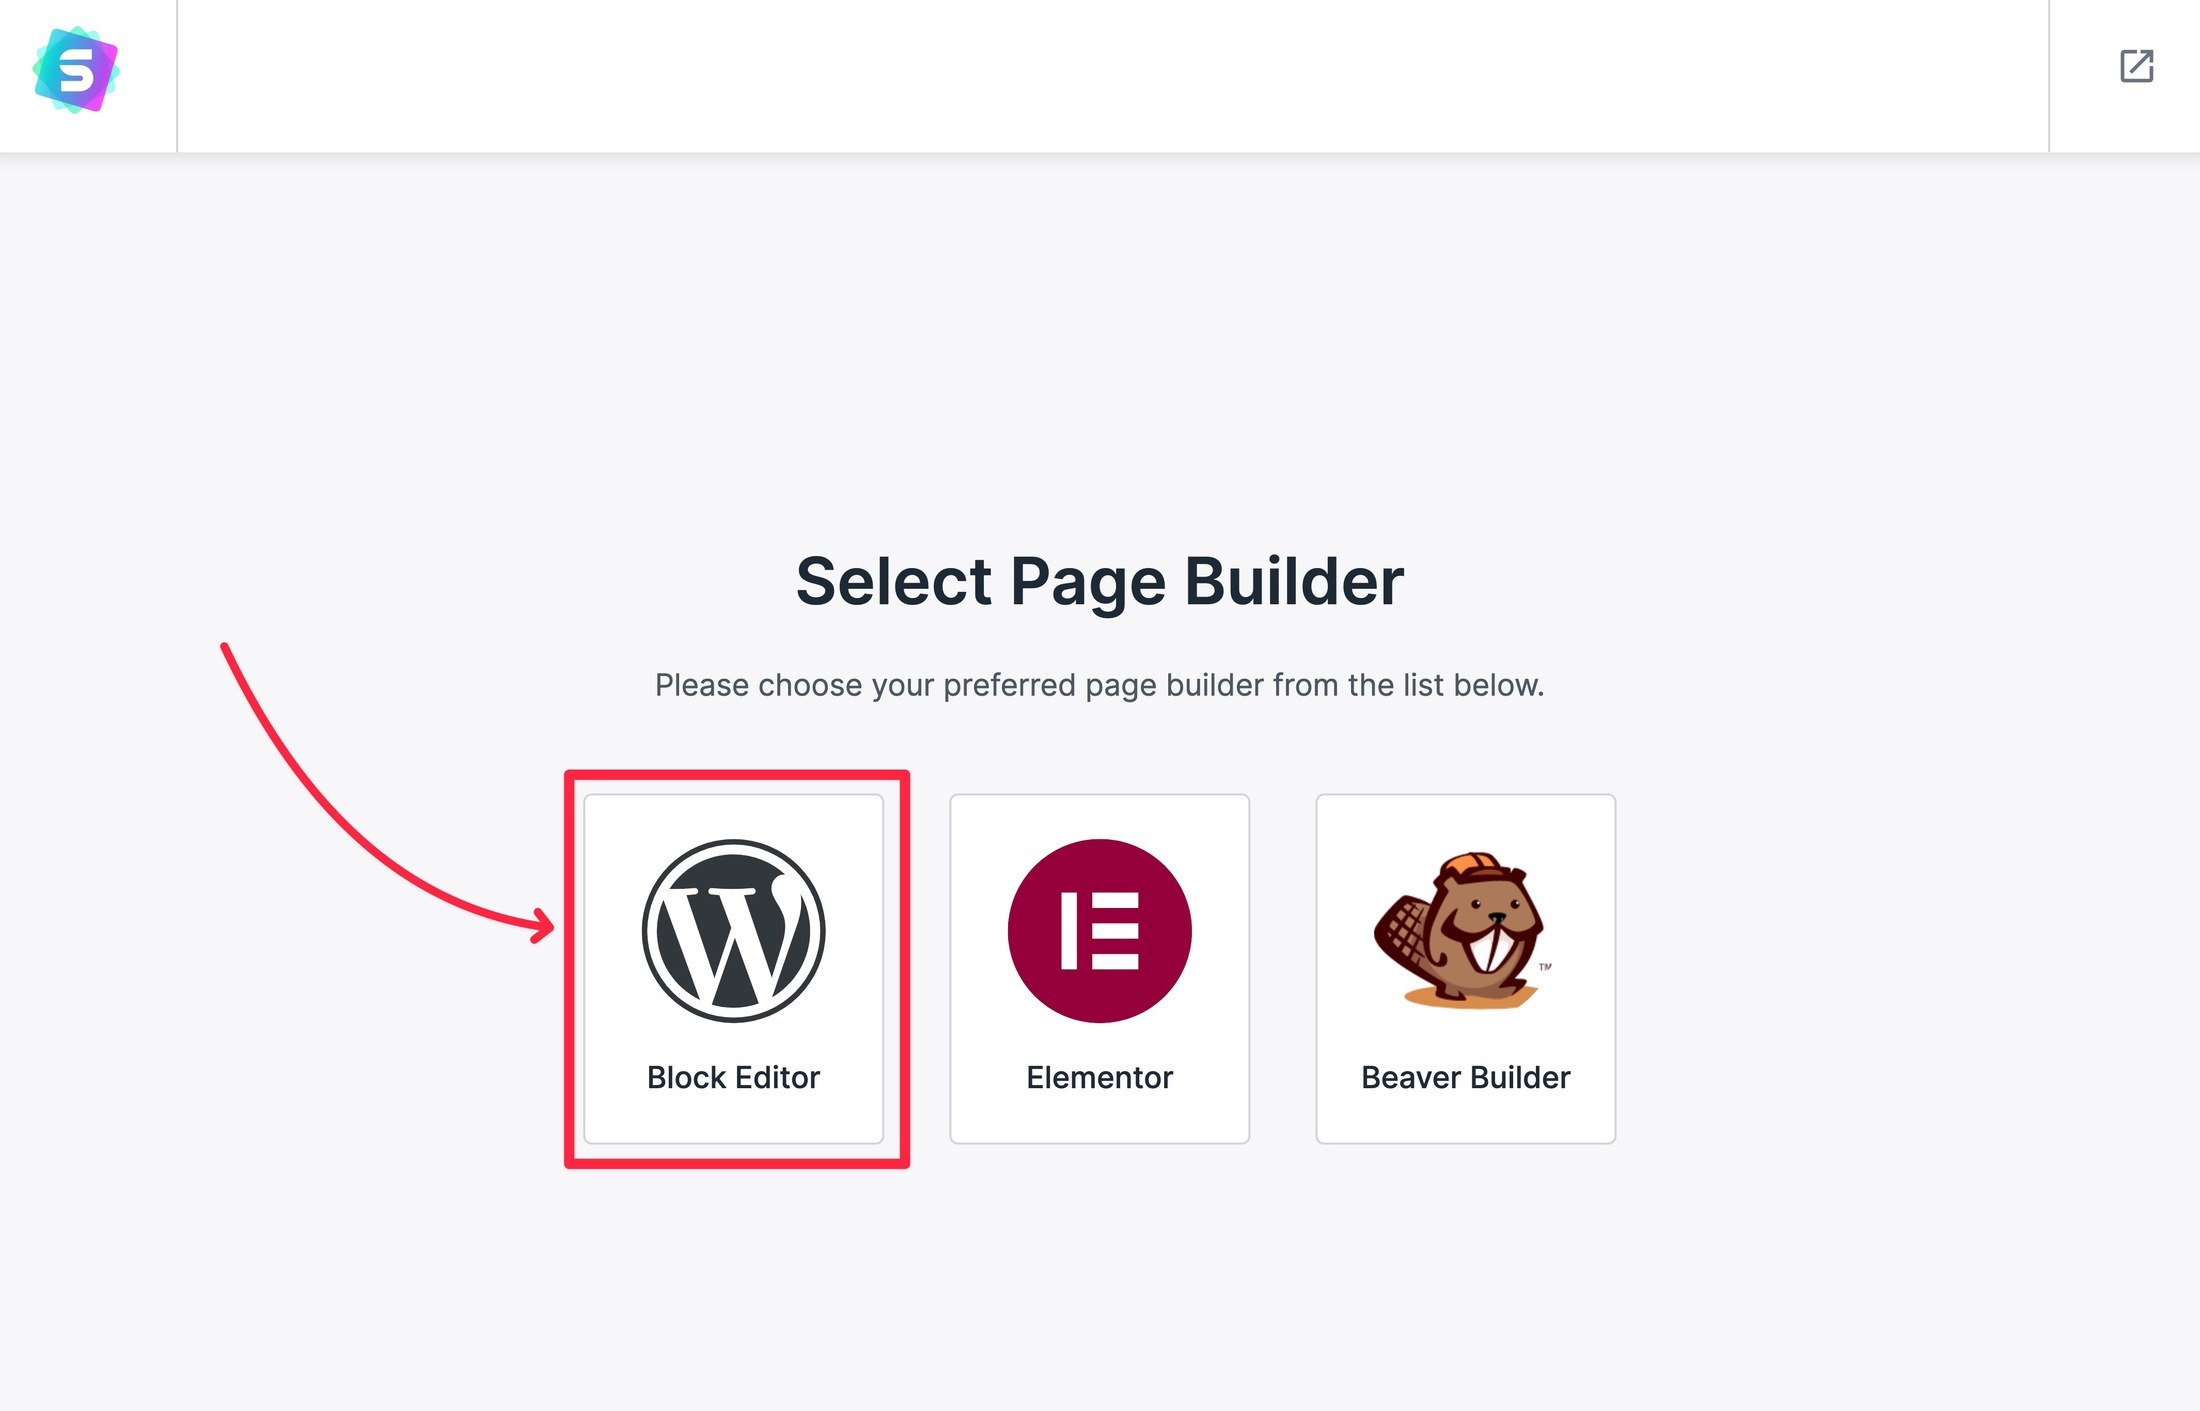
First, you can choose the content editor you want to use for your starter site. For now, we recommend using the native WordPress editor, which is called the Block Editor in Astra’s interface.
Then, you can browse all of the importable starter sites. To see a preview, you can click on any site you’re interested in.
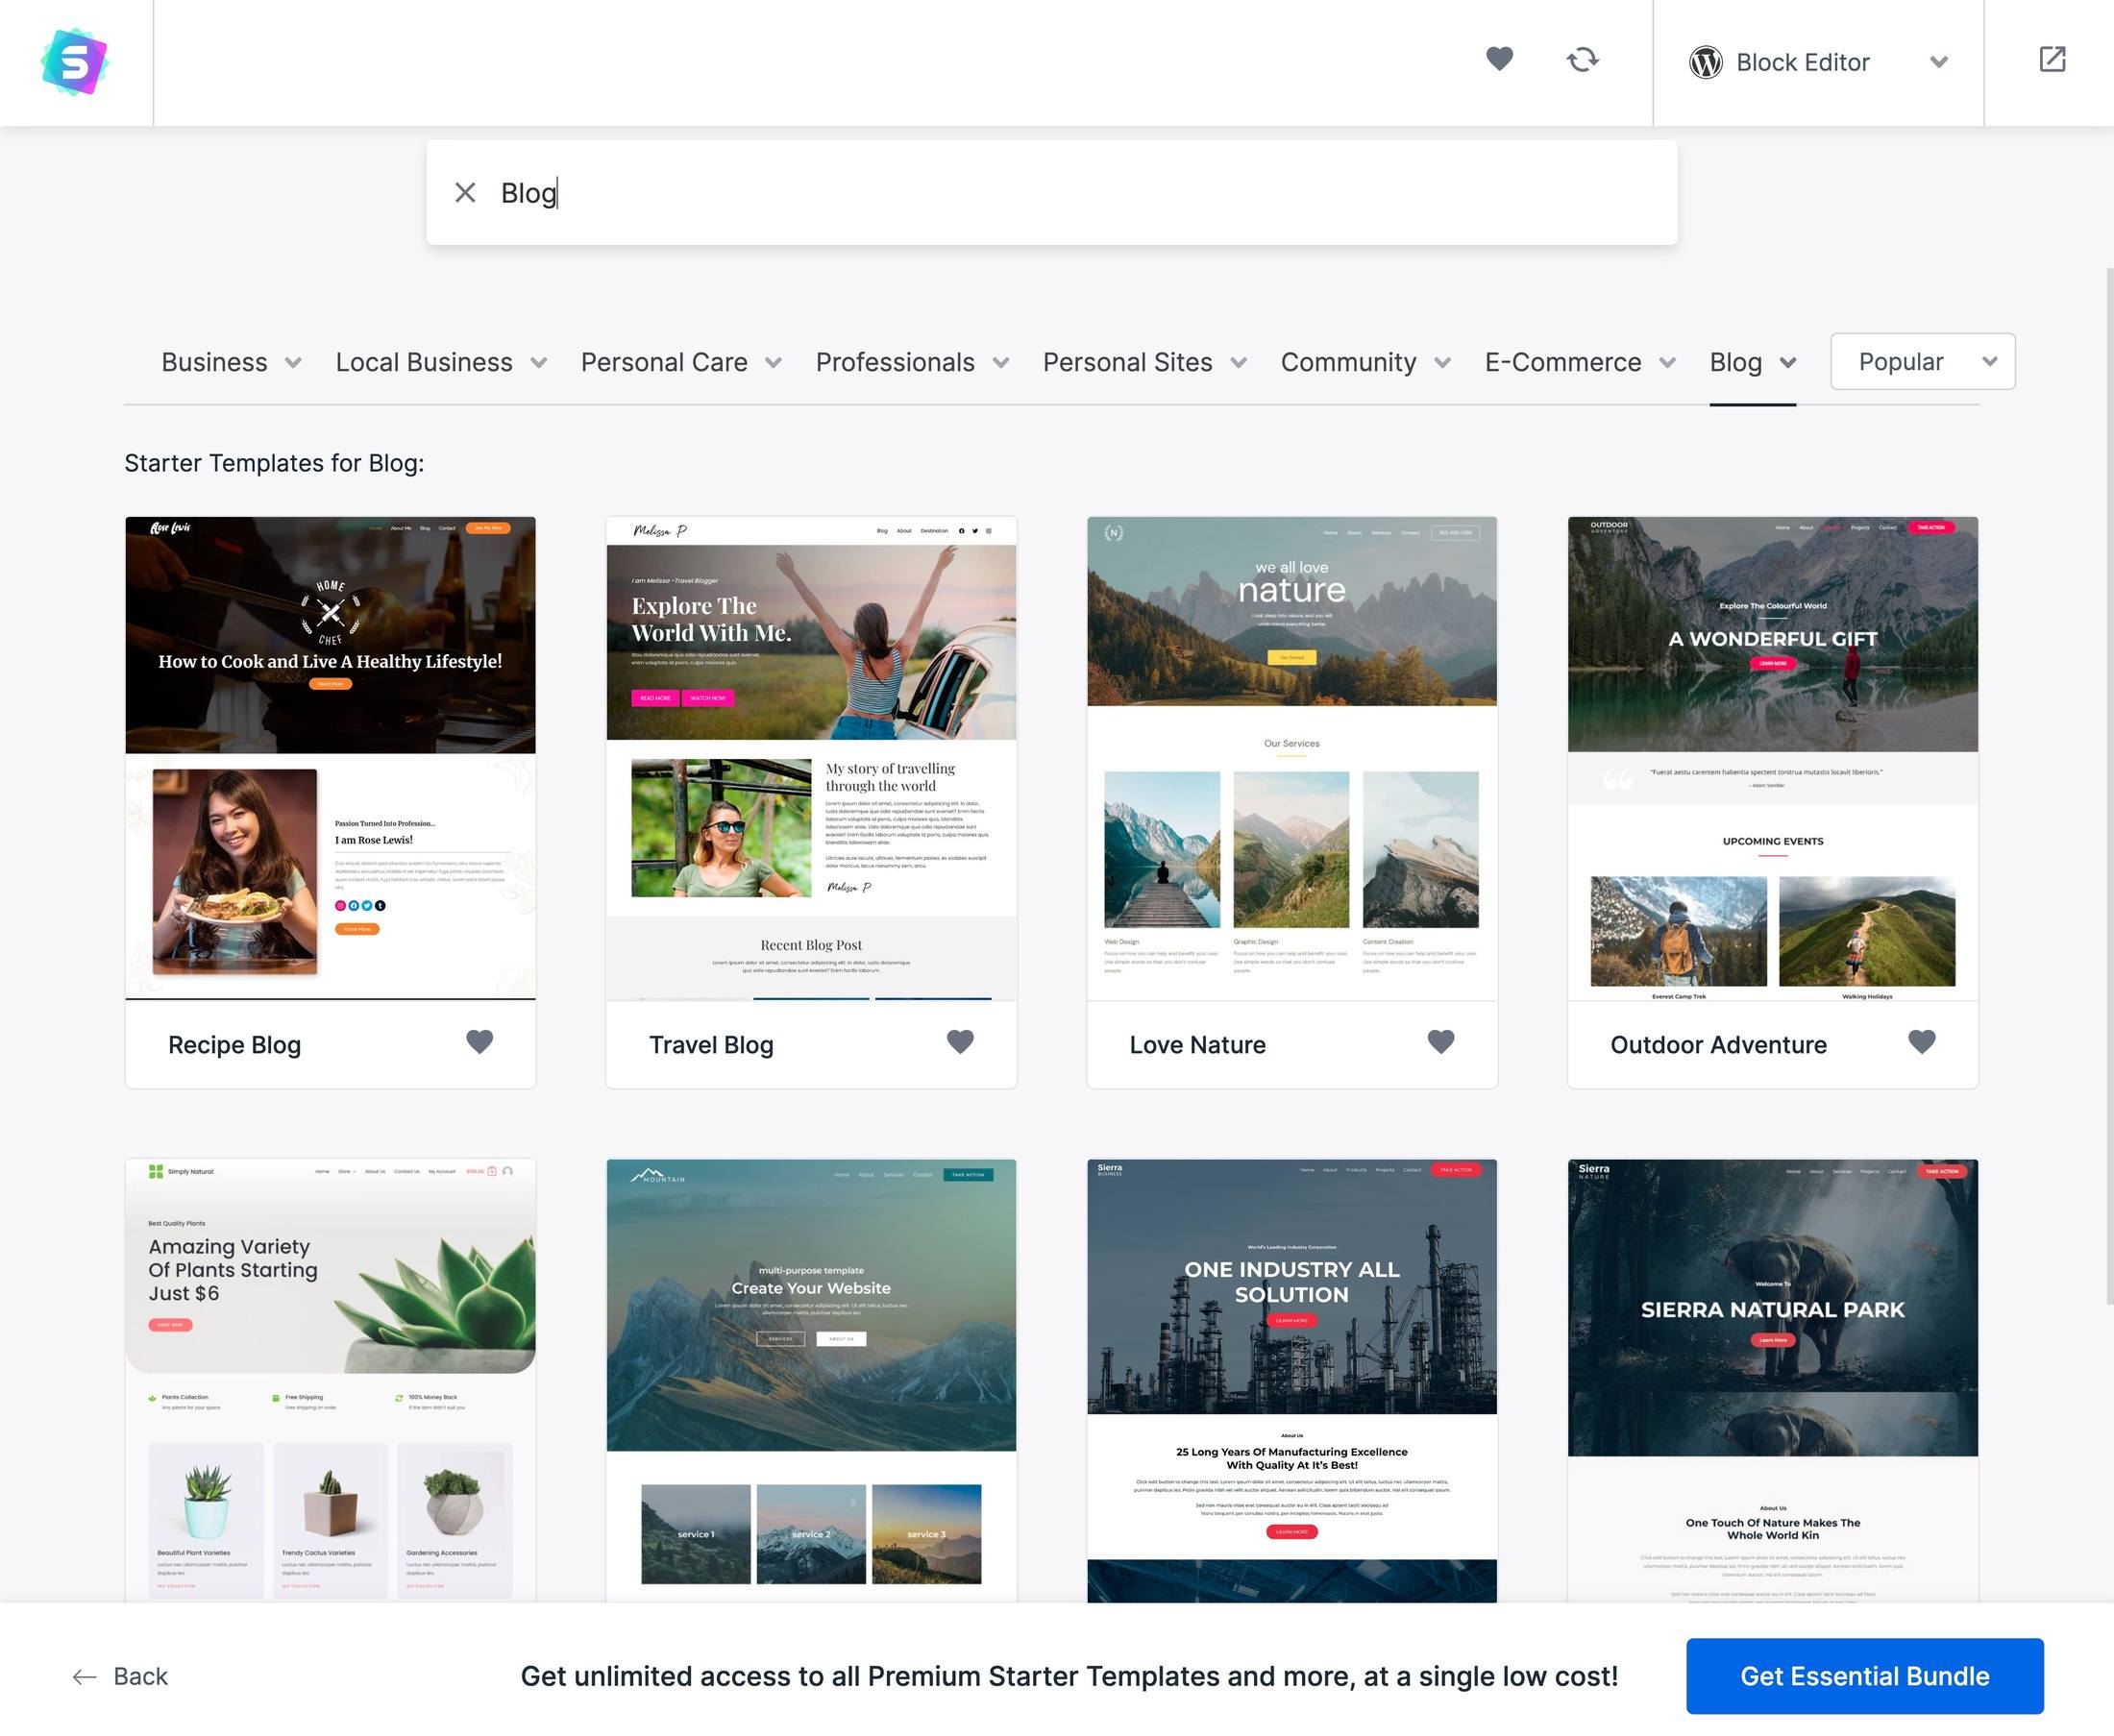
Once you’ve found a starter site you like, click on it to launch the import wizard.
On the first screen, you can upload your own logo. If you don’t have a logo yet, don’t worry! You can just skip this for now and upload it later.
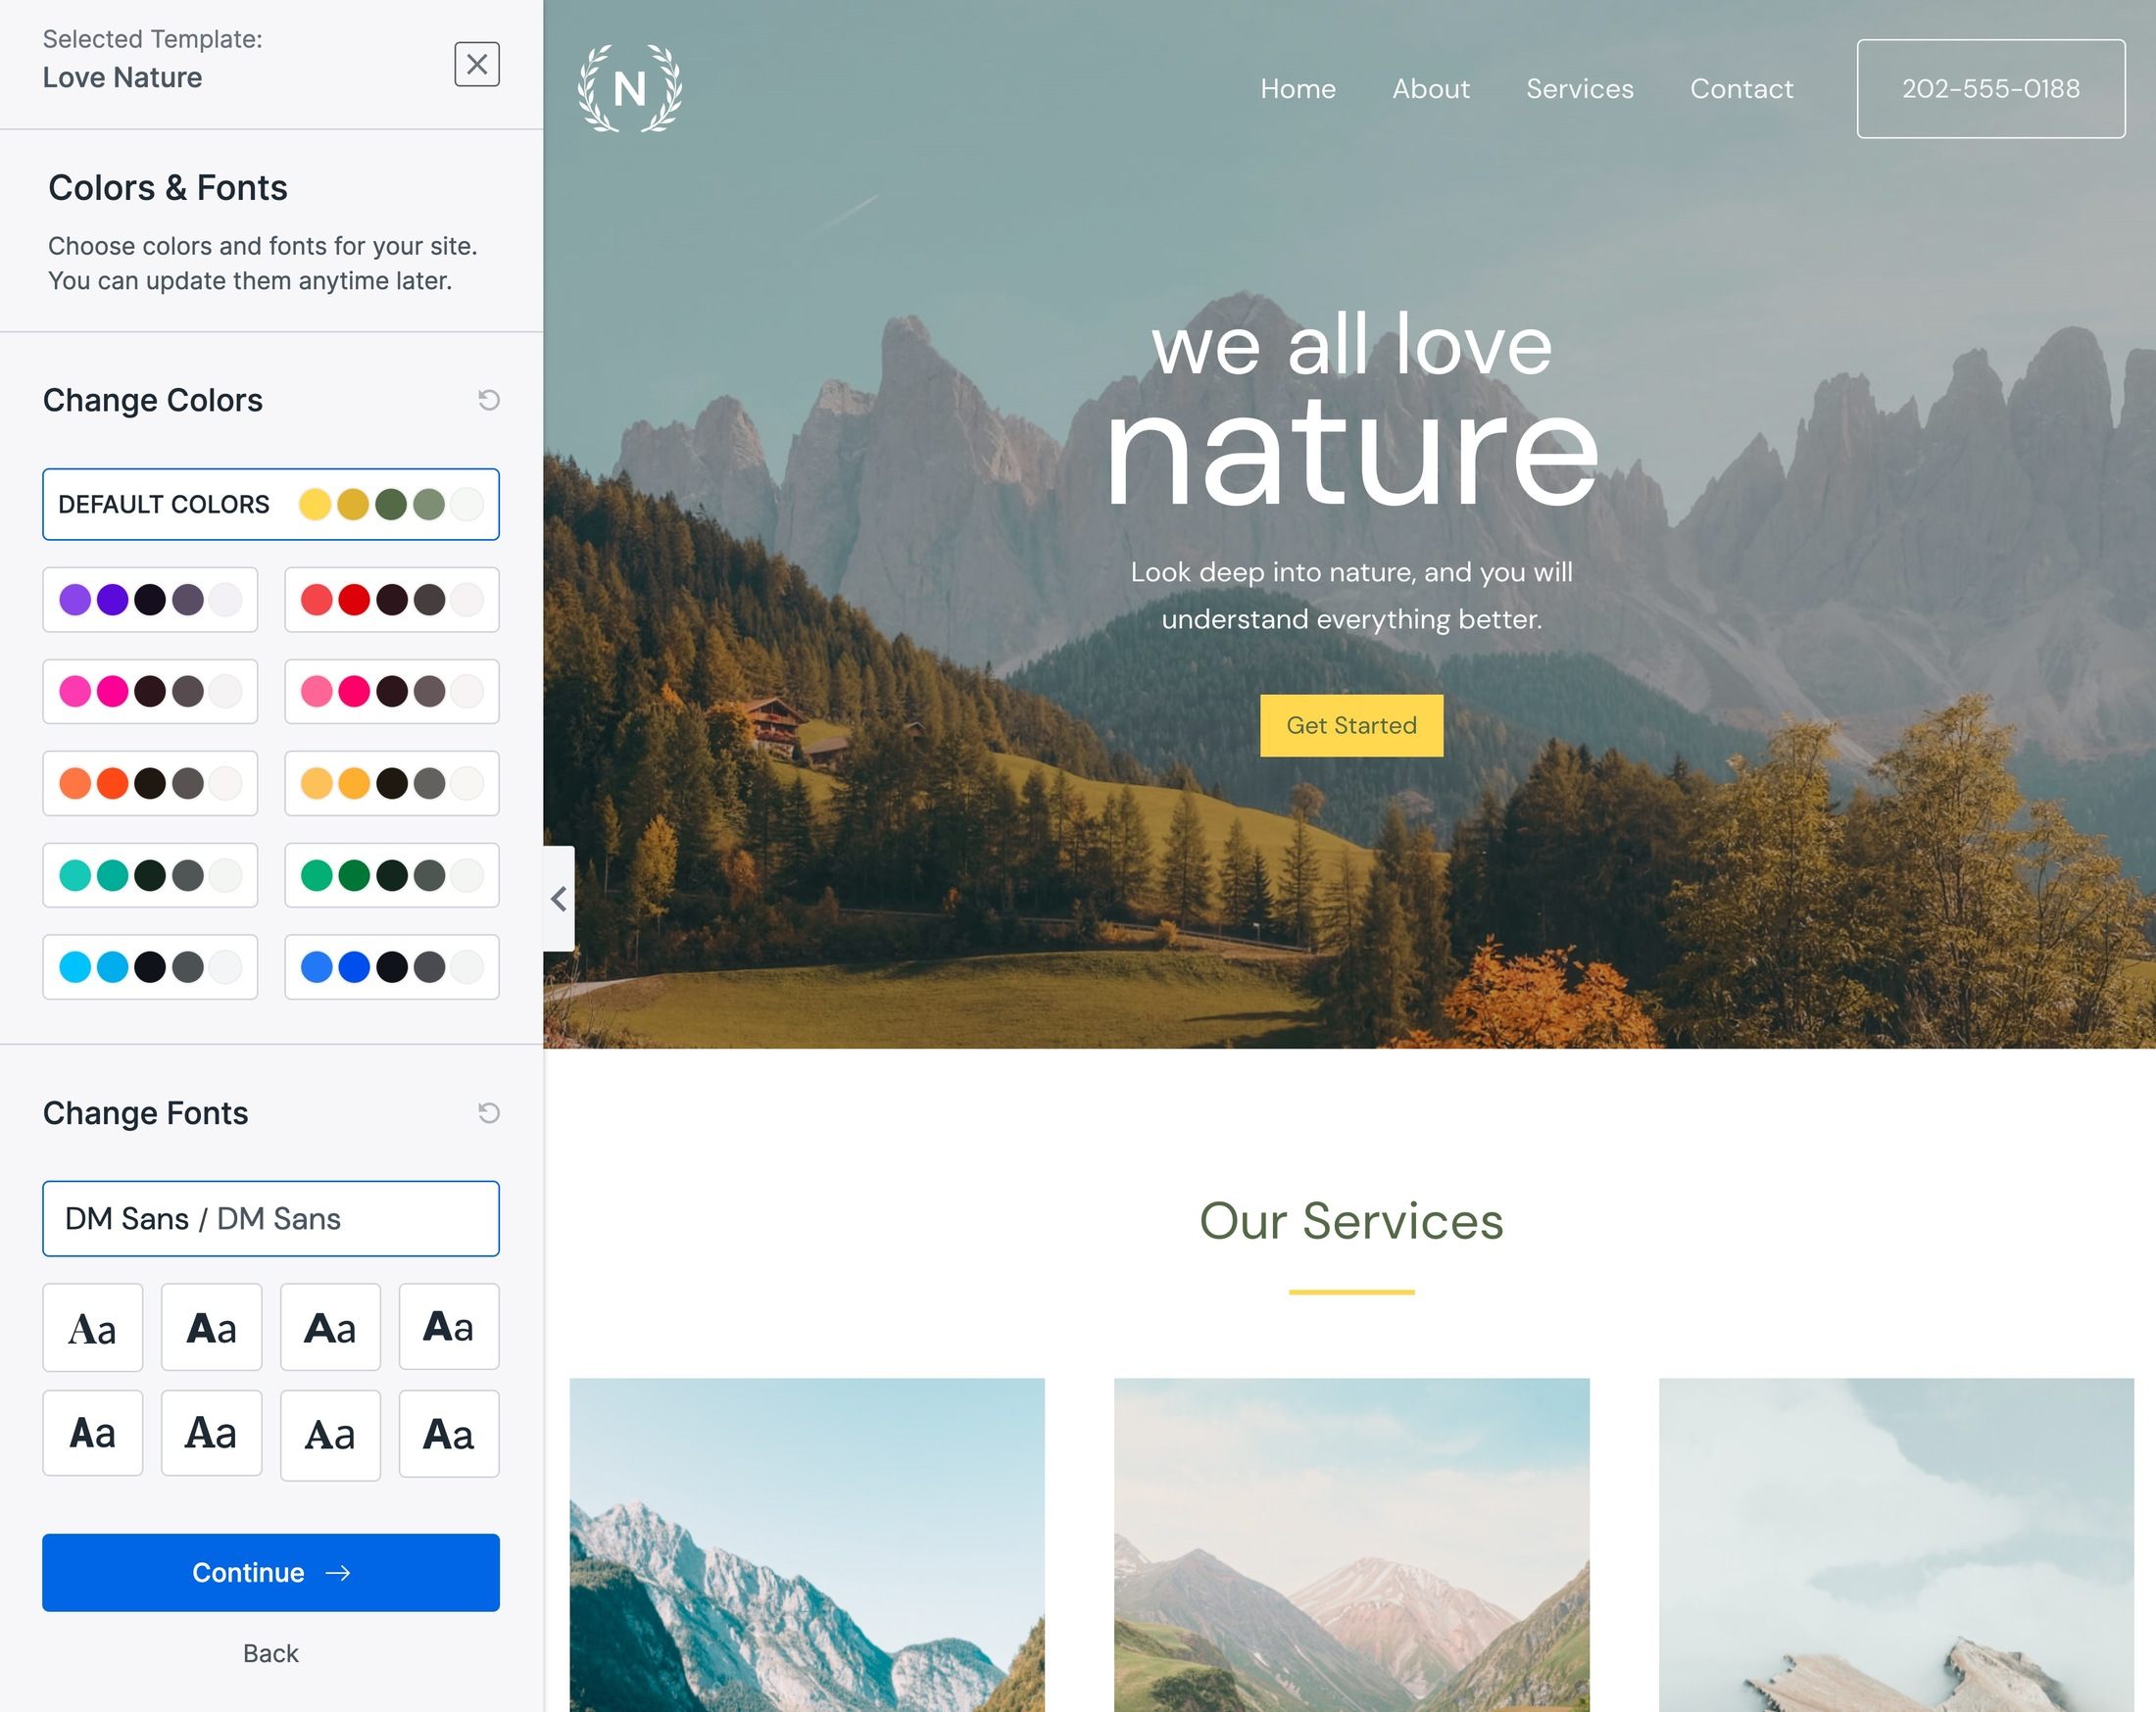
Next, you can customize the color palette and font pairing for your site. Again, don’t stress too much because you can always customize these details later on.
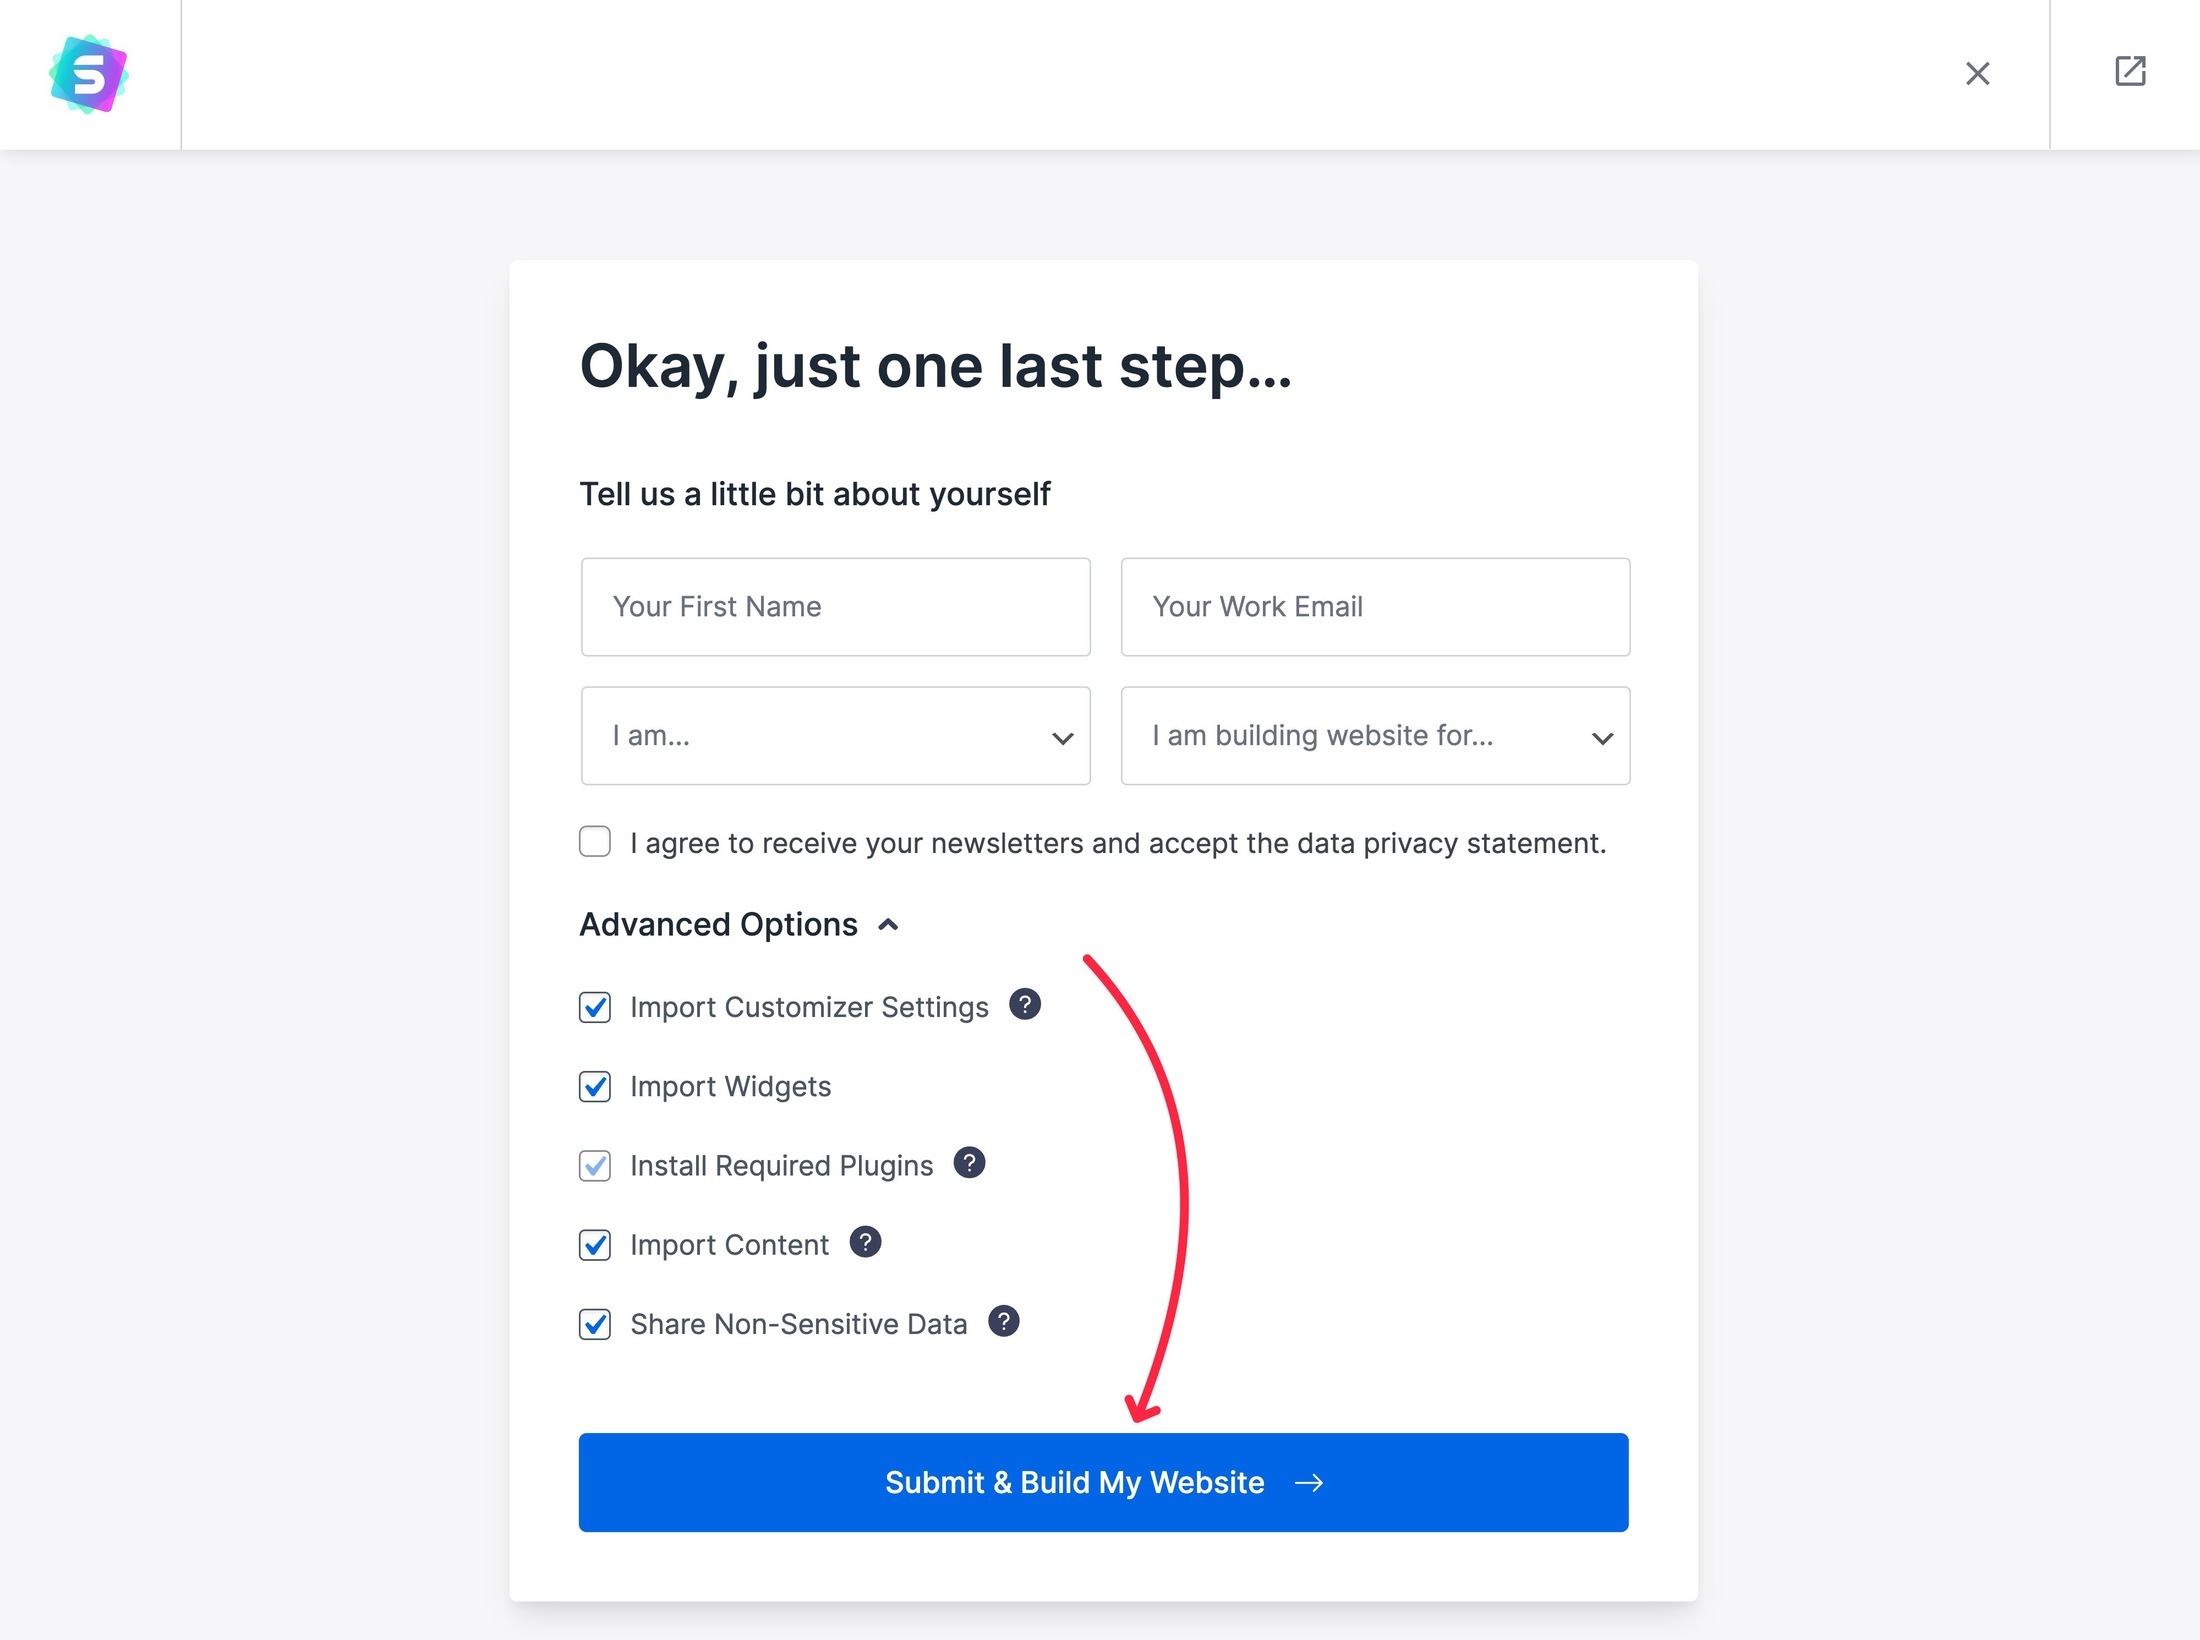
Finally, the last step lets you tweak import details in the Advanced Options. For most sites, we recommend just leaving the defaults. You also do not need to fill out the personal information — you can just leave that blank.
To finish, click the Submit & Build My Website button.
After a short wait, your site should look exactly like the demo of the starter site you selected.
Customize Your Site’s Design
Now, you’re ready to customize your site’s design:
- If you imported a starter site, you’ll be tweaking it to match your needs.
- If you opted to start from scratch, you’ll be configuring all of the settings from a blank slate.
To access all of your theme’s customization settings, go to Appearance → Customize.
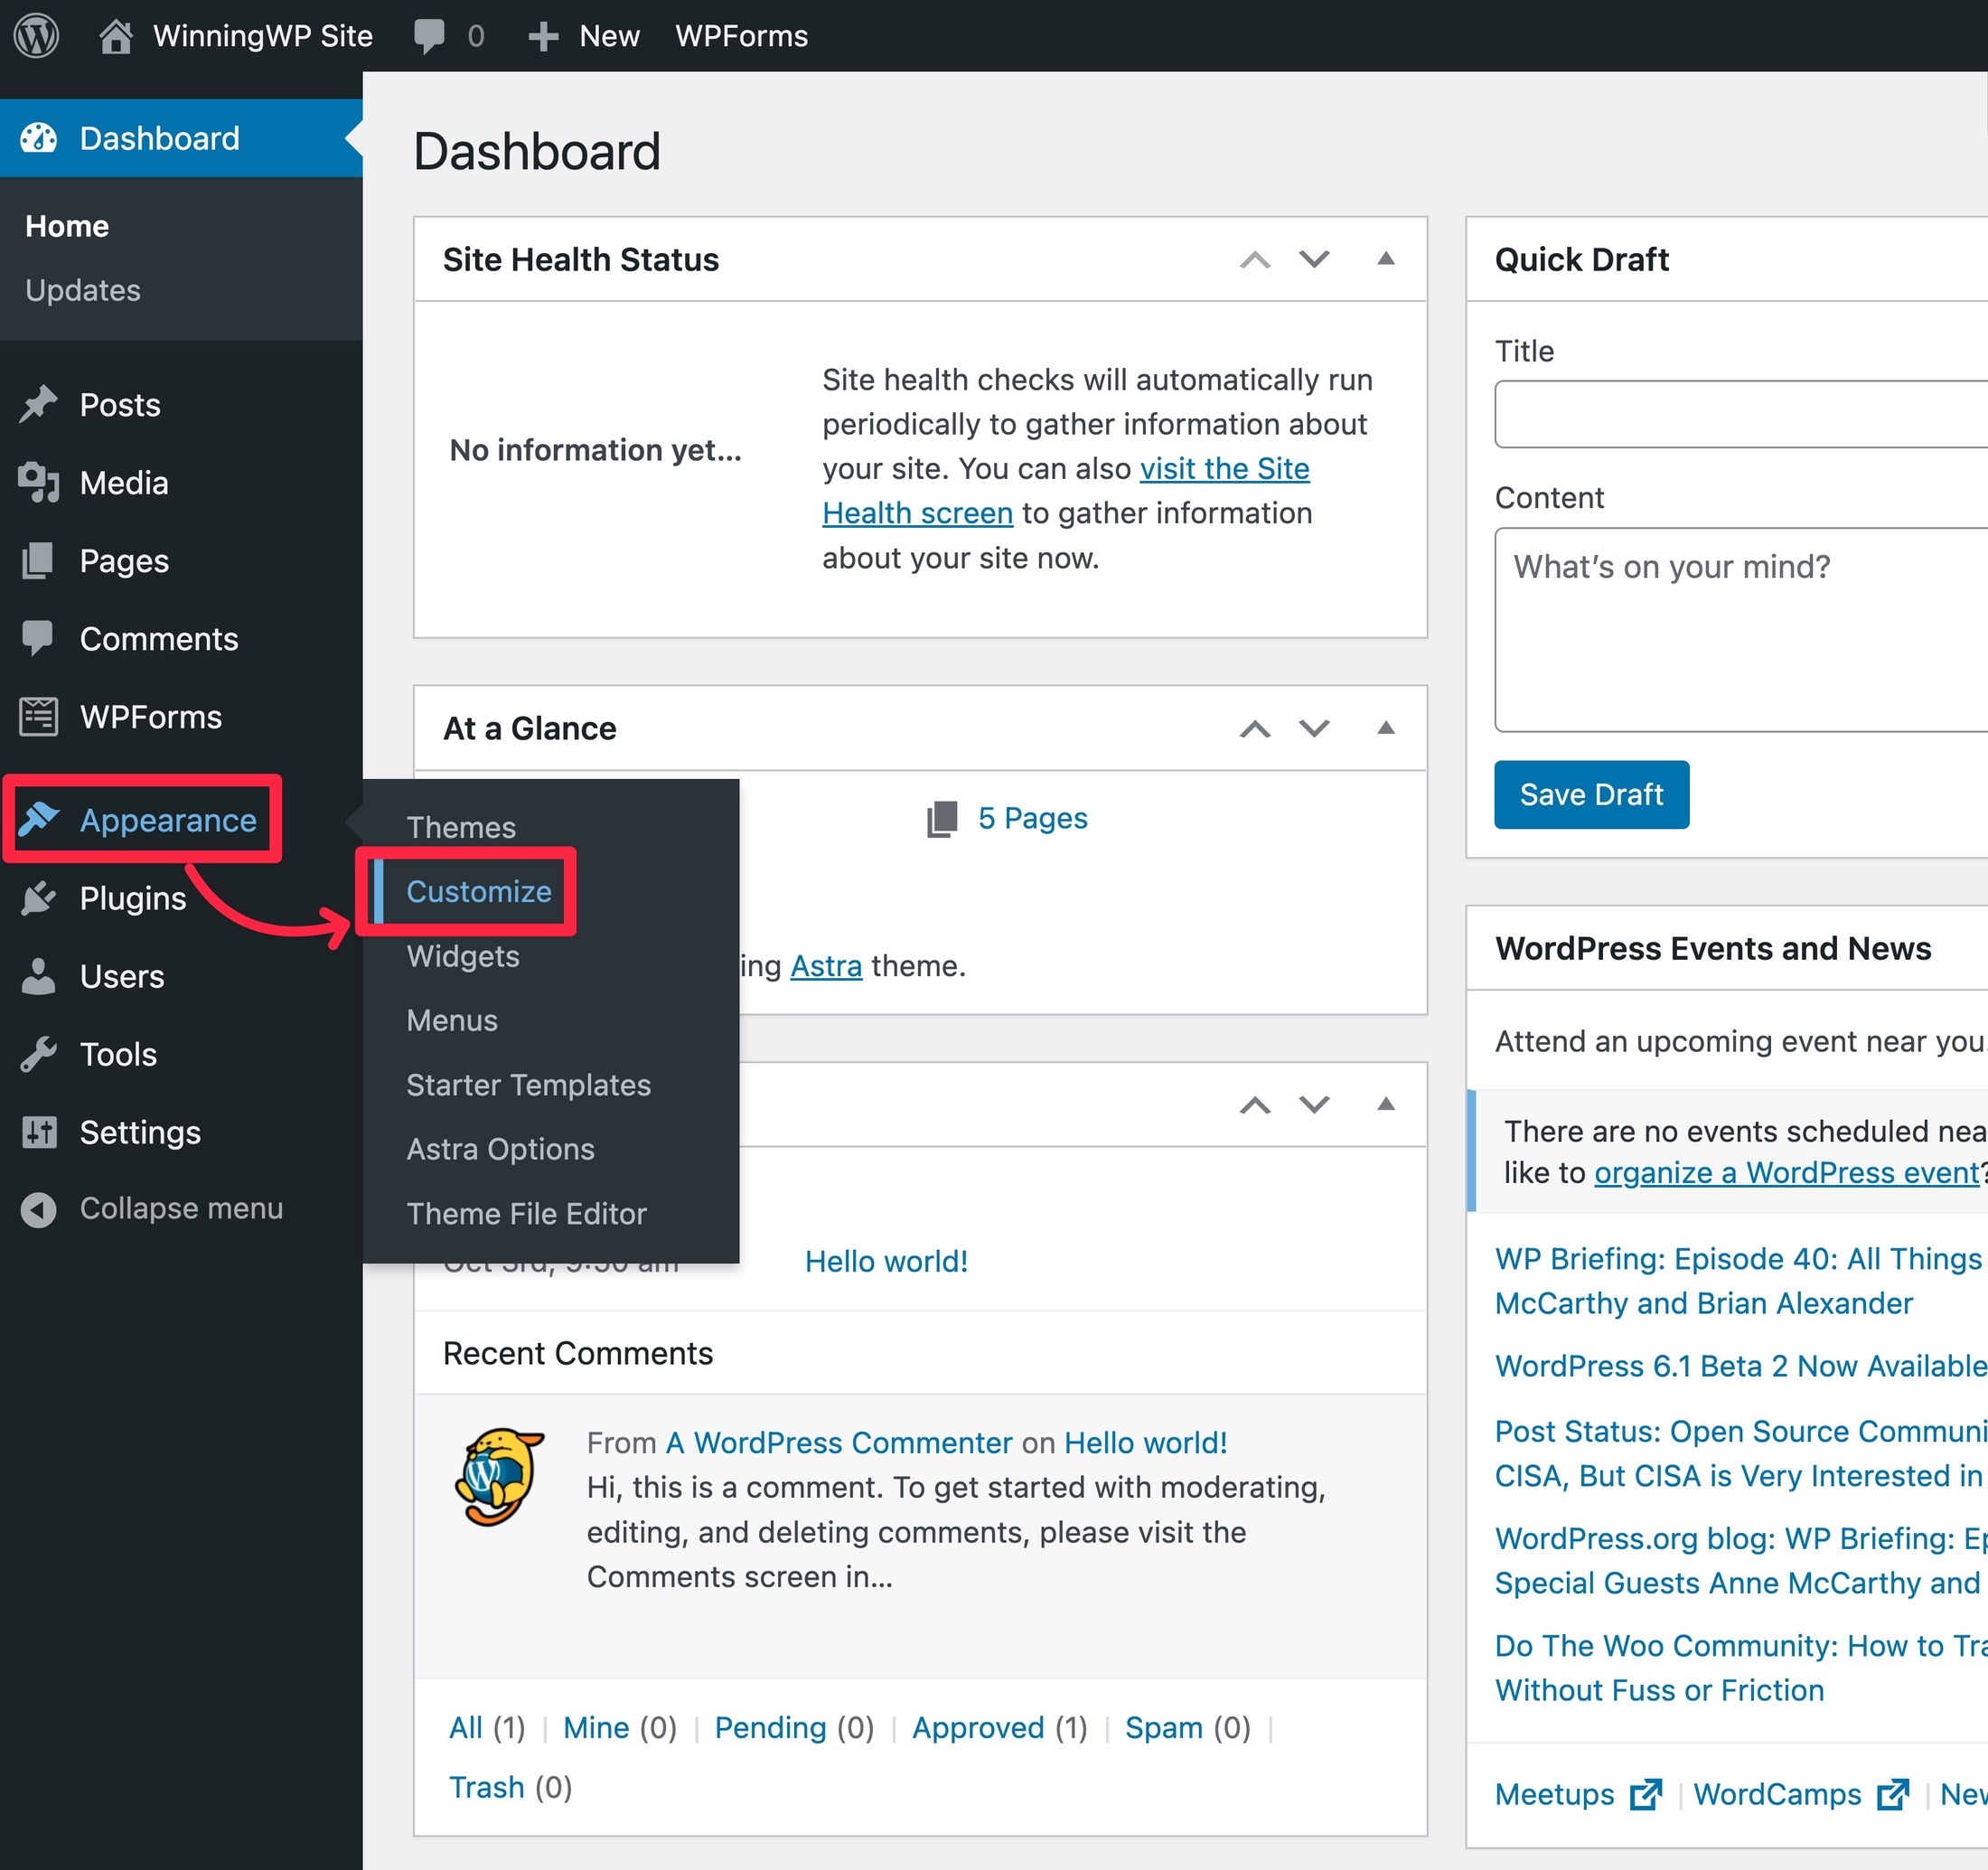
This will launch the real-time Customizer — you’ll see a live preview of your site on the right and a sidebar on the left where you can access a bunch of settings.
Here are some examples of the types of settings you’ll find in the sidebar:
- Choose your theme’s layouts for the header, blog posts, blog listing page, and so on.
- Control your theme’s fonts and typography.
- Adjust your sitewide colors and colors for specific elements.
- Etc.
Here’s how to use the Customizer:
- Use the sidebar to navigate to the settings for the options you want to adjust. The exact settings will depend on your theme, but they should be organized logically. For example, to control your theme’s colors, you’d look for a menu or submenu that included ‘Colors’.
- Use the settings in the sidebar to make changes to your theme.
- As you adjust the settings, the live preview of your site should automatically update.
- If you’re happy with your changes, click the blue Publish button to make them live. If you don’t like how the changes look, just refresh the interface (without saving) and your site will go back to how it was.
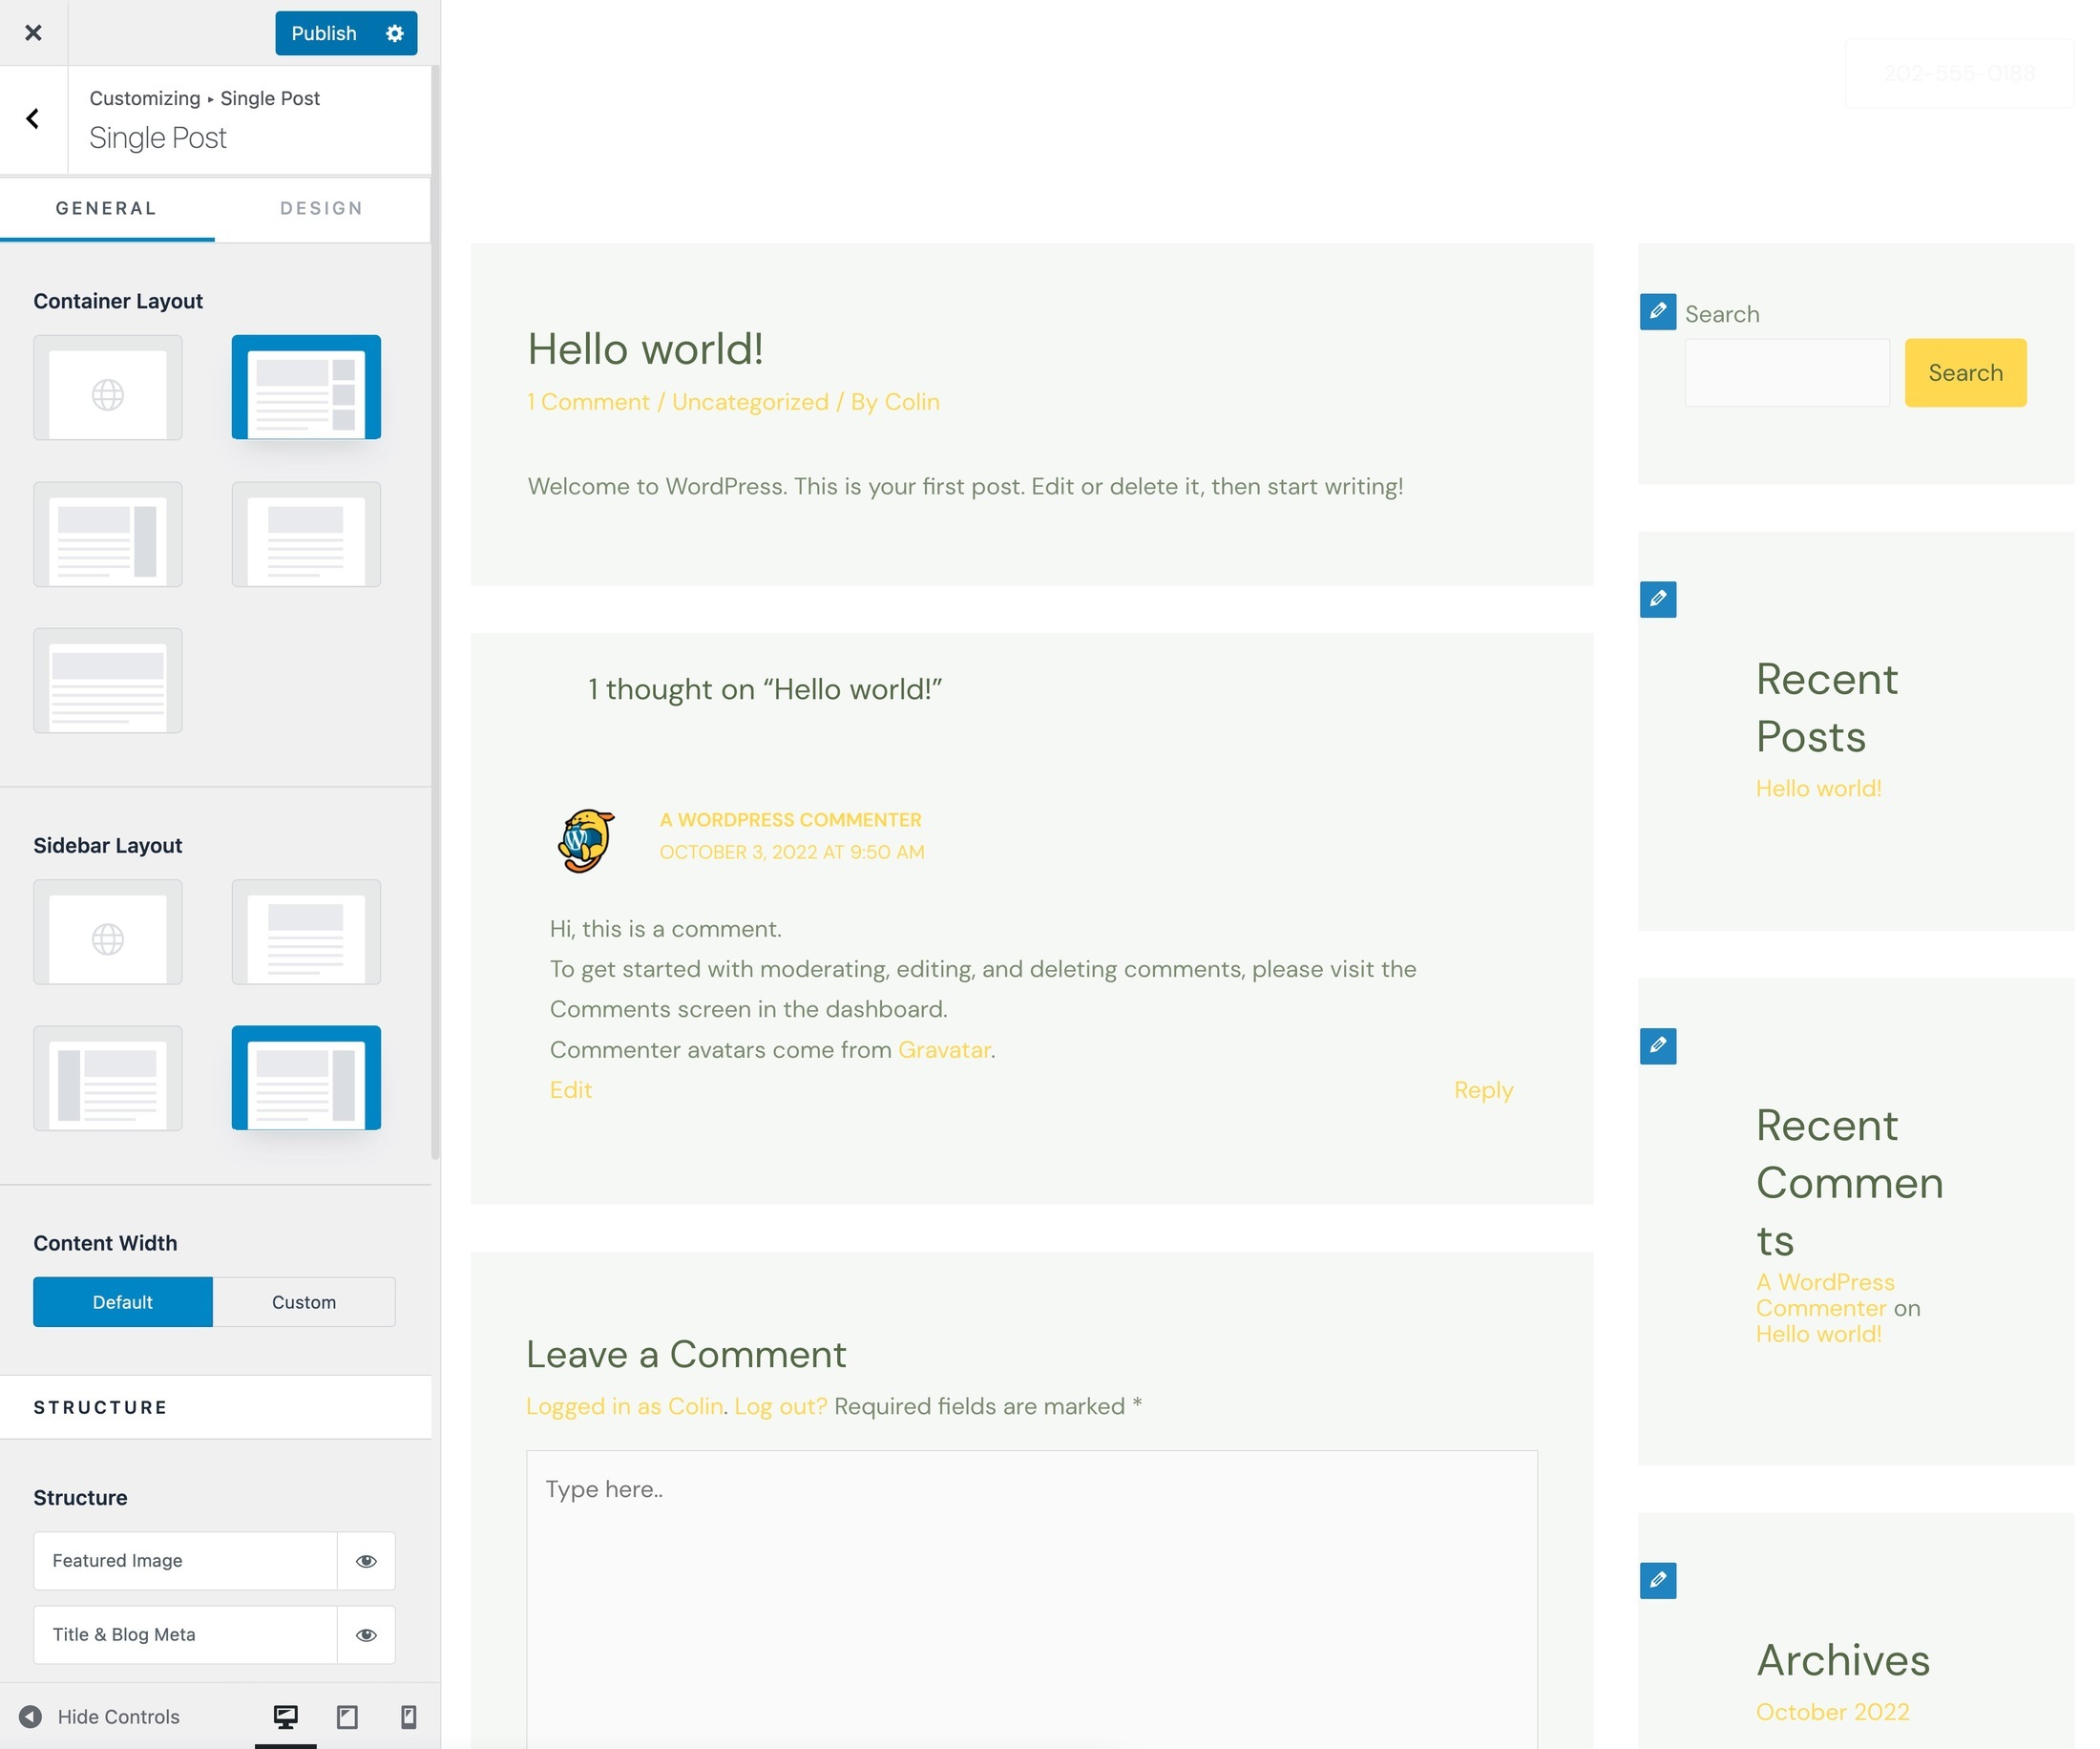
For example, to customize the layout of your blog posts with the Astra theme, you would go to Blog → Single Post to choose from different content containers, sidebars, and more.
Set Up Your Navigation Menu
Your navigation menu typically appears in your site’s header. It helps visitors to discover and navigate to the most important content on your site.
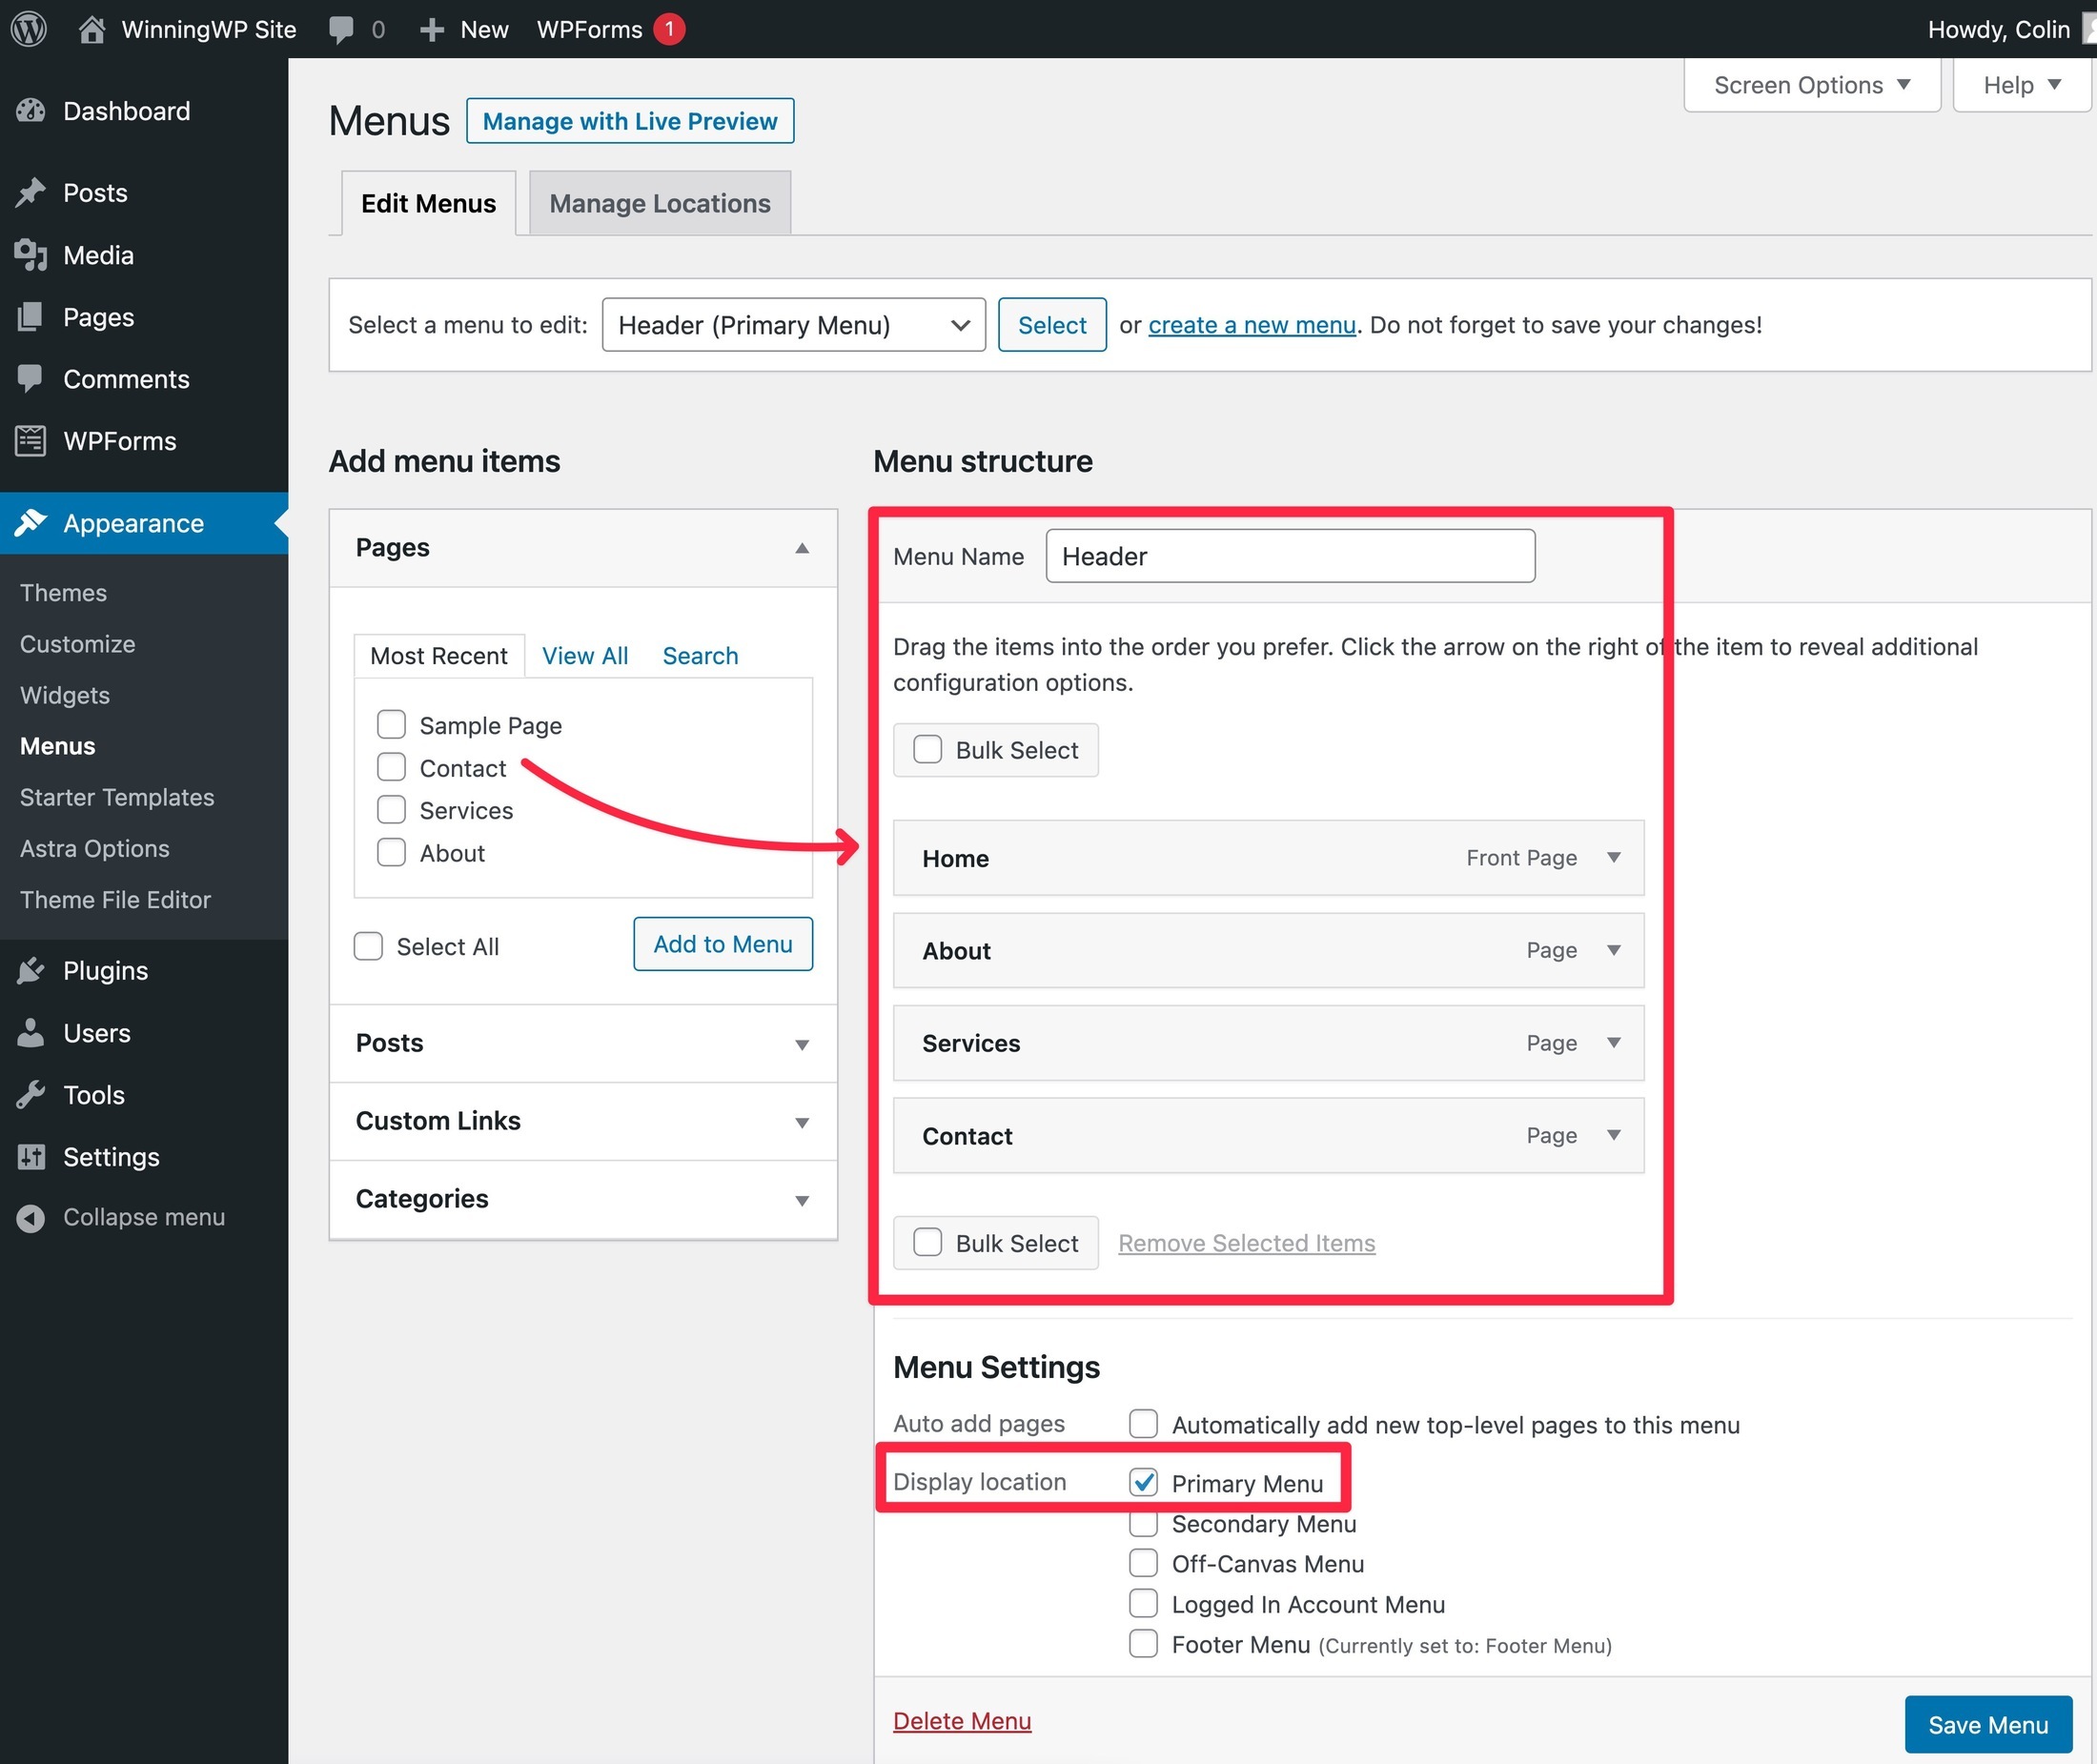
To control your WordPress navigation menu, you can go to Appearance → Menus in your dashboard.
If you didn’t import a starter site, your menu may be empty — that’s fine. In the next step, you’ll learn how to add your site’s core pages and start writing blog posts. Once you do that, you can always come back here and add those important pages to your navigation menu.
Here’s what to do in the interface:
- Make sure the menu’s location is set (if it’s not already). The exact menu location will depend on your theme, but it should be something like ‘Primary’ or ‘Main’.
- Use the interface to add links to your menu. Once you’ve added a link, you can use drag and drop to rearrange it. You can also create dropdown menus by dragging a link underneath another link — you can see that it will be indented in the list after doing so.
Want more detailed instructions on controlling your site’s design? Read our full WordPress theme customization tutorial.
STEP 6: INSTALL MUST-HAVE WORDPRESS PLUGINS
WordPress plugins add new features and functionality to your site. All WordPress sites need at least a few plugins to add key features such as SEO and performance optimization.
👉 Action Steps:
- Browse the must-have plugins below to choose the options that sound right for your site.
- Install the plugins by going to Plugins → Add New in your WordPress dashboard.
While your theme controls your site’s looks, WordPress plugins help you to add new functionality.
Plugins can add small features, such as a contact form, or big features, such as turning your site into a fully functioning eCommerce store.
There are tens of thousands of free and premium plugins available, but we’ll divide them into two rough categories:
- Must-have plugins that all WordPress sites need, no matter what your site is about.
- Niche-specific plugins that add functionality that’s specific to your needs. Not all sites need them, but you may want them to flesh out your site.
In this section, we’ll focus on the first category — the must-have plugins.
Here are the few basic plugins that we believe all WordPress sites need:
- Backup plugin — it’s essential to regularly back up your site to keep your data safe. We recommend Jetpack Backup for a premium option or UpdraftPlus for a free option.
- Security plugin — the core WordPress software is already secure, but a good WordPress security plugin will help you to lock things down even more. We recommend Wordfence or Sucuri, both of which offer free versions.
- SEO plugin — a search engine optimization (SEO) plugin helps your site to rank higher in Google for relevant queries. Two good free options are Yoast SEO or Rank Math.
- Caching/performance plugin — it’s important to make sure your site loads quickly, and caching/performance plugins help you to do that. We recommend WP Rocket (our review) for a premium version or WP Fastest Cache for a free option.
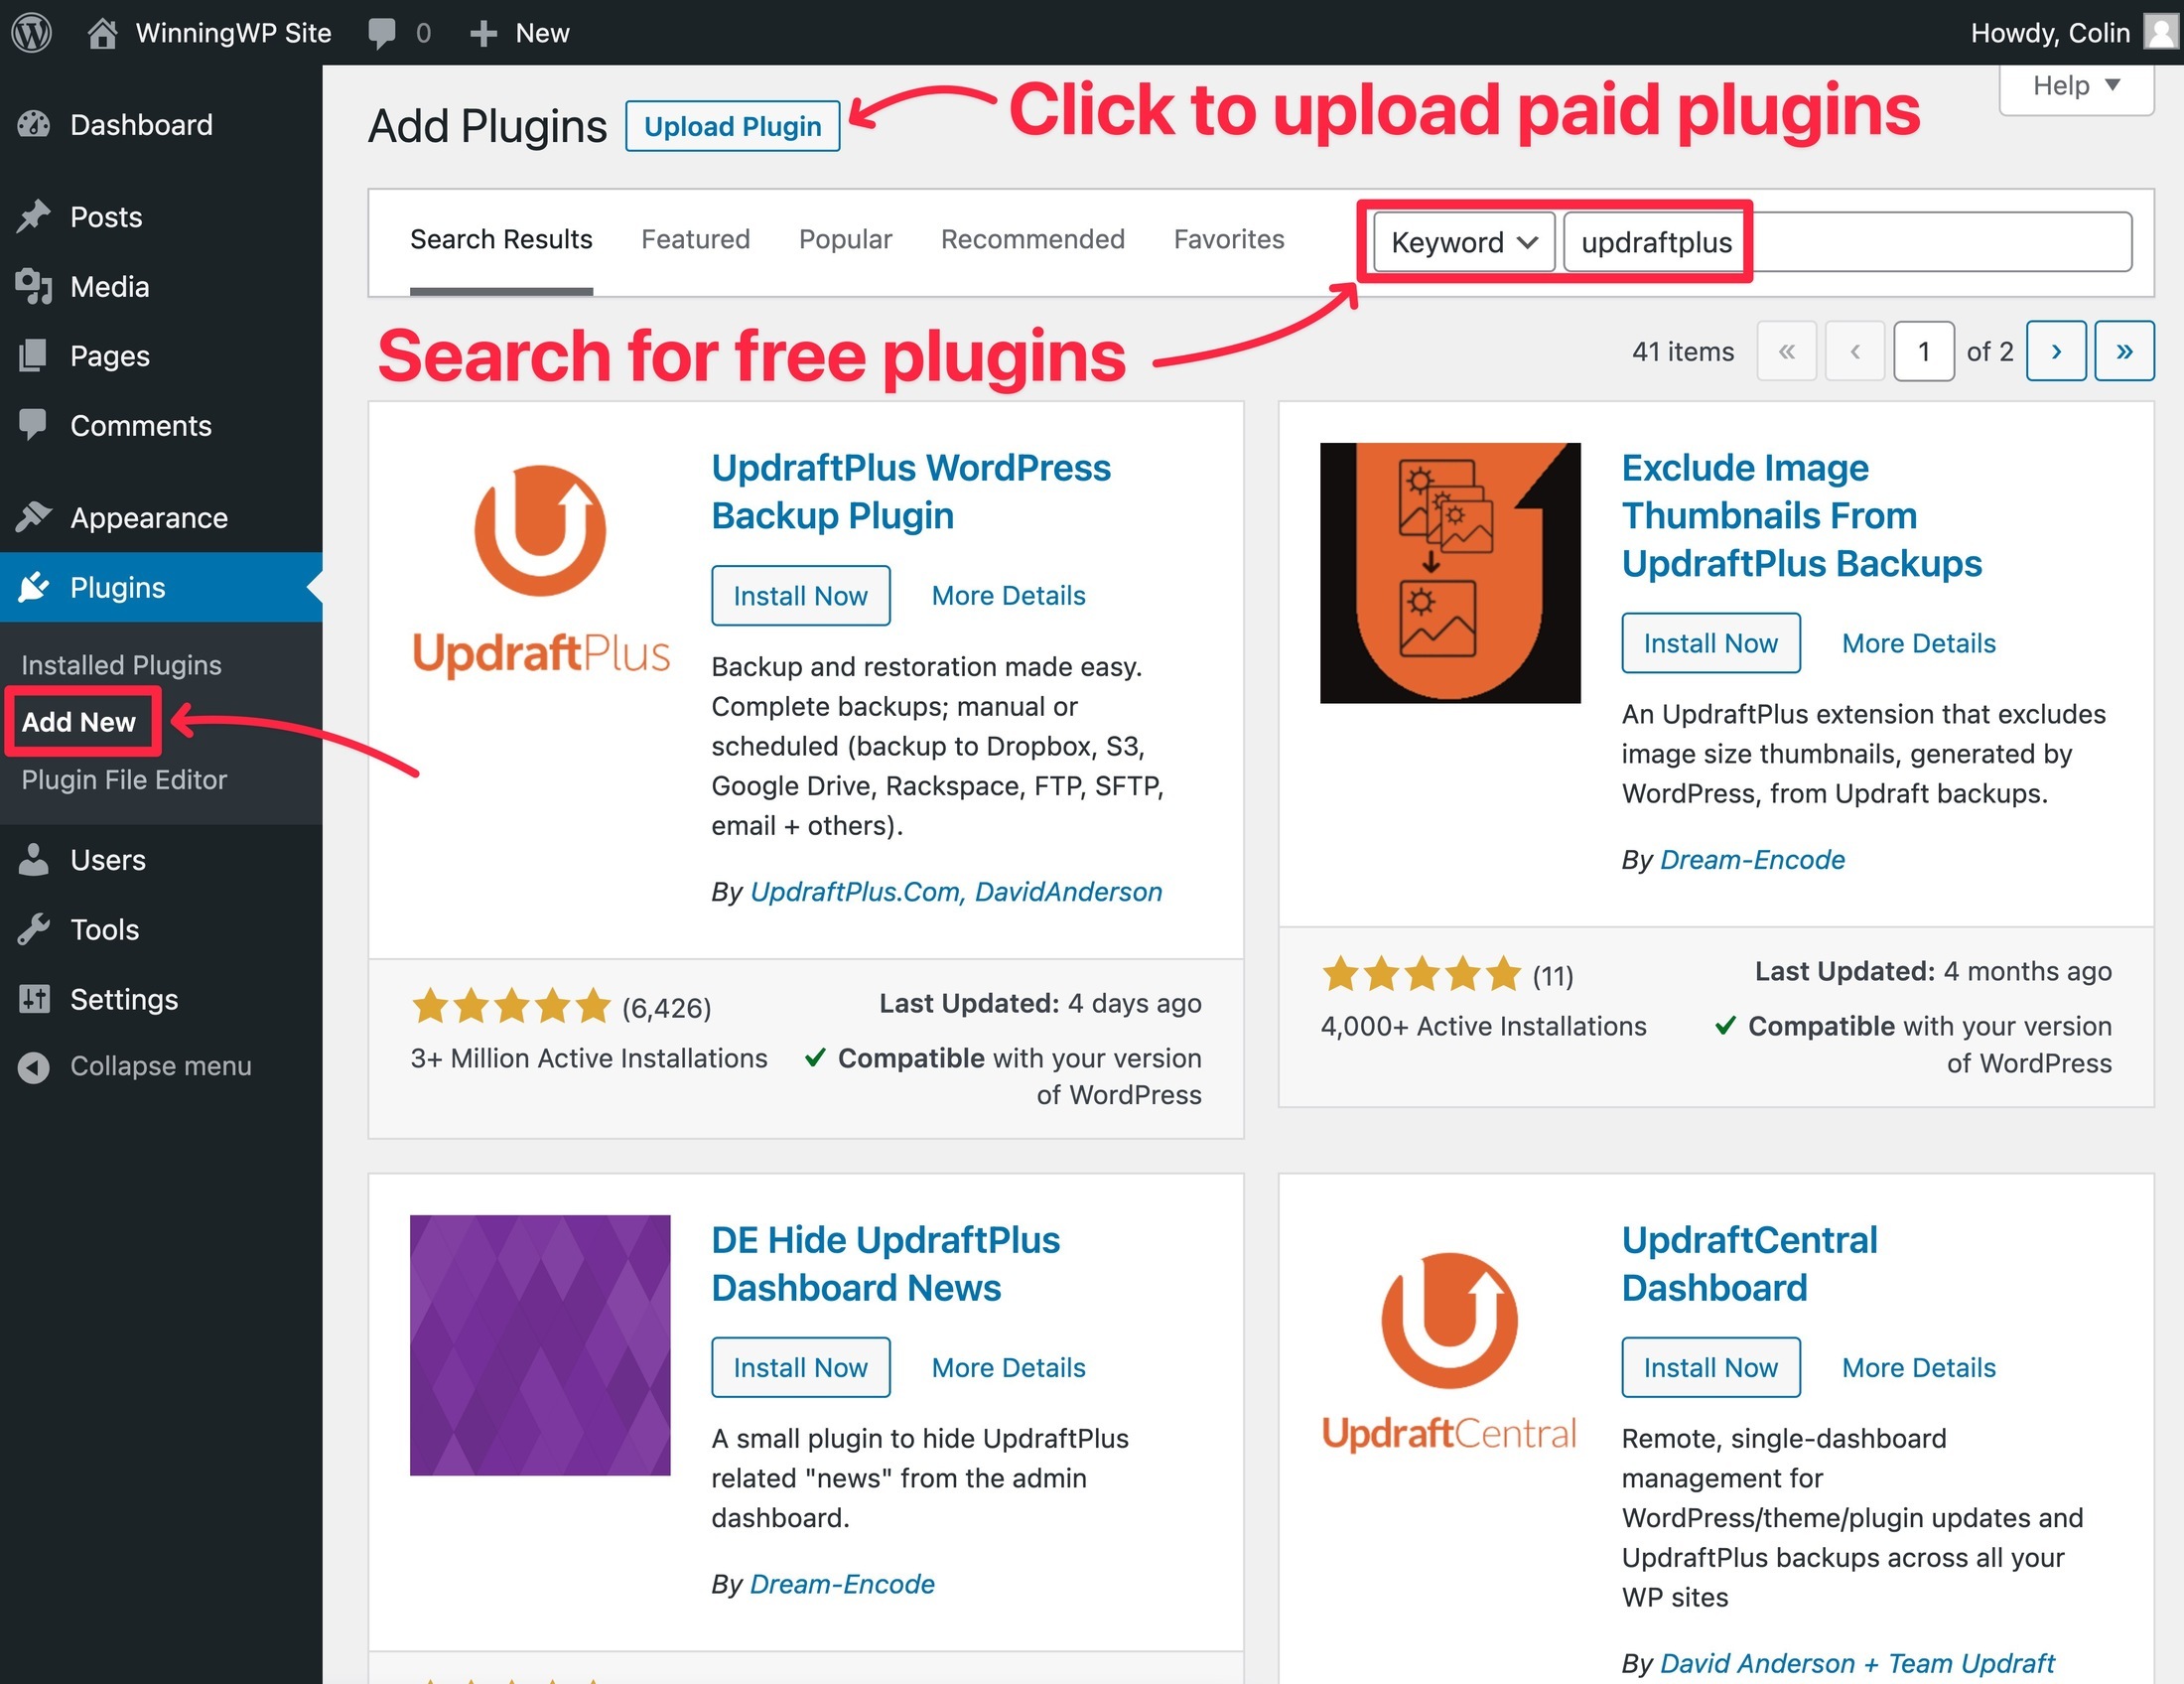
To install a WordPress plugin, go to Plugins → Add New:
- For a free plugin available at WordPress.org, you can search for it by name.
- For a premium plugin, such as WP Rocket, you can install it by uploading a zip file.
Want more detailed instructions? Check out our full tutorial on how to install WordPress plugins.
STEP 7: ADD YOUR CONTENT (HOMEPAGE, ABOUT, ETC.)
Now, you can start adding content to your site using Posts (for blog posts) and Pages (for static content).
👉 Action Steps:
- Think about the core pages your site needs — ‘About’, ‘Contact’, etc.
- Go to Pages → Add New.
- Add your content using the editor.
- If you want to write your first blog post, go to Posts → Add New and use the content editor.
At this point, you’re finished with the foundation of your site. You should have the WordPress software installed, your theme set up, and a few must-have plugins that will set your site up for success.
Now, you’re ready to start adding your content. A good spot to begin is your site’s ‘core’ pages, such as your homepage, ‘about’ page, and so on.
Once you’ve done that, you can also write your first blog post to get a taste of WordPress’s blogging capabilities.
To actually add your content, you can choose from two main editing experiences:
- Built-in WordPress editor — the built-in WordPress editor works great for blog posts and simple pages. We always recommend using it whenever possible because it will help your site to load quickly.
- Page builder plugin — these are third-party tools that give you more of a visual, drag-and-drop design experience. They can work great for landing pages or other pages where you need more design flexibility (but we normally don’t recommend using them for basic blog posts).
Use the Built-in WordPress Editor
Your first port of call should be the native WordPress Editor. You can access it by going to Pages → Add New.
The native editor uses a ‘block’ system, which lets you incorporate multimedia content, as well as basic layout options. You can check out this post to learn more about how blocks work:
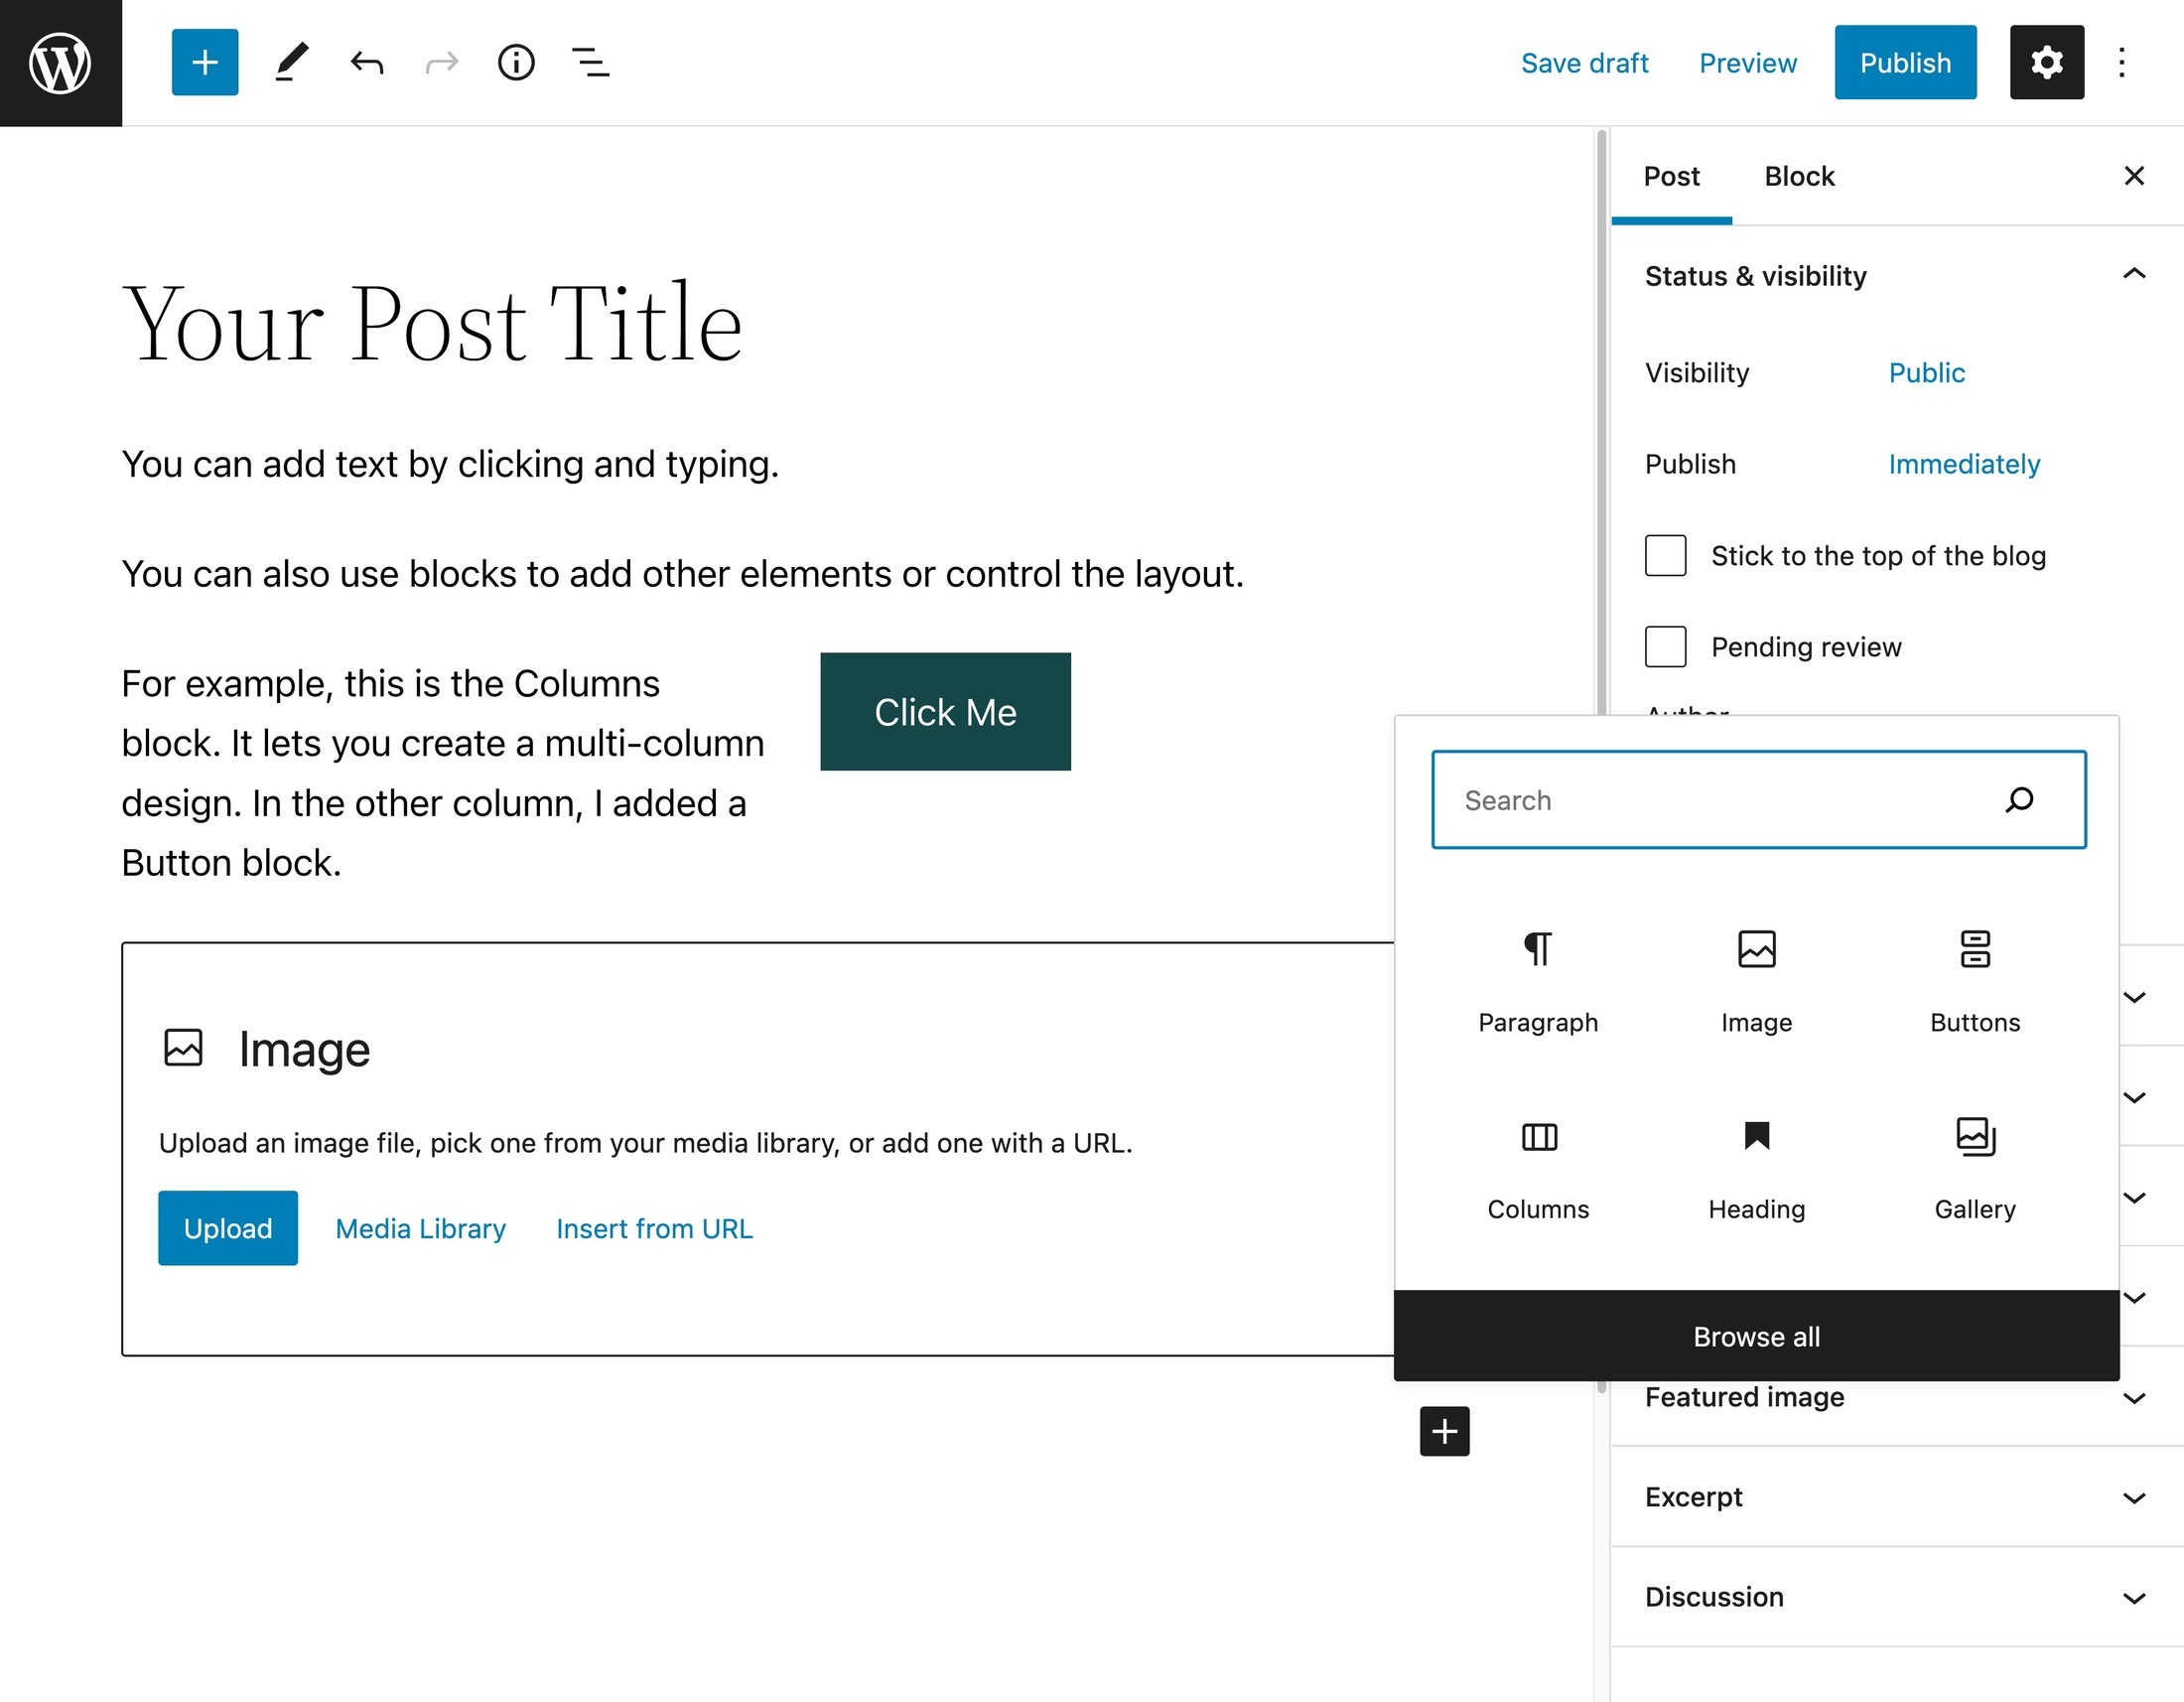
It’s a great place to start and, if your desired layout isn’t complicated, it may be all you need.
If, however, you want something with a little more design power, you may want to turn to a WordPress page builder plugin.
Install a WordPress Page Builder Plugin (Optional)
A page builder plugin gives you a visual interface where you can create more complicated layouts using a simple drag-and-drop system. If you’ve ever tried a website builder, such as Squarespace or Wix, a page builder plugin brings that same type of experience to WordPress.
While there are a lot of great WordPress page builder plugins, Elementor (our review) is a great starting option because:
- it offers a generous free version that can help you to design complex pages without paying a dime
- the interface is pretty easy to pick up.
Here’s an example of what it looks like to design a page with Elementor:
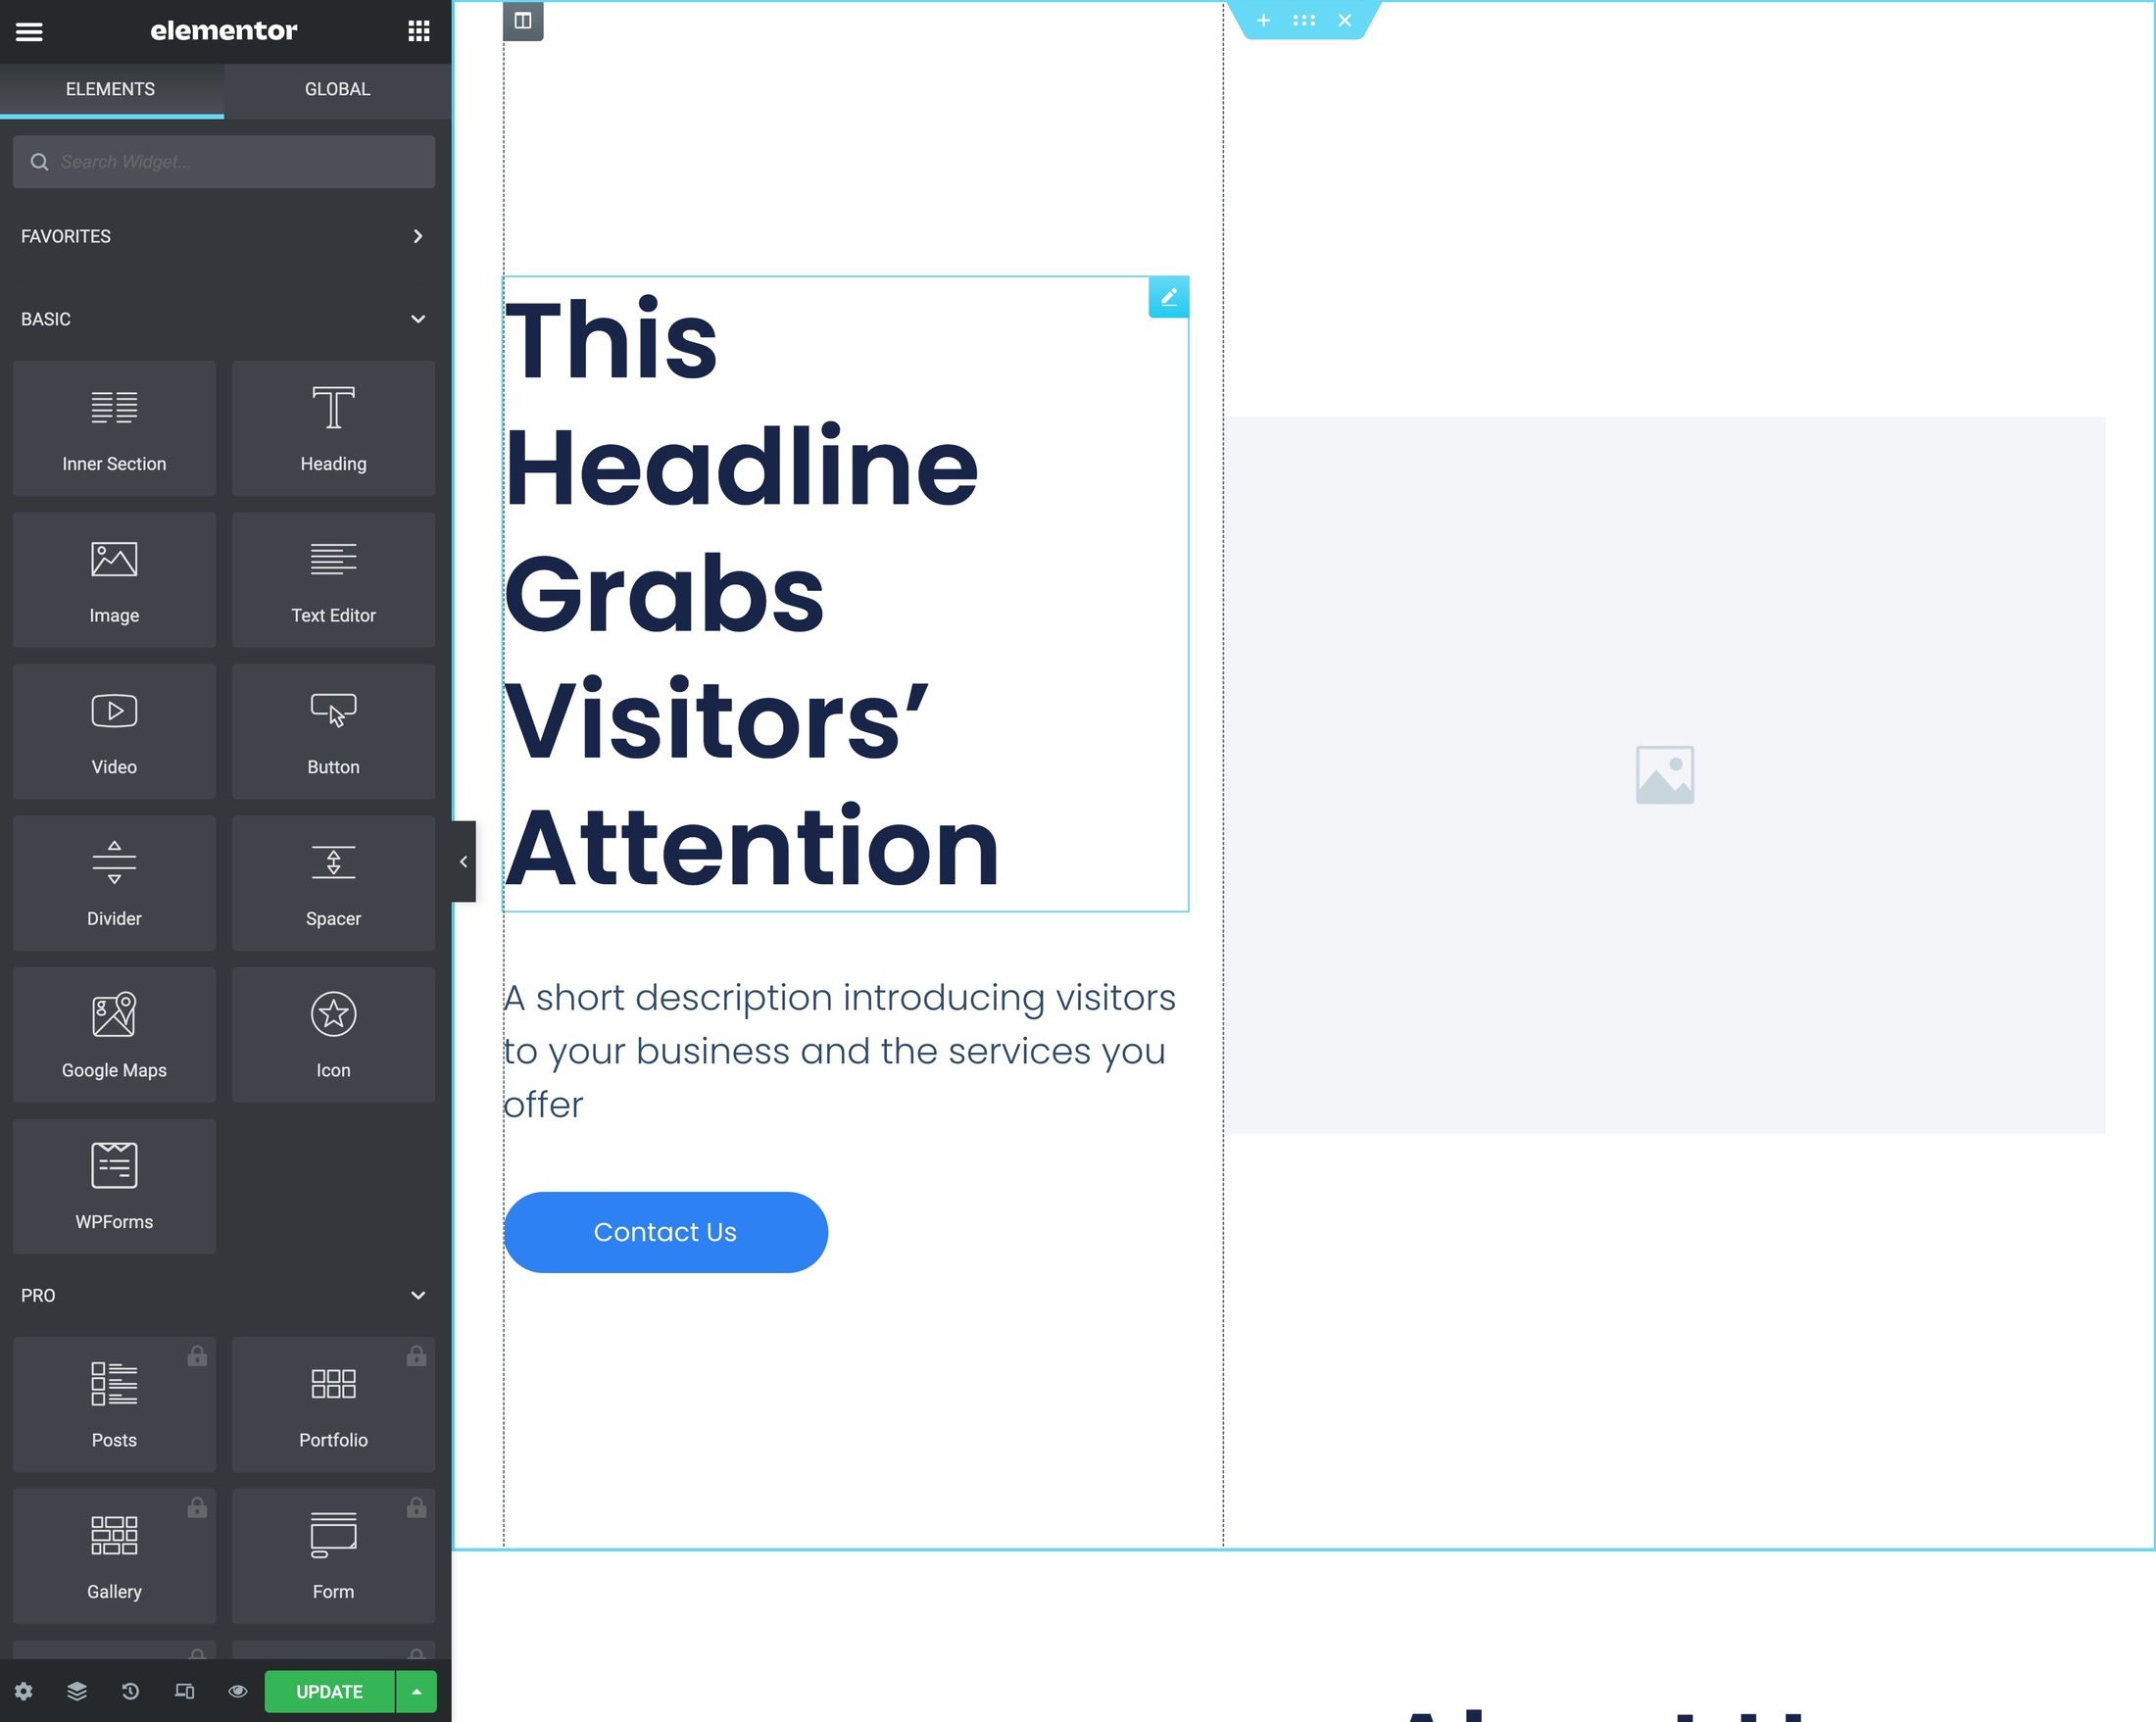
Notice how you’re able to see exactly how your page will look to visitors? That, along with drag-and-drop and more style/layout options, is the big appeal of page builder plugins.
STEP 8: ADD MORE PLUGINS AS NEEDED
In addition to the must-have ones mentioned earlier, you’ll probably want to install some plugins to address the unique needs of your WordPress site.
👉 Action Steps:
- Browse the various plugin marketplaces for free and premium plugins with the features you need.
- Read a plugin’s reviews carefully to make sure it’s a high-quality extension.
- Install these plugins on your site (if you think they’ll make a meaningful improvement).
In Step 5, we took you through some of the must-have WordPress plugins that all sites need. However, you’ll probably also want other plugins that are specific to your site’s needs.
At this point, you should do some exploring to find plugins that will add helpful functionality to your site.
For example, if you’re active on Instagram, you may want an Instagram feed plugin to display your latest Instagram posts on your website.
Or, if you host a lot of events, you may want an events calendar plugin.
So, where can you find such plugins?
A great starting point is the official WordPress.org plugin directory. It contains over a staggering 60,000 plugins, so you can probably find something relevant to your site.
Many of these plugins are 100% free, while you’ll also find some that have a limited free version, along with extra functionality if you’re willing to pay.
Beyond WordPress.org, you can also find tons of premium WordPress plugins at CodeCanyon.
For more curated lists, we’ve also written a bunch of posts that collect plugins for important use cases. Here are some good posts to consider:
- Social media plugins
- Contact form plugins
- Search plugins
- Popup plugins
- Affiliate plugins
- Table plugins
- Membership plugins
- Commenting plugins
- Translation plugins
- Email newsletter plugins
- Donation plugins
You can find even more helpful plugin lists such as these by browsing the Plugins category of WinningWP.
⚠️ Just one warning: While it’s totally fine to install more plugins, you’ll want to be careful about only installing plugins you really do need. If you install too many unnecessary plugins, and those plugins aren’t optimized, you can ‘bloat’ your site, which may make it slow to load or more likely to have compatibility issues.
There’s no hard limit on the number of plugins you can use — just make sure each plugin adds real value to your site.
Congratulations! You Just Made a WordPress Website
And with that, you officially have a working WordPress website with a great design and all of the important functionality you need.
Of course, there’s a good chance you’ll want to keep tweaking your site’s design, browsing plugins, adding content, and so on.
But, in terms of the core foundation of your website, you’re all done!
FAQs About How to Get Started With WordPress
Still have questions? Here are some of the most common questions about how to get started with WordPress. Or, you can also check out our full 60+ question WordPress FAQ page.
The easiest way to get started with WordPress is to use a web host with a beginner-friendly dashboard and a one-click WordPress installer. From there, use a multipurpose theme with importable demo sites, such as Astra or Kadence Theme. With this approach, you can have a great-looking website in under an hour.
WordPress makes a great option for beginners and even non-techies can build great-looking sites with WordPress. You can build your site without ever looking at a line of code and access tons of resources and tutorials to learn more about WordPress.
Setting up a working WordPress website only takes around 30 minutes. From there, you’ll spend the rest of your time adding content and tweaking your design, which can take as long as you want it to.
For a basic WordPress site, you can pay as little as $60 per year for running your site. However, you might want to spend extra money on premium themes and plugins. Plus, as your site grows, you might need to upgrade to more high-performance hosting, which will cost more money.
A lot of the difficulties of WordPress come from its open, self-hosted nature. However, these difficulties are also what allow you to have so much flexibility when building your site with WordPress. So, yeah — we know that some stuff can be a little annoying, but we promise the learning curve is worth it because these “difficulties” actually give you so much control over your site.
Website builders aren’t better or worse than WordPress — they’re just different. They do some things better, but some things a lot worse. For most people, WordPress is a better option, but website builders can be great for simple sites. We have a comparison that might help you decide — WordPress vs Squarespace vs Wix.
Enjoy Your New WordPress Site!
Congrats! If you’ve made it to this point, you should now have a working WordPress website that’s customized to your needs.
Now, it’s time to learn more about WordPress and grow your website. To that end, we have a reading list with some helpful blog posts and tutorials:
- Glossary of Common WordPress-Related Terms and Phrases
- How to Speed Up WordPress — a Comprehensive Guide
- How to Update, Maintain and Troubleshoot WordPress
- How to Set Up an Email Address for Your Own Domain Name
Do you still have any questions about how to get started with WordPress? Let us know in the comments and we’ll try to help!


All comments are held for moderation. We'll only publish comments that are on topic and adhere to our Commenting Policy.