

How to Set Up an Email Address for Your Own Website Domain Name
How can you set up an email account for your domain name? What’s involved, which services should you use and what are the various costs? What about security? The goal of this guide is to answer all of these questions and more! (Note: For guides on other aspects of setting up a WordPress-powered website, take a look at our WinningWP Guides page.)
-Note: WinningWP content is free to all. If you make a purchase through referral links on our site, we earn a commission (learn more).
Having an email account for your domain name is essential. Whether you’re doing business online, managing a team, or just want to look that bit more professional, this really is a must-have!
Setting up an email account for your domain name has long seemed a technically daunting feat, but, luckily, with advances in technology, it's all much easier nowadays. You can use a third-party company that will take care of all the technicalities and security, so all you really need to do is the initial setup. Such services are also generally available for free or for a relatively small monthly cost.
A domain name is a website address, and we’ll continue the guide assuming you have one already. If you don’t, then see our guide on how to choose a great domain name for your website before continuing.
If you’re ready to go, let’s get to it! This guide will show you everything you need to know about setting up an email account for your domain name.
Why Should You Set up an Email Account for Your Domain Name?
Why bother with this at all? What’s wrong with using the email address you already have? There are a number of great arguments for setting up an email account for your domain name. Let’s run through them:
- Emails coming from your own domain look professional, much more so than emails from a free email service such as Gmail, Hotmail, or Yahoo.
- You can have multiple email addresses for different parts of your business. You may, for example, have one email for presale inquiries, another for support, and a third for existing customers. Even if you just have one person checking all of these, you'll be able to prioritize each inbox differently as appropriate.
- If you have a team, everyone can communicate using an 'official' email account using your domain name. Plus, all email archives will be in one place where administrators have access if needed.
If you have a domain name, you should be using an email account with that domain name, as it’s worth setting up for the professional look alone. So how do you do this? We’ll discuss the options available to you, as well as the pros and cons of each.
How Should You Set up an Email Account with Your Domain Name?
Let’s get this out of the way first: Your best option for setting up an email with your own domain is to use an externally hosted email service.
An externally hosted email service will handle everything for you, offering the security and reliability that are crucial when dealing with email.
The best externally hosted email service is Google’s G Suite. G Suite offers Gmail-style email along with a calendar, a document editor, and online storage -- all on your own domain from $5 per user per month. We’ll show you everything you need to know to set up G Suite later in this guide.
If you’re trying to keep costs down, external email hosting service Zoho offers many similar features to G Suite, but with the option of opening a basic account free of charge. This guide will also cover everything you need to set up Zoho later on.
You may have noticed your hosting provider also offers free email services. Indeed, most shared hosts, such as SiteGround, DreamHost, and Bluehost offer free email at your domain out of the box (managed hosts such as WP Engine typically don't offer email). These are okay as a temporary solution while you’re starting out, but we don’t recommend them for the long term: Shared hosts rarely offer the same reliability and security found with email hosting services. For instance, you won’t get the two-factor authentication that will keep your email safe, and unreliable spam settings can cause you to miss important business while failing to catch actual spam. You’ll also experience limited storage, and typically have to use poorly designed desktop and mobile user interfaces.
A domain email offered by your web hosting provider is okay to start with, or if you only email occasionally, but an external email hosting provider will do a much better, more pleasant, and more reliable job. For those reasons, we’d recommend using an external email host. We’ll now look at the best external email hosting providers and how to set them up, as well as how to set up email provided by your web host.
How to Set up G Suite with Your Own Domain
G Suite, formerly known as Google Apps, lets you use Google’s productivity suite -- including Gmail, Docs, Calendar, and Drive -- with your own domain name. Even if you’re only interested in the email, G Suite is by far the best solution available for setting up an email account with your own domain.
G Suite offers a number of features that its competitors can’t match:
- Reliability: Essentially, you won’t need to worry. Your email is always going to work; you’ll receive all emails sent to you, and the deliverability of emails you’re sending others will be excellent as well.
- Security and privacy: Google obviously takes this very seriously, and you get all of the security benefits Google uses for all of its products. You also get reliable two-factor authentication.
- Spam prevention: Gmail’s spam prevention and machine learning are the best offered by any email service. With G Suite, you get to use this for your domain’s email.
- 24/7 support: This isn’t a game-changing offer, but the advantage of using a company of Google’s size is obvious when it comes to support -- you can phone someone at any time of the day and get an answer.
G Suite is more expensive than its competitors, but at $5 per user per month, it’s not going to break the bank. This is the best option if you need a serious email to go with your domain name.
Setting up G Suite to provide email with your domain name requires a couple of steps: Registering for G Suite and setting up your domain.
Start by heading to the G Suite signup page and following the prompts. Enter your business name, number of employees, location, and an existing email address so you can be contacted. You’ll be asked if you already have a domain name. Click Yes, and enter the domain. You’ll need to choose a primary email account (you can change this later -- for now, either your name or [email protected] will do) and agree to the terms of service, and then you’re good to go.
You’ll now be prompted to set up G Suite. The setup guide will ask you to add any extra users to your account before continuing. You only need to add extra users here; if you just have multiple email address aliases, these can be added later on. Note that once the trial period is over, you’ll need to pay for each user. Once you’ve added everyone, check the box at the bottom of the page and click Next.
The next step is to verify that you own the domain you’ve added. There are a couple of ways you can do this: Add some code to your site’s homepage, upload a file to your site, or add a verifying note to your domain name.
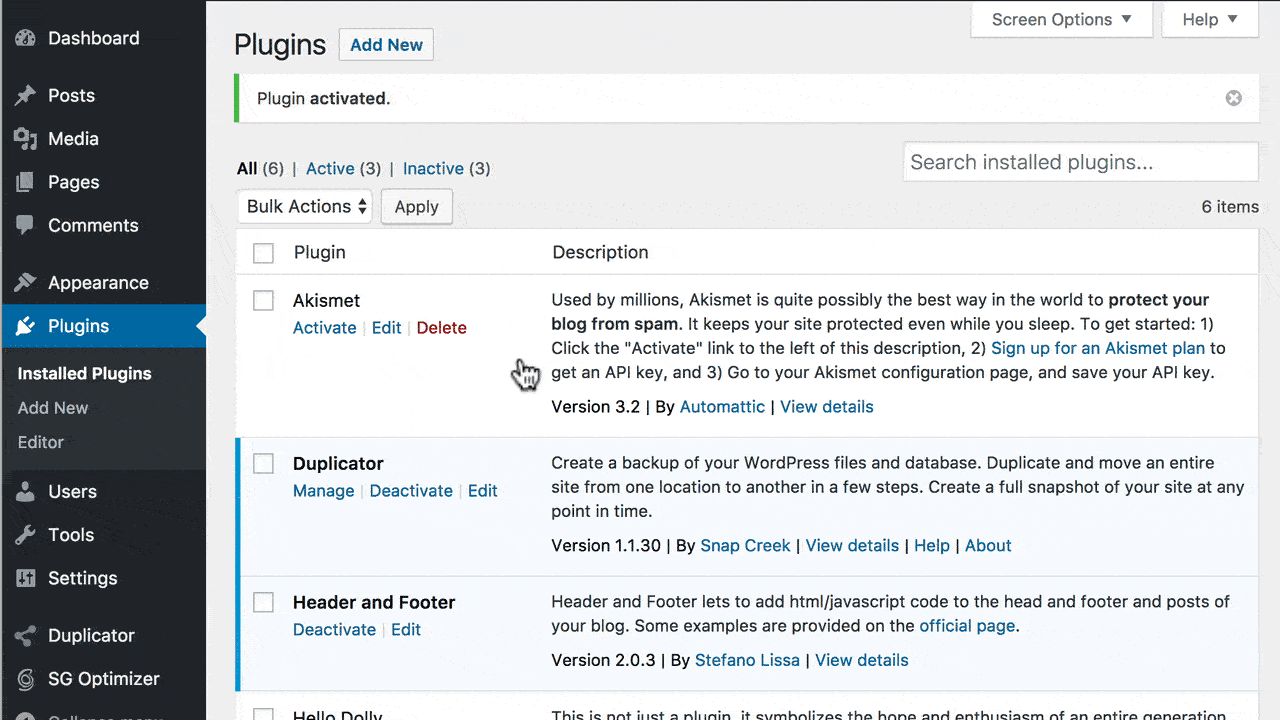
Adding code to your site’s homepage is easy to do with WordPress. Head to your WordPress Dashboard, then Plugins → Add New and search for Header and Footer. Install and Activate the plugin. Now, head to Settings → Header and Footer and paste the meta tag verification code from G Suite into the '<head> Section Injection', 'Only Homepage' box. Save, return to the G Suite setup, and tick the box confirming you’ve added the meta tag.
If you don't have WordPress installed or can’t add the plugin, the easiest option is to add a verifying note to your domain name. Under 'Choose a different method', select the option to add a domain host record. Head to the site you purchased your domain name from, and log in.
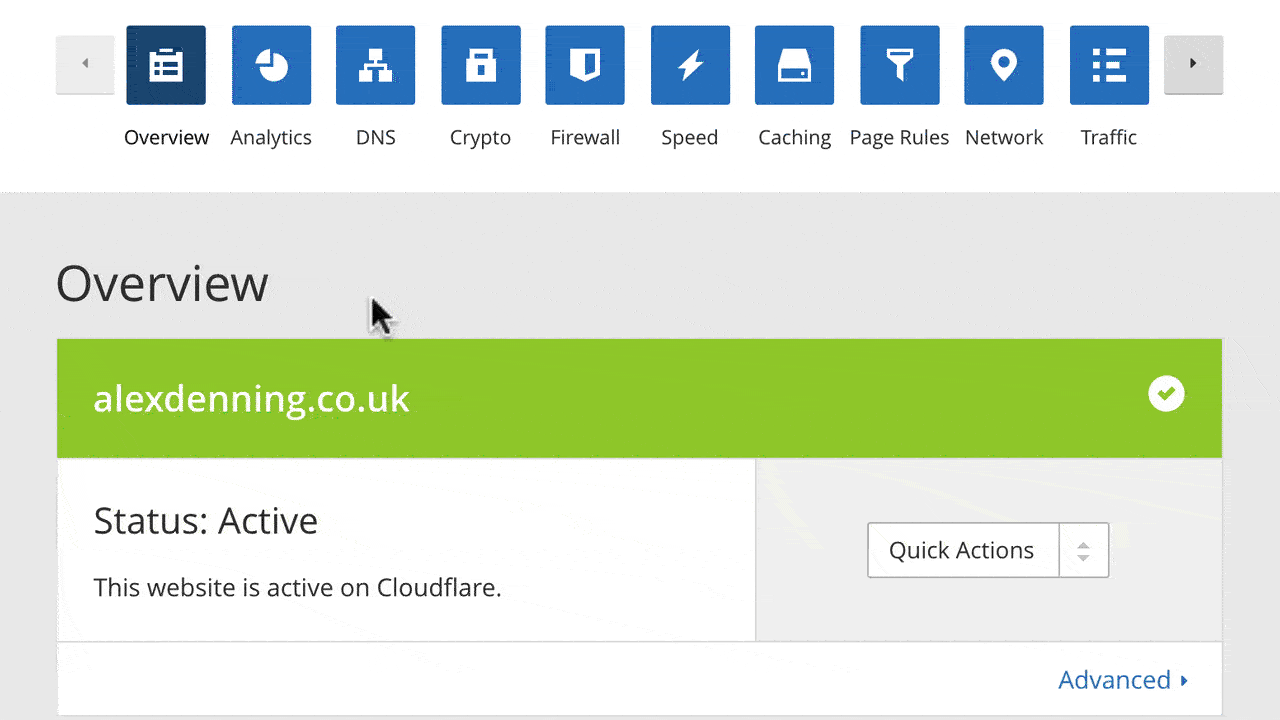
If you’re using our favorite WordPress host, WP Engine, with your domain routed through Cloudflare, you can add a verifying note to your domain name by logging into Cloudflare and clicking DNS from the top menu. Change the dropdown to TXT, add @ as the Name and click to configure the content, copying and pasting the verification code created by Gmail. Add Record, and you’re done.
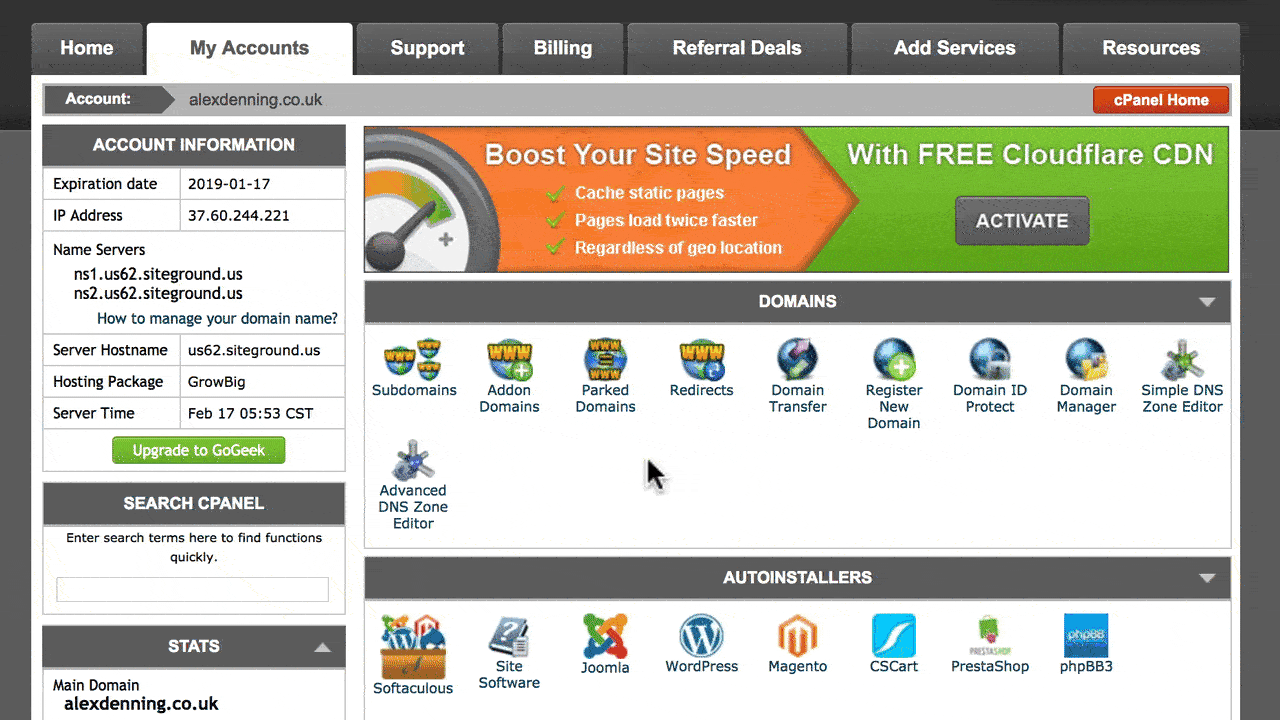
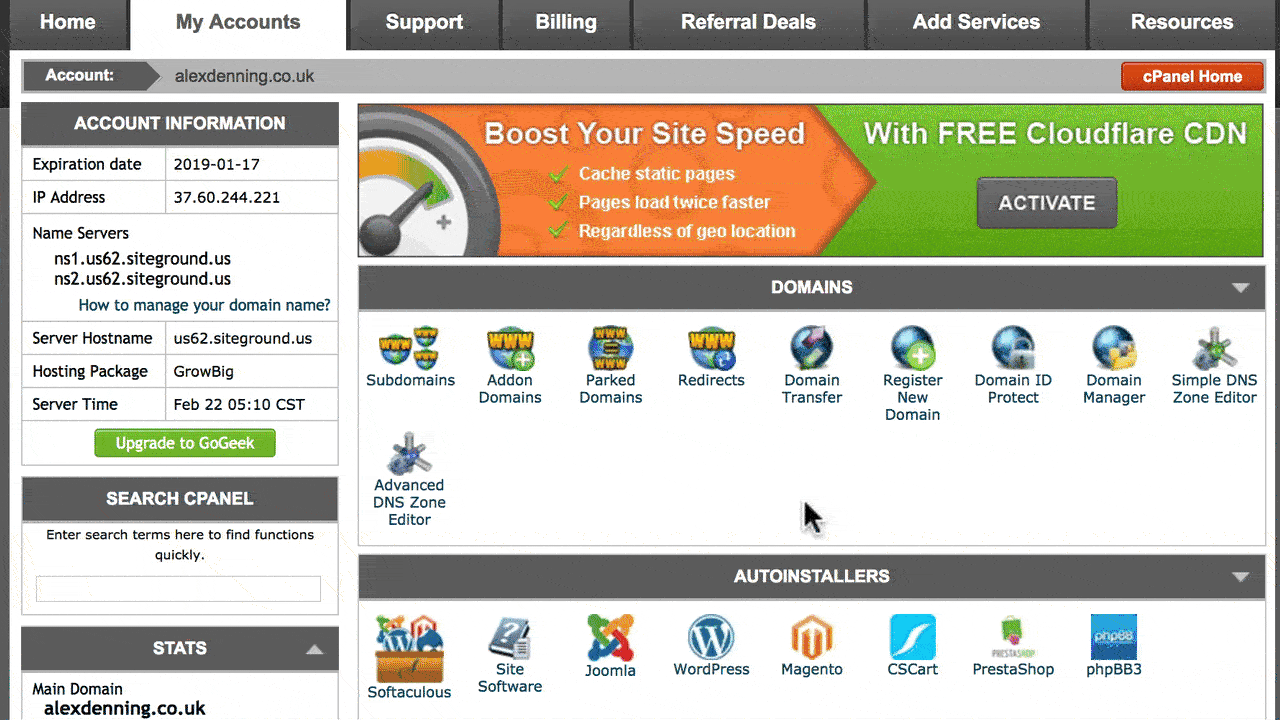
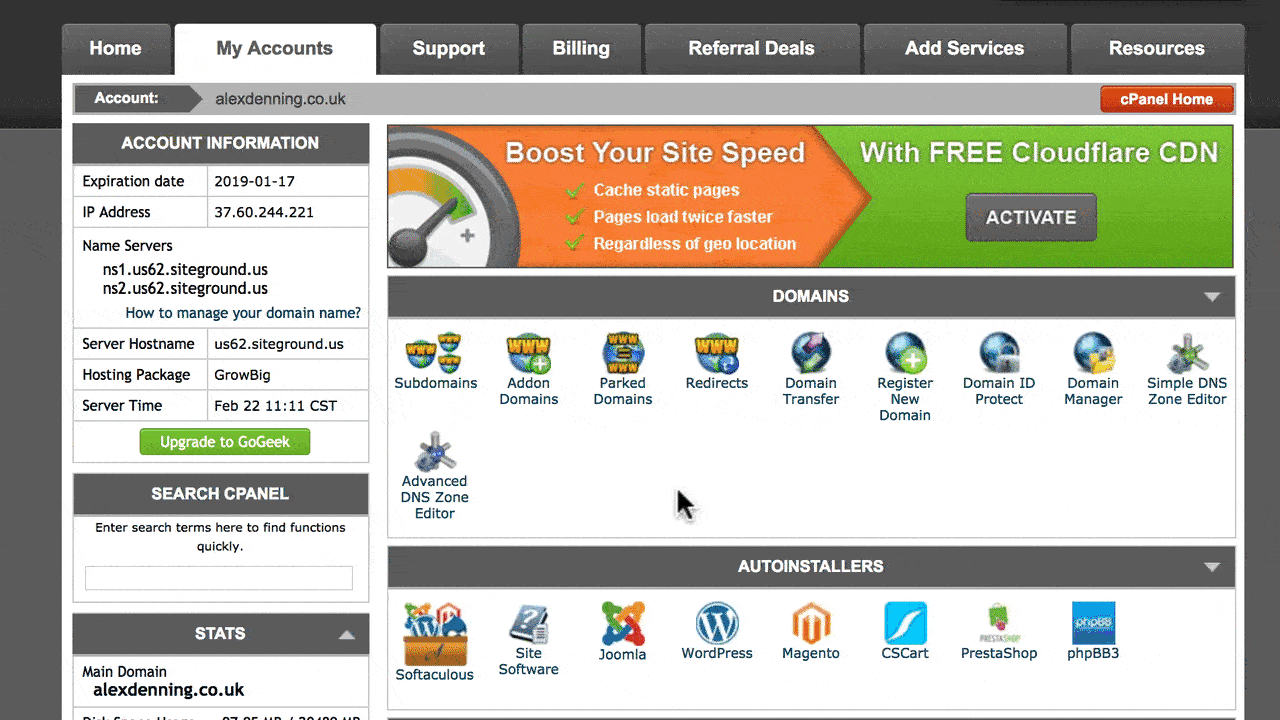
Alternatively, if your domain is registered with our preferred shared WordPress host SiteGround, you can verify your domain through cPanel. This is similar to many other hosts that offer domain services. From the SiteGround Dashboard, go to My Accounts → Information & Settings → Access cPanel. Under Domains, click Advanced DNS Zone Editor. Add a new record: The name should be your domain name, in the TLL field enter 14400, set the type to TXT, and finally, in the TXT Data field, add the verification code from G Suite. Once done, Add Record. If you get stuck, Google offers detailed instructions for nearly every single domain registrar.
Once you’ve verified your domain name, we need to let G Suite access it so it can send emails. If you’re using a managed host (such as WP Engine), which has your domain running through third-party security service Cloudflare, you’ll need to add these details through Cloudflare. Otherwise, add the details using your domain registrar’s dashboard.
Adding your domain to G Suite through Cloudflare involves a couple of easy steps. Log in to Cloudflare, select your domain, and click DNS from the top menu. Next, scroll down and look for any entries with the type MX. If you find any of these, delete them by clicking the X.
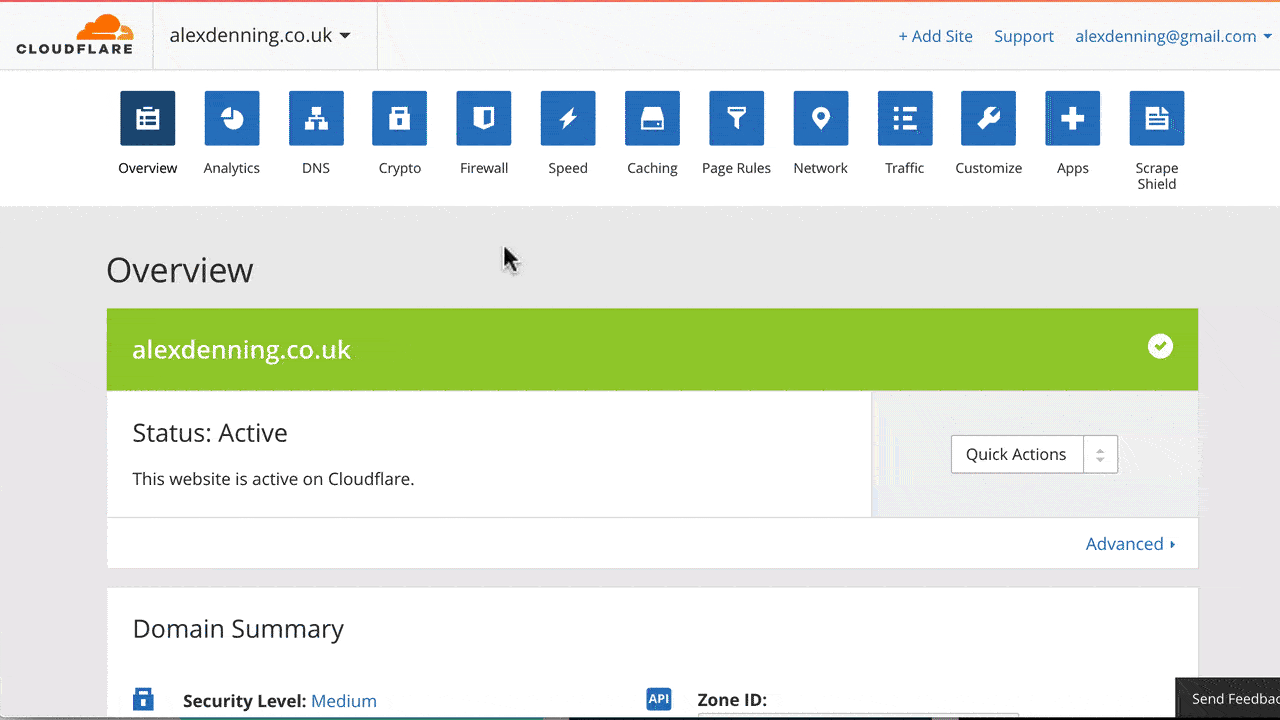
You now need to add new records to connect your domain to G Suite. These all have the type MX, so select this from the drop down at the top of the page. Enter @ in the name field, then click the 'Click to configure field'. Enter ASPMX.L.GOOGLE.COM as the server and set the priority to 1. Save, then Add Record. Now repeat, adding all of the servers and priorities below (@ is in the name field for all of these):
- Server:
ALT1.ASPMX.L.GOOGLE.COM. Priority: 5. - Server:
ALT2.ASPMX.L.GOOGLE.COM. Priority: 5. - Server:
ALT3.ASPMX.L.GOOGLE.COM. Priority: 10. - Server:
ALT4.ASPMX.L.GOOGLE.COM. Priority: 10.
Once you’ve added all of these, you’re done!
For domains registered with SiteGround -- and any other registrar using cPanel -- log in to cPanel and MX Entry. Then click Set Google MX, and, in an instant, everything will be set up! You now just need to wait for the changes to take effect.
The process for adding these MX records to domains with other registrars is very similar: Log in to your domain registrar, head to DNS settings, delete any existing MX records, and then add the MX records above. If you need assistance, Google has details on how to do this with nearly every domain registrar.
With MX records added, head back to the G Suite setup wizard and tick all of the boxes, then Verify and Complete. Google will now set everything up -- a process that can take an hour or so. Separately, it can take your domain registrar a couple of hours to update your domain’s records -- until this has happened, you won’t be able to send any emails using your domain name.
Leave the setup page open or head back to admin.google.com later on. Once the setup is complete, you’ll need to choose a plan. G Suite Basic costs $5 per user per month, and will likely offer all of the features you need. Select this, confirm the number of users you need, and then enter your payment details (you’ll only be charged after the two-week trial period). You’ll be upsold some extra apps that can be skipped, and then you’re in!
We can now set up your G Suite Gmail. General settings are available by clicking the sidebar menu and heading to Apps → Gmail. You’ll also find a link to your G Suite Gmail login page, with the format mail.google.com/a/yourdomain.com. Head to this page, and then bookmark it as you’ll need it a lot. Note: All other G Suite services, such as Drive and Calendar, can be accessed using the same format -- so your G Suite Drive login can be found at drive.google.com/a/yourdomain.com.
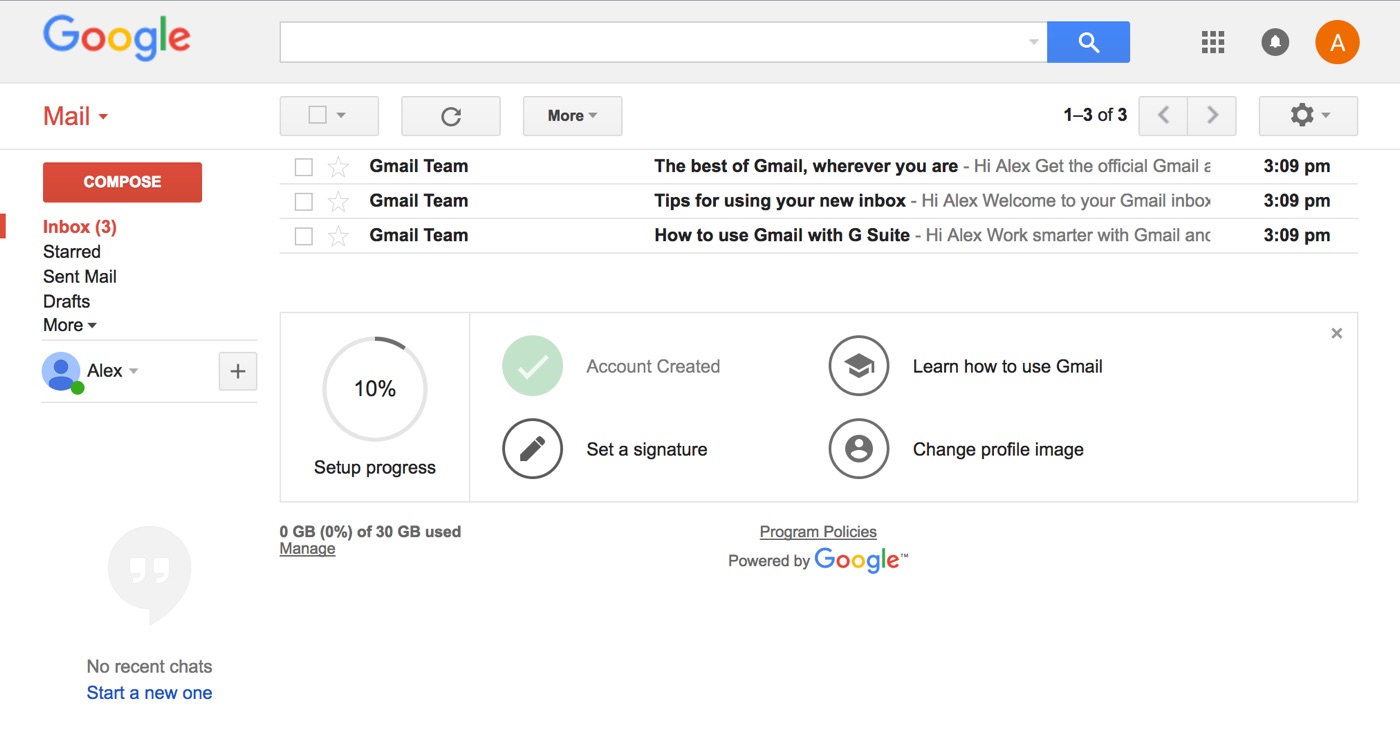
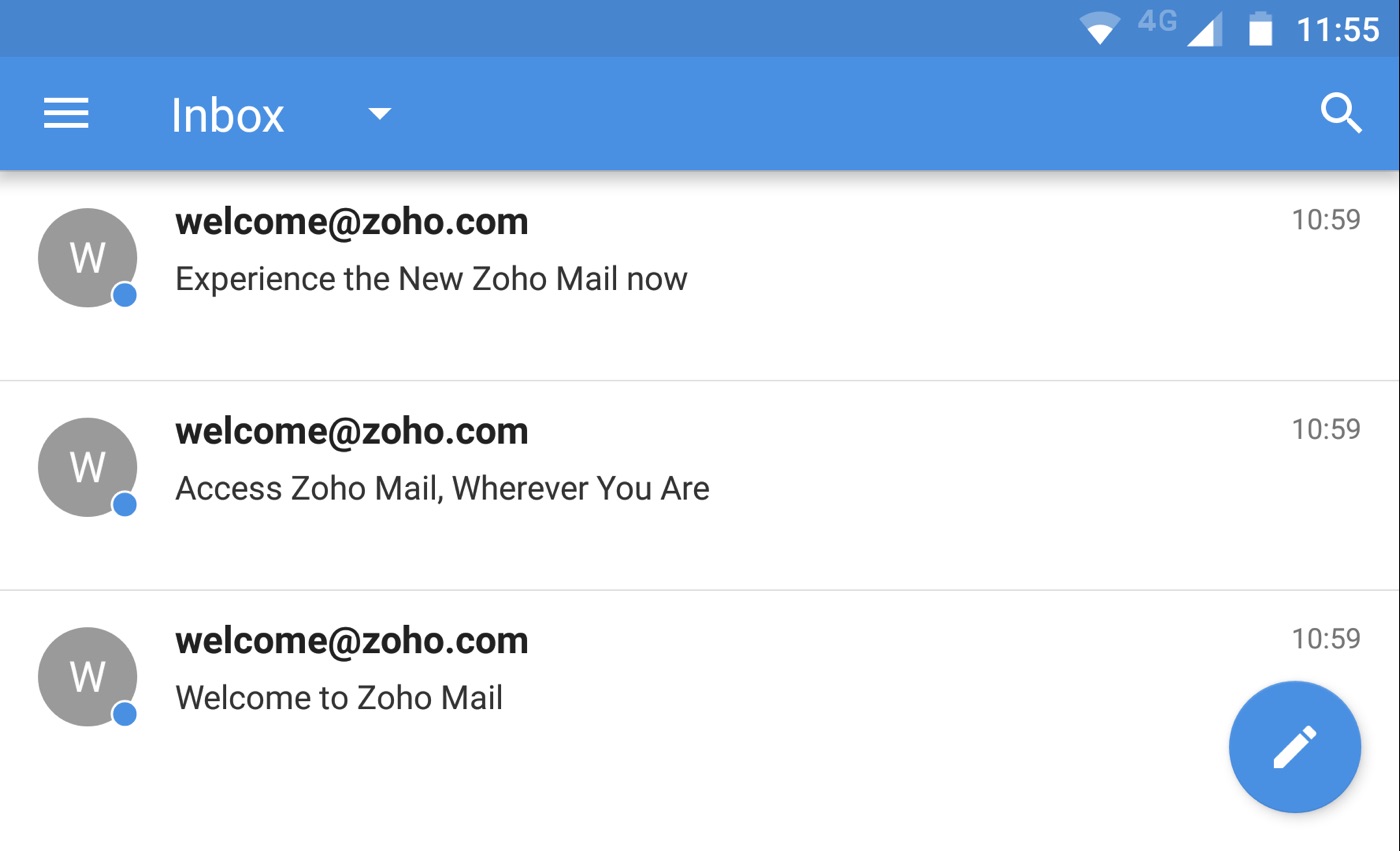
Your new inbox will have a couple of welcome emails already, but, before you continue, it’s time to test out your email!
To do this, send an email from your old account to your new one.
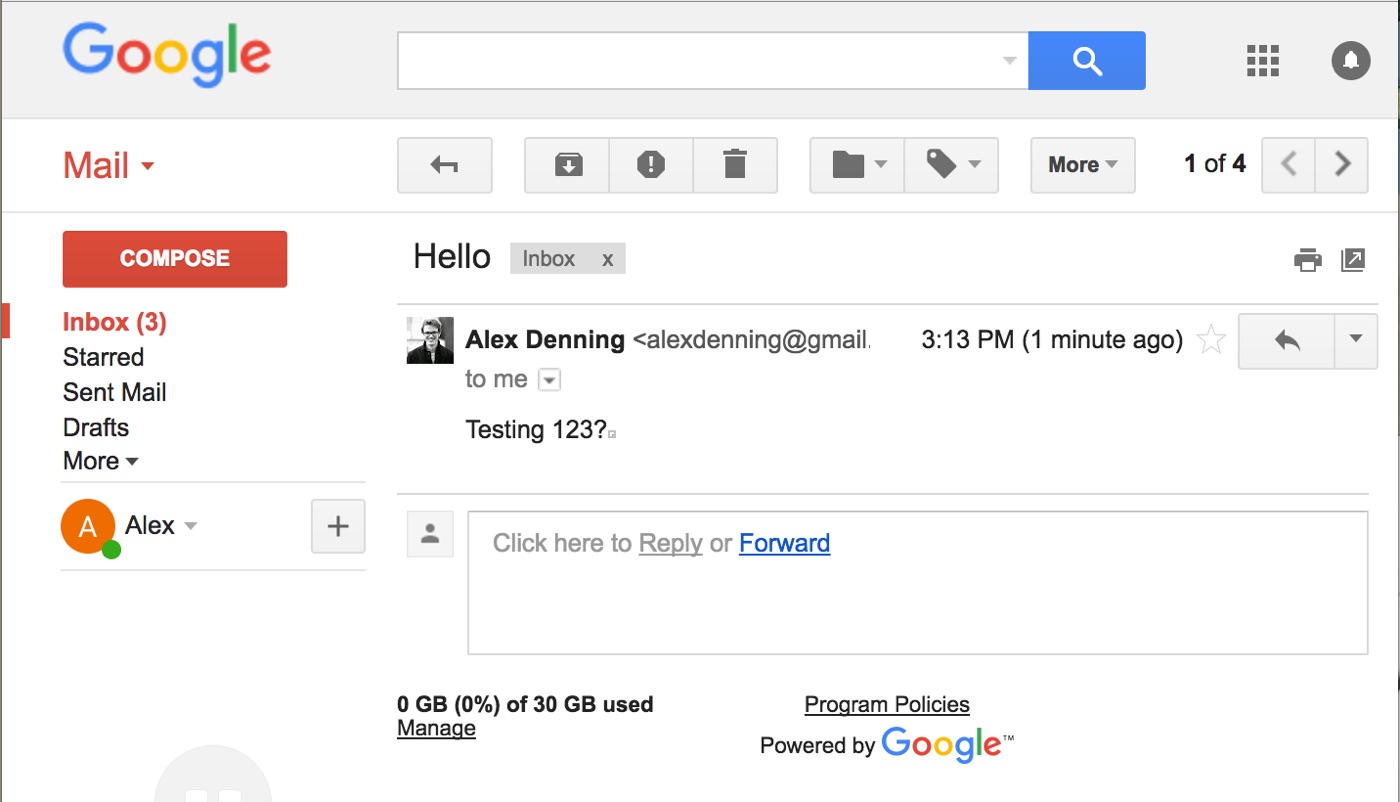
Your email should show up right away; if it does, you’re in business! If it doesn't, head back to admin.google.com and look for a message about your domain setup. It may just need a couple more hours to take effect.
By default, G Suite uses the Gmail setup, but, if you’d prefer to use Google’s newer Inbox webmail, you can activate this by heading to the G Suite Admin, navigating to Apps → G Suite → Gmail → Advanced settings and ticking the two boxes under the Inbox by Gmail heading. Save changes, and after up to 48 hours you’ll be able to access your G Suite Inbox at inbox.google.com/a/yourdomain.com.
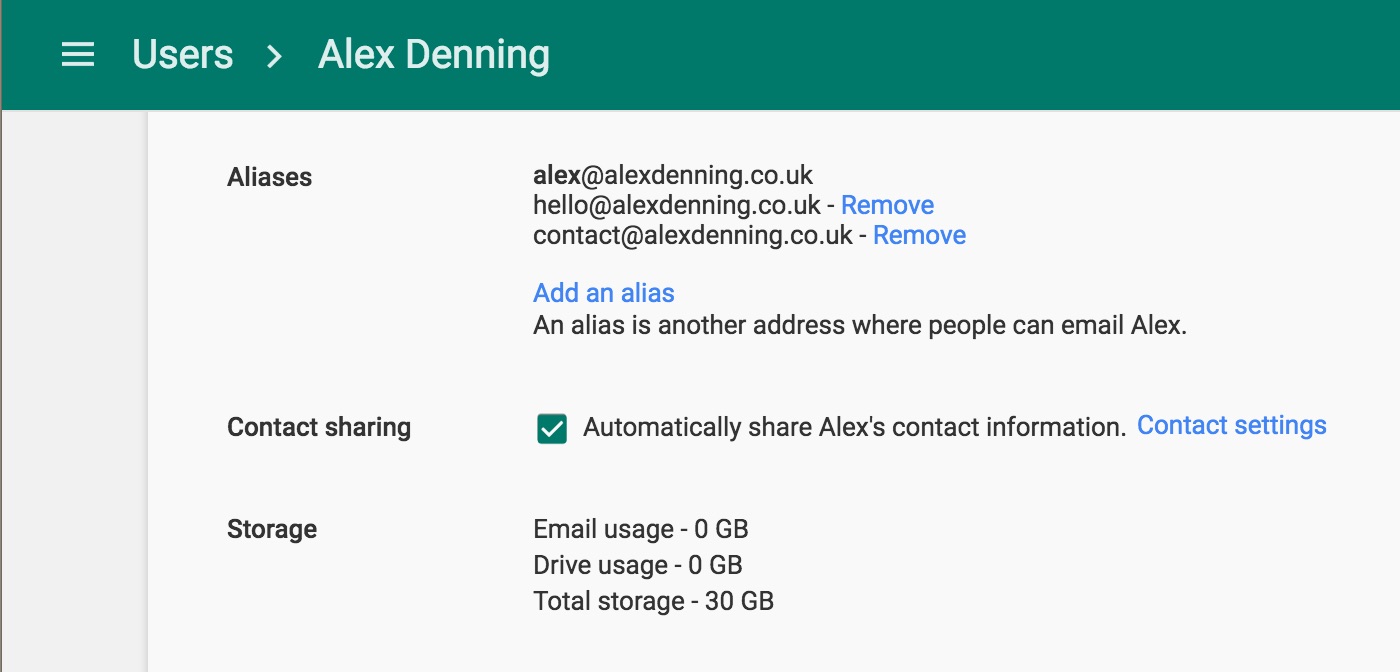
There are now a couple of other bits of setup to handle. You can add aliases by heading to the G Suite Admin, clicking Users → your user → Account → Add an alias. You can have as many of these as you want, but you'll still use your primary account to log in to G Suite. Enter the email address you want, and press enter to save.
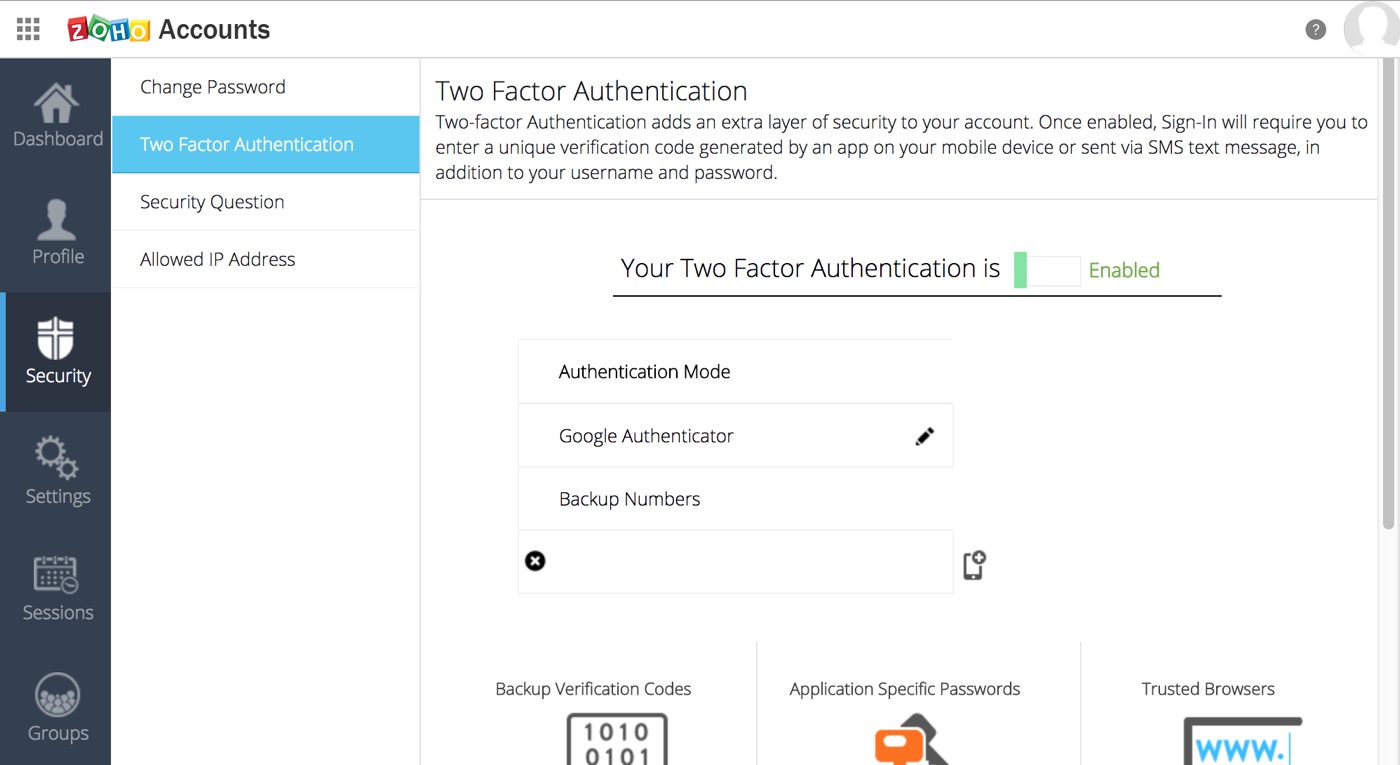
You should also set up two-factor authentication for your G Suite account. Two-factor authentication is a security system that requires two pieces of information to access your account -- your password and a temporary code -- which vastly increases the security of your account. One of the strengths of G Suite is its compatibility with the vast array of two-factor authentication options Google offers, including the Google Authenticator app you may already be using.
Activate two-factor authentication by heading to the two-factor page, making sure to log in with your G Suite account. You’ll need to enter your phone number so you can log into your account without the Authenticator app -- you can choose either text message or phone call. Right away, you’ll be contacted using your chosen method, and will need to enter a verification code on the next screen. Once verified, turn on two-factor.
You’ll now want to activate and print out (or write down) backup codes. These can be used to log in to your account, so keep them in a safe place.

You can also set up the Google Authenticator app to get codes more conveniently. Click Set Up, select Android or iOS, and download and run the Authenticator app (Android or iOS). Press the plus sign in the app, then scan a barcode. Hold your phone up to the screen, wait for a beep, and then press Next. You’ll have your G Suite account added, along with a set of codes that refresh every 30 seconds. Enter the code shown next to your G Suite account on the next page, and press Verify. You’re now all done!
If you have multiple users, you can force them to use two-factor authentication by heading to the G Suite Admin, clicking More Controls → Security → Basic settings → Advanced settings to force two-factor authentication, and turning on enforcement either right away or from a certain date. Within 48 hours, all users will be forced to set up two-factor authentication, keeping their accounts secure.
G Suite offers tight integration on Android and iOS. Add your account to your Android or iOS devices, and you’ll be able to use Google’s apps to access your G Suite from anywhere.
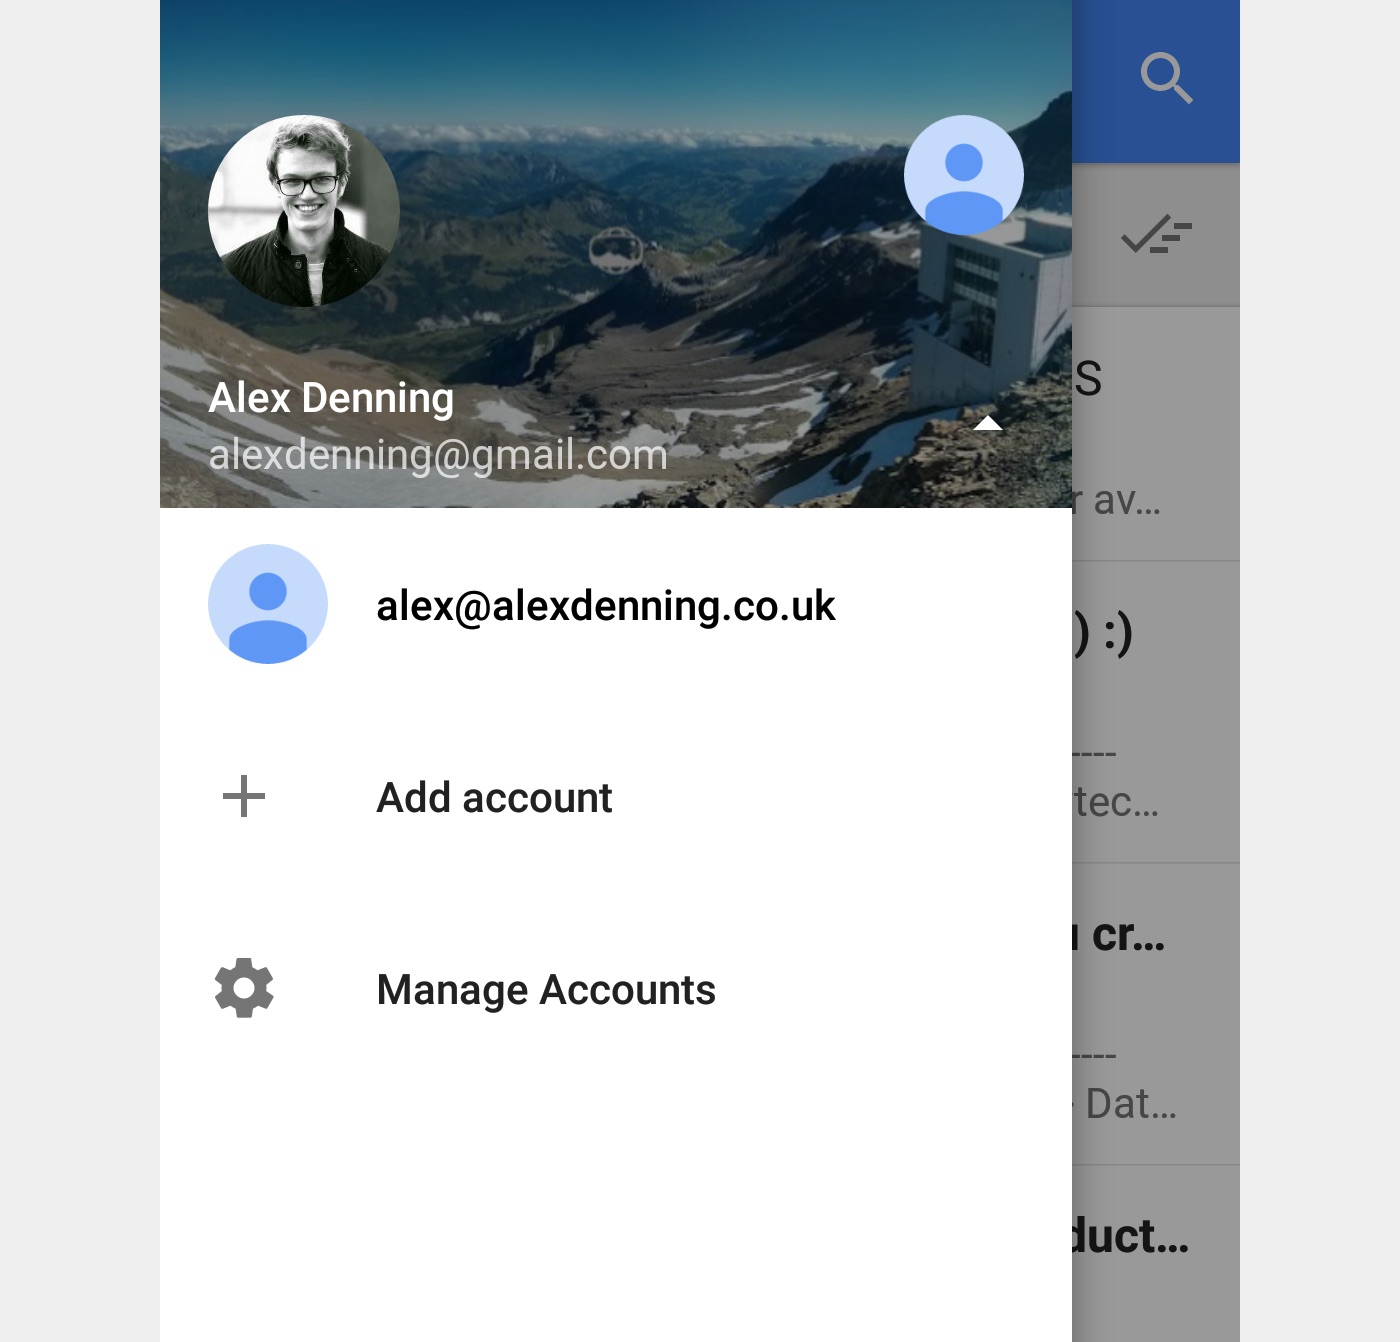
On Android, add your account by tapping Settings → Accounts → Add account → Google and logging in with your G Suite account. You’ll then be able to launch Gmail, Google Calendar and Google Drive, and access your G Suite account -- just use the left sidebar to switch from your default Google Account to your G Suite account.
On iOS, the setup process is slightly more complex, but you only need to do it once. Tap Settings → Mail, Contacts, Calendars → Add Account → Exchange. Enter your primary G Suite email address and password, then touch Next. In the Server, enter m.google.com but leave the Domain field empty. In the Username field, enter your primary G Suite email address again. Your password should be entered already -- if not, add it again. Note that if you’ve set up two-factor authentication already (hooray!), you’ll need to generate an application-specific password and use this instead of your regular password.
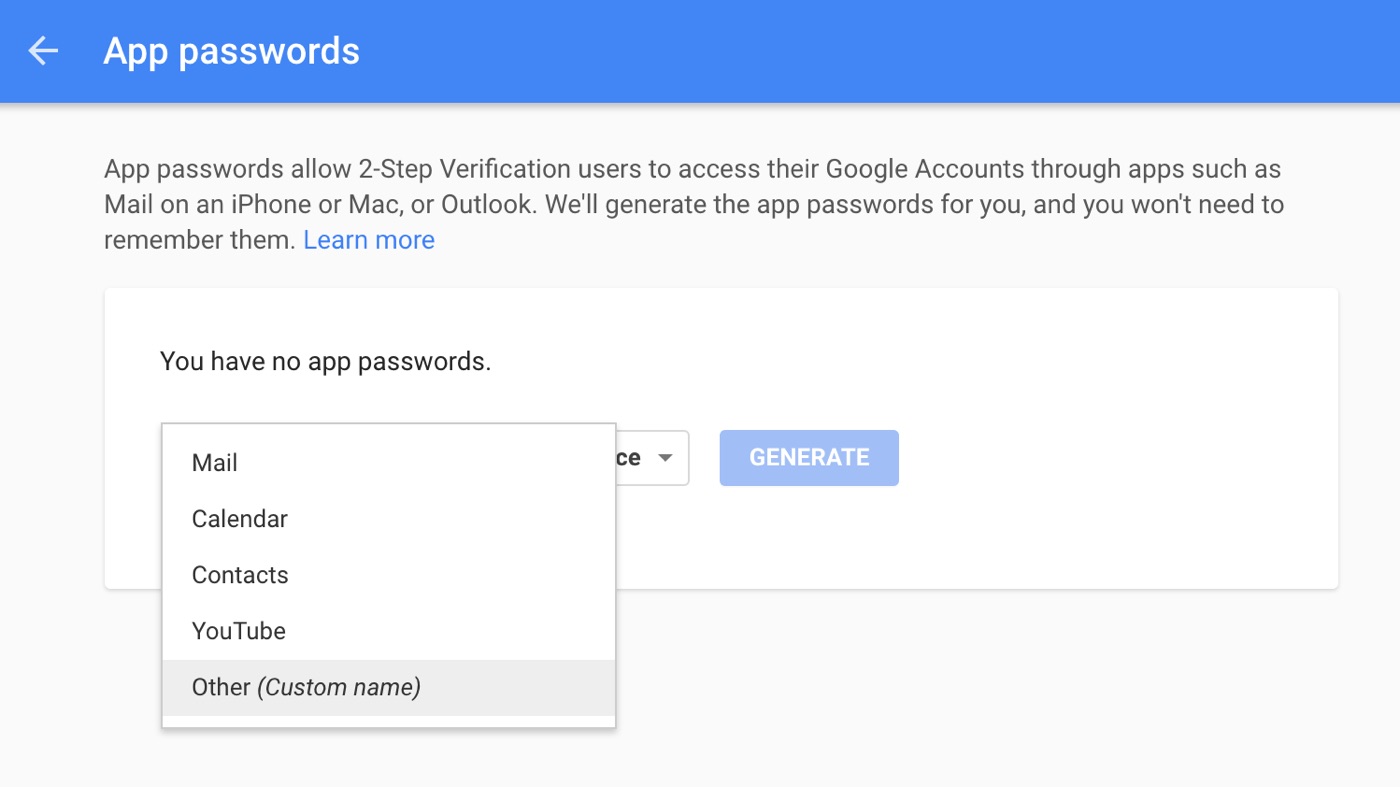
Create your application password by heading to Google’s Security page → App passwords, making sure to log in with your G Suite account rather than regular Google Account. Select Other from the dropdown, and then enter the password you’re given into your iOS device. Finally, select the Google services you want to sync (select at least Mail) and save. You’ll now be able to use the Gmail, Google Calendar, and Google Drive apps to access your G Suite account.
You may also want to set up G Suite with a desktop email client, especially if you’re already using one. This process is very similar for all email providers, so we’ll cover this separately later on.
G Suite is incredibly powerful, and by far the best choice for setting up an email account with your own domain name. It’s now a case of enjoying the world-class productivity suite and having your own domain name on it!
Zoho Is the Best Free Hosted Email Service
Zoho offers many similar features to G Suite, but, crucially, it offers a basic free plan that will get you hosted email at your own domain alongside a productivity suite. You miss out on Gmail’s world-class spam protection, only get a modest 5GB of storage, and generally only get basic controls, but if you don’t want to pay for email this is definitely the best choice.
It’s also worth noting that Zoho’s first paid tier removes a lot of these restrictions, adding more storage, security features and admin controls -- but not the same quality spam protection offered by Gmail -- and costs only $2 per user per month, a fee significantly lower than G Suite’s. If you want to start out on the free plan, but are concerned you’ll outgrow it, this option to upgrade later is another bonus for Zoho.
Let’s get started running through how to set up the Zoho free plan for email at your own domain. Head to the Zoho website and create a free account. Once signed up, select Mail, add your phone number for security if required, and then select the Lite plan.

On the next page, you’ll be prompted to enter your domain name. Do so here, then Continue. You now need to verify your domain. Continue the Mail setup to do this. On the next page, you’ll need to select where your domain is registered. This process is very similar to G Suite's. Zoho offers registrar-specific instructions for the most popular domain registrars, so you can select your domain registrar from the dropdown for further details. Note that 'WordPress' refers to WordPress.com blogs, and, while few popular shared web hosts that also register domains are listed, cPanel is, and a lot of shared web hosts use this for domain management.
If you’re using our favorite managed WordPress host, WP Engine, you’ll have your domain name routed through Cloudflare. Verifying your domain with Cloudflare is very easy: Log in, select your domain, and click DNS. Select CNAME from the dropdown, enter in the name field the Name / Host / Alias / CNAME value provided by Zoho, and in the Domain name field the address Zoho provides under Value / Points To / Destination. Add Record, and you can now head back to Zoho and verify. You’ll need to wait up to an hour for the verification to go through.

In the example above, the verification is done with our recommended shared WordPress host SiteGround. SiteGround uses cPanel for domain management, so from the SiteGround Dashboard, go to My Accounts → Information & Settings → Access cPanel. Under Domains, click Simple DNS Zone Editor. Add a new CNAME record: The name should be the Name / Host / Alias / CNAME provided by Zoho, and the CNAME should be the Value / Points To / Destination Zoho provides. Once done, Add CNAME Record. You can now head back to Zoho and Proceed to CNAME Verification. You’ll need to wait up to an hour for the verification to go through.
Once your domain is verified with Zoho, you’ll be prompted through a couple of setup steps, including creating your primary email address, and adding any other users and any group emails. If you want these, then set them up as prompted. Otherwise, skip through to continue.
As with G Suite, you now need to update your domain name’s MX records.
For domains connected to WP Engine through Cloudflare, this involves a couple of easy steps. Log in to Cloudflare, select your domain and click DNS from the top menu. Next, scroll down and look for any entries with the type MX. If you find any of these, delete them by clicking the X. Add Zoho’s MX records by selecting MX from the dropdown at the top of the page, entering @ as the hostname, Clicking to configure and adding mx.zoho.com as the Server and 10 as the priority. Save, then Add Record. Now repeat, but with mx2.zoho.com as the Server and 20 as the priority. With both of these added, return to Zoho and click the MX Lookup button. As with all domain changes, these may take up to an hour to go through.

For domains registered with SiteGround -- and any other registrar using cPanel -- log in to cPanel and click Advanced MX Editor. Change the email routing to Remote Mail Exchanger, remove any existing MX records and then add the two Zoho mail servers: Server mx.zoho.com has a priority of 10 and Server mx2.zoho.com has a priority of 20. Press Add Record after adding each of these, and you’re done. Zoho has detailed instructions for other popular domain registrars; use the dropdown on the Configure Email Delivery page to find yours. Once these are added, head back to Zoho and click MX Lookup. You may need to wait up to an hour for these changes to take effect.
The next step is to add some more settings to your domain that will ensure better deliverability of your emails. First, you need to add another record to your domain name. This should be a TXT record, and can be added in the same way as other records we’ve added so far.

For Cloudflare, log in, select your domain, and click DNS from the top menu. Change the dropdown to TXT, add @ as the Name and Click to configure the content, adding the TXT Value shown on the Zoho setup page. Add Record and you’re done.
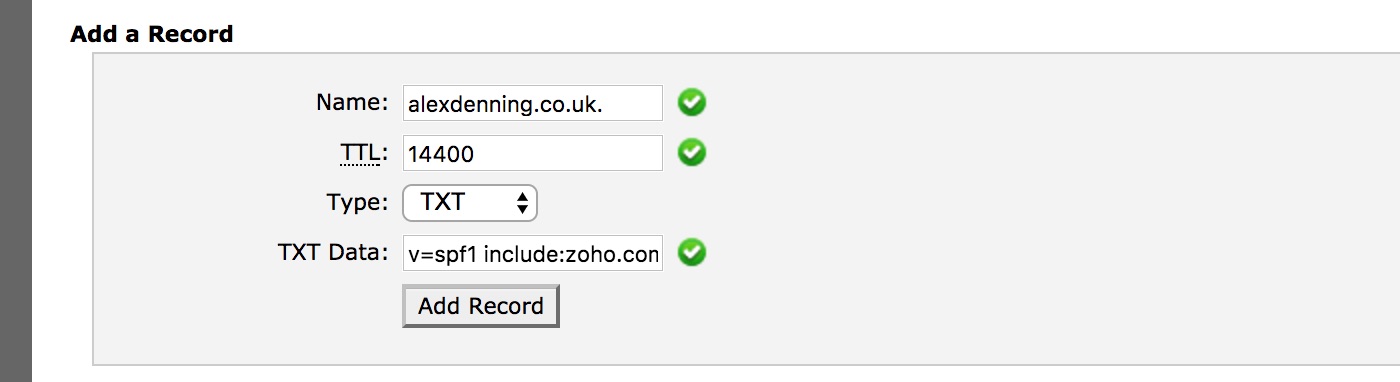
For SiteGround, log in to cPanel and select Advanced DNS Zone Editor. Set the Name to your domain name, set the TTL 14400, change the Type to TXT and then under TXT Data, enter the code from the Zoho setup page. Add Record and you’re done!
You now need to return to the Zoho setup page and under DKIM click Proceed to configure DKIM. Click the pencil next to your domain, and then Add Selector. Enter Zoho as the selector name. You now need to add another TXT record to your domain name. Head to the same screen you did this before, entering the Name in Cloudflare as the full zoho._domainkey.yourdomain.com URL and content as the code generated by Zoho. For SiteGround, do the same but add the TTL as 14400. Add the record and then return to Zoho and verify.
Zoho will now prompt you to migrate your emails. If you're switching from another email host to Zoho, you'll need to enter the POP or IMAP details of your previous email host. Zoho will then copy all of your emails over. You can find details of common POP and IMAP settings in the section below (if you don’t need to migrate emails, you can skip this section).
Next up is email client configuration. Setting this up is very similar for all email providers, so we'll cover this in detail in a separate section later in this guide.
Finally, Zoho offers native mobile apps for iOS and Android. These can be downloaded here and here respectively. Getting set up with these is just a case of installing the app and signing in to your account.
Once you’re through the Zoho setup wizard, the final step is to add some extra security to your account by turning on two-factor authentication. Head to the Zoho security settings and select either Google Authenticator or SMS. The Google Authenticator app, available on Android and iOS is the most convenient option. Select this, then install or open the app on your phone, add new, and then scan the barcode on screen. Your phone will vibrate when this is accepted. Click Next on Zoho, enter the code from the app and then a backup phone number. Verify this too, then save your recovery codes somewhere safe -- you’ll need these if you get locked out of your account. Click through the remaining screens and you’re done!
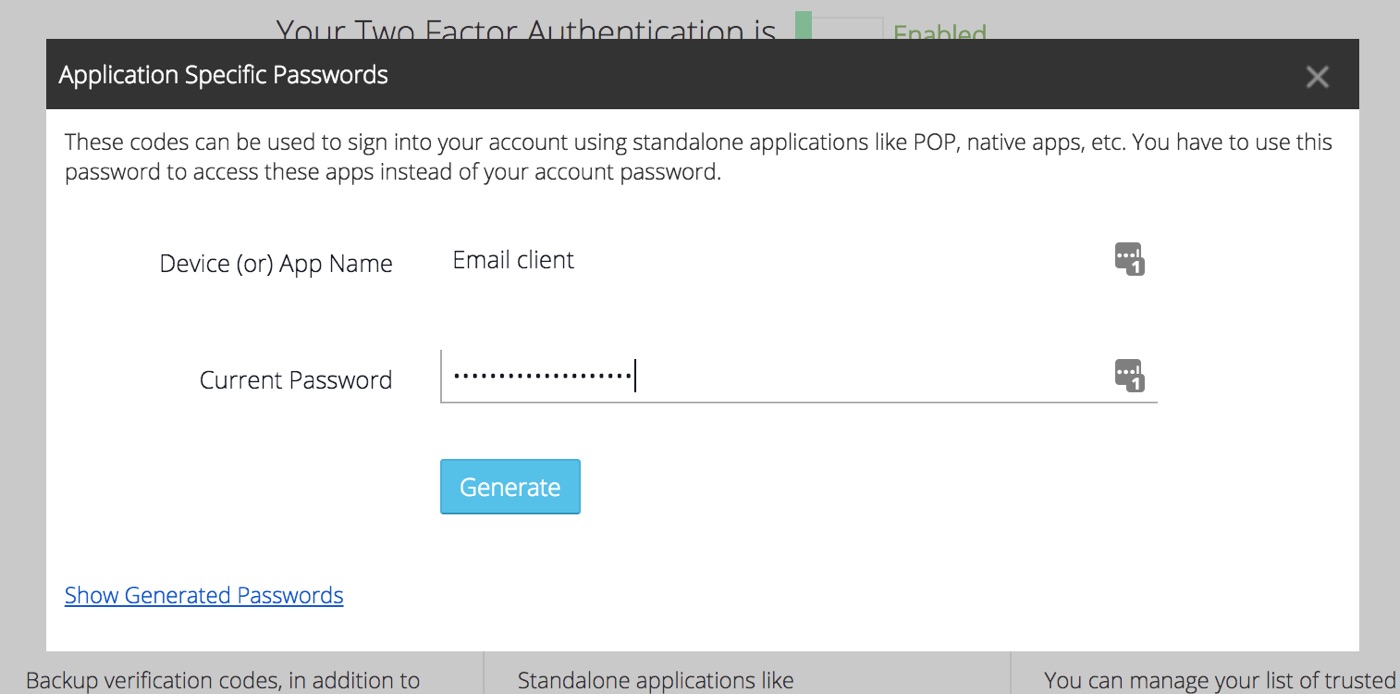
As with G Suite, you’ll now need to generate application-specific passwords for your email clients. Click Manage Application Specific passwords, enter the name or the app or device, and then your regular password. You’ll be given a new password to use; you now just need to update the password you’ve given your email clients to the application-specific password.
With everything set up, you can finally access your email. Either follow the link from your Zoho Home or click here. Bookmark this, as you’ll need to come back in the future. You’ll also want to take the tour offered the first time you sign in, but it should be fairly intuitive. You may wish to send a test email from your old email account to the new one to make sure everything works smoothly. If you want aliases, these can be added by heading to Settings → Control Panel → Mail Accounts. Select the relevant account, click Add New Alias, provide the address, and save. That’s all there is to it.
That’s all for setting up Zoho! You’re good to go with email, but you may wish to have a look around the other applications on offer. You can do this from Zoho Home; the free plan lets you use up to nine applications, so take a look around and start using the applications best-suited to your needs.
How to Set up and Use Your Shared Host’s Email Service with Your Domain Name
Many web hosting providers also offer free email services. As we’ve discussed, these don’t offer the same reliability or security found with dedicated email providers. If you’re just starting out or emailing occasionally, however, the ease of use of web hosts' email services make them a good choice.
Most web hosts offering email services are shared hosts, and use an industry-standard hosting dashboard called cPanel. We’ll walk through how to set up email at your domain using our favorite shared host, SiteGround. The steps will, however, be very similar for other hosting providers using cPanel.
Start by logging in to SiteGround and heading to My Accounts → Information & Settings → Access cPanel. Now, click the Email Accounts icon. Fill in the email, password and mailbox quota for the new account, then click the Create Account button at the bottom. You’ve now got an email account on your own domain!
There are no domain settings to set up here if your domain is also registered with SiteGround and you haven’t changed any of the defaults. If you’re using a domain registered with any other registrar and pointed at SiteGround, you’ll need to set the MX records as follows:
- mx10.mailspamprotection.com (priority 10)
- mx20.mailspamprotection.com (priority 20)
- mx30.mailspamprotection.com (priority 30)
You’ll be able to do this in a way that's similar to how they've been added throughout the guide: Log in to your domain registrar, head to DNS records, delete any existing MX records, and then add the records above. You’ll need to wait up to 48 hours for the changes to go through.

Once your email account is set up, you can access it via SiteGround’s webmail interface. Visit yourdomain.com/webmail, or click the 'Webmail' icon on your cPanel’s main page. You’ll have a choice from three possible webmail clients -- Horde, Roundcube and SquirrelMail -- each of which offers its own interface for sending, reading, and forwarding emails. Frankly, none of these are attractive options, but you’ll likely find Horde to be the most tolerable.
You may prefer to connect your email to an email client on a desktop or mobile that you’re already using, rather than use the webmail interface. The process for this is very similar for all email hosts, so this is covered in detail in a later section of this guide.
In short, your host’s email service isn’t great, but it’ll do for very occasional usage. Plus, when you hook up your host’s email service to your regular email client, it’s every bit as convenient as personal email, but much more professional.
Alternative Hosted Email Services
G Suite and Zoho are the best overall options for hosted email services. If convenience and ease of use are your top priorities, then email provided by your web host is fine too. There are, however, plenty of competing hosted email services. These typically offer something unique in terms of features or cost, so, while they may not be the best option for everyone, if you need what they specifically offer, they may be the best option for you. The email hosts below offer something different.
If you’re intent on using Outlook Exchange to manage your emails, Rackspace is your best bet. This service allows you to use their own app for $2 per user per month, or integrate with Outlook Exchange for $7.99 per user per month. For that higher price, you’ll get a massive 100GB mailbox and the ability to send attachments up to 50MB. Rackspace is also designed for full compatibility with Outlook, allowing you to sync shared calendars, global address lists, tasks, and, of course, emails, across devices. Other helpful features, such as anti-spam and anti-virus scans, make Rackspace a solid choice for enterprise businesses.

For the security conscious, ProtonMail offers end-to-end encryption of every email for €4 a month. Nobody except the intended recipient can read messages sent via this service, which are also protected by Switzerland’s strong data protection laws. ProtonMail’s servers are in a physically secure location (which can allegedly survive a nuclear attack -- so if the literal worst happens, at least you’ll still have your email) and the company stores no personally identifiable information. However, all of this security comes with some caveats: You’ll only get 5GB storage, and you’ll be limited to a thousand messages per day -- and, while you’ll be able to use web, and iOS and Android apps, you won’t be able to send secure email from any other applications.

FastMail is only worth mentioning very briefly. At $5 per user per month or $50 per year for only 25GB of storage, this email service is much more expensive than its competitors. For the same price, you could use G Suite or Zoho, both of which come with four times the storage. You do, however, get an intuitive web interface and app, so if you really want these, it’s a decent choice.

If you want a very simple email address at your own domain but no accompanying website, Flaskmail is a good option. This service makes it very easy to register a new domain already set up for email in one minute flat. You pay $2.99 per month per email address (which includes the domain registration), and you’ll have access to your email through an ad-free webmail client, but no native mobile apps. Flaskmail is great if you want a non-technical solution to having an email address at your domain, but if you want anything more complicated -- such as a whole website or productivity suite -- it’s best to steer clear.
Connecting Your Email at Your Own Domain to Your Existing Email Client -- or Gmail
If you already use a third-party desktop or mobile email client, such as Thunderbird, Outlook or Apple Mail, you may also want to add your email at your own domain to your existing email client. This has a major convenience bonus, and the process is very similar for all email hosts.
First, set up your email host to integrate with email clients. This involves enabling IMAP and varies per provider:
- G Suite: Load up your G Suite Gmail, clicking the gear icon and then Settings → Forwarding and POP/IMAP. Enable IMAP and Save Changes.
- Zoho: Load up Zoho Mail, go to Settings → Mail → POP/IMAP and Email Forwarding. Under IMAP Access, change the Status to Enable. Save and you’re done.
- SiteGround and most web hosts: IMAP is enabled by default.
You now just need to add your email to your client of choice. For most desktop clients, this is just a case of heading to Accounts → Add New and then entering your email and password, and server details. For the iOS Mail app, you’ll need to go to Settings → Mail first, and add the account as 'other'. For the Gmail app on Android, tap the top left Menu icon, and then the down arrow next to your username. From there, you can Add account, selecting Other as your email service (if you want to add a G Suite account here, see above in the G Suite section of this guide as these steps differ).
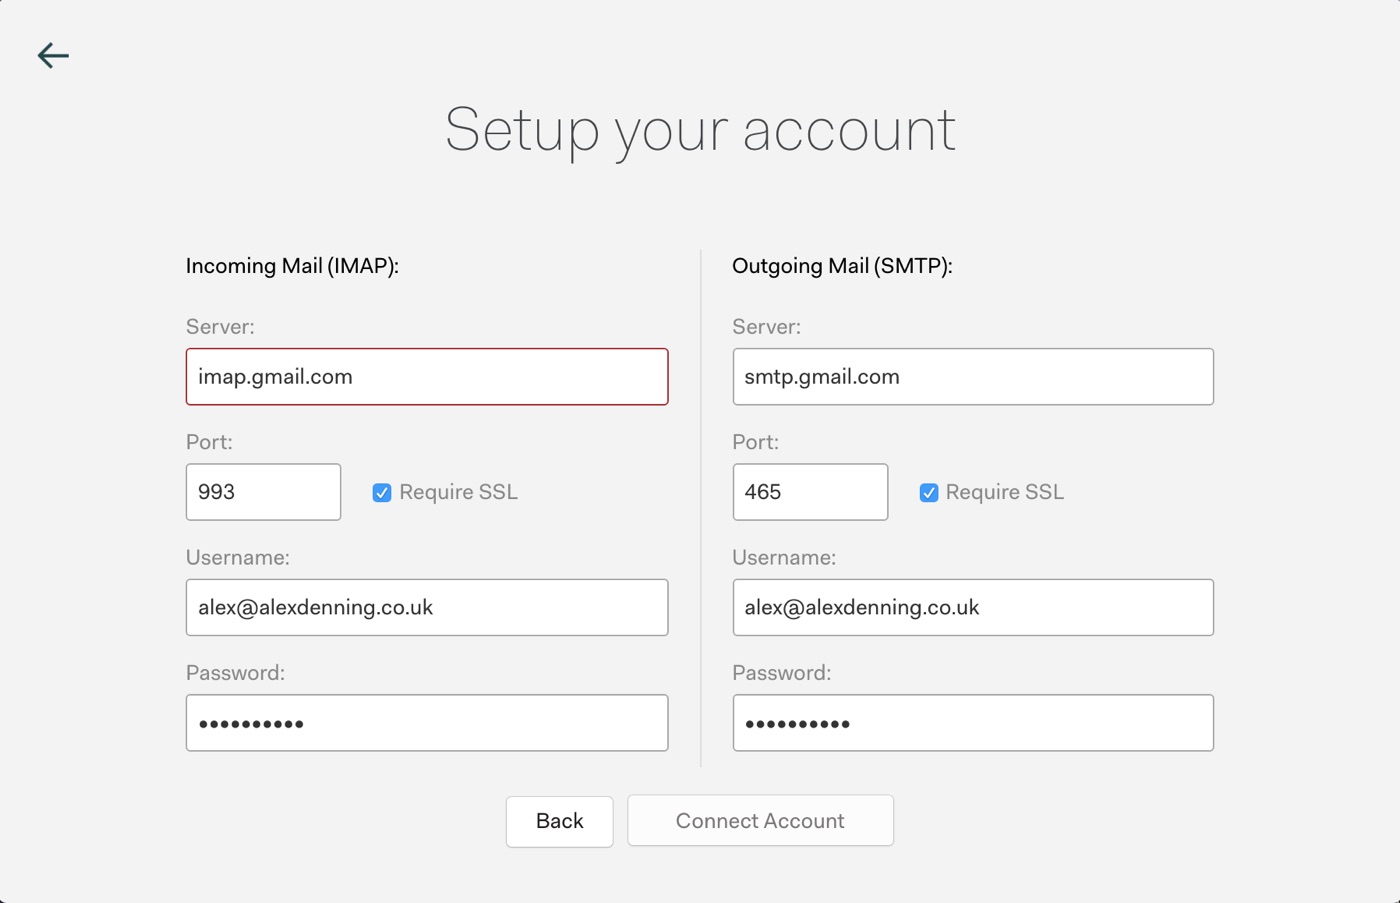
Once you’re ready to add in settings, get the appropriate settings for your host:
- G Suite: G Suite’s IMAP details can be found here. If you have two-factor authentication on, you’ll need to create an application password and use this instead of your regular password. See the G Suite iOS setup section above for details on how to do this.
- Zoho: IMAP details can be found here. As with G Suite, if you have two-factor authentication on, you’ll need to create an application password -- details of how to do this are in the main Zoho section above.
- SiteGround and most web hosts: Your incoming and outgoing mail server is
mail.yourdomain.com.
Enter all of these settings into your email client, finish the setup, and you’ll be good to go! You’ll now be able to send and receive email in your email client using email at your own domain.
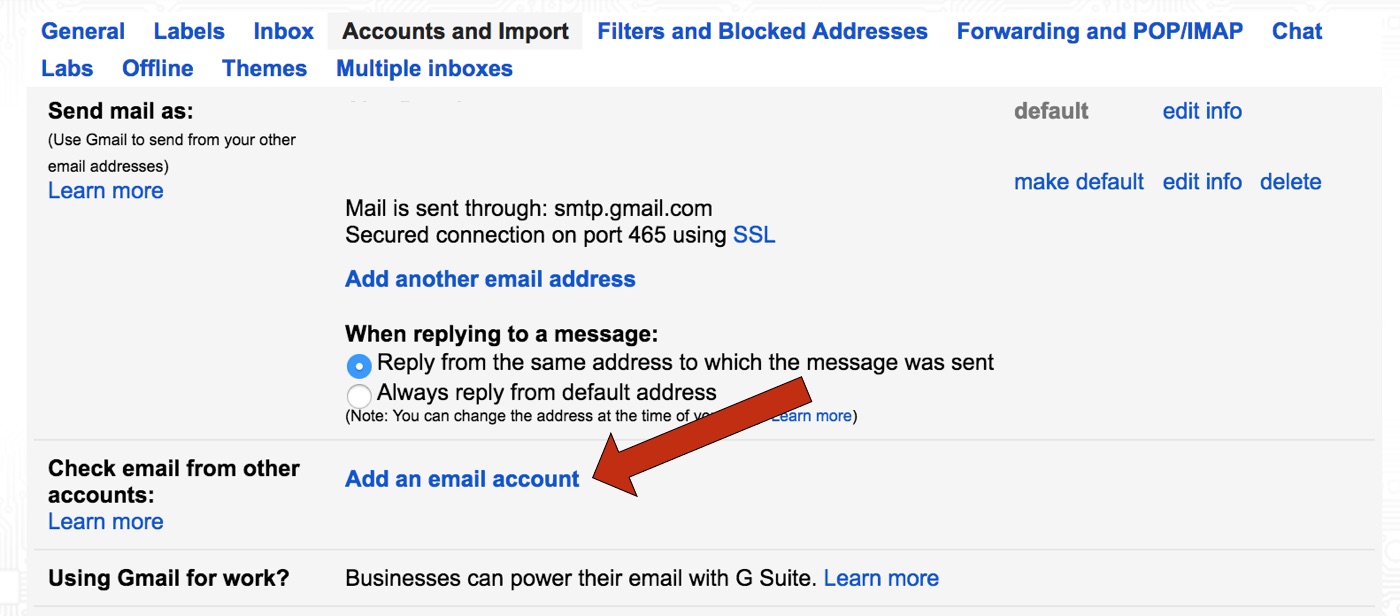
You can also access your email at your own domain from Gmail. This works similarly to adding your email to any email client: In Gmail, click Settings → Accounts and Import (or click this link once you’re logged in). In the Check Mail from Other Accounts section, add an email account, and type in your new email address at your domain name.
Click Next, and then enter the IMAP settings for your email host, as listed above. Leave the rest of the settings as-are, and click Add Account. You’re now all done, and will get new emails at your domain’s email address sent through to your Gmail account.
Whichever email client you're using, add your new email at your own domain for extra convenience.
Conclusion
An email address at your own domain name looks highly professional and is essential. This guide has walked you through all of the steps you need to follow to have your very own email set up.
For the sake of convenience, it’s worth finding an email at your domain setup that works with your favored email clients on desktop and mobile, so, if you haven’t done so, revisit this section of the guide. The time taken now will be well worth it in the long run.
WinningWP Staples
There's more to us than just WordPress guides. Here's a few favorites:


Under the Hood
Wondering what plugins, tools and services we used here at WinningWP? We spill the beans...
WordPress Deals & Coupons
Save oodles of cash on some of the best hosting, themes & plugins around!
Good luck!
So there you have it! You should now have your own custom email account set up for your own custom domain name: the importance of which, from a business/professional point of view, really shouldn't be overlooked. In fact, many folk just won't take your emails really all that seriously if you're using anything else!