
Top 15 (Essential) Things To Do After Installing WordPress – Must Read!
So, you’ve just installed WordPress… Now what? How do you turn your blank WordPress install into a finished website that’s ready to receive visitors?
While WordPress is fairly ready to go out of the box, there are some basic housekeeping steps you’ll want to take to set your site up for success.
These include basic settings to configure, extensions to install and customize, and content you should have ready before you open your doors. For example, you’ll want to set your WordPress URL structure and timezone — little things that are easy to overlook but play an important role in your site.
Similarly, it’s essential you set up a strong backup policy to keep your site safe.
To guide you, here are 15 essential things to do after installing WordPress:
Table of Contents
- 15 Things to Do After Installing WordPress
- 1. Acquaint Yourself With the WordPress Dashboard
- 2. Change Permalink Structure
- 3. Choose Your Timezone
- 4. Fill In Your User Profile
- 5. Configure Commenting Policy
- 6. Install and Customize Your Theme
- 7. Create a Logo and Favicon
- 8. Remove Dummy WordPress Content
- 9. Create Your Core Pages and Set Homepage
- 10. Set Up Widgets
- 11. Set Up the Navigation Menu
- 12. Set Up an Automatic Backup Policy
- 13. Install Some Other Must-Have WordPress Plugins
- 14. Remove Any Unused Plugins and Themes
- 15. Write Your First Blog Post
- Get Started With WordPress Today
15 Things to Do After Installing WordPress
1. Acquaint Yourself With the WordPress Dashboard
When you’ve just installed WordPress, the first thing you’ll want to do is get familiar with the WordPress dashboard.
It’s the control panel for your site, so you’ll be spending a lot of time in it throughout the rest of this post (and the rest of your site’s life).
You can access your WordPress dashboard by appending /wp-admin to the end of your site’s URL — for example, yoursite.com/wp-admin. If you haven’t already logged in, WordPress will prompt you to before you can view the dashboard.
The main dashboard gives you a basic summary of your site. To access additional areas, you’ll use the sidebar menu on the left:
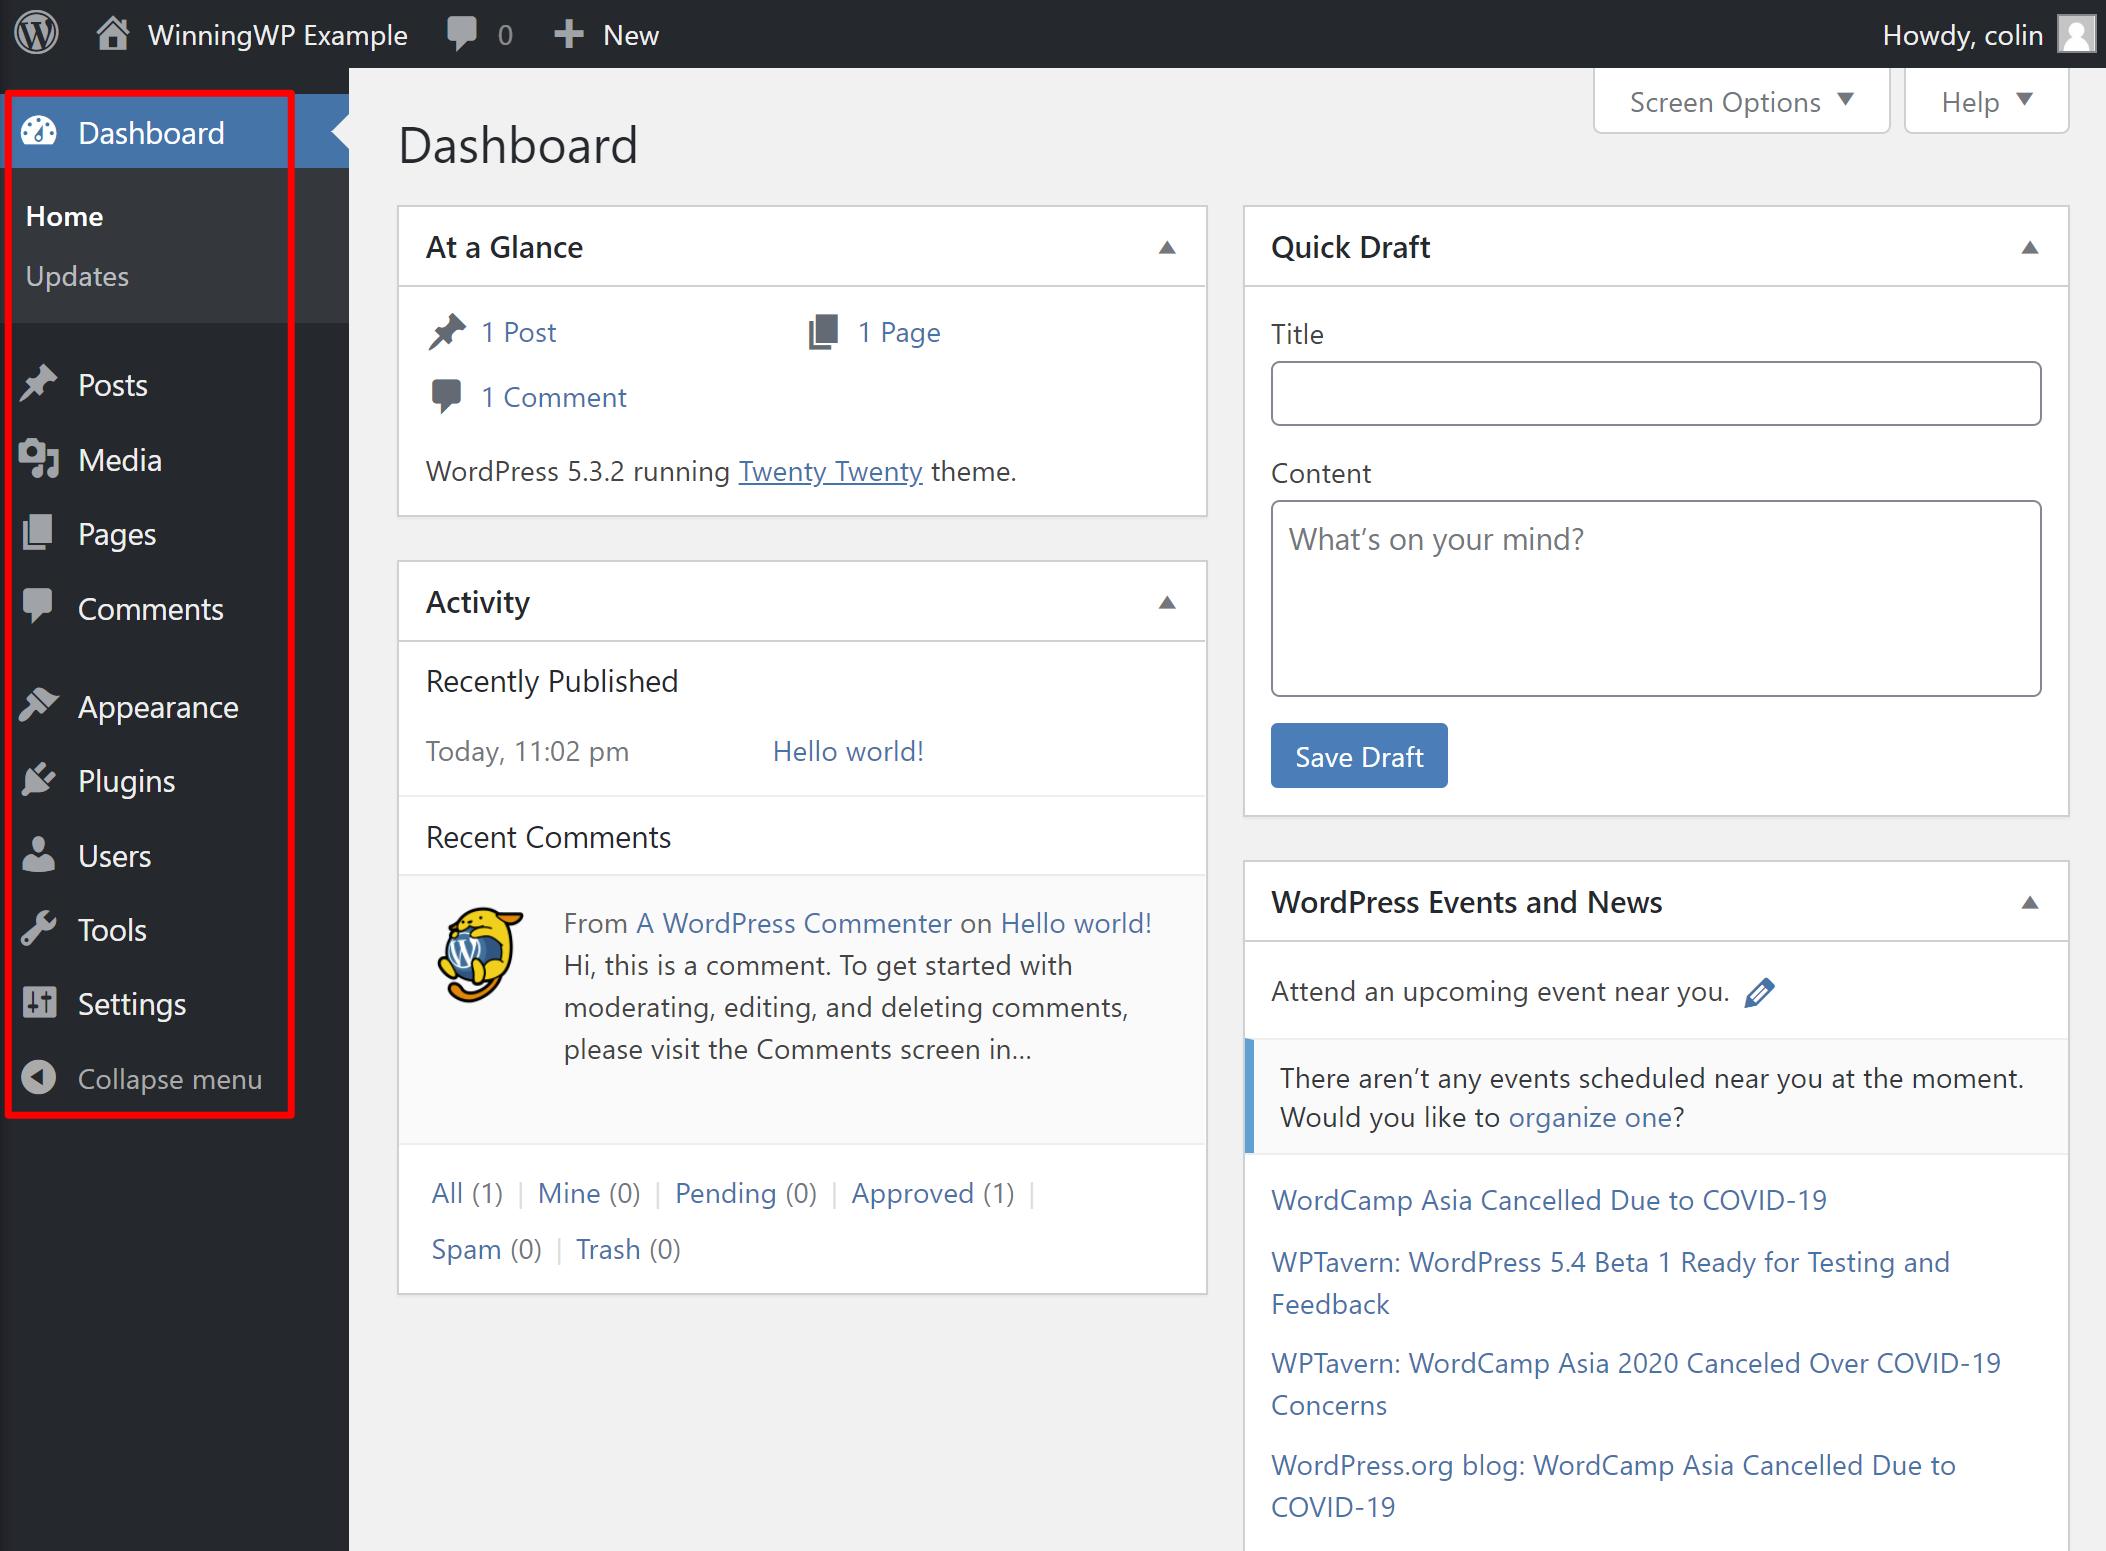
Each menu item on the left will also include a number of sub-menus when you hover over it.
To create new content, you’ll use the Posts and Pages menus:
- Posts — these are blog posts.
- Pages — static pages, such as your ‘About’ or ‘Contact’ pages.
To manage your site’s extensions, you’ll use the Appearance and Plugins menus:
- Appearance — install and customize your WordPress theme, which controls your site’s appearance.
- Plugins — install and manage your WordPress plugins, which add new functionality to your site.
Finally, when you’re just getting set up, you’ll spend a lot of time in the Settings area. However, once you configure all of the settings, you’ll mostly ignore this area in your day-to-day site management.
Once you feel comfortable working in the WordPress dashboard, you’re ready to dig in to the rest of these tips…
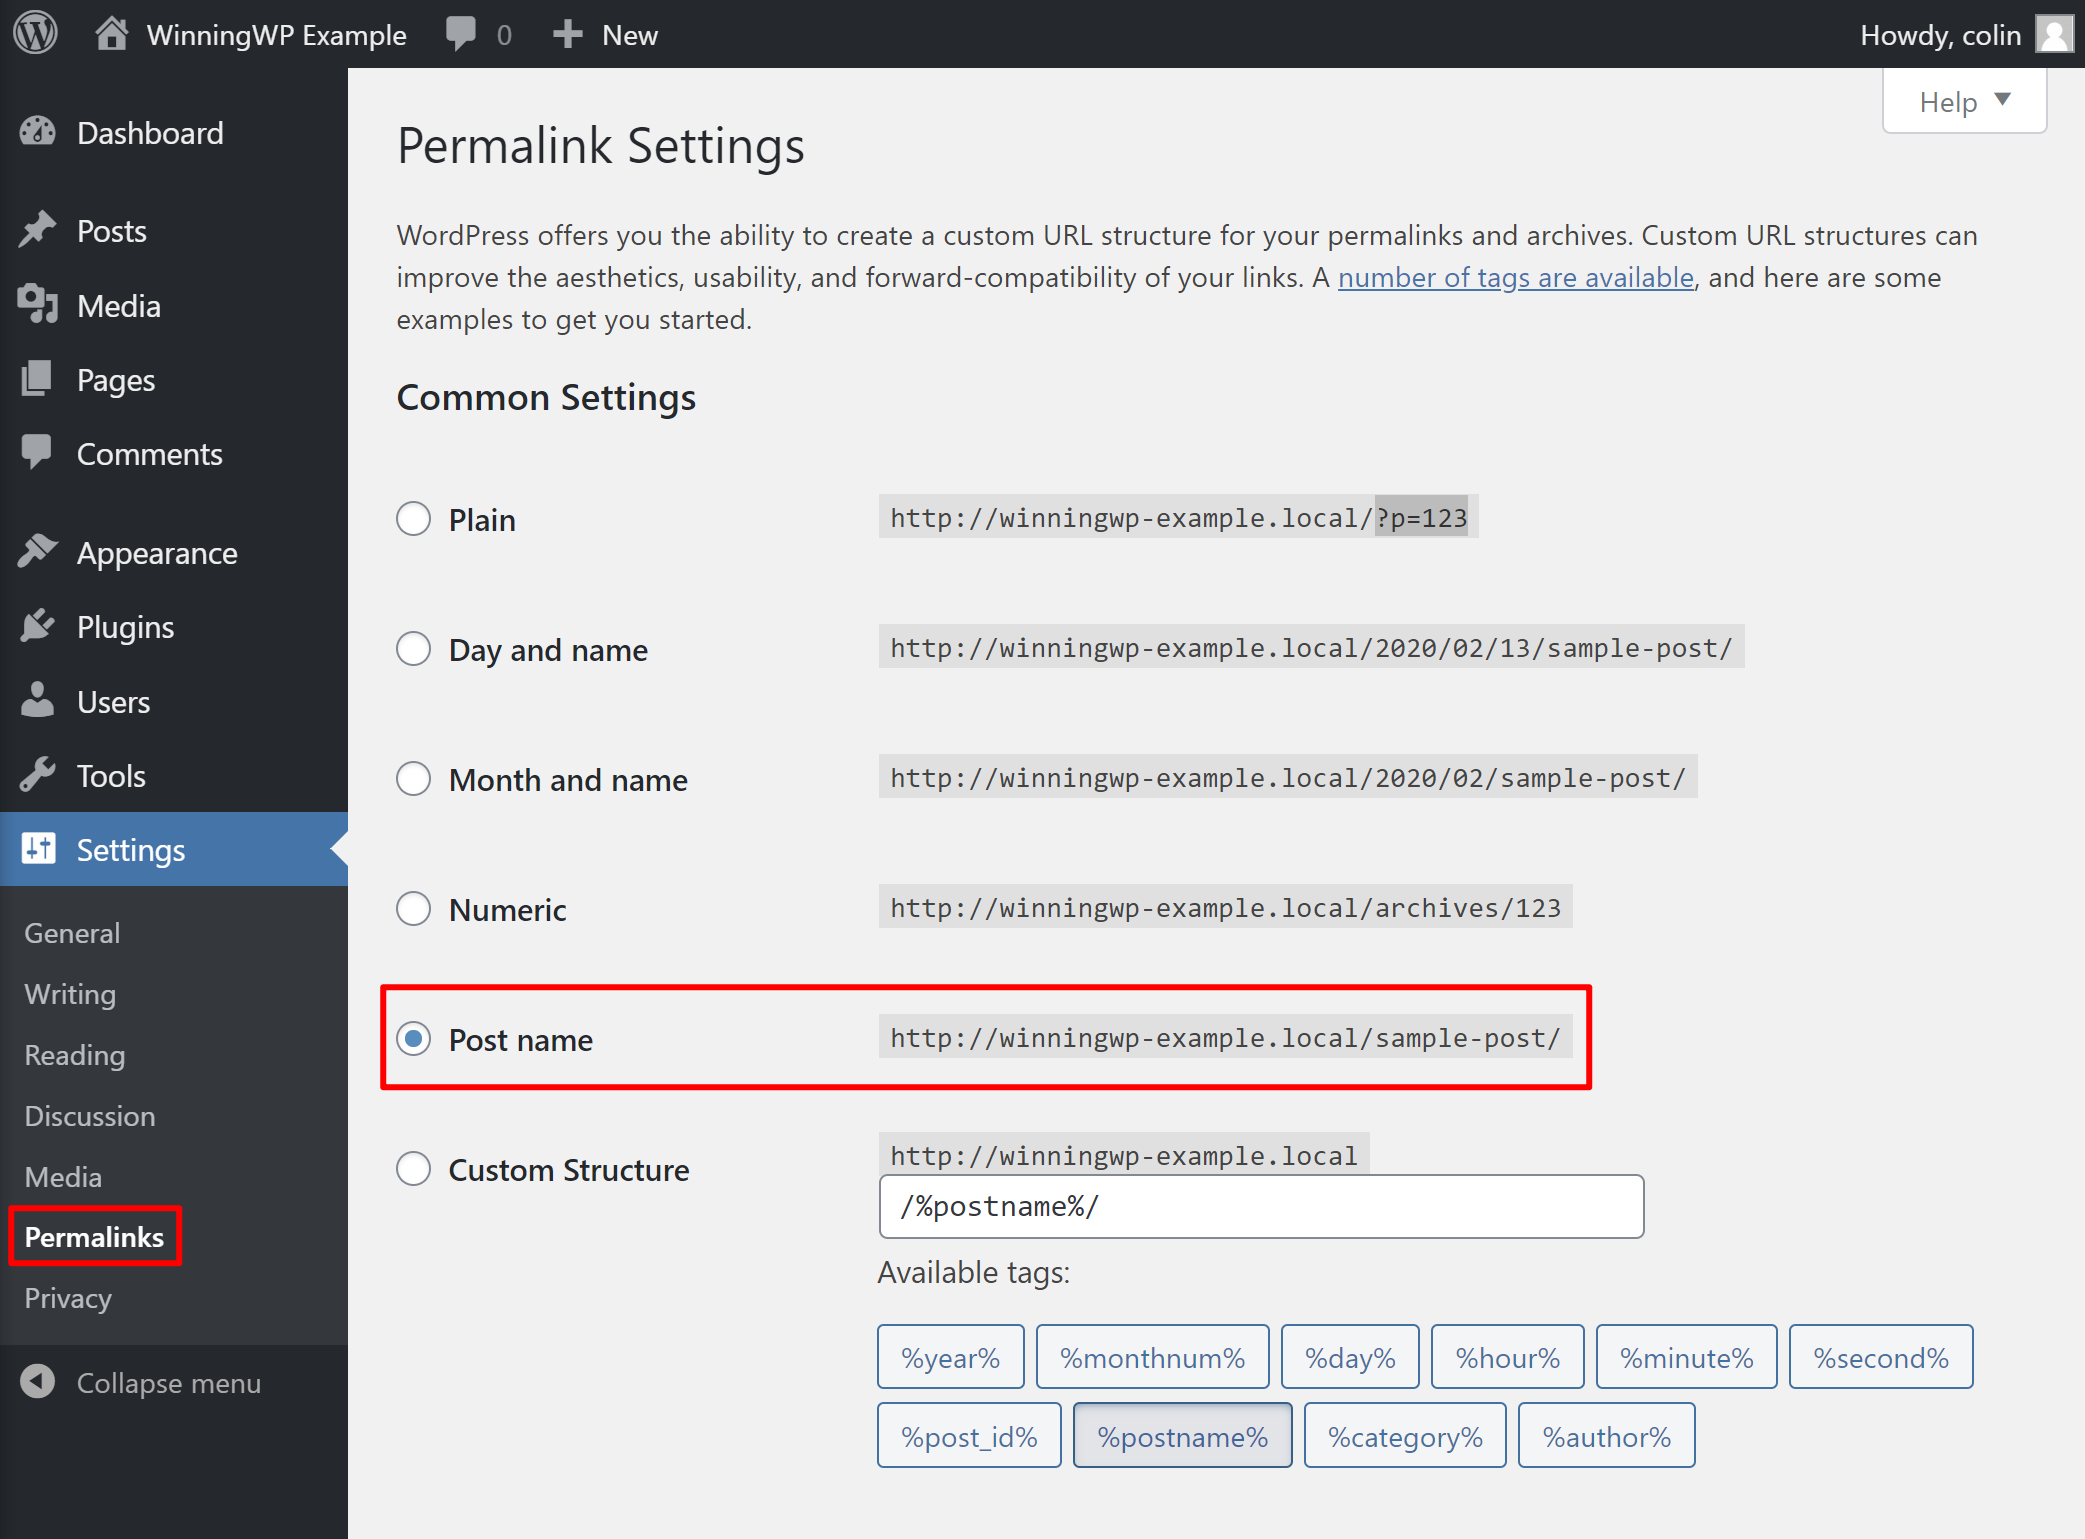
2. Change Permalink Structure
Your WordPress site’s permalink structure controls the part of your website’s URLs that comes after your main domain name.
For example, if the URL of a post is ‘yoursite.com/things-to-do-after-installing-wordpress‘, then the permalink structure controls the ‘things-to-do-after-installing-wordpress‘ part.
It’s an important consideration for both user experience and search engine optimization (SEO), because you can use the words in your permalinks to provide important context about the content of a post.
However, many fresh WordPress installs use an unoptimized permalink structure based on numbers, such as ‘yoursite.com/?p=123‘.
To fix that and choose an optimized permalink structure, you can go to Settings → Permalinks.
For most websites, the best option is to choose the Post name structure. However, if your site posts time-sensitive news, it may also make sense to choose a permalink structure that includes the date.
For most blogs, you shouldn’t include the date in the URL, though, because you may want to go back and update the post in the future. In that situation, it can get confusing if you updated a post but the URL structure still indicates it was published in 2017:
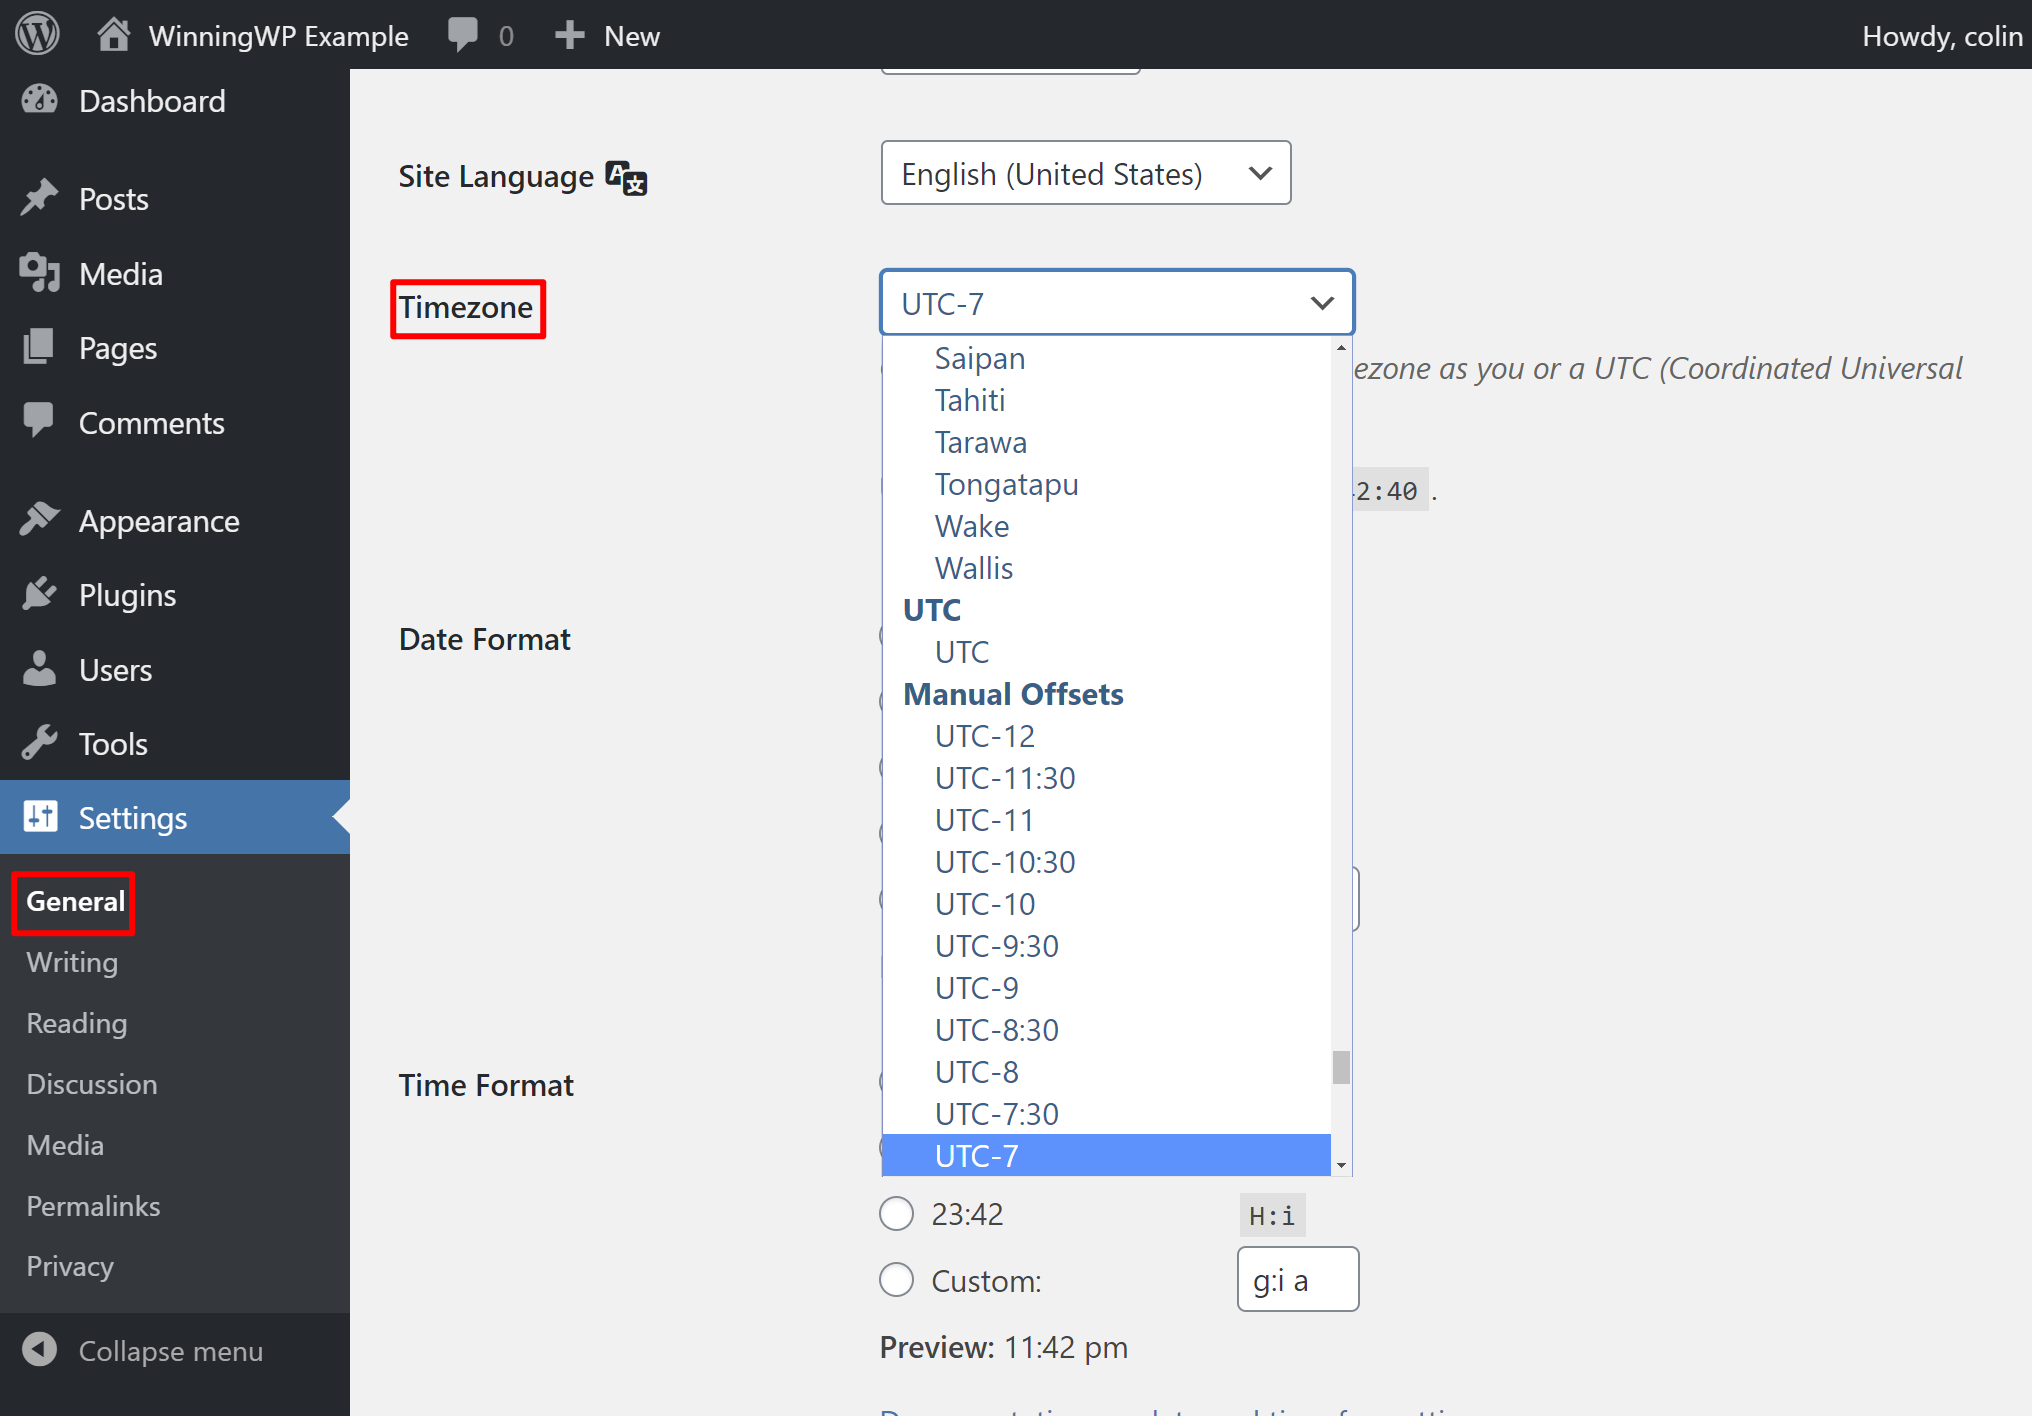
3. Choose Your Timezone
The timezone of your WordPress site plays an important part in scheduling and automation. For example, if you schedule a blog post to go live at some point in the future, the exact publish time will be based on the timezone in your WordPress settings.
The simplest option is normally to set it equal to your own timezone. However, if your website’s target audience is in a different geographical area, it can sometimes make more sense to set your site’s timezone equal to the timezone of your audience.
To set your timezone, go to Settings → General and use the Timezone drop-down. Below that, you can also configure some other time-related settings, such as your date and time formats:
4. Fill In Your User Profile
When you publish a blog post, most WordPress themes include a small box at the bottom of the post that has more information about the author. This box gives you a chance to connect with your visitors and put a face to the content.
For example, if you scroll to the bottom of this post, you’ll see something like this:
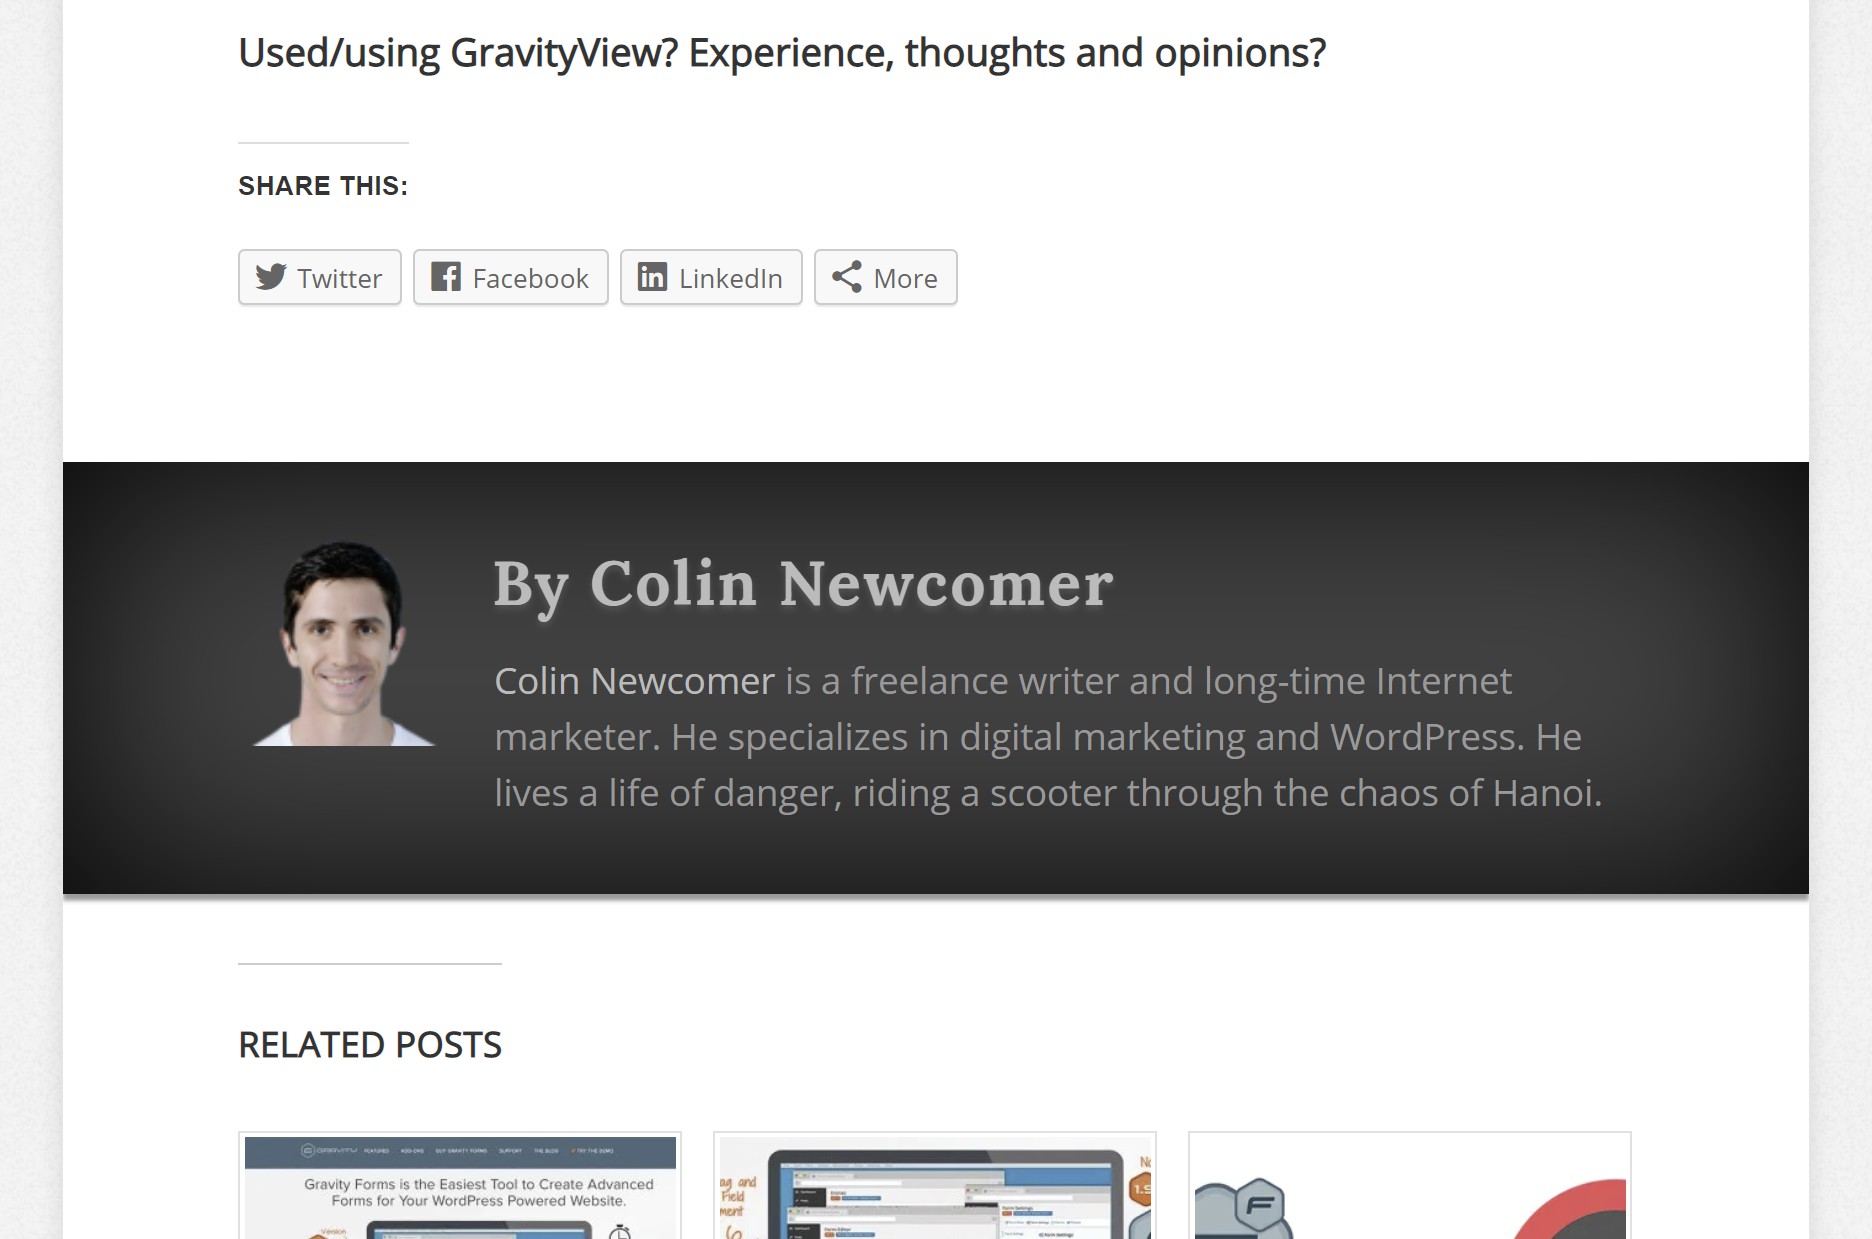
To generate this author box, WordPress automatically pulls in information from your WordPress user profile, so you’ll want to add all of the pertinent information to your profile.
To fill it in, go to Users → Your Profile. There, you can enter your name and biographical info:
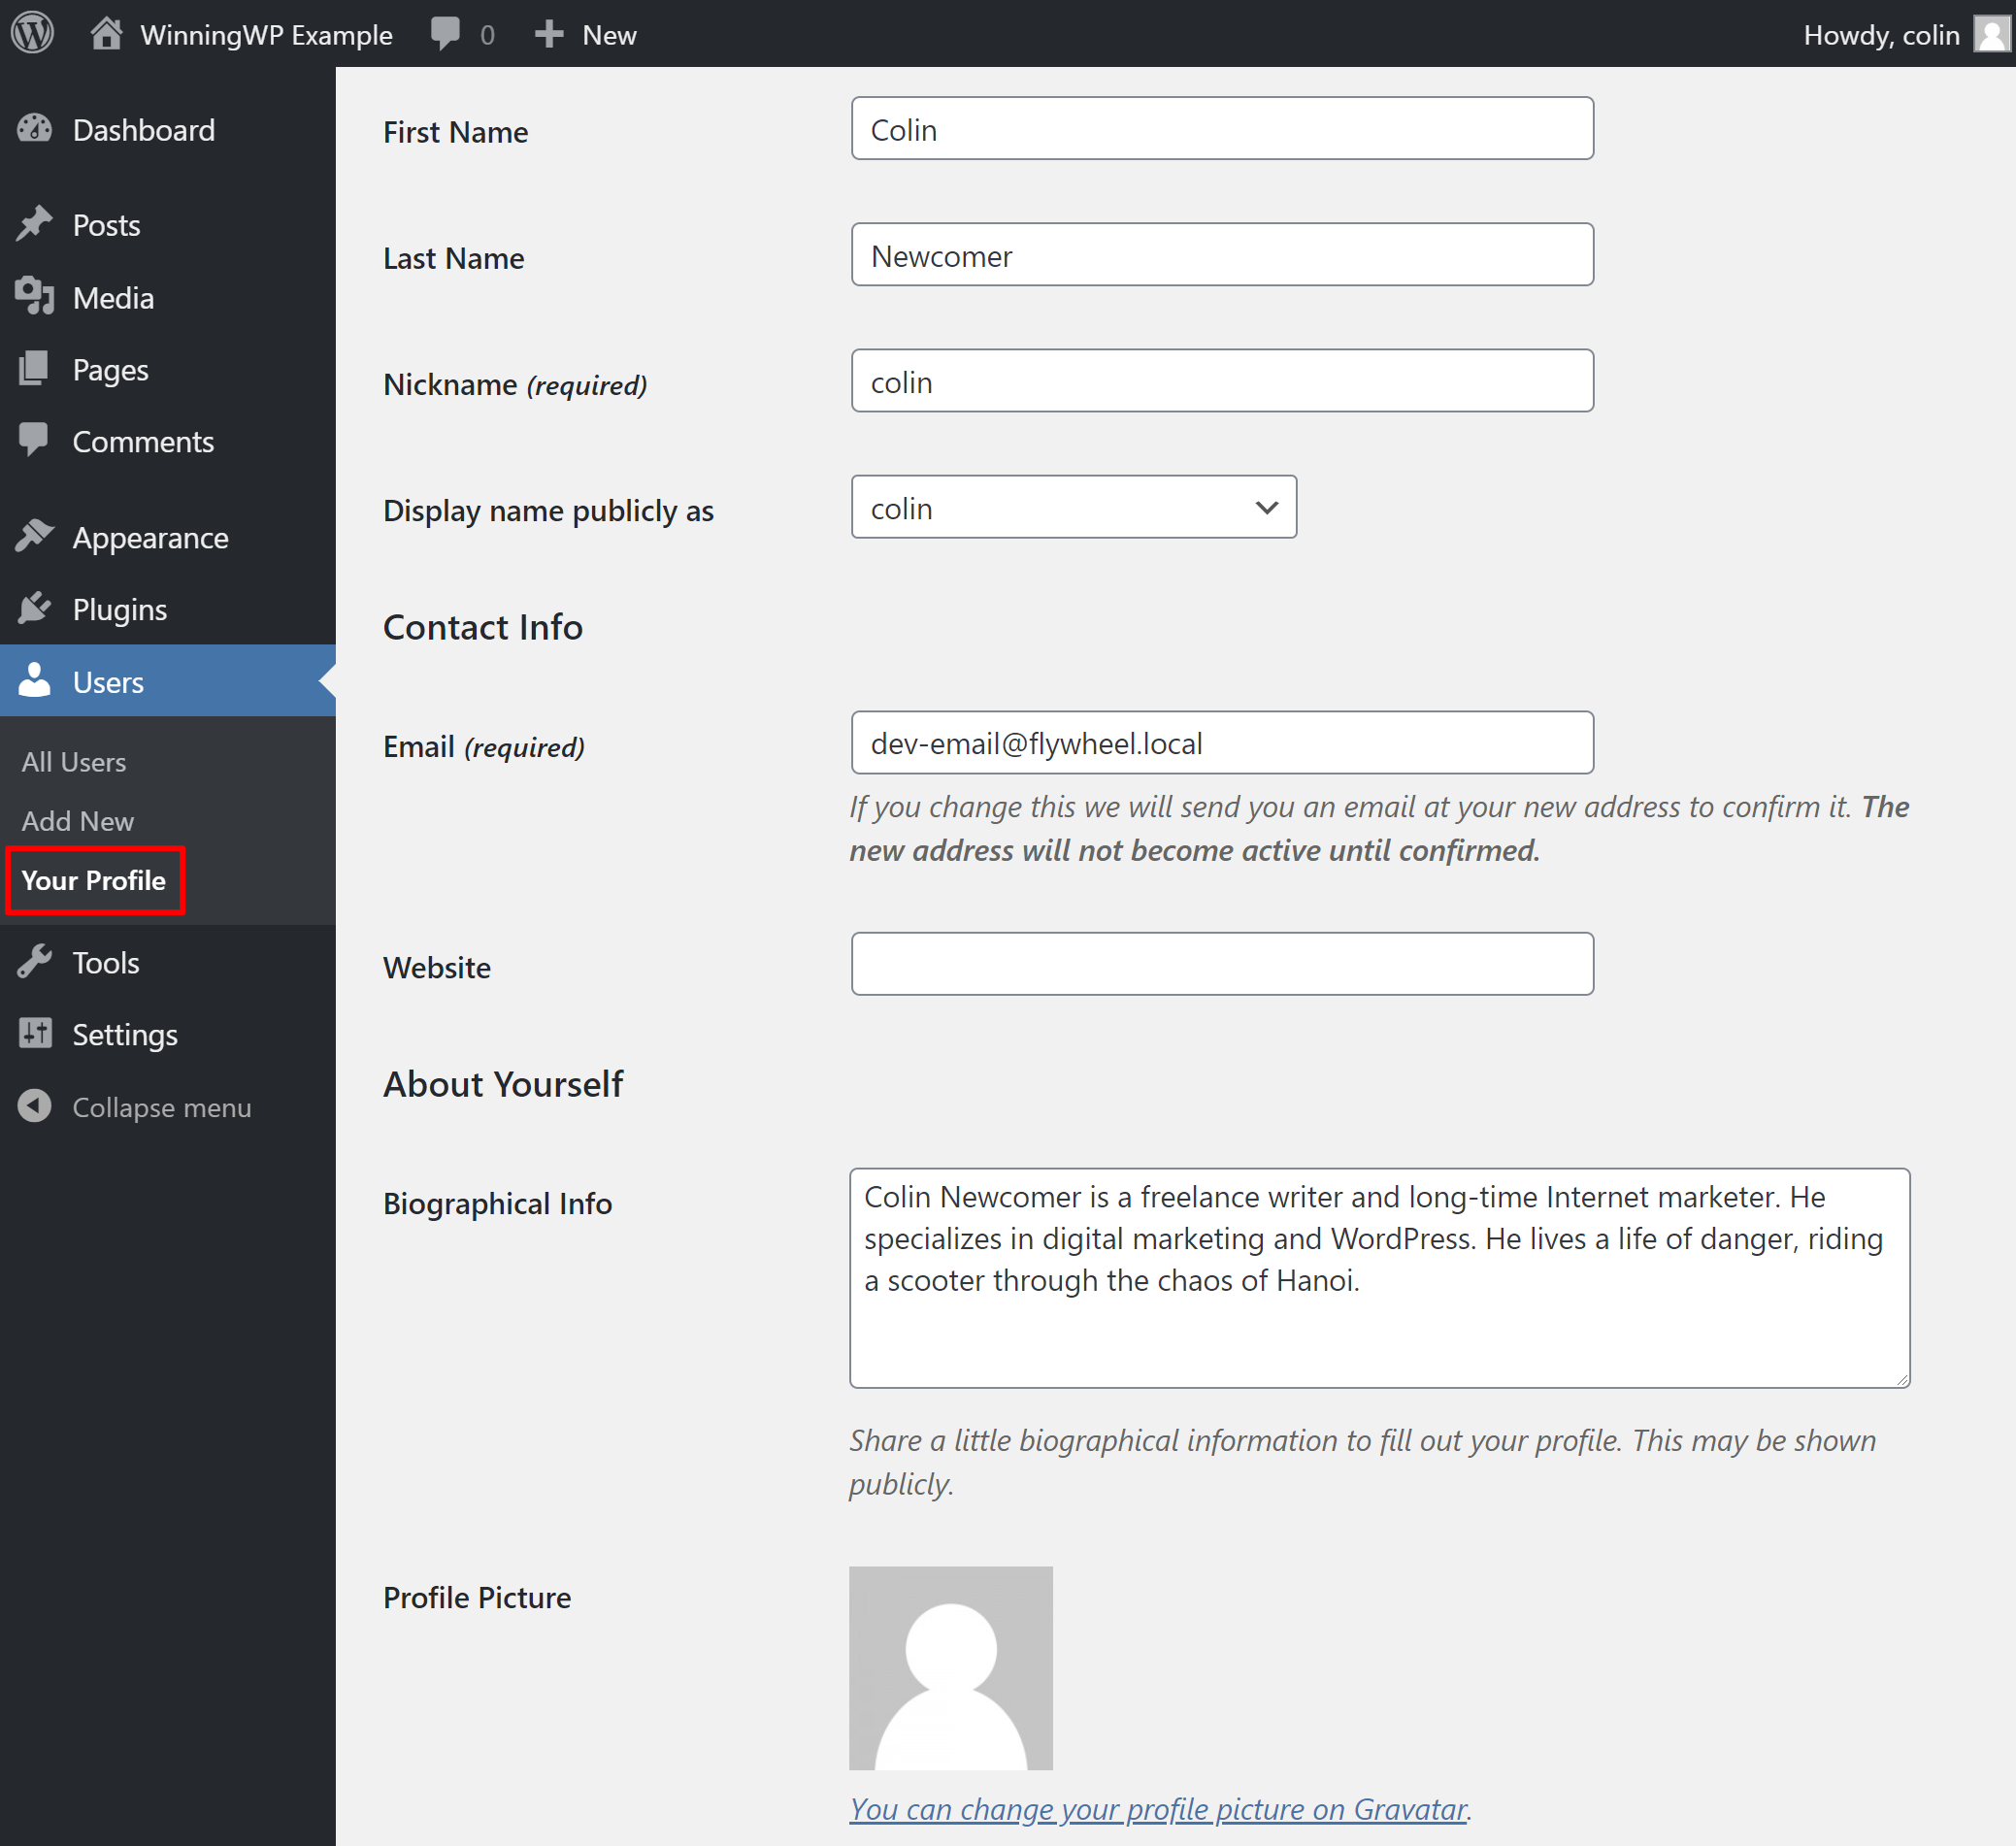
To control your profile picture, you’ll need to sign up for Gravatar using the email address associated with your WordPress account.
If you’d rather be able to upload your profile picture directly to WordPress, you can use a free plugin such as WP User Avatar to add that feature. More on plugins later.
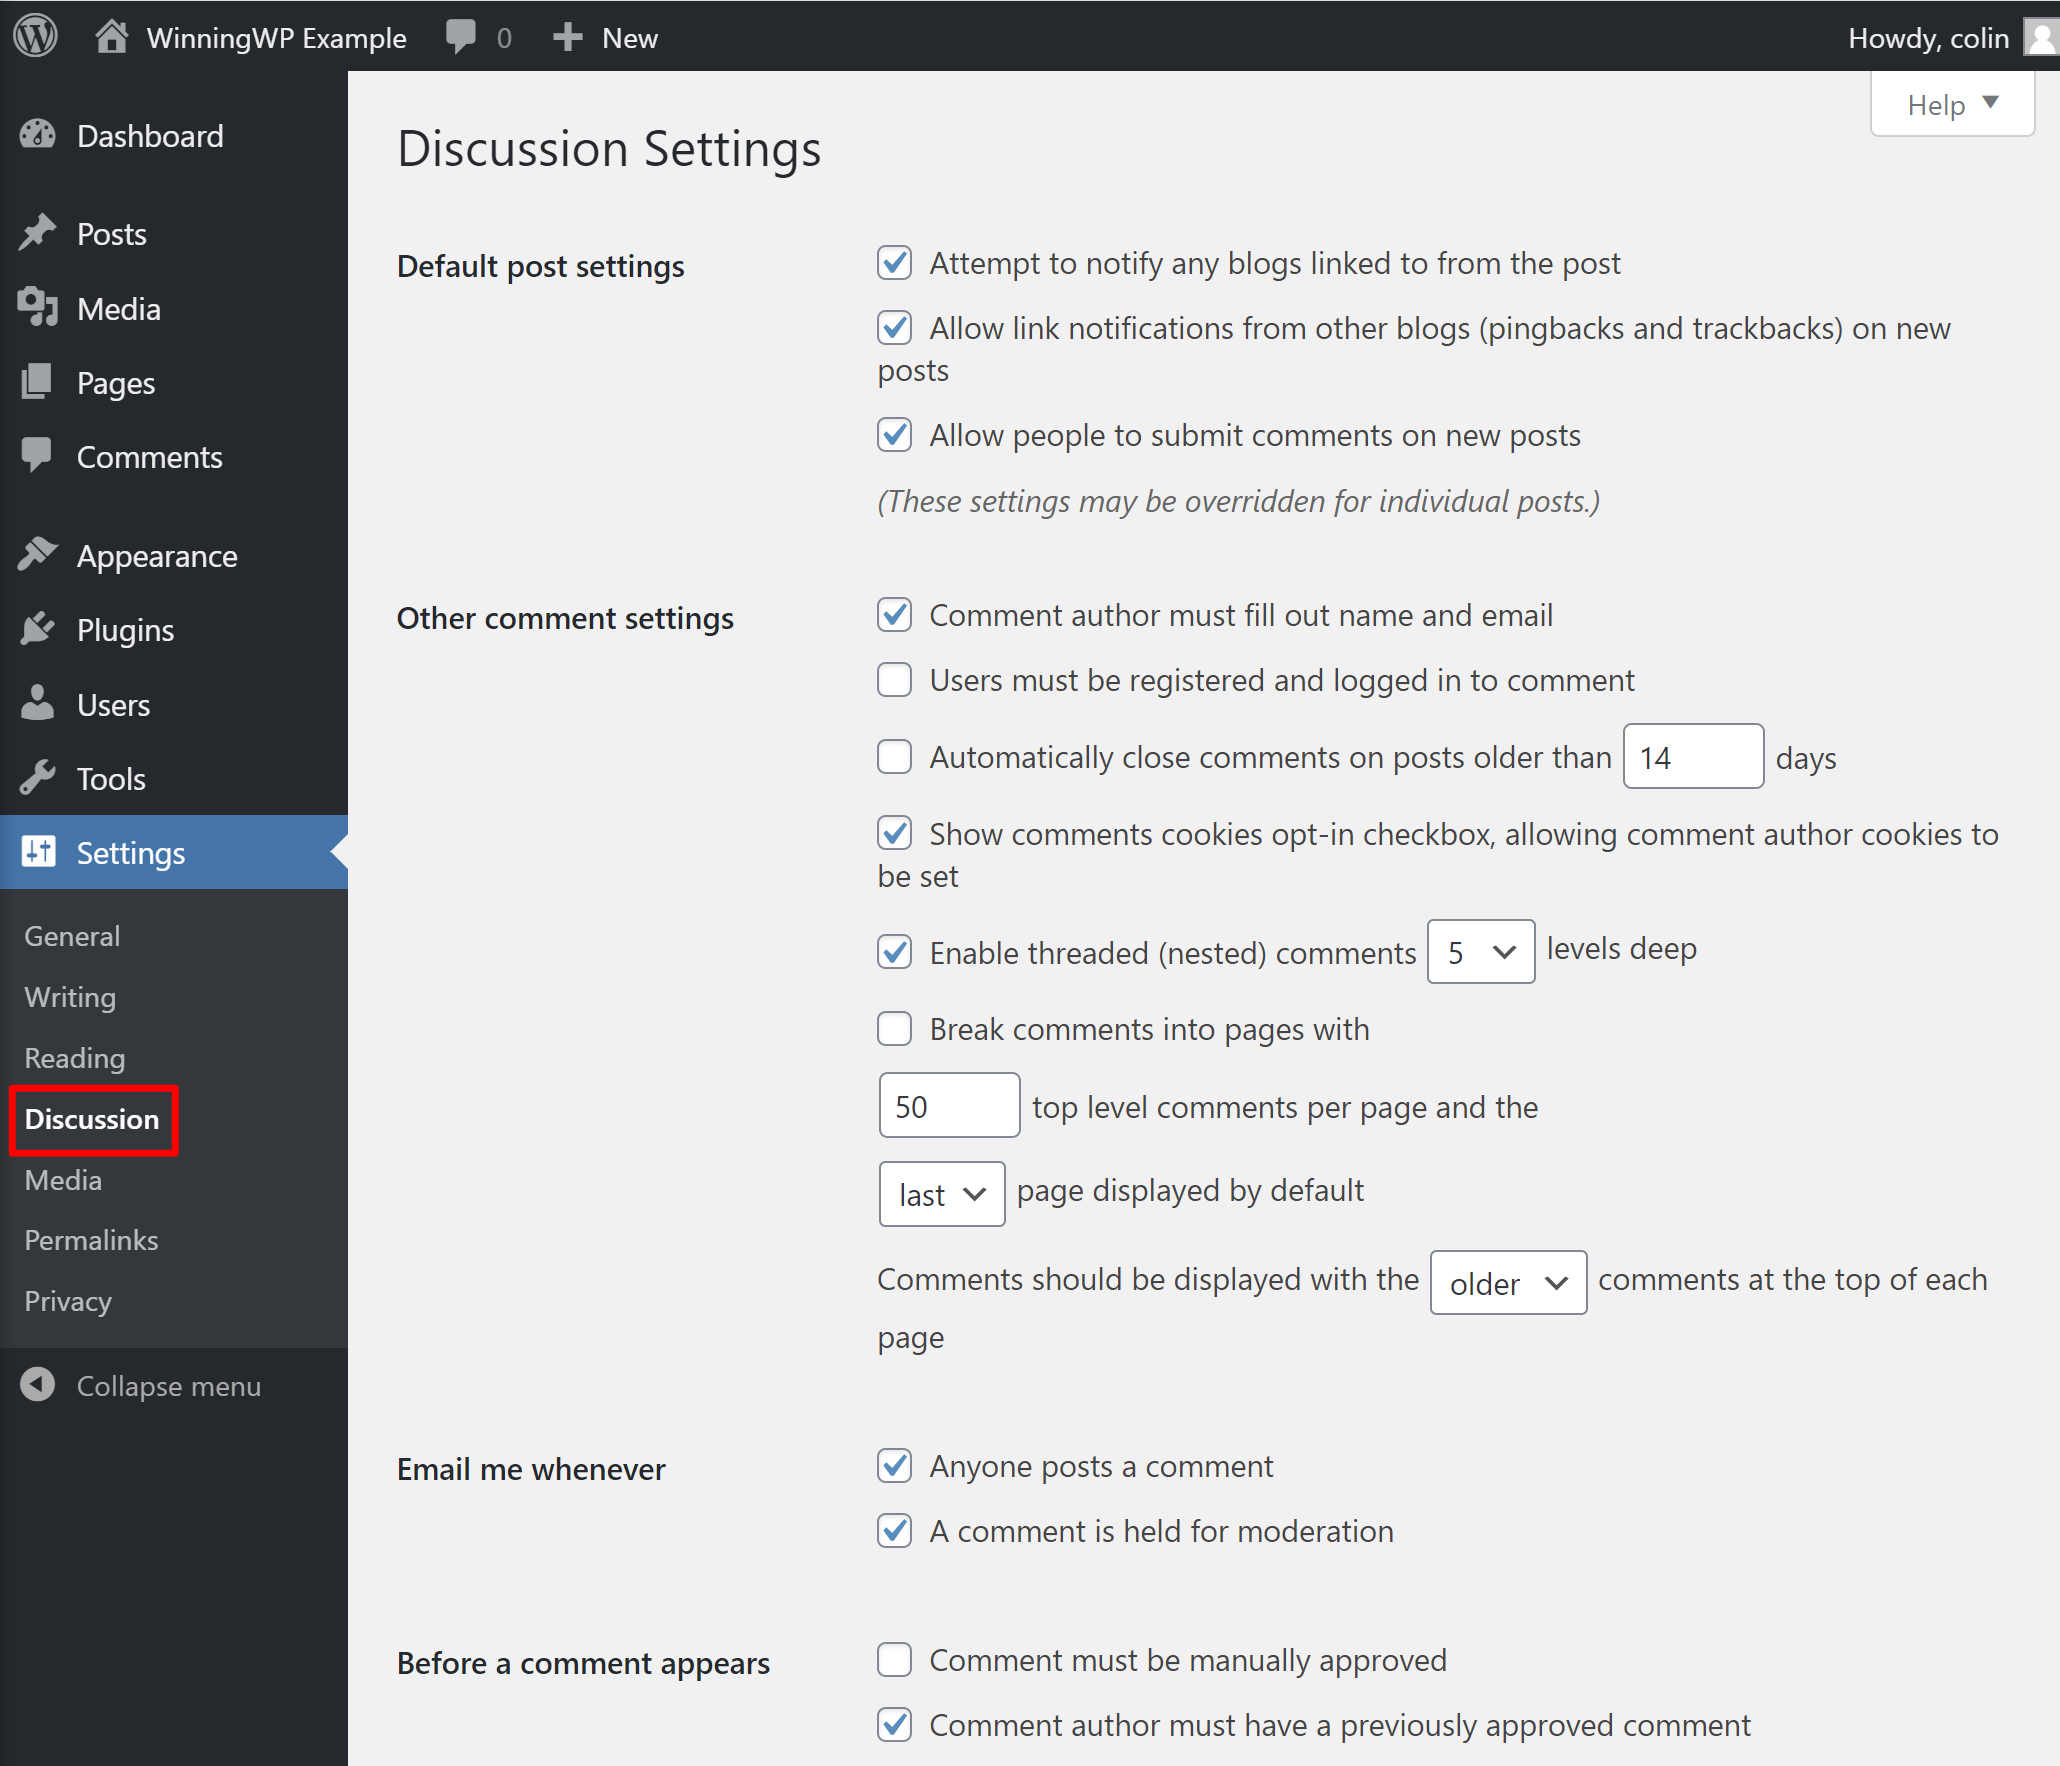
5. Configure Commenting Policy
By default, anyone can leave a comment on your blog posts. You’ll need to manually approve a person’s first comment, but after that they can comment freely.
Depending on the type of site you’re creating, you may want to use a different commenting policy. For example, you could:
- require users to register to leave a comment
- automatically close comments after a certain period of time.
To adjust your site’s comment rules, or turn off comments altogether, you should go to Settings → Discussion.
In addition to controlling who can comment, you can also set up comment moderation rules to make your life easier:
If you’re worried about comment spam, you can also install an anti-spam plugin such as Akismet. More on this later.
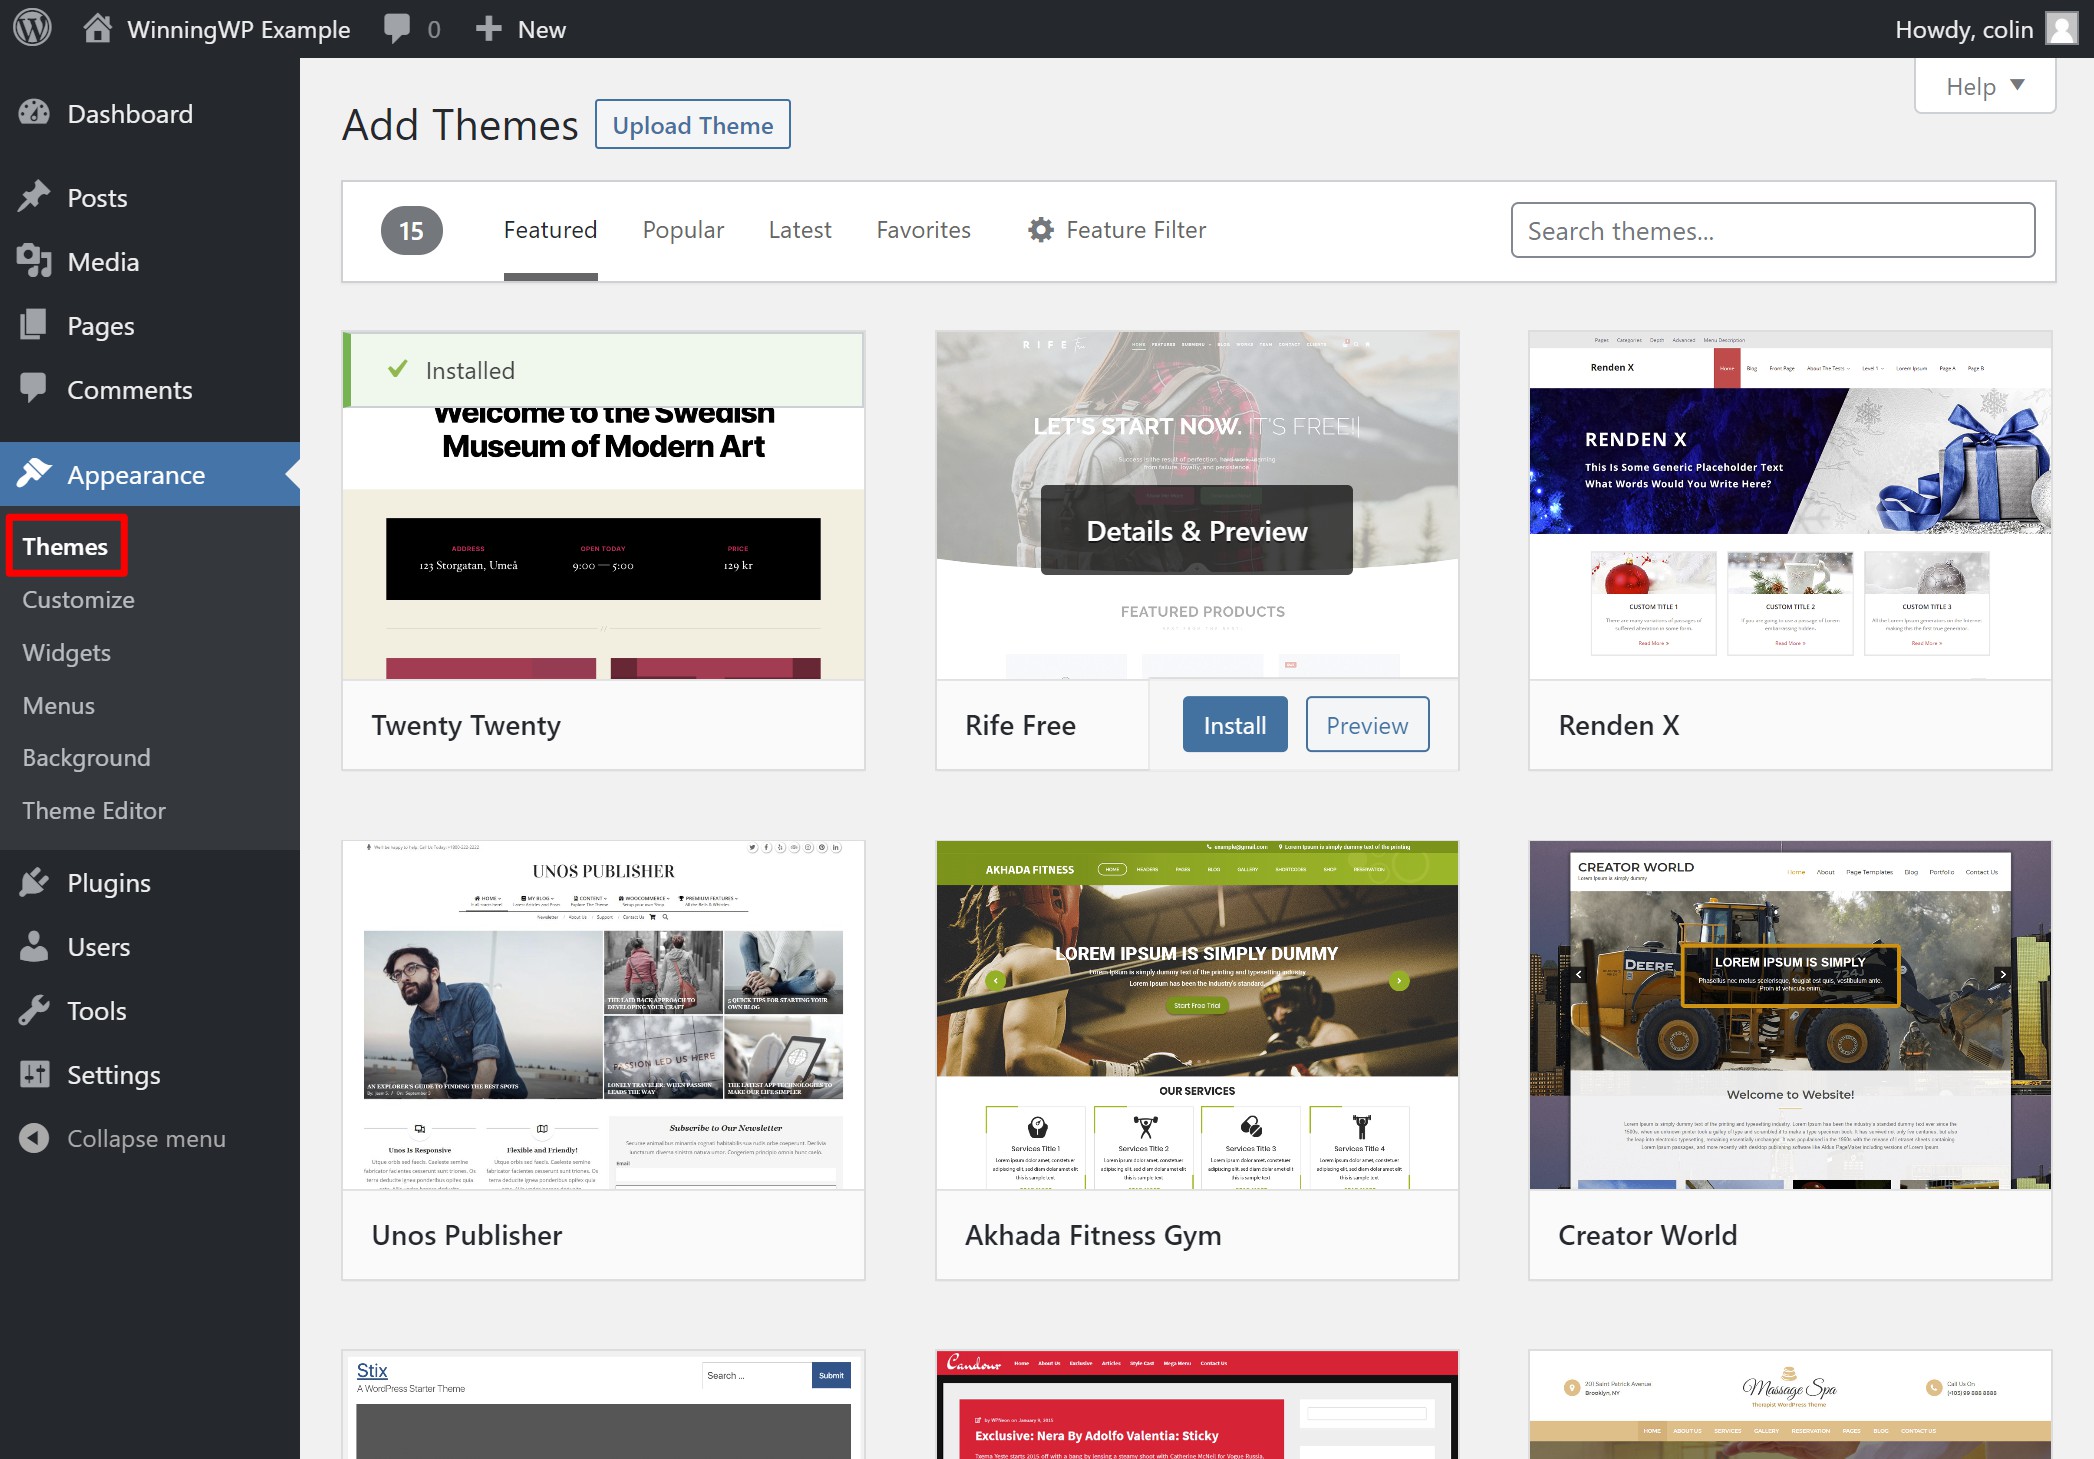
6. Install and Customize Your Theme
Your WordPress theme controls how your site looks — think of it like your site’s ‘clothing’.
Every WordPress site needs a theme, and you’ll want to choose one that matches your niche and desired aesthetic.
You can find thousands of free themes at WordPress.org. Or, if you want a little more flexibility, you may prefer to purchase a premium theme (here are our favorite spots).
To install your theme, go to Appearance → Themes → Add New and either:
- search for your theme by name if you found a free theme at WordPress.org
- upload the .zip file of your theme if you purchased a premium theme.
Once you install your theme, you can customize it using the real-time visual customizer by going to Appearance → Customize.
Some themes also include pre-made demo content that you can import. You’ll need to consult your chosen theme’s documentation to find out if that’s the case.
For a more detailed look at working with WordPress themes, check out our complete guide to installing and setting up WordPress themes.
7. Create a Logo and Favicon
Your logo plays an important role in your site’s branding.
Most WordPress themes display a logo somewhere on the top navigation, usually in the top-left corner (which is where you’ll see the WinningWP logo).
If you don’t have a logo already, you can find a bunch of free logo generators if you Google that term. Or, you can find cheap $5 to $25 logo design services on Fiverr.
Of course, you get what you pay for, and if you want an amazing logo, you should be prepared to spend hundreds on it.
Your favicon is the small image that appears in the browser tab. Google also displays it next to your site in mobile search results (and is working on bringing that to desktop search results as well):
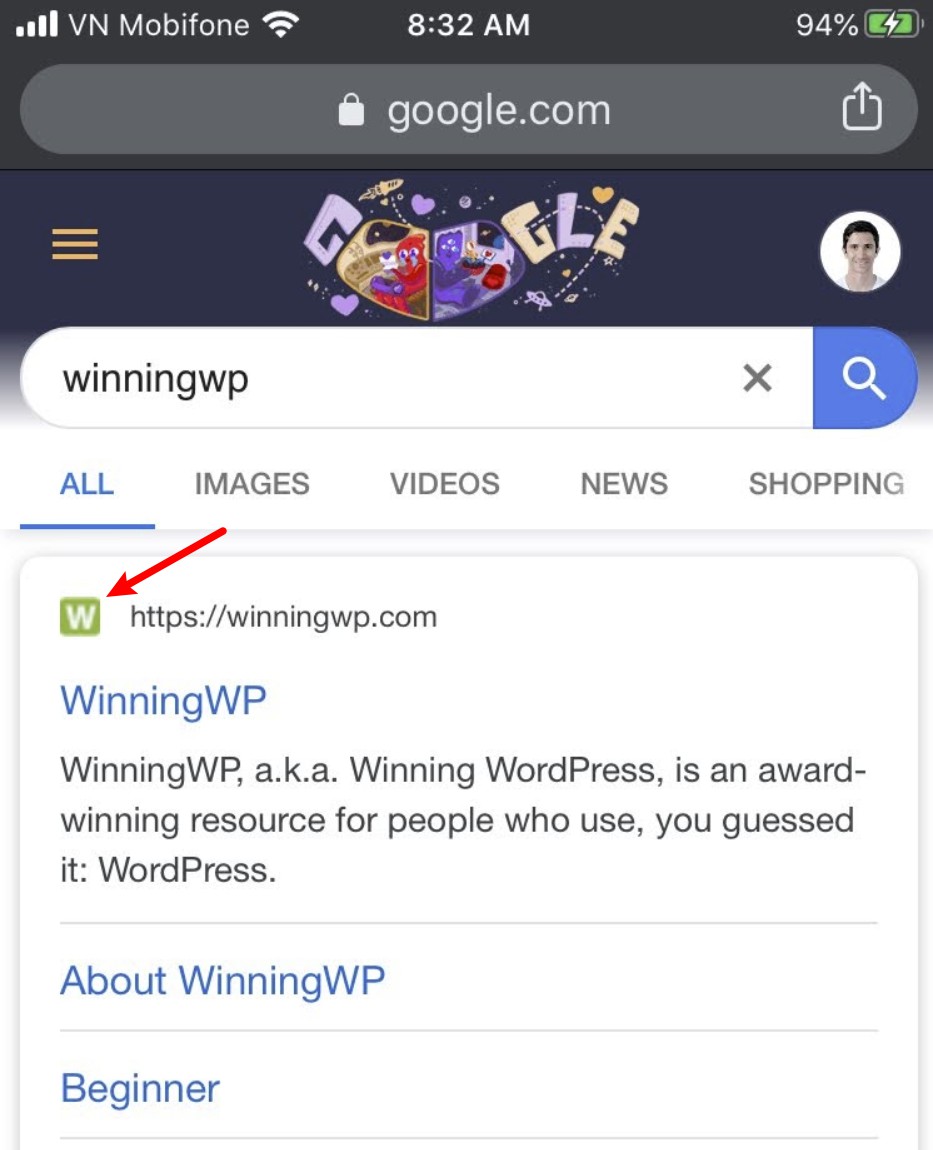
Because it gets such a prominent position, it’s another important part of your WordPress site’s branding.
You can use a tool such as favicon.io to create a favicon for your website.
Once you have your logo and favicon, you can add them to WordPress by opening the WordPress Customizer (Appearance → Customize) and going to the Site Identity section. There, you’ll see two options to Select logo and Select site icon (your favicon):
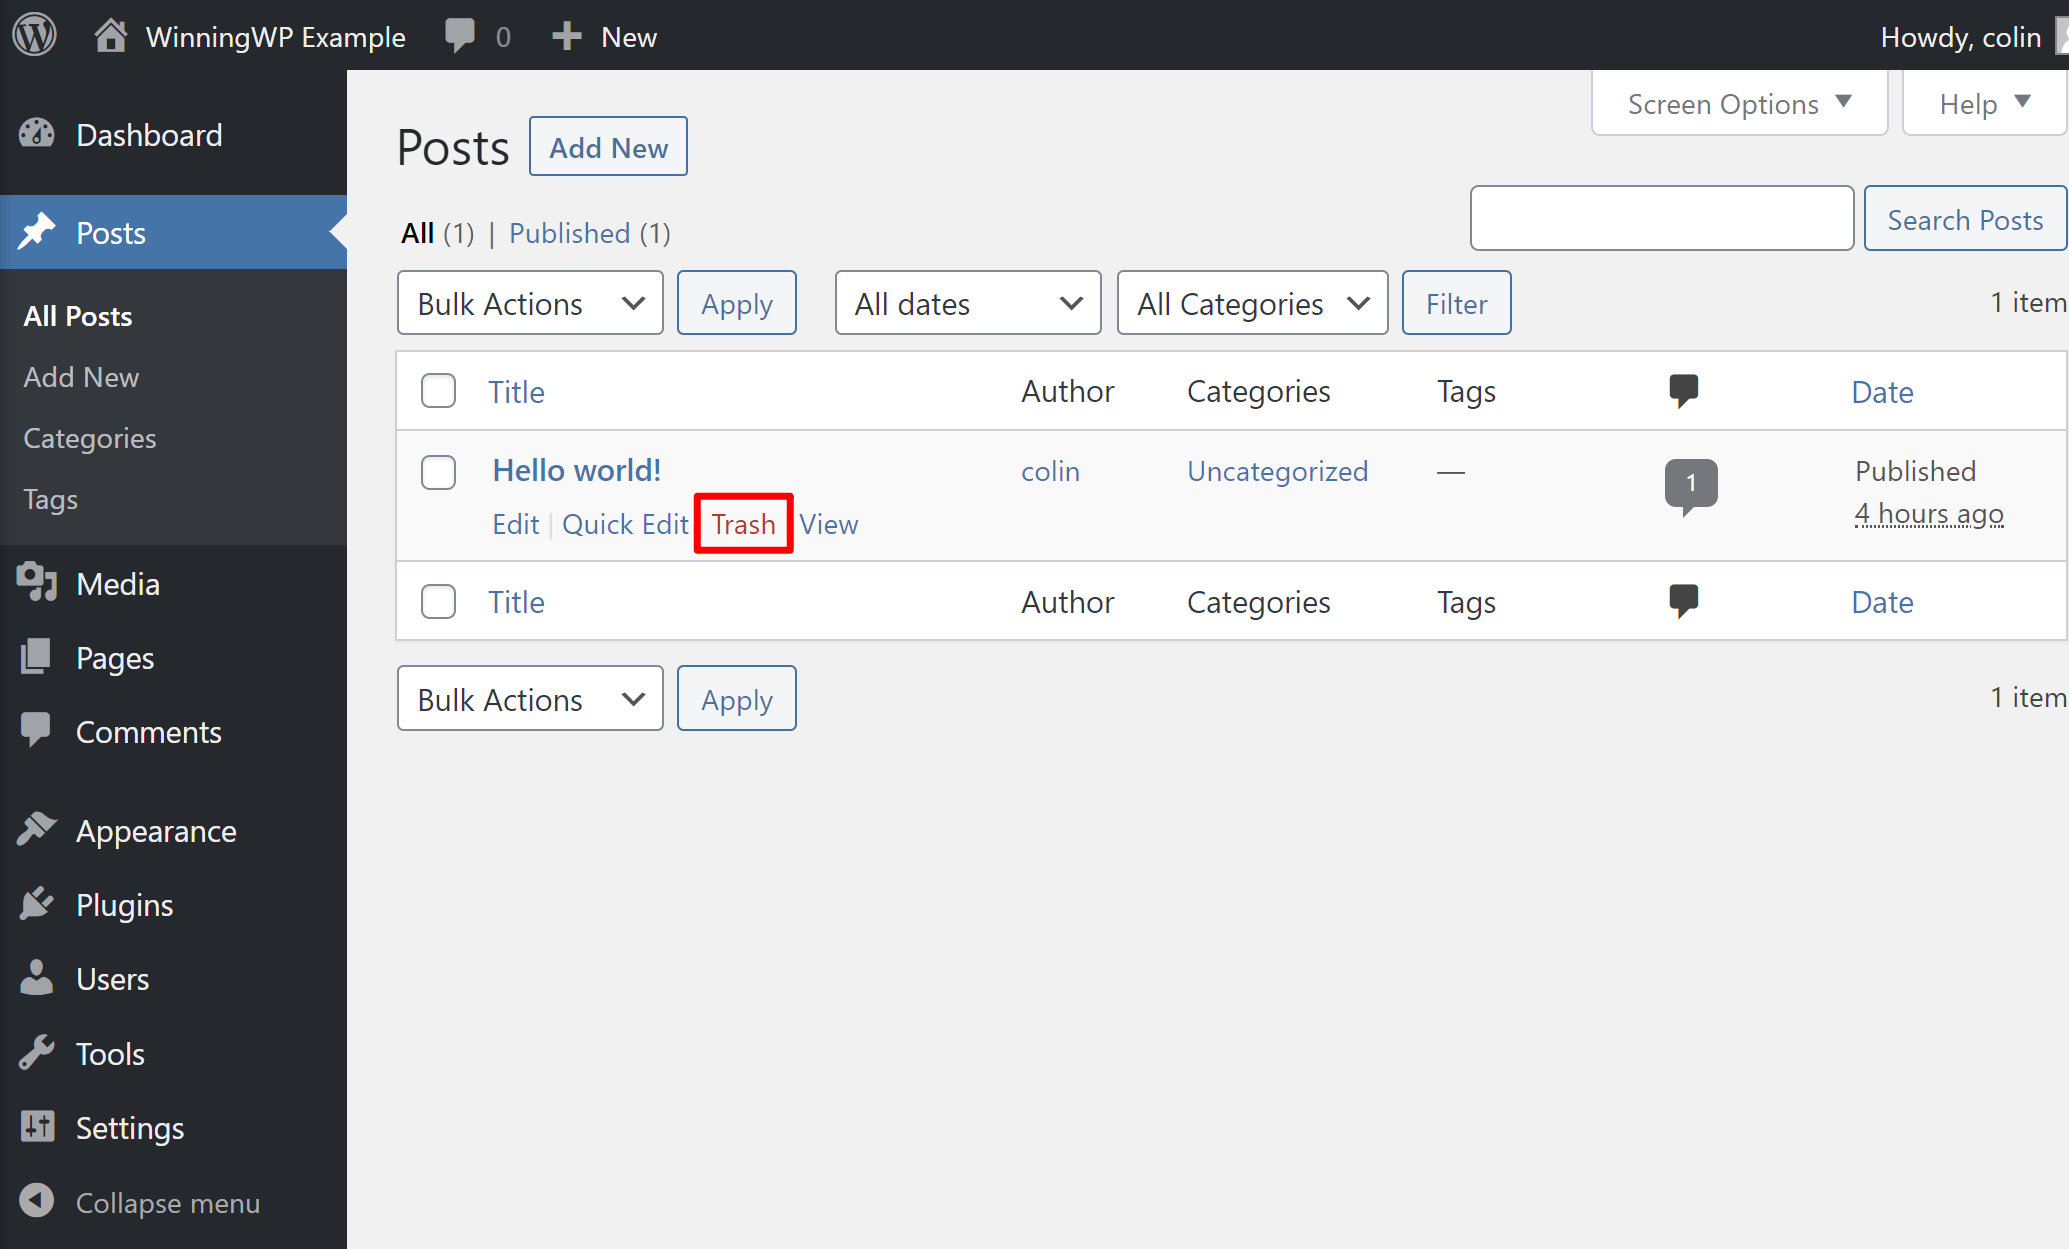
8. Remove Dummy WordPress Content
When you install WordPress, it includes some dummy content on the front end of your site. This is useful when you’re still choosing your theme, but, once you’ve set up your theme, you’ll want to delete it to make way for your own content.
Here’s how:
- Open the Posts and Pages area.
- Hover over the existing content.
- Click the Trash option to delete a piece of content.
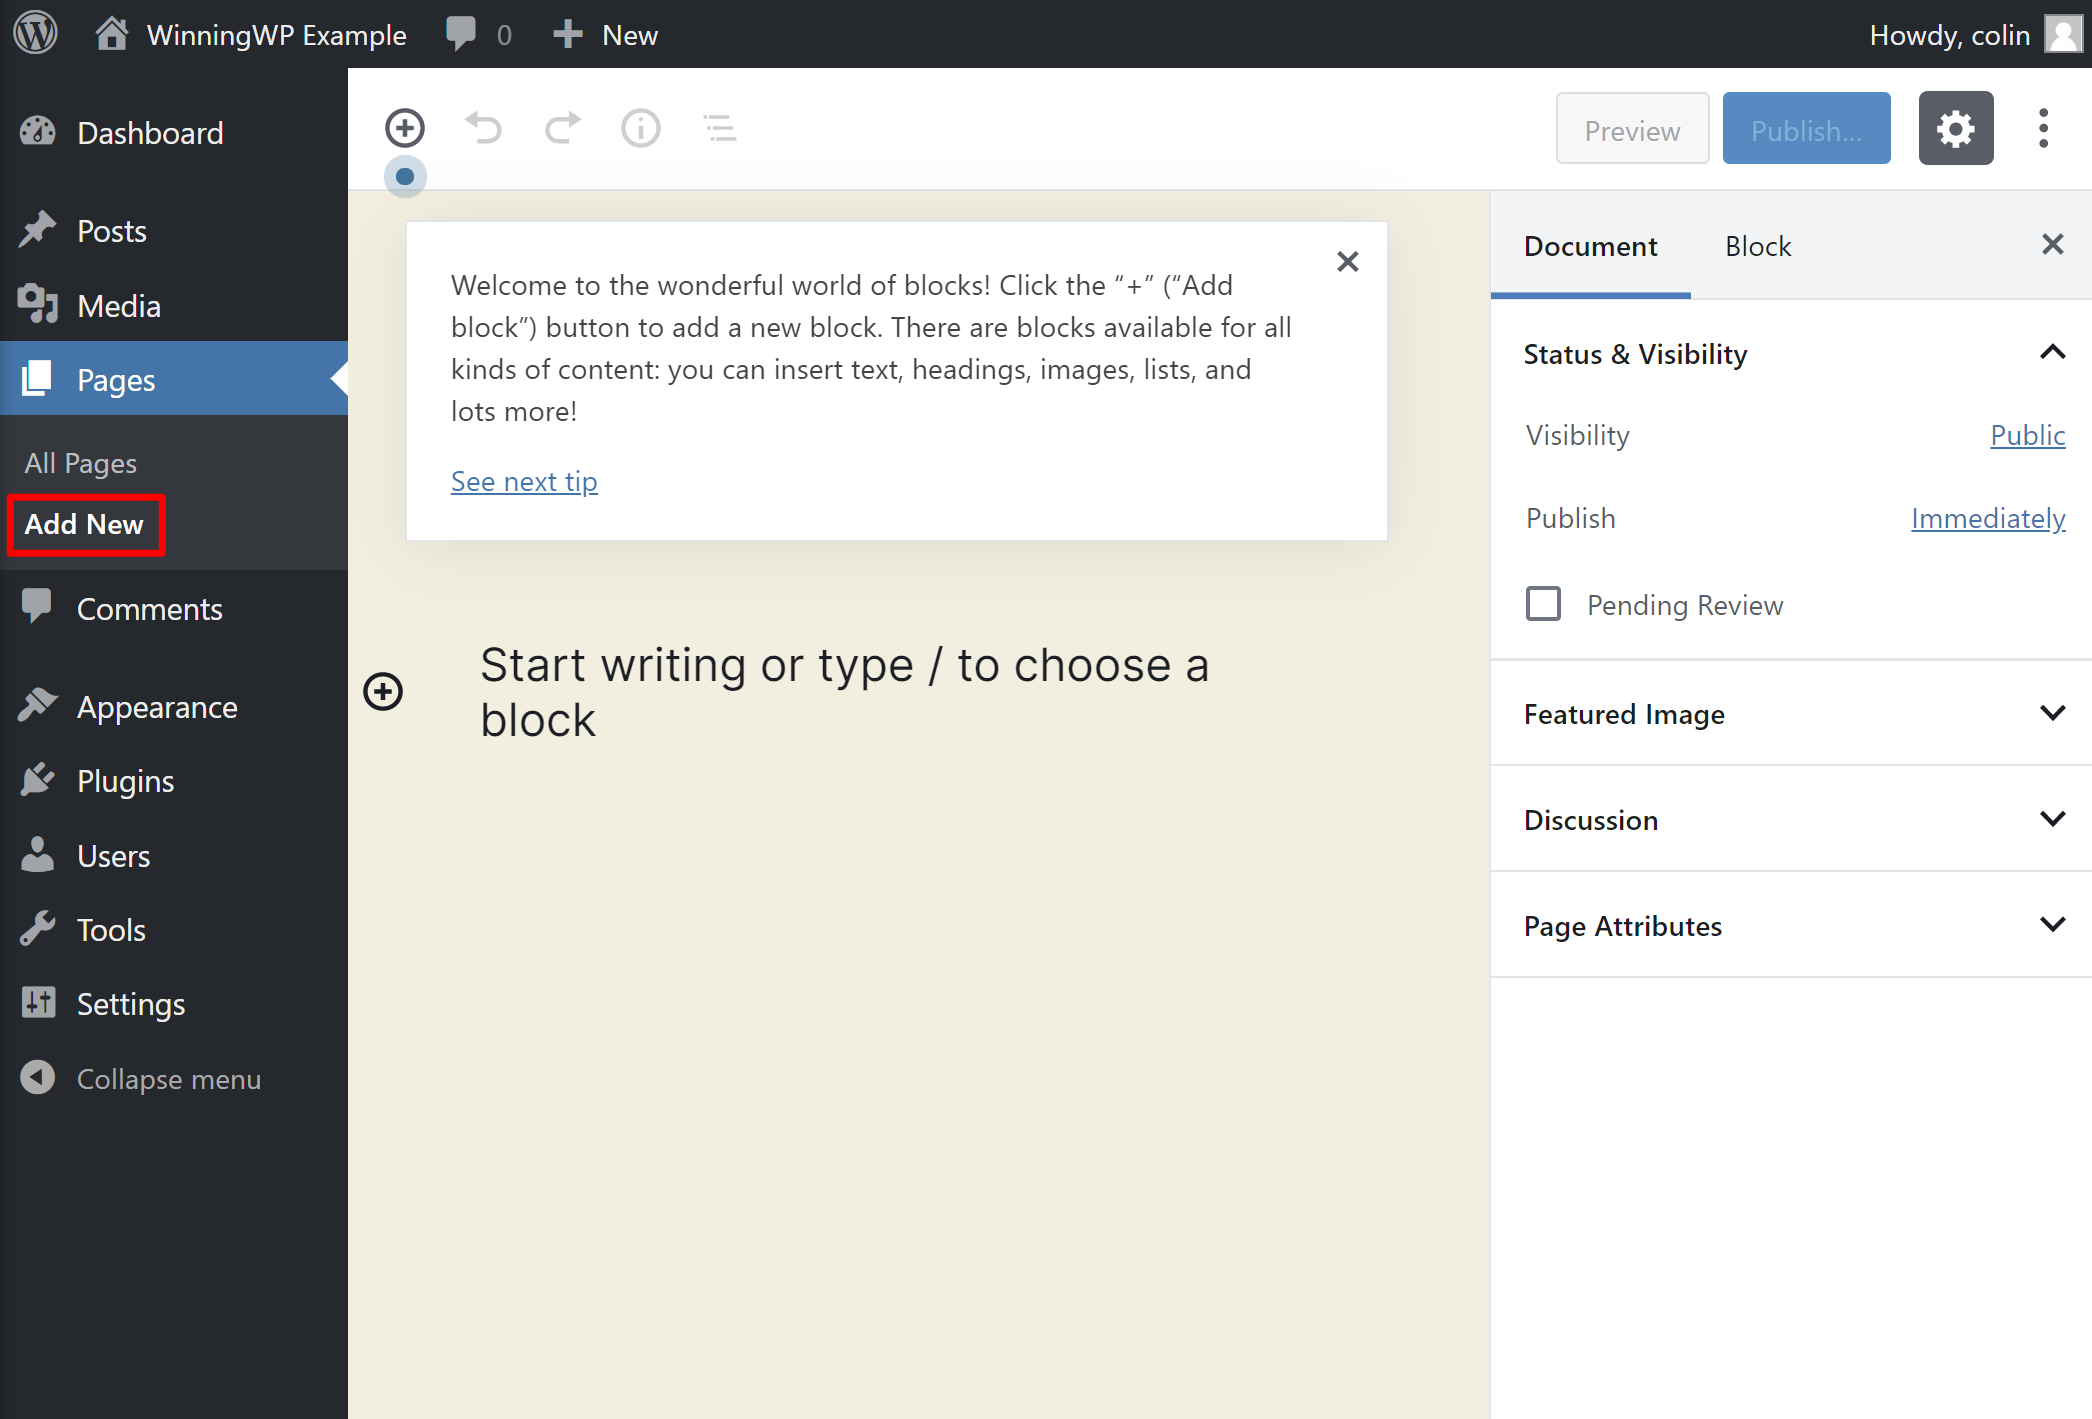
9. Create Your Core Pages and Set Homepage
Once you’ve removed the dummy content, you’re ready to replace it with your own content.
First up, you’ll want to create your core pages. This will likely include, at a minimum, your ‘About’ and ‘Contact’ pages. You can check out our About and Contact pages for inspiration — it’s totally fine to keep things simple for now.
If you’re creating a blog, you may also want to include a dedicated ‘Start Here’ page that links to your most important content.
Of course, you don’t have blog posts yet! But you can always add those later.
To create a new page, go to Pages → Add New. There, you can use the block editor to add content and control the layout of your page:
If you find yourself overly limited by the block editor and want more design freedom, you may prefer a WordPress page builder plugin such as Elementor. Such a plugin will give you a visual, drag-and-drop interface to design your content.
Finally, by default, WordPress displays a list of your most recent blog posts on your homepage.
If you’d rather display a static page instead, you can create a new page to act as your homepage. Then, go to Settings → Reading and set the Your homepage displays setting equal to A static page:
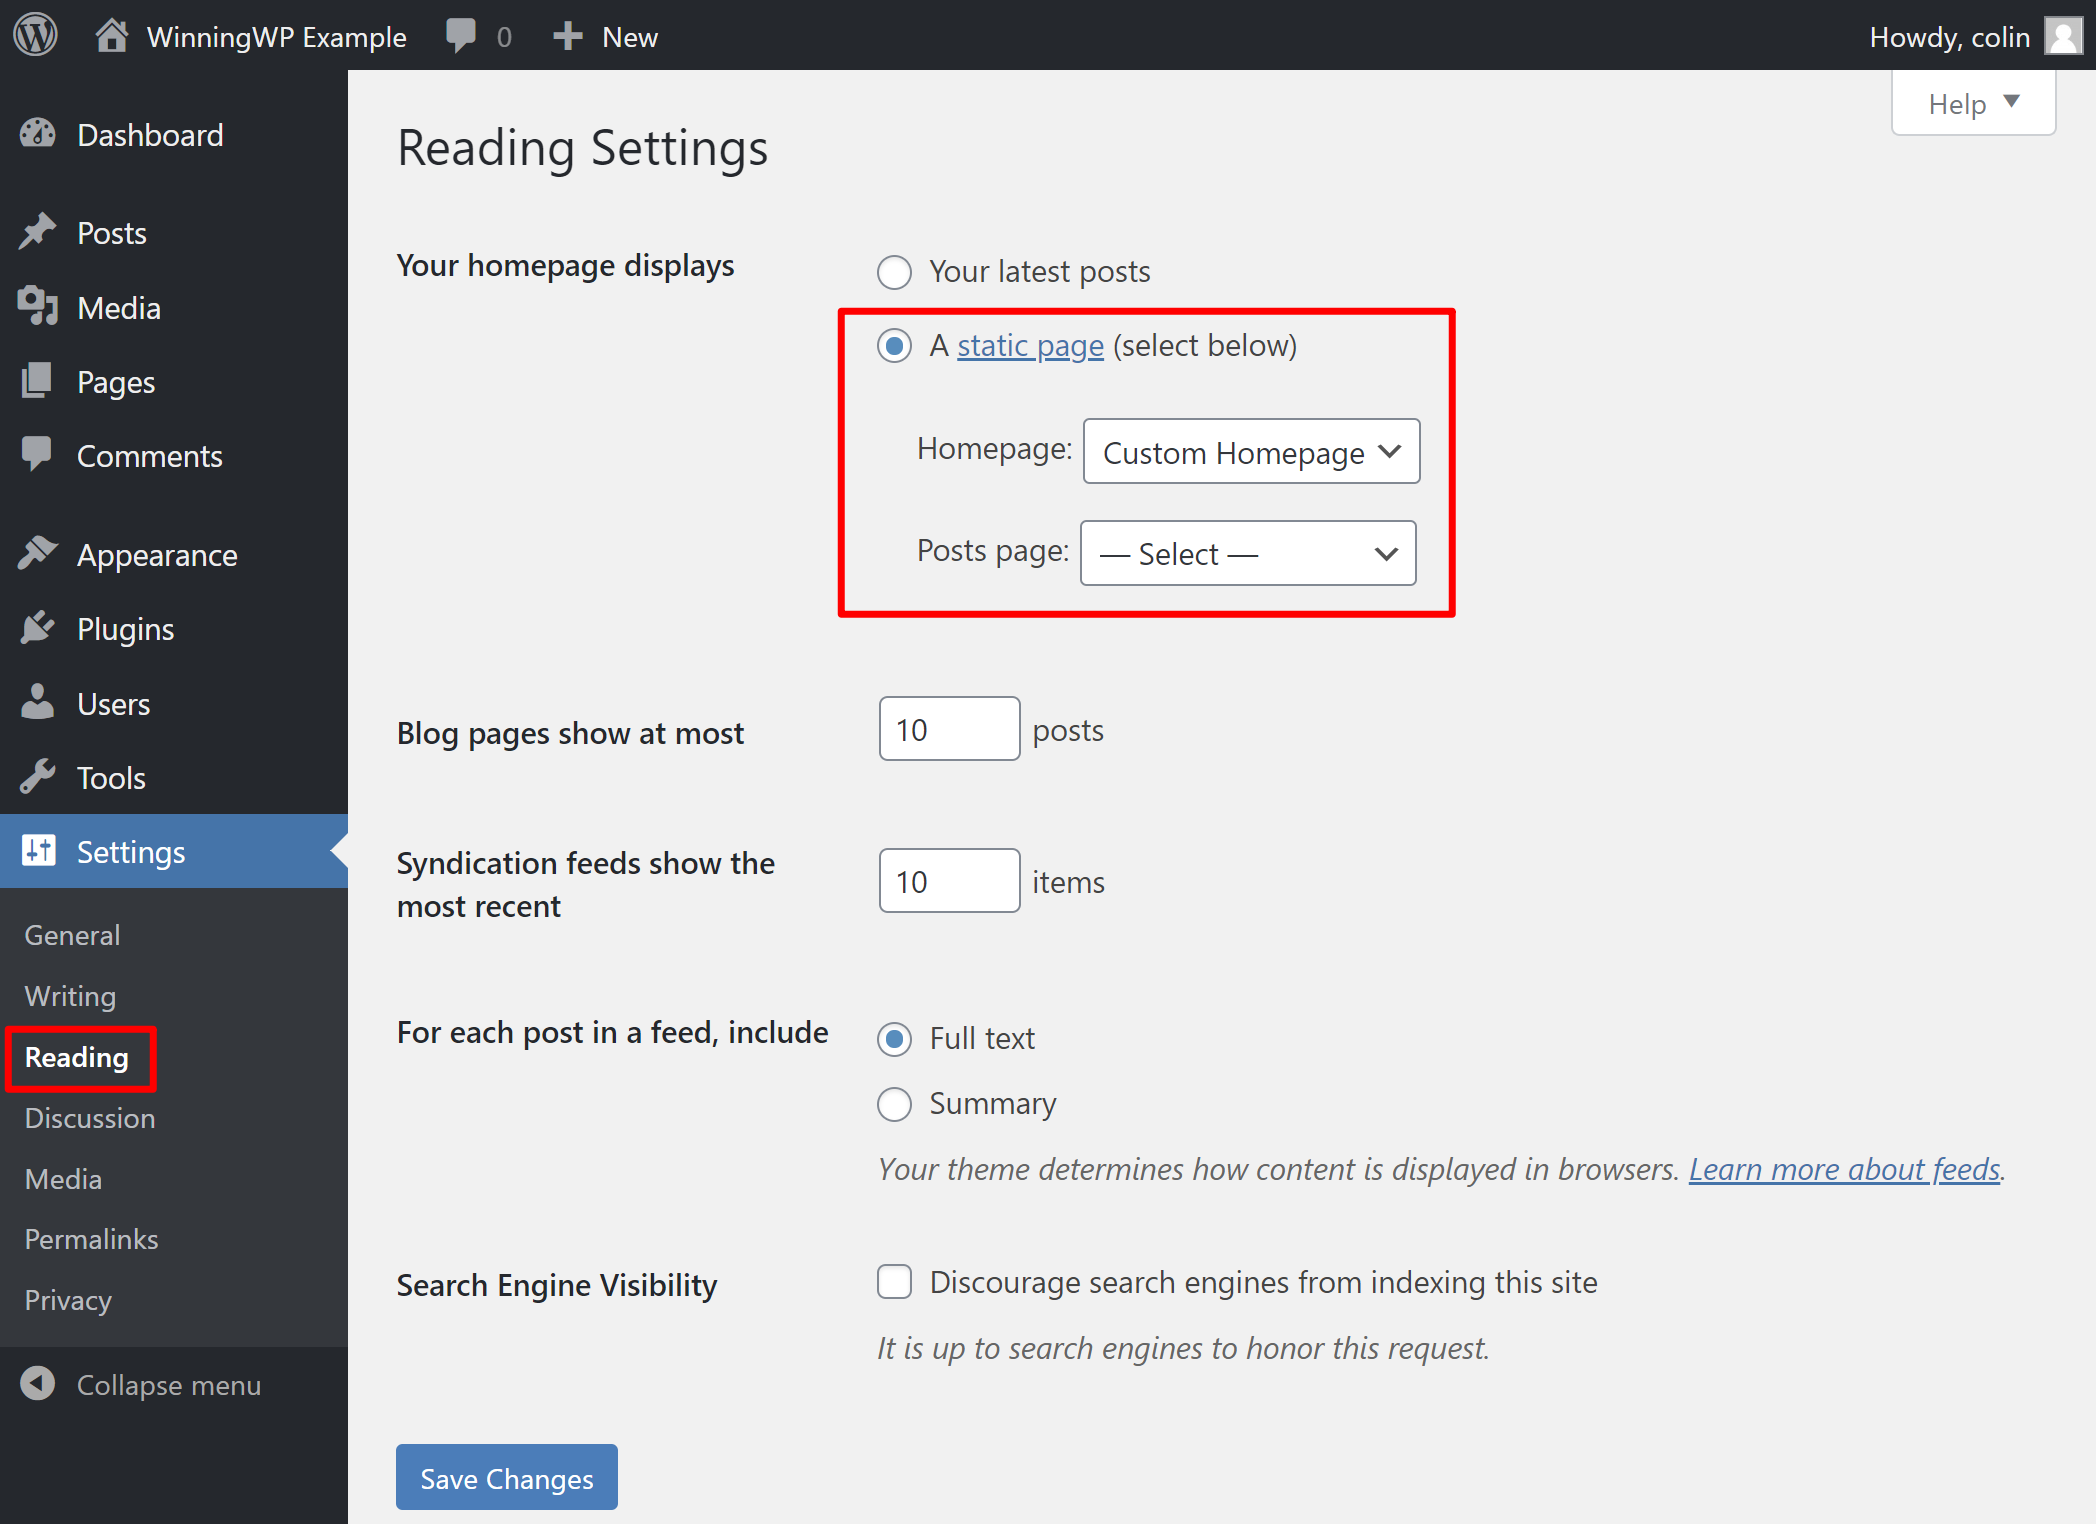
If you do this, you’ll also want to create another page to act as your blog page.
10. Set Up Widgets
Most WordPress themes include one or more sidebars that appear beside your content. For example, if you’re using a computer and you look to the right of this blog post, you’ll see the WinningWP sidebar.
To control what information displays here, you’ll use widgets.
To set these up, you can go to Appearance → Widgets:
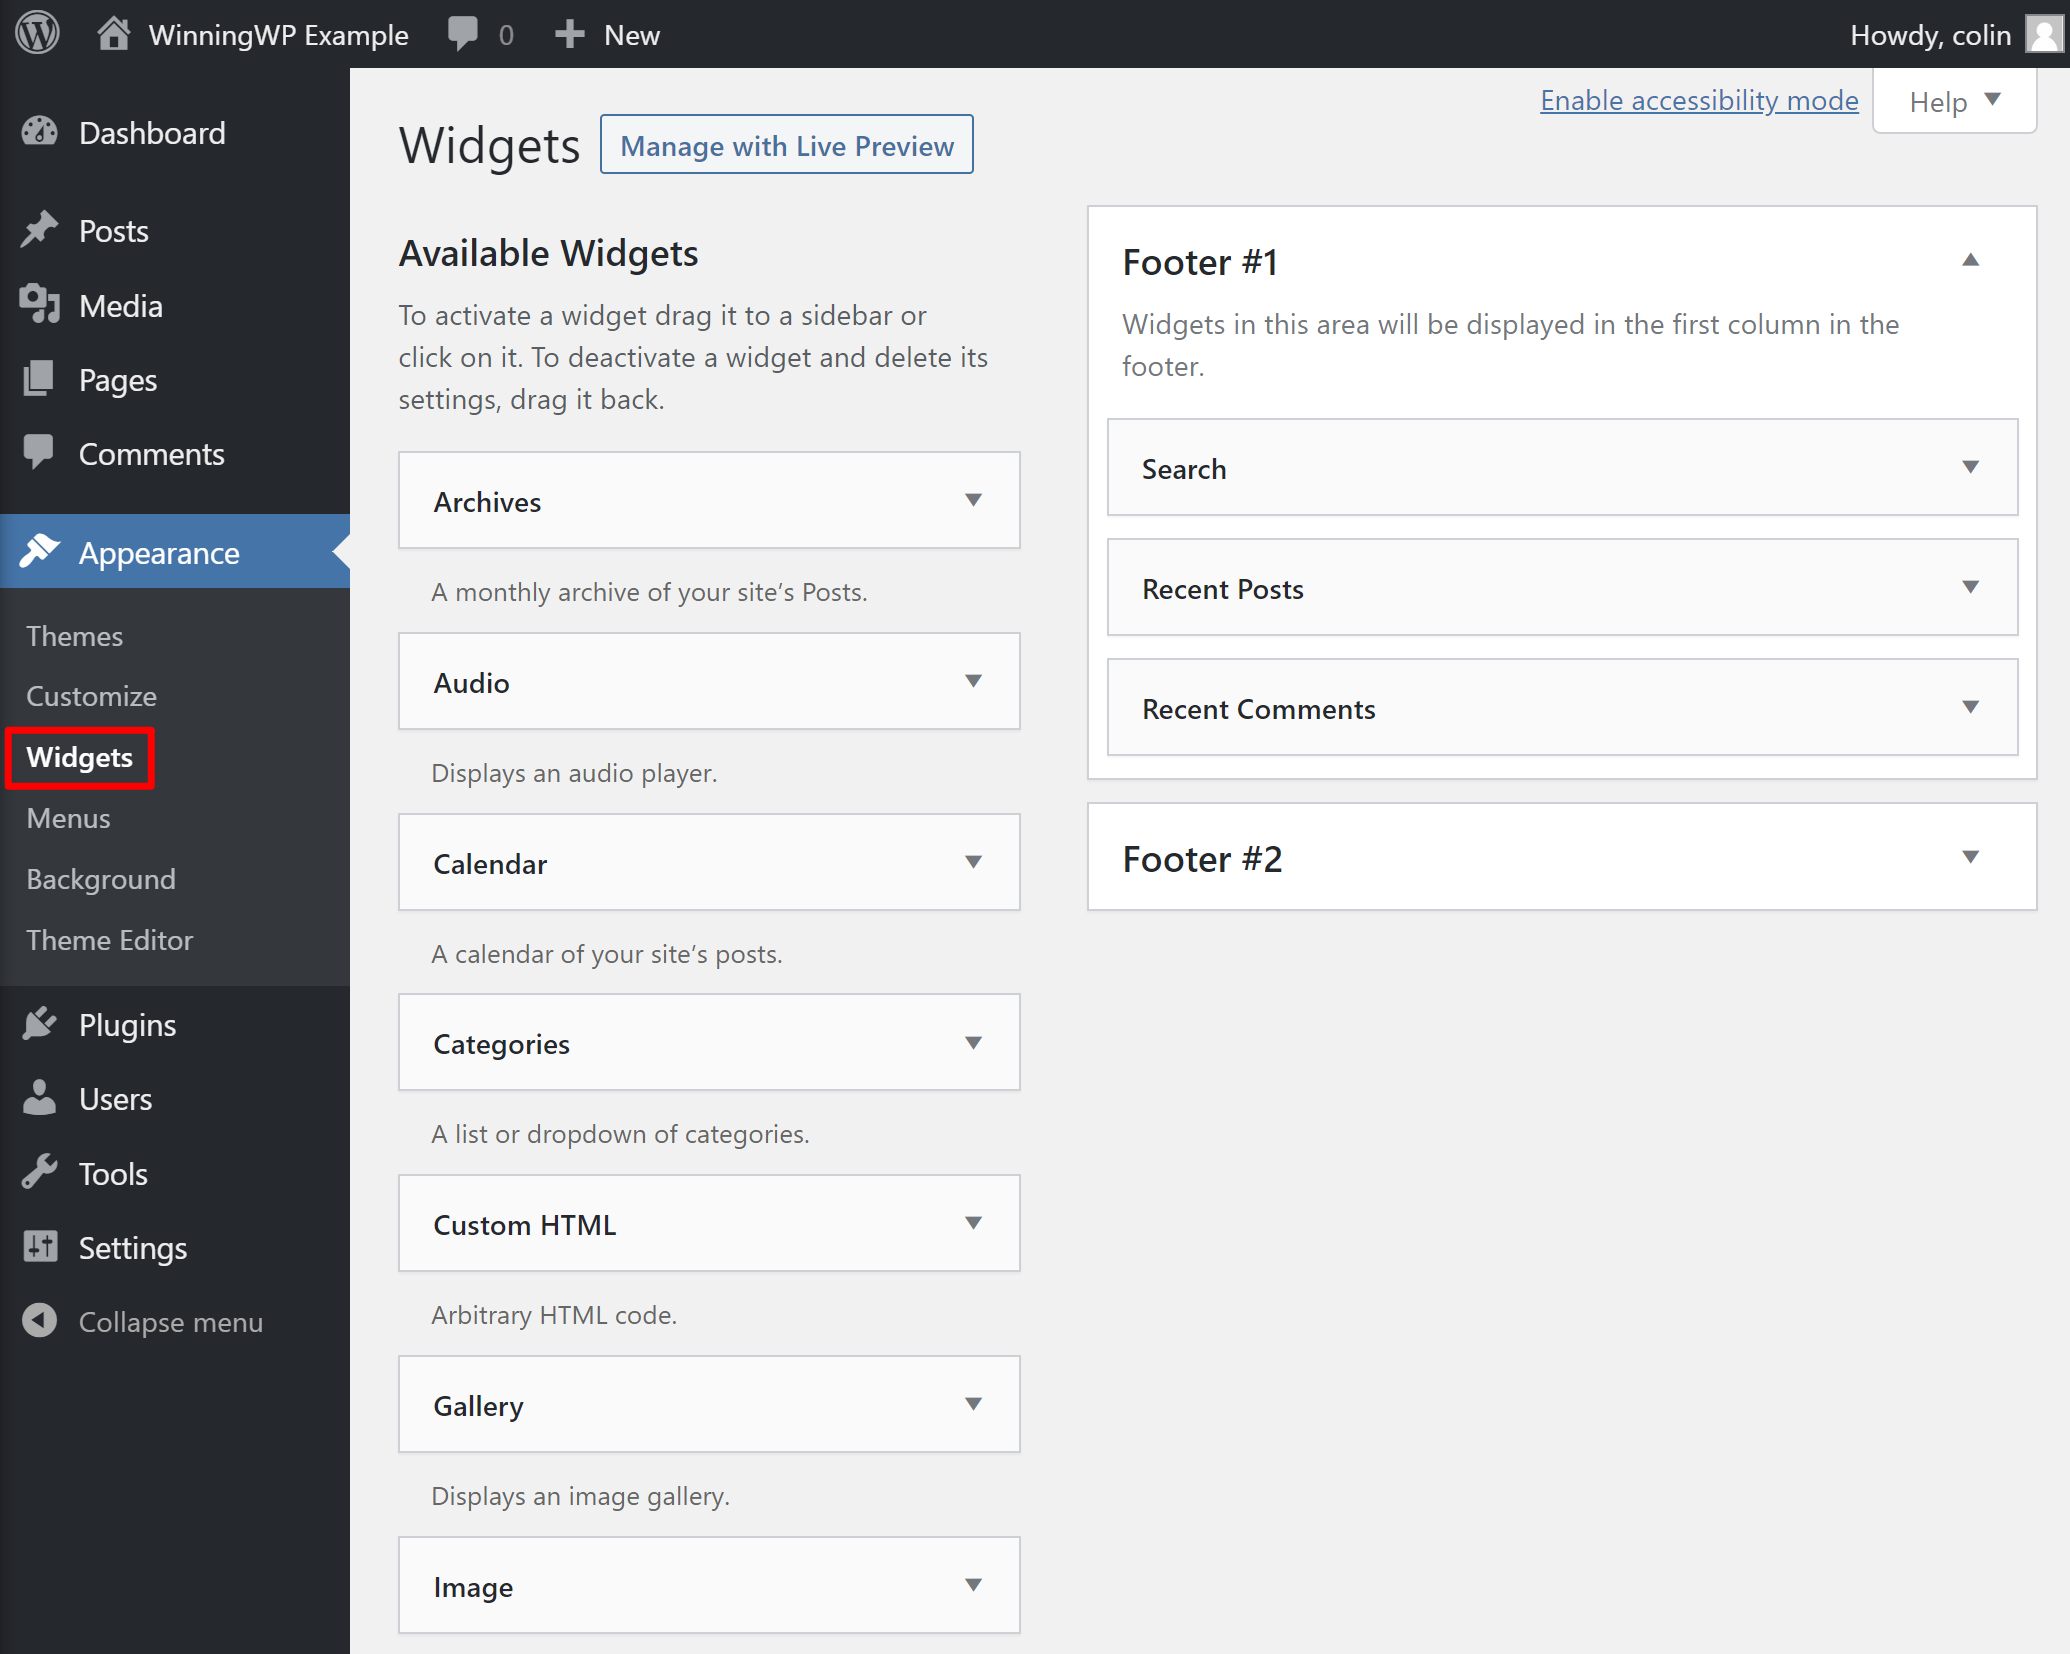
Some themes also let you use widgets to control the information that appears in your footer, which is the case in the screenshot above. The process is the same whether you’re working with sidebar widgets or footer widgets.
If you prefer a more visual interface, you can also control your WordPress widgets from the WordPress Customizer (Appearance → Customize). The nice thing about this approach is that you’ll be able to preview your widgets in real-time.
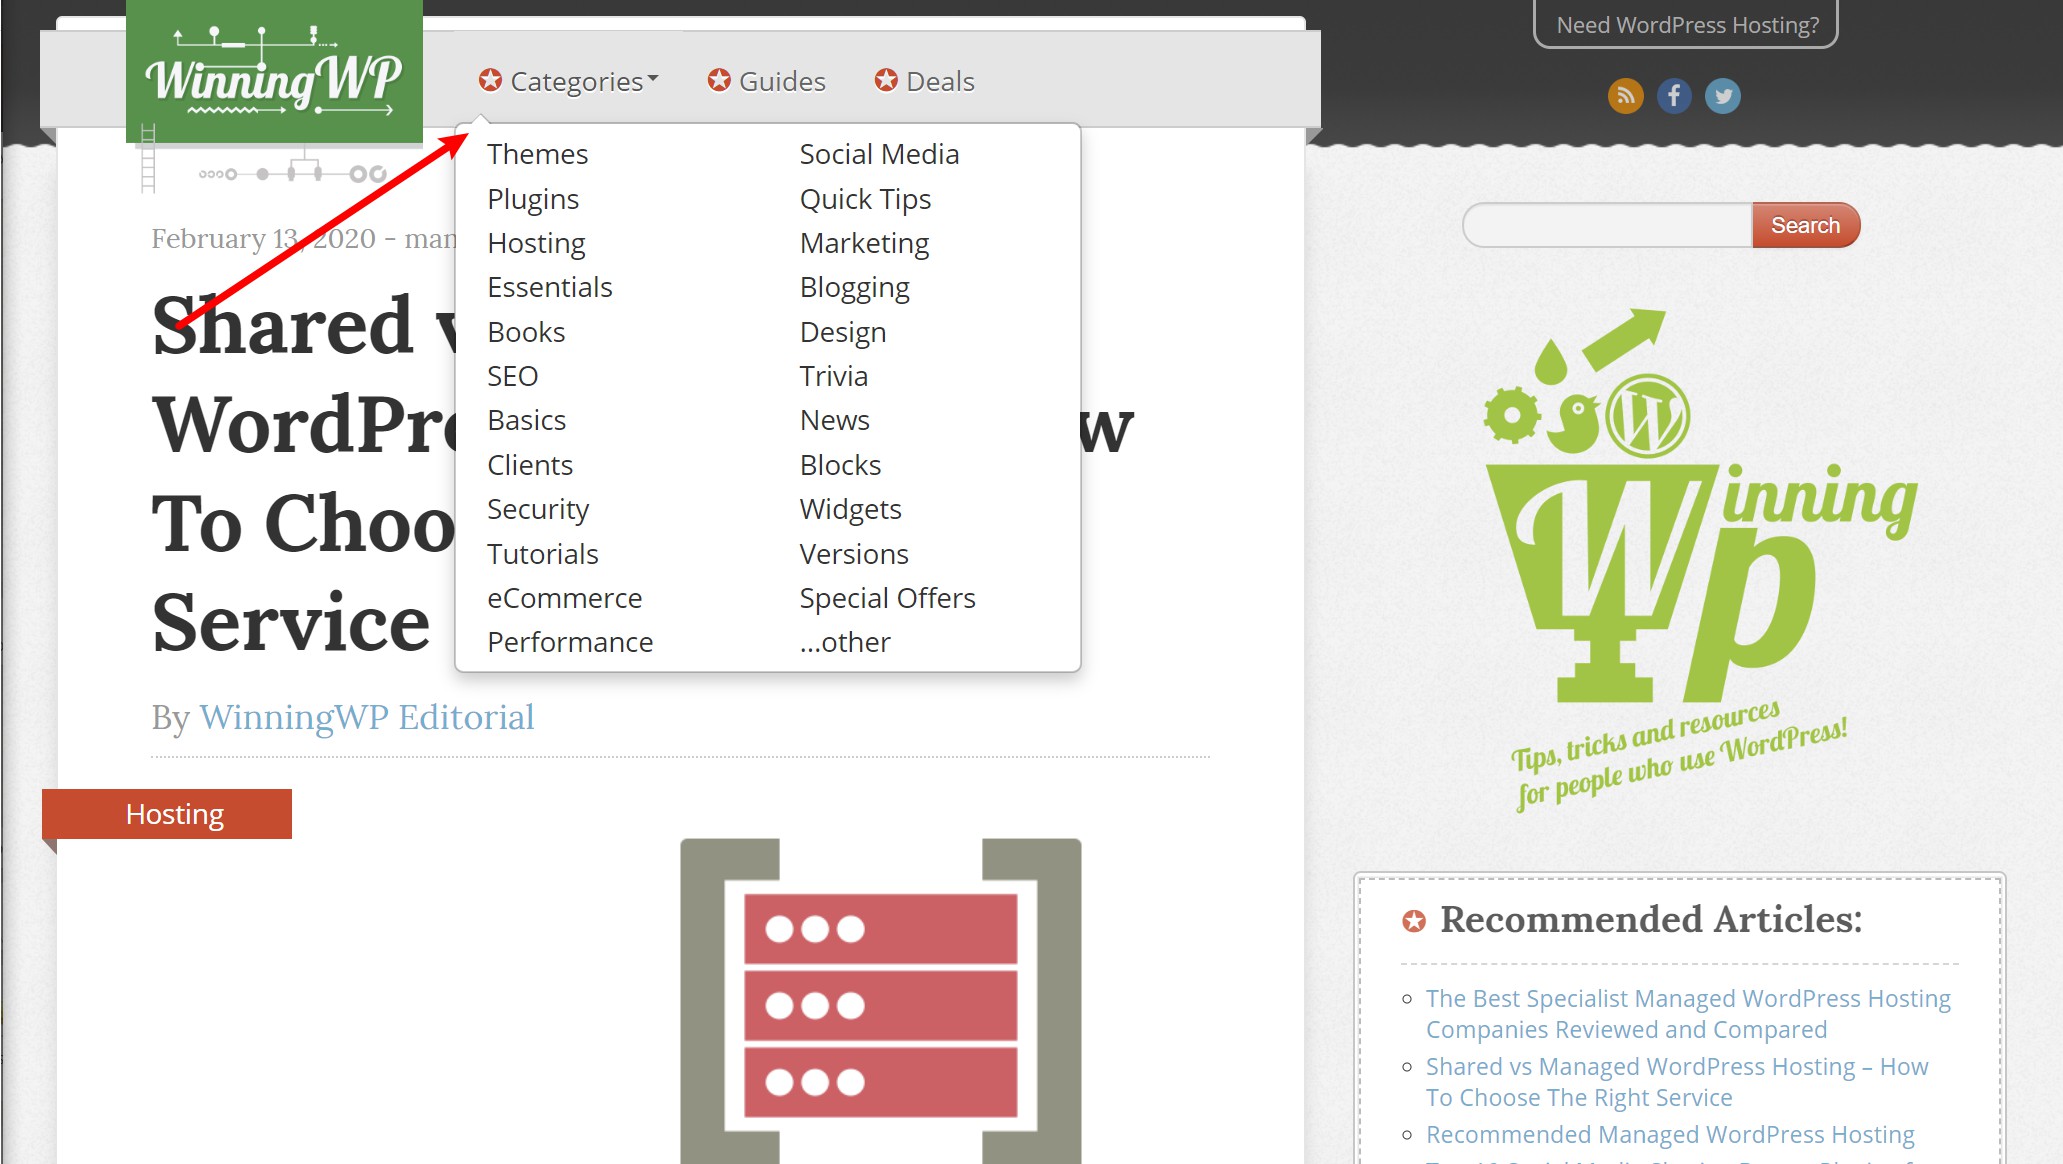
11. Set Up the Navigation Menu
While you’ll use widgets to control your sidebar and/or footer, you’ll also need to set up your main navigation menu, which most themes display at the top of the page.
Typically, this menu will include links to your core pages at a minimum. You can also use sub-menu items in a drop-down to drive people deeper into your site.
For example, if you hover over Categories on WinningWP, you can jump straight to specific blog categories:
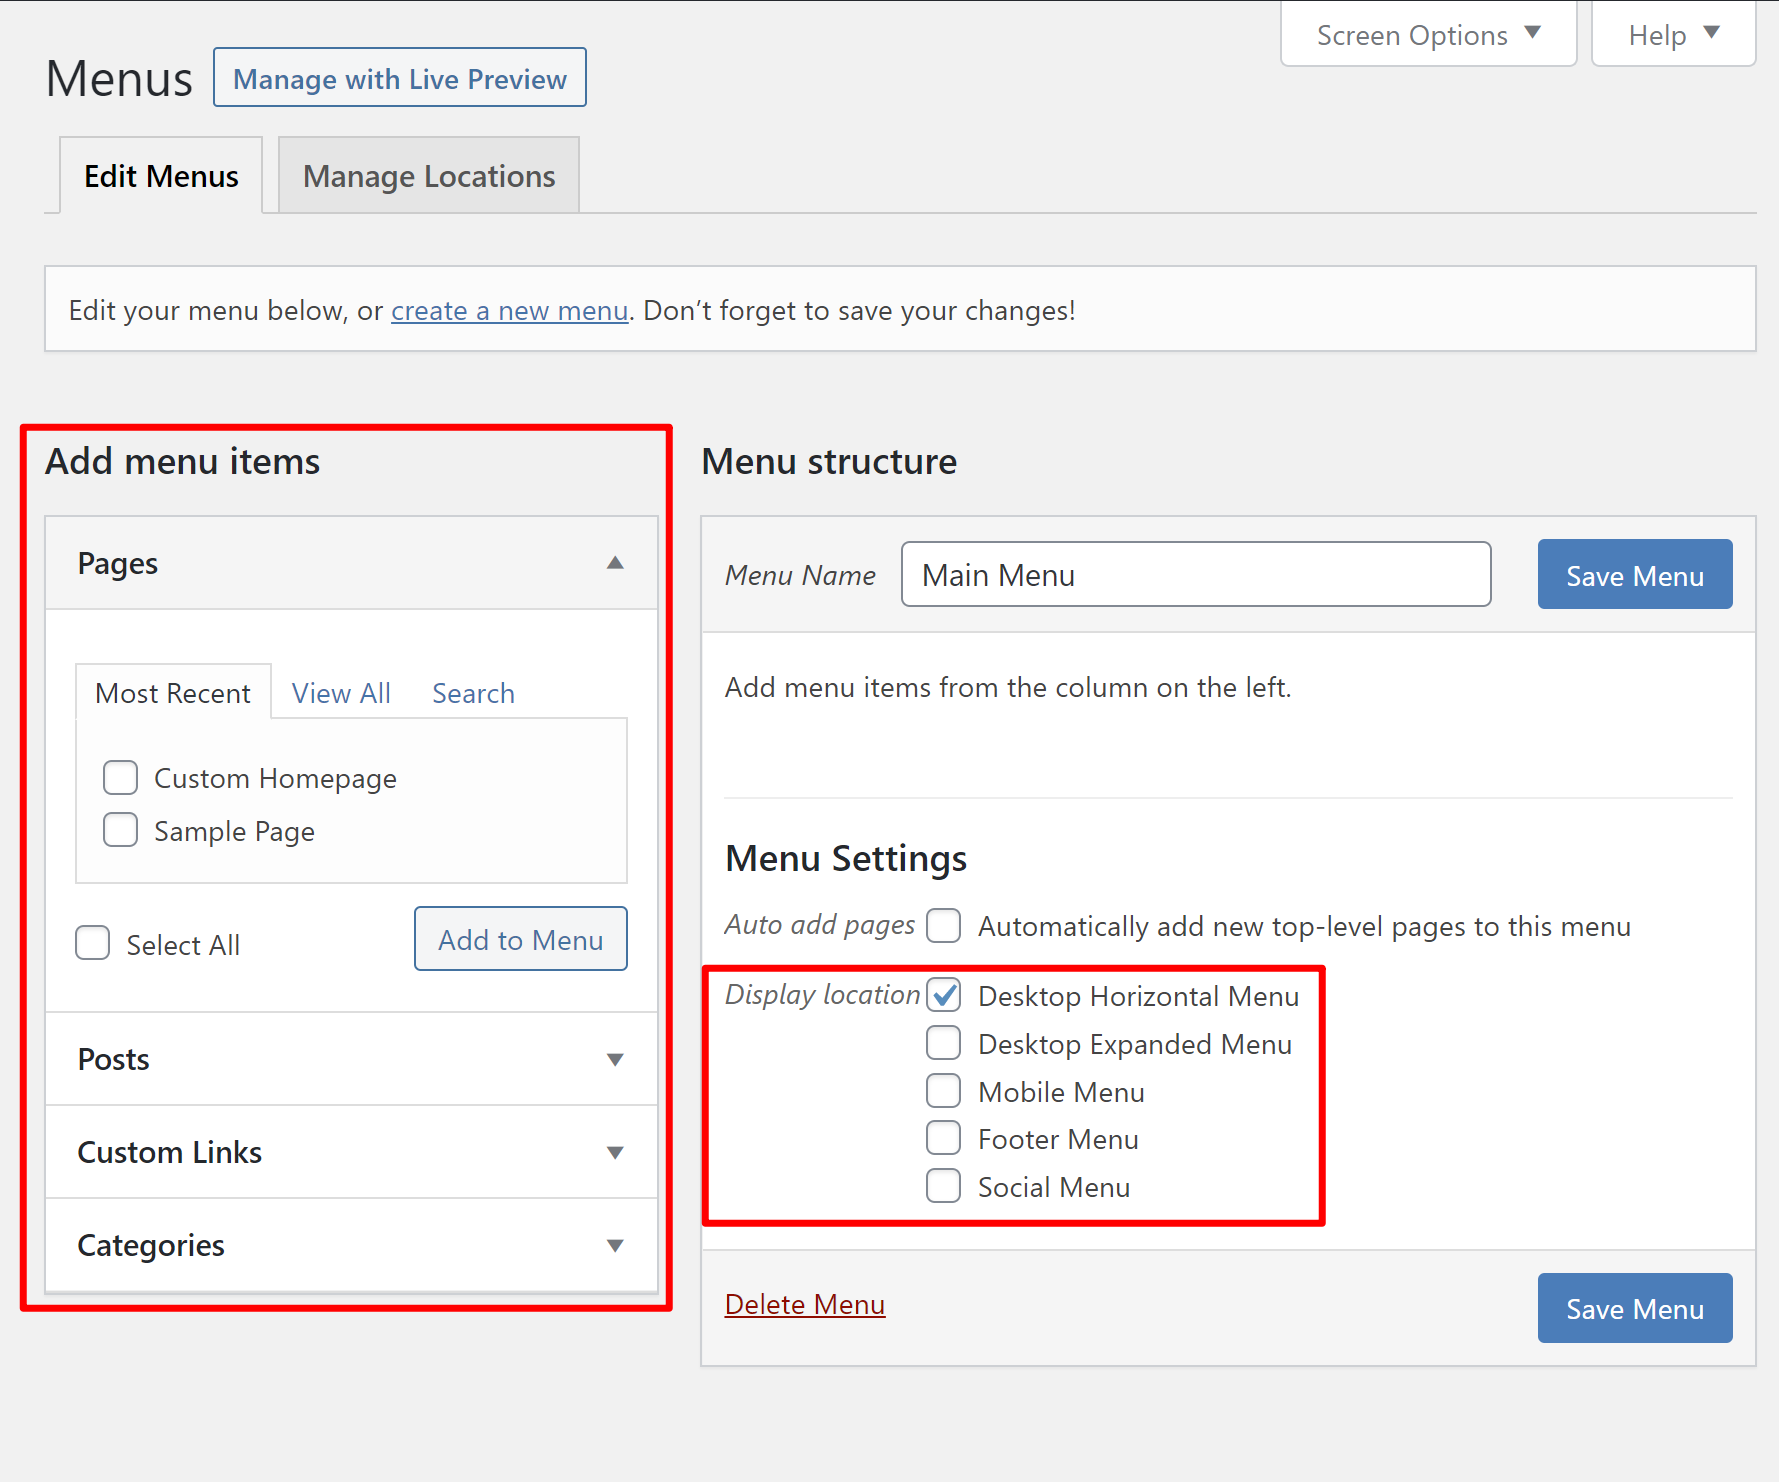
To set up your menu, go to Appearance → Menus and create a new menu:
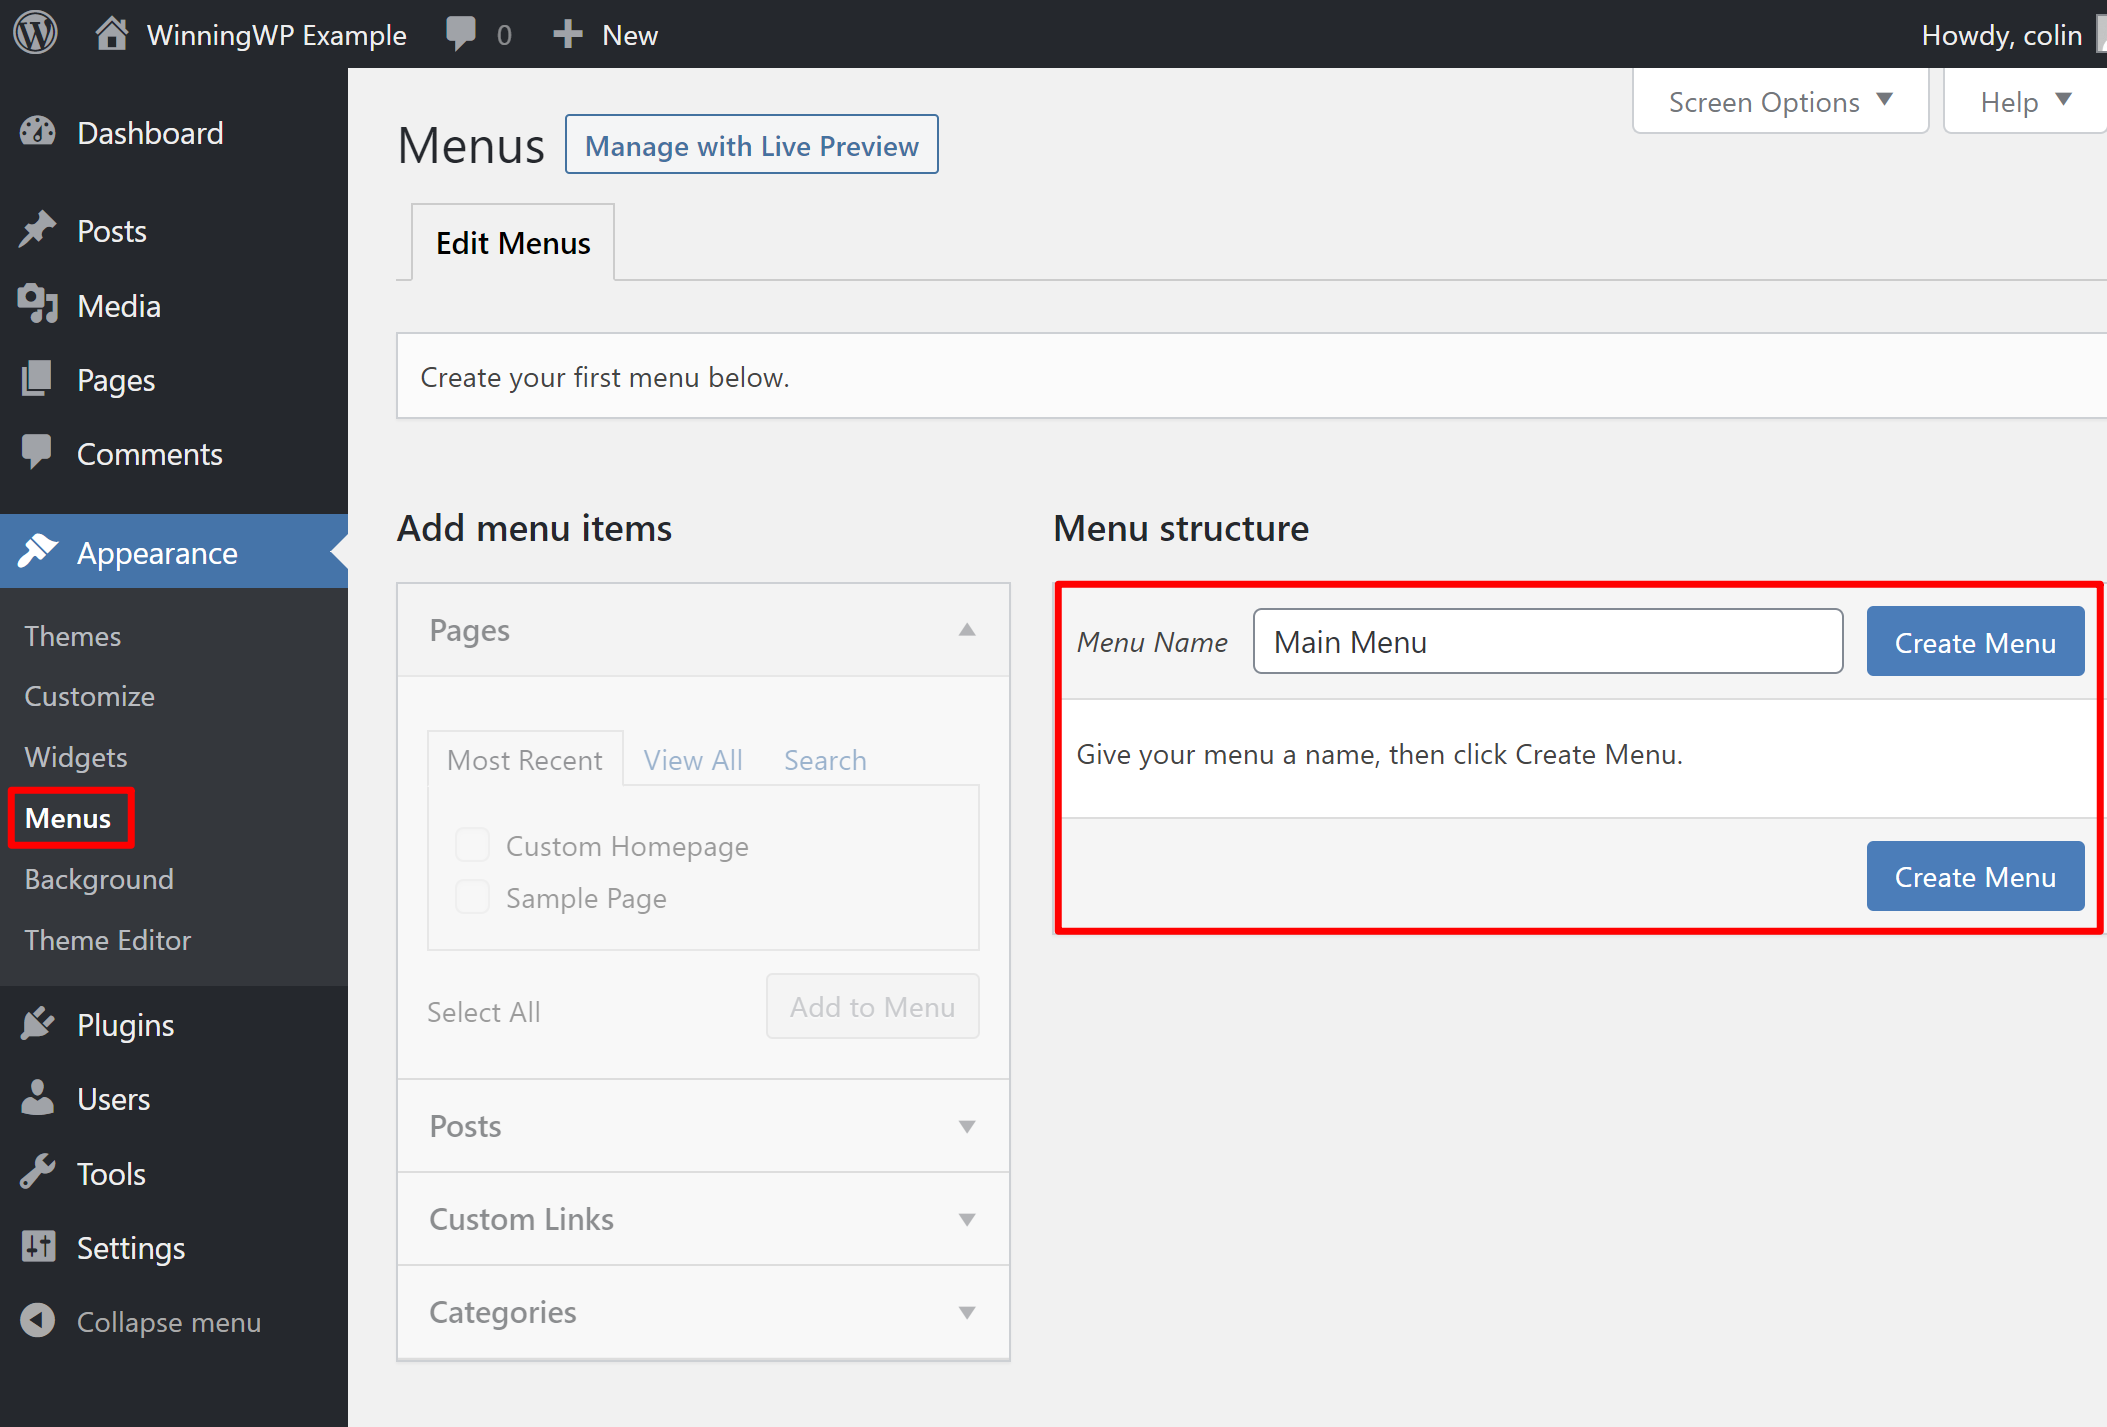
Then:
- Use the items on the left to add links to your menu.
- Set your Display location. On most themes, you’ll want to set this equal to something such as ‘Primary’ or ‘Main Navigation’, though the exact names vary by theme. The default Twenty Twenty theme uses ‘Desktop Horizontal Menu’.
12. Set Up an Automatic Backup Policy
To keep your site’s data safe, it’s imperative that you set up some kind of automatic backup policy.
If you’re using high-quality managed WordPress hosting, your hosting company are probably already doing this for you, and you can skip this section. But if you’re using budget shared hosting it’s unlikely your hosting company have any kind of meaningful backup policy in place.
To fix that, you can use a WordPress backup plugin. Two good options are:
- VaultPress — paid, but super simple and hands-off.
- UpdraftPlus — free and still pretty hands-off once you get past the setup process.
13. Install Some Other Must-Have WordPress Plugins
Beyond a backup plugin, there are also several other plugins that all WordPress sites need.
First off, to install a plugin, you can go to Plugins → Add New. We also have an entire guide on how to install WordPress plugins if you want a little extra help.
So, what are the must-have plugins?
- Yoast SEO — free — helps you to improve your SEO and rank higher in Google.
- WPForms — free — lets you add a contact form to your site using drag-and-drop. Our WPForms review.
- WP Rocket — $49 — helps to speed up your site. WP Super Cache is a good free alternative, though it isn’t quite as comprehensive. Our WP Rocket review.
- Akismet — free — protects your site from spam, which we mentioned earlier.
- ShortPixel — free — optimizes your images automatically to make your site load faster.
And then I think these plugins are useful for most WordPress sites but I wouldn’t quite classify them as must-haves:
- Jetpack — free — a useful collection of lots of small tweaks and features.
- Elementor — free — adds visual, drag-and-drop editing to help you to create more unique designs.
- Thrive Leads — $67 — helps you to grow your email list.
14. Remove Any Unused Plugins and Themes
At this point, you should have installed your chosen theme and must-have plugins.
Now, it’s time to go back and remove anything you’re not using! Many hosts install some extra plugins and themes, or you may have installed a few options you tested out and didn’t like.
Either way, you should remove unused plugins and themes because they’re just wasting space (and they can even be a security risk in some situations because those files are still sitting on your server).
To do this:
- Go to Appearance → Themes or Plugins, respectively
- Hover over a theme or plugin you’re not using
- Click Delete
15. Write Your First Blog Post
And, with that setup out of the way, you’re officially ready to write your first blog post! Introduce yourself to your future readers and let them know what’s in store for them on your site.
To create your first blog post, go to Posts → Add New. There, you can use the WordPress block editor to type up your post.
When you’re ready, click Publish and share your site with the world.
Get Started With WordPress Today
By following the steps in this post, your WordPress site should be ready for prime time.
You’ll probably find that your WordPress site is never really ‘finished’ and you’ll love to tinker with new plugins, design changes or refinements to your core pages.
But, in general, you’re ready to open your doors and start receiving visitors.
To help to grow your site, you can check out our guides to WordPress SEO and how to create content that drives traffic.
Anything to add? Leave a comment!


All comments are held for moderation. We'll only publish comments that are on topic and adhere to our Commenting Policy.