How to Install WordPress - All You Need to Know!
Although it can be a daunting prospect for beginners, installing WordPress is actually remarkably simple once you know what's involved — and that's where this guide comes in. Starting from scratch, we'll cover everything you need to know to get WordPress set up exactly as it should be. (Note: For more guides in the same series, head on over to WinningWP Guides.)
-Note: WinningWP content is free to all. If you make a purchase through referral links on our site, we earn a commission (learn more).
Installing WordPress is remarkably easy. Its 'famous five-minute install, and the accessibility this brings to the platform, is one of the reasons why more than a quarter of all websites are built with WordPress.
Nowadays, the five-minute install is actually one of the slowest ways of installing WordPress, and there are two alternative methods that will take you even less time!
As always, however, while the actual process of installing will only take a couple of minutes, you need to spend a bit of time beforehand making sure you have everything else in place and are proceeding with the option that makes the most sense for your website.
This guide will cover everything you need to know about installing WordPress -- whether you’re installing for the first time or just want a recap of the best options. Let’s get right to it.
Before You Install WordPress, You Need to Look at Hosting
The main prerequisite for installing WordPress successfully is making sure your hosting is sorted, as this provides the storage and power for your website. Having the right hosting is very important for your site's health and success, and it’s much easier to sort this out before you install WordPress.
Furthermore, different types of hosts have different ways of installing WordPress, and some of these are significantly easier than others. Let’s look at these different types of host in more detail.
Managed hosting is the best way of hosting a professional WordPress website. Managed hosts use servers optimized to run on WordPress. This has a number of benefits, including very fast load times (the faster your site loads, the better), and guarantees your site will be online during traffic spikes (most likely to come from social media).
Managed hosts also throw in useful extras, such as WordPress security protection, automated backups and updates, and expert WordPress support. All of this does, however, come at a price: Managed hosting costs between $30 and $100 for most small-to-medium sites, and significantly more for large sites.
Shared hosting is inferior to managed hosting, but significantly cheaper. The name is derived from a single server being 'shared' between dozens, hundreds or even thousands of websites. As you may expect, this means resources are often stretched, and a single resource-intensive site on the same server can cause all other sites to load slowly (or not at all). A site hosted on shared hosting will also struggle with large spikes of traffic.
Furthermore, shared hosting is designed to be versatile, and, thus, is rarely well optimized to run WordPress -- meaning your site will load more slowly than on managed hosting (visitors won’t like this). You may get backups and some security features, but these won’t be of the same quality as those found with managed hosting. Shared hosting is popular despite these drawbacks because it’s cheap: Plans start at $5 a month and rise to only $15 a month.
The takeaway from this is simple: If you can afford a managed host, you should use one. Managed hosting is easy to use, reliable and comes with extra features that'll keep your site safe. We recommend WP Engine, which starts at $29 a month, and will be using this as our managed hosting example for how to install WordPress later in this guide.
If managed hosting is too expensive, then the best shared host to use is SiteGround. We’ll be using SiteGround as our example for a 'one click' WordPress install.
This is your overview of WordPress hosting, and should be sufficient information to make a decision. If you need more detail, however, we have a full article on how to choose between managed and shared hosting, and a full guide on how to choose the best WordPress hosts.
With your hosting sorted, we can move on to the main part of this guide: Installing WordPress.
How Should You Install WordPress?
There are three ways of installing WordPress:
- Having it done automatically for you.
- Using a 'one-click' installer.
- Manually installing WordPress.
The first two options are the easiest, and you should default to one of those if possible.
Managed hosts will install WordPress automatically for you, and most shared hosts will offer some sort of easy 'one-click' installer. Both of these typically come with advantages such as automatic updates and backups, and, as discussed, managed hosting also gives you other benefits. There are no real disadvantages to using either of these installation methods.
If neither automatic or 'one-click' installs are available, you’ll need to install WordPress manually. You should also do this if it’s imperative you have complete control over the installation process. For most people, however, this isn’t going to be the case, and the other two installation methods are superior options.
We’ll cover how to undertake each of these types of installation next in this guide.
How to Install WordPress on a Managed Host
Installing WordPress on a managed host is exceptionally easy. We’ll use our favored managed host, WP Engine, as an example here, but you’ll find the process very similar for all managed hosting providers.
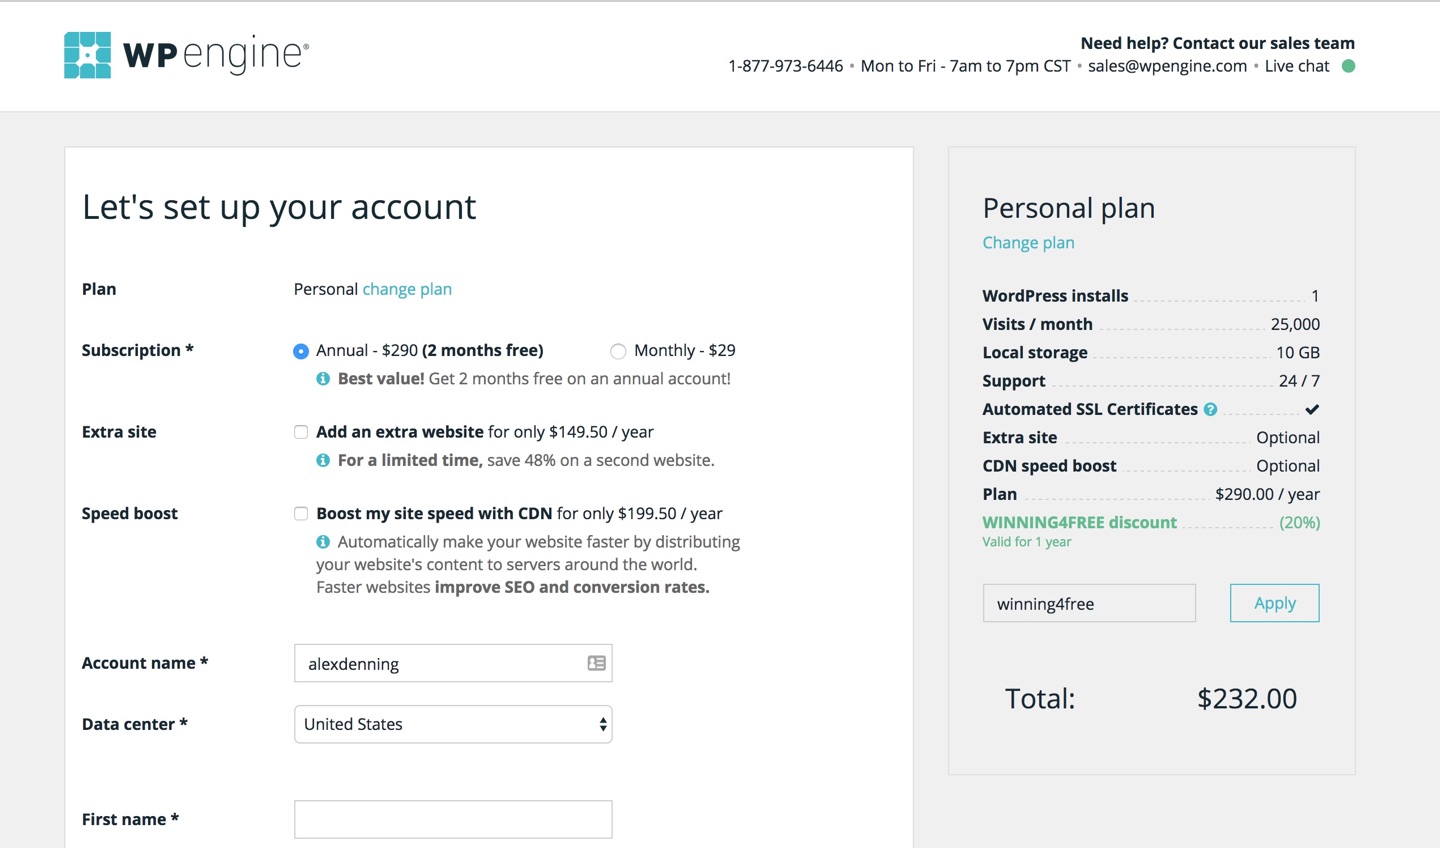
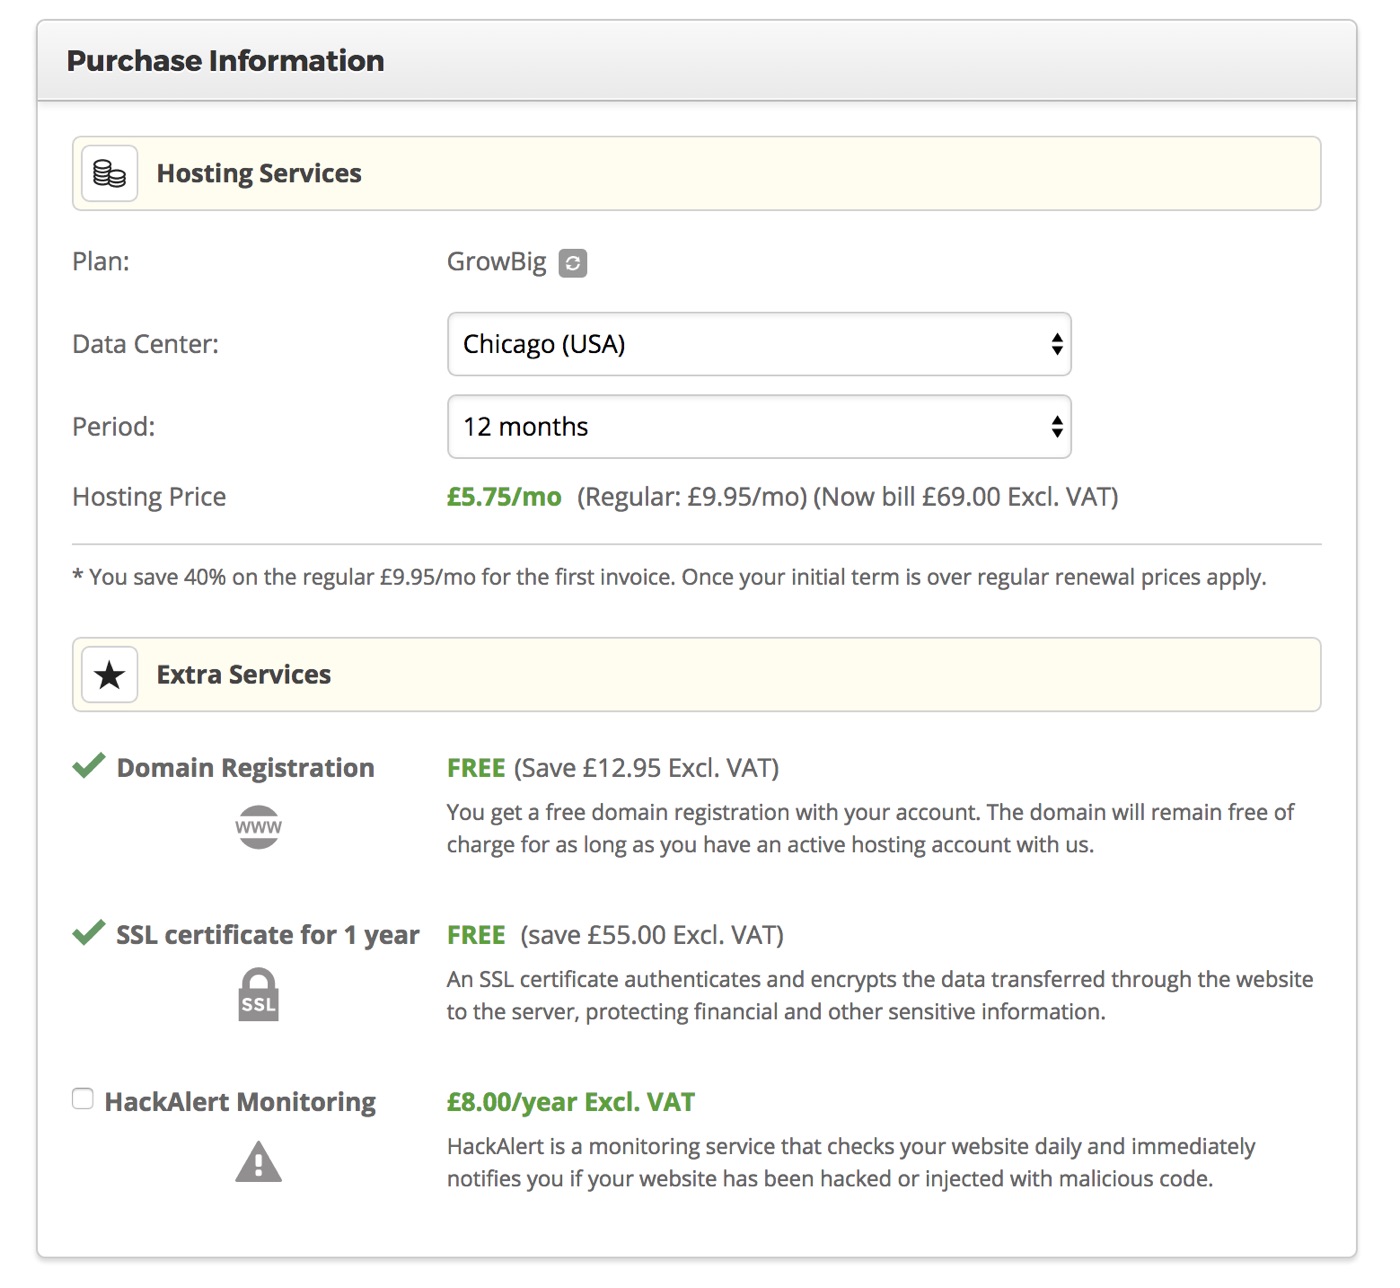
Here’s how easy this is: When you sign up with WP Engine, you get WordPress automatically installed for you. All you need to do is select the plan you want (remembering to add any discounts that may be available) and pay for your hosting.
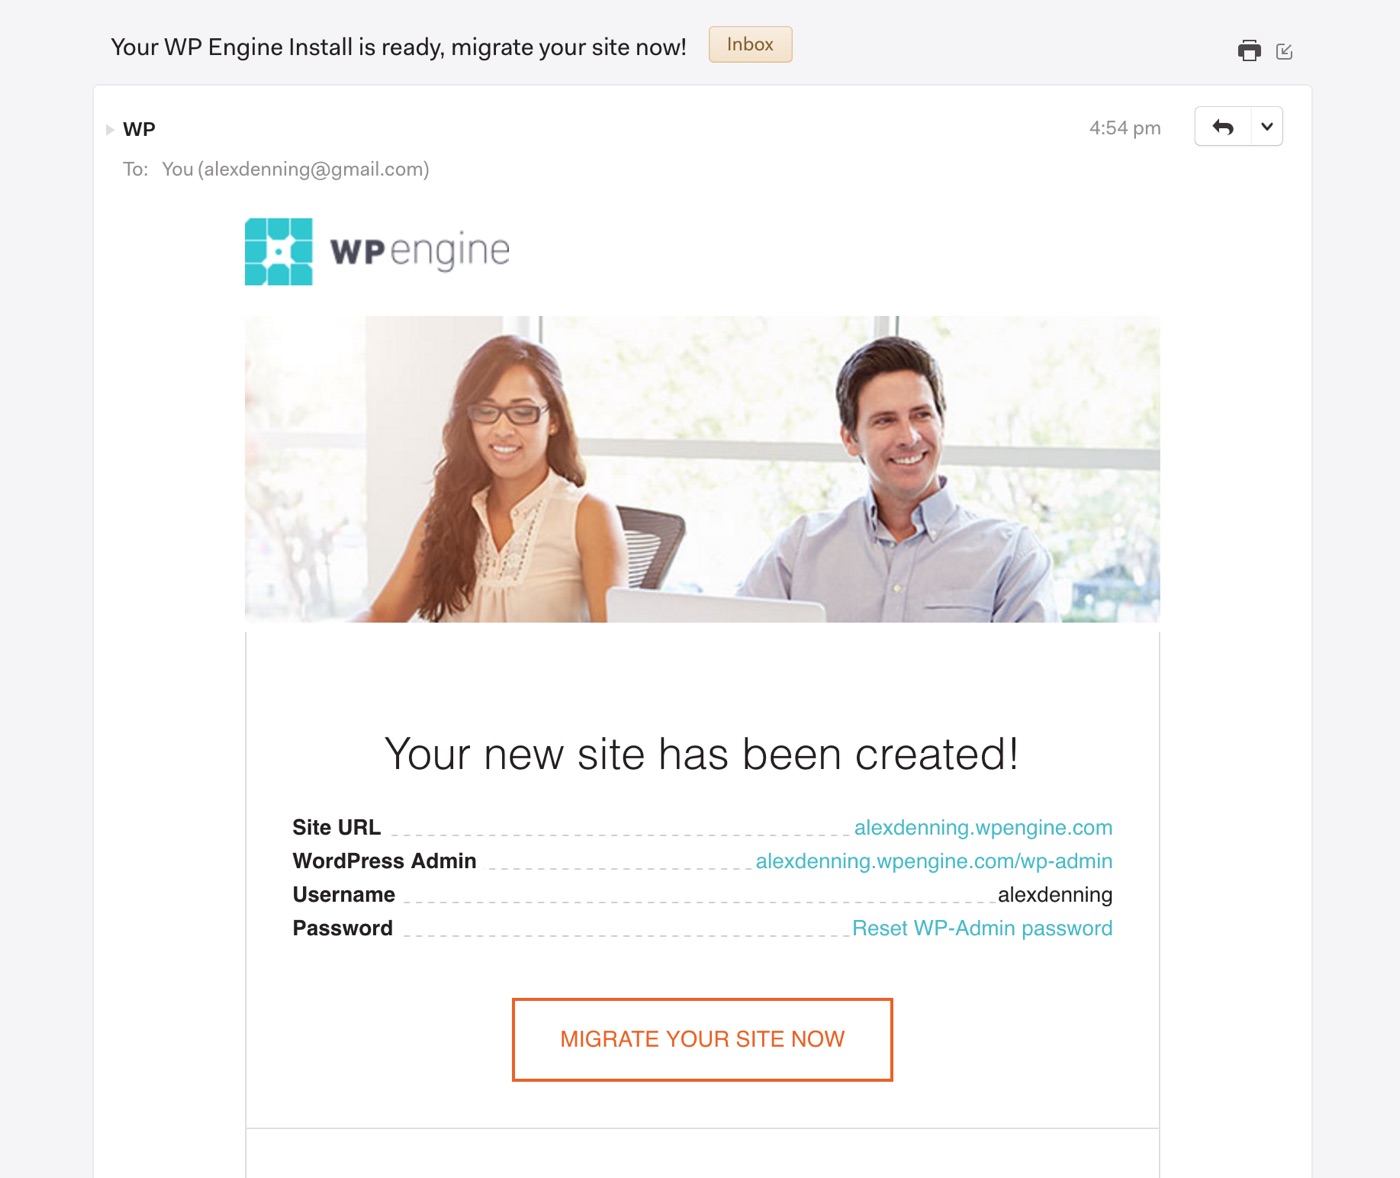
You’ll get an automatic email a couple of minutes later letting you know your WordPress installation has been created.
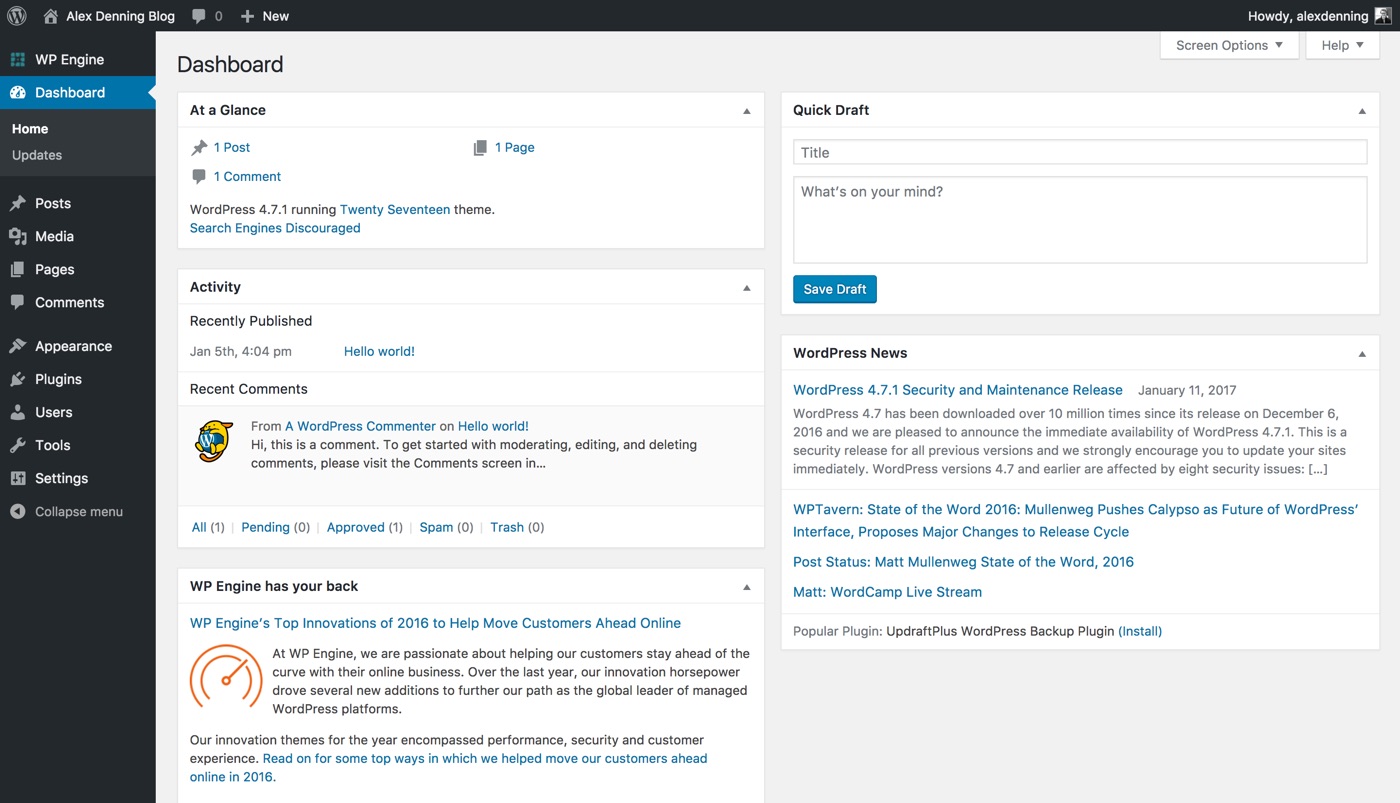
You’ll need to reset your WordPress administrator password, which you can do by clicking the link in the email. You’ll then be able to log in and enjoy your WordPress Dashboard, complete with all of the benefits of managed hosting: Site speed optimized, caching and backups enabled, and access to a 'staging' area where you can test changes to your site.
When we said this was exceptionally easy, we meant it. Most managed hosts will have a similar procedure: Sign up, and you’ll have WordPress automatically installed and details sent over right away. While the installation of WordPress itself is easy, there are a couple of extra steps to follow if you need to migrate from a previous host, and also to connect your domain name.
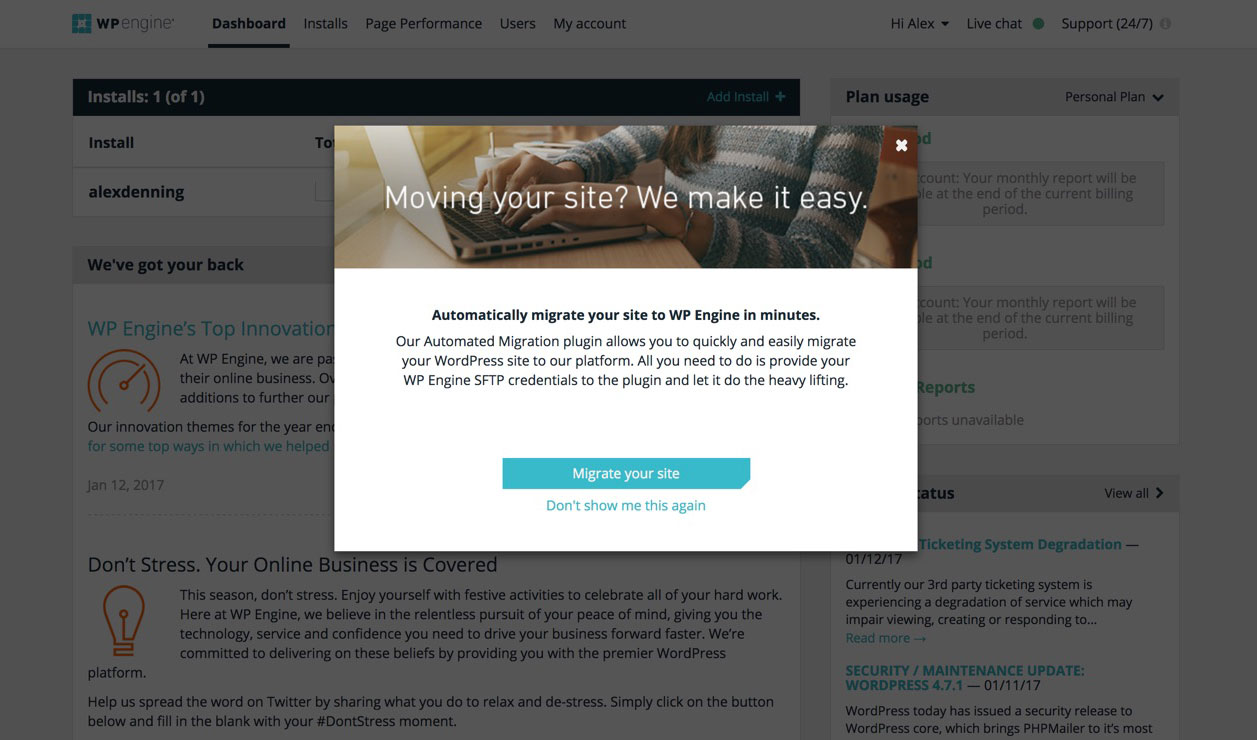
Migrating an existing site is also straightforward. Most managed hosts will have some sort of automated process for this, and WP Engine are market leaders here, offering a plugin that allows you to enter account details for your old hosting and have your site transported to WP Engine within minutes.
The plugin is very easy to use: Head to the site to be migrated, and install WP Engine Automated Migration. You’ll need a couple of bits of information, all of which can be found by heading to the WP Engine Dashboard and clicking Installs → Site Migration. The only extra step is generating an SFTP password, which can be done with one click from the Site Migration page.
Head back to the site to be migrated’s dashboard, and click on the Site Migration tab. Enter the details, and click Migrate. You’ll be taken to a page where you can see a real-time view of the migration.
Once the migration is complete, head to the new URL (your WP Engine Destination URL) and check to ensure everything’s working. Click around the posts and pages to make sure the links are okay, and confirm that any special features are still working. If you run into any problems or need extra guidance, WP Engine have full written details and a video tutorial at the Site Migration page (see above for how to access it).
The final piece of setup is to connect your domain name to your managed hosting (if you need a domain name, then read this guide). With WP Engine, this is slightly more complicated, as part of the hosting management constitutes moving your site between servers, so it’s always on the optimum setup.
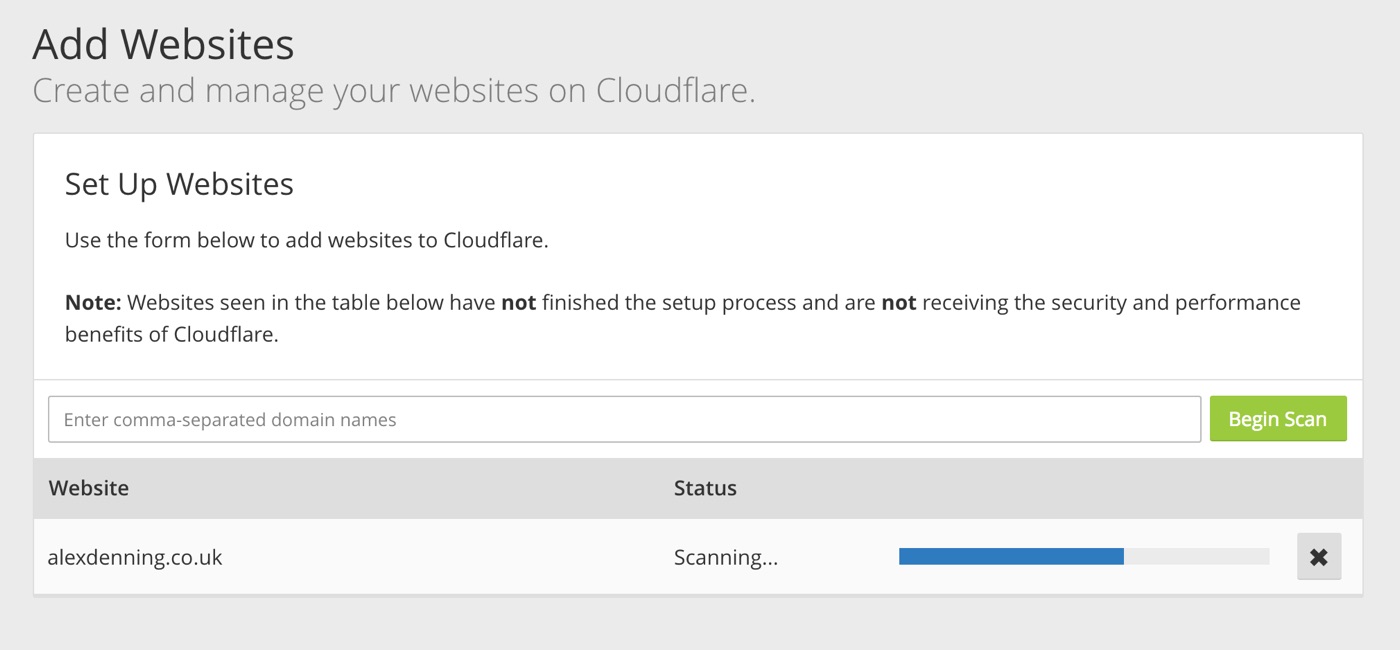
To make sure your site is moved between servers without problems, you’ll need to use an external service called Cloudflare. Cloudflare is a website security and speed service, and it offers a free plan that'll be ample for your site. Sign up for a free account, and follow the prompts to add your domain name. Enter your domain name, and Cloudflare will scan your site to see what its current setup is.
You’ll be asked to 'verify all your DNS records are listed below'. If you haven’t changed any DNS settings -- or if you don’t know what it is -- then you can safely continue, as Cloudflare will take care of this unless you’ve set something that makes it difficult for it to scan your site. Continue, and then select the Free Website plan.
The final step is to tell your domain name to point at Cloudflare. The technical explanation for this is it's changing your nameservers. How you do this varies depending on who you registered your domain name with, but you can generally change nameservers by heading to your domain registrar’s administrator panel, looking for options to manage your domain, and then finding nameservers. Replace your existing nameservers with the two listed by Cloudflare, and Continue one last time. It can take up to 24 hours for the switch to take place, so you’ll want to return later and Recheck Nameservers.
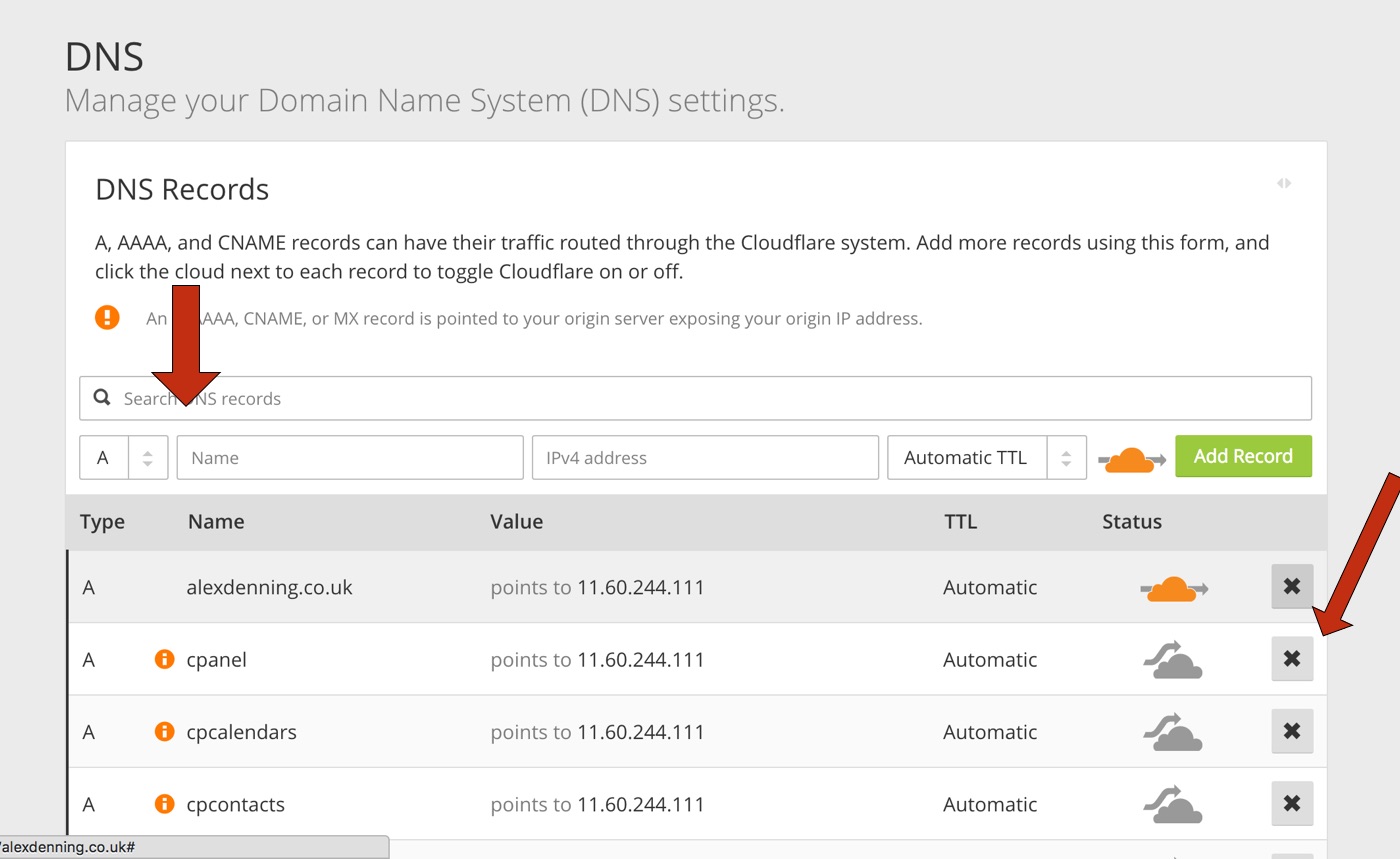
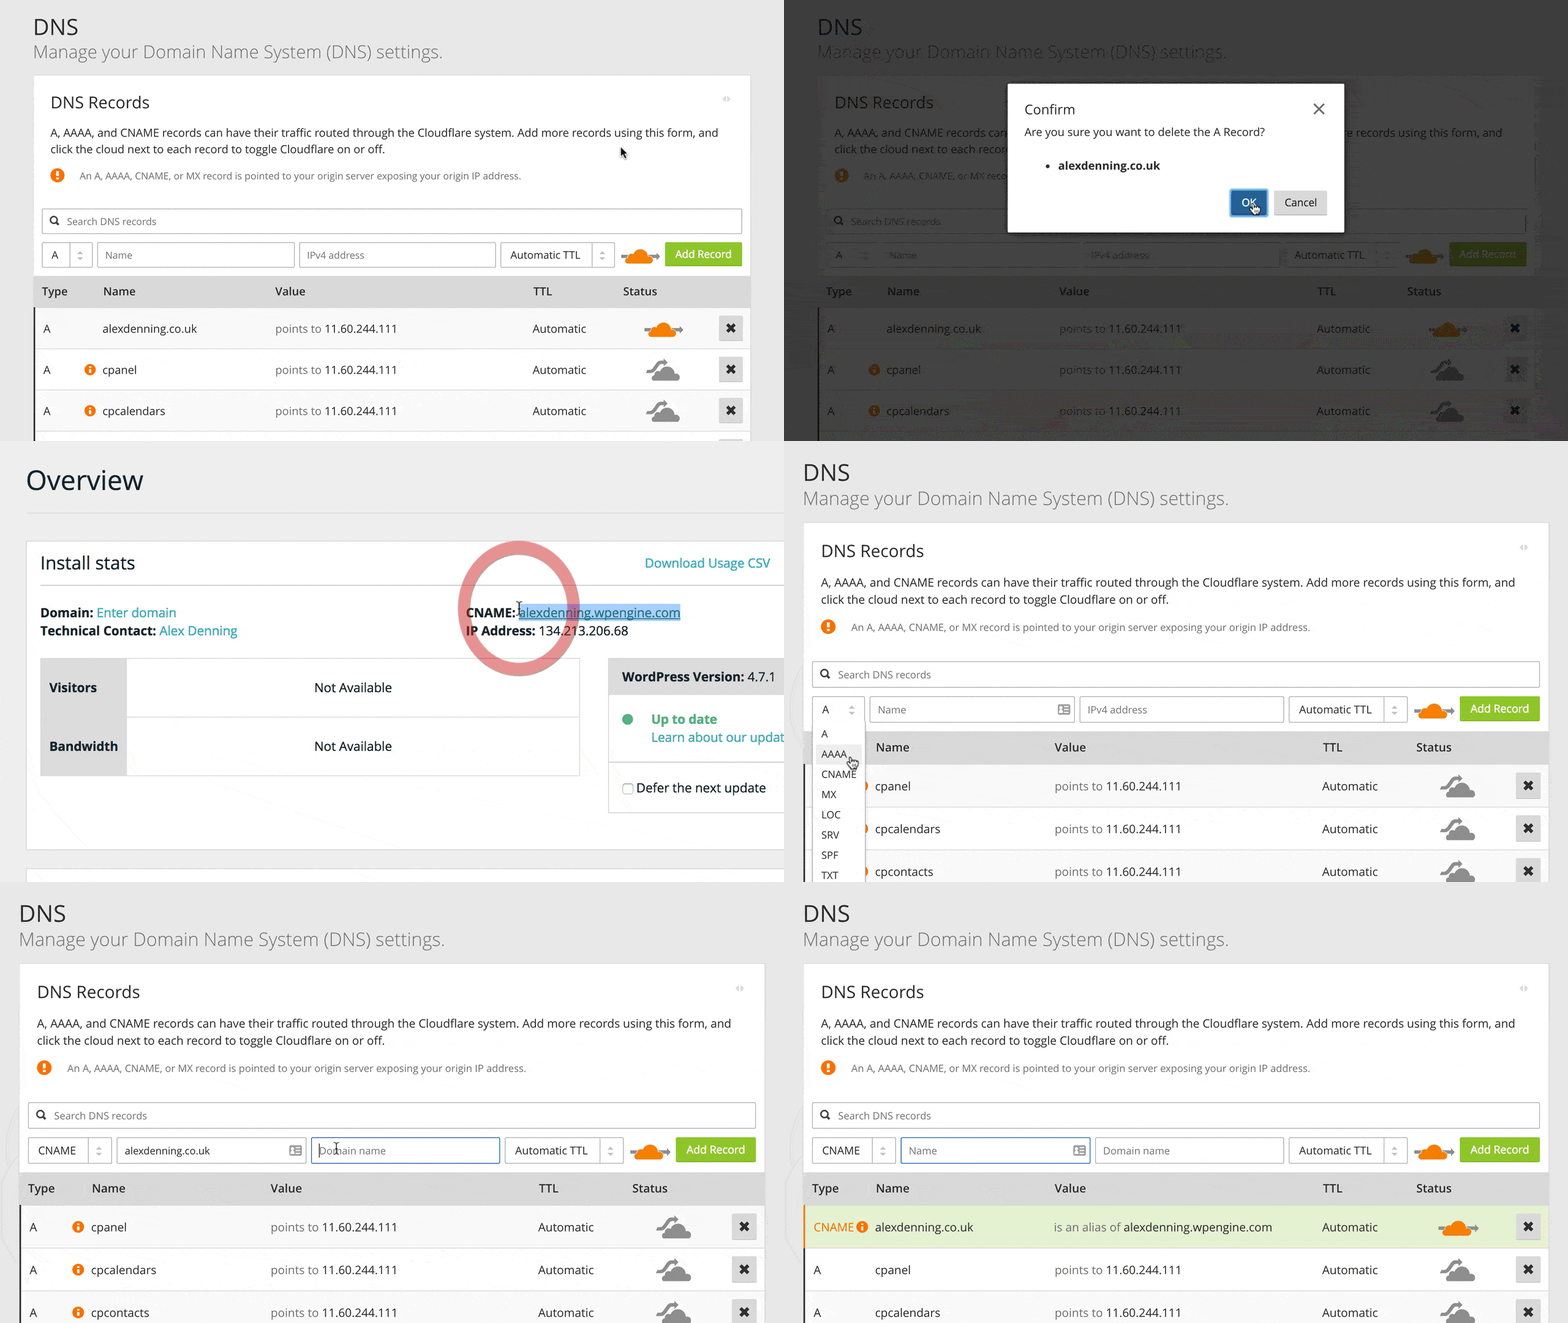
Once your domain is set up with Cloudflare, head to the DNS tab and look for the type 'A' entry that has your domain name. Delete this.
Next, add a new record using the bar at the top of the table. Select the type to be CNAME, the Name as your domain name (i.e., winningwp.com), and the Domain Name as your WP Engine CNAME (you can find this here, i.e., winningwp.wpengine.com). Add Record, and you’re done.
Note: Your site will be unavailable while you’re performing this change, so do it quickly! If you need any extra help with this, WP Engine have a detailed tutorial here, and their support staff can step in if necessary.
Setting up your domain name is the final step in installing WordPress on a managed host -- if you’re not with WP Engine, your host should provide detailed instructions on how to complete this process. With that, then, congratulations on your new WordPress installation!
Enjoy WordPress and all the benefits managed hosting offers with it.
How to Install WordPress with 'One Click'
Using a 'one-click' WordPress installer isn’t quite as easy as having it automatically done for you -- and there’s more than one click involved -- but it’s still a straightforward process.
With most shared hosts, installing WordPress is very simple. We’ll first cover how to install WordPress using our recommended shared host, SiteGround, and then we'll look at the most common installation method used by other shared hosts.
Installing WordPress with SiteGround is incredibly easy -- it’s not quite as easy as having it done for you automatically, as with managed hosting, but it’s close.
Start by choosing which SiteGround package you want -- remembering to add any available discounts -- and making the purchase.
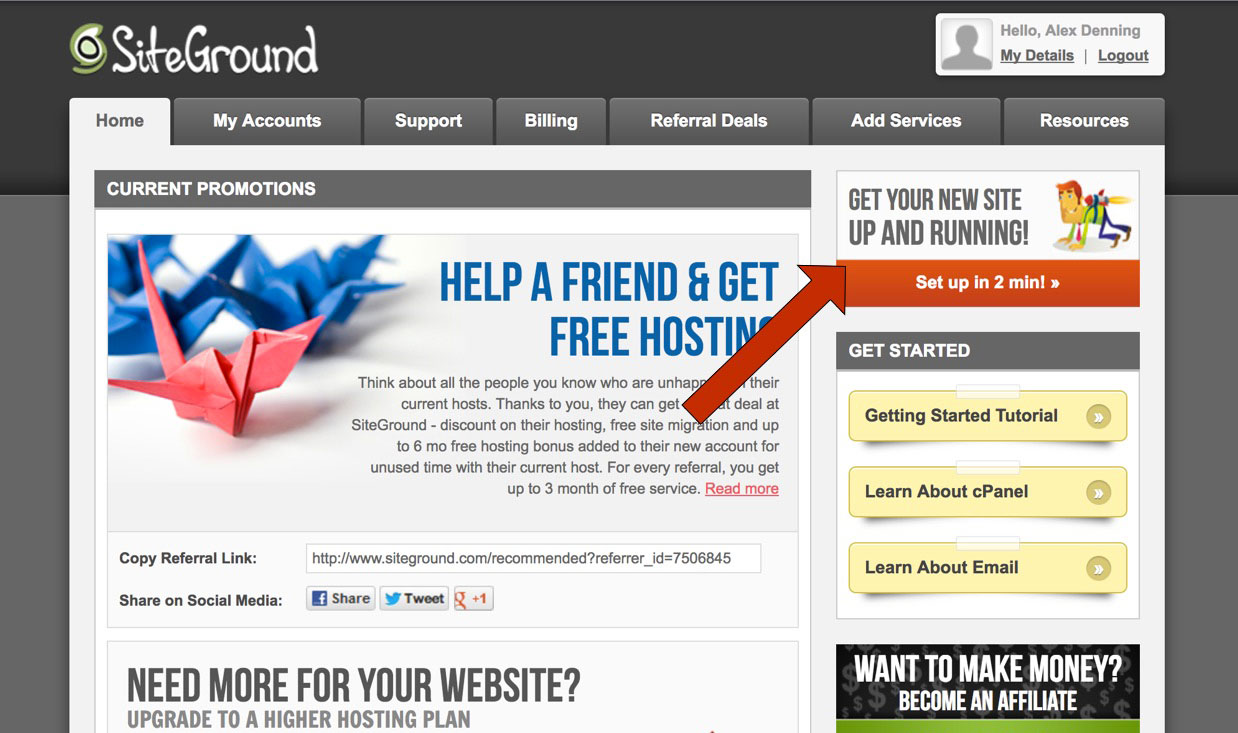
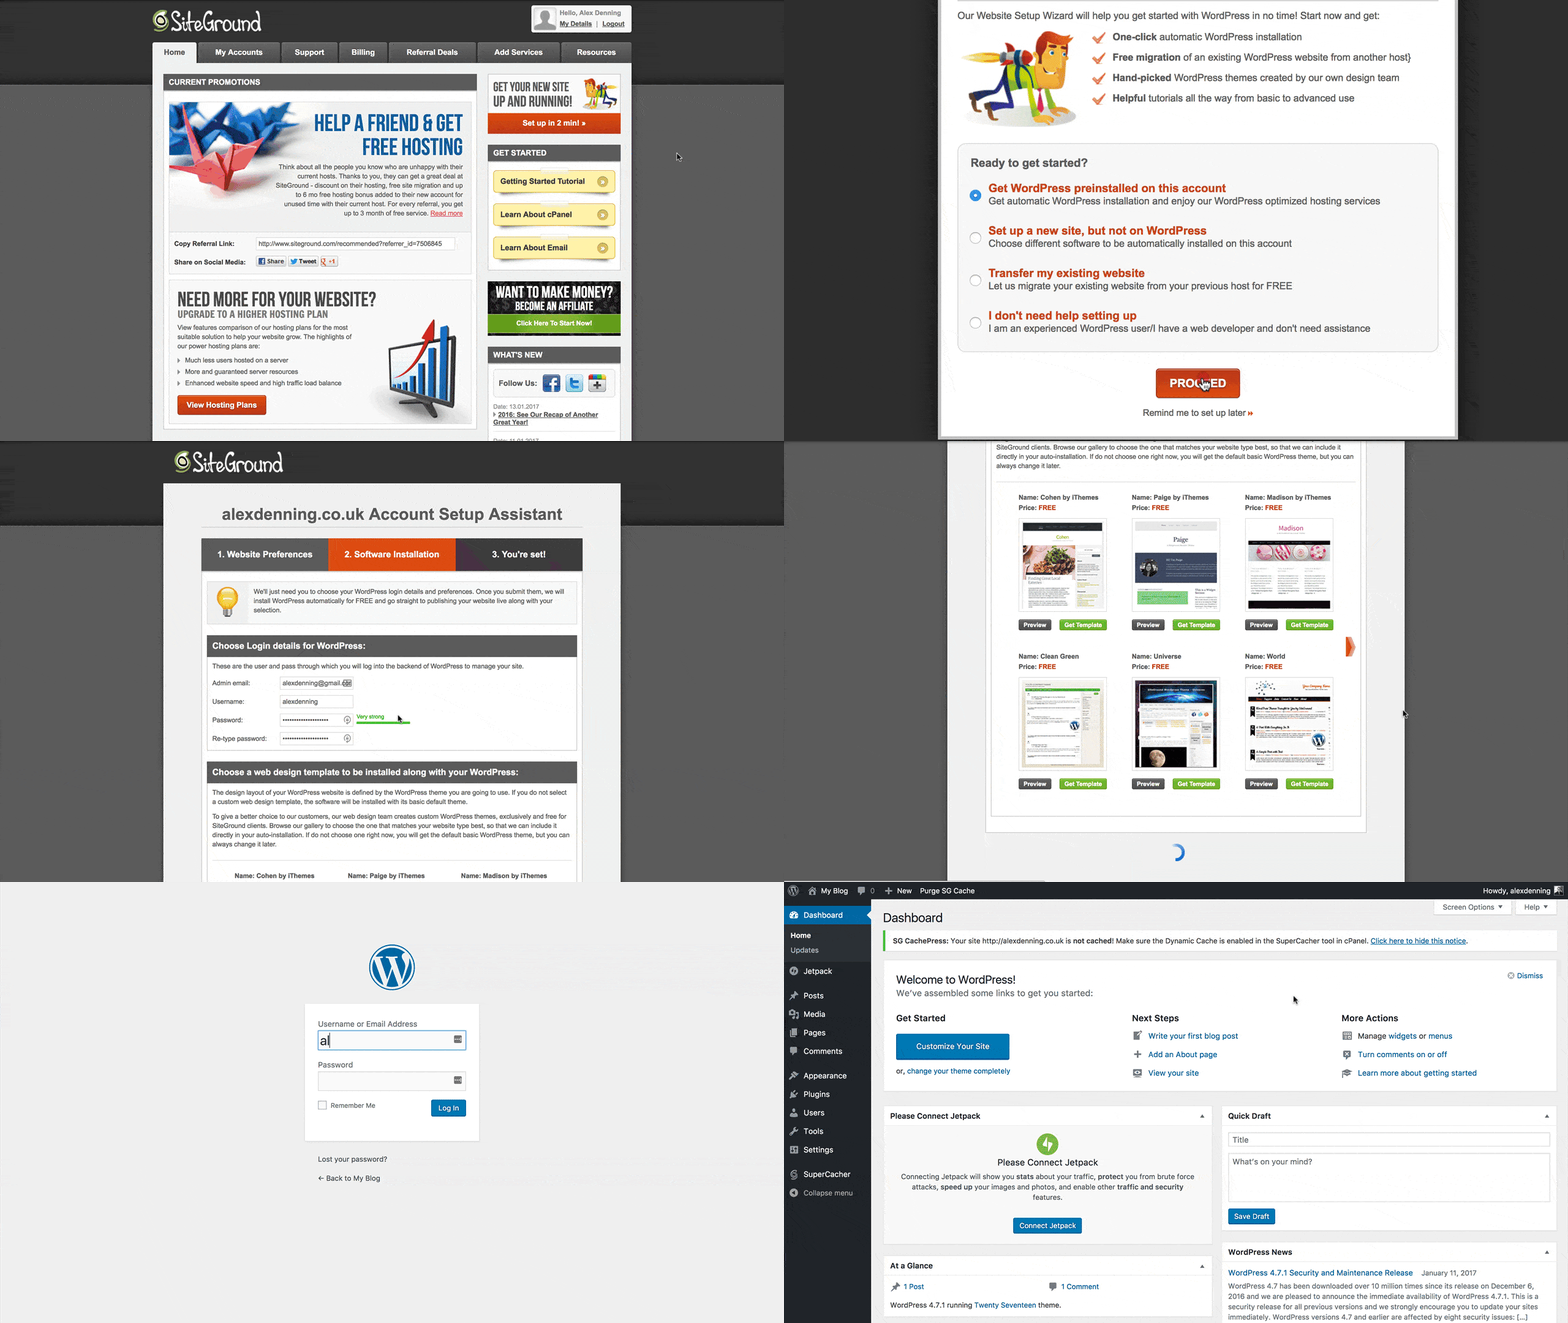
From the SiteGround user area, click the sidebar link to 'get your new site up and running'. This will take you to the WordPress install wizard. Select the option for installing WordPress and proceed.
On the next screen, enter the email address, username and password you’d like to use to log in to WordPress. You can also choose a WordPress theme to be installed here, but we’d recommend coming back to this later and spending some serious time choosing the right WordPress theme for your site -- we have a full guide on choosing WordPress themes to help you with this. Scroll to the bottom of the page and Submit.
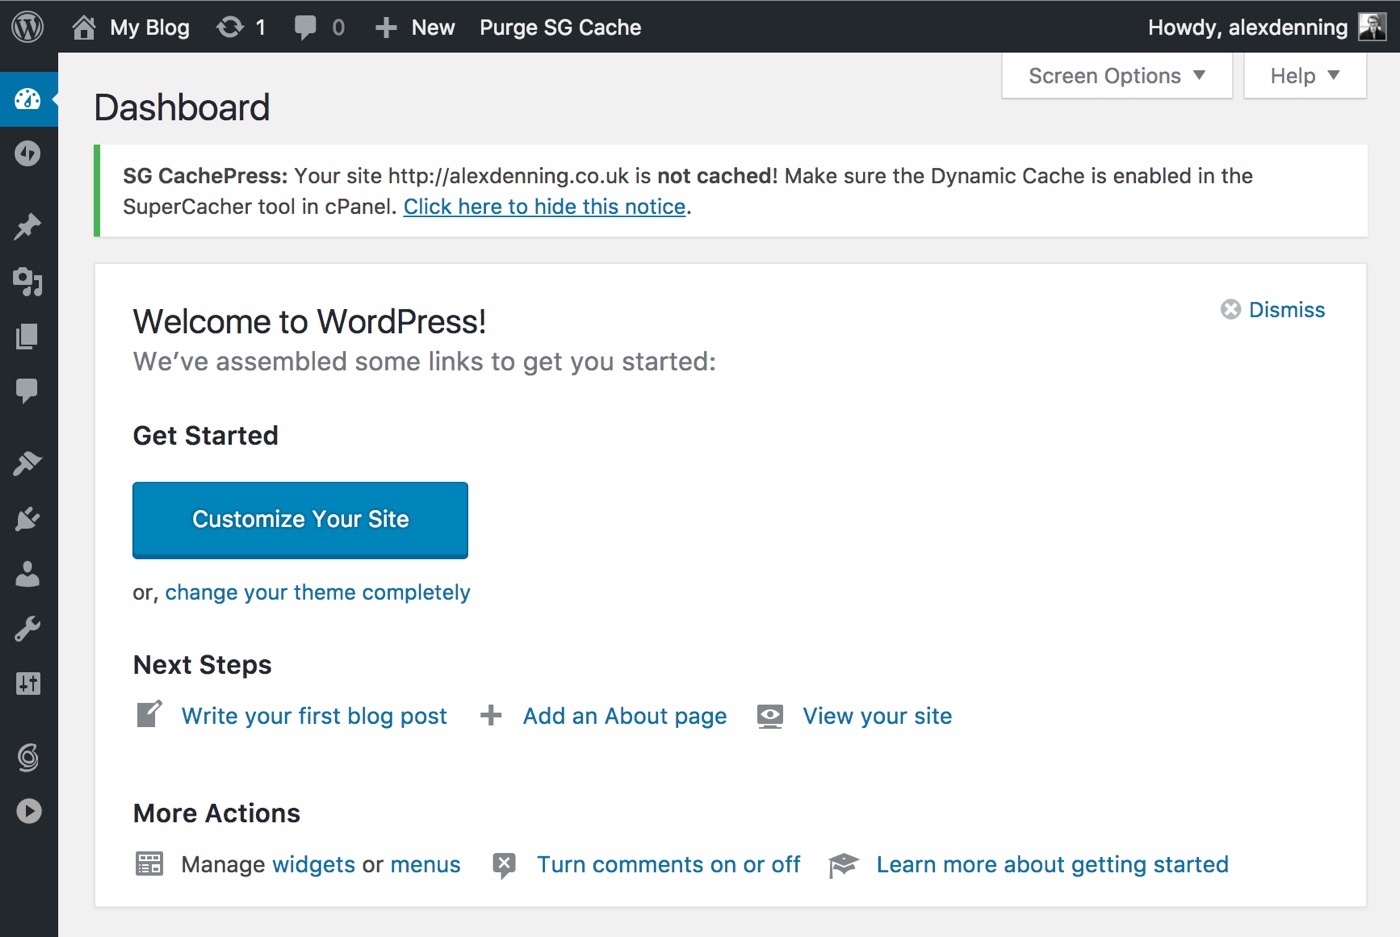
SiteGround will now install WordPress for you, and you’re done! You’ll be taken to a confirmation screen, where you can see the details you set and find a link to log in to your WordPress Dashboard.
As this is shared, rather than managed, hosting, there are a couple of final bits of setup to do. You’ll see a notice saying you need to make sure 'Dynamic Cache is enabled in the SuperCacher tool in cPanel'.
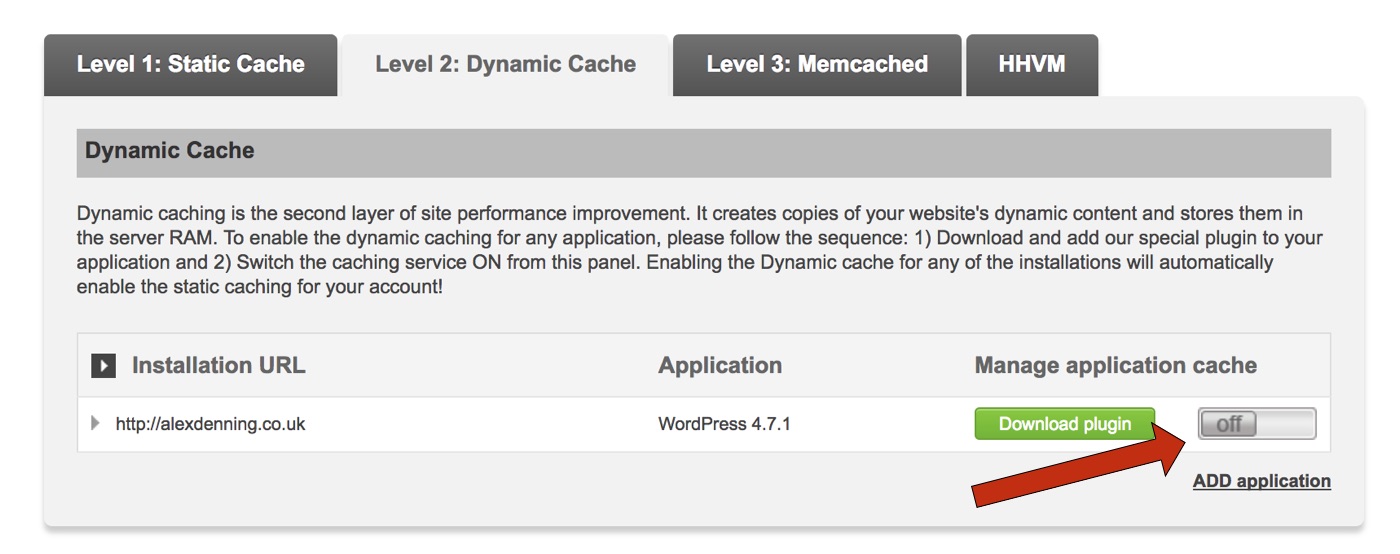
This just means you need to turn on a setting to make sure your site loads as fast as possible. Do this by heading to My Accounts and clicking Access cPanel. Under Site Improvement Tools, select SuperCacher. Now click Level 2: Dynamic Cache and toggle 'off' to 'on'. You can skip the part where you’re asked to install a plugin, as this is done automatically for you with the installation wizard.
SiteGround will automatically turn on backups and automatic updates for your WordPress installation, so you don’t need to worry about those.
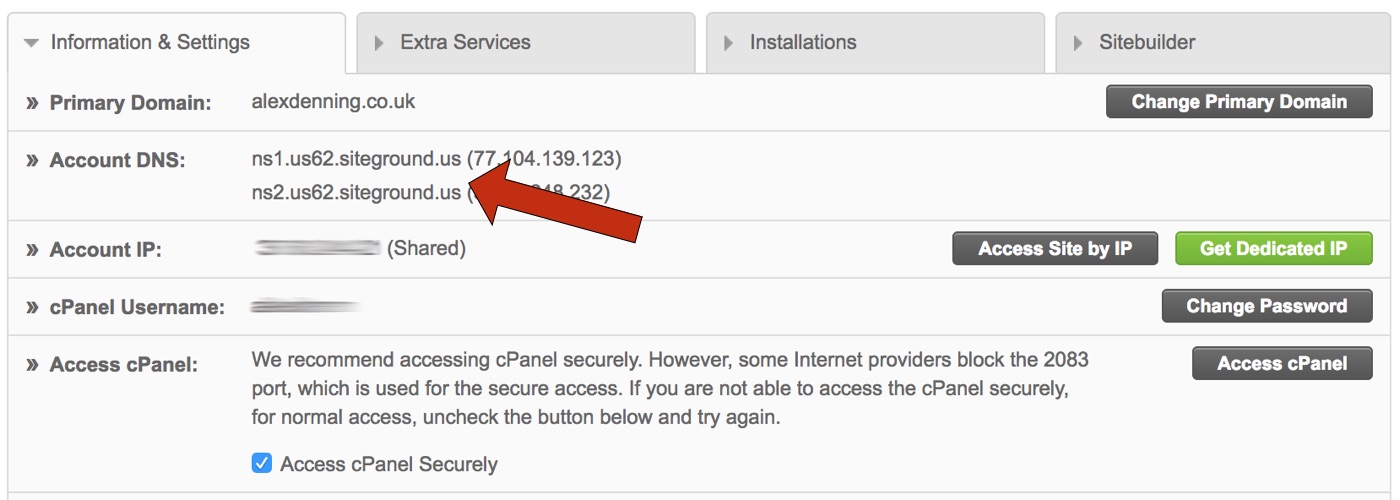
The final step is to connect your domain name to SiteGround. If you’re using a name provided free by SiteGround as part of your signup process, this will be done automatically for you, but if you’re using a separate domain name you’ll need to change the nameservers. You can find these details under My Accounts: Just look for Account DNS.
Now, log in to your domain registrar’s administrator panel, look for options to manage your domain, and then find nameservers. Replace whatever’s listed with the two SiteGround URLs (rather than the IP addresses), and save. You’ll now need to wait up to 48 hours for these details to update -- at which point, your website will be ready!
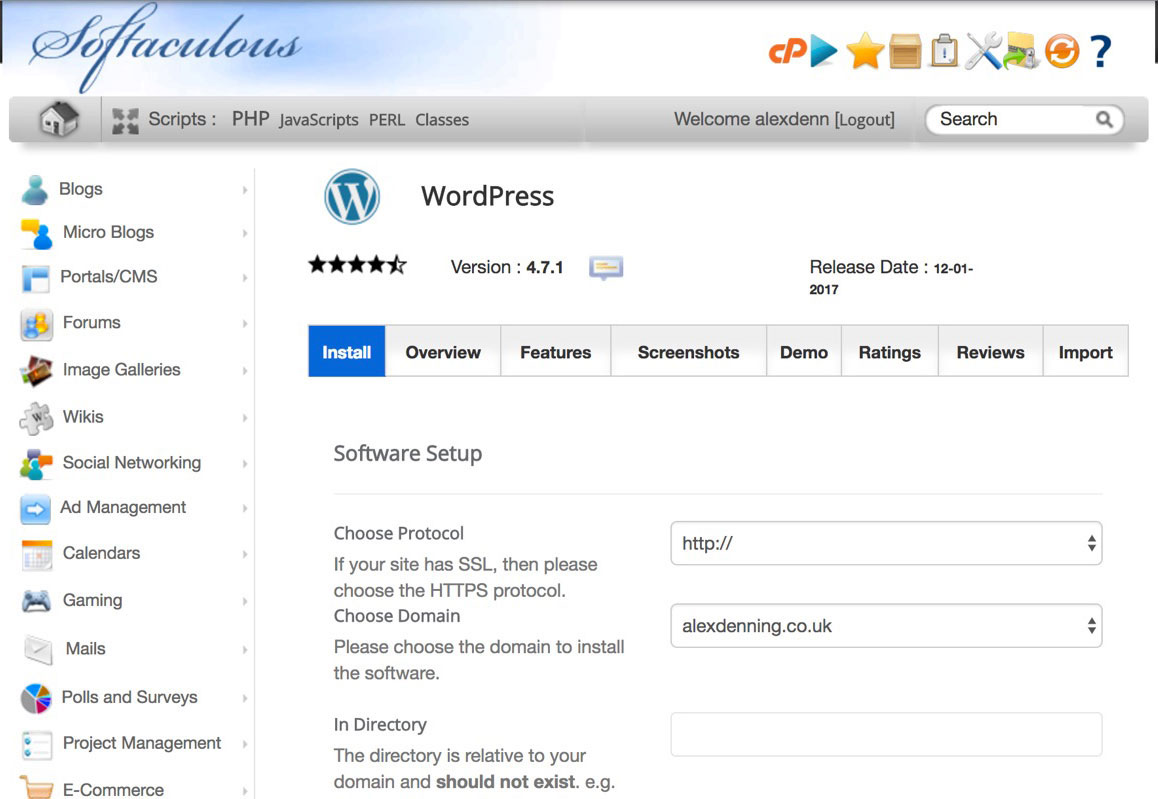
Many shared hosts will require you to access cPanel and use the Softaculous Apps Installer to install WordPress. This is similarly easy to use: Choose WordPress as the software you want to install, then select your domain name from the dropdown menu. If you want to install WordPress in your site’s root directory (i.e., winningwp.com/), then make sure the directory field is blank. If you want to install WordPress in a folder, enter the name in the directory folder, but without any slashes.
You can now set a site title and description, as well as your username and password. Set the other settings as desired (if you have the option to install Limit Login Attempts, we’d recommend this as a security procedure), and click Install. Softaculous will now install WordPress and show you a link to where you can log in to your new Dashboard.
Using one of these 'one-click' installation methods isn't quite as easy or convenient as managed hosting, but it is straightforward, and, if your host won’t install WordPress automatically for you, this is a convenient way to do it.
How to Install WordPress Manually
The vast majority of managed and shared hosts offer either automatic or 'one-click' WordPress installation. Our recommendations of WP Engine and SiteGround respectively are market leaders in this area.
If your host doesn't offer either of these easy installation methods, you want to have total control by doing the installation yourself, or you’re installing on a local server, you’ll need to proceed with a manual WordPress installation. We’ll assume here you’ve already connected your hosting to your domain; the steps for doing this are the same as with shared hosting and automatic installs.
Even installing WordPress manually isn’t especially difficult; the manual installation is what was originally the 'famous five-minute install'. It is, however, much more 'hands on', and requires two extra tools: An FTP client and a text editor. You’ll also need to understand what the WordPress database does. We’ll explain these tools and walk you through all the steps required next.
Understanding the Prerequisites for Installing WordPress Manually
An FTP, or 'File Transfer Protocol' client lets you move files between your computer and hosting server, and vice versa. An FTP client also lets you move, copy and delete files on your server as desired.
The best free FTP client is FileZilla, and, whether you’re a Mac or Windows user, getting FileZilla set up is very straightforward. You’ll want to use the Client version of FileZilla: This is for consumers, whereas the server version is for hosts to install on servers. Download FileZilla Client, and follow the prompts to install.
The second tool you’ll need is a text editor. This needs to be one specifically for displaying and editing computer code, rather than a copy editor, such as Microsoft Word. You won't have to learn to code to install WordPress, but you will need to edit a few configuration files that are written in computer code (typically, in the PHP programming language).
There are plenty of free text editors available. If you don’t envisage yourself making any code changes in the future, then you can use one built in to your computer: Notepad on PC or TextEdit on Mac. If, however, you think you’ll be editing code in the future, it’s worth getting a fully featured text editor. These will display your code in neatly organized, indented and color-coded lines, which make it much easier to find the exact bits of code you need to edit, and make sure they’re formatted and saved correctly.
If you’re on PC, you can use Notepad++ and if you’re on Mac, then choose Brackets. Both of these are free and straightforward to install: Just follow the prompts.
The final thing to get up to speed with before we start is the WordPress database. WordPress uses a database to store information. Think of this as a digital library that organizes and stores all the posts, pages, comments, categories, tags and other info that make up the content of your WordPress site. When WordPress loads a specific page, it can grab only the content it needs from the database. The additional advantage of this is that you only need to make a change once and it’s applied right across your site.
Knowing what the database does is important so you can understand what’s happening as we install WordPress. You don’t need to know how it works or follow any complicated steps, but it’s useful to be on the same page.
With the prerequisites covered, we can get on with installing WordPress!
The Manual WordPress Installation Process
Start by creating a database that you’ll use for the installation. Make sure to write down all the names and passwords used here, as you’ll need them again later.
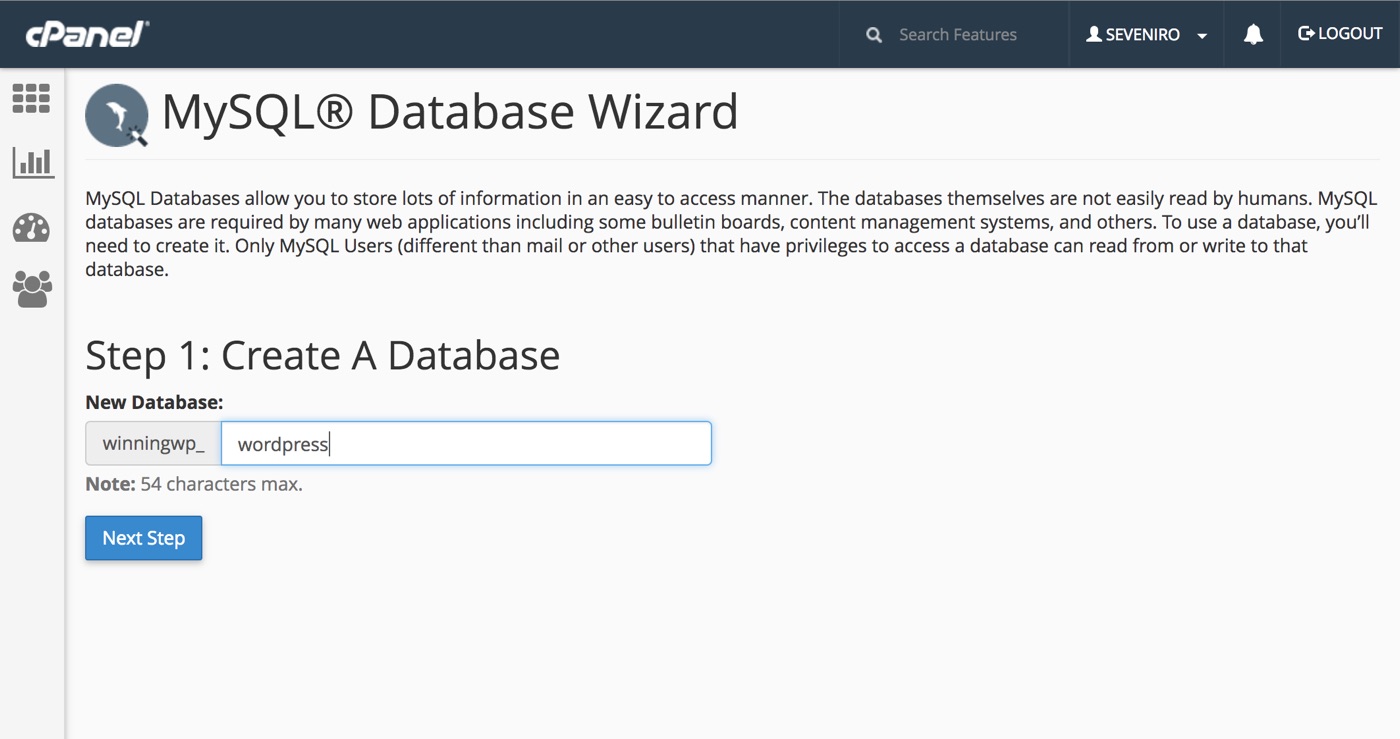
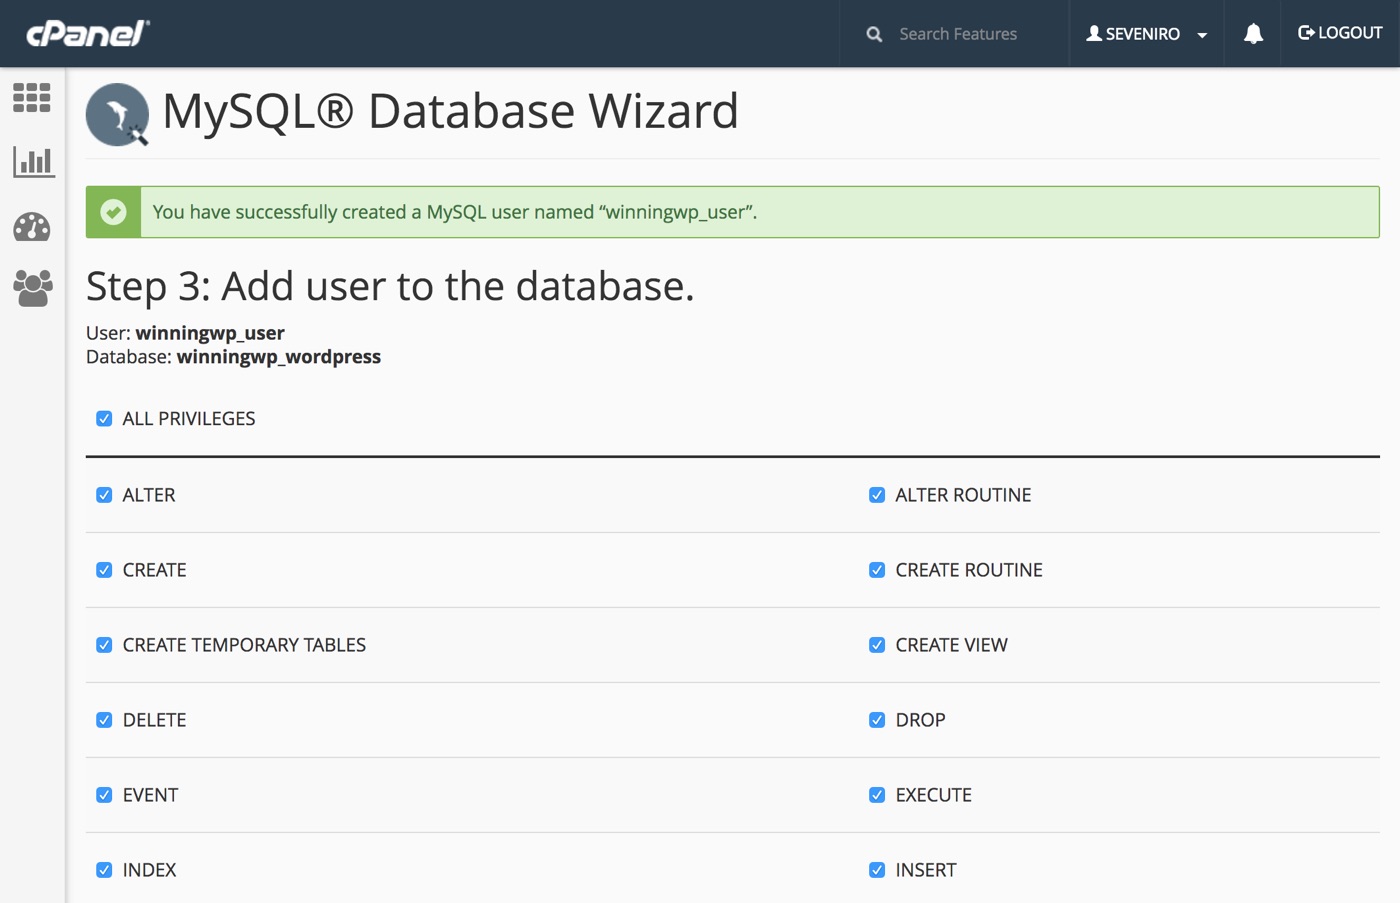
Your host should provide some sort of administrative screen -- typically the same cPanel tool mentioned earlier. Head to this, and look for the Databases section. If your host offers a 'MySQL Database Wizard' or 'Create MySQL Database' option, then use this.
You’ll need to add a name for your database. This just needs to be unique: 'Install' or 'wordpress' are fine, provided you’ve not used them already on your host.
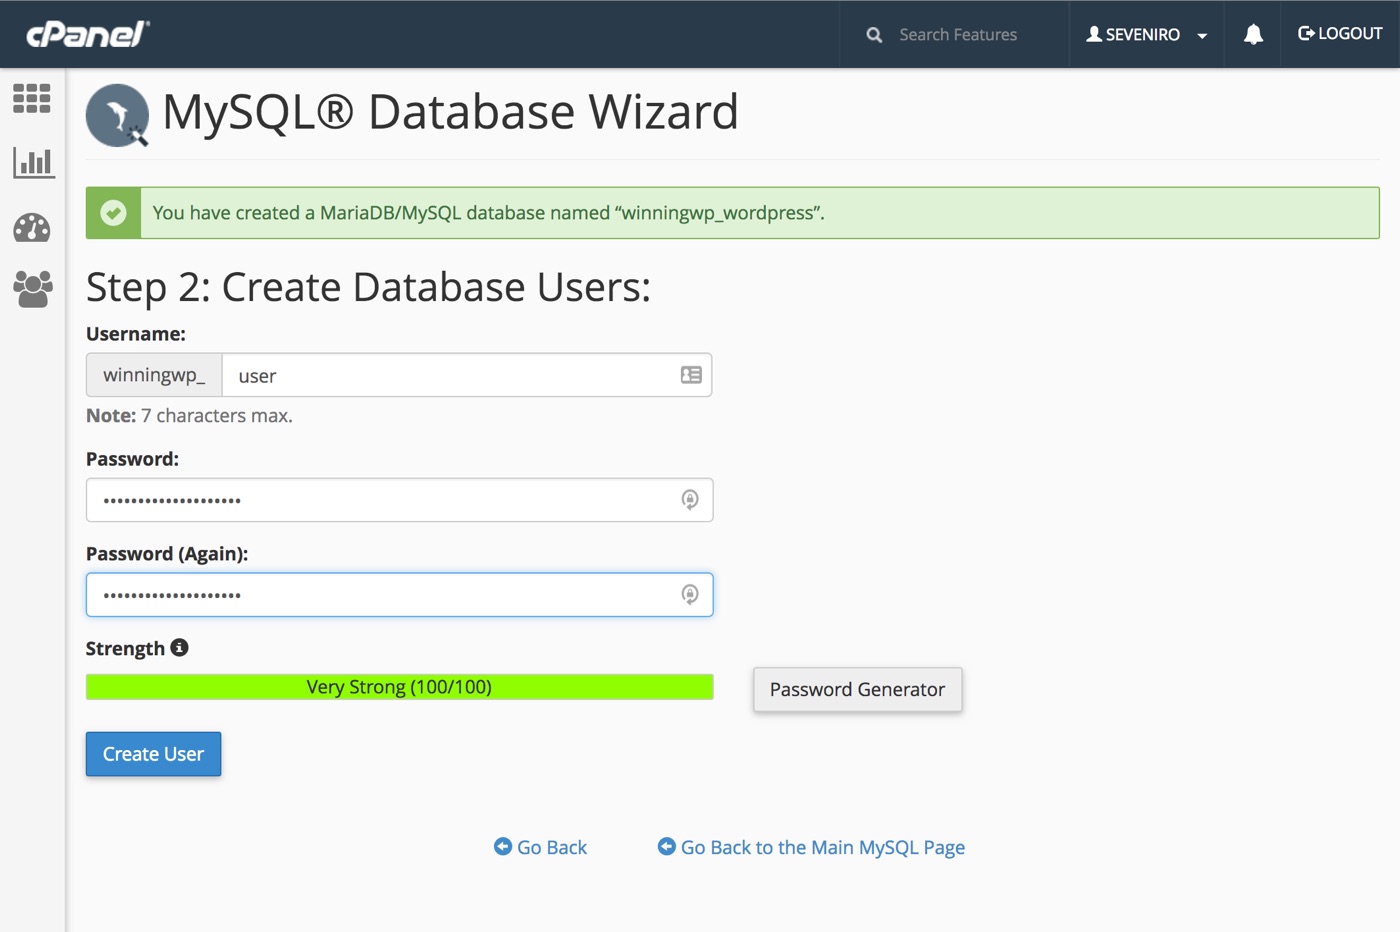
Next, you need to create a user. As with the database name, you can enter any unique username here. You’ll need to enter a password too -- and make sure this is a very strong one. Your host may provide a password generator for you, or else you’ll want to use one for this. Make sure you write the password down -- you’ll need it again in a minute!
You may be asked what privileges the user should have, in which case, you'll want to make sure all privileges are checked.
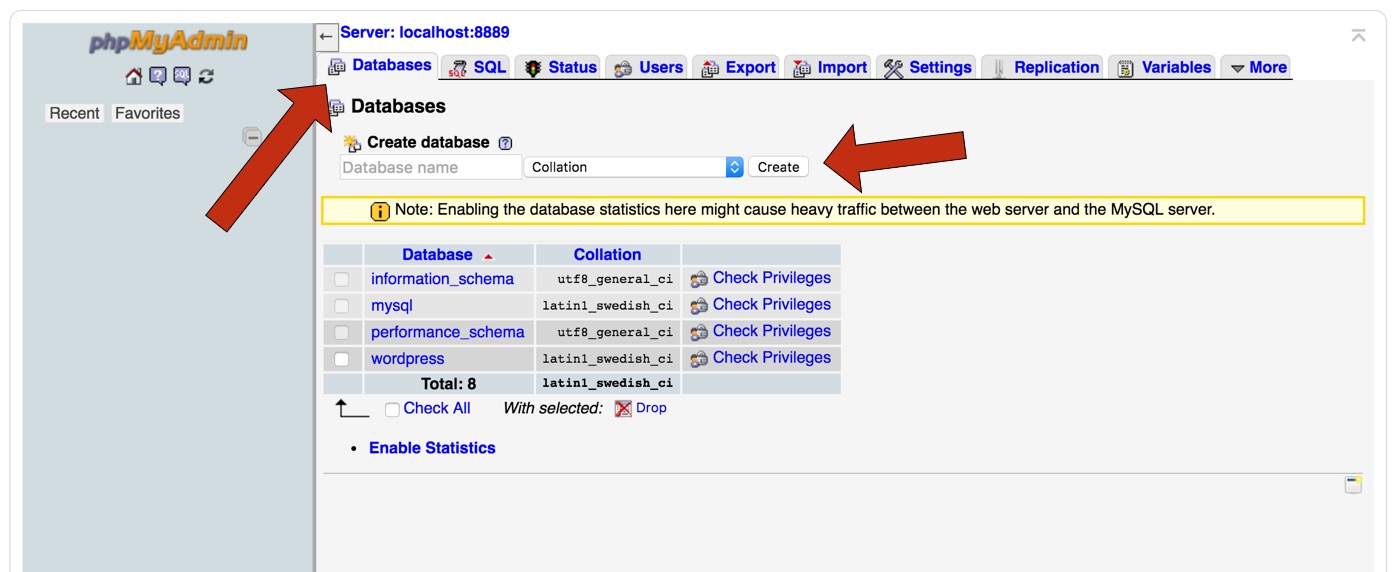
If you don’t have a database creation wizard available, or if you’re installing WordPress locally, then you’ll need to use phpMyAdmin to create a database, which you should be able to find from your host’s administrative page. Load up phpMyAdmin, and click on the Databases tab.
Under 'create database', type the name of your new database (this just needs to be unique with no spaces), and create the database.
Next, click the Privileges tab and Add user. Add a unique username and a strong password, select all privileges and 'Go' or 'Add User'.
It’s now time to upload WordPress’ files. To do this, you'll need to download them. Head to wordpress.org, and download the latest version of WordPress. You’ll get a zip file, which you'll need to save to your computer and unzip.
We’ll now use the FTP client you downloaded earlier to upload the WordPress files to your host. To do this, you’ll need an FTP host, username and password. These typically have the syntax ftp.yourdomain.com and [email protected], respectively. You should be able to find these from the same cPanel administrative screen we used earlier. If your host offers sFTP (secure FTP), then use this.
Load up your FTP client, and log in to your host using the details you’ve just collected. In FileZilla, you can use the Quickconnect feature and leave the Port field blank.
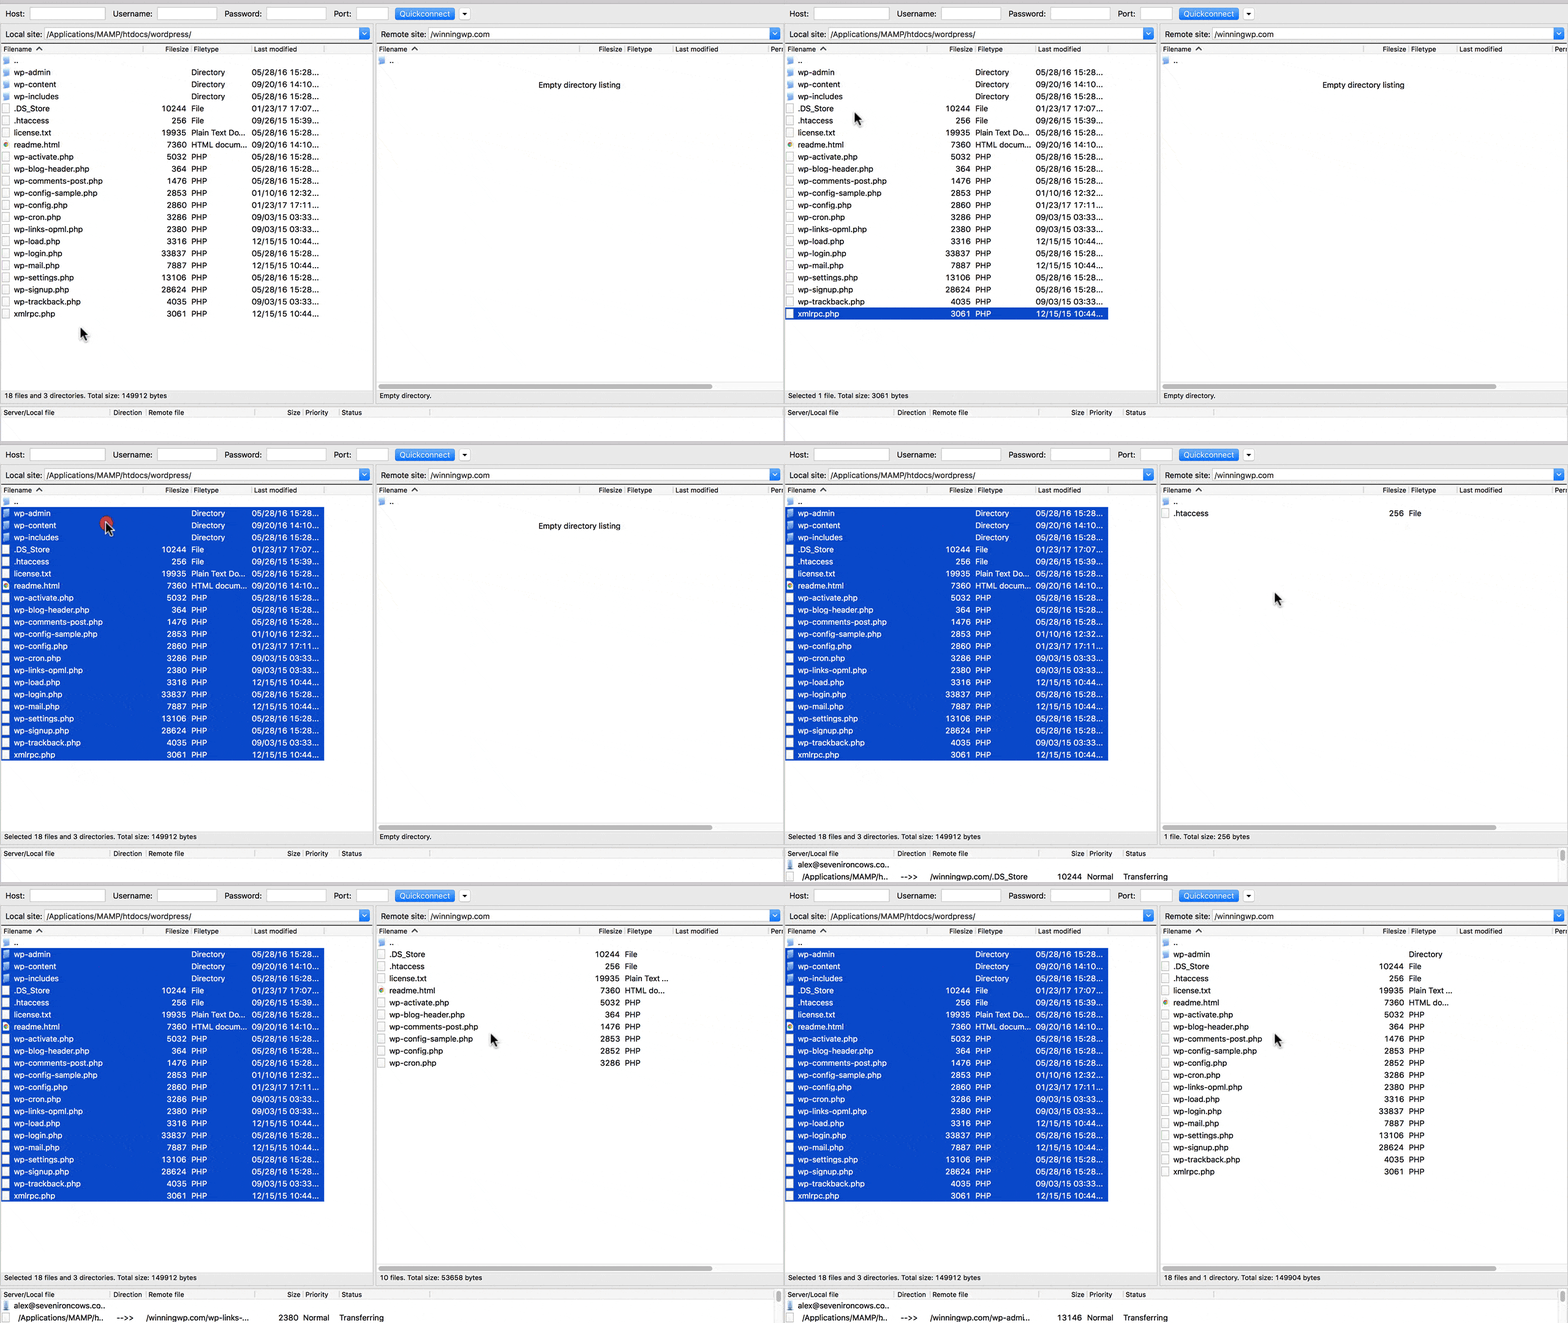
You’ll now be logged in to your hosting, and can transfer files from your computer to your website. Before doing this, you'll need to decide where to upload WordPress. If you want WordPress to load when you go to yourdomain.com (this is known as the 'root'), then you should navigate to the folder /public_html/yourdomain.com, or, if such a folder doesn’t exist, then either just /public_html/ or you’re there already. If you want to install WordPress as a subdirectory (i.e., yourdomain.com/folder/), then navigate to the root and create a new directory with the name you want the folder to have.
Use the left-hand panel in your FTP client (this shows your computer), to navigate to the unzipped WordPress folder. Select all of the files and folders, and drag and drop into the opposite panel. The FTP client will now upload all of the files to your host. This may take a while, but that’s perfectly normal.
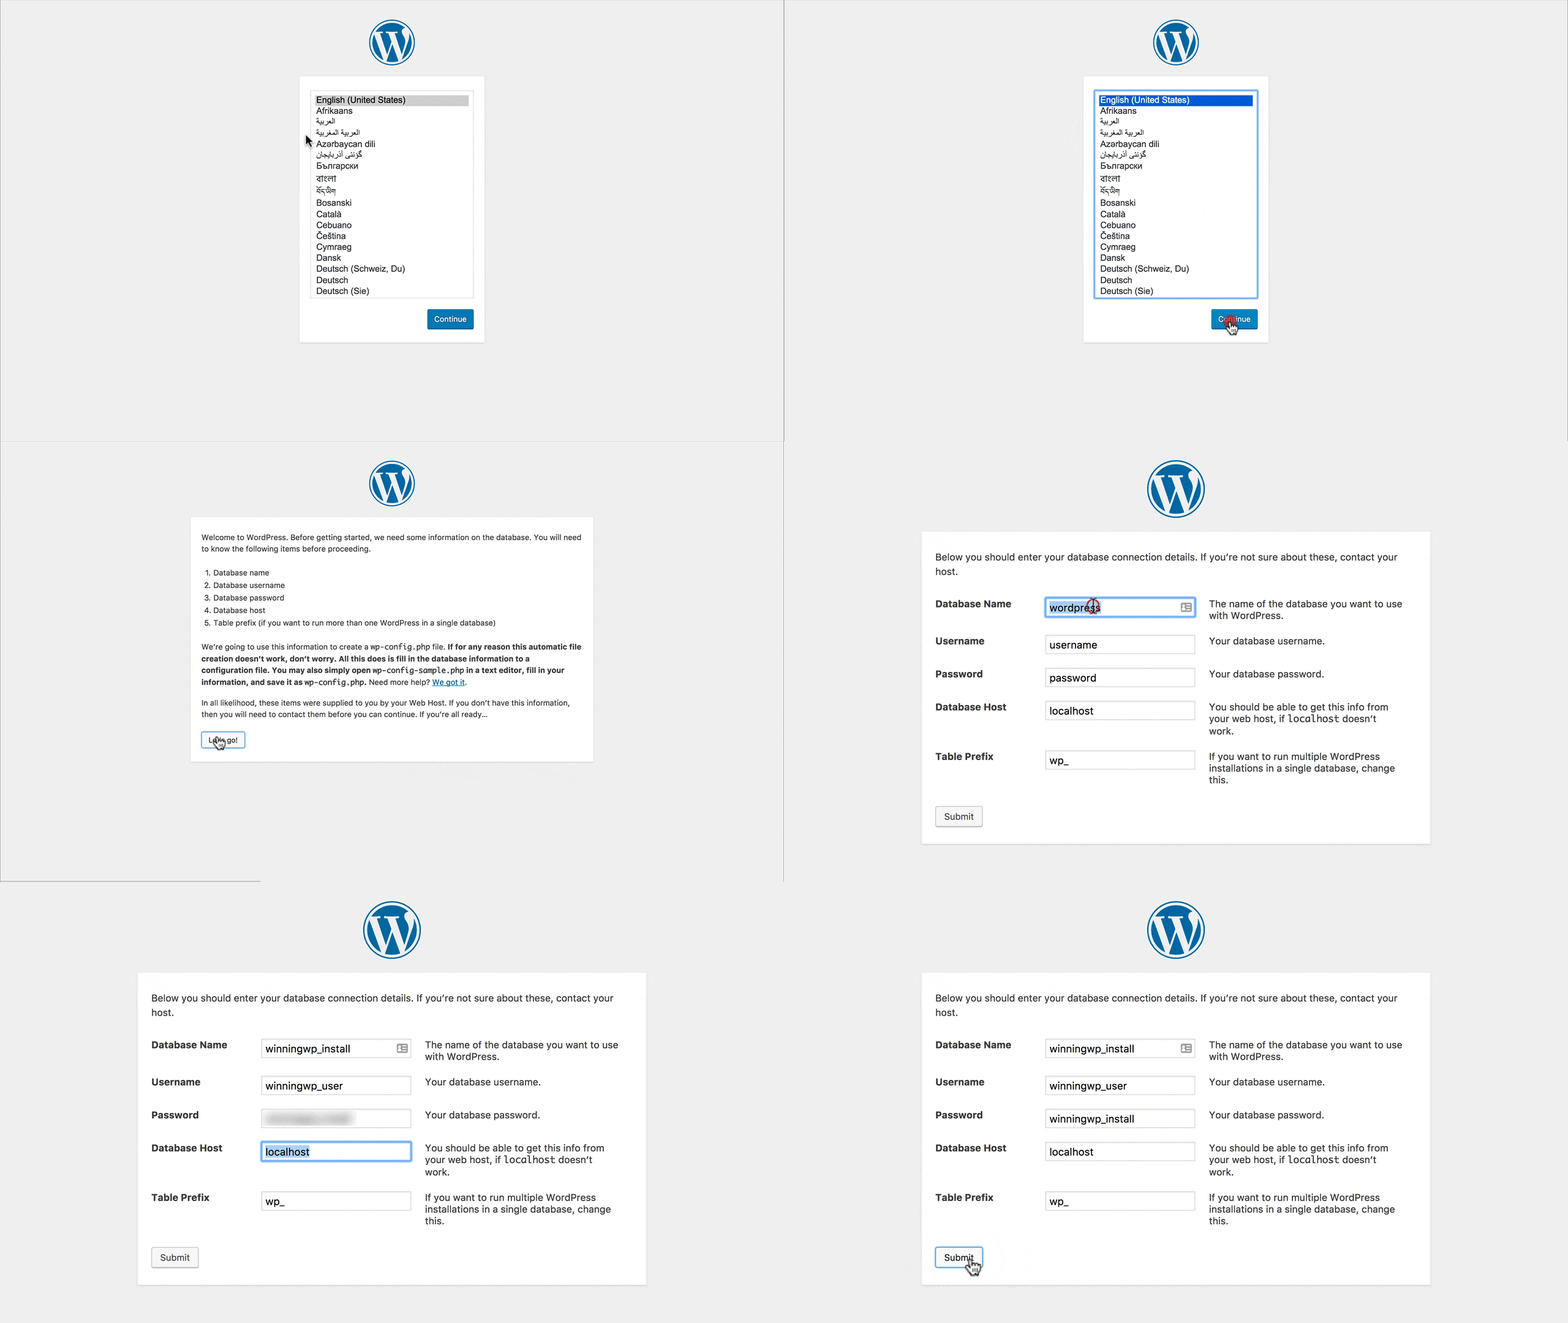
Once the files have uploaded, open your web browser and navigate to where you just uploaded WordPress’ files (either yourdomain.com or yourdomain.com/folder/). You’ll be asked to choose a language, so pick the one you want and continue. The next screen tells you we’re going to connect WordPress to your database. There are two ways of doing this: Either use the form on the next page or, if this fails (which happens but is unlikely), edit some code. We'll cover both.
Connecting WordPress to your database with the form is straightforward: Fill in the first three fields with the details you set up earlier (you can leave the final two fields as they are). Press Submit once you’re done, and then Run the install.
If the installer fails to make a database connection (it will be obvious if this is the case), you’ll need to do this manually. This involves editing code, and, to do this, you’ll need the code editor we discussed earlier. Re-open your FTP client and navigate back to where you uploaded the WordPress files. Find the file wp-config-sample.php and download it to your desktop, or a folder in which you can easily find it. Now, open the file with the text editor you chose earlier.
You’ll need to add a couple of details about the database:
- Add the name of your database where
database_name_hereis marked. - Add your username where
username_hereis marked. - Add your username’s password where
password_hereis marked.
Now, save this file as wp-config.php and use the left-hand window in the FTP client to navigate to it. Once you’ve found the file, drag and drop it into the right-hand panel to upload it to your host. Visit where you uploaded WordPress’ files, and you should be taken to the next stage of the setup.
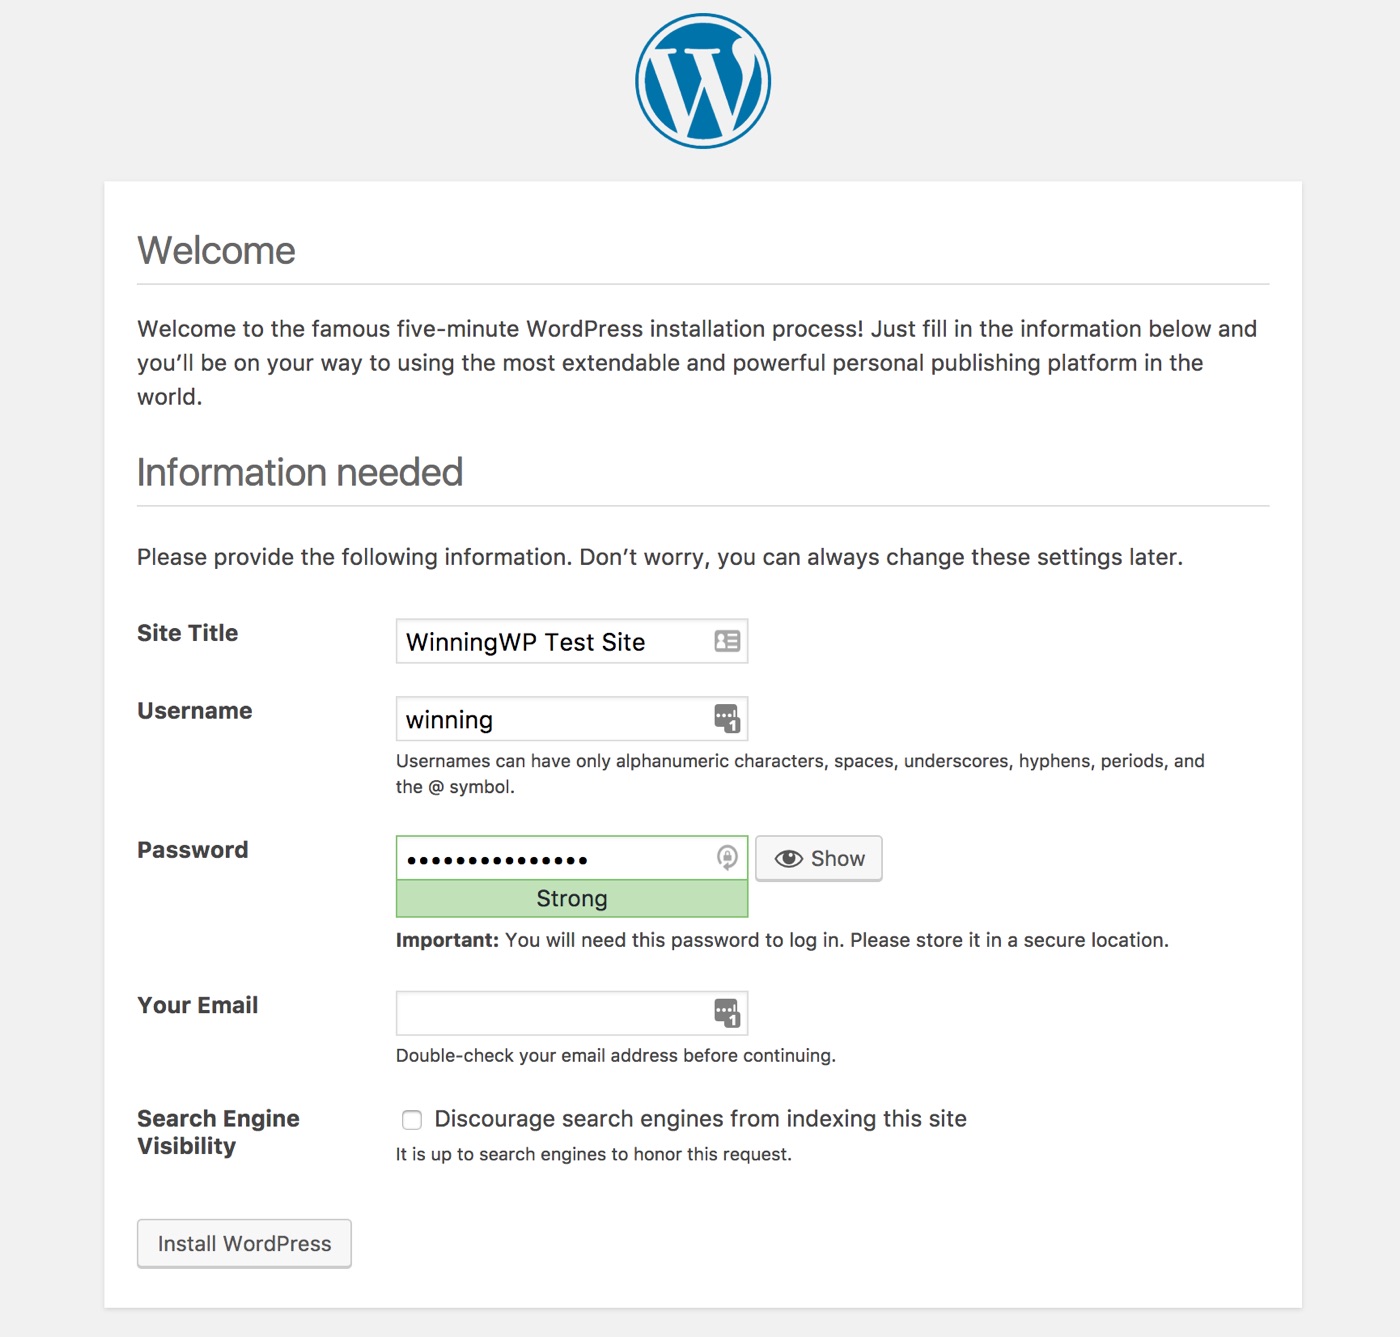
You’ve now connected WordPress to its brain, the database! The only setup left is to choose a Site Title, enter your username and password, and enter your email. If you’re building a public website (which the vast majority of websites are), then make sure the box to discourage search engines from indexing your site is unchecked. This will let your site appear in relevant search results. Press the Install WordPress button when done.
Once the install is complete, follow the prompts to log in, and you’ll be taken to the WordPress Dashboard. This is the final step, and WordPress is now installed!
With the manual installation method, you don’t get any of the additional benefits offered by the alternative methods, such as backups or automatic updates, but it’s important to set these up. To help, we have full guides on WordPress updates and maintenance and WordPress backups and security.
Installing WordPress Is the First Step
Congratulations on installing WordPress! You’ve joined hundreds of thousands of others in using the most popular -- and arguably best -- tool for making a website.
The next steps are just as important: Choose a theme, add extra functionality, make your site load quickly, and keep your site backed up and secure. Just as this guide has taken you through the whole installation process, we’ve prepared a set of WordPress Guides to take you through the entire process.

Good luck!
Setting up your very first WordPress site is always a challenge – the second: really not so much! And once you've done it a few more times, you'll likely be able to do everything that's necessary in just two or three minutes (forget five!)!

