

How To Speed Up WordPress - A Comprehensive Guide
Speed is critical to the success of a website: Visitors have increasingly short capacities to wait around, and may be annoyed by a site loading in more than two or three seconds. Site speed has a direct influence on visitor satisfaction, the chances of visitors returning, conversion rates and even how well your site ranks in search engines! This guide is your comprehensive reference point for all you need to know on speeding up WordPress. Note: For more WordPress guides, head to the WinningWP Guides page.
-Note: WinningWP content is free to all. If you make a purchase through referral links on our site, we earn a commission (learn more).
How fast does your site load? Can it load faster? Fortunately, the answer is almost always 'yes'. Your website can almost certainly load faster.
Visitors expect your website to load in under two seconds, and will leave your site if they’re left waiting around for too long. Speed optimization also relates to SEO: Google takes site speed into account when generating its rankings. A slow website could cause visitors to become unhappy and leave, making your search rankings drop as well.
We’re going to cover the tools, tricks, and techniques that make the biggest difference to your site’s speed first, and we’ll then move on to the things that make a smaller impact and may only be worthwhile for bigger or high-traffic sites. The aim of this guide is that you are able to follow along and actually put the content here into practice to make your website faster.
The guide is designed to be methodological, so start at the beginning and follow systematically from there. Before we start, you may wish to purchase WP Rocket: This is the best WordPress speed plugin available, and we’ll be using it throughout this guide. If you don’t want to make the purchase, we’ll be providing free alternatives throughout, although taking this route will be a lot more cumbersome.
To get the most out of this guide, you should follow in order, so don’t leave anything out. Let’s get to it.
Fast Hosting Is a Prerequisite for Fast Websites
Behind any fast website is a fast web host. Web hosting is what powers your website, and we can’t emphasize enough how important good hosting is to the speed of your site.
There are a number of technical features required from web hosts to have your website loading as fast as possible. These include:
- NGINX support (this is web server software that will load your site faster and handle high traffic better).
- PHP 7 support (this is the latest version of PHP, the coding language WordPress is written in -- it’s significantly faster than its predecessor).
- SSL (this is required for
HTTPS). - HTTP/2 support (this delivers files faster; you can use this tool to see if your host uses this).
- Server side caching (this reduces the work required by the server to load each page; it can also be done by an external plugin, but this is less efficient).
- SSD drives (makes for faster file loads on servers).
We happily recommend WP Engine as a web host that offers all of the above. WP Engine is a managed WordPress host, which means it generally takes care of things such as backups, updates, and security for you (see here for the differences between shared and managed hosting). One of the big advantages of WP Engine is that it’s set up to be fast -- with features such as caching automatically handled for you -- so, by choosing WP Engine, you’re starting out with a significant advantage.
We generally don’t recommend shared hosting (one in which lots of websites share a single server), but, if you absolutely can’t afford managed hosting, then go for SiteGround. SiteGround meets the criteria above, and also has its own caching solution, although you’ll need to set it up yourself. We’ll cover caching on WP Engine, SiteGround, and all other hosts later on in this guide.
It’s worth saying explicitly: Good hosting is a prerequisite for a fast-loading website. You must have a good host to have a fast website. If you do not currently use one of the hosts we recommend (or other managed hosting), we’d strongly recommend switching before you proceed.
We have a full guide on transferring WordPress to a new host that will help you to move to one of the hosts we recommend (including details on how to transfer to WP Engine using its transfer service).
With hosting covered, let’s move on to the tools that can make your site -- a site that's already fast on a good web host -- even faster.
Do You Really Know How Fast Your Website Loads?
Understanding page load speed is incredibly important: You need to get to grips with this to understand how to most effectively make your website faster. We’ll start with the theory, do some practical analysis (which you can copy for your own site), and then show you how to properly test how fast your website loads.
Understanding Page Load Speed
The headline figure we’re interested in here is how long (in seconds) it takes a given page on your website to load. This is known as your page load speed, and it should be your main focus when trying to make your website faster.
Your goal for page load speed should be under two seconds. A tiny bit more than this may be acceptable, but you really don’t want your visitors waiting any longer than two and a half seconds or so. An extra second sounds like an insignificant amount of additional time, but studies show again and again that visitors really care about site speed and will leave your site if it takes too long to load.
Page load speed is the headline figure, but there are also a number of other factors in play:
- Time to connect: The time taken to connect to your site’s server.
- Time to first byte (TTFB): The time it takes for your site’s server to respond to an initial page load request and send back the first piece of data needed to load the web page. This is important since nothing else will load until the TTFB is complete.
- Page rendering time: Total time taken to load and display your website.
- Location: The physical location of your website visitor can affect how quickly your site loads. Visitors further away from a server will experience slower load times, and vice versa for visitors closer to servers.
- Render blocking resources: Your web page won't load until this has loaded (this would be HTML, which is essential for a page to display, and CSS and Javascript, which aren’t necessarily essential).
- Number of HTTP requests: These are requests for data from visitors’ browsers to your site’s server. Generally, more requests results in slower page load speed.
The interplay of these different factors results in your overall page load speed. You might find it useful to think of this as a waterfall, where at the top is the visitor loading the web page and at the bottom is the loaded web page. The additional factors, such as TTFB, render blocking requests, and location, can be thought of as blocks preventing the water from reaching the bottom.
A twist here is that a page doesn’t necessarily need to have finished loading to be usable, and this creates scope for further optimization. If we can load and render the top of the page first, we can make the website usable -- since visitors start at the top and then scroll down -- without needing to wait for the full page load time.
Users will typically start at the top of the page and then scroll down after a couple of seconds: Thus, if the top of the page renders as fast as possible and only then does the rest of the page load and render, this creates the illusion of a faster website and a better user experience.
There are a couple of other innovative tricks that can be used to speed up the initial page render speed. We’ll cover these later in this guide.
Testing Page Load Speed
Once you understand what we’re dealing with when discussing page load times, we can measure your website’s page load speed. You can use two tools to test this: GTmetrix and Pingdom. Both of these are free, and offer a detailed loading speed test of your website from across the globe (note that you’ll need to register for a free account with GTmetrix to access all of its features).
You’ll need to test your site multiple times from multiple locations with each tool to get an accurate picture of how quickly it loads. This will even out any discrepancies, and give an accurate overall picture. Both tools allow you to select test locations from around the globe from their settings, so you can do this from the comfort of your computer. Three different locations should give a reasonable snapshot of how your site performs: If you use Google Analytics, you can get help deciding which locations to use by logging in, clicking Audience → Geo → Location and picking the top three.
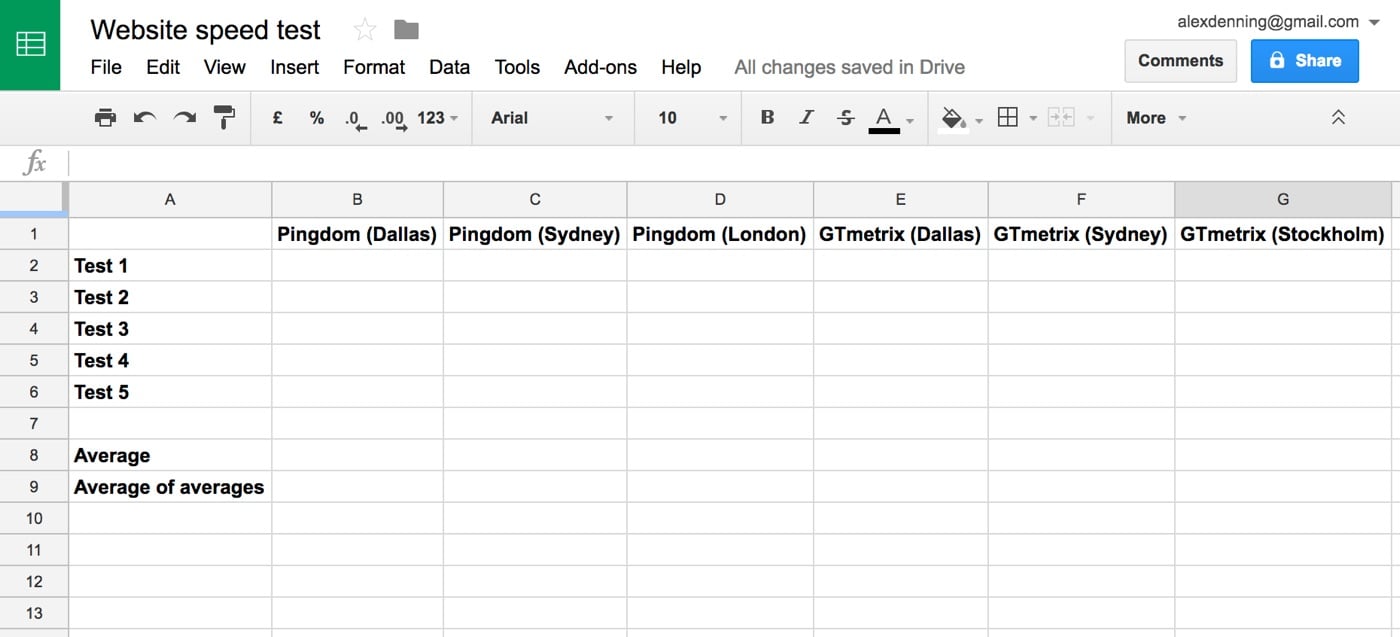
You’ll find it helpful to set up a spreadsheet to manage your speed tests, with the layout as below:
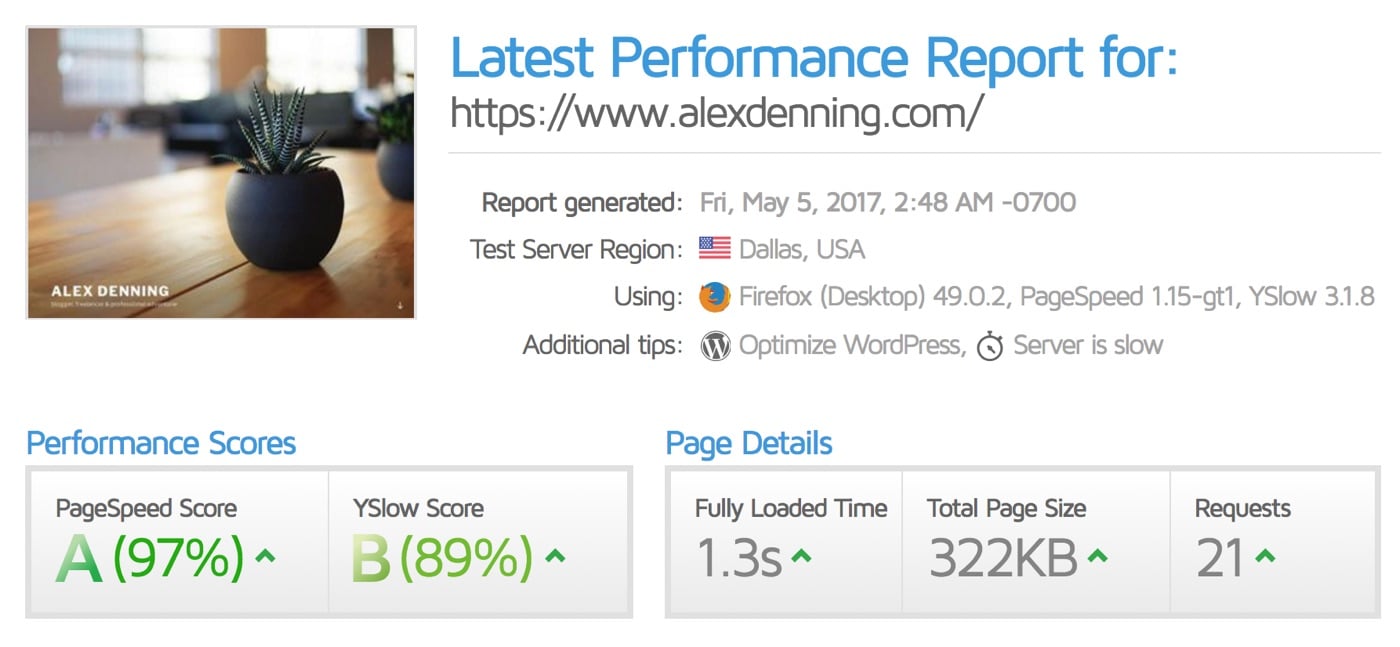
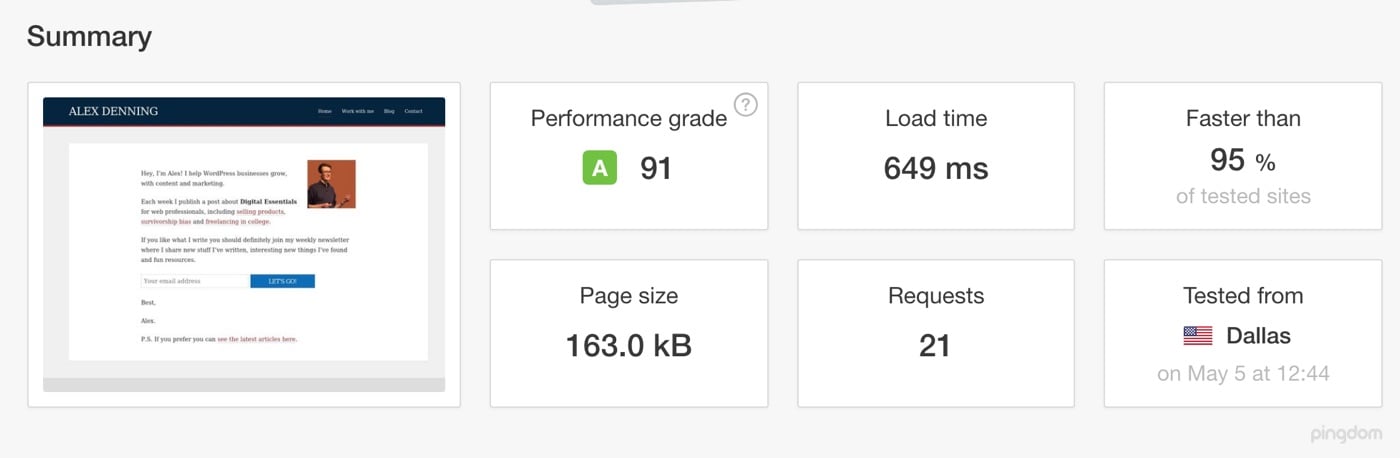
It’s now just a case of running the tests and filling in your spreadsheet! You can run tests in GTmetrix by entering your site’s URL (including https and www if appropriate), and clicking Analyze. You can change the location under Analysis Options. You can run tests in Pingdom by entering your site’s URL (again including https and www if appropriate), selecting the location and clicking Start Test.
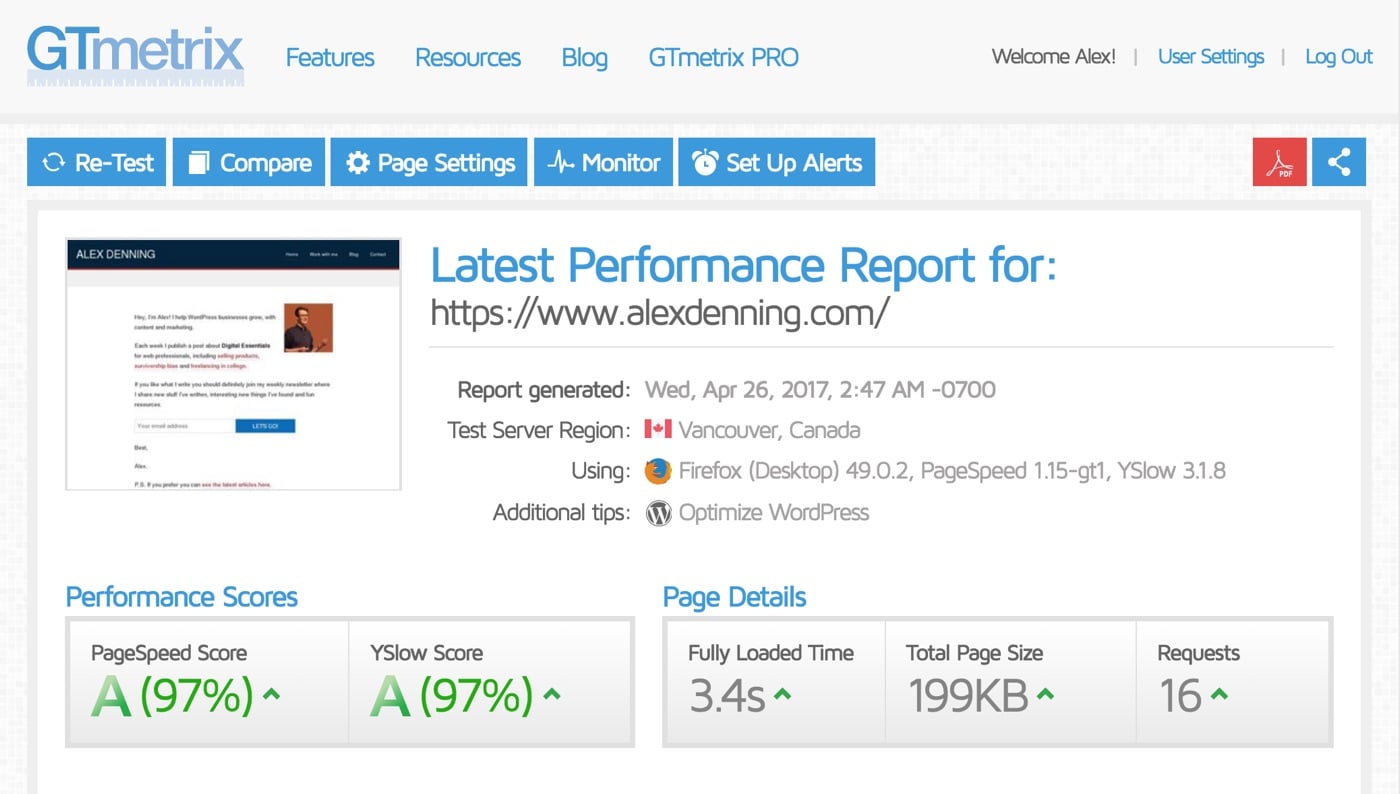
You should also make a note of your page size and number of HTTP requests (shown as just 'Requests') as recorded by Pingdom, and the same as recorded by GTmetrix. This data will stay the same regardless of location, so you only need to make the note from one test.
This testing will take a couple of minutes to do, and, by the end, you’ll have an accurate picture of how quickly your website loads across the globe.
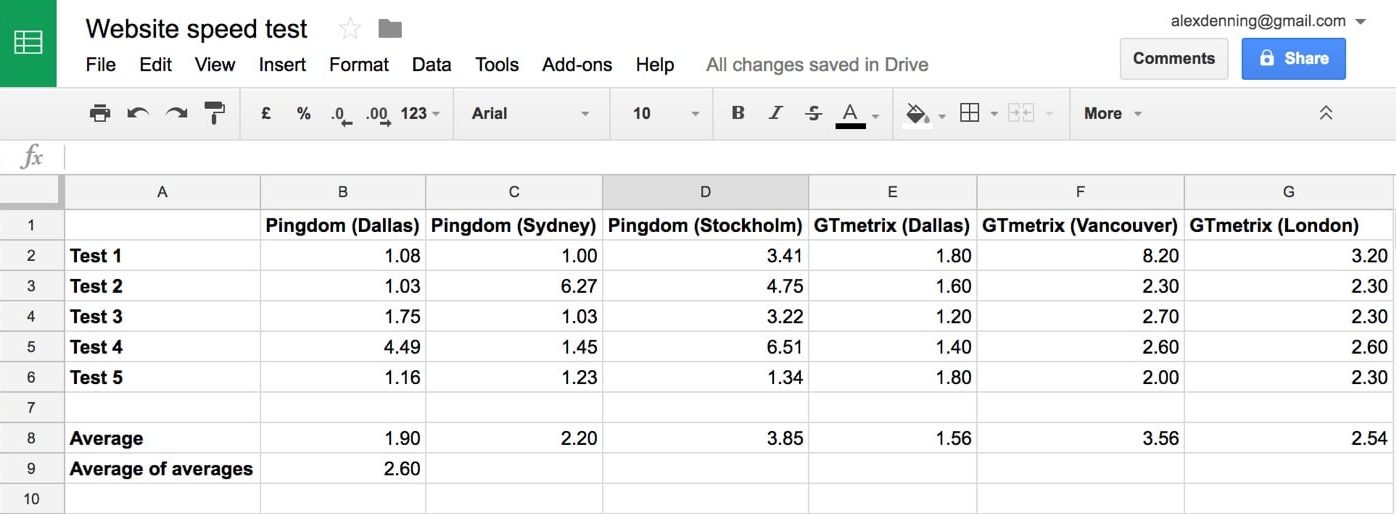
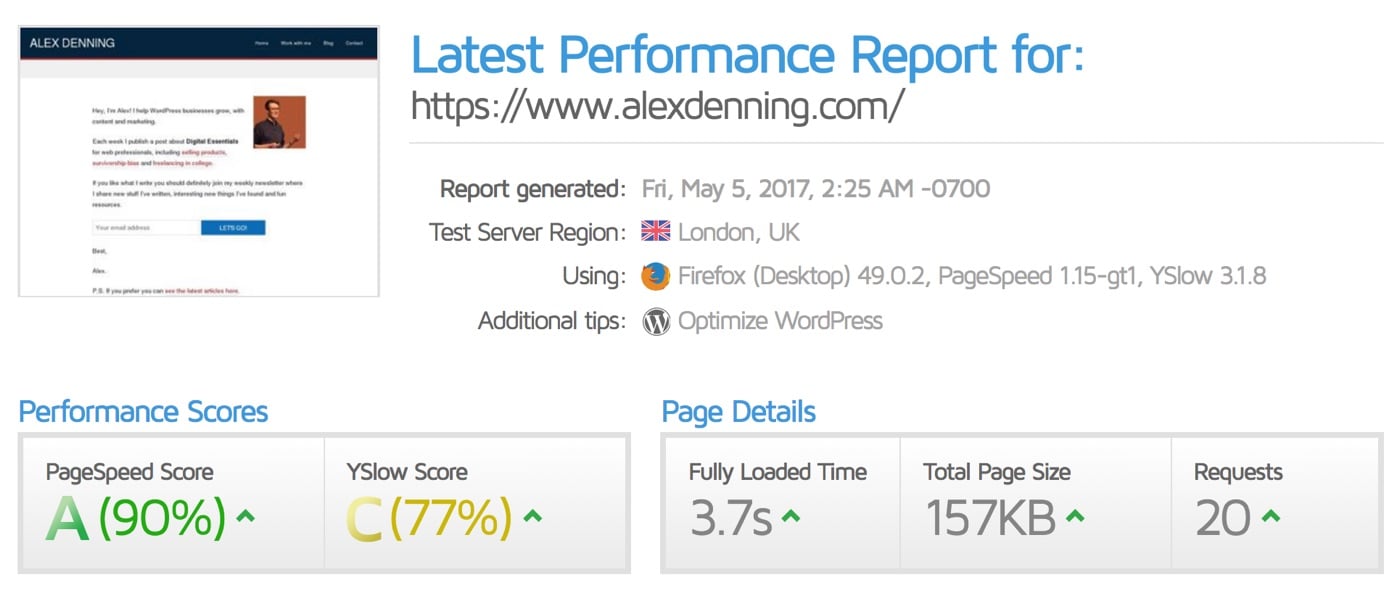
In my tests, for example, I can see that while my site performs very well in the US, loading in under two seconds, it does significantly less well internationally, with load times higher in all other regions. In Europe, GTmetrix shows load time to be up to four seconds, an unacceptably high result. This shows me I have a reasonable starting point, but I have work to do.
It will also be useful to test the two or three most popular pages on your site (you can again use Google Analytics to find these: Login, click Behaviour → Overview and you’ll find your most popular pages). You can make recording the results easier for yourself by duplicating the spreadsheet tab and updating the numbers as appropriate.
Note: You can also set GTmetrix to regularly monitor your site, and alert you to any variations. Instructions for how to do this are covered in our guide to monitoring a WordPress website.
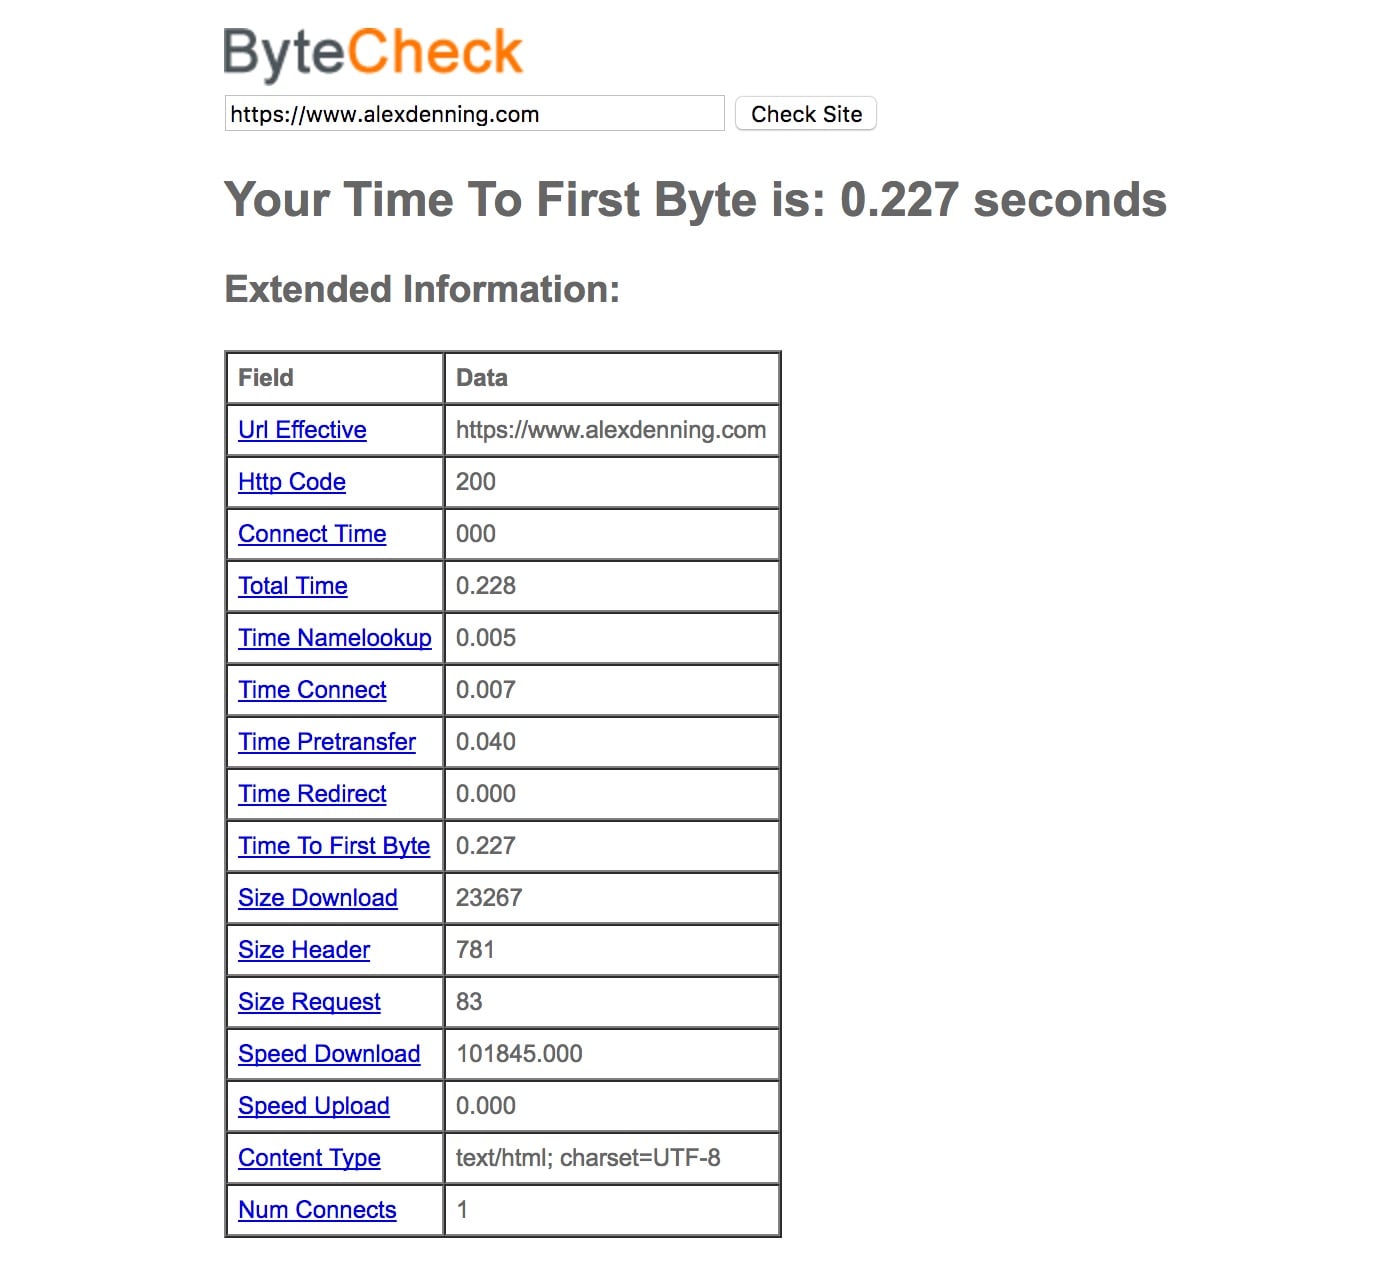
You can test your site’s time to first byte (TTFB) across the globe using this tool. Enter your site’s URL and test, then copy and paste the TTFB test results (last column) into a new tab in your spreadsheet. You’ll want to run the test at least three times to get an accurate picture.
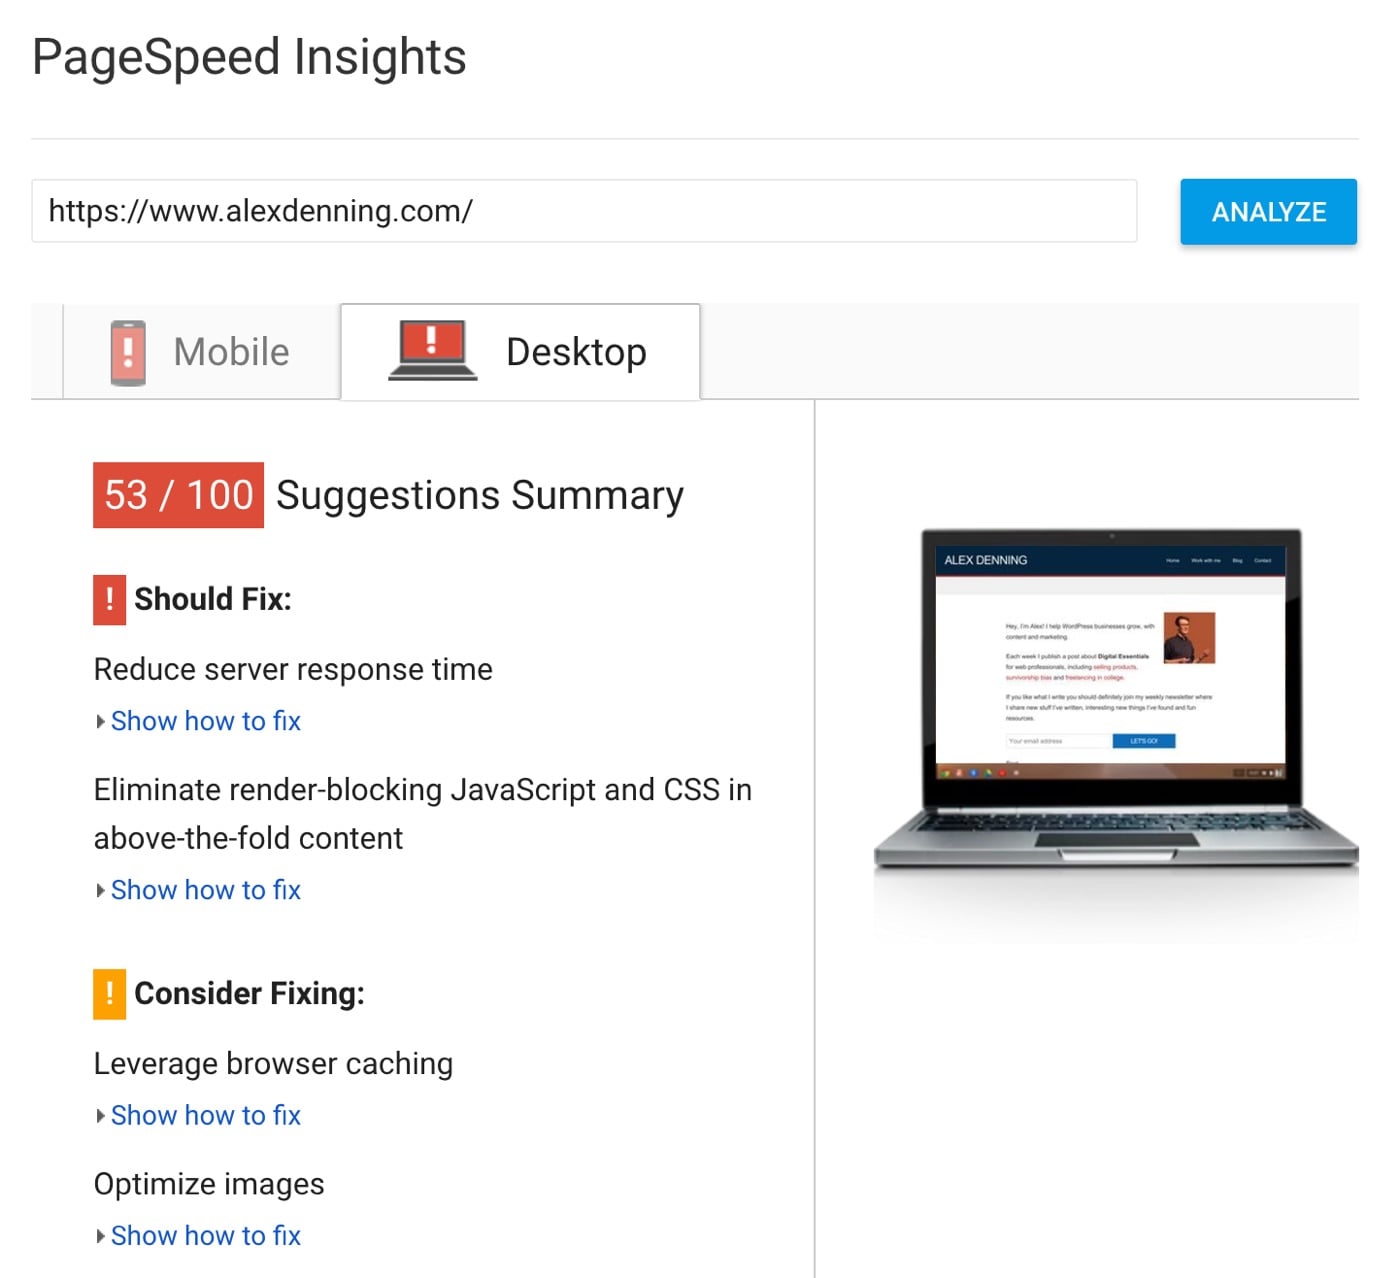
Finally, run your site once through Google’s PageSpeed Insights. PageSpeed is the site speed score Google awards to all websites, which forms part of its search algorithm. Google wants the web to be faster, so it rewards faster websites in search results. PageSpeed is not an absolute measurement of your site’s speed, but a relative score based on how well your site adheres to best site speed practices.
Both Pingdom and GTmetrix will tell you your PageSpeed score, but it’s useful to get this from Google itself, as this offers a more detailed breakdown. You get a single score, so run your site once through PageSpeed Insights and make a note of your score for desktop and mobile devices. We’ll test again at the end of this guide, by which point your score should be significantly improved.
With an understanding of what we’re dealing with and how your website performs in the real world and across the globe, we can move on to making your website faster. As mentioned, we’ll start with the most effective tools and move to the least effective: You’ll be able to follow along and make your website faster as we go, stopping when you decide the gains have become marginal.
How to Set up Caching in WordPress
Caching is the single best thing for the speed of your WordPress site, so we’ll cover this first.
When a visitor to a WordPress site requests a page, a lot has to happen for the page to load. All of the content has to be fetched from the WordPress database, the theme and its settings have to be loaded, and the same has to happen for any plugins. This creates work for the server, which takes time.
Caching reduces the work required to load your website by doing the server work once and storing a temporary 'finished' copy of each page. This temporary copy can then be served to visitors, and, as much less work needs to happen, is much faster -- the finished page can be sent right away.
This temporary finished copy of each page can be refreshed every couple of hours to make sure your site stays up to date, and also whenever any new posts or pages are published or updated. This means that, in practice, the only difference a visitor will see between a non-cached site and a cached site is that the cached site has a much faster page load speed.
Everybody should be using caching on their WordPress site, and, fortunately, it’s easy to set up. Precisely how depends on which host you’re using.
If you use our recommended managed WordPress host WP Engine, there's no action required of you. WP Engine handles all caching for you, automatically. There's literally nothing you need to do or optimize; it’s all taken care of out of the box.
If you use our recommended shared WordPress host SiteGround, however, you’ll need to do some setup. SiteGround is a fantastic shared host, and also has its own caching solution, but you’ll need to set this up yourself.
This only takes a couple of minutes: First, head to your WordPress Dashboard, and then navigate to Plugins → Add New and search for SG Optimizer. Install and Activate the plugin. Now, log in to the SiteGround User Area, and click Go to cPanel. Click on SuperCacher. You now need to activate the different layers of caching for your site: Turn on static cache, click the next tab and turn on dynamic cache, and then click the final tab and turn on Memcache.
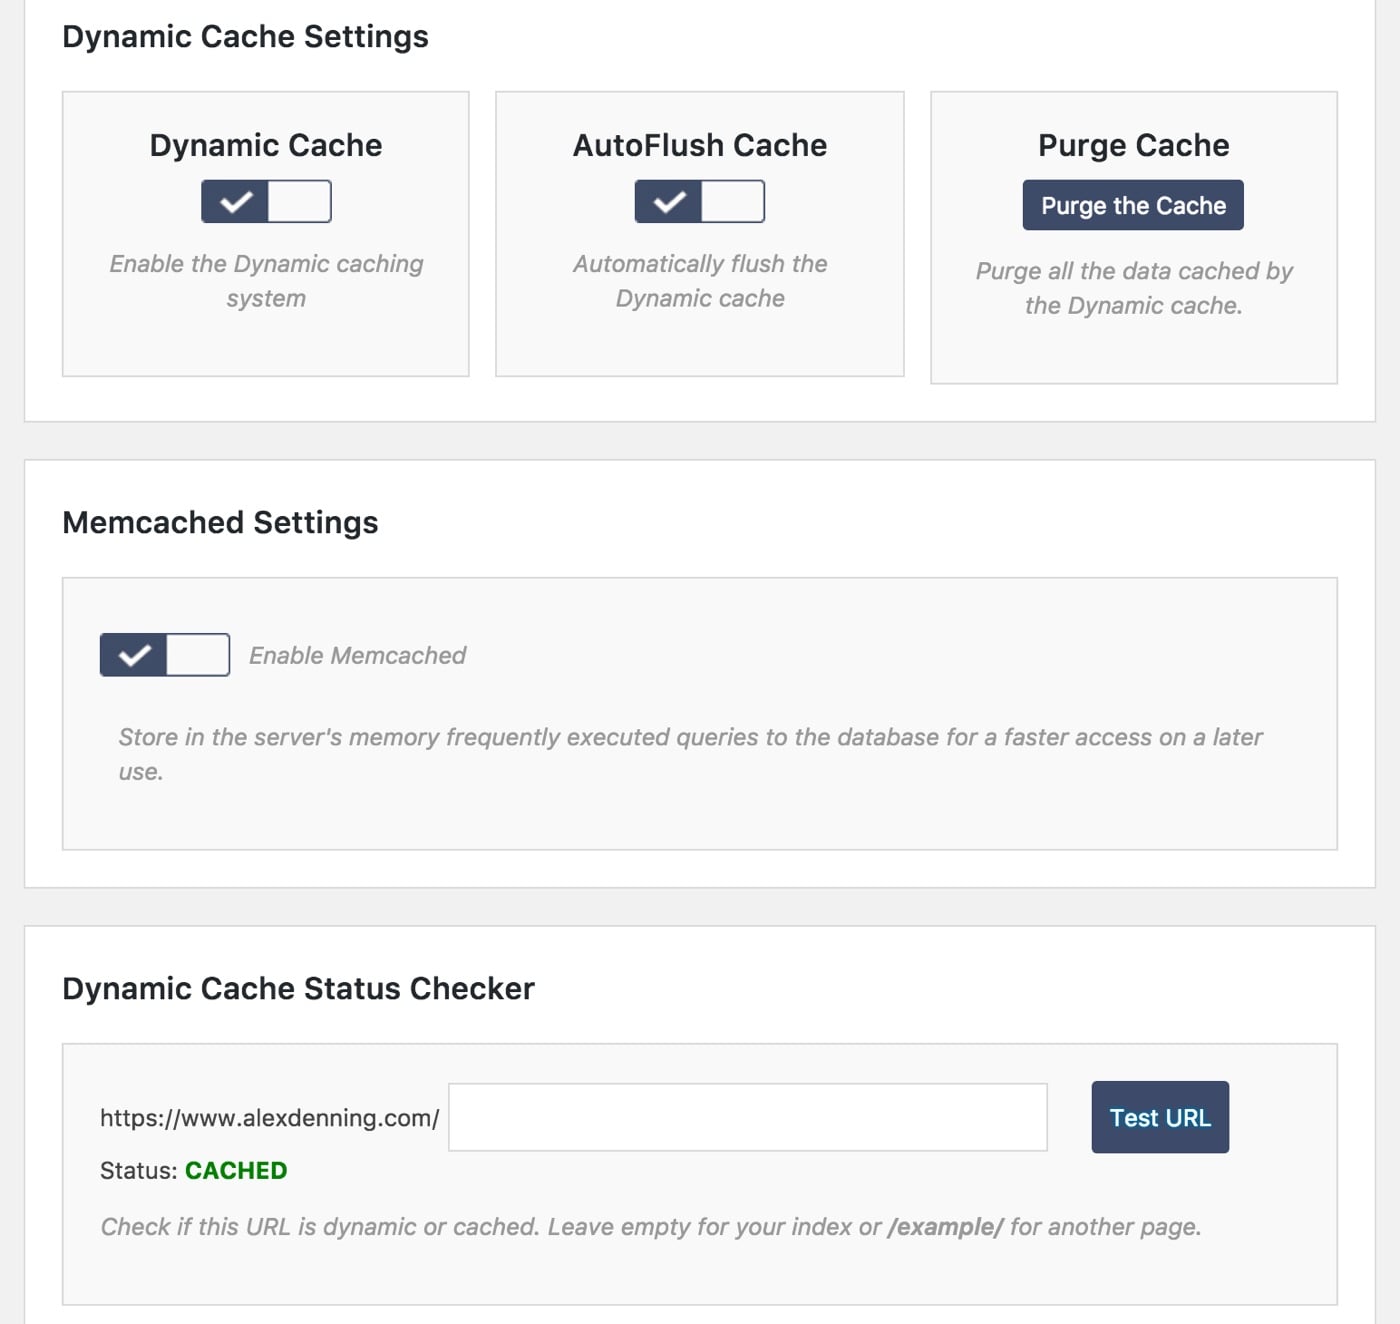
Return to your WordPress Dashboard, and click on the new SG Optimizer menu, then SuperCacher Config. Check to make sure that Dynamic Cache, AutoFlush Cache, and Memcache (you’ll need to scroll down) are turned on, and you’re all done.
Note: Some other hosts will offer their own caching solutions. If this is the case with your host, use this instead, as caching provided by your host will be the fastest option available.
If you use any other host, you should use WP Rocket. WP Rocket is the fastest caching plugin available, although you will have to pay for the privilege of using it. WP Rocket also gives you a lot of additional features that will make your website faster. If you’re using WP Engine or SiteGround, you may find this convenience makes purchasing the plugin worthwhile, even though you won’t be using its caching feature.
WP Rocket is really easy to set up (which is one of its benefits). You’ll need to purchase the plugin and follow the prompts to download. Next, head to your WordPress Dashboard, and then Plugins → Add New. Select Upload Plugin, and then select the ZIP file you’ve just downloaded.
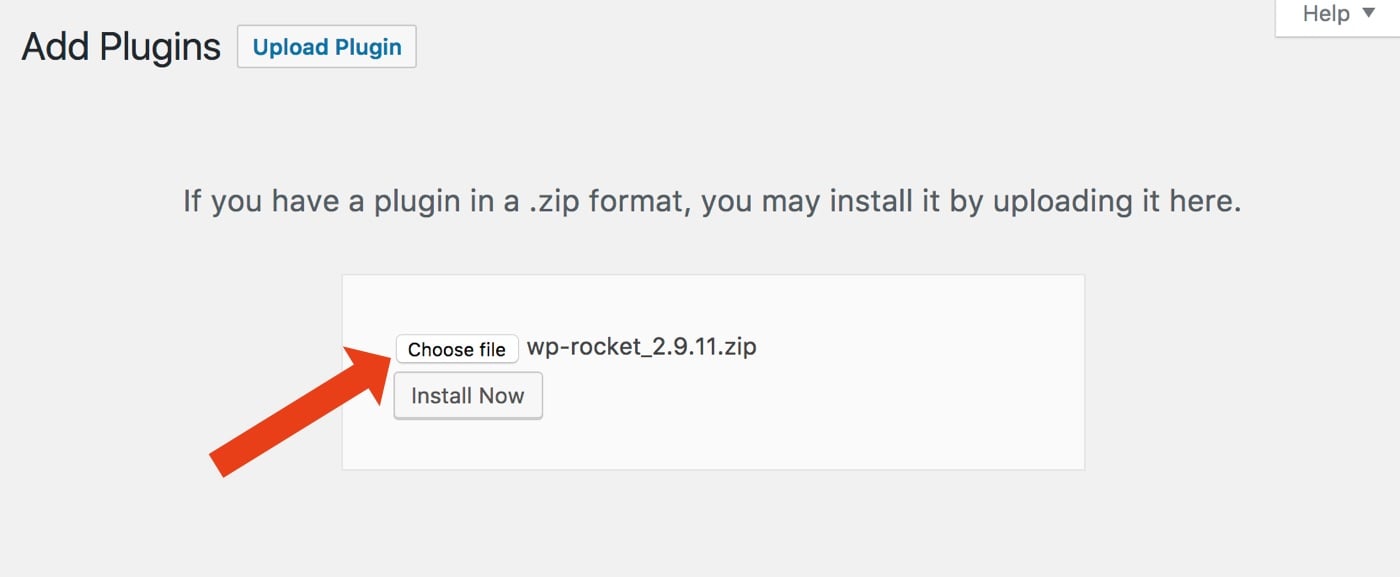
Press Install Now, and then Activate Plugin. The plugin automatically turns on caching and a couple of other features. We’ll come back to these later in this guide.
WP Rocket is the best caching plugin for most people, but if you’d prefer a free option you should use WP Super Cache. WP Super Cache offers much fewer features than its rocket-powered competitor, but it does a good job of the basic caching functionality.
When people talk about caching, they’re usually referring to server side caching. There is, however, a second type of caching: browser caching. This tells the web browser not to reload parts of your website that are reused on different pages, making for faster pages. Elements reused between pages typically include images such as logos, the stylesheet (which tells the browser how the page should look), and JavaScript files (which add extra functionality to web pages).
Browser caching won’t have the same impact as server side caching on page load times, but it will make your site a lot faster for those all-important multipage and returning visitors, and is well worth doing. If you’re using WP Rocket, this is already handled for you. If not, you can install this plugin to have the same result. You’ll need to install and activate the plugin, then head to Tools → Browser Caching, follow the instructions, and activate the caching.
Once you’ve got caching running on your site, you should see an immediate improvement in page load speed: Rerun a test with Pingdom and GTmetrix, and you’ll see instant improvements. Caching is the one element that'll make the biggest difference to page load speed. With that covered, let’s move on to the more nuanced speed improvement tools.
Optimizing WordPress Page Render Speed
Making sure the top of pages on your website render faster than your total page load speed is a great way of improving the user experience. We touched on this earlier: You can do this by loading the code needed to render the top of each page first and loading everything else afterwards.
The two techniques that'll make the biggest difference to how fast the top of each page on your site renders are: Changing when JavaScript loads, and loading the CSS needed initially separately from the rest of the CSS in your theme (CSS controls how your website looks). These don’t require technical skill, but do require an understanding of what you’re doing. There’s a small risk of 'breaking' elements of your site, so be vigilant for these -- we’ll troubleshoot common problems as we go.
Load JavaScript last. JavaScript is used to add extra functionality to your website, and is typically used by sliders, popups, image galleries, email software and analytics tracking tools. JavaScript is added to your website using JavaScript files. Think back to our waterfall analogy of how your website loads: JavaScript files act as a dam, only allowing the rest of the page to load once they have loaded.
As JavaScript is only adding extra functionality, this means the core functionality of your site is delayed from loading, and your page render speed is increased.
The solution here is to load JavaScript after everything else has loaded. This lets visitors see and start using your website as fast as possible and reduces the perceived page load time, with the extra functionality added a moment later. We do this by moving JavaScript files to the bottom of your web pages.
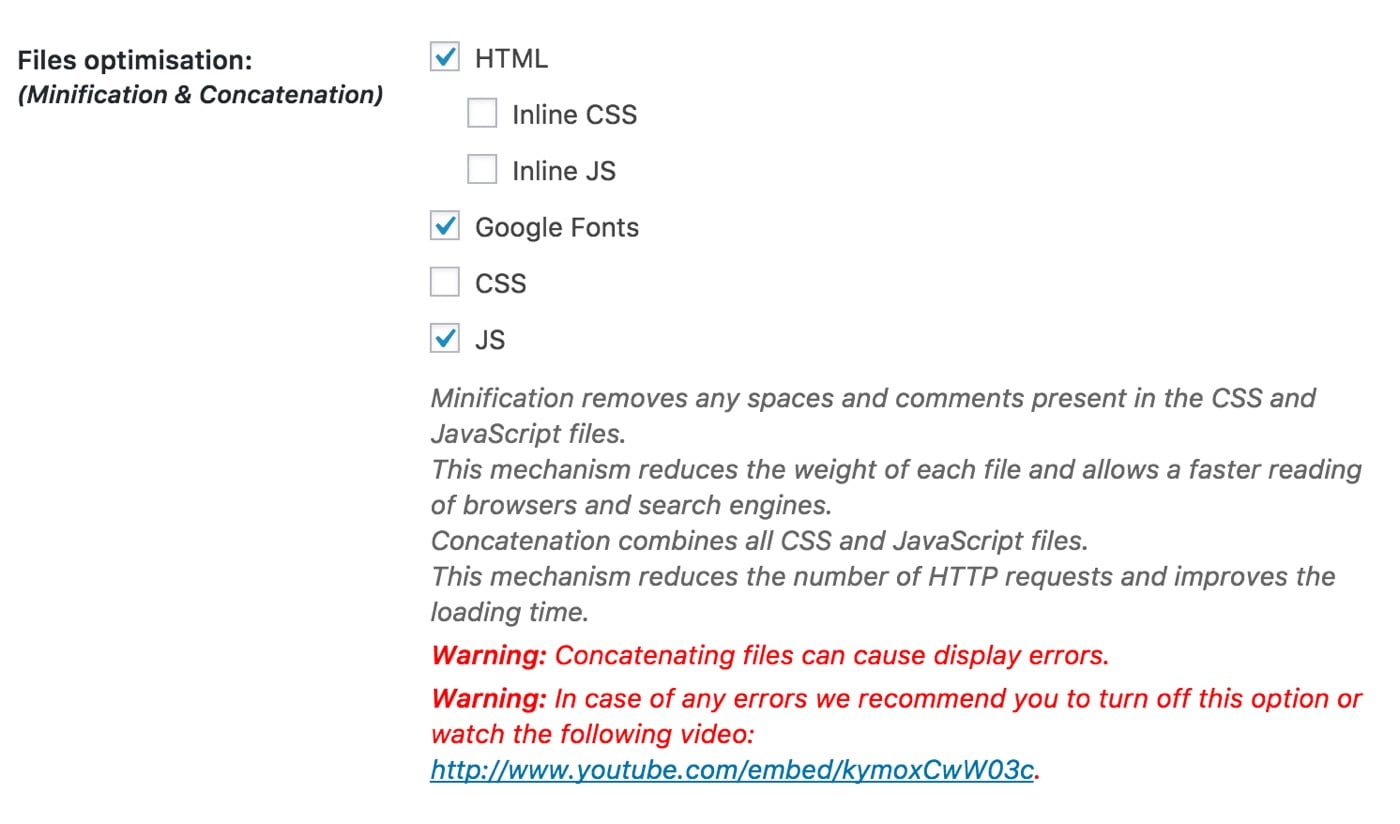
You can do this using the WP Rocket caching plugin we mentioned earlier. With WP Rocket installed, head to your WordPress Dashboard and then Settings → WP Rocket. Under Files optimization, tick the JS box and save changes (you can also tick the HTML and Google Fonts boxes while you’re at it, but leave CSS unticked as we’ll address this separately).
WP Rocket will now automatically optimize your JavaScript files and place those that it thinks need to go at the top of the page at the top of the page, and those that it thinks can go at the bottom of the page at the bottom of the page.
With the optimization in place, take a look at your site in an incognito window to see if everything is still working. You want to pay close attention to any features on your site requiring JavaScript: Sliders, popups, image galleries, email software and analytics tracking tools. WP Rocket is very good at identifying which files need to be loaded where, so you shouldn’t experience any problems.

If anything is 'broken' or not working as expected, WP Rocket has incorrectly placed a file. If you feel confident, you can manually identify which files should be loaded where, and in what order. This requires more advanced technical knowledge, so is not for everyone (WP Rocket’s documentation here will be helpful). Those not confident should either contact WP Rocket’s support to seek assistance or turn off the function.
You can achieve very similar results with a free plugin, although note that by default this puts everything in the footer. It is common for WordPress sites to require a JavaScript library called jQuery to be loaded in the header, so if you immediately notice that your site breaks when this plugin is installed head to Settings → Scripts to Footer and check the option to keep jQuery in the header.
Next, make sure the CSS needed to display the top of your pages loads first. This is slightly more technical, and, as with the JavaScript change, will need to be updated when you change your theme or make any major changes to your website. Furthermore, this is only suitable for websites with a standardized layout across the whole site: If your site’s homepage is vastly different from the rest of your site (perhaps using a page builder), you won’t be able to do this. Most WordPress sites, however, use a standardized layout, so most readers will be able to proceed.
We’ll start by installing the Autoptimize plugin by heading to the WordPress Dashboard and clicking Plugins → Add New and searching for Autoptimize. Install and Activate the plugin, then head to Settings → Autoptimize. You’ll want to untick the optimization options for HTML and JavaScript, but tick Optimise CSS Code and the sub option Inline and Defer CSS. Save the changes. You’ll now need to generate the code to paste in the large text box. This will be the CSS needed to render the top of your site’s pages.
You can use a tool called Critical Path CSS Generator to automatically generate the CSS you should paste in here. There are three steps needed to use this tool:
- Enter the URL of your site’s homepage.
- Paste all of the CSS code used on your site. Find this by loading your site’s homepage in an incognito window, right clicking, and selecting View Page Source. Press
ctrl + fon your keyboard and search for.css. One of the first files you should see is a.cssfile created by Autoptimize (it should feature/wp-content/cache/autoptimize/css/in its URL). Open this file, select all and copy, and then paste into the CSS generator. - Press the button and wait!
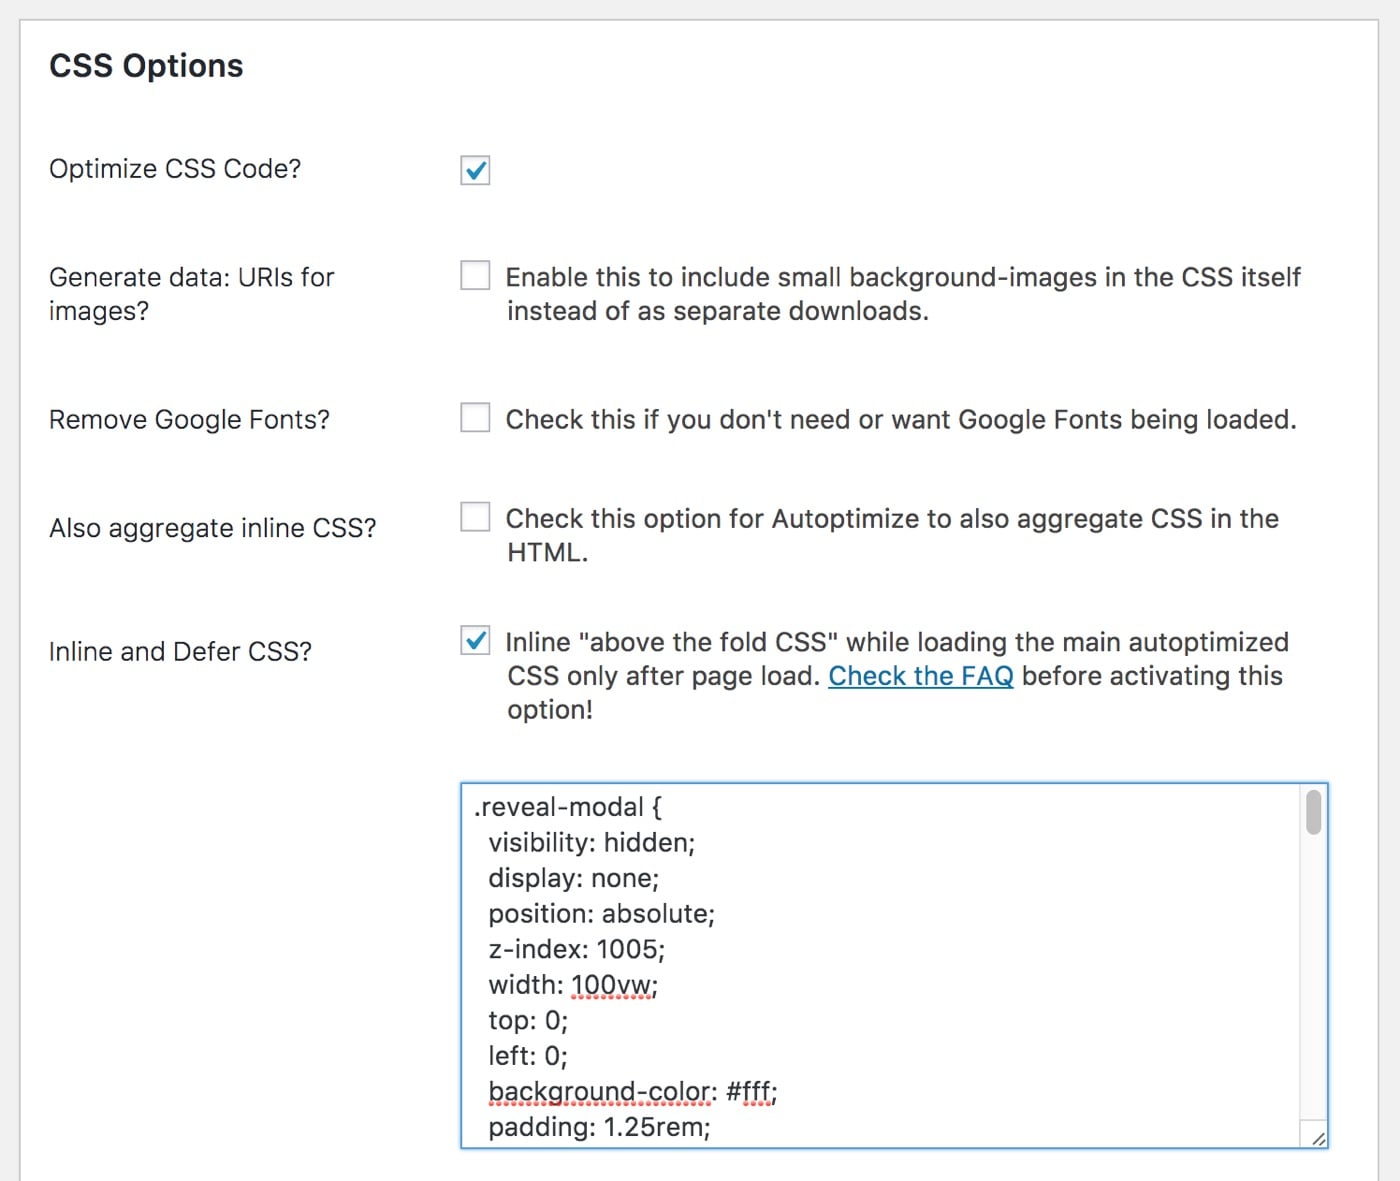
Once the CSS generator has done its thing, select all of the output and copy and paste into the Autoptimize settings in the text box provided for Inline and Defer CSS. Save your changes (and empty cache), and test out your site. You should see the top of your site load right away, with the rest of the styling coming in afterwards. Try this on a couple of pages to be sure of the results. You may notice your site doesn’t look quite perfect initially, but, as long as it’s usable, that’s fine.
If something looks seriously odd, head back to the CSS generator and double check that you pasted in all of the CSS correctly. You may find that simply rerunning the generator will sort out the problem.
If this doesn't deliver a fix, you can try to find a page on your website more representative of the rest of the site than your homepage -- but one that still makes your homepage render properly. The answer for most WordPress sites would be to use an archive page or regular blog post as your URL entered in the generator (i.e., https://yoursite.com/a-blog-post/). This will likely result in extra CSS being inlined, but will make this workable for some sites where this isn’t otherwise possible. The alternative if this doesn’t work or sounds too complicated is to turn this off completely by unticking the checkbox in Autoptimize.
Optimizing your site’s page render speed is a powerful way of improving the user experience and making your site faster with some straightforward on-page optimization. This will make a big difference to your site’s users.
Let’s Talk about Themes and Plugins
Next, let’s talk about themes and plugins, and how these impact your page load speed. We’ll start with themes and then look at plugins.
WordPress themes can have a huge impact on page load speed. They typically do this in one of three ways, by adding extra:
- Work server-side: Processing extra theme options, settings, and functionality creates extra work for the server generating the web page. The more work there is to do, the slower the website. The technical term for these is extra database queries.
- HTTP requests and page size: These are typically extra features in the theme using JavaScript to power sliders, email opt-in features, and contact forms.
- Media: Image-heavy themes require a lot of images! These all need to be downloaded, which takes extra time.
None of these things are necessarily bad: They all add the extra features and functionality that make WordPress such an attractive platform to use when creating a website. A text-only website will obviously load faster than an image-heavy magazine blog, but the whole point of using WordPress is to get easy access to the extra functionality, making it easy to create an image-heavy magazine blog. Thus, the important point is not to necessarily aim for the absolutely lowest possible figures here, but to aim for the lowest reasonable figures, striking a compromise between functionality and speed.
The slowest-loading WordPress themes typically have the most functionality. 'All-in-one' themes -- especially those with page builders included -- are some of the worst offenders, and are typically highly inefficient. For example, it’s common to see page builders use dozens of shortcodes to output pages. Shortcodes are one of the least efficient of WordPress’ features, and dozens -- or more -- of these result in very heavy server load and slow performance time. Others store a lot of information as data attached to individual posts, or store theme options in the WordPress database -- both of which create extra work and slow down sites.
Unfortunately, the best option is to avoid all-in-one themes and page builders. Themes designed with a specific function in mind are typically a lot more efficient as they’re only loading the functionality you specifically need, rather than functionality for every eventuality. If you’re wondering how much additional work your theme is creating, the easiest way to find out is to make a quick switch back to the default WordPress theme, run a speed test, and then switch back. You can do this from the WordPress Dashboard under Appearance → Themes. The most recent default WordPress theme is Twenty Seventeen.
If the load time is now significantly faster than your regular theme, then this isolates your theme as the problem -- and there's work to do. Note: The load speed won't necessarily be perfect here as plugins will still have an impact (we'll get to those in a moment).
The worst effects of multipurpose or page builder themes can be mitigated with good caching, but, if even with caching your site is taking three or four seconds to load with one of these themes, it’ll be best to switch to a more efficient theme. We have separate guides that go into detail on how to choose the ideal WordPress theme and where to buy high-quality WordPress themes.
If you’re in the two to three-second page load speed with your theme, you can probably stick with the theme and work to reduce the time taken to load. Your first port of call should be to turn off features you’re not using. Your theme’s Theme Options page may include such options. Any sliders, email, or social-sharing features you’re not using are perfect candidates for being turned off. If no such options are available, but you’re aware of large theme features you’re not using, get in touch with your theme’s support team. The second port of call should be to make sure each page only loads the files it needs. We’ll get to this later on in this guide.
WordPress plugins can have an impact on page load speed, but the long-held mantra that 'you shouldn’t use too many plugins' isn’t necessarily true: You don’t want to be using too many resource-intensive plugins. Resource-intensive plugins typically work similarly to their resource-intensive theme counterparts. You can use a plugin called Query Monitor to research how many times each of your themes and plugins are making requests to the WordPress database, and you can then remove high-impact plugins, replace them with a 'lighter' alternative, or try to mitigate the impact of each one.
It’s important to stress that looking at the overall number of plugins isn't helpful. Furthermore, just because a plugin takes up a significant amount of load time, doesn’t mean it should be deactivated. Good caching will mitigate the effect of resource-intensive plugins, although not completely. It’s important to conduct a more nuanced analysis here.

Install Query Monitor by heading to the WordPress Dashboard → Plugins → Add New and searching for Query Monitor. Install and Activate the plugin. You can now head to your site’s homepage to see a new menu in the WordPress Admin Bar: QM. This is where Query Monitor will do its analysis. Hover over this, click Query Monitor, and you’ll be taken to an in-depth analysis of how everything in your WordPress installation (including WordPress itself) is interacting with the database and the load time.
This analysis can look a bit daunting, but all of the technical information isn’t necessary to get the big picture. Instead, hover over QM again and click Queries by Component. This will take you to a much more useful table where you can see how many database queries each component on your site is running, the time taken to run these, and the totals.
My results, for example, show my theme is running a high number of queries. Therefore, I should see if there are sections of my theme I’m not using that can be disabled. I can also see, however, that the three queries the Yoast SEO plugin is running takes up nearly the same amount of time as my theme’s 40-plus queries. The time involved here -- 0.01 seconds -- is really not significant, but it’s useful to note that one plugin accounts for nearly 1/3 of this.
If you’re running lots of plugins, you could easily see these numbers increase and would want to start deactivating those you’re not using, or find alternatives for particularly resource-intensive plugins. In my example, switching from Yoast SEO to the lighter The SEO Framework delivered a significant reduction. This is a great example of the kind of results you should be looking for.
Your site’s homepage will likely produce different results to archive pages and posts, so also run Query Monitor on these pages and make the same analysis.
Database queries are a useful metric when working out the resource insensitivity of plugins, but they’re not the be-all-and-end-all. Here are some further useful rules for analyzing a plugin:
- Any plugin loading extra resources onto a page is adding to load time. Slider, email marketing and contact form plugins are especially bad for this, as they’ll typically load the JavaScript required to power their functionality, whether or not it’s in use on the page. We’ll cover how to deal with this in the next section of this guide.
- Plugins that provide features only for logged-in users can be ignored, as these won’t load for regular site visitors.
- Any plugin doing unnecessary work on every page load should either be deactivated, or this feature needs to be turned off. Jetpack’s social sharing and site stats are a good example of this, as is Wordfence’s live traffic feature.
- Jetpack deserves a special note: Jetpack is typically one of the most resource-intensive plugins, but it also does a lot of useful things. Just deactivating it would cost you all of those benefits. Instead of deactivating completely, head to Jetpack → Settings on the WordPress Dashboard and disable the features you’re not using.
Query Monitor is an incredibly powerful plugin, so spend the time digging into its data and identifying where your site is being slowed down. Try to mitigate the effects of resource-intensive plugins by deactivating features, and, where that’s not necessary, consider (and test) an alternative. If you’re not using a plugin or can live without its functionality, deactivation is a surefire way to reduce impact.
Choosing your plugins correctly is extremely important, and you can read more about how to choose and install WordPress plugins and WordPress plugins we recommend.
A final note on themes and plugins: Always keep these up-to-date. How to handle this automatically is covered in our guide on updating and maintaining WordPress.
Minimize Overall Page Size and Number of HTTP Page Requests
This next section will look at minimizing two important factors in overall page load time: The overall page size and the number of HTTP page requests. In our waterfall analogy, think of this as shortening the distance the water needs to fall. The result here can be much-improved page load times.
Stop themes and plugins loading JavaScript and CSS unnecessarily. WordPress’ great power comes in its flexibility, and a big part of the flexibility is the ability to easily and quickly extend WordPress with themes and plugins. Unfortunately, this also makes it very easy to add a huge amount of bloat to your site: Themes and plugins often add extra JavaScript and CSS files to power a specific site feature, but they load these files onto every page on the site. This is unnecessary, and increases the number of HTTP requests each page makes, as well as the overall page size.
Fortunately, a useful plugin called Gonzalez can fix this for you. Gonzalez analyzes which files are being loaded by which themes and plugins, and lets you control which pages these display on. The result is that you can stop files from being loaded unnecessarily.
Get started with the plugin by purchasing, checking your email for login details, logging in, and downloading the plugin. You’ll also need to unzip the file. Head to your WordPress Dashboard, then Plugins → Add New → Upload Plugin and select the zipped file inside the folder you just unzipped. Activate the plugin and head to your site’s homepage. You’ll now have a new option in your WordPress Admin Bar: Gonzalez. Click this and you’ll open up the Gonzalez options.
You’ll be presented with a list of everything that's loading on the page, separated into three sections:
- Themes: This is everything your theme is loading.
- Plugins: This is everything any plugin is loading.
- Everything else: This is everything WordPress itself is loading.
Unfortunately, you’ll need to identify what's what using only the file names and URLs. Here are a couple of helpful pointers:
- Use URLs to identify who's responsible for which file. Plugins need the most identification, but WordPress uses the URL structure
/wp-content/plugins/plugin-name-here/for all plugins, so you just need to look for the plugin name in the URL. Autoptimize, for example, displays as/wp-content/plugins/autoptimize/. - Anything with
toolbaroradminbarin the file name can be left alone: This is for the WordPress admin bar, and will only be shown to users who are logged in. - jQuery is the JavaScript library we mentioned earlier. This is required to power most JavaScript features, including sliders, email optins, and some dropdowns.
wp-embedis used to embed videos, music, and images from external sites (see the full list here).
You can now start using Gonzalez to streamline your site by removing files that aren't needed. A great place to start is task-specific plugins such as contact forms; these only need to load on pages where the specific task is added. A contact form plugin, for example, only needs to load its CSS and JavaScript on your contact page and any other pages with a contact form embedded. General files such as jQuery and wp-embed can be safely disabled on a page-by-page basis, but only where you’re sure they’re not in use.
You can disable files using the Disable column: Choose either Everywhere or Current URL. You can then use the Enable to add exceptions. Think of the two columns as 'if' and 'but': You would disable a file on all pages except the current page by disabling everywhere 'but' enabling for the current URL. After you’ve made each change, save changes, clear your site’s cache (you should be able to do this from a link in the admin bar), and load your site in an incognito window to test that everything works properly. If anything’s broken, don’t panic! You’ll just need to revert the change you just made.
You’ll need to click through to other pages on your site to use Gonzalez on specific URLs: To disable the contact form plugin’s files on all pages except the contact form page, you’ll need to load Gonzalez on your site’s contact page and apply the rules set above.
Gonzalez works best when set up with rules targeting specific plugins on individual posts or pages, and types of post or page. Instead of enabling your social-sharing plugin individually on each post, for example, it’s much more efficient to tell Gonzalez to load a file on all posts. You can do this using the Posts checkbox in the Enable column. Similarly, Pages will enable a file on all pages and Media will enable a file on all media pages (i.e., pages used to only display media files).
Spend a bit of time setting up Gonzalez, and you’ll be able to achieve significant reductions in files loaded onto pages on your site, and consequently a reduction in HTTP requests, overall page size, and page load speed. Perfect!
Image optimization is a huge area of potential site speed gains we’ve not covered yet! It’s often possible for images to have much lower file sizes without any adverse effect on quality (known as lossless compression), or to have significantly lower file sizes with a modest trade-off in image quality (known as lossy compression). Optimizing images on WordPress sites can vastly reduce the overall page size, and likewise for reducing the height and width of images that are too large.
The best solution here is to resize and optimize images for your WordPress site before you upload them. This can be done with an image editing tool such as Photoshop, GIMP or Pixelmator. These tools come with an 'export for web' feature that allows you to resize and compress images with a live preview. However, as this has to be done on an image-by-image basis, this isn't appropriate for sites with non-technical users or with a lot of images uploaded already.
Like most of the WordPress speed tools here, various services have sprung up to offer image optimization as a service through a plugin. The best such image optimization service is TinyPNG. TinyPNG automatically losslessly optimizes images (so no loss of quality) when they're uploaded to your site, and can also optimize your entire WordPress media library. TinyPNG can handle JPEG and PNG images, and uses an external service to work on your images, so no extra load on your server! TinyPNG is free for approximately a hundred images a month, which will be suitable for most WordPress sites.
If you think you’ll need more than a hundred images a month, then you can either pay a modest fee (adding another hundred images costs $4.50 a month) or use the alternative service EWWW Image Optimizer, which runs on your server and is completely free, but doesn’t do quite as good a job at optimizing images and is not allowed on WP Engine accounts. We’ll stick with TinyPNG here as it’s the best for most people.
You can install TinyPNG from your WordPress Dashboard by going to Plugins → Add New and searching for TinyPNG. Install and Activate the 'Compress JPEG & PNG images' plugin, and you’ll be presented with a message asking you to connect to the TinyPNG API. Click the link, and enter your name and email to do this.
You’ll need to confirm your account by clicking a link in a confirmation email. Once done, return to the plugin (if you need to get back to this screen, head to Settings → Media), and you’ll be confronted with a series of checkboxes asking you to choose the size of images you wish to compress. This is because WordPress, by default, creates four versions of each image:
- Original full size
- Thumbnail
- Medium
- Large
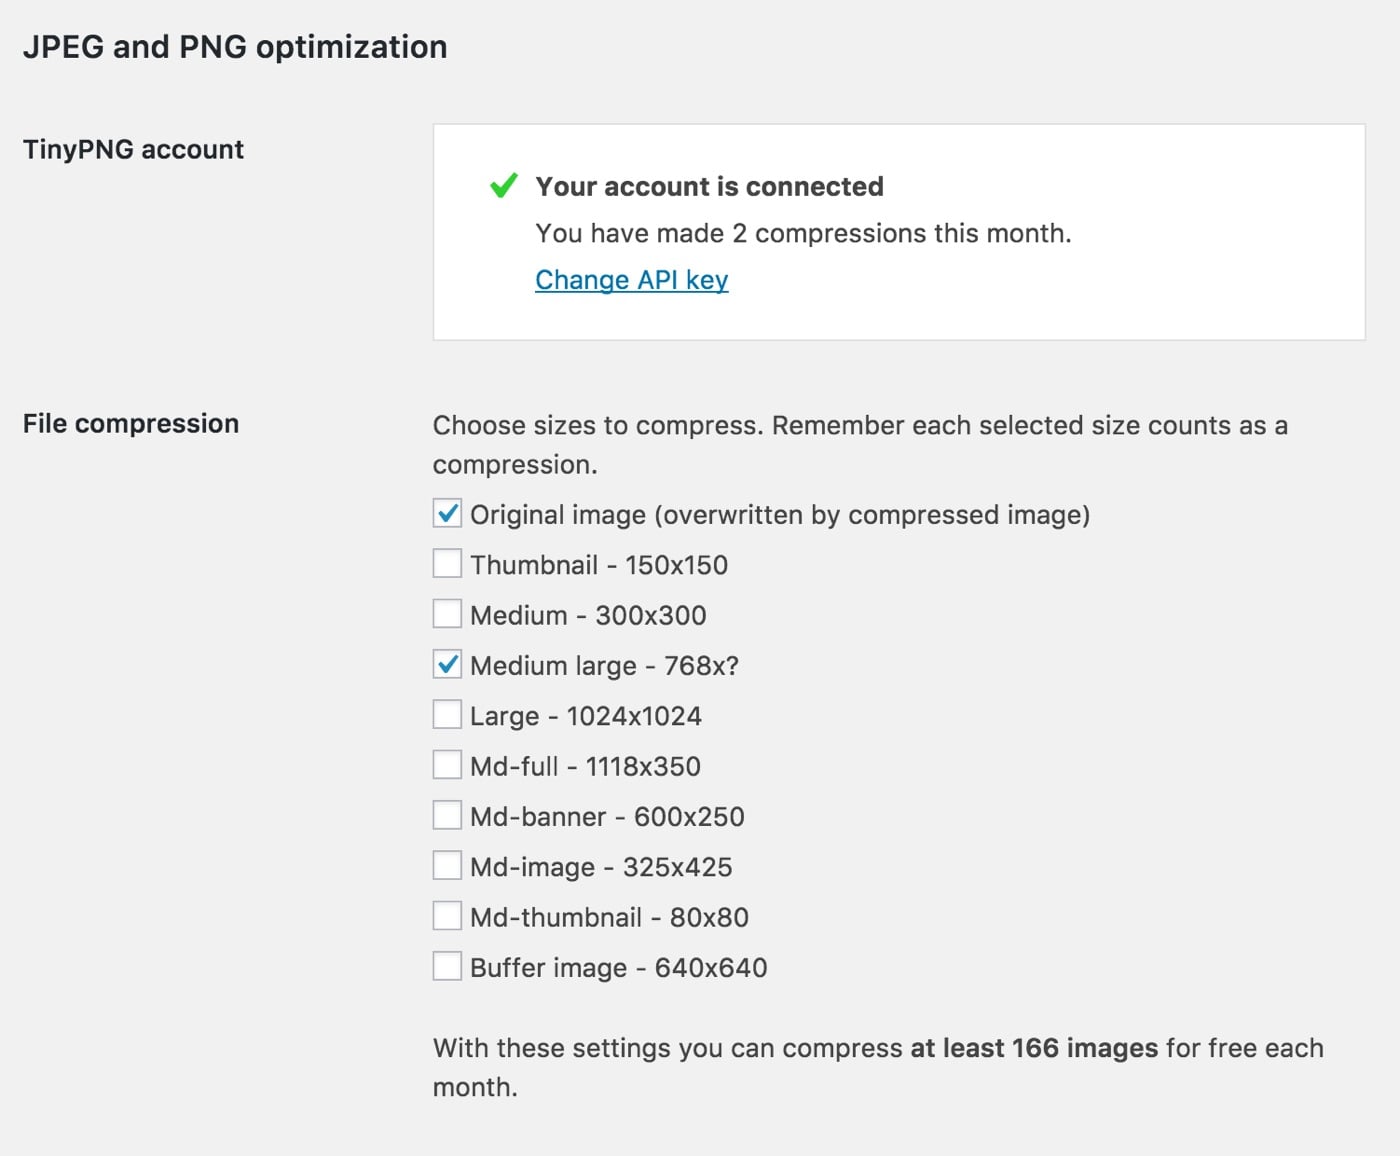
Many themes and plugins add even more image sizes: My WordPress install had ten different image sizes. TinyPNG lets you have 500 free image optimizations per month. With only the four standard image sizes, this would let you resize 125 individual images (with four versions each), but, as you add more image sizes, this number falls. The plugin will tell you how many images you can resize each month with the options selected. If you feel you’ll need more, you can start deselecting image sizes. These will vary for each theme, but, as a general rule, you can safely remove any social media sizes and should then move to whichever sizes you don’t think your theme is using. My theme, for example, has a bunch of thumbnail sizes. I’m not using any of these, so they can all be deselected.
You can also choose to resize and compress the original image. Doing this will make sure you’re only hosting images on your site that are actually usable on the web. Unless your site is hosting a portfolio or gallery where you expect images to be viewed at a high resolution, you should turn this on. The default settings will work well for most sites as they provide a resolution high enough to give leeway later on, but low enough that the file sizes will be reduced. You can also choose to preserve extra information attached to images. If you need these, check the boxes. Save Changes when you’re done.
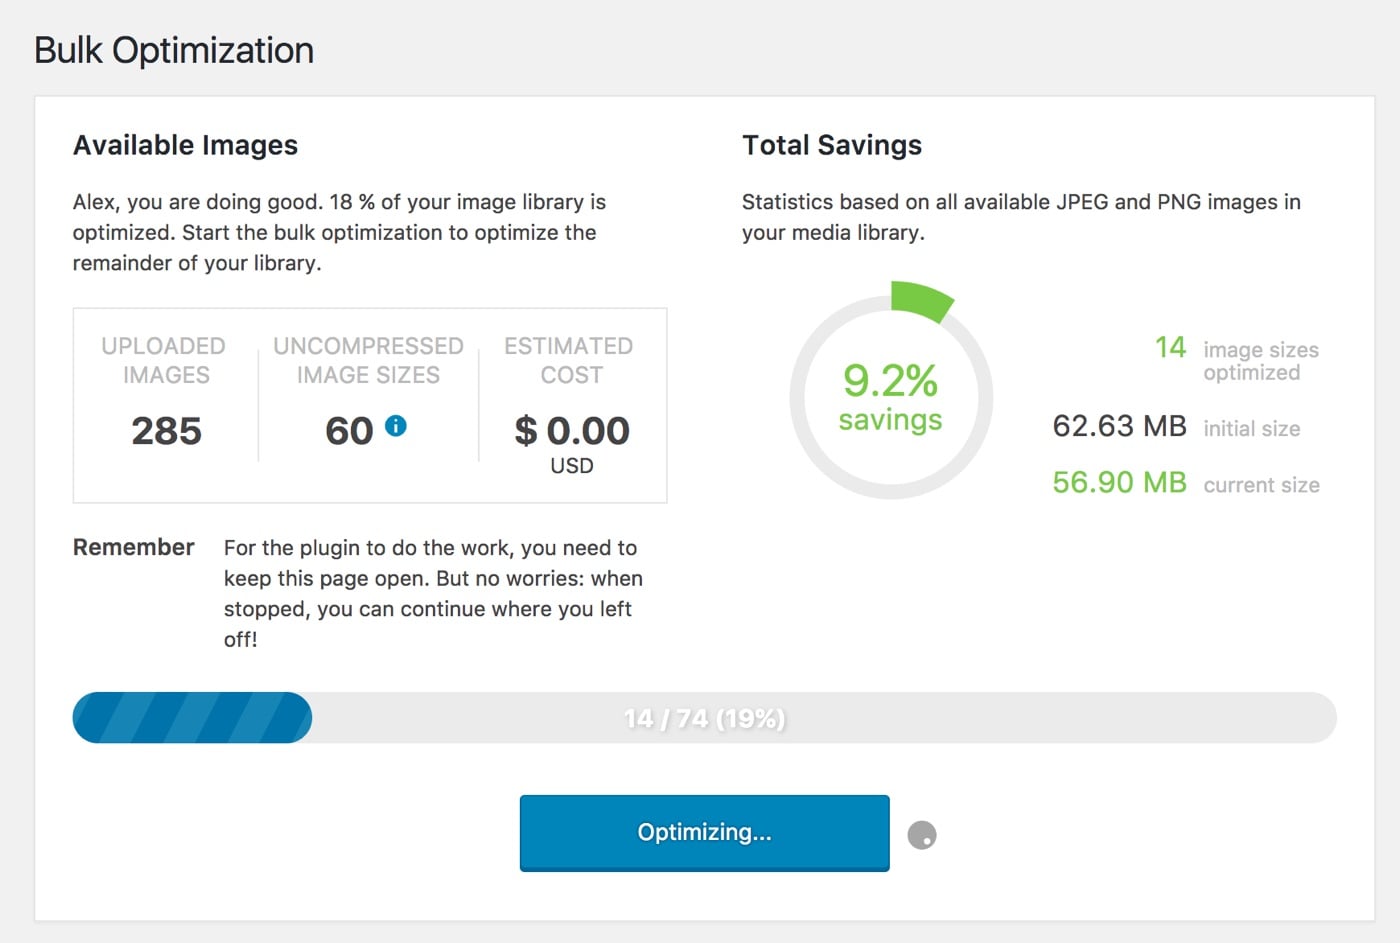
TinyPNG will now kick in whenever you upload a new image to your media library, but this still leaves your existing images unoptimized. We can fix this by heading to Media → Bulk Optimization. You’ll see how many images you have on your site already and how large the total file size is. TinyPNG will also tell you how many of your 500 free credits you’ll use up and the cost, if any. When you’re happy to proceed, press the Start Bulk Optimization button and wait for the plugin to start its work. You’ll need to keep the page open while the plugin runs.
Once complete, you’ll be able to see the savings you’ve made to your images’ file sizes, and can enjoy reduced overall page size and a faster site. With TinyPNG in place to handle future image uploads, you’ve got a great automatic image optimization setup in place.
Before we move on, one final note: If you don't want to rely on a plugin to handle the image optimization for you, and would prefer to do this on your computer, use either ImageOptim or FileOptimizer to optimize images on your desktop before uploading. These tools come with the benefit of giving you more control over how much optimization is applied and whether this is lossless or lossy. You could pair this technique with Imsanity to then resize images on upload to WordPress. TinyPNG is the best option for most people, but if you and all other contributors to your site are prepared to add a little bit of technical work to your workflow, desktop optimization is a great alternative.
Lazy loading is a clever technology that delays the loading of images and videos until they're needed. Standard loading will load everything on a page, regardless of whether it will be viewed. Lazy loading, however, will only load the images and video that the reader can see: An image halfway down the page will only be loaded when the reader scrolls to halfway down the page. This results in faster initial load times, a reduced page size and reduced number of initial HTTP page requests. Lazy loading is especially useful on sites with lots of images and videos.

Lazy loading is also really easy to implement! If you have WP Rocket, just head to Settings → WP Rocket and tick the options to lazy load images, videos and iframes. Save changes, and you’re good to go. If you don’t have WP Rocket, you can install this plugin. No settings are required: Just install and you’re done. You can try out the lazy loading by loading up a long post on your site with images you need to scroll to see. Load the post, scroll as fast as you can to the image, and you should see the lazy loading kick in.
Minification is a file-optimization technique that removes all unnecessary characters from code, but without changing its functionality. This typically means removing the spaces and tabs that make code easier for humans to read. This process can be done automatically for you, and delivers a speed benefit since your HTML, CSS, and JavaScript files will have smaller sizes.
Realistically, minification isn’t going to have a huge impact on your site’s loading time, but it’s an easy-to-use best practice. In fact, if you’ve followed the WP Rocket instructions from earlier, you’ll have this done already: With the plugin installed, head to the WordPress Dashboard, then Settings → WP Rocket. Ensure the JS, HTML, and Google Fonts boxes are ticked under Files optimization, and those will be set up. The CSS optimization discussed in the previous section using Autoptimize will also make sure your CSS is minified.
If you’re not using WP Rocket, you’ll be able to do all the minificiation with Autoptimize: With the plugin installed, head to Settings → Autoptimize and tick the options to optimise HTML, CSS and JavaScript.
GZIP compression is another technique that can reduce your site’s file sizes. GZIP compression works in a similar way to zipping files: It uses a standardized compression library to convey the same amount of information as the original file, but using fewer characters. The result is that you reduce your overall page size by as much as 70%, and your site loads faster.
If you’re with WP Engine or have WP Rocket installed, GZIP compression is added automatically, and you don’t need to do anything. If you don’t have either of these, you can use this free plugin to get GZIP compression. Just install and activate the plugin, then check under Tools that Compression is on, and you’ll be good to go. You should also see an immediate boost to your site’s speed.
The techniques here will greatly reduce your site’s overall page size and number of HTTP page requests. All this adds up to a definite decrease in page load speed for your site, and following these best practices will also make Google happy and increase your PageSpeed. We’ll now move on to look at content delivery networks and database optimization. These next two sections will help at the margins, but will be worth doing for sites with a lot of international traffic or high visitor numbers.
Use a Content Delivery Network
A CDN, or content delivery network, is a great way of optimizing your WordPress website. A CDN serves assets on your website (such as images and video) from a location geographically closest to your visitor. As the data has to travel a shorter distance, the assets -- and your site -- load faster. Furthermore, CDN servers are specifically designed to load files as fast as possible, and will therefore be generally faster than your host's servers.
For example, without a CDN, visitors will have to load content from a single location, regardless of where they are. With a CDN, however, a visitor from the USA can have data sent from the USA; a visitor from Europe can have data sent from Europe; and a visitor from Australia can have data sent from Australia. All of this makes for a faster website and happier visitors. You may remember from our initial tests that my site was especially slow for European visitors: Using a CDN is a solution for this.
Before we start, it’s worth mentioning that most managed WordPress hosts (including our recommendation WP Engine) include a CDN as part of their package. If you’re with WP Engine, this is really easy to activate: Log in to the User Portal, navigate to your WordPress installation, click the CDN link, and check the box to enable the CDN. Save changes, wait ten minutes, and everything will be active. If your hosting includes a CDN, make use of it! Otherwise, follow the steps below.
The best CDN for WordPress is MaxCDN. MaxCDN is the most popular CDN service for WordPress, and with good reason: It's very fast, and at $9 a month is reasonably priced. It's also very easy to set up.
Create an account at MaxCDN for whichever tier you need, and activate your account. You'll need to log in to your site (which requires going back to the homepage) and create a Pull Zone by clicking Zones → Create Pull Zone → Entering a name and your site's URL and clicking Create. From the Summary page, copy the CDN URL; you’ll be needing this in a moment.
If you have SSL on your site (as denoted by https in URLs), you'll now need to click Manage and then SSL. You should now copy the SSL URL as this is the URL of your CDN. Click the Shared SSL tab, and then Enable. Finally, click the HTTP/2 tab and Enable that as well. If you don't have SSL enabled, copy the CDN URL from the Summary page.
We now need to add a subdomain to your site (such as cdn.yourdomain.com), through which the CDN will push files. Doing this requires logging into your web host and adding a CNAME DNS record. For most hosts, this can be done through cPanel.
Log in to cPanel and click Simple DNS Zone Editor. Scroll to the Add a CNAME Record box and type cdn in the name field, and cPanel will auto-fill the rest of the field for you. Click the CNAME field and paste in the URL for the CDN we copied to your clipboard earlier. Now, you're all done!
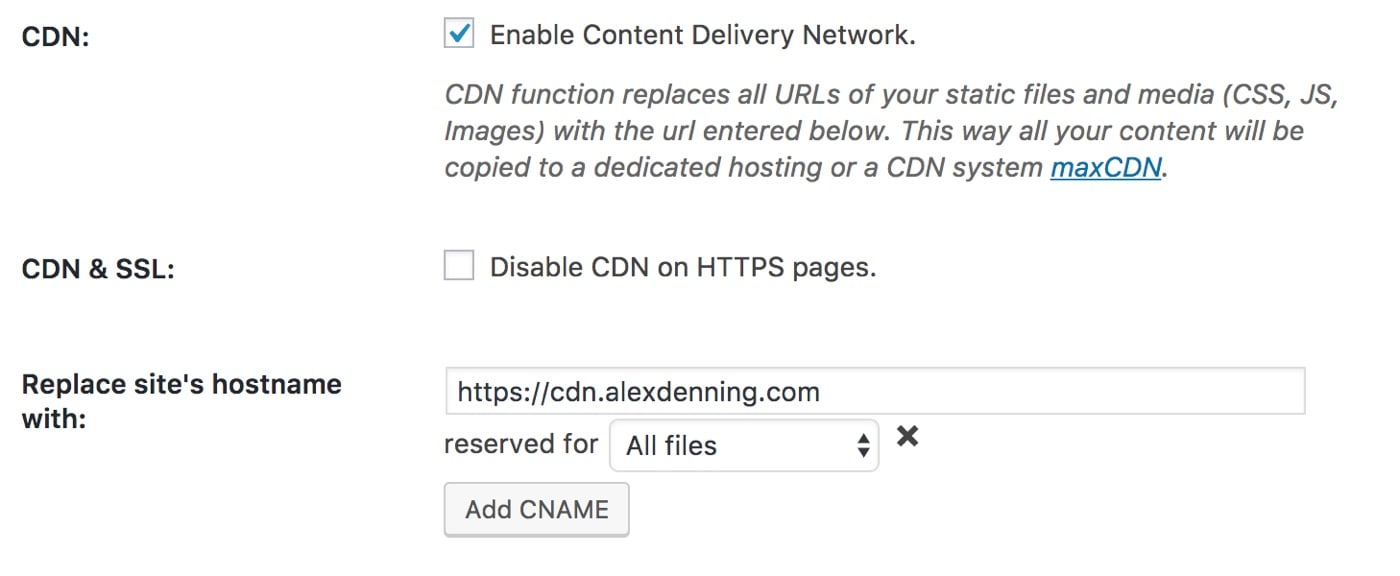
You now need to connect the CDN to WordPress. You can do this through WP Rocket: Head to Settings → WP Rocket and click the CDN tab. Tick the box to Enable Content Delivery Network, and in the box below, enter the subdomain you just created -- for example https://cdn.yourdomain.com. If you have SSL on your site, make sure to add the subdomain with https rather than http. Save Changes, and you're done!
If you've set up Autoptimize to optimize your site's CSS, then you should also head to Settings → Autoptimize and add your CDN URL under CDN Options. Save changes when done.

You can now load up your site, and the CDN should kick in! You can double check by testing your site in Pingdom, scrolling down and looking for cdn.yoursite.com in the File Requests section.

Finally, if you just want a very basic (and free) solution, then Jetpack is once again able to help. Jetpack offers a free CDN for images only called Photon. Photon is limited, but is exceptionally easy to set up. Ideally use a fully fledged CDN, but, if you'd prefer not to, Photon is better than nothing.
Optimize Your Database
The database is where WordPress stores all information about your site, including your posts, pages, user information, and settings. As you add content, themes and plugins to your site, the database gets bigger, but a larger database is bad for page load times since the bigger the database, the longer it takes to retrieve information.
You can optimize your database by removing unnecessary data. This makes finding information in the database faster, and reduces page load times. With good caching in place, this isn’t going to make a huge difference to load times, but, if you want to go after every possible speed boost, this will be worth doing.
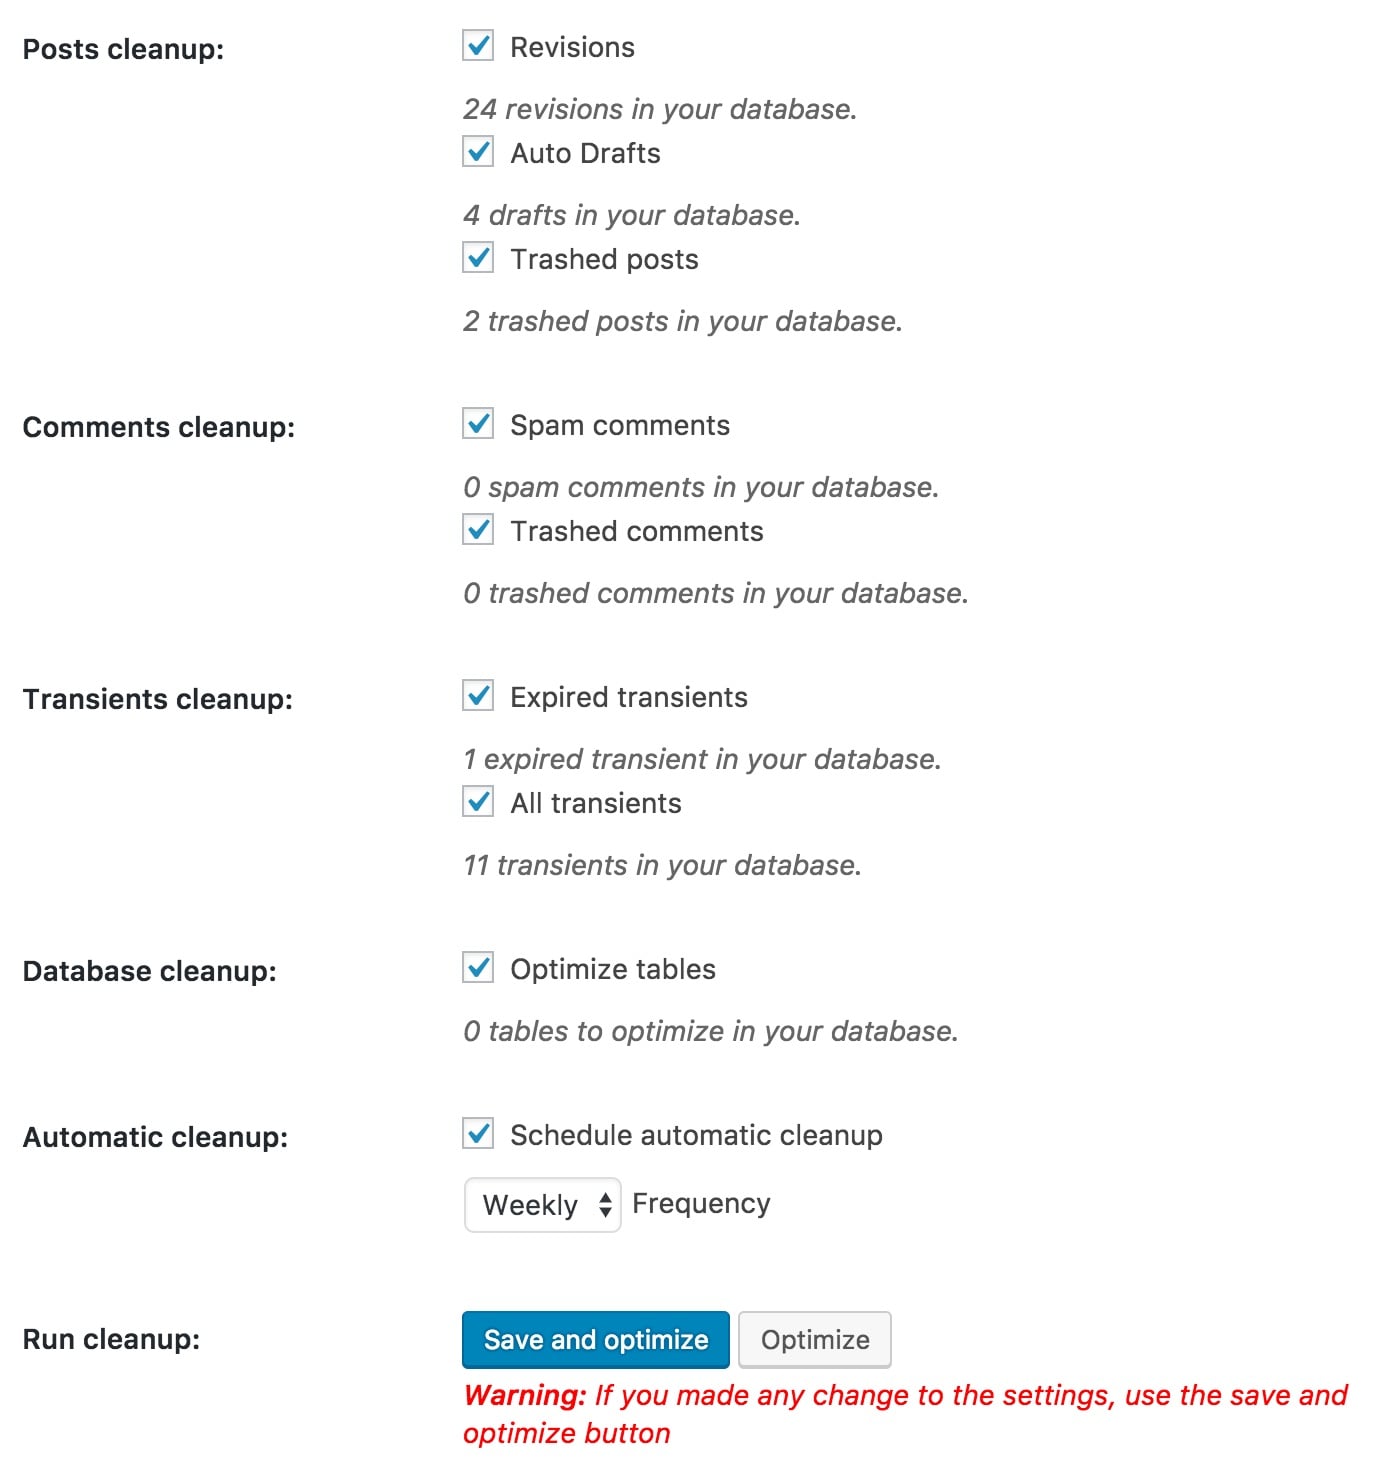
As with most tactics for making WordPress faster, WP Rocket will handle much of this for you. Head to Settings → WP Rocket → Database, and you’ll be able to clean up your database. The majority of this work is removing post revisions, automatically created drafts and trashed posts, removing spam comments and transients. Here’s more detail on the two points that need further explanation:
- Post revisions are created every time you save a post. These can be helpful, and you may want to keep some of these, but, since WordPress creates a revision every time you save, it’s unlikely you'll need all of them. You can tick the box in WP Rocket to delete all revisions, or edit a file to set a limit on the number of revisions WordPress can store.
- Transients are temporary information stored in the WordPress database. These are just adding extra bloat to your site.
Most people should tick all of the boxes on this WP Rocket settings page, and set a weekly automatic cleanup to keep everything tidy in the long term. Note: WP Rocket repeats the sage advice that you should have a backup before making any changes to your database. See our guide on backing up WordPress for more details.
If you’re not using WP Rocket, you can achieve the same effect using this database optimization plugin.
There’s one final piece of the database cleanup puzzle required here: Deleting data from unused themes and plugins. Themes and plugins often add data to the database, but don’t remove this on uninstall or deactivation. If you’ve deactivated a theme or plugin and are not going to use it again -- or don’t mind setting up your settings if/when you reinstall -- then you should clean up after the plugin. You can do this using the WPDBSpringClean plugin.

Install and activate the plugin, then head to Settings → WPDBSpringClean → Perform Search. The plugin will bring up a list of database tables deemed to be unused.
You’ll now need to identify which theme or plugin the unused database table corresponds to. This should be possible from the prefix to the table name: Popular security plugin Wordfence, for example, uses the prefix WF. If you’re able to identify unused tables as corresponding to themes or plugins you’re no longer using, then go ahead and remove them. If you’re not sure, however, it’s safest to leave this; the performance gain is marginal, and you risk breaking your site. As with general database optimization, make sure you have a backup before undertaking this.
Spring cleaning your database has to be done manually and won’t have a huge impact on performance: Doing this clean every three-to-six months, depending on how many themes and plugins you activate/deactivate, will be fine for most sites.
How Fast Does Your Site Load Now?
The above is your comprehensive guide to making any WordPress site faster. The necessities are hosting, caching, optimizing page render speed, and some investigation of themes and plugins. If you haven’t already, head back to those points in the guide and put them in place on your site. The rest of the topics covered in this guide will make a difference, but the impact will be lower. If you’ve already put the other techniques in place, that’s great; if not, rerun your tests now and do further optimization if the results aren’t what you’re after.
Finding out how fast your site is now is just a case of rerunning the initial tests and making a note of the difference. The aim is to have your site consistently loading under two seconds, so this should be your measure of success. Follow all of the steps here, however, and you should be comfortably under one second.
Make sure to also re-test your TTFB and PageSpeed Insights score. TTFB should be under 200ms, and PageSpeed score comfortably 85-plus.
Having followed all of the techniques, tools and advice in this guide, here are the results for my website and the change from the original tests:
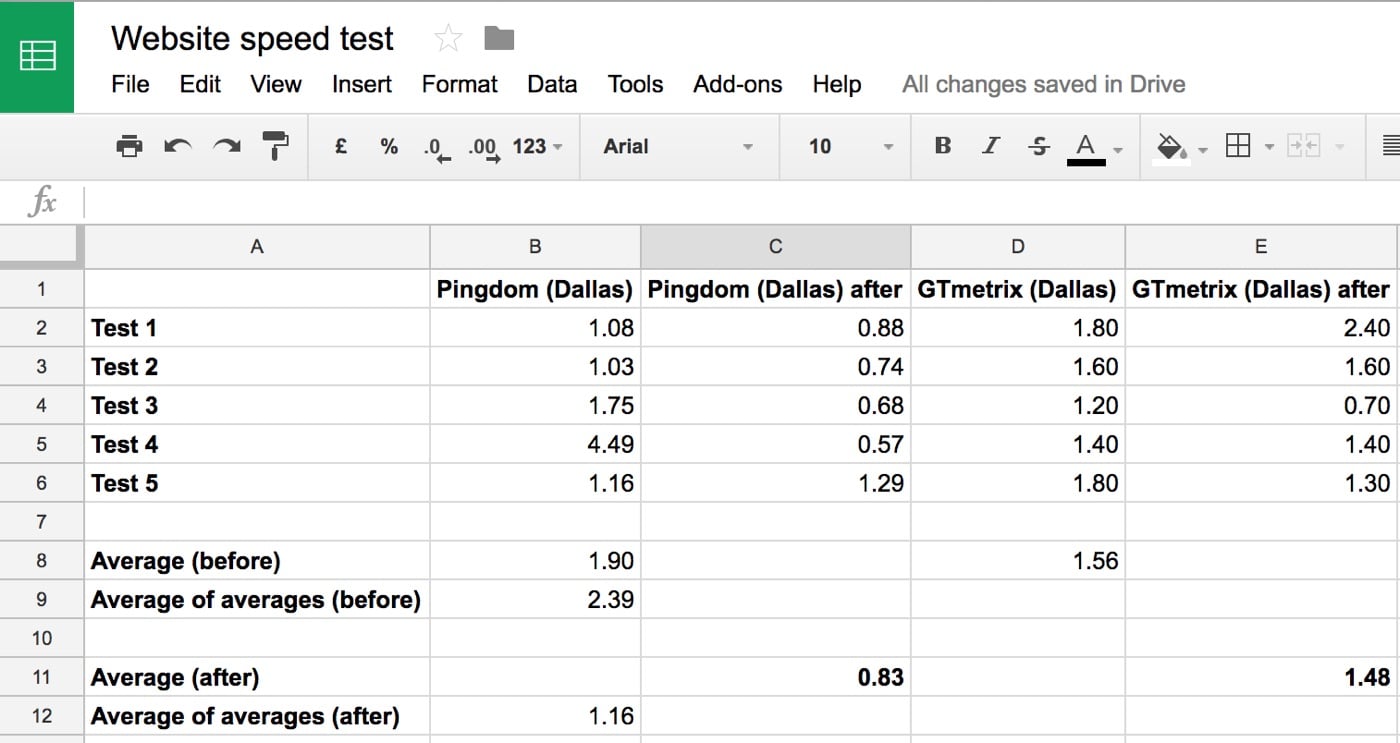
An average global load time only just over one second is a great result, and is achievable for any WordPress site -- it’s just a case of following this guide systematically and putting these best practices in place.
That wraps up our look at how to speed up WordPress. You may wish to check out the rest of WinningWP’s Guides for next steps with your WordPress sites and more highly detailed guides!
WinningWP Staples
There's more to us than just WordPress guides. Here's a few favorites:


Under the Hood
Wondering what plugins, tools and services we used here at WinningWP? We spill the beans...
WordPress Deals & Coupons
Save oodles of cash on some of the best hosting, themes & plugins around!
Good luck!
Slow websites cost businesses money — and depending on the size of the site, sometimes the sums can be enormous! The cost, time and effort of speeding up a website can vary (sometimes the solution is simply a case of moving to a much more capable host for example — or maybe even just reducing the number of plugins you're using). One thing's for sure though: for almost any business website, speeding things up will almost always pay significant dividends down the line. If your site isn't fast enough, bite the bullet now (i.e. today) and make it load as fast as you can!