
The Ultimate Guide to the Jetpack for WordPress Plugin – Review
- By
- 2 Comments

Created by Automattic — the company behind WordPress.com and one of the largest contributors to WordPress open-source software — Jetpack by WordPress.com is one of the most influential and feature-rich plugins in the WordPress repository.
In this guide, we’ll take a look at some of the best modules of Jetpack, and show you how they could benefit your WordPress website.
Jetpack for WordPress: A Primer
Since its inception, the Jetpack plugin has given away a ton of useful features for free. These include a content delivery network (CDN), related posts and lazy loading of images, among others.
Over the years, Jetpack has evolved into an all-in-one plugin that touches upon almost all aspects of maintaining a WordPress site. These range from performance optimization and visitor engagement to backup and security, and theme customization.
As with most plugins under active development, Jetpack operates on a freemium model, while offering a ‘forever free’ plan. The paid plans include additional features — most of which can be obtained for free by installing other plugins.
Why Jetpack Plugin for WordPress?
When starting a WordPress site, there a lot of things you need to do. For starters, you have to submit your blog to search engines, create a contact form, and ensure primary security measures are met.
From SEO and security to social media sharing and contact forms, Jetpack makes it easy to take care of these aspects under one roof. You don’t have to install multiple plugins for each feature — everything is available within a single plugin. That’s Jetpack’s unique selling point.
Now let’s get started with the features!
Features of the Jetpack Plugin
Jetpack offers more than 30 features for your WordPress site, which we’ve grouped into relevant categories and listed below:
- Customization
- Engagement
- Analytics & SEO
- Performance Optimization
- Security
- Backup and Restore
- Publishing
- Monetization
Getting Started with Jetpack for WordPress
As with all plugins, you start by installing and activating Jetpack on your WordPress site. Upon activating it, you need to connect your WordPress site to WordPress.com. And, yes, this means you need to create a WordPress.com account to reap the full benefits of Jetpack.
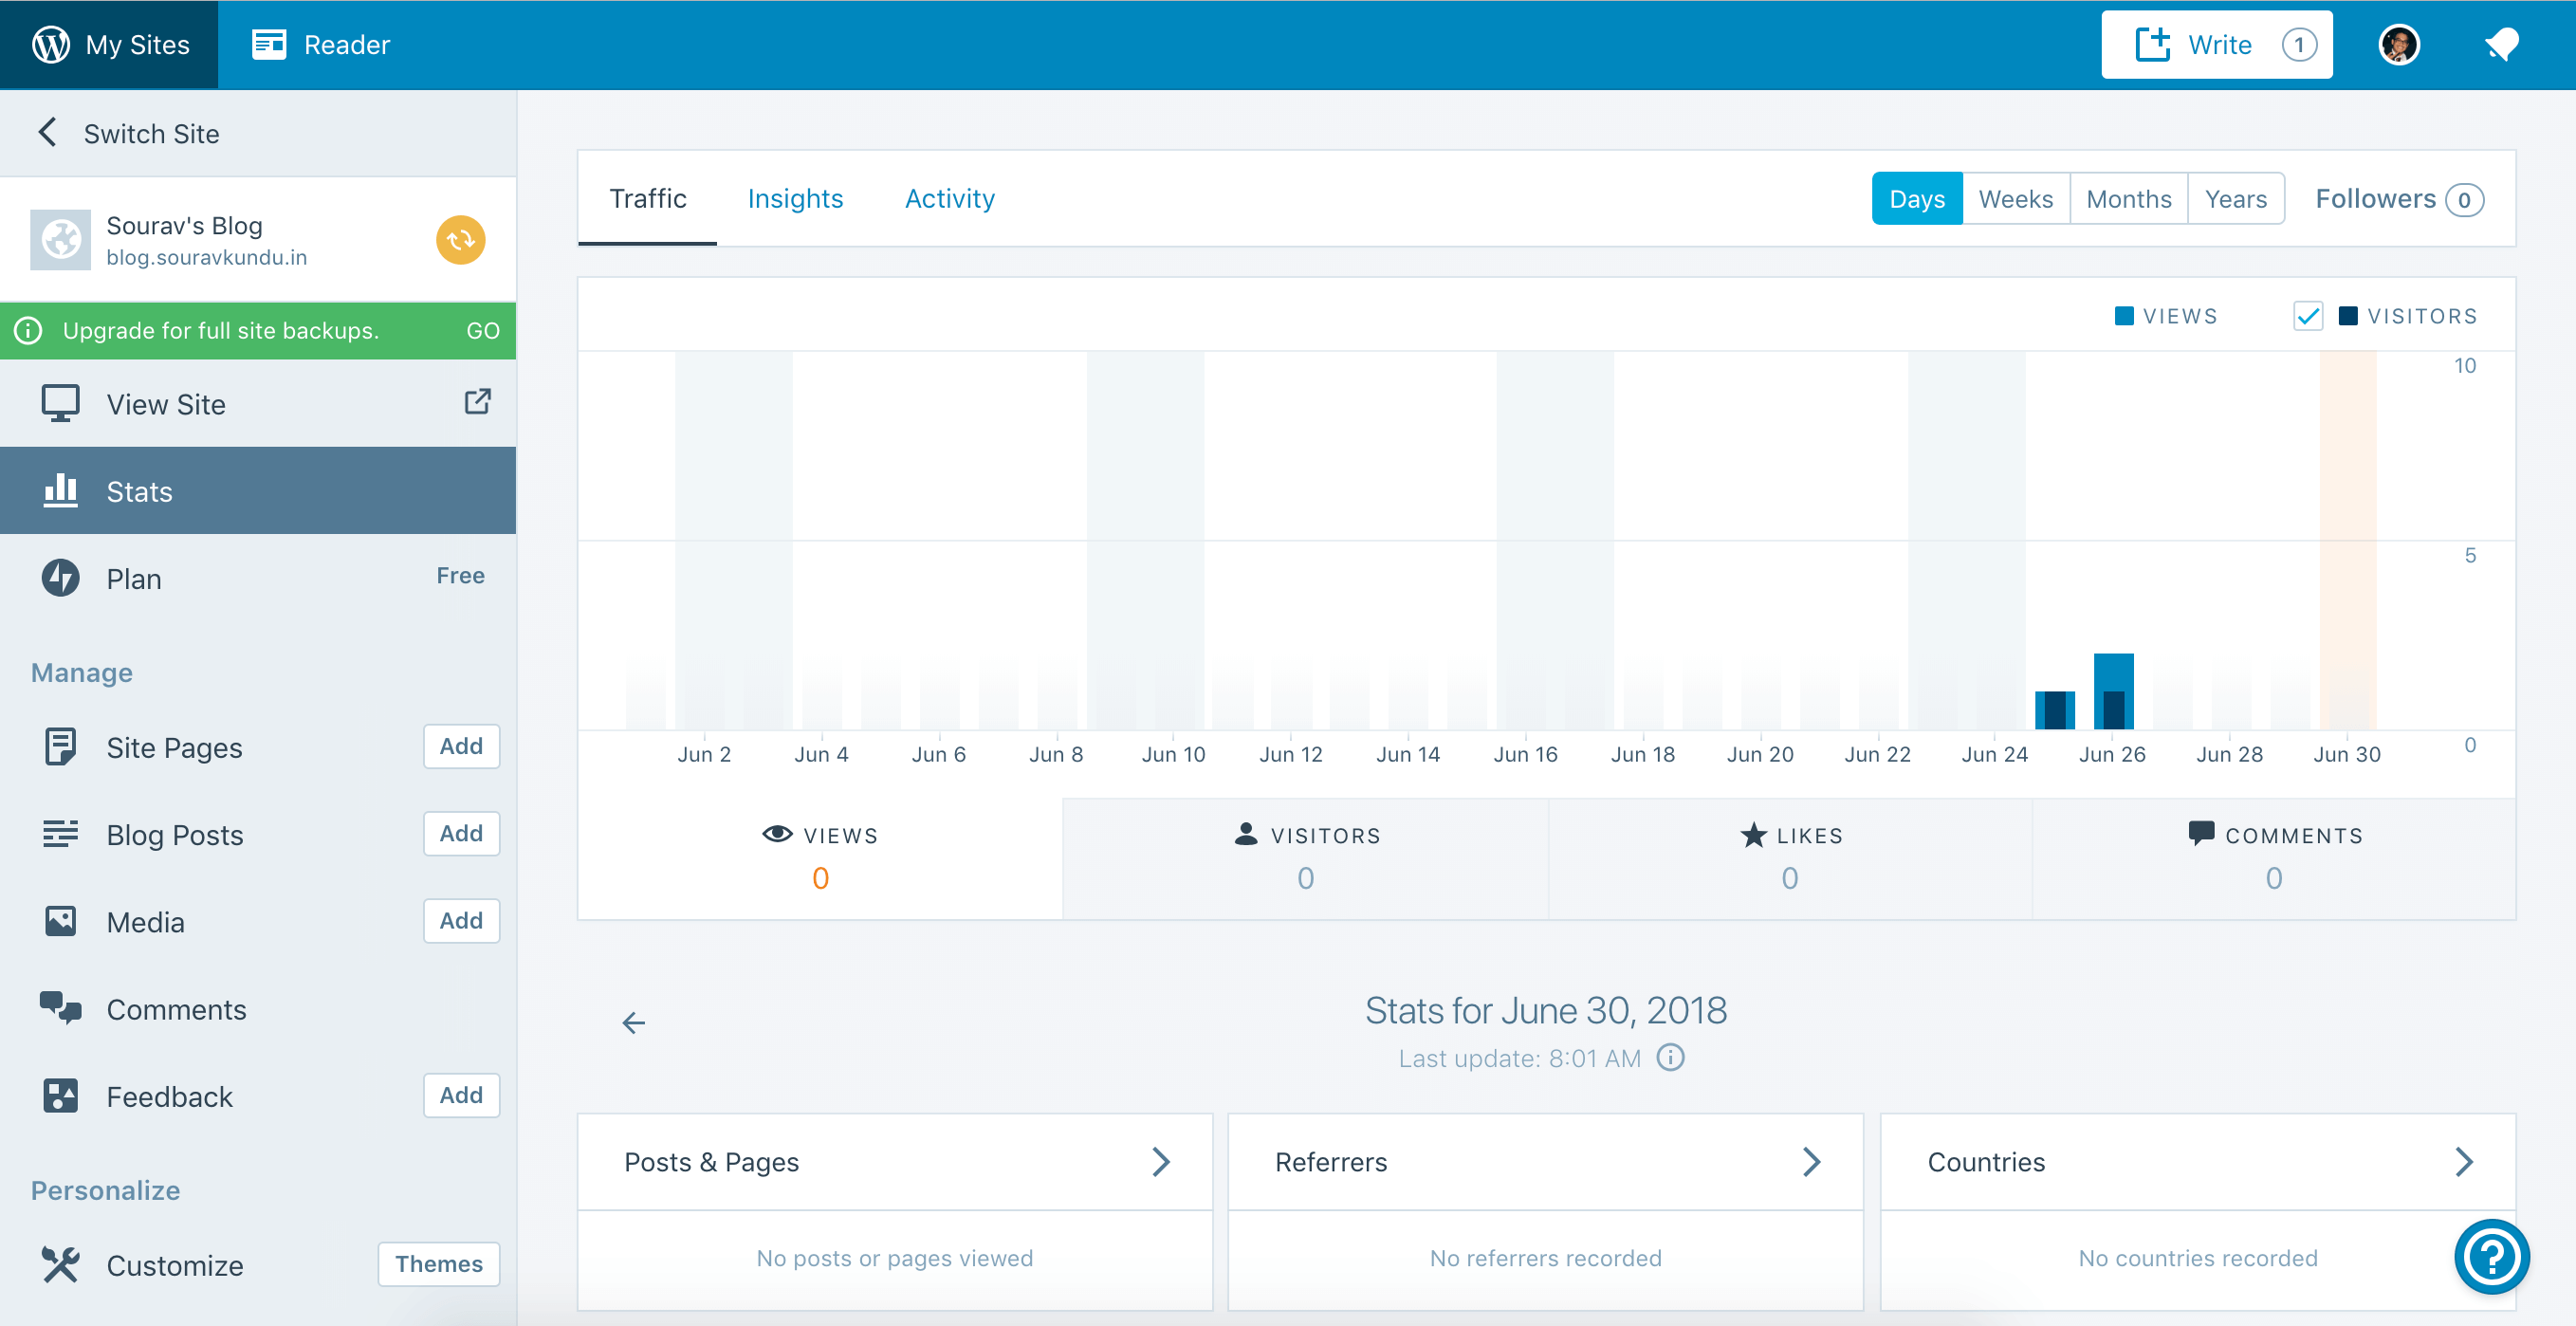
The WordPress.com Blog Management Dashboard.
A lot of the features we’ll see next have their advanced customization and configuration options saved in the WordPress.com dashboard.
Creating a WordPress.com account is absolutely free and comes with a ton of features and benefits. It enables you to monitor all of your connected sites, publish posts, update plugins, view site stats and a lot more — all from a single dashboard.
Let’s get started!
WordPress & Theme Customization Features from Jetpack
Jetpack offers a host of customization options, ranging from premium themes to conditional widgets. Let’s take a look at each of them:
WordPress Themes from Jetpack
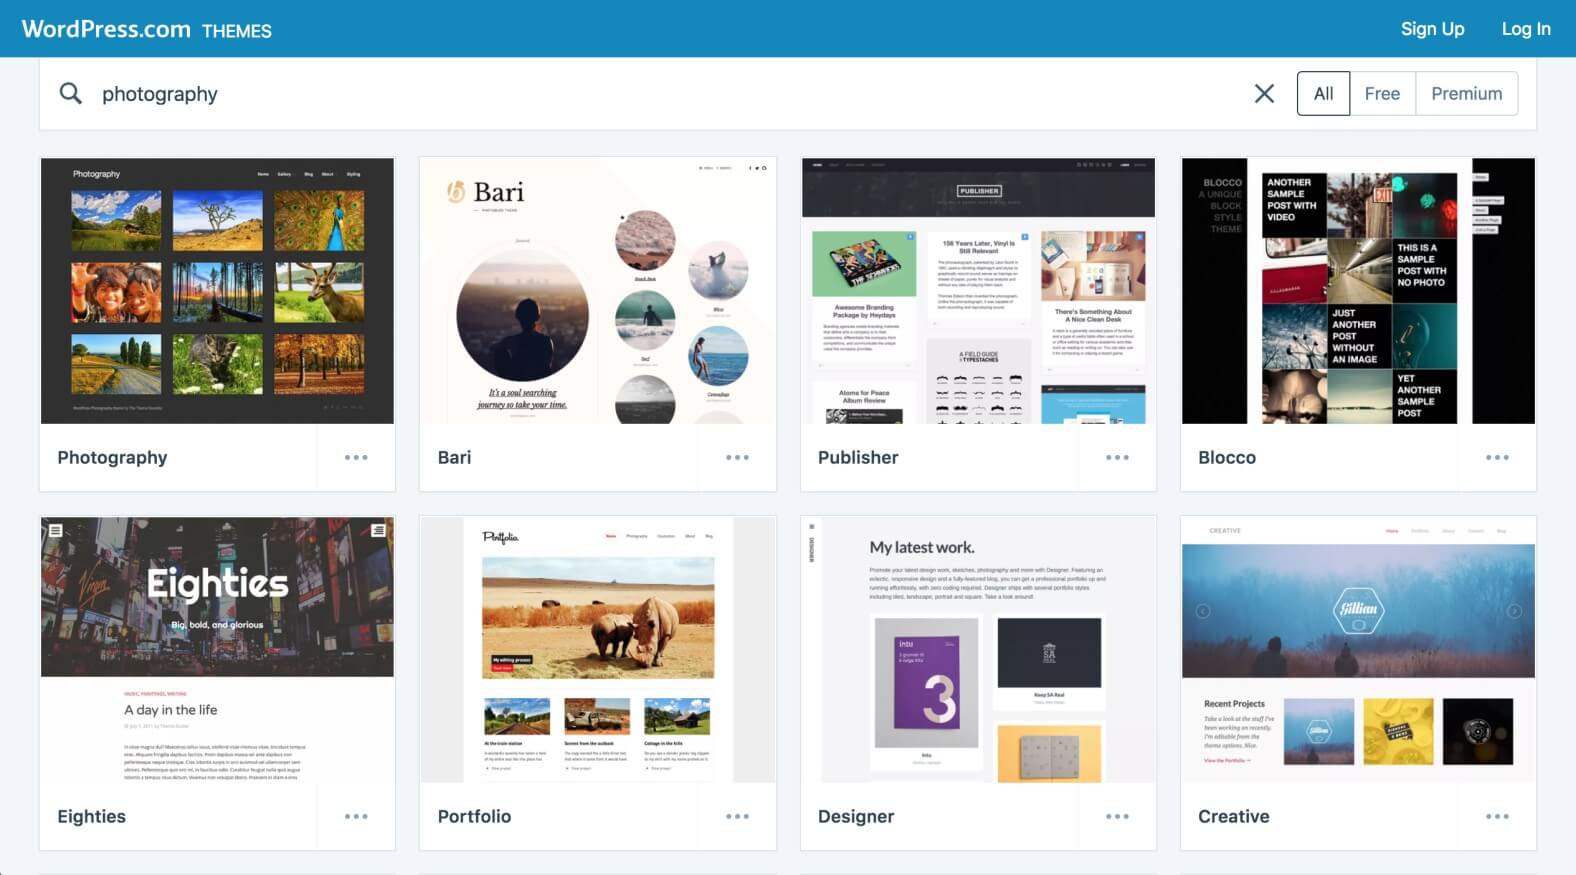
Free photography themes from Jetpack (WordPress.com).
With the free version of Jetpack, you can choose from hundreds of free WordPress themes, while the paid version (Professional Plan) gives you a more extensive selection of 200-plus premium themes from the WordPress repository.
Themes form an essential part of the WordPress website experience. However, they’re vulnerable to poor coding practices, security loopholes and performance issues.
The good news is the themes available on WordPress.com (i.e., the ones you get from Jetpack) undergo rigorous security and performance tests to ensure they’re up to scratch. Only when approved by the Automattic staff are themes available on WordPress.com.
Also, WordPress.com themes are made compatible with the additional features of Jetpack, such as lazy loading, free CDN and so on.
All things compared, if you’re just starting out, getting a theme from WordPress.com via Jetpack is a good start.
Image Galleries
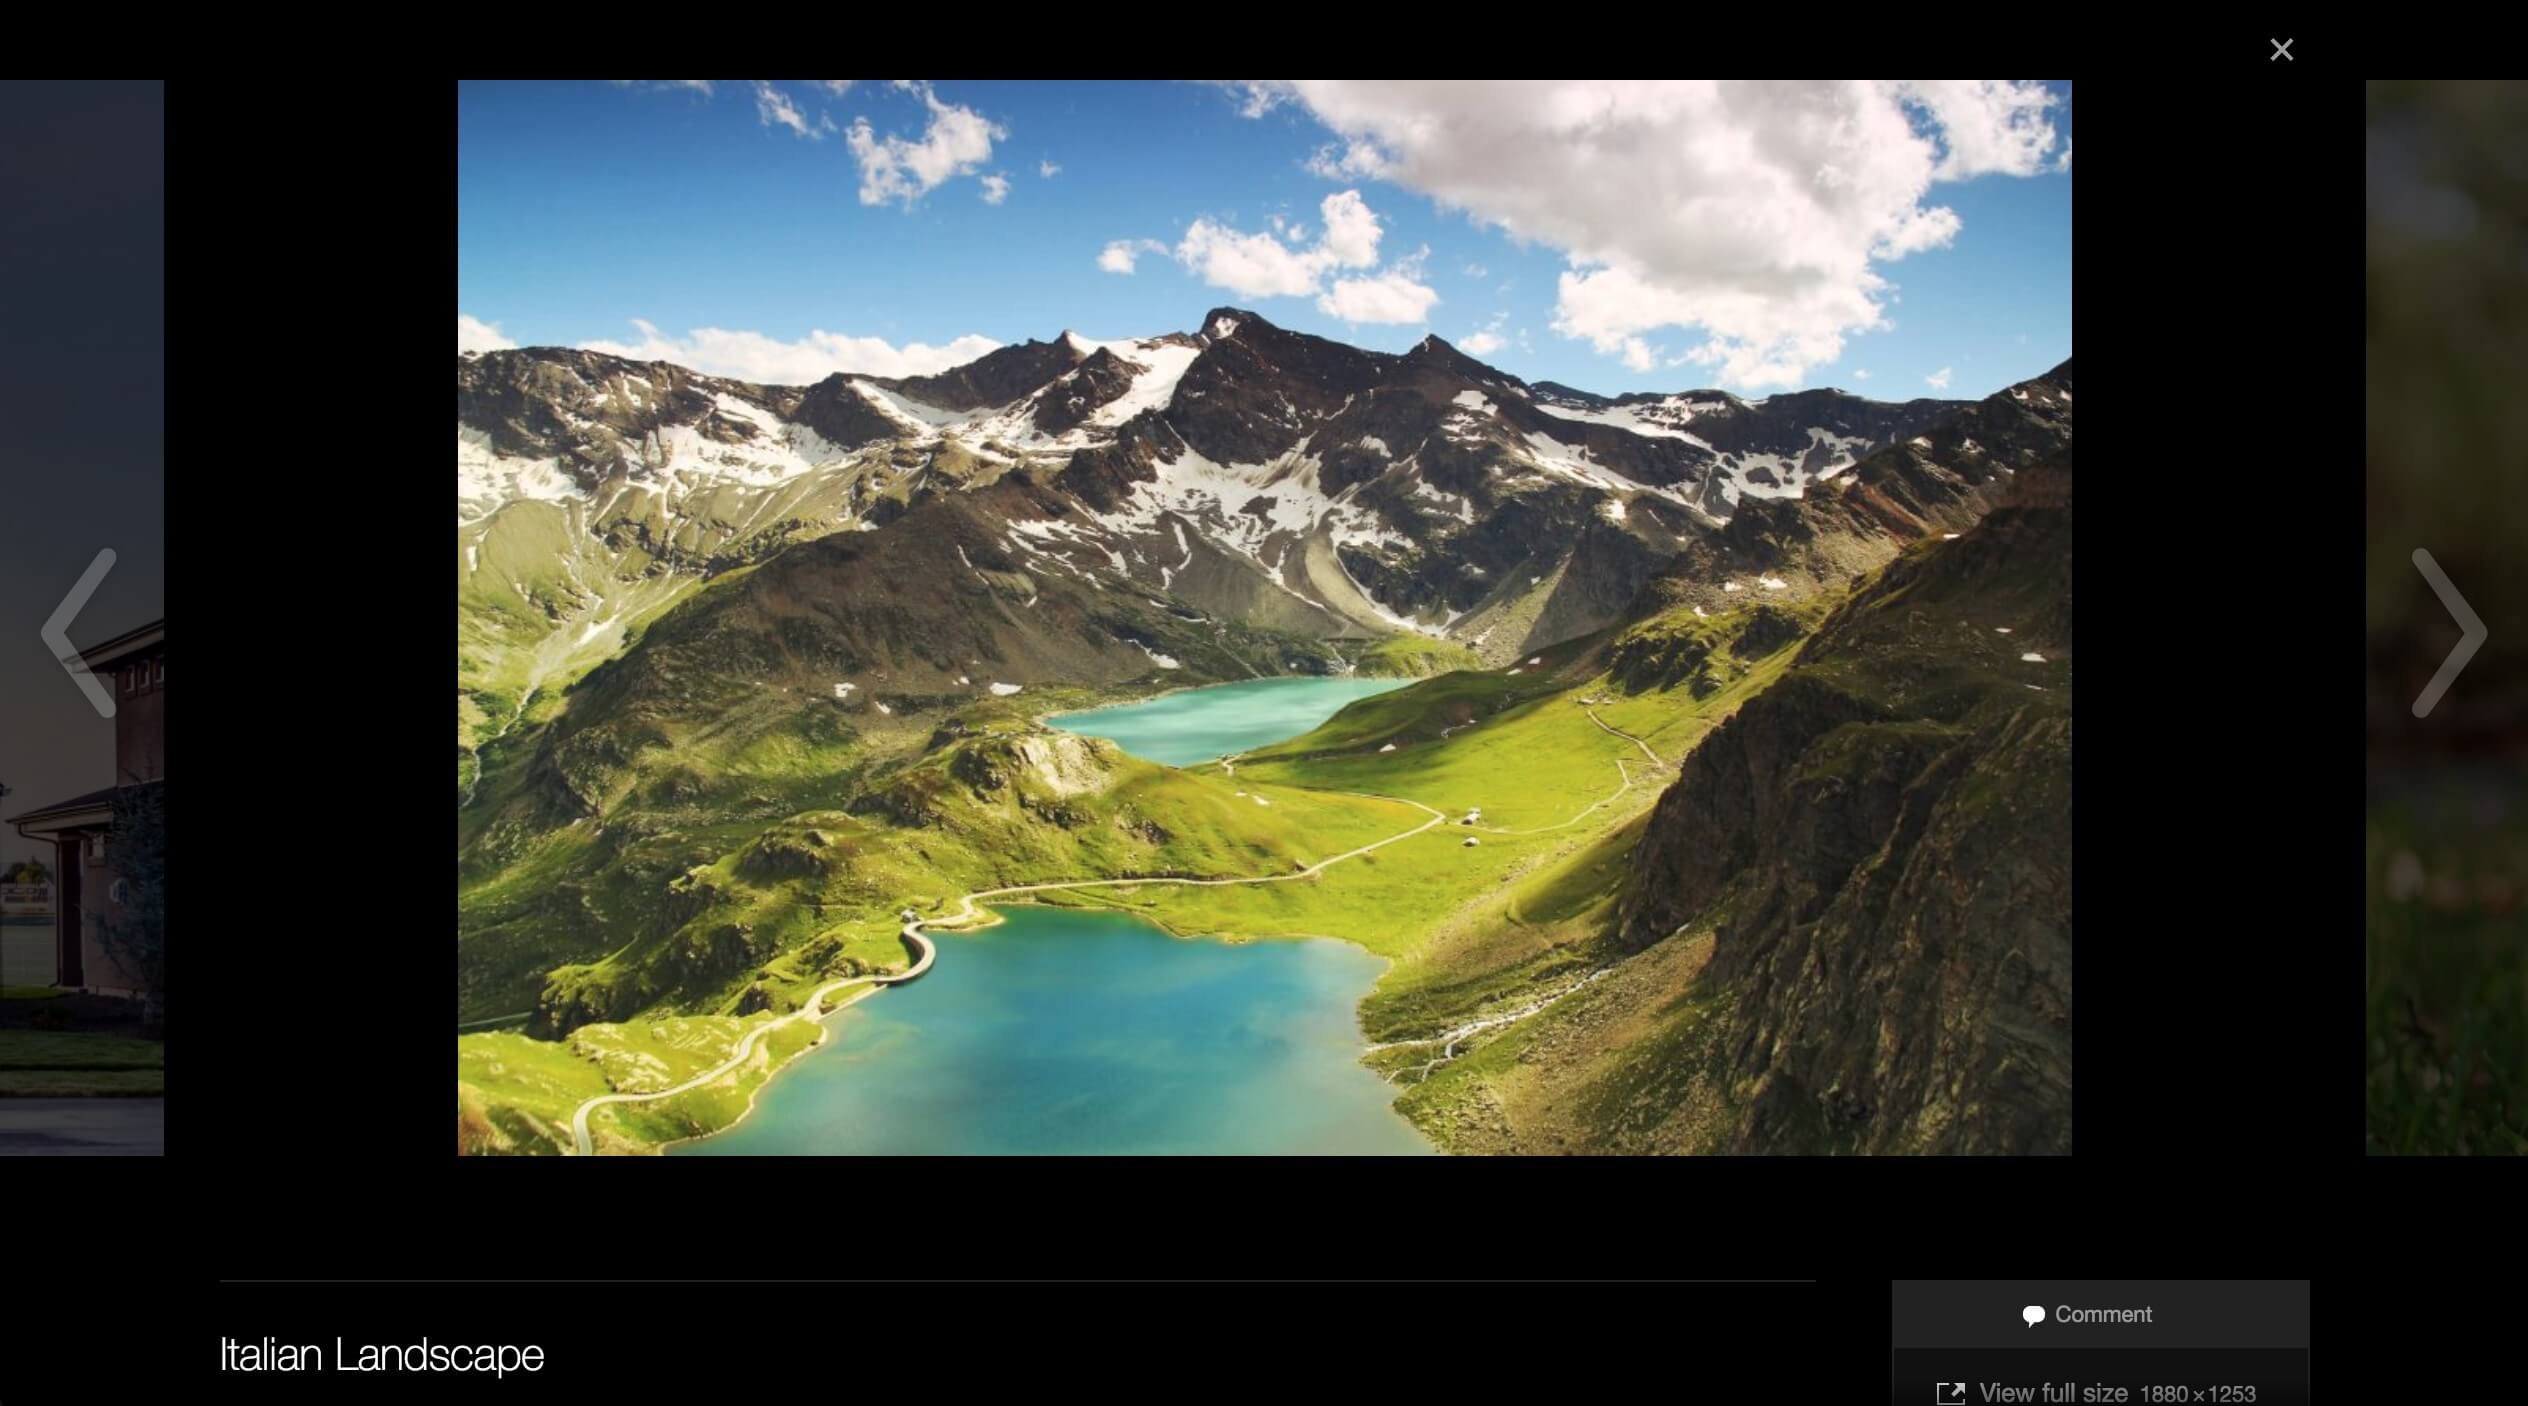
Example of an image gallery created using Jetpack.
Jetpack makes it super easy to create beautiful image galleries on your WordPress site. It supports a variety of layouts, including tiles, carousels, square or rectangular mosaics, and circular grids. Additionally, you can create full-screen image galleries to deliver an immersive experience to your site’s visitors.
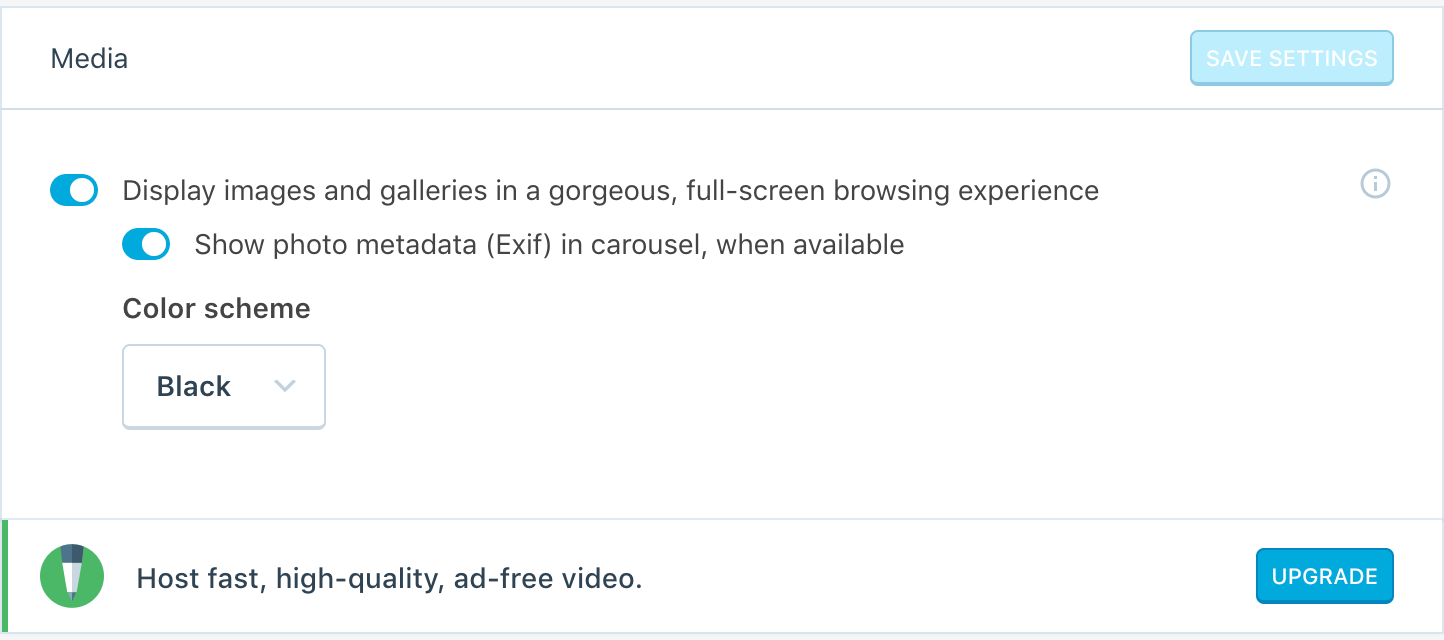
Jetpack Media (image gallery) settings.
You can activate this module from the Media setting under WordPress Dashboard > Jetpack > Settings > Writing.
The best part? All of this is powered by the free Photon CDN (more on this later).
Portfolios and Testimonials
Whether you’re a freelance designer or copywriter, your portfolio and the testimonials on your site go a long way to establishing lasting authority and winning new clients.
Jetpack gives you two new custom post types — portfolio and testimonials — for you to display your work to get the attention it deserves.
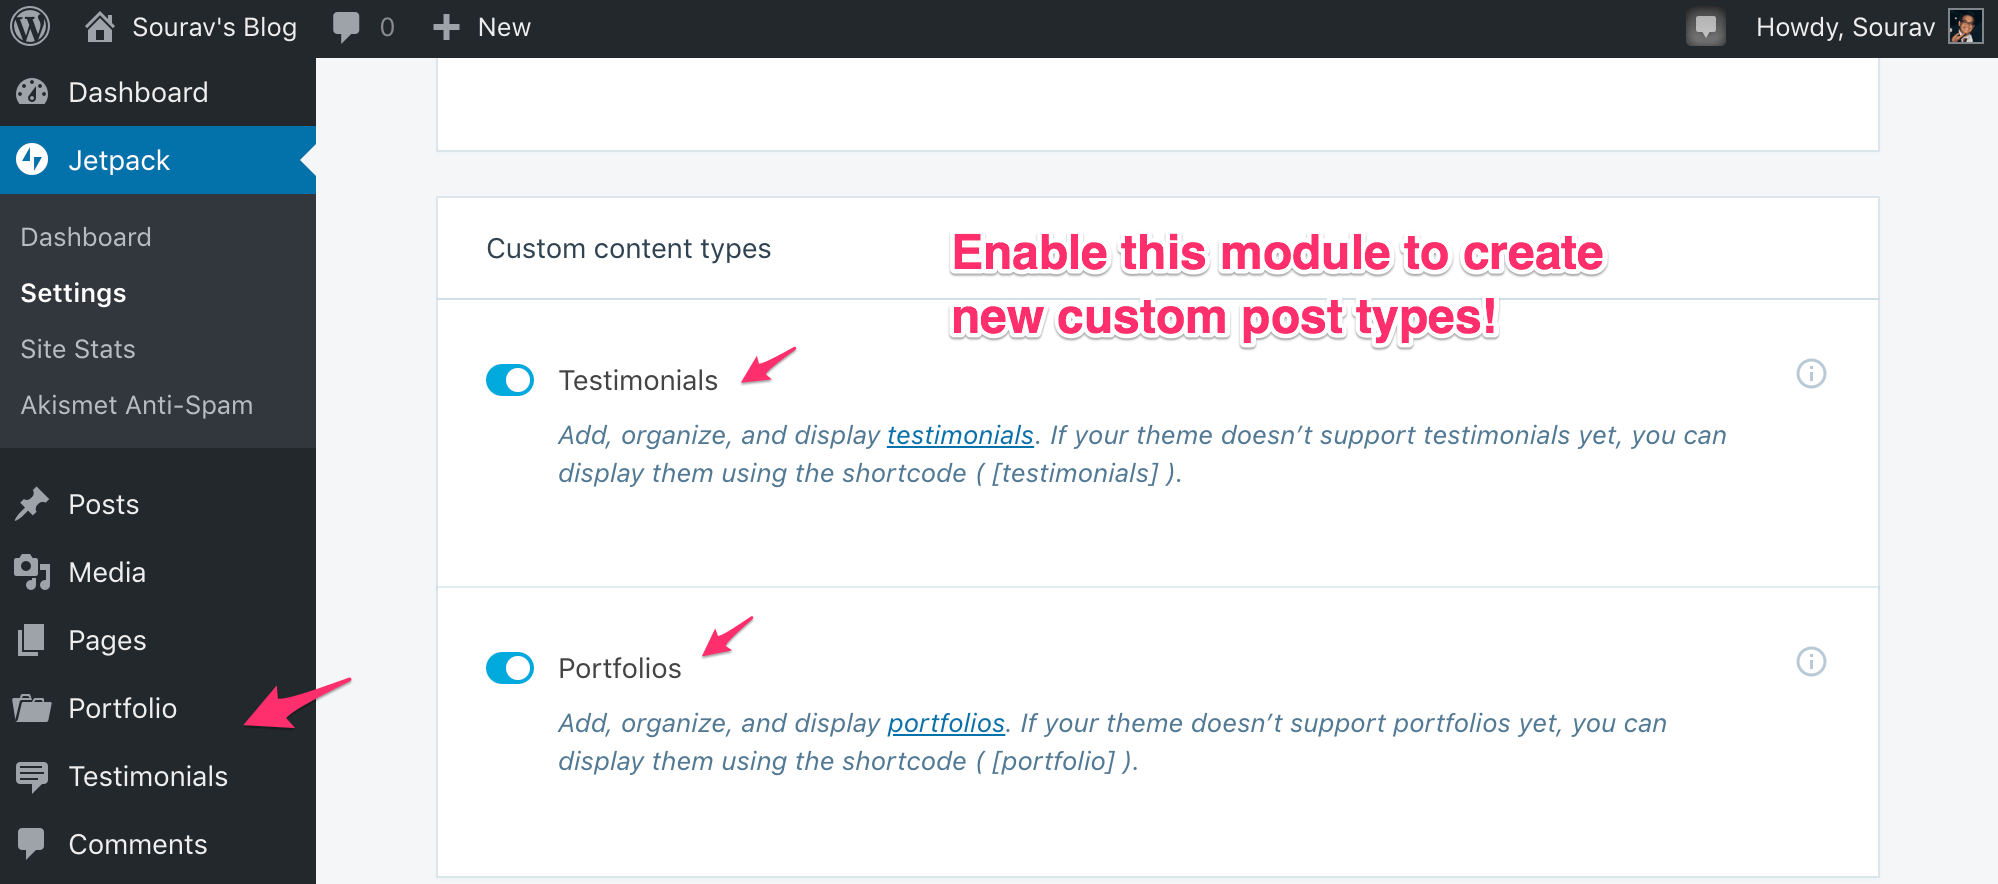
How to enable the Custom Post Type module in Jetpack.
This module is optional, and needs to be activated from the Custom content type setting in the Writing tab under Jetpack settings. You can access it from: WordPress Dashboard > Jetpack > Settings > Writing.
Customizable Widgets on the Sidebar
Custom widgets in Jetpack.
Jetpack has a brilliant collection of useful WordPress widgets, ranging from social media to cookie usage notifications.
Conditional Widgets: You can also use conditional logic inside each widget to make it appear for a particular page, post, tag or category.
Conditional widgets in Jetpack.
Embedding External Content into WordPress
An example of media embeds by Jetpack.
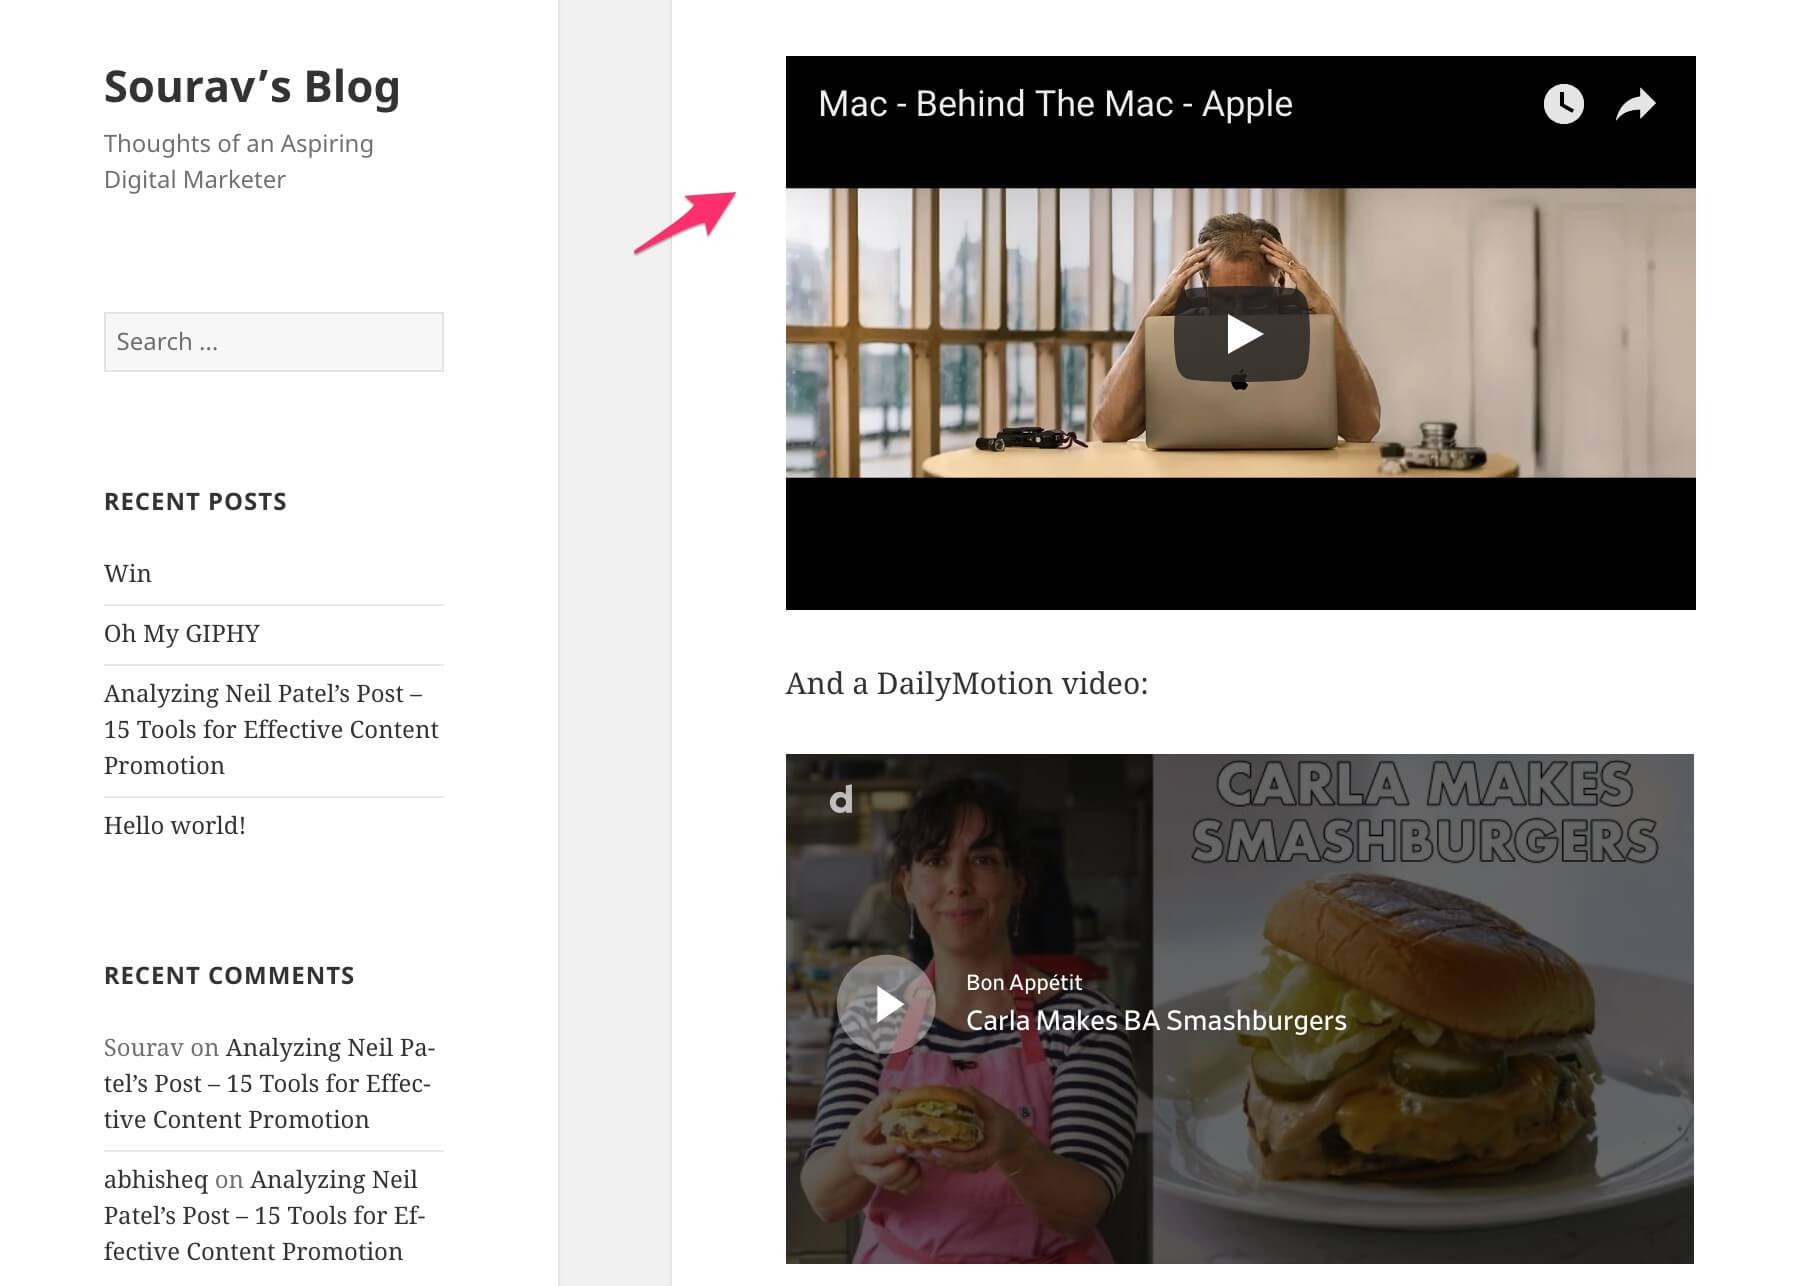
Embedding YouTube videos, Instagram posts, tweets, live code snippets or podcasts from SoundCloud has never been easier with Jetpack.
All you need to do is copy and paste the link into your WordPress editor — the rest is taken care of by Jetpack.
I find this module extremely useful for embedding YouTube videos into my blogs.
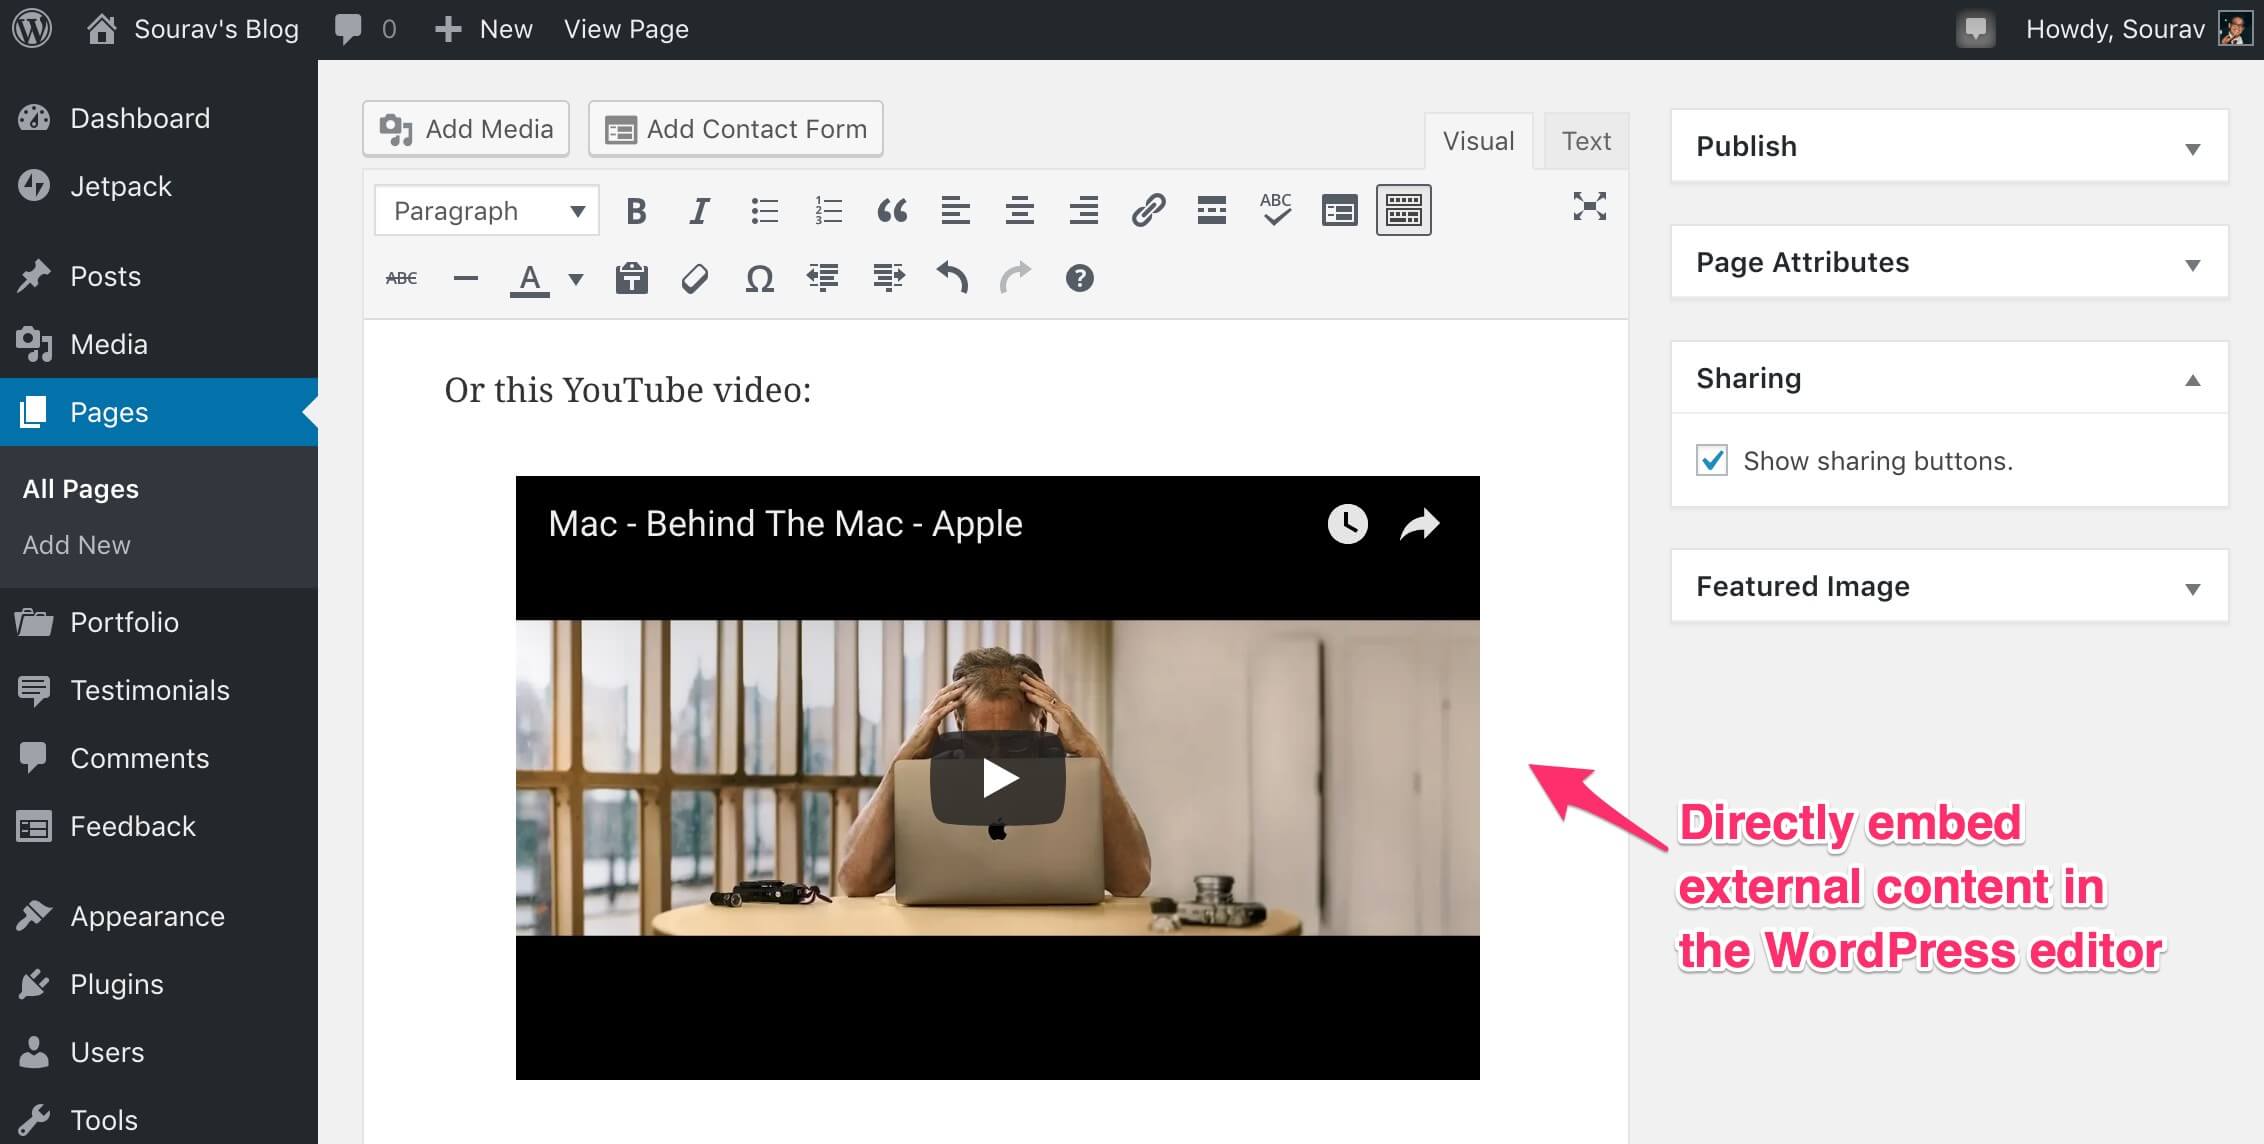
You can embed external content in the WordPress editor with Jetpack.
Check out the official Jetpack documentation to learn more about the support media type embeds.
Visitor Engagement Features from Jetpack
Engaging your site’s visitors is a crucial component to the long-term success of any blog. Jetpack gives you the necessary engagement modules to improve conversion rates and decrease your bounce rate.
These include a feature-rich comments section, email marketing, infinite scroll, related posts and social media automation, as we’ll see below:
Jetpack Comments
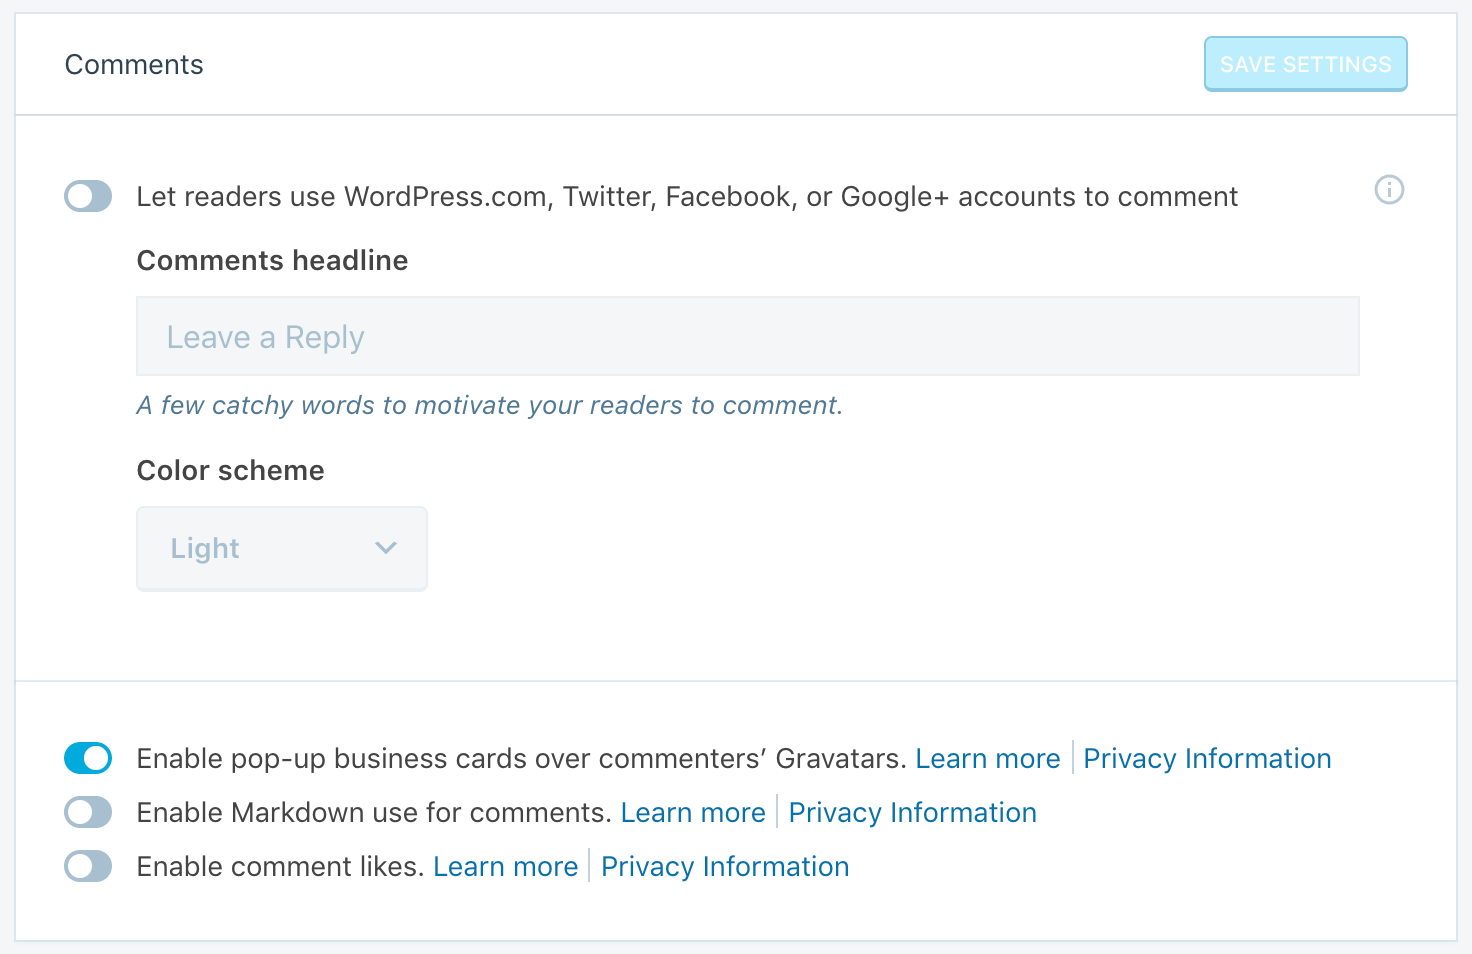
Comments settings in Jetpack.
Not every WordPress theme comes with the best comment system.
Jetpack solves the problem by enabling people to leave a comment using their social media accounts, or their WordPress.com account.
It also offers customization options, such as Markdown support in comments, comment likes, and pop-up business cards. These are entirely optional, and can be customized to the type of your site.
You can enable the Jetpack Comments module from the Comments setting located under WordPress Dashboard > Jetpack > Settings > Discussion.
Email Subscription from Jetpack
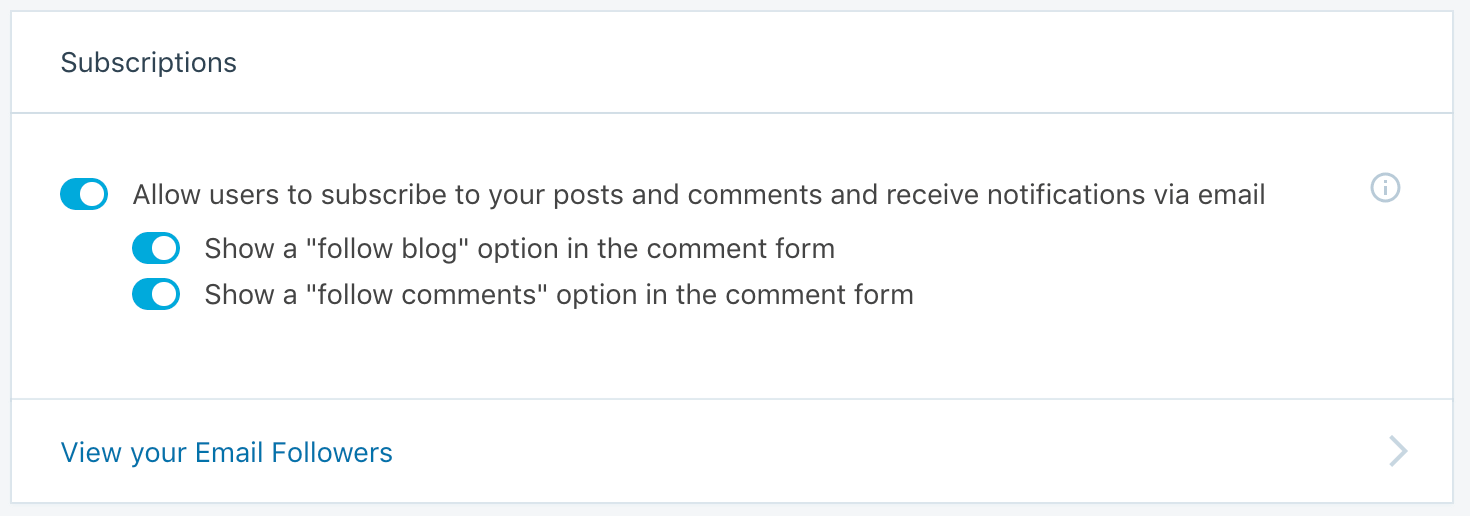
Email Subscription settings in Jetpack.
This is one of my favourite features of the Jetpack plugin.
By enabling this feature, you’re essentially building your email list.
The ‘follow blog‘ option subscribes the user to your email list, and whenever a new post is published an email is sent to all of your subscribed followers. That’s list building 101.
Check out our articles on email marketing and getting started with MailChimp in WordPress to learn more.
The next option — ‘follow comments‘ — is also a personal favourite. It notifies you of any comments and follow-up comments to posts that you follow, which helps to keep the conversation ongoing and also grow your site’s subscribers.
Infinite Scroll
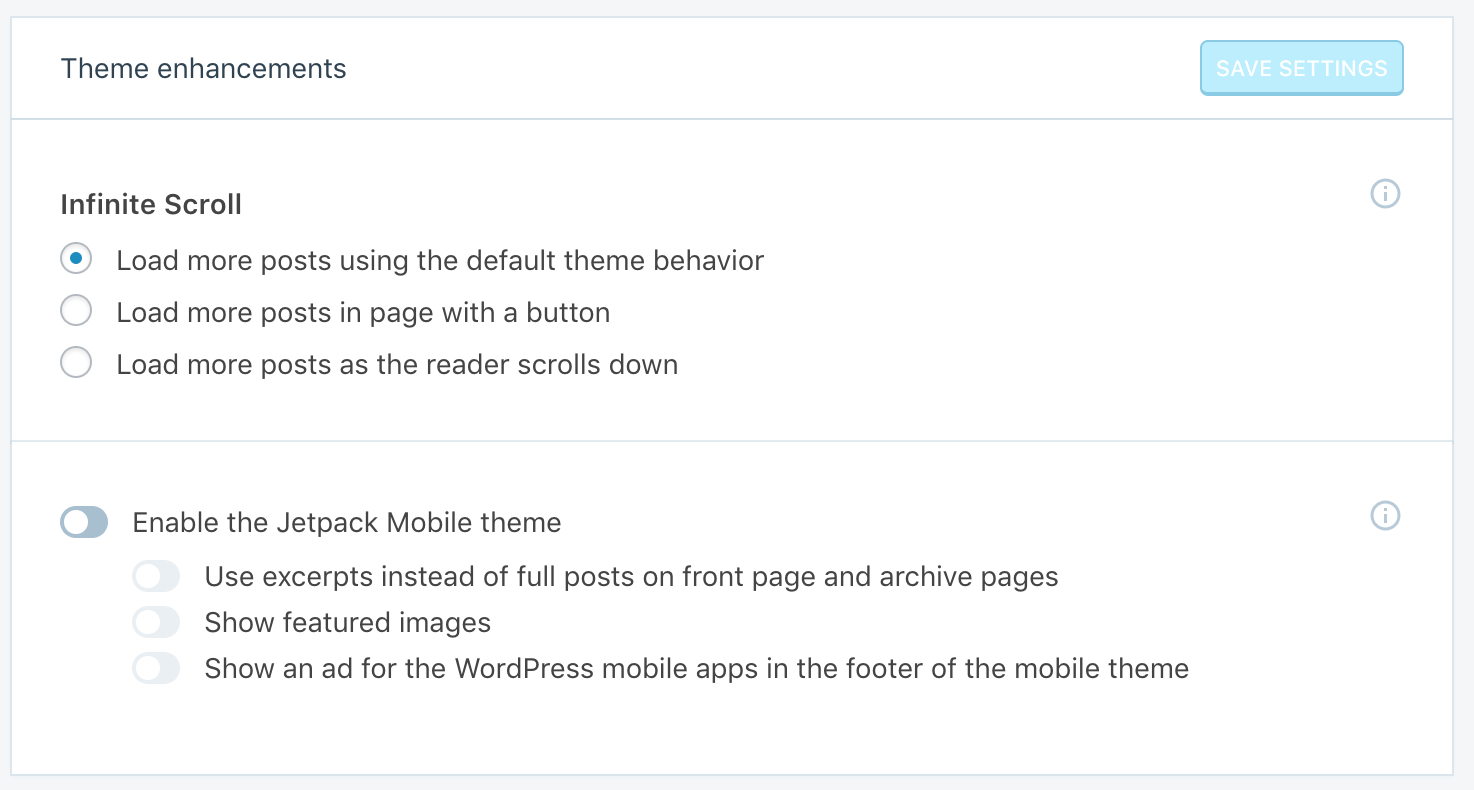
Infinite Scroll settings in Jetpack.
This feature will automatically load the next post as the reader approaches (scrolls down to) the bottom of the page. With Jetpack, you can choose from two options:
- Automatically load the content.
- Create a ‘Load More’ button that, upon clicking, loads the next article.
The second feature is especially useful, as it hands control to the end user.
You can access the infinite scroll feature in Jetpack under the Theme Enhancements setting found under WordPress Dashboard > Jetpack > Settings > Writing.
Related Posts in WordPress Using Jetpack
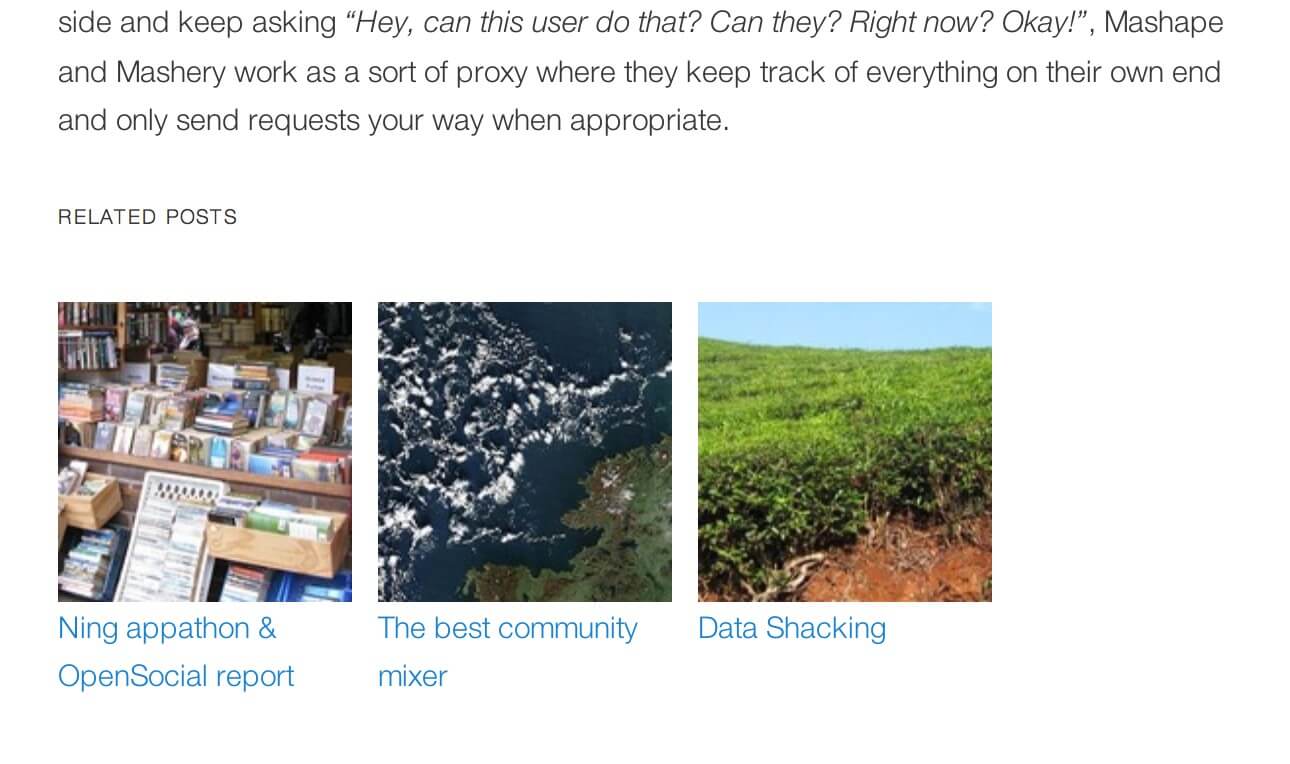
Example of Related Posts in action.
Related Posts is a powerful feature that’s used to keep your visitors engaged with your website for longer.
The module basically picks up the previously published posts from the same categories and tags (hence the term related), and shows them at the bottom of each post. A reader is likely to click on that content, as it’s related to the original article he/she was reading.
However, calculating related posts consumes a lot of server resources — and this intensifies when you have multiple posts, pages, categories and tags.
On top of that, if you’re using shared hosting, this could lead to your account being suspended due to CPU usage spikes — even when you don’t have too many visitors.
The Related Posts module in Jetpack.
Jetpack solves this problem by offloading this computation onto the cloud — on their servers. It then merely pastes those results (i.e., the related posts) into the bottom of your content.
Your web host’s resources aren’t used, and you end up winning more pageviews!
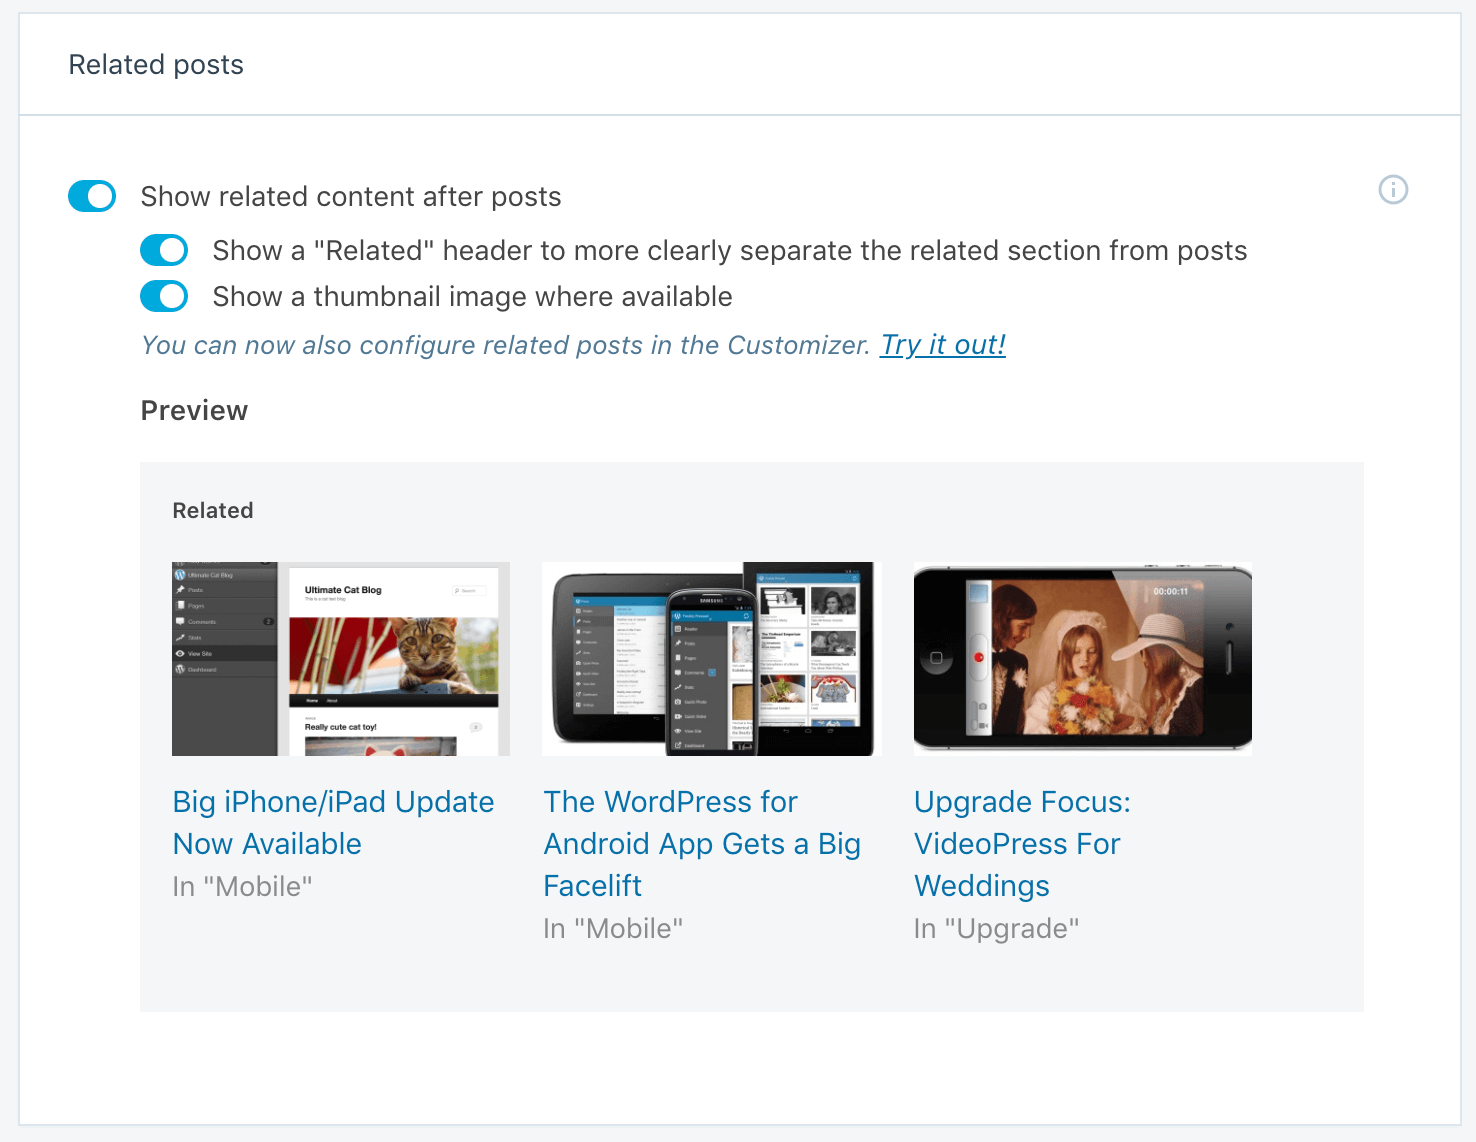
To activate the module, go to WordPress Dashboard > Jetpack > Settings > Traffic.
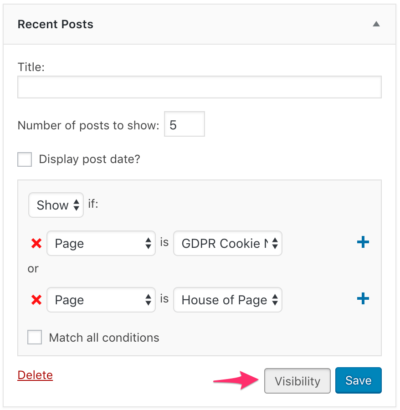
Bonus: You can also customize how each related post appears under the post, by using the default WordPress customizer. To access this, go to WordPress Dashboard > Appearance > Customize > Related Posts.
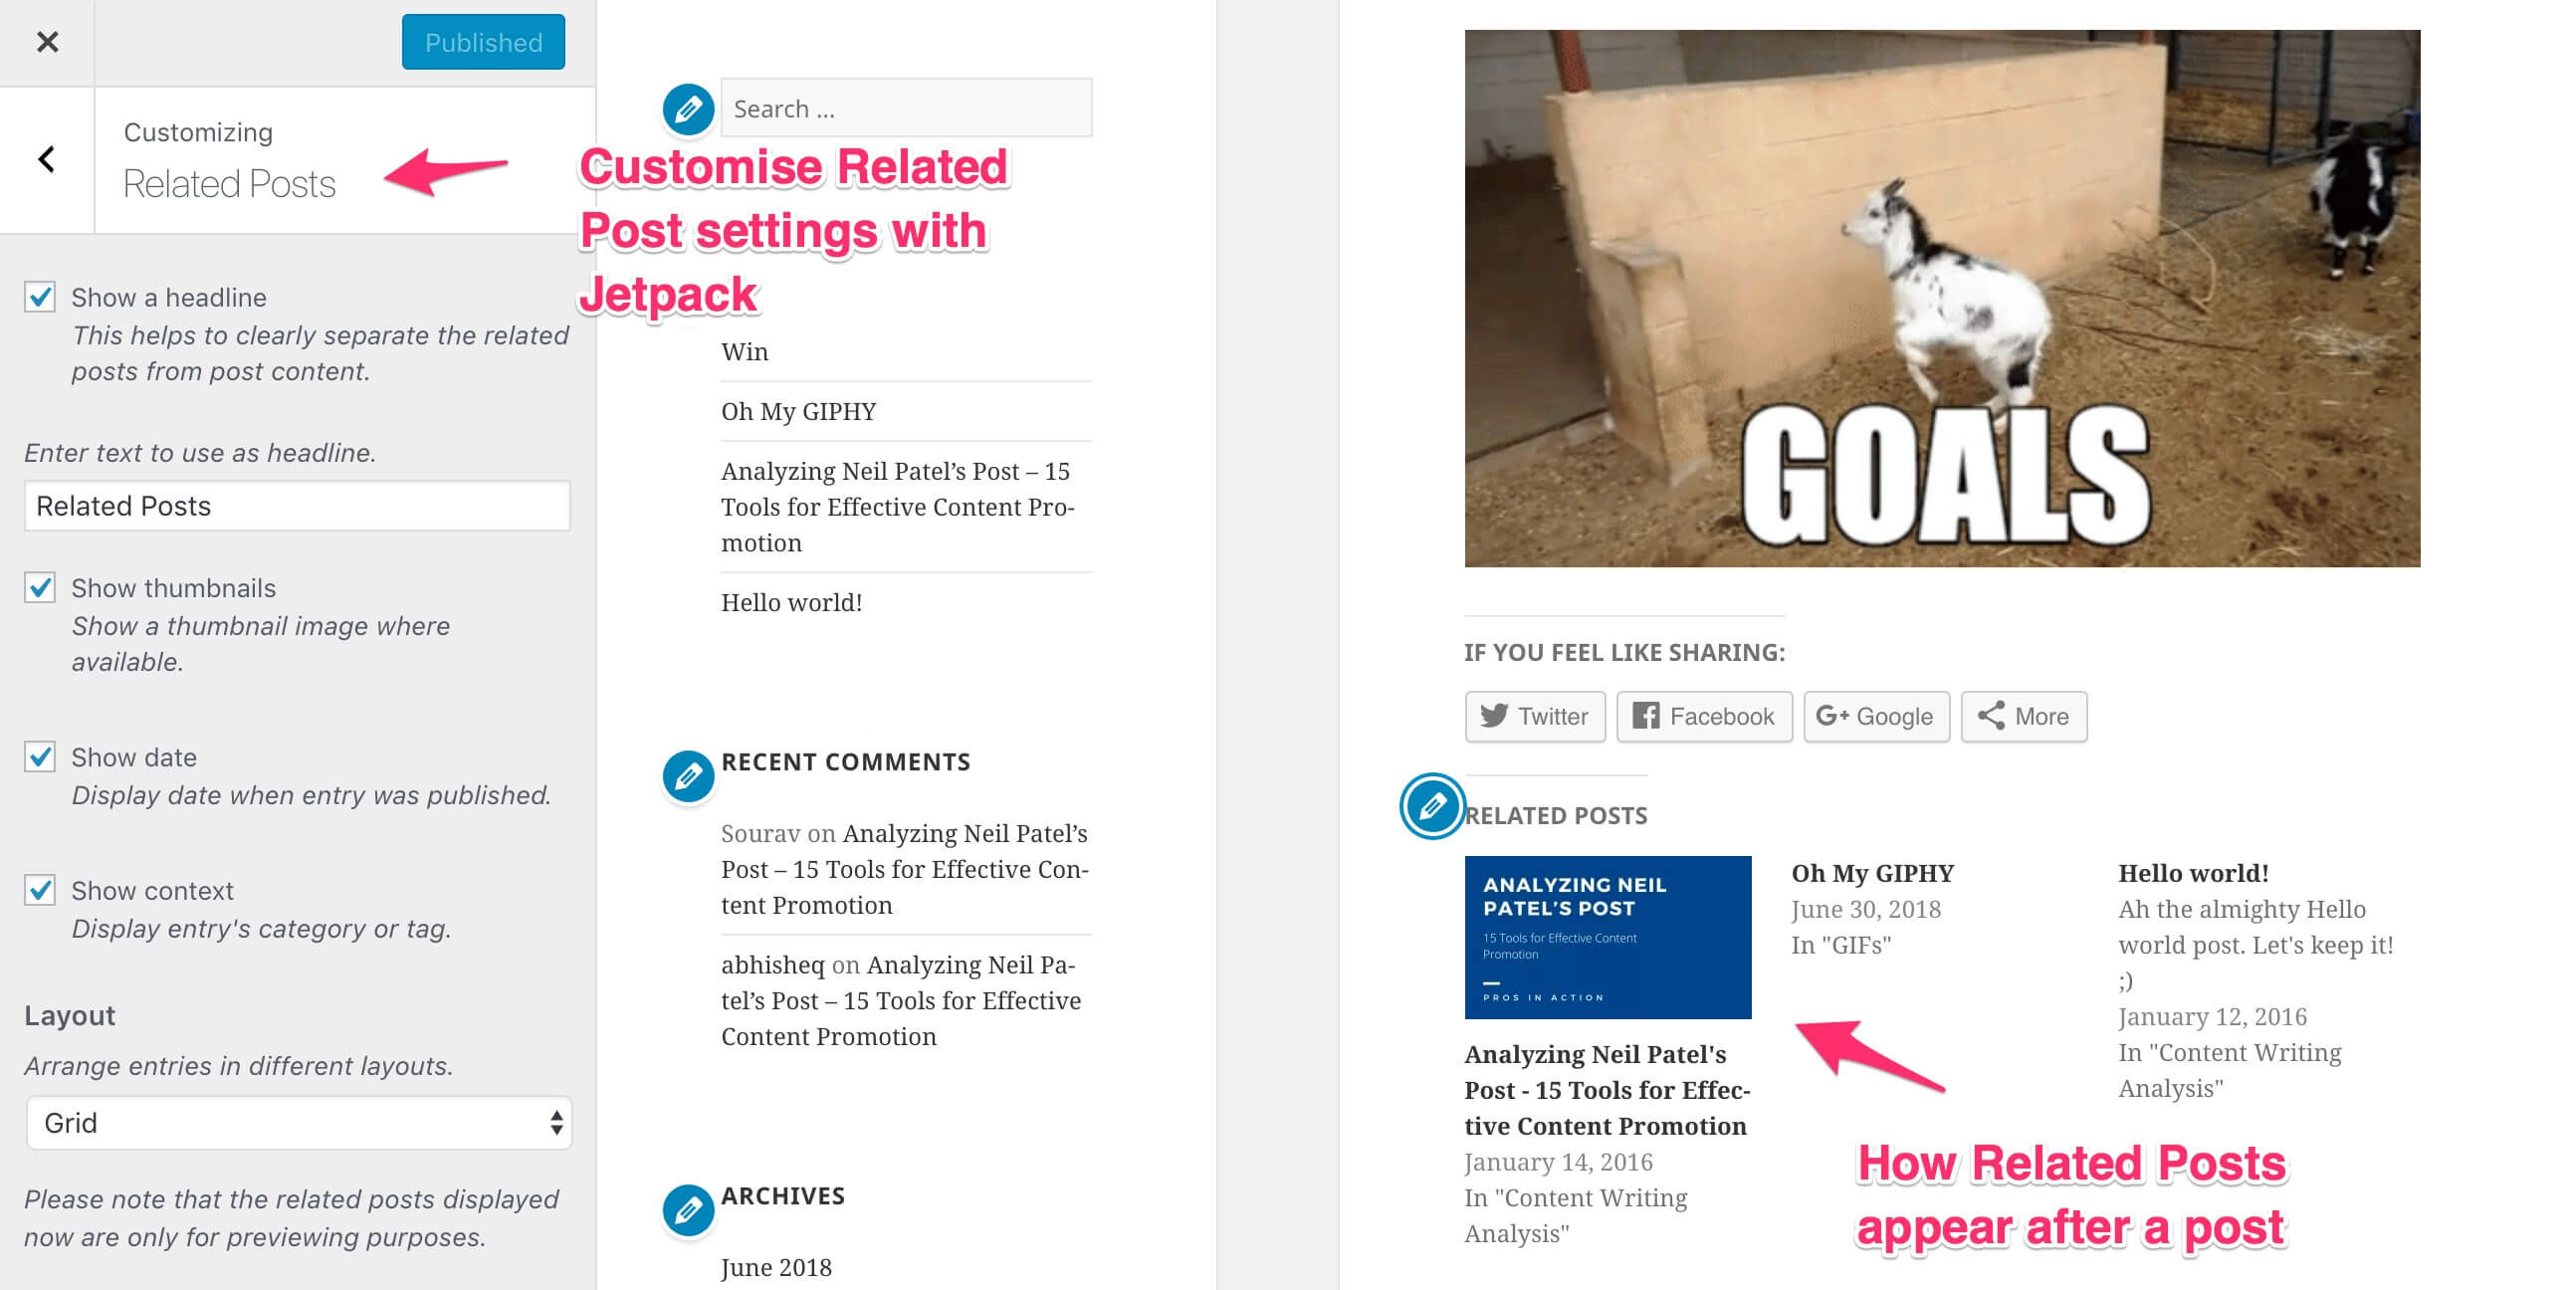
Customizing the Related Posts layout in Jetpack.
Customizable Sharing Buttons
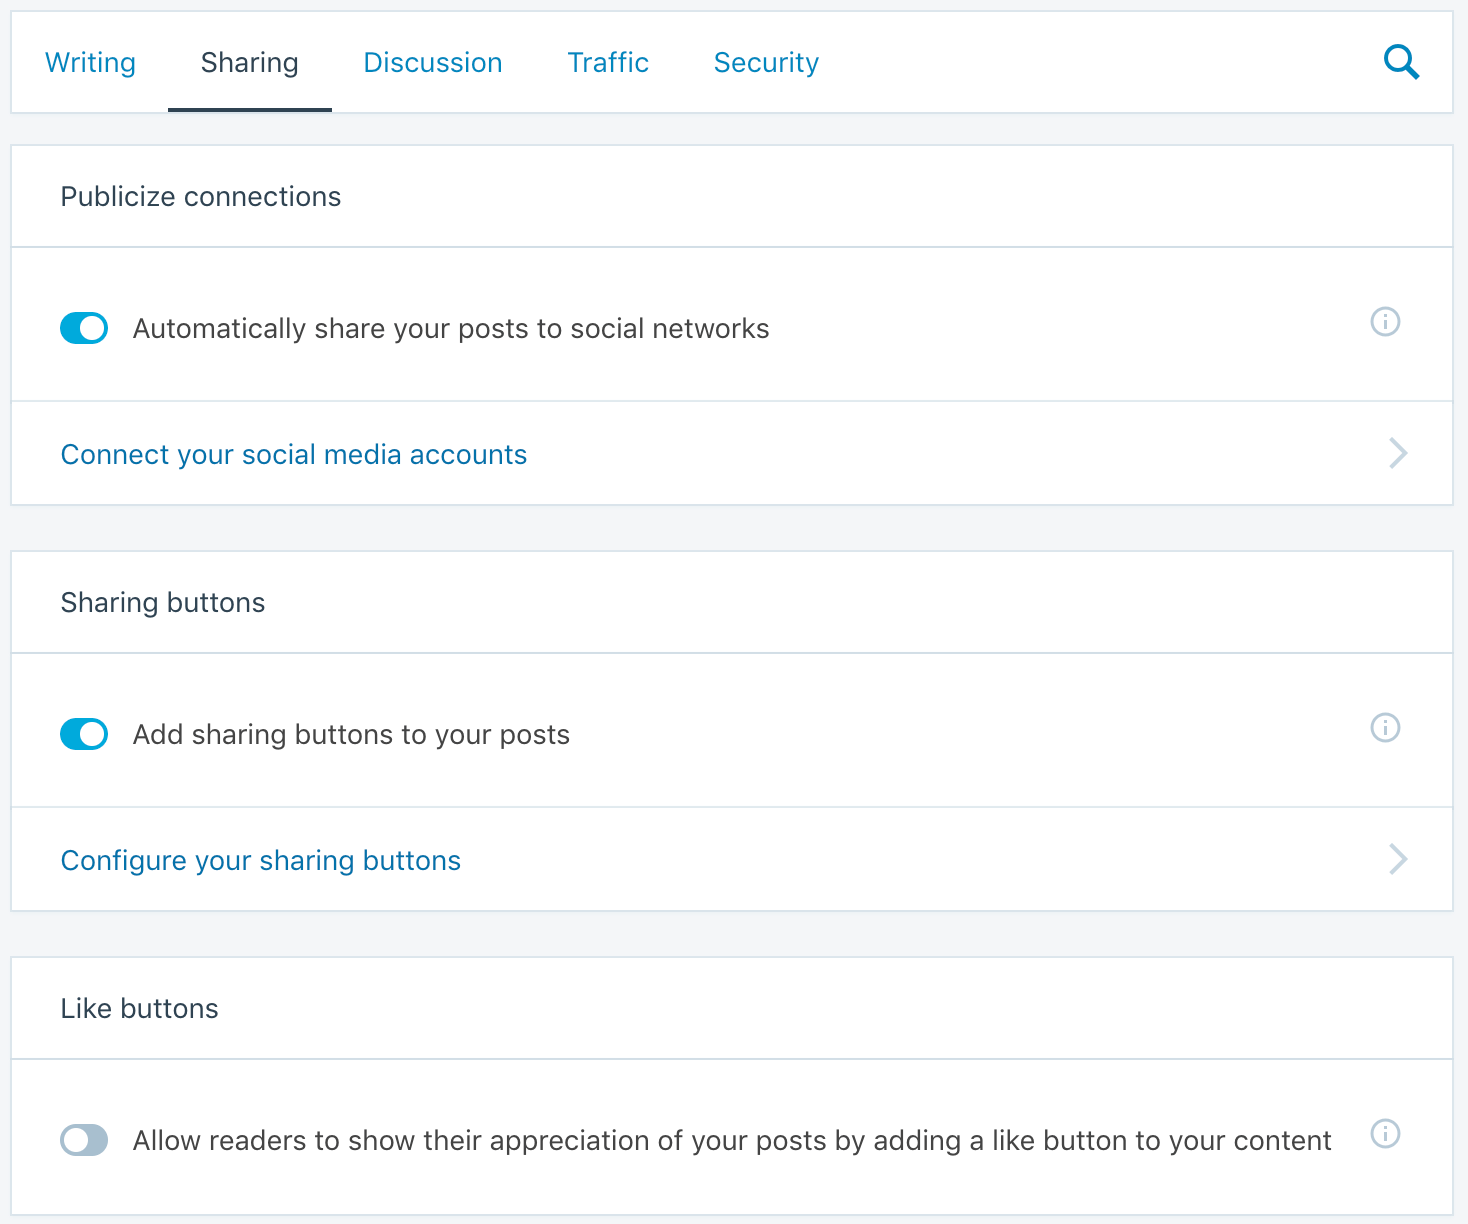
Social Sharing settings in Jetpack.
Jetpack lets you add customizable like/share buttons after each post. These settings are available under the Sharing Button settings, under WordPress Dashboard > Jetpack > Settings > Sharing.
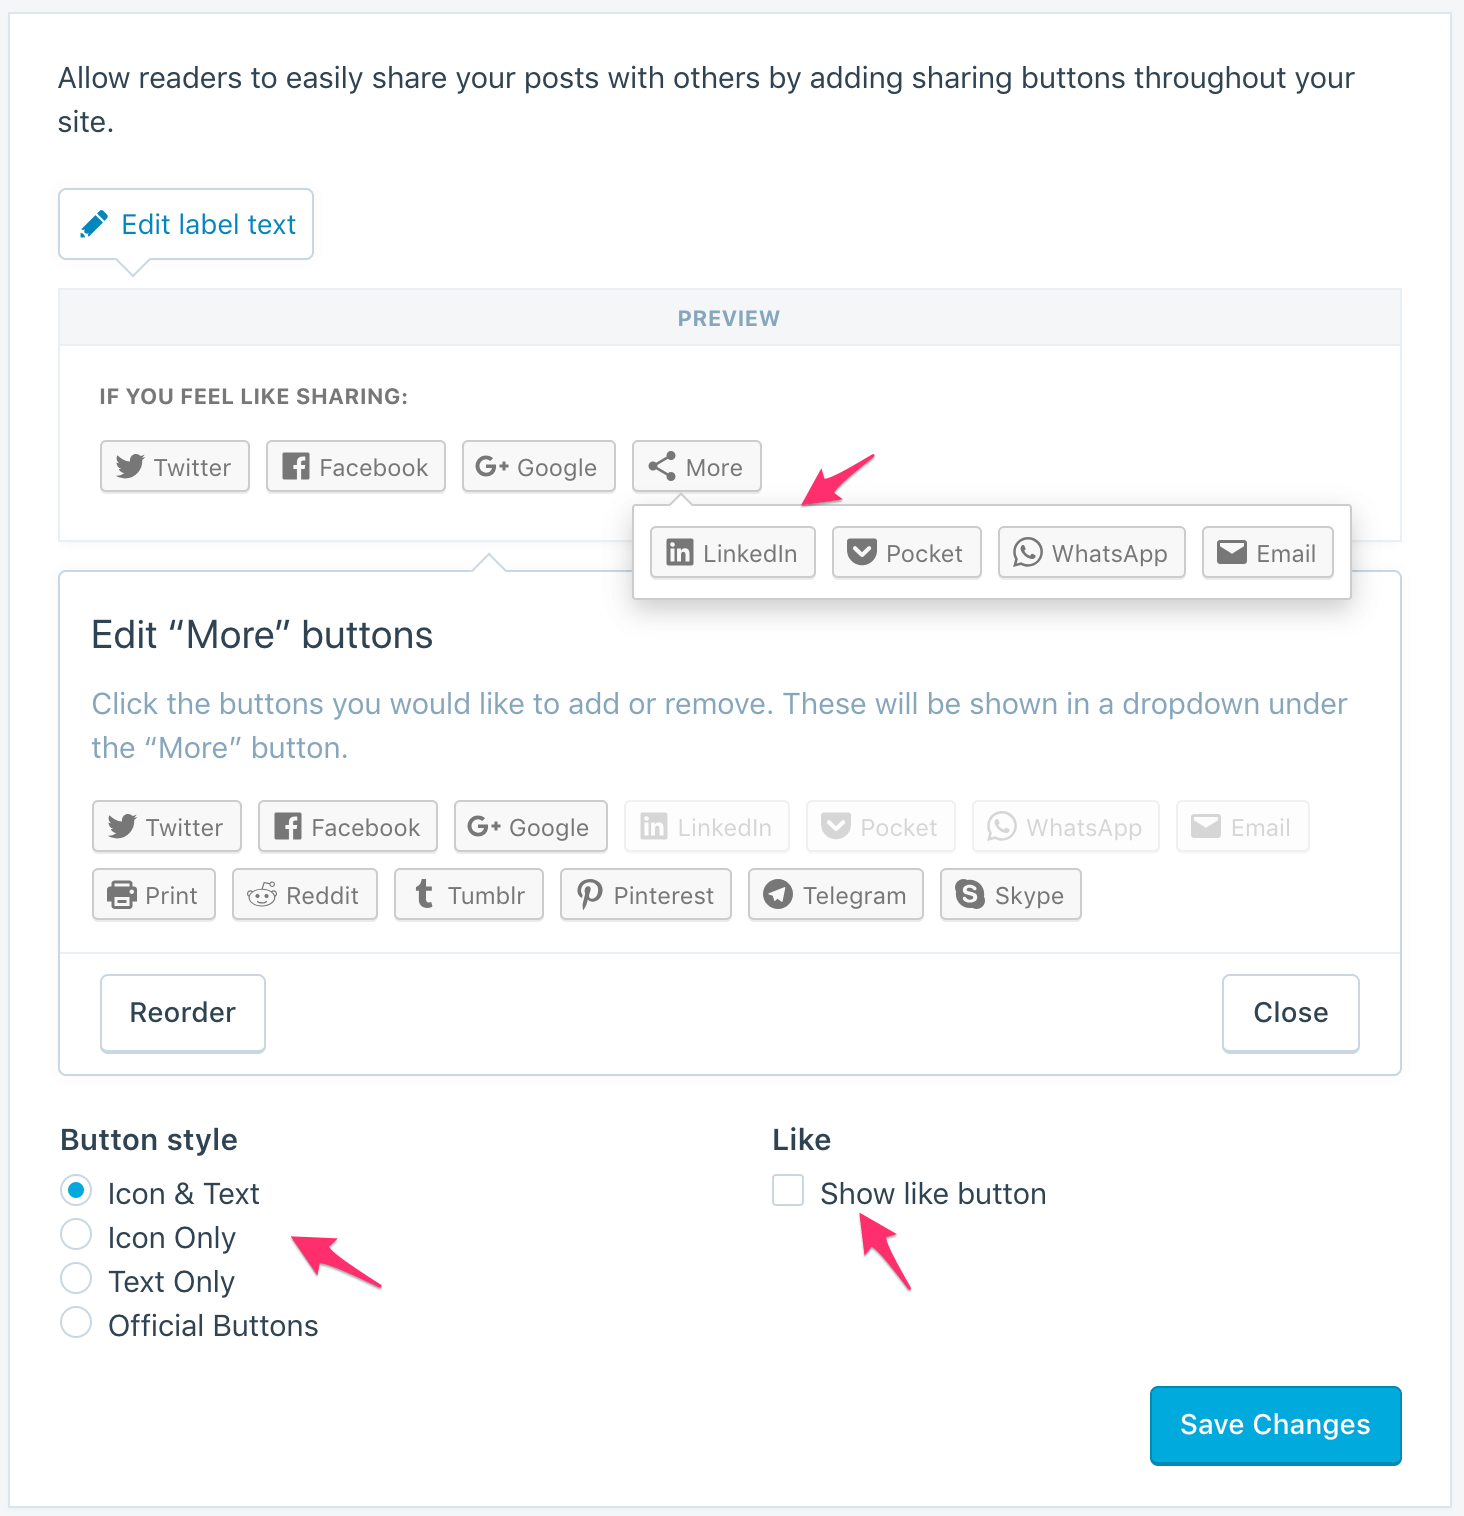
Customising sharing buttons in Jetpack.
Bonus: You can customize the look and feel of the sharing buttons, and select newer ones such as Pocket and WhatsApp.
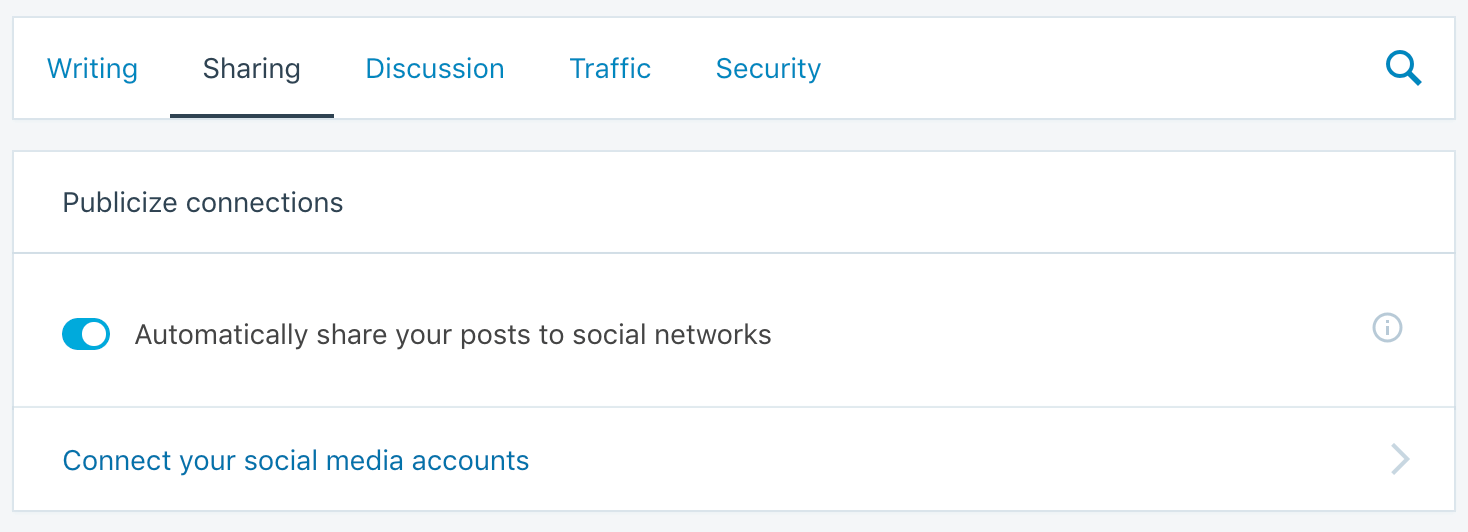
Social Media Automation
Apart from customizable sharing buttons, Jetpack also enables you to auto-post to your connected social media networks whenever a post is published. This feature is called Publicize.
The Publicize module from Jetpack.
You can enable this module from the Publicize Connections setting under WordPress Dashboard > Jetpack > Settings > Sharing.
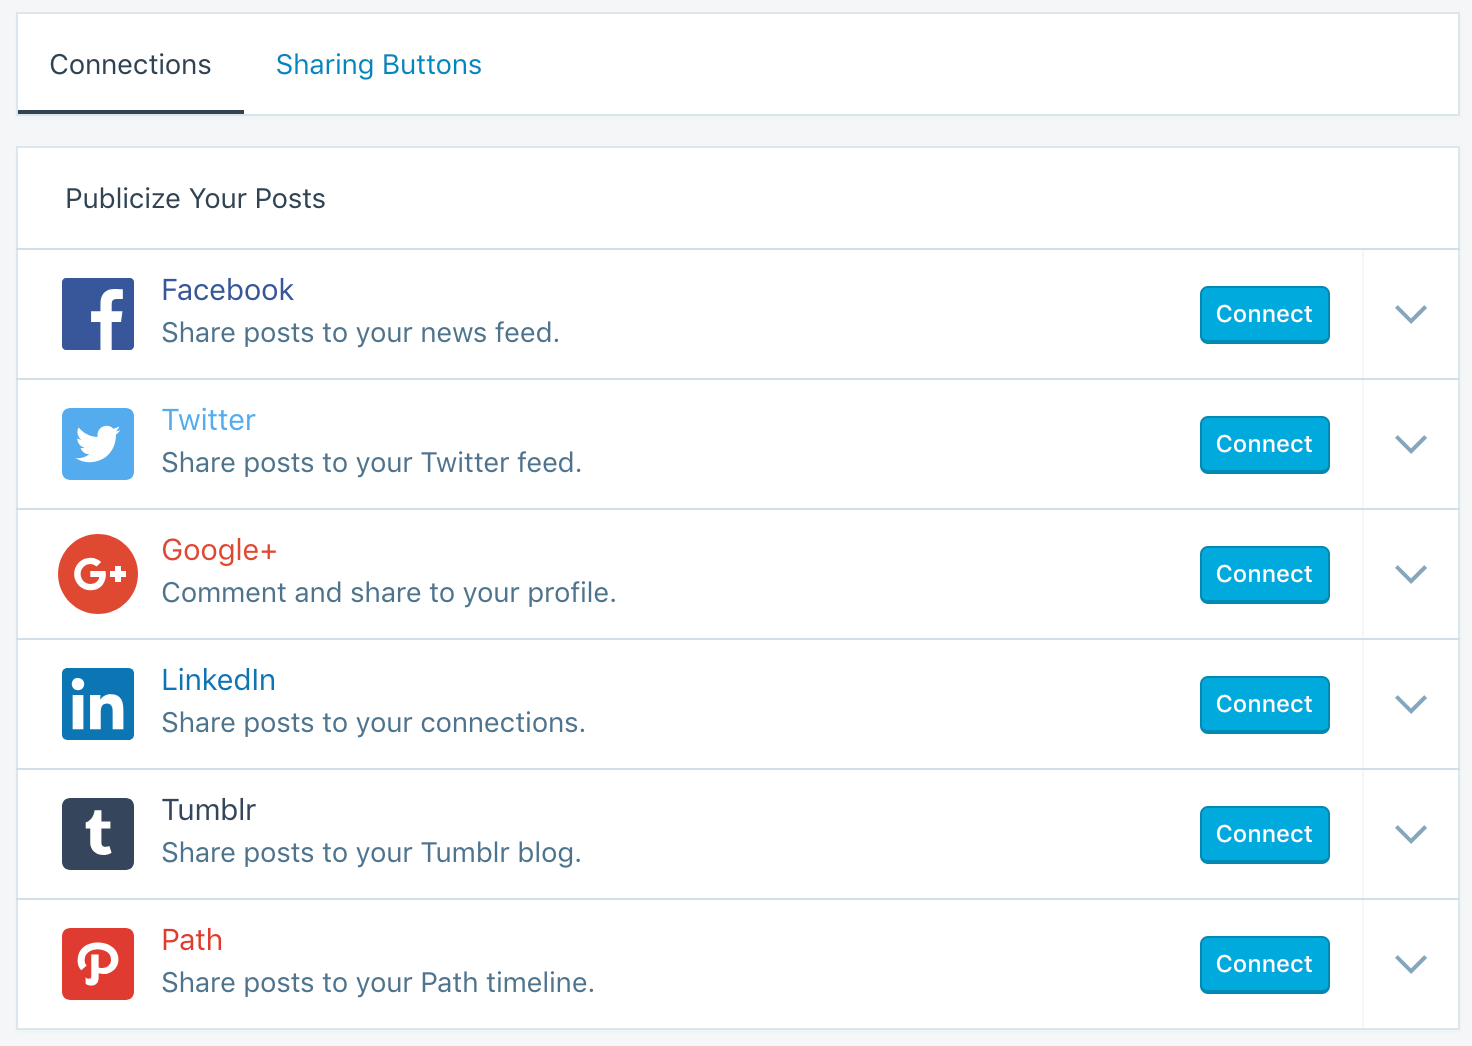
Supported social media networks in Jetpack’s Publicize module.
Supported social media networks include Facebook, Twitter, Google+, Facebook, Tumblr, and Path, and whenever you publish a post it’s automatically shared in all of the connected social media profiles. (In the screenshot below, I haven’t connected to any network.)
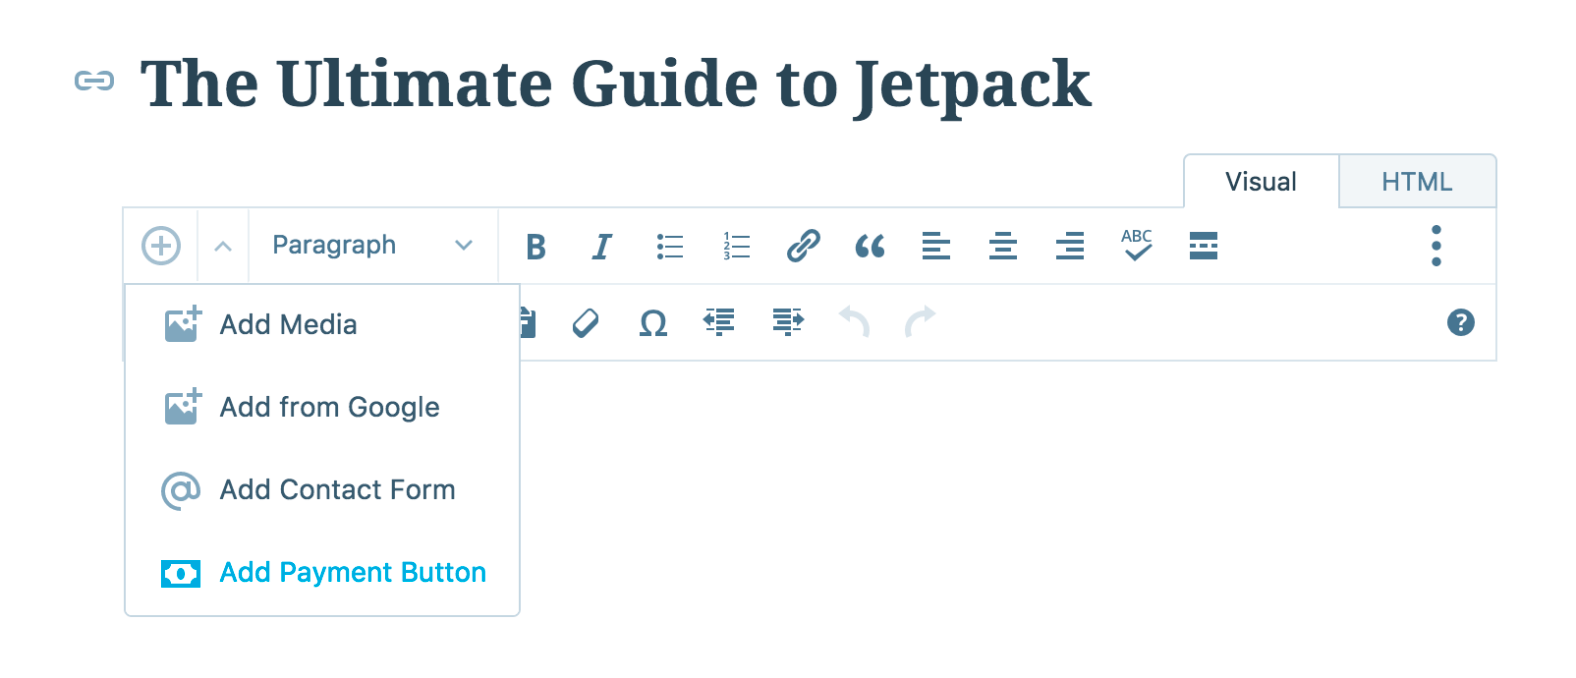
Jetpack Contact Form
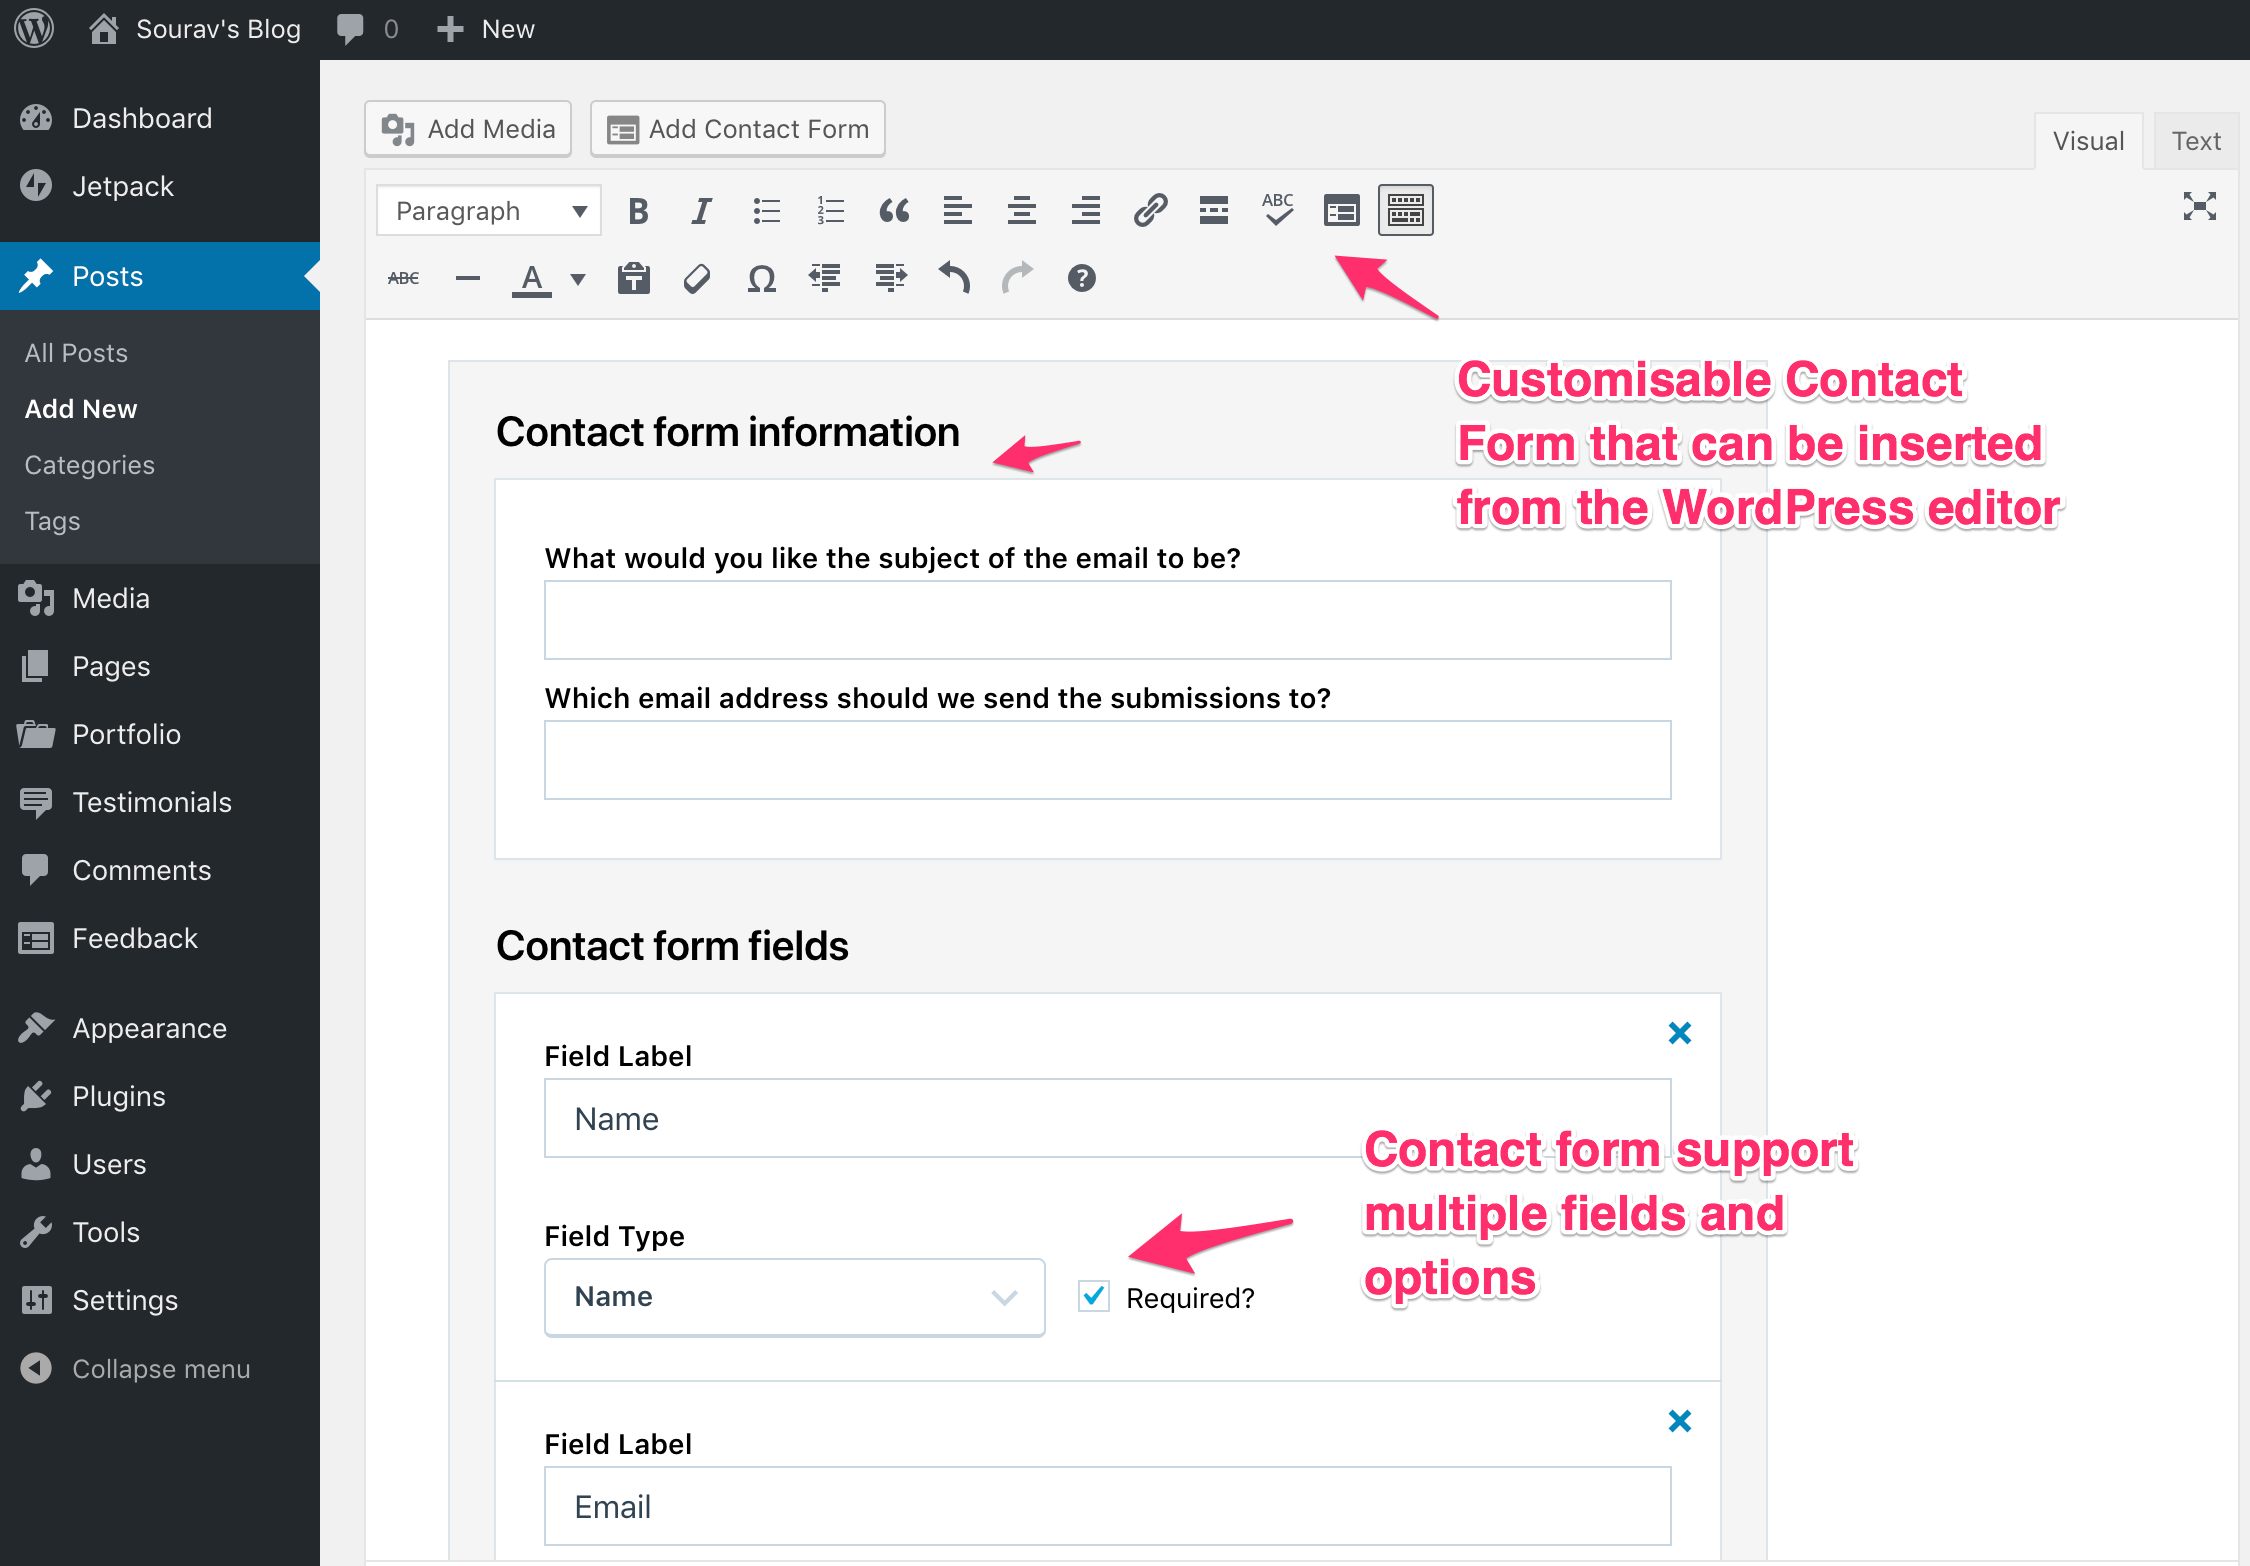
How to add a contact form in the WordPress Editor using Jetpack.
While there are a lot of great contact form plugins for WordPress (both free and paid), Jetpack gives you a simple one that can be inserted into any post or page.
Here’s the contact form in action:
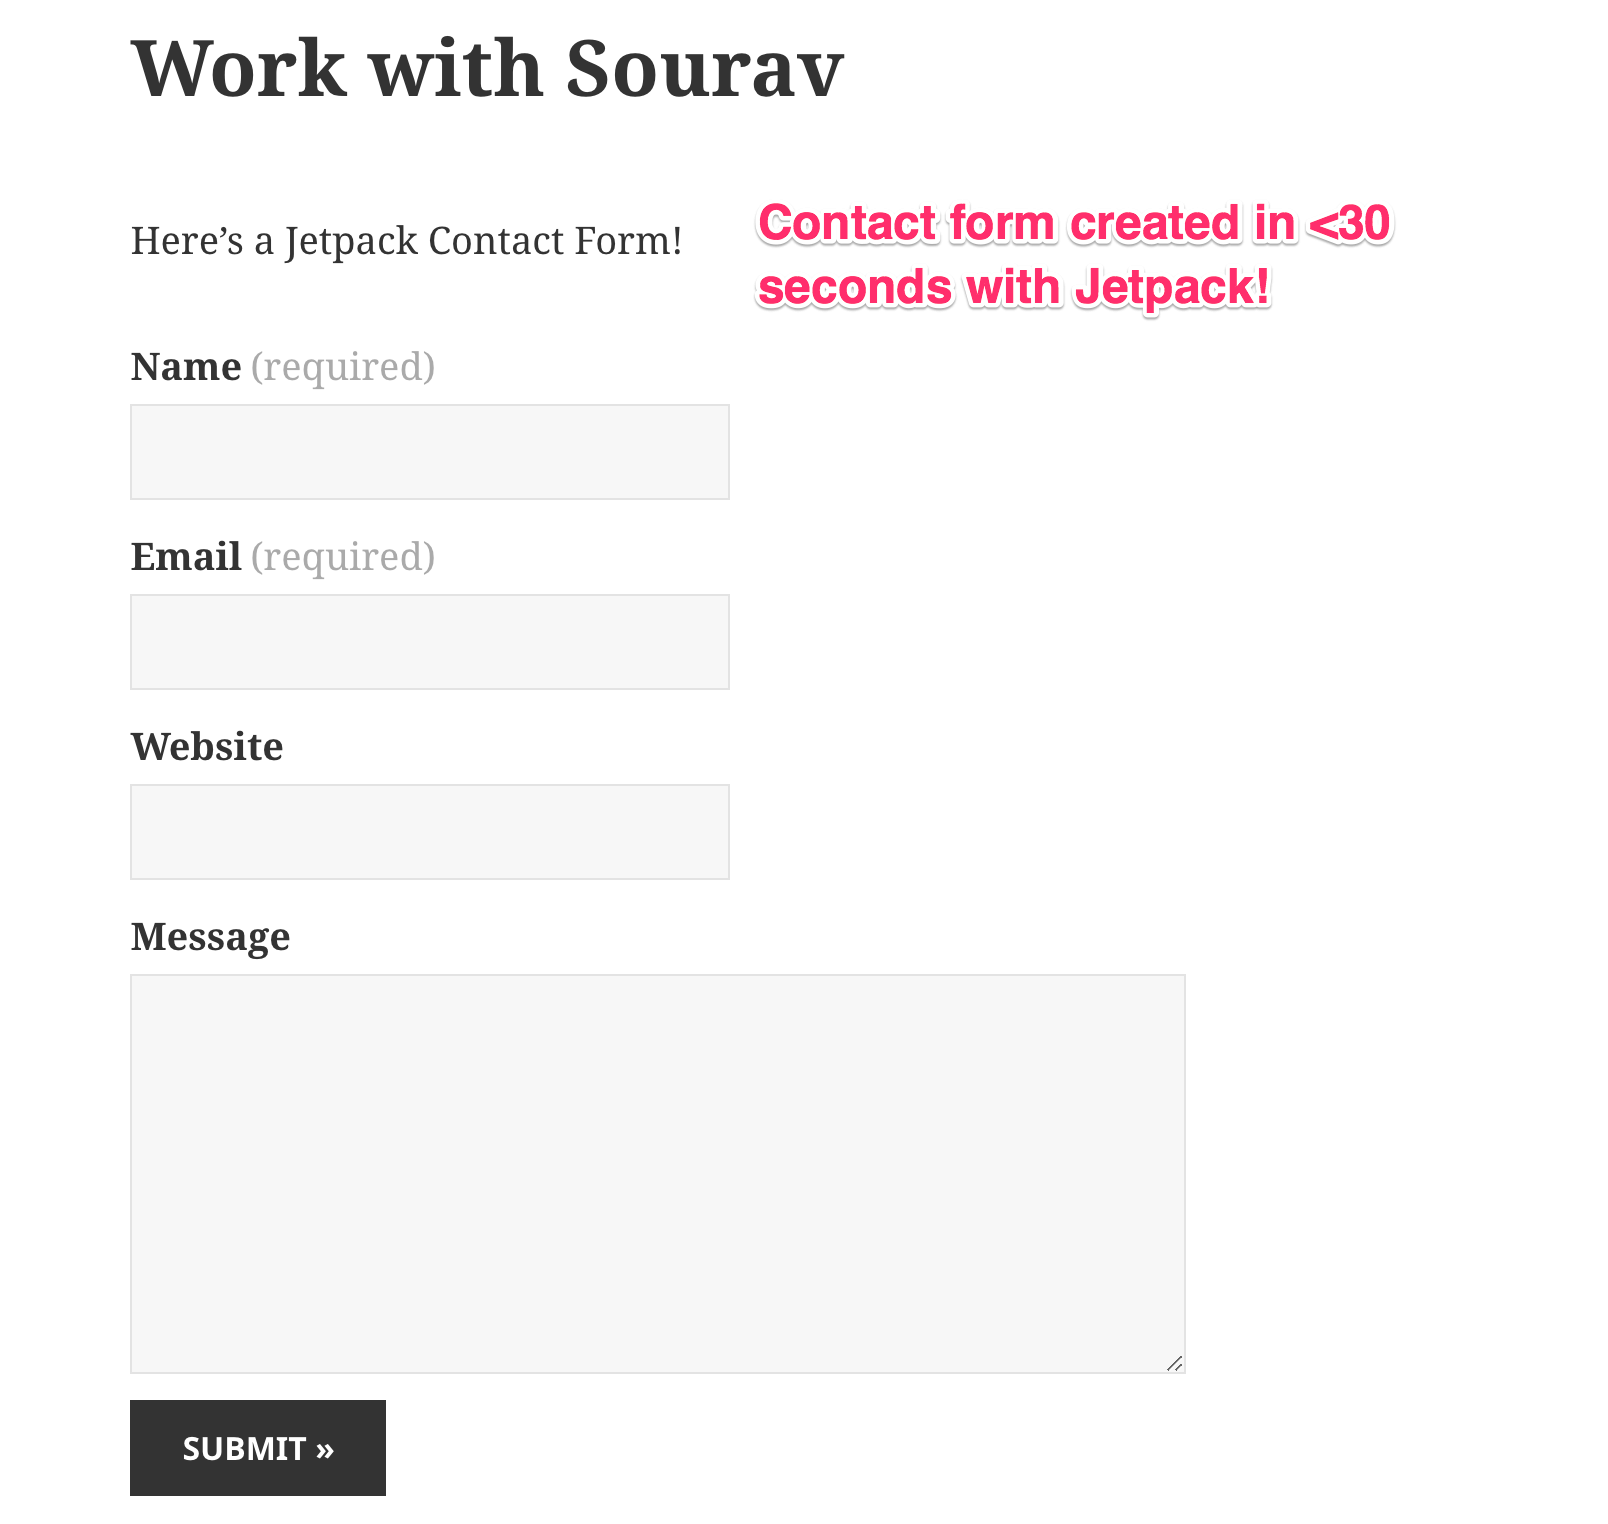
A contact form created by Jetpack.
Analytics and SEO Features in Jetpack
The core premise of Jetpack is to bring a handful of the most essential features of a WordPress site under one roof. While this approach has been great so far, we’re going to recommend a few alternative plugins as opposed to the available Jetpack modules.
Jetpack Site Stats
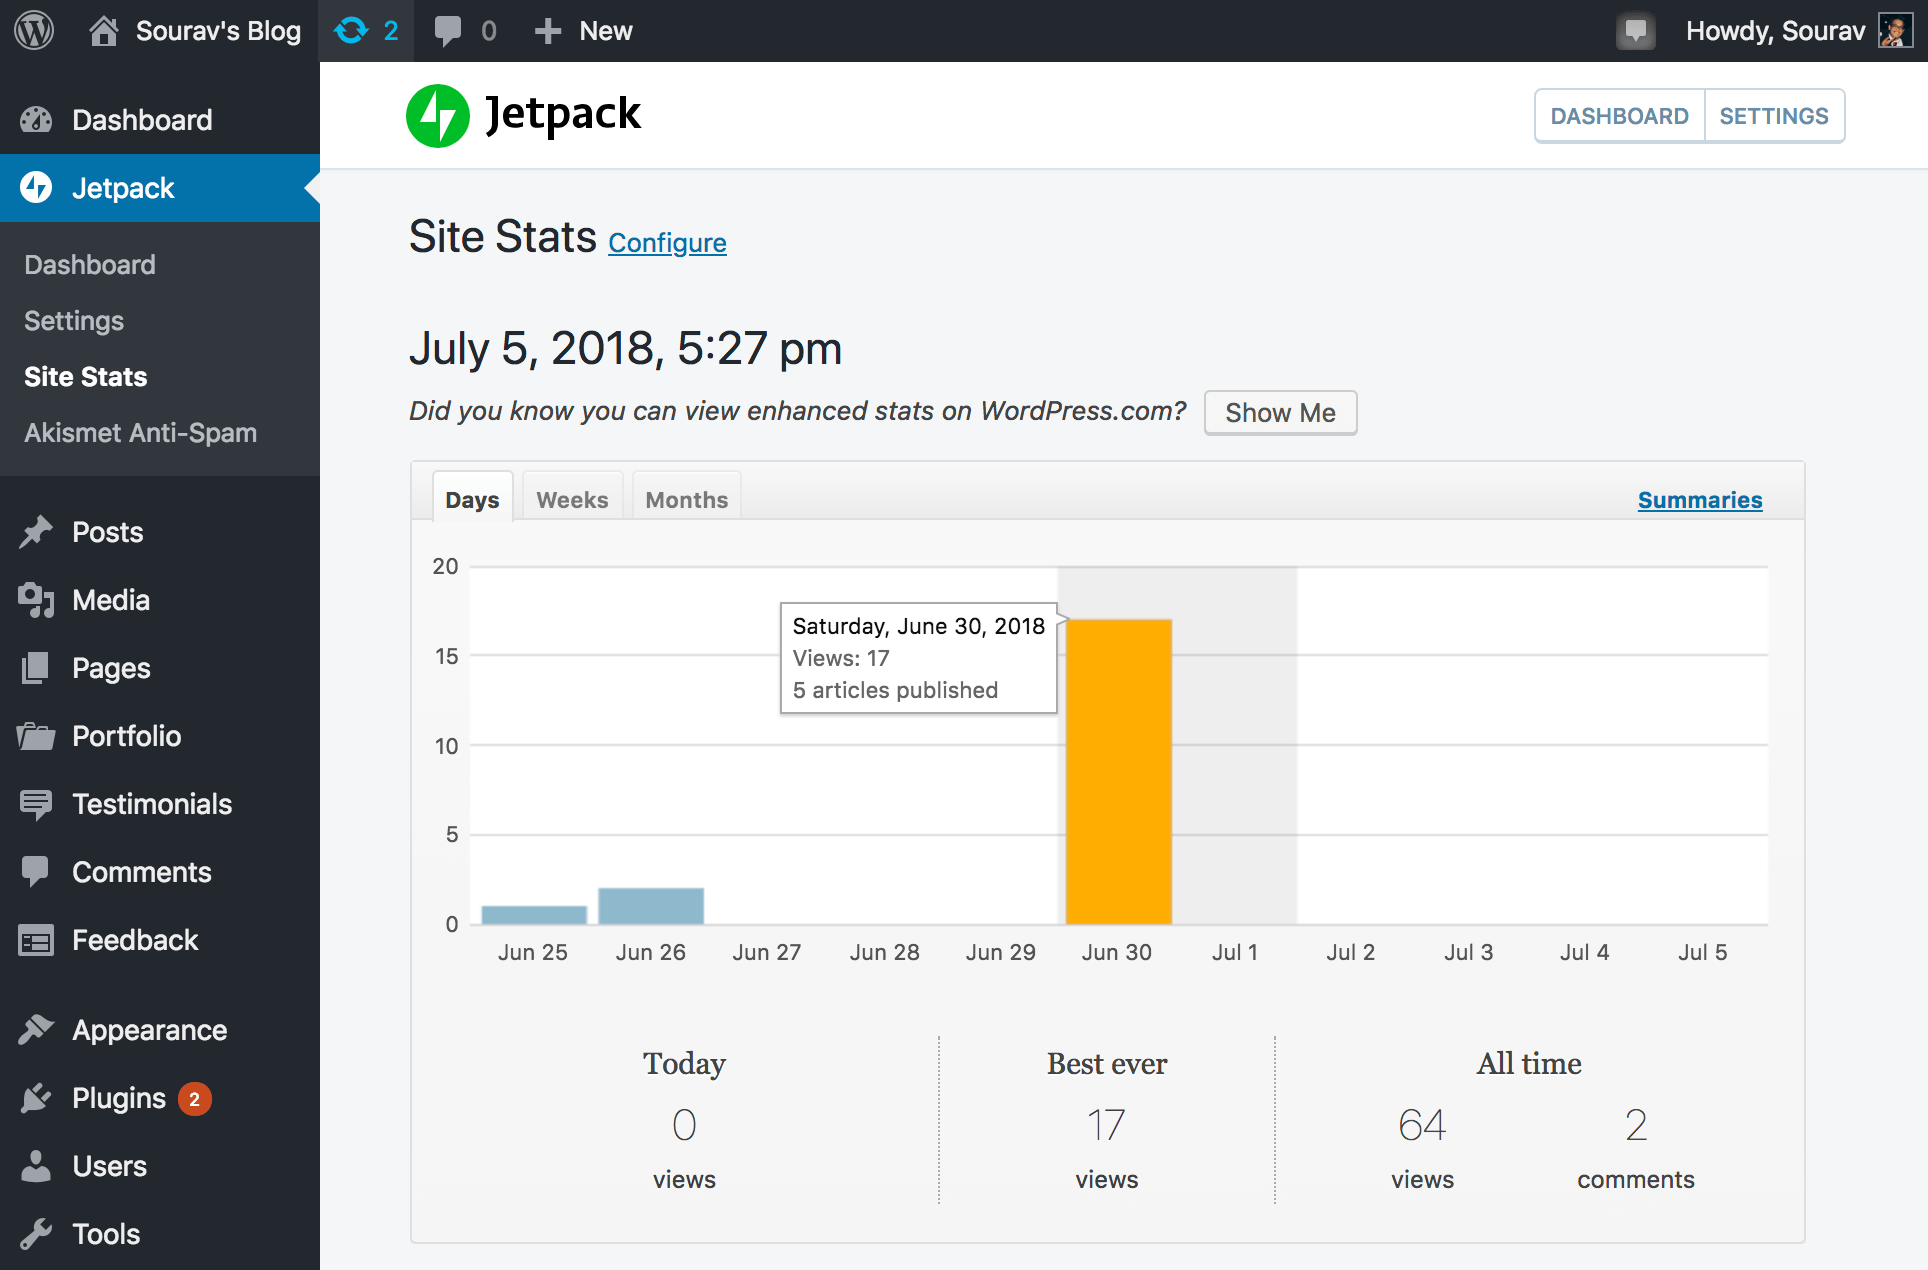
An example of Jetpack Site Stats
Jetpack Site Stats gives you a bird’s eye view of your website’s visitors.
However, if you want to take a more in-depth look, it’s recommended you follow Google Analytics and understand intermediary concepts such as bounce rate, sessions per visit and more.
Site Verification
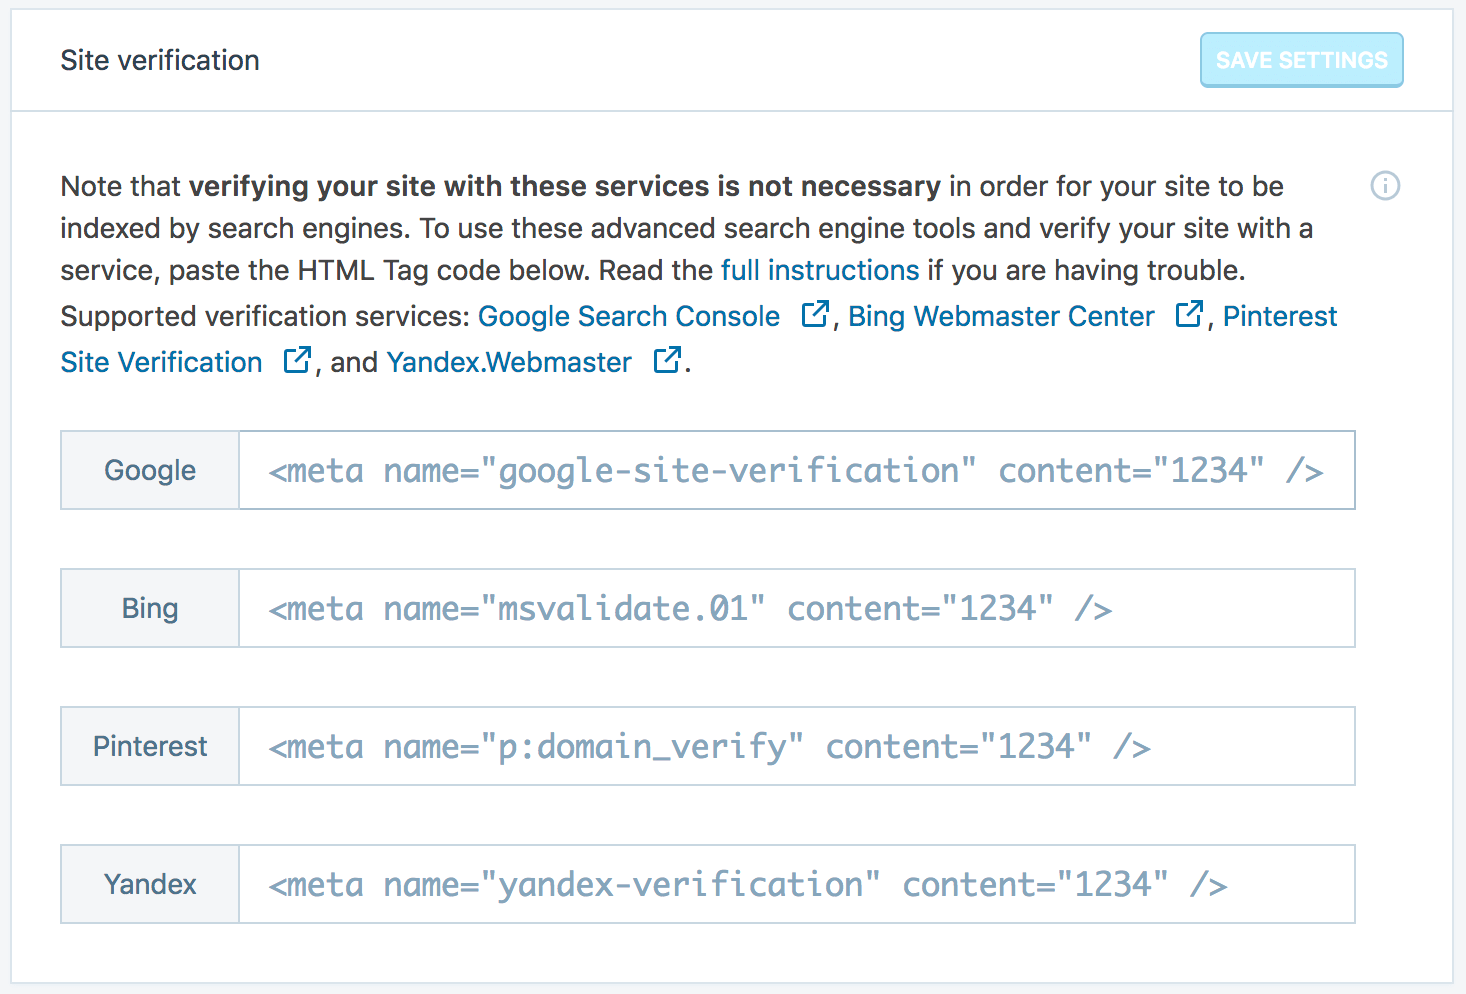
Website verification for the Search Engines module in Jetpack.
While this is an optional feature, it’s always recommended that you verify ownership of your site with the various search engines, such as Google, Bing, Yandex, Yahoo, and so on. This gives you access to their Webmaster Tools, which is useful for monitoring your SEO efforts.
We would recommend you verify your WordPress site with Google and Bing, to begin with. Once you have the verification codes, just copy and paste them into the relevant fields, and you’re good to go!
XML Sitemaps
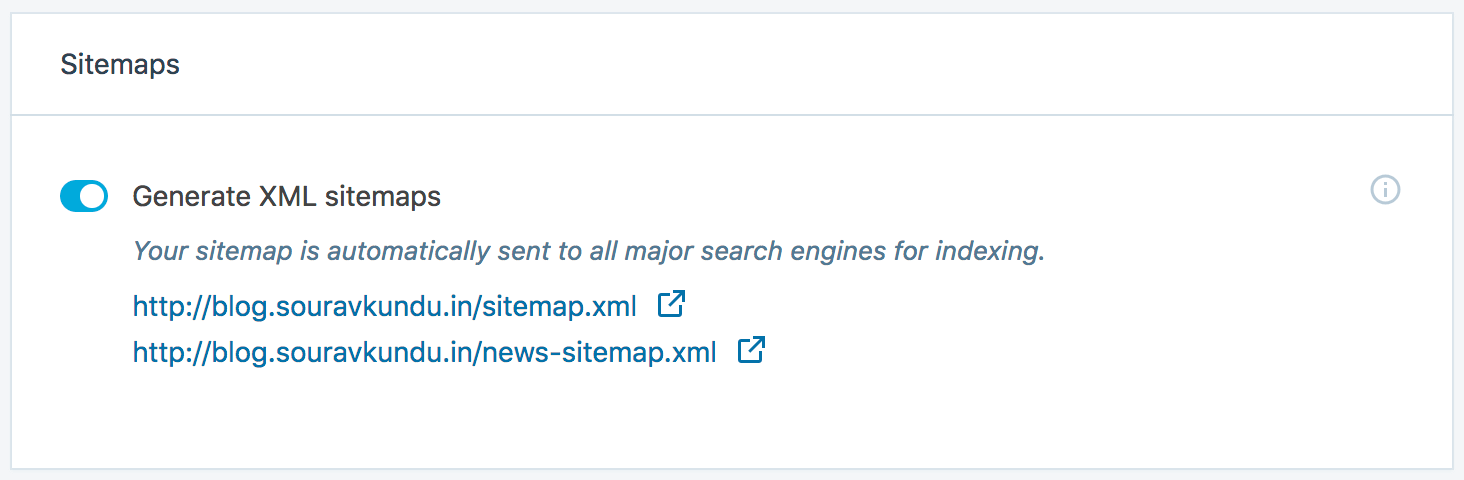
The Jetpack Sitemaps module.
Again, an optional feature, XML sitemaps help search engines crawl your site better, and Jetpack automatically generates one for you.
SEO and Jetpack
SEO customization is a paid feature in Jetpack, and includes options such as optimizing title and meta descriptions, linking your Google Analytics account, and more.
As an alternative, I would highly recommend installing the Yoast SEO plugin (currently used by more than five million active websites) for anything related to WordPress SEO. It gives you all of the features, training and recommendations necessary to create an SEO-optimized WordPress site.
WordPress Performance Optimization Features in Jetpack
Jetpack delivers immense value as a performance optimization plugin, among its (many) other features. In this section, we’ll cover image delivery and optimization, video hosting and downtime monitoring.
Photon: Free Content Delivery Network from Jetpack
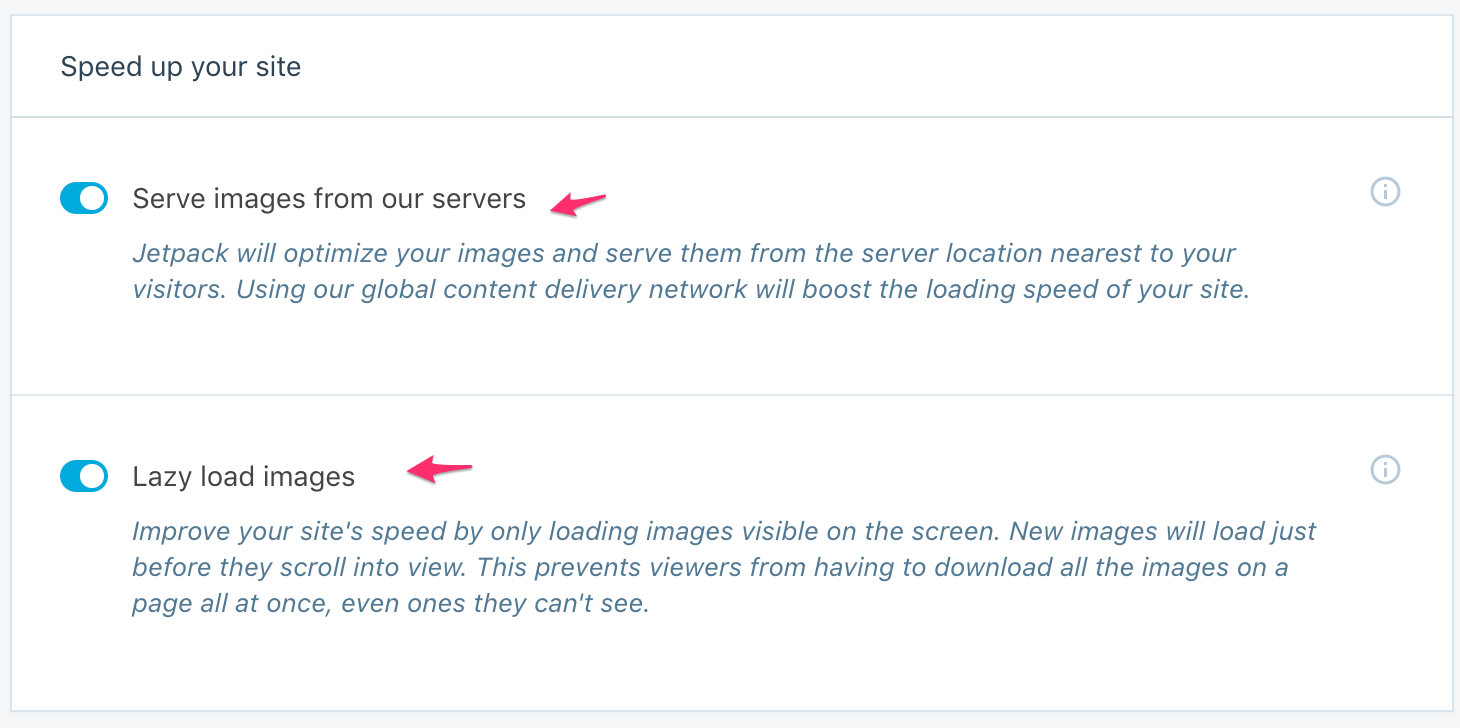
Free CDN and image ‘lazy loading’ from Jetpack.
This is probably one of the most useful features in the Jetpack plugin. It gives you free, unlimited access to a content delivery network (CDN) called Photon. It’s a simple, no-strings-attached deal, and there are a number of benefits to using a CDN:
- Speed: Images are delivered to your visitors from a globally distributed network, with minimal latency.
- User Experience: A faster site equals a better user experience.
- Save Bandwidth Costs: Since the images are delivered via the Photon CDN, you save server resources and bandwidth.
In short, you get all of the benefits of a CDN without paying for it.
Additionally, the Photon developer API lets you take advantage of the free CDN to host other static files as well!
Photon settings are available in the Speed Up Your Site settings, found under WordPress Dashboard > Jetpack > Settings > Writing.
Lazy Loading Images
This is a feature that loads images only when they’re in the viewport of the browser. In other words, only when the image is visible in your browser (i.e., when you scroll down), is it actually loaded.
Lazy loading images in your WordPress site creates faster loading times by postponing the image load to when it’s required.
It also saves bandwidth on two sides. You — the site owner — save your server’s bandwidth (or CDN bandwidth), and your visitors save their bandwidth too!
You can enable this option in the Speed Up Your Site settings, below the Photon option.
Video Hosting by Jetpack

Example of video hosting by Jetpack.
Jetpack also has its own paid, ad-free video hosting service called VideoPress. If you’d like to keep all of your videos in your WordPress website, then VideoPress could be a useful service. However, there are alternatives available such as YouTube (duh), Wistia and Vimeo.
If you’re looking for a YouTube alternative, you should consider Wistia for the following reasons:
- First off, Wista operates on a freemium model, while VideoPress is paid, so brownie points for that!
- Both Wistia and VideoPress have great built-in video SEO.
- However, Wistia as an organization dedicatedly does just this — fast, responsive video hosting for all kinds of sites. They even say when and when not to use Wista (as opposed to YouTube).
Note that Wistia’s free plan is limited to three videos, and paid plans start at $99 a month, which is significantly more expensive than VideoPress.
Wistia’s video hosting tech is better than VideoPress’s (they’ve got a bit of catching-up to do), so I’d recommend Wistia out of the two as the preferred YouTube alternative.
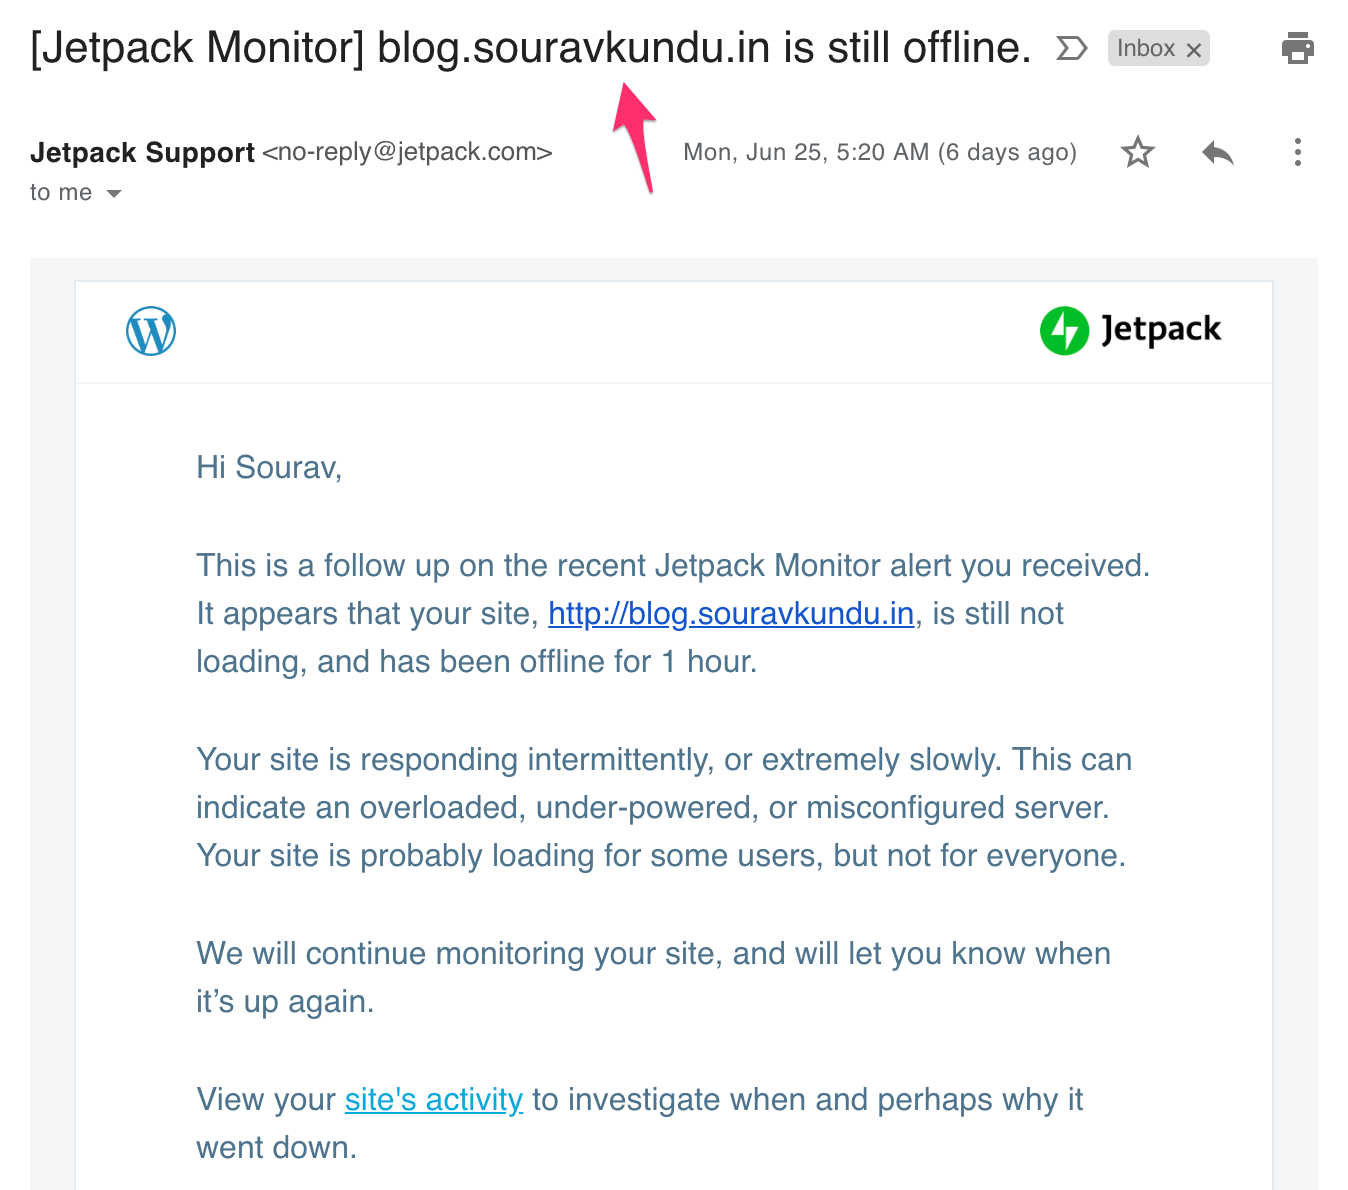
WordPress Site Downtime Monitoring by Jetpack
Downtime monitoring in action.
Another one of those highly useful features, Downtime Monitoring is a service that periodically monitors your site and emails you whenever it’s offline. It also sends you a reminder if your site has been offline for a day, and notifies you as soon as your site is back online.
Here’s a sequence of emails I received before I decided to change my hosting provider.
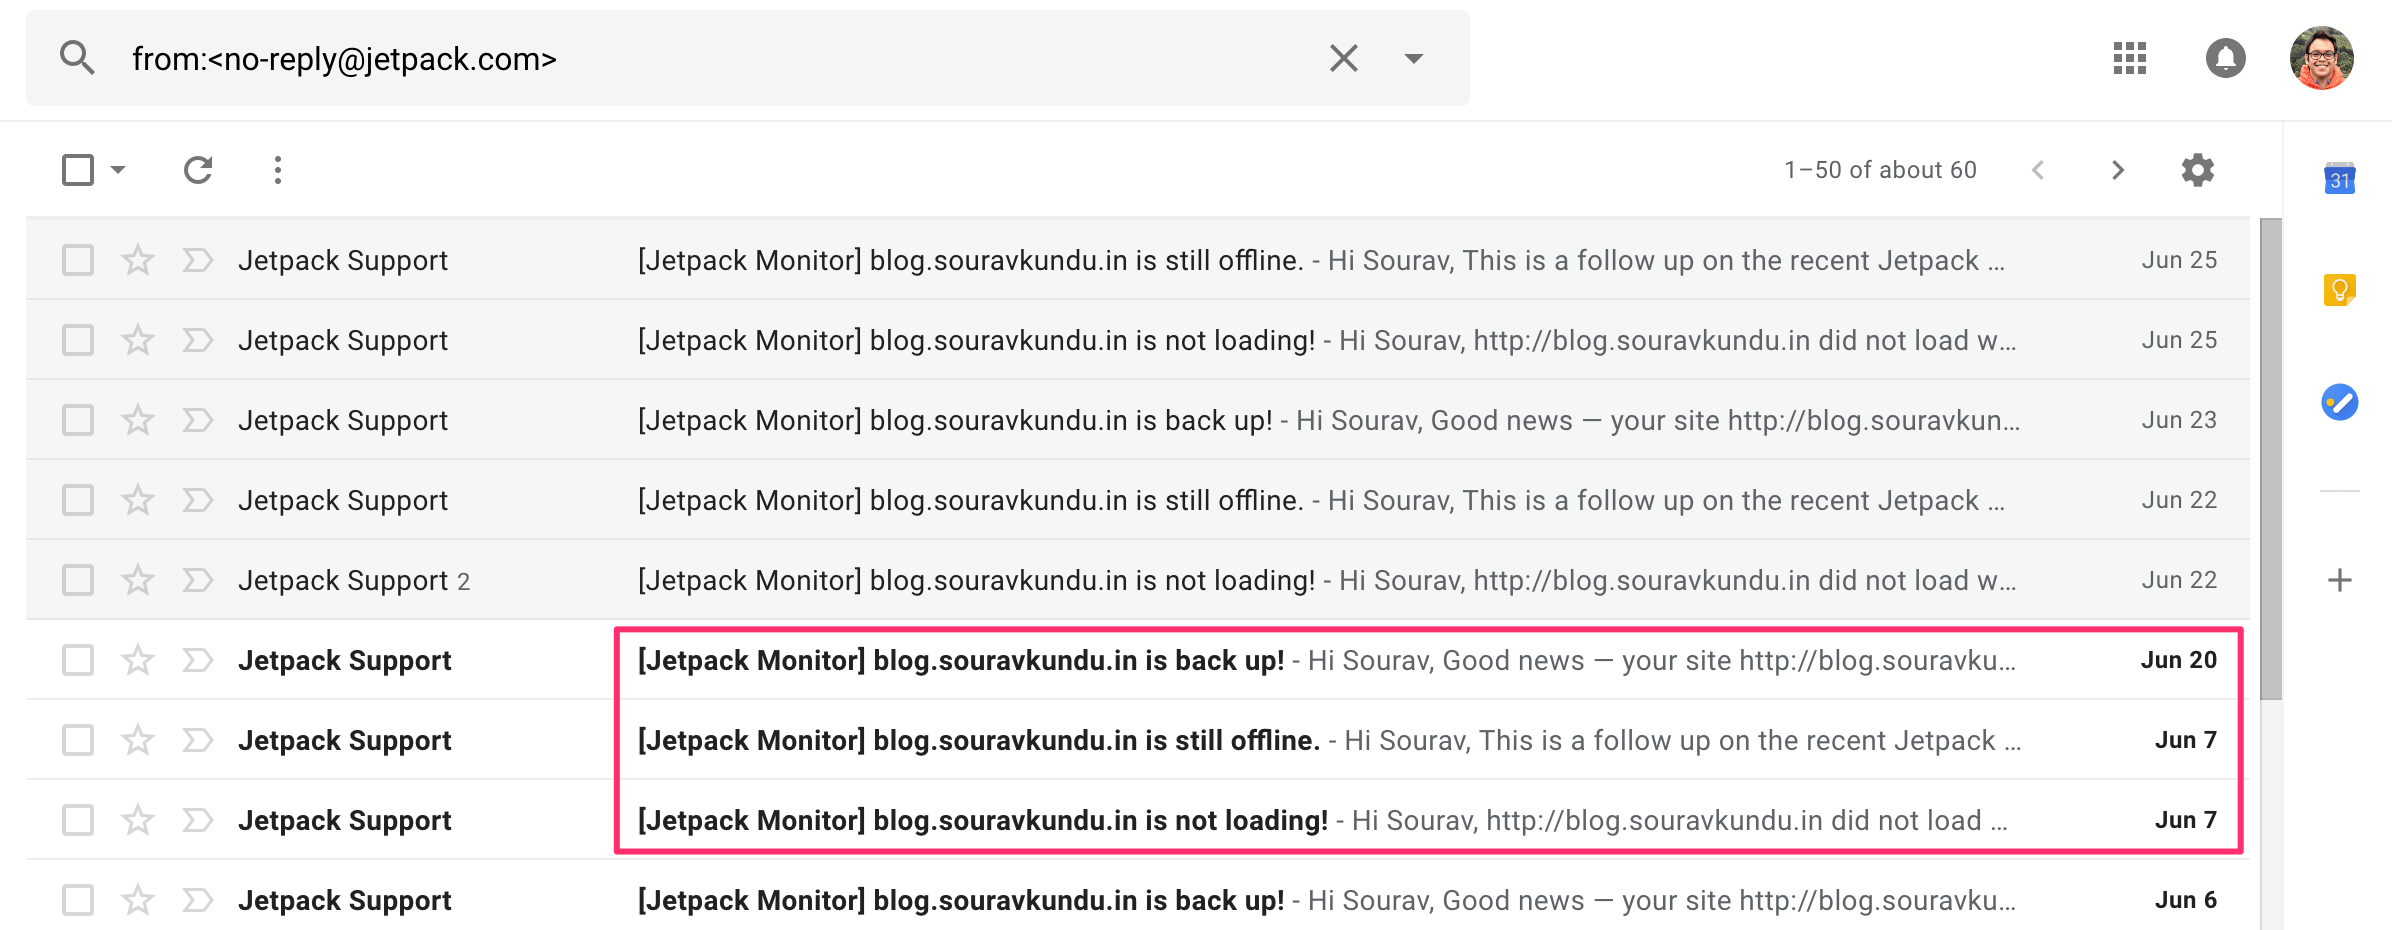
Email alerts sent by Jetpack’s site Downtime Monitoring module.
You can enable this module from WordPress Dashboard > Jetpack > Settings > Security.
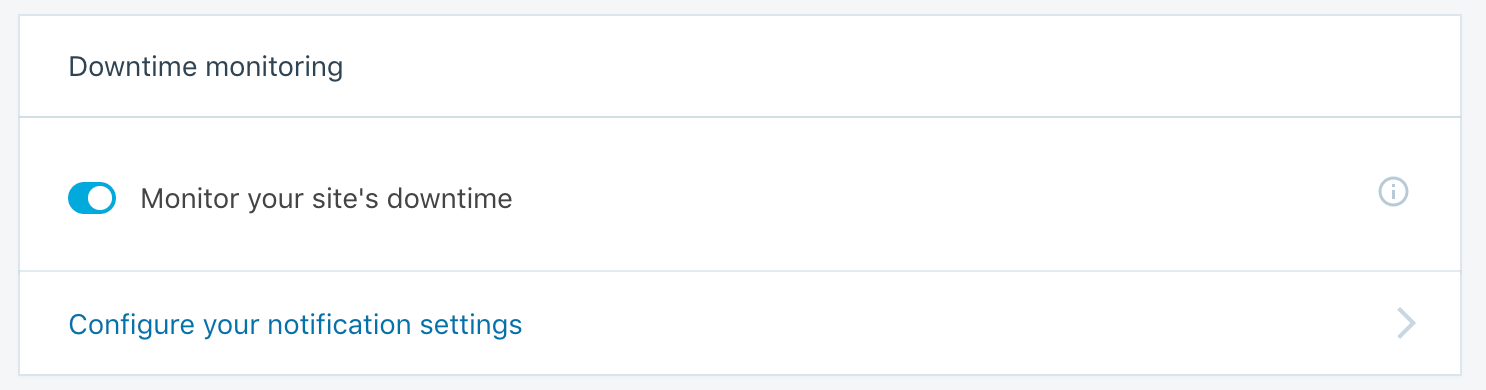
Downtime Monitoring settings in Jetpack.
Cloud-Powered Elasticsearch by Jetpack
Elasticsearch is a paid feature that uses the cloud to compute search queries.
‘Search’ in itself is pretty complicated (we have some of the smartest scientists at Google working on this), and the default WordPress search, well, isn’t very good.
Elasticsearch is a premium feature in Jetpack (available with the Enterprise plan) that computes search queries in the cloud, and returns relevant results in your site.
Benefits: Your visitors get better (more relevant) search results, and you don’t use your server resources.
Elasticsearch is most helpful for sites that have a lot of content, such as news/media sites, tutorial-oriented sites, and more.
WordPress Security Tools from Jetpack
Jetpack provides a couple of good security features in the free version of the plugin, including the following:

Bruteforce Attack Protection settings in Jetpack.
Brute force Attack Protection: This module automatically blocks attempts to access your site from millions of known malicious attackers. This module is enabled by default.
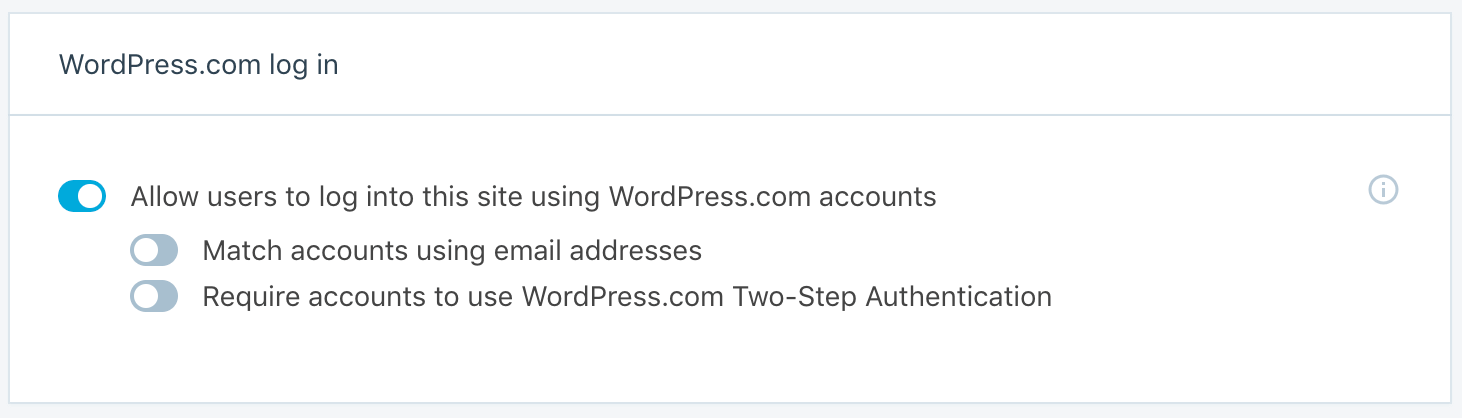
WordPress Login security settings in Jetpack.
The Secure Authentication module enables users to log in to your WordPress site using WordPress.com’s login infrastructure. You can further configure the login process so the user’s WordPress.com email must match the one used to log in to the site.
Additionally, you can require your users to use two-factor authentication with WordPress.com.
Automatic plugin updates ensure all plugins are kept up to date.
Jetpack also maintains a security library, wherein it detects and reports known security issues in multiple plugins, which it automatically scans for.
The security settings are located under: WordPress Dashboard > Jetpack > Settings > Security.
There are a couple of premium security modules offered by Jetpack under the paid plan, which include malicious code scanning, expert priority support and spam filtering. While the first two may be useful, you can always get free spam filtering using the Akismet plugin.
WordPress Backup and Restore from Jetpack
Backing up your WordPress site is one of the most important things you can do. However, there’s one factor we often seem to overlook, and that’s the restoration bit. What happens when you actually need to restore the WordPress site to it previous state?
You see, managed hosting providers, such as WP Engine, make it very simple for you to restore your site with a single click.
A good backup plugin not only makes the backup process seamless, but also the restoration process! Popular plugins include UpdraftPlus, BackupBuddy and BackWPup.
But the fact is, there are just too many backup plugins out there, and we don’t know for sure how complicated the restoration process of each plugin would be.

One-click restoration from VaultPress.
The good news is Jetpack gives you automatic backups and one-click restoration of your site — and it just works.
The service is called VaultPress, and it takes daily automated backups, maintains a 30-day backup archive and supports one-click restoration.
Publishing Made Easy with Jetpack
While I like the default WordPress editor, I think Jetpack adds some value with support for Markdown, one-click proofreading and other behind-the-scenes features, such as the content embed feature we discussed earlier.
Dedicated Mobile (and Desktop!) Apps

WordPress also has its own Android and iOS apps, and now a dedicated desktop app for MacOS and Windows 10.
The mobile apps support publishing, site stats and push notifications, so you’re instantly notified of comments. To quote the landing page, ‘From notifications to sharing tools, you’ve got the entire WordPress community in your pocket.’
Email to Publish
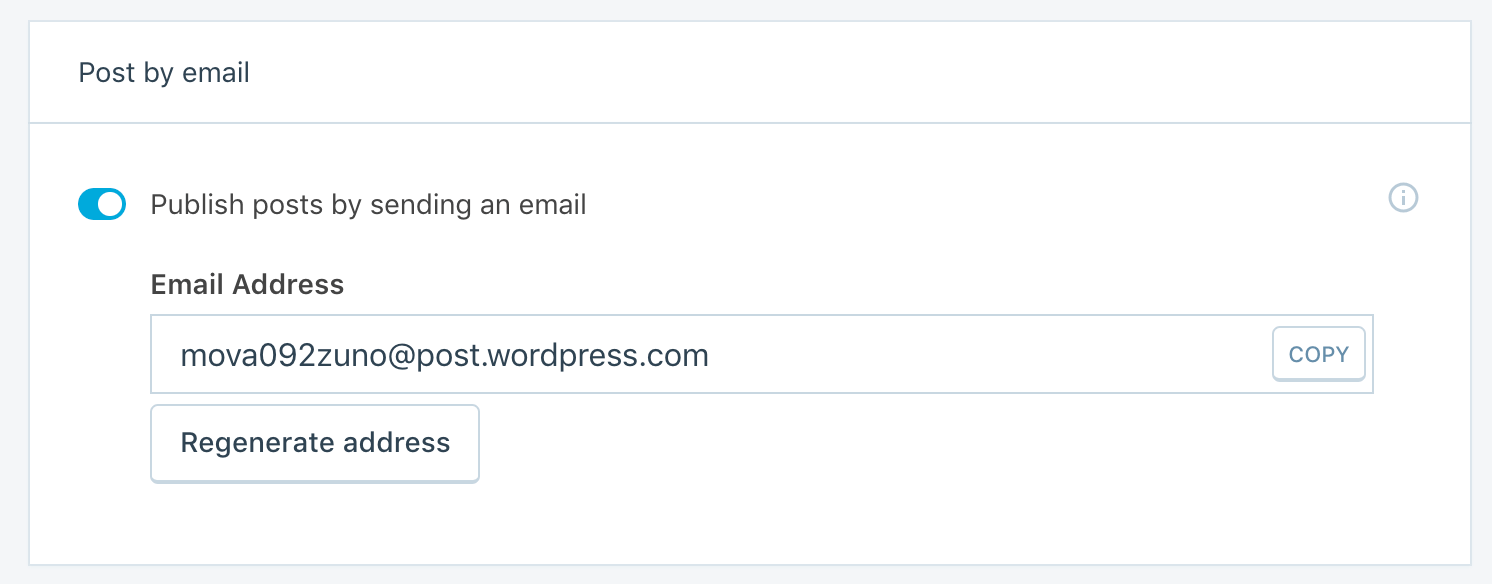
Use Jetpack to publish posts via email in WordPress.
Interestingly, you can also publish new posts to your WordPress site by simply emailing them. The subject line would be the title of the article, and the email content the blog post itself. Jetpack gives you a dedicated email address, where you can email to post your articles.
You can also send additional post information via email, such as categories and tags, by using these shortcodes. I find the post by email feature to be very useful in places with limited network capability.
Monetisation made easy with Jetpack Ads
A lot of blogs are started with the intention that they’ll become a source of income, and some eventually grow to some form of a monetization model. While there are many ways to make money in WordPress, we’re going to focus on making money as a publisher.
You, the website owner, are the publisher. You can show ads in your website to earn money based on the number of visitors to your site. A classic example is by using Google AdSense.
Jetpack Ads: This monetization feature from Jetpack makes it easy to set up ads on your WordPress site, and they work with the ad networks to make sure they display the ads that are most relevant to your site’s niche. This can serve as an alternative to Google AdSense.
Accepting Payments via PayPal: The monetization module also adds a nifty payment feature, whereby you can receive payments via PayPal with a single click.
Accepting payments via PayPal with Jetpack.
Additionally, you can configure the display logo, description, amount and email address that’ll be displayed on the PayPal payment page.

PayPal payment configuration options from Jetpack.
The Jetpack monetization module is a paid feature available with the Premium and Professional plans.
Jetpack Pricing Options
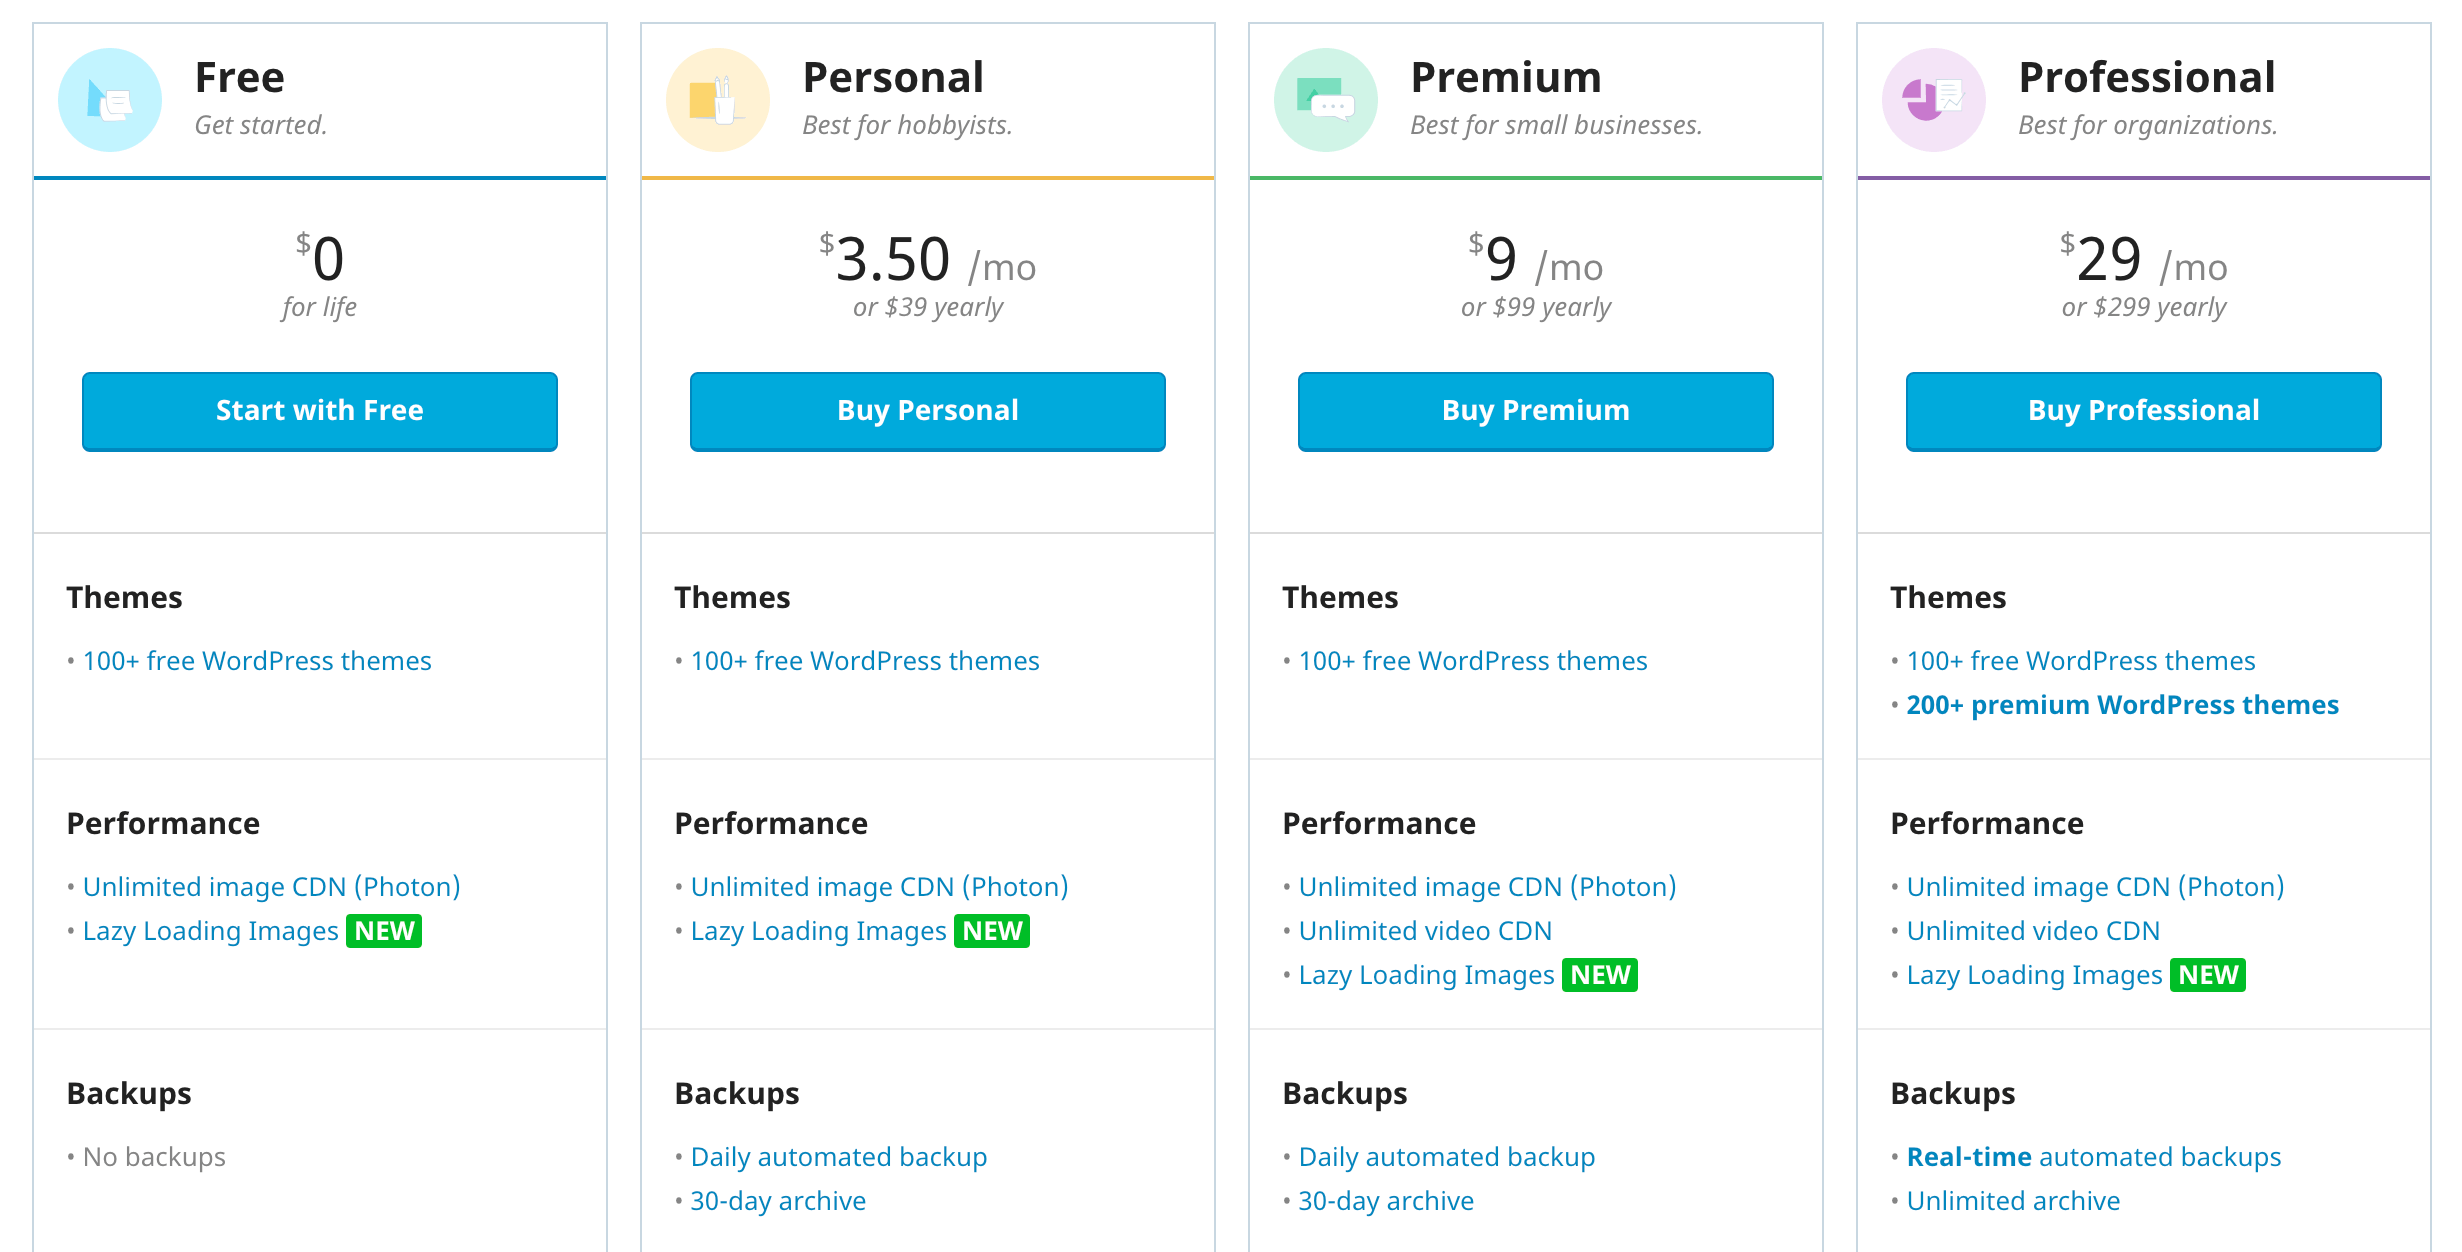
Jetpack pricing options (July 2018).
The core features of Jetpack are free to use and always will be. However, there are a few neat features that come under a paid plan — as they rightly should.
In the following table, we’re going to look at the various features that come with each pricing option, and recommend free alternatives for the paid ones. Sounds good? Here we go:
| Jetpack Free | Jetpack Personal | Jetpack Premium | Jetpack Professional |
| $0 a Month | $3.5 a Month or $39 a Year | $9 a Month or $99 a Year | $29 a Month or $299 a Year |
| Free CDN | Everything in Free, Plus | Everything in Personal, Plus | Everything in Personal, Plus |
| Lazy Loading of Images | Daily Automated Backups (Alternative: BackWPup) | Unlimited Video CDN via VideoPress (Alternative: YouTube or Wistia) | 200-Plus Professional Themes (Alternative: ThemeForest) |
| 100-Plus Free Themes | 30-Day Backup History | Malware Scanning (Alternative: Wordfence Security) | Real-Time Automated Backups |
| Bruteforce Attack Prevention | Spam Filtering (Alternative: Akismet) | Automated Security Fixes | Premium Theme Support |
| Downtime Monitoring | Priority Support | SEO Tools and Google Analytics Integration (Alternative: Yoast SEO) | Elasticsearch-Powered Search |
| Site Stats | Concierge Jetpack Setup Service | ||
| Related Posts | Ad Network Approval | ||
| Email Support | Accept Payments via PayPal (Alternative: PayPal Donations) |
Recommendation: I would recommend the Personal plan at $39 a year, which essentially comes with VaultPress and priority support. Think of it as a way to support the developers and the service at large.
However, if you run a media blog with multiple contributors, the Premium or Professional plan should come in handy — specifically for the malware code scan, elasticsearch and real-time backups.
Wrapping Up
Here’s a quick summary.
Jetpack gives you a host of theme customization, engagement, analytics and performance optimization features for free. Out of all of the free and premium Jetpack modules, these are the ones I’d recommend under each category:
- Performance Optimization: Photon CDN, Lazy Loading Images, Downtime Monitoring.
- Engagement: Jetpack Comments, Email and Comment Subscription, Contact Form, Related Posts.
- Analytics: Site Stats.
- Backup (paid).
Jetpack is being continually developed and more features will continue to be added throughout 2018. Already though (as it has been for a long time now), it’s definitely a plugin well worth making use of!
Used/using Jetpack? What are your most-used features? What would you like the developers to add next? Thoughts?
By
TOP DEALS


Leave a Reply
All comments are held for moderation. We'll only publish comments that are on topic and adhere to our Commenting Policy.
thank you sir for well written optimized article, but I want to ask one thing regarding the Jetpack subscription box i.e. I want to add box at bottom of my all article. Please guide me
thanks you good article