Thrive Leads Review: The Ultimate Email List Building Plugin?
- By
- Last updated:
- 1 Comment
‘The money is in the list — and if you haven’t started building an email list, start now!’ That’s what we’ve been told for years, right? But when it comes to building an email list, which plugin should you use? In this post, I’ll be shedding some light on the matter by putting one of the market-leading plugins, Thrive Leads, through its paces.
A good lead generation plugin should not only let you create great-looking optin forms, but also give you the tools to display those forms to the right visitors, on the right content, at the right time. Thrive Leads delivers on all counts, although it’s stronger in some areas than others.
In this Thrive Leads review, I’ll go hands-on with this popular plugin to help you to learn how it works, what it does well, where it could be improved, and whether or not it’s the right tool for your needs and budget.
Table of Contents
How Thrive Leads Helps You to Get More Leads
Before getting into the more detailed review, let’s take a look at the basic features and value proposition of Thrive Leads.
To help you to create effective opt-in forms, Thrive Leads comes with ten different types. For each form, you can either choose from a variety of pre-built templates or design your optin form from scratch.
To design your own form (or customize one of the pre-made templates), Thrive Leads offers an excellent visual drag-and-drop builder. It’s actually a stripped-down version of Thrive Themes’ popular Thrive Architect page builder plugin, which is a nice synergy and something that makes the Thrive Leads editor a lot more flexible than your average list building tool.
To control who sees your forms and when, Thrive Leads comes with a solid list of targeting and trigger rules. For example, you can target your forms to specific content, devices, types of WordPress users, and so on. You can also choose from different triggers, such as exit intent, time on site, scroll depth, and more.
You can connect your forms to all of the popular email marketing tools, as well as a few webinar tools. For example, you’ll get integrations for Mailchimp, Campaign Monitor, and more. There’s also a catch-all Zapier integration that lets you connect to any one of the thousands of apps at Zapier:

Finally, once you publish your optin forms, Thrive Leads gives you built-in analytics to track your impressions and conversion rates. If you’re disappointed by the results, you can then spin up A/B tests right away to try to find a better-performing offer.
There are a few relevant smaller features, but that’s the general gist of how Thrive Leads works and how it helps you.
The Different Types of Thrive Leads Optins
Not every webmaster wants to display in-your-face popups to visitors, right? Some prefer a more subtle approach, focusing on user experience rather than jaw-dropping conversion rates.
Where you stand on this is a personal choice. However, Thrive Themes doesn’t discriminate: The plugin supports a huge variety of optin forms, which means it caters to everyone, whatever their approach.
As I mentioned earlier, Thrive Leads comes with ten different popup types. Some are aggressive, full-screen affairs that your visitors can’t ignore, while others are much more subtle, such as an unobtrusive notification bar. Here are all of the different types of opt-ins you can create:
- ThriveBox (Popup Lightbox): Your classic popup, this form overlays your content to command maximum attention.
- ‘Sticky’ Ribbon (AKA Notification Bar): A Hello Bar-style optin that you can anchor to either the top or bottom of a visitor’s screen.
- In-Line Forms: These aren’t popups at all — they’re forms that sit within your content.
- Two-Step Optin Form: Add a small CTA with a button that, when clicked, opens a full lightbox popup.
- Slide-In: This is another unobtrusive popup that ‘slides in’ from the corner. Typically, you’ll display this as a visitor scrolls down the page using a scroll depth trigger.
- Optin Widget: A form for widget spaces, but it probably works best in the sidebar.
- Screen Filler Overlay: A popup on steroids! This optin covers the entire screen, meaning it’s guaranteed to get your message across.
- Content Lock: Lock content behind an optin form. Once people enter their email, they can unlock the content.
- Scroll Mat: Similar to a screen filler overlay, but the optin form ‘pushes’ your content down as the popup appears.
- Yes/No & Multi-Choice Forms: Add multiple steps to your optin forms to engage visitors. This is a kind of variation on the lightbox popup.
For example, here’s what a traditional lightbox popup looks like:

And here’s what a similar design would look like as a ribbon bar:

One nice thing is that Thrive Leads includes similar template ‘themes’ for the different optin types, so you can usually keep the same aesthetic even across different types of optin forms.
How You’ll Create Optin Forms with Thrive Leads
In this section, I want to walk you through the process of building an optin form from start to finish. This will not only give you a deeper look at many of the features we discussed above, but it should also help you to understand the user experience.
To create your first optin form, navigate to Thrive Dashboard > Thrive Leads. Here, you’ll see four sections:
- Lead Groups — this is what you’ll use most of the time. It’s how you create ‘standard’ optins.
- Lead Shortcodes — these let you manually place optins using a shortcode.
- ThriveBoxes — these are two-step optins. Visitors will click a link/button to open the popup.
- Signup Segue — these are one-click signup links that you can send to existing subscribers. For example, you can send a link to your email subscribers that, when clicked, automatically signs them up to your webinar.
You need the first one, so go ahead and click the Add New button in Lead Groups.
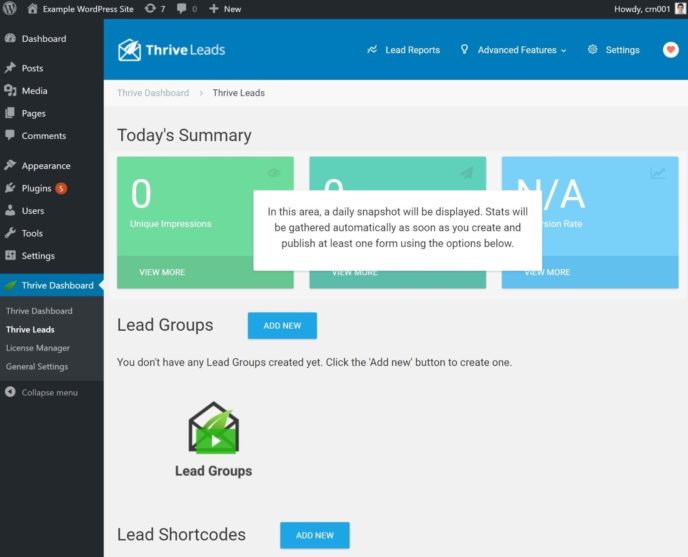
Essentially, a Lead Group is a collection of optin forms that share a set of common targeting rules (more on those later). It can be just one form or several, and you can mix and match between different types of forms.
For example, let’s say you want to display a popup and a widget optin for posts in a certain category. Well, you can create a single Lead Group to manage that. If you want a different optin form to target a different post category, you’ll need to create a different Lead Group.
Once you create a Lead Group, you’ll see a prompt to add a new optin form, which will open a popup where you can choose the type of optin you want to create from the options we discussed above. For this example, we’ll create a regular lightbox popup:
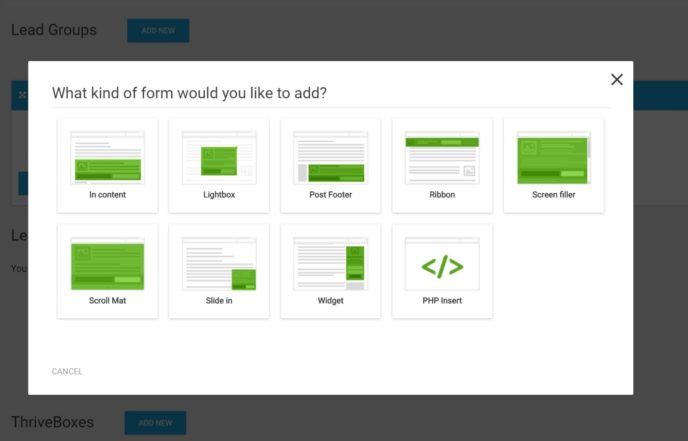
Once you choose your optin type, Thrive Leads will launch a sort of ‘setup wizard’ that will guide you through setting everything up. For example, you can see that Thrive Leads is pointing out the next step, which is to add a form:
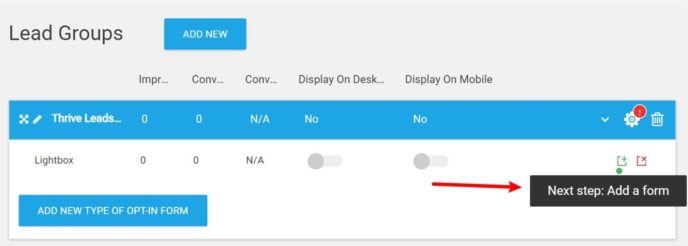
You’ll then be prompted to add a form and give it a name. The name helps you to remember different variations — for example, you could create an ‘Orange Form’ and a ‘Blue Form’. If you create multiple variations, Thrive Leads can automatically divide traffic between your different forms. I’ll cover A/B testing later on, though.
Once you’ve created a form, you can click the blue pencil icon to edit its design:
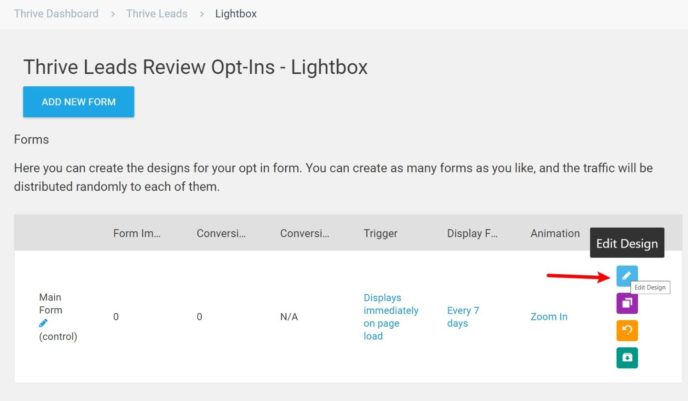
Thrive Leads Drag-and-Drop Editor
Clicking the icon to edit a form will open up the drag-and-drop editor, and now the fun starts! Immediately after launching, the editor will present you with a variety of templates. The exact templates depend on the type of form you’re creating, but you generally have a good number of options for different styles and use cases. You can also start with a blank template if you prefer:
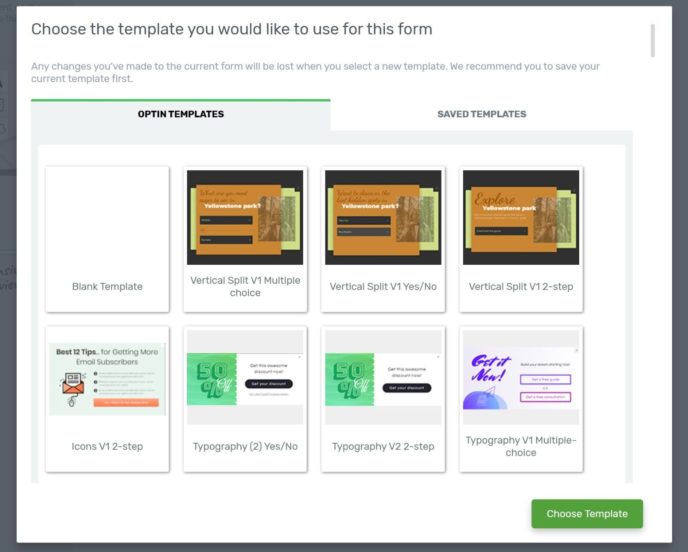
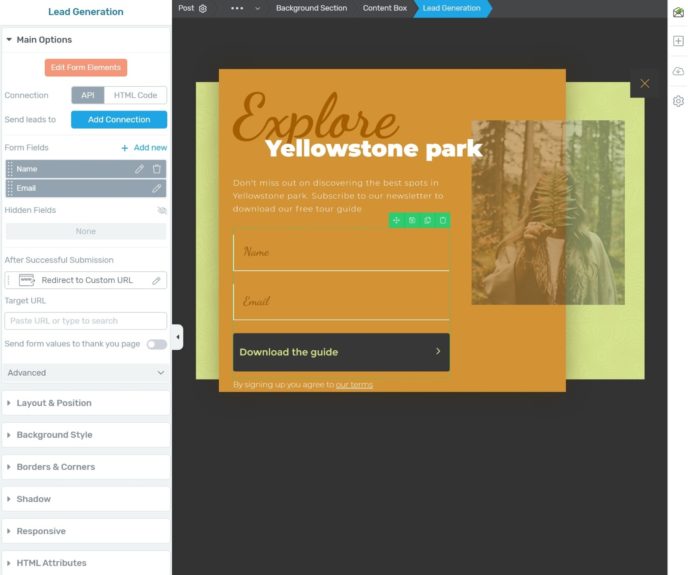
Once you choose your template, Thrive Leads will open the visual editor. The visual editor feels a lot like a WordPress page builder, so if you’ve used a page builder you’ll feel right at home. Again, that’s because the editor literally is a stripped-down version of Thrive Themes’ page builder (Thrive Architect).
You can customize every element on the form in any way imaginable. All you need to do is click to open a widget in the sidebar, where you’ll see tons of style and layout settings. For some elements, such as the form widget itself, you’ll also get additional options to control functionality. For example, you can choose which form fields to include if you want to collect more information about leads:
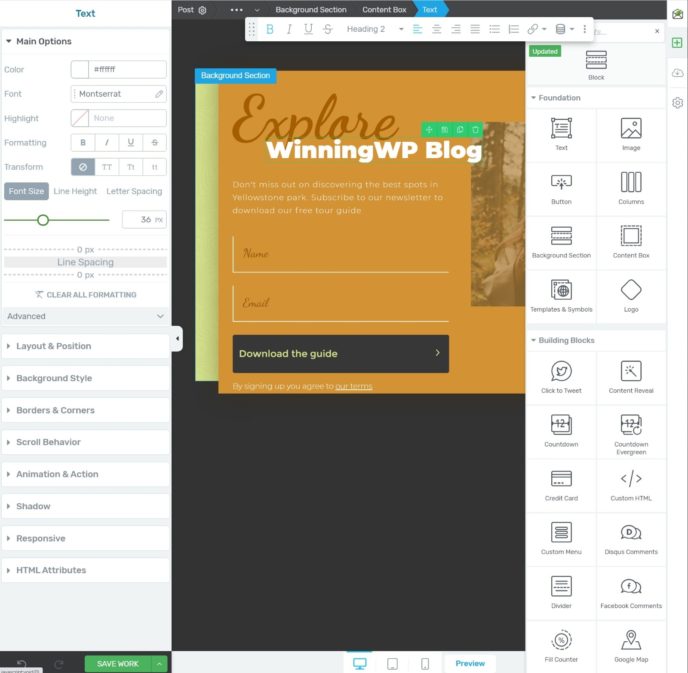
If you want to edit any of the text in your design, all you need to do is click and type. You can also add new content elements by clicking on the ‘plus’ icon on the right side to open a list of widgets you can use:
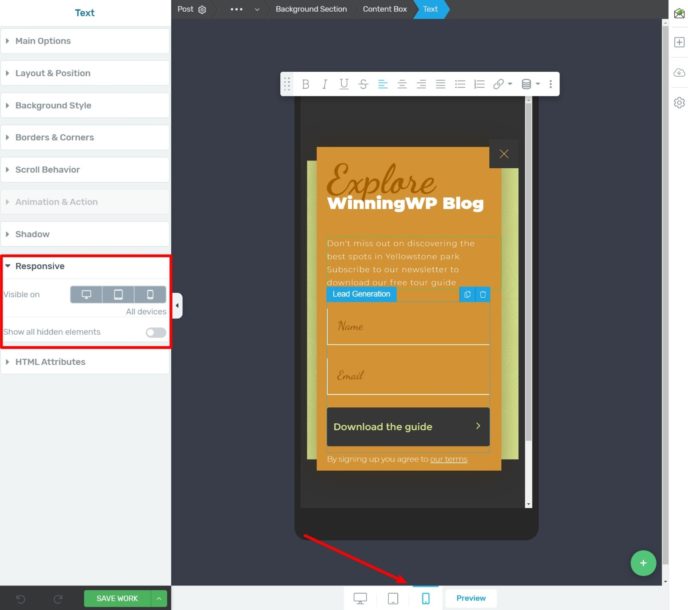
Another extremely useful set of features here are the responsive settings and preview. Using the icons at the bottom, you can preview how your optin will look on different devices. When you edit your design, you’ll also be able to hide individual elements on different devices, which lets you optimize your form for every type of visitor:
If you’ve used some other optin builder tools, Thrive Leads may feel a little overwhelming at first. Again, that’s because you’re basically getting a WordPress page builder plugin, just for your optin forms. But, once you wrap your head around all of the options in the editor, you’ll most likely appreciate the flexibility it offers.
However, if you just want a simple tool where all you need to do is go in and tweak a few colors, you may prefer one that skips the whole drag-and-drop editor to give you a more straightforward experience. In that case, you may like the Bloom plugin (our review).
Settings and Triggers
When you’re finished, close the editor and head back to your first list. Here, you’ll control the trigger rules, display frequency, and animation for this specific form variation.
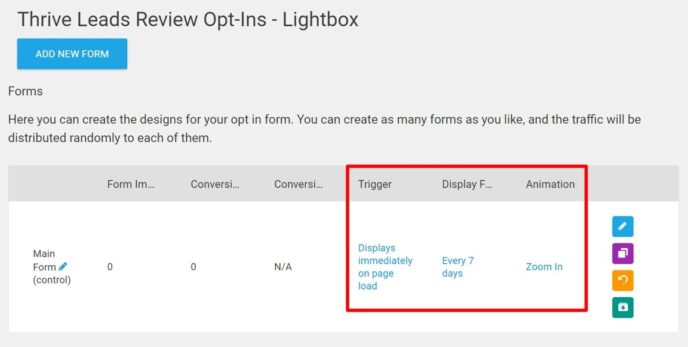
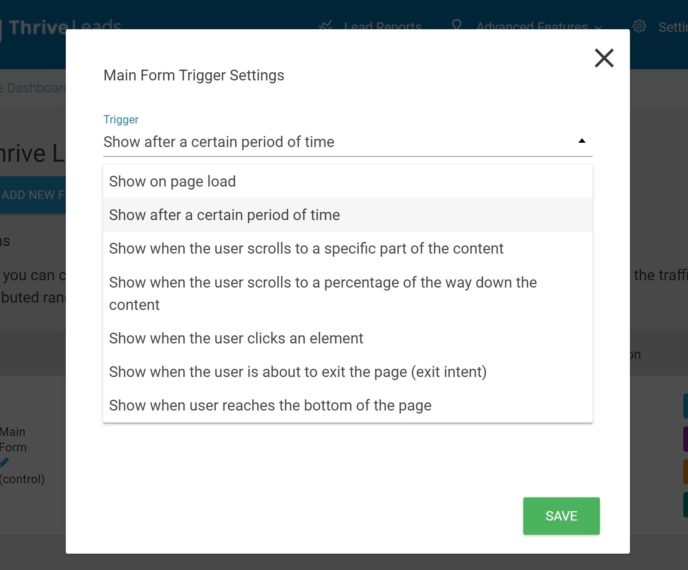
First, the popup trigger. This lets you pick when the popup appears to visitors, with seven options available:
- Immediate.
- Specified time delay.
- After scrolling to a specific point in your content (by CSS class or ID).
- After scrolling a fixed percentage of the page.
- When a visitor clicks a specific element.
- At the bottom of the page.
- When the visitor shows exit intent (e.g when their mouse cursor leaves the main browser window).
You can also create two-step optin forms in which a visitor clicks a button to trigger the form. You can set this up using the ThriveBoxes feature.
Beyond those initial trigger methods, you can also add exit intent as a fallback trigger if another condition isn’t met. This is called SmartExit. For example, if you set the trigger to a 50% scroll depth, but it looks like a visitor will leave your page before hitting that depth, you can still optionally trigger the popup with SmartExit, so you don’t miss the chance to reach that visitor:
To avoid overloading your visitors — remember, popups are intrusive — you can also configure how frequently your site displays this optin to each visitor. You can set this anywhere between once every day and every hundred days. You can also set it to zero, which will display the popup on every visit. For example, if you set it equal to seven days, each visitor will see the popup at most once a week.
The final setting is for animations, with 22 to choose from. This lets you control the animation for when a popup appears. For example, you could make it ‘bounce’ or ‘spin’ if you really want to grab people’s attention.
In addition to these extra settings, this screen also functions as a brief analytics page. You can view a snapshot of each form’s performance — impressions, conversions and conversion rate.
How to Target Your Optin Forms
Whereas you set triggers and display frequency at the form level, you’ll control your targeting rules at the Lead Group level. Again, each Lead Group can contain different types of optin forms and each form type can have different variations. If you want to use different sets of targeting rules, all you need to do is create multiple Lead Groups.
Thrive Leads gives you a good number of targeting rules, but it’s not quite as flexible as a tool such as OptinMonster. For example, you don’t get options to target referring URLs, geolocations and other advanced types of targeting rules. Still, most people will have all of the targeting rules they need.
To access the targeting feature, head back to the Thrive Leads overview page — Thrive Dashboard > Thrive Leads. To the right of your newly created group, you’ll see a cog icon — if you haven’t configured the targeting before, it will be bright red. Click this to open the targeting options.
Now, you’ll be able to choose exactly which pages you want the optin form to appear on:
- Basic Settings — top-level selections, such as the homepage, search page, 404 error page or all posts/pages.
- Categories — display the optin on all of the content with a certain category, tag or custom taxonomy.
- Posts — select specific posts on which to display the form.
- Pages — select specific pages on which to display the form.
- Page templates — some themes support a selection of page templates. If your theme is one that does, you can choose to display optins based on which page template a post is using.
- Post types — do you want your popup appearing on all posts, pages or custom post types? For example, if you run an eCommerce store, you may want to display the popup on product pages.
- Archive pages — select specific category or tag archives. For example, the page that lists all of the posts in a specific blog category.
- Other — target whether or not a person is logged in to WordPress. For example, you could show a popup to guest users, but hide it for logged-in users.
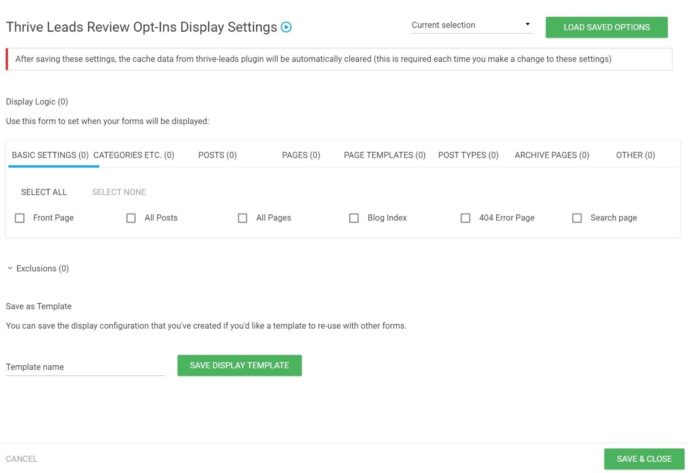
You can also set up Exclusions. You get all of the same options to exclude content as you saw above. For example, you could display the popup on all blog posts except for blog posts in a certain category.
To save time, you can also choose to save your settings as a template, so you can reuse them with a single click in the future. When you’re done, don’t forget to click Save & Close.
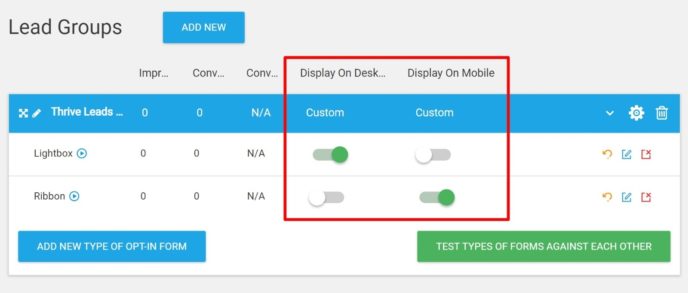
In addition to the targeting options you saw above, you can also enable/disable specific optins on desktop and mobile. For example, you could display a lightbox popup to desktop visitors but use a ribbon for mobile visitors to avoid Google’s mobile popup penalty:
How to Set Up A/B Tests
As any optimization specialist will tell you, A/B testing is an essential part of maximizing conversions. And, like all good conversion-focused WordPress plugins, Thrive Leads ships with powerful A/B testing features.
You can run split tests on any optin form. On any form overview page, the purple icon will clone your form, and you can use the drag-and-drop editor to make cosmetic tweaks to the form.
In addition to style and design tweaks, you can also use different trigger rules, which is a really powerful test variant. For example, you could test to see if your optin performs better when you display it immediately or if you wait until a visitor scrolls halfway down the page.
To begin the split test, click the Start A/B Test button. Give it a name and a brief description. If you want the plugin to pick an automatic winner, click the drop-down button, then click the Enabled checkbox.
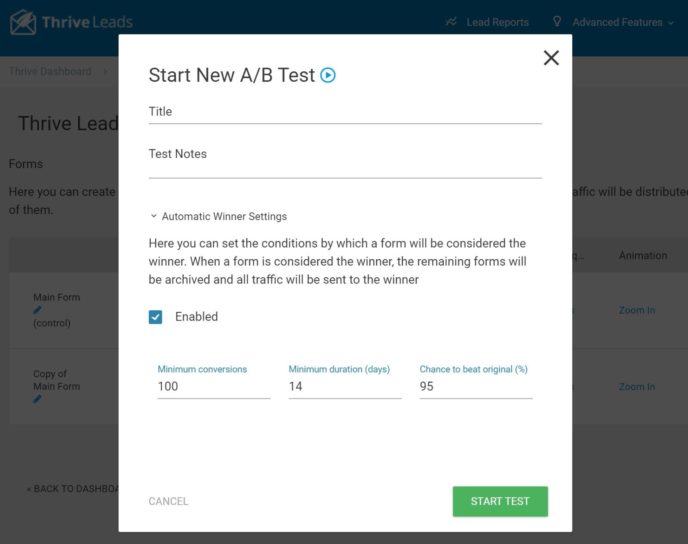
The plugin will determine the winner based on three criteria:
- Minimum number of conversions.
- Minimum duration.
- Chance to beat original (CTBO) — this is easily the most important figure. CTBO tells you if there’s a statistical significance to the results, and the higher this number, the better, as it reduces the impact of chance.
This is, of course, useful functionality for any optin plugin to possess, and all of the best ones do. However, Thrive Leads stands out from the crowd with one unique A/B testing feature.
A/B Test Different Form Types
One of Thrive Leads’ best features is the ability to pit different types of forms against each other in split tests. For example, rather than analyzing the impact of headline tweaks, you can test whether, say, a popup form crushes the conversion rate of a slide-in.
You can access this feature by navigating back to your Lead Groups, then clicking the Test Types of Forms Against Each Other button at the bottom. You’ll only see this button if you’ve created at least two types of forms:
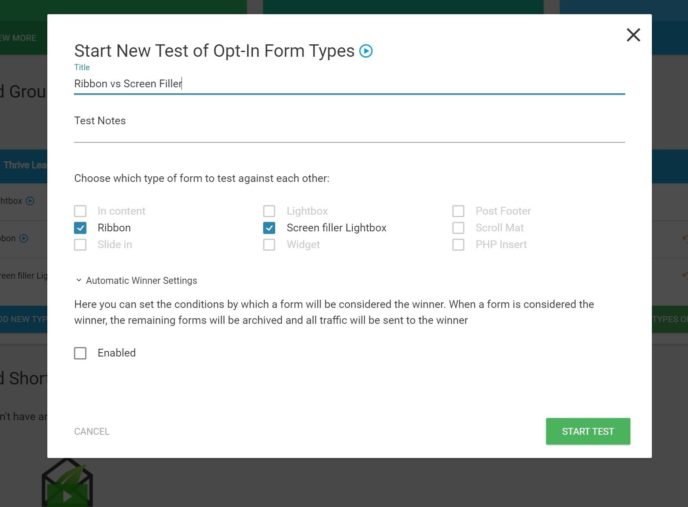
Now, you can pick which types of forms you wish to include in your split test, and you can let Thrive Leads determine the winner using the same three criteria as before.
How to Integrate With Your Email Service
Of course, before you can begin building an email list, you need to have an email marketing service to help you to manage your subscribers and send emails. Thrive Leads only helps you to get more subscribers — it doesn’t help you to send emails to them.
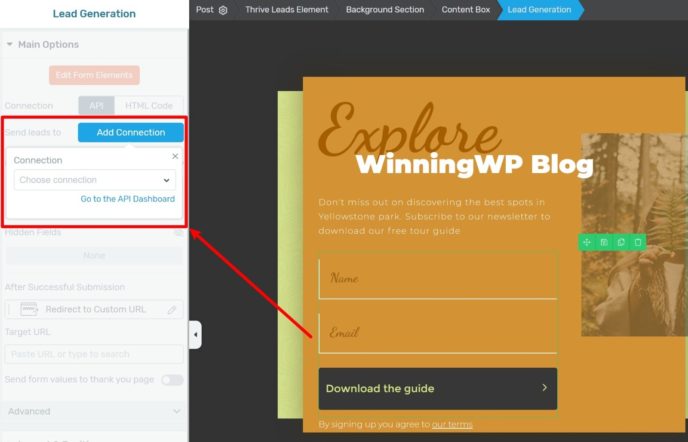
Thrive Leads offers built-in integrations for most popular email marketing services, and also has integrations for some webinar services. And, if that’s not enough, there’s a catch-all Zapier integration that lets you connect to the thousands of apps that are available at Zapier.
You can set these up by going to Thrive Dashboard > API Connections > Manage Connections > Add New Connection.
Once you add an integration in the Thrive Dashboard, you’ll be able to choose this integration in the drag-and-drop builder when you edit a form widget. You can also use different integrations for different optins, which is a nice bit of flexibility. For example, you could have one optin that connects to your email marketing service and another that connects to your webinar service.
Other Features
Before we finish, here’s a quick rundown of several more of Thrive Leads’ useful features:
- SmartLinks — if you’ve already landed a conversion, what good is showing the same optin form? You can’t convert twice, after all. Thrive Leads’ SmartLinks feature addresses this problem by hiding the optin form for existing subscribers.
- Analytics — Thrive Leads also boasts easy-to-digest conversion reports. You can track the performance of individual forms over custom timeframes, as well as the overall performance for all of your forms.
- Lazy Load — worried about load times? Thrive Leads’ lazy loading functionality means your optin form is only loaded as and when required, e.g. just before the visitor scrolls it into view.
- Asset Delivery — offering a lead magnet or content upgrade, such as an eBook, in exchange for people’s email addresses? The asset delivery feature lets you upload files to WordPress and automatically deliver them to new subscribers after they join your list.
Thrive Leads Pricing
Now you’ve seen what Thrive Leads can do, let’s next cover the small matter of pricing.
When we originally wrote this review, there were two ways that you could purchase Thrive Leads — you could either purchase just the standalone plugin or you could get it as part of the Thrive Themes membership, which includes access to all of the developer’s plugins and themes.
That changed in early 2021 when Thrive Themes completely revamped how it sold its products. Now, the only option to access any of Thrive Themes’ products is to buy the membership, which is called Thrive Suite.
This approach is very similar to the popular Divi theme (our review) — you can’t purchase Divi by itself; you can only get it as part of the Elegant Themes membership, which also gets you access to all of Elegant Themes’ other products.
The same is now true of Thrive Leads — the only way to purchase it is to purchase the full Thrive Suite membership. For one price, you not only get access to Thrive Leads, but you also get access to every other plugin and theme from Thrive Themes:
- Thrive Architect — a visual, drag-and-drop page builder plugin.
- Thrive Theme Builder — a visual, drag-and-drop theme builder.
- Thrive Comments — a replacement for the native WordPress comments section. Our review.
- Thrive Quiz Builder — a tool to build conversion-focused quizzes.
- Thrive Apprentice — a lightweight WordPress LMS plugin for simple online courses.
- Thrive Ultimatum — a plugin to add evergreen or time-specific countdown timers.
- Thrive Ovation — a plugin to collect and display testimonials.
- Thrive Optimize — an add-on to run A/B tests on your Thrive Architect designs.
Those are a lot of valuable tools, but this is also a pretty big change to the value proposition of Thrive Leads. In the past, you could purchase just Thrive Leads for $69, which was great value when compared with a tool such as OptinMonster (our review), which costs $108 a year for just the cheapest plan.
Now that Thrive Leads is only available as part of the full membership, though, it’s a lot more expensive. You get two pricing options:
- Quarterly membership (billed every three months) — $90, equivalent to $30 a month.
- Annual membership (billed once a year) — $228, equivalent to $19 a month.
Both plans let you use all of the products on up to 25 websites — there’s no unlimited website option.
Additionally, Thrive Themes no longer offers lifetime updates as it once did. Now, you’ll only continue to receive updates as long as you have an active Thrive Suite membership (which is how most other WordPress developers do things). Note: The current version of Thrive Leads you have installed will continue to work, even if you let your Thrive Suite membership expire, you just won’t receive new updates for the plugin.
Basically, you’ll now need to pay $228 a year for as long as you want to continue receiving updates for Thrive Leads (and all of the other Thrive Themes products).
This makes it a little pricey if all you need is a list building plugin, but, for my full thoughts on how that pricing affects the value proposition of Thrive Leads, let’s move on to the verdict.
The Verdict
Because of the recent pricing changes, whether or not you should use Thrive Leads is a trickier question to answer.
In terms of its functionality, Thrive Leads is definitely one of the better options for WordPress list building. You can create a variety of different optin form types, which lets you be as aggressive as you want with your list-building efforts. If you like the ‘in-your-face’ style, you can use full-screen popups or welcome mats; if you prefer a less aggressive approach to marketing, you can stick to notification bars or slide-ins.
Thanks to the pre-built templates and visual drag-and-drop builder, you can also make sure these optin forms look great and match your website’s branding. Again, the drag-and-drop editor can feel a little overwhelming at first, but it gives you a ton of flexibility, so it’s worth the time to learn how it works.
You also get a full complement of trigger rules, a comprehensive integration list, and built-in analytics and A/B testing to help you to improve your forms. The A/B testing feature is especially noteworthy, letting you go beyond just cosmetic changes and also test different triggers and form types against one another to find what works best.
One area where Thrive Leads lags beyond some other tools is its targeting and personalization rules. While you get an adequate list of options, you miss out on some advanced user-specific rules that other tools offer — for example, you can’t target visitors from specific referring URLs, geolocations or WordPress user roles (though you can target logged-in versus logged-out users). Additionally, there’s no time scheduling feature. Still, most people will be happy enough with the content targeting features, which Thrive Leads does quite well.
However, the confounding factor is now the pricing, since you have to pay for the full Thrive Suite membership, even if you only want to use Thrive Leads.
So, with those price changes in effect, this is kind of how I see it:
If you plan to use other products from Thrive Themes, purchasing Thrive Suite provides great value. You not only get Thrive Leads, but you also get some other really useful tools, such as Thrive Architect and Thrive Theme Builder. If you put all of these tools together, you can build awesome, conversion-focused WordPress sites without needing any technical knowledge.
However, if you’re just looking for a WordPress list building plugin, purchasing Thrive Suite probably isn’t a good decision. It’s not that Thrive Leads is ‘bad’, it’s just that it’s overpriced if you’re just going to use Thrive Leads and ignore all of the other Thrive Themes tools.
In this case, I recommend Convert Pro as a good alternative. It includes a lot of the same features you get in Thrive Leads, and even goes further in some areas, such as more advanced user-specific targeting rules. It’s also now much better value at $99 for use on unlimited sites (with regular discounts to $79). Basically, you’re paying less than half the price and you get to use it on unlimited sites vs Thrive Themes’ 25 site limit.
Or, if you’re willing to invest in the absolute best tool, you may want to consider OptinMonster. It’ll be more expensive than even the Thrive Suite membership, but it gives you a lot more advanced features than you get with Thrive Leads and the difference in price is no longer as large as it once was. You can learn more in our full OptinMonster review.
Used/Using Thrive Leads? Thoughts?
Leave a Reply
All comments are held for moderation. We'll only publish comments that are on topic and adhere to our Commenting Policy.


I do not get it – looks confusing and not straight forward.