
LifterLMS vs WP Courseware: Which is the Better Course Building Plugin?
- By
- Last updated:
- Leave your thoughts
If you want to teach courses and you have a WordPress site, using a course building plugin is the obvious solution. But what plugin should you use? In this guide — LifterLMS vs WP Courseware — I’ll compare two of the most popular options to help you to answer that question.
In the past few weeks, I’ve tested a variety of course building plugins, also known as Learning Management Systems (LMSs). I’ve pitted WP Courseware against LearnDash and found them to be equal in many ways. Now it’s time to see how well LifterLMS holds up against the competition.
Table of Contents
What to Look for in a Course Building Plugin
Before you dive into comparing LifterLMS and WP Courseware, it’s important to consider what actually makes an LMS worthwhile. There are a variety of features you’ll want to look for — all designed to give you flexibility during the course creation process.
Course Builder
The most important component is, of course, the course builder itself. You want the process of building new courses and editing existing courses to be simple, without any requirement for code. The course builder should also offer extensive customization, including the ability to control how students progress through the course.
Quiz builder
Some online courses consist only of lectures, and allow students to progress as they listen — but for many other courses, tests are an important component. Look for a plugin with a code-free quiz builder that allows you to configure a variety of question types. You should also be able to customize the grade students need to pass and what happens when they complete a quiz.
Content dripping
Content dripping is the practice of making content available over a period of time. For example, you may send lessons out once a week.
Forums
Building a community around your course is a great way to keep students engaged, and forums are one of the best ways to build that community. Most course building plugins provide this functionality through compatibility with bbPress. Some may also have this functionality built in.
Email Capability
Email is the best way to get course updates to your students. Along with automated emails when students complete parts of the course, you should be able to manually send emails to students.
Subscriptions
Some course building plugins offer the option to sell courses as subscriptions. This is a great way to build recurring income.
Memberships
Memberships are another great way to build a recurring income. You can also offer memberships as a way for students to access all of your courses as they come out. Some course building plugins have this functionality built-in, while others provide it through integrations with plugins such as MemberPress.
Payment Processing Options
Most course building plugins are only compatible with a limited number of payment processing options. If you have a preferred system to work with, make sure the plugin you’re considering is compatible.
Coupons
Coupons are a great way to win over potential customers who may be on the fence about your courses. You should be able to create unlimited coupons, choose between a percentage discount and a dollar discount, and set the precise discount of each coupon. Like everything else, this should be easy to do without previous coding experience.
Ease of Use
Ease of use boils down to two things. First, you shouldn’t need previous coding experience to use the plugin. Second, the course creation process should be an intuitive one.
Support and Documentation
There should be a plethora of resources available to help you to effectively work with the plugin you choose. You should also be able to access customer support in a timely manner, as issues with your course building plugin can have major ramifications for your business.
Cost
This may not be a feature, but it’s important to consider. Most course building plugins charge an annual fee for continued access. Make sure you know how much you’re willing to spend before you start comparing the options.
LifterLMS review
Features
The core LifterLMS plugin comes with the following features:
- Unlimited courses
- Unlimited students
- Multi-tier drag-and-drop course builder
- Multimedia lessons
- Content dripping
- Course tracks, allowing you to create certification and degree programs
- Quiz builder
- Student dashboard
- Capacity for multiple instructors
- Form integrations
- Graphics pack
- Course review collection
- Quick course export (ideal for site migration or backups)
You can also select one premium LifterLMS add-on with the basic plan. Payment gateways are purchased as add-ons.
How to use LifterLMS
Setting LifterLMS up on your WordPress site
The first step to setting up LifterLMS is to purchase it.
The payment options seem a bit unusual at first glance, as the lowest tier is billed as including the plugin ‘plus one add-on’ and the plugin itself is free. However, there’s no built-in compatibility with any payment processor, so you’re stuck choosing your preferred payment option as your add-on. This means that, really, you’re just getting the base plugin.
Once you’ve selected your add-on, you’ll be directed to enter payment information. You can pay with credit card or PayPal. LifterLMS will also require you to enter your email address and a password.
Completing your payment will take you to a page where you can view your payment details, download your extension and grab your license key. To get the plugin itself, scroll down the page to ‘Related Subscriptions’. This is where you’ll be able to see your actual LifterLMS subscription.

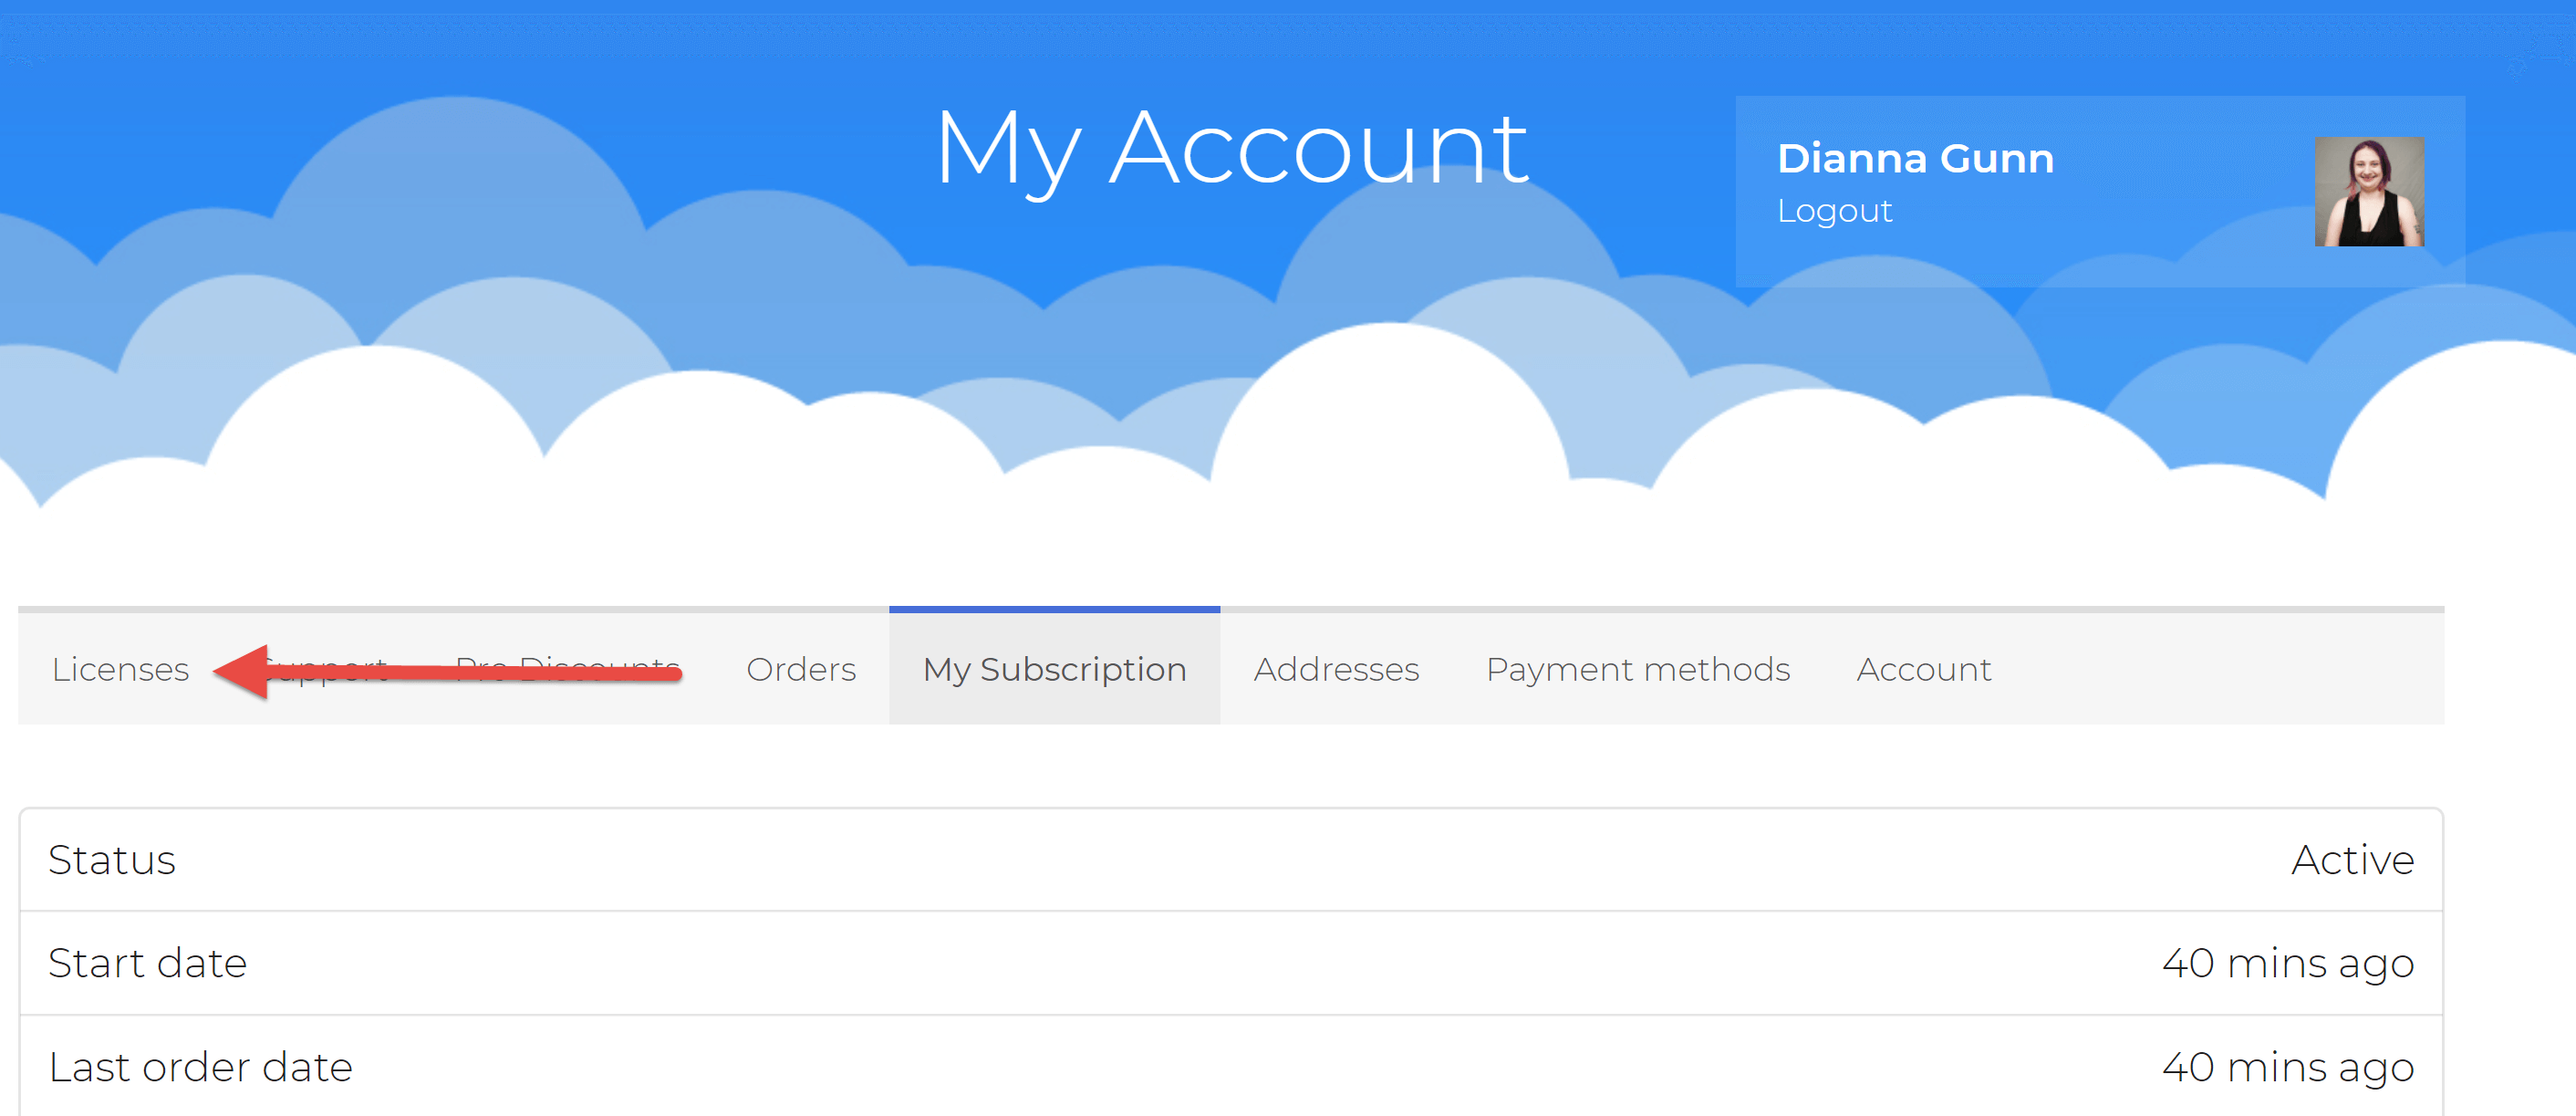
If you click ‘Get a Quick Start’, you’ll be taken to a short video course that walks you through how to use LifterLMS. To get to the plugin itself, click on either your subscription number or the ‘My Account’ button. This will take you to the LifterLMS account dashboard.
Here, click on the ‘Licenses’ link.
This will take you to a page where you can view and download both your extension and LifterLMS. Click ‘Downloads’ to see the download links. These will download your plugin and extensions, including the LifterLMS Helper, as ZIP folders.
Next, open your WordPress dashboard in a new page and go to ‘Plugins > Add New’. Click the ‘Upload Plugin’ button. A box will appear asking you to select a file. You can either click the ‘Choose File’ button to find the plugin manually or drag-and-drop the plugin into the box.
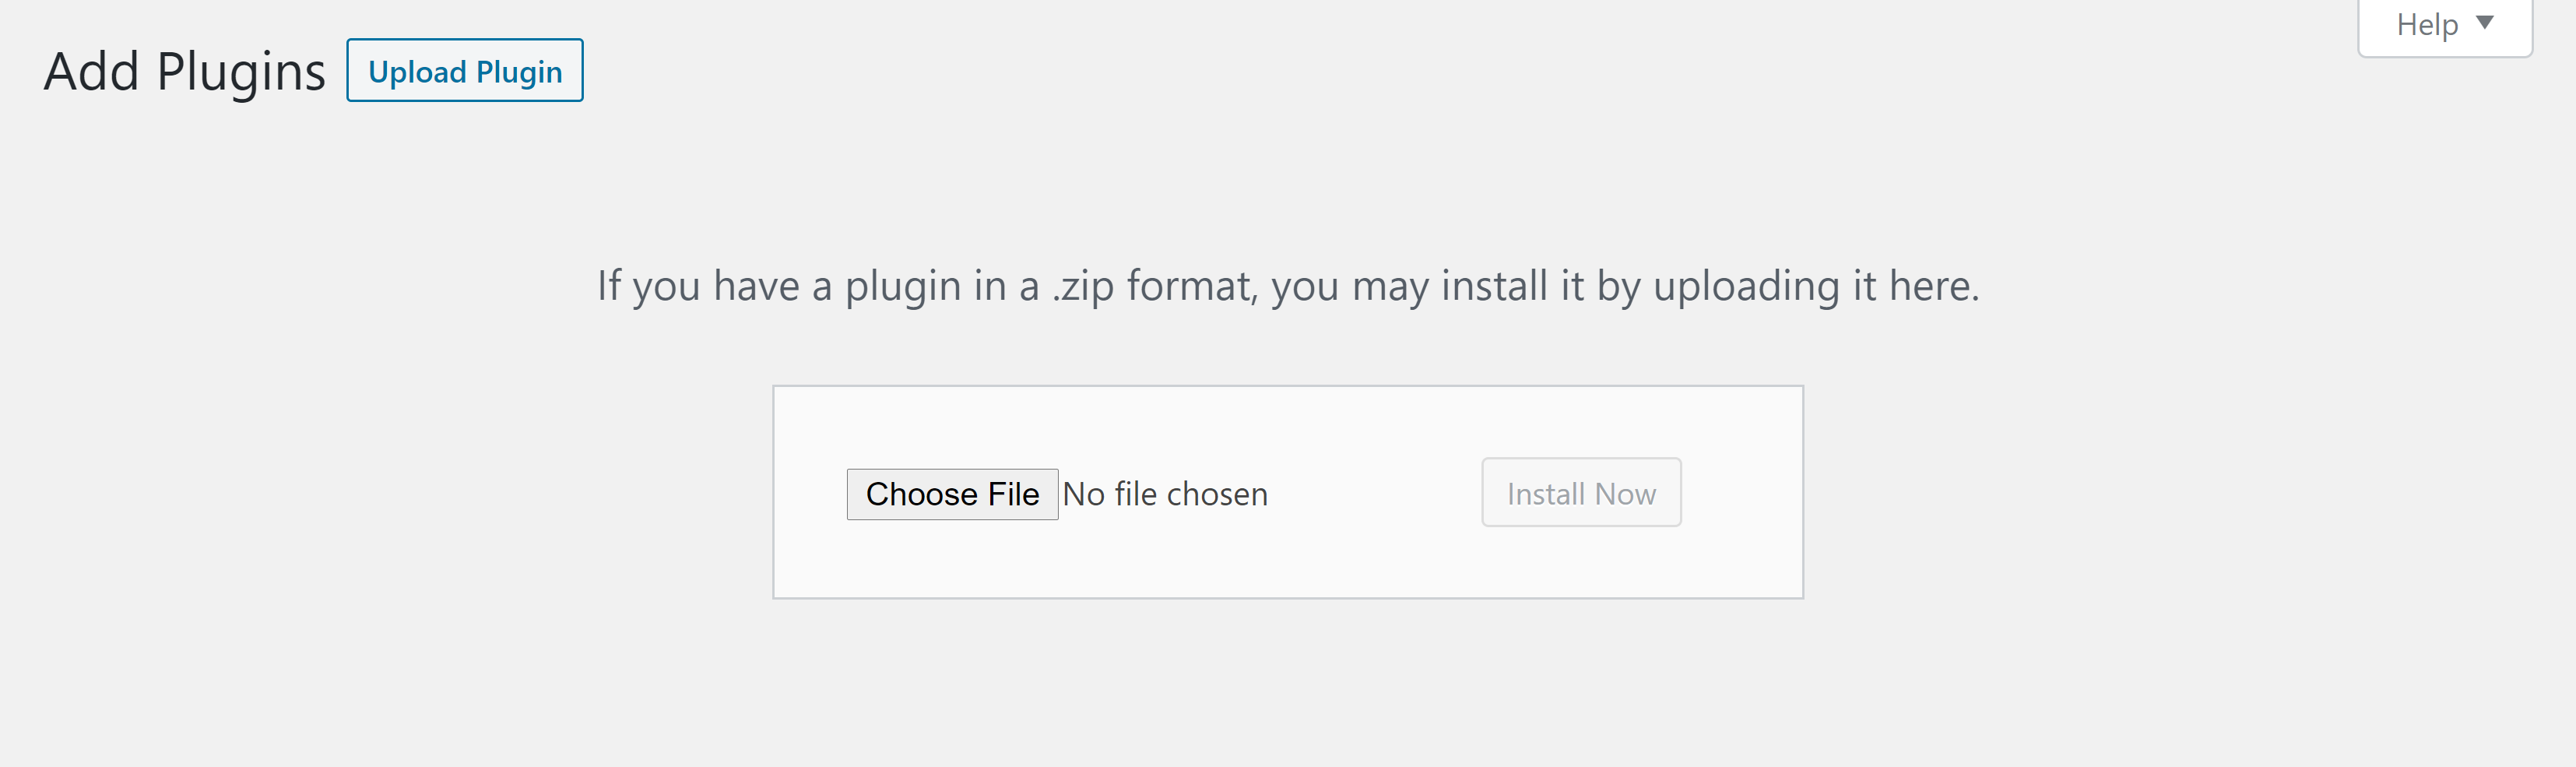
Click ‘Install’, and WordPress will automatically unpack the plugin. When the process is complete, press the ‘Activate’ button.
When the plugin is activated, you’ll be taken to the LifterLMS setup guide. This will walk you through some of the basics of the plugin, but doesn’t provide the opportunity to do much setup, so you can skip this and dive right into configuring the plugin.
Setting up a Payment Gateway
Next, grab your payment extension and the LifterLMS Helper from the Downloads area of your LifterLMS account. These are both plugins, so you can install them on your site using the same process used to install the main plugin. You need both plugins to accept payments. This is the first important point in LifterLMS vs WP Courseware, as it makes the setup process for LifterLMS rather clunky.
When your plugins are activated, go to the newly visible ‘Add-ons & More’ area of LifterLMS and click the ‘My License Keys’ button near the top of the page.
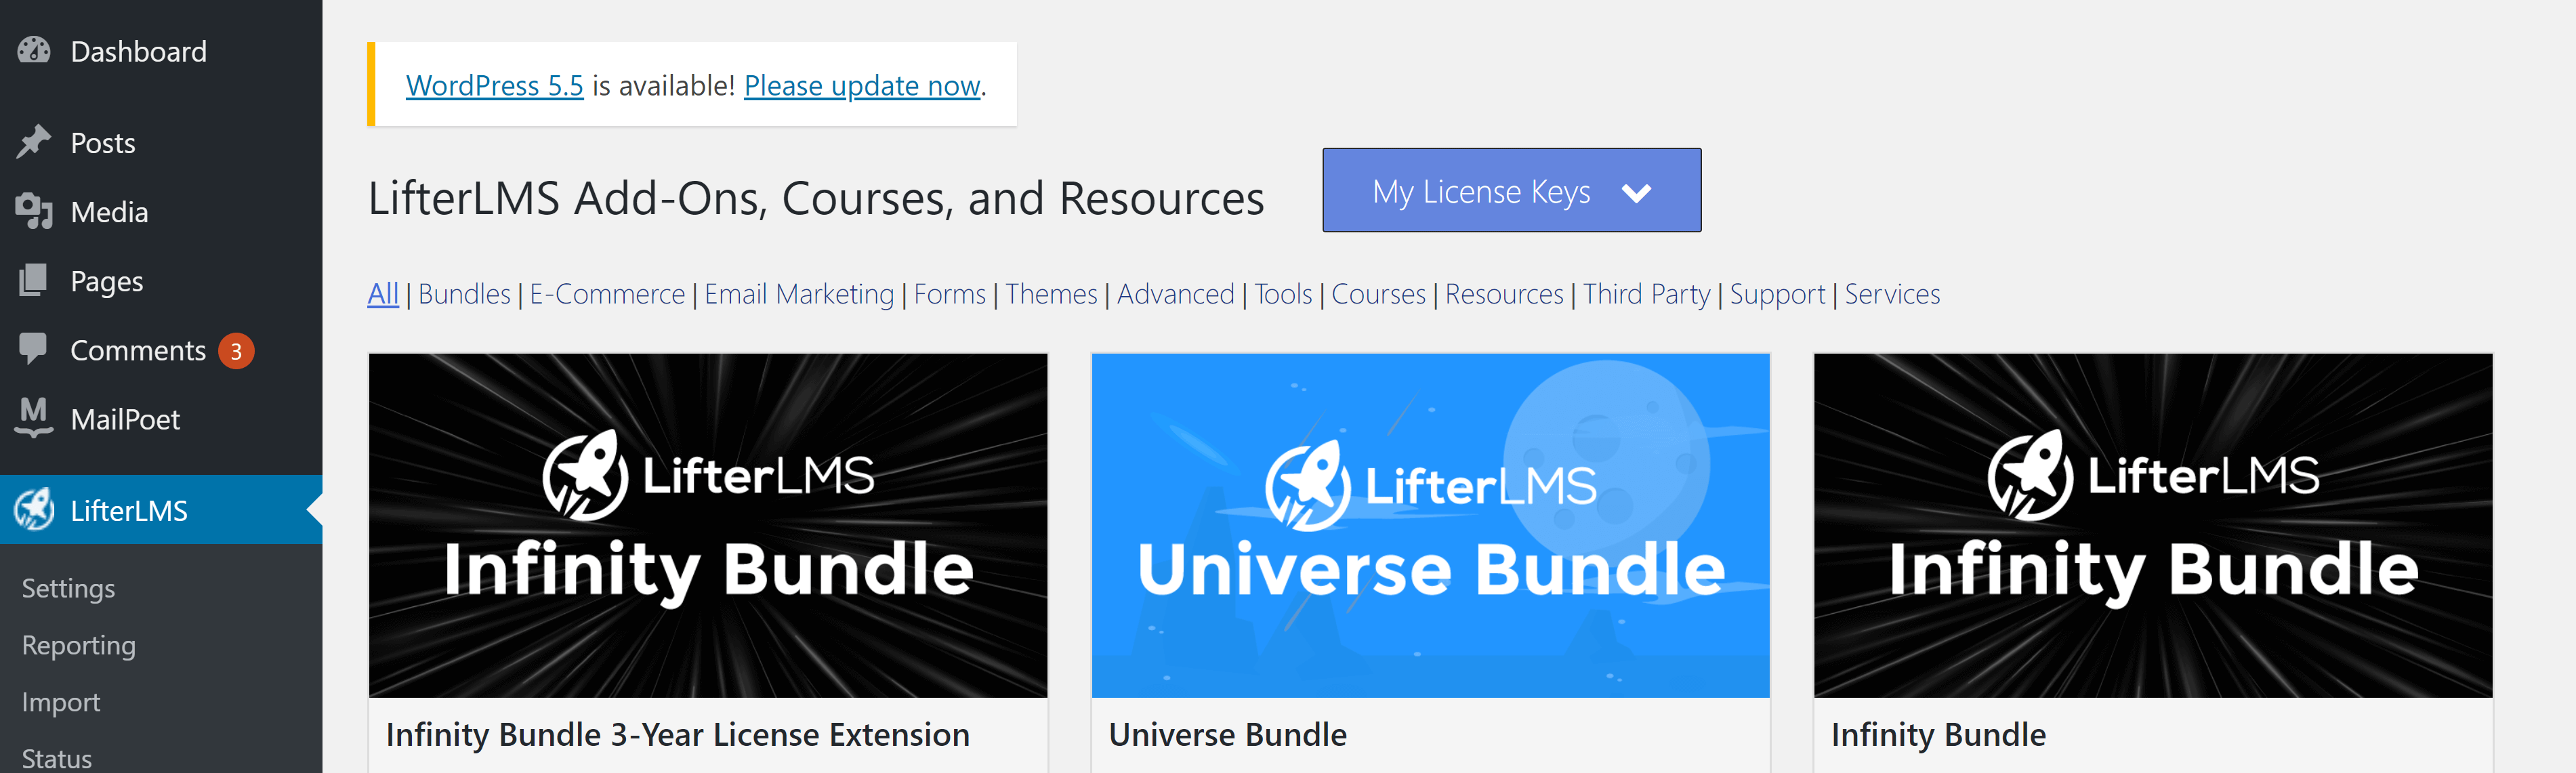
Copy and paste your license key from the ‘Licenses’ page of your LifterLMS account to the box that appears and click ‘Add New’ to activate your extension.
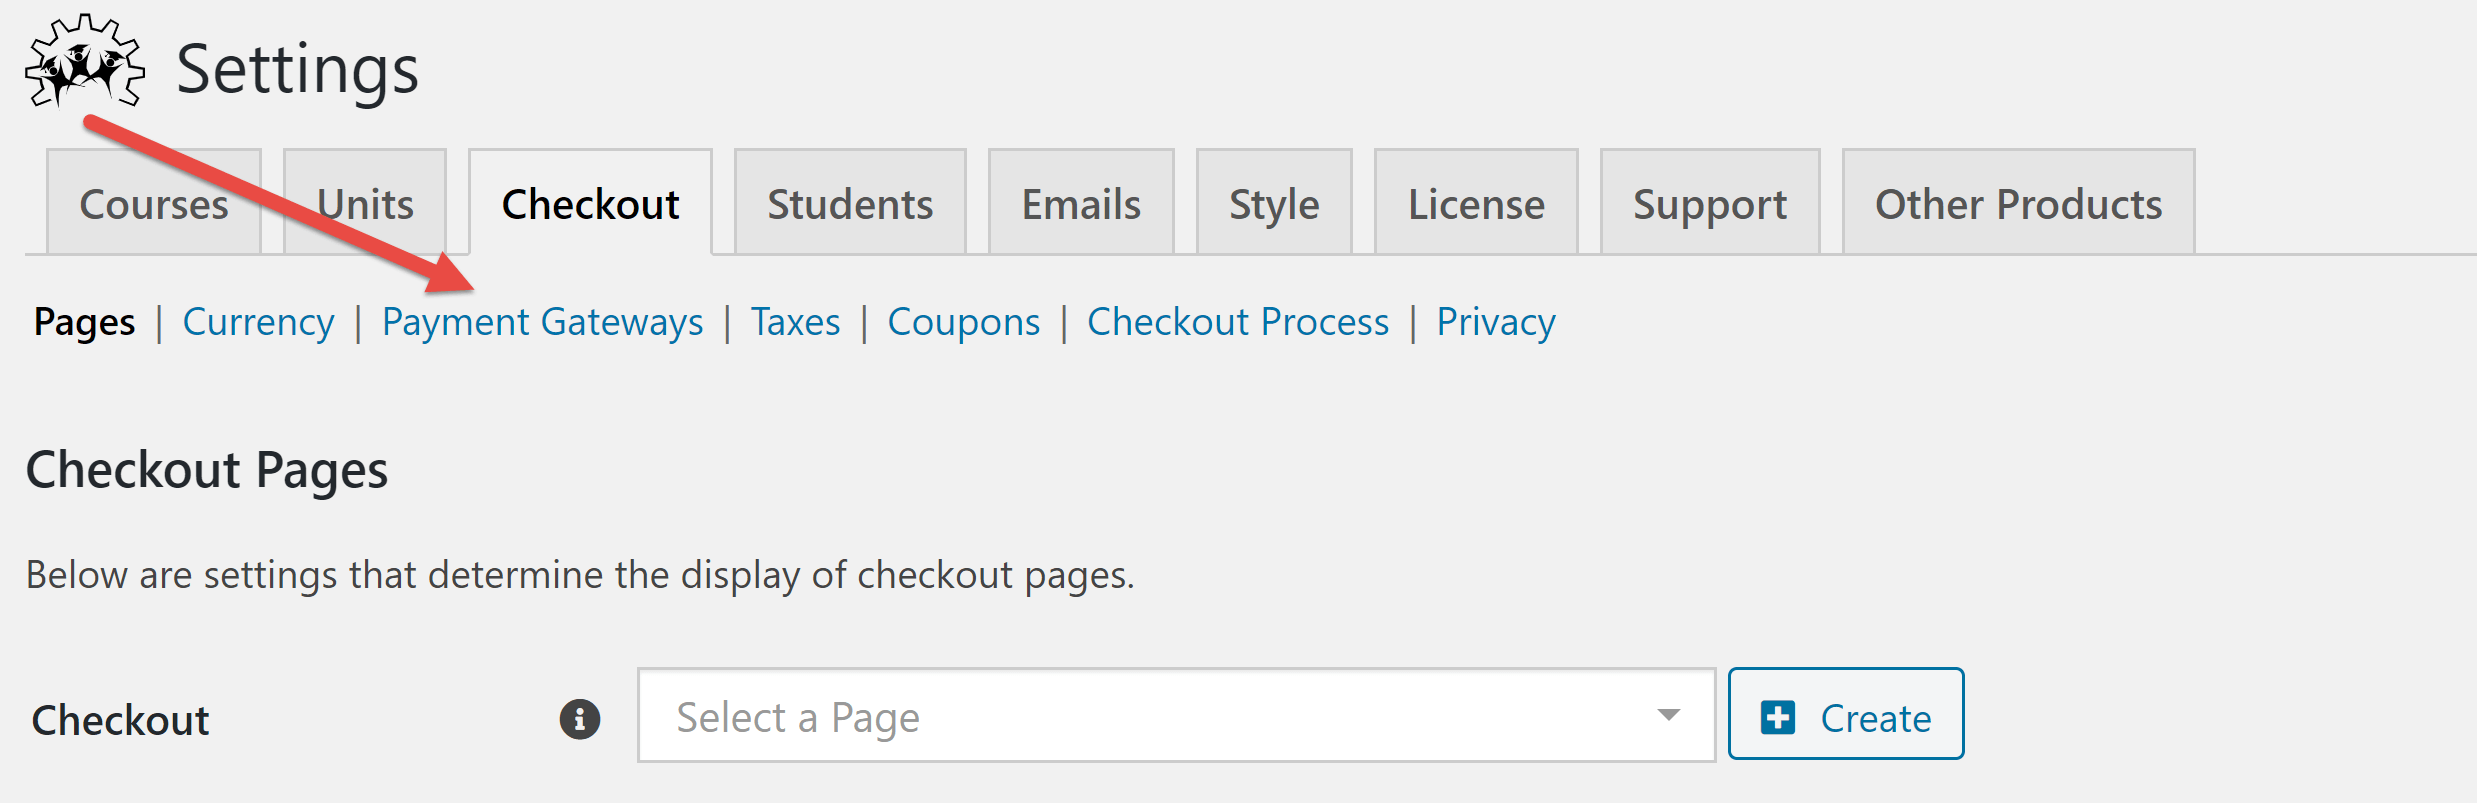
Now go to the ‘Settings’ area of LifterLMS and click the ‘Checkout’ link near the top of the page.
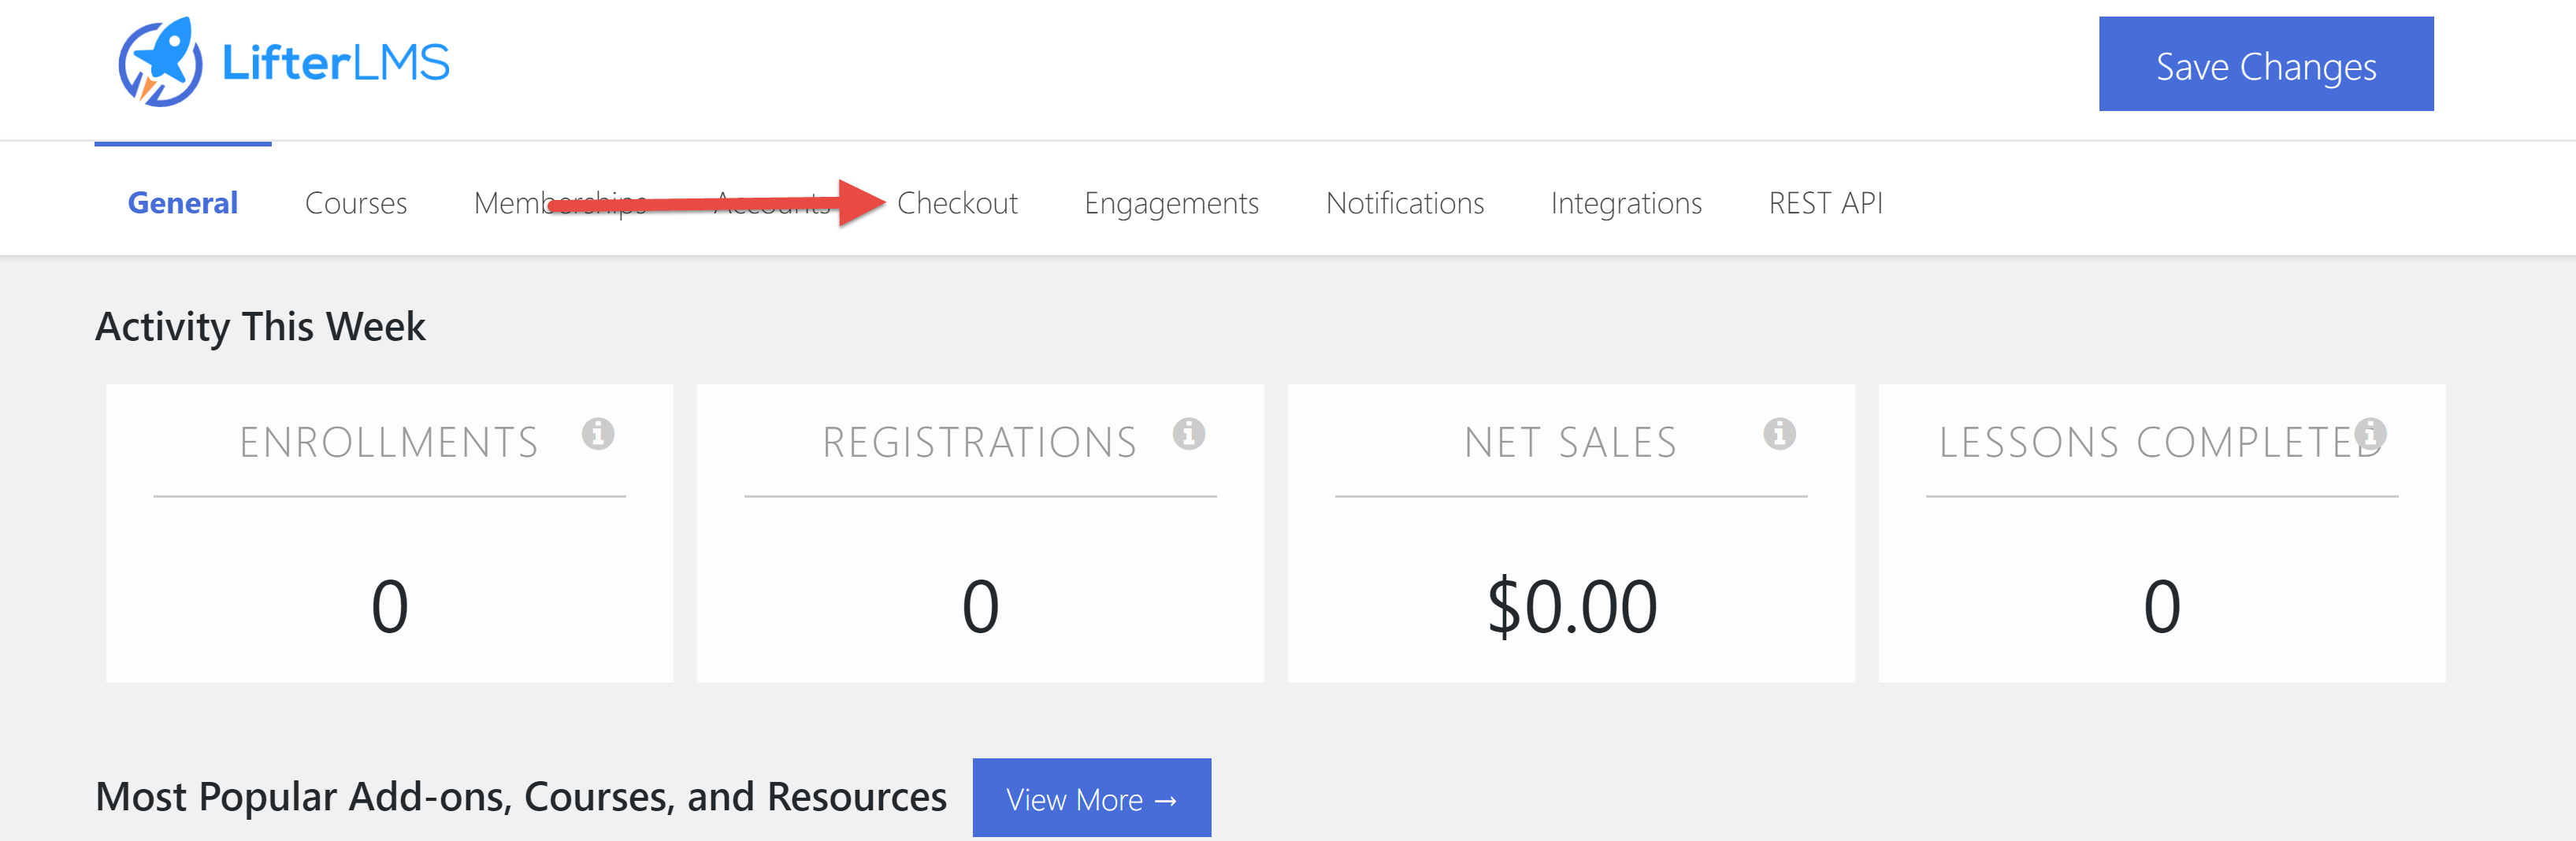
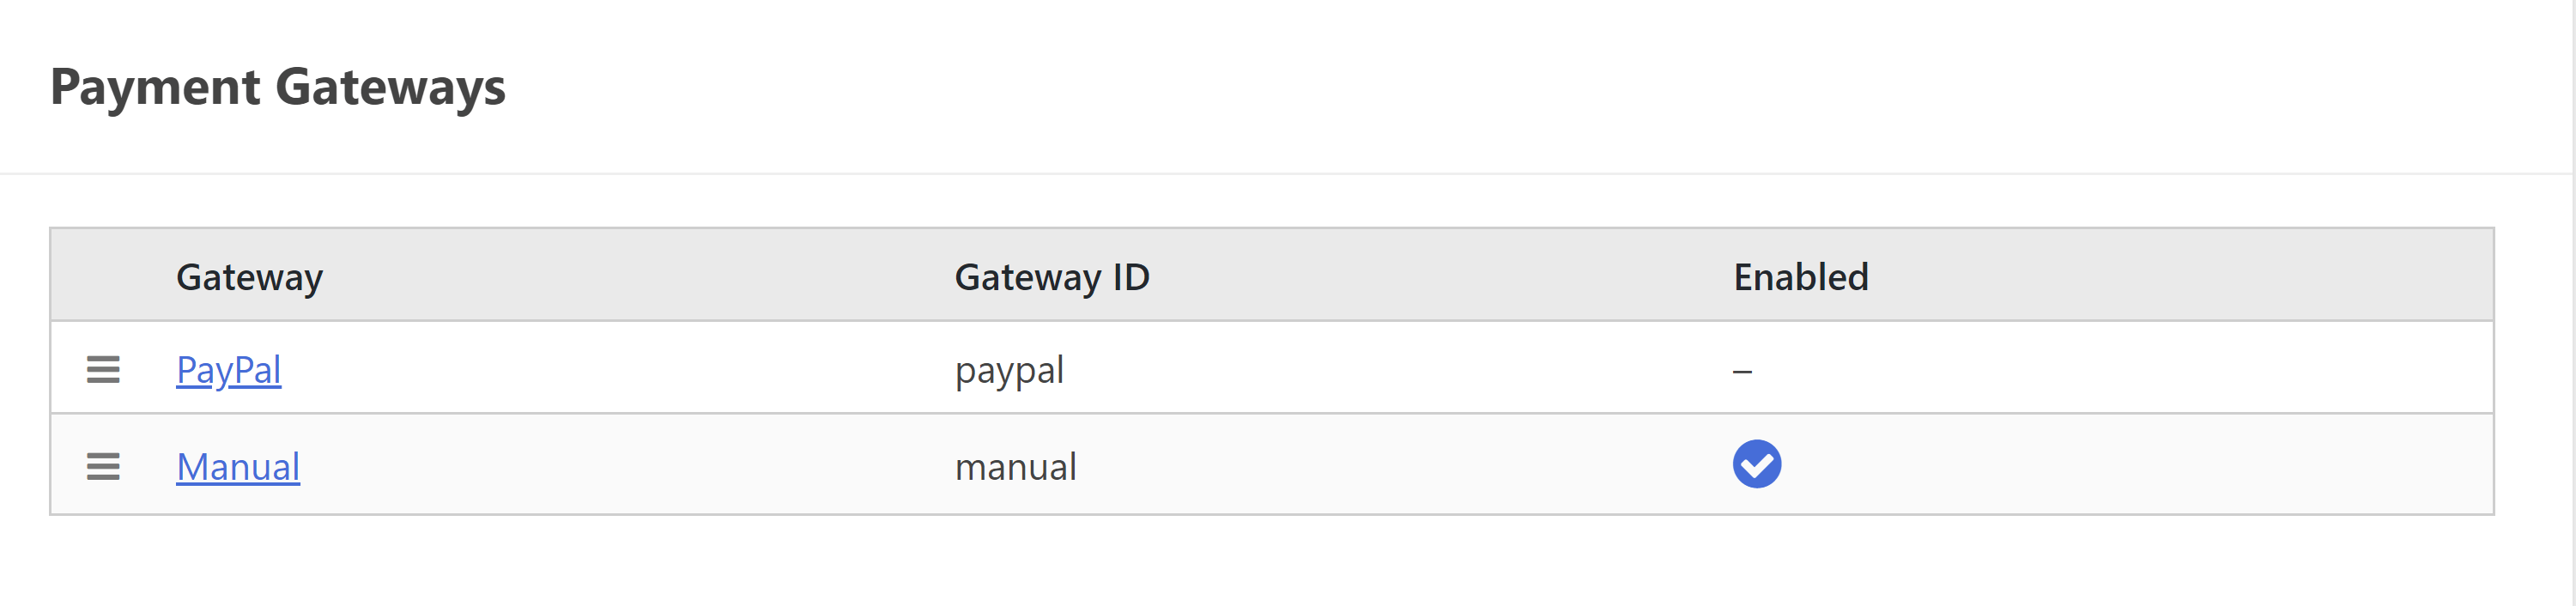
You’ll be taken to a page where you can choose the currency in which payments should be made, the page your customers see when they complete checkout and how the system interacts with failed payments. Scroll to the bottom of the page to find your options for payment gateways. By default, only manual payments will be enabled.
Click on the payment option you want to configure — for the purposes of this article, I’ve chosen to use PayPal payments.
On the next page, you’ll be given options to enable PayPal payments and PayPal sandbox.
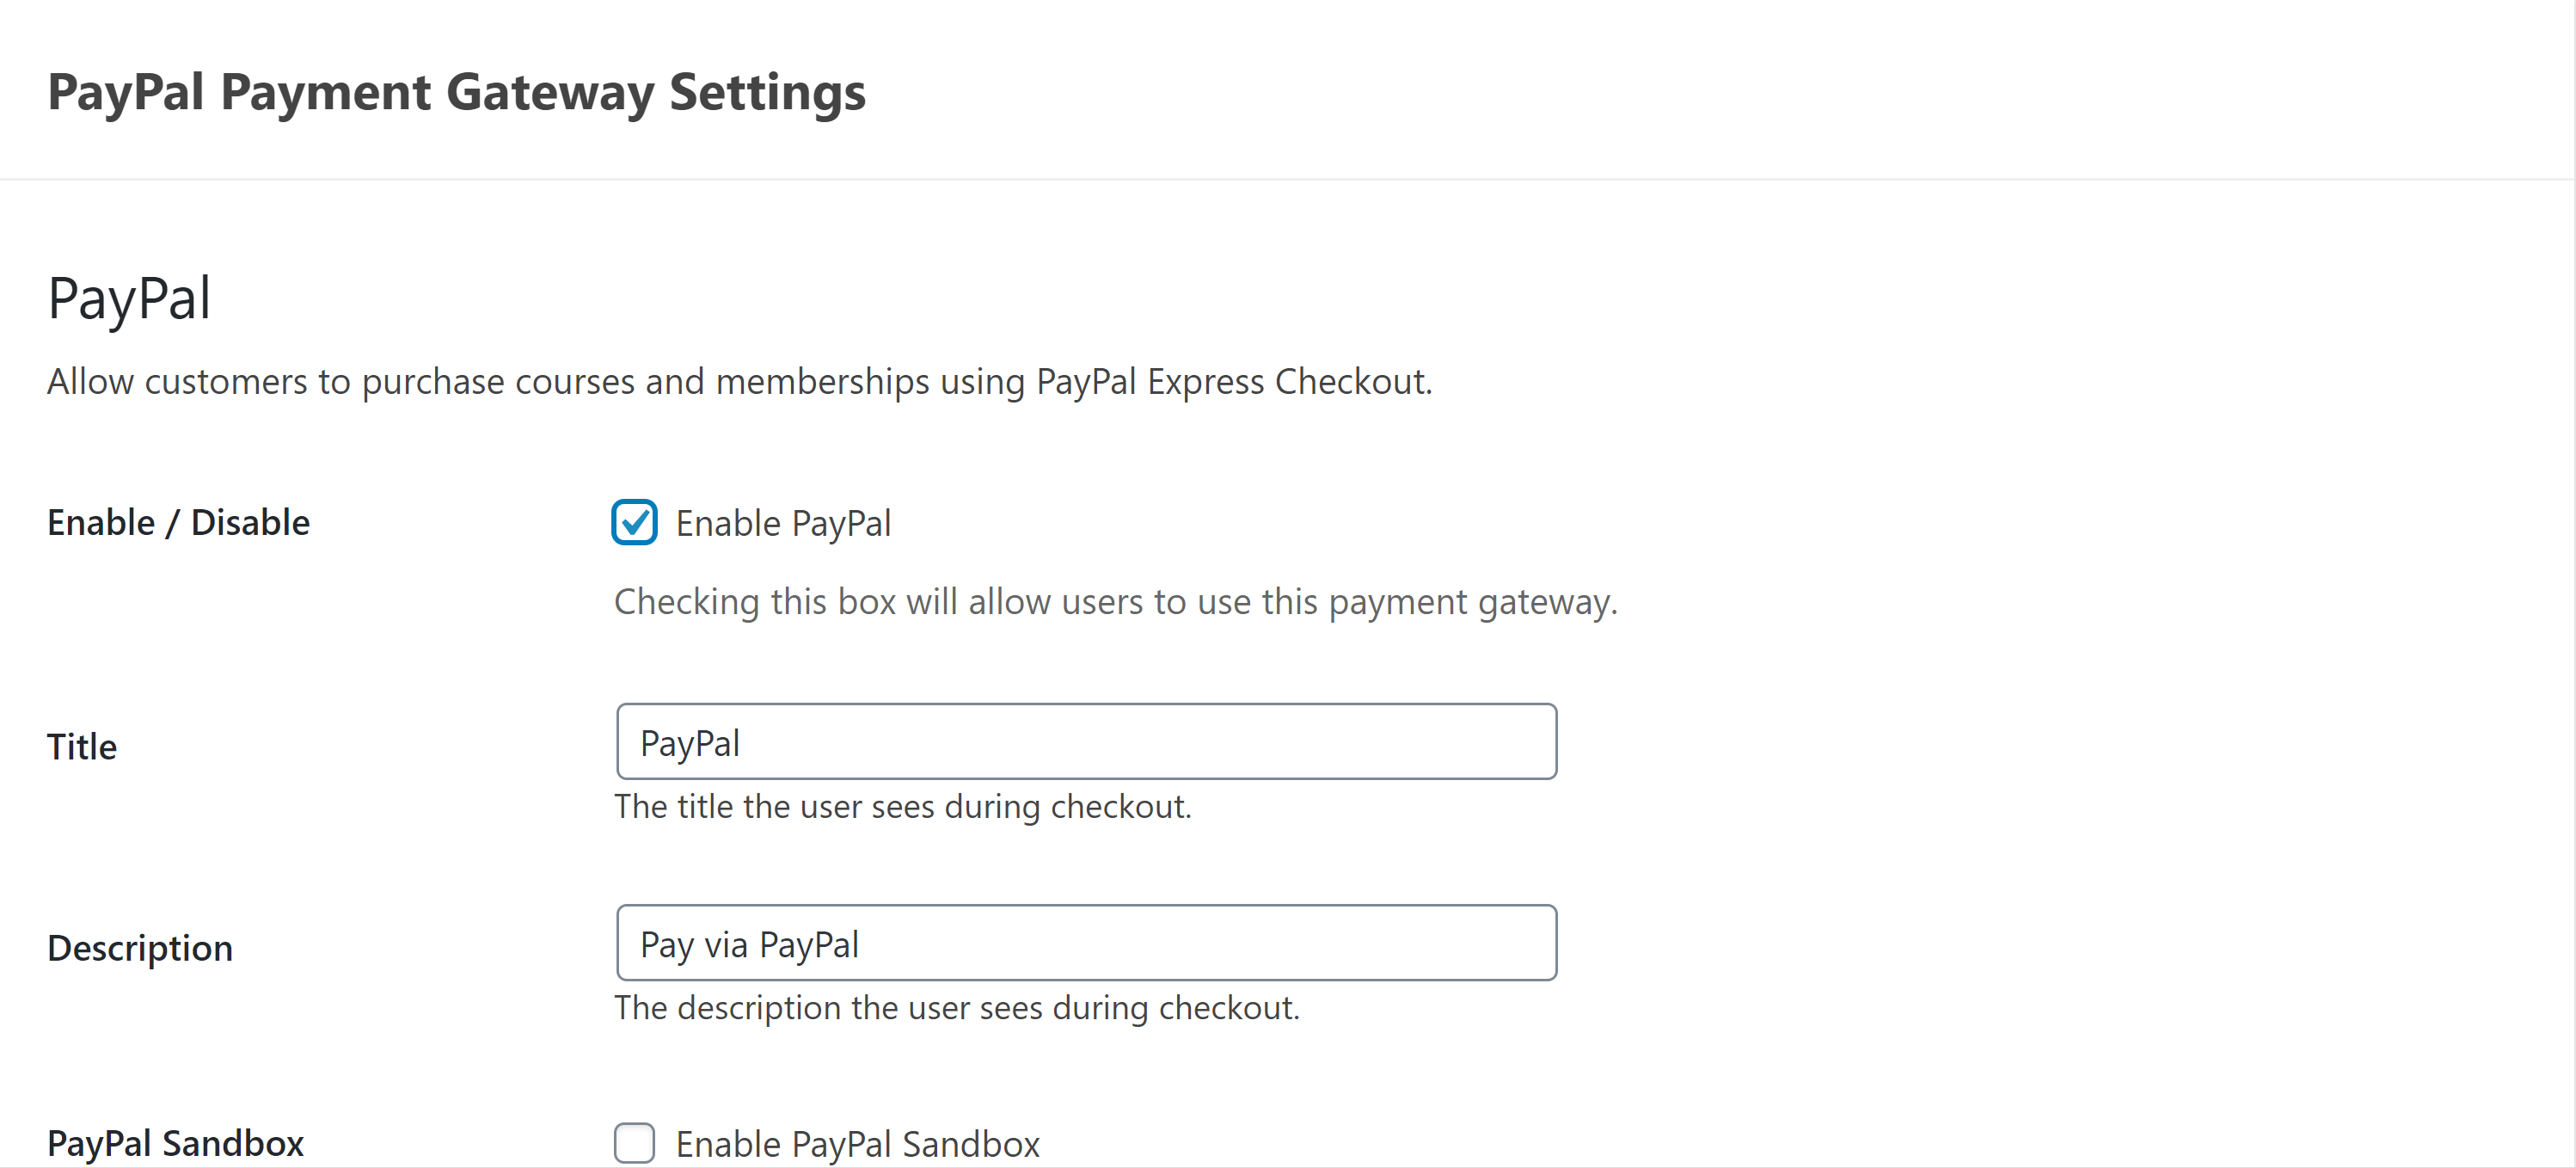
Further down the page, you’ll find places to enter information about your PayPal account. You’ll need your PayPal API credentials, including username, password and signature. You can find more details about how to get this information in the PayPal knowledgebase.
When you’re confident you’ve entered all of the information correctly, click the ‘Check Now’ button at the bottom of the page. This will verify your account information and connect PayPal to LifterLMS.
Creating a Course
With payment processing set up, you’re ready to create your first course! To get started, click the ‘Courses’ link in your sidebar (Note: This is on your main sidebar, not contained within a submenu.)
This will take you to a page where you can view and manage existing courses. Click the ‘Add New’ button at the top of the page to open the course editor.

At first glance, the course editor looks a lot like the regular WordPress editor — you have space for a title, a larger text block for a description and a sidebar with information about the document.

However, you’ll also notice a few key differences:
- Tools — along the top of the screen, you’ll find quick-access buttons for adding blocks and accessing tools. The button with three horizontal lines will open a menu that provides access to the LifterLMS pricing table, course syllabus and other modules. These can help you to fully customize your course description.
- Course instructor — LifterLMS course descriptions include an area at the bottom where course instructors are listed. This includes the instructor’s username, profile photo and bio, so make sure all of your teachers have posted up-to-date information!
- Difficulties — this is the difficulty level of the course, which will be displayed prominently on the information page. This helps to give customers an idea of what they’re getting themselves into.
- Track — this area allows you to make the course part of a certification or degree program.
Further down the page, you’ll find the Course Options area. This is where you can choose the pricing, set prerequisites and enable review collection.
What really impressed me at this point in the debate of LifterLMS vs WP Courseware are the Access Plans — i.e. the payment options you provide to people who want to access your course — which are highly customizable:
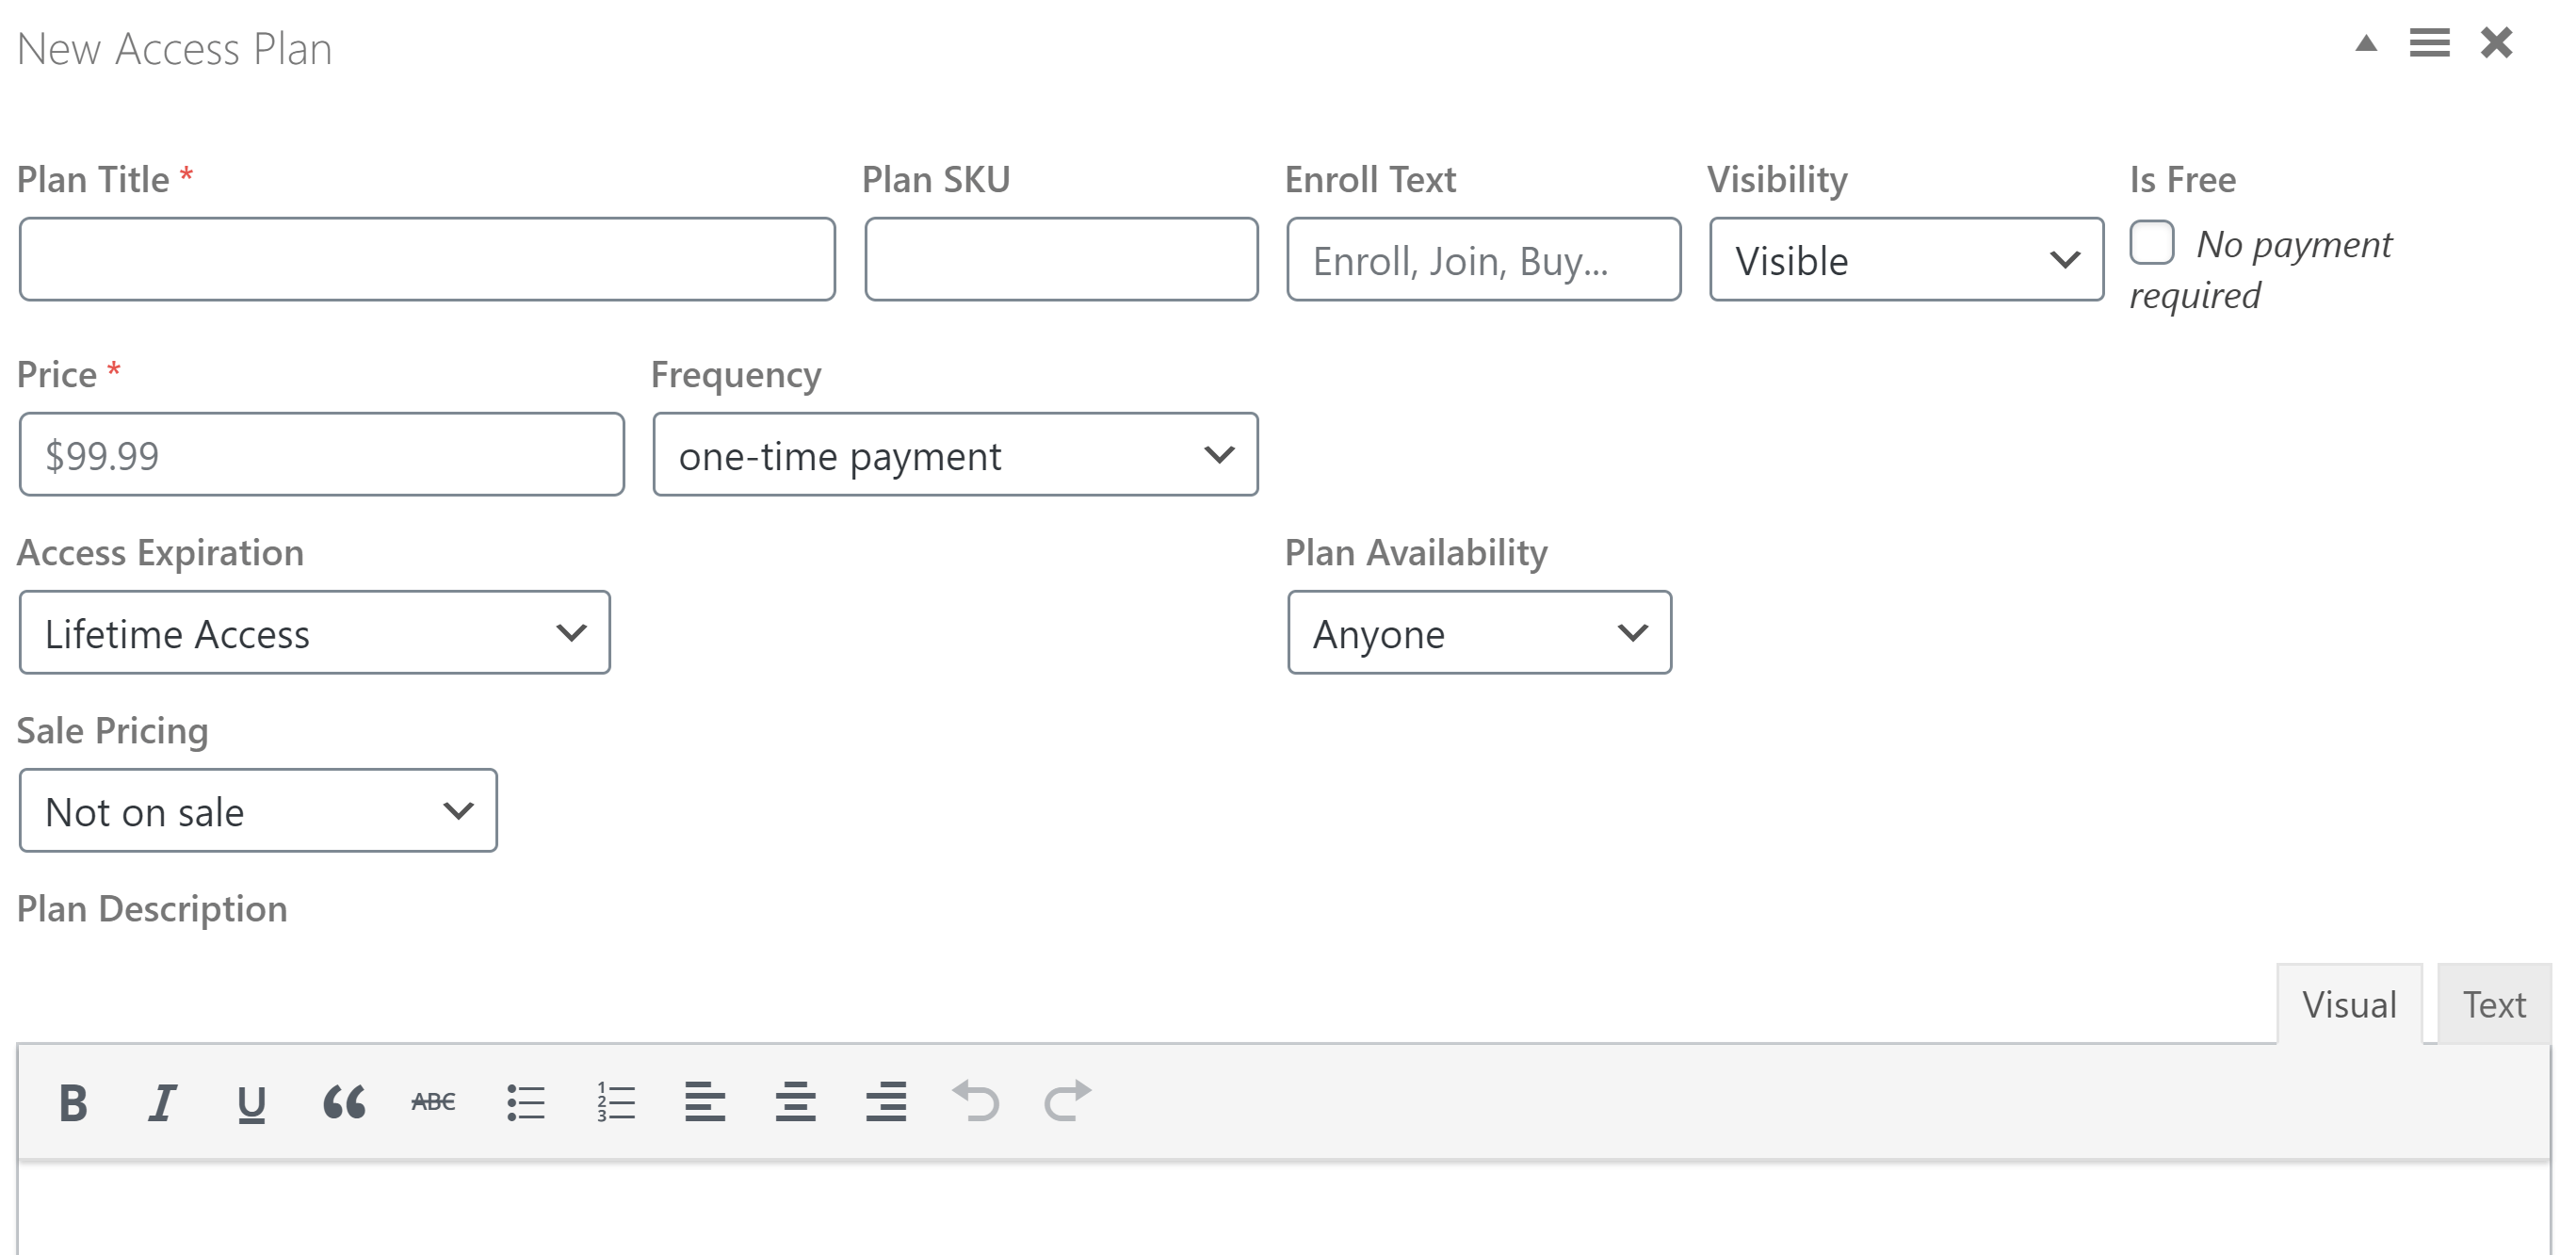
The cool thing here is you can add as many access plans as you want, meaning that for every course you can have a one-time payment option, a recurring payment option and a discounted version that’s only available to existing members of your site. This allows you to transform every course into multiple streams of income, as well as providing potential students with a variety of options.
Adding Content to Your Course
To add lessons and quizzes to your course, scroll down to the bottom of the sidebar and click the ‘Course Builder’ button.

This will open the course builder, which, at this point, is a blank page with some buttons in the sidebar. Click ‘Add Section’ to start building your course.

Next, click ‘Add Lesson’. This will appear as ‘New Lesson’ in the course outline, and you can click on the name to edit it.
If you hover your mouse over the title of this lesson, a series of small buttons will appear. Click on the ‘W’ button to open the lesson editor.
This will take you to a page that combines the WordPress block editor seamlessly with LifterLMS tech. The first portion of the page will already be devoted to specialized course modules inviting students to take a quiz or switch between lessons.
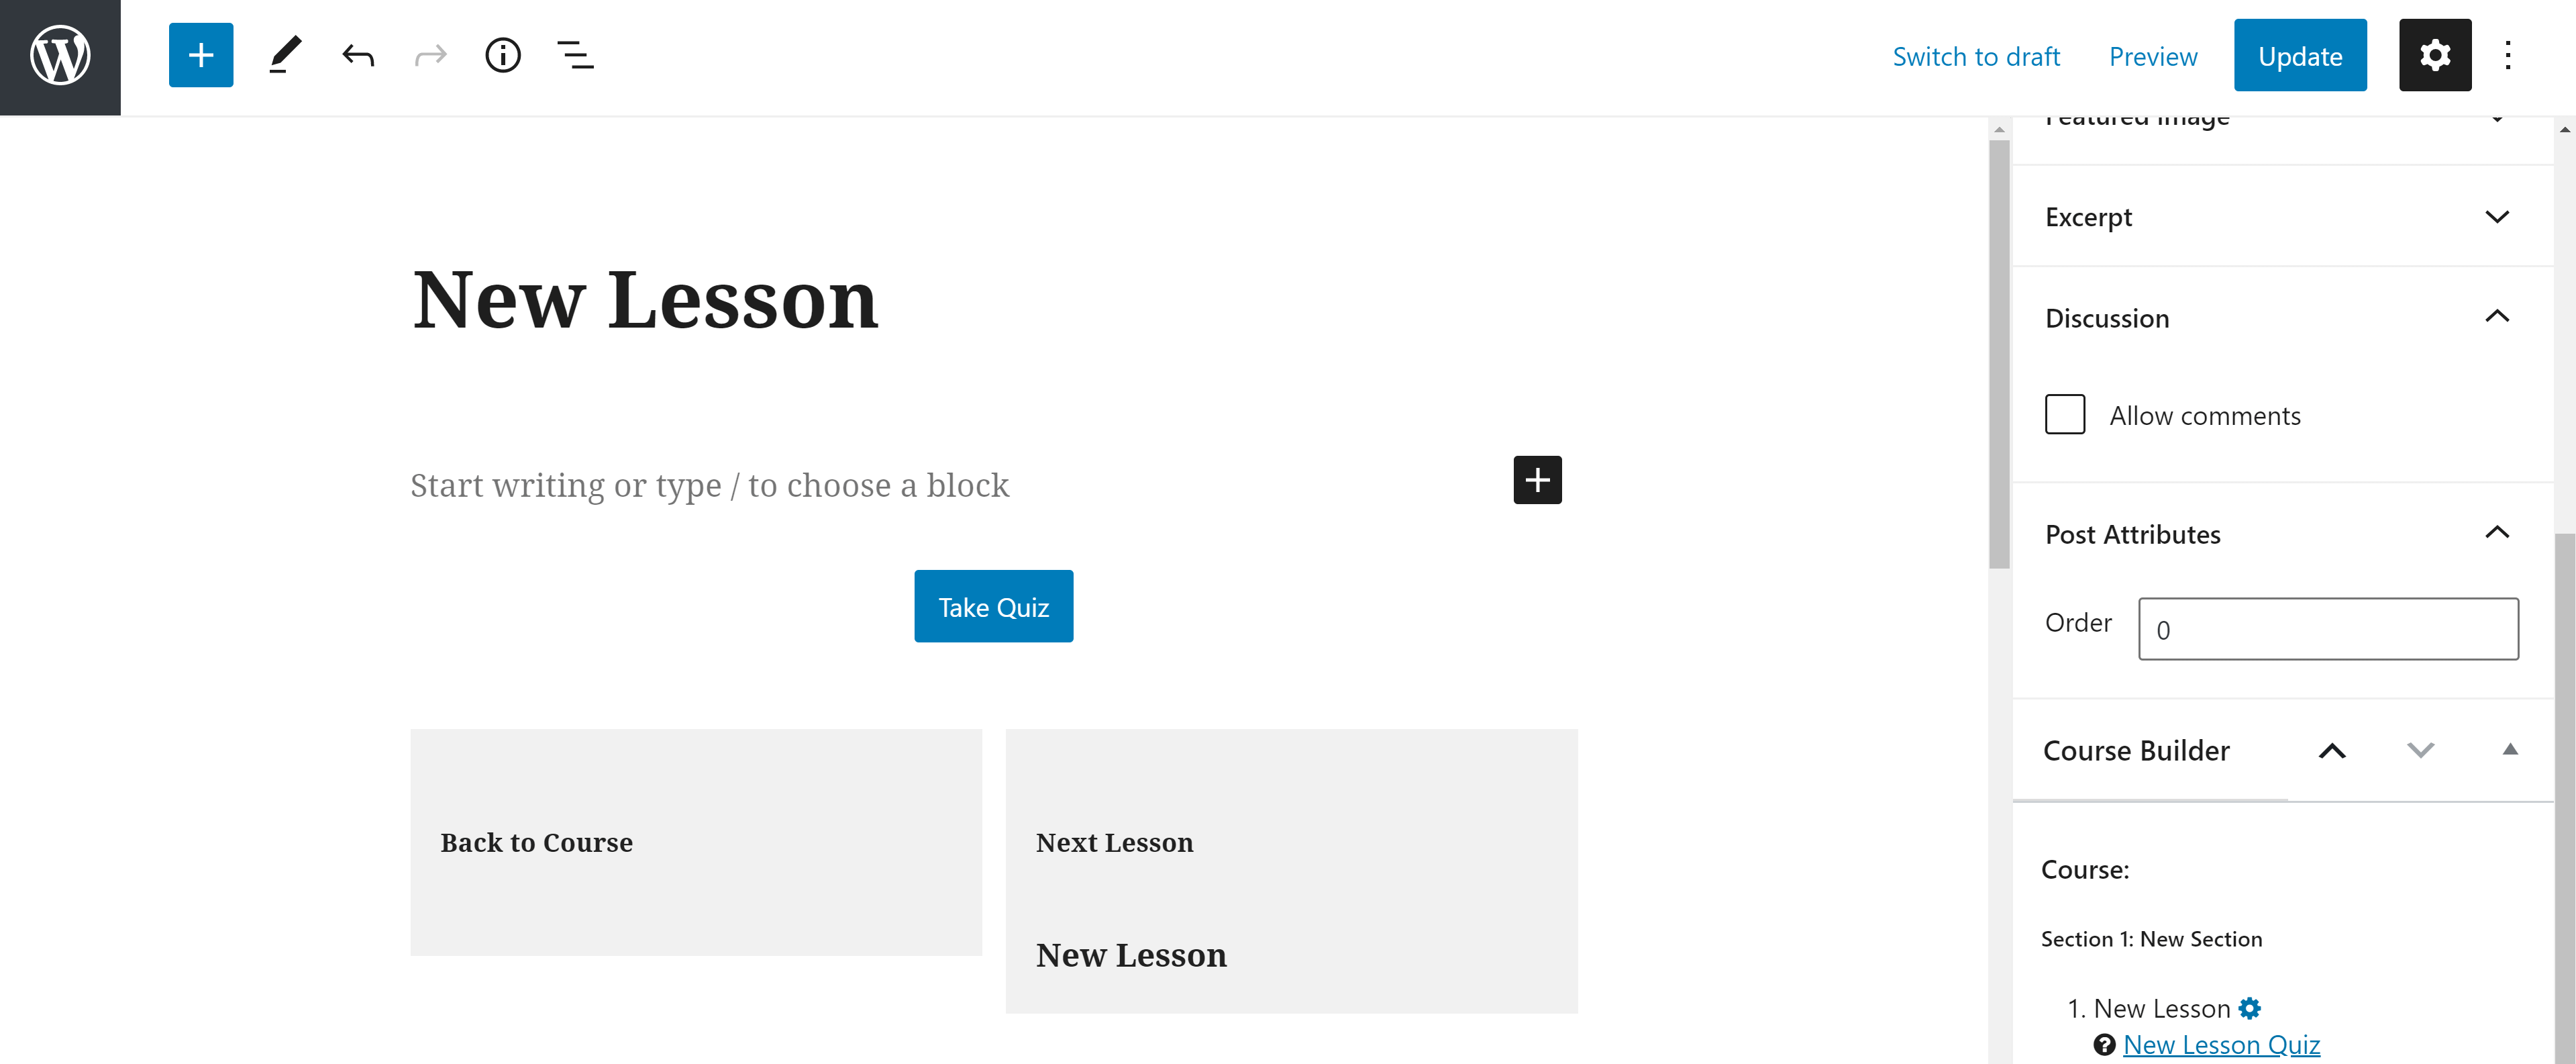
You can rearrange these easily by clicking on a module and pressing the up and down arrows that appear above it.
Once you’re happy with the placement of these modules, you can start adding content. Any block you can use in a regular WordPress blog post can be used in a LifterLMS lesson.
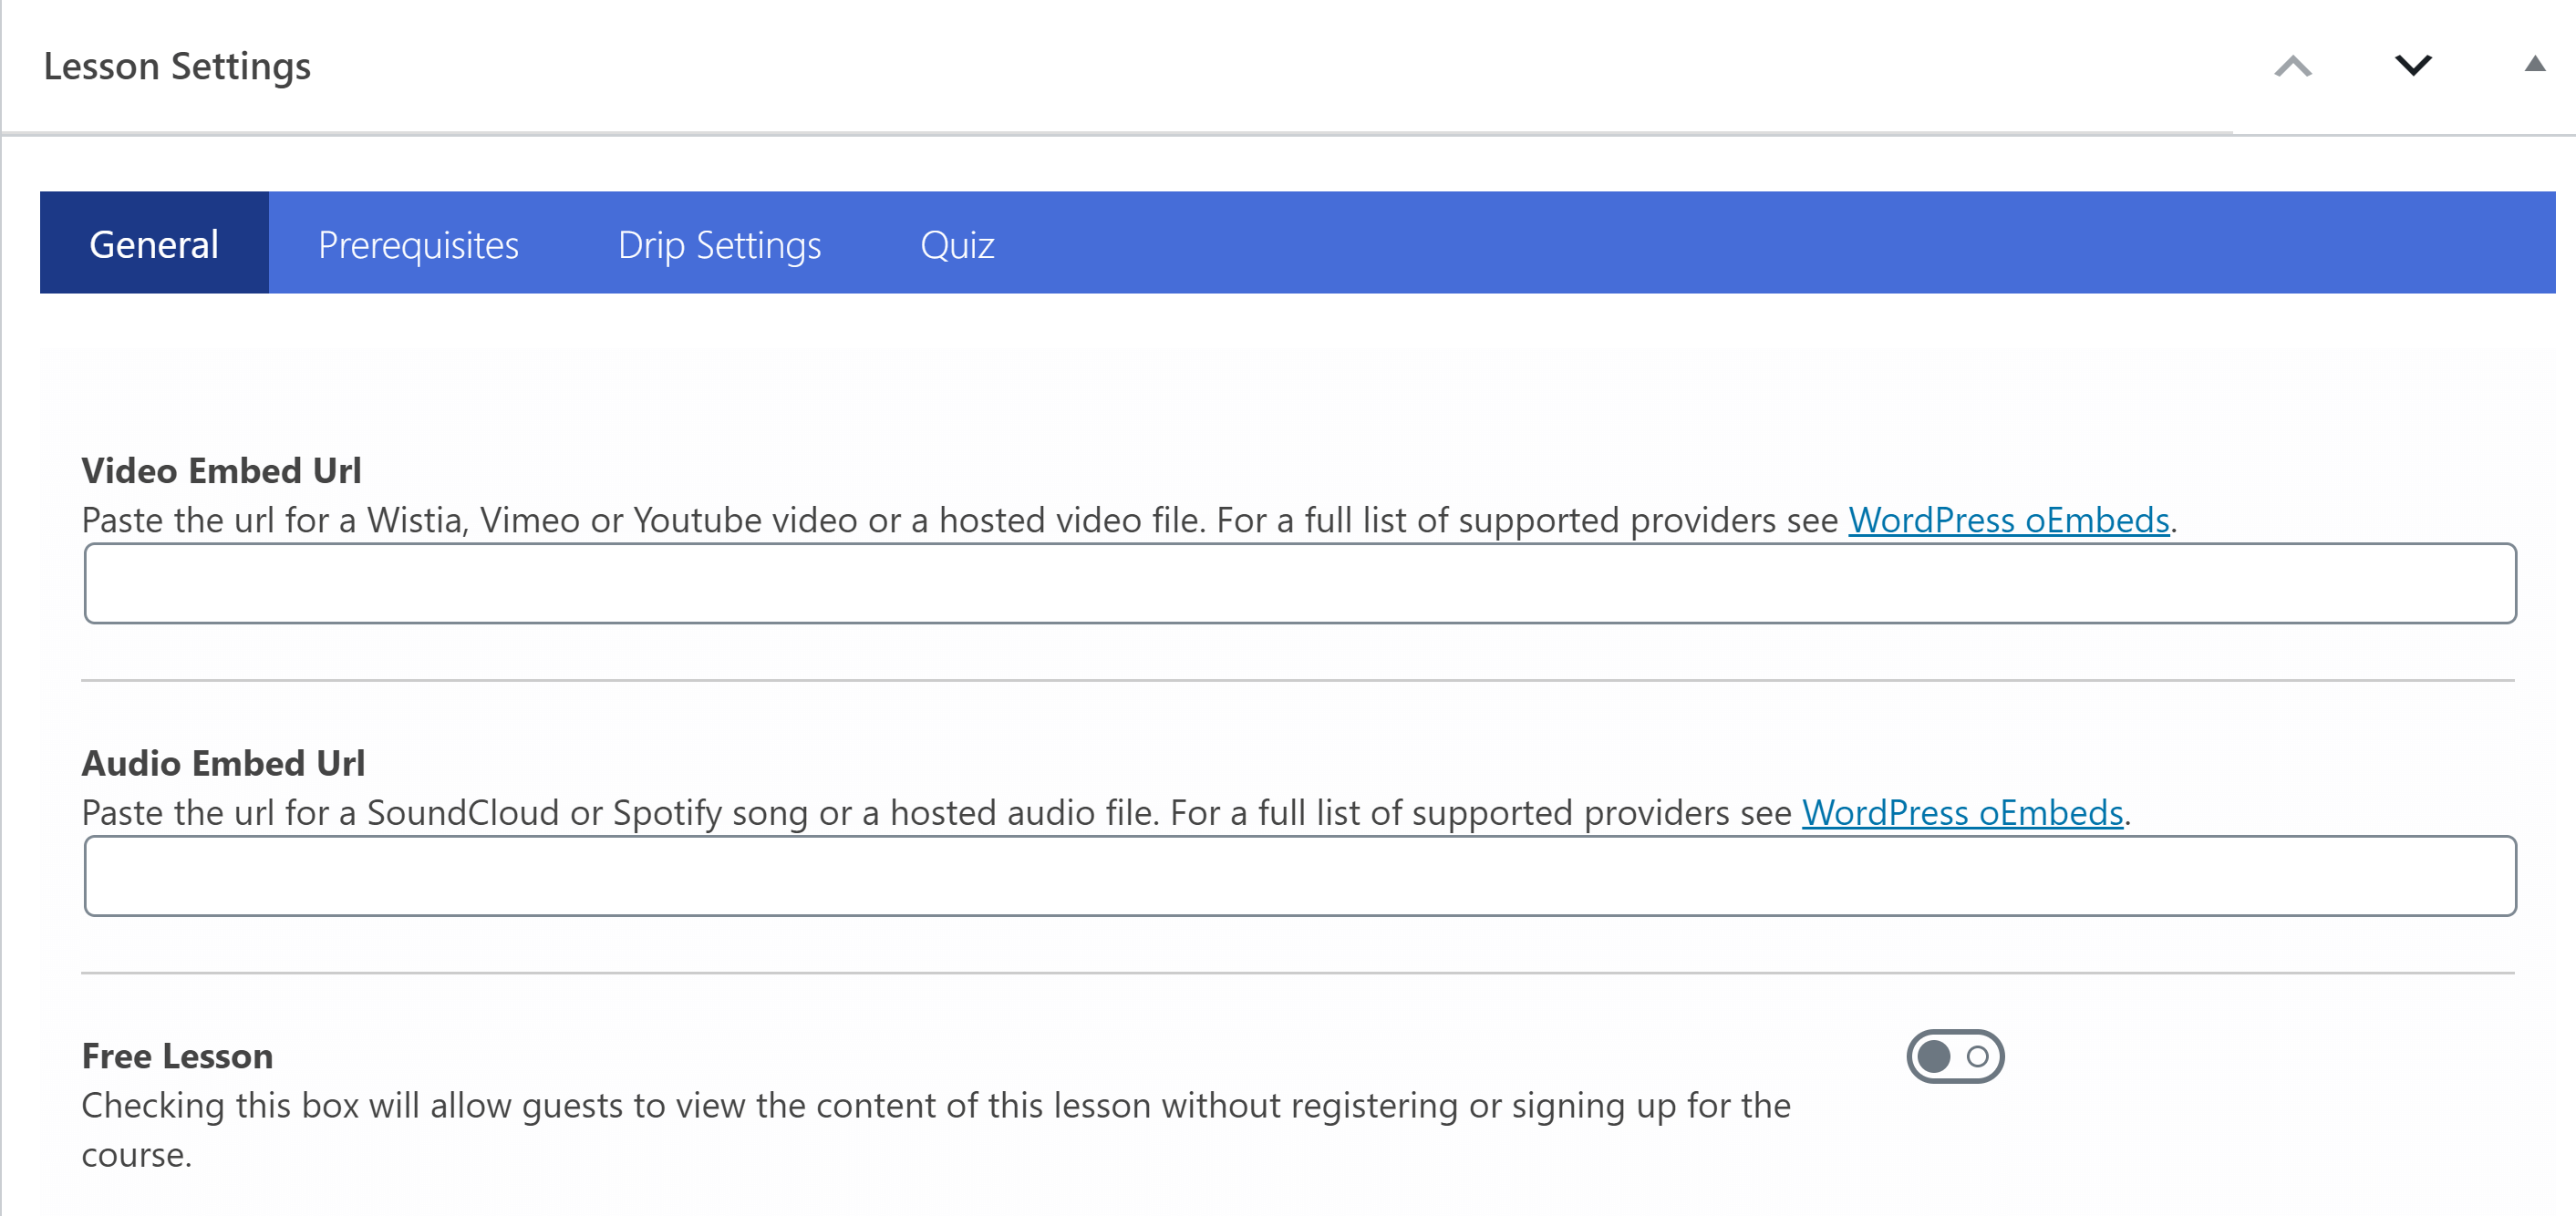
Below the lesson content, you’ll find lesson settings, which allow you to customize several aspects of the lesson:
- Settings — the permalink for the audio and/or video associated with the lesson, content drip settings and whether or not the lesson is available for free.
- Prerequisites — this allows you to choose a specific lesson that must be completed before students can view this lesson.
- Drip settings — lets you control when students will receive this lesson, either in relation to their enrollment or by a specific date.
- Quiz — where you can choose whether or not students must achieve a passing grade on the associated quiz to complete the lesson. Quizzes must be edited from the course builder.
When you’re happy with these settings, click the ‘Update’ button at the top of the page. You can then return to the course builder.
To edit the quiz for this lesson, click on the question mark button below the lesson title.

This will open the LifterLMS quiz editor on the left side of the page.
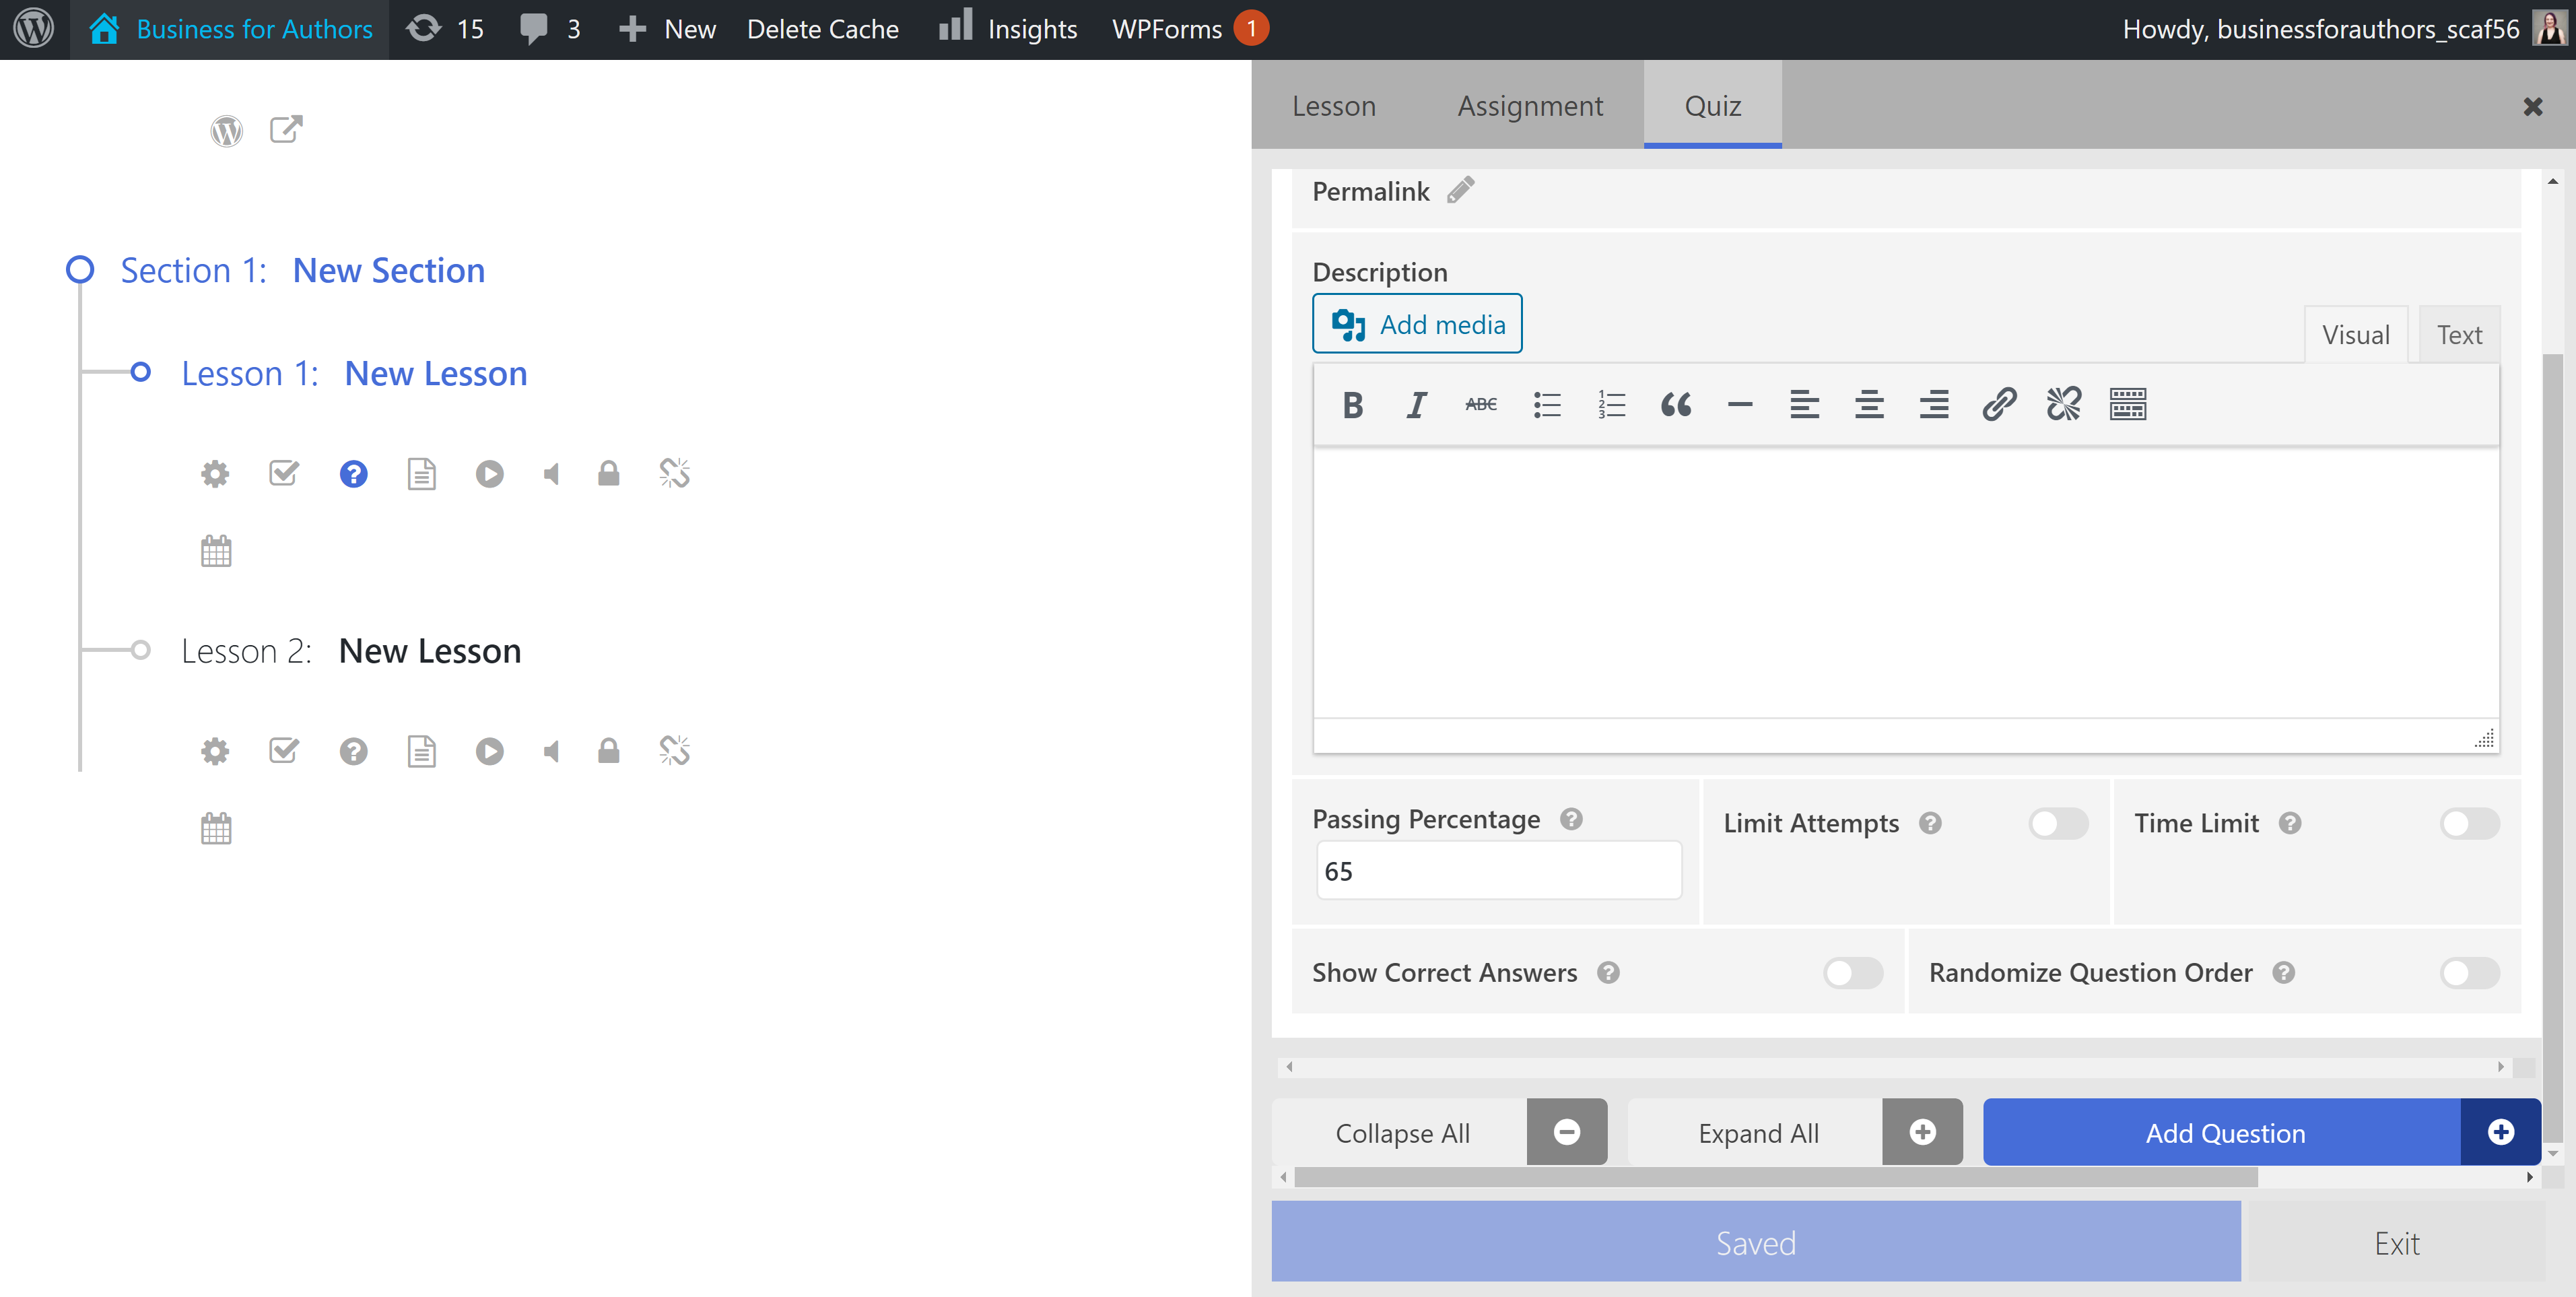
Here, you’ll be able to specify several things about the quiz:
- Quiz description
- Passing percentage
- Attempt limit
- Time limit
- Show answers
- Randomize question order
To add an actual question, click the ‘Add Question’ button in the bottom left corner, which will make a menu appear with options for question types. With the most basic plan, you’ll note that only multiple choice, picture choice, and true or false questions are available.

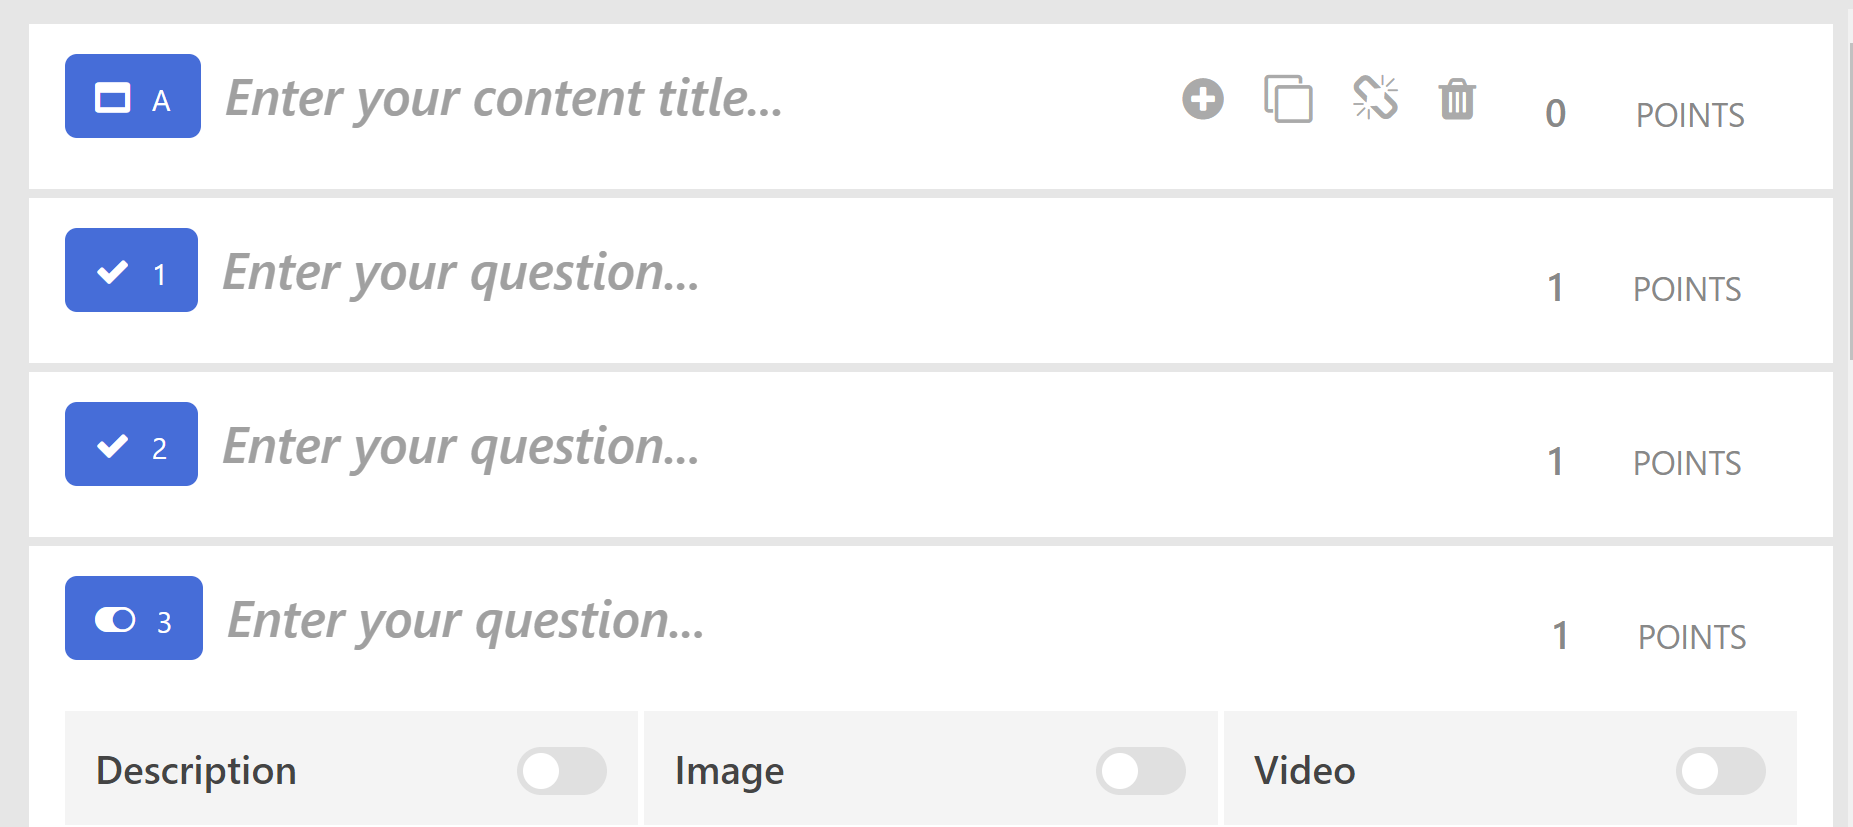
I had a moment of confusion here, because when I selected the type of question I wanted, it didn’t appear on the screen. You must collapse the General Settings area to access the questions.
Once this is done, though, the interface is quite friendly. Along with easily editing the question and answers, you can add a description, image or video to each question, which is a great way to create a truly immersive experience.
When you’re satisfied with the questions, click the ‘Save’ button at the bottom of the quiz editor. This will save the quiz to the appropriate lesson.
Moving Content Around
There are two ways to change the order of content within your course:
- Click on the circle beside your lesson title — this will highlight the lesson block, which you can then drag and drop to its new position.
- Hover your mouse over the title of the lesson you want to move, and a row of small buttons will appear — including two circular buttons with up and down arrows. Use these to move the lesson one module up or down.
This makes it easy to rearrange the course as it’s updated.
Creating Tracks
One thing that really stands out in the debate of LifterLMS vs WP Courseware is the LifterLMS Tracks function. This allows you to group courses together into a certification or degree program. To access it, go to ‘Courses > Tracks’, and you’ll be taken to a page where you can add a new track or view existing tracks.
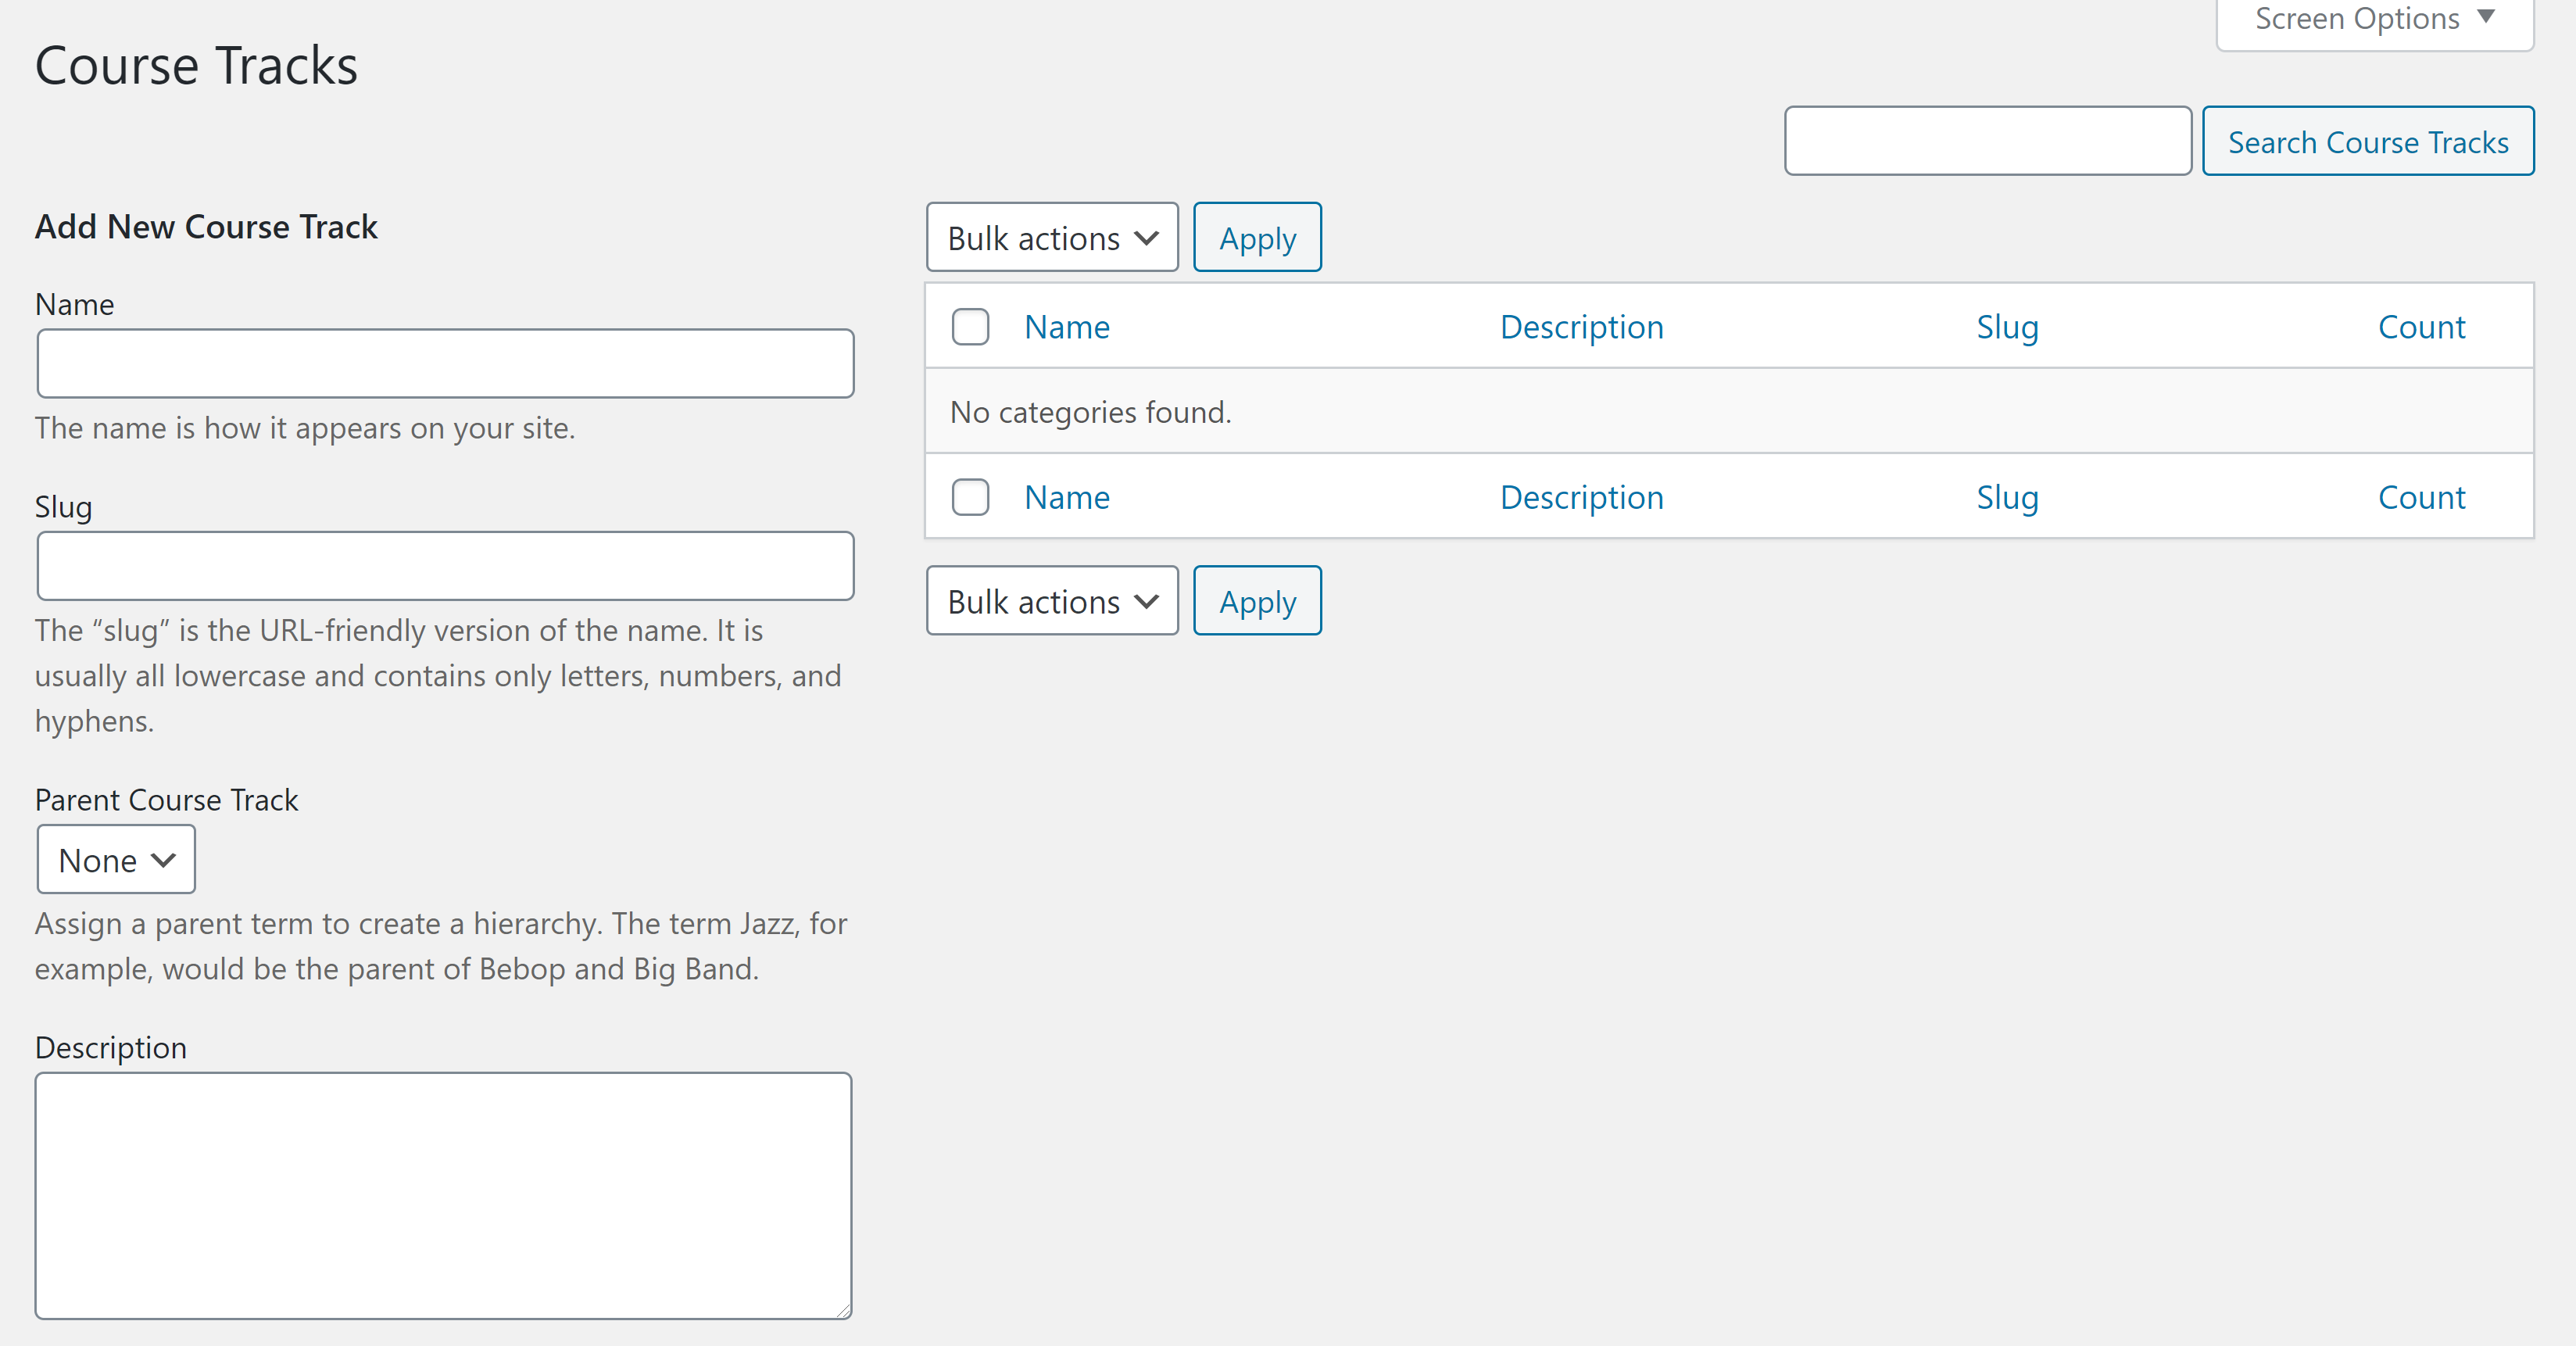
To add a new track, fill in the information requested in the boxes on the right side of the page. You’ll note that you can actually nest tracks, allowing you to create multi-layer certification programs. Once the information is complete, scroll down the page and click ‘Add New Course Track’. Courses can be assigned to tracks within the course builder.
Add-ons and Integrations
As far as I was able to determine, LifterLMS only offers built-in integration with three plugins: bbPress, BuddyPress and Monarch.
To integrate LifterLMS with other plugins and software, you’ll need to purchase premium add-ons, which can integrate LifterLMS with a variety of popular marketing tools, including ConvertKit, GravityForms, MailChimp and WooCommerce. However, you must pay separately for each one. This is a major deciding factor in the debate of LifterLMS vs WP Courseware, as the add-ons offered by WP Courseware are free.
You can also use add-ons to increase the functionality of LifterLMS, adding things such as assignments, advanced quizzes and advanced user profiles.
Pricing
I mentioned before that the LifterLMS pricing structure is unusual. The core plugin is free; what you pay for are the add-ons. However, the core plugin doesn’t have payment processing capacity, so, if you want to sell your courses, you’ll need at least one add-on.
There are three payment tiers to choose from:
- Individual add-ons: Available for $99 a year each.
- Universe Bundle: Available for $299 a year. Comes with add-ons for design, marketing and CRM, ecommerce, and forms. All add-ons purchased with this plan can be used on up to five sites.
- Infinity Bundle: Available for $999 a year. Comes with everything in the Universe Bundle plus advanced quizzes & assignments, private coaching features, advanced video features, custom fields features, and groups features. Can be used on unlimited sites.
It’s important to note that there’s no single plan that includes all premium add-ons. The Social Learning add-on, for instance, is only available as a separate purchase.
Overall Thoughts
LifterLMS seemed quite promising at first, and, in some ways, I was impressed. I loved the integration of the block editor with LifterLMS modules in the course description and lesson content areas. The visual course editor was quite intuitive, and the outline format made me feel like I was working on a real university course. The Tracks function allows for the creation of advanced academic programs.
However, there were several things I disliked about LifterLMS. First, I found the pricing structure somewhat misleading. I also found the contents of the bundles somewhat lacklustre; things such as forms were prioritized in the Universe Bundle, but I felt that assignments and advanced quizzes would be more useful for most people.
Some aspects of the plugin also seemed engineered to sell you add-ons. For example, the top of the screen where you view the quiz editor also has ‘Lesson’ and ‘Assignment’ tabs. If you click on ‘Lesson’, you’ll see a screen where you can edit some basic information about the lesson; if you click ‘Assignment’, you’ll see a button to create an assignment, but when you click on it, you’ll be told this feature is only available through an add-on.
The quiz editor itself also seemed engineered to upsell folks. Only having access to multiple choice, picture choice, and true/false questions significantly limits your ability to create complex quizzes. This is particularly egregious when you take into consideration that every other course building plugin lets you use several question types in quizzes.
WP Courseware Review
Features
The WP Courseware Teacher plan comes with the following features:
- Licenses for use on two sites
- Unlimited courses
- Unlimited users
- Code-free course builder
- Advanced quiz editor
- Content dripping
- Capacity to create paid subscriptions
- Capacity for multiple instructors
- Compatible with PayPal and Stripe
- Integrations with a variety of membership and marketing plugins
How to Use WP Courseware
Getting WP Courseware Installed on Your WordPress Site
The first step to using WP Courseware is to pay for the plan you want. Payment can be completed with PayPal or credit card. You’ll also be asked to provide some basic information, such as your name and email address.
Once your payment has been processed, you’ll be taken to a page where you can view information about your payment and your API key. Scroll down the page to find a download link.

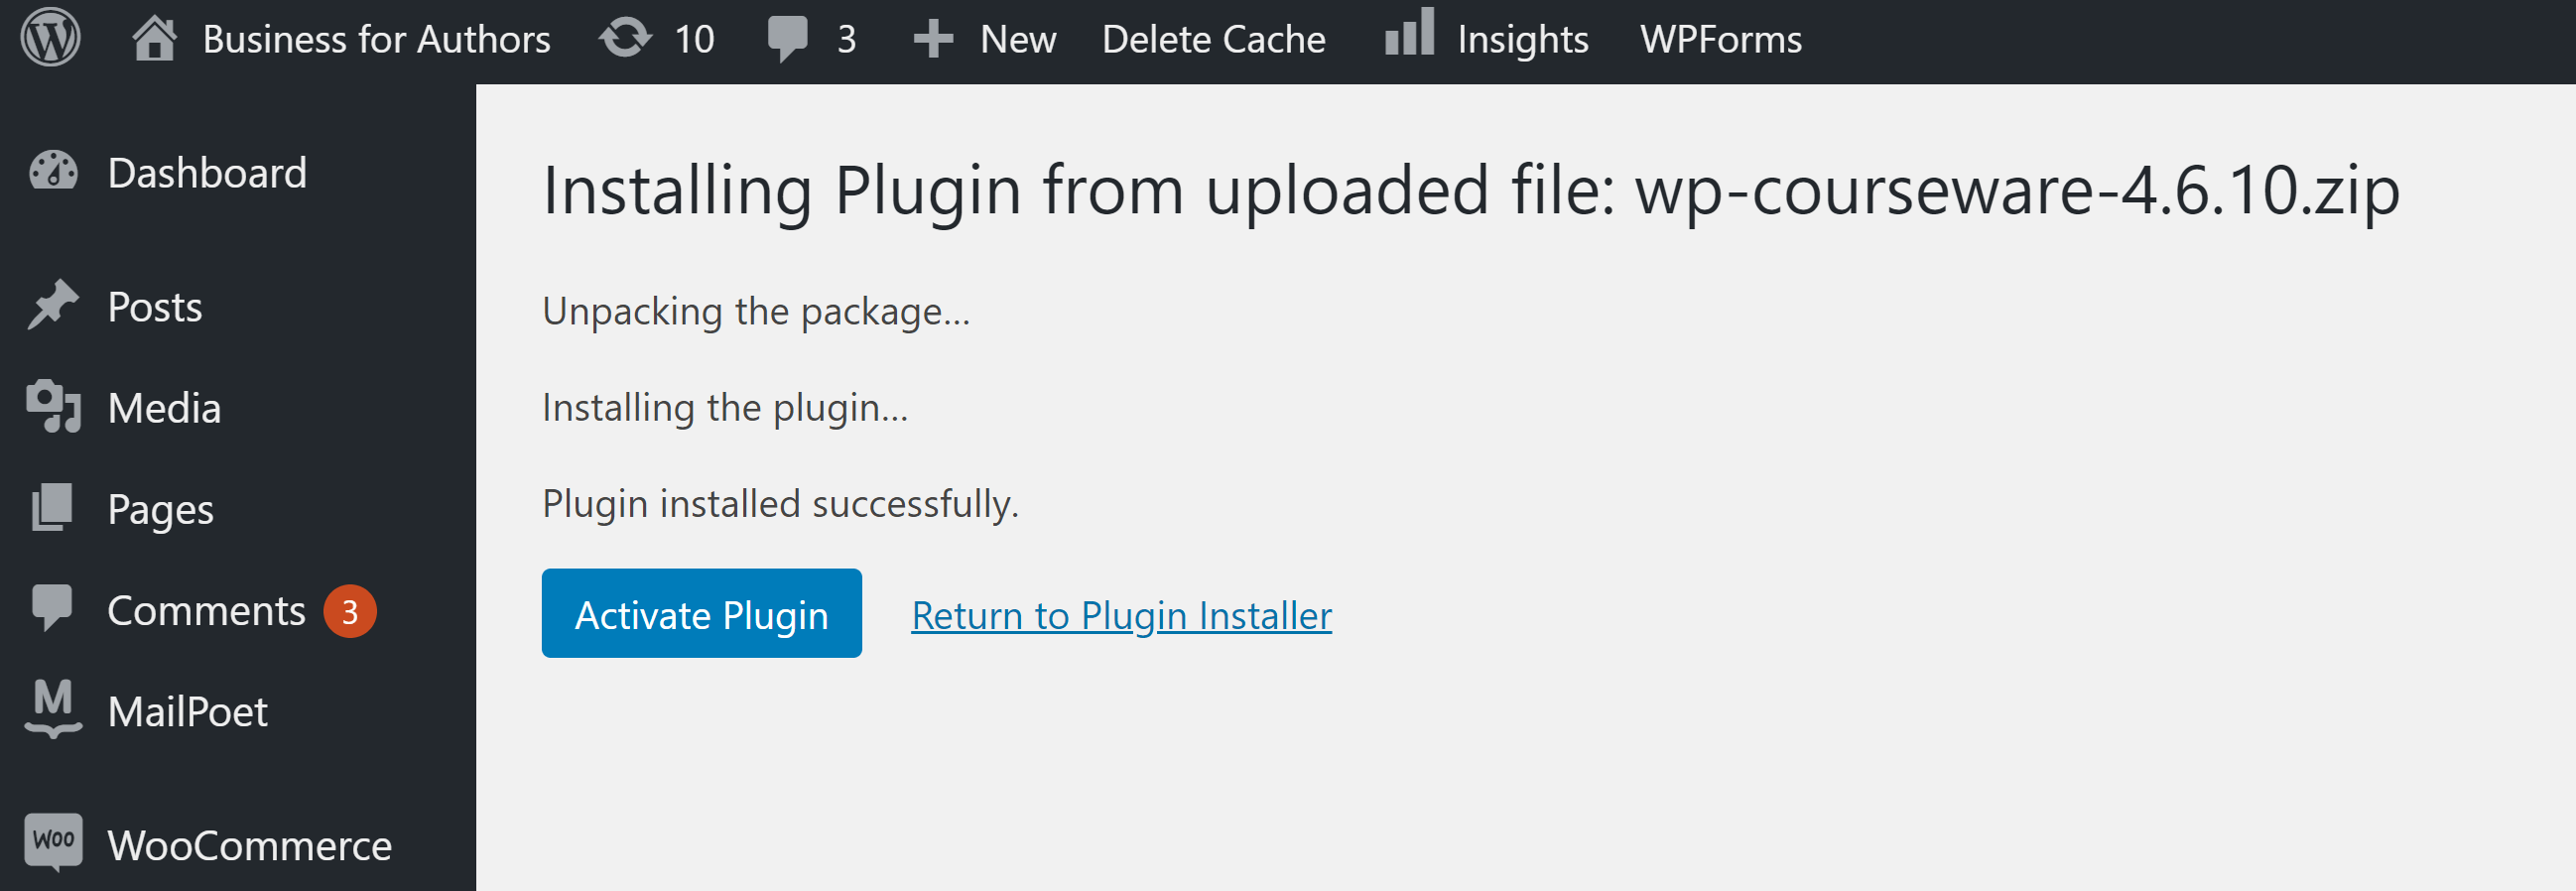
Next, open your WordPress dashboard in a new tab. Go to ‘Plugins > Add New’ and click the ‘Upload Plugin’ button at the top of the page to open a box where you can drag-and-drop your plugin. You can also click ‘Choose File’ to manually search for the plugin on your computer.
Click ‘Install Now’ for WordPress to unpack the plugin. When the process is complete, you’ll be asked to activate it.
Now, go to the ‘Settings’ area of WP Courseware and click on the ‘License’ tab, then copy and paste your API key from your payment page into the box provided. If you’ve closed your payment info page, you can also find the API key in the receipt emailed to you.
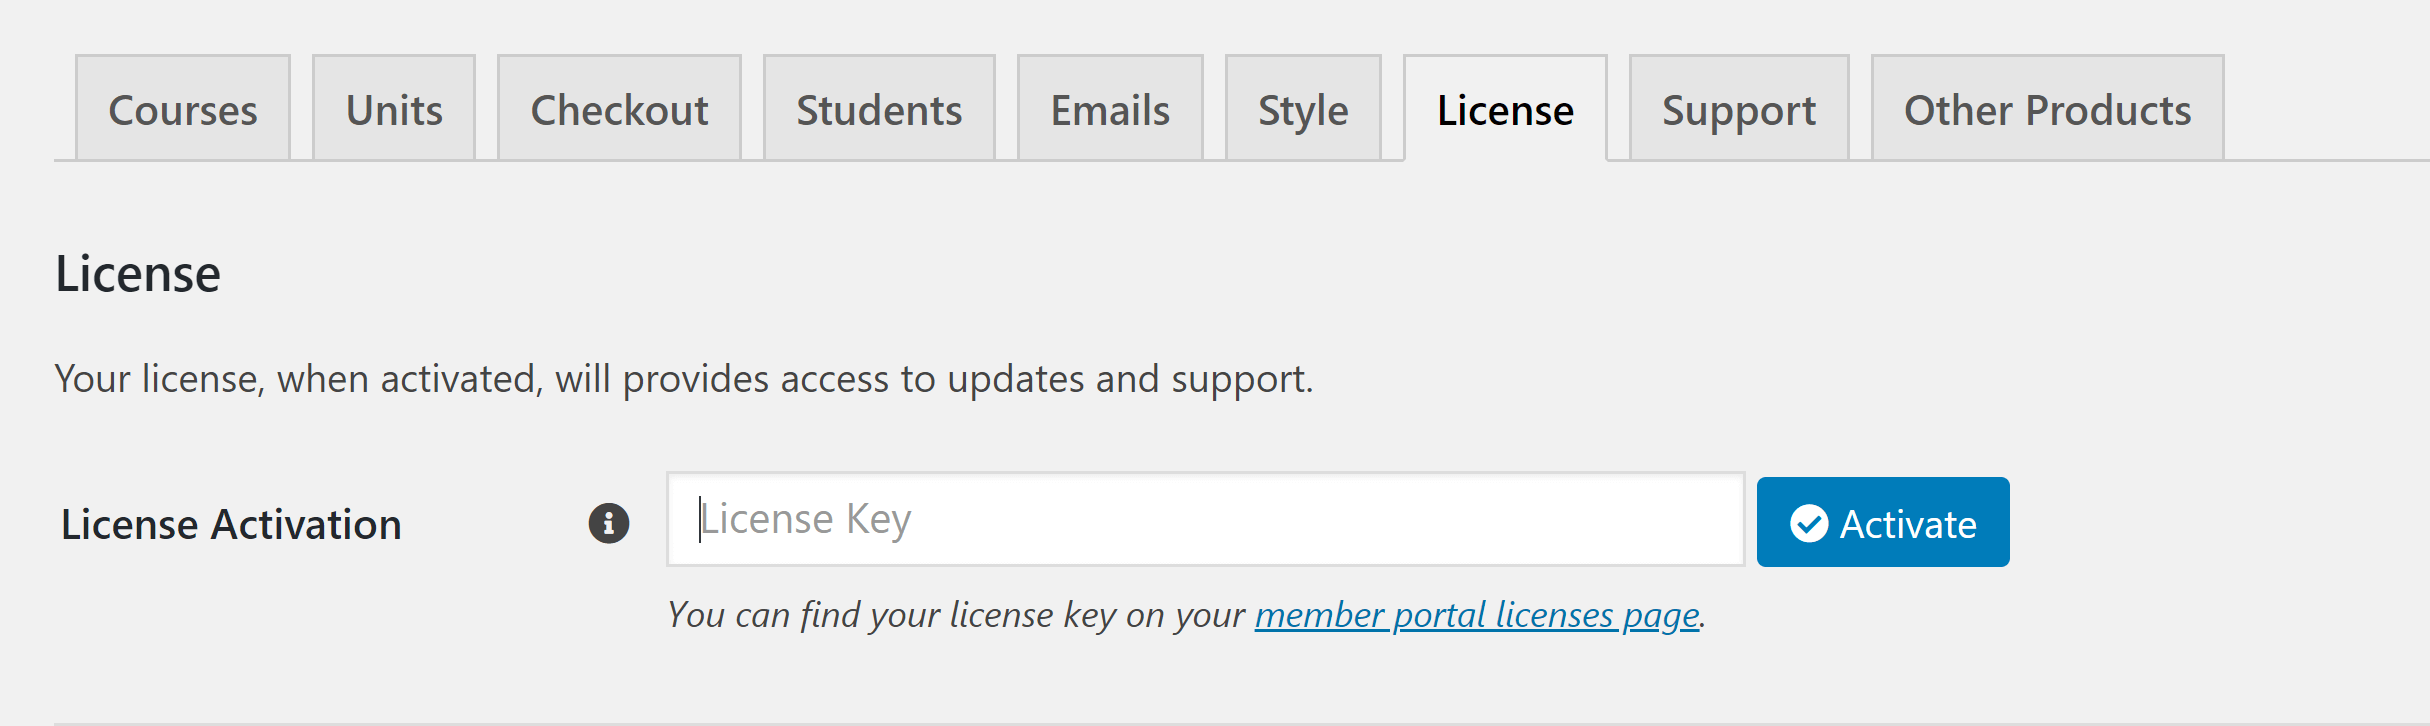
Entering the API key ensures your copy of WP Courseware will automatically receive updates, which is critical to keeping things working.
Setting up a Payment Gateway
This is the first place where you’ll notice a major difference in the debate of LifterLMS vs WP Courseware: WP Courseware has built-in compatibility with both PayPal and Stripe.
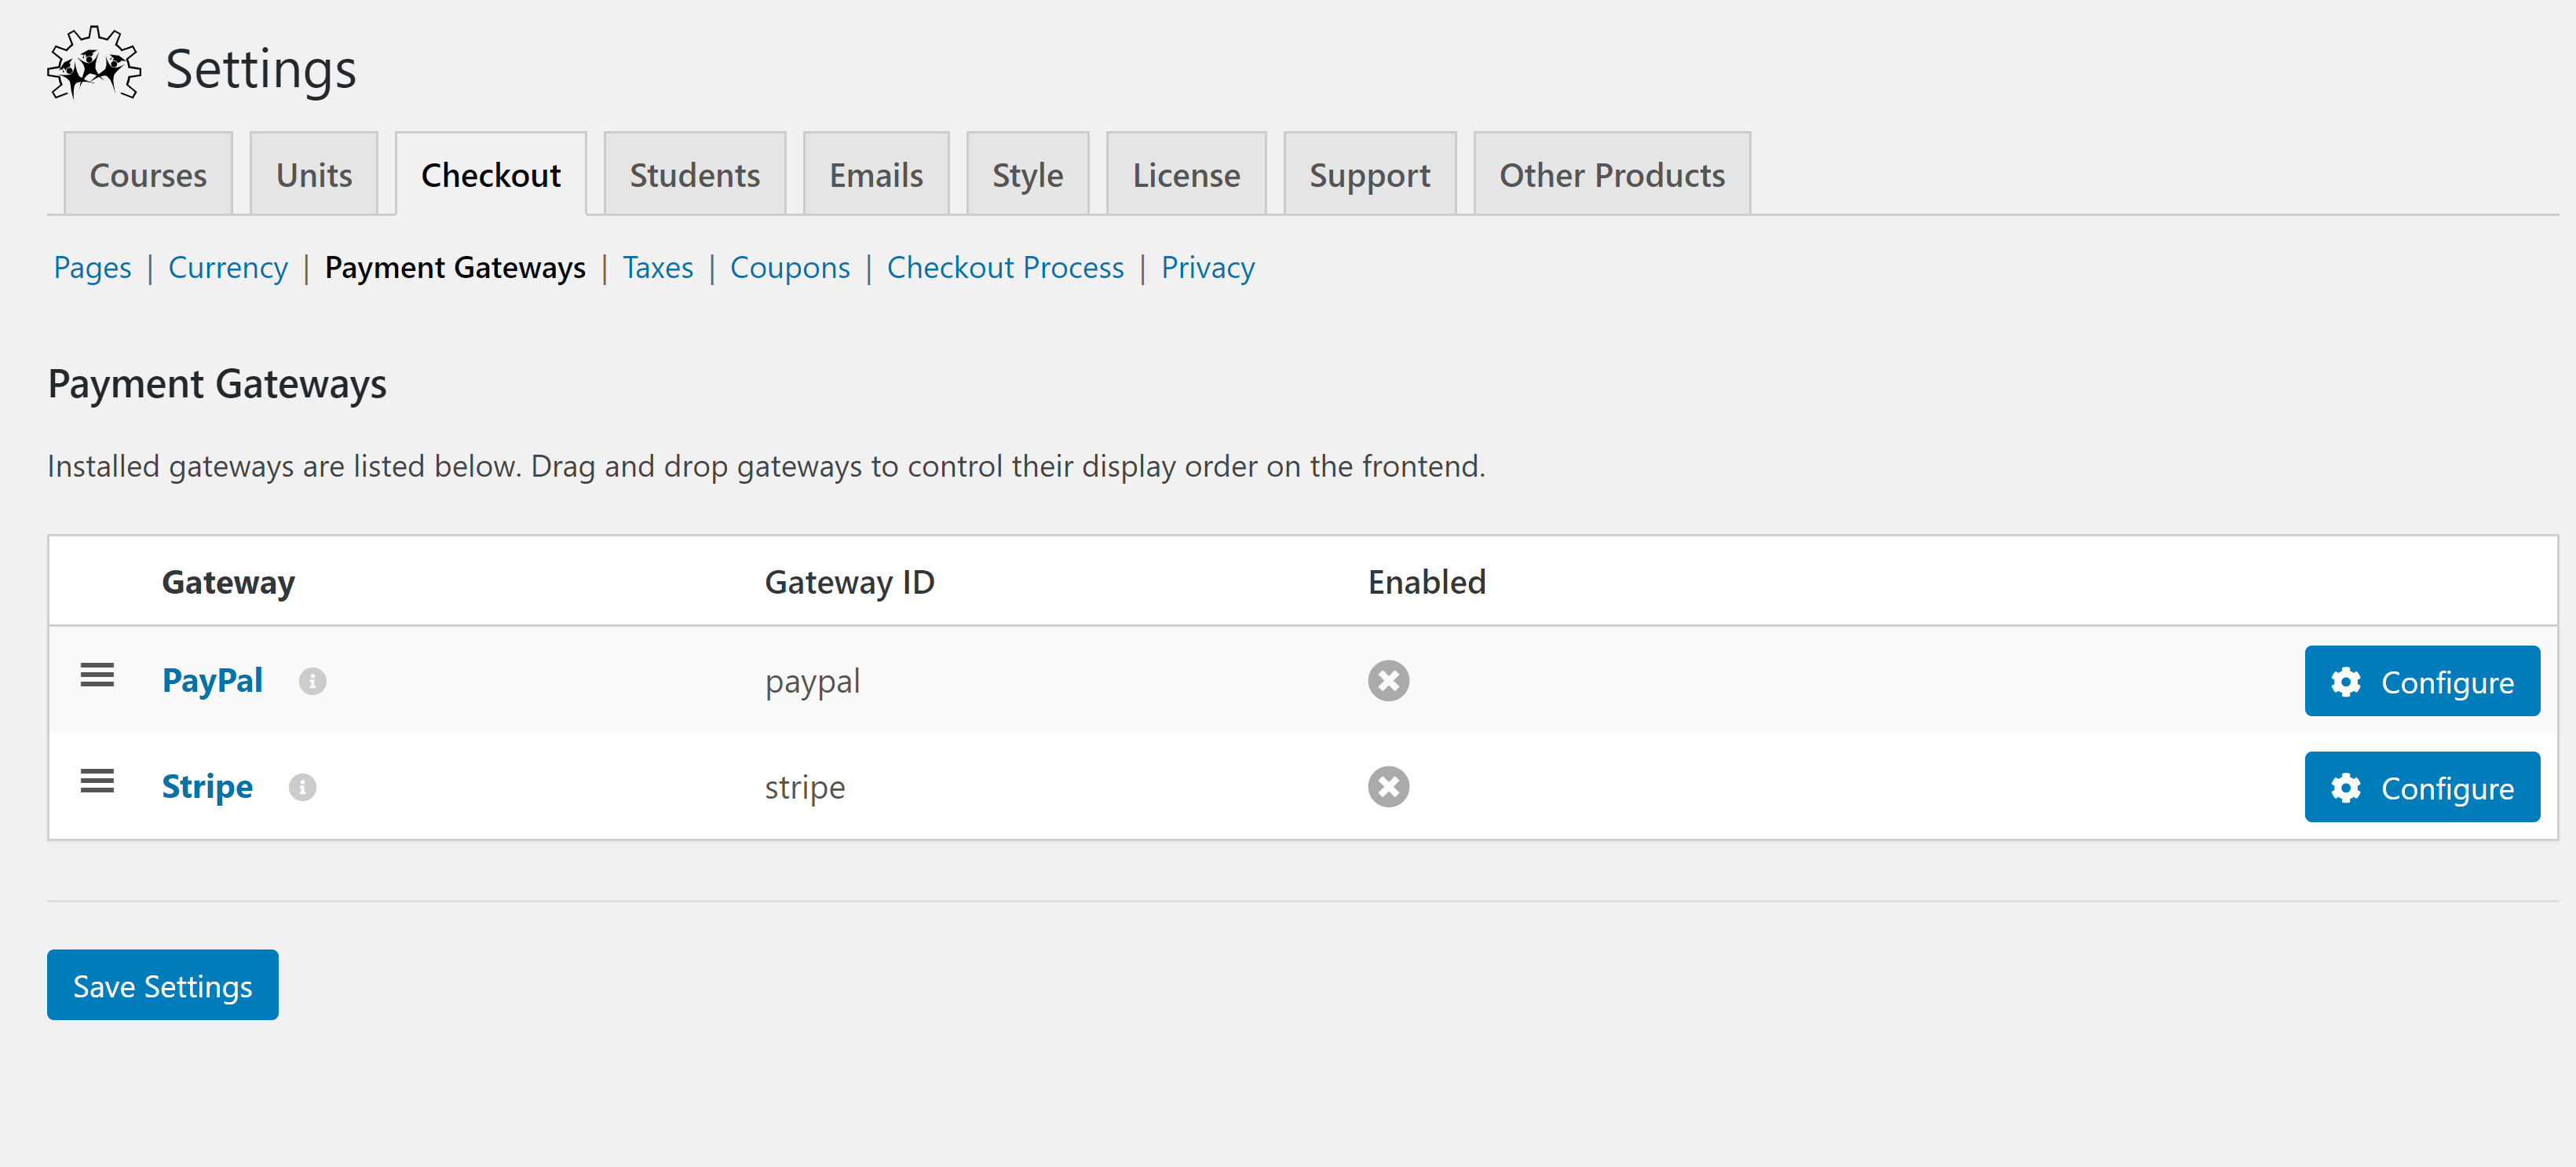
To set up your payment gateway, go to the ‘Checkout’ tab of the WP Courseware Settings area. This area has separate pages for a variety of settings, including currency, coupons and privacy. Click the ‘Payment Gateways’ link for now.
On the next page, choose the payment processor you want to use. You can click on either the name of the processor or the appropriate ‘Configure’ button.
The payment details you’ll need will vary based on the processor you choose.
Creating a Course
Now that you’ve got your payment processor set up, it’s time to start building a course! To do this, go to the ‘Courses’ area of WP Courseware and click the ‘Add New’ button at the top of the page.
This will take you to the course editor. The first time you’re here, you’ll see some information bubbles explaining basic components of the course builder. You can skip these if you want to dive right into course creation.

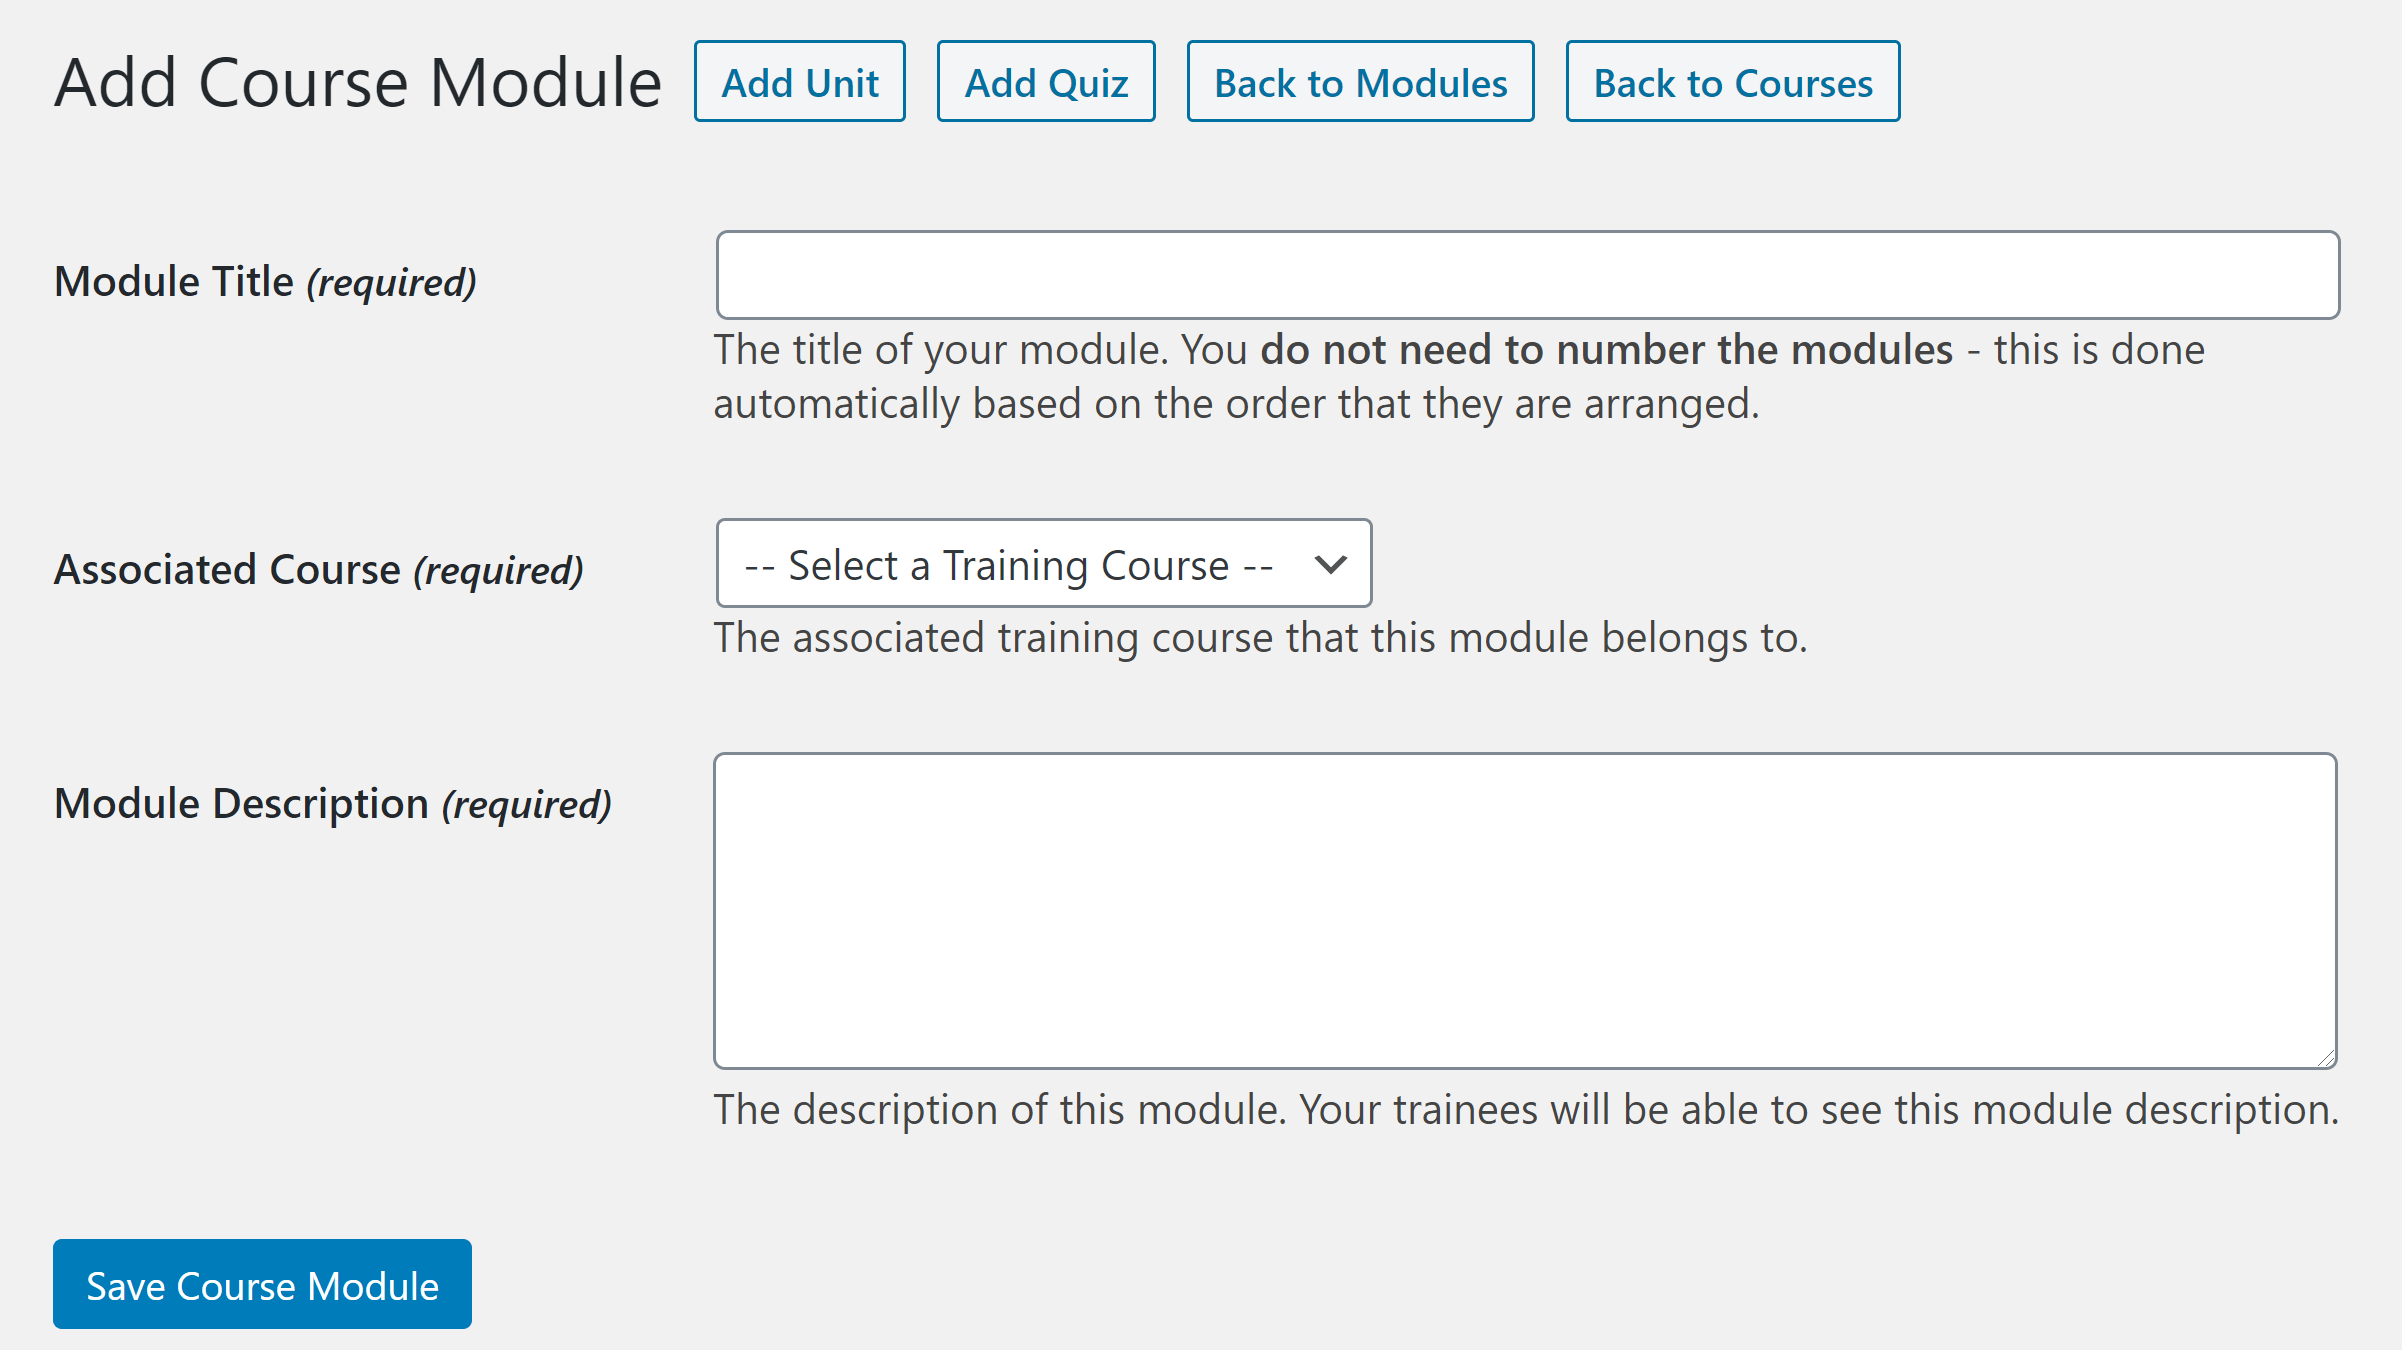
The course builder itself is directly below the title area. To get started, click ‘Add Module’, which will open a box where you can enter a title and description for the module. You can use HTML, images and other formatting elements you’d use on an ordinary WordPress page in the description.
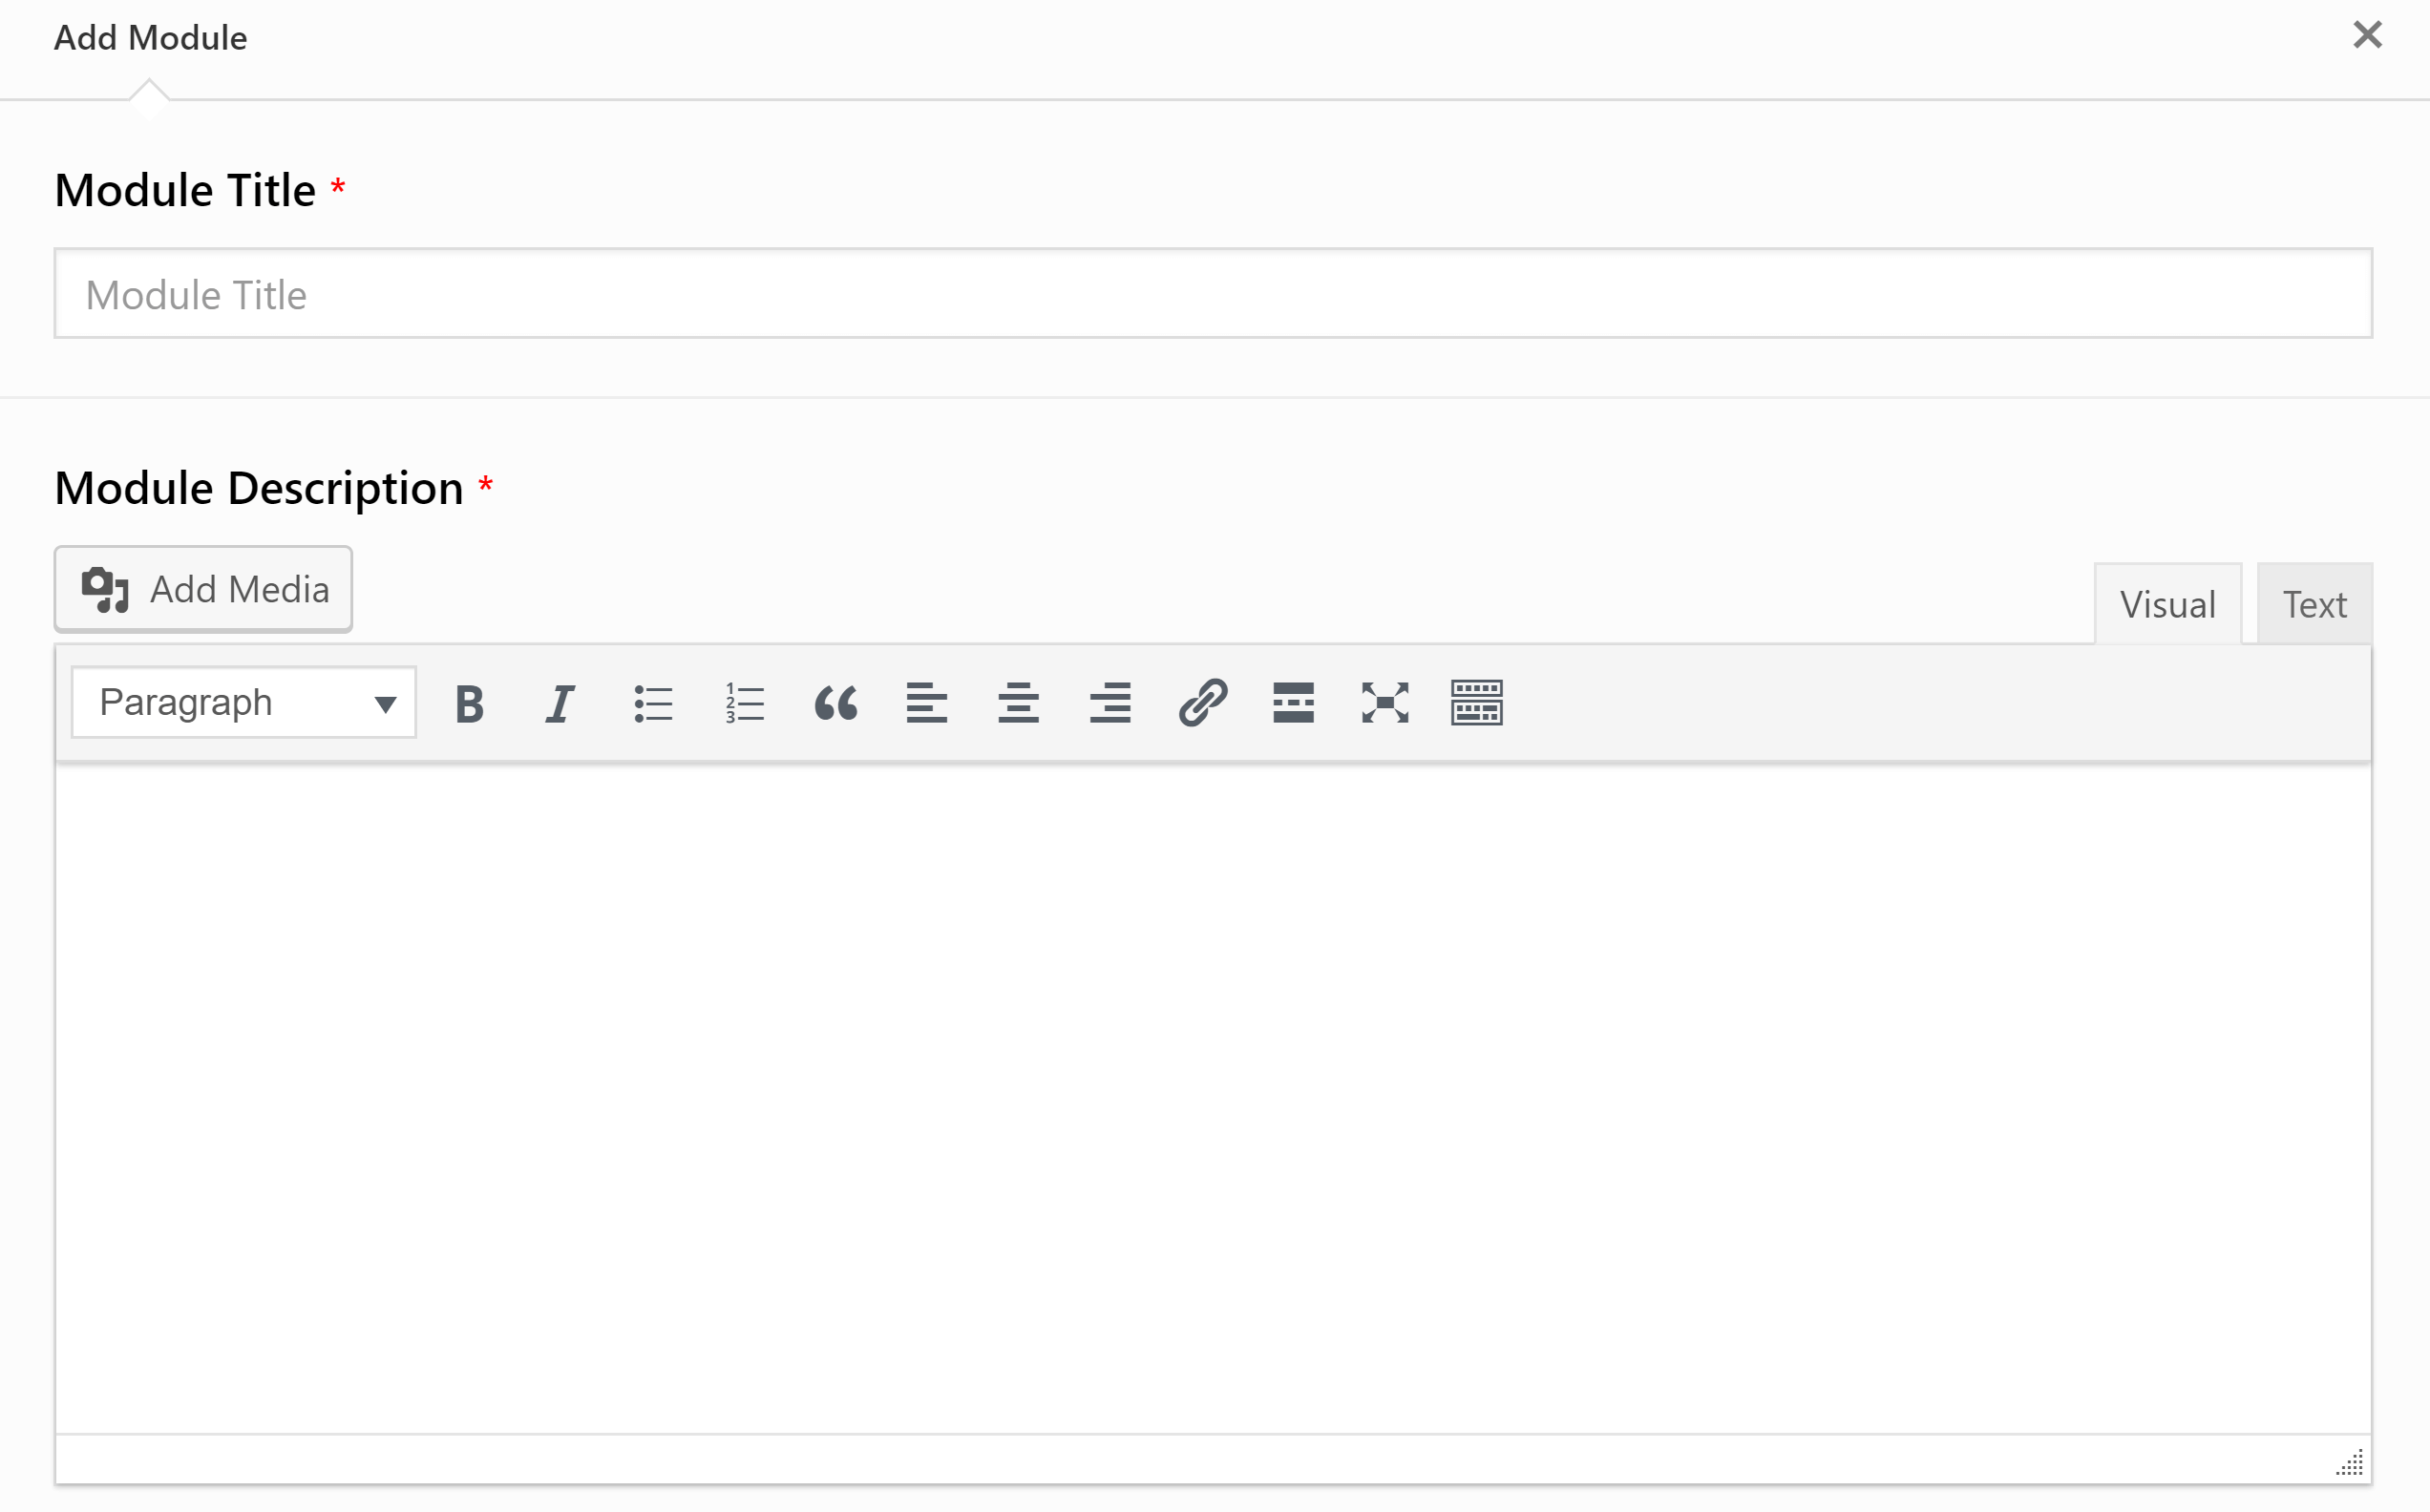
When your module is saved, you’ll be prompted to add a lesson. Clicking on the ‘Add Lesson’ link will make a box appear with areas for the unit title and contents — again, this can be formatted like any other WordPress page.

You can also add quizzes to modules by clicking the appropriate ‘Add Quiz’ link. An editor will appear, allowing you to set the title and description for your quiz — however, to edit questions you’ll need to separately go to the quiz editor.
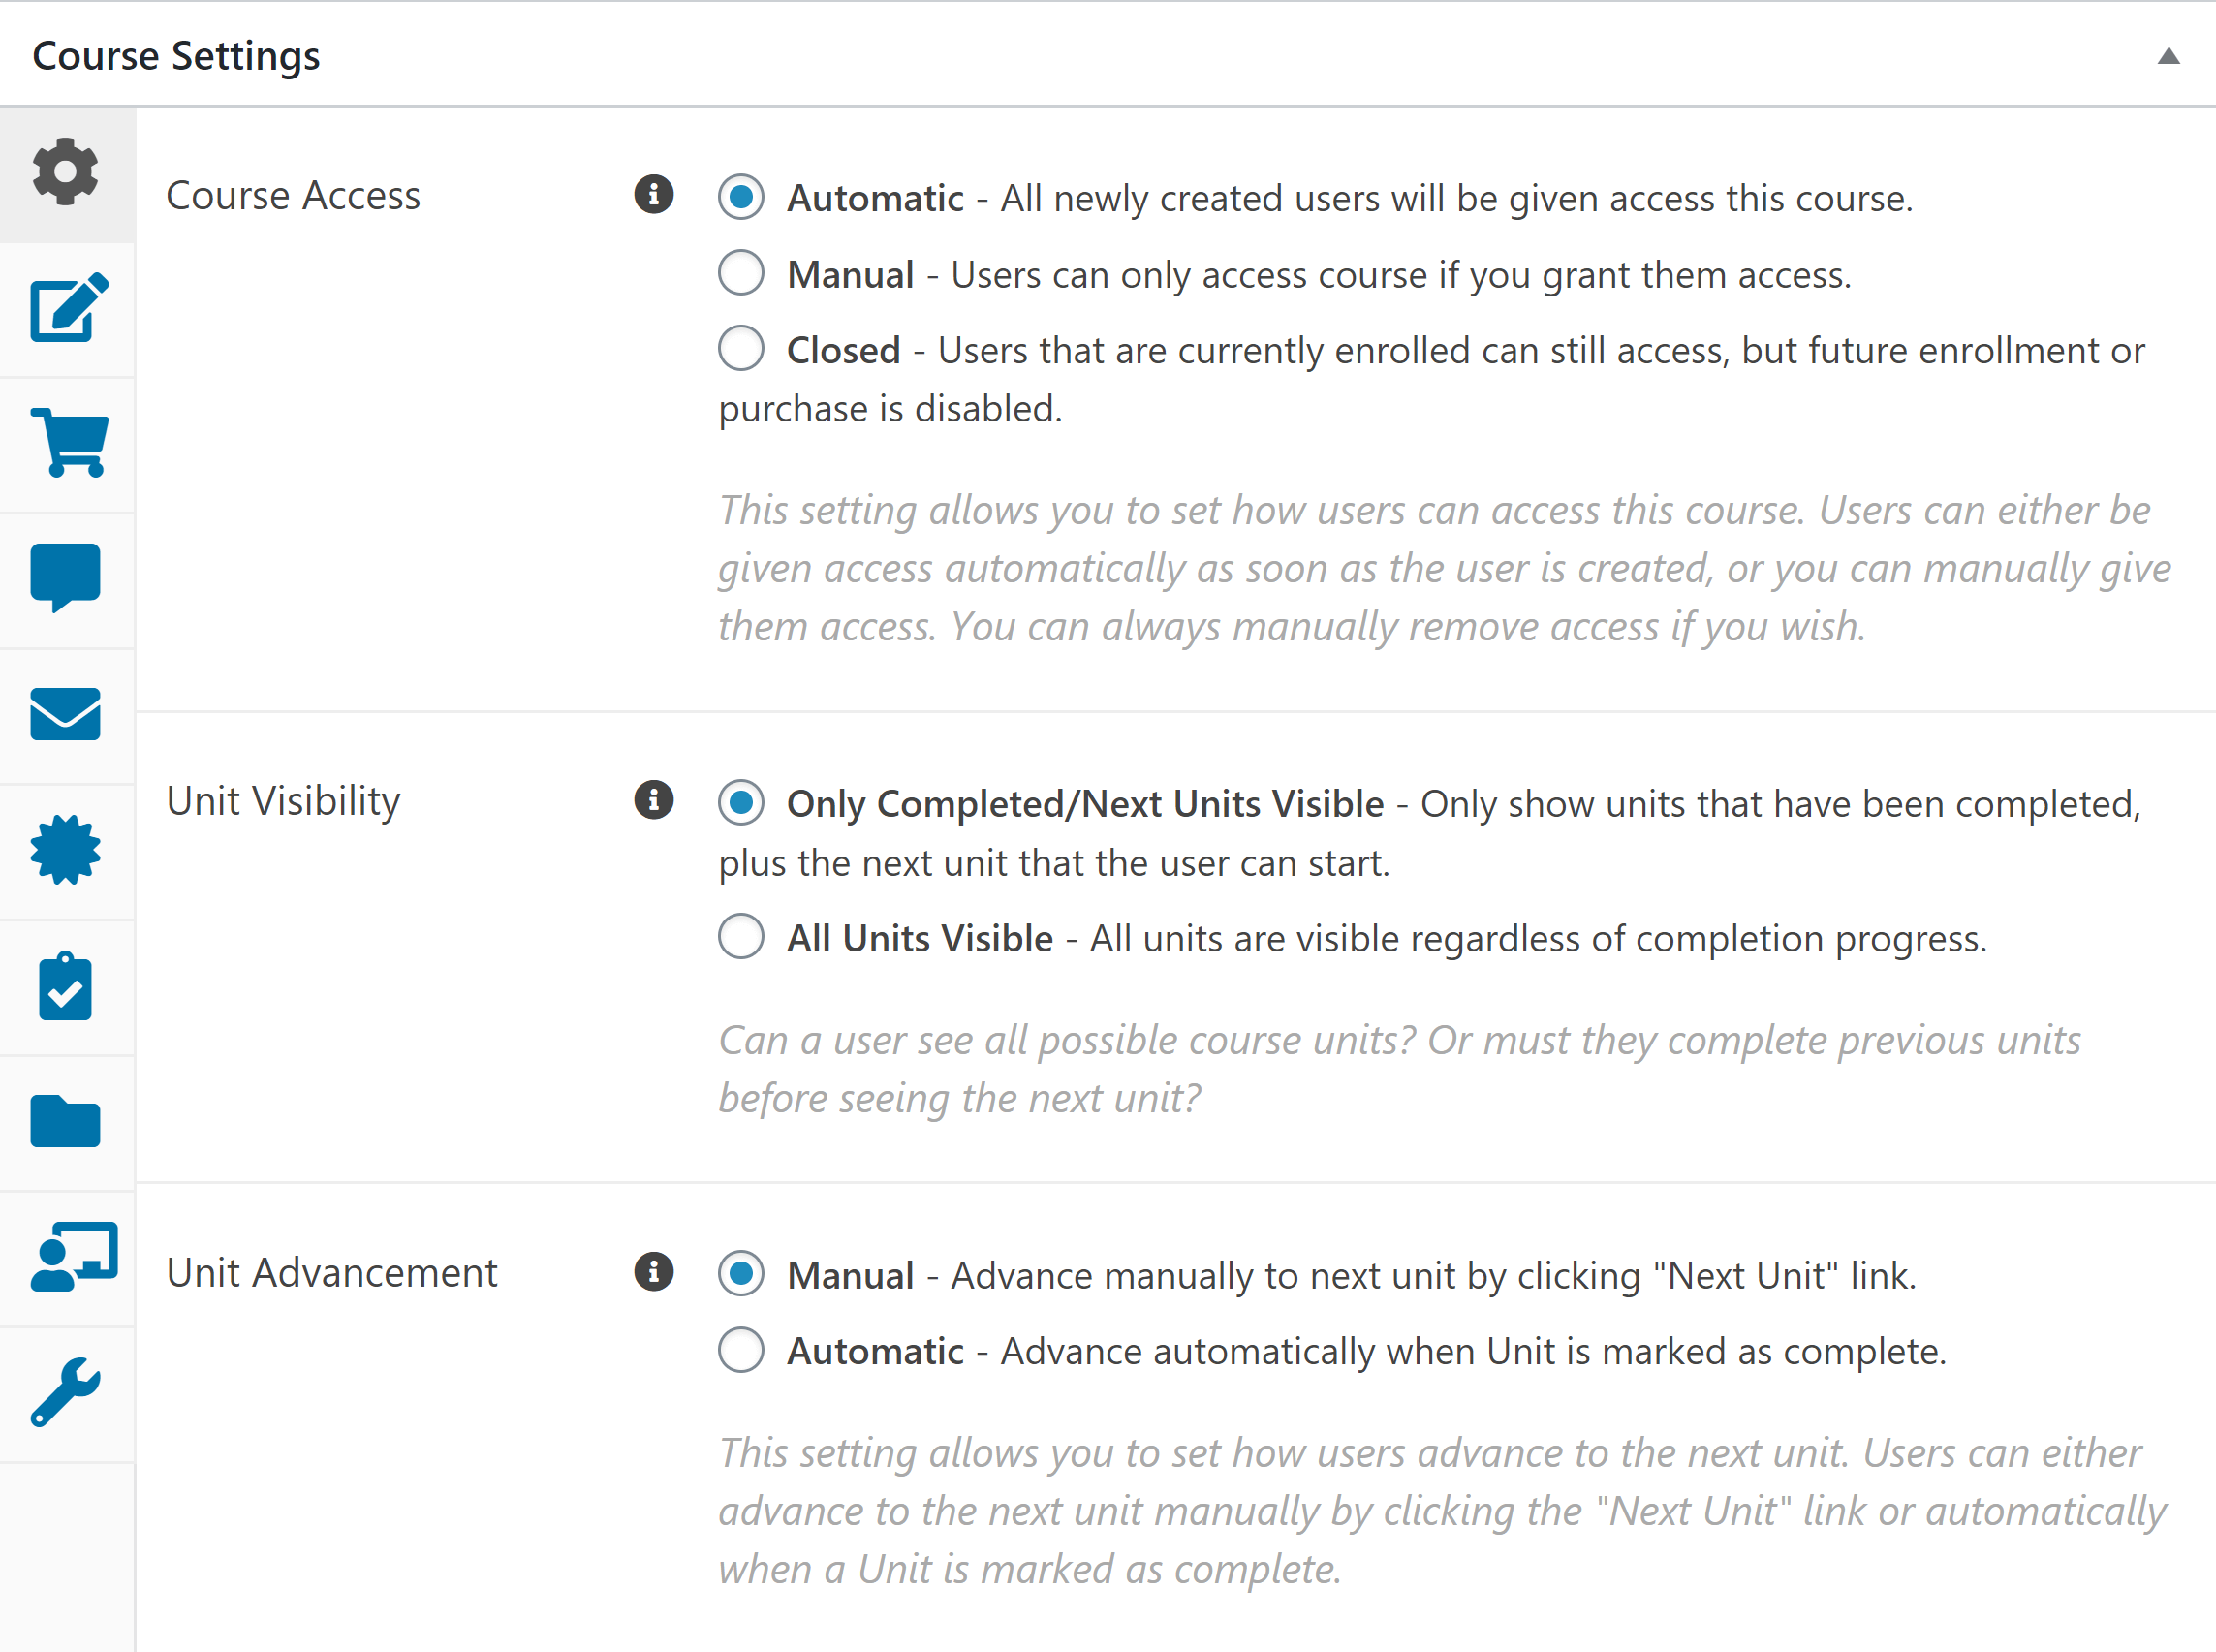
When you’re happy with the content you have in place, scroll down to the ‘Course Settings’ area. This box is divided into tabs that allow you to customize a myriad of features:
- Course description — this is what people interested in purchasing your course will see. You can format it like a regular WordPress page.
- Permissions — who can access the course, how they gain access to it, and how they advance through the course.
- Payment details — whether students can access the course for free, through a one-time fee or via subscription. You can also set the exact price here.
- Course messages — the emails students receive when they finish units and complete the course. These can be fully customized with HTML.
- Sending email — the email address that will appear in the ‘From’ area of course emails. You can also specify a different email address to receive course notifications.
- Instructor — The person who is officially in charge of the course. This must be an existing user on your WordPress site.
- Course prerequisites — choose other courses that must be completed before students start this one.
- Course bundles — sell this course in a group with other relevant courses.
- Bulk access/reset — change access or reset progress for students in bulk.
Once you’re happy with all of these settings, click the ‘Publish’ button near the top of the page.
Module Editor
Another notable thing in the debate of LifterLMS vs WP Courseware is that with WP Courseware you can create modules outside the course builder. To do this, go to ‘WP Courseware > Modules’ and click the ‘Add New’ button near the top of the page.
This will take you to a page where you can create a title and description for a module, as well as assign it to a specific course. A module can’t exist without being assigned to a course.
If you click the ‘Add Unit’ or ‘Add Quiz’ buttons along the top of this page, you’ll be directed to the appropriate editor for that type of content.
Unit Editor
Another way to create units in WP Courseware is to go to the ‘Units’ area and click the ‘Add New’ button near the top of the page. This will take you to what’s essentially the WordPress block editor with a couple of adjustments.
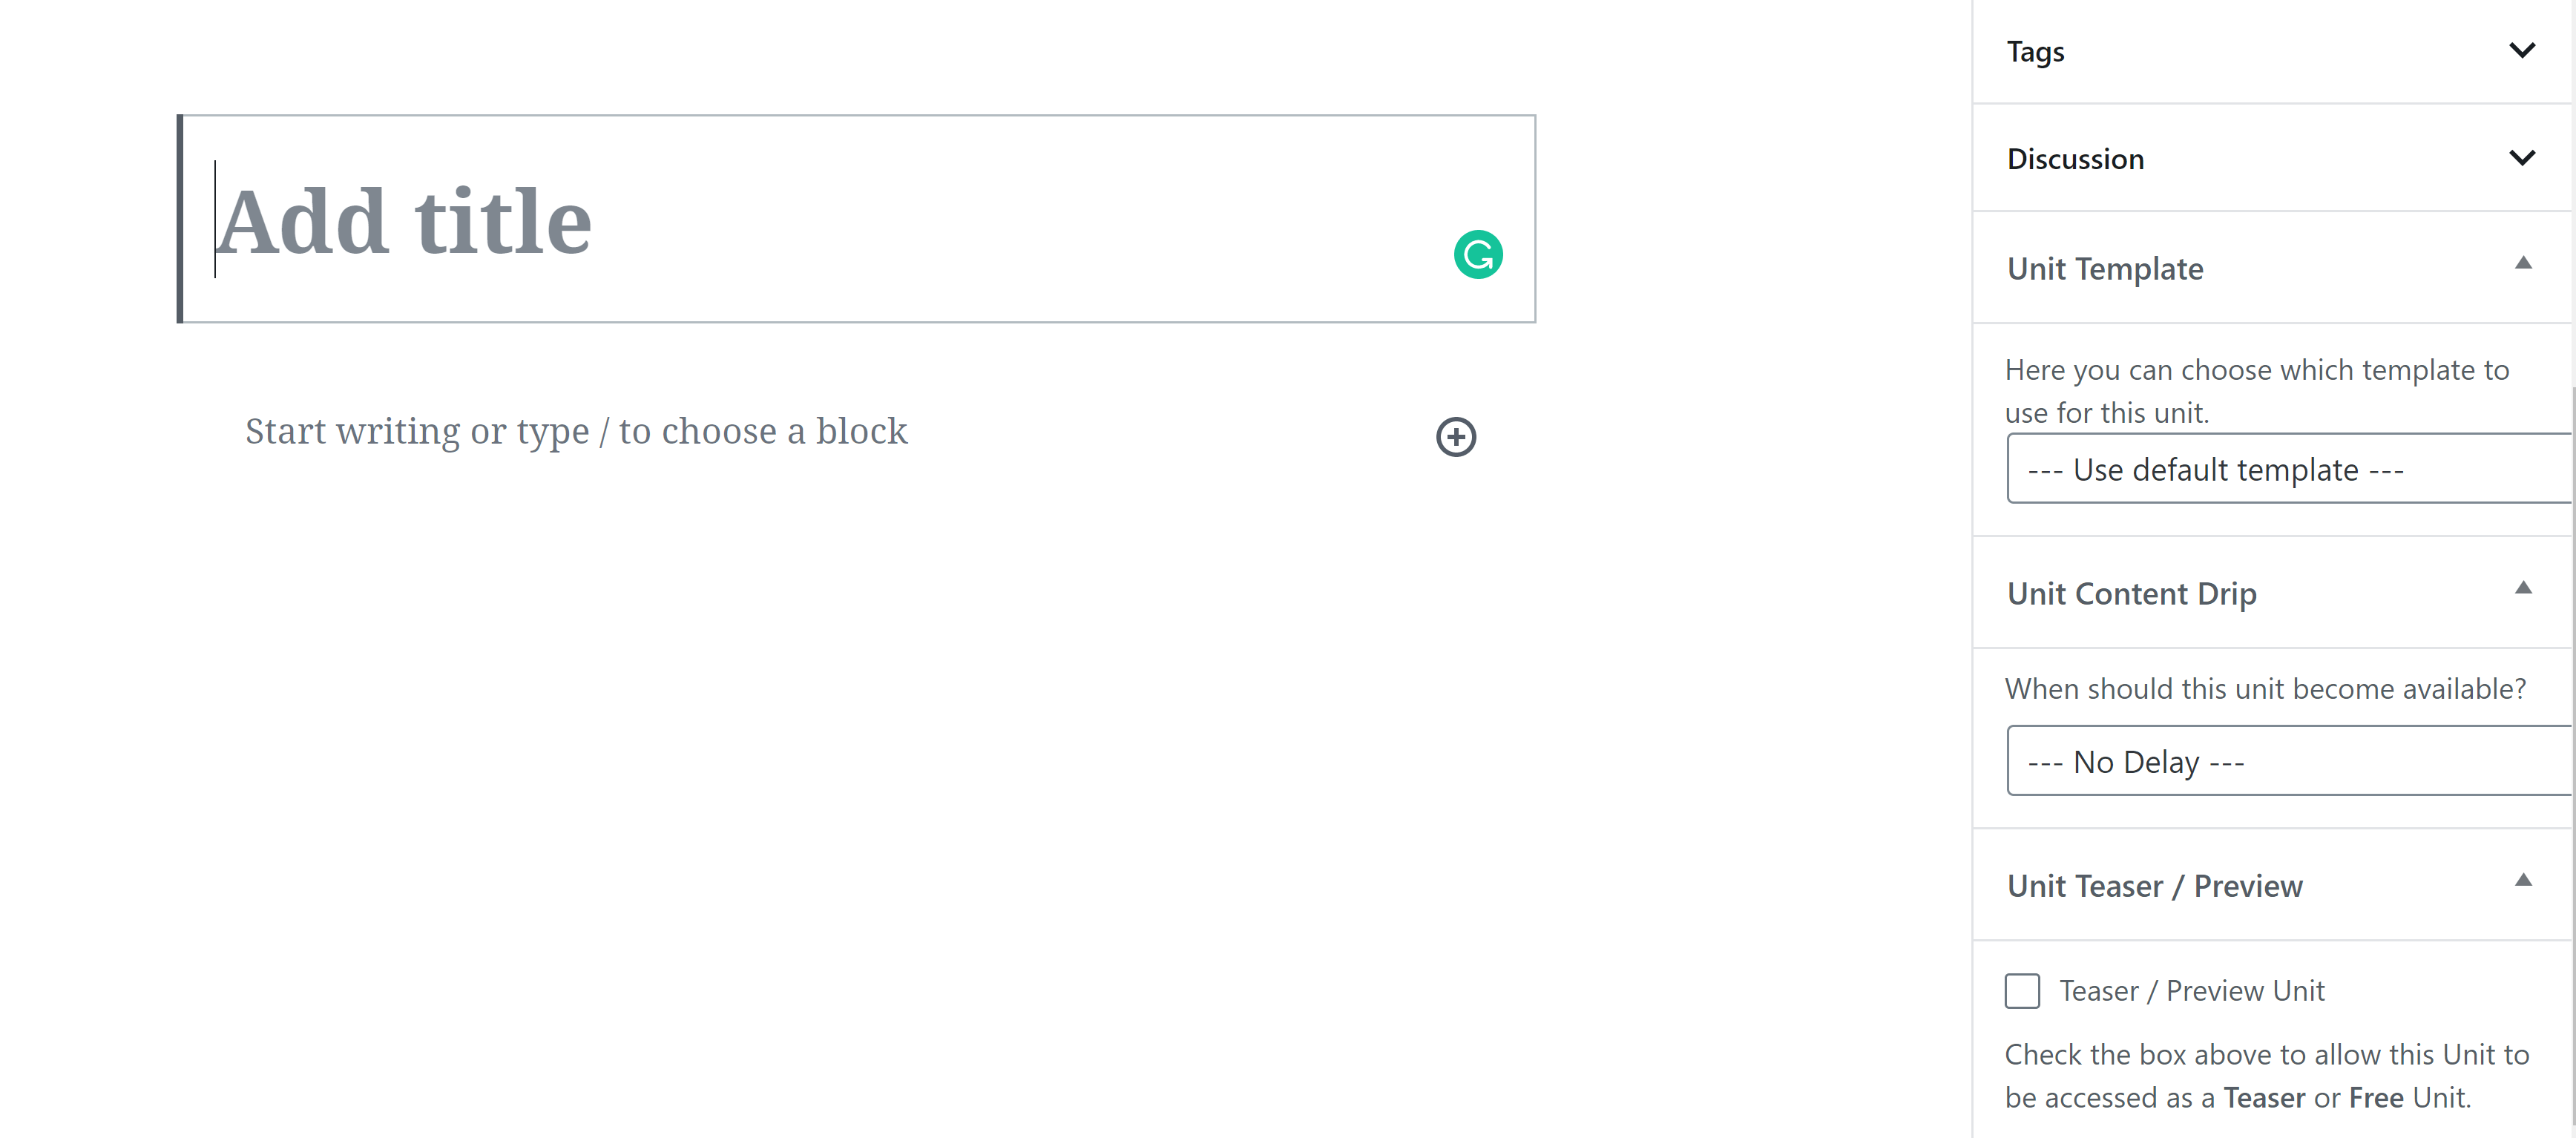
The unit editor can also be used to specify content dripping settings and choose a unit template (an ideal way to make the course experience more cohesive), and/or make the unit a free preview for the course it’s in.
Quiz Editor
This is the second place where WP Courseware really outshines LifterLMS, with more advanced customization and less confusion in the setup process.
To get started, go to the ‘Quizzes’ area of WP Courseware. From here, you can either click on a quiz you created while building your course or press the ‘Add New’ button at the top of the page.
This will take you to a page where you can select the title, description and quiz type. You must select a quiz type before you can add questions.
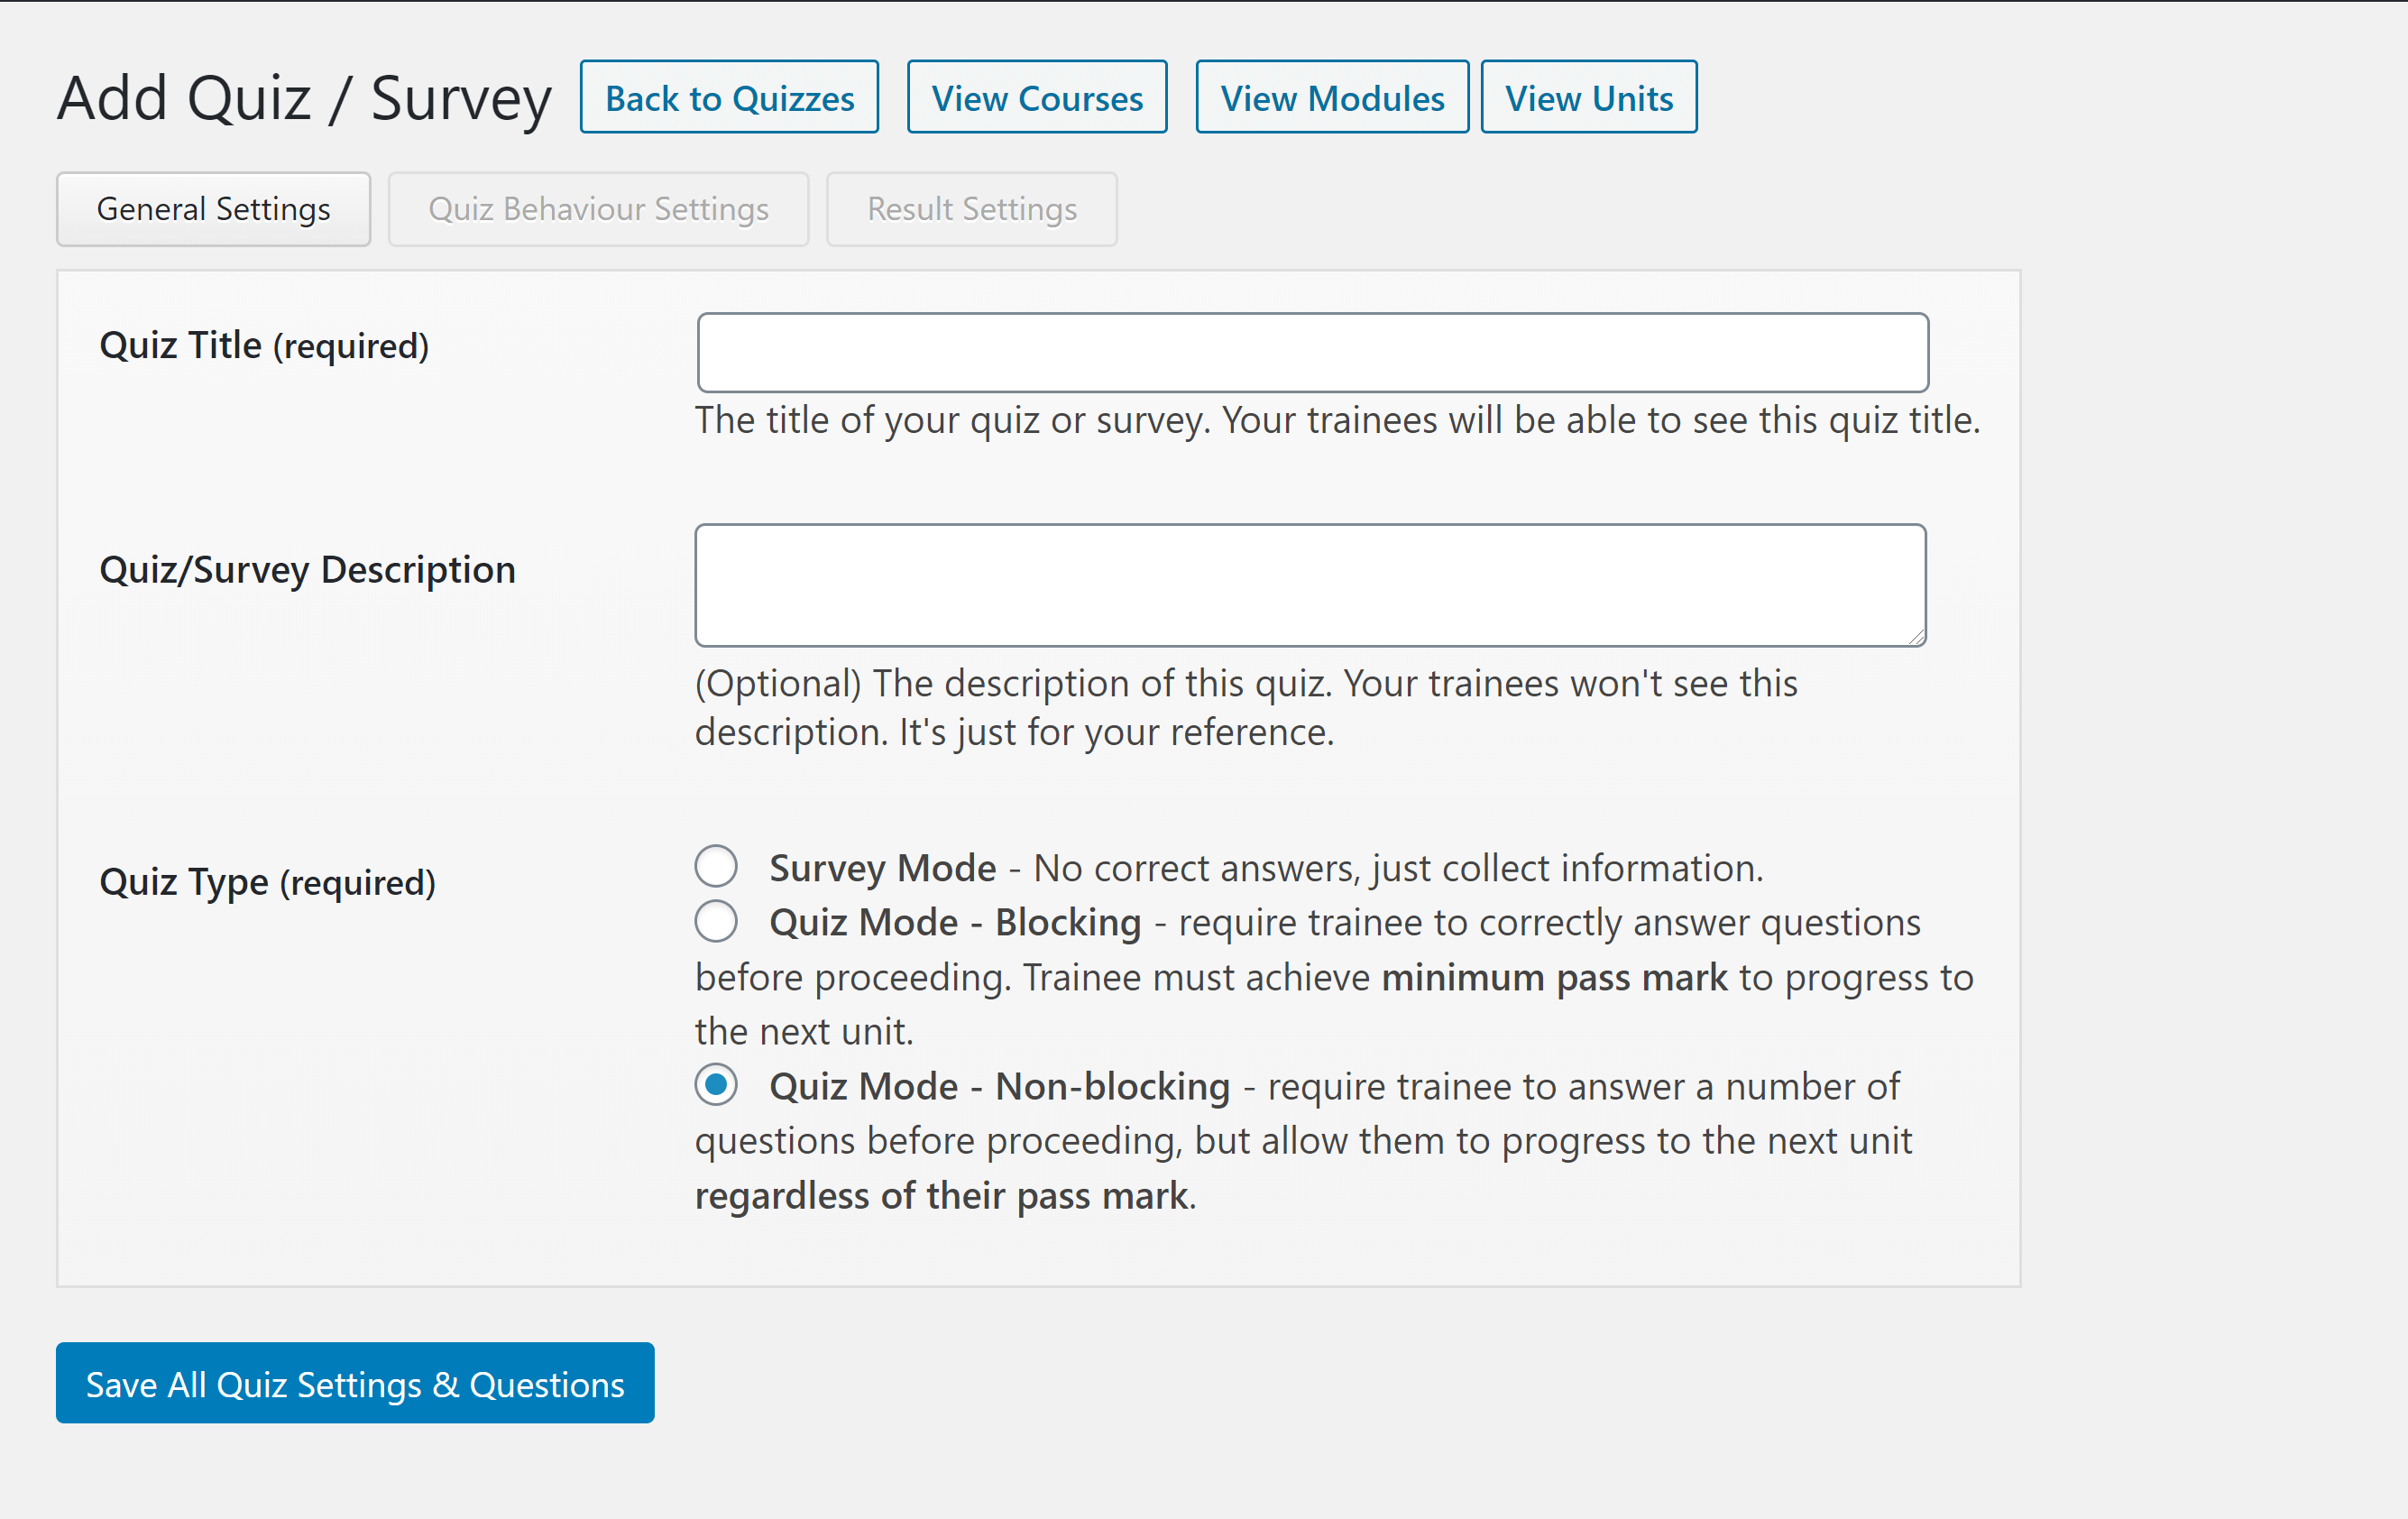
When you’ve saved these settings, a box will appear with buttons for various question types, and you can add several of these:
- Multiple choice
- True/false
- Open ended
- File upload
You can also add a question from the pool or have WP Courseware select a random question if you’ve created quizzes before.
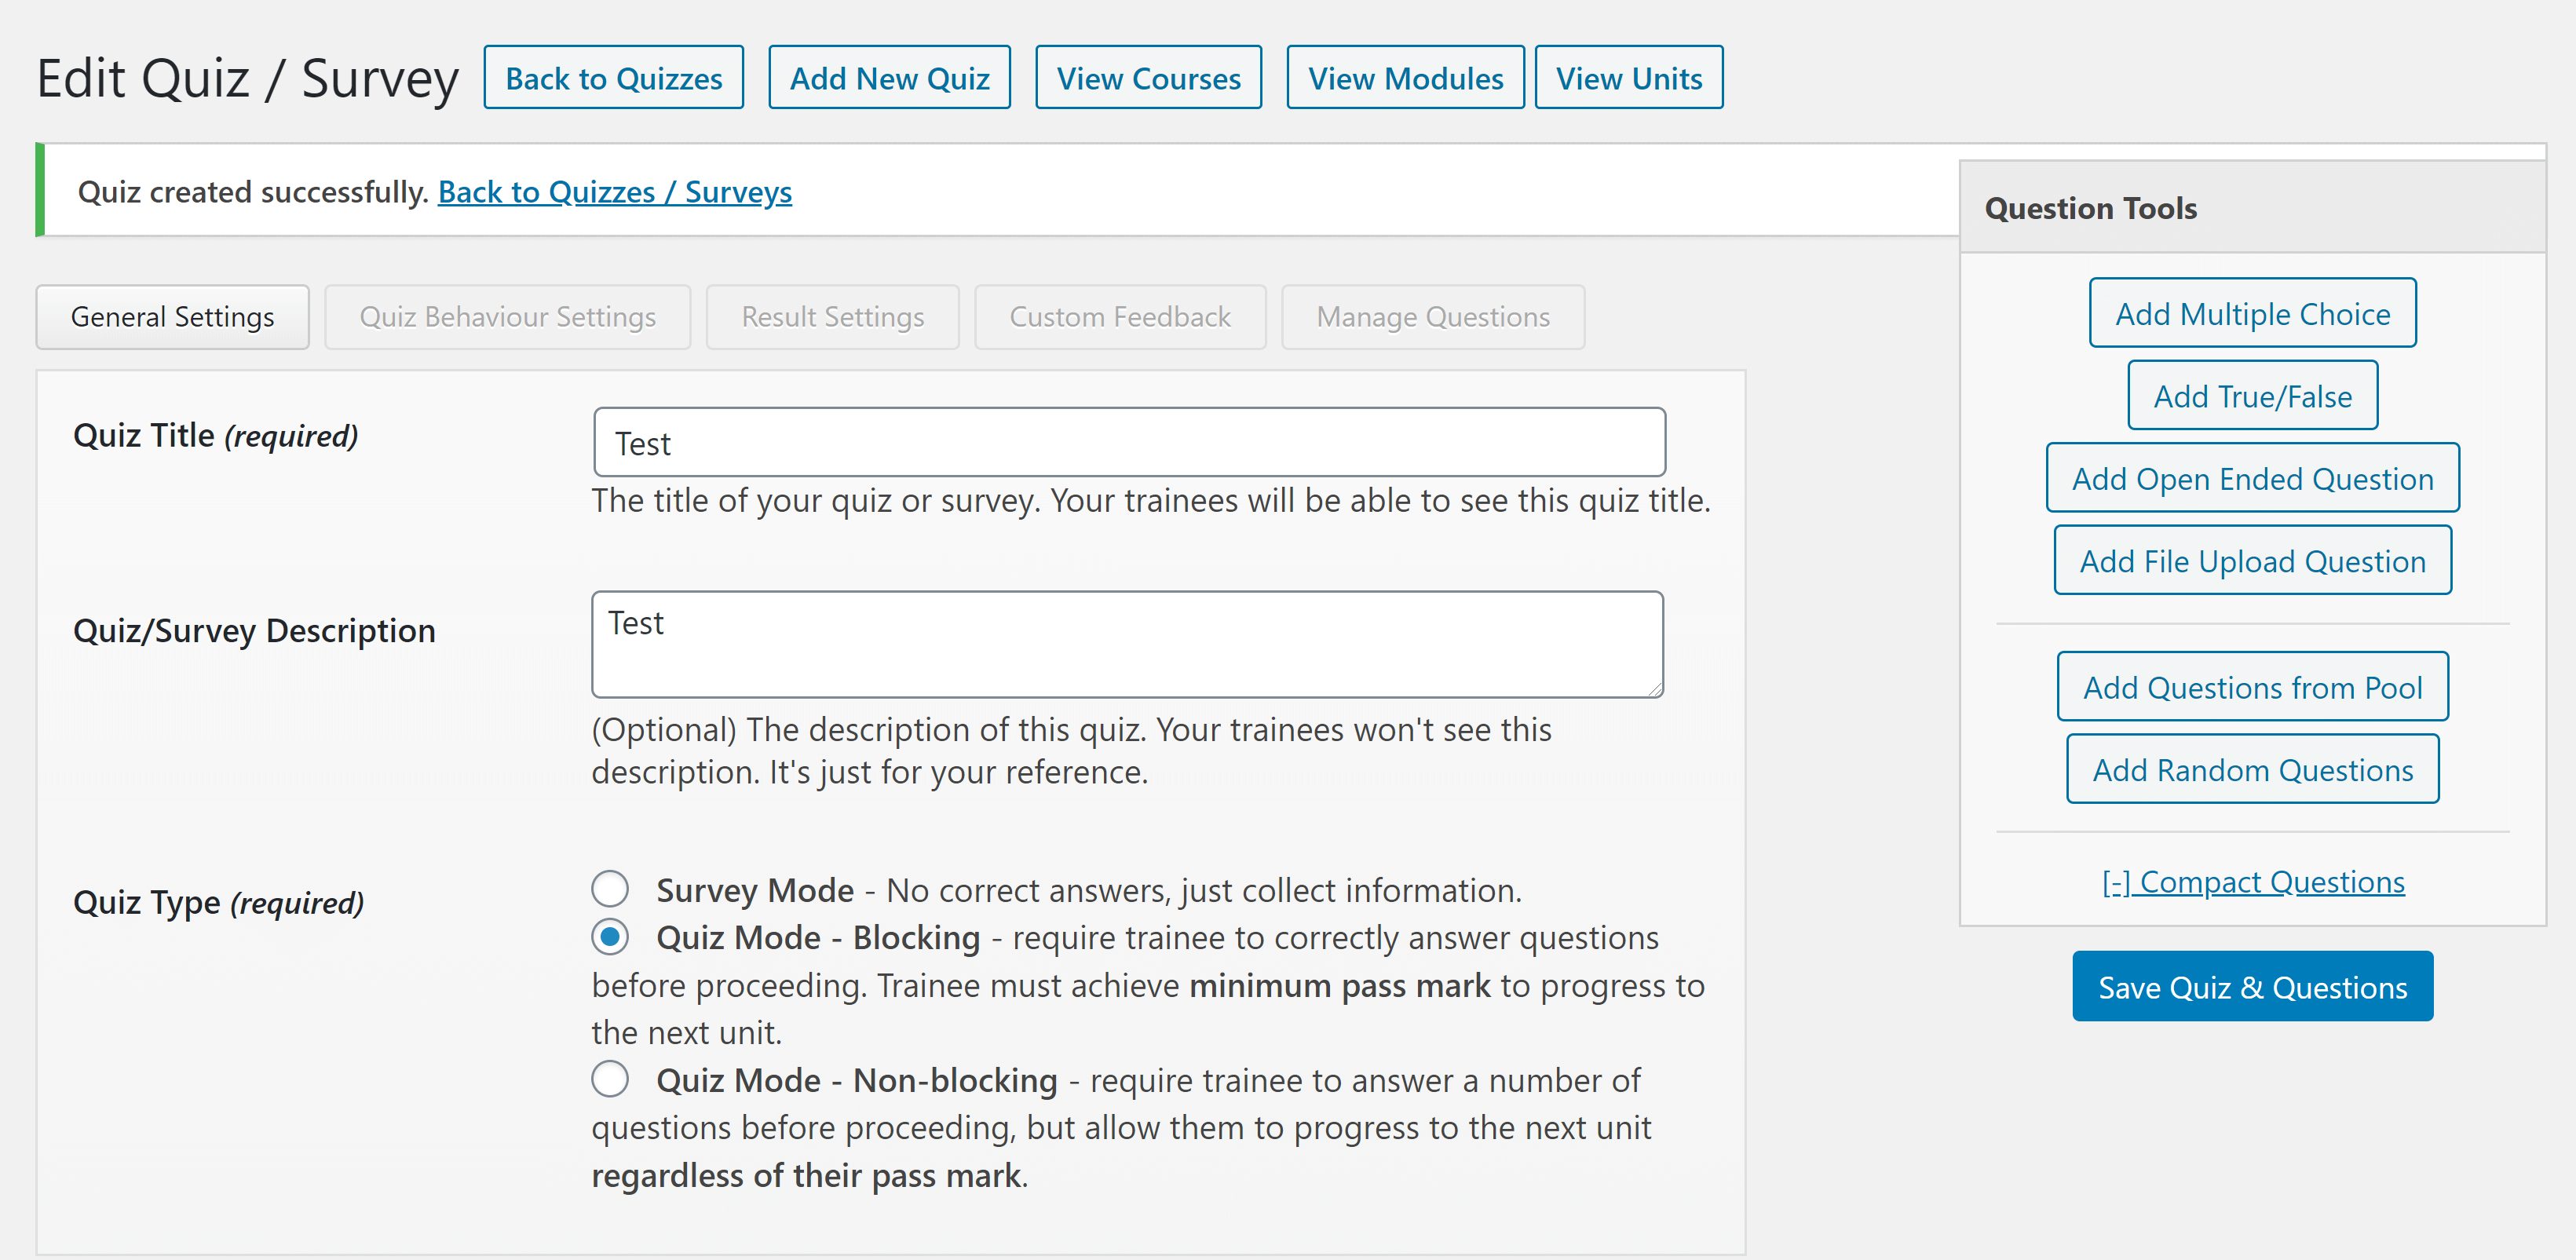
The buttons along the top of the quiz editor will take you to pages where you can modify a variety of settings:
- Quiz behavior — the mark required to pass, how many times students can attempt the quiz, and the time they have to complete it in (you don’t have to set a time limit if you don’t want to).
- Results — how students see their quiz results, and whether or not they can download these results.
- Feedback messages — custom messages that appear when students give specific answers.
- Question management — what order the questions are asked in.
When you’re satisfied with these settings, click ‘Save All Quiz Settings & Questions’.
Add-ons and Integrations
WP Courseware is compatible with numerous plugins, including bbPress, Bloom and DW Question & Answer.
WP Courseware also offers free add-ons that allow integration with marketing tools, membership plugins and WordPress page builders. These come in the form of additional plugins, which can be downloaded from WordPress.org.
Pricing
WP Courseware offers three pricing plans:
- Teacher: Available for $124.50 a year (regular $249 a year). This is the plan we looked at for this article, which includes all features of WP Courseware for use on up to two sites.
- Professor: Available for $149.50 a year (regular $299 a year). This plan offers all features of WP Courseware for use on up to 10 WordPress sites.
- Guru: Available for $199.50 a year (regular $399 a year). This plan offers all features of WP Courseware for use on up to 25 sites.
There are no add-ons, surprise fees or misleading pricing to worry about here.
Overall Thoughts
In the debate of LifterLMS vs WP Courseware, the winner is pretty clear. WP Courseware doesn’t try to upsell you on a bunch of add-ons — everything is built right into the program or available as a free add-on. The pricing structure is also easier to understand.
On a functional level, WP Courseware offers more flexibility and a less convoluted process. The course builder, course settings and descriptions are all on the same page.
The WP Courseware quiz builder is also much more functional, both in terms of how the quiz functions and the types of questions you can ask.
LifterLMS vs WP Courseware: Similarities
- Code-free course builders with drag-and-drop functionality.
- Quiz capability.
- Multimedia lessons.
- Content dripping.
- Capacity for multiple instructors.
LifterLMS vs WP Courseware: Differences
- LifterLMS has a more aesthetically pleasing interface.
- WP Courseware offers built-in compatibility with multiple payment processors.
- LifterLMS offers a Tracks system that allows you to create certification and degree programs.
- WP Courseware has a more advanced quiz builder than the core LifterLMS plugin.
- LifterLMS offers a student dashboard to create a more immersive and organized experience for students.
- WP Courseware offers built-in compatibility with a wider variety of plugins.
- WP Courseware provides add-ons for free.
LifterLMS vs WP Courseware: The Verdict
Initially, I was excited to try LifterLMS. The flashy marketing and academic aesthetic really appealed to me. However, I experienced misgivings when I noticed the unusual price structure, and those grew as I used the plugin. The constant upselling and the requirement to pay for add-ons for even basic integrations rubbed me the wrong way. I also disliked the limitations of the quiz builder.
All of this combines to make one thing clear: WP Courseware is the clear winner. It may not be as pretty, but it offers far more functionality without any of the predatory pricing. You also get license to use it on two sites even with the most basic plan, which gives it unbeatable value.
Used/using either of these two plugins? Thoughts?


All comments are held for moderation. We'll only publish comments that are on topic and adhere to our Commenting Policy.