
How to Create an Online Course Website With WordPress – Beginner’s Guide to What’s Important
- By
- Last updated:
- Leave your thoughts
There’s a lot of information out there on how to create an online course website, which you’ve probably realized if you’ve been researching this subject for any amount of time.
The topics really pile up:
- How do I pick the right platform? How much do I need to invest in my online course website? Can I build it all on my own? How do I make money off the damn thing?!
If you’re looking for advice on how to simplify things a bit and take the path of DIY-ing your way to success with an online course, then you’re in the right place.
In this guide, I’ll show you how to create an online course website with WordPress and take it all the way from take-off to a fully fledged business project that generates income.
Table of Contents
FAQs on How to Create an Online Course Website
Can I create an online course website on my own?
That’s a strong yes!
Doing the whole thing by yourself is kind of the point of using WordPress to run your course website.
Speaking of WordPress:
What is WordPress, and why use it to create an online course websites?
WordPress is the most popular website engine in existence. And ‘website engine’ means exactly what it sounds like: If you think of your website as a car, then WordPress is what powers it.
WordPress takes care of all of the technical aspects of making a website run, and it’s quite good at it too! At the time of writing, WordPress was powering around 43% of all websites. This number makes it by far the market leader among website platforms of its kind.
WordPress is incredibly versatile, which is one of the reasons why it’s won over so many users. This is also what makes it perfectly capable of running your online course website.
How much does it cost to create an online course website with WordPress?
I’ll cover this in a bit more depth later, but, for now, let’s say it’s about $60(ish) a year on the low end, and around $500 if you want to take things in a more premium direction.
The main factors contributing to this price tag are website hosting, domain name, a website theme (design) and the online course module itself.
Will I be able to sell access to my online courses?
Yes. The model I present in this guide allows you to enroll people in paid courses, as well as offer access for free. It’s your call.
The payments themselves are going to be processed by one of the popular online payment gateways.
Get the Prerequisites in Line
(Note: If you’re already familiar with how building a generic site with WordPress is done, you can skip to this step.)
Before we can create an online course website with WordPress, we need to look at the big picture and understand how building a website with WordPress works in general — not just for online courses but for all types of sites.
As I said above, WordPress is a website engine, and we have to put that engine in place before we can build the rest of our online course website around it.
Here are the beginning stages of building a website on WordPress:
- Buy a domain name (around $15 a year).
- Sign up for web hosting (from $3.99 a month).
- Install WordPress on that web hosting account (free).
- Import/create your website content.
Here at WinningWP, we usually advise our readers to sign up with SiteGround and ultimately get steps one, two and three all taken care of in one place.
What follows is a short tutorial on how to get through this initial setup with SiteGround. If you’d like a more in-depth walkthrough, read this (stop after step three of the guide and come back here).
Go to SiteGround and pick one of the three main options. Most new sites are good with the cheapest one at $3.99 a month.
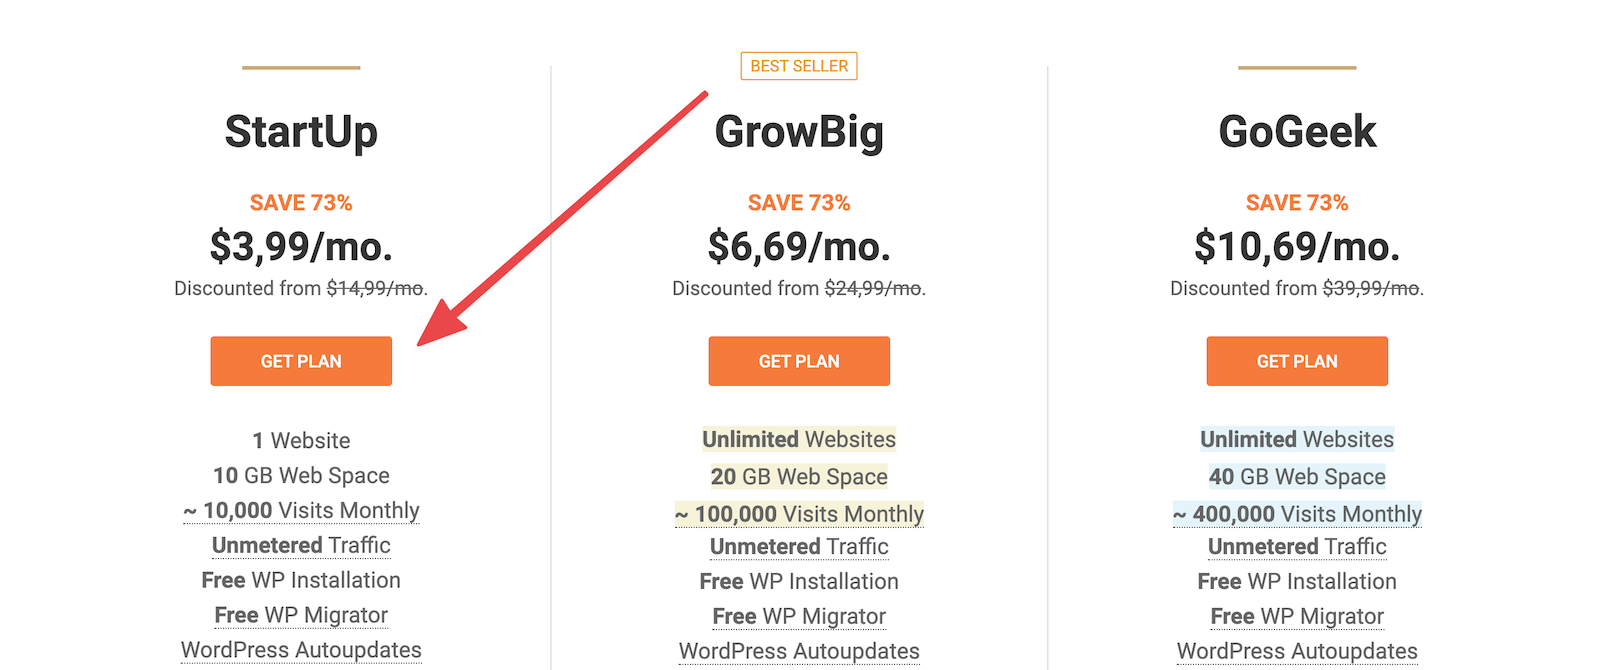
In the next step, you’ll be able to purchase the domain name for your new online course website. Pick something that’s representative of your business, the niche you’re in and the type of course(s) you’ll be offering.
The next step is all about providing your personal and payment details; the one section that may be a little less intuitive here is the one under ‘Purchase Information’:
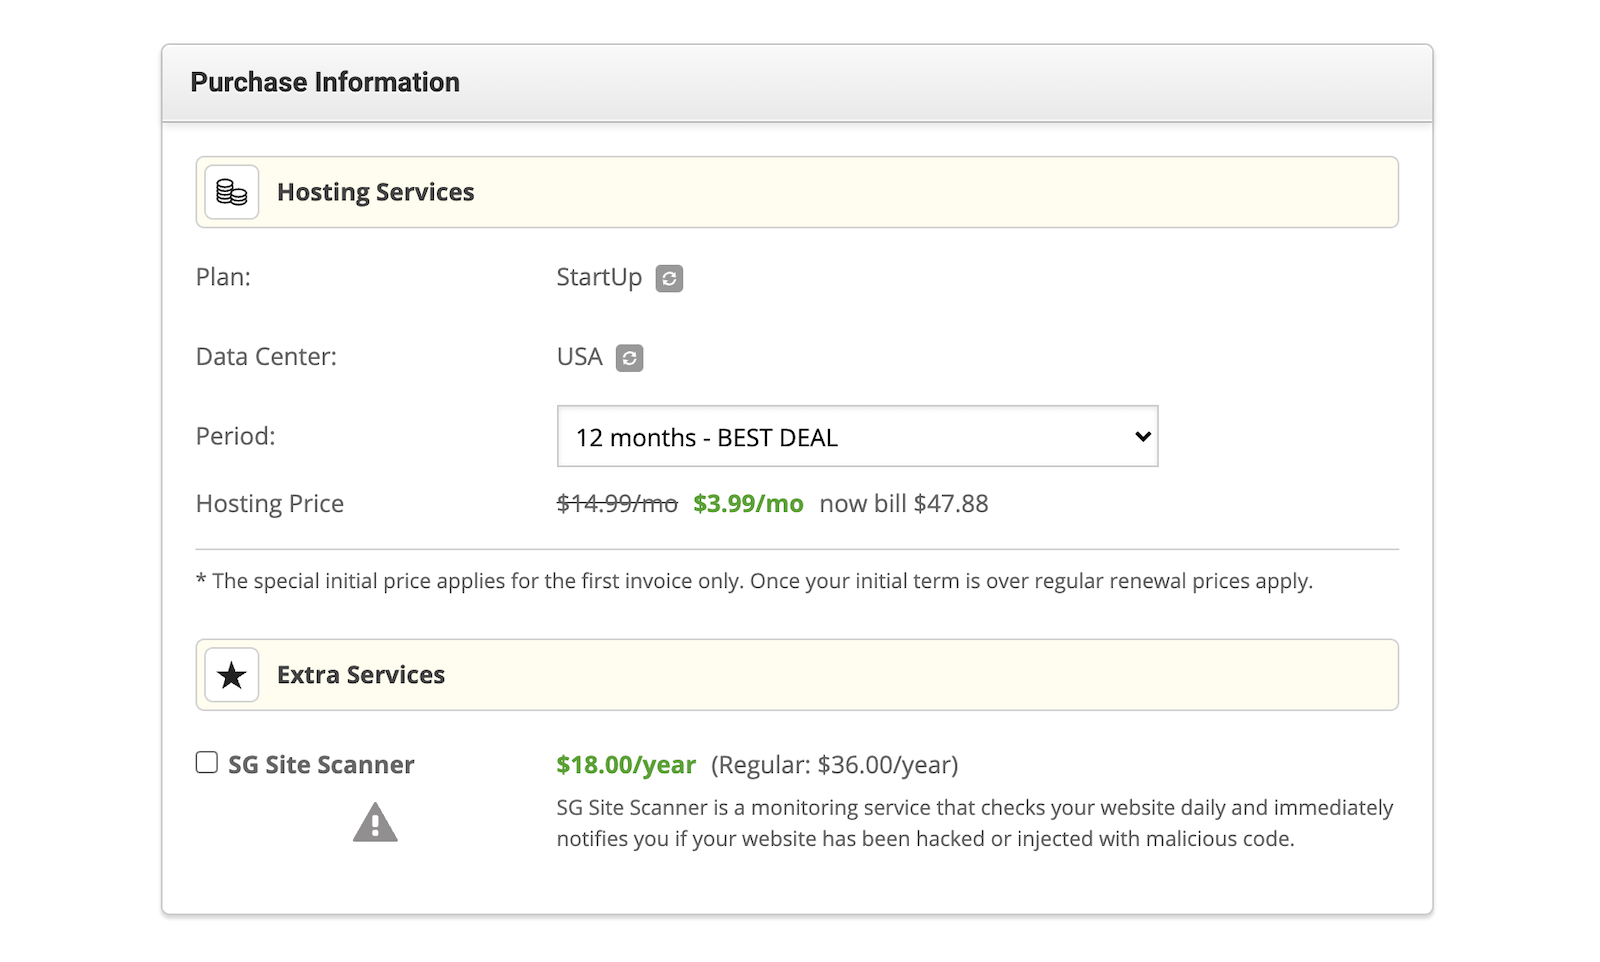
- Plan: This is the hosting tier/plan you selected in the previous step.
- Data Center: You get to choose from a handful of data center locations. Pick the one that’s the closest to your target audience’s location. For instance, if your courses are meant for EU audiences, then pick a data center that’s either in the Netherlands, Frankfurt or London.
- Period: This is the amount of time you want to buy your hosting setup for. Picking 12 months will give you the best deal. However, keep in mind that the price will go up in year two and further. This is a standard practice in the web hosting space.
- SG Site Scanner: You don’t need it at this stage. You can de-select the box.
In the next step (or after you log in to your SiteGround account for the first time), you’ll get to pick how you want to have WordPress installed on your hosting setup.

The best choice here is the option to Start New Website and choose WordPress as your platform (just like the image above presents). Apart from making the choice, the only thing you have to do at this stage is enter the login details you want to use for your main user account on WordPress.
If you’re struggling with any steps so far, we have a detailed guide on how to install WordPress here.
The installation usually takes less than a minute. After it’s done, you’ll be able to access the WordPress dashboard at yoursite.com/wp-admin/.
You should see something like this after you log in:
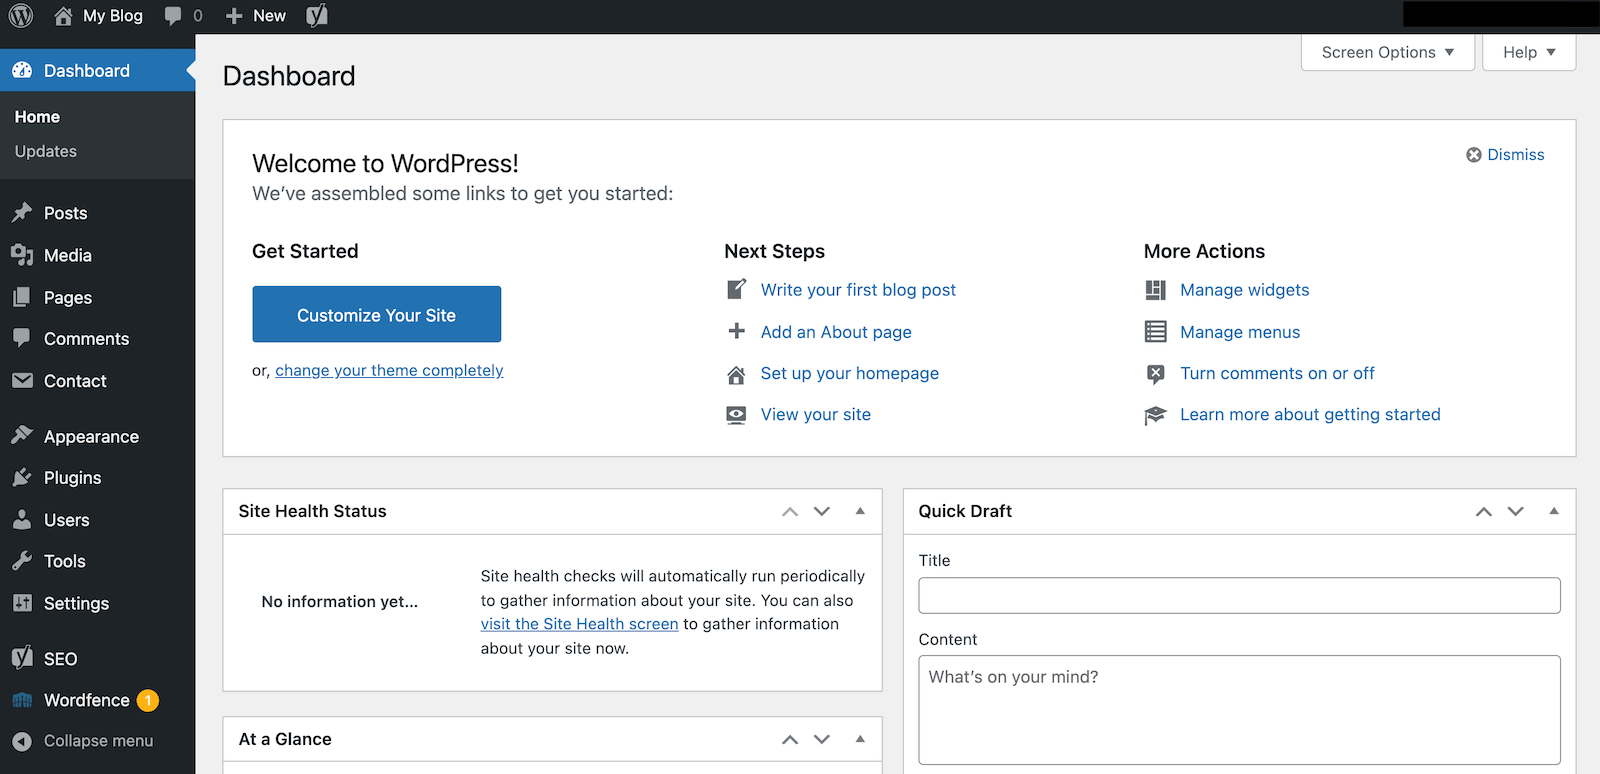
What you have at this stage is a blank WordPress website that’s 100% operational; what we need to do next is turn it into an online course website.
Install LifterLMS
‘Install what?’ you ask.
Okay, so the thing with WordPress is although it’s the most popular, and, frankly, the best, website engine of them all, it’s not much of an online course platform on its own.
To turn it into a fully fledged online course website, you’ll need to install an additional module (a plugin) called LifterLMS.
We’ve covered LifterLMS on WinningWP a couple of times before, and consider it one of the best e-learning plugins on the market, plus it’s very affordable.
You can build your entire online course website with LifterLMS for free. You’ll only have to upgrade to one of its paid plans if you decide to sell access to your courses, at which point it will cost you in the range of $120 to $360 a year. That said, you’re free to set the price of your courses wherever you like.
Here’s how to set up LifterLMS and use it when putting together your online course website:
Install the LifterLMS Plugin
To begin, go to the Plugins → Add New section of your WordPress dashboard. Once there, enter LifterLMS into the search box. You’ll see the LifterLMS plugin on the list. Click on Install Now next to the plugin’s name.

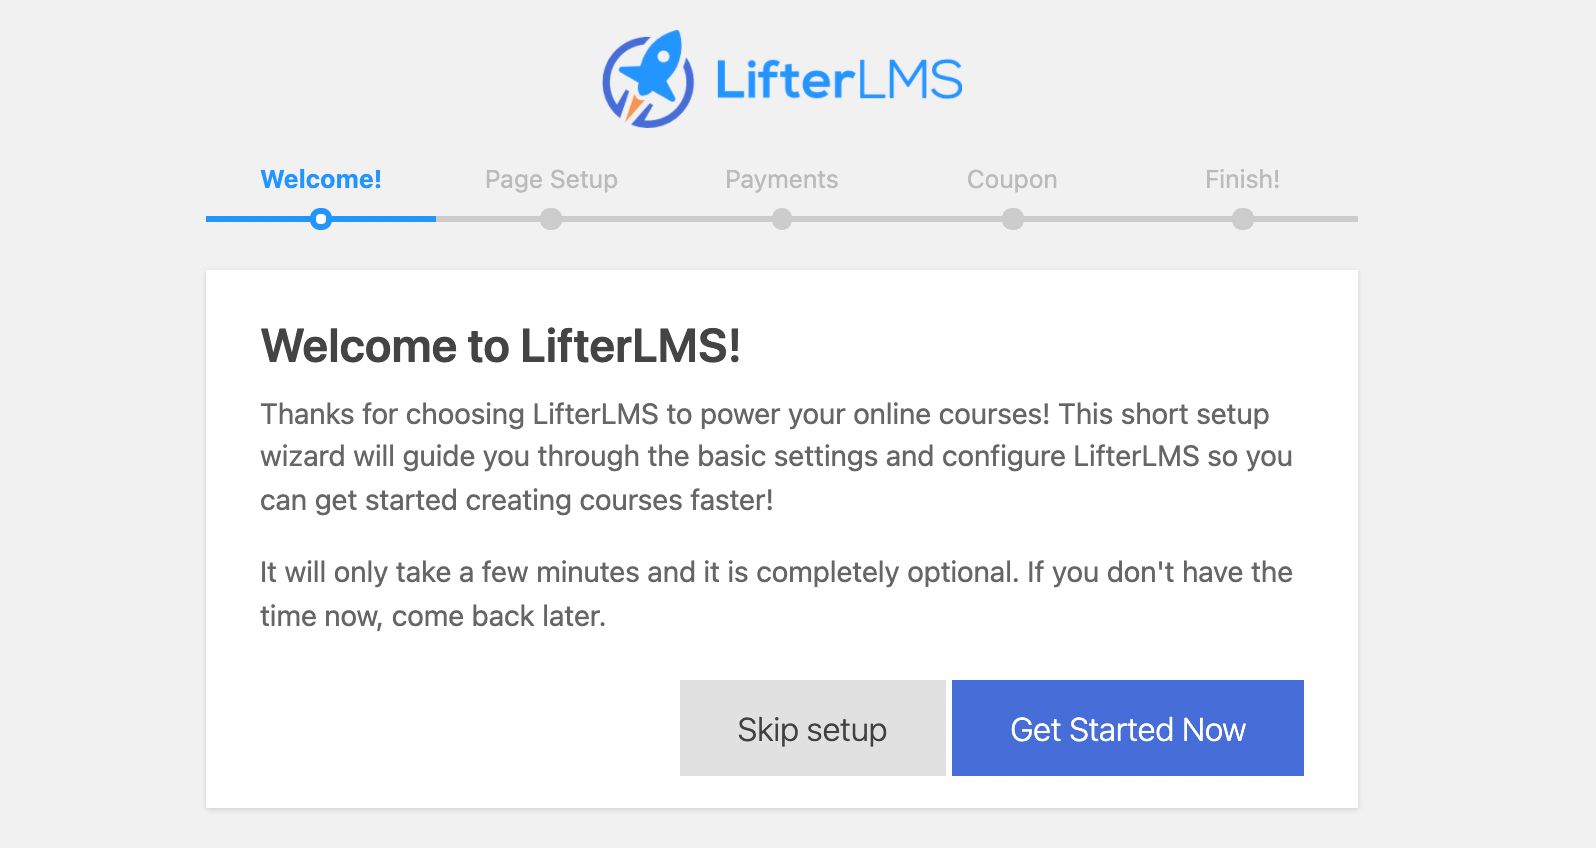
When the installation finishes, click on Activate — the button will appear in place of the Install Now button you clicked a few seconds ago.
Doing this will launch the LifterLMS setup wizard, which is a step-by-step sequence that’ll take you through all of the core settings of your new online course platform. Click on Get Started Now to get the ball rolling:
Getting the Core Pages Created
In the first step, LifterLMS will look through the pages that are already on your site and create new pages that will later be used for various sections of your online course website.
LifterLMS does a great job of explaining what each new page does and why your online course website needs it:

Setting up Currencies
LifterLMS is a tool that not only allows you to publish online courses and make them available to students for free, but also to sell access to your courses. At this step of the setup, you can change the default currency settings payments will be processed in.
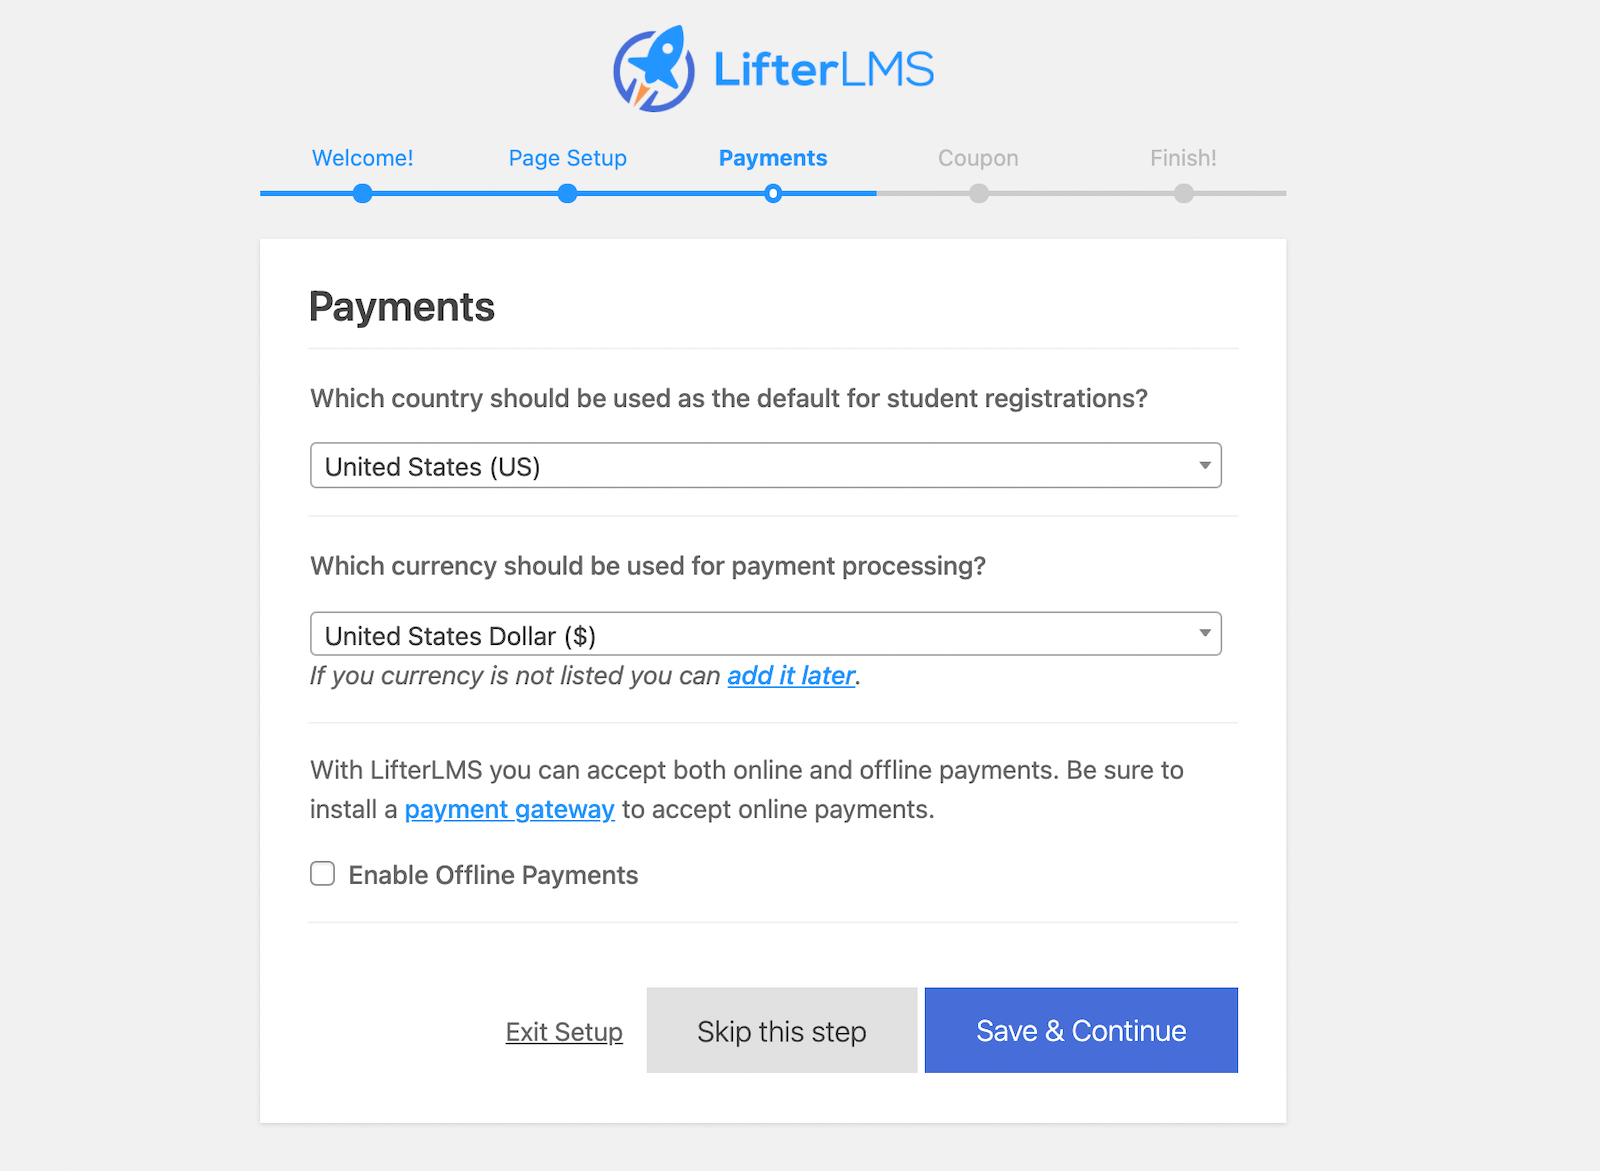
Note: At this stage, you’re not enabling online payments per se, you’re just telling LifterLMS what your preferred currency is. Installing a payment gateway — the module that makes online payments possible — is something you’re going to do later.
Data Sharing and Final Approvals
Depending on when you’re installing LifterLMS, you may be asked to share your usage data anonymously in exchange for a coupon code that you can redeem on any of LifterLMS’s premium plans.

On the last screen, LifterLMS will give you an option to import some sample courses. The idea with those is that having an example course installed on your site will help you to learn the ropes more quickly vs building your course content from scratch.
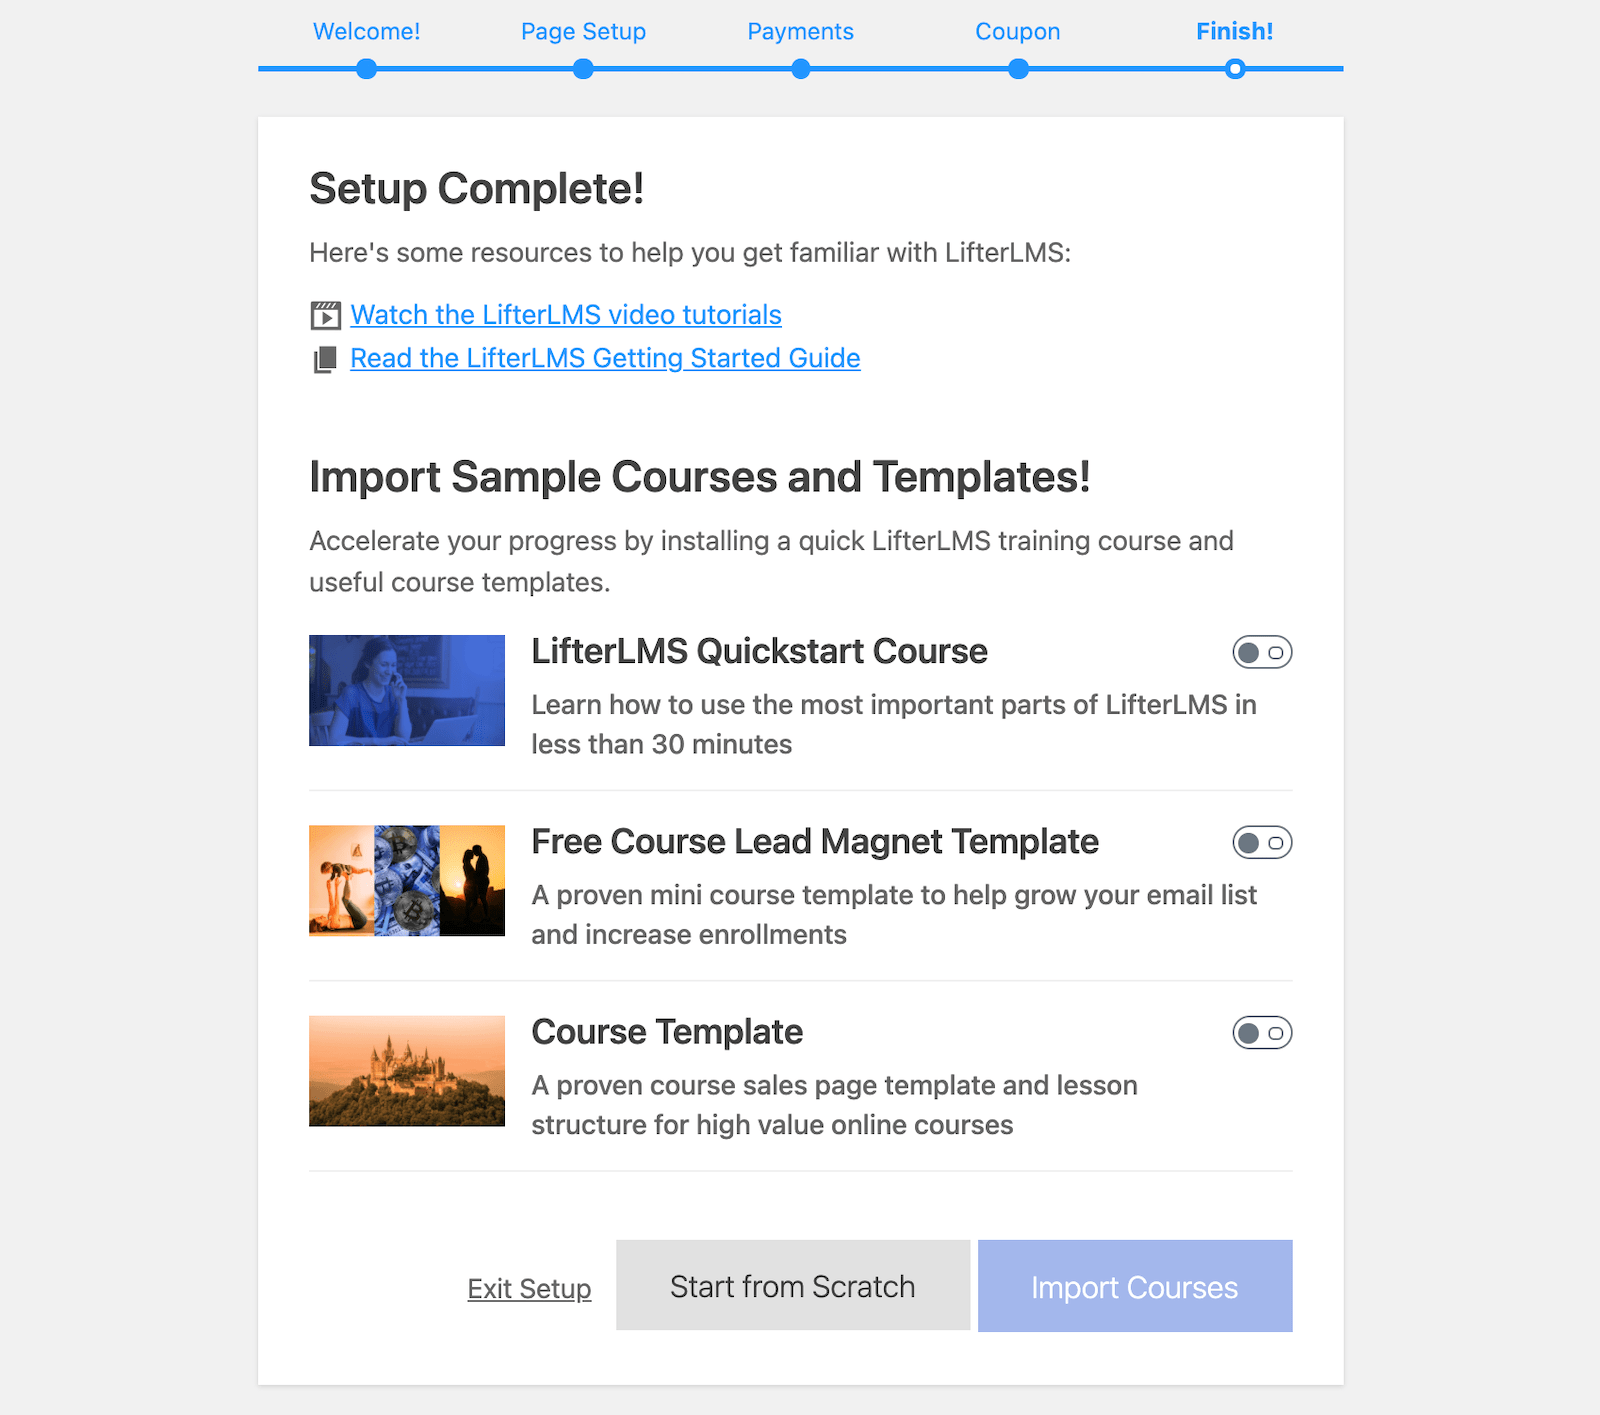
I like to import the first course on the list — LifterLMS Quickstart Course. Switch the toggle next to the course and click on the final Import Courses button.
After a couple of seconds, LifterLMS will redirect you to your main course page. However, there’s not much for you to do there at this stage, so you can safely come back to the main dashboard areas of WordPress.
Prepare Your Online Course Content
Since you’re here looking up how to create an online course website (with WordPress), then I assume you already know what the topic of your online course is going to be and you have the course content roughly prepared.
The thing is, I can’t really show you how to pick the right course topic and ensure your idea has high market demand.
First, those things change in time (for instance, who’d have guessed that all types of ‘remote work’ topics will become this popular after 2020), and then there’s also your natural aptitude for certain topics vs others. These things are different for all of us, so there’s no one-size-fits-all advice out there.
Therefore, the topic of your course is something you’ll need to figure out on your own. That said, I can help you to validate the idea, and then show you how to structure the course content so it resonates with the intended audience.
Validating Your Course Idea
The main goal of validating an online course idea is to simply make sure there are people out there who’d want to enroll in a course such as yours.
There are a couple of tools we can use to figure that out.
First, Google Trends.
Google Trends is a free tool that’ll show you a general estimation of how popular various topics (search terms) are over time.
For instance, if you look up something like ‘plant care‘, you’ll see the interest in that goes through its cycles throughout the year but remains at roughly the same level. This makes it a good topic for an online course.
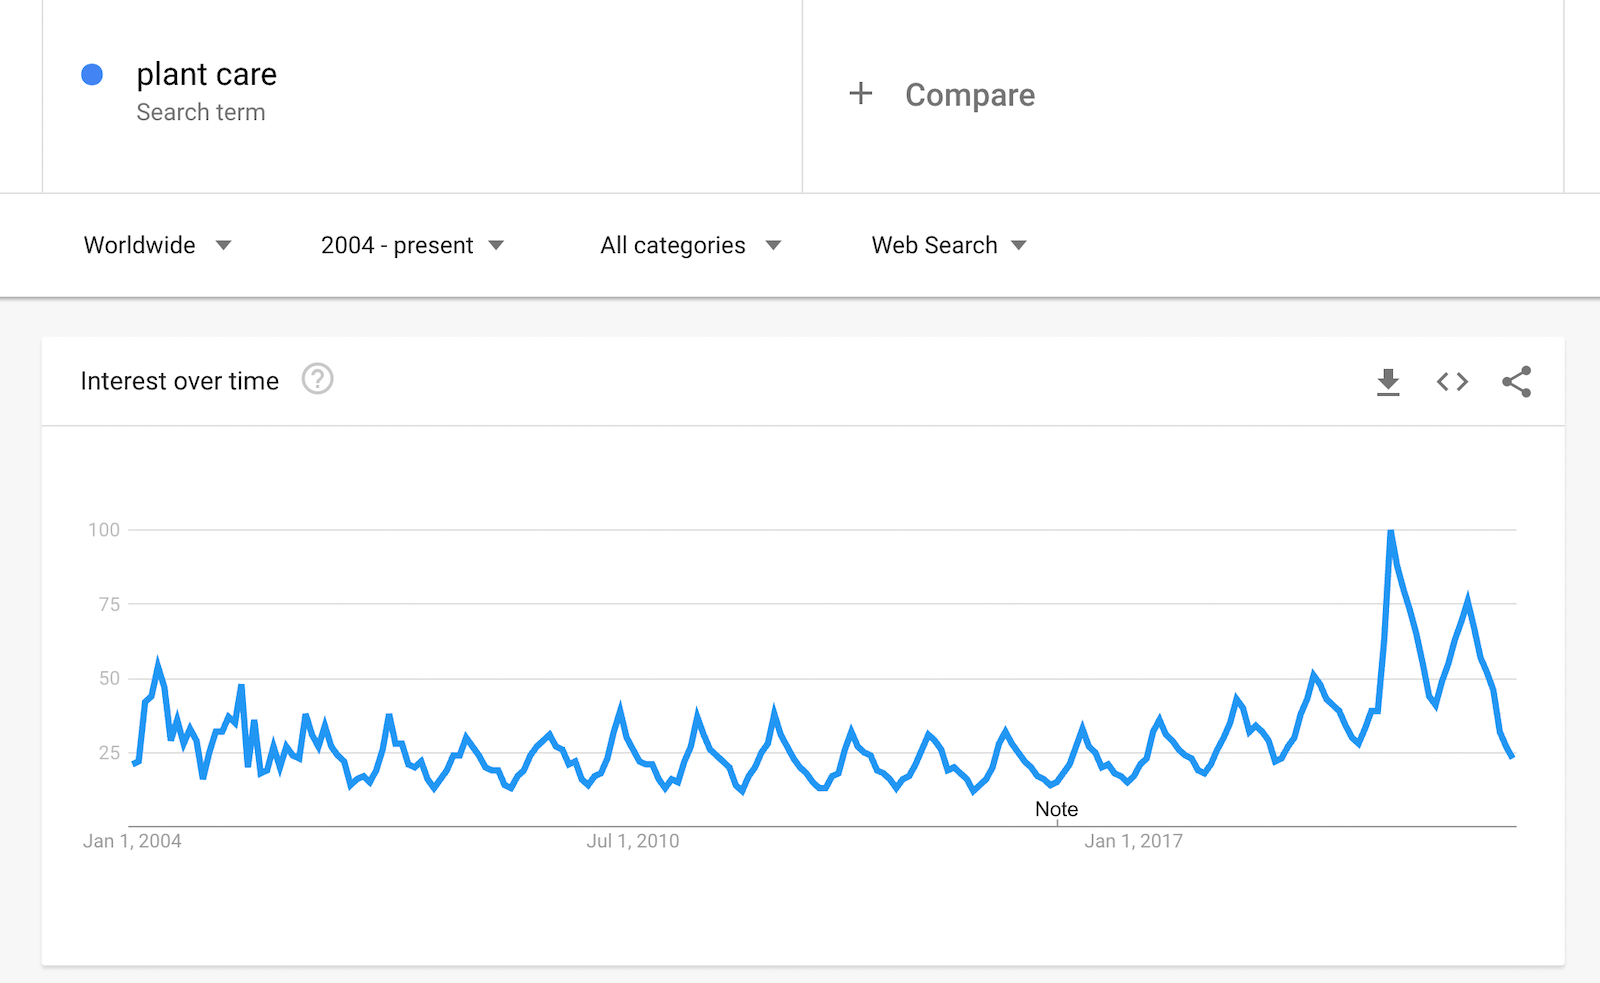
(Side note: Have you noticed the spike round May 2020? I wonder what that might be related to.)
The next tool you can use is Google Keyword Planner. This one is meant predominantly for advertisers who run campaigns through Google AdWords. However, it’s also quite useful to check the popularity of any search term people put into Google.
Visit it and look up the main search terms you think people will use when looking for your course on Google.
For my plant care example, I imagine these will be things such as ‘plant care advice’ or ‘plant care tips’. Here’s what Keyword Planner tells me:

As you can see, ‘plant care tips’ proves to be the winner here, with around a thousand to 10,000 average monthly searches. Right under the two keywords I entered, Google will show me other keyword suggestions to consider.
It’s advisable to go through those keyword suggestions one by one to get more ideas on various lesson topics that you can include in your course.
Should you look anywhere else when validating your online course idea? Generally, the more you do in the research phase, the more certain you can be that your course is going to succeed.
Google Trends and Google Keyword Planner are a good start, but I wouldn’t base my course idea solely on those. Doing some in-person research can be invaluable, too.
For instance, you can check if there are any thematic Facebook groups talking about the topics your course would touch upon. You can also look up your soon-to-be competition and see what types of content they make available and if there are any courses similar to yours out there already.
Overall, the more data points you get the better!
Structuring Your Course
The way you build an online course with LifterLMS (and most other e-learning solutions working on top of WordPress, actually) is by structuring your course to go from sub-topics to lessons, quizzes (assignments), and then to the final outcome.
Even before you get to put your course content into LifterLMS, you should be clear about the structure you’ll use.
Start by taking your course content and dividing it into a handful of larger sub-topics. For example, for a general course on plant care, those sub-topics could be:
- Plant Care Basics.
- Caring for Specific Plants.
- Plant Care Cheat Sheet.
- FAQs.
Then, populate each sub-topic with individual lessons. A lesson should ideally focus on one self-contained issue, goal or area of interest.
Each lesson will have its own page in LifterLMS.
A good practice is to conclude each sub-topic with a quiz or some form of assignment that your students need to complete before being allowed to proceed.
Then, at the end of the course, consider offering a certificate the student can print out or just keep somewhere on their computer. This sounds like a simple thing, but it really can be a factor for your student’s satisfaction after completing the course.
Add Your Course Content to LifterLMS
Before you start adding your course content to LifterLMS, it’s a good idea to take advantage of that example course you imported, and actually go through it yourself.
From your WordPress dashboard, go to Courses and click on View under LifterLMS Quickstart Course.
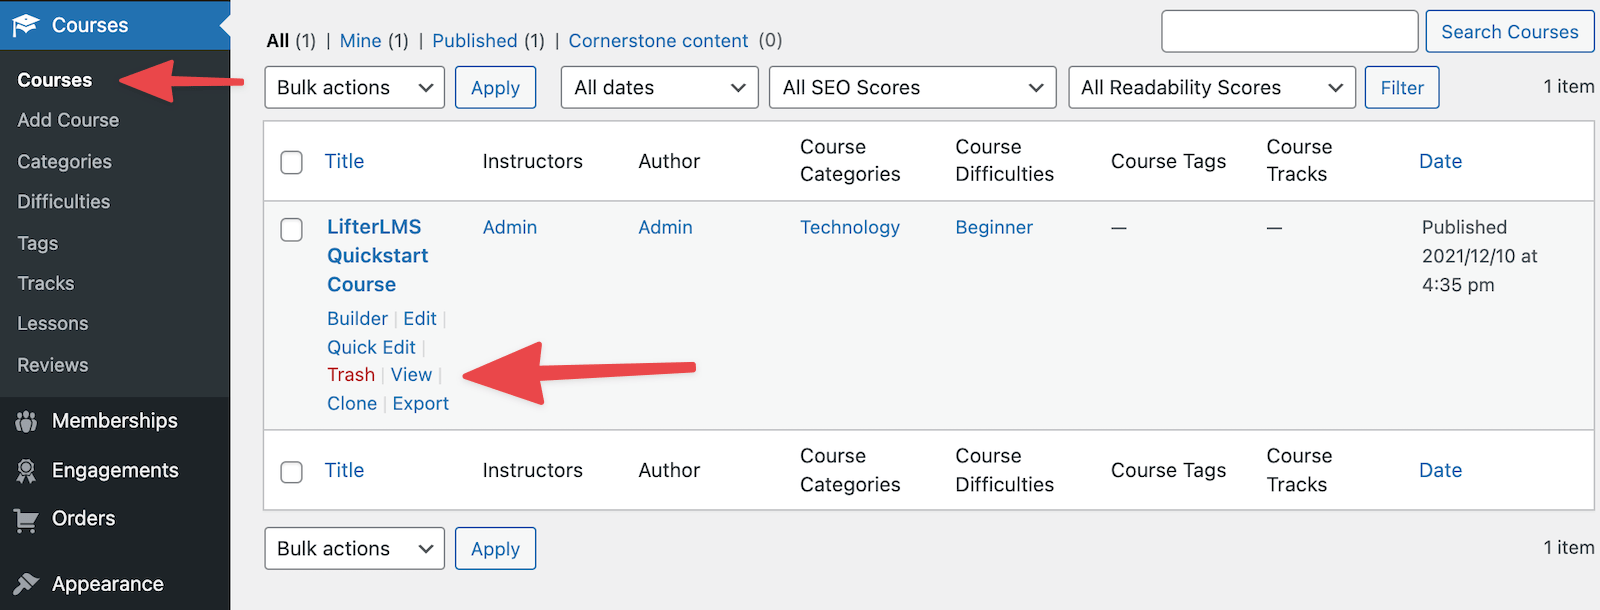
It’ll take you through all of the most important features of LifterLMS and show you how to use them.
Once you’re done with that, start your adventure in course creation by going back to the Courses section in the WordPress dashboard and clicking on Add Course (up top).
Adding Your Course Title and Description
The first step in working on your online course is to set its title and the main description.
Here’s what you’ll see after clicking on Add Course under Courses (in the WordPress dashboard):

This screen itself is pretty self-explanatory. Add your course title where it says Add title, and then the description in the section directly below. When you have that ready, click on the Publish button in the top right corner of the screen.
At this stage, you can also add what’s called a featured image to your course. This image is going to represent the course on your website’s front page.
To do that, scroll to the Featured image section in the sidebar and add your image here.

Adding Sub-Topics and Lesson Titles
This step is where all of the fun with creating your course takes place!
Click on the Launch Course Builder button that’s in the bottom right corner of the editing screen.
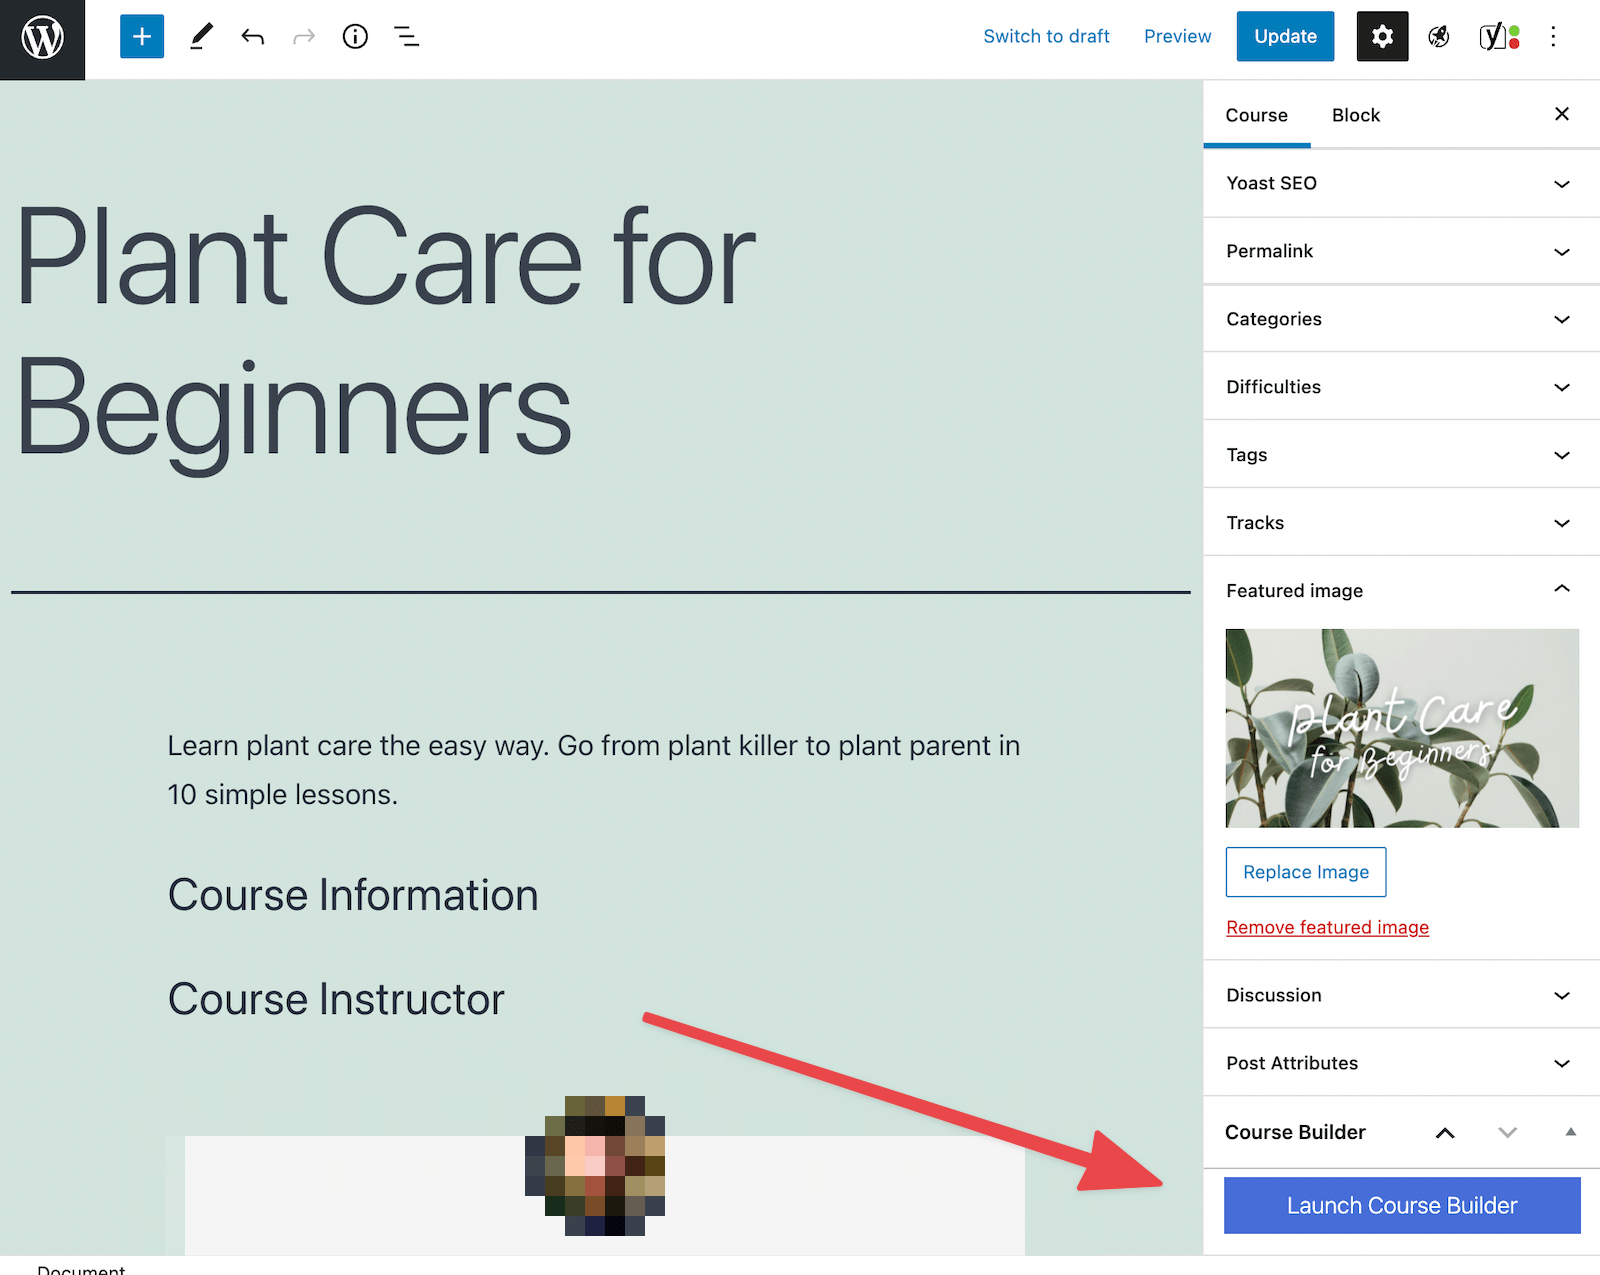
Note: If you don’t see this button, make sure you’re in the Course tab of the sidebar, and not the Block tab (see the image above).
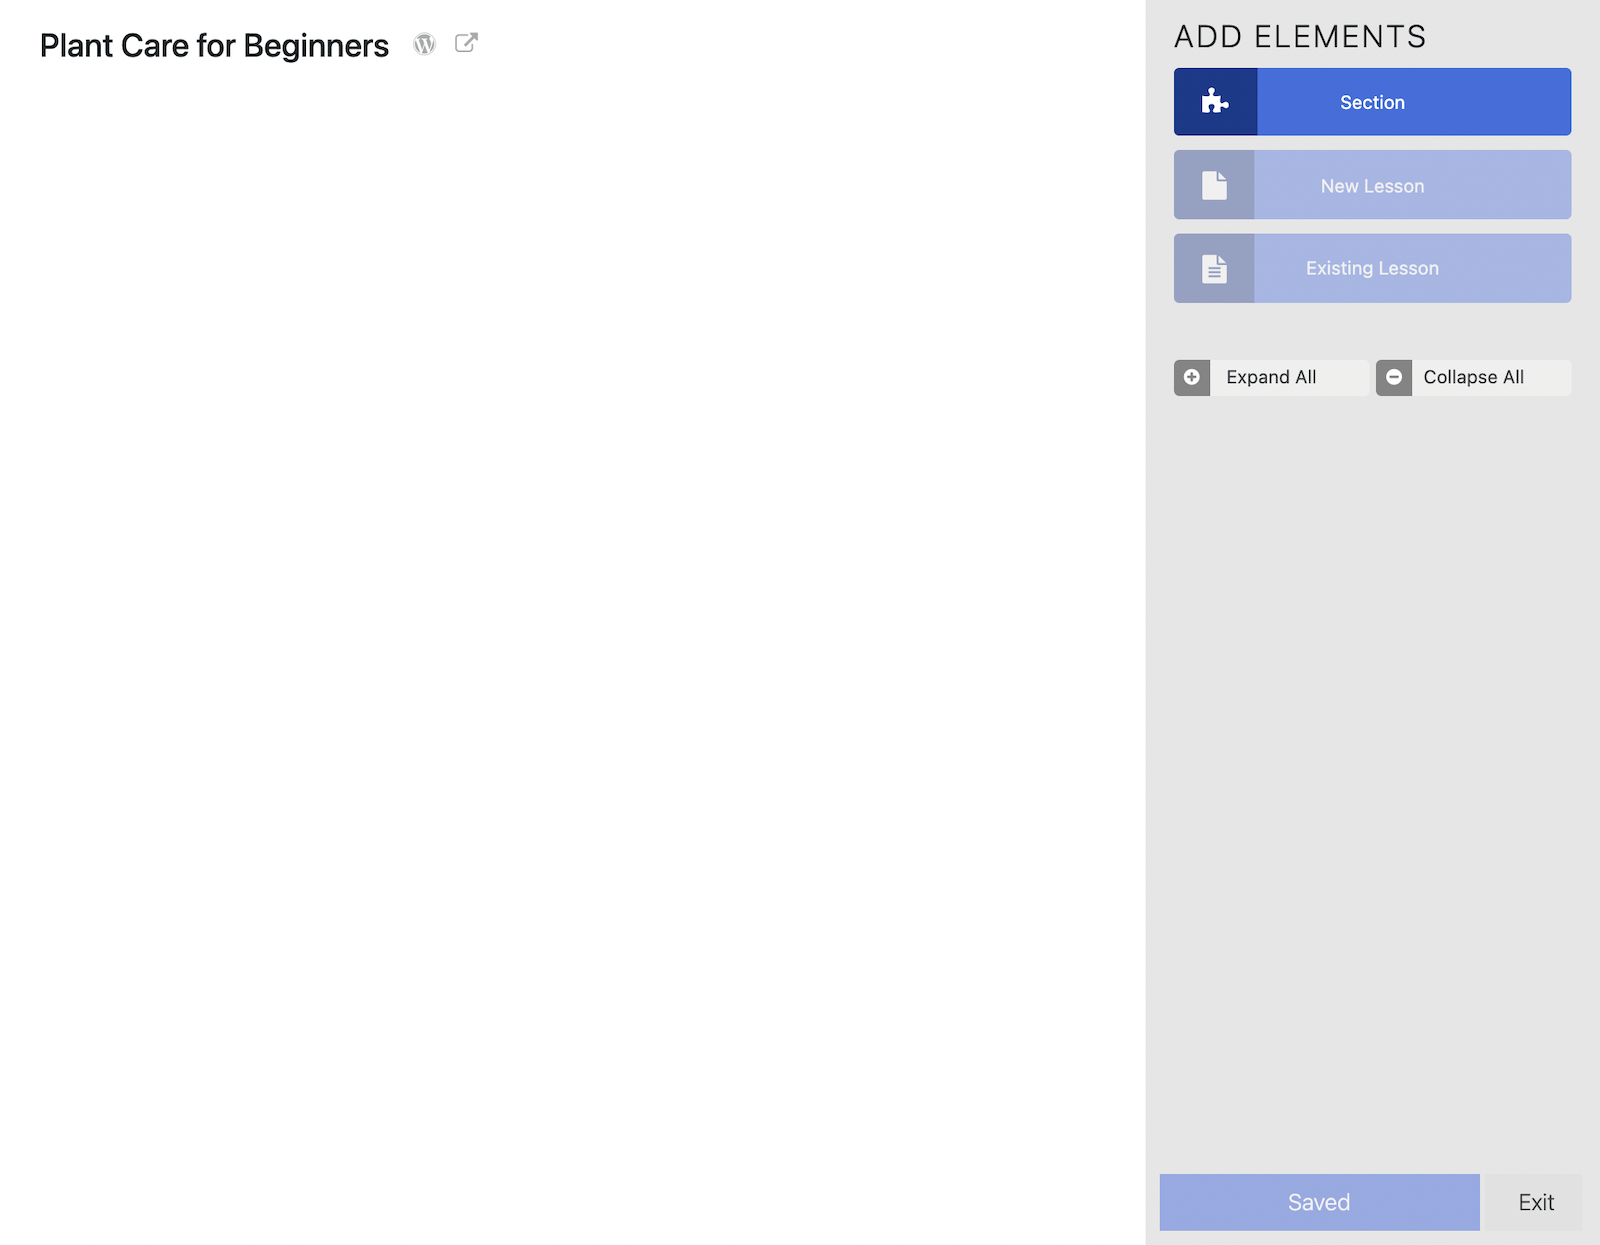
Here’s what you’ll see:
To begin, click on the Section button. This will add a new section item onto the canvas. This section is going to be the first sub-topic of your course.
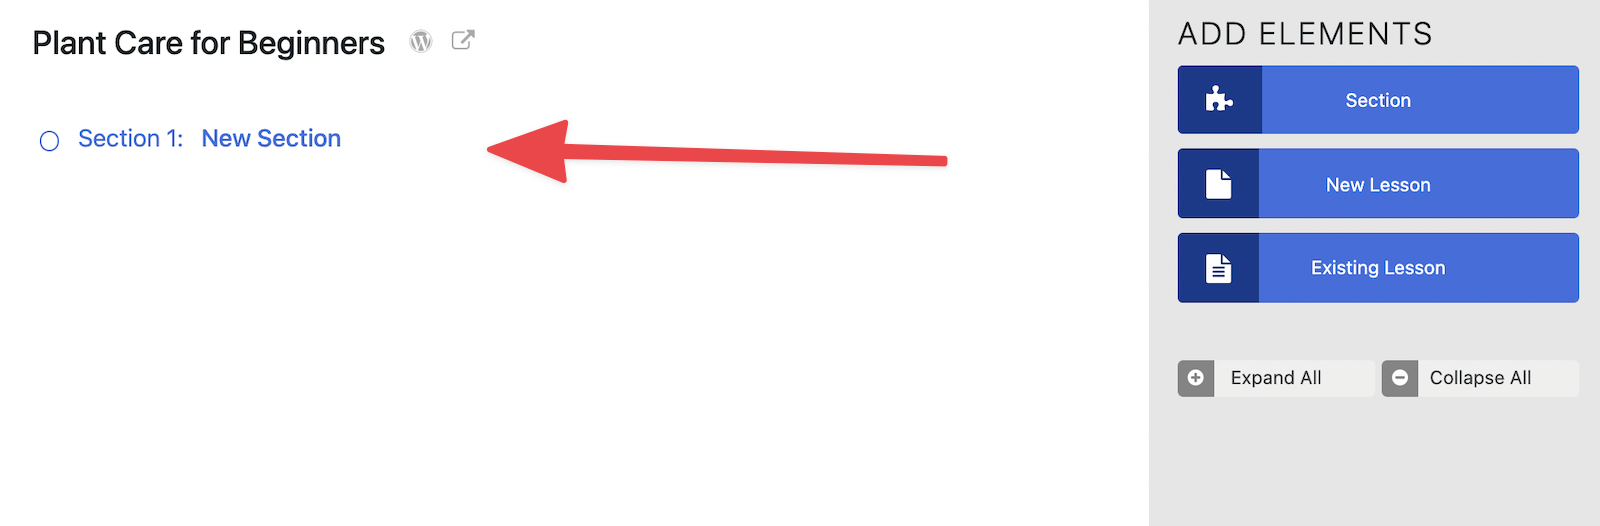
You can change the title of the section by clicking into it.
Next, add your individual lessons by clicking on New Lesson. You can also change the titles of these lessons by clicking on their names.
Create as many sections and individual lessons as you have in your course outline. With that done, your course structure should look something like this:

Adding Lesson Content
What we have right now is only a type of scaffolding, so the next thing we need to do is fill it in with actual course content.
To do that, click on the gear icon next to any of the lessons.

This will open up the main settings panel of the lesson.
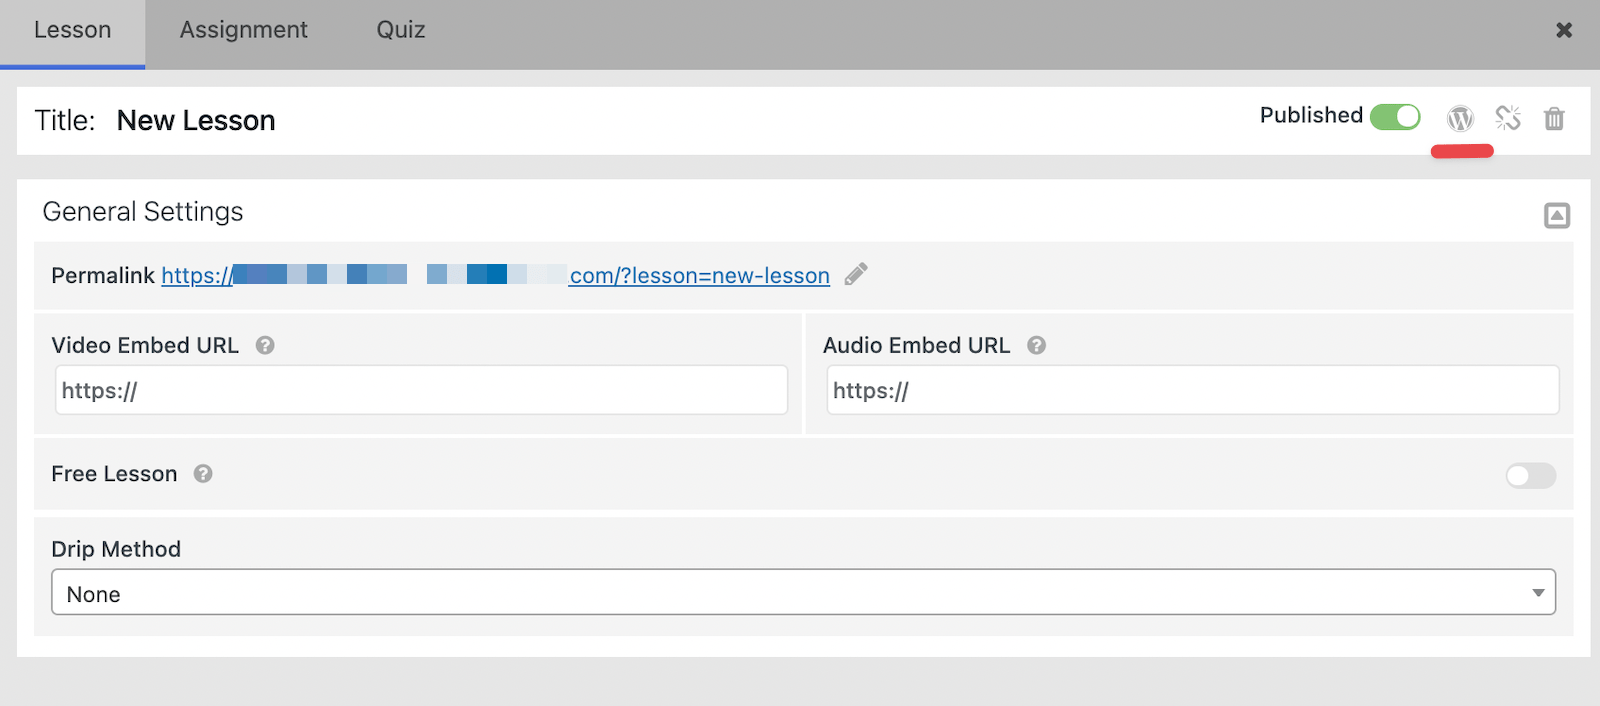
If your course is a video-only course:
- Add the link to your lesson where it says Video Embed URL.
If your course is text-based:
- Click on the WordPress icon that’s in the top right corner of the panel.
Clicking that WordPress icon will take you to an editing screen where you’ll be able to work on that specific lesson.

This panel is very similar to the one we used when adding the main course description. Again, start by adding the right lesson title and then enter the main lesson content.
Remember to click on Update in the top right corner when you’re done.
Adding Quizzes
Each of your lessons can end with a quiz the student needs to take before they can move on to the next lessons. To add a quiz, pick a lesson from the list and click on the question mark icon below its title.

This will launch the quiz builder tool.
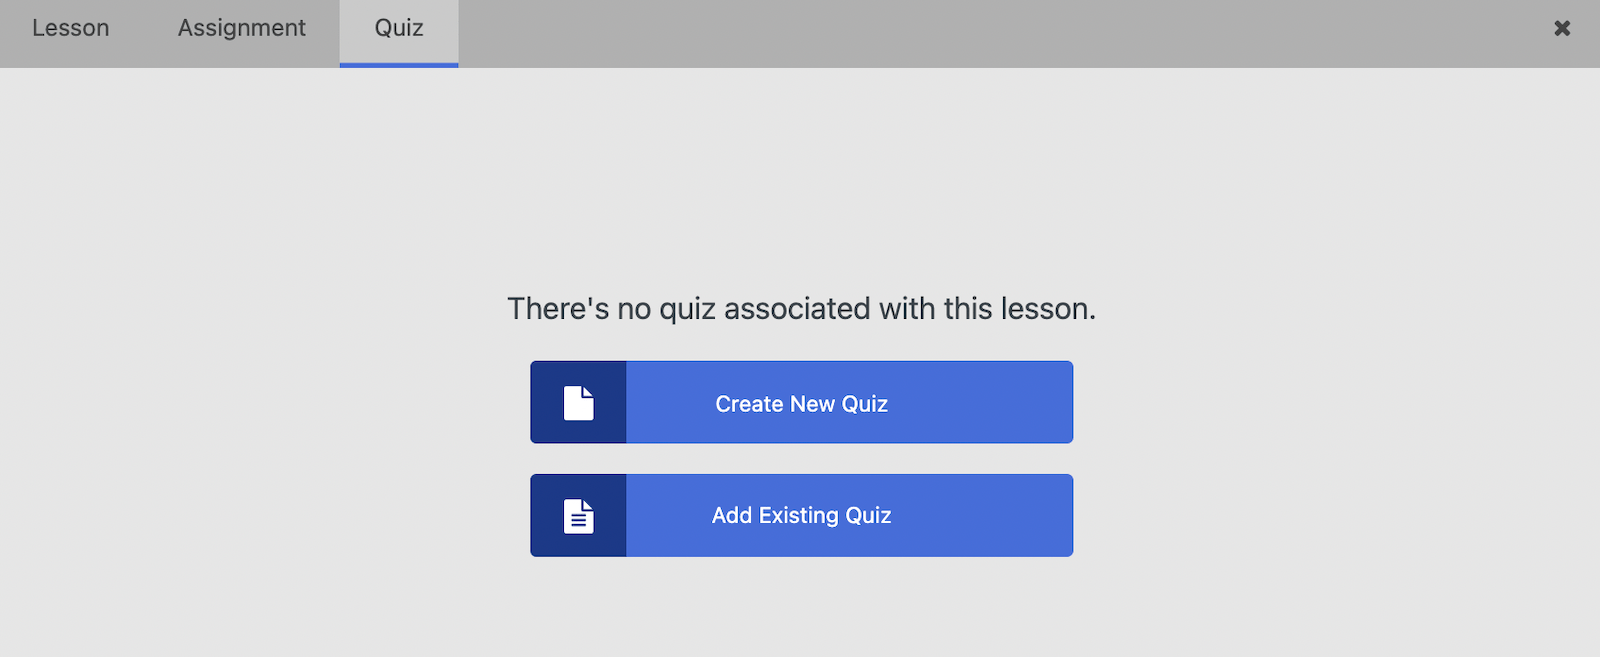
Inside, you’ll be able to add your questions and the proposed multi-select answers for each question, and also point out the correct answer.
Finishing the Course Content
As you can see, the way you add a course in LifterLMS is by going from section to section and from lesson to lesson and filling it in with content. Then, every X lessons you can also add a quiz that summarizes the material covered.
This part will take you some time, but there really isn’t much more to it when it comes to crafting the course itself.
Now, let’s move onto other aspects of the whole operation.
Set up Course Pricing and Access
With your course content ready, the next step is to decide how people are going to be able to access it and if there’s going to be any payment required to do so.
Go back to the editing screen for the title page of your course (click on your course’s title in the Courses section of the WordPress dashboard).
Scroll to the bottom of the screen and open the Access Plans section.

Click on Add New to begin.
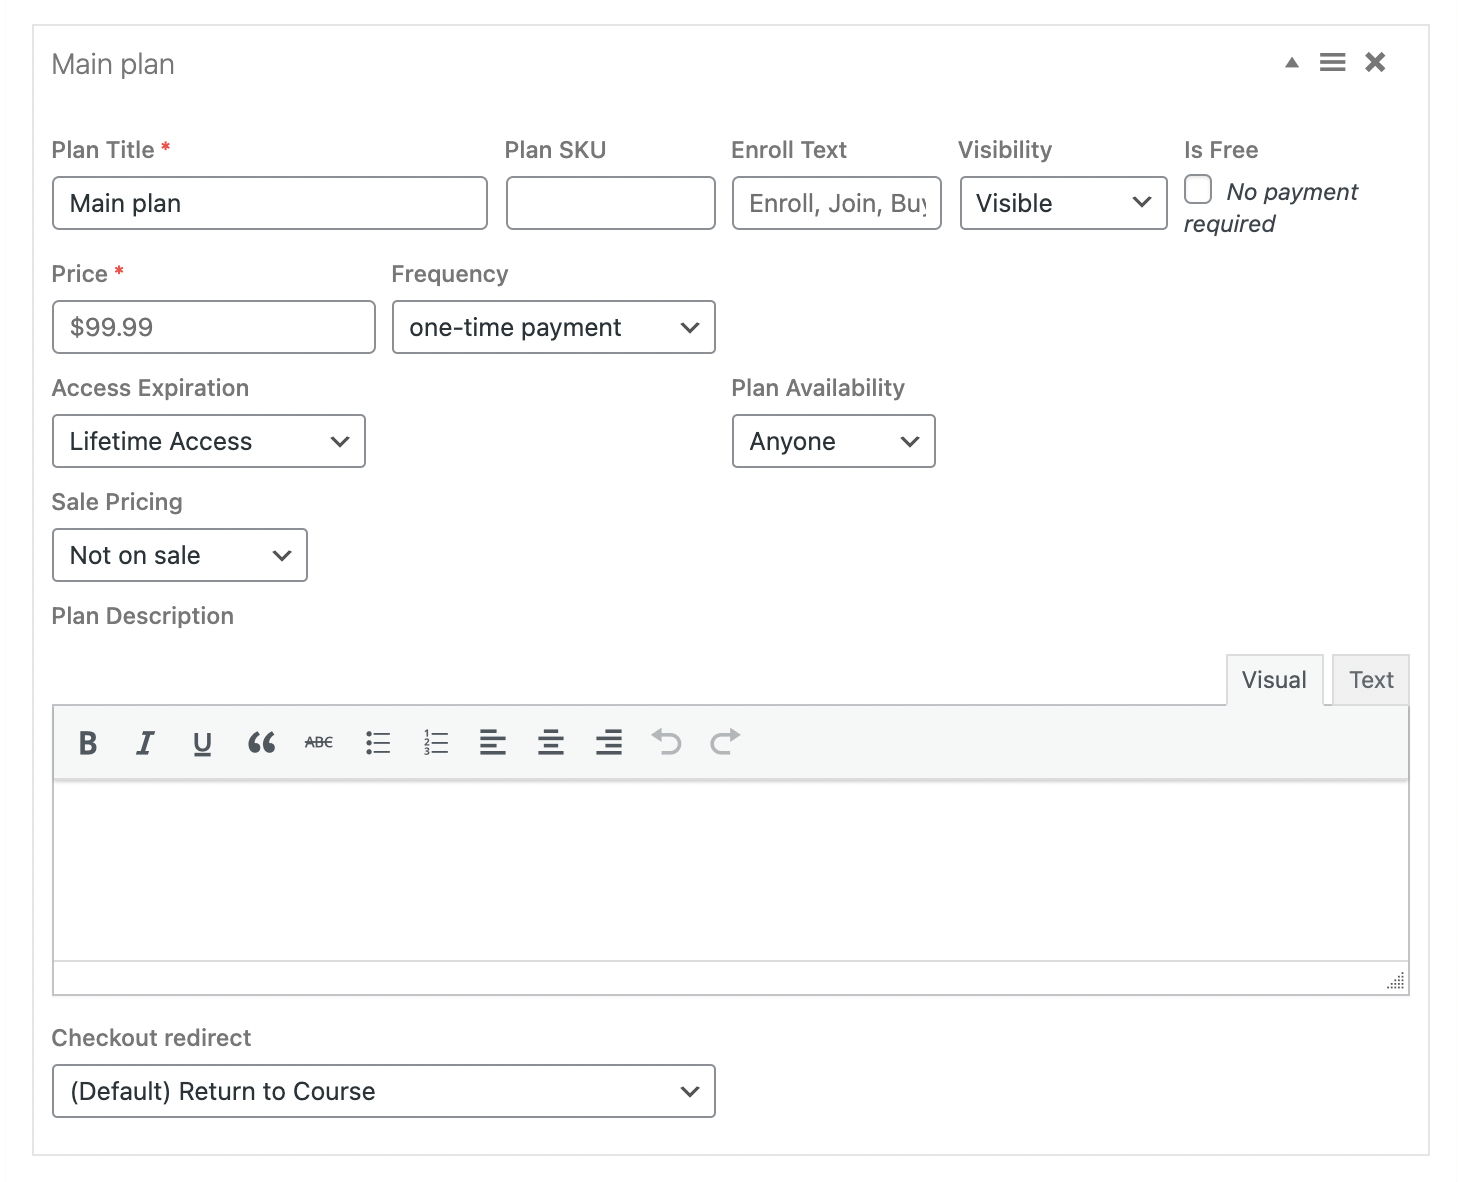
You’ll quickly realize how many options you have in terms of how you want to make your course available.
First off, you can offer access to the course for free by selecting the No payment required box.
Apart from that, you can customize the payment frequency, expiration dates, plan availability and more. You can also offer payment plans — meaning you can offer your students installments of $X every month for, say, three months (or however many). The customizations go really deep here.
At this stage, what we’ve set in place are the rules that define what the pricing of your course is. What we don’t have, though, is a module that would allow people to actually pay for the course.
A module like that is called a payment gateway.
Set up a Payment Gateway
LifterLMS allows you to use multiple payment gateways on your online course website. However, most people will opt for PayPal or Stripe.
- Stripe will allow you to process credit card payments.
- PayPal will allow you to accept payments from PayPal account holders.
There are two important details about using payment gateways with LifterLMS.
The first is they’re not built into LifterLMS out of the box. They come as paid add-ons.
Each payment gateway is a separate add-on (PayPal, Stripe). You can get these add-ons one by one — the price tag is $120 apiece. Or, you can get what LifterLMS calls its Universe Bundle for $360, which gives you access to all add-ons.
There’s quite a number of these add-ons in the catalog, so, if you’re planning to get at least three of them, the bundle will be a better deal.
The second thing to know about these payment gateway add-ons is each of them comes with its own setup procedure.
Since both Stripe and PayPal are quite lively platforms, the way the actual integration works can change with time. It’s best to get the most up-to-date setup procedure by going to LifterLMS’s own docs.
- Here’s how to enable PayPal.
- And here’s how to enable Stripe.
With the payment gateway integrated and enabled, you don’t have to do anything else in terms of taking care of the payments.
The gateway itself will let your students pay for your course and also guarantee the transaction security. Then, you get the funds deposited either in your Stripe or PayPal account.
Pick a Design — A.K.A. a Theme
I’ve saved the most fun step for last! Up until now, we’ve been working on the default design that comes with the WordPress platform.
However, with WordPress being the most popular website engine of them all, there are literally thousands of installable design packages (called themes) available for it. Many of them are quite awesome looking, too!
For starters, you can go to the official theme directory at WordPress.org. There are around 10,000 free themes to choose from there.
If you’re ready to invest in a premium theme, then you can go to ThemeForest. It’s the biggest marketplace of paid WordPress themes, and it has a rather sizable section of themes optimized for education websites.
Lastly, if you’re looking for one good recommendation, you should try out the Astra theme. It’s free and comes with built-in support for LifterLMS.
Okay, so how do you install themes in WordPress?
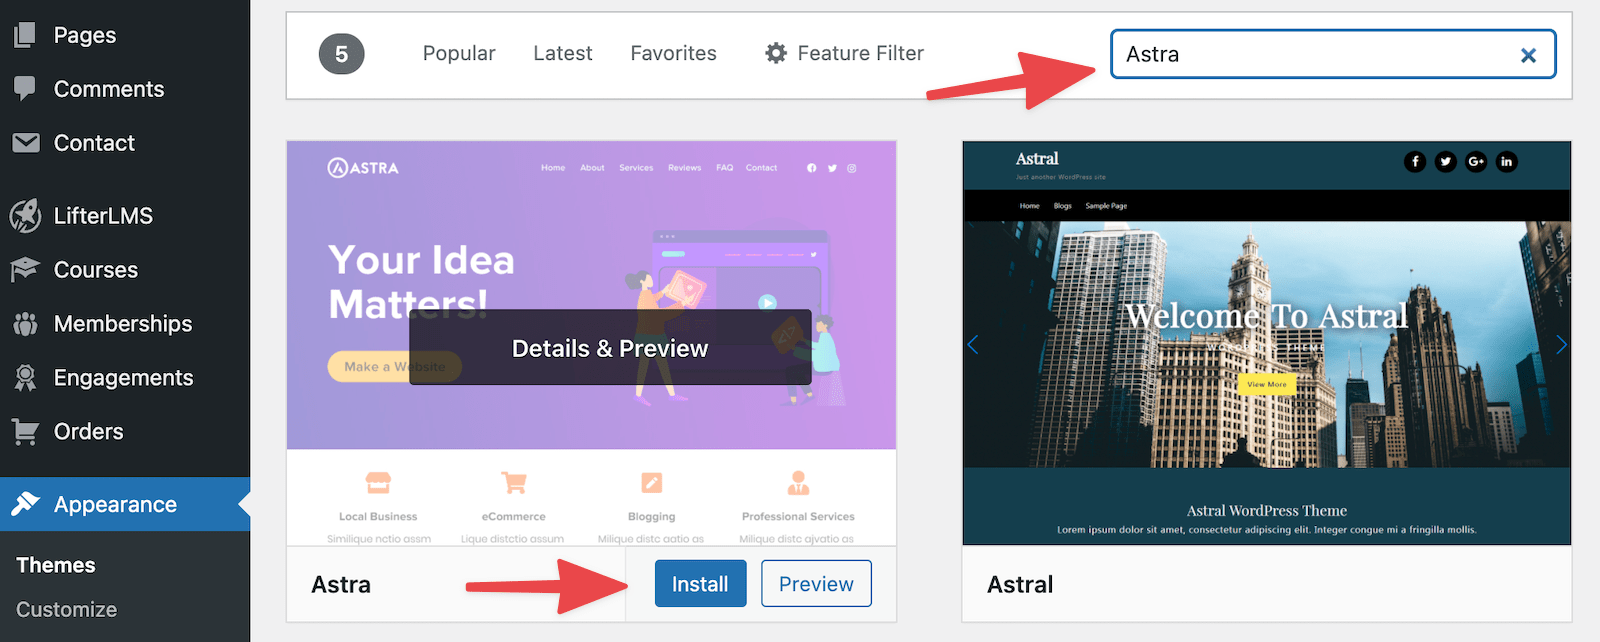
The process is simple and can be done in around a minute. Just go to the Appearance → Themes section of the WordPress dashboard and click on Add New.
Enter ‘Astra’ into the search field, and click on Install and Activate next to the theme’s name.
If you need assistance in installing a WordPress theme, we have a separate guide on this topic here.
The stock version of Astra doesn’t look like much, but there are ‘starter site’ designs available that you can import with a couple of clicks. To get a design like that — one optimized for an online course website — go to Appearance → Astra Options. From the right sidebar, click on Install Importer Plugin.

This installation takes only a couple of seconds and it takes you straight to an onboarding video of how to use starter designs. If you just want to get down to business, click on the Build Your Website Now button.
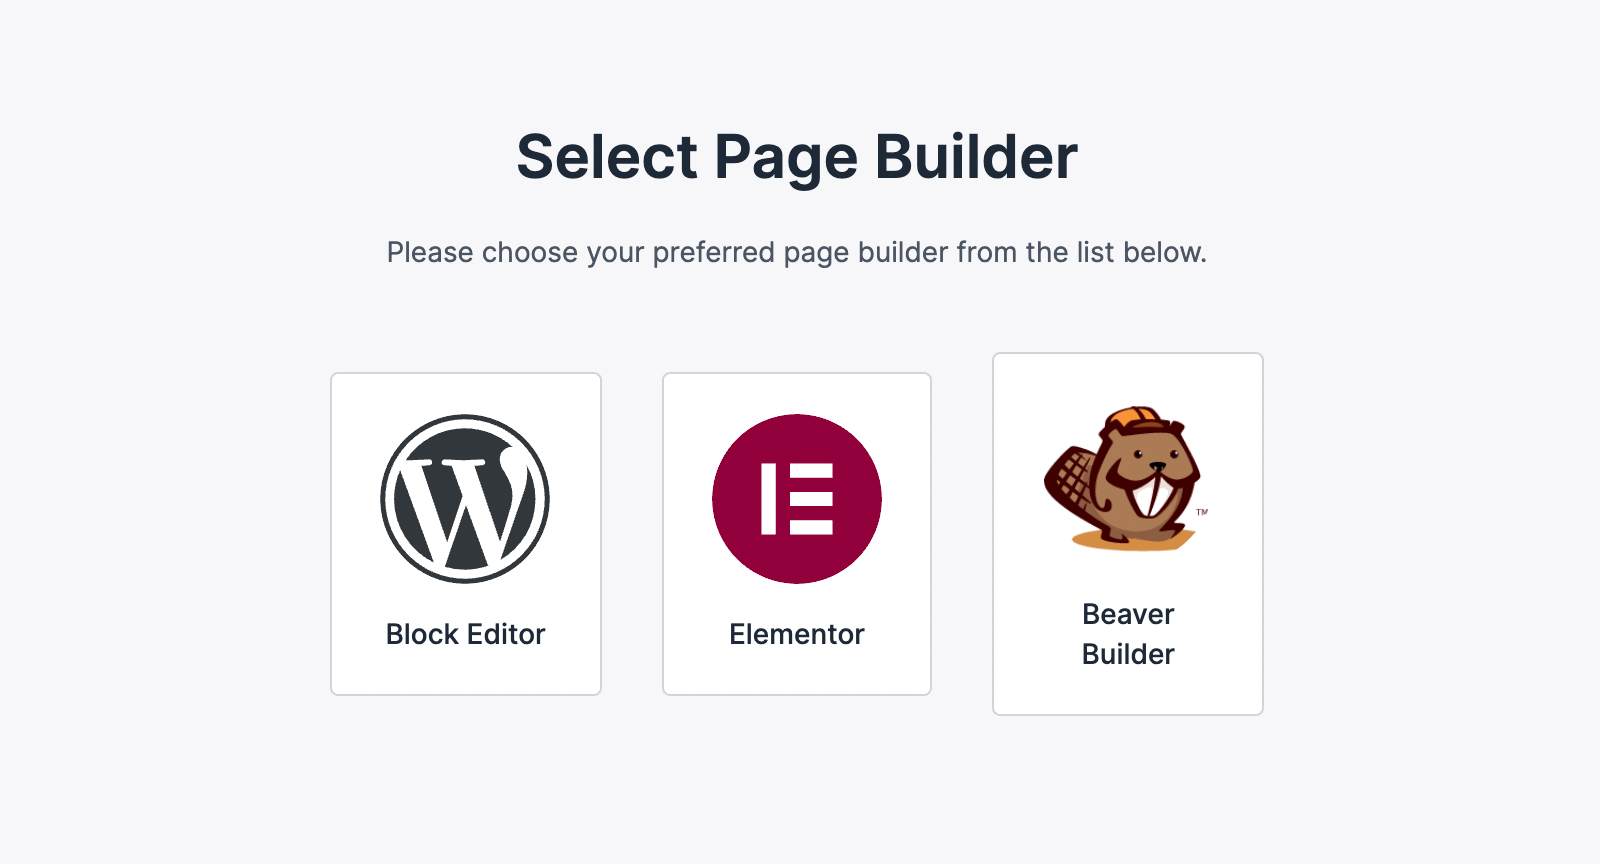
Astra will ask you to choose your preferred page builder solution. If you’re not sure what those mean, just click on Block Editor.
This will take you to the next screen, where you’ll be able to pick a starter design for your site. There’s a whole category for eLearning websites there.

You’re free to pick whichever you like, but you’ll probably get the best results by going for the ones intended for online course websites.
It only takes a couple of clicks to get the design imported. During the process, you’ll have the option to add your logo, and select the default color scheme and fonts.

After a minute or so, your new starter site should be ready. Of course, as the name indicates, this is only a ‘starter’ design. While it looks pretty good already, you should probably take care of some final tune ups to make this design truly yours.
Check out this page from Astra’s official documentation to learn more on how to integrate Astra with LifterLMS to the full extent possible.
Of course, Astra is just one of the options in terms of possible designs you can have on your new online course website. I encourage you to consider other themes, too, from either the free WordPress.org directory or paid marketplaces.
Conquer the World!
This concludes our guide on how to create an online course website with WordPress!
Now you have your course prepared and ready to welcome students, all that’s left is to enroll as many people as possible and turn your new online course into a serious long-term business.
Okay, this is much easier said than done, but at least now you have all the tools to take you toward that goal.
I hope you’ll put this advice into practice and share a link to your online course website in the comments below!


All comments are held for moderation. We'll only publish comments that are on topic and adhere to our Commenting Policy.