
GravityView Review – What Is It? What Does It Do? And Is It Any Good?
- By
- Last updated:
- Leave your thoughts
Gravity Forms is one of the most popular WordPress form plugins — in large part because it’s incredibly flexible (our review). You can use it to create pretty much any type of form — from a simple contact form all the way up to payment forms, registration forms and anything else that tickles your fancy.
One thing Gravity Forms doesn’t let you do, though, is display all of the information you collect on the front-end of your site. That’s a problem because, for certain types of forms, collecting the information isn’t enough — you also need a way to show it to your visitors.
That’s where GravityView comes in. GravityView lets you take the form entries from Gravity Forms and display them on the front-end of your site in a bunch of different ways.
For example, if you have an event directory where people can submit events through a Gravity Forms form, then you can take those event submissions and automatically display them on the front-end of your site for visitors to browse. The possibilities are endless.
Below, I’ll share more about what this plugin does and what you can use it for. Then, I’ll show you how everything works on a live WordPress site and share my final thoughts on the plugin.
Let’s dive in…
What Does GravityView Do?
GravityView’s tagline from its website is a pretty good high-level explanation of its value proposition:
‘Gravity Forms collects data. GravityView displays the data.’
That means what I explained above — you can take data from your Gravity Forms entries and display it on the front-end of your site.
To control how that data looks, GravityView gives you a drag-and-drop layout builder where you can control the output of your data using widgets. For example, one widget might represent the data from a specific form field, while another might represent a search box for visitors to search all of the entries.
You can include all types of form data in your layouts, including images, video, audio, review ratings and more.
You can also choose from different layout options, including:
- Tables — both simple tables and more advanced tables via a DataTables integration.
- Lists — kind of like the page that lists your blog posts, but you can control the layout for each form entry.
- Google Maps — display form submissions on a map. Great for physical location directories. For example, you can list apartments for rent on a map and let people submit new apartments through Gravity Forms.
- Calendar — display entries on a calendar view. Great for the event directory I mentioned above or any type of date-based site.
To help visitors to browse the data, you can add front-end search, sort and filter options.
Finally, you can let users edit their own Gravity Forms entries from the front end of the site and even track revisions to those entries. You can also limit which form fields people can edit from the front end.
What Can You Use GravityView For?
Because Gravity Forms is so flexible, you can also use GravityView in a ton of different ways.
The biggest use case is probably any type of directory site, such as:
- Businesses
- Physical locations
- People
- Events
- Digital information
- Etc
You can use Gravity Forms to let people submit entries to your directory. You can even charge people for submitting entries via Gravity Forms’ built-in payment features. Then, you can use GravityView to automatically create the front-end database from those submissions.
The GravityView blog also details a lot of other interesting use cases, though. Two of my favorite examples are:
- Event planners using GravityView to create a public guest list for events.
- Collecting and displaying feedback.
So, really, if you get creative, you can use GravityView for a lot more than just directories.
How GravityView Works on a Real WordPress Site
Now that you understand what GravityView helps you to do, let me show you how everything works.
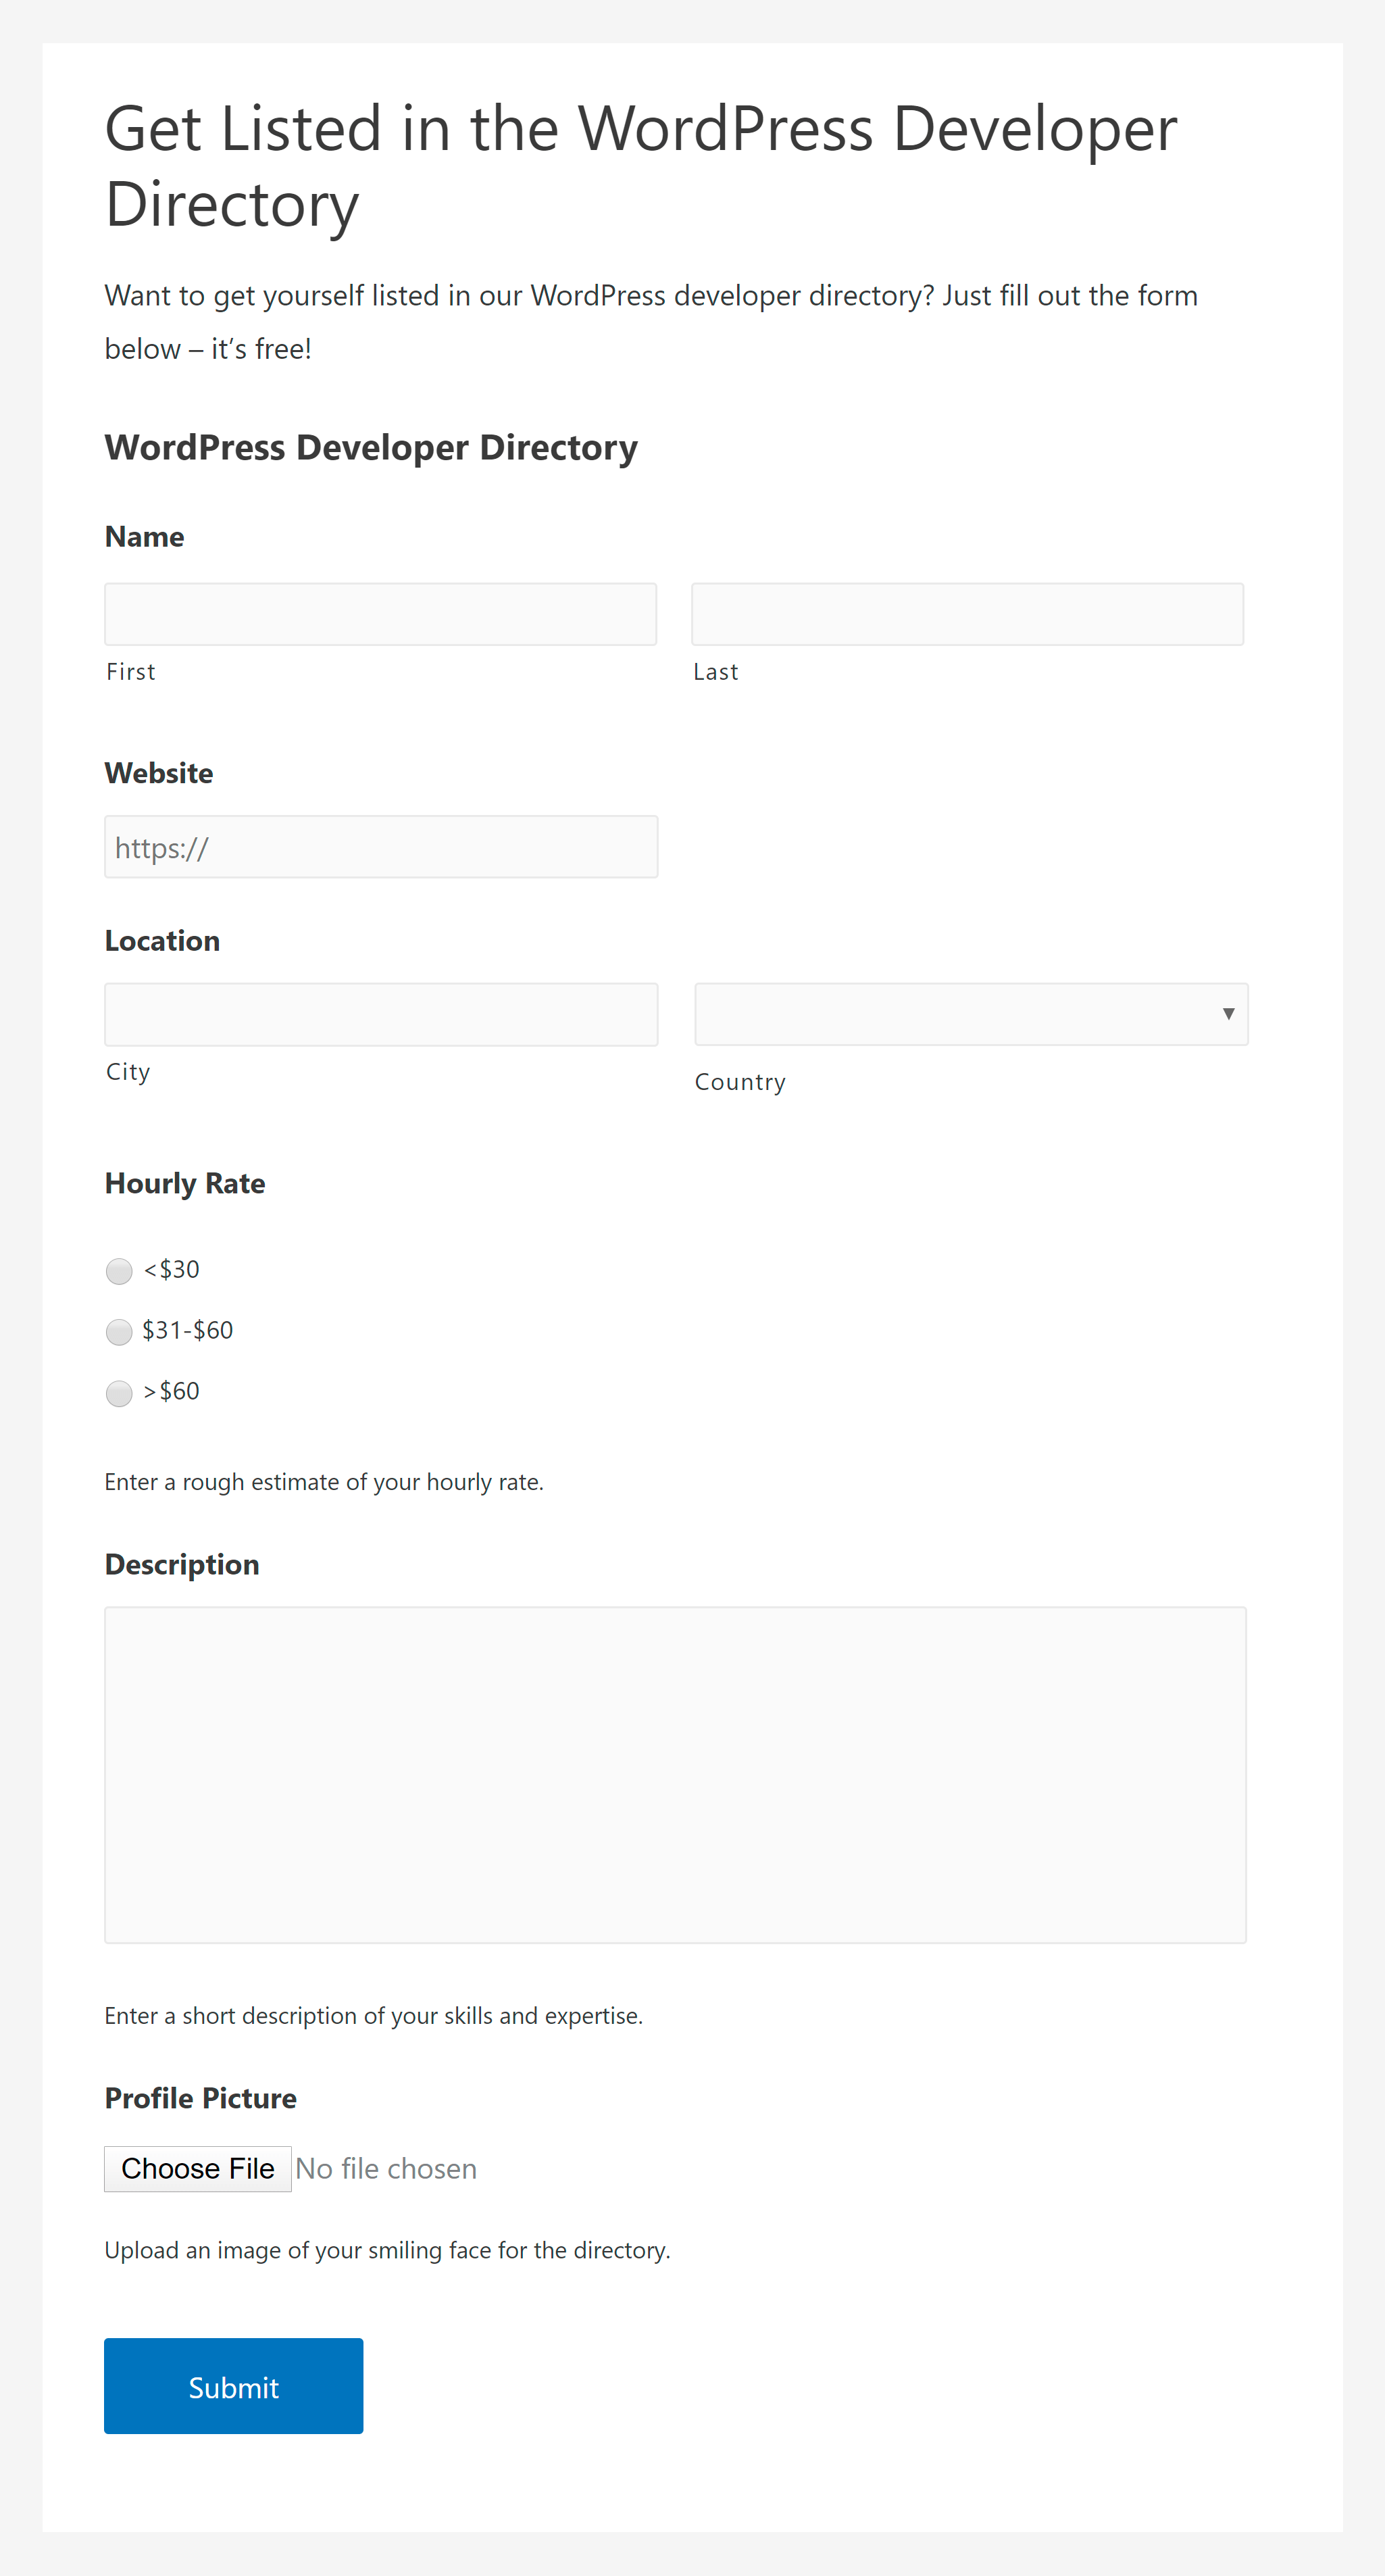
It all starts with a form, so, before installing GravityView, I used Gravity Forms to set one up.
I chose the example of a directory of WordPress developers. If a developer wants to list themselves in the directory, they can use the form to submit their details.
In this example, they can do this for free, but remember that you could just as easily charge people for the privilege using the Gravity Forms payment fields. Or, you could let people list for free but charge them for a sponsored listing.
So, now that I have that form (and some entries I submitted), we can take a look at how to use GravityView to display that information on the front end.
Creating a New View
As its name suggests, a specific front-end layout for your Gravity Forms entries is called a ‘view’.
When you go to create a new view, you can choose two different sources for your data:
- A Form Preset — use a preset template form from GravityView rather than one of your existing forms. It includes templates for business directories, human profiles, job boards and more.
- An existing form — choose one of your existing forms from Gravity Forms. That’s what I’ll do for this review because I already created the form above.
Once you choose your data source, you can select your View Type, which roughly defines the front-end layout for your data. With the core version, you can choose between a table or list view. You can also add the map and calendar layouts I mentioned using add-ons:
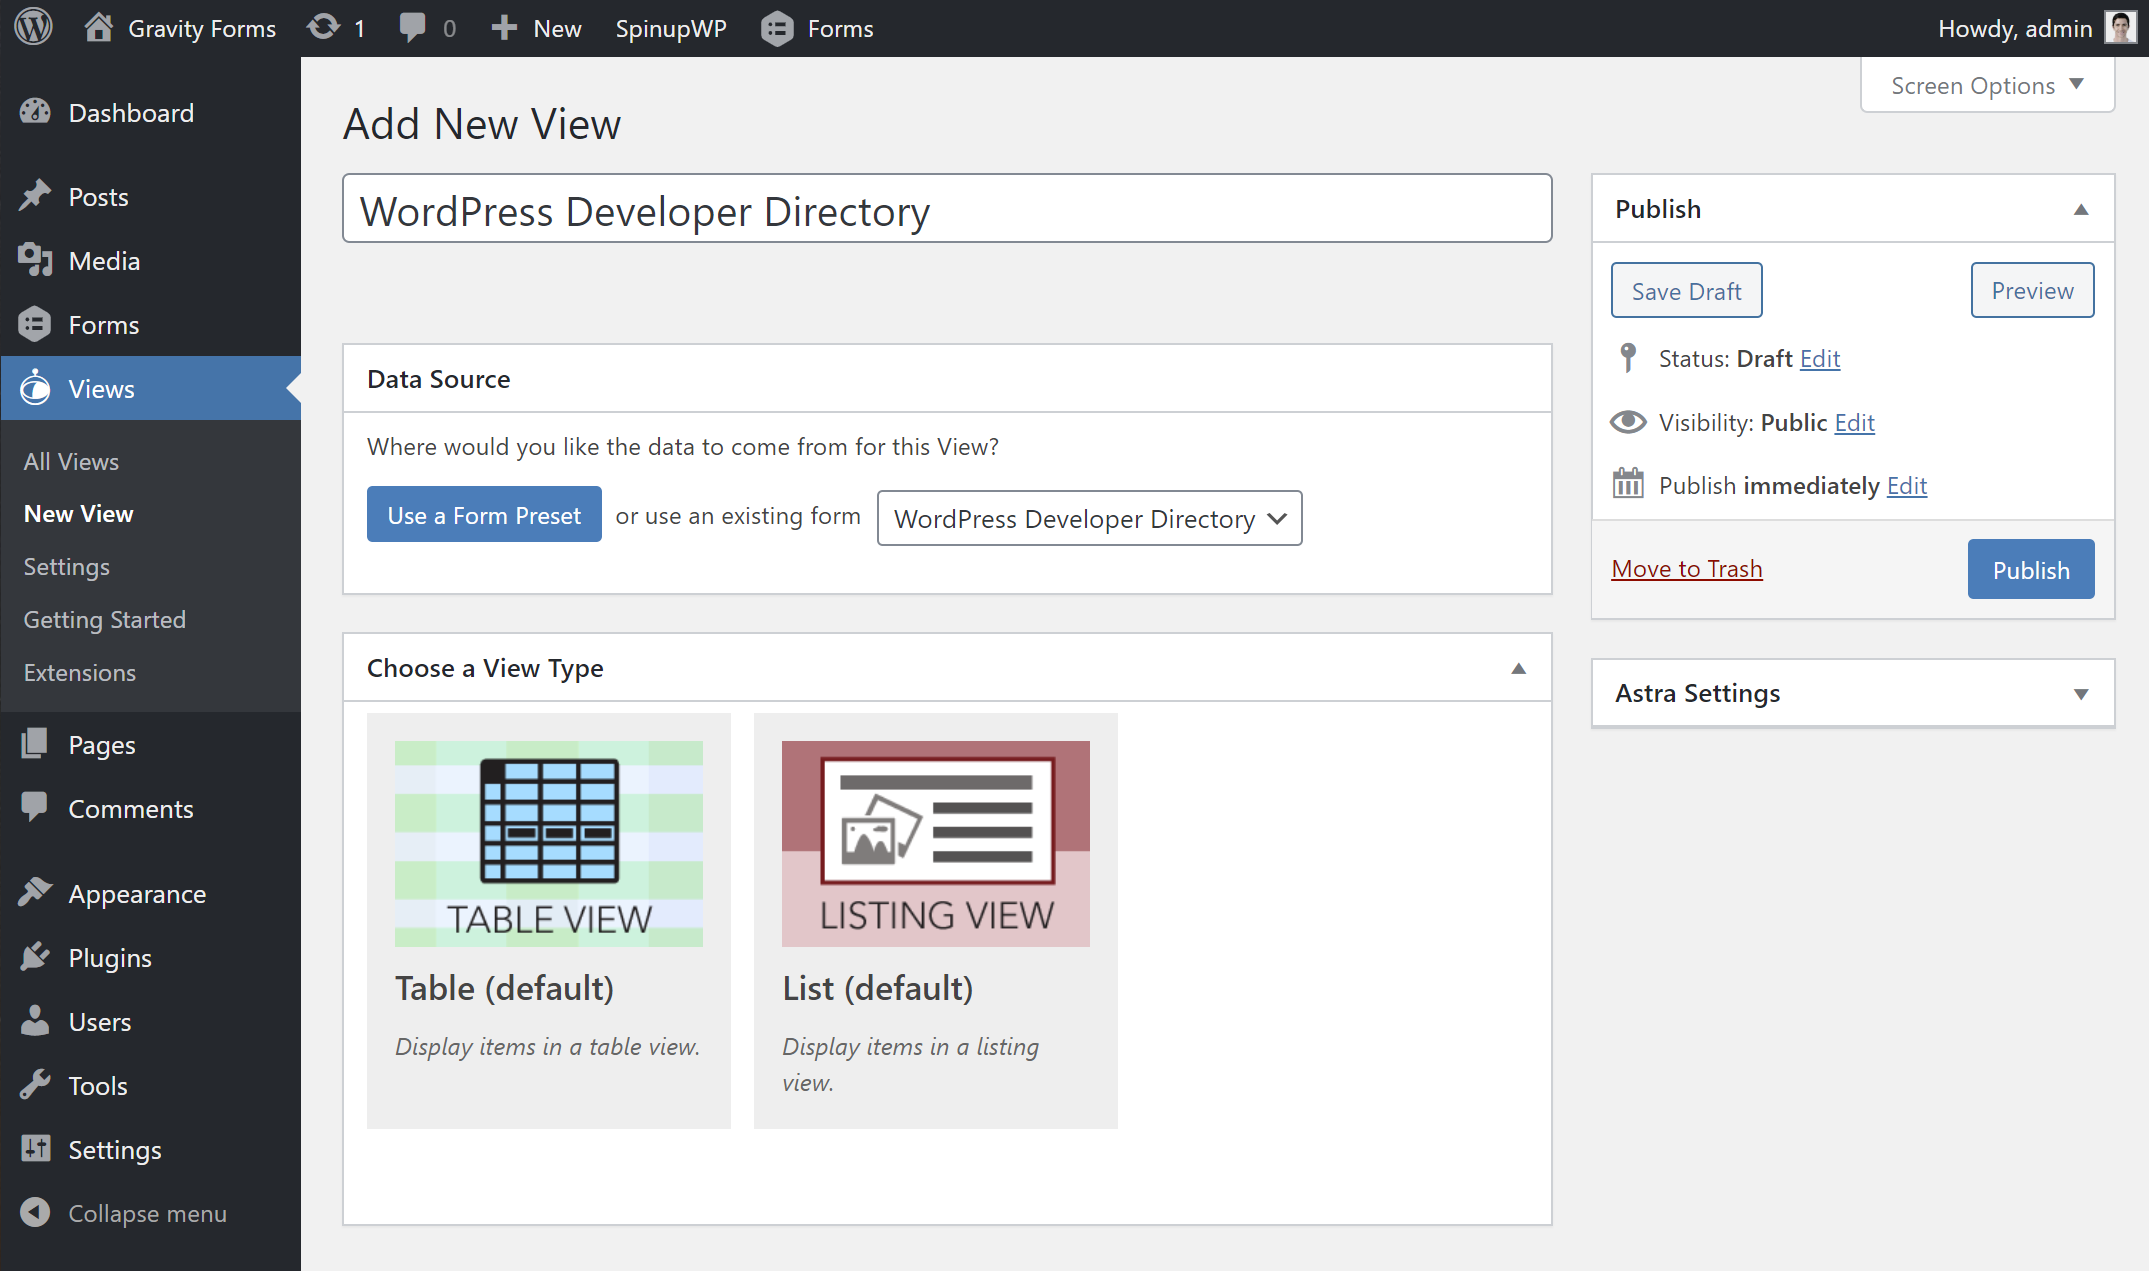
For this example, I’ll choose a list view.
Controlling Your View Layout
Once you choose a data source and layout option, you can use a drag-and-drop builder to control the actual layout of your view using widgets.
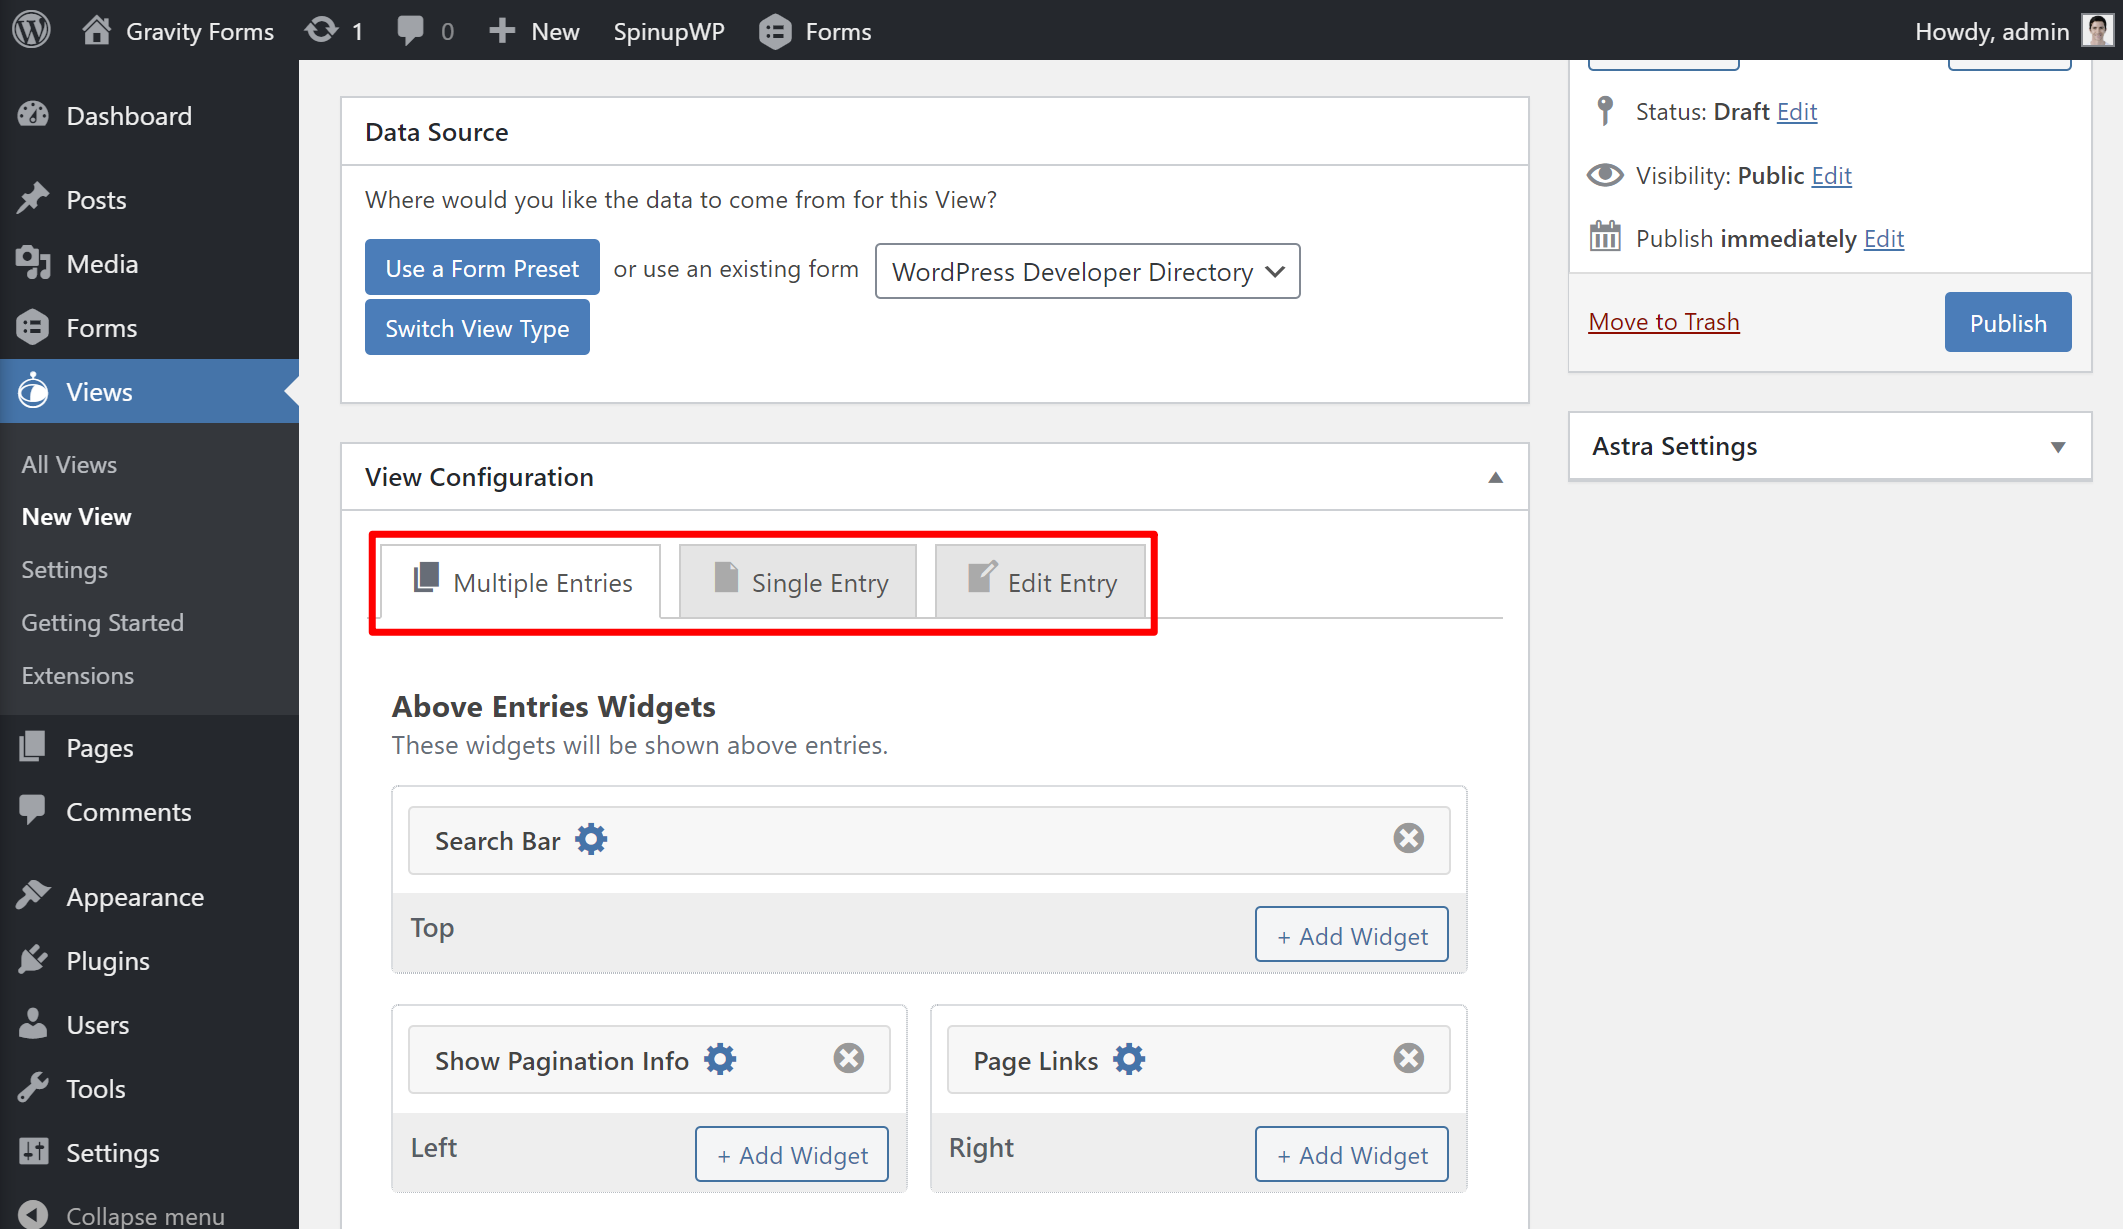
You can design three pages in total:
- Multiple Entries — this template controls the list of all of the Gravity Forms entries.
- Single Entry — this template controls the dedicated page for a single entry. Usually, people navigate to this page from the multiple entries list.
- Edit Entry — this controls which fields people can edit from the front-end interface.
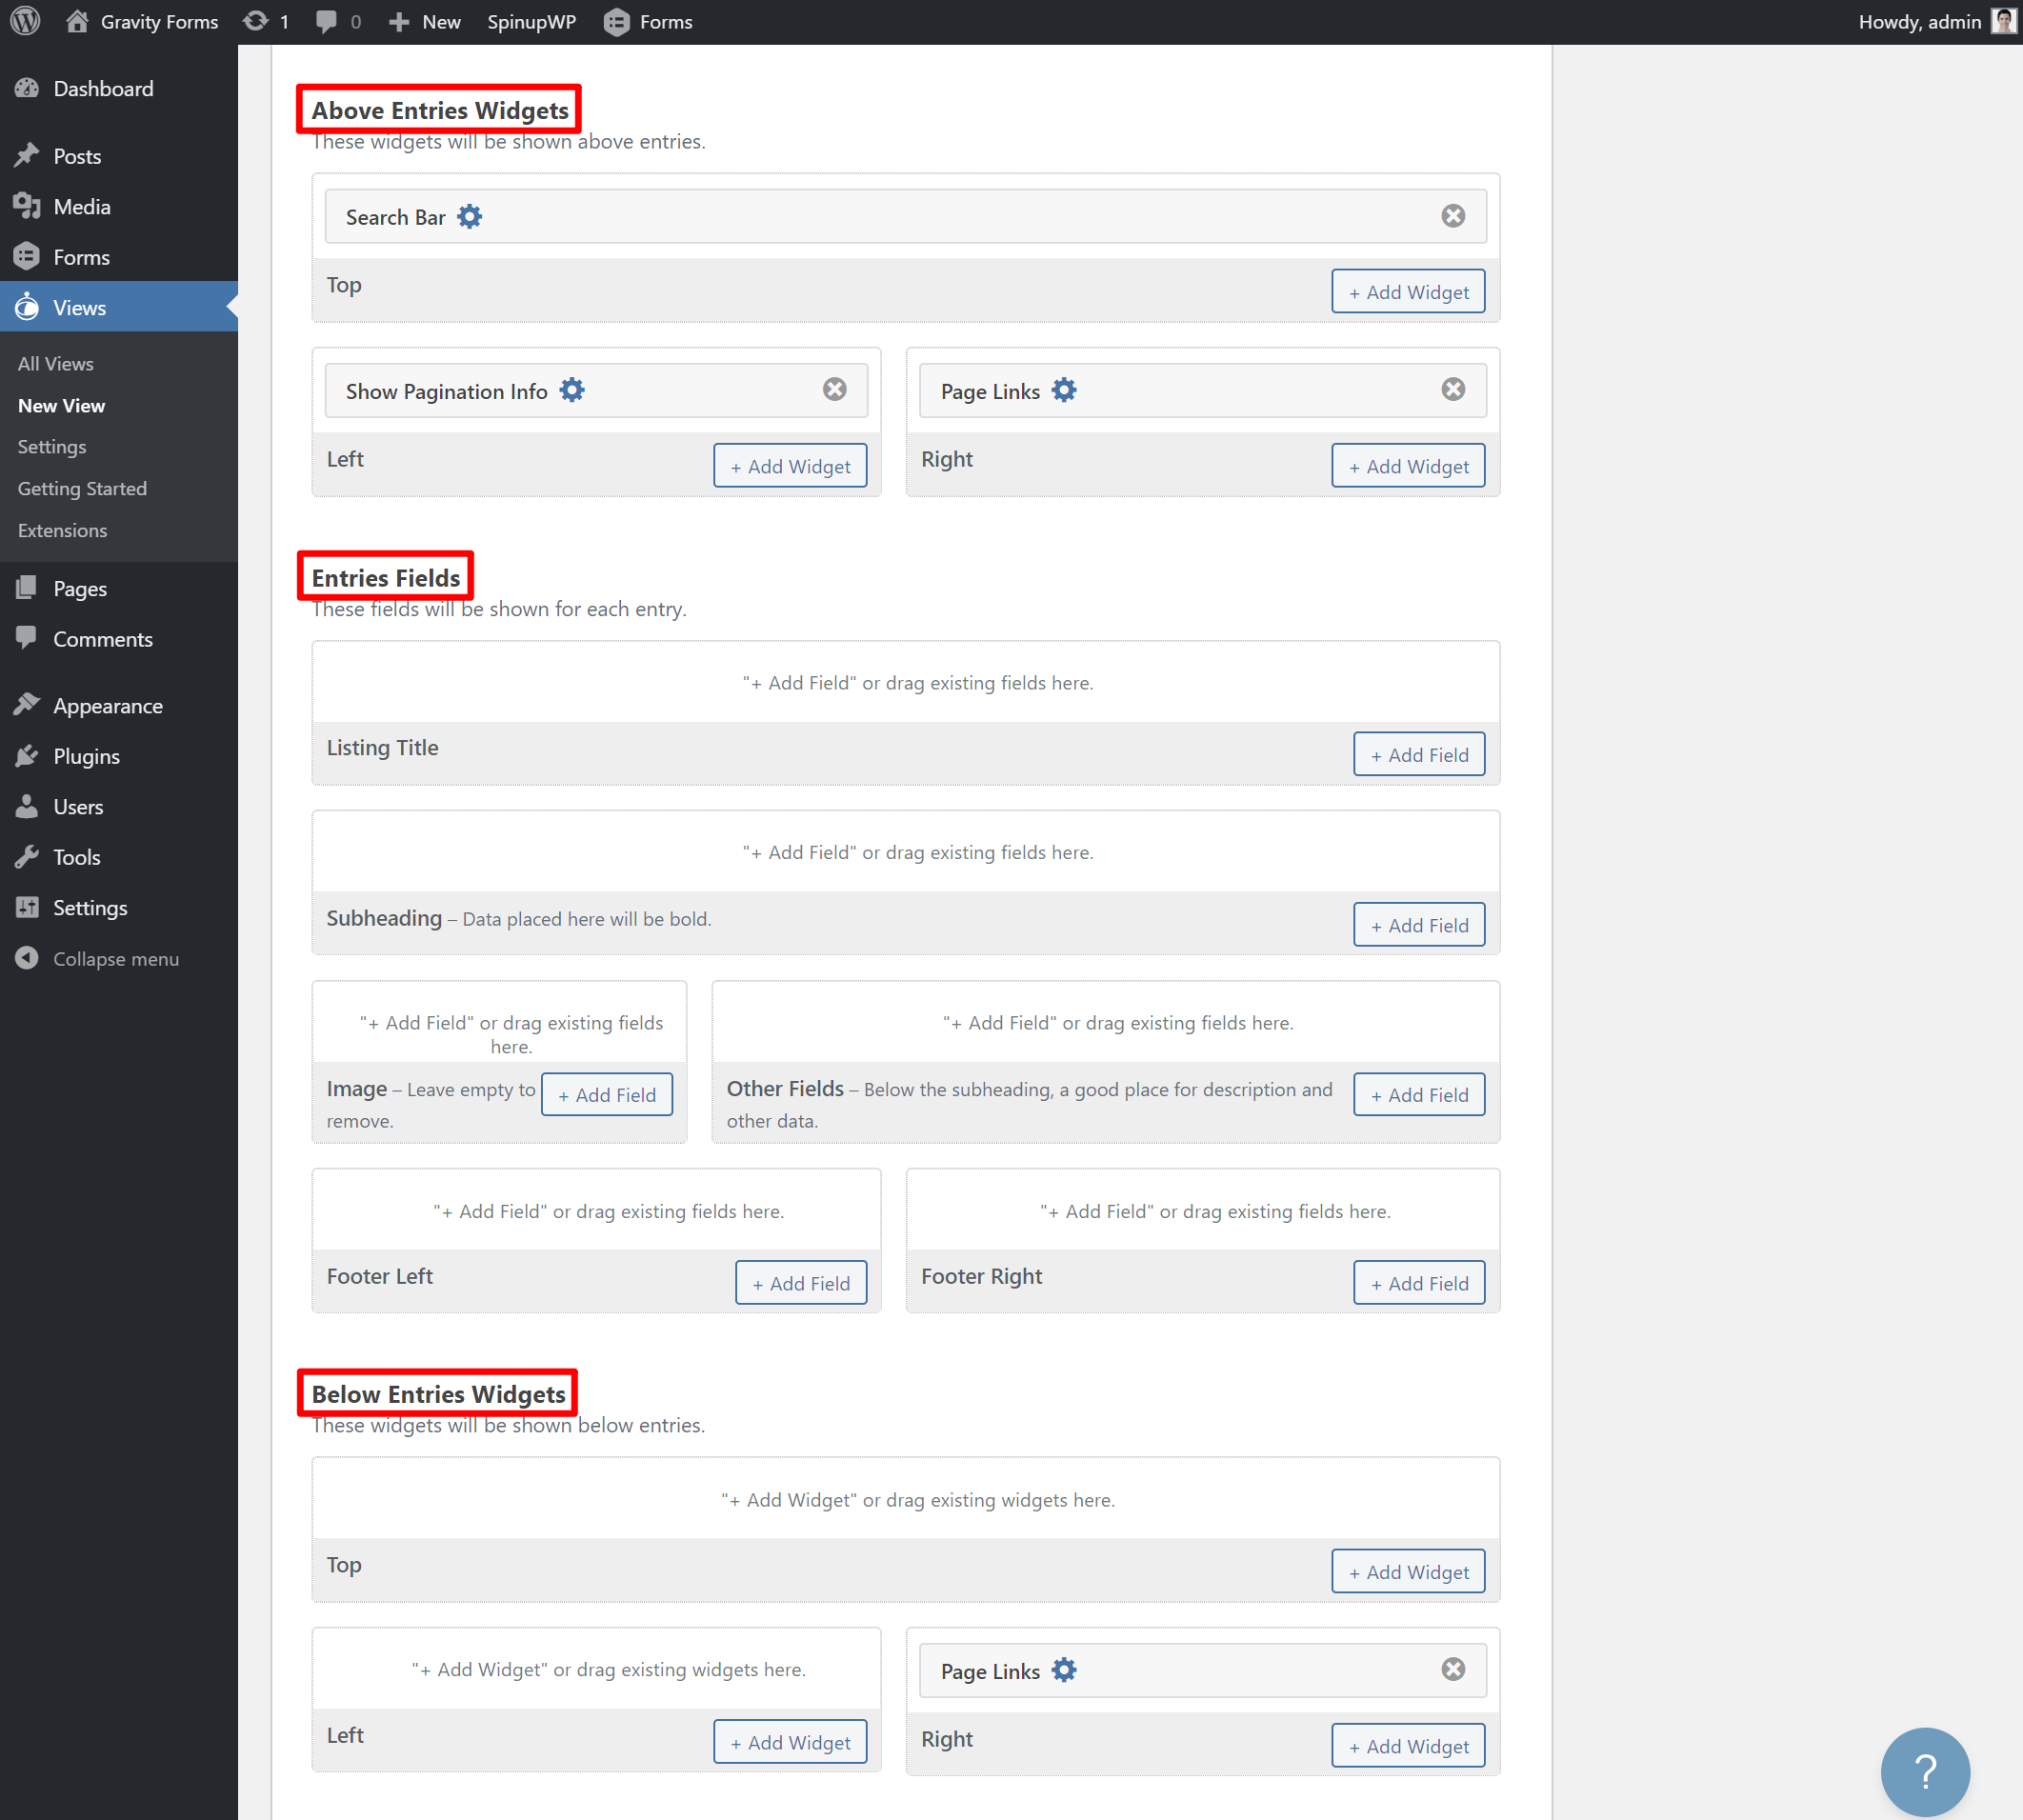
Multiple Entries Template
For the Multiple Entries page, you can control three parts of the page:
- Above Entries Widgets — these widgets only appear a single time. For example, you can add a search bar or filters.
- Entries Fields — these ‘loop’ for each entry that you display. That is, they’ll repeat over and over to display the same details for each entry (much like your blog list page automatically lists all of your blog posts and repeats the same layout for each post).
- Below Entries Widgets — like the above entries widgets, these widgets only appear a single time. You can use them for things such as pagination or another search box.
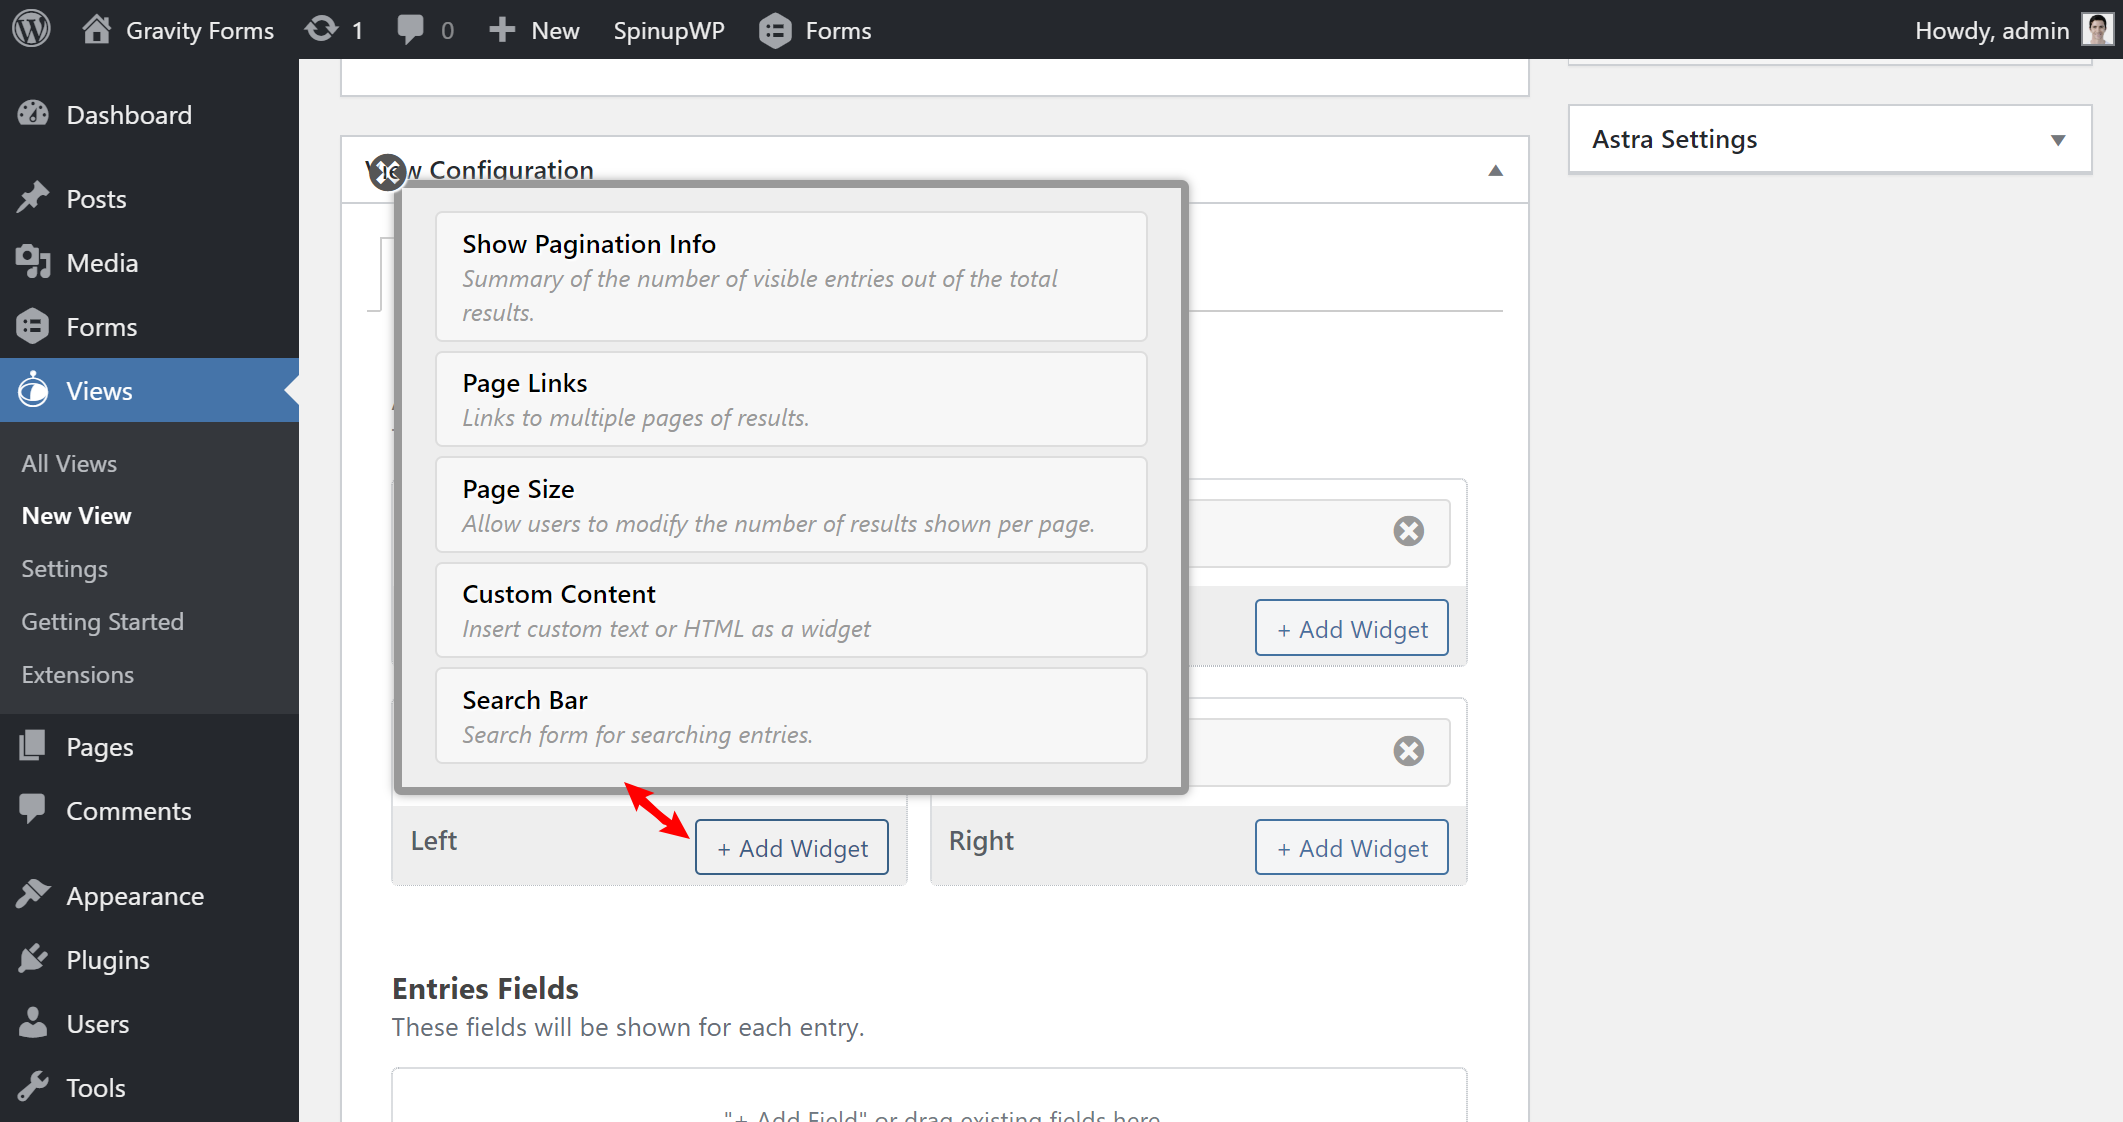
For the above and below widgets, you can choose from a preset selection of widgets including:
- Show pagination info.
- Page links.
- Page size — let users change how many entries are displayed.
- Custom content — add your own static content.
- Search bar.
If you click on the gear icon next to a widget, you can control how that widget functions. For example, if you edit the search bar, you can limit it to only search for specific fields in each entry and configure some other settings:
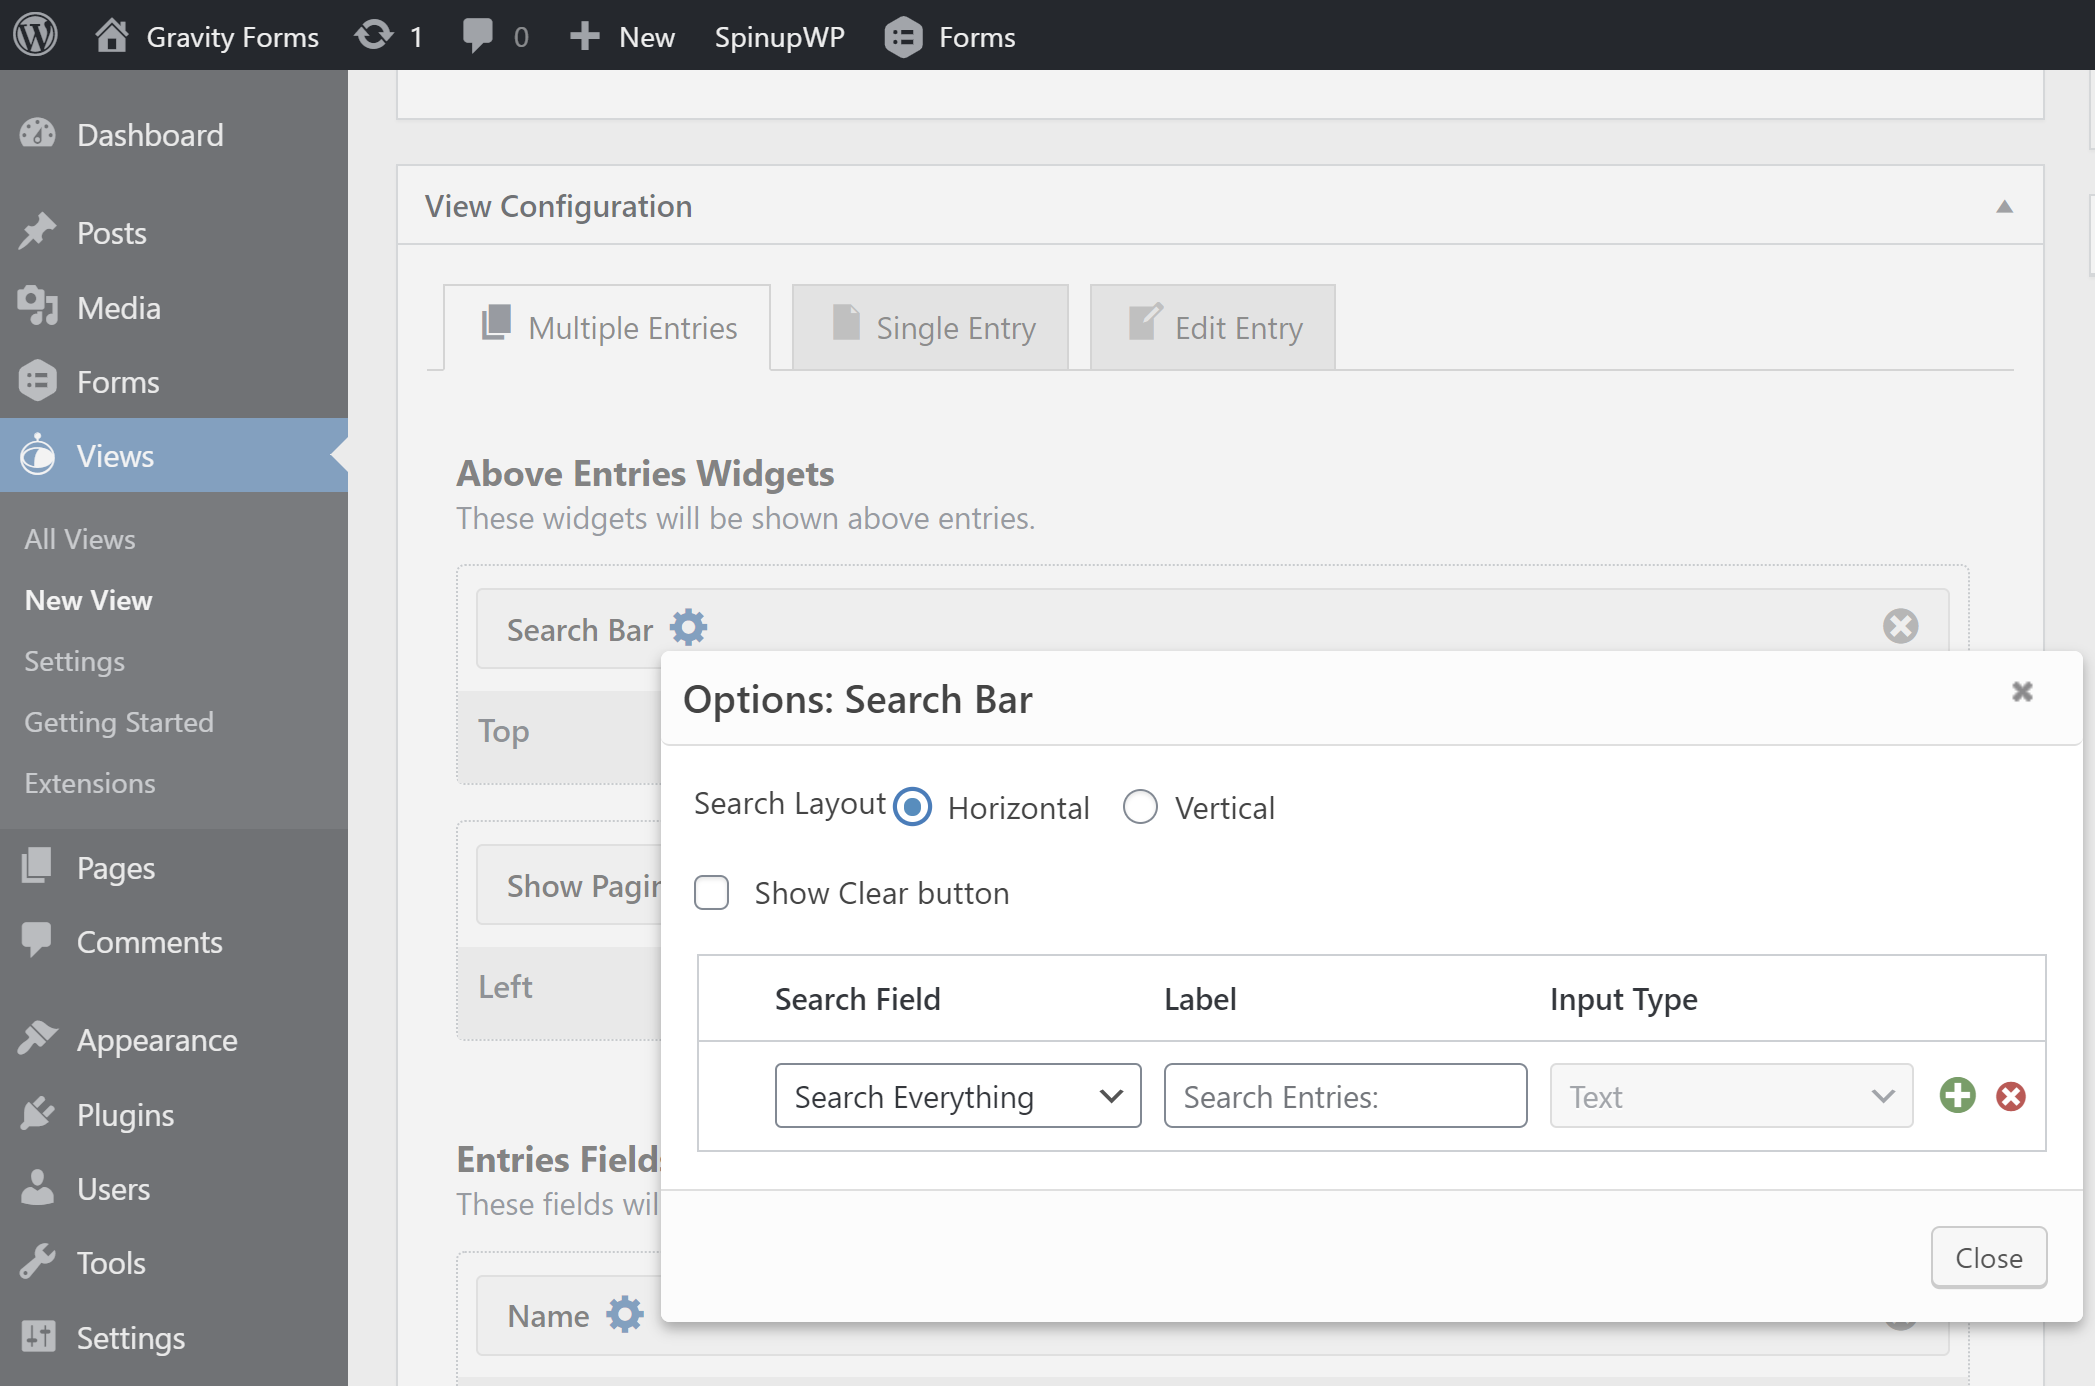
You can also add additional widgets with add-ons, which I’ll touch on later.
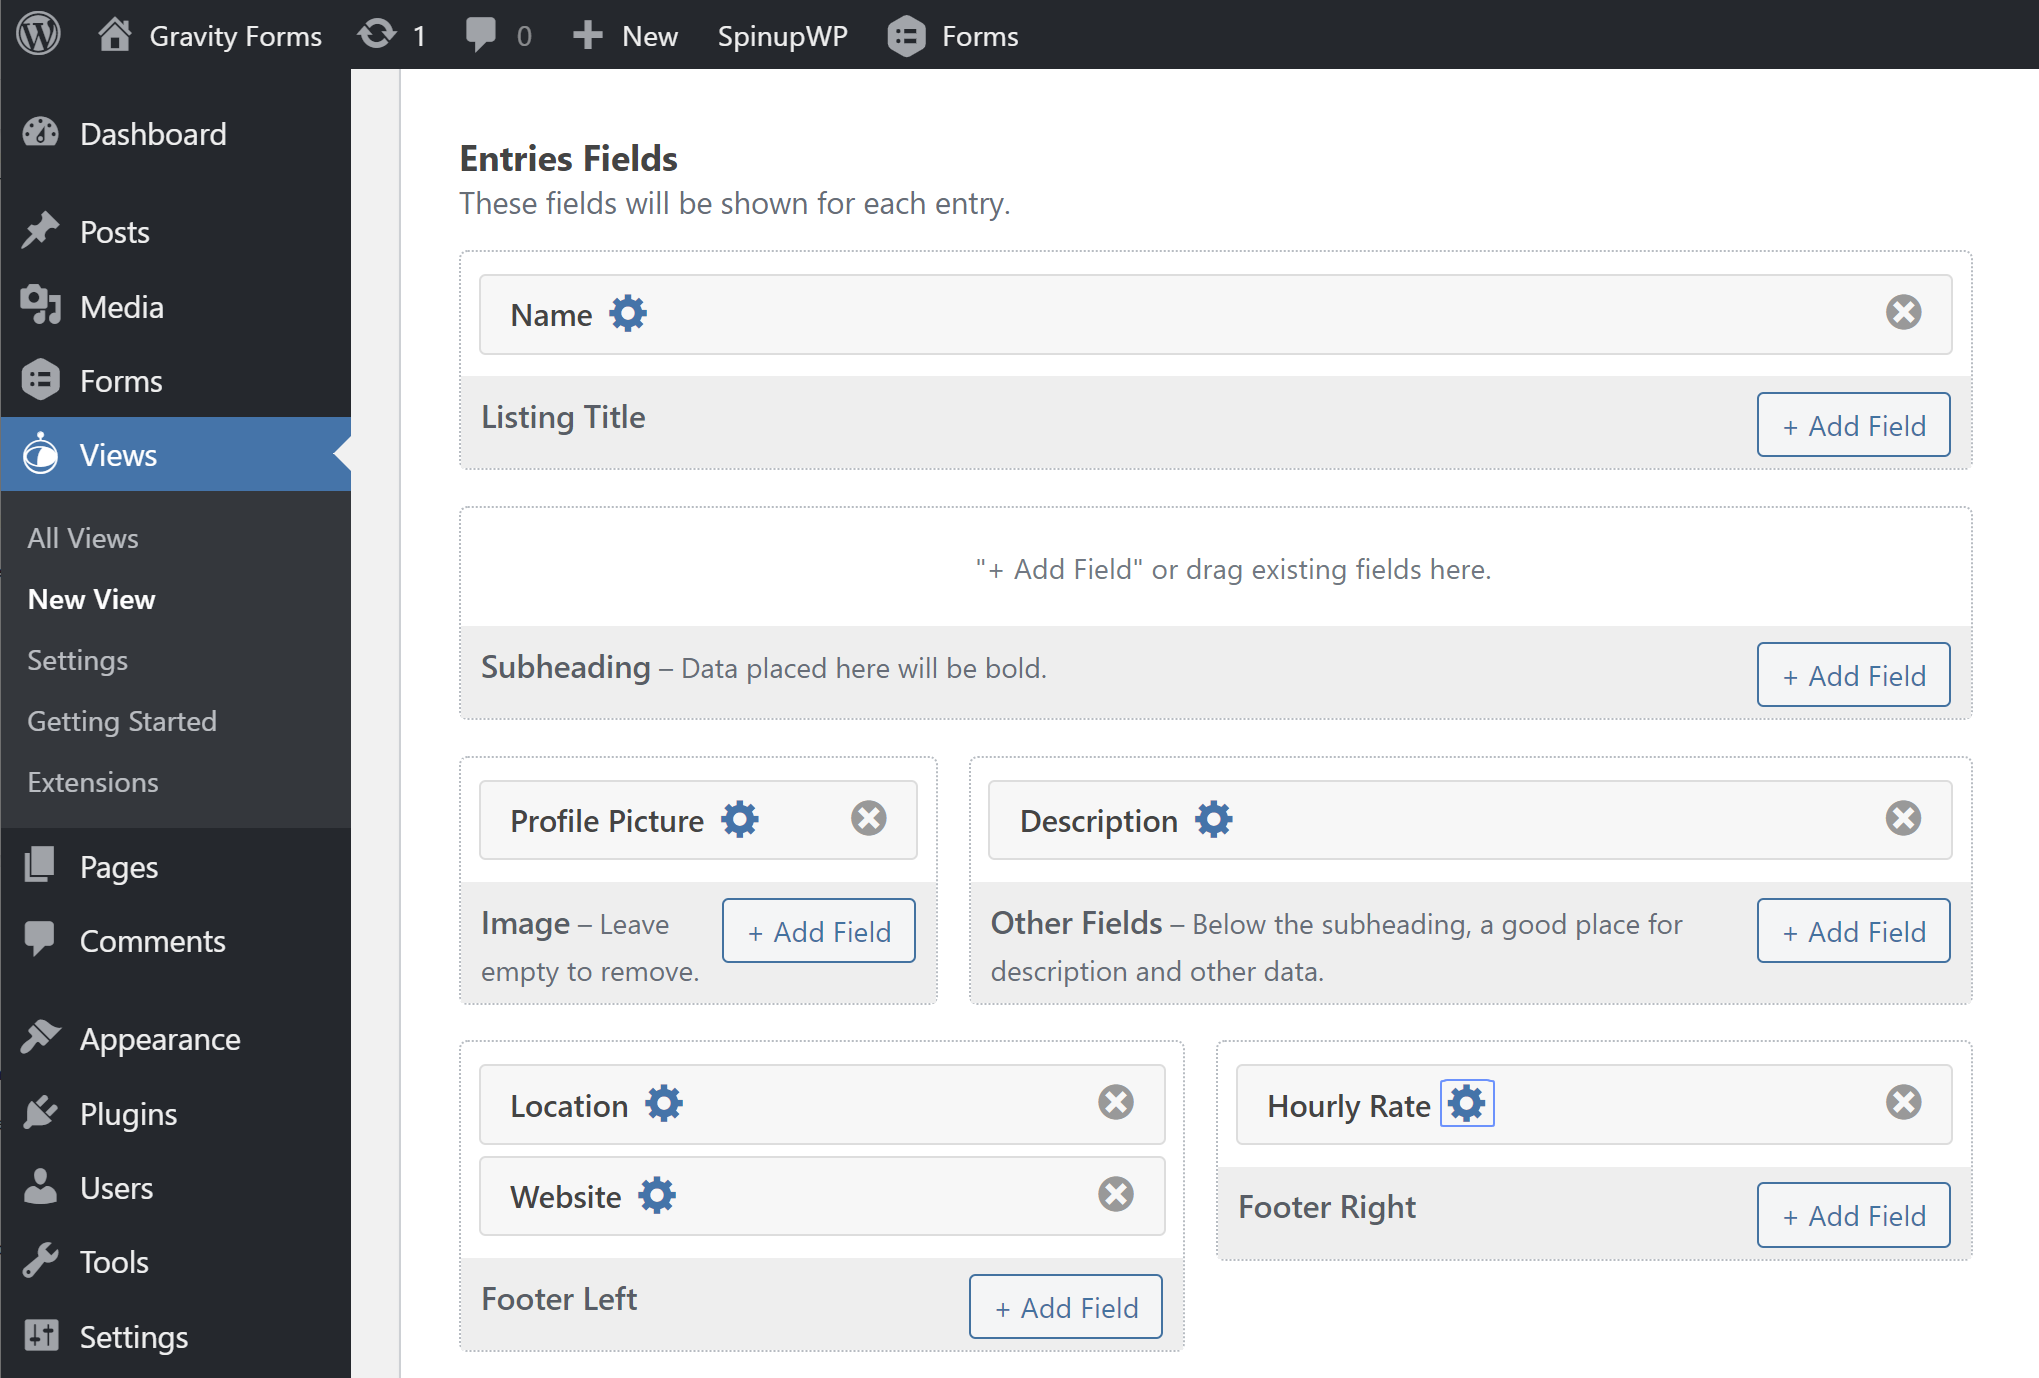
For the entry fields, you can choose the actual form fields from the form you selected earlier.
For example, you can set the title of each listing equal to the name field from your form:
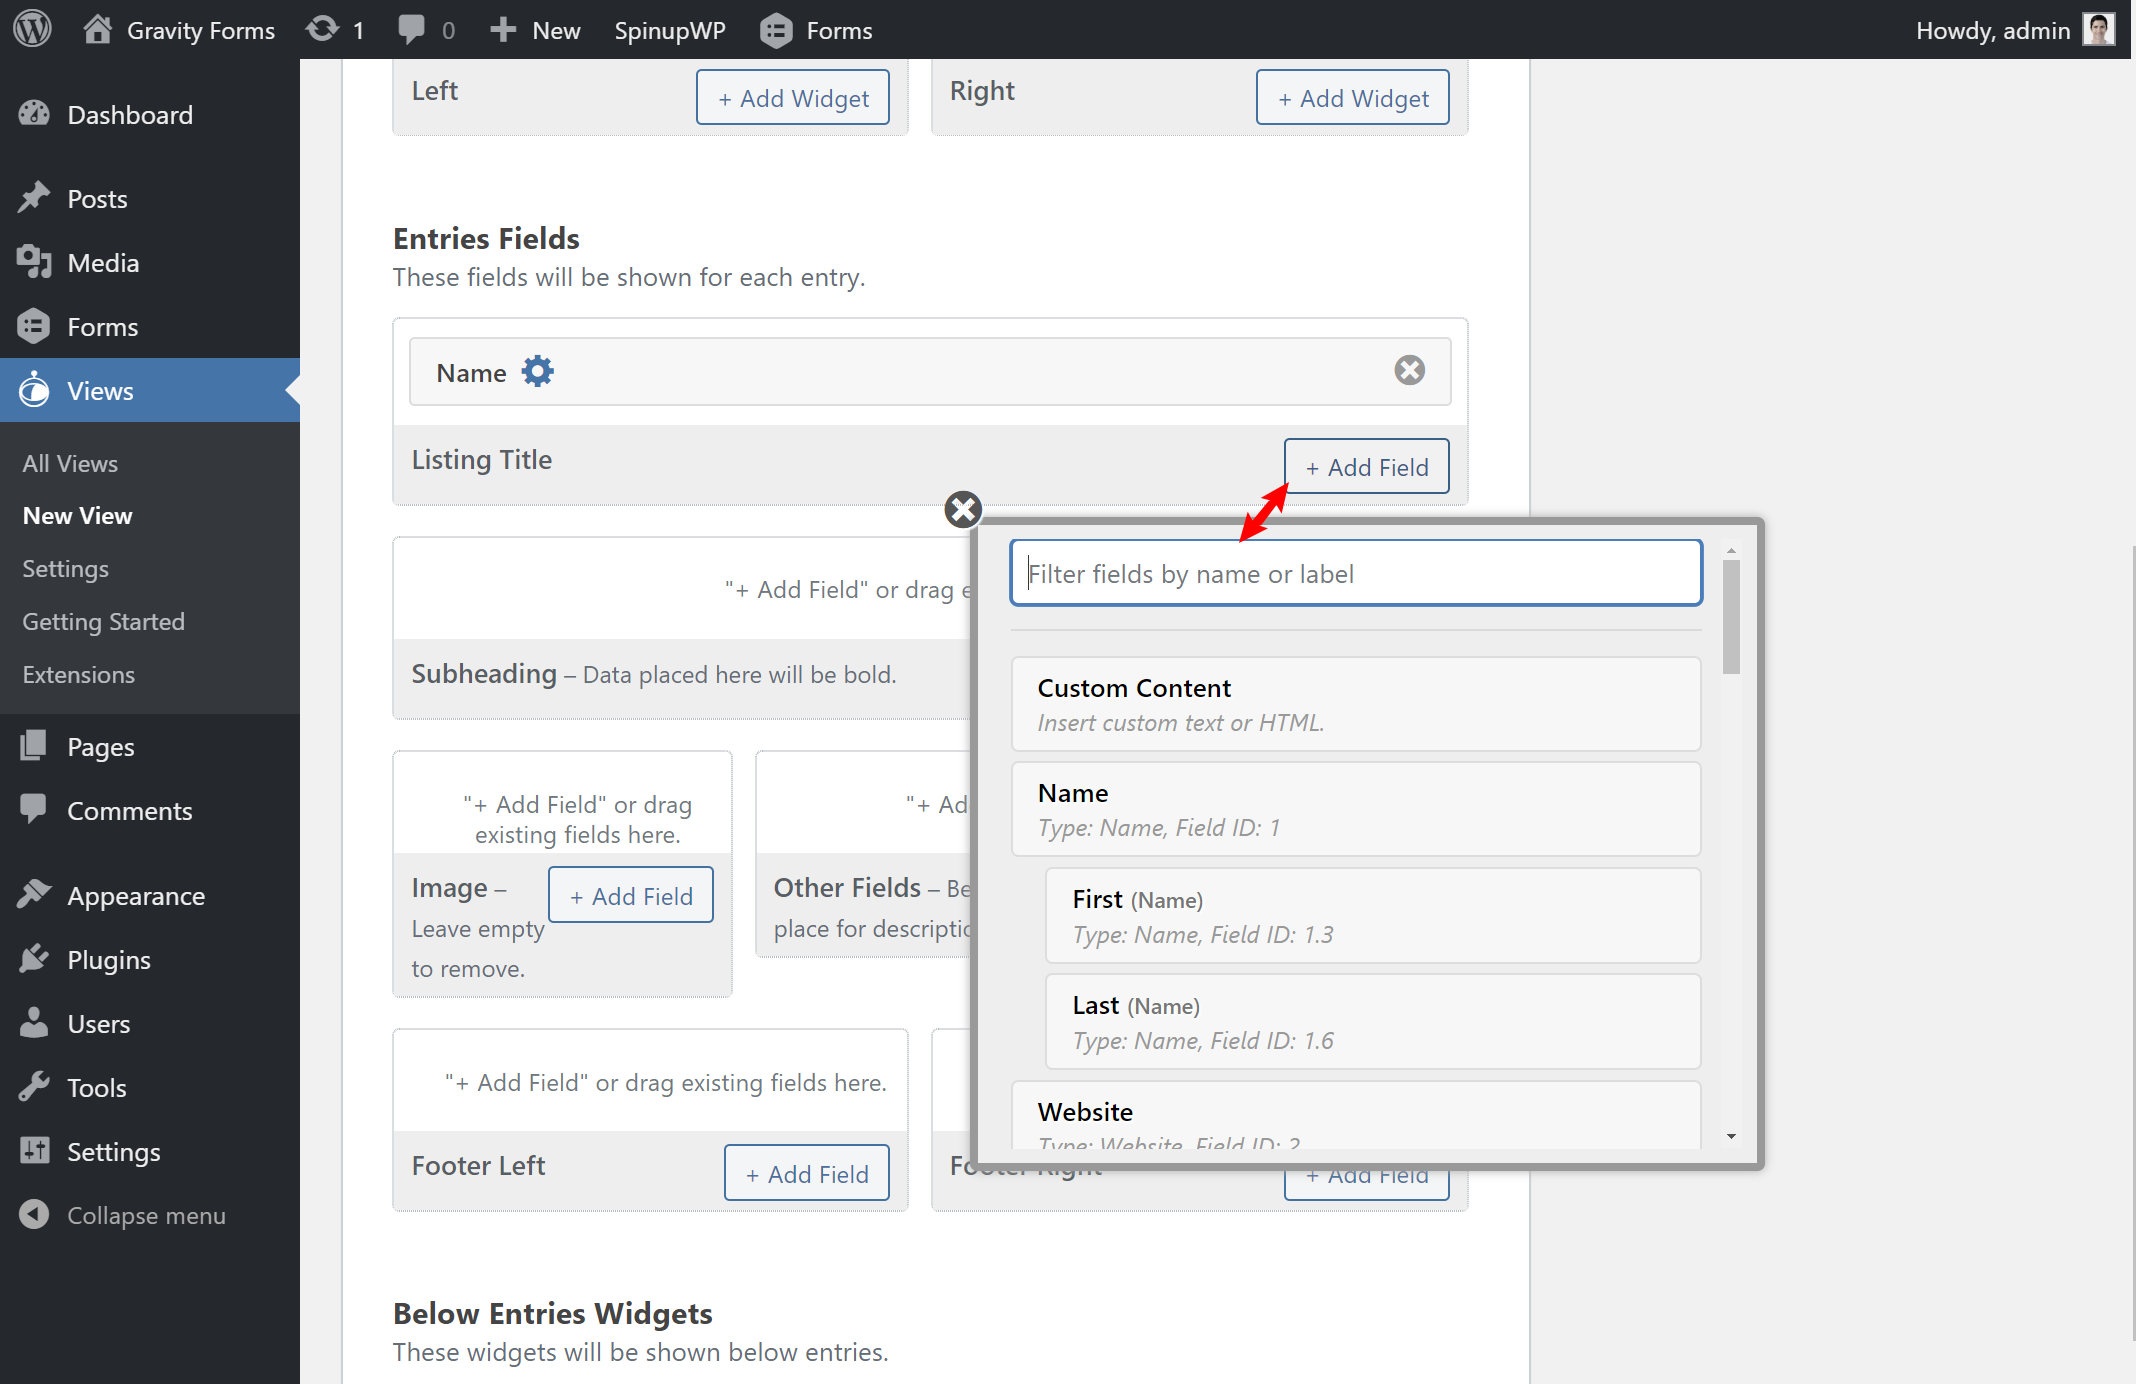
You can add fields to all of the different layout areas for your chosen layout, and use drag-and-drop to move fields around as needed.
One thing to note is that you’re limited to the preconfigured layout (e.g. ‘Listing Title’, ‘Subheading’, ‘Footer Left’, etc.)
If you know your way around HTML and CSS, GravityView does offer a tool to make it easy to create your own layouts without editing template files. However, if you don’t know HTML and CSS, you’re limited to the preset layouts — although you can arrange your fields in any order within those layouts.
Here’s what it looked like after I added all of the fields from my example form:
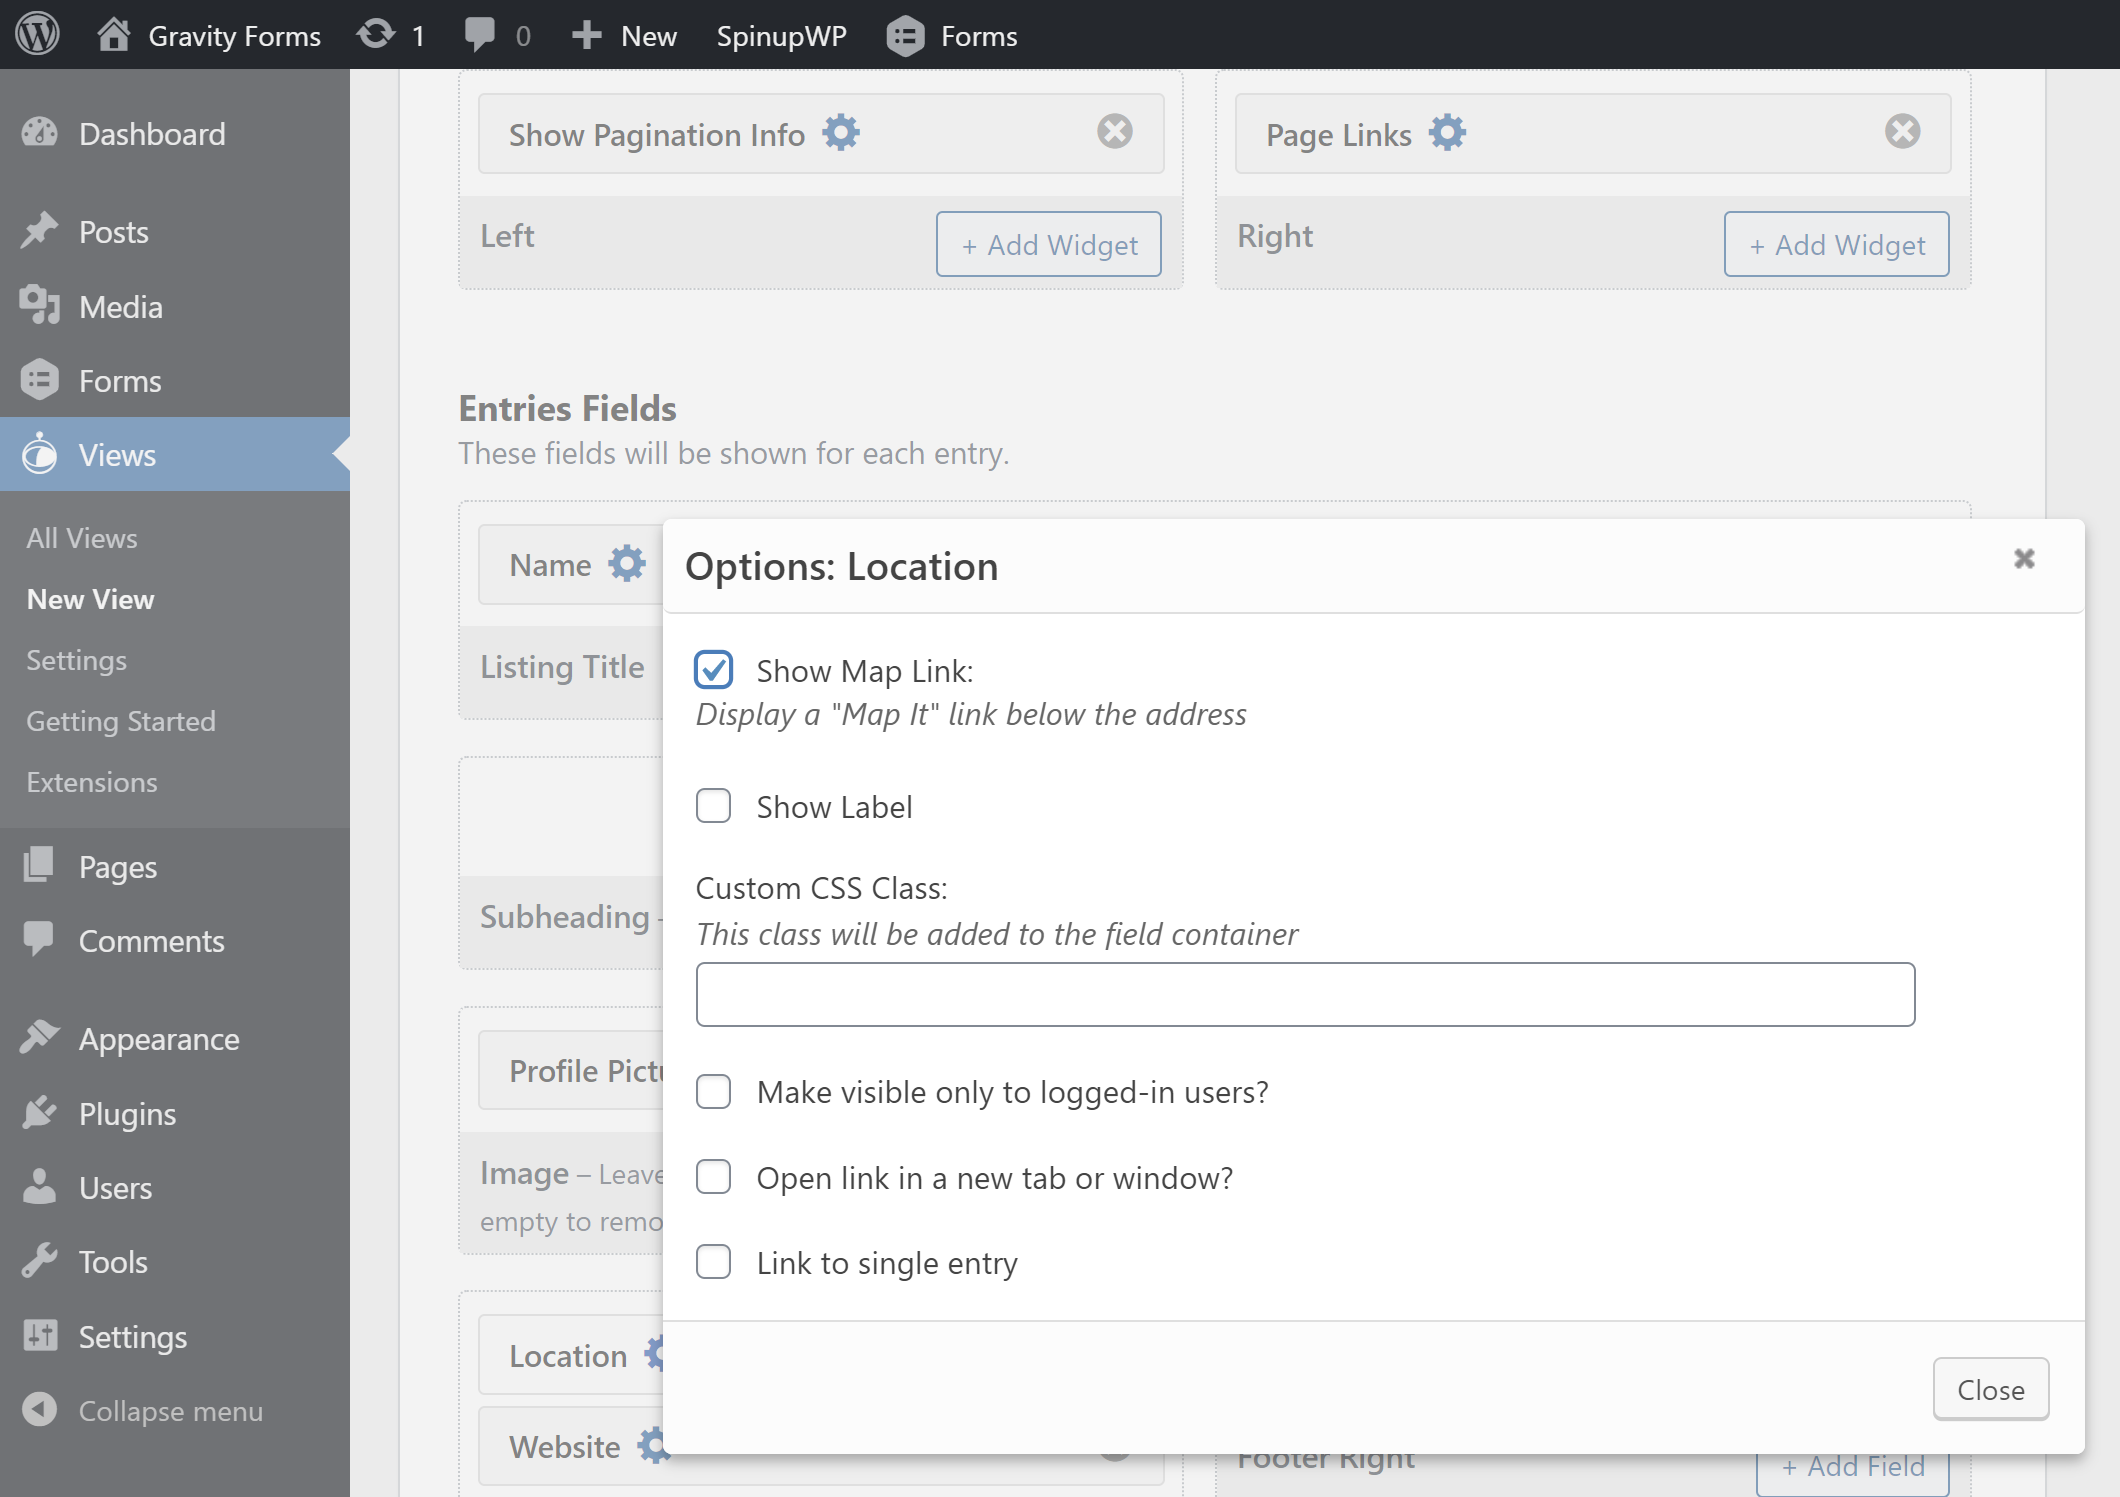
If you click on the gear icon next to a form field, you can edit that field. For example, you can only show some fields to logged-in users, or link a field to the single entry page.
Some fields also get additional settings. For example, for a location field, you can add a ‘Map It’ link to help people find the location using Google Maps:
Single Entry Template
In the Single Entry tab, you can use an identical interface to design the layout for the single entry page. Except now you only work with the form fields — there’s no need for search or pagination widgets because this template only displays a specific entry:
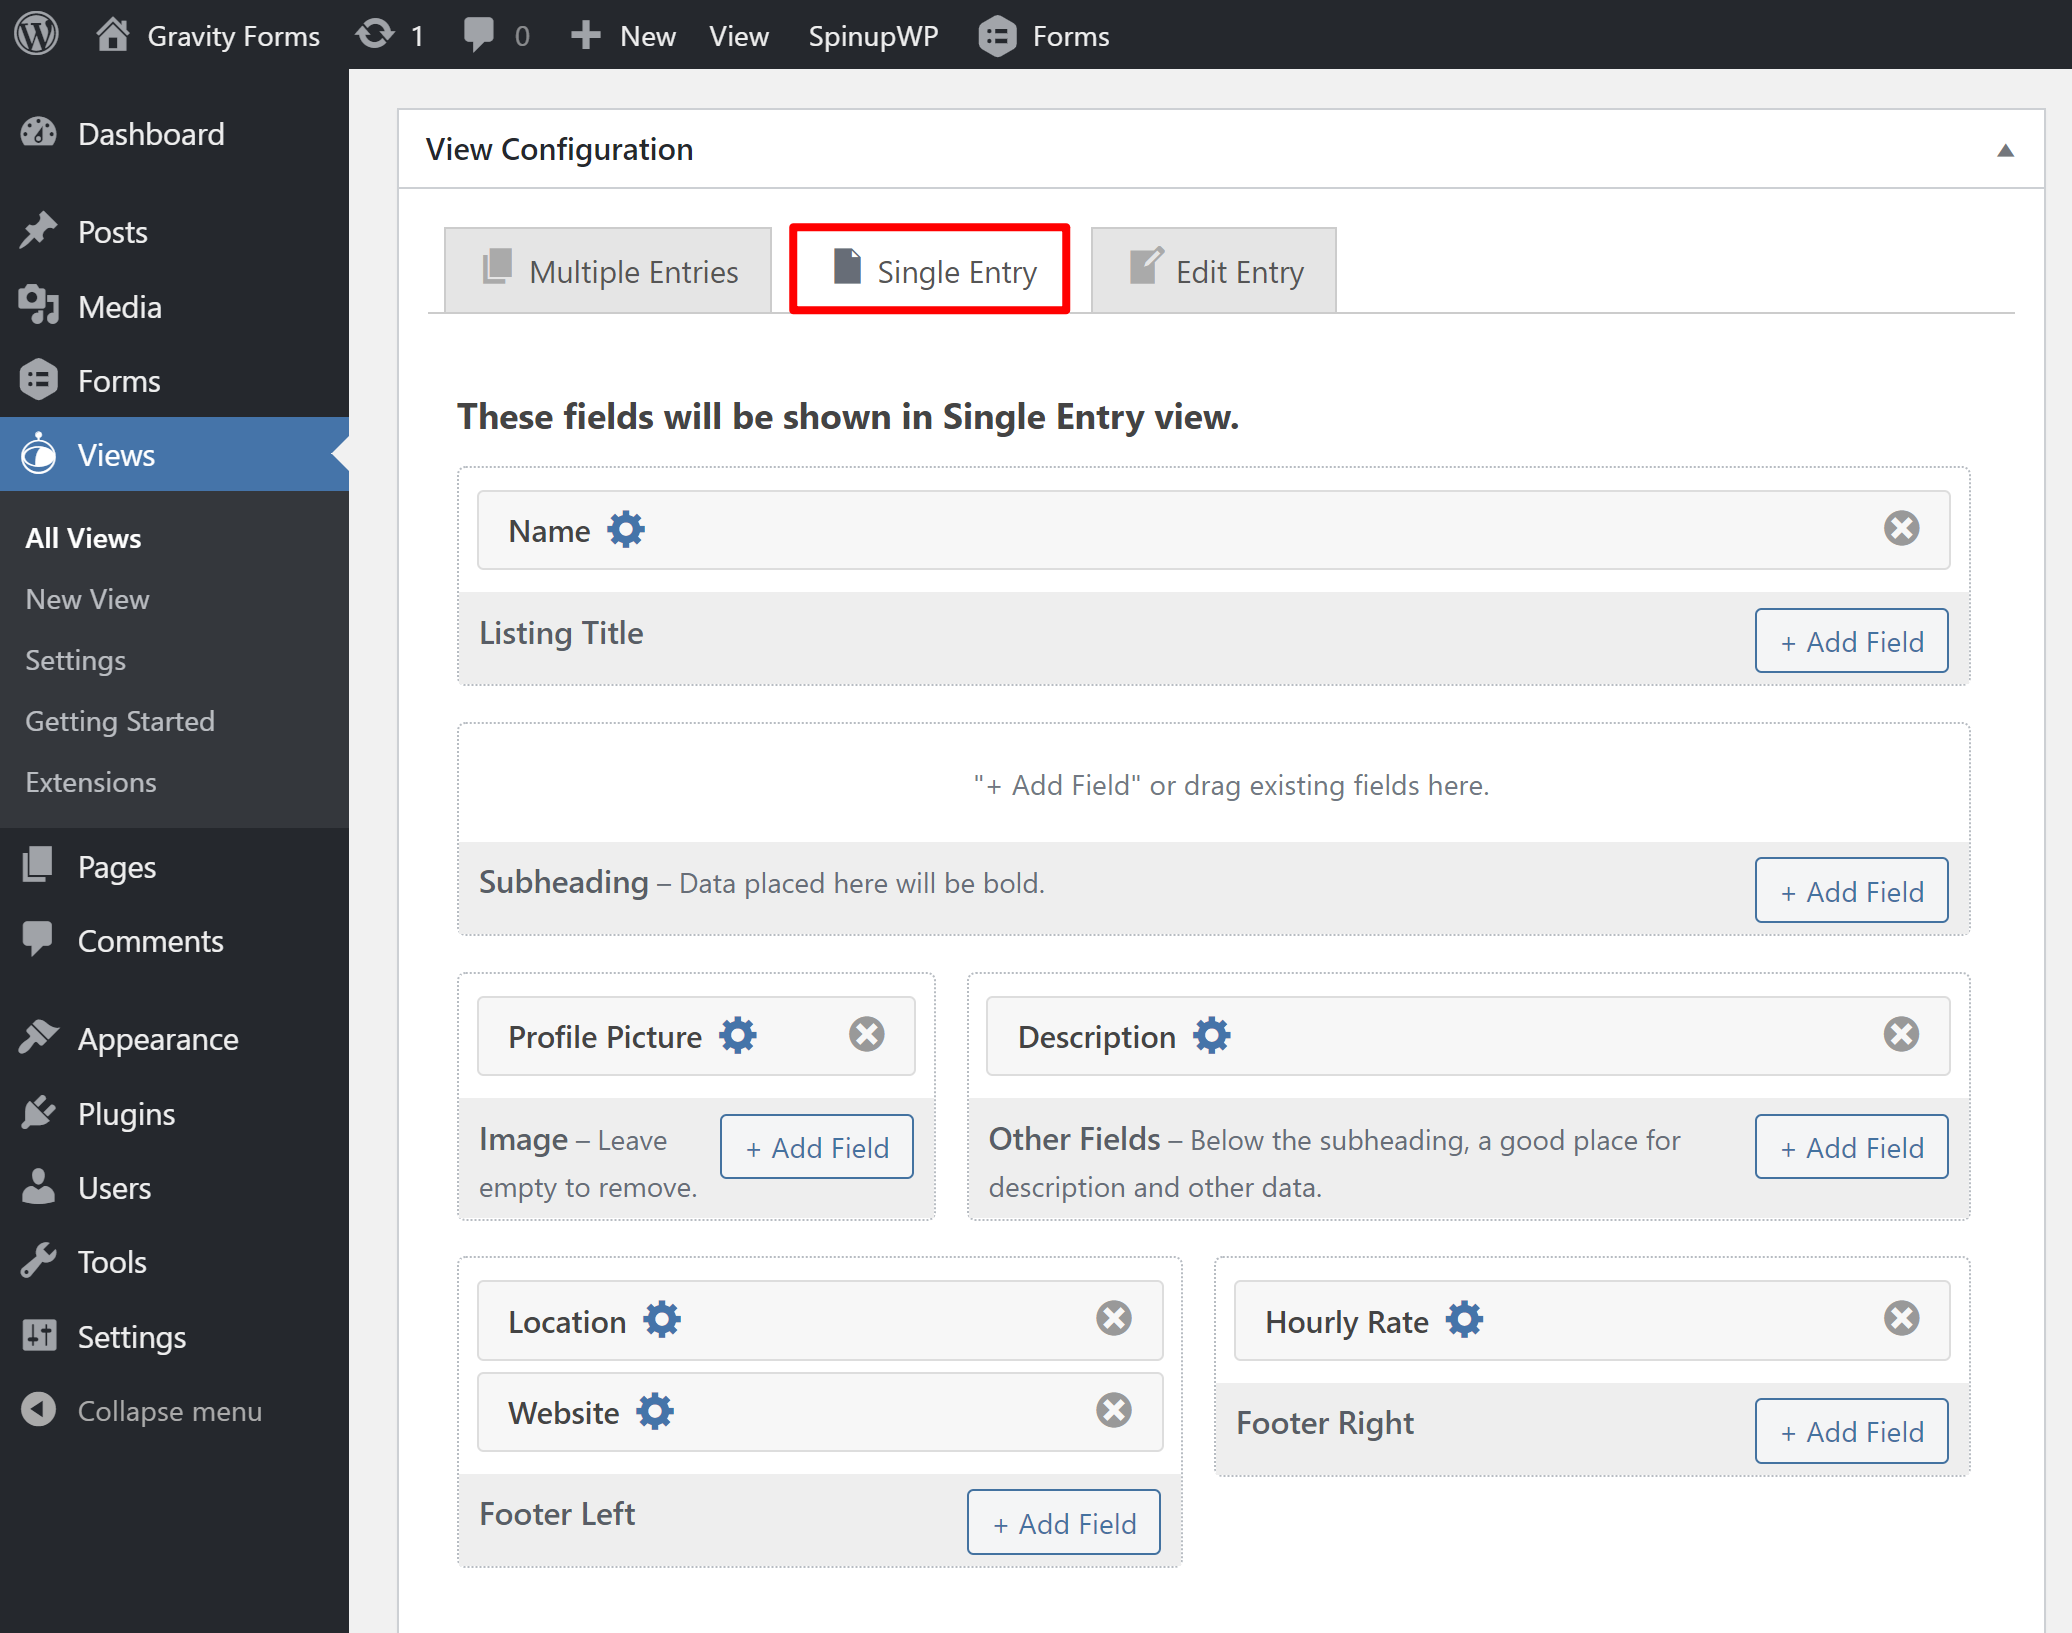
You can also add your own custom content using a Custom Content field if needed, as well as fields to let people edit or delete entries:

As with the multiple entries template, you’re limited to this preset layout arrangement unless you know your way around HTML and CSS.
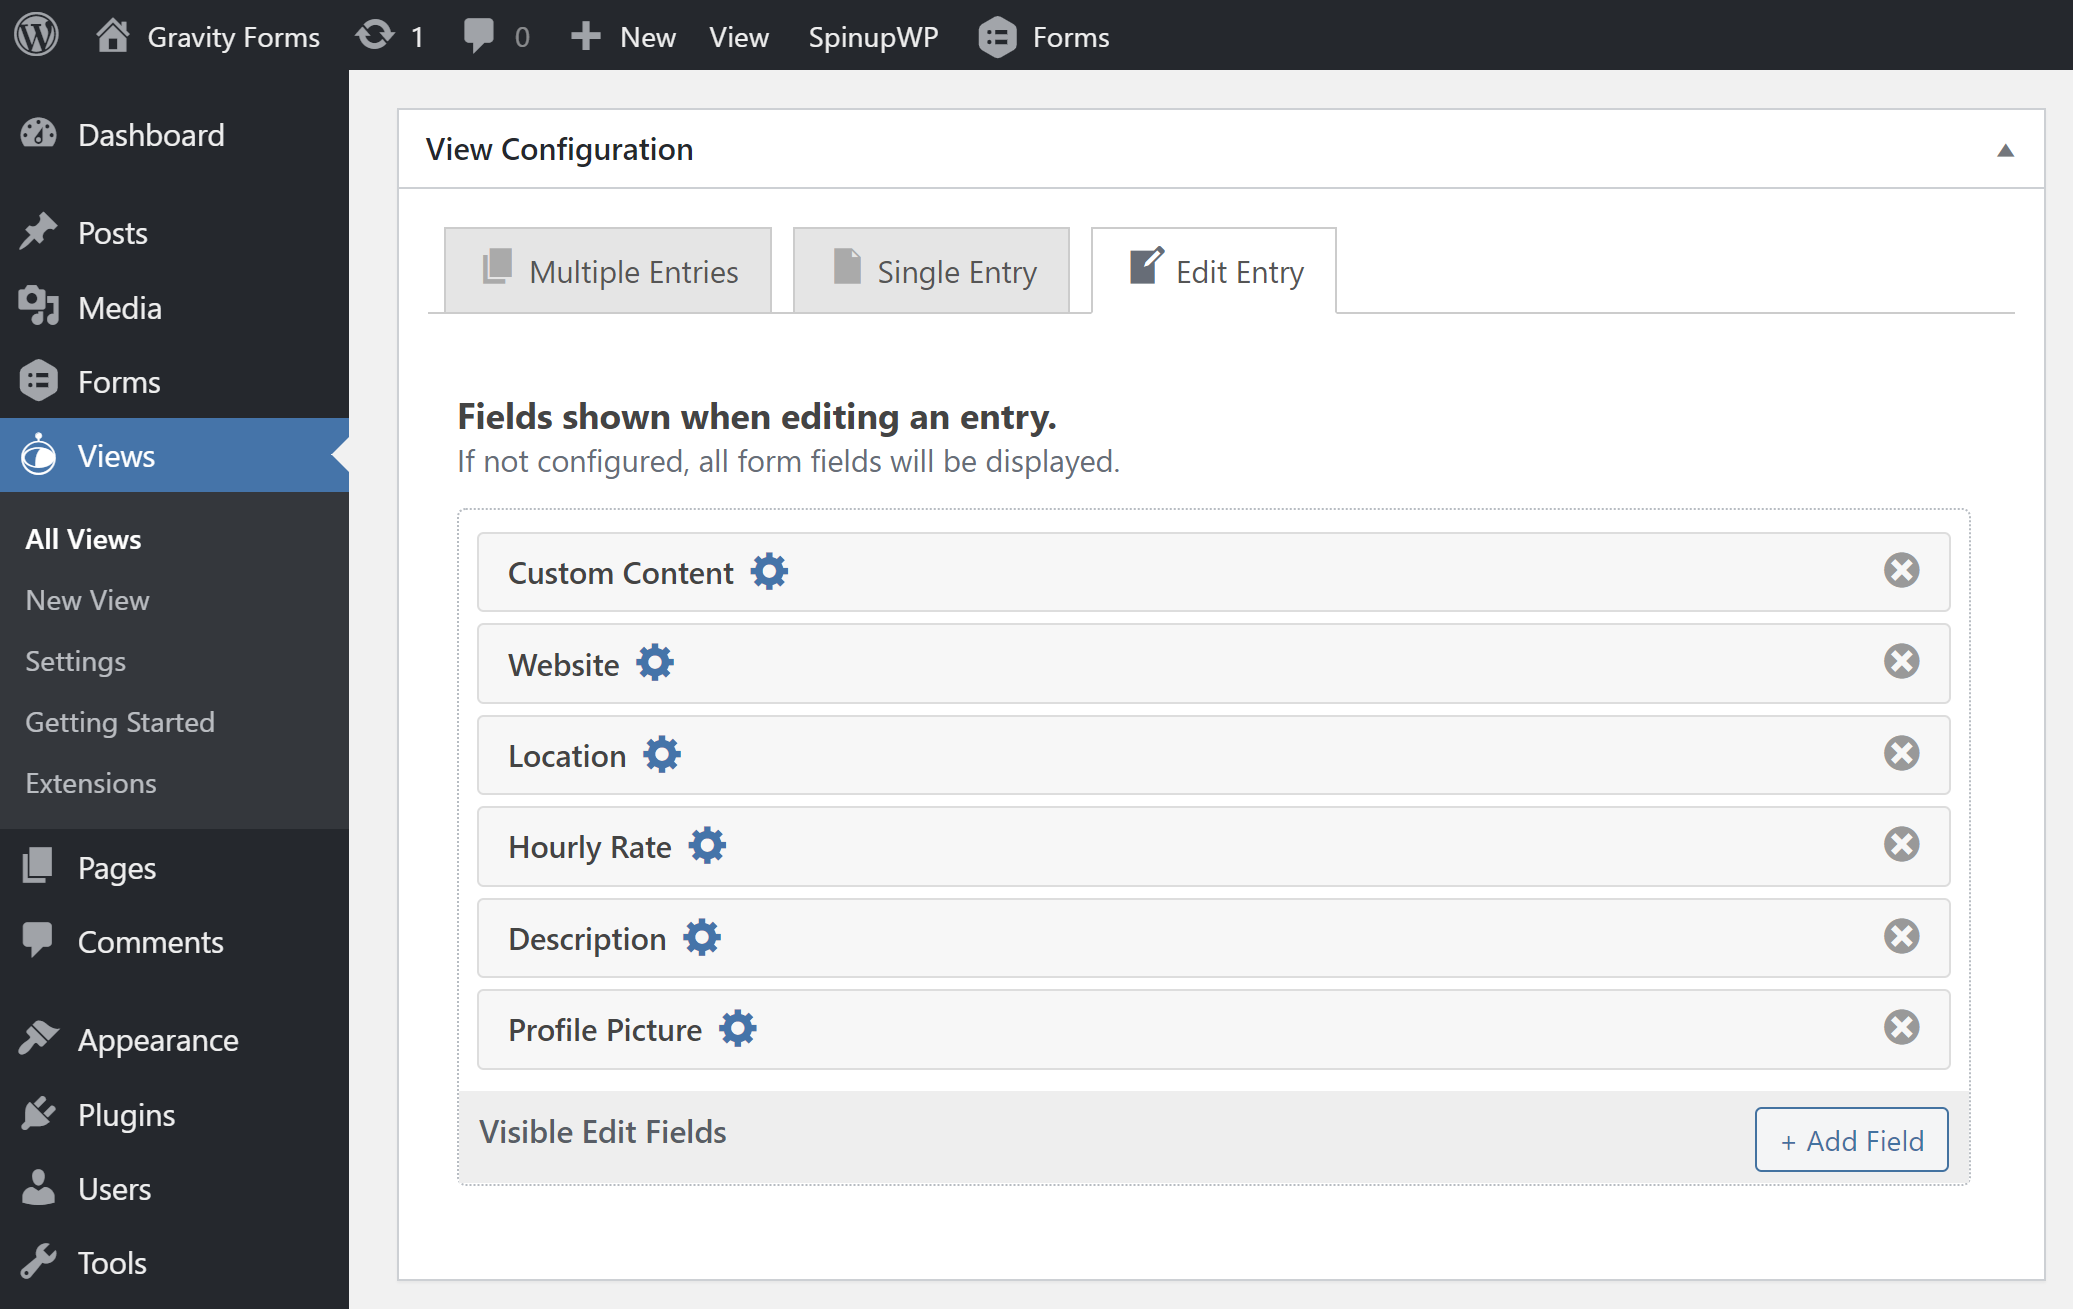
Edit Entry Template
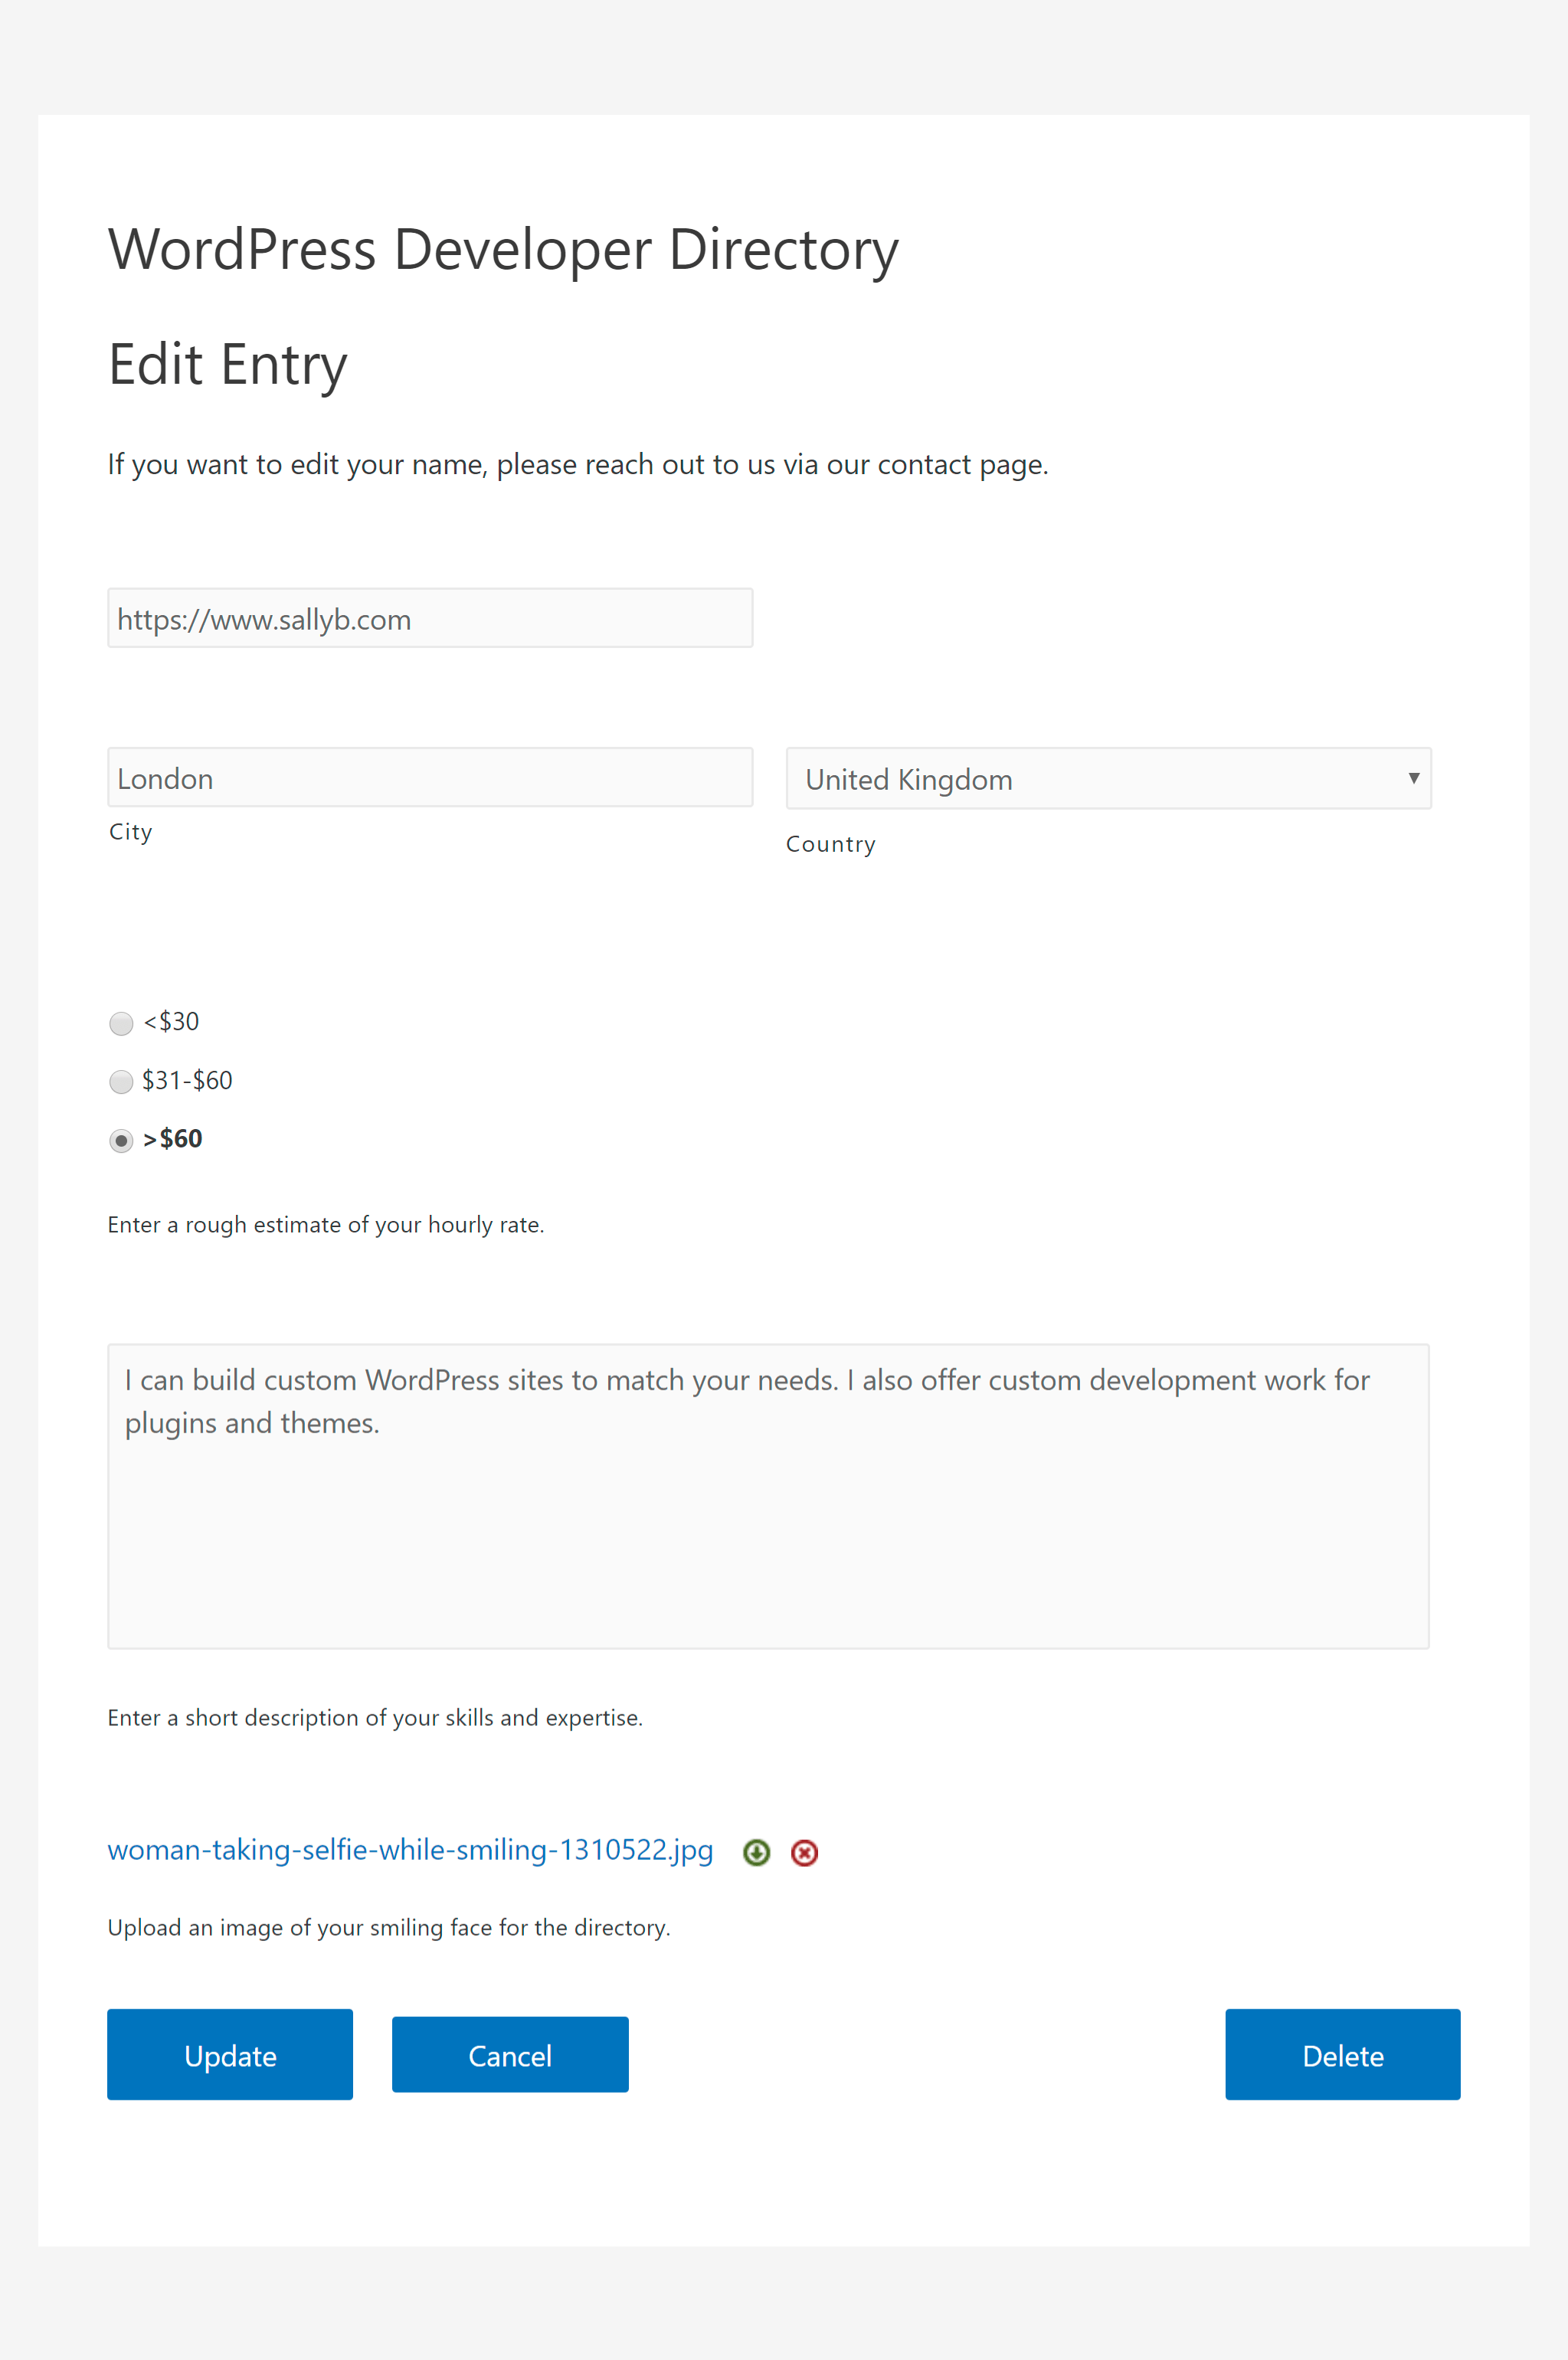
Finally, you can control the layout for the Edit Entry template. Again, these are the fields that logged-in users will see when they try to edit one of their own entries.
You can use this so that people can only edit certain fields, rather than the entire entry.
For example, I can set it up so that WordPress developers can edit all of the fields except for their name:
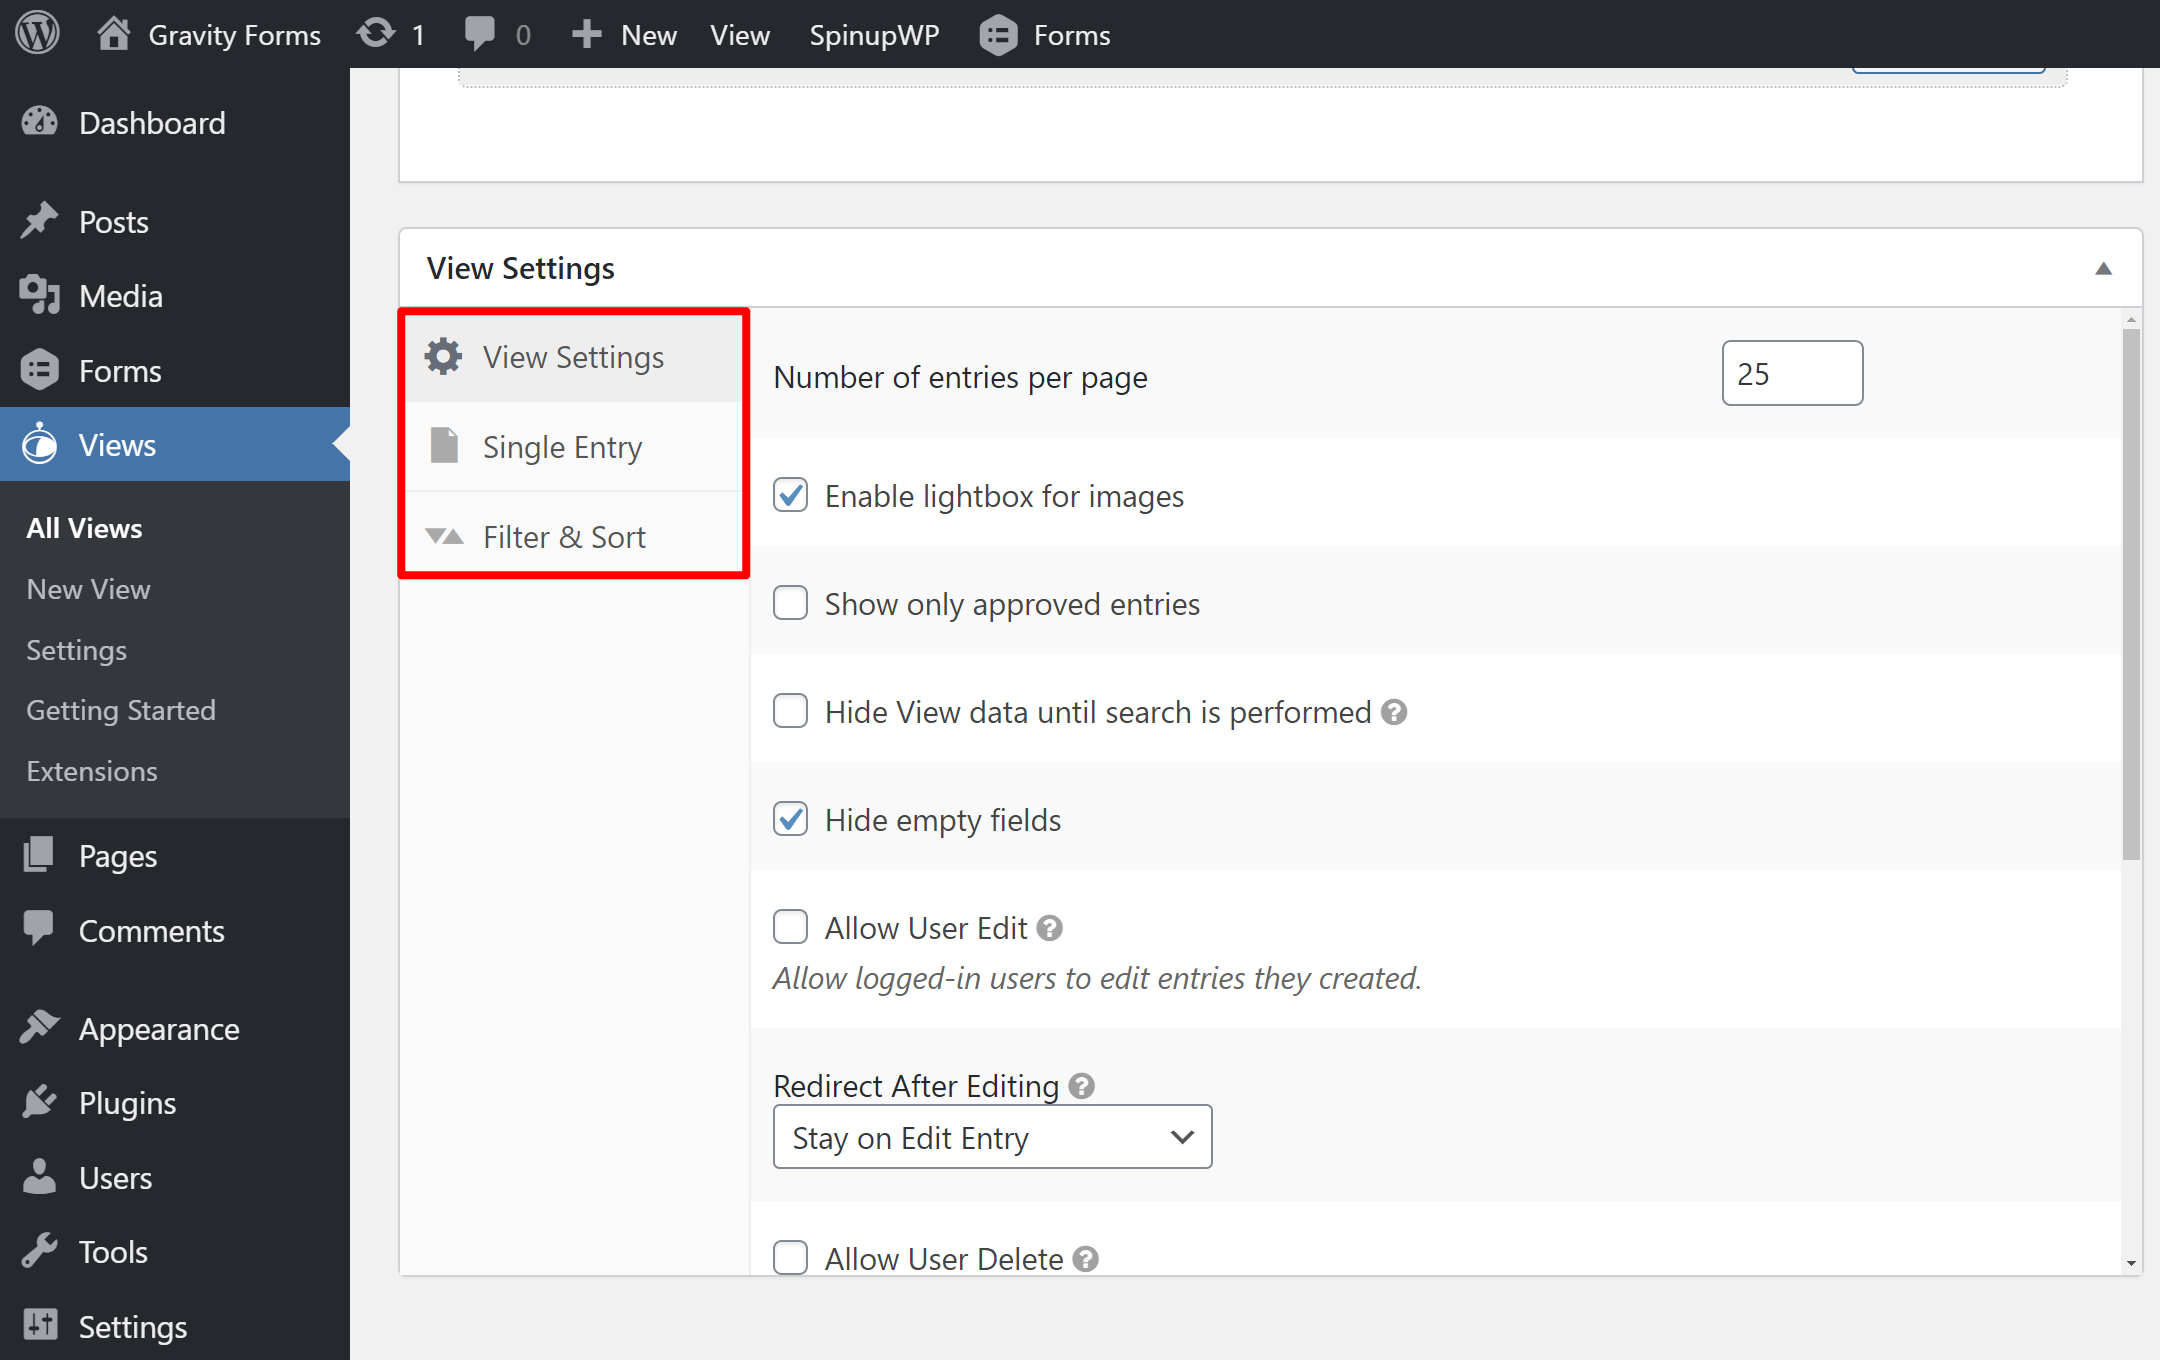
View Settings
The final thing you need to configure before publishing your view is the overall View Settings.
Here, you can configure a bunch of smaller general settings, such as:
- whether or not to hide empty fields
- sort behavior
- whether to show all form entries or only entries you’ve manually approved
- whether logged-in users can edit their own entries.
And that’s it! Now you can publish and display your view anywhere on your site using the provided shortcode.
Exploring How a View Works In More Detail
Now that I’ve created a view to go along with my form, let’s take a deeper look at the interplay between a form from Gravity Forms and a view from GravityView.
I already showed you the front-end form from Gravity Forms:
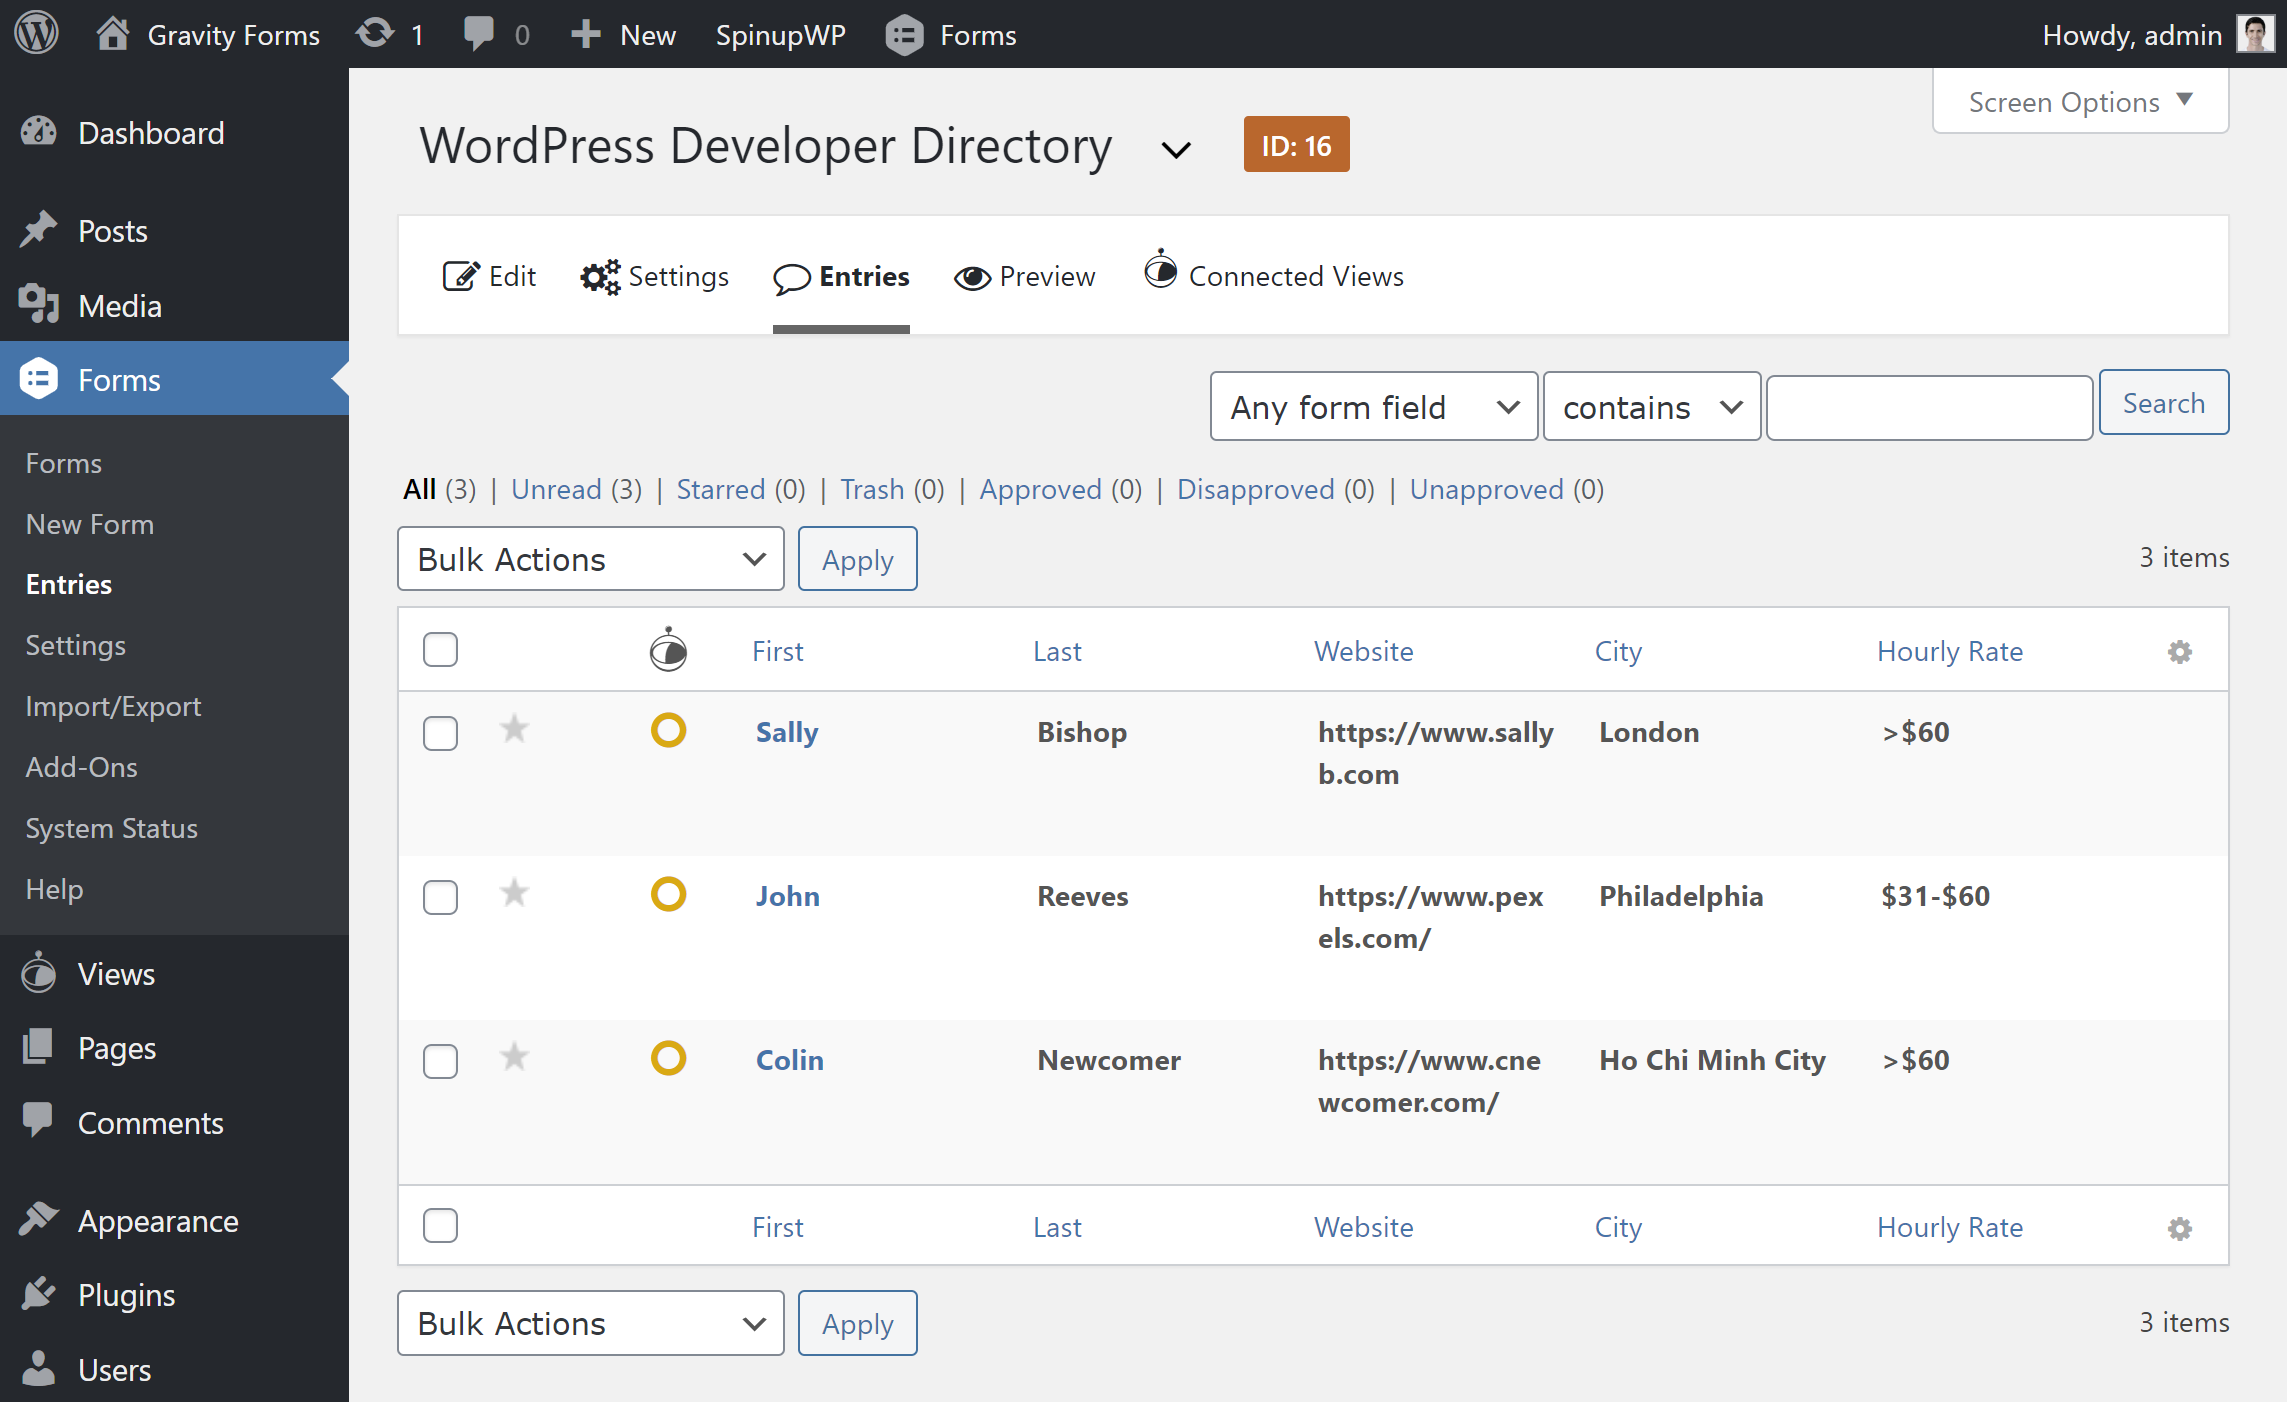
When someone submits data via that form, it shows up as an entry in Gravity Forms. You can see that our example form has three entries, each representing a WordPress developer:
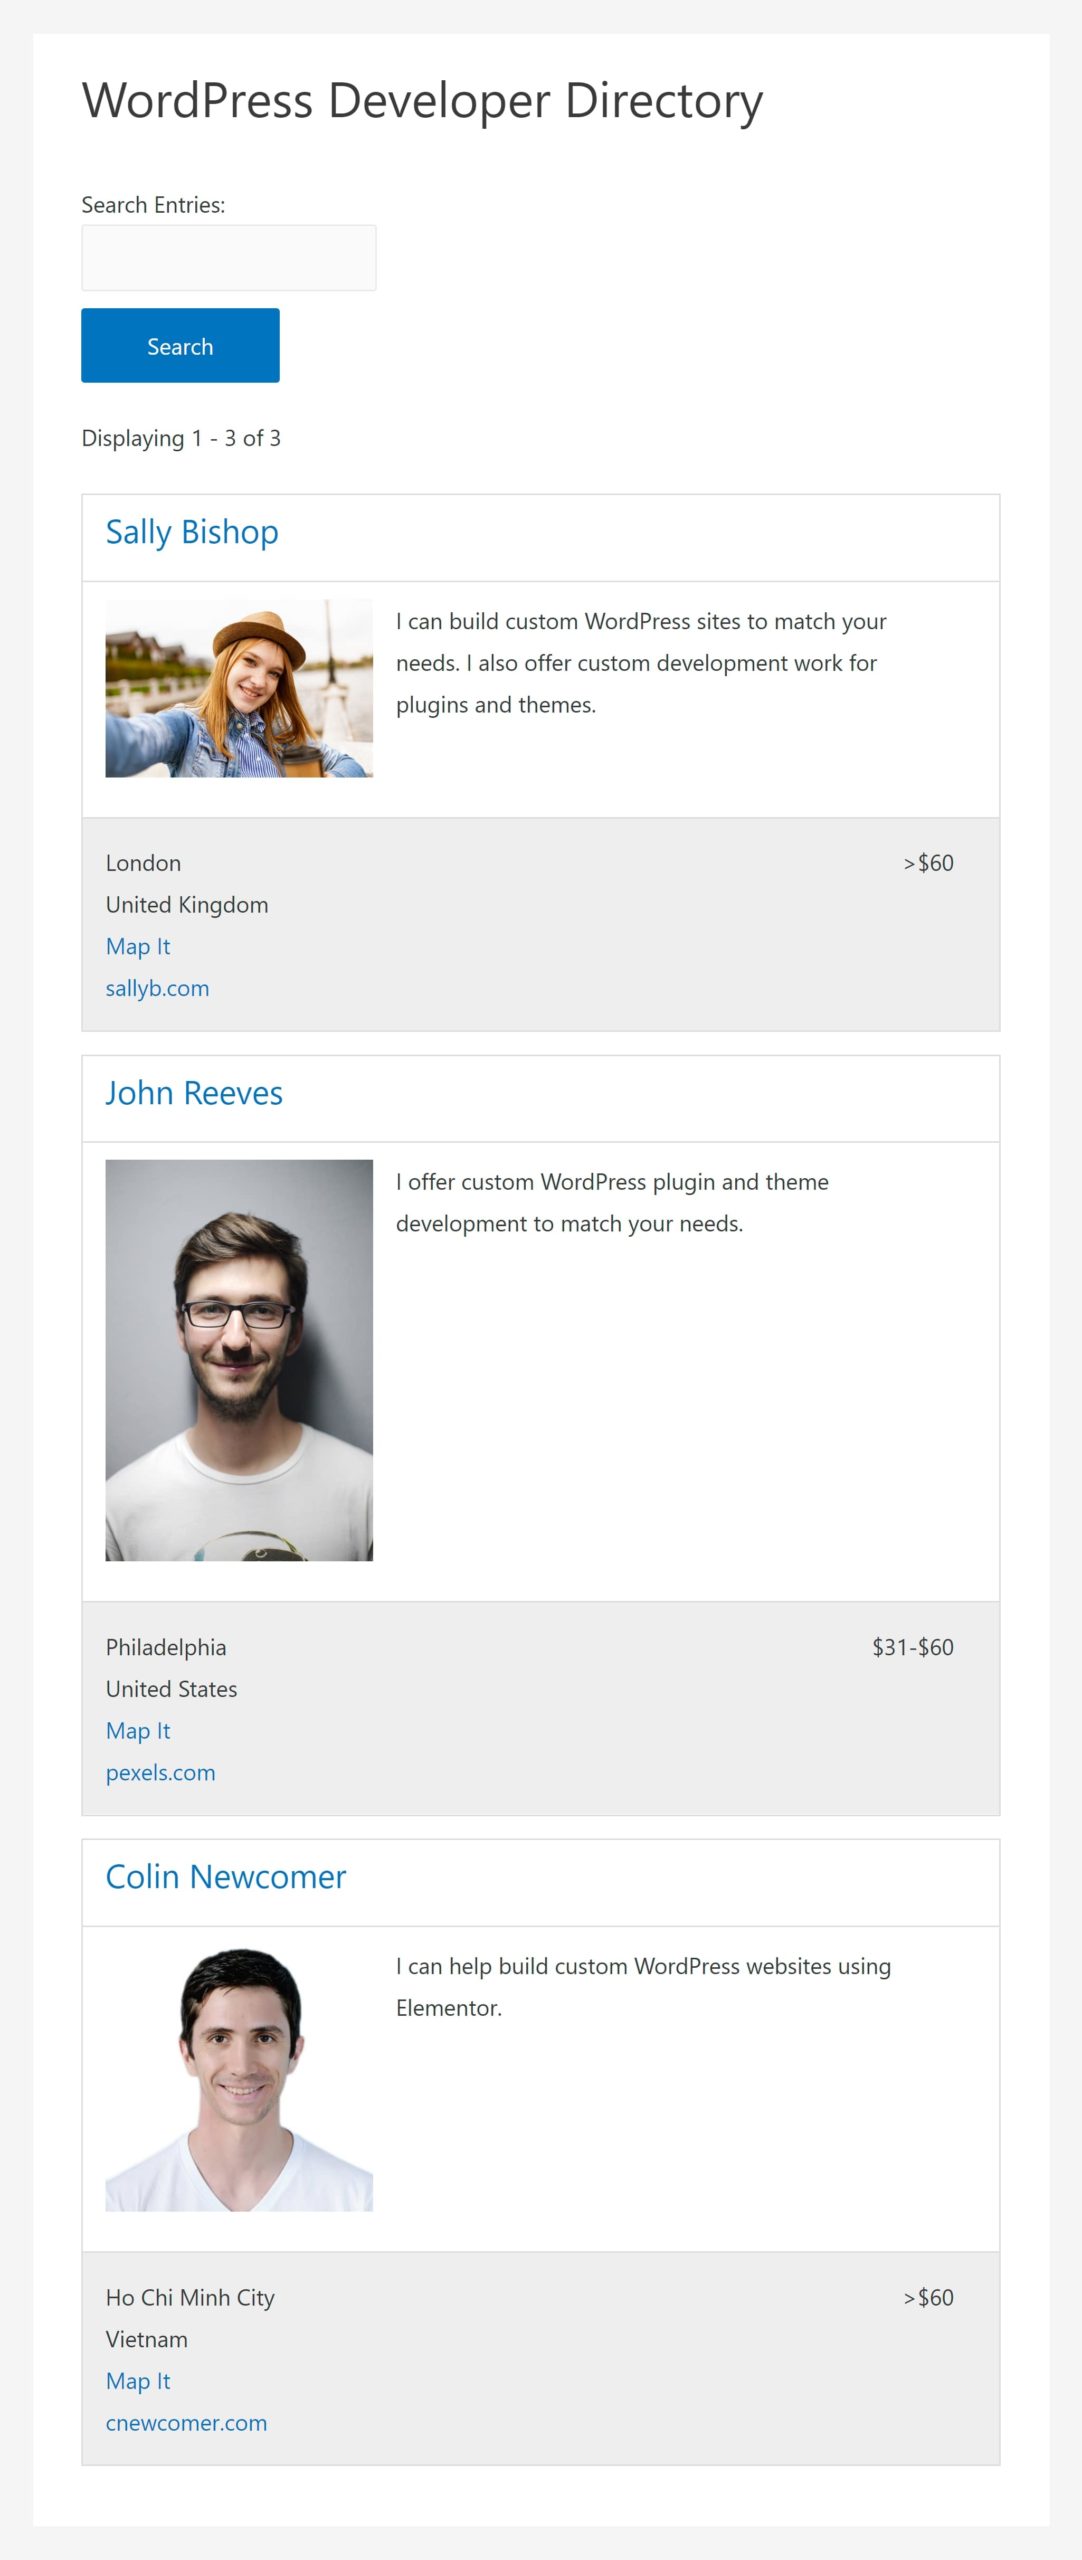
Now, here’s where GravityView kicks in. On the front-end page where I added the GravityView shortcode, you can see a list item for each entry in Gravity Forms. This is the multiple entries template:
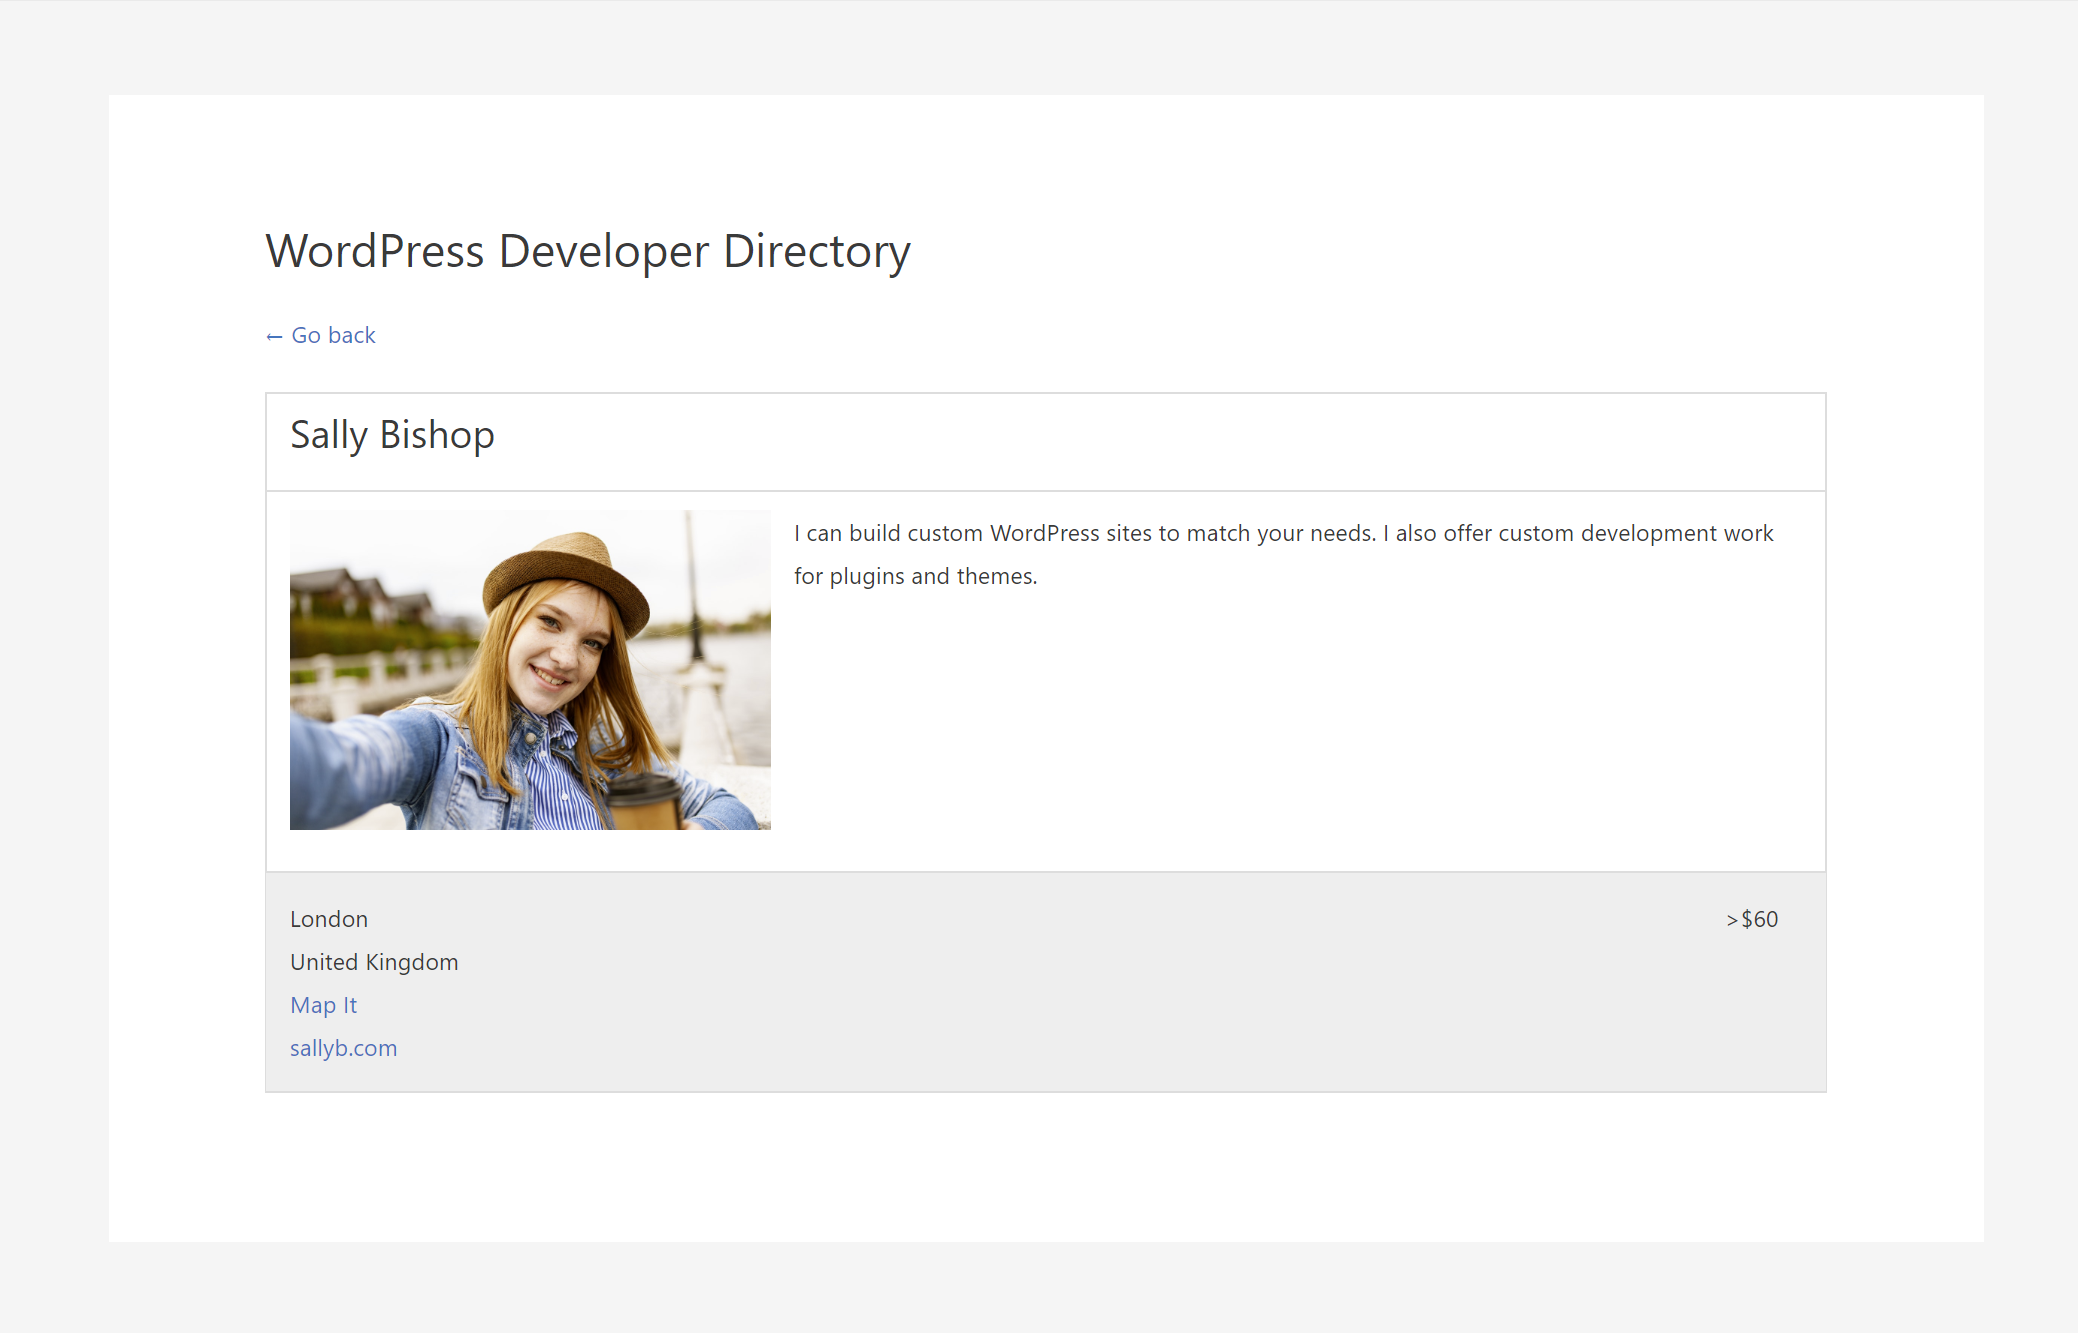
If someone clicks on one of those entries, it will take them to the single entry template for that specific entry:
And then, if you’ve enabled it, logged-in users can edit their own entries from the front end using the edit entry template. But, based on how I configured things earlier, you can see that people can’t edit the name field:
And that’s how it works! If you get creative, you can build some really neat implementations.
GravityView Add-Ons
You can do everything I showed you above with just the core GravityView plugin. But, depending on the plan you purchase, you can also get access to add-on plugins to further extend GravityView’s functionality.
You can view the full list of add-ons here, but here’s a short summary of what each add-on lets you do:
- Import Entries — bulk import entries to Gravity Forms using a CSV. You can then use this data in your views. Doesn’t require GravityView.
- Calendar — display entries on a calendar layout. Great for event sites.
- Inline Edit — offers inline editing in GravityView and Gravity Forms for faster edits.
- Entry Revisions — see the changes made to an entry and easily revert those changes when needed.
- Multiple Forms — build views that display data from multiple forms.
- DIY Layout — create your own custom layouts. This still requires some HTML and CSS knowledge, but the add-on makes the process a lot easier than it would be otherwise because you don’t need to directly edit template files.
- Math — perform mathematical calculations based on entries. Doesn’t require GravityView, but integrates well.
- Maps — display entries on a map. Great for directories of physical locations.
- Ratings & Reviews — let visitors rate and review entries. Another great option for directory sites. For example, you can let people rate local businesses or service providers.
- A-Z Filters — let people filter results by the starting letter of each entry.
- Featured Entries — feature specific entries in your view layouts. Great for paid directory listings. You can let people submit basic listings for free, and then pay to upgrade to a sponsored listing.
- Social Sharing & SEO — adds social share buttons and more advanced SEO options.
- DataTables — integrate with DataTables to create more detailed table layouts.
- Advanced Filtering — control which entries appear in your view by advanced conditions, such as the user who created an entry, search values, user roles, date ranges and more.
You can purchase the first three extensions on a standalone basis, while the rest are only available as part of a paid license plan. Speaking of…
GravityView Pricing
GravityView only comes in a premium version — there’s no free version to play around with. There are three different pricing plans, with significant differences to each when it comes to:
- how many sites you can use GravityView on
- the add-ons you get access to
- how many layouts you get access to.
You can view the features and prices in the image below:
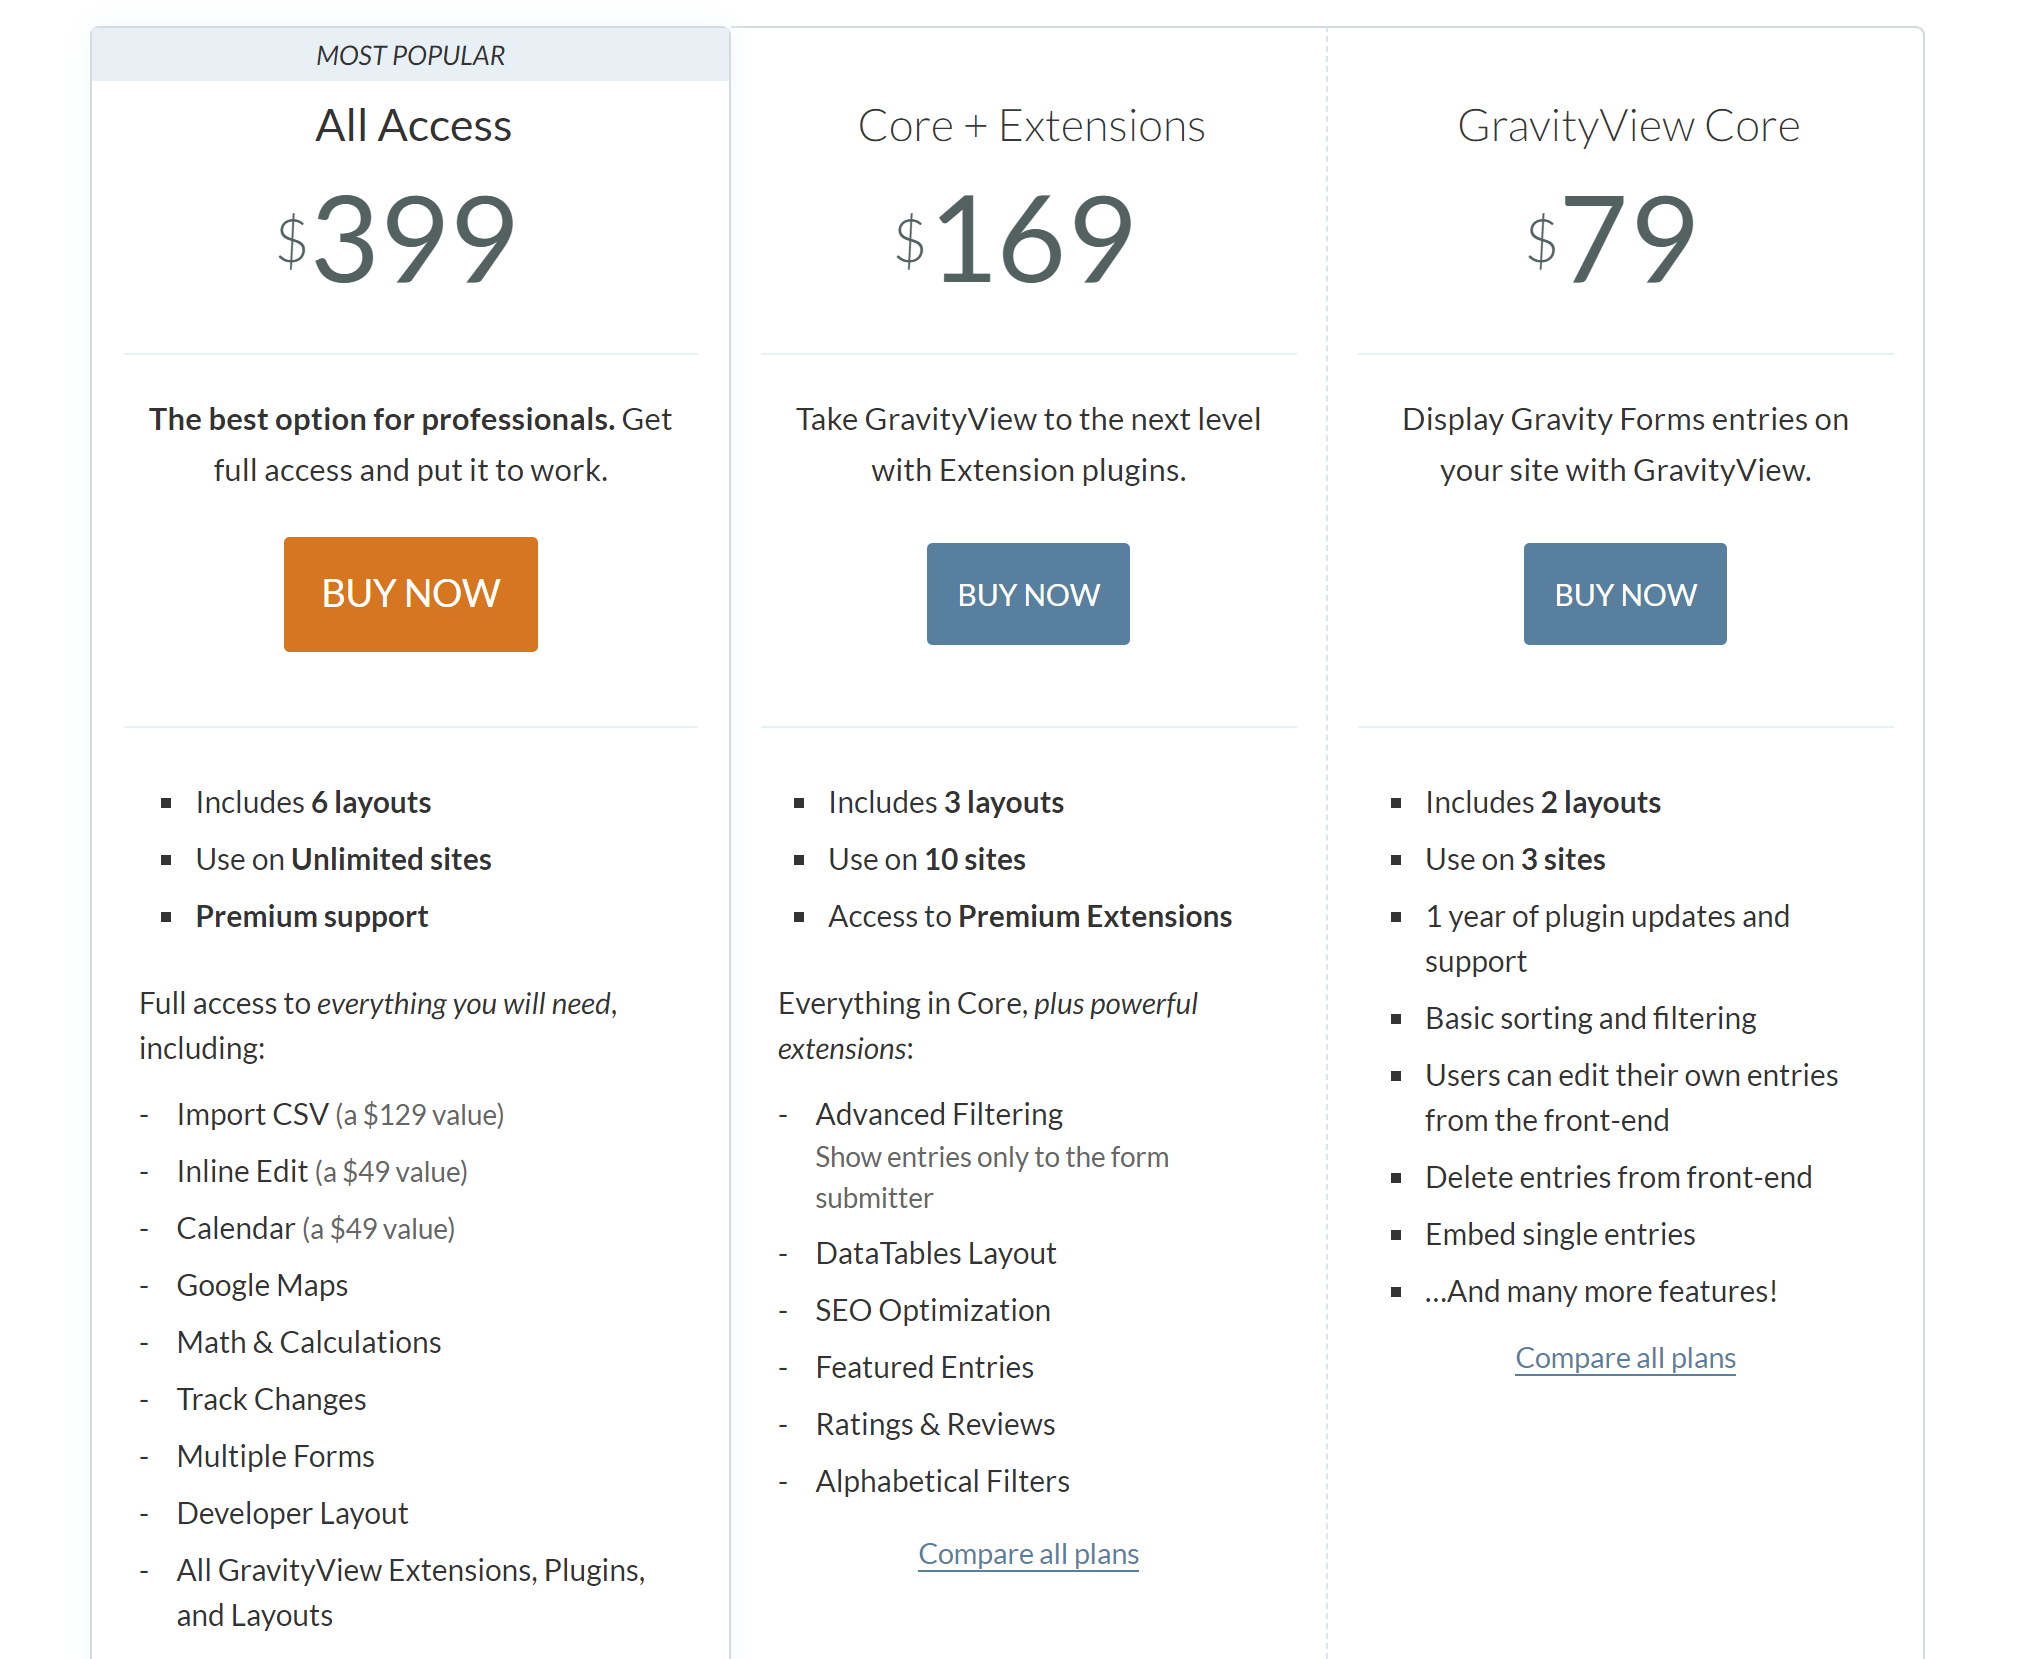
There’s also a lifetime plan that comes in at a hefty $949. That plan gets you access to everything in the All Access plan plus lifetime updates (but only three years of support).
The lifetime plan is obviously not cheap, but, if you’re using it to build a lot of sites for clients, you can spread that cost out over all of your client sites, and it may actually save you some money.
Final Thoughts
In the Gravity Forms world, GravityView is quite popular — and for a reason. Put simply, it’s the easiest way I’ve found to get Gravity Forms entries on to the front end of your site.
While there are other options for some use cases, such as adding entries as a custom post type and displaying those on your site, they usually aren’t as simple or flexible as using GravityView.
Creating a view is simple and intuitive. More importantly, it doesn’t require any knowledge of PHP, HTML or CSS unless you want to create your own custom layout, so you don’t need to be a developer to get value from this tool.
Additionally, because Gravity Forms itself is so flexible, the use cases are pretty much unlimited.
It makes a great option for any type of directory, but you can also use it in other ways, too. Basically, if your use case involves collecting data via a form and showing that data on the front end of your site, GravityView can probably help you to get the job done.
If you want to learn more and get started, click here to head to GravityView.
Used/using GravityView? Experience, thoughts and opinions?


All comments are held for moderation. We'll only publish comments that are on topic and adhere to our Commenting Policy.