
Media Temple’s new Premium WordPress Hosting with MaxCDN – here’s how!
(Update: Due to the inability to white list specific IPs with Media Temple’s Premium WordPress Hosting plan, the below methodology is no longer deemed a good solution to this problem – as of January 13th 2015)
As regular readers will know, about a month back we swapped our hosting from a DreamHost VPS (Virtual Private Server) to Media Temple’s new Premium WordPress Hosting – something that resulted in a whopping big speed increase… However, because this new hosting service doesn’t allow caching plugins, it wasn’t immediately clear how to go about using a CDN (Content Delivery Network) with the plan – since, as many readers will no doubt already be aware, by far the easiest way to go about setting up a CDN with WordPress is simply to install one of the many caching plugins that make the integration an absolute breeze (such as W3 Total Cache and WP Super Cache, etc)! So what to do? Well, a few support tickets to MaxCDN (the service we’ve been using with WinningWP since way back when) later and it turns out there’s a couple of plugins out there (with a clear winner) that both solve this particularly vexing problem without breaking a sweat and (as far as I know) aren’t on any of the major managed hosting provider’s* not-allowed-plugins lists.
Introducing CDN-Linker by W-Mark Kubacki…
About CDN-Linker
Created by W-Mark Kubacki, CDN-Linker modifies links pointing to files located in whichever directories you specify (such as ‘wp-content’ and/or ‘wp-includes’ – which, incidentally, are both very good starting points and the plugin’s default settings) by replacing your ‘blog_url’ with a custom one, thereby enabling you to pull static files (such as images, CSS and JS, etc) from a different host, mirror or CDN.
See the plugin’s official page on GitHub to read more about the project, understand the license (basically it’s free to use for personal – i.e. non-commercial – ventures), an FAQ and info on troubleshooting and support.
The ‘how to’ part. . .
Assuming you’re already accustomed to MaxCDN (if you’re not then you’ll want to head on over to the official website, signup and take a little time to become familiar with the service), go ahead and create a new Pull Zone (or simple use the same one you were using with your previous hosts if, like us, you’ve just recently swapped your hosting to Media Temple’s new Premium WordPress Hosting and can use the same Pull Zone you were previously using with your pre-Media-Temple setup). Note: if you’re not sure how to go about doing this you’ll want to check out the official MaxCDN docs on the subject. Adjust settings according to your preferences (or just start off with everything set to default if you’ve any doubts about what to choose – since you can always come back and change things at a later date) and make a note of the generated hostname (usually something long and hard to remember, like ‘wwp.na1365521290.netdna-cdn.com’).
Download the CDN-Linker plugin ZIP from GitHub (contact the author to obtain a commercial license if need be), unzip and upload to your plugins directory via ftp and then activate it (just as you would with any newly installed plugin). Navigate to ‘Settings’ -> ‘CDN Linker’ and you should see something like the following:
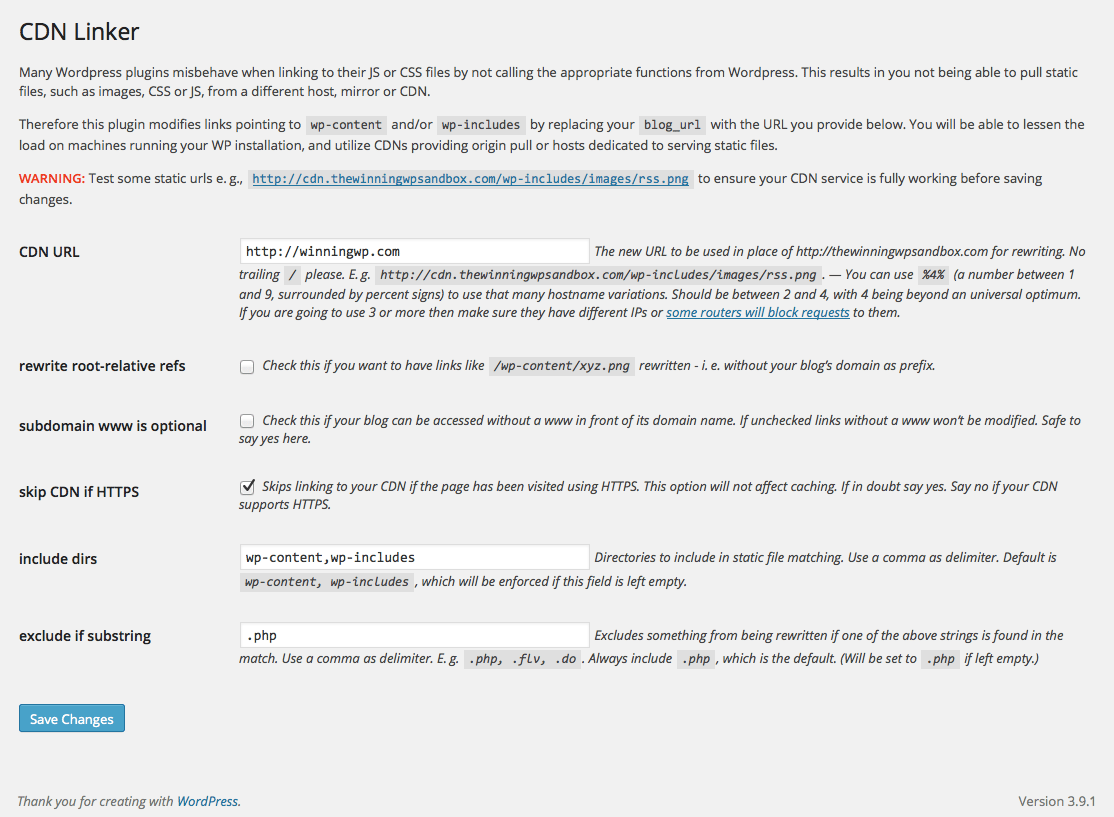
Fill out the various fields for your own particular website (being careful to remember to add ‘http://’ in front of your CDN URL) and hit ‘Save Changes’. Here’s what ours looks like – just in case anybody’s wondering:
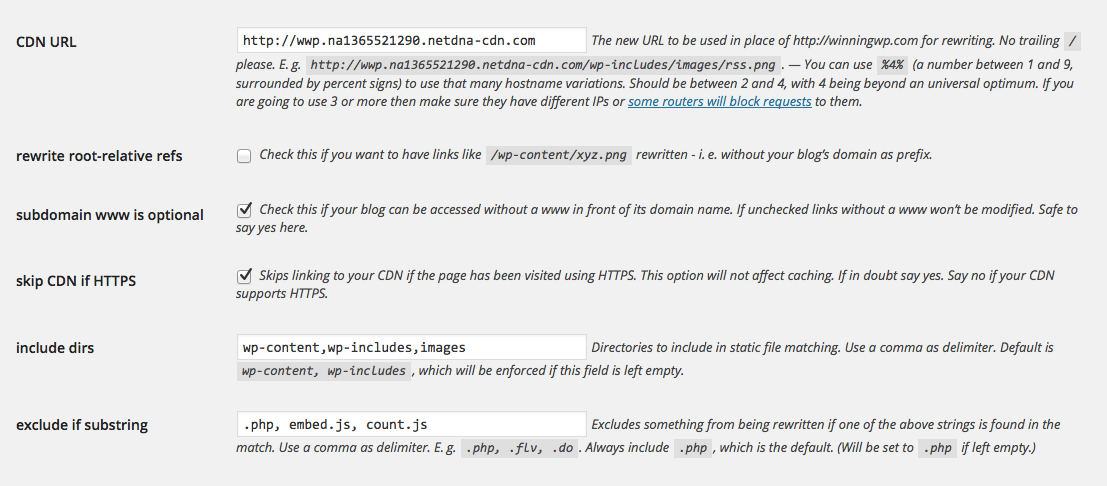
(note: obviously don’t go blindly copying our settings since you’ll need to enter your own specific ‘CDN URL’ etc.)
Flush the Media Temple cache (hit ‘Flush Cache’ in the toolbar at the top of your WordPress dashboard), clear your browser’s cache and reload your site and, all being well, you should then start to see your images, CSS and JS files loading from your MaxCDN hostname within the HTML of your page (in Firefox: right click on your page and select ‘View Page Source’ to view your website’s HTML). Like so:

So how well does it work?
In short: very well! It does exactly what it says on the tin – and, so far, it appears to work pretty much seamlessly with our new hosting service, i.e. Media Temple’s new Premium WordPress Hosting. Simple to setup/install**, free for personal use (currently approximately $10 for commercial license – although we donated an additional $50 since we’ll probably be using it both at length and for some time to come) and configurable enough to add custom directories – what’s not to like?! Best of all – thanks to this very handy plugin (coupled with MaxCDN of course), we’ve been able to shave about another 0.5 to 0.75 seconds off of our site’s load times!
*Meaning you could, presumably, also use this exact same process to integrate a CDN with various other managed WordPress hosting plans like WP Engine (who only offer the use of their proprietary CDN integration functionality with their ‘Personal’ hosting plan for a rather pricey additional fee of $19.95 per month) and GoDaddy’s Managed WordPress Hosting, etc, etc.
**If you’re using Disqus (as we are) you’ll want to take note of the ‘Disqus’ section on the plugin’s GitHub page under Troubleshooting and either uncheck ‘rewrite root-relative refs’ and/or add ‘count.js’ and ’embed.js’ to ‘exclude if substring’ in the CDN-Linker plugin settings (located under the ‘CDN-Linker’ in ‘Settings’ in the WordPress dashboard) accordingly.
Note: after setting up MaxCDN, remember to go through all of its settings to ensure everything is set up exactly to your liking (like turning on the ‘Canonical’ setting etc in the MaxCDN dashboard under the Pull Zone’s SEO settings tab – usually a good idea to ensure search engines map the content loaded via your CDN back to your own website’s domain) – just as you would when using MaxCDN with any other hosting service.
Pretty neat solution huh?! Anything to add?
(Update: Due to the inability to white list specific IPs with Media Temple’s Premium WordPress Hosting plan, the above methodology is no longer deemed a good solution to this problem – as of January 13th 2015)


All comments are held for moderation. We'll only publish comments that are on topic and adhere to our Commenting Policy.