Teachable vs LearnDash: What is the Best Learning Management System?
- By
- Last updated:
- Leave your thoughts
Teaching online courses is one of the best ways to build an income around your skills — but setting up your first course can be intimidating. Fortunately, there are a variety of programs available that make it easy to create and sell courses — no coding required. In this guide to Teachable vs LearnDash, I’ll take a close look at two popular course building programs to determine which is best.
Teachable allows users to create online Schools and populate those Schools with multimedia courses, which are then hosted directly on Teachable.
LearnDash, on the other hand, is a learning management system (LMS) plugin for WordPress that allows you to build multimedia courses right onto your WordPress site. With LearnDash, you’re responsible for hosting all content yourself.
Table of Contents
What to Look for in a Course Building Tool
Every course building tool has different features, so it’s important to establish what you want early on in your search. Take a look through the following list and decide which features are the most important to you.
Visual Course Builder
This is the main appeal of any LMS: A code-free course builder. This is where you can add lessons and quizzes, with most using drag-and-drop functionality to make reordering lessons easy. You want this part of the program to be intuitive and flexible, allowing you to create a variety of course types.
Multimedia Capacity
Some course builders, such as Skillshare, are only compatible with video content. This is fine for some courses, but, in most instances, you’ll want the ability to include multiple types of content.
Content Dripping
Content dripping is the ability to specify when students receive individual lessons — for example, you may want to send a lesson out every Monday. This can help to keep your students engaged over time.
Quizzes
Quizzes are powerful tools for assessing how much your students have learned. At the bare minimum, you want the ability to create multiple choice quizzes, but some course building software allows you to create more complex tests.
Community
Community isn’t essential to most courses, but it can be a great way to increase student engagement. Most course building software lets you do this by allowing comments on lessons, while some also offer forum capacity or other means of community building.
Email Capability
At the bare minimum, you want to be able to email your students when course materials are updated. Some programs may also have email marketing capability, often provided through integration with various email marketing services.
Payment
There are three aspects of this:
- How the courses are priced: You want to be able to specify how the courses are priced, which includes choosing the payment structure. Many course builders allow for subscription models, as well as one-time fees, while some also make it possible to create payment plans.
- How customers are able to pay: To maximize conversions, you want to make sure customers can pay with either credit card or PayPal.
- How you get paid: Some LMSs allow for instant payments, while others send payments on a monthly basis. You also want to know whether you’ll be paid through the likes of PayPal or a proprietary payment system.
Support and Documentation
LMSs are designed to make the course building process easy, but there’s still a lot going on. You should be able to find answers quickly when you get stumped. Customer service should also be readily available and knowledgeable on common issues.
Cost
Course building software can vary dramatically in price, so make sure you know what you’re willing to spend, and whether you want a monthly plan or an annual plan.
Teachable Review
Features
The following features are available on Teachable’s Basic plan:
- One school
- Unlimited students
- Unlimited courses
- Visual course builder
- Content dripping
- Coaching program creation
- Members-only community
- Capacity for two admin-level users
- Custom domain support
- Coupon creation
- Instant payments available through Teachable Payments (only in certain countries)
- Email marketing integration
- Third-party integrations
- Access to training for creators
- Product support
- 5% transaction fees
For more information, take a look at the full list of Teachable plans.
How to Use Teachable
Getting Set up as a Teacher
The first step to creating a course on Teachable is to sign up by going to the Teachable home page and clicking the ‘Get Started’ link in the top right corner. You’ll be asked to enter some basic information, including your email address and a password.
From there, you’ll be taken to your personal profile dashboard. This is where you can see any courses you’re enrolled in, schools you’re an affiliate of and any schools you manage.

Click on ‘Create New School’ in the sidebar, and you’ll be asked to enter a name for your school. You can change this name at any point.
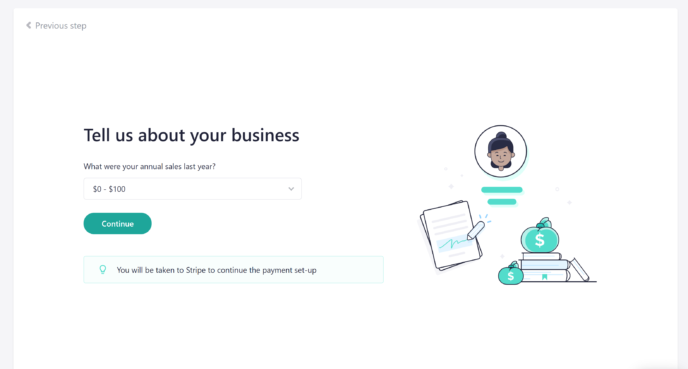
Next, Teachable will ask you a series of questions about your business and your experience with teaching online courses.
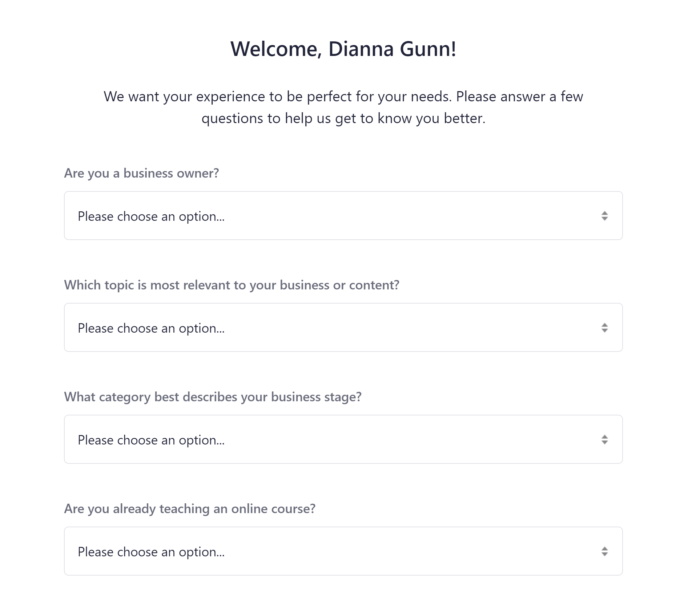
These questions will be used to determine the resources available in your school dashboard — which is the next place Teachable takes you. This is one of my favorite things about Teachable, as it makes the platform welcoming to people who haven’t built online courses before.
It should be noted that, while you can create a course for free, you must sign your school up for a premium plan to sell courses. In other words, a free school can only create free courses. You can upgrade your plan at any time by going to ‘Settings > Plan’ in the school dashboard.
Creating Your First Course
To create your first course, click the ‘+’ icon next to ‘Products’ in the sidebar of your school dashboard.

You’ll be taken to a page where you can choose to create either a course or a coaching product. This is an important note in the comparison of Teachable vs LearnDash, as LearnDash doesn’t offer a built-in coaching option.
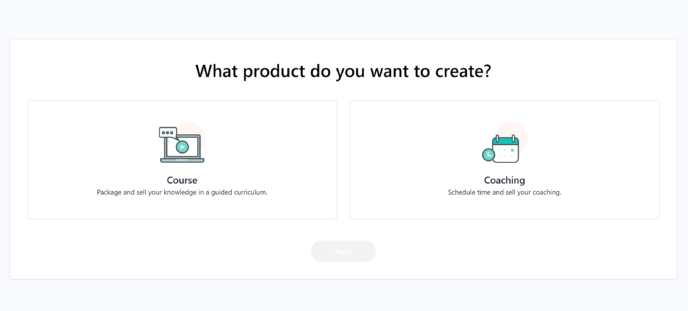
Choosing ‘Course’ will take you to a page where you can choose a title, subtitle and category for your course. If you’re not 100% confident in your current title, don’t worry — you can change these details at any point in the process.
You’ll also be asked to choose a template for your course on this page. Teachable offers three templates: Blank, mini course and standard course.
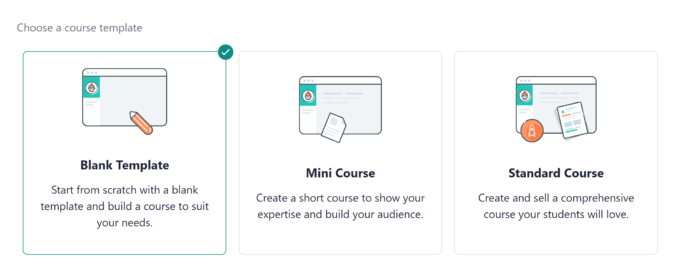
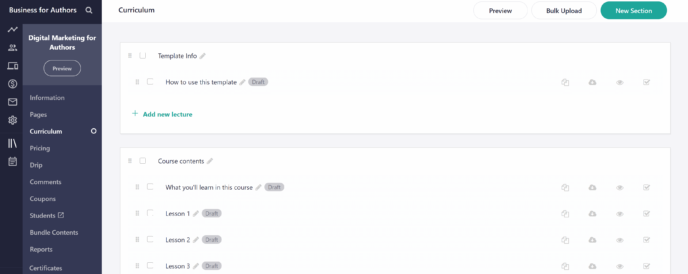
Once your template is selected, you’ll be taken to the ‘Curriculum’ area of the Teachable course builder. This is where you can add, rename and reorder lessons and quizzes.
Creating Lessons and Quizzes
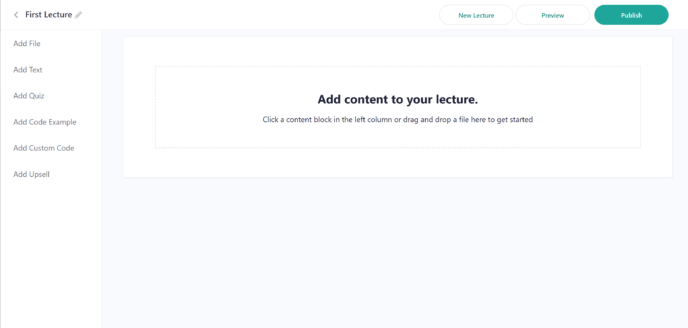
Click on the title of a lecture to enter the Teachable lesson editor. This editor features a new sidebar listing the types of content you can include. One feature that stands out is the ability to add both custom code and code examples in specialized blocks.
Another important thing to note here is the ‘Add Quiz’ link, which will open an editor where you can configure multiple choice questions.
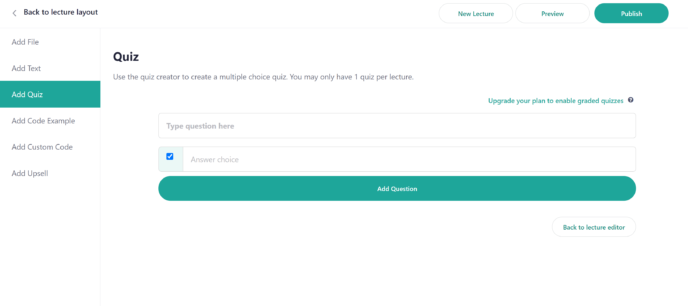
You can combine any number of content types in one lesson. This means you can include text, video, images, code examples and a quiz all in the same lecture. The only limitation here is there can only be one quiz per lecture.
Once you’ve created all of the content for your lesson, you can reorder it using the drag-and-drop functionality of the layout editor.
Content Dripping
Teachable’s approach to content dripping is a little different from what I’ve seen in most LMSs. Instead of specifying it for individual lessons in the lecture editor, you need to select ‘Drip’ from the course builder menu. This takes you to a page where you can manage content dripping for individual sections of your course:

Teachable allows you to set content dripping intervals based on when students enroll in a course or by specified calendar dates. Note that this feature is only available with a paid plan.
Pricing Your Course
The next thing you’ll want to do is establish how much students will pay you and how those payments will be structured. To do so, click the ‘Pricing’ link in the course builder menu, then press the ‘Create Pricing Plan’ button on the next page.

Teachable lets you set up four types of pricing plans:
- Free
- One-time payment
- Multiple installment payment plan
- Subscription (monthly or annual)
There is no limit to the number of pricing plans you can make available for any given course.
Getting Paid by Teachable
Teachable offers two payment systems:
- Teachable Payments: Available to users in the US, UK and Canada, this system deposits money from credit/debit card transactions directly into your bank account. Payments are made on all business days on a two-day payment cycle, which means you’ll receive the money from Monday’s transactions on Wednesday.
- Monthly Payment Gateway: This system pays users through PayPal on the first of every month and runs on a three-month cycle. This means you’ll receive payments from January on April 1st. Users outside the US, UK and Canada must use this system.
You can access the payment option available in your country by accessing ‘Settings > Payments’.
All Teachable payments are made in USD.
Integrations
Teachable offers integration with a variety of tools:
- Zoom (for coaching)
- MailChimp
- ConvertKit
- Zapier*
- Webhooks
- Vizia
Most of these integrations are built right into Teachable and can be activated by connecting your Teachable account with your account on the relevant tool.
*For full Zapier integration, you must purchase a Pro or Business plan.
Teachable Plans
Teachable offers three paid plans:
- Basic: Available for $29 a month, billed annually, plus a 5% fee on all transactions. Includes all of the features discussed in this review.
- Pro: Available for $99 a month, billed annually. Includes all of the features of Basic for up to five admin-level users. This plan also offers graded quizzes, advanced reports, course completion certificates and integrated affiliate marketing. There are no transaction fees for pro users.
- Business: Available for $249 a month, billed annually. Comes with all of the features of Pro for up to 20 admin-level users. Business users also gain access to custom user roles, advanced theme customization and group coaching calls.
For more information, check out Teachable’s pricing page.
Overall Thoughts
Teachable makes it easy to create multimedia courses online, no previous experience required, and its course building software is compatible with audio files, videos, images and text. The design of Teachable ‘Schools’ is also quite intuitive, and, overall, I found working with Teachable quite pleasant.
The one thing I found disappointing, especially in the context of Teachable vs LearnDash, is the limited quiz builder. Multiple choice questions can be useful, but they aren’t always the most effective way to evaluate how much your students have learned.
LearnDash
Features
The following features are available on the Basic LearnDash plan:
- One site license
- Unlimited courses
- Unlimited users
- Course content protection
- Content dripping
- Advanced quiz builder
- Grading and academic reporting
- Certificates and badges
- Email notifications
- Wide range of integrations and add-ons including Course Grid, Easy Digital Download, bbPress and more
- Payments processed through PayPal
For more information, check out the LearnDash pricing page.
How to Use LearnDash
Getting LearnDash Set up on Your WordPress Site
LearnDash is a premium WordPress plugin, which means you’ll need to install it on your site. First, however, you’ll need to sign up for a LearnDash plan. You can pay for this plugin using a credit card or PayPal.
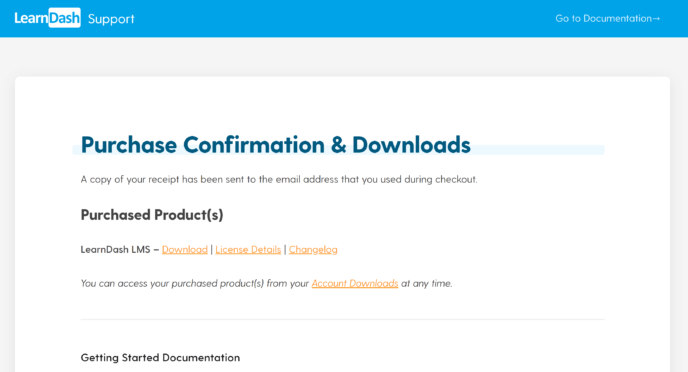
When your payment is processed, LearnDash will send you to a page where you can view your purchase information and download your plugin. Click ‘Download’ to receive your plugin as a .ZIP folder.
Once the plugin is downloaded, open the Plugins area of your WordPress dashboard in a new tab and click ‘Add New’. This will open a box where you can either drag and drop the plugin or search for it manually.

Click ‘Install Now’ and WordPress will unpack the plugin. When this process is complete, you’ll be prompted to activate the plugin.
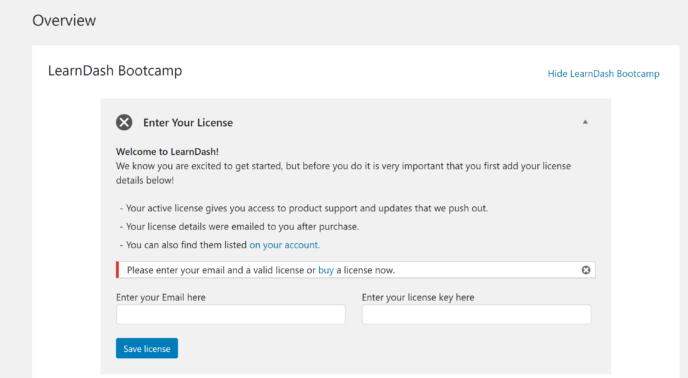
Once activated, LearnDash will offer to open the LearnDash Bootcamp. Accept this offer to reach a page where you can enter the plugin activation key. You can find this on the payment information page or in your purchase confirmation email.
Setting up Payment Processing
Next, you’ll want to set up payment processing. You can do this by going to the ‘Settings’ area of LearnDash and clicking the ‘PayPal Settings’ link at the top of the page.
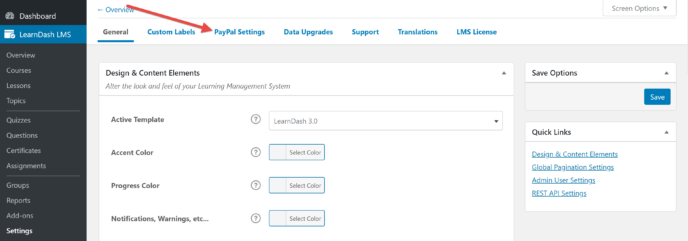
You’ll be directed to a page where you can enter your PayPal email and select your country and currency. This is a notable point in the comparison of Teachable vs LearnDash, as Teachable only pays in USD.
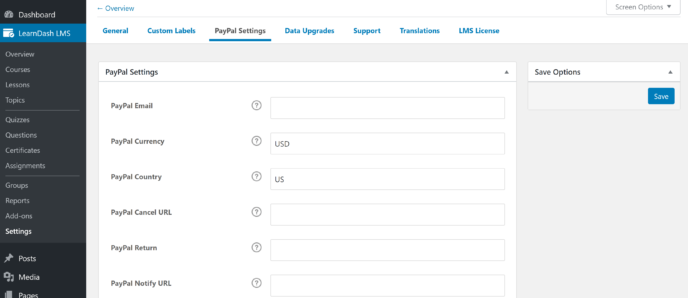
You can also use this area to specify what URLs people will be sent to when they complete various actions.
Further down the page, you’ll be given the option to enable PayPal Sandbox — a program that uses mock transactions to test the functionality of your connection between LearnDash and PayPal.
Creating a Lesson
With the basics set up, it’s time to start working on your first course. The best way to do this in LearnDash is to create all of your lessons and quizzes first, then put them together in the course builder.
Start by going to the ‘Lessons’ area of LearnDash and clicking on the ‘Add New’ button in the top right corner, and you’ll be taken to the main page of the lesson editor.
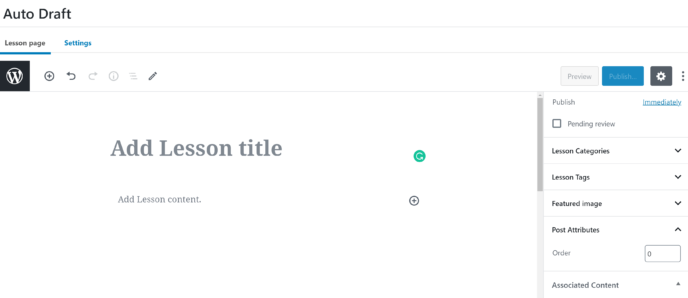
This is where you can enter the content for your lesson. LearnDash combines seamlessly with WordPress, allowing you to format lessons the same way you format regular pages.
When you’re happy with the content and layout of your lesson, click the ‘Settings’ link near the top of the page. This will take you to a page where you can customize several aspects of the lesson:
- Support materials, such as links or supplementary reading files.
- What course the lesson is associated with.
- When the lesson becomes available to students.
- If you want to make the lesson available as a free preview.
- If students must finish watching the video contained within this lesson before progressing to the next.
You can also enable assignment collection. If you use this feature, you’ll be given the option to use the automated LearnDash grading or to grade assignments manually.
Creating a Quiz
Next, go to the ‘Quizzes’ area of LearnDash and click the ‘Add New’ link near the top of the page.
The first section of the quiz editor allows you to enter a title and description for your quiz. This uses the WordPress block editor, so you can format the description however you want.
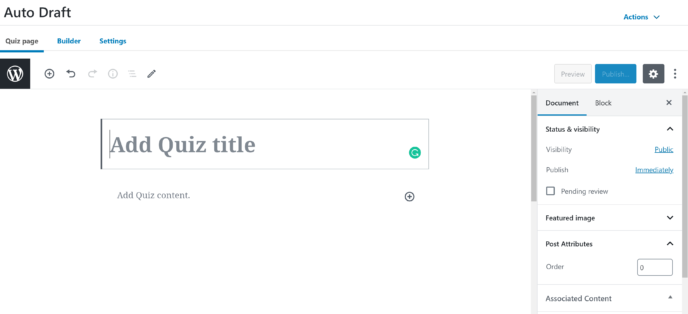
To start working on the questions for your quiz, click the ‘Builder’ link near the top of the screen, which will take you to a page where you can edit the quiz itself.
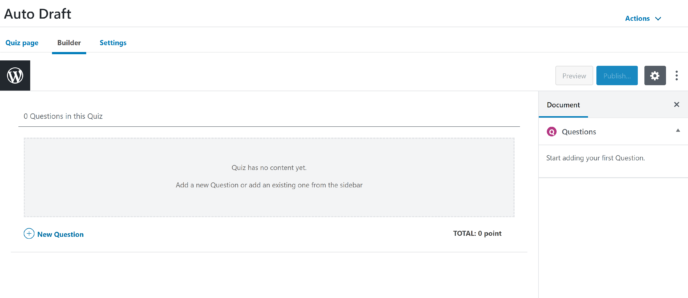
Clicking the ‘New Question’ button at the bottom of the builder will open a question editor. This box lets you type in the question, and configure a few key aspects of it:
- Type: LearnDash allows for a variety of question types, including single choice, multiple choice and essay answer. This is an important factor to consider in the comparison of Teachable vs LearnDash, as Teachable only permits multiple choice questions.
- Answer: What the correct answer is.
- Score: The number of points students get for answering the question correctly.
- Messages: Customized messages for students when they enter certain answers (for example, pointing out the correct answer to people who choose the wrong one).
When you’re happy with all of these settings, you can click the ‘^’ in the top right corner of the question box to minimize it. This will make it easier to view all of your questions at once.
You can reorder questions at any time using the drag-and-drop functionality of the builder.
Once you’ve completed the questions, click the ‘Settings’ link at the top of the quiz editor. This area is where you can connect the quiz to an existing lesson or course and set prerequisites for the quiz. You can also specify what grade is required to pass, restrict how many times students can retake the quiz and set a time limit.
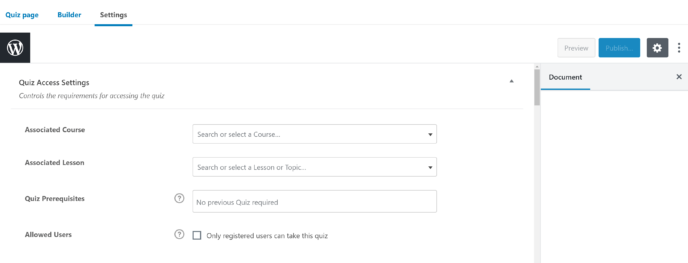
The final area of this page lets you customize what the quiz and results pages look like to students.
Building a Course
Finally, it’s time to compile these lessons and quizzes into a course!
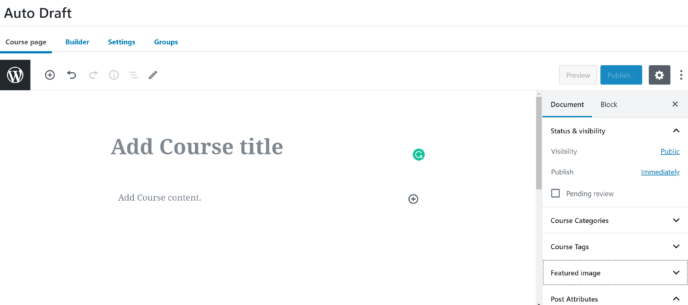
Start by going to the ‘Courses’ area of LearnDash and click on the ‘Add New’ button in the top right corner of the page. You’ll be taken to the course description area, which uses the WordPress block editor to help you to format your sales page.
Next, click on the ‘Builder’ link near the top of the page and you’ll be taken to the area where you can add and organize course content.
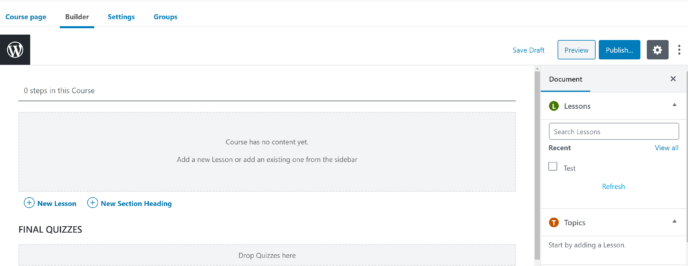
One thing I love about this part of the editor is the right sidebar displays lessons and topics you’ve already created. You can then drag and drop these into the appropriate content boxes in the builder, and also add lessons by clicking ‘Add Lesson’ and typing the title of an existing lesson into the box that appears.
The order of lessons and quizzes can be changed at any time using the builder’s drag-and-drop functionality.
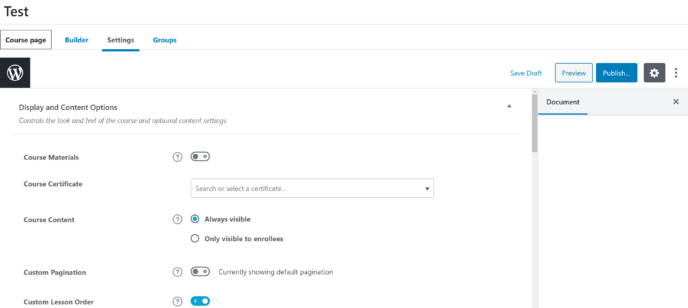
When you’re happy with the order of your lessons and quizzes, click on the ‘Settings’ link near the top of the page. This is where you can customize several aspects of the course, including the lesson order, who can access the course and how the course appears to its students.
Add-ons and Integrations
LearnDash offers a wide variety of add-ons in the form of plugins with one-click installation, and you can access these by going to the ‘Add-Ons’ section of LearnDash in your WordPress admin panel.
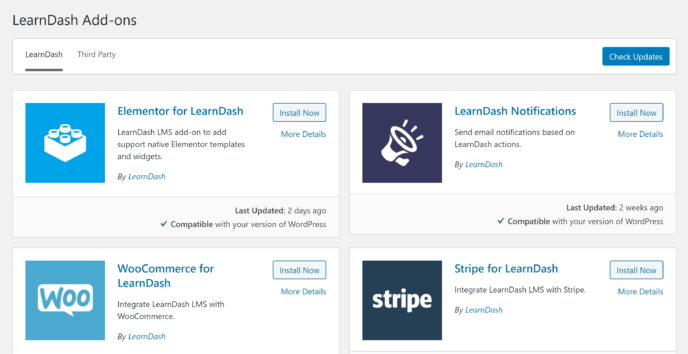
Some of the tools you can connect to with LearnDash add-ons are WooCommerce, Easy Digital Downloads, GravityForms, Elementor and bbPress. This is an important note, as Teachable only integrates with a handful of tools.
LearnDash has also created proprietary add-ons to increase the functionality of its LMS, including LearnDash Notes, which allows students to take notes as they go through your course, and the LearnDash Toolkit, which gives you several additional features.
Last, but certainly not least, there’s an extensive list of community-created add-ons.
LearnDash Plans
LearnDash offers three plans:
- Basic: Available for $159 a year (regular $199 a year), this is the plan covered in the LearnDash review portion of this article.
- Plus: Available for $189 a year (regular $229 a year), this plan comes with all of the features of Basic for up to ten websites. Plus users also gain access to the LearnDash ProPanel.
- Pro: Available for $329 a year (regular $369 a year), this plan gives you 25 site licenses for LearnDash, with all of the features from the Plus plan.
For more information, check out the LearnDash pricing page.
Overall Thoughts
LearnDash offers an intuitive course creation process with a wide range of customization options. I found its quiz editor particularly pleasant to work with.
Another thing I like about LearnDash is that it exists on your WordPress site, rather than being hosted by a third party. This is great for two reasons. First, LearnDash combines seamlessly with WordPress technology, making it easy for anyone familiar with WordPress to format course pages. Second, you don’t have to worry about losing part of your income if a third-party host shuts down.
Similarities
- Both programs use visual course builders with drag-and-drop functionality.
- You can have unlimited courses and students with both LearnDash and Teachable.
- They’re both compatible with a variety of media types, including video, audio and images.
- Both programs offer excellent documentation and customer service.
Differences
- Teachable hosts courses on their site; LearnDash keeps everything on your WordPress site.
- LearnDash offers more ability to customize quizzes, including the ability to use multiple question types.
- Teachable always pays out in USD; LearnDash allows you to choose the currency you’re paid in.
- LearnDash offers a much wider range of integrations and add-ons.
The Verdict
The truth in the debate of Teachable vs LearnDash is that the best option for you depends on the context of your business. I’m going to determine the winner by considering two factors: Functionality and value.
Functionality
Both programs make it easy to build and sell multimedia courses with no prior experience. However, they do have somewhat different functionality, so the best program for you depends on your goals.
Teachable is an excellent option for people who want to create coaching programs as well as courses. This can be a great way to build multiple streams of income. Teachable also lets you accept assignments, which can be a great way to evaluate learning.
LearnDash is a better tool for people who want to focus on creating rigorous courses. The ability to create complex quizzes and offer certification, along with the seamless integration with WordPress, make it great for educators.
Value
The final thing to consider is which program provides the better monetary value.
At $29 a month, the Basic plan of Teachable costs a full $348 a year. If you intend to create coaching programs, this is an excellent price; popular coaching software such as Vagaro often costs $20 to 25 a month on its own.
However, LearnDash only costs $159 a year at the Basic plan, meaning that if you only want to build courses LearnDash provides much better value.
Used/using either Teachable or LearnDash? Thoughts on each?
All comments are held for moderation. We'll only publish comments that are on topic and adhere to our Commenting Policy.