How to Choose – and Install – New WordPress Plugins
After choosing the ideal hosting and the best possible theme for your site, the next thing to do is to think about plugins (more on what plugins actually are below). But how do you find new ones? How can you ensure you're getting one that's credible, secure, and does exactly what you want it to do? That's where this guide comes in -- helping you to sort the wheat from the chaff and get the right plugins for your needs. (Note: For more guides in the same series, head here: WinningWP Guides.)
-Note: WinningWP content is free to all. If you make a purchase through referral links on our site, we earn a commission (learn more).
WordPress plugins let you add extra functionality to your website. They are 'bolted on' -- or 'plugged in' -- to WordPress installations in a way that lets the same plugin be used on any WordPress site.
Plugins can transform your site: Add shop functionality, and you’ve got a full e-store; add a simple contact form, and readers can easily reach you. There are thousands of plugins available to add just about any type of functionality -- you can find more on the very basics of WordPress plugins here.
This guide will show you how to choose the right plugins for your site: Where to find them, how to install them and how to manage them. You’ll learn everything you need to know to work confidently with WordPress plugins.
If you’re a WordPress beginner, then make sure you’ve read the other guides in this series to get you started with WordPress. You can also use our WordPress Glossary to look up any terms you’re unfamiliar with.
Finding Really Good WordPress Plugins
The world of WordPress plugins is slightly unusual: Developing a plugin, releasing it publicly and maintaining it takes a lot of time, but thousands of WordPress plugins are available for free. Paid plugins are also available, and are typically priced between $5 and $200, depending on their complexity. We'll talk more about the advantages of free and paid plugins later.
It’s important to choose WordPress plugins carefully, as you'll be running other people’s code on your website. Ideally, any given plugin adds the functionality you want as advertised, but there are risks that range from breaking your website to spreading viruses or malware.
How do you choose safe plugins? Are paid plugins always better? First, we’ll look at where to find really good WordPress plugins, then we'll look at the differences between free and paid plugins. Finally, we’ll look at how to choose between plugins offering the same or similar functionality.
Where to Find WordPress Plugins
We need to start by looking at where you can find WordPress plugins. We're looking at this first, so you can understand the advantages and disadvantages of each location, and put that knowledge into practice when looking at plugin recommendations.
You'll be able to find plugins in five places:
- The WordPress.org plugin repository, which hosts tens of thousands of free plugins. A team of volunteers review and approve each plugin in the repository, so you can be sure all of the plugins present are safe.
- CodeCanyon. This is a marketplace for selling WordPress plugins. They're vetted, although the quality of coding is less carefully policed than those on the WordPress.org repository. There are some gems, but also some lacklustre offerings. Use our framework below for evaluating plugins from CodeCanyon.
- Independent developers who sell WordPress plugins and themes. Many WordPress theme developers such as Elegant Themes, Themify, ThemeIsle, WPZOOM and MyThemeShop also make WordPress plugins. These are typically good plugins, and have the advantage of being built on the developer's pre-existing theme support and documentation infrastructure. Look for the usual signs of a reputable website, such as https, presence of a refund policy, and terms and conditions.
- Independent developers who sell only WordPress plugins. Some developers, such as CalderaWP, Pippin's Plugins, WP Rocket and Gravity Forms only sell WordPress plugins. These are often some of the best plugins available, but look for the same signs as found with theme shops that these are reputable.
- Github. Many developers will release their plugins freely on Github, a platform for sharing code. While this can be a great place to get the very latest plugins and ideas, be aware there's no vetting process, and, while it's possible to get automatic updates, this won't happen by default.
Between all of these locations, you have access to all of the WordPress plugins you can possibly need.
There's one place you want to avoid: Sites that package together other people's plugins. Any site offering a bundle of popular plugins (and usually themes as well) for a 'bargain' price should be avoided. The plugins may be infected with malware, you won't get support, and there's no guarantee of updates. Only purchase plugins from the original developer.
Once you know where to find plugins, and the pros and cons of each location, you can move onto how to find these plugins.
Understanding Plugin Recommendations
The best way of finding WordPress plugins is to look at recommendations.
A simple Google search for best WordPress plugin + desired functionality will typically give you multiple results for sites offering recommendations. Of course, we also have dozens of plugin recommendations here at WinningWP. These can be a very useful starting point.
Each list of recommendations will typically give you a couple of plugins to choose from (free and paid), and you can look for the plugin that best suit what you’re after. You may find it helpful to corroborate recommendations across multiple sites, and use the detail on the advantages and disadvantages of each location above to aid your decision making.
Relying on recommendations to find WordPress plugins has the advantage of letting other people do the research for you. The top results for plugin recommendations are typically published by WordPress experts, whose suggestions will be the best plugins available, so you can be confident these plugins will be secure, and, in most cases, work flawlessly on your site.
Here are some examples from WinningWP's plugin category of quality plugin recommendations:
- The Best Free and Premium Contact Form Plugins for WordPress
- The Seven Best Drag-&-Drop WordPress Page Builder Plugins -- Compared
- The Ten Best Social Media Plugins for WordPress
Where recommendations aren’t available, or you find it difficult to choose between multiple recommendations, you may need to evaluate the plugin yourself. We'll look at how to do this shortly.
Why Should You Pay for WordPress Plugins?
You may also be wondering: Why should you pay for WordPress plugins? Why would you pay for a plugin when you can get a similar one for free? These are great questions to be asking! Paid plugins have a number of advantages:
- More features. Paid plugins typically have extra features. If you need them, pay for them, and you can have them!
- Quality support. Paying should get you fast support from the plugin developer or from their team. We'll talk more about support later, but the guarantee someone can fix your site when something goes wrong is often worth the cost of the plugin.
- Documentation and user guides. Free plugins often have basic documentation, but paid plugins usually have much more detailed tutorials and user guides -- or even video tutorials -- to help you get started and get the most from your purchase.
- Long-term commitment. Making WordPress plugins takes a lot of time, and if developers aren't being compensated plugins are likely to be a low priority, or they may not find it possible to continue working on the plugin. With a paid plugin, you'll (typically) get more and faster updates, and (should) have a guarantee of the developer's commitment to the project. This won't apply in all cases, but is a useful general rule.
A lot of the best WordPress plugins are free, but many are paid. Making plugins takes time, so be prepared to pay where necessary, and be aware of the tradeoff you're making when going with free plugins.
The Checklist for Choosing WordPress Plugins
How do you choose between multiple similar plugins? Choosing a WordPress plugin may seem intimidating or overwhelming, but there are a number of questions you can ask yourself to make this process easier.
Let’s take a look at what you should be asking:
When was this plugin last updated? Is it compatible with the latest version of WordPress? The general rule is to always look for recently updated plugins that are compatible with the latest version of WordPress. WordPress receives three major releases per year, so look for updates within the past three months.
The exception to this rule is plugins that add basic functionality, which require no update to continue working. An example would be Widget Logic. Generally, however, look for up-to-date plugins.
For premium plugins, you can apply these rules much more strictly: The plugin must be compatible with the latest version of WordPress, and new updates and features must be added regularly. Don’t accept anything less.
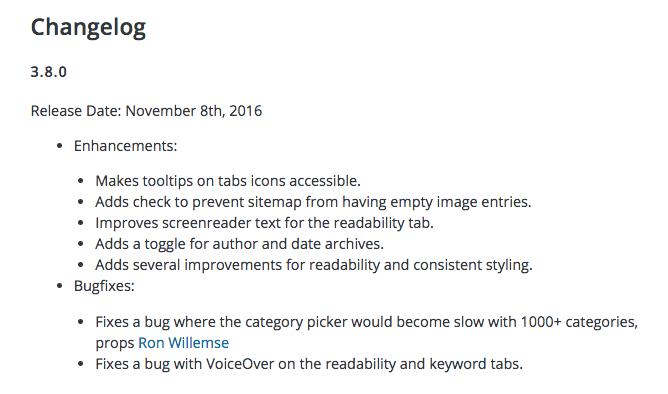
While looking at the plugin’s most recent update, also be sure to ask: Is this plugin going to receive updates in the future? Check the plugin’s changelog (on WordPress.org, this is available as a tab on the plugin’s page; with other plugins, you can find it by searching plugin name + changelog), and see how frequent updates have been in the past. This is generally a good indicator of whether updates will be continued in the future.
You can also look at who made this plugin to get an idea of whether updates will be available. On WordPress.org, you can find this by looking under 'Author', on CodeCanyon 'view portfolio', and on independent websites by looking for an about section. The safest option is plugins made by a small team or individuals who also make other plugins. Be wary if the team or individuals have no other plugins to their name.
A great example of what you should be looking for in a plugin author is Tom McFarlin's profile. In the top right, you can see three badges: Core contributor, plugin developer and WordCamp speaker. The first means he has contributed to the main WordPress software, the second means he has published plugins on WordPress.org, and the final means he's spoken at a WordPress conference (known as a 'WordCamp'). These are all very reputable things to be doing.
You can see Tom has a number of well-reviewed plugins under the Plugins tab and a frequently updated website. Both of these are excellent signs, and you should be very happy using one of his plugins. None of these are deal-breakers, though: If someone hasn't updated their blog in six months, it's okay, but if the person hasn't updated any web presences or the plugin(s) in six months, that's a bad sign. With premium plugins, look for similar clues on CodeCanyon or the developer's website.
How clearly is the plugin’s functionality described? This is easy: Look for a clear and detailed description with FAQs and screenshots of the plugin in action. More detail here generally indicates more care taken with the plugin, which is what you’re after.
How many other people use this plugin? The wisdom of crowds isn’t necessarily infallible, but it’s another useful indicator. If plenty of other people are using a plugin, it’s less likely it has any problems.
It’s easy to see how many active installs free plugins have. Each plugin’s WordPress.org page shows in the sidebar the number of active installs. The most popular free plugins have more than a million active installs, but a plugin can still be 'popular' with 1,000 to 50,000 installs. Just remember: Different plugins have different levels of appeal. It’s generally better to go with popular plugins, so make sure your choice is widely used.
Paid plugins generally can’t tell you how many active installs they have, but the most popular paid plugins will happily boast how many sales they have. CodeCanyon will show how many sales a plugin has, regardless of the number. For niche plugins, 50 purchases is okay; for more general plugins you want to see a significantly higher number.
What do the ratings and reviews say? Reading ratings and reviews is a useful way of finding out what real-world users think of the plugin, although the recommendations mentioned earlier are likely more insightful.
Free plugins on WordPress.org have a one-to-five star rating system. This is viewable on the plugin’s page and works okay, but not amazingly. You can click on each star to see the content of each review. Short reviews and elaborate rants can happily be ignored; instead, look for the well-balanced articulate reviews. Similarly, bear in mind plugins with a low number of ratings will be skewed towards very negative or very positive experiences. Take ratings for plugins with fewer than 100 ratings with a heavy pinch of salt, but over that number look for four stars and above.
For premium plugins on CodeCanyon, look at the ratings and comments. Regardless of the quantity, you want to see that the vast majority of customers have had a good experience. Bear in mind premium plugins on independent sites have no obligation to show you bad reviews, and are unlikely to do so. Google is again helpful here: Search plugin name + review to find independent reviews.
Are there any better alternatives? Again, Google is your friend. Simply type something like: '[name of plugin] alternatives' and see what comes up. Another good thing to try here is to type the issue you're having (or the feature you want) into Google, something like 'Best WordPress plugin for [issue/feature]'. In short: Research, research, research!
Do you really need this plugin? Apart from those that have been created to make your site faster (think caching plugins, etc), almost all plugins will have at least a small impact on speed. What's more, most will also add to the complexity of future maintenance and updates. Do you really need whatever plugin you're about to install? Will it really add to the bottom line of your business or help your users? Or are you being a bit whimsical in your decision to go ahead and use it? If in doubt, leave it out!
Case Study on Why This Is Important: W3 Total Cache
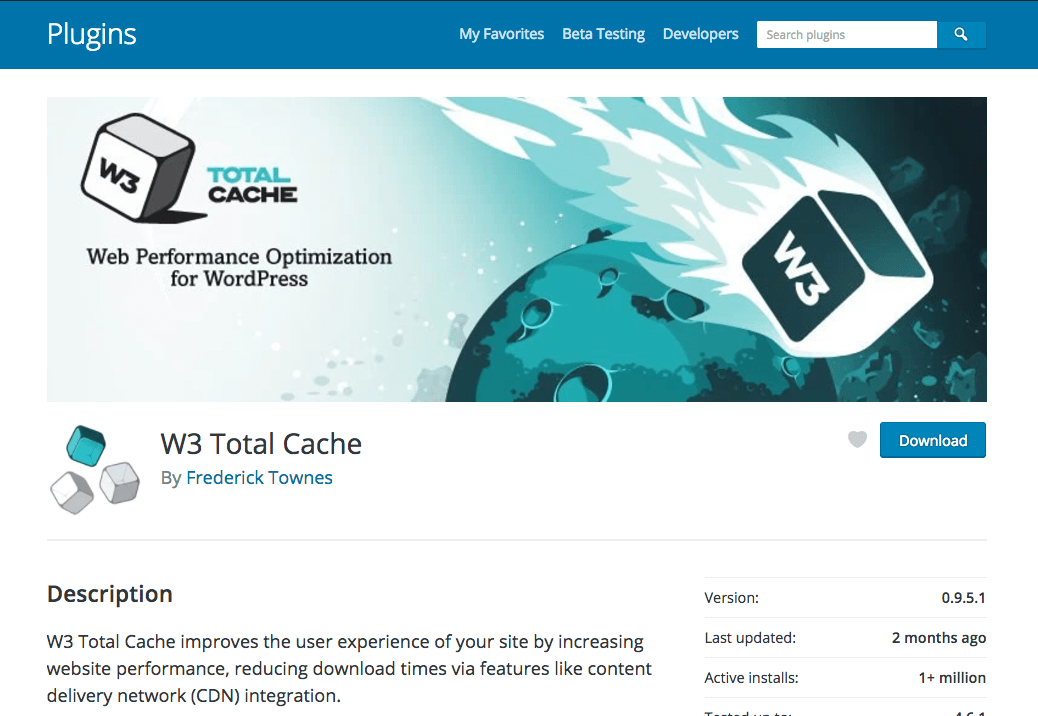
W3 Total Cache is one of the most popular WordPress plugins, with more than a million active installs. The plugin offers an easy way to make WordPress sites faster using caching (see more on getting a faster WordPress site here), and for a long time was the best option available and near-universally recommended.
Currently, however, the plugin has not received a major update for more than two years, with the only updates bringing fixes for issues such as huge security holes. Furthermore, there has been widespread speculation the plugin has been abandoned by its developers, and even paying customers reporting they have not received what they paid for.
This case study serves as an example of the importance of choosing the right plugin. For a plugin handling something as complicated (and important) as caching, you want the best plugin available. A cursory glance at W3 Total Cache’s WordPress.org listing shows a good plugin that’s wildly popular, but a closer reading would show:
- Huge number of support tickets, but few solved.
- Very few updates in the past two years, and virtually no new features added (see company blog). Notably, updates in that period have been to fix security issues, so a plugin left without updates would be a security risk (see more on WordPress security here).
These concerns should set the alarm bells ringing. On seeing this, you’d want to consider the major free alternative, WP Super Cache, which has quasi WordPress parent company Automattic as a developer, or a quick Google search would find the best paid alternative available, WP Rocket. Given the availability of good alternatives, W3 Total Cache should be avoided.
How to Install a WordPress Plugin
Once you’ve chosen your plugin, it’s time to install. The installation process is very straightforward, although you may need to test before installing. We’ll first show you how to install a WordPress plugin so you know how to do it, but be sure to read the following section on testing before installing a plugin yourself.
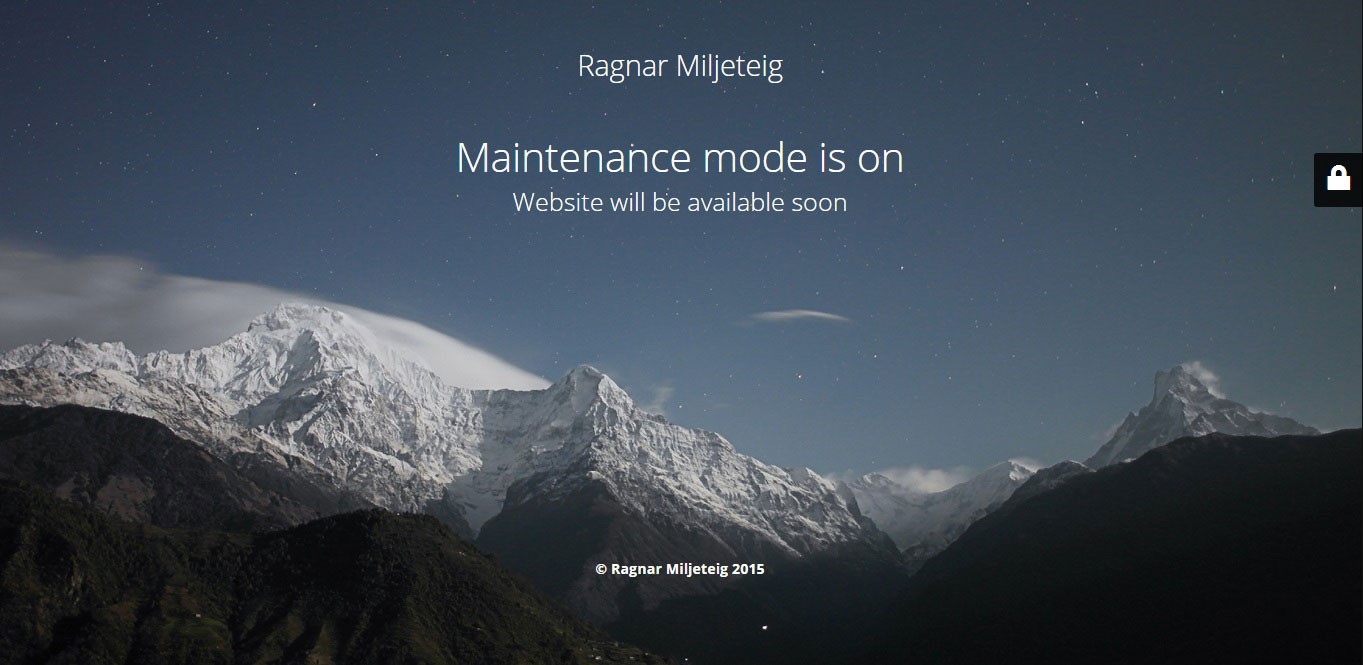
While making any changes to your WordPress site, it’s best to use maintenance mode. There are a number of options available, all with different features. Find the one most appropriate for your site, and install and activate maintenance mode before making any changes (these are plugins, so read on for details on how to install). This will ensure visitors do not see your site while you’re making changes.
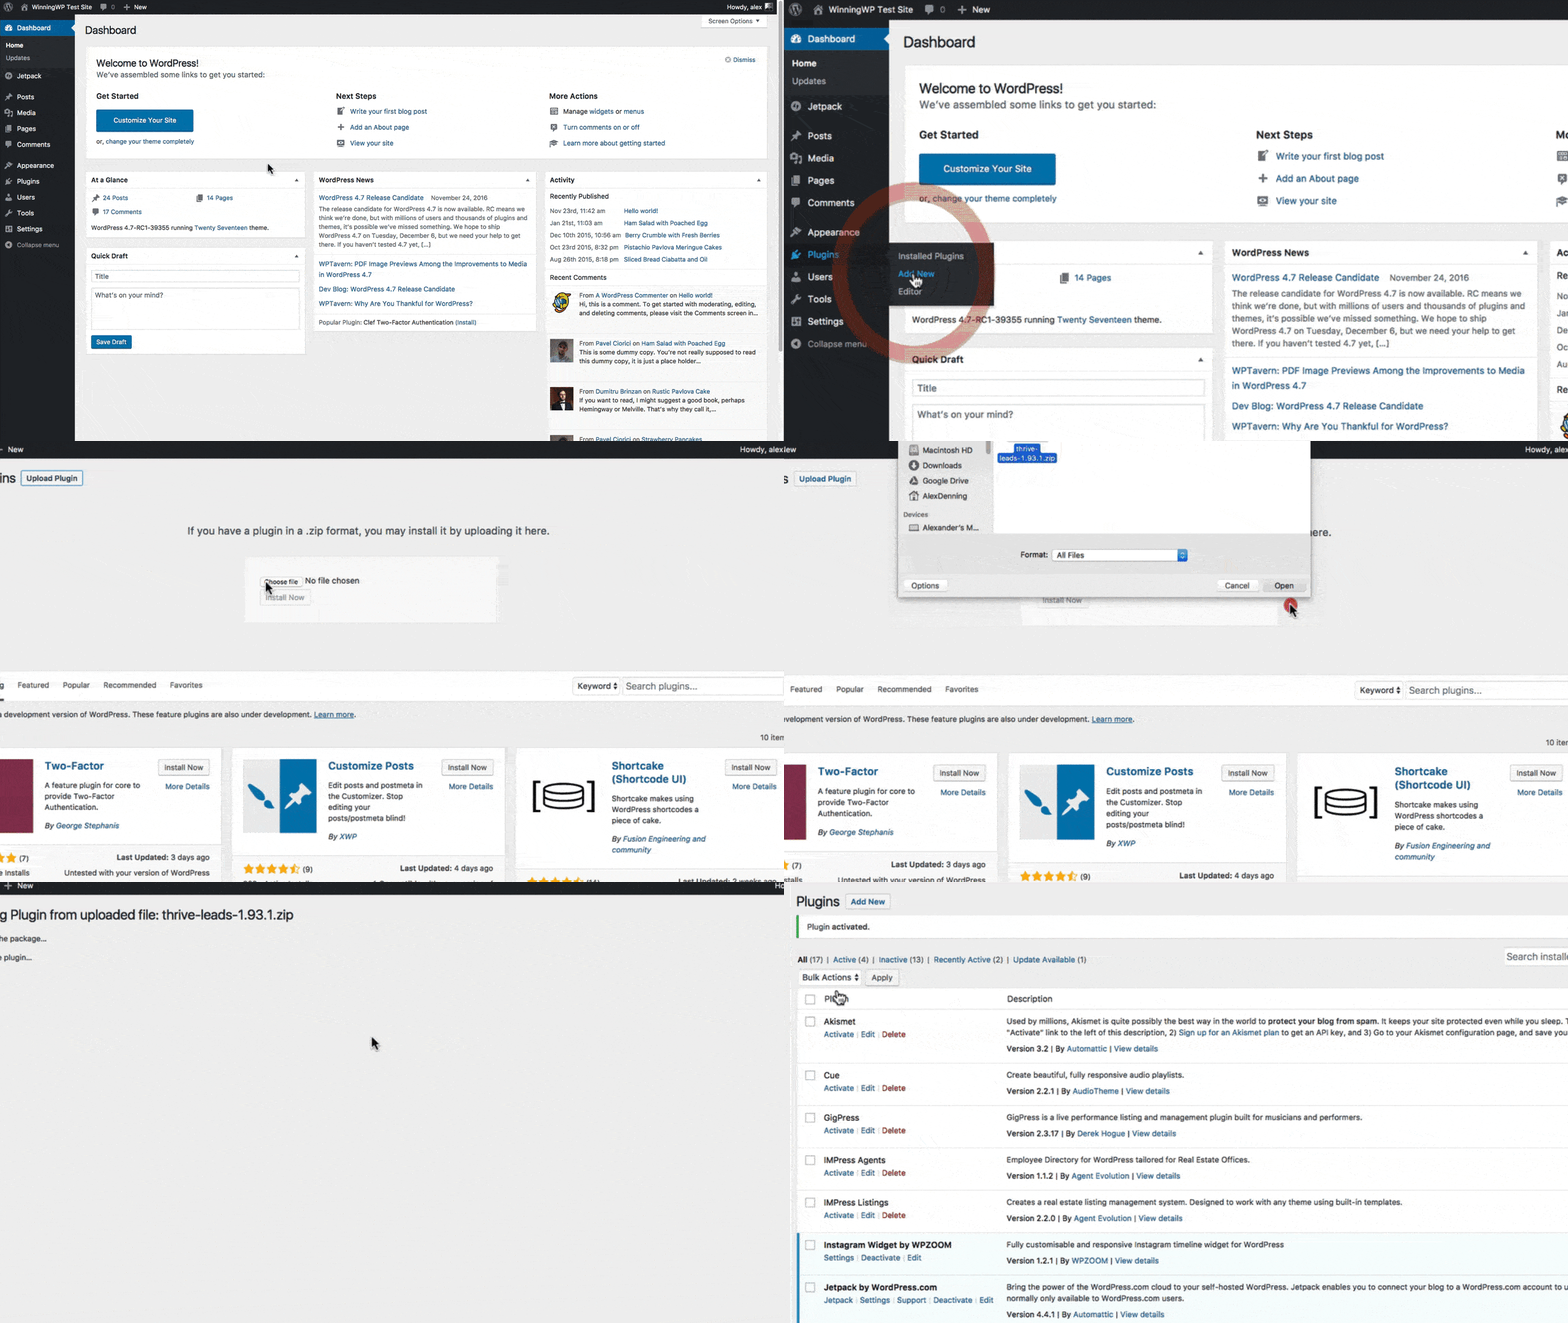
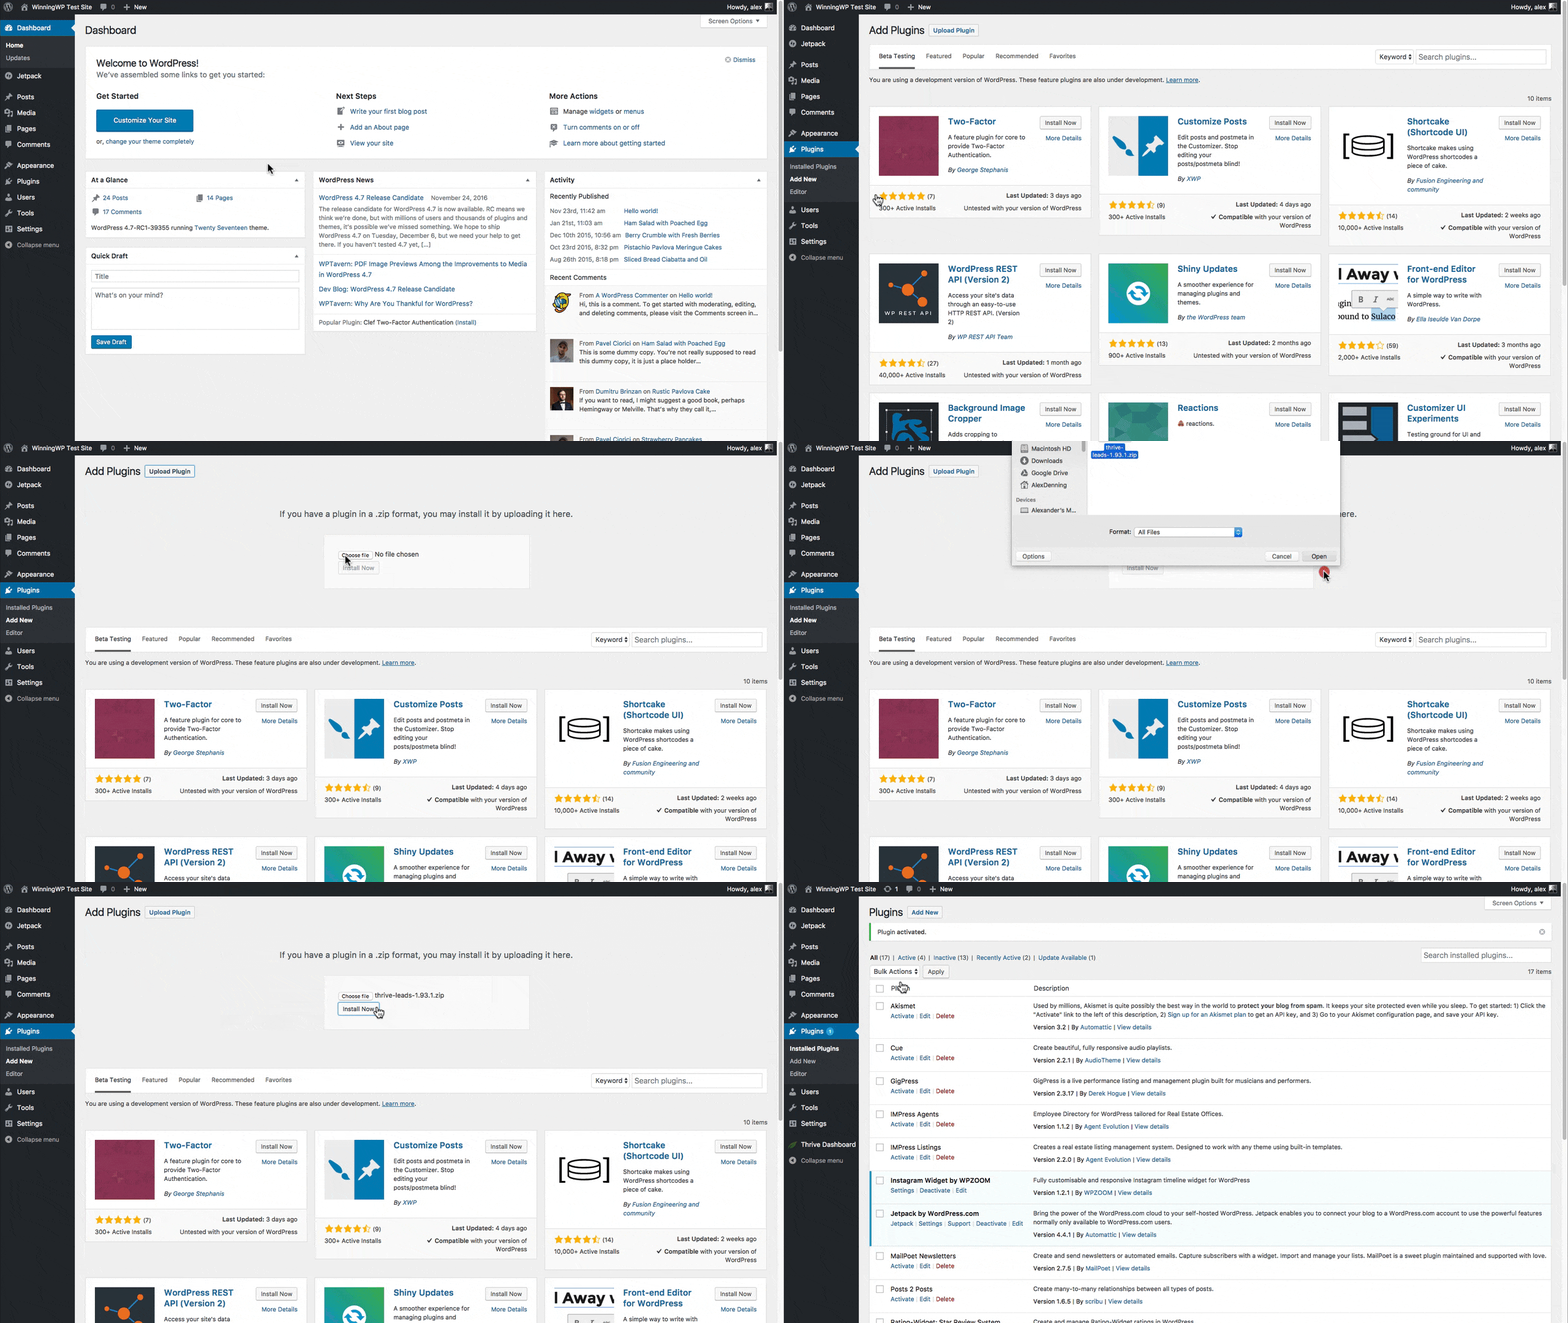
Installing a plugin from WordPress.org is very straightforward. From the WordPress Dashboard, head to Plugins and then Add New. In the top right, search for the plugin’s name. Find your desired plugin from the results page, and press Install Now. Wait while WordPress downloads the plugin onto your site, then press Activate. You’ll be redirected to the plugin management screen, and the plugin will begin running on your site! You can now set up the plugin, and deactivate maintenance mode once you’re done.
Installing plugins from third-party sites is only a little more complicated. You'll be doing this if you've got a plugin from CodeCanyon or an independent plugin developer. Download the ZIP plugin files from your third-party site to your computer, but don’t open or unzip the file. Head to your WordPress Dashboard, navigate to Plugins and Add New. Now, select Upload Plugin and Choose File. Select the ZIP file you’ve just downloaded, and press Open, then press Install Now. Wait while it uploads, and then Activate Plugin. You’ll now be taken to the plugin management screen, and can set up the plugin. Deactivate maintenance mode once you’re done.
This is the theory of installing plugins. Before you do this on your site, it’s important to test (but you can’t test without knowing how to install). We’ll now cover when and how to test WordPress plugins safely.
Testing WordPress Plugins Safely
Plugins can add a huge amount of power and functionality to your site. Unfortunately, they can also break it if you’re not careful. For very simple plugins, testing is unnecessary, but for a complex plugin, such as WooCommerce, page builder plugins or Jetpack, it’s best to try it out safely before you install it on your live site. With high traffic sites, or sites where uptime is imperative, you'll always want to test a plugin before installing.
The best way to test WordPress plugins is to use an environment that's as close as possible to your actual site, complete with the same content.
There are two options for doing this:
- Make a 'staging' test environment on your hosting.
- Duplicate your site on your computer.
The best WordPress hosting companies have a staging test environment set up automatically, which lets you quickly duplicate your site, test any changes safely and then 'push' the test version of your site to your live site. The advantage of this is you can test safely, but you don’t need to repeat any work to make the site live. Check your host’s support for details on using staging; if your host does not offer this, it’s also possible to do it yourself.
Alternatively, if your host doesn’t support staging, you can duplicate your site onto your computer, test out the plugin there, and then install the plugin on your live site once you're happy with the result.
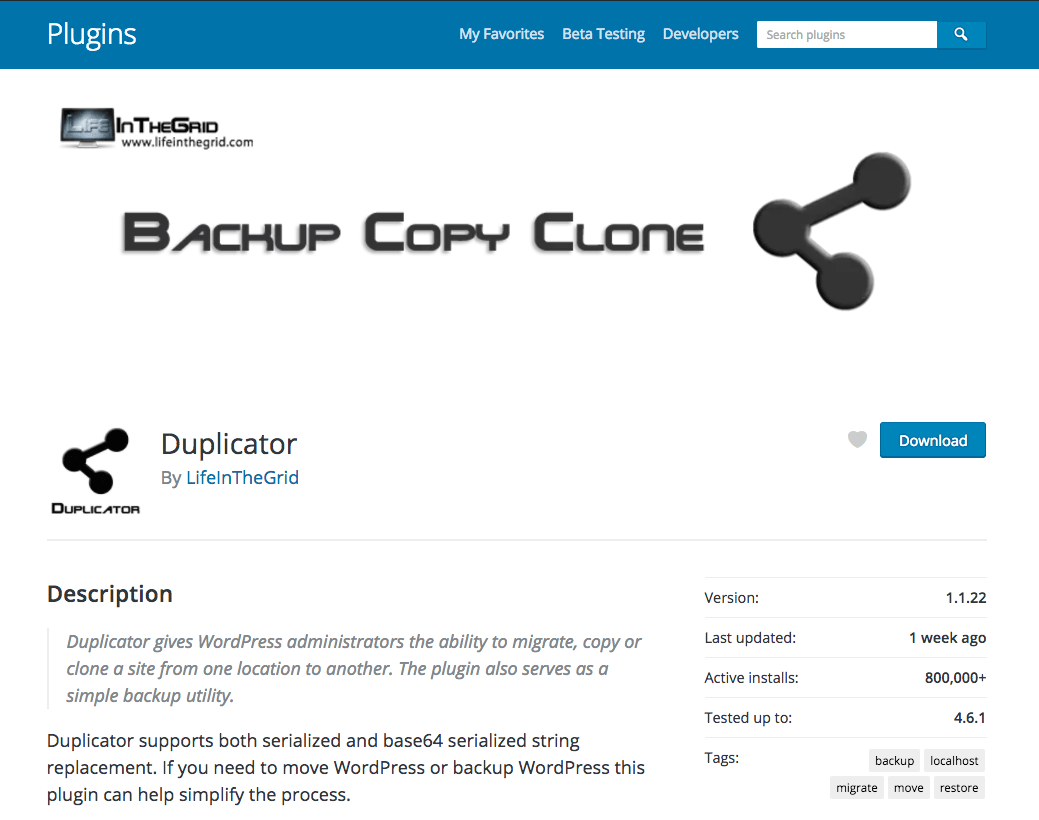
The easier method of testing is to duplicate your website onto your computer, test out the plugin and then install the plugin afresh on your site. A number of plugins are available for duplicating WordPress sites. Our top pick is Duplicator (which, happily, can be installed without testing). Using this plugin, it’s easy to copy your whole site onto your computer. You’ll find details on how to do this here: Follow the instructions to duplicate your site onto your computer, and then install the to-be-tested plugin using the directions above.
If you want a more technical, but more flexible option, consider using Vagrant to create a virtual server where you can do your testing.
Once you have the plugin installed in your test environment, it’s time to get testing! The best way to do this is with real data: Start using the plugin as you would normally, and see how it goes. Most plugins add extra items to the side menu on your WordPress Dashboard, or else their settings will be available under the Settings menu. If you’re stuck, search for plugin name + documentation to find extra help.
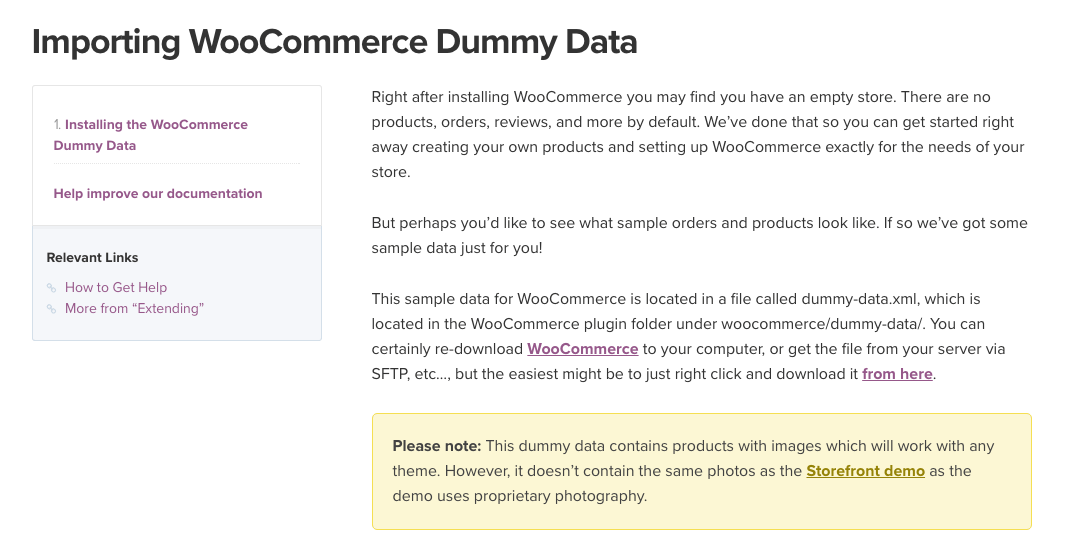
You may find it useful to use sample content to speed up your testing. This is typically available for more complex plugins, and is the same content that's found on the plugin’s demo. This lets you quickly import ready-made text, images and settings, although if you’re using staging you’ll need to delete the sample content when you’re ready to put your site live again. Searching for plugin name + sample content or plugin name + dummy content will let you find any sample content, if available.
It’s useful to consider how easy the plugin is to use, whether you can get all of the functionality desired, and how the plugin affects visitors to your site. If any of these are unsatisfactory, try out an alternative plugin. You’ll also want to check thoroughly that nothing on your site is broken, as this is an obvious red flag. We’ll cover troubleshooting WordPress plugins shortly.
Once you’ve finished testing, you can either push your staging environment live (also known as 'production') or install the plugin on your live site, using the steps outlined above.
Remember: Plugins change your site both for you and for your visitors, so you may find it helpful to get a fresh perspective by asking a friend to test your site for you.
Testing out plugins is time intensive, but it’s essential for ensuring they work with the functionality desired and don't have any adverse effects on your site. The steps outlined here, together with the maintenance mode recommendations above, will ensure you can confidently install WordPress plugins while ensuring your site runs smoothly and the user experience isn't interrupted.
Troubleshooting WordPress Plugins
Sometimes, things go wrong with WordPress. WordPress powers millions of sites, running on thousands of different types of infrastructure, so it’s inevitable something will occasionally break. Here, we’ll tackle common troubleshooting points for WordPress plugins. You can also see our full guide to troubleshooting WordPress.
Dealing with Plugin Conflicts
Plugins often perform the same or similar functionality as WordPress themes, and this can cause plugin conflicts. These conflicts occur when a plugin and a theme, or two plugins, are trying to access the same code or code library, causing one or both to break.
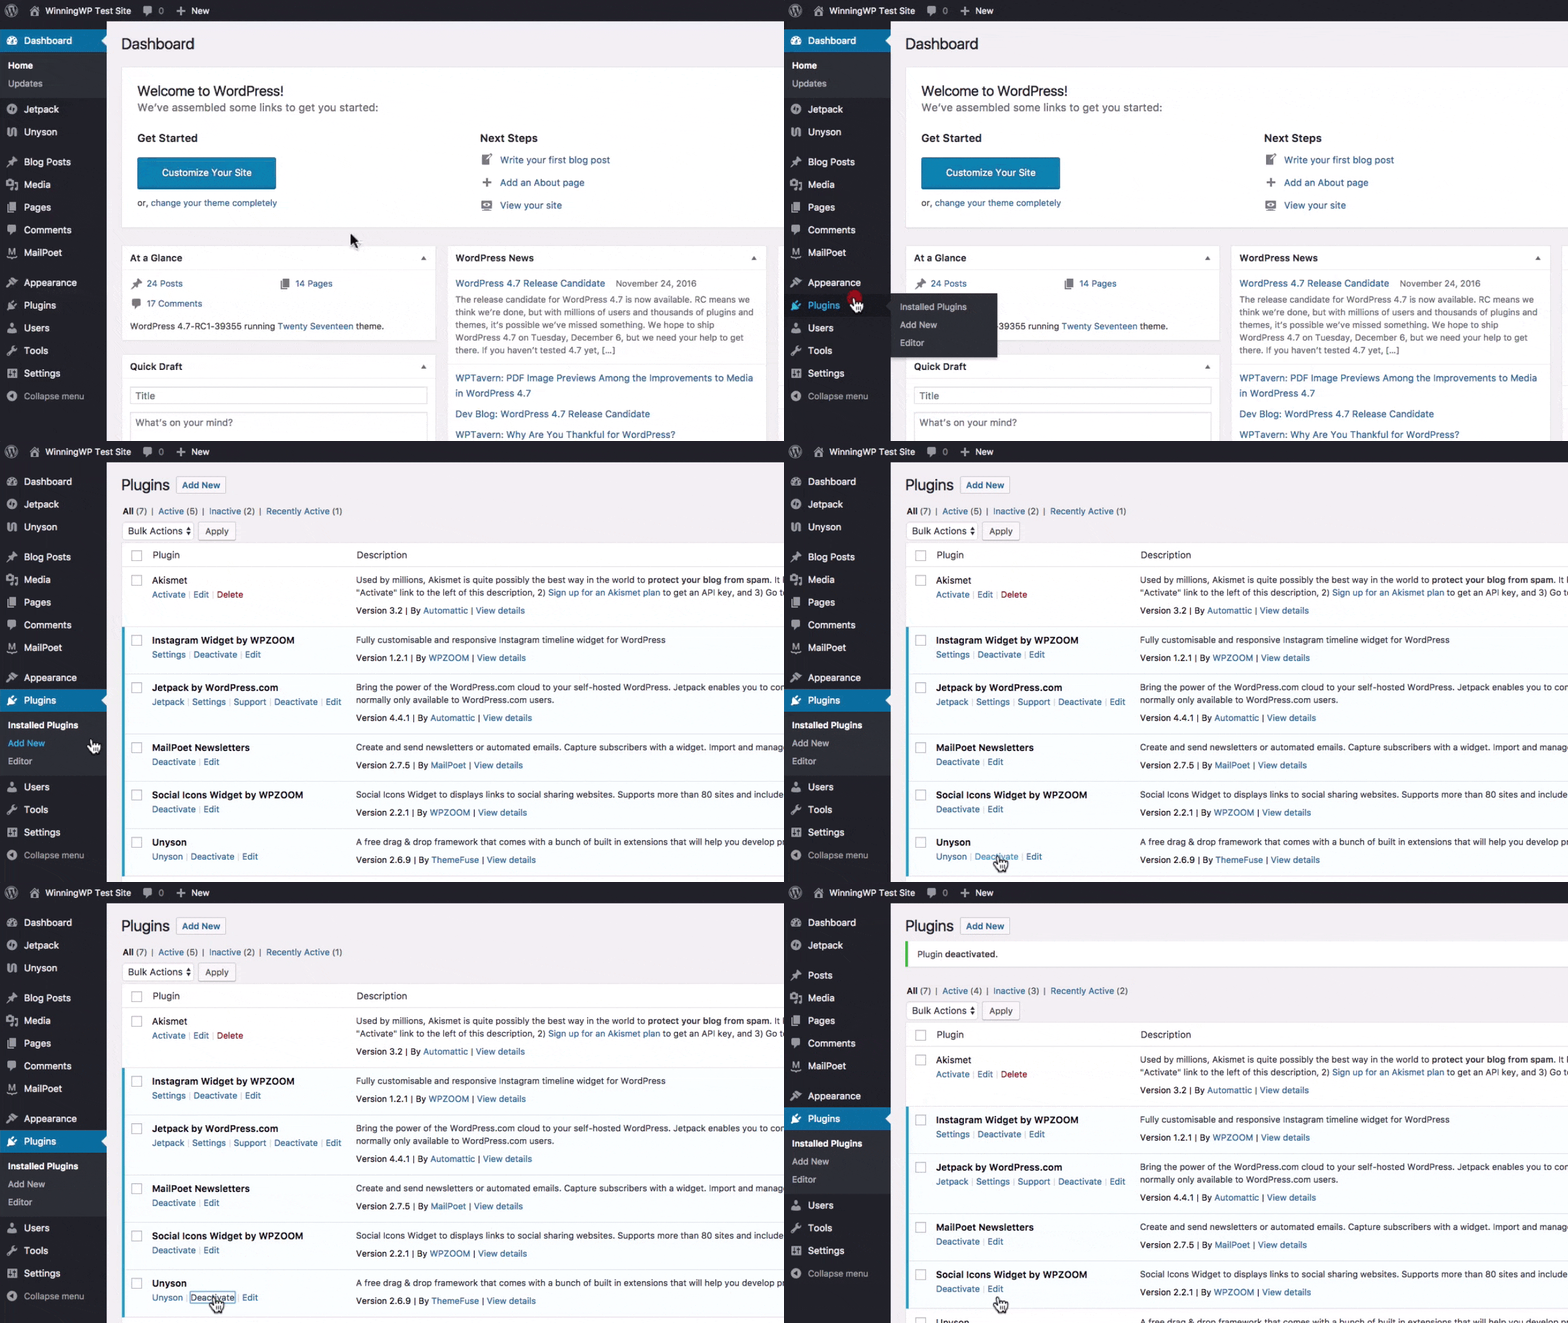
The best temporary solution is to disable one of the offenders. It’s typically not desirable to disable your WordPress theme, so, usually, you'll need to disable a plugin. You can do this on the WordPress Dashboard by going to Plugins, finding the plugin you’d like to disable and pressing Deactivate.
This will get your site running again, but won't actually fix the problem. If you’re using a free plugin, it’s probably easiest at this stage to find an alternative, although you can try to get support. For paid plugins, you should contact support right away. We’ll cover how to do both of these shortly.
Disabling WordPress Plugins When You Can’t Access Your Site
If you can’t access your site at all after installing or making a change with a plugin, you’ll need to disable that plugin. If you’ve made multiple changes, or are unsure which plugin is at fault, you’ll need to disable all of your plugins. You’ll then be able to isolate which plugin is at fault, and get your site working again.
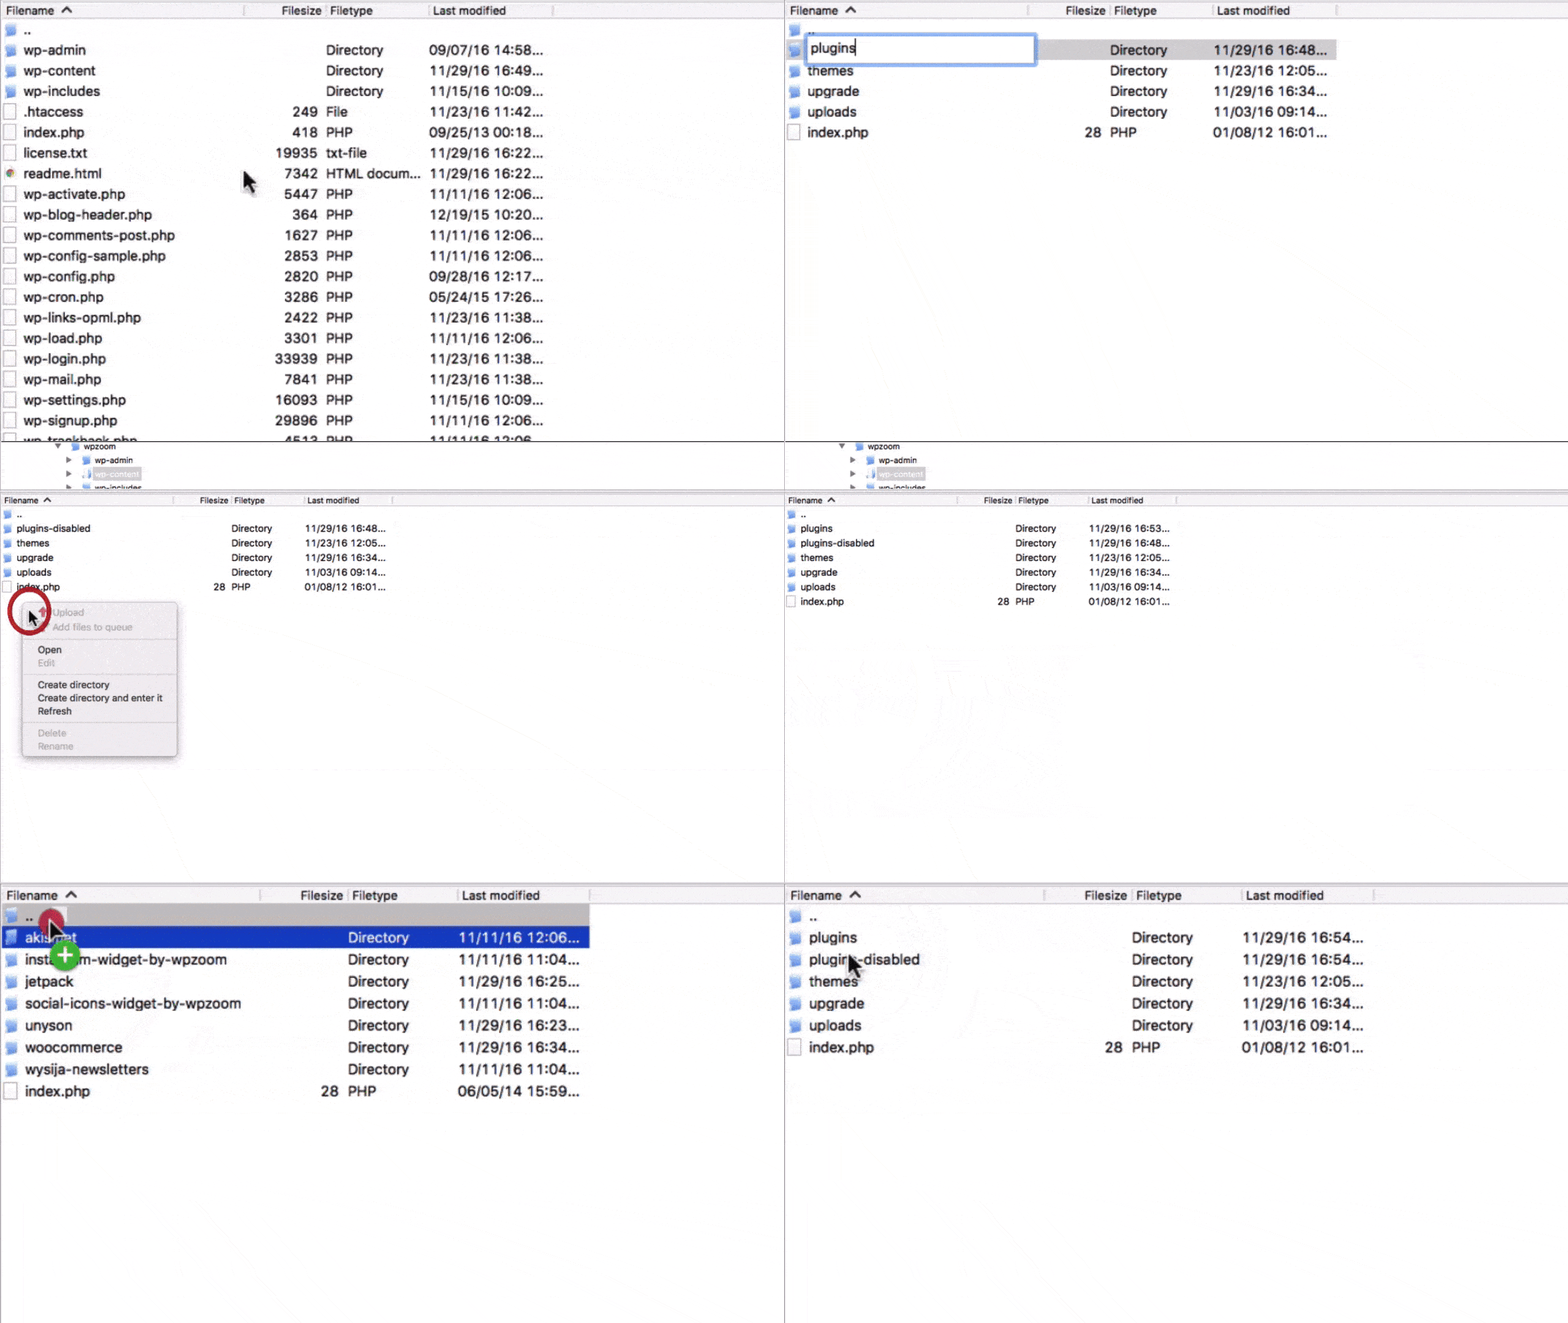
Doing this requires accessing your site’s files using FTP. You need an FTP program to do this (see this list), and you can get your FTP login details from your host. Log in to your site using FTP and navigate to /wp-content/. If you know which plugin is at fault, create a new folder called plugins-disabled, navigate into the /plugins/ folder, and move the folder of the culprit plugin to the new disabled folder you’ve just created. Test your site -- if it’s working again, you’ve found the culprit plugin. Otherwise, proceed with the following.
You can disable all of your plugins by navigating to /wp-content/ and renaming the /plugins/ folder to /plugins-disabled/. This will disable all of your plugins. After doing this, check your site, and you should see it working again (if not, rename the folder back to plugins, as the plugins weren’t at fault here, and consult our guide on troubleshooting WordPress). You can find the faulty plugin by moving plugin folders one by one from the /plugins-disabled/ folder back to /plugins/ and testing your site each time. This will reactivate plugins, so continue until your site breaks again. Once you’ve found the culprit, move it back to the disabled folder so your site works.
Getting Support with WordPress Plugins
You can get support for most WordPress plugins from the developer or their team. You should do this when you’ve identified a plugin as causing a problem on your site, or have identified a bug and can’t find a solution by searching. The type and quality of support available varies depending on the type of plugin.
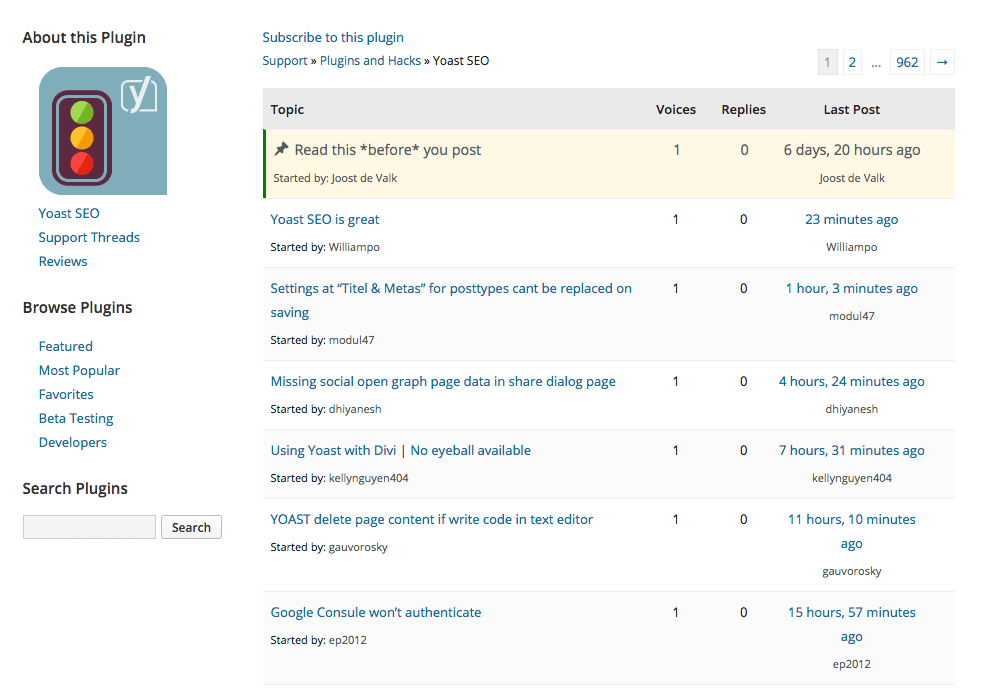
Free plugins from WordPress.org have a support forum system in place. You can access this by finding the plugin on WordPress.org and clicking View Support Forum on the right sidebar. Log in (or create an account), and scroll to the bottom, where you’ll be able to submit a new question. Be as clear and concise as possible, including all relevant details. Your question will be public and anyone -- including the developer -- can reply. Note: Developers have no obligation to reply, but WordPress.org’s plugin rating system incentivises this.
Some free plugins sell a support package or have premium versions available that include support, and details should be available from the developer’s website. If you receive no response with the WordPress.org support forum, this is your best option.
Premium plugins typically have 12 months of support included (six months on CodeCanyon) -- after this period, you’ll need to purchase an extension, which can usually be done with a discount. Your premium plugin’s developer should have a support system in place -- check their site for details -- and make sure to include as much detail as possible in any queries. You should get a response within one business day.
If you need an urgent response from a professional, then use an external WordPress support service that, from $49, will get your problem fixed immediately. This is especially useful for free plugins, but is also a useful last resort for paid plugins.
How to Manage WordPress Plugins
Managing WordPress plugins is simple. You just need to do two things:
- Keep your plugins up to date.
- Make sure all plugins have been updated recently.
Plugins from the WordPress.org repository can be updated in the same way you would update a theme or WordPress itself. When updates are available, a notice will display on the Admin Bar and in the Dashboard:
To carry out updates, click on Updates from the WordPress Dashboard, tick all available updates, and then Update Plugins. WordPress will handle everything else for you.
You can automate this process to ensure you’re always completely up to date. Our guide on this has full details, but the short version is as follows: Install WP Updates Settings, head to Settings → Updates, tick everything and save. You’ll now have all of your plugins (as well as themes and WordPress itself) updated automatically.
Most premium plugins have automatic updates available. Accessing these typically involves entering a license code into the plugin’s settings. You’ll need to keep your license valid to keep receiving updates -- it’s important to do this, even when it involves purchasing extensions.
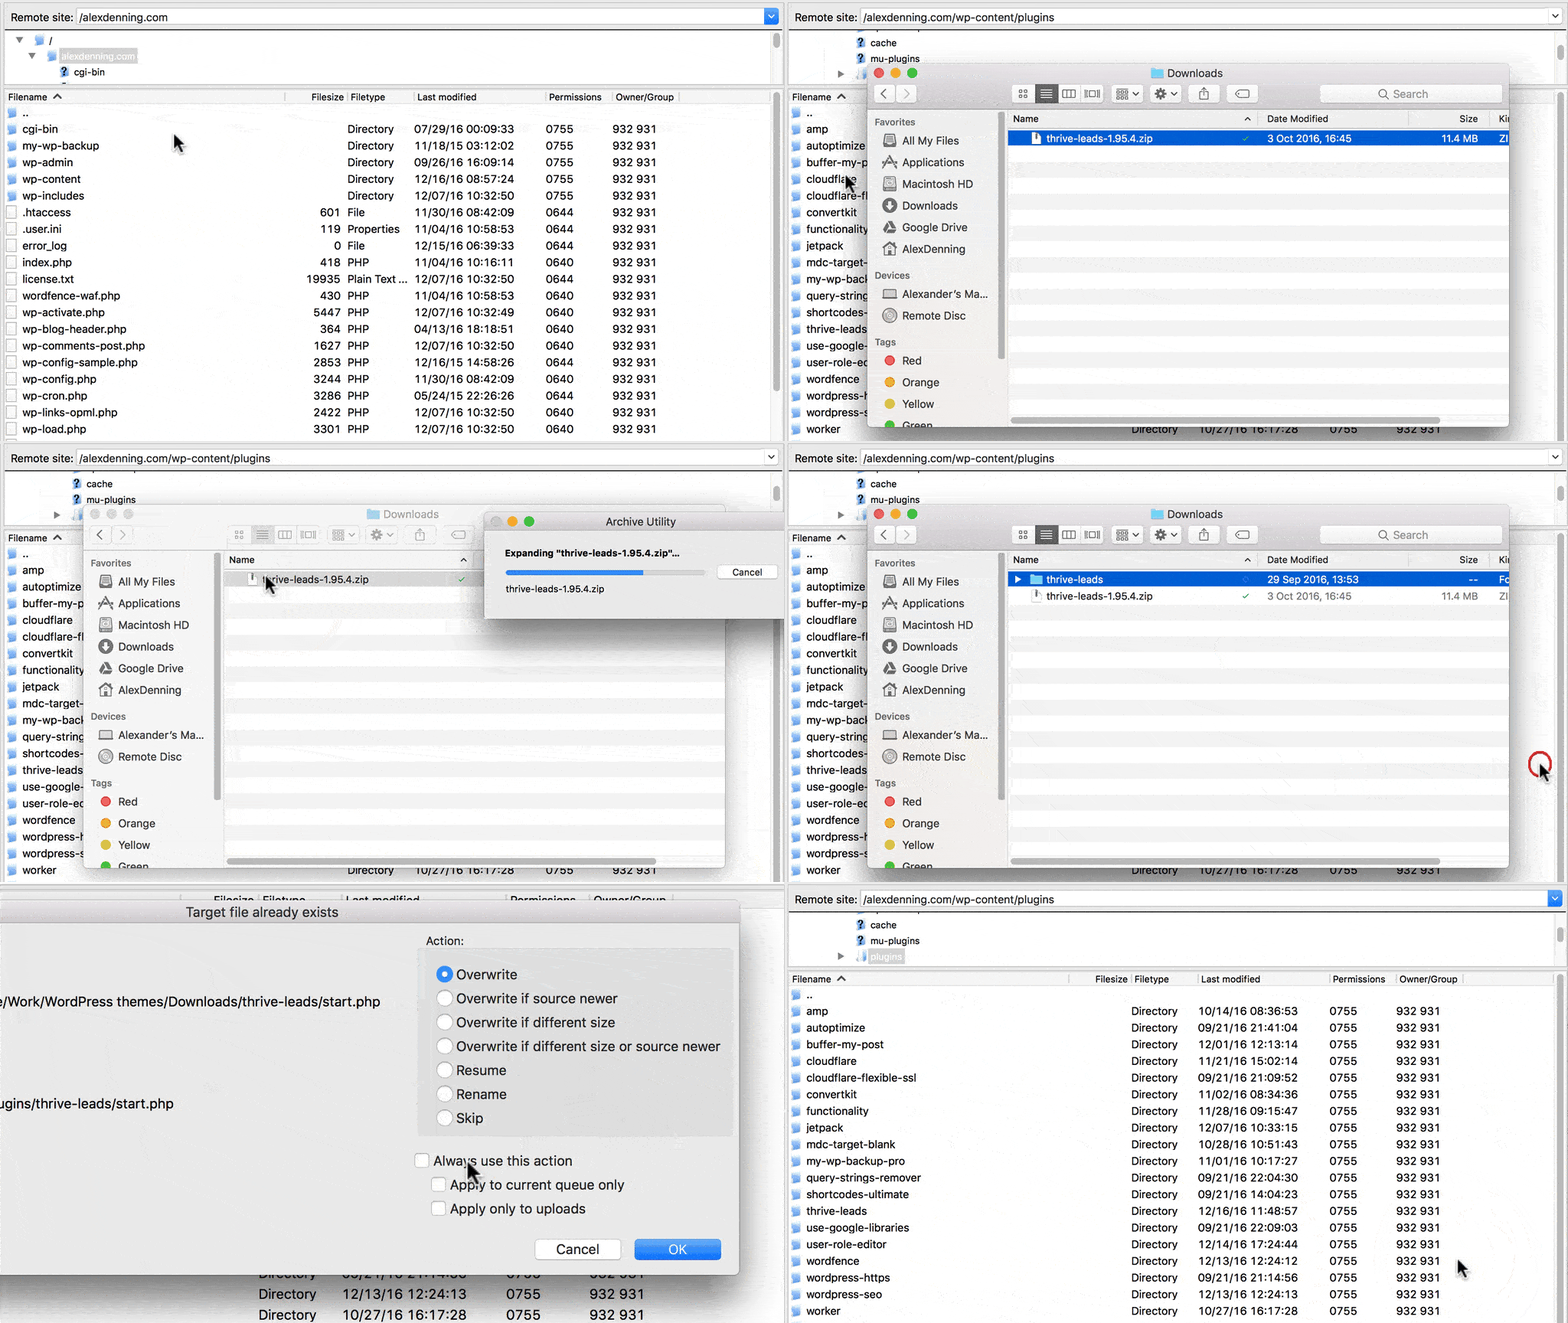
If your plugin doesn't have automatic updates available, you’ll need to manually update. This requires downloading the latest version of the plugin from its developer and then unzipping the folder. You now need to use an FTP program to connect to your site using FTP (as mentioned earlier, find details of programs you can use here and get your FTP login details from your host). Navigate to /wp-content/plugins/, and upload the whole folder you’ve just downloaded and unzipped. This should have the same name as a folder you can see on your site.
You’ll be asked if you want to overwrite files; you do want to do this. You may find it easier to bulk allow this, especially if the plugin has a lot of files. Wait for all of the plugin files to upload, and the plugin will be updated. All settings are carried over, so you’re all done!
The second part of managing WordPress plugins is to check to see when they were last updated. This should be done every couple of months. Earlier in this guide, we recommended looking for plugins that had been updated within the past three months -- once you’ve installed a plugin on your site, it’s important to make sure it’s continuing to get updates. As usual, this process is different for WordPress.org plugins and premium plugins:
- Check when WordPress.org plugins were last updated from the Dashboard by going to Plugins and then selecting View Details on each plugin. Look for the Last Updated notice on the right.
- Plugins from CodeCanyon display their Last Update on the product info page, so head there to find details.
- Find out when other premium plugins were last updated by searching
plugin name + changelog, and looking for the most recent entries. Alternatively, check the developer’s blog for mentions of plugin updates.
It’s vital you keep using up-to-date plugins that are updated regularly, as this alone goes a long way in keeping your WordPress site secure. For more details, see our full guide on WordPress security.
Customizing Plugin Functionality
One of WordPress’ great strengths is its ability to be customized. Indeed, the vast array of functionality available from plugins is a key part of this. You may have already installed and customized your WordPress theme, so when something with a plugin doesn’t look quite right, you may wish to customize this also.
Unfortunately, while themes offer easy customization methods (see more about them here), the same can’t be said for plugins. WordPress offers no 'child plugin' system, and, beyond plugins’ built-in options, customizing the functionality of a plugin requires professional assistance.
When you want a plugin’s functionality customized, there are a number of options:
- For small changes, contact the plugin’s support using the channels discussed earlier in this guide.
- Major custom work will require a developer. Again see this list for commercial options, starting at $49, but rising rapidly with complexity.
- Radically different functionality may simply require an alternative plugin. A different plugin may be your best option when seeking radical changes.
Plugins aren’t customizable in the same way themes are, but, if you want changes made, it’s still possible -- whether through an alternative plugin or hired help.
Final Thoughts
Choosing plugins isn't easy, and you'll need to put some effort into it. If you want to ensure the long-term health of your website, you should take the time to review and test some plugins, and should only activate the ones on your production site that you find worthy.
Keep in mind that selecting good plugins is somewhat of an acquired skill. As you go deeper into WordPress territory, you'll have more and more experience to draw from, and you'll find your website will get better as a result. Happy hunting!

Good luck!
Much like themes, each and every plugin is different to the next: in fact, when it comes to plugins, the vast majority are usually wildly different to each other — and some can even change the workings of your site beyond almost all recognition! Because of this, tread slowly and carefully. Ensure you do in fact really need whatever it is you're thinking of installing, and above all: choose each and every new plugin wisely!

