
How to Make a Professional Small Business Website – with WordPress: A Complete Step-by-Step Guide
When it comes to creating and managing new websites, WordPress is now pretty much everyone's go-to tool. What started out over fifteen years ago as a simple means of publishing content online is now so, so, much more. From personal blogs to some of the biggest online corporations, publishers, and retailers, WordPress now powers an extremely diverse range of sites and has rightfully earned a name for itself as one of the most capable content management systems ever created. Below, we'll show you, step by step — from start to finish, and with no steps skipped, exactly how to go about using this incredibly powerful tool to create a professional small-business website (not just a blog) that will almost certainly outshine your competition!
-Note: WinningWP content is free to all. If you make a purchase through referral links on our site, we earn a commission (learn more).
First of all, if you're worried about how much creating your own website will cost you, let me begin by saying that, nowadays, it really doesn't have to cost you an arm and a leg. Not anymore, at least! In fact, there's a revolution going on in website building, and it's all about giving more power to the people!
In other words, if you want to make a small business website for yourself, you can:
- do it all on your own
- do everything on a budget
- AND end up with a site that's just as good (if not actually a heck of a lot better) as that which you'd get if you were to hire an agency to build it all for you
In this guide, we'll go through the entire process step by step, and get into as much detail as necessary to show you exactly how you can make a small business website for yourself.
But Can I Really Make a Small Business Website Without Hiring Anyone?
Okay, I get it, the prospect of having to build an entire professional-looking website for your business is probably a little daunting — especially if you have no prior experience with websites, online publishing or design/development.
Hiring someone for the job may seem more intuitive at first – and it has its unquestionable pros – however, there are also a few cons...
Here's how the DIY approach compares with hiring a professional:
If you're hiring someone to build a site for you:
- You need to have a significant budget at your disposal. This is usually in the neighborhood of $1,000 to $2,000 for a VERY basic site, and more like $5000-$10,000+ if you require advanced features. This is a guesstimate of course, since the pricing will differ greatly depending on a number of factors, but you can generally expect a developer to charge $35 to $100 per hour - and the whole project for a business site can take anything from two to six months.
- You get to capitalize on the expertise of the person/team building the site for you. It's probably not their first rodeo, so they should be able to advise you on the optimal solution for your site, and how to make sure it will advance your business.
- You don't need any technical experience or skills. You generally don't need to ponder 'how' something's going to be built, you only need to know 'what' you want built.
- You get all of the elements put in place for you — domain, hosting, website software, design, the whole nine yards.
- It requires significantly less of your time compared with the DIY approach.
Going full DIY:
- You need to set aside around $60 to $80 per year for your website and the required tech setup to make it operational (domain plus web hosting). Optionally, you may need an additional $40 for a premium theme (installable design package).
- You're making all of the decisions on your own, you need to educate yourself on what makes a small business website great and how to run a successful operation. In other words, no one will advise you on what to do.
- You need to be comfortable around 'computer things', but there are still no coding/programming or website building skills required. You can still make a small business website that's great all on your own without knowing anything about how websites actually work under the hood. This is all possible thanks to modern tools.
- You'd best set aside at least one weekend to get your website done from start to finish.
Okay, so those are the facts and the pros and cons of each path. However, even though building a website for your business by yourself is technically possible, is it actually worth it? In other words, are you even capable of producing anything worthwhile?
Yes, you really are!
That's all thanks to the tools we have at our disposal nowadays. With platforms such as WordPress, we can make our websites incredibly feature-rich, beautiful, and user-friendly, without needing to understand how each of the cogs works. For instance:
- Need some specific features for your business website? Easy-to-install WordPress plugins will give you those.
- Want an awesome design? Find a WordPress theme you like.
- Want a website that's fast? WordPress is fast by default.
- Want to build an ecommerce store? You can do that with WordPress as well.
...you get the idea, and I hope I've got you on board by now!
The remaining part of this guide is going to show you exactly how to get all of that (and more) done.
What Makes a Small Business Website Superb?
A small business website can have a lot of different elements and traits, but to be a successful one it should check off the following:
1. A Proper Small Business Website Has to Serve a Clear Purpose
The main mistake first-time website owners make is trying to be too many things at once. People throw everything and the kitchen sink onto their website, and then act surprised when no one can comprehend what it's about.
Here's an alternative:
Do just one thing right!
Again, if you want to make a small business website that can turn into an asset, make sure it does one thing right.
Here's what I mean:
Your business, like most businesses, is probably very specific in what it does. You either sell this or provide a service of that. In other words, when a customer walks through the door, you know what you want to sell them.
Your website should be similar — when a visitor walks in, they should be guided towards a specific outcome. Most commonly, that outcome is buying something from you, but that's not a rule. It's up to you. After all, I'm not here to tell you what it is you should set as the main goal for your website — only you can do that.
⚡ ACTION POINT: Your first step when aiming to make a small business website that's awesome should be to pick your main goal and write a mission statement that puts everything in perspective.
'Mission statement' may sound like a Silicon Valley buzz term, but it's actually a great thing to have. Among other things, you can use it as a guidepost when making future decisions regarding your website.
To make this guide easier to follow, I'm going to be building a demo site to show the process in practice. Therefore, here's the mission statement for my site:
I want the website to establish my restaurant as the best Paleo dish joint in the area. I want to do that by making it easier for people to find the restaurant and reserve tables, and I also want to educate them on the benefits of the Paleo diet.
2. A Good Small Business Website Resonates With the Right Audience
The first thing you need to make peace with as a website owner — and it's the harsh reality of owning a website — is that no one will ever come to visit out of curiosity. Your mom is probably the only person in the world who's going to do that.
For the rest of the population, you have to give them a reason to visit. And no, simply telling them what you have on sale isn't a good-enough reason.
People — everyone (yourself included) — are only interested in what's in it for them.
So what can you do with that knowledge?
For starters, you can focus on figuring out these two core elements:
- Who are the people you want to reach?
- Why will they listen to you?
Now, here's the kicker, if what you do is, say, sell socks, then 'people with feet' isn't a narrow-enough definition of your target market, okay?
And I know this may indeed be your core market base, but it just won't be one that's possible to reach in your first few months in the online marketplace.
Even Facebook didn't start as 'a global social network for everyone alive', even though that's exactly what it's become. It started as a social network for Harvard University students. Nothing more.
So here's how you can apply the same principle of audience-searching:
Instead of defining your ideal audience five years from now — 'people with feet' — think of a subset of that group you can reach today. Maybe you're a mountain biker and you know people in that community... How about 'socks for mountain bikers (with feet)'?
What we're doing is narrowing down your target market until you're comfortable that you know where those people are, and have a good feeling as to how to talk to them.
Then, with time, use that as a stepping stone to reach broader audiences. Rinse and repeat until you can grow into the market of 'people with feet'.
Now, the second core element — why would anyone listen to you? Or, to put it another way, what is it you can offer people that's going to be a good enough reason for them to visit you repeatedly?
Again, people won't come to your site to simply check out what's up with you — they only care about what's in it for them.
So, what on your website brings value to your visitors?
Usually, it's good content.
Therefore, you need to figure out what sort of content you can provide your audience that will keep them coming back for more.
Here's a recipe that usually works:
Your task: Figure out what that might be for you.
Spoiler alert: This basically involves creating some form of content for your audience. The type of content is up to you. It could be articles, short blog posts, reviews, comparisons, reports, PDF documents, videos, audio, and so on.
To make it easier, you can look up what your competition is doing, and see if you can do things better.
Ultimately, this is all meant to help you build authority, and convince your visitors you have a strong position in the niche and should be paid attention to. Once you have their trust and attention, it's going to be much easier to sell them something.
3. A Good Small Business Website Represents Your Business Accurately
Are you a formal kind of person? Or maybe you're more 'hip' and relaxed? Is it the same for your business?
Every business has a personality. It may be subtle, but it's certainly there.
Your website should subscribe to the same vibe as your business.
For example, if you're a lawyer, then you don't want your customers to think of you as someone who's too laid-back; a wedding photographer probably shouldn't be grumpy, and so on. Your website should always reflect the vibe that's right for your business.
Apart from that, every niche has its standards. For instance, in the music industry you'll often find dark color schemes on websites, multiple custom graphics, large imagery, and an overall energetic vibe. For the funeral industry... Well, you get my drift.
4. A Good Small Business Website Should Be an Effective Sales Tool by Itself
This should go without saying, but your website should be built in a way that takes the visitor by the hand and guides them through all of the steps towards getting one of your products or services.
Even if a visitor lands on a seemingly random article on your site, they should still be able to find their way to your products in less than three clicks.
What to Do With the List Above?
I know that everything you see above — all of those things needed to make a small business website superb — can seem a bit intimidating.
But the goal isn't to discourage you; the goal is to introduce you to the key elements you should consider as you go through the next stages in the process.
Simply read the above once, and then treat it as your checklist whenever you face an important decision regarding your site (such as when picking your design, or the features you want).
Simply ask yourself the following: 'Is this going to help me make my business site superb, and also help me to reach my goals?'
Here are all of the factors again in a more scannable form:
- ✔ A good small business website has to serve a clear purpose.
- ✔ A good small business website resonates with the right audience.
- ✔ A good small business website represents your business accurately.
- ✔ A good small business website is an effective sales tool by itself.
With the core planning stage out of the way, we can get into what's usually the most fun part of building a new business website — picking a good name for it.
Choosing a Name and Getting the Branding Dialed In
Picking a name for your business website is an incredibly fun and satisfying thing. People just love to name things!
Once you put a name on something it becomes official, it feels as though it's tangible — like you've officially started working towards something.
At the same time, that name is crucially important. After all, everyone is going to identify your website by its name, so you want to make sure it's a good representation of what the website is about and what it can do for people.
Overall, there are a couple of factors you should take into account when naming your website:
- Your website name needs to be unique. This may sound obvious, but what I actually mean is there shouldn't be any other business in your niche (or in similar niches) that has a similar name.
- Firstly, this could spell trouble for you in terms of trademark violation and the like. And secondly, you wouldn't want anyone to mistakenly visit a competitor.
- Google is your best tool when researching this. Whatever name is on your mind, just Google it and browse at least five pages of results to see if there's anyone already using it.
- It needs to be clear, and easy to type and memorize. Imagine yourself mentioning the name in passing over the phone. Will the person you're speaking to be able to memorize it on first go? Let me give you an example, there's an actual to-do app named TeuxDeux. It reads 'to do'. Good luck spelling it out over the phone.
- It needs to be catchy and have branding potential. In other words, it should be a word or phrase you can 'own' entirely. As in, it shouldn't stand for many things other than your business name. Think, 'Facebook' or 'Google'.
With that, you also need to consider a couple of other factors:
Firstly, your niche plays a role too. Look at your competition and try to somehow list the elements most of those websites have in their names. Not to look too far for an example, most websites in the WordPress niche have 'WP' somewhere in their name. There may be something similar going on in your niche, so do the research to find out.
Secondly, consider possible legal restrictions. For example, sticking to the WordPress niche, you may wonder why everybody is opting for 'WP' instead of 'WordPress'. Well, using 'WordPress' would infringe on WordPress' trademark. In other words, it would be illegal. Are there any such restrictions in your niche?
Thirdly, the official name of your business and the name of your website don't have to be the same. Your website name can be based on one of your popular products, an original brand name, or even a completely new term — unless, of course, you do want to use your business name. In which case, go for it.
And lastly, decide whether you want to feature your main keyword in the name of the website.
For example, there's a popular website in the online business space called The Smart Passive Income. That website was born to tackle the idea of 'earning passive income', and 'passive income' was the focus keyword for the entire site. So, it made its way into the website name and URL — smartpassiveincome.com.
⚡ ACTION POINT: Try to come up with five to ten alternative website names. Make each name short, three words or less, while also taking into account the factors we discussed above.
Earlier in this guide, I told you I'm building a demo site to show you the entire process in practice. So, here are the possible names I have on the list for my site:
- Caveman Cuisine, Paleo Cooking Guide, Eat Like a Caveman, Caveman Cooking, The Paleo Cook, Cooking the Caveman Way, Caveman in the Kitchen.
Domain, Hosting, Install WordPress
This is the technical part of how to make a small business website.
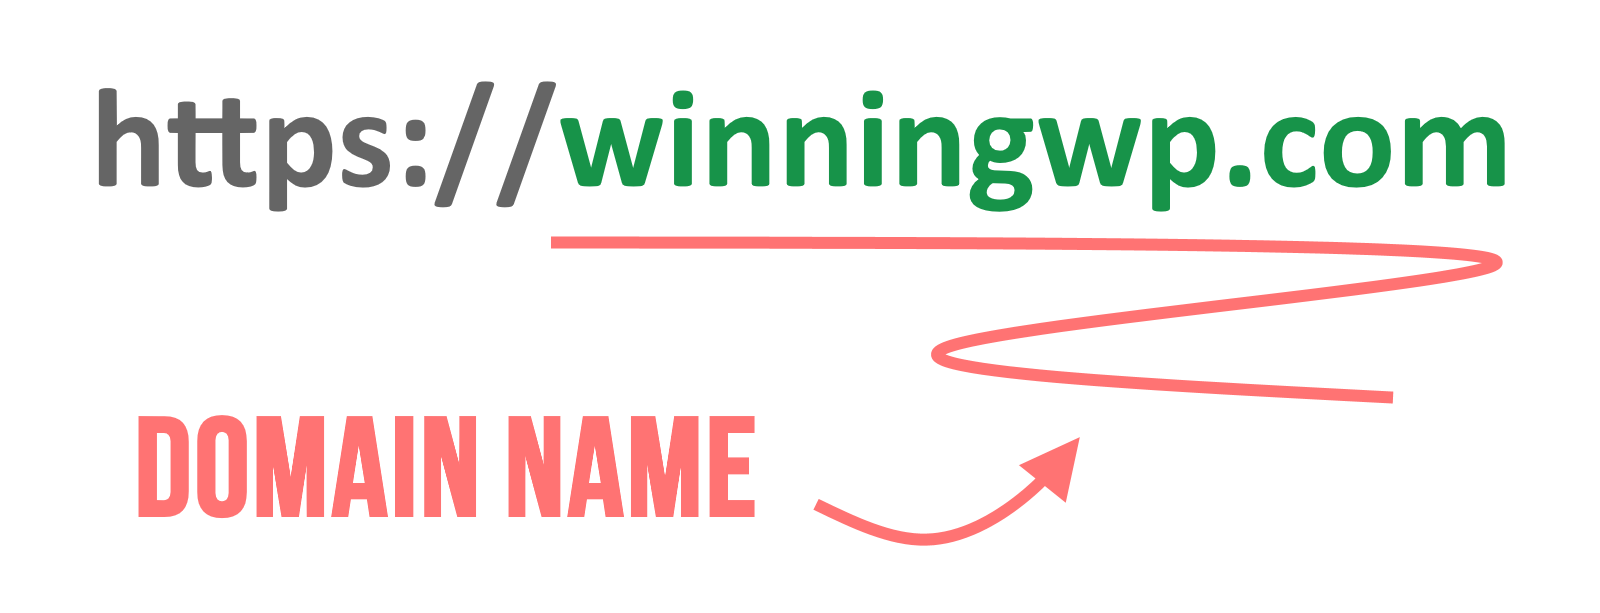
Choosing a Domain Name
Simply speaking, a domain name is your website's address on the internet.
(Here's a more detailed explanation.)
Domain names are something you register — as in, you tell a company called a domain registrar they should register a domain name on your behalf and let you use it for your website. This involves a small fee — usually around $10 to $15 annually.
Most of the time, the best domain names end in .com. Or, more accurately, people assume your website address is going to end in .com, so if it doesn't they may not be able to find you.
The reason I recommend that you prepare five to ten alternative names for your website is because some of those names won't be possible to register as a domain name. They may already be taken, or be unavailable for other reasons.
One of my favorite tools for checking the availability of domain names is DomainTyper. It starts working as soon as you begin typing your domain name, and it shows you a number of other domain extensions apart from .com.

Further down the page, you can also check whether you're going to be able to register Twitter, Facebook, Instagram and other social profiles under the same name.
(If you're having a tough time finding something that's available as you go through your list of website names, you can help yourself to some of these domain name generator tools.)
⚡ ACTION POINT: At this stage, pick the domain name you like the most that's available. However, don't register it through DomainTyper. For that, we'll go somewhere else.
Going back to my demo site, I took my list of all the possible names and put it through DomainTyper. The one name that stood out to me was caveman-cooking.com.
Getting the Domain Name and Hosting in One Place
As awesome as DomainTyper is, it's better to do the actual domain name registration somewhere else.
Namely, SiteGround.

SiteGround is best known for being a web hosting company. Web hosting (or a web server) is the place where your website files and data are kept, and from where they can be delivered to any visitor who wants to access your website.
(For more info on the differences between domain names and hosting, see this.)
SiteGround is our favorite hosting company for a couple of reasons:
- It's affordable. You can get a hosting setup starting from $4 to $6 a month.
- It's WordPress-optimized (again, WordPress is the website platform we're going to be using). SiteGround also lets you install WordPress in a couple of simple steps (we'll cover this as well).
- We've tested SiteGround on multiple occasions, and it's been able to rise to the task every single time. Independent reviews, tests and surveys tend to confirm this as well. ReviewSignal rates SiteGround at 71% (their #1 top selection among shared hosting setups), and two user surveys conducted by CodeinWP rate it at 9.2 and 8.56 out of ten (the highest scores).
- It has an awesome support team. This means no matter what question you have regarding your web server or your WordPress website, the team will be able to answer it.
- You can get your hosting setup and the domain name in one go.
Here's how to register a domain name and pick a hosting setup with SiteGround all in one go:
First, head to SiteGround by clicking this link, and pick one of the available hosting plans.
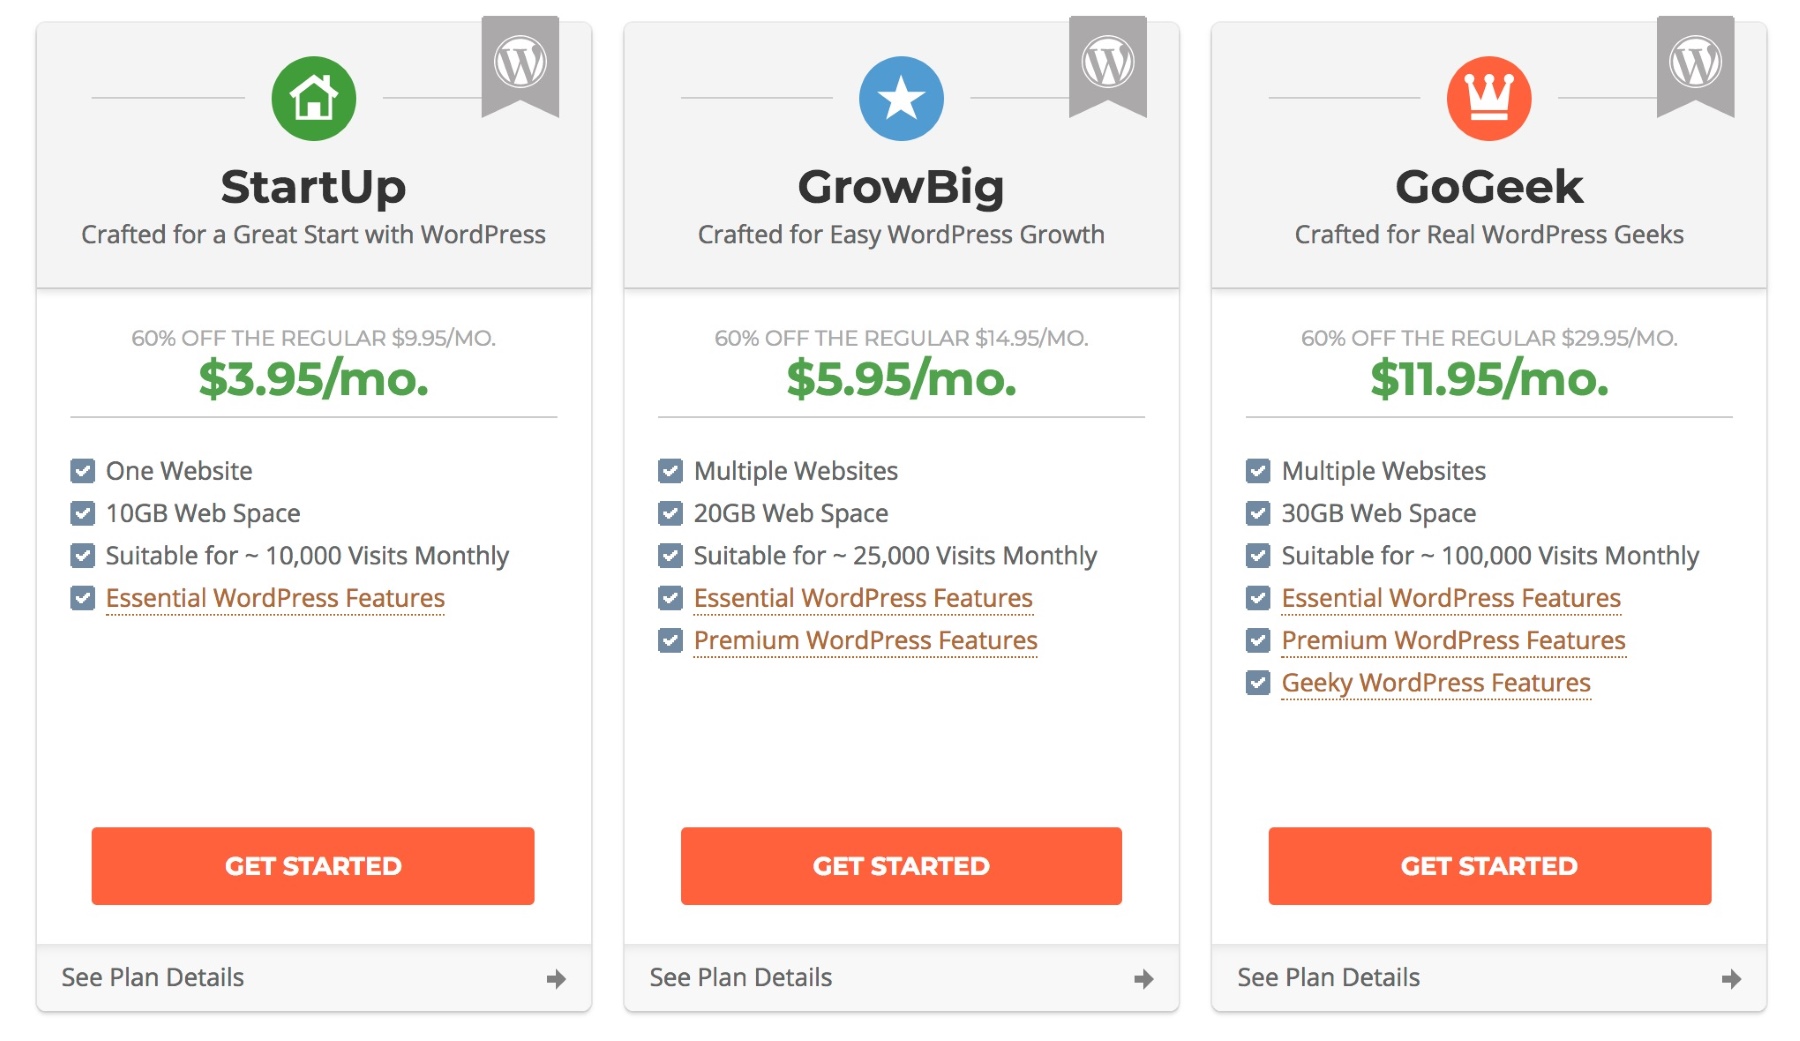
As you can see, there are three main options at different price points. Although it may be tempting to go for the cheapest one — $3.95 a month (the price you're seeing depends on your location) — you're better off opting for one of the other two tiers.
- If you're not planning to launch an ecommerce store when you make your small business website, then you can go for the cheaper one — GrowBig (at $5.95 a month).
- If launching an ecommerce store is on your radar, then go for the GoGeek plan ($11.95 a month).
Why not the cheapest hosting option? By opting for the slightly more expensive GrowBig or GoGeek, you receive a number of perks, the most important of which are:
- priority technical support — so there's always someone to talk to if you need help with your site (available both on GrowBig and GoGeek plans)
- servers with PCI compliance — needed for ecommerce (available on GoGeek).
To begin the setup process, click on one of the Get Started buttons. You'll be taken to the domain name setup panel.
This is one of the things that makes SiteGround great. Instead of having to use two separate companies for your domain name and hosting, with SiteGround you can set everything up in one place.
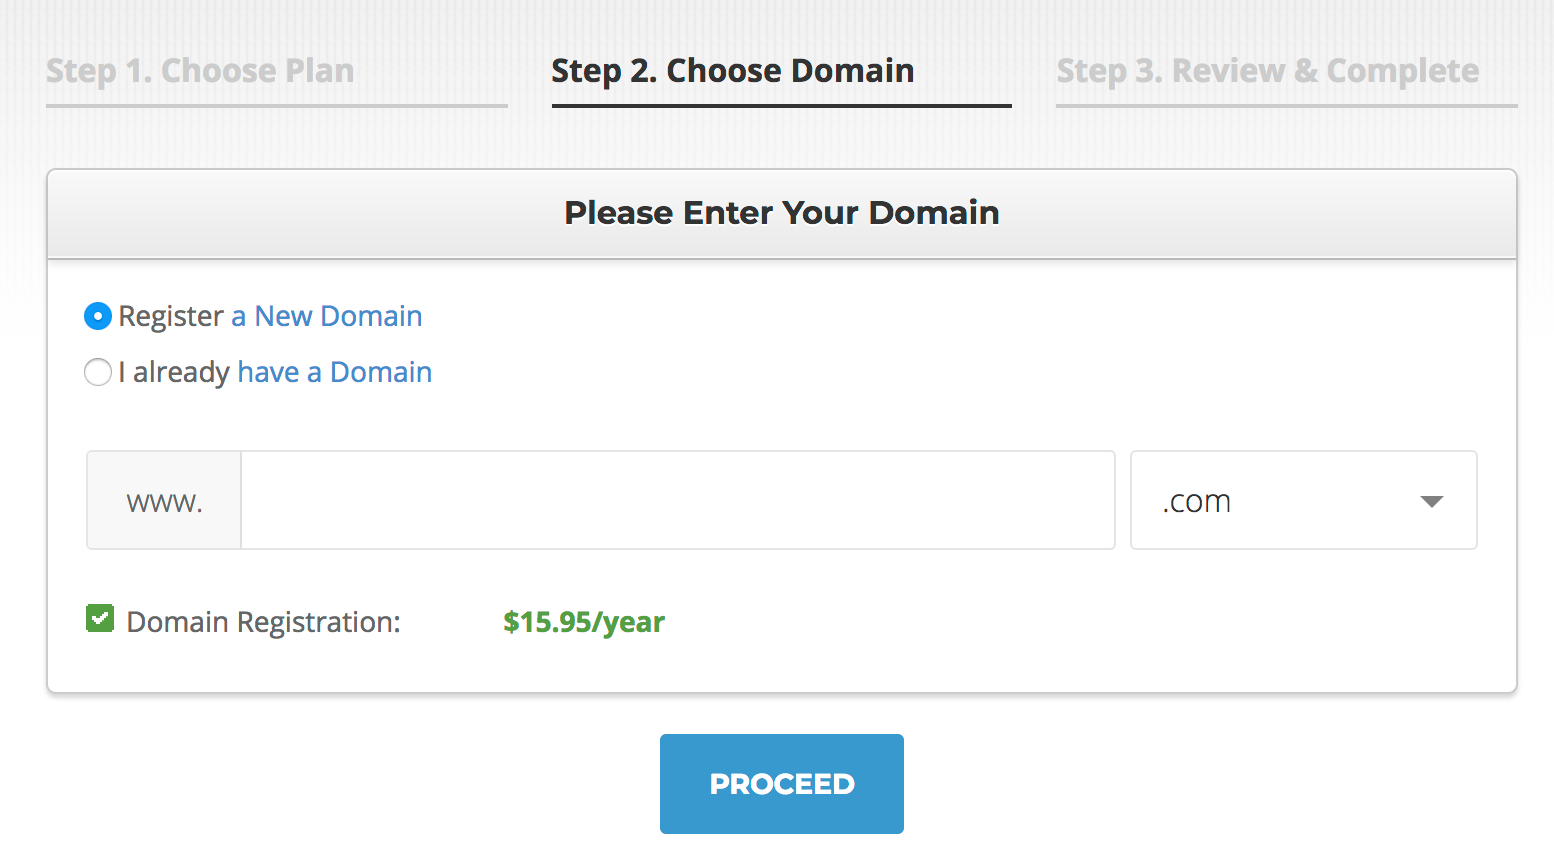
Input the domain name you found via DomainTyper earlier, and click Proceed.
The next screen is all about your personal and payment information. This is pretty straightforward, and nothing you wouldn't find in any other online checkout process.
The only section where additional attention is needed is the block labeled Purchase Information.

- Data Center — pick a location that's the closest to your target audience. You get to choose from a handful of locations in the US, Europe, and Asia.
- Domain Privacy — as you can see in the image above, if you don't get this additional service, your personal information (the data you've just filled in above) will be publicly visible to anyone doing a 'whois' search on your domain name. If that's something you want to avoid, you'll need this Domain Privacy add-on.
- SG Site Scanner — I'd say this one isn't mandatory for most users.
Click on Pay Now to finalize the setup.
...
At this stage, your hosting account is fully functional and you can begin building your website!
The first order of business is getting WordPress installed (the engine of your website).
Now, even though SiteGround provides you with some nice tools to get through the manual installation in less than a couple of minutes, there's actually an even simpler and more hassle-free way of getting WordPress installed and ready to roll.
You can call it a lifehack, even.
- Log in to your SiteGround user panel.
- Go straight to the support section from the top menu.
- Scroll all the way to the bottom where it says 'REQUEST ASSISTANCE FROM OUR TEAM' and click the 'contact us' link. This will initiate a chat with a support representative. (Note: The steps needed to initiate a support chat can change from time to time with SiteGround.)
- Once there, simply ask them to install WordPress for you. The support representative will be happy to do it (tried and tested).
They will take care of all the basic settings that are required to get WordPress running, and without any additional fees.
Also, while we're at it, ask the support representative to 'enable a free SSL on your website'.
An SSL is a piece of technology that will encrypt the connection between your website and the visitor. This makes your website overall more secure and safer to browse from your visitor's perspective.
The support representative will also ask you for the admin username and password you want to set up for your WordPress installation.
And that's it!
Once this is done, you have WordPress installed and ready to go! Read: You're now ready to complete your DIY small business website build.
WordPress 101
WordPress is a great platform. Everybody loves it. Even Beyoncé. (Yes, if you go to Beyonce.com, that's WordPress too.)
However!
The user interface isn't the most straightforward when you first see it, and it takes some time to get used to. So, here's your simplified getting started guide to WordPress.
Your First WordPress Experience
To log in to the admin panel — where you'll be doing all of your work — go to yourdomain.com/wp-admin/, and log in using the access details set during installation.
This is what you'll see in the main dashboard:
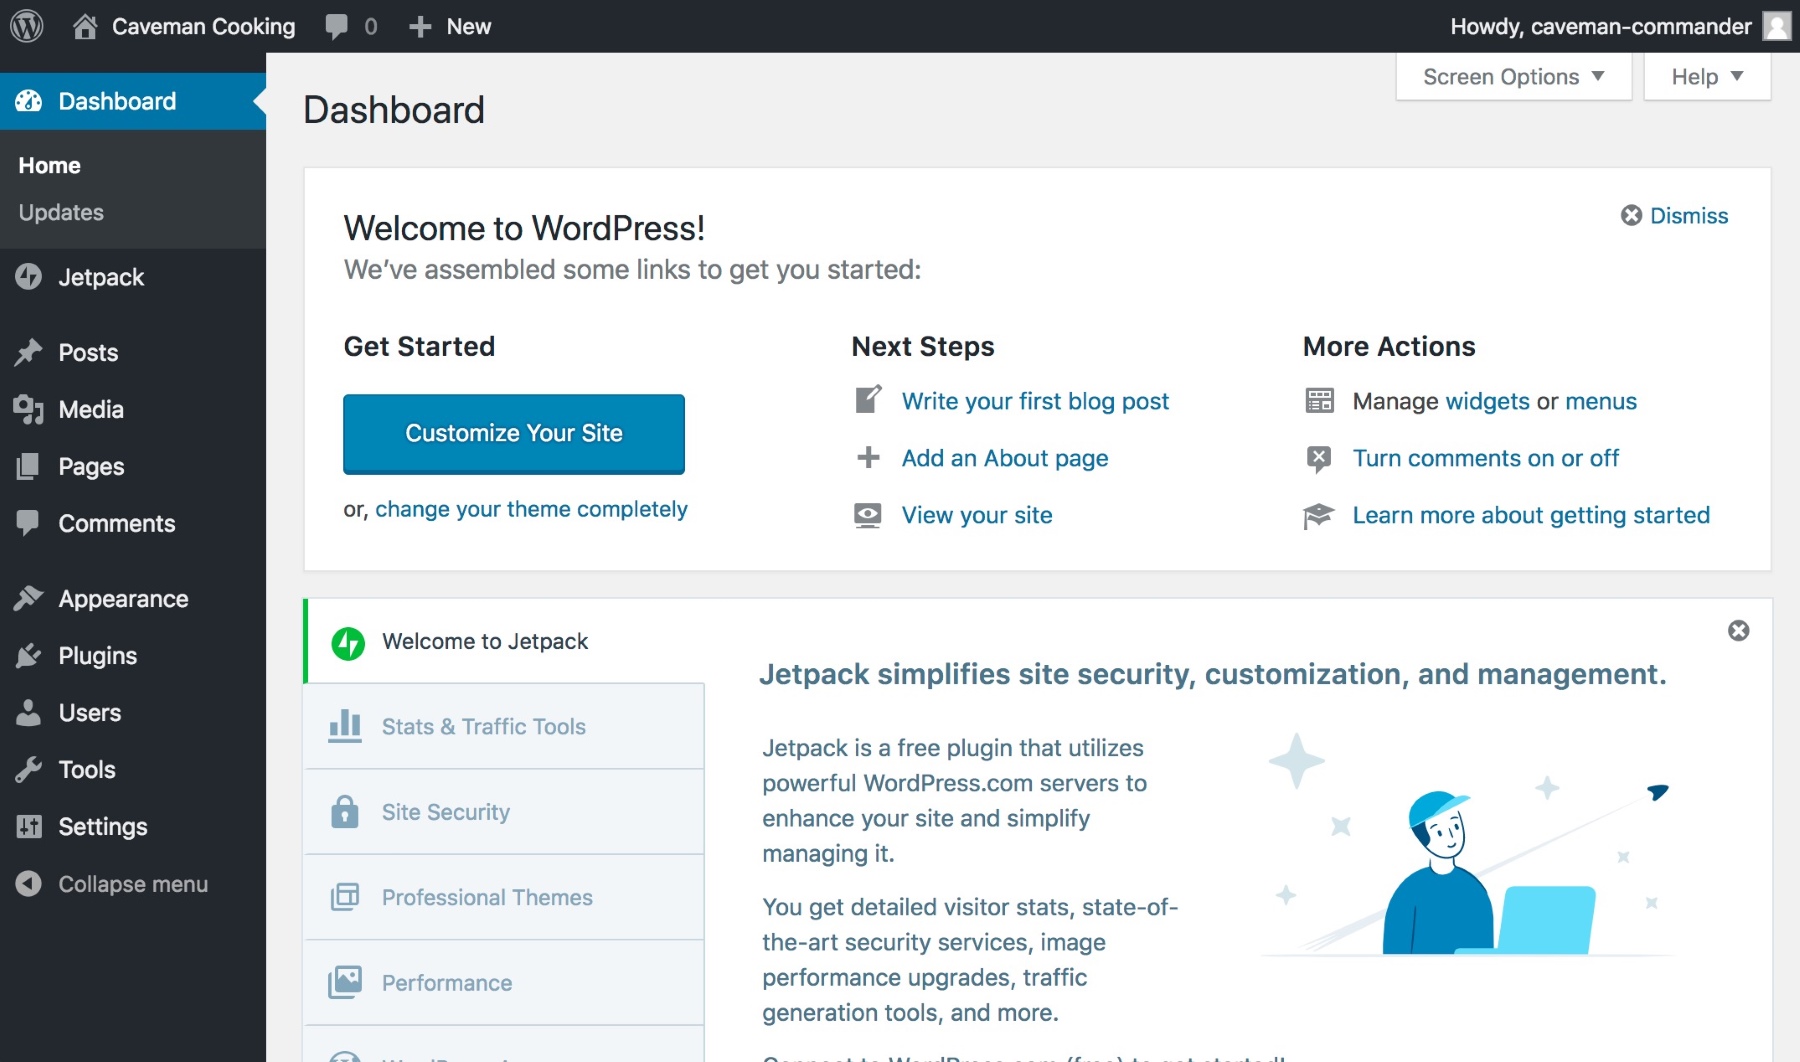
Every screen in the WordPress admin panel is kind of similar — there's a sidebar on the left giving you easy access to all of the different options, and a center section where you can take action on those options.
- That initial dashboard screen (which you can see above) presents you with a welcome message, plus some shortcuts to things you'll most likely want to do sooner or later.
- There's also a Jetpack block directly beneath it. Jetpack is one of the most popular WordPress plugins, and it comes preinstalled with your SiteGround setup.
For now, you can ignore both the welcome block and the Jetpack block. We'll come back to those.
Let's focus on the main sidebar, since this is where the most important stuff can be found:
Posts
For a small business website, posts can serve two purposes: You can either run a fully fledged blog (which you should, according to data), or you can use blog posts to announce new developments, products and goings-on in your business.
Under the hood, posts have a very simple structure — it's basically a headline, body text of the post, and a couple of meta settings (such as categories or tags).
By default, WordPress takes your blog posts and displays them on your website's homepage in a reverse chronological order.
Media
This section allows you to upload files straight to your website, and then use them in your posts, pages, and other areas of the site.
Those files can be anything from images to videos, PDFs and documents — you name it!
Pages
Technically speaking, pages have nearly the same structure as posts. The only difference is pages aren't going to be displayed anywhere in a reverse chronological order.
If you want people to get to your pages, you need to link to them from a menu.
Pages are also commonly used for evergreen information on your website — things such as your 'about' info, contact details, any terms of use you may have, and so on.
Comments
If you have comments enabled on your blog posts, this is where you get to see and moderate them.
Appearance
This is where you get to change the way your website looks.
We'll talk about this later on in this guide.
Plugins
If you need custom features added to your website, you can get them through plugins.
Plugins are compact, installable pieces of WordPress software that integrate with your main site. Think of them as apps for your WordPress site.
Users
This is where you can set up new user accounts, change passwords, and stuff like that.
If it's only you managing the website, you'll hardly ever need to visit this section.
Tools
I'd say this is a leftover section from the old days of WordPress. There's nothing particularly useful here.
Settings
This is where you'll find all of the crucial settings that define how your website operates.
As going through these settings is something you should do right after establishing your site, we're going to take care of this right now.
The Settings Every Fresh WordPress Site Should Start With
Start by clicking on the Settings link in the sidebar menu. This will take you to the General settings panel.
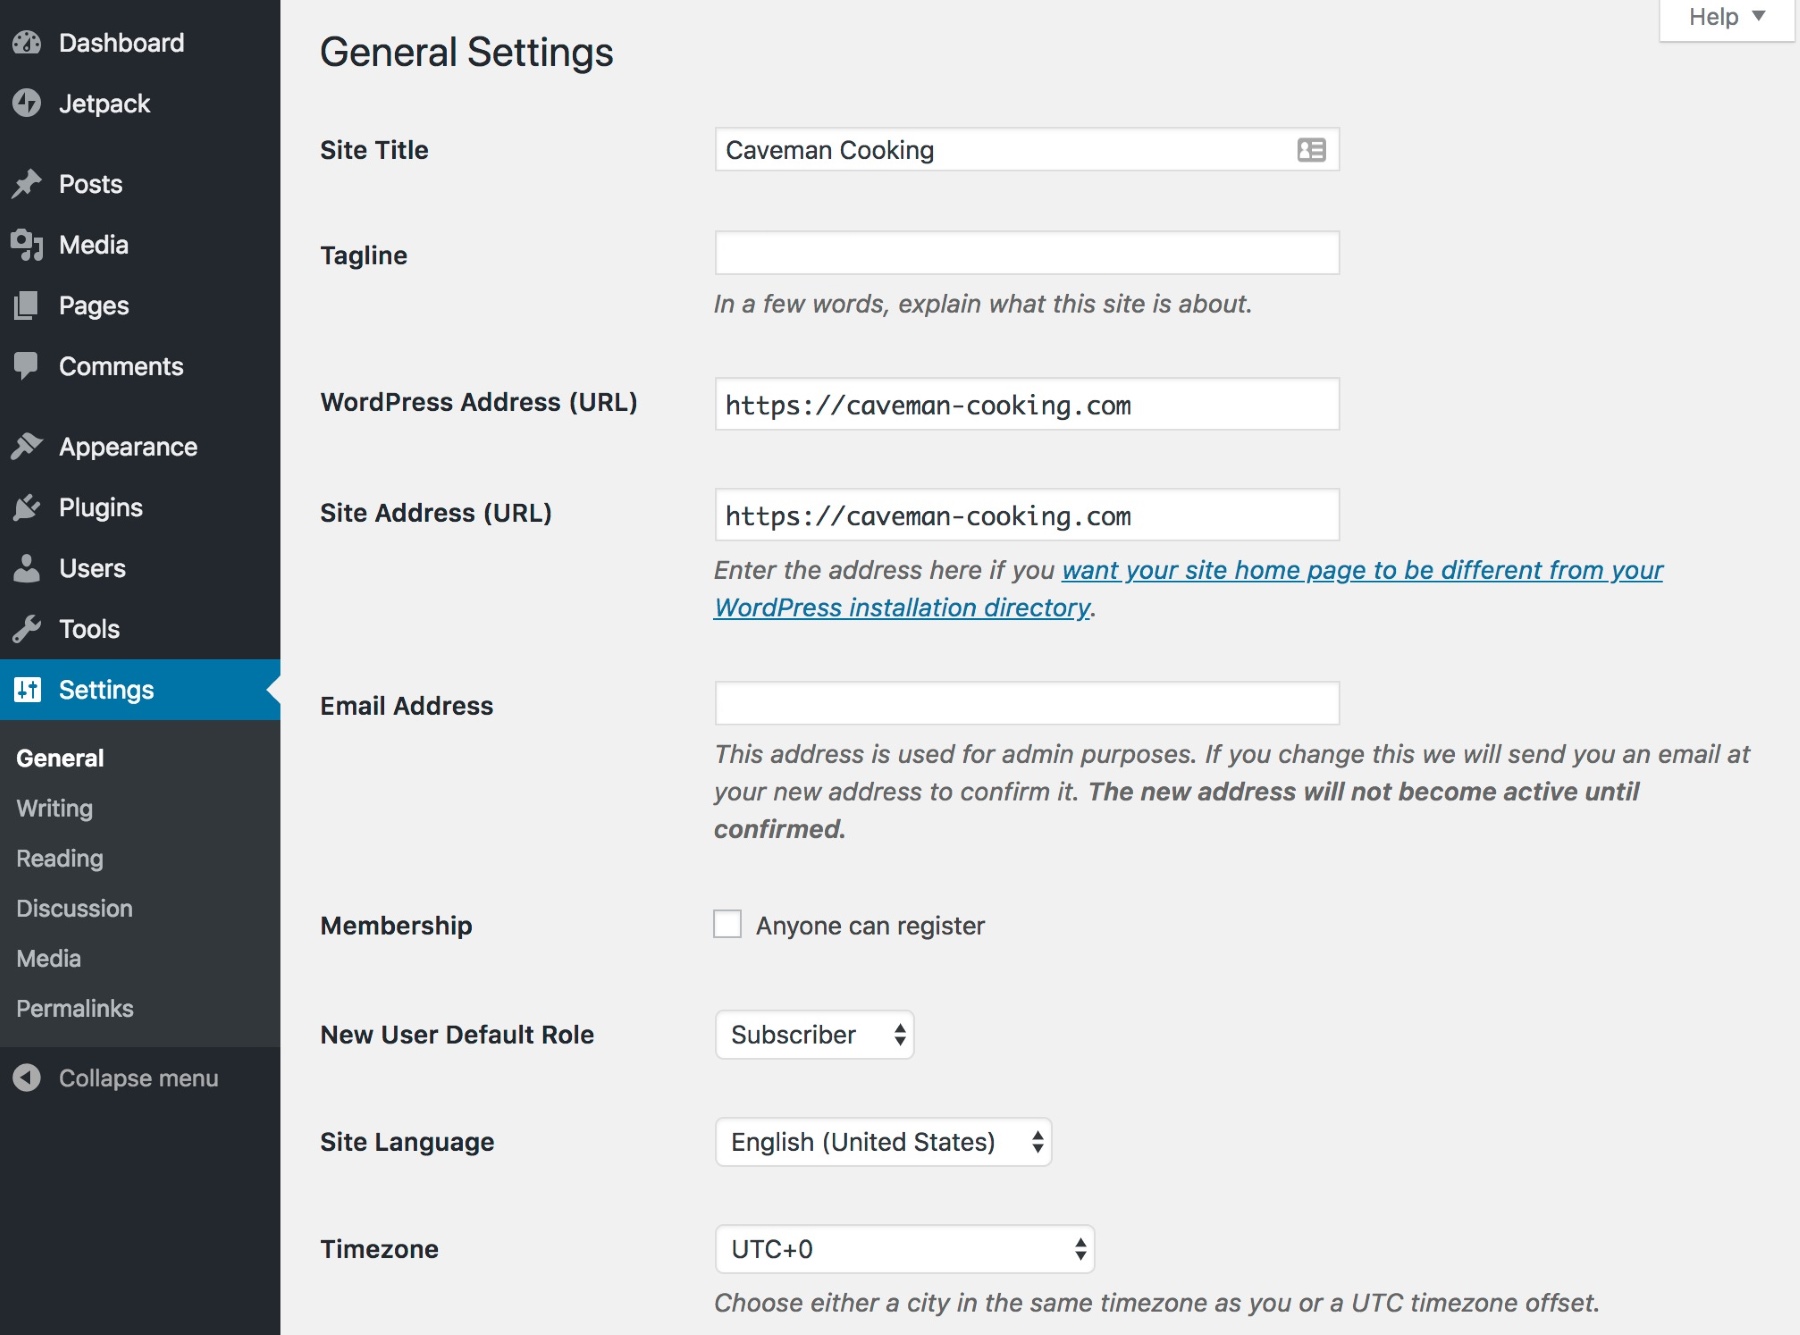
Here's what to pay attention to:
- Site Title — make sure this is the name you want for your website.
- Tagline — set it if there's a motto you'd like to convey alongside the site name.
- Timezone — set it to your audience's timezone.
Next, go to the Reading section of the Settings panel.
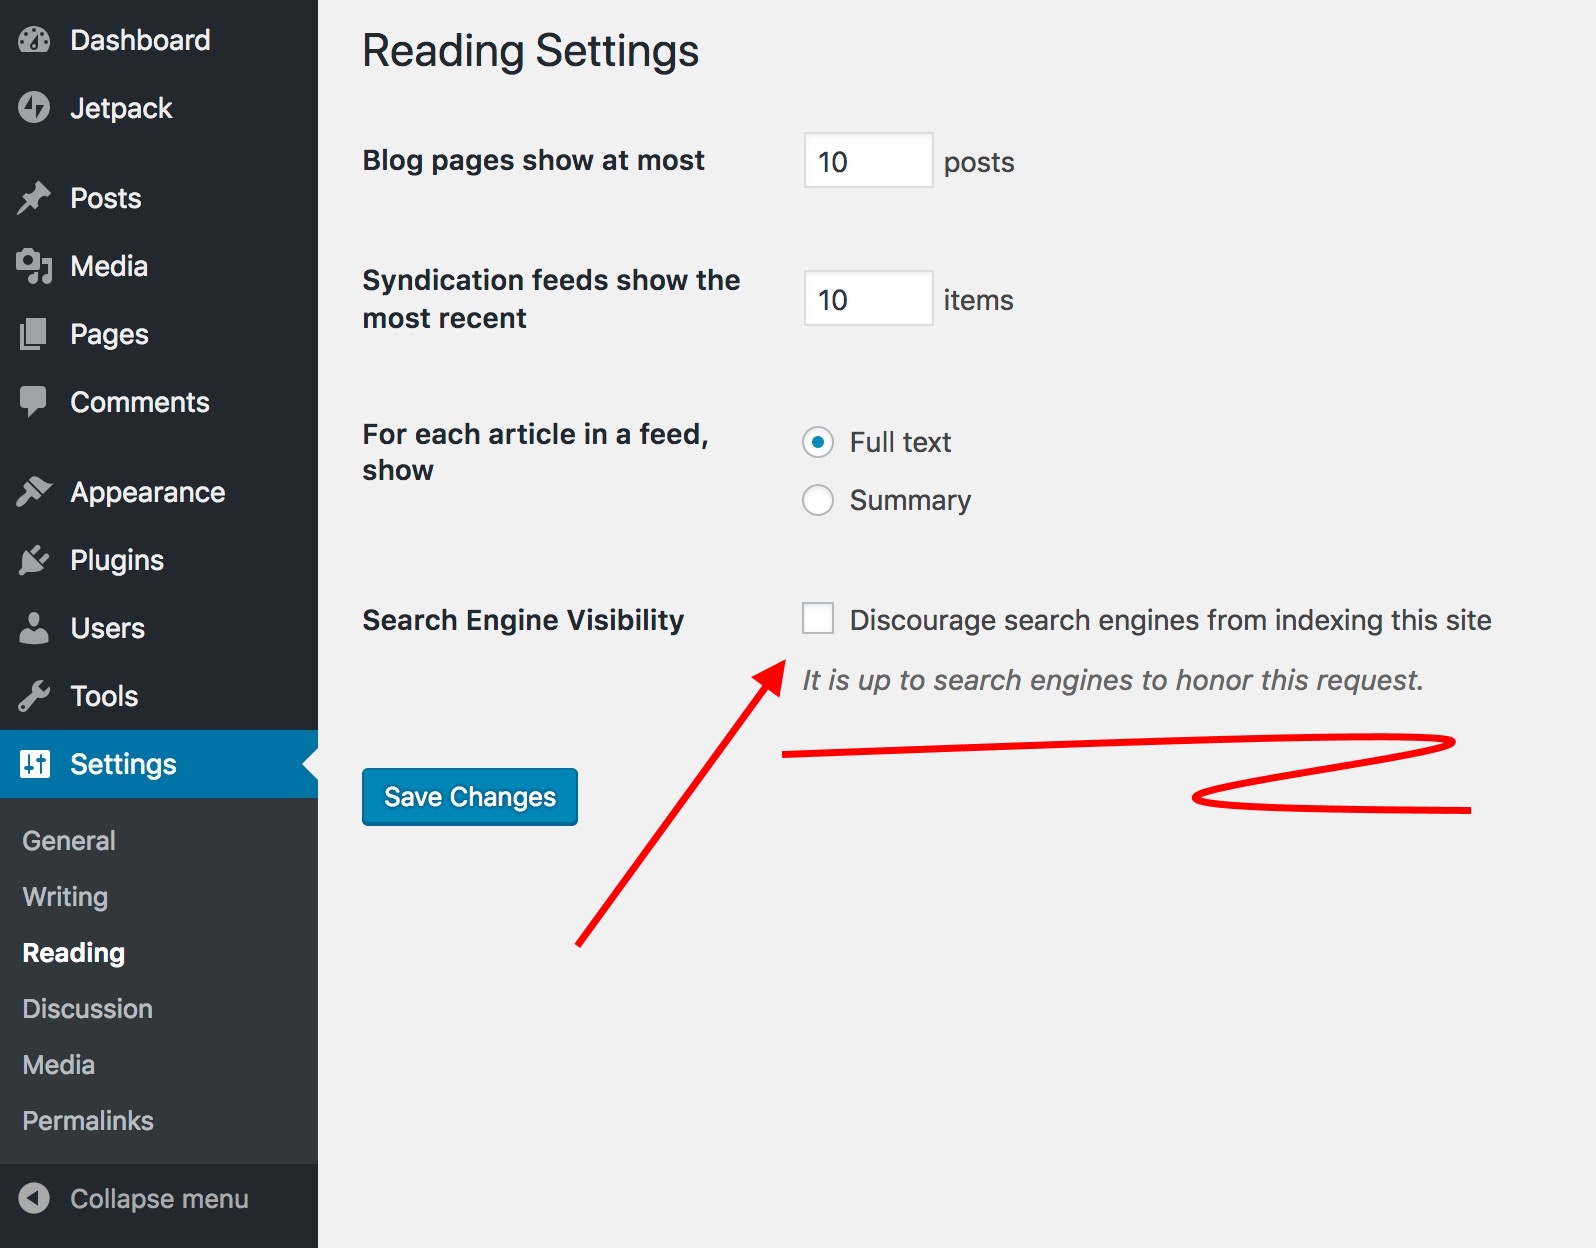
There's only one crucially important thing you should set here:
Make sure the Search Engine Visibility checkbox remains unchecked, as you can see in the image above.
If that one is checked, Google may never get to discover your website!
The next section to visit in the Settings panel is Discussion.
In it, you should make one important decision — do you want to allow people to comment on your blog posts or not?
This comes down to personal preference.
- On one hand, enabling comments helps you to build a community around your website and encourage people to interact with one another.
- On the other, it also means you'll need to moderate those comments and make sure none of them feature things you wouldn't like on your site.
If you want to have the comments enabled, go for these settings:

If not, you can simply uncheck the box labeled 'Allow people to post comments on new articles'.
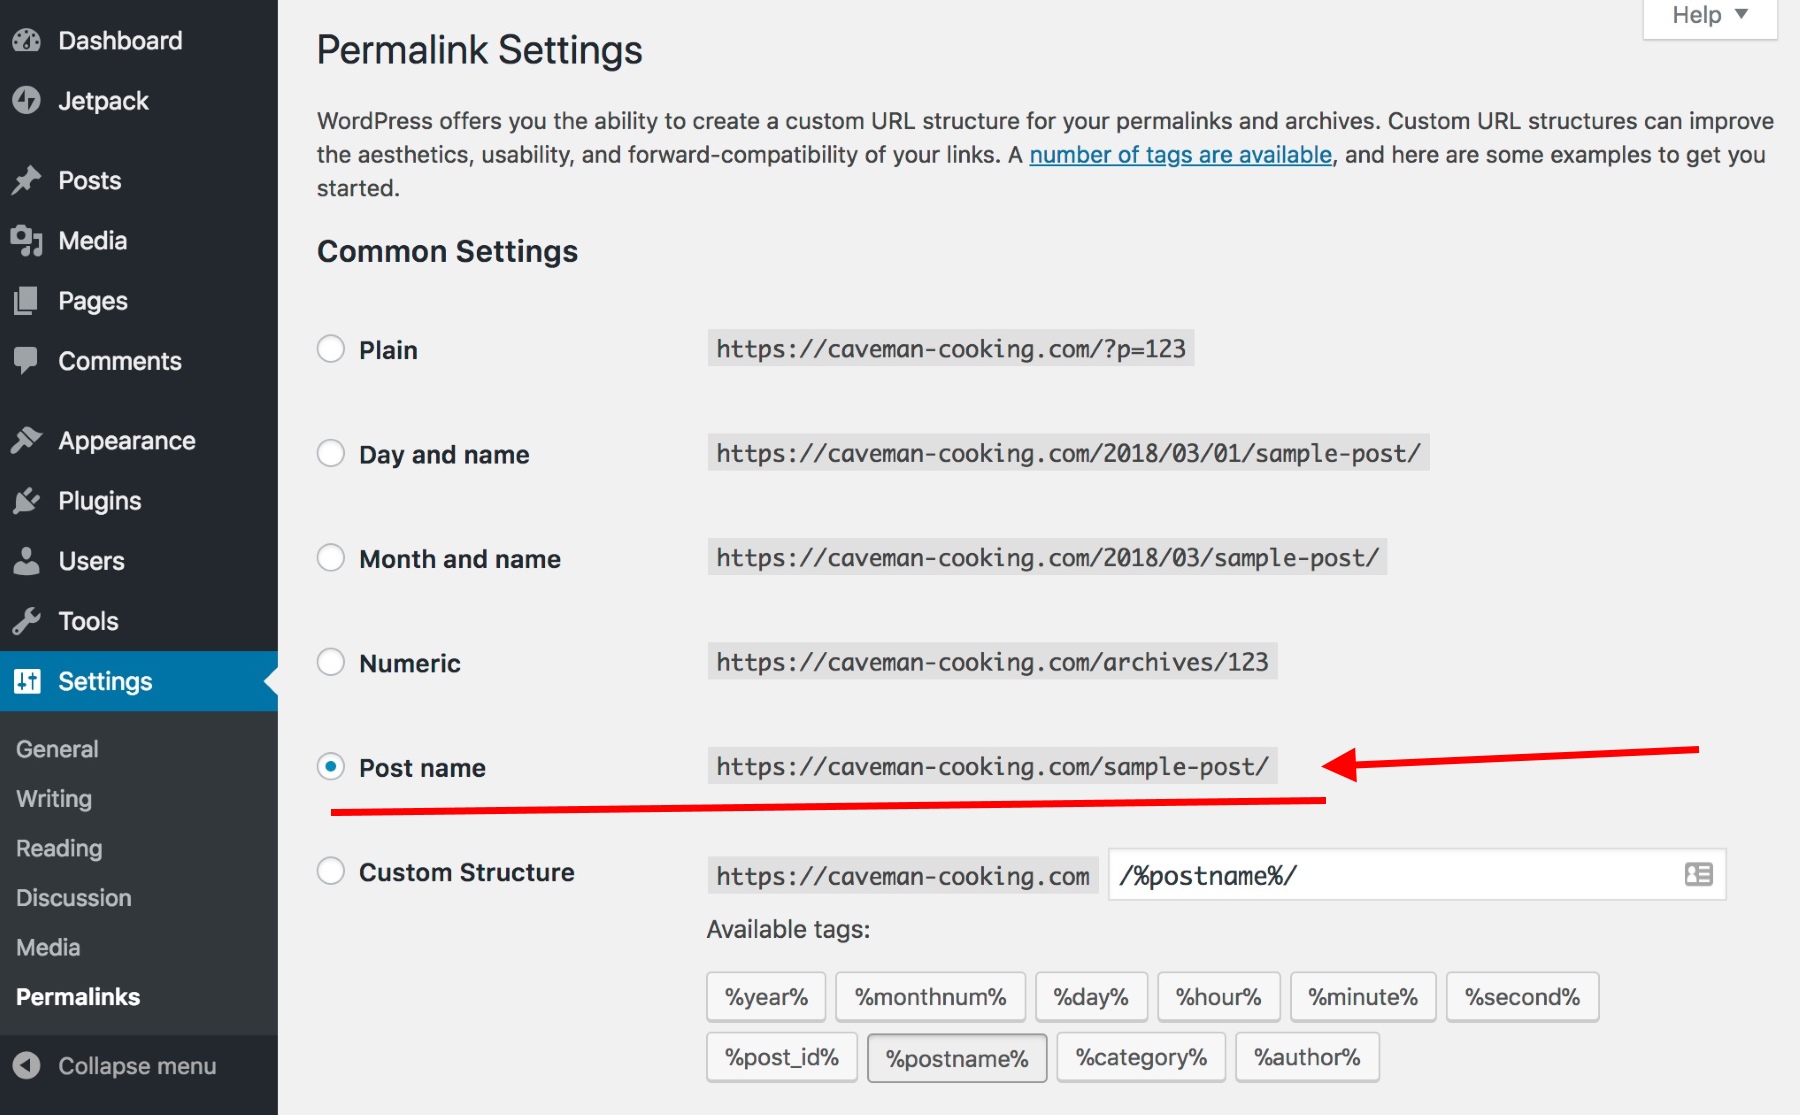
The last Settings section we're going to visit is Permalinks.
Permalinks is short for permanent links. They define how the individual addresses (URLs) of your posts and pages are structured.
For example, by default, if I publish a new post on my Caveman Cooking site titled '10 Reasons Why Butter Rocks', that post will be published under a URL such as https://caveman-cooking.com/?p=123. This isn't particularly reader-friendly, because no one can tell what this post is about just by looking at the address.
A much better solution would be to have it under something like https://caveman-cooking.com/10-reasons-why-butter-rocks.
This is where permalinks come into play. By setting the permalinks to Post name we get the effect we want.
That's all when it comes to your basic WordPress settings. At this stage, you're ready to pick an awesome design for your website.
Getting an Awesome Design for Your Website
One of the great things about WordPress is how it approaches the topic of website design.
- First, there are thousands upon thousands of designs — called WordPress themes — that you can get for your site, with both free and paid options on the market.
- Second, you can install any of those themes in a matter of seconds — it's a true push-button solution.
- Third, you can customize those themes to fit your needs hand-in-glove.
- Fourth, you can switch between themes without losing any of your website's content — your posts and pages.
From a technical point of view, WordPress themes are compact, installable packages of design that take care of everything looks-related on your website.
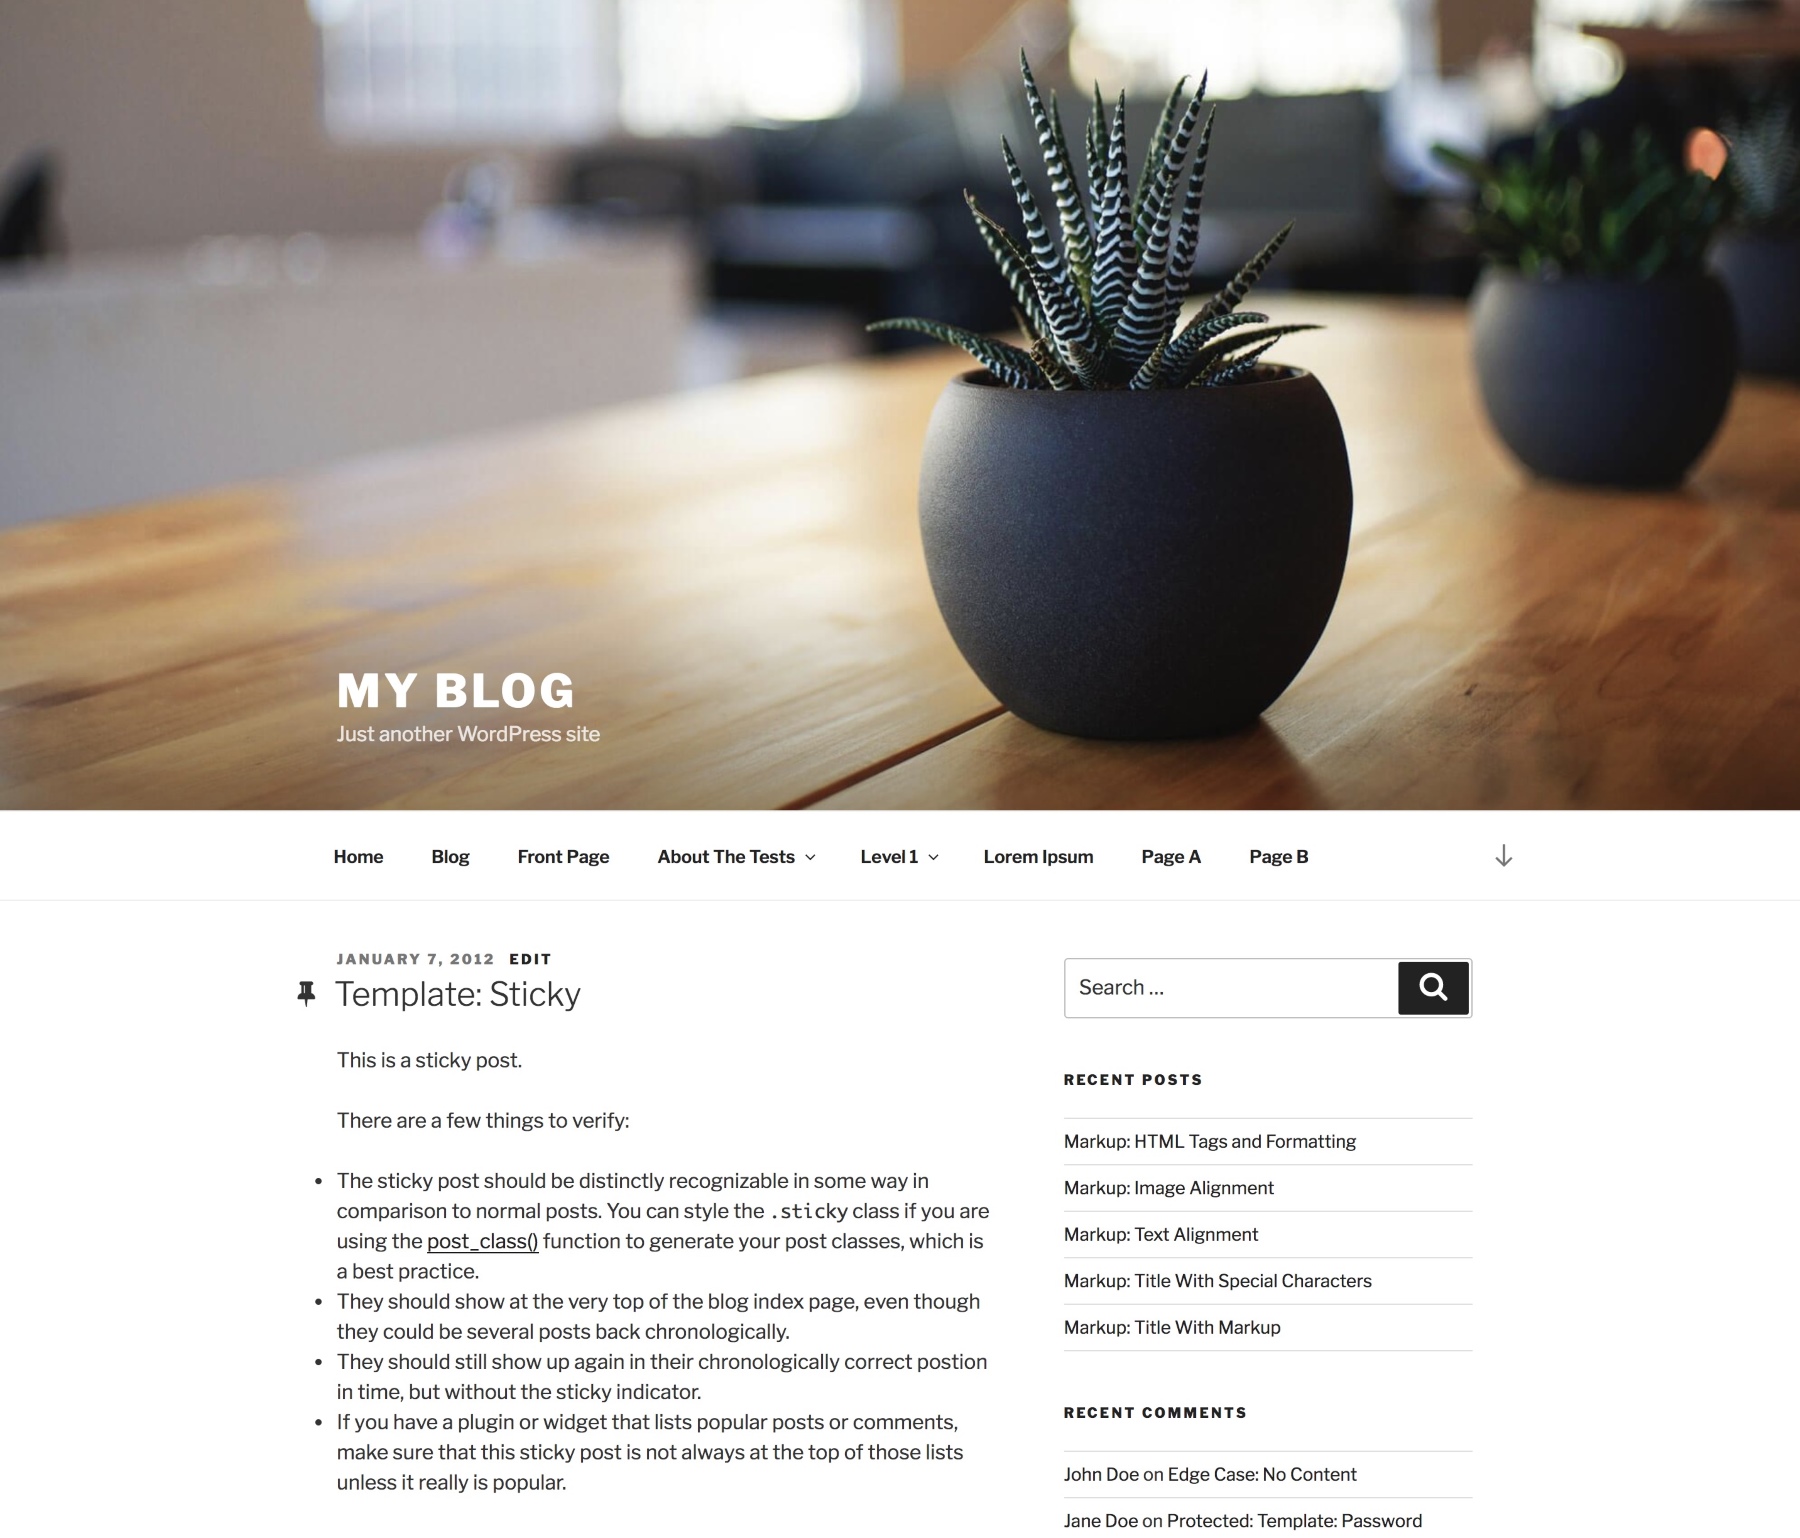
If you'd like to see what the default WordPress theme looks like, just visit your new website at yourdomain.com. You'll most likely see something like this:
How themes usually work is you get a ZIP package containing the theme, and you can install it on your site with a couple of clicks.
- The official directory of free WordPress themes can be found at WordPress.org.
- When it comes to the premium stuff, there are a couple of popular stores, such as: ThemeForest (which is a whole marketplace), Elegant Themes, ThemeIsle, Themify, and more. The price tags on premium WordPress themes range from $40 to around $80.
Okay, so we know what WordPress themes are and where to get them, but there's still one question we should answer:
What Makes for a Quality Design for a Small Business Website?
One of the things we discussed earlier in this guide was what made a small business website superb, and I gave you a handy checklist to reference.
This one:
- ✔ A good small business website has to serve a clear purpose.
- ✔ A good small business website resonates with the right audience.
- ✔ A good small business website represents your business accurately.
- ✔ A good small business website is an effective sales tool by itself.
Picking the right design for your website takes care of many of these qualities, but there's more we should consider from a technical standpoint. So, what exactly is this mysterious right design for a small business website?
- Your design needs to look modern. They say trends come and go, but that's no reason to ignore them. Every trend in website design, user interface design, and so on is always an answer to the current challenges in user experience, and a solution to what was wrong with the previous generation of websites. If your website design looks outdated, it will create a bad first impression. Read: Your potential customers will have second thoughts about doing business with you.
- It looks just as great on mobile as it does on desktop. This is simple, if you're building a website, it absolutely must be accessible (possible to be read by people with impaired vision) and optimized for most kinds of mobile devices. These days, more people access the web on mobile than they do on laptops and desktops. In other words, do you really want to prevent more than half of your potential visitors from seeing your website?
- It looks friendly and inviting. Try to avoid dark color schemes overall, and think about how you can portray your website as a place that's friendly and safe for your visitor.
- It looks trustworthy. Will people question the legitimacy of your website after seeing your design? You may not believe it, but look who this website belongs to:
- It's not too flashy and lets you showcase your branding and products — the design can't be the focus of the site. In other words, the design shouldn't aim to be a work of art, but rather should serve the business and help to make it look good. Bad example:
Equipped with all of this info, you can begin your scavenger hunt for the perfect theme!
I understand that these guidelines are all subjective, so there's no right or wrong way to proceed, but give them some thought and make sure the theme you're going for checks out on the above.
- Again, to get your hands on some themes, try going to either the official directory for free WordPress themes, or one of the theme stores mentioned above.
- Alternatively, you can also try googling things like
best WordPress themes for NICHE.
💡 PRO TIP: This is a good moment to get a logo designed. If you have the budget to get one created professionally, you can try out 99designs. If not, you can ignore the logo for now.
Let me show you how I went about picking a theme for my Caveman Cooking website:
I begin my search in the Popular tab of the official theme directory at WordPress.org.
The Popular tab is quite useful, since it only lists the themes that have been appreciated by users the most. There has to be a reason why those themes are the popular ones, right?
Right out of the gate, there are a few interesting choices for a business website:
- Hestia — a multipurpose business theme with attractive graphics.
- OceanWP and Astra — configurable multipurpose themes that come with a number of design packages that can be imported with a couple of clicks — the design libraries of both themes are quite impressive, and can be helpful for website owners in a number of niches (fitness, architects, coaches, coffee shops, restaurants, and so on). You should check them out.
- Sydney — another business theme, similar in structure to Hestia, but a bit different in terms of styling.
If you like any of the designs offered by those themes, you should give them a try and see how they can work for your site. When it comes to my Caveman Cooking, however, I need something more food-specific.
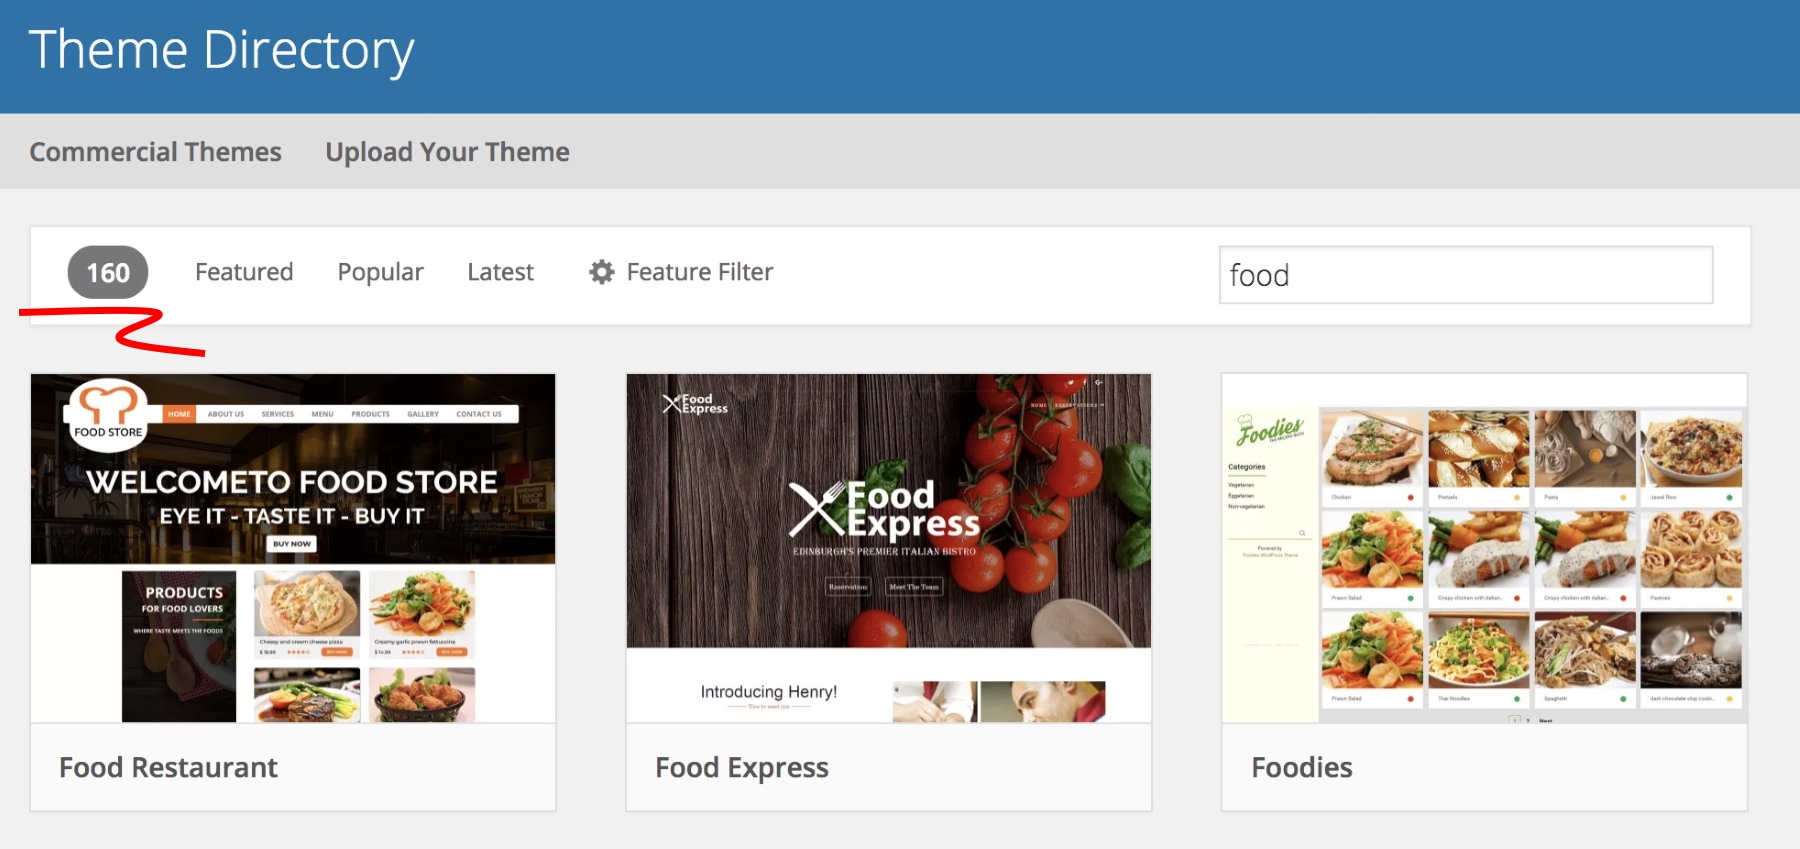
Luckily, the wide food niche is catered to (pun intended) quite nicely in the official theme directory. When I put food in the main search field, I get 160-plus themes shown to me.
Looking through all of this, I've stumbled upon a theme called Dyad:
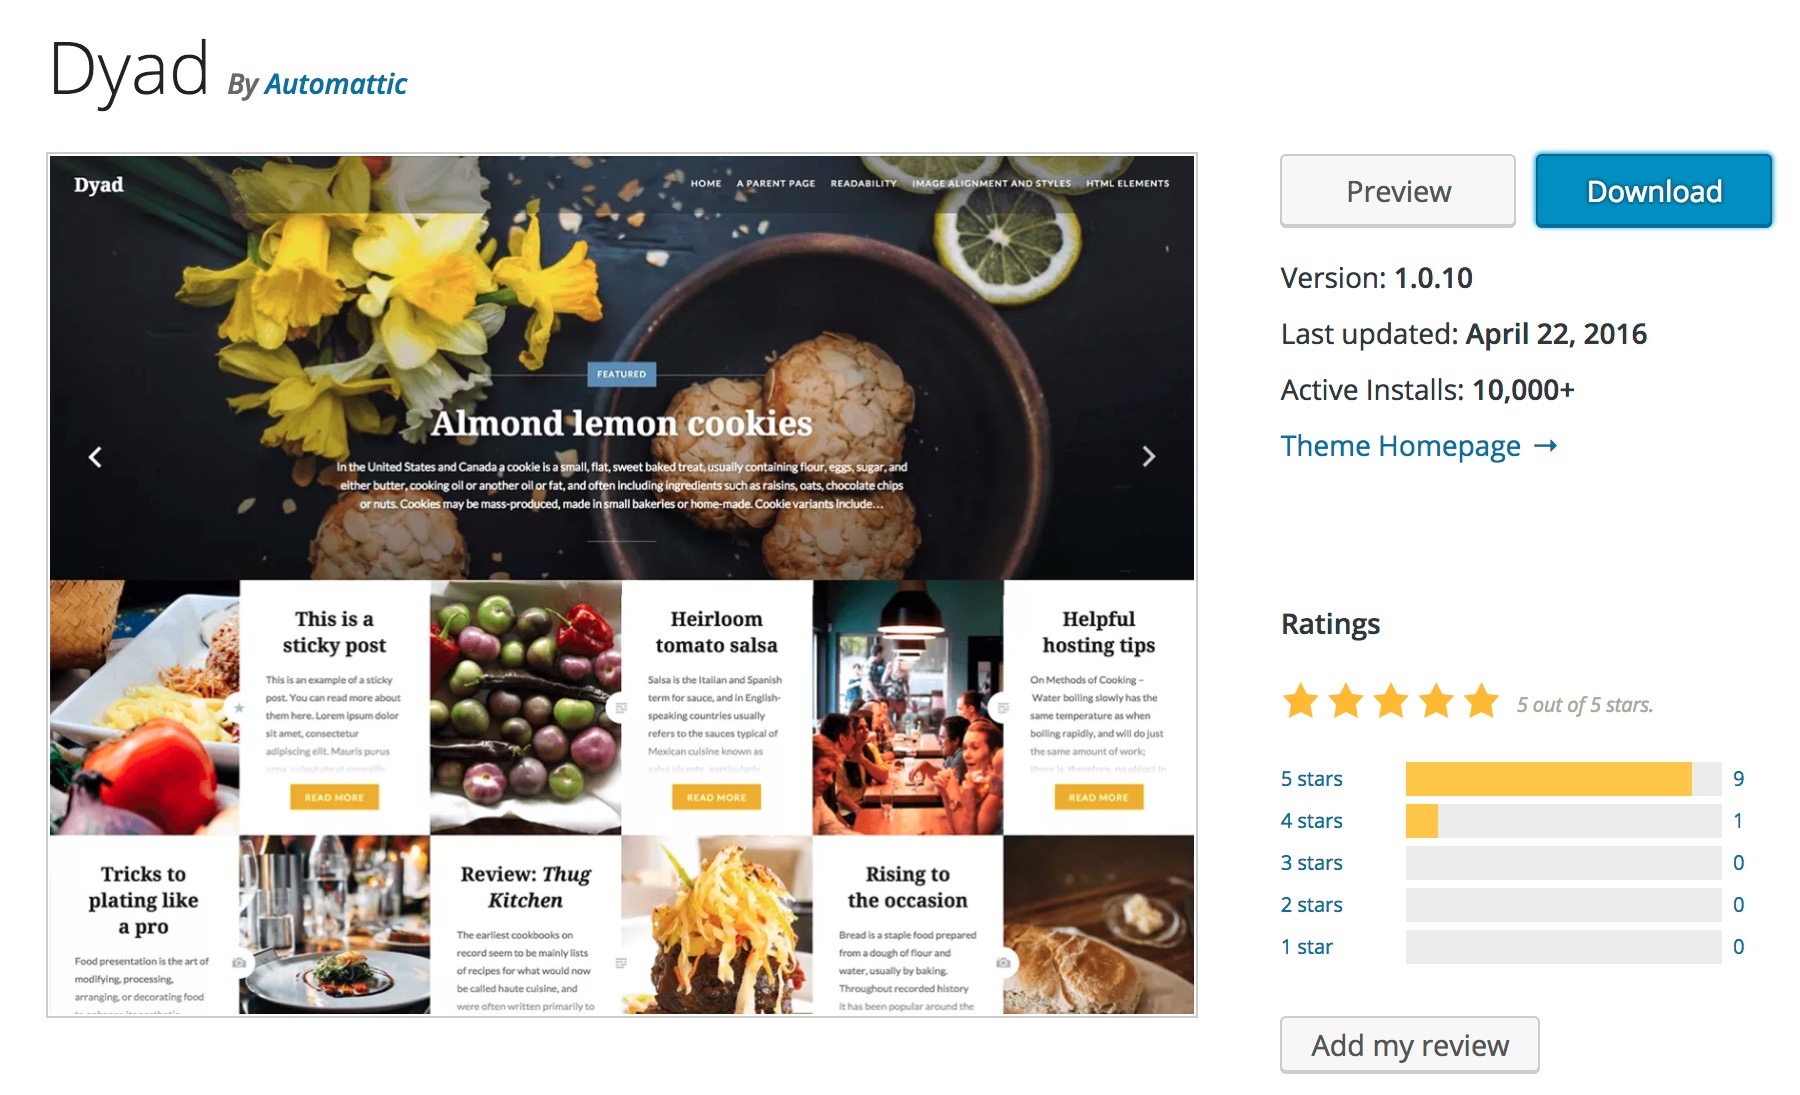
I like this style for a couple of reasons:
- It has great imagery — it's important in the food niche to showcase all of those tasty goodies.
- The way individual posts and pages look leaves a lot of room for presenting my restaurant, recipes and other content.
- It works with page builder plugins (more on these in a moment).
How to Install a WordPress Theme
Once you've picked a WordPress theme for your website, it's time to get it installed.
There are a couple of alternative ways to do that:
Case #1: If You Found Your Theme on WordPress.org
Installing themes that come from WordPress.org is the easiest thing in the world! Here's how:
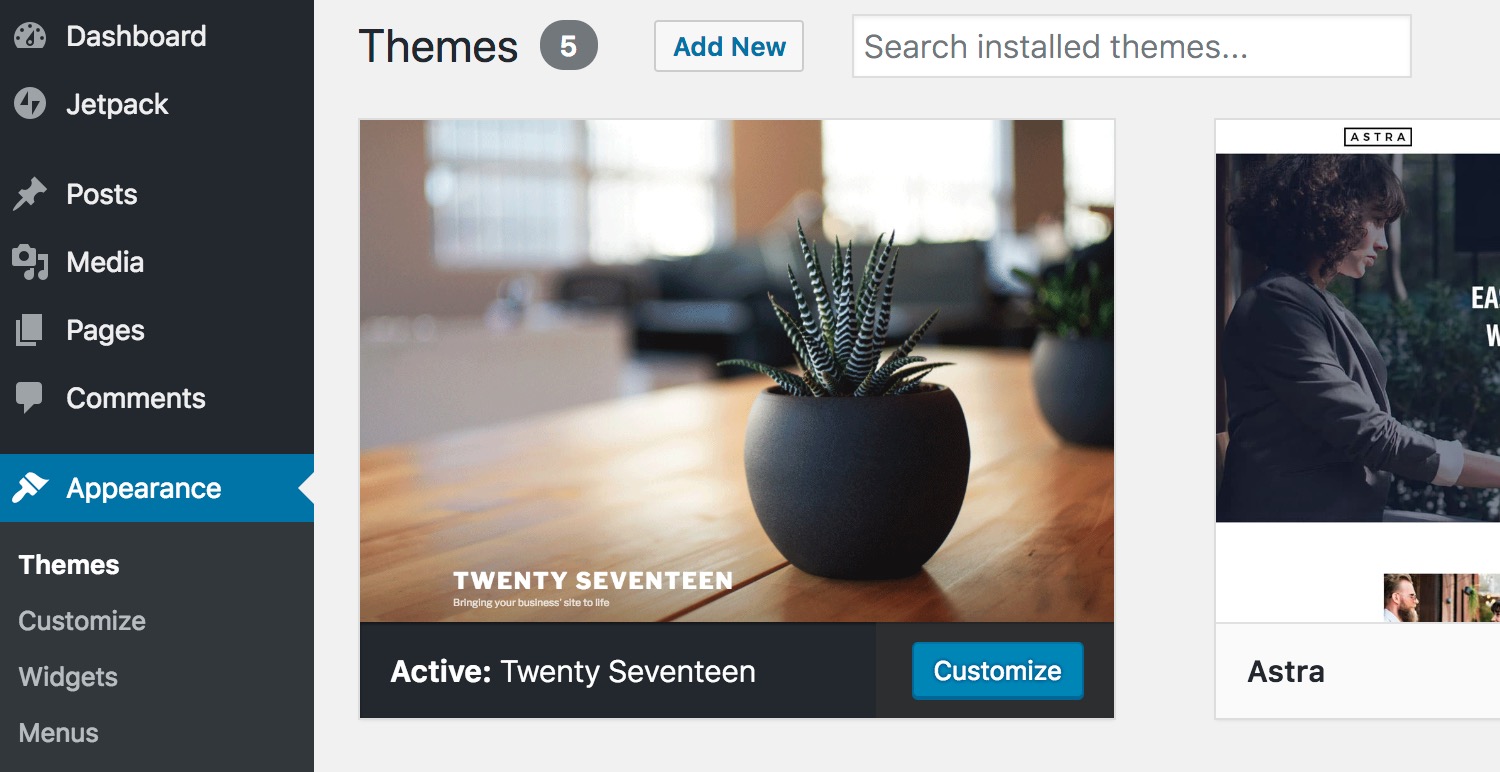
Start by going to your WordPress dashboard and then to Appearance → Themes. You'll see this:
Click on Add New. This will take you to WordPress' internal search mechanism for new themes. Once there, use the search field and look for the theme you found on WordPress.org earlier. In my case:
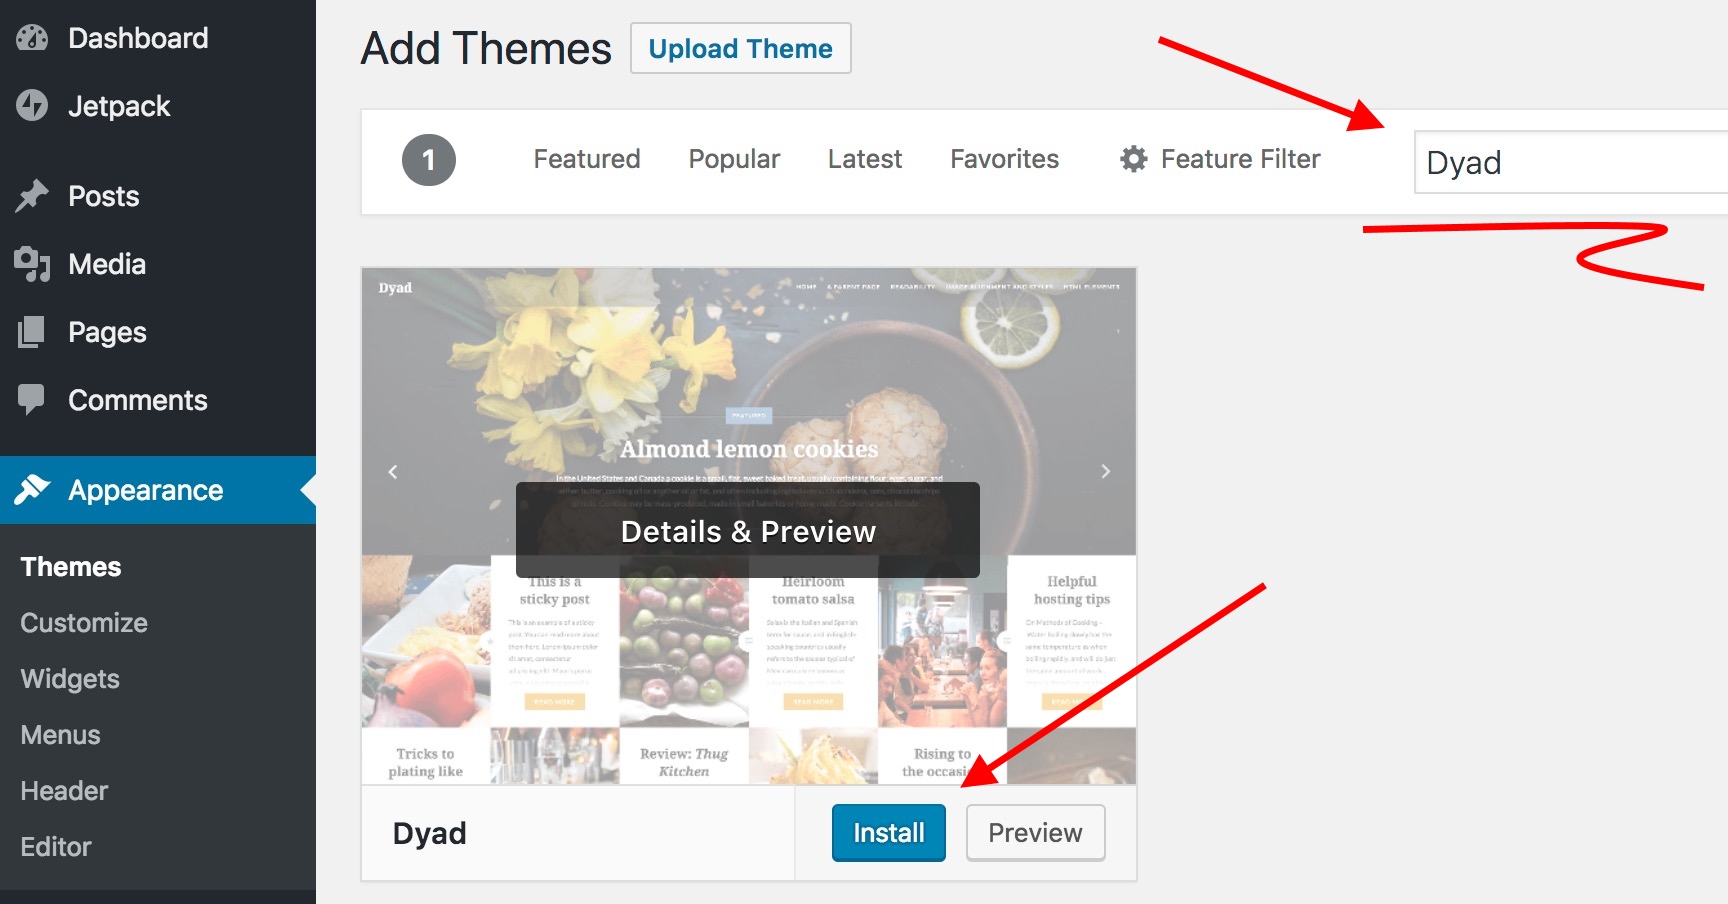
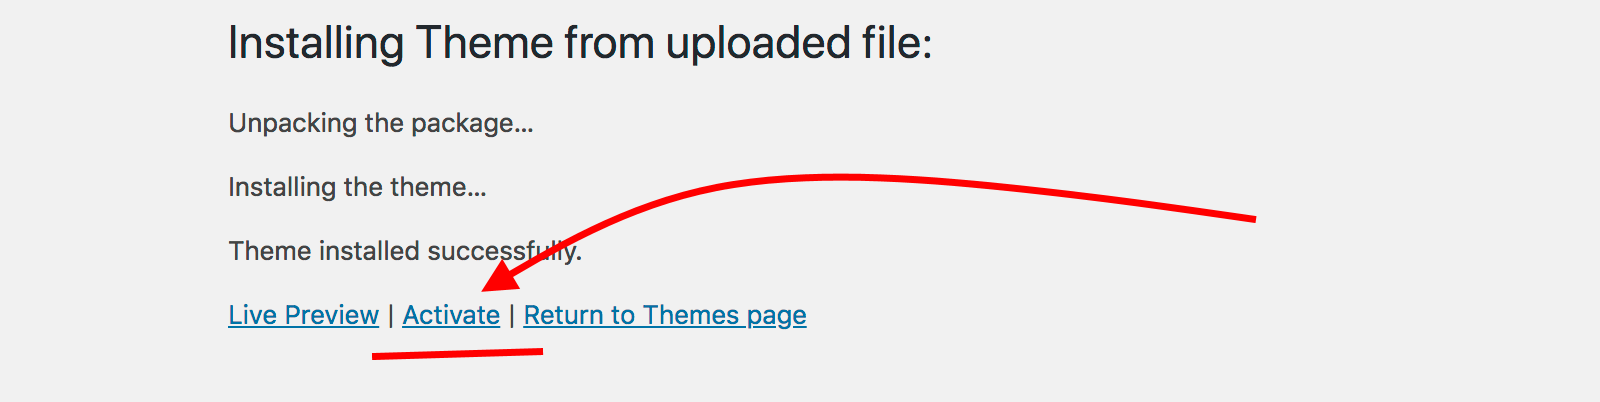
Click on Install, and then on Activate (the button will appear replacing the Install button).
That's all! Your theme has been activated, and you can now see it in action if you go to yourdomain.com.
Case #2: If You Found Your Theme Elsewhere
Themes you didn't get from WordPress.org will need to be installed manually (it still isn't difficult, though).
First, you need the ZIP file containing the theme. When you buy/download a theme, this is usually what you get.
Don't extract that ZIP archive, keep it as it is.
Go to your WordPress dashboard and then to Appearance → Themes. You'll see this:
Click on Add New. On the next screen, click on Upload Theme:
This will show you a prompt to upload your theme's ZIP file. Once the upload is done, click on the Activate link.
That's all! Your theme has been activated, and you can now see it in action if you go to yourdomain.com.
How to Configure Your New Theme
Getting your theme installed is one thing, now let's tune it up and tailor it to your business.
To do that, let's go to your WordPress dashboard and then to Appearance → Customize. This will launch what's called the WordPress Customizer.
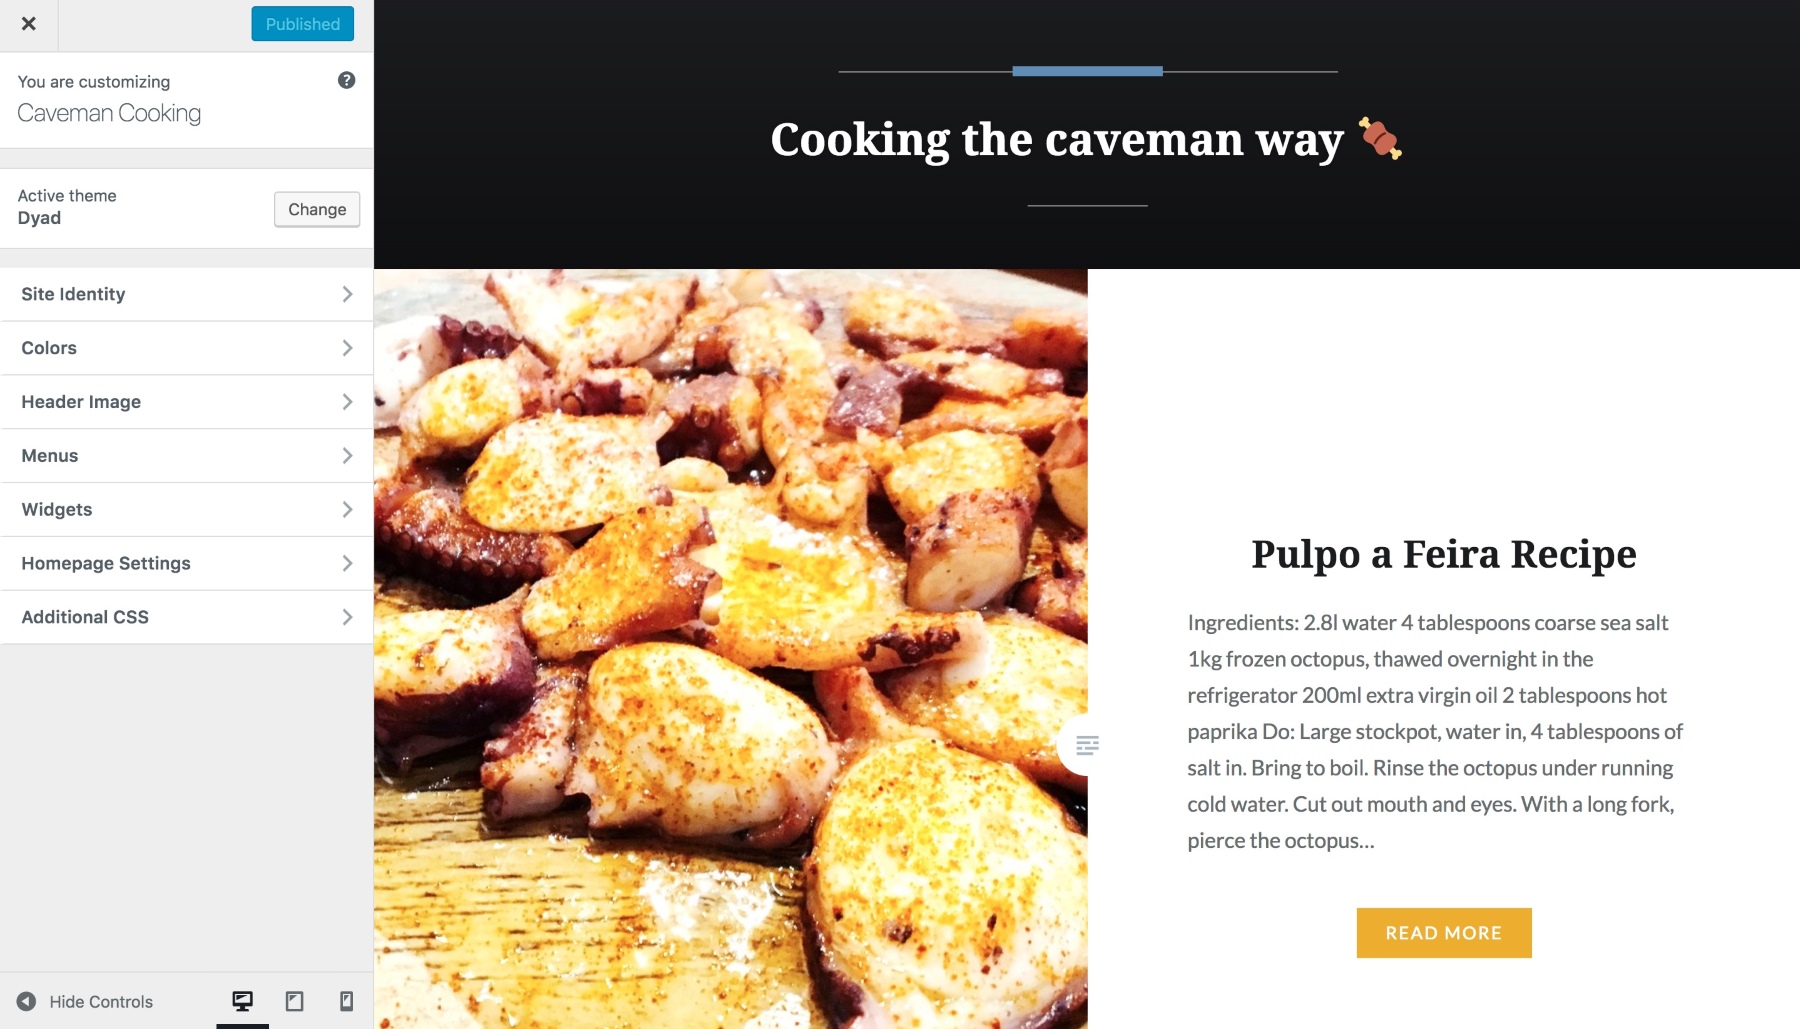
Note: Depending on the theme you've selected, the options you get in the left sidebar of the Customizer can be different. What you can see above is what I got for my theme.
The thing to do now would be to go through each of these options and adjust them until you're satisfied with the way your website looks. Here are the sections you should pay special attention to:
Site Identity

This is where you can set your logo, title, and site icon. This does a lot for your overall branding, so you shouldn't neglect it.
Colors

Set the main colors for things such as backgrounds, fonts, links, and so on (based on your theme). As much as possible, this should be in tune with your brand identity.
Header Image

Some themes will allow you to display an image in the header of the website. If this is something you want, experiment with this feature.
Background Image
Similar, but it defines the image that's going to be placed in the background of all your pages, posts and the homepage.
Widgets

Widgets are one of the classic features of WordPress. Basically, widgets are small content blocks that you can put in the sidebar or footer of your website. Those content blocks can feature things such as links to your previous blog posts, recent comments, a search field, a list of categories, and more.
By default, WordPress displays a handful of widgets on your site from the start. You can reorder them via drag-and-drop, and you can add new widgets by clicking on Add a Widget (see the image above).
While they aren't crucial from a business website's perspective, you can experiment with them to see how you enjoy the overall effect.
...
As I mentioned, what you get inside the Customizer depends greatly on the theme you've chosen, so you should experiment with what's possible and play around with things for a while to really get the most out of it.
Also, you can see how your website looks on mobile and tablet. For that, click on any of the icons in the bottom left corner. These:

When you're happy with the results you've gotten from the Customizer, don't forget to click the main Publish button at the top.
At this stage, your website is pretty much operational, but it's still very empty. Let's address that:
The must-have pages that every small business website needs
Here's a list of subpages that are generally worth considering when you make a small business website:- Homepage — more on this in a minute.
- About — to tell people what your business is and how it came to be.
- Contact — to tell people how best to reach you. You can also embed a Google Maps module on this page directly. Google Maps will give you a piece of code that you can simply copy and paste onto your page.
- Services, Products, Pricing — to showcase your offering. Using good-looking images and compelling copy here is a must.
- Store — in case you want to sell through the website directly; for ecommerce.
- Legal pages — terms of use, privacy policy, and so on. Consult with your lawyer about those. Different markets and jurisdictions have different requirements.
- ...plus everything else that's the standard in your niche.
Generally speaking, creating most of these pages works pretty much the same. Once you learn how to create one page in WordPress, you'll know how to create them all.
How to Create a New Page in WordPress
Start by going to your WordPress dashboard, and then to Pages → Add New. This is where you'll see the default interface for editing page content. Here's what it looks like:
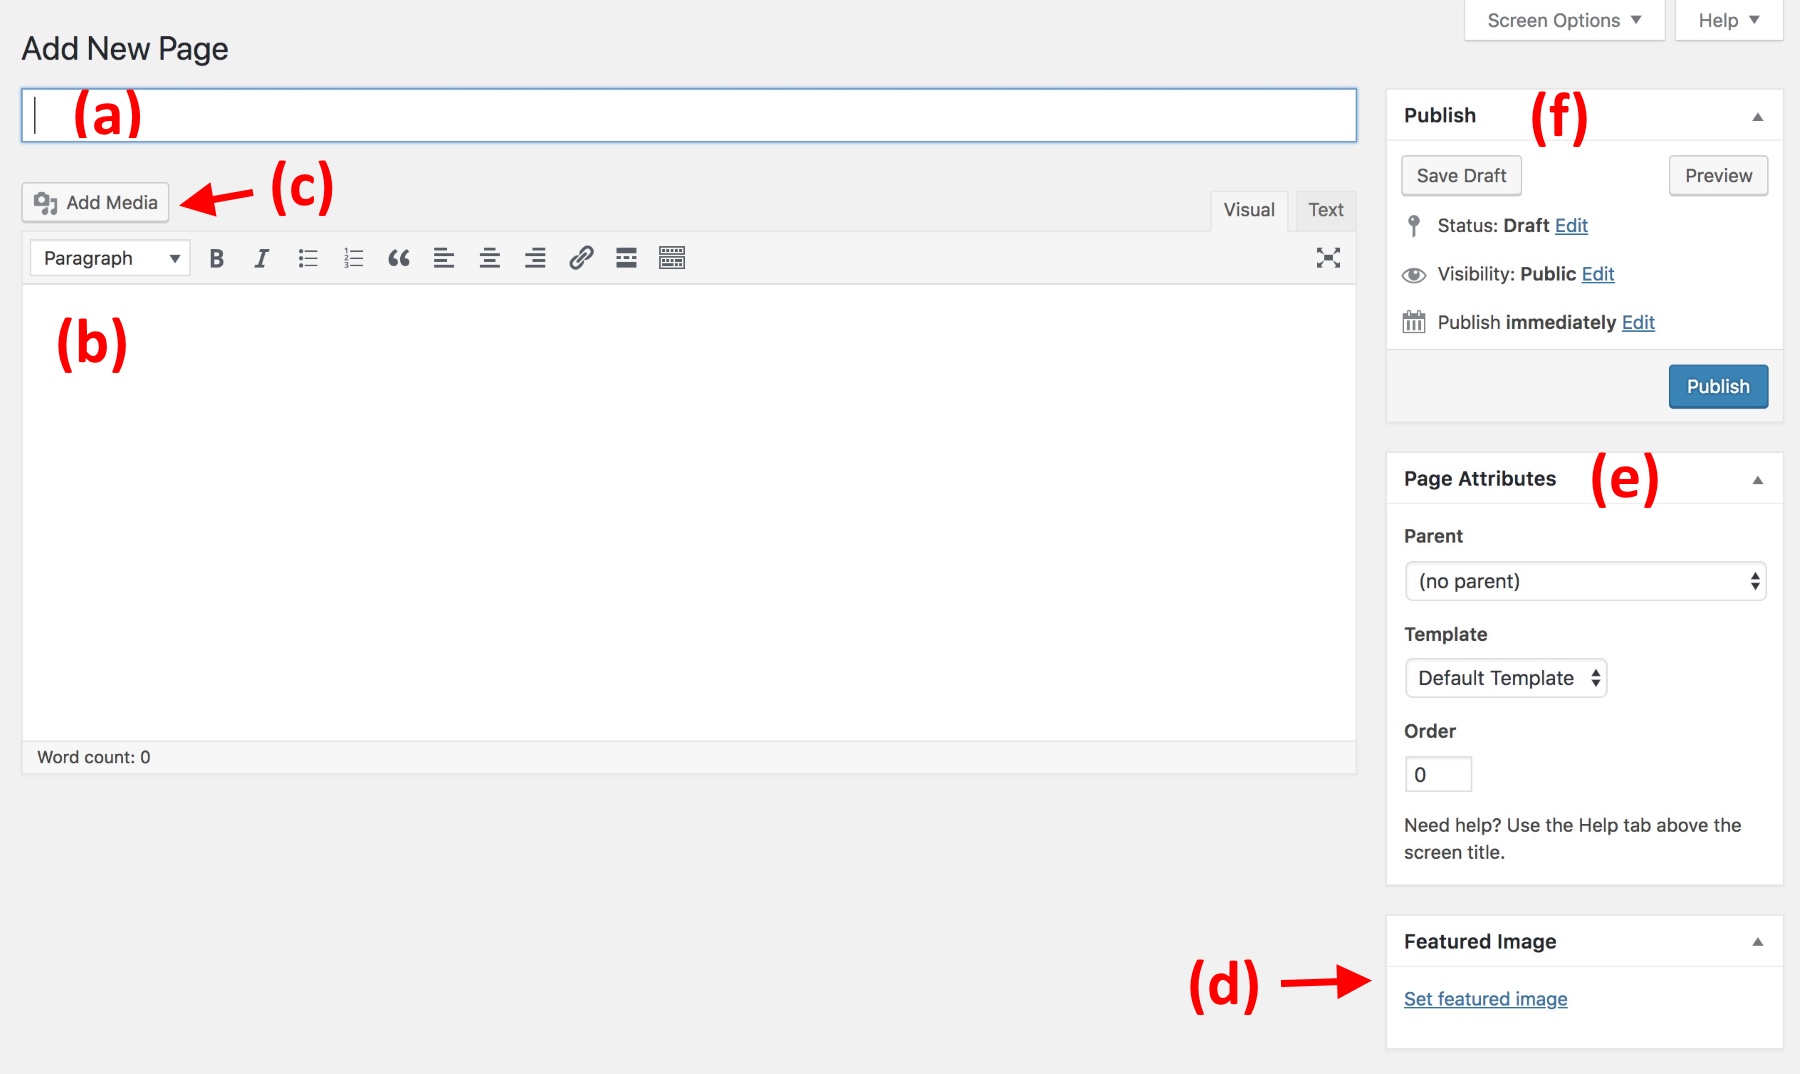
Here's what's important:
- (a) This is where the title of your page goes.
- (b) The main content space. This is where you can type in your content, and also format your text using the standard editor features such as bold, italics, and so on.
- (c) The Add Media button. Use it to include images and other media in between your text content.
- (d) When you set a featured image, that image is usually going to appear in a prominent place on the page. Think of it as the image to represent your page. Setting it is optional.
- (e) For the most part, this section can be ignored.
- (f) This is where you get to publish your page for the world to see. For that, click on Publish. Alternatively, if you haven't completed working on the page but you want to save your changes, click on Save Draft. Finally, the Preview button will show you what your page is going to look like for the visitor (which will be different from what you're seeing in this editor window).
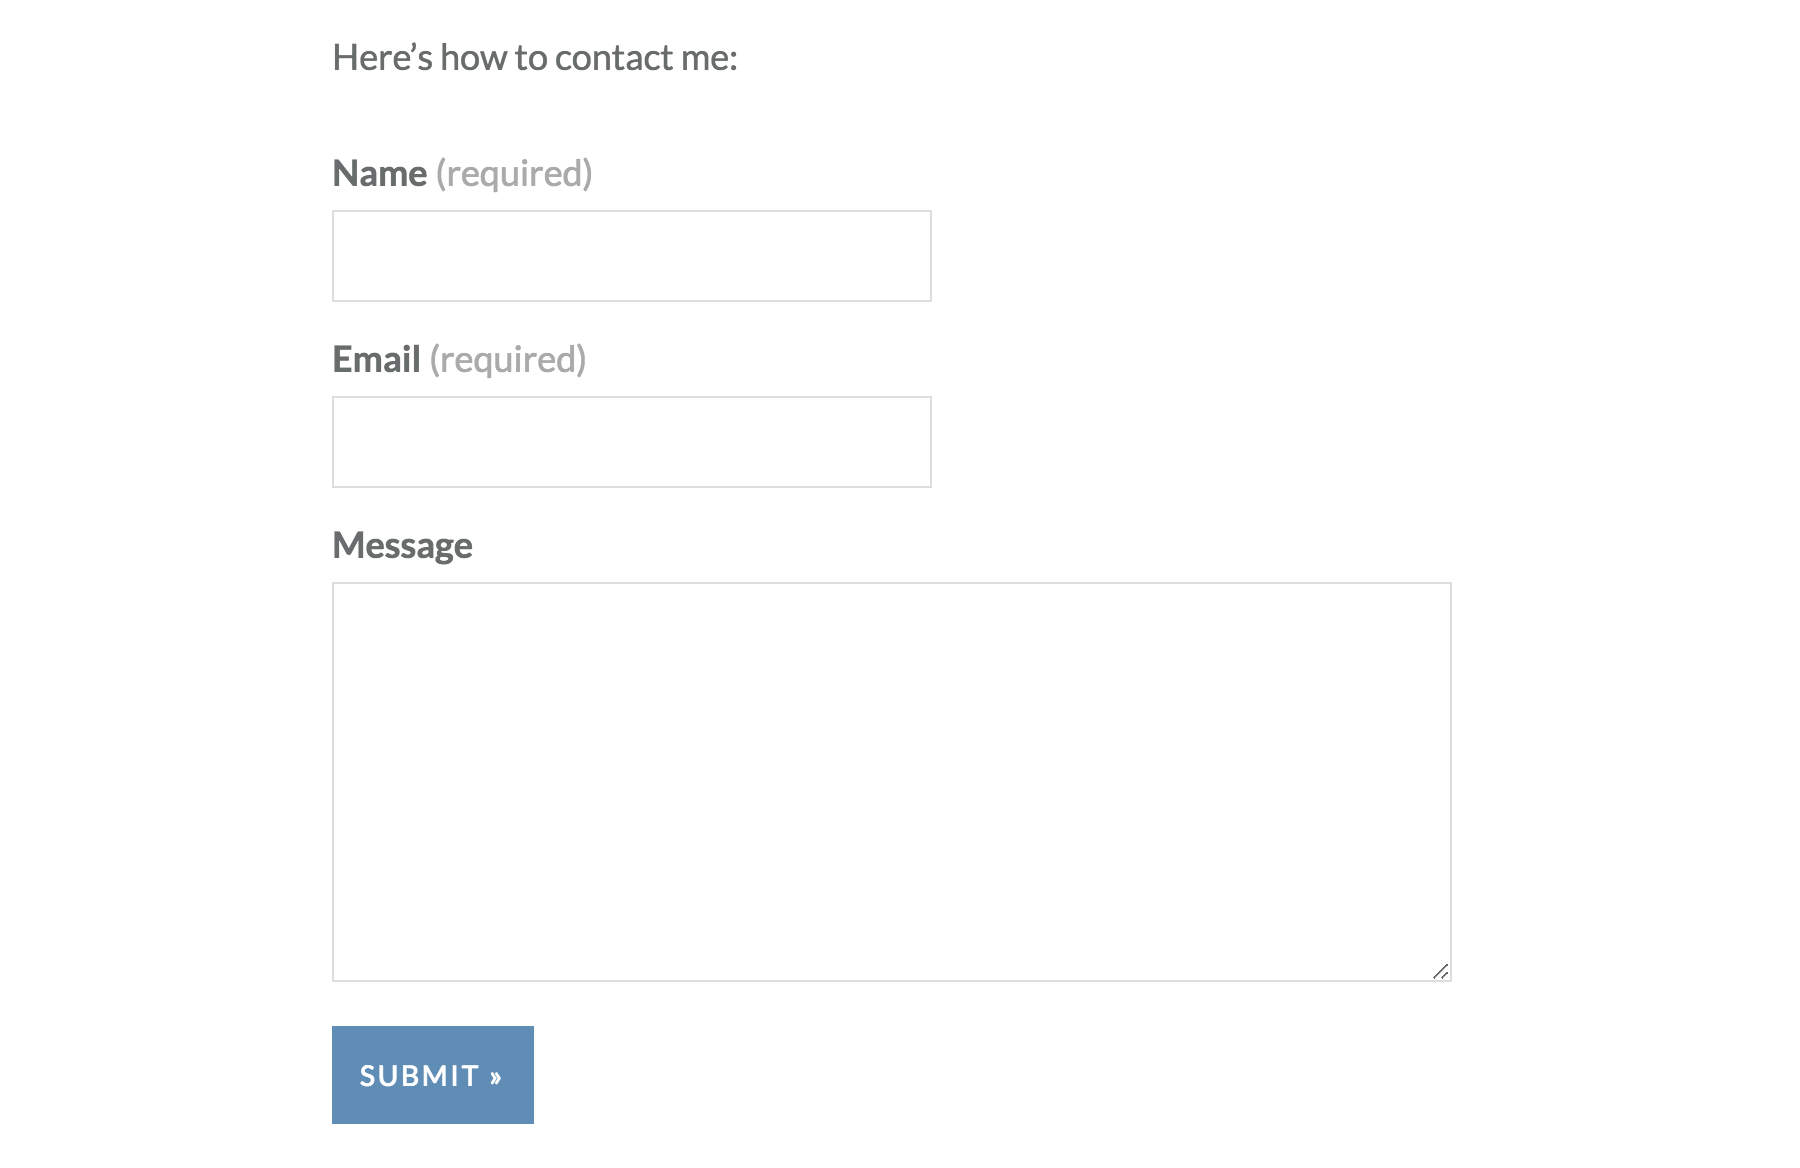
Some of the pages I mentioned above can benefit from additional interactive elements. For example, as you're building your Contact page, it would be nice to enable the reader to submit their message to you directly via a handy form. Something like this:
I'll show you how to get that with the use of plugins — the topic of the next section of this guide.
But first:
How to Create a Menu
Okay, so right now you have a handful of pages created. Great!
However, those pages probably can't be found by any reader yet, simply because you haven't linked to them from anywhere on your site. We'll do that now with the use of menus.
Menus in WordPress are incredibly configurable. You can basically create any number of menus, and place any number of links in them (pointing to your pages, blog posts, and even external websites).
To do all of that, let's go to the WordPress dashboard, and then to Appearance → Menus. When you visit for the first time, you'll see something like this:
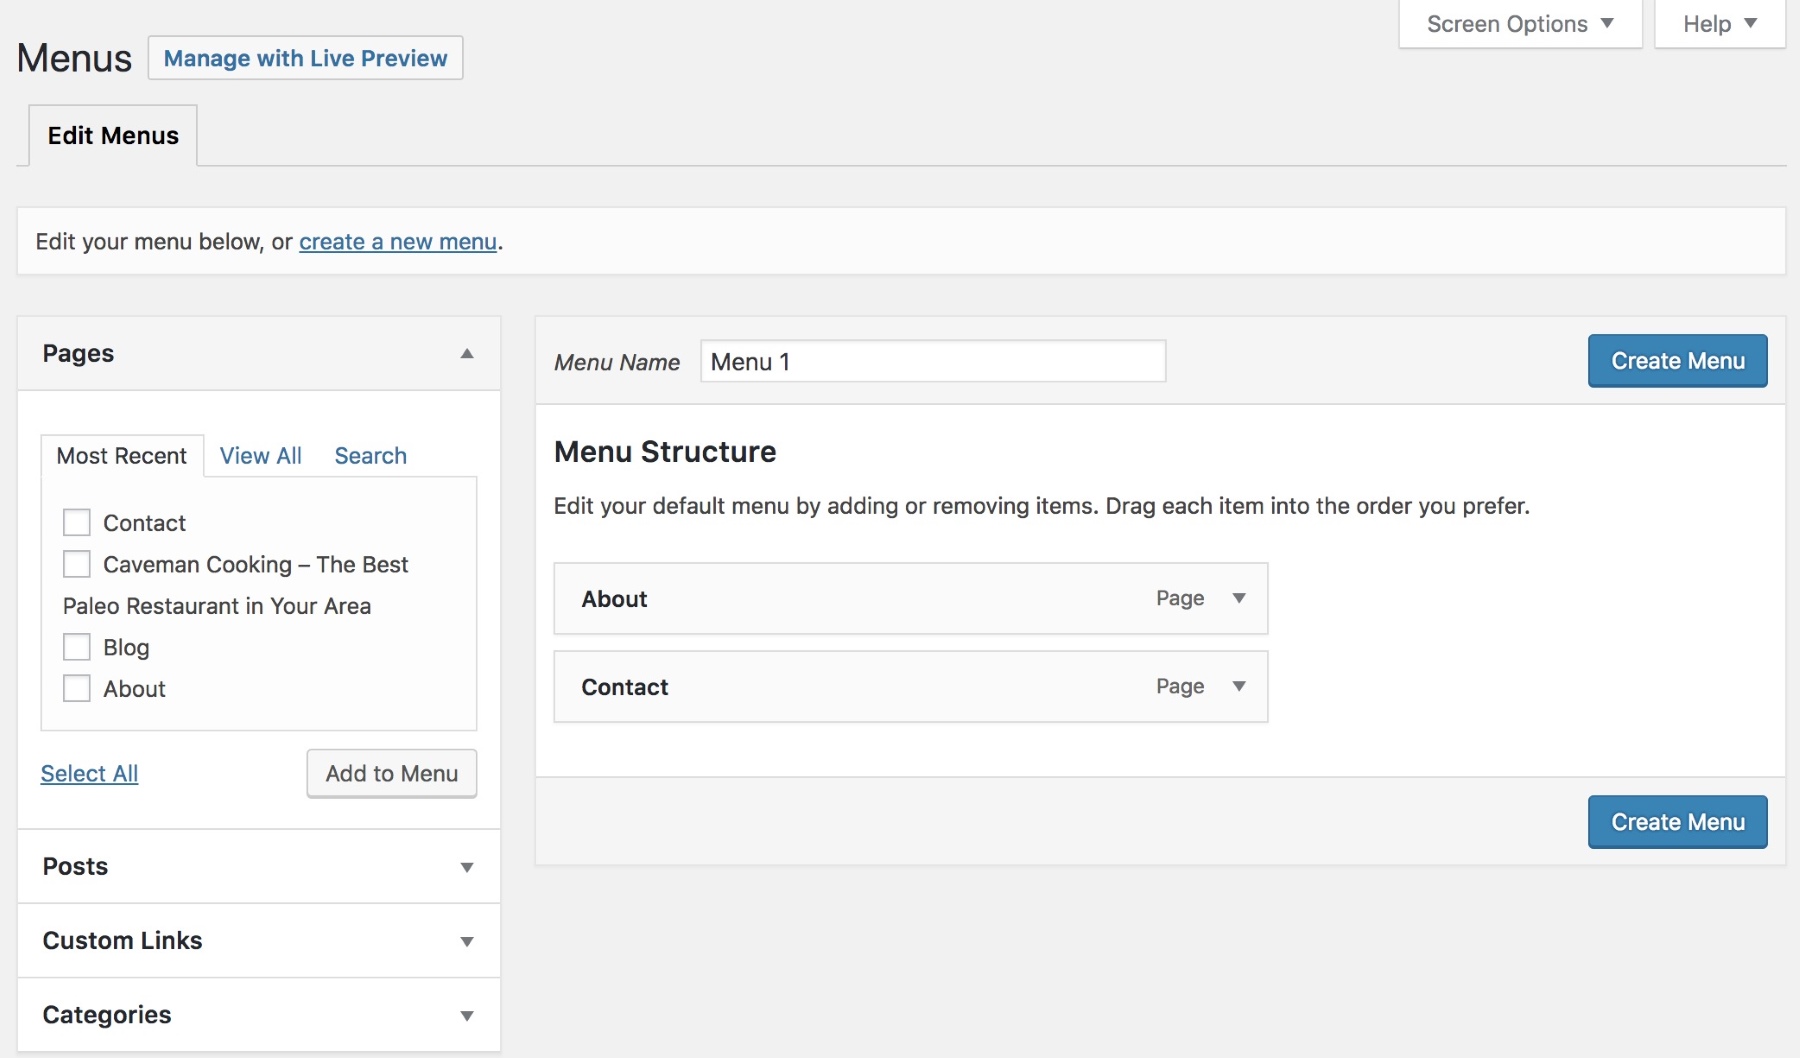
- On the left, there's a set of drop-downs, from which you can select the pages to be added to your menu.
- On the right, there's the current menu structure. By default, WordPress populates this menu with all of the pages you've created so far.
Here's what you can do:
- Change the name of the menu to something more representative. I went with 'Main Menu'.
- Add new pages by locating them in the left-hand section, checking the corresponding checkbox, and clicking Add to Menu.
- Realign the existing items in the menu via drag-and-drop.
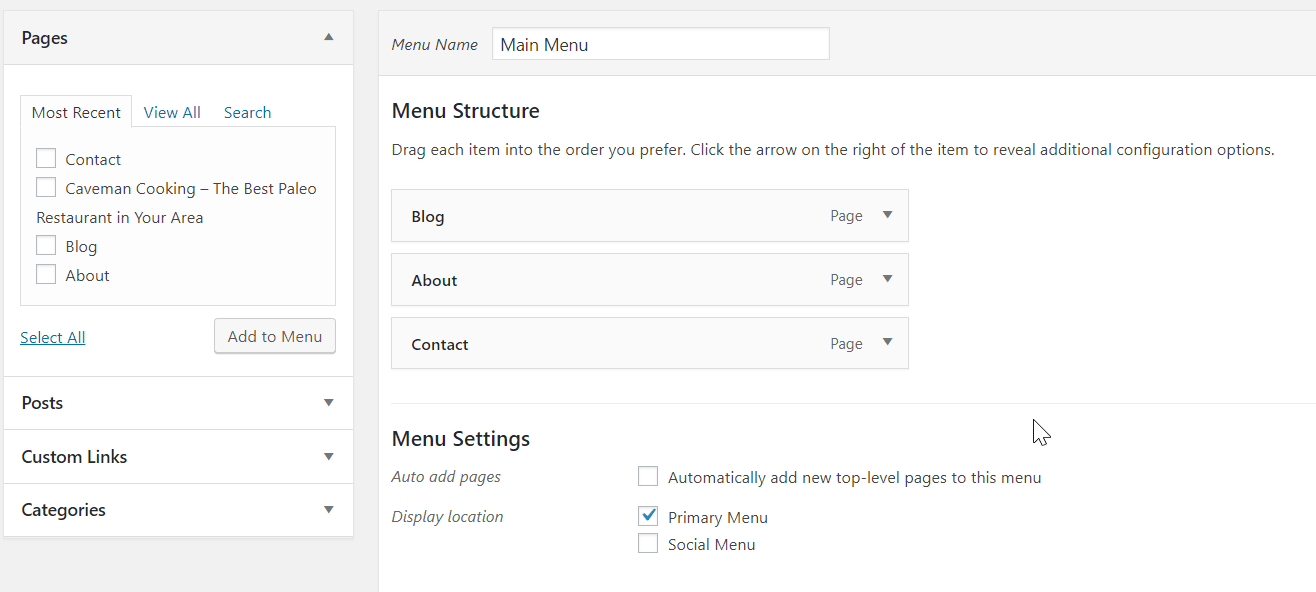
Once you're done, click the Create Menu button.
By default, that menu is going to get added to your WordPress theme's primary menu area — most likely in the header. If you go to your website's front page (yourdomain.com), you'll see the menu already there.
The Features You Need on a Small Business Website
As great as WordPress is by itself, the built-in functionality of the platform can always be extended with the use of plugins.
In short, WordPress plugins are small, installable software packages that integrate with WordPress and bring new features.
And there are a lot of WordPress plugins out there! Like, a lot, lot!
Even if you're interested in the free options only, there are around 55,000 of those available in the official directory at WordPress.org. But of course, you don't need them all...
We'll show you a more manageable list of only the must-have plugins (or at least the must-consider plugins).
But first:
How to Install a WordPress Plugin
The process is similar to installing a WordPress theme, but it's done in a different section of the WordPress dashboard.
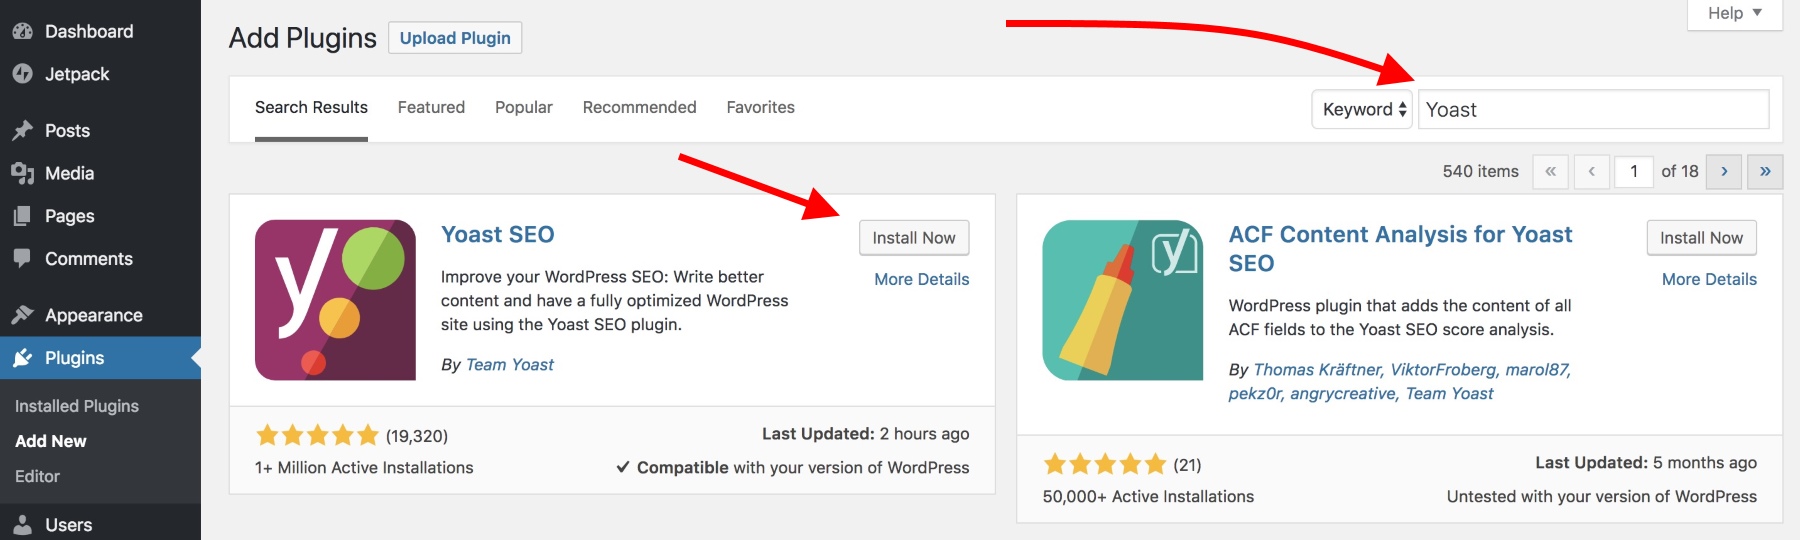
Case #1: If You Found the Plugin on WordPress.org
All plugins available in the official directory at WordPress.org can be installed from within the dashboard of your website.
- Go to Plugins → Add New.
- Input the name of the plugin you're looking for in the search field.
- Click on Install Now next to the plugin.
- After the plugin is done installing, click on Activate (the button will appear).
At this stage, your plugin is installed, activated, and ready to go!
Case #2: If You Found the Plugin Elsewhere on the Web
First, you need to obtain the ZIP file containing your plugin. After that, do the following:
- Go to Plugins → Add New.
- Click the Upload Plugin button, and select the plugin's ZIP file from your drive. Click on Install Now.
- After the plugin is done installing, click on Activate. Like so:

At this stage, your plugin is installed, activated, and ready to go!
...
Now, about that list of must-have/must-consider plugins:
An SEO Plugin
SEO (Search Engine Optimization) is a key piece of the puzzle for anyone who wants to make a small business website, and then promote it effectively.
In simple terms, SEO is the practice of optimizing your site's content in a way that makes it easier for people to find it on Google.
The best such plugin for WordPress is called Yoast SEO.
It packs a ton of options, and allows you to go pretty deep in terms of the SEO parameters you can adjust.
Once you install and activate it, you'll see a new section in the sidebar of your WordPress dashboard called SEO. When you click it, you'll see Yoast's main panel.
The best way to get started with the plugin is to go through some of its onboarding materials.

A Backup Plugin
Backups are crucial. They're the absolute must-have, and someday may even save your whole website.
Although websites don't break down too often, over the long haul you can experience a couple of issues here and there — I'm talking about the likes of hacker attacks, server errors, or even your own mistakes when administering the site.
If any of those occur and you don't have a snapshot of your website from the time when it was operating correctly, you may even be forced to rebuild it entirely from scratch.
A simple solution to mitigate the risk is to use a backup plugin. The one I recommend is called UpdraftPlus.
What's great about it is it's free and works on autopilot. You can set it to back up your site ever X days, and even send those backups to your Dropbox account.
Here's how:
After you install and active the plugin, go to Settings → UpdraftPlus Backups. Once there, switch to the Settings tab.
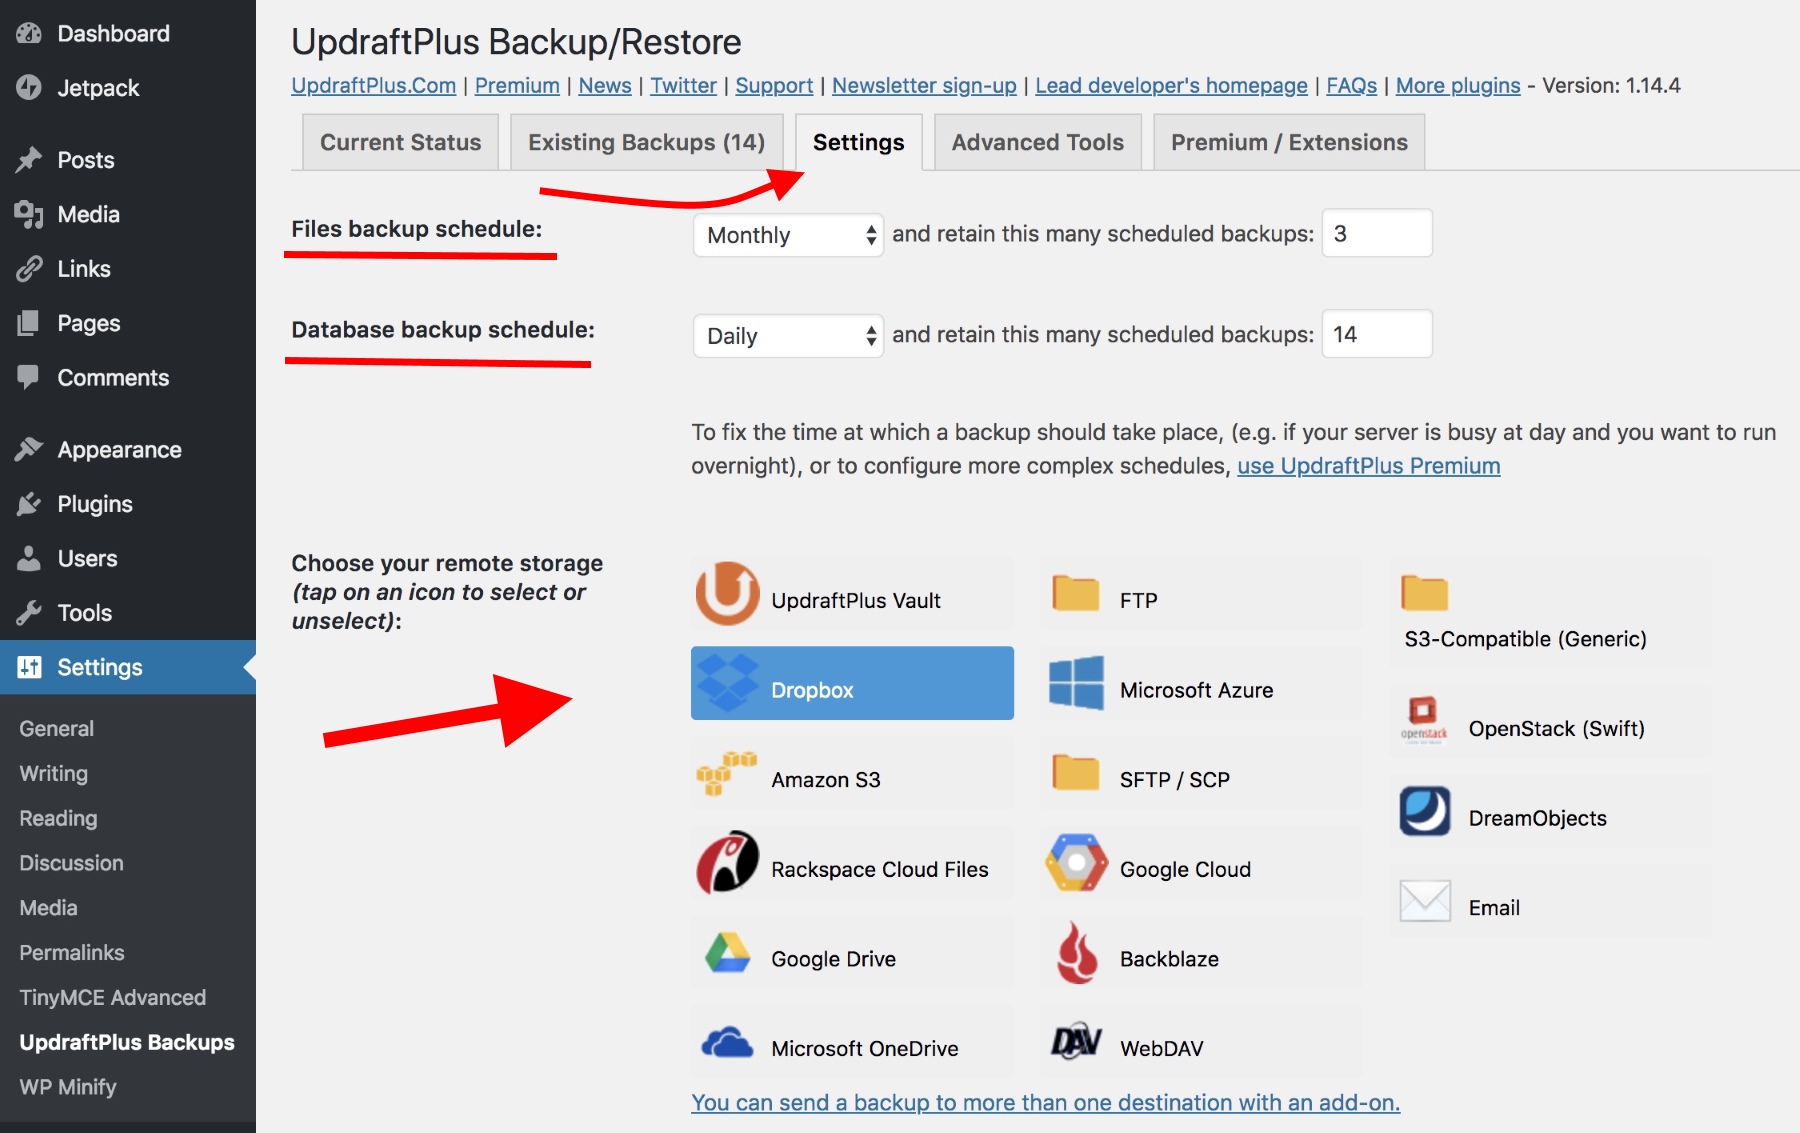
You can set the 'Files backup schedule' and the 'Database backup schedule' to whatever seems reasonable (updating the database daily and the files weekly is a good starting point).
Further down, you can pick the cloud storage where you want your backups to be stored. When selecting any of them, you will be guided through the process of integrating everything.
A Thing Called Jetpack
The Jetpack plugin is one of the most popular plugins of all, and a true workhorse. It packs a number of useful modules, giving you loads of features.
If you've decided to host your website with SiteGround, you'll notice that the Jetpack plugin comes already preinstalled right out of the box. If you don't have it yet, though, you can install and activate it normally.
With the plugin active, go to its main section in the WordPress dashboard:
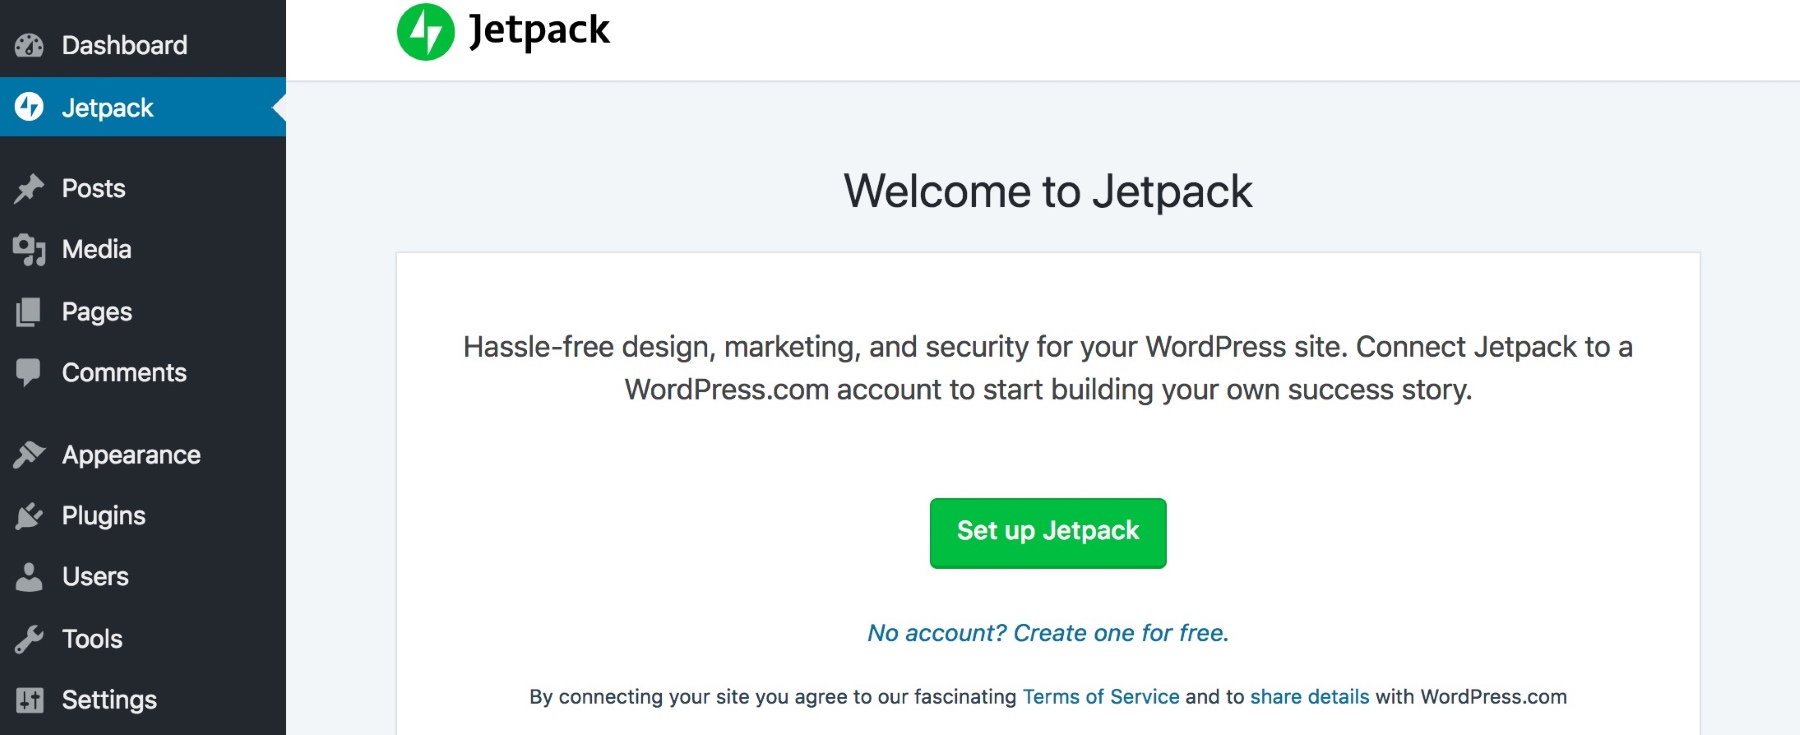
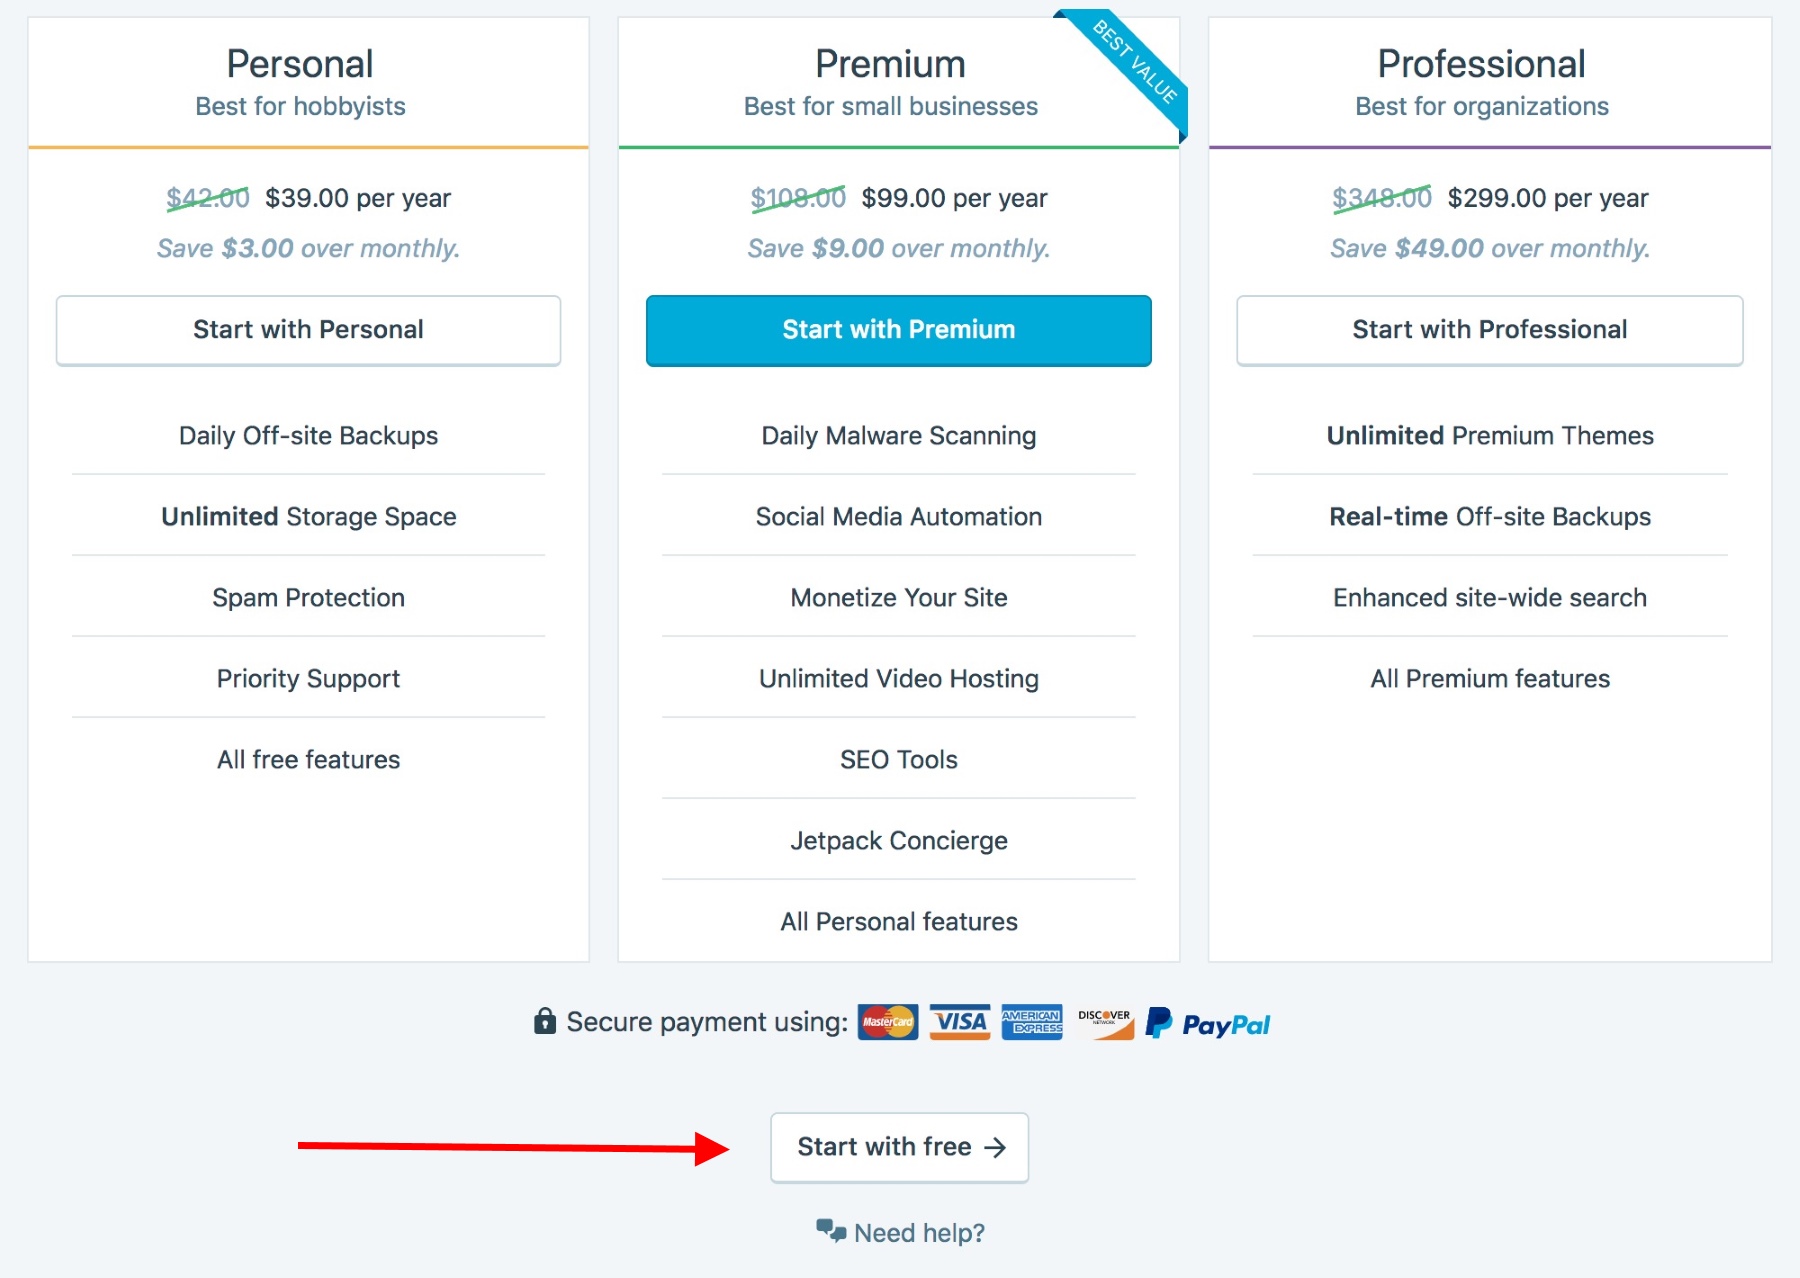
Before you can use the plugin fully, you need to set yourself a WordPress.com account. Start by clicking the Set up Jetpack link that you can see in the screenshot above. You will be guided through the process step by step.
Note: During the registration process, Jetpack will attempt to sell you on one of their premium plans. This isn't needed. On the final setup page, you can scroll down and click on 'Start with free' instead.
When this is done, you'll be able to start working with Jetpack.
Here are some of its more useful features:
Social media buttons
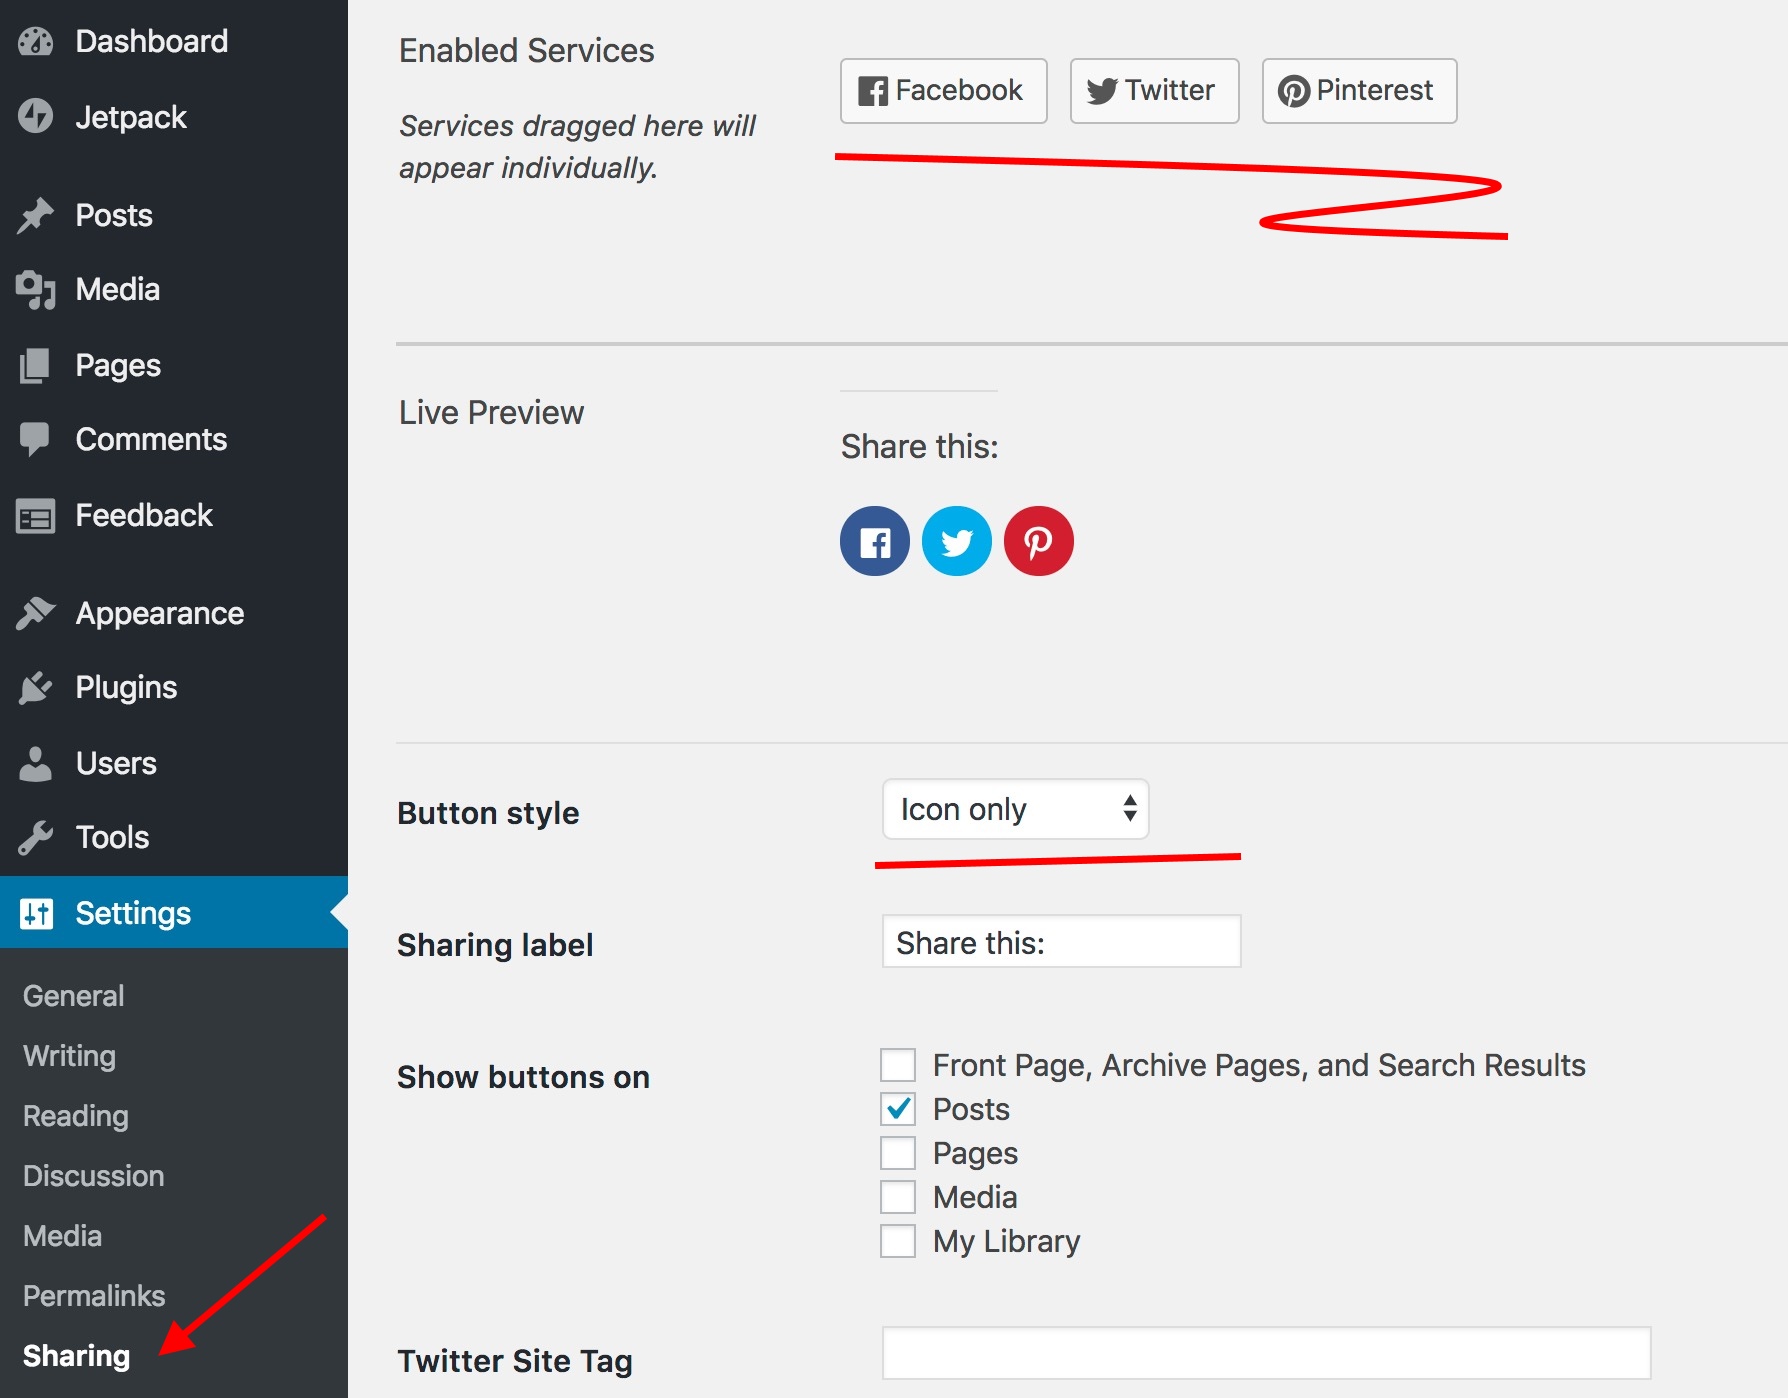
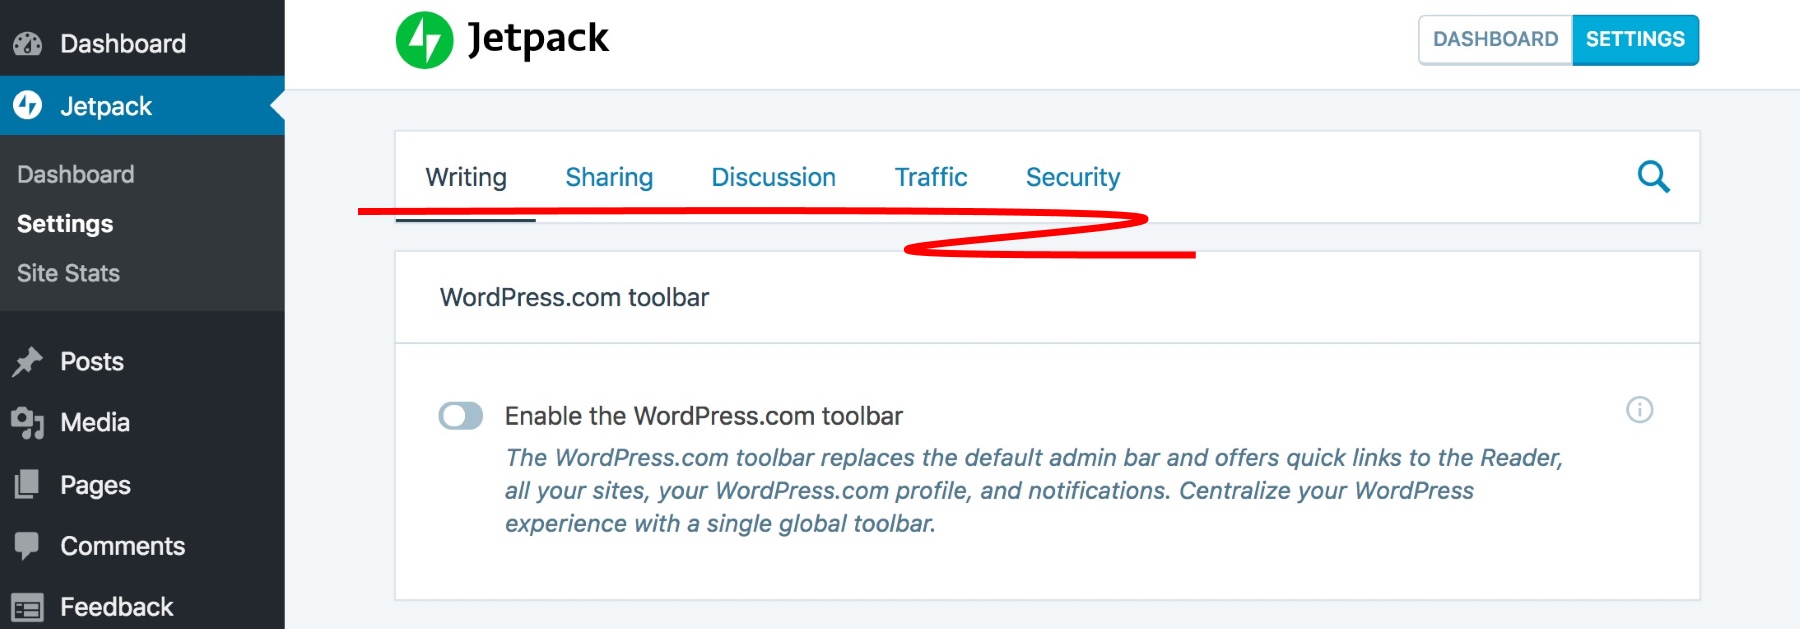
This one you can enable by going to Jetpack → Settings, and then selecting Sharing → Add sharing buttons to your posts.
With that done, you can go to your WordPress dashboard's main Settings → Sharing. Once there, you can customize which specific social buttons you want and where you want them to be displayed.
Here are the settings I enjoy:
Contact forms
If you go to one of your pages and edit it, you'll notice a new button in the toolbar:
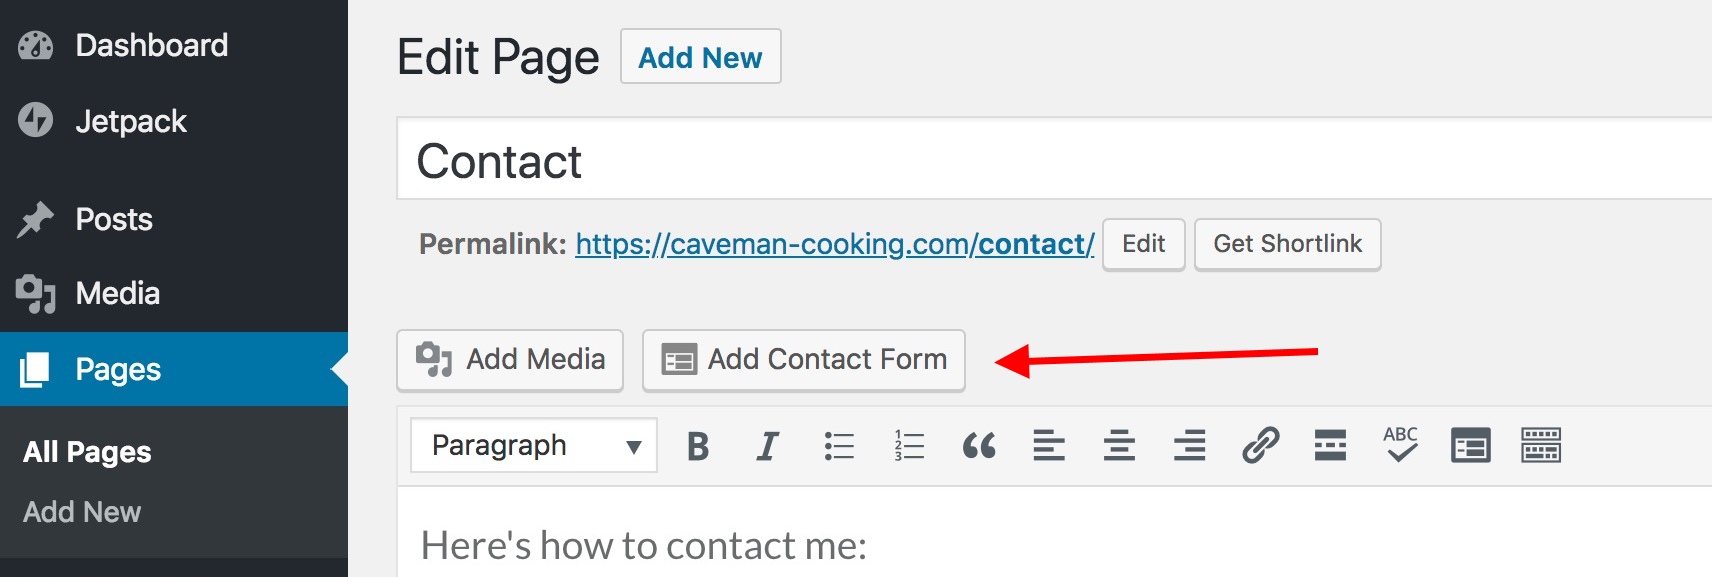
After clicking it, a functional contact form will be added to the page. You can configure it by clicking on the pencil icon.
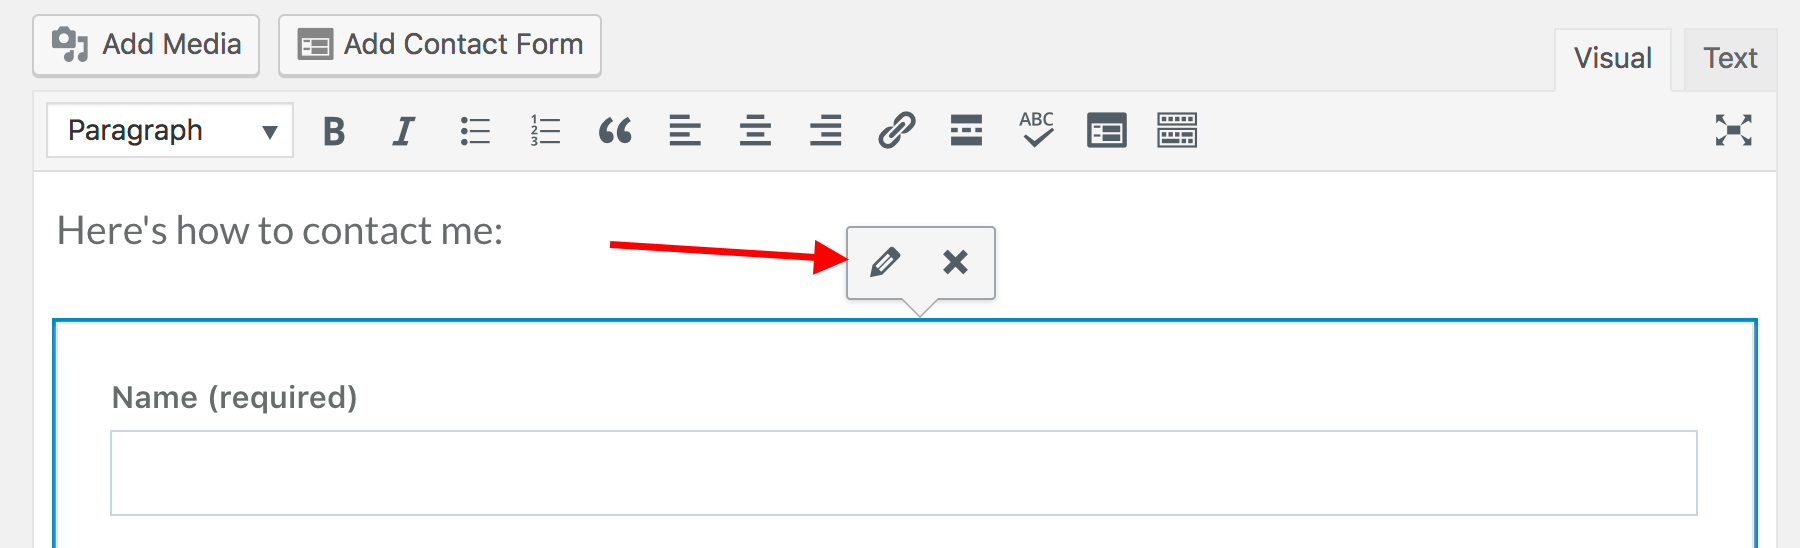
The best place for an interactive contact form such as this is, naturally, your Contact page.
Site stats
This is a very useful module that's going to tell you how many people visit your website on a daily basis, which pages/posts they read, and how much time they spend doing so.
To see the stats, go to Jetpack → Site Stats. If you just enabled Jetpack a minute ago, you won't find much activity there yet. But, with time, things will become more interesting.
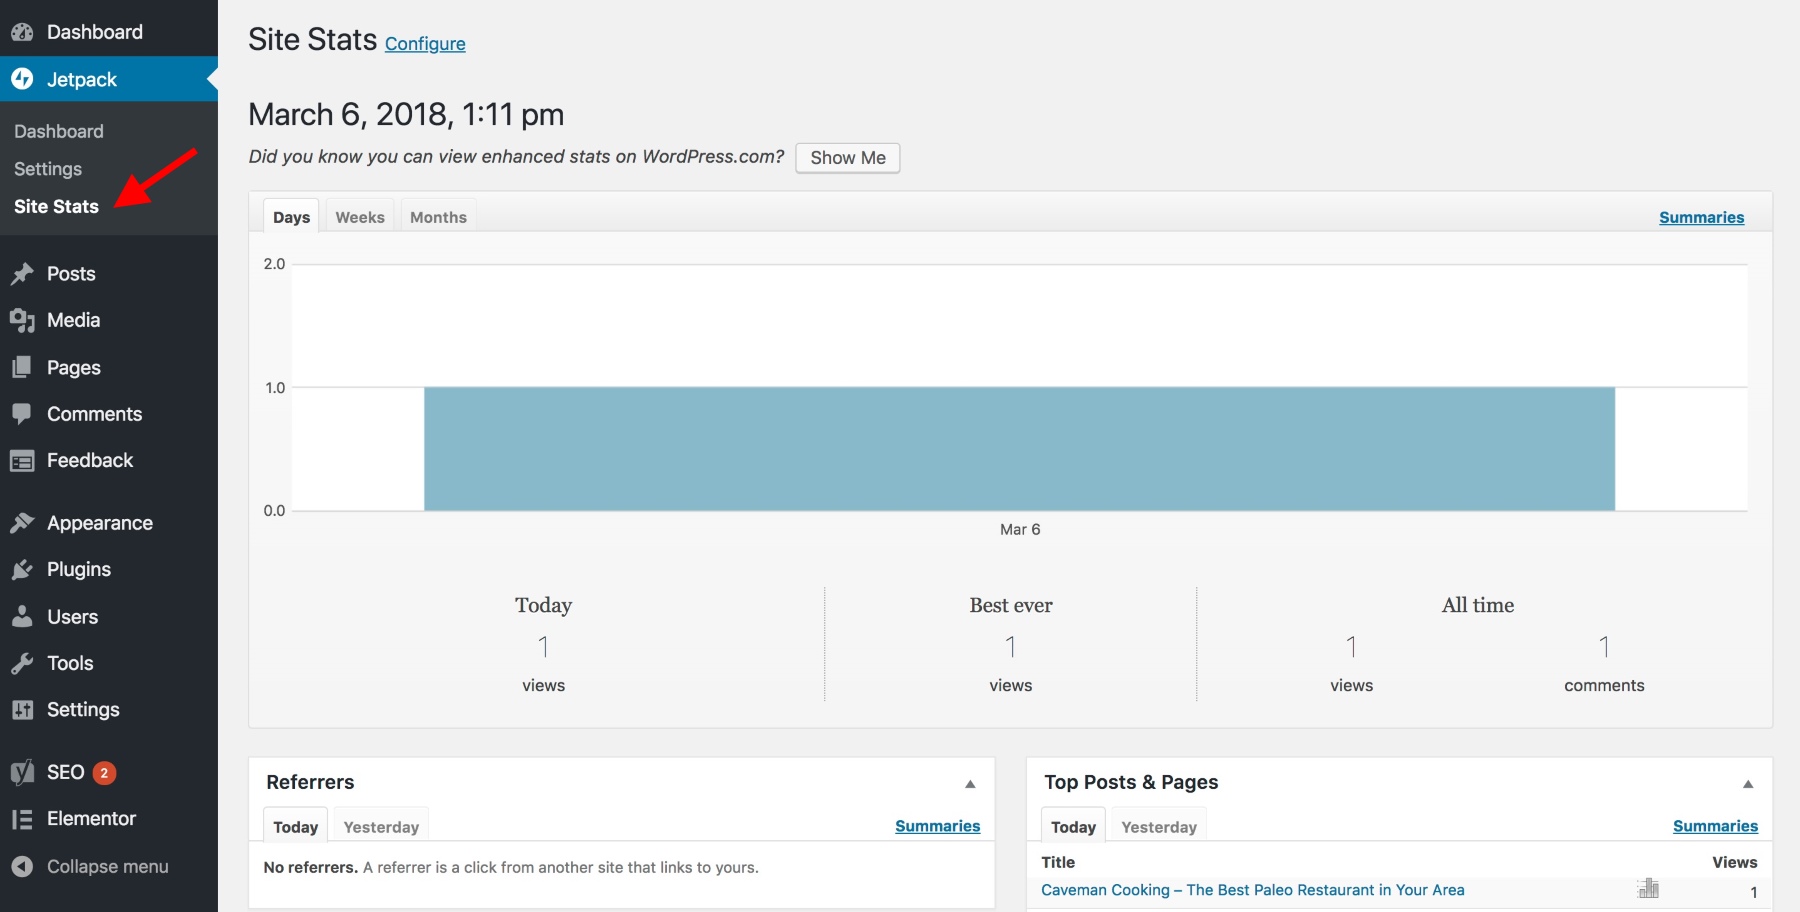
Insights such as these can be invaluable to a business owner. Without site stats of any kind, you're basically in the dark as to how many people visit your website and how they interact with it.
💡 PRO TIP: If you'd like even more insights, you should integrate your site with Google Analytics — a more powerful but still free tool for site traffic analysis.
Other modules
I, personally, also like to enable the following modules via Jetpack → Settings:
- Writing → Check your spelling, style, grammar
- Writing → Serve images from our servers
- Writing → Lazy load images
There are explanations of what each of these does next to the corresponding toggle button.
Starting a blog
A popular blog can be an incredibly valuable asset for any business' web presence.
As I mentioned earlier, it's very hard to persuade online audiences to keep coming back to a business website if they don't have a clear-enough reason to.
In other words, people won't necessarily be interested in reading your promo materials over and over again.
However, what can get their attention is a well-written blog.
Most commonly, businesses launch blogs that cover topics related to the niche the business is in.
A strategy that works for most is the following:
- Dissect the niche the business is in and look for common challenges people face.
- Compile a list of ten or so such challenges.
- Write blog posts that explain how to deal with those challenges.
- Distribute those posts over time
- Optionally, plug your products or services in those posts.
In a scenario like that, people are compelled to keep coming back to learn more and more from each new blog post.
Now, the actual act of launching a blog in WordPress is very simple. Or, more specifically, you already have a blog module in WordPress right out of the gate.
Remember when we talked about how to create and edit your website pages? Creating blog posts works basically the same — just go to your WordPress dashboard, then to Posts → Add New. You'll see this familiar editor screen:
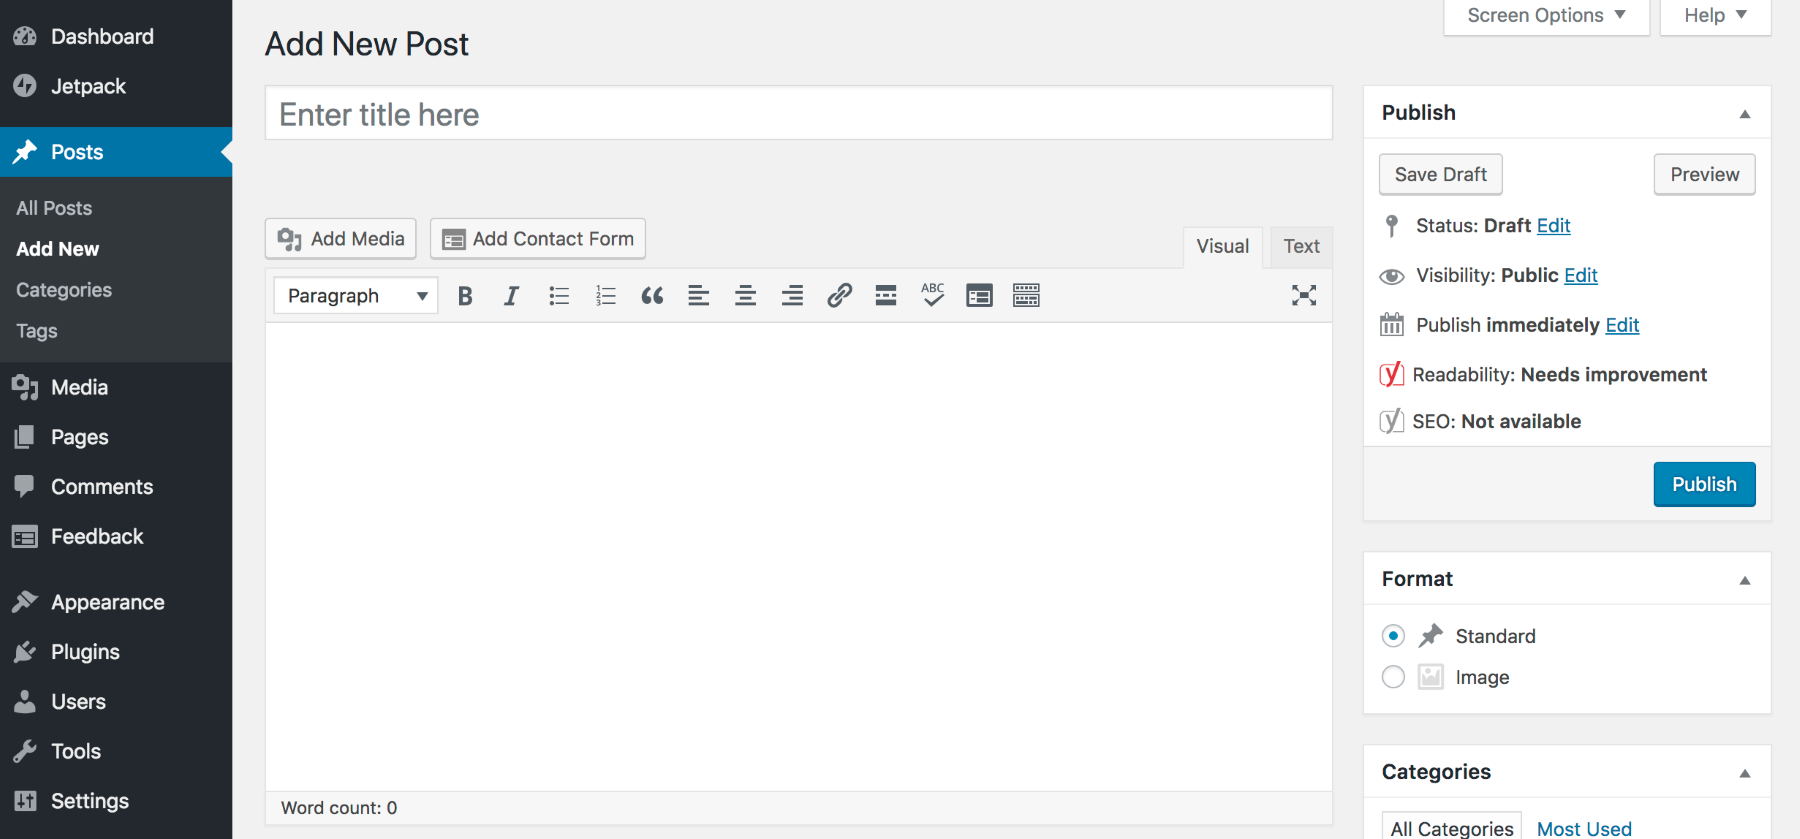
This looks nearly the same as the page editing screen we discussed previously.
...
With that said, you now have all of the elements in place to turn your small business website into a valuable asset... Except for one missing thing:
Why and How to Create a Custom Homepage for Your Website
By default, WordPress will take the listing of your latest blog posts, and display those as your homepage. This may be an optimal solution for classic blogs, but not for a business website.
We can do better!
Introducing the concept of a custom homepage! ✨
First off, a custom homepage is better than the default blog listing because it allows you to showcase any content you wish on that page — including custom texts, headlines, business and product details, images... You name it!
The purpose of a homepage is to:
- introduce the visitor to your brand
- explain what you're all about in a concise and easy-to-follow way
- point out the 'next step' — the thing you want the visitor to do right after they're done going through the homepage.
To achieve that, you can use at least a handful of the following building blocks:
- A rather big (or even massive) headline.
- A to-the-point intro text.
- A 'what to do next' text and a call to action.
- Your services/products summarized.
- Clients/testimonials/other trust elements.
- Your best content/latest posts.
- About info.
- Contact info.
- Email optin.
Here's why each of these elements matters, and how to build your custom homepage using them:
How to Build an Awesome Homepage for Your Small Business Website
Depending on the WordPress theme you're using on your site, you may or may not get a custom homepage feature built in.
- (Some themes that do come with a custom homepage template include the aforementioned Hestia and Sydney.)
So, since not all of them have that, I'm going to assume yours doesn't. Therefore, we're going to build the homepage in a way that's much more universal, and also more functional at the same time.
For that, we'll use a popular page builder plugin called Elementor.
- Elementor is free.
- It's easy to use.
- It doesn't require you to have any coding knowledge/skills.
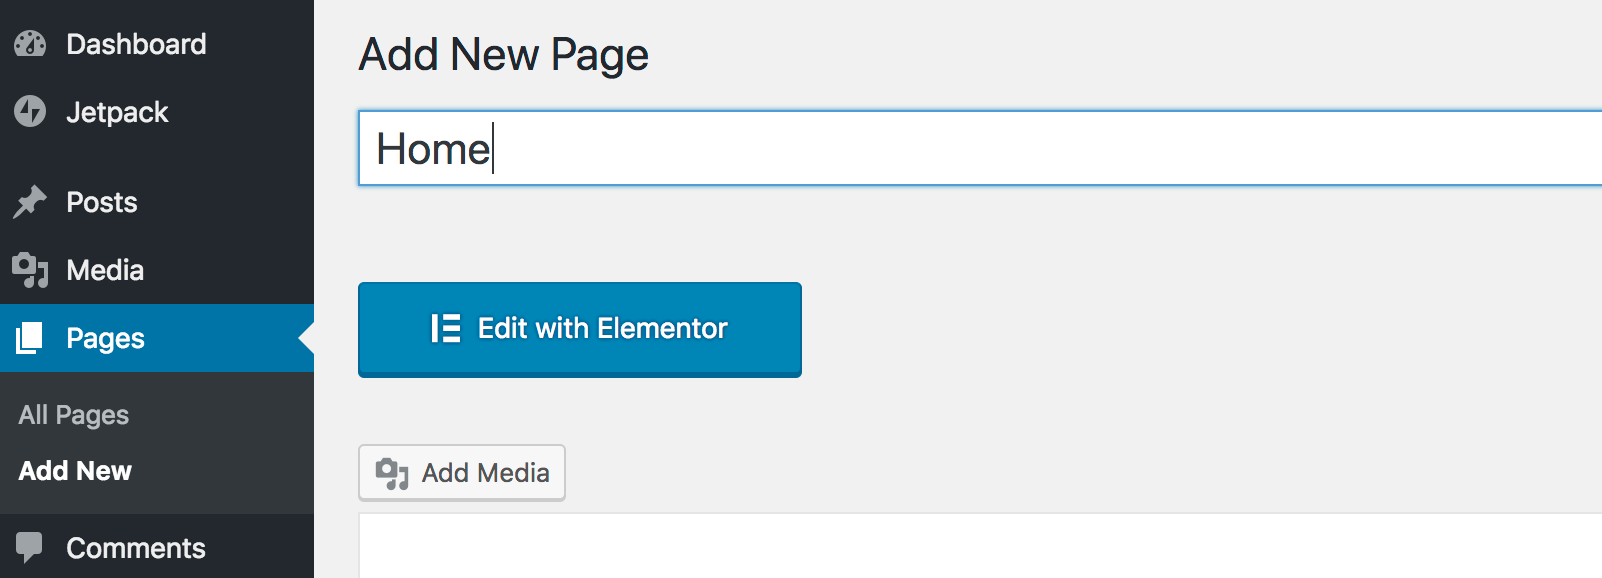
Step 1: Create a Blank Page
Once you have the Elementor plugin installed and activated, go to Pages → Add New.
The title of this new page will likely become the main headline for your homepage, so let's make it representative.
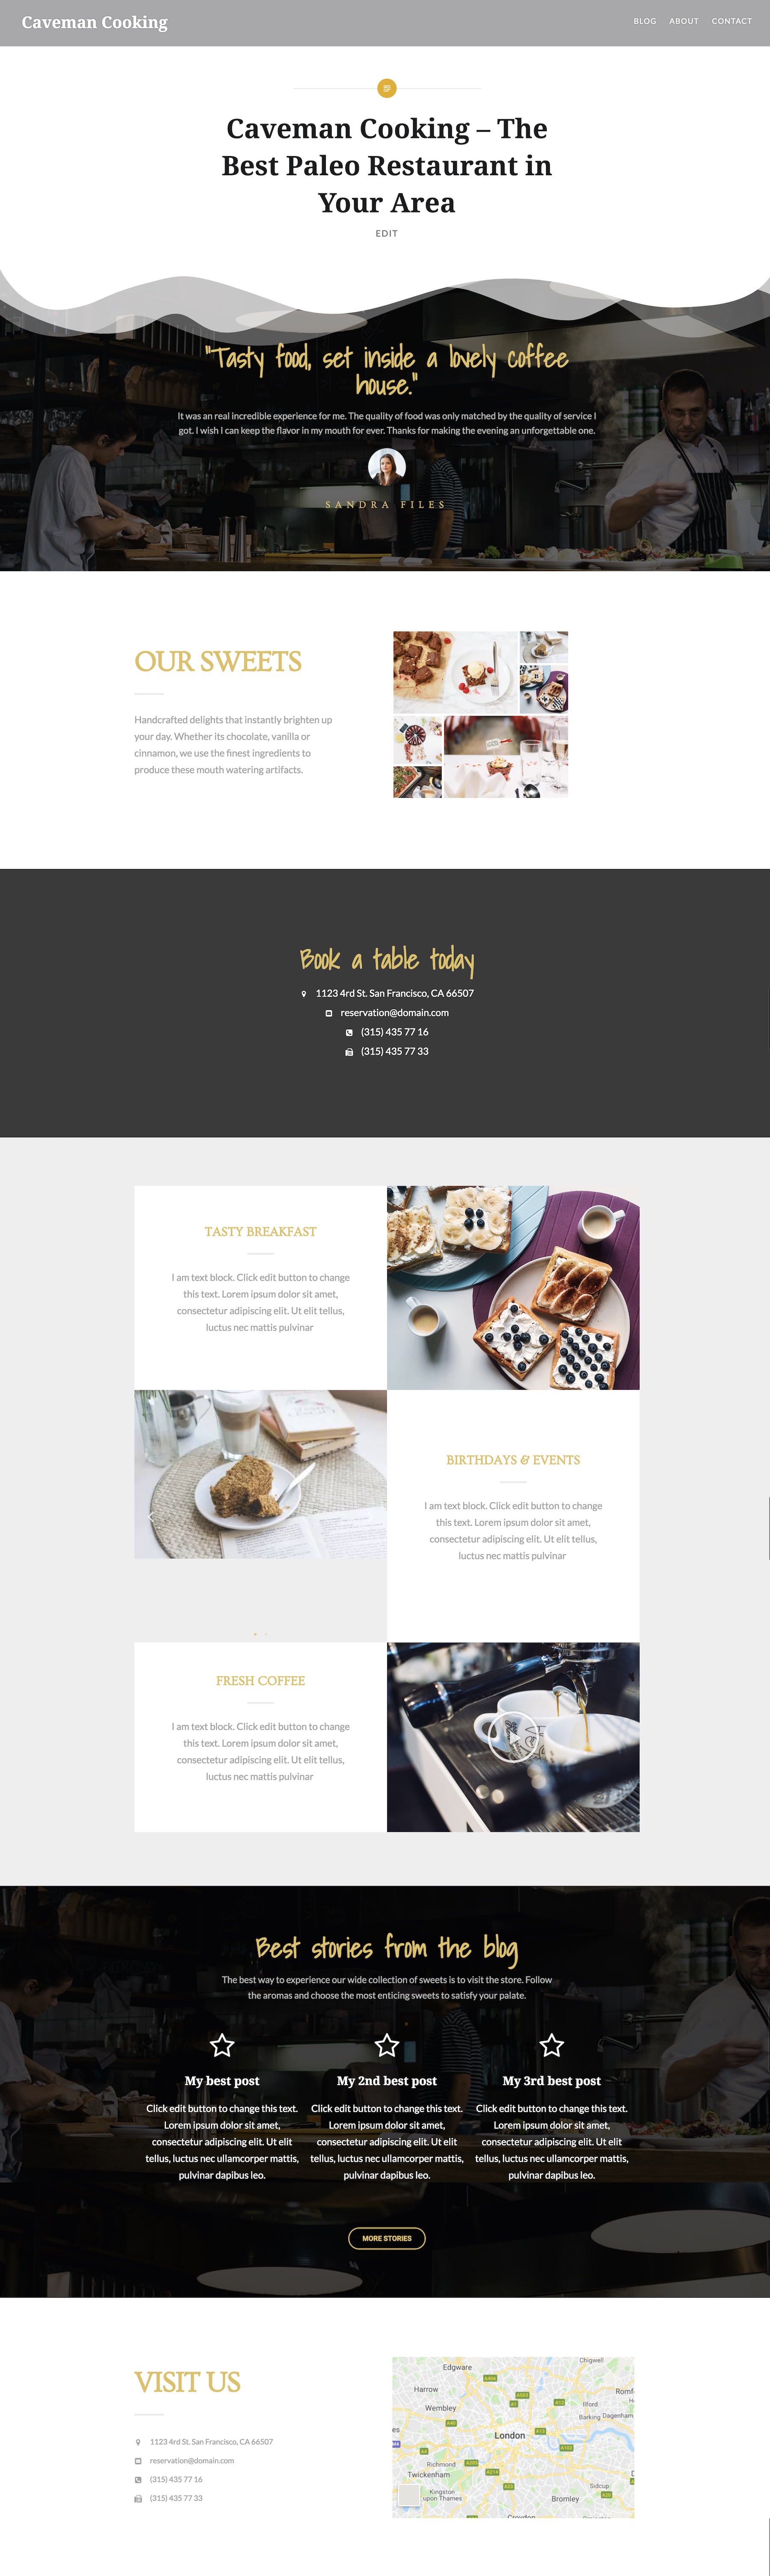
In my case, that's 'Caveman Cooking — The Best Paleo Restaurant in Your Area'.
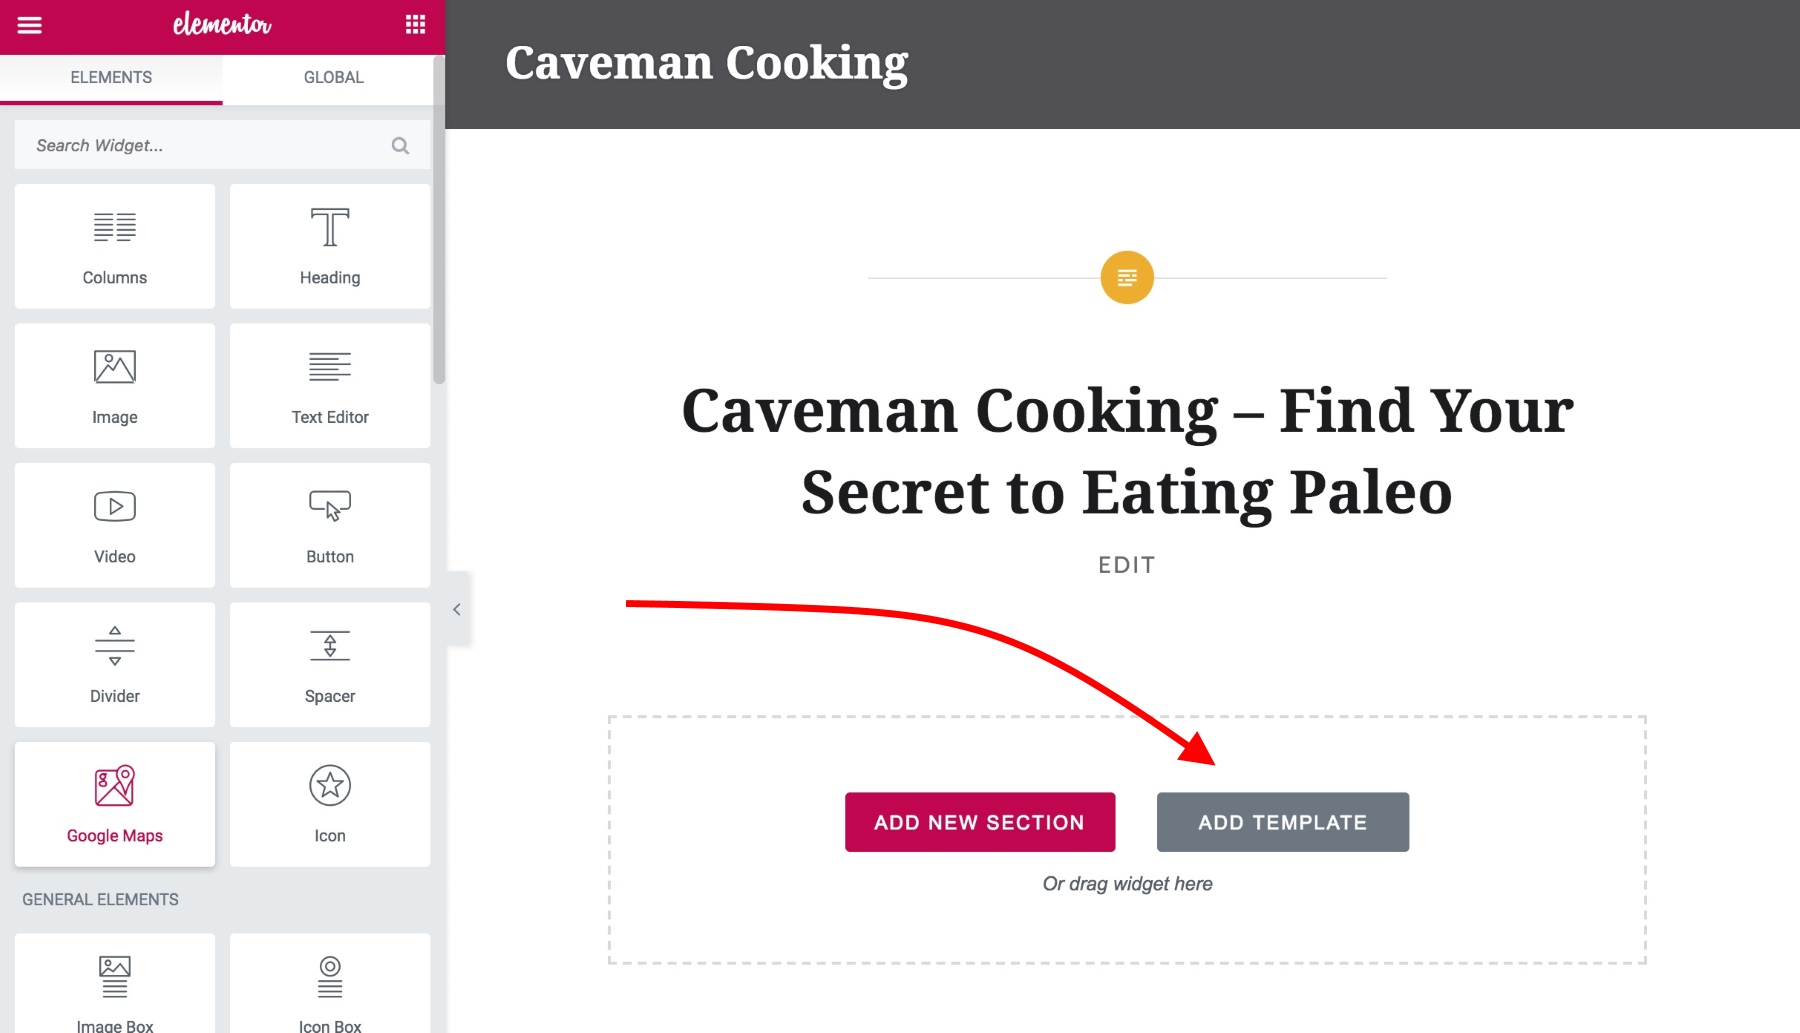
Now, you're ready to click that big Edit with Elementor button.
Step 2: Import the Homepage Template
One of Elementor's cool features is it lets you import ready-made page templates, and then use them as the basis for your creations. This is exactly what we're going to do here.
In the following section, you're going to learn how to customize each of the elements of the page, and how to change the colors, add new texts, realign the blocks, and more.
Start by clicking the ADD TEMPLATE button.
What you see there is a library of predesigned templates that you can import with one click. Keep in mind that some of those designs are paid-for, but there's a good number of free ones as well.
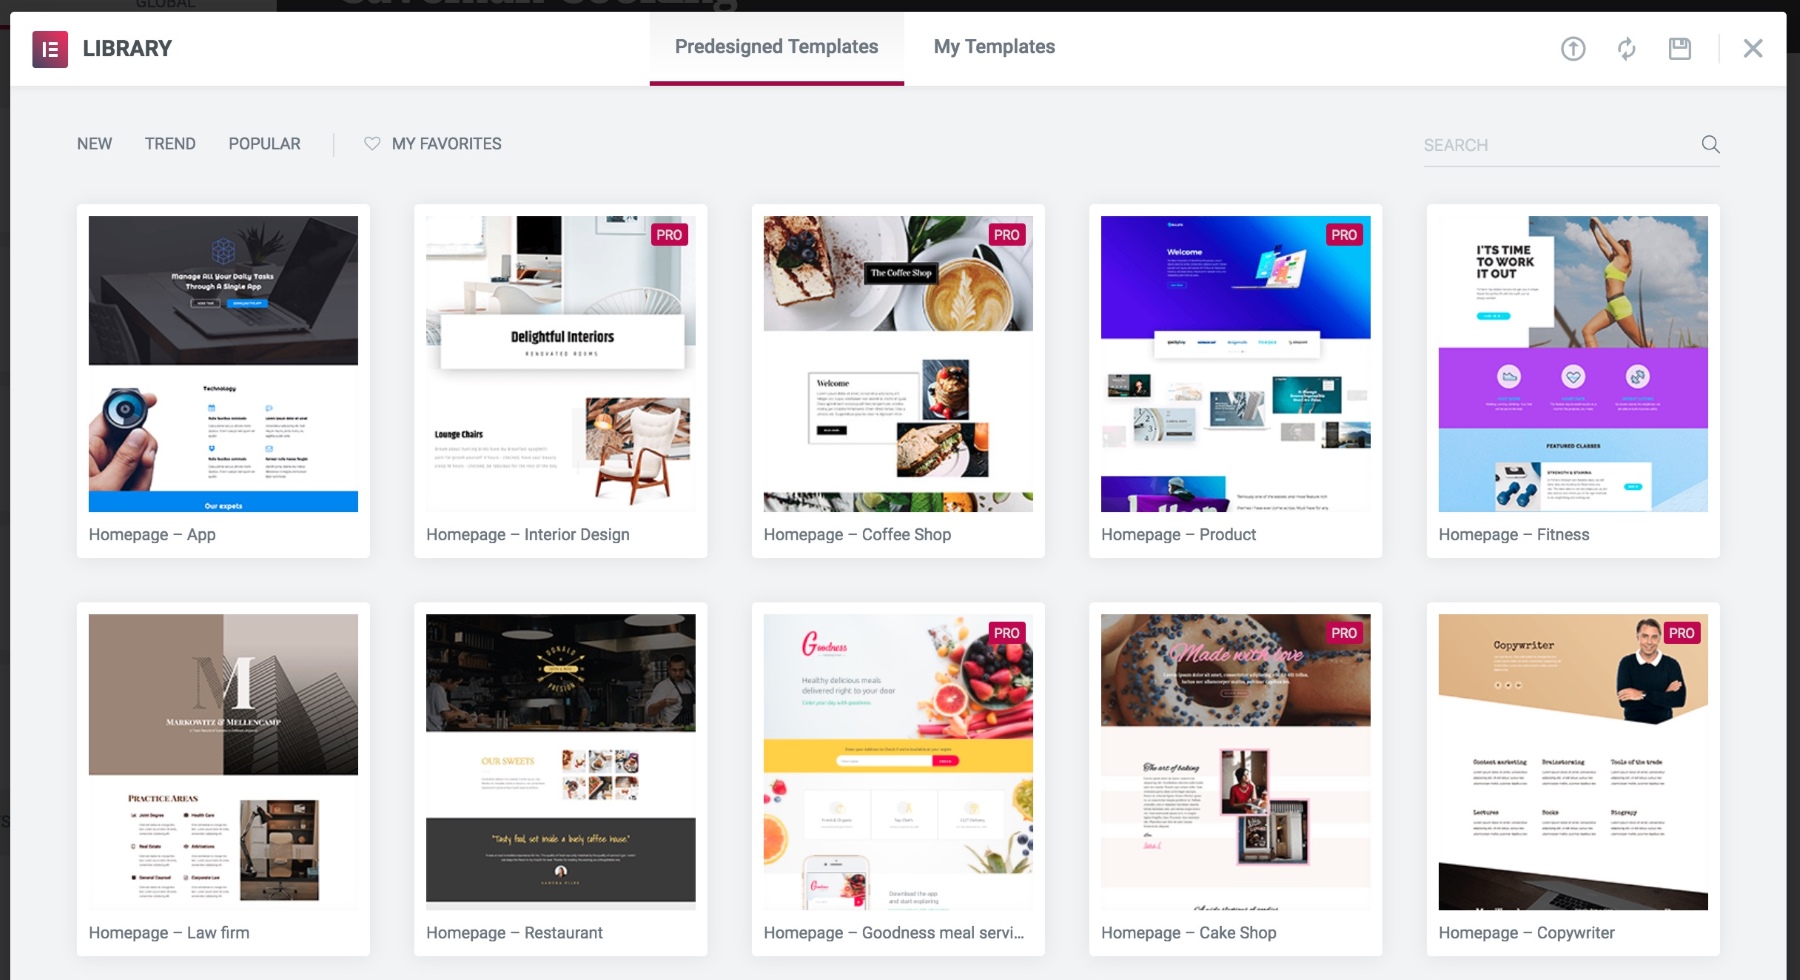
I, for instance, like the looks of the one called 'Homepage — Restaurant', so I'll try importing that one (the 'Import' button is going to appear as you hover over the template).
Step 3: Modify the Template
Your imported template may need some adjustments before you can confidently use it as your homepage, so let's do that. At the same time, this portion of the process is highly dependent on what type of business you're running and what your offer is.
Elementor constructs your page based on a specific architecture. Namely, your page is built of individual sections (one below the other), which are then built of individual elements — and all of those can be moved around with drag-and-drop.
So, if you want to put anything on your page, you first need to create a new section, and then put a given block inside that section. If you want to divide the section into X columns, you can do that when creating the section, too.
This overall architecture is also how Elementor templates work. Each predesigned template is built of a number of sections and a number of elements within those sections. No element or section is put there permanently. You can realign them freely, modify, or even delete sections/add new ones.
There are, therefore, two approaches when it comes to working with Elementor templates.
- (a) You can find a template that's nearly perfect for what you need, and then just change the texts and graphics.
- (b) You can find a template that's mostly okay, and then do some more in-depth customizations on it.
If you're not 100% comfortable dragging things around and getting into options, you should probably opt for (a).
Here's what I did on my site:
The first order of business is to make sure the template you're using looks correct upon import. For instance, in my case, the full-width blocks of the template weren't entirely full width, so I needed to do something about that.
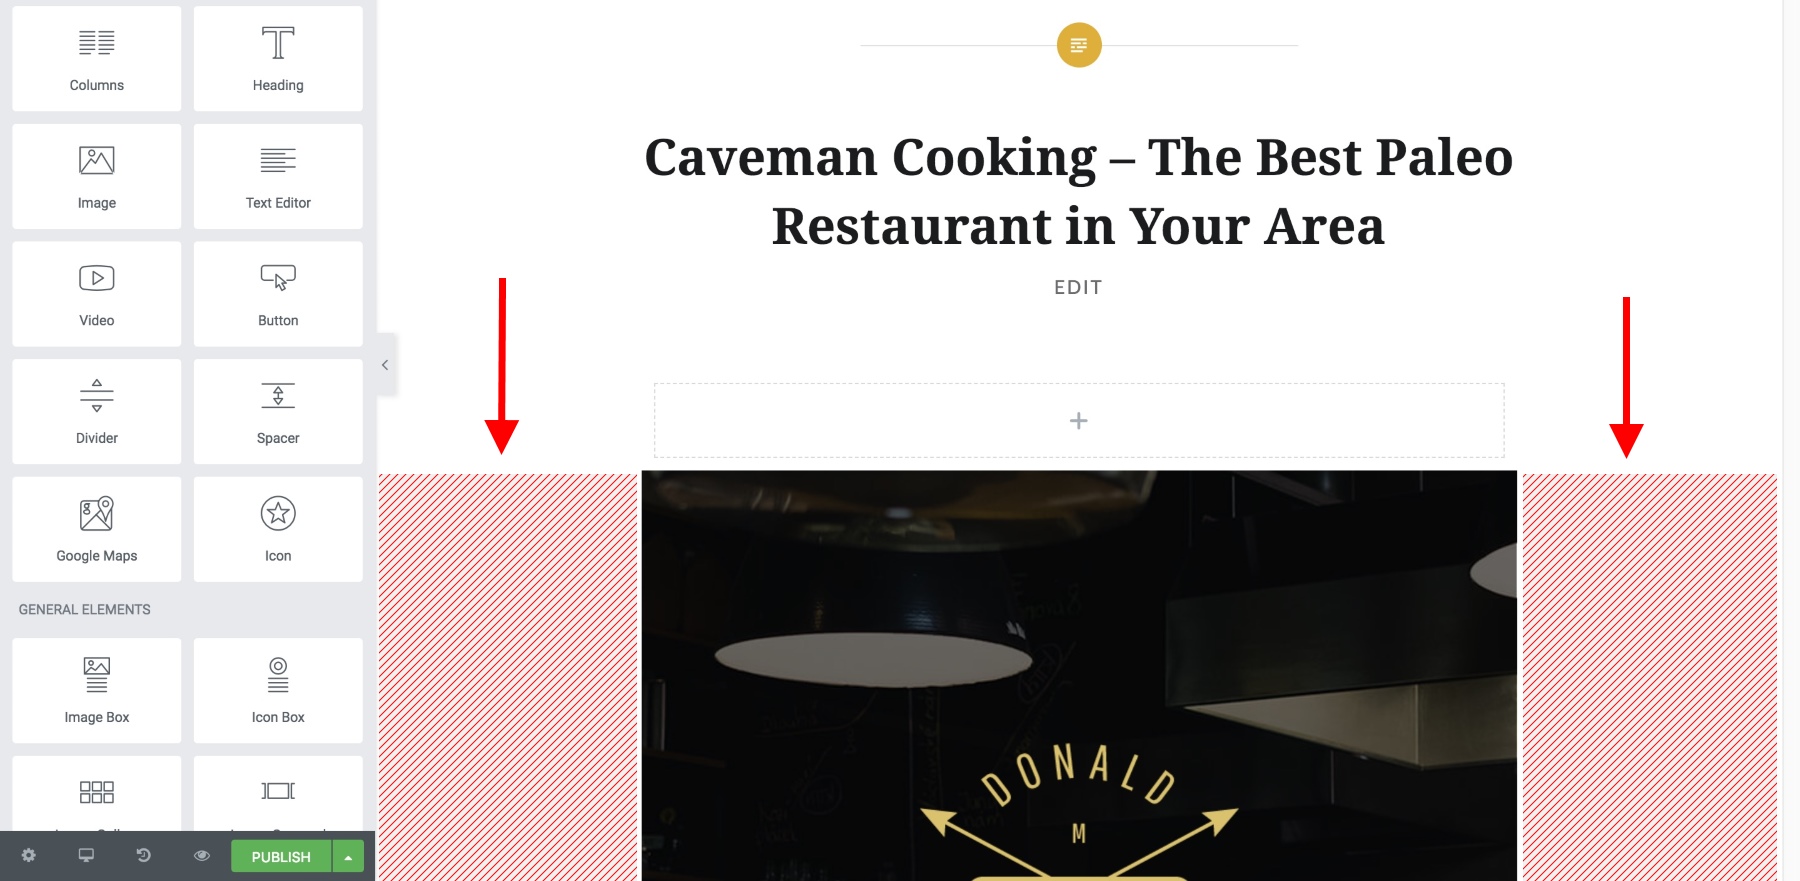
If you're facing a similar problem with your template, you can fix it by clicking on the Edit Section icon, and then enabling the Stretch Section toggle.
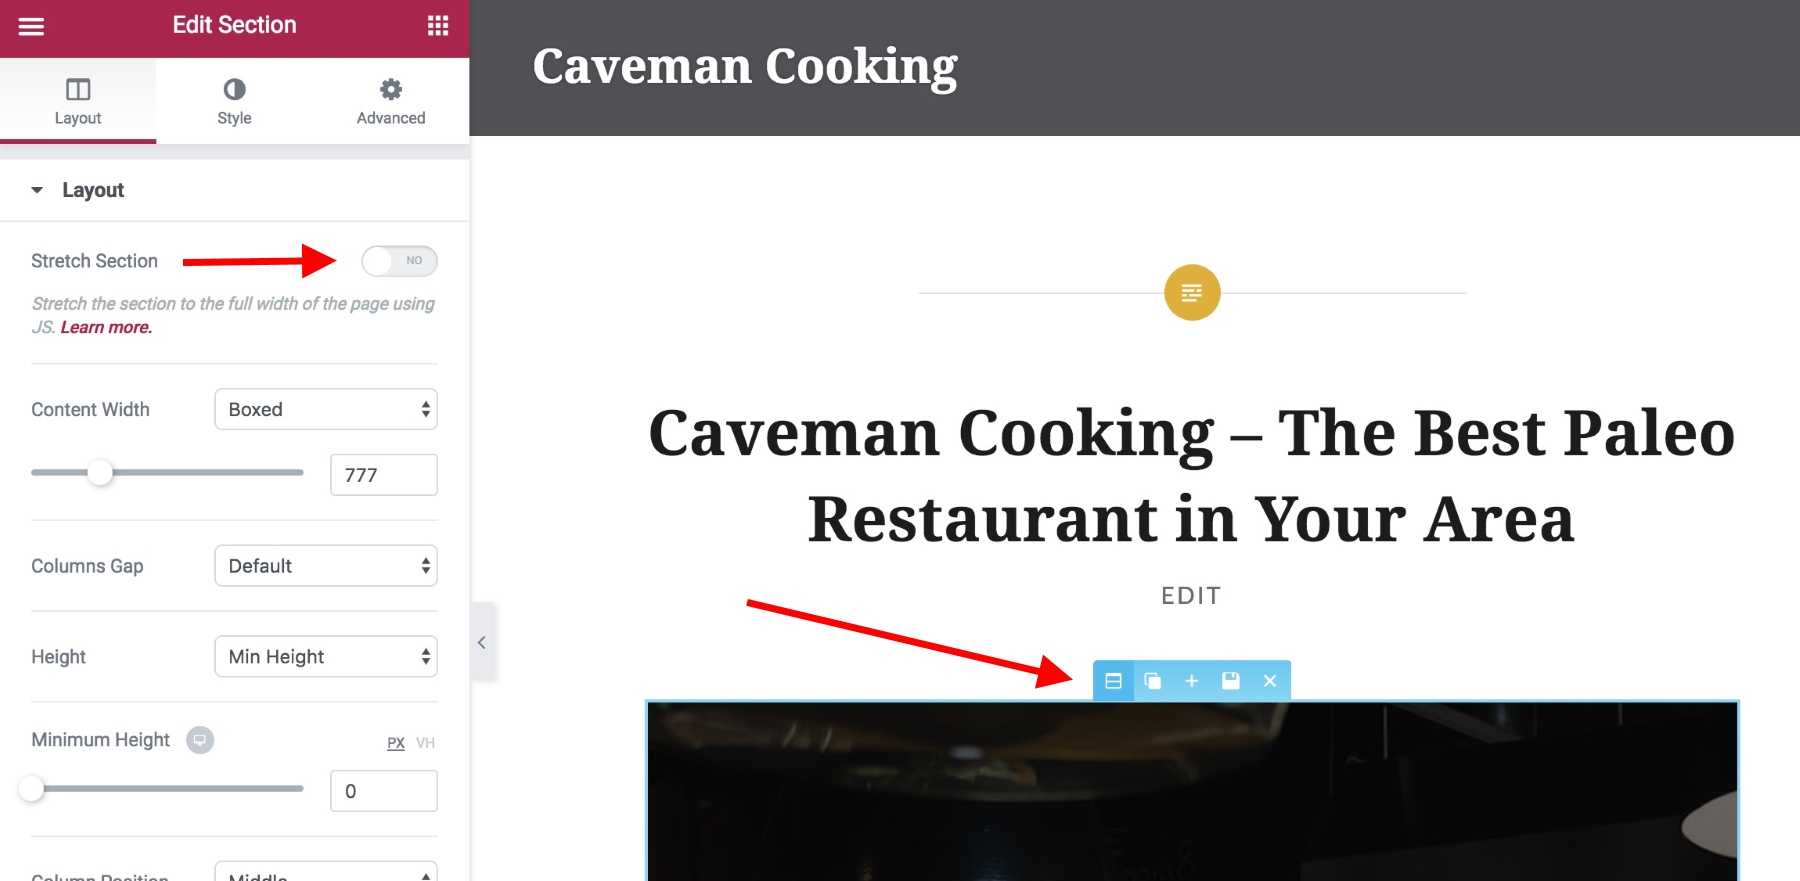
This will take care of just that one section, so repeat until all of the sections look correct. In my case, I ended up needing to stretch all of my sections.
Next, let's fix the headline.
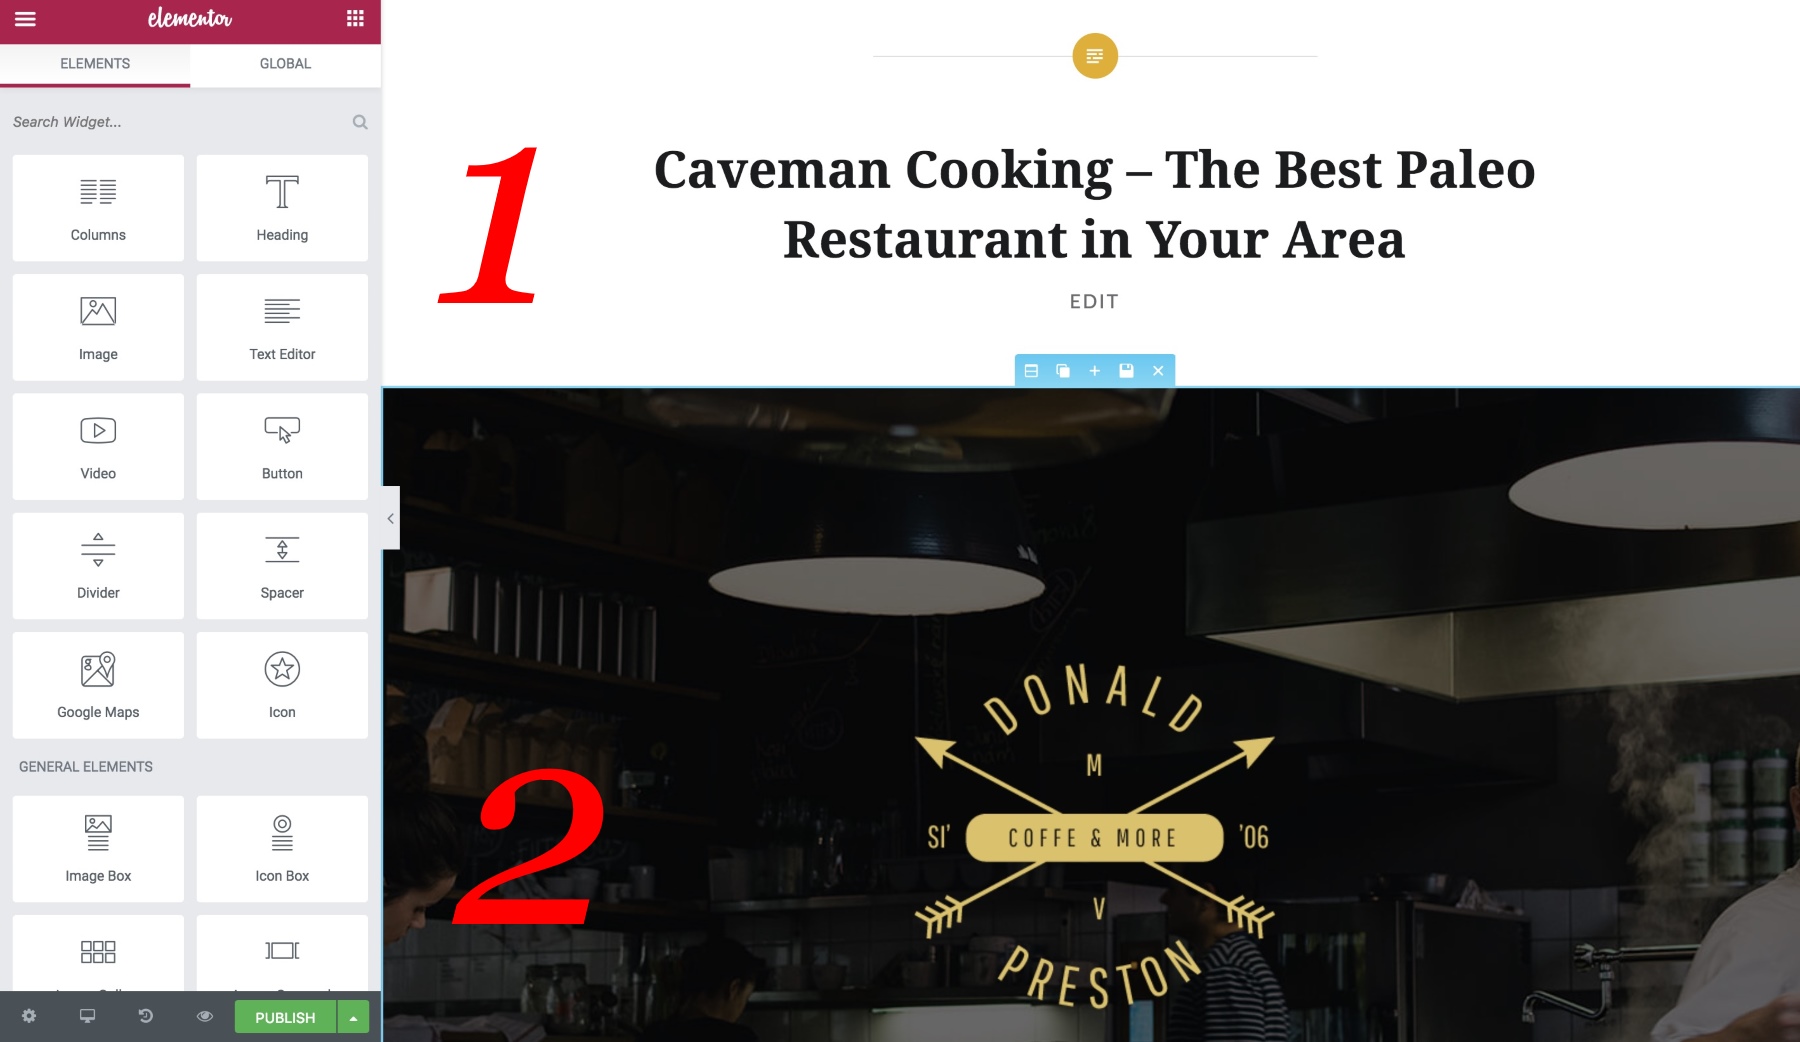
Depending on the theme you're using, you may not be able to get rid of the title of the page or customize it in any way. This may result in your homepage looking as though it has two head sections — as it does for me:
I'll fix this by clicking the first section's Edit Section icon (the same one I clicked to stretch the section), and then switching the tab to Style, scrolling down to the Shape Divider menu, and from there selecting a divider I like — namely, Mountains.
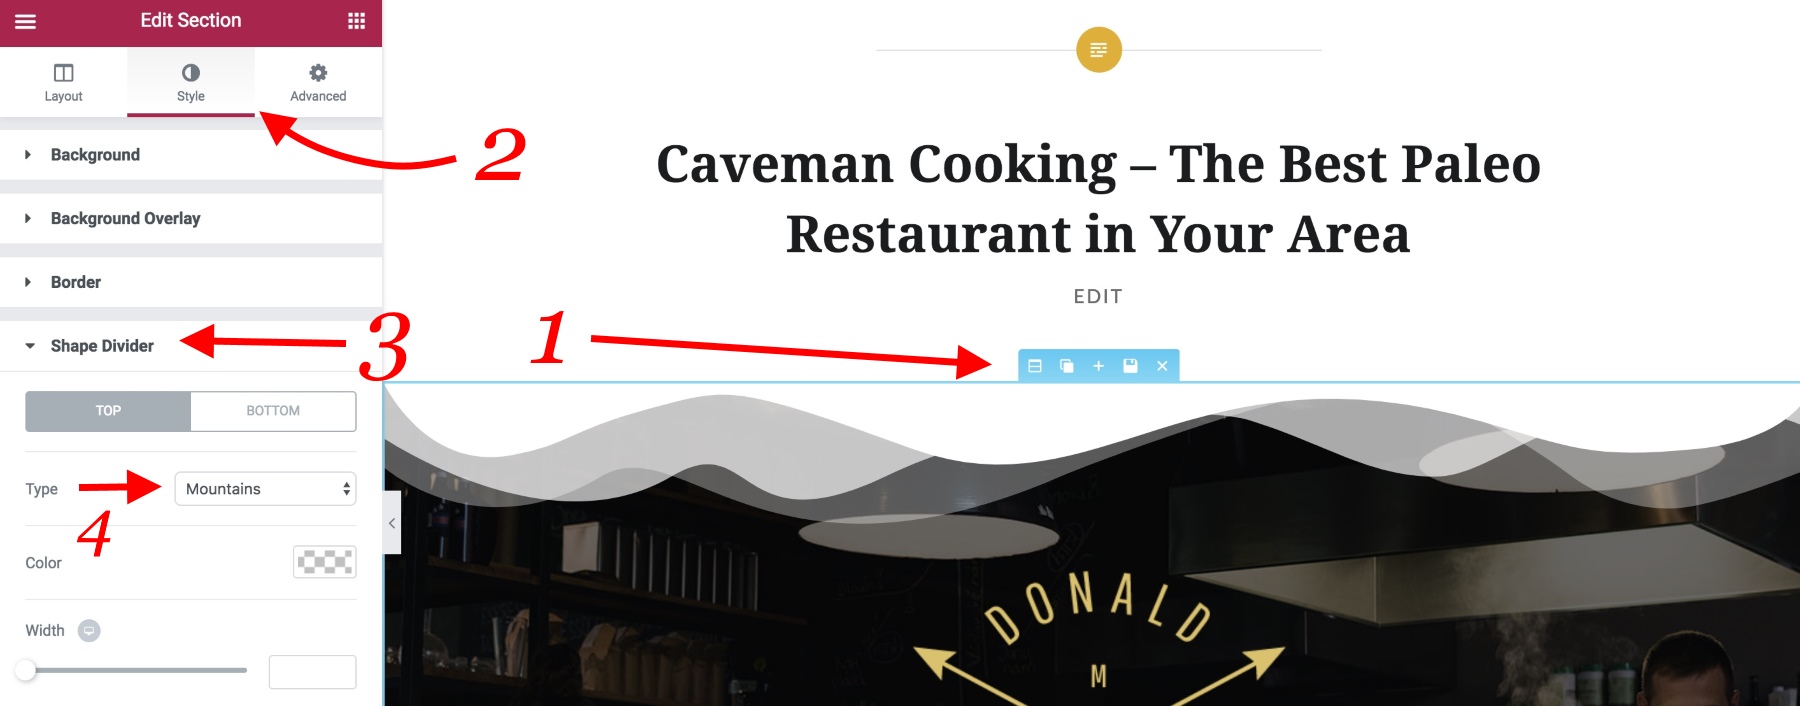
This will introduce some nice visual separation between the sections.
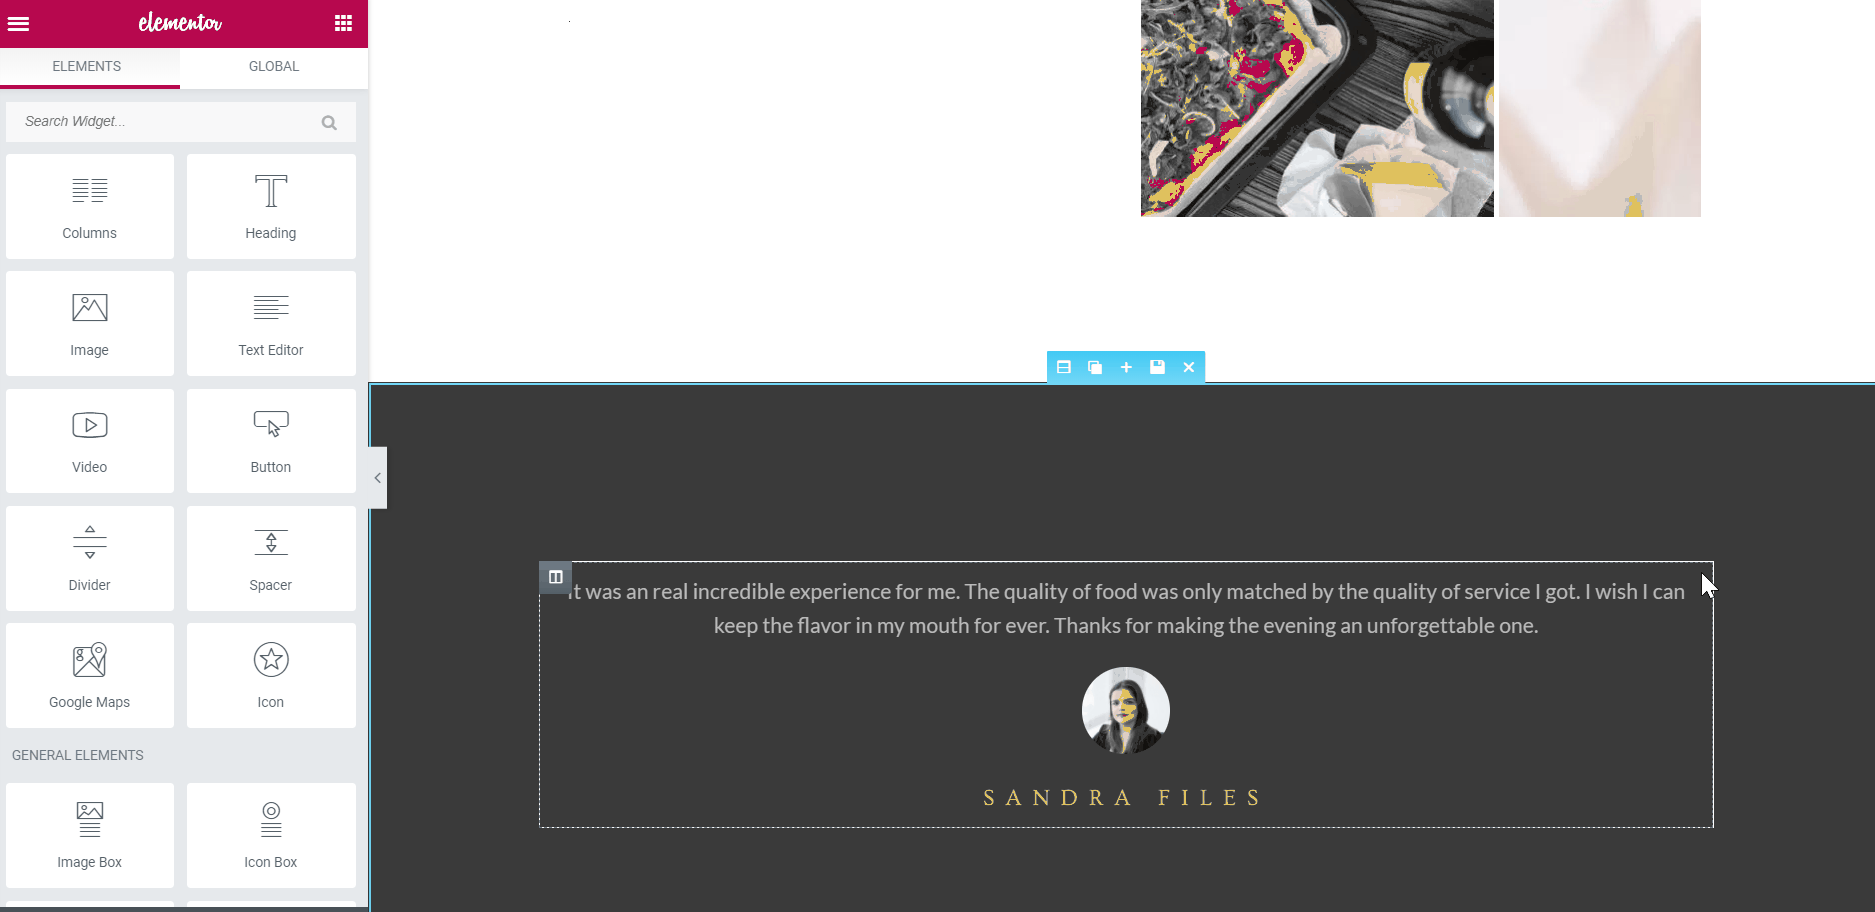
I'm also going to delete the logo from that first section, and in its place I'm going to drag and drop the testimonial section. Here's how it's done.
First, remove the logo:
![]()
Next, drag and drop the testimonial from a section further down.
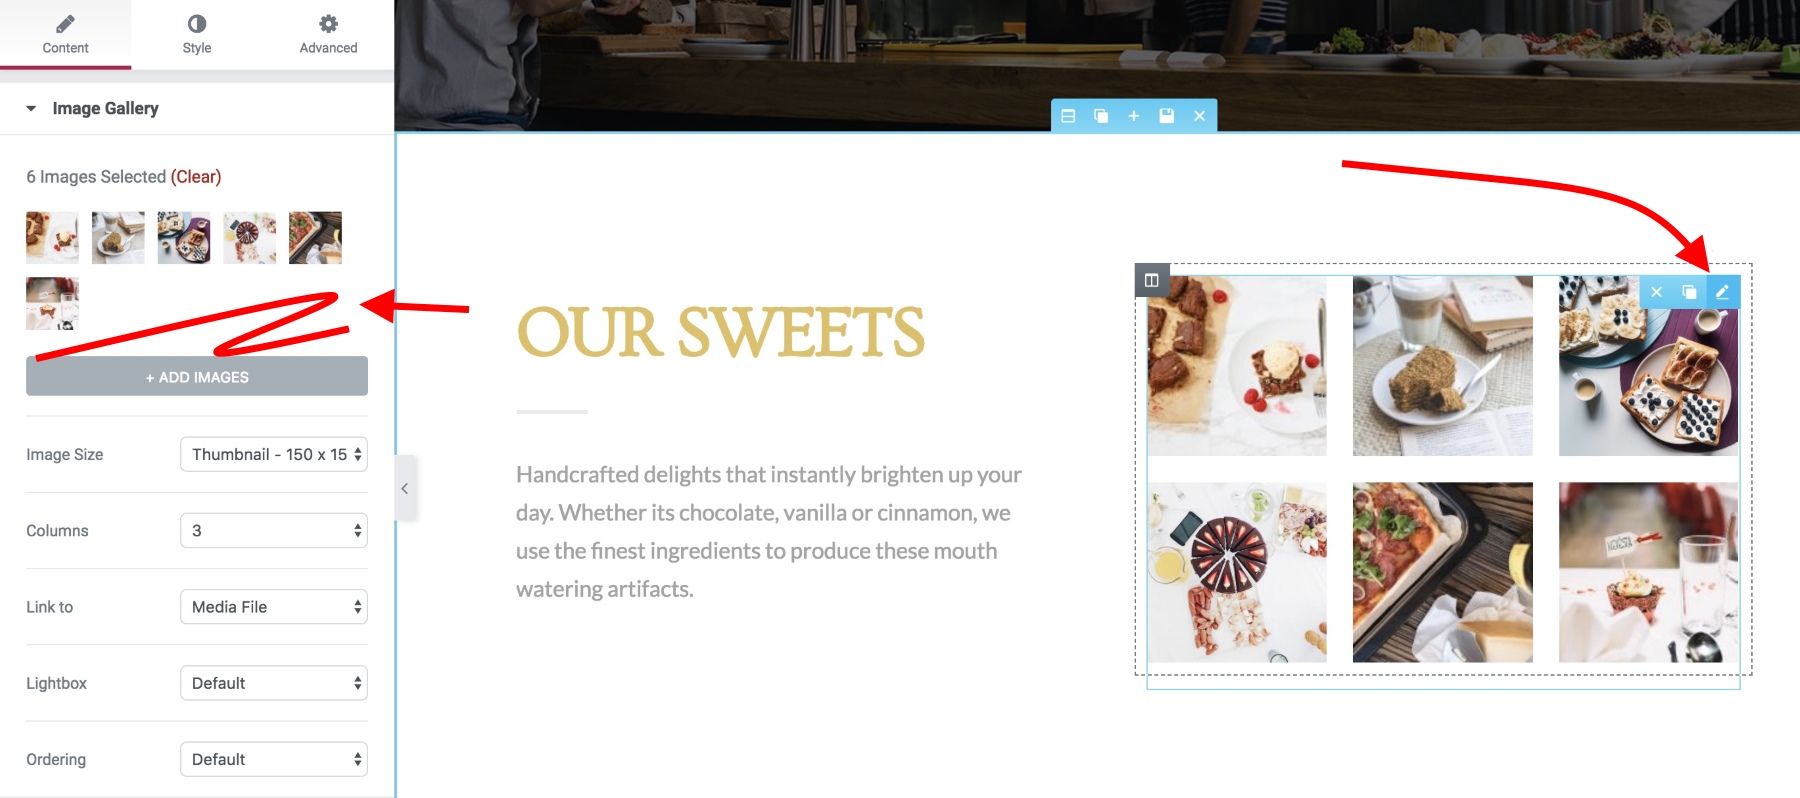
The rest of the page looks pretty great. I can, for instance, reuse the OUR SWEETS section to present my best dishes, which can be done by clicking the pencil icon next to the images, and switching them to my own.
The same goes for the text. You can edit that easily if you click a similar pencil icon next to any text block. Like so:

The next section on my homepage looks like a nice place to tell people how they can book a table at my restaurant. For that, I'll reuse the contact section that's at the bottom of the page. This one:
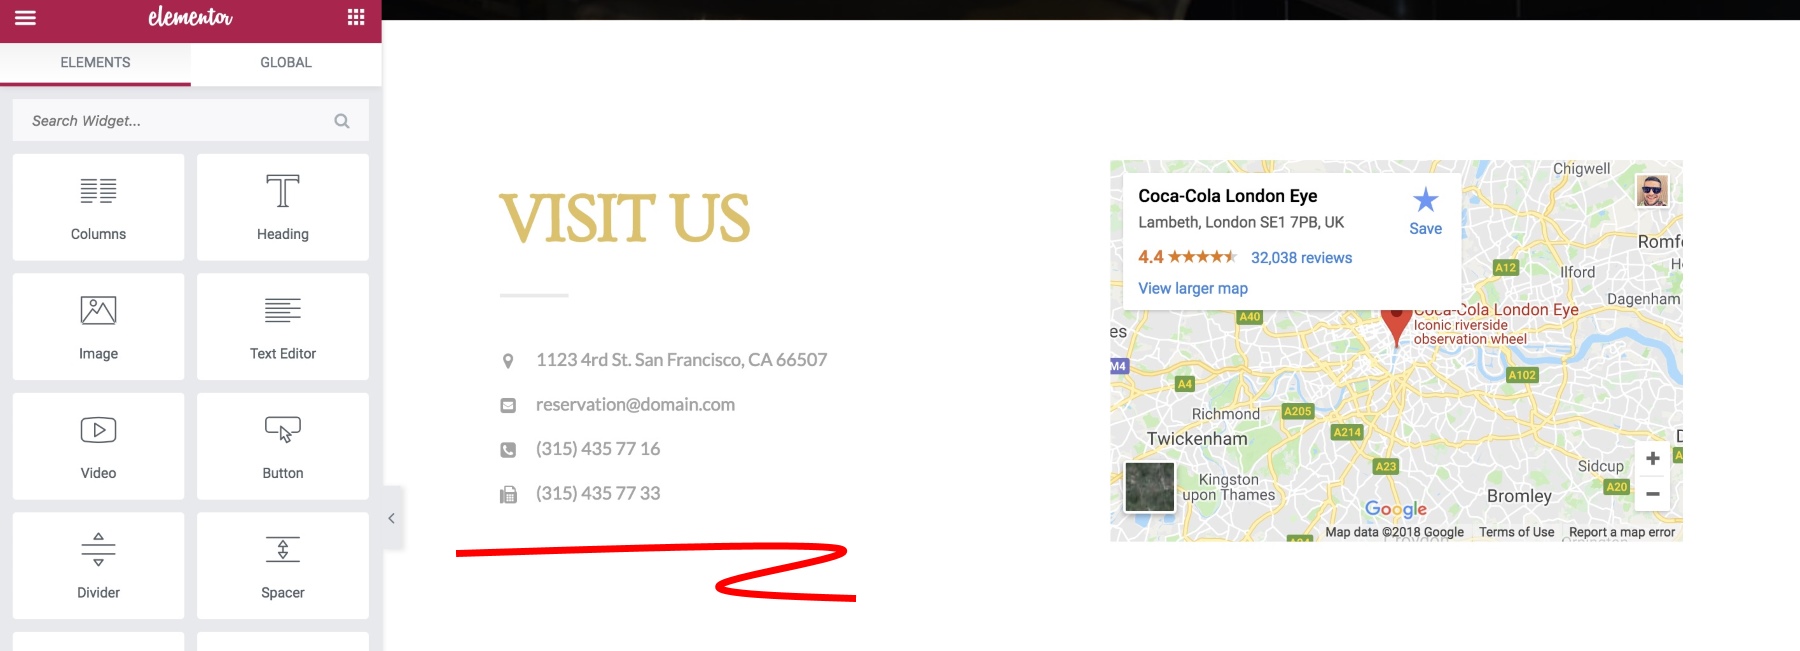
I'll just drag and drop it to a section that's nearer to the top, and also add a clear heading. Here's what I get after doing that:

Further down in my template, I have a section called Our Sweets Collection. I can repurpose that one to display links to my best content on the blog. In less than two minutes, I went from this:
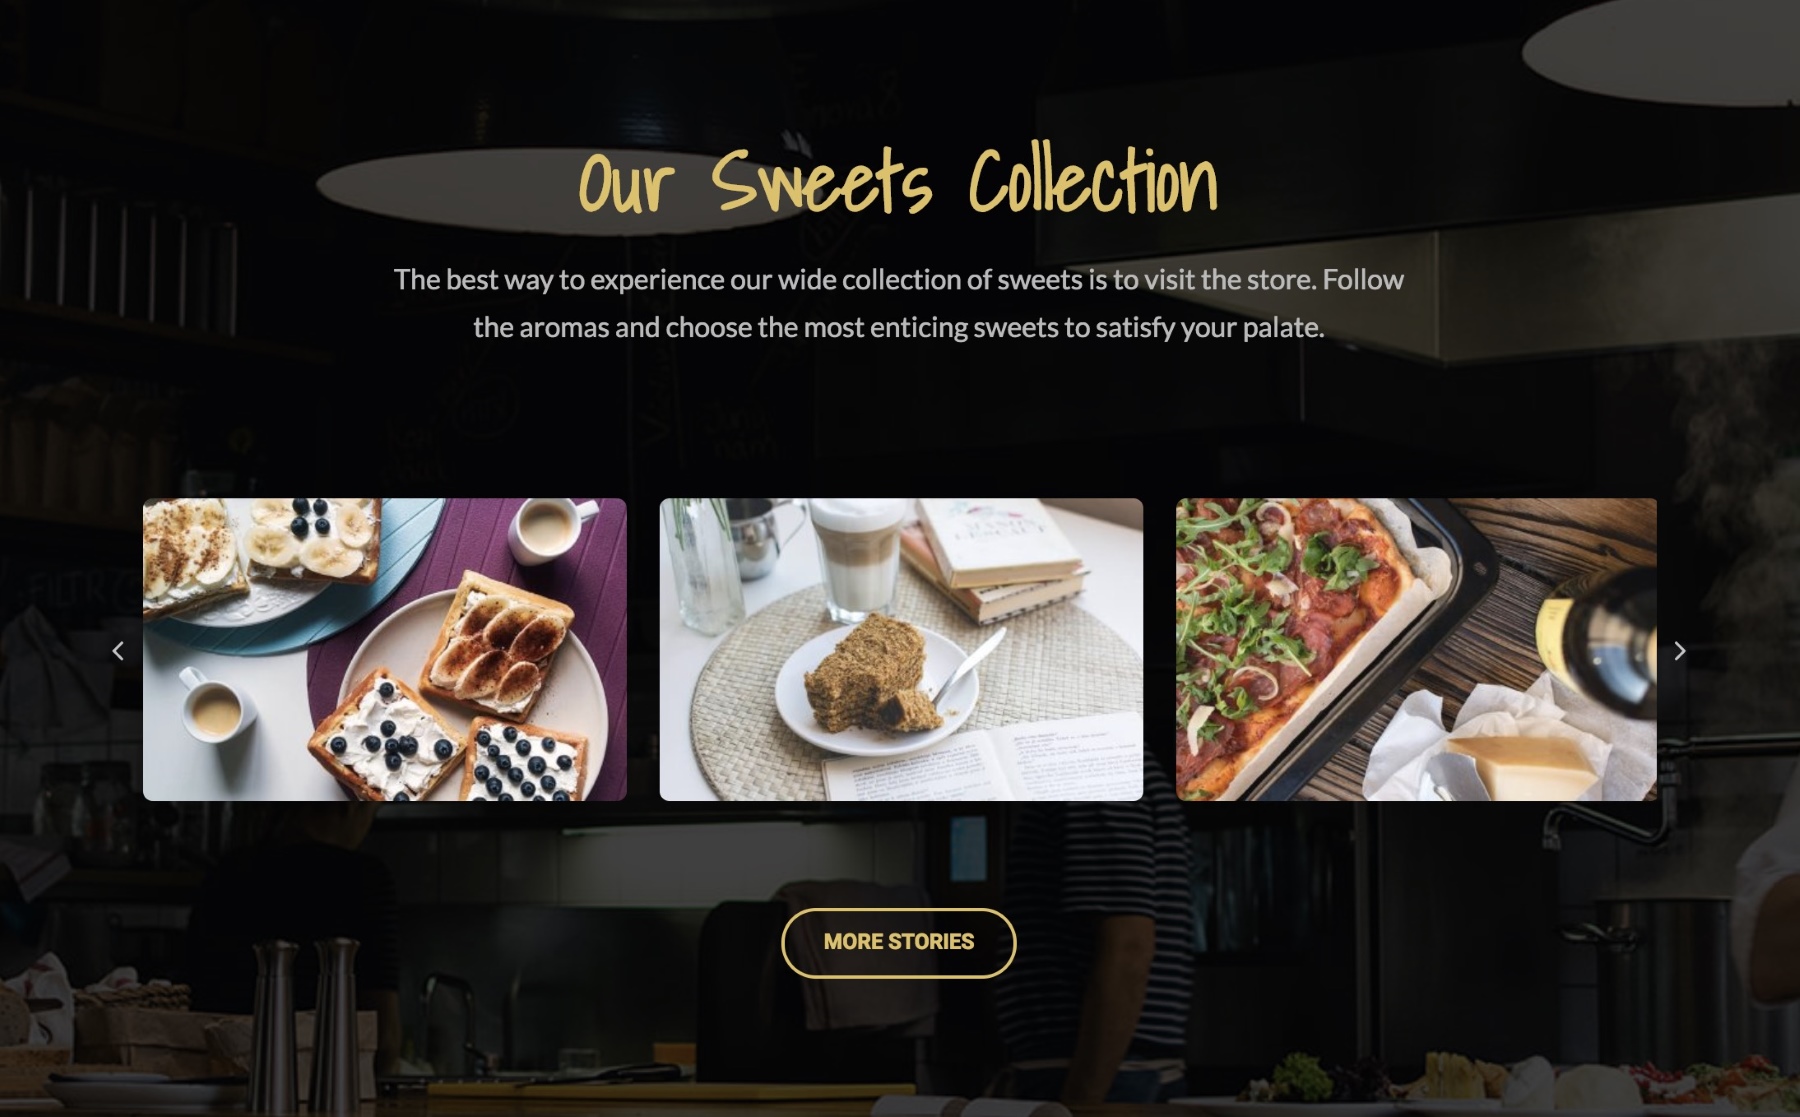
To this:

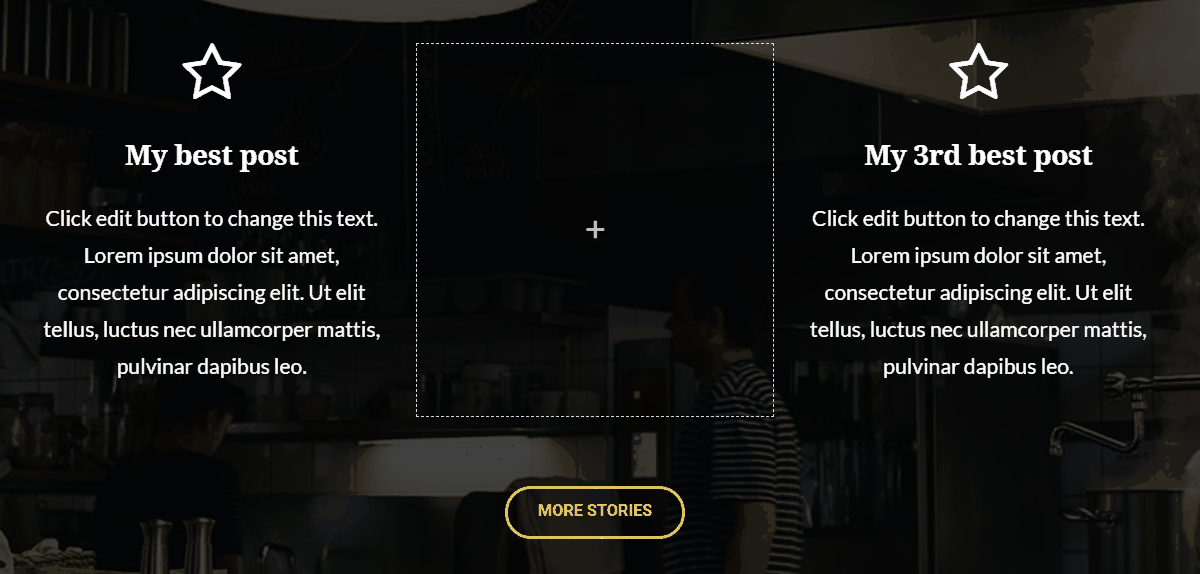
Those new blocks with the stars are made with the elements called 'Icon Box'.
💡 PRO TIP: Want to use another instance of a given element and just change it slightly? Don't create the element from scratch, just duplicate it and fine tune. Like so:
Overall, my homepage looks quite nice after all of these tweaks. See for yourself:
There's just one thing missing at this point — the page hasn't been set as the actual homepage for the website yet.
How to set your custom homepage as the actual homepage of your website
This is a very simple operation:
Go to your WordPress dashboard, then to Settings → Reading. Once there, select your newly created page as the homepage:
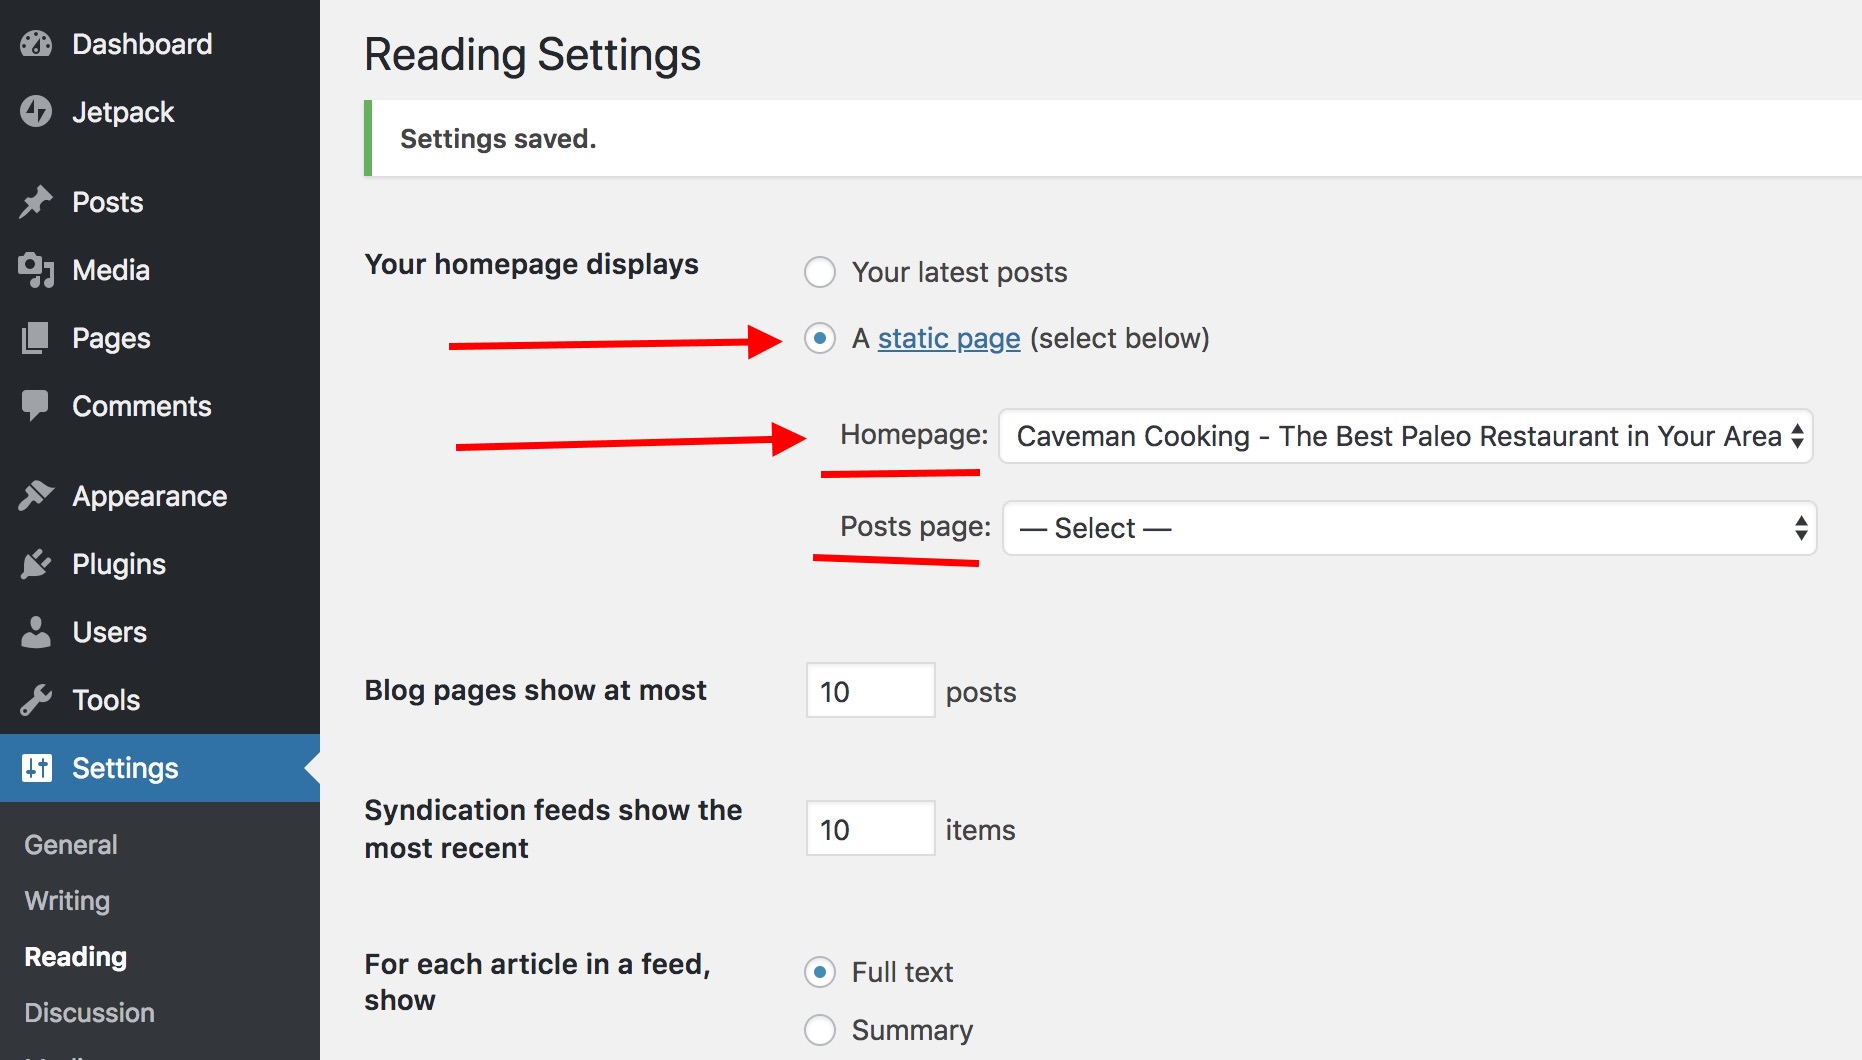
While we're at it, it's also a good idea to create a new blank page, call it 'Blog' and assign it as the 'Posts Page' (the other box visible in the screenshot above). This new page will now serve as the new listing page for your blog posts.
That's all! At this stage, you have a great-looking homepage that you can customize freely via Elementor and keep interesting for your readers for months if not years to come.
The fundamentals of how to promote your business website
Website promotion could be a topic for a whole separate guide, so let's not get into specific tactics here, but instead focus on the fundamentals of what matters when promoting your business website.First off, if you operate locally — as in, you have a location where people can visit you — then the best way to promote the website is to keep mentioning it to people in person. This includes all of your customers, people who visit you, suppliers, and so on.
The main mistake people make when promoting their websites is thinking too broadly. They attempt to 'crack the code', so to speak, and find a way to make their website a global success right from day one. This isn't a good mindset. You're much better off figuring out how you're going to reach your first 100 visitors, your first 1,000 after that, and so on.
With that in mind, there are loads of things you can do to make it more likely for both Google and online audiences to find you:
- Include your website address on your business cards/restaurant menus/flyers/everywhere.
- Search Engine Optimization (SEO). As I said before, SEO is a key piece of the website promotion puzzle. When working on your site, always pay attention to what the Yoast SEO plugin is telling you about your optimization levels, and try to learn SEO beyond that from other sources.
- Use your blog as a marketing tool. It's called content marketing, and the principle is simple: You publish blog articles that help people to deal with specific challenges → those people then check out the rest of your website → you get new customers.
- Try out paid promotion via Google AdWords. Create ads for your products or services and point them back to your website.
- Build a presence on Facebook. Join groups in your niche, participate in discussions, create your own page and tell your customers about it (again, in person).
- Advertise on Facebook once you pin down the right demographic.
- Create a profile on Instagram. Take pictures of your products and publish them using relevant hashtags (this tool can help you with that). Link back to your website from your profile bio.
- Create a YouTube channel if it makes sense in your niche (and for you personally). Link back to your website from the descriptions of your videos.
- Comment on popular websites/blogs in your niche, and link your name back to your website. Most comment forms allow you to do that.
- Reach out to your friends and other people who may be interested via email. Let them know about your website and why they should visit.
- Go to industry conferences and meetups. Build your network. Tell them about your website and business.
In general, you should make your website the hub for everything else you do on the web.
Meaning, if you publish a new update on Facebook, link it to a post on your blog that gives more context. Do the same with any other social platform you're on. Always remember to link back to your site.
The results may come slowly at first, but the important thing is to stick to it. With time, it'll all start falling into place.
Now It's Your Turn!
You now know just enough to be dangerous, as they say, and to successfully make a small business website all on your own!
Here's a handy action plan to make things more manageable as you're going through the steps. It's best to copy and paste it to your notes, and just check things off when you're done with them:
- Define a clear purpose for your website to exist.
- Define your audience.
- Settle on a general vibe. (Should your website be more 'hip' or 'corporate'?)
- Choose a name for your website and pick your domain name.
- Buy the domain and a hosting setup.
- Install WordPress.
- Learn the basic WordPress interface.
- Get through the core settings that every WordPress site needs.
- Pick the right theme (design) for your website.
- Install the theme.
- Configure the theme through the WordPress Customizer.
- Make sure the design is optimized for mobile.
- Create all of the must-have pages.
- Create a navigation menu for the website.
- Install a handful of useful WordPress plugins.
- Write your first blog post.
- Create a custom homepage.
- Start promoting your website.
Interested in learning more about WordPress and how you can use it to grow your business? Check out our other guides right here on WinningWP.
WinningWP Staples
There's more to us than just WordPress guides. Here's a few favorites:


Under the Hood
Wondering what plugins, tools and services we used here at WinningWP? We spill the beans...
WordPress Deals & Coupons
Save oodles of cash on some of the best hosting, themes & plugins around!
Good luck!
Making a small business website is certainly a challenge, and it may all seem a little daunting at first, but with a little determination, we hope you'll go on to create a website that will go on to give your business a solid standing for years to come! Good luck!