
A Complete Step-by-Step Beginner’s Guide on How to Make a Professional WordPress Blog – from Start to Finish
When it comes to blogging, there's arguably no better tool for the job than WordPress! Over 28% of all websites on the net use WordPress: it is, quite simply, by far and away the most popular content management system in existence. Not only does it allow you to completely own your own content (no third parties — like Facebook — involved), it's both extremely powerful and completely customizable. A WordPress-powered website really can be anything you'd like it to be. But how to make a WordPress blog? Below, we'll show you, step by step — from start to finish, and with no steps skipped. By following this guide, you'll have a technically superb blog — entirely of your own — set up and running in no time! Let's get started!
-Note: WinningWP content is free to all. If you make a purchase through referral links on our site, we earn a commission (learn more).
WordPress is the most popular tool in the world for building a website, and for good reason: It’s feature-rich, customizable, and remarkably affordable. What’s more, it’s also highly scalable: It’s just as happy powering a small blog with ten visits a month as it is powering some of the biggest blogs and websites in the world.
All of this makes WordPress an excellent choice for creating a blog of any size. But how do you get started? WordPress has a 'famous five-minute install', but what happens when you’ve completed this? How do you navigate the world of hosting, themes, and plugins? This guide has all of the answers: We’ll take you from start to finish, with easy-to-follow steps, on a journey to create the best possible WordPress blog.
This will be your standalone guide. We’ll bring in links to other articles and guides for deeper exploration of a topic, but don’t expect to click away. WordPress is a huge topic (as a testament to this, this whole site is about WordPress!), but it’s possible to overcomplicate the basics. We won’t do that; this guide is detailed but no longer than it needs to be.
We’ll also strive to make very few assumptions throughout this guide. The only exceptions are that we’ll assume you want to use self-hosted WordPress rather than WordPress.com (full details on the difference between those two are here), and that you’re comfortable with a budget of $100 to $200, with some of that recurring every year. If you’re good with those parameters, we’re good to proceed.
We’re going to start with choosing what your new blog should be about. Next, we'll tackle basic setup — including hosting and website names — then move to installing WordPress, adding your initial content, and choosing a design. We can then cover design customization, adding extra functionality through plugins, and growing your blog. We’ll cover everything you need to know and all the essential insights — but nothing you don’t need.
If you’re on board with all of the above, we won’t waste another word. Let’s get started: Here’s the complete step-by-step beginner’s guide to creating the best possible WordPress blog.
What Are You Blogging About
Before we get to the practical how-tos of creating the best possible WordPress blog, you must be absolutely clear on what you'll be blogging about. This is your site's topic or niche, and sorting this first allows you to build your blog to fit its purpose.
You're reading a guide about how to create a WordPress blog, so you quite possibly already have ideas about what you want yours to be about. If so, that's great! You should still read this section, however, as you need to make sure your idea is well suited to the blogging form.
Your blog's topic should be easy for the reader to identify. A single topic is typically best, as this allows readers to quickly decide if they'll be interested in what else you have to say.
Choosing this topic is challenging, and will require some serious thought: Most advice on what to blog about says you should 'follow your passion'. This is a reasonable starting point, as you'll have to write a lot about your given topic, so it's useful to start with something you're interested in. However, this shouldn't be your only test: Here are some other criteria to think about:
- Are you an expert on the topic, or do you at least you have knowledge or insights that others will find valuable?
- Are you going to be interested in the topic in two years? Five years? 'Passion' fits into this, but also consider whether your topic is a passing trend or around for the long-term.
- Do you want to make money from your blog? We'll talk about how to do this later, but, for now, it's useful to know whether you want to do this.
- Who else is doing what you want to do? If you have commercial aspirations, competition is an incredibly important point. If other people are writing about the same topics, can you do a better job?
- Similarly, do you have a unique take or approach on your given topic? Do you, for example, take contrarian positions to the industry standard? Competition aside, this is a great way of testing for originality.
- Can you write a concise 'elevator pitch' for your blog? Think of how you'd describe your blog to a friend. Is the pitch attractive? If it takes you more than 30 seconds to explain to a friend, visitors are going to have a hard time understanding what you're doing, and you'll need to simplify.
You may find it helpful to get a piece of paper and a pen, and sketch out your various ideas. Then, test against the criteria! If you're all good, can you now think of ten blog post ideas? If yes again, you're good to go. This whole process will take you time, but it's completely worth it: You don't want to sink hours and hours into your new blog, only to realize in six months or a year that you're writing about the wrong thing.
We'll use a case study throughout this guide to take you through the process of starting the best possible WordPress blog, and we'll start by following the exercise above to find out what our blog should be about.
Let's say, hypothetically, we want to create a blog about golf. We think golf tutorials are, on the whole, done badly, and that we can do them better. We're not golf experts, but have been playing for 20 years, and definitely know enough to help and provide value to beginners and intermediates. We'll focus on using language and terms that are widely accessible, and this translates into the elevator pitch for the site: 'Golf tutorials you can understand'. To start with, we just want to share our knowledge, but, in the long term, a side income would be nice.
All of the above makes for a decent pitch for a new blog. We'd now need to think up ten blog posts. Assuming we can do this, we're all good to go. We'll keep coming back to our new golf blog throughout this guide.
Working out what you're blogging about, what visitors should take from your blog, and what you want from your blog, are exceptionally important considerations. It will take time to work these out, but getting this right now will save a huge amount of time later. With this covered, we can move on to the first technical part of creating the best possible WordPress blog: Getting your new blog set up with WordPress running on it.
Choosing Hosting, Getting a Website Name, and Installing WordPress
This first section is going to quickly get you up to speed on the basic purchases, installation and setup you'll need for your WordPress blog. We’ll start with hosting, look quickly at website names (the technical phrase is 'domain name'), and then get WordPress installed on your website.
The very first thing we need to look at is hosting. Hosting is what stores and powers your website. The 'self-hosted' part of self-hosted WordPress means you'll need your own hosting, and you'll need to choose your hosting provider yourself.
Choosing the right hosting can be a daunting task, as there are a huge number of competing providers all offering different packages, price points, and features. Fortunately, once you know a few basics, it’s easy to make an informed decision.
The most important choice is between shared and managed hosting. Shared hosting is cheap (from $5 a month), but your website 'shares' the same server as lots of other websites. Thus, shared hosting can only handle up to around 50,000 visitors a month. You’ll also probably have to take care of backups, security, and optimization. Managed hosting, on the other hand, is expensive (from $30 a month), but everything is taken care of for you, including backups, security, and optimization. Plus, there’s no upper limit on how many visitors you can have each month.
In addition, you’ll also want a host with excellent uptime (at least 99.99% annually), fast speeds (look for SSDs — faster hard drives — as a sign the host takes speed seriously), and good customer support (an easy way of testing this is to ask a pre-sales question).
Shared hosting is fine for new WordPress blogs, and most small and medium WordPress sites. If your site fits one of those descriptions, then you should choose shared hosting — you can always move it to managed hosting later if you change your mind (we have a guide on how to move WordPress to a new host).
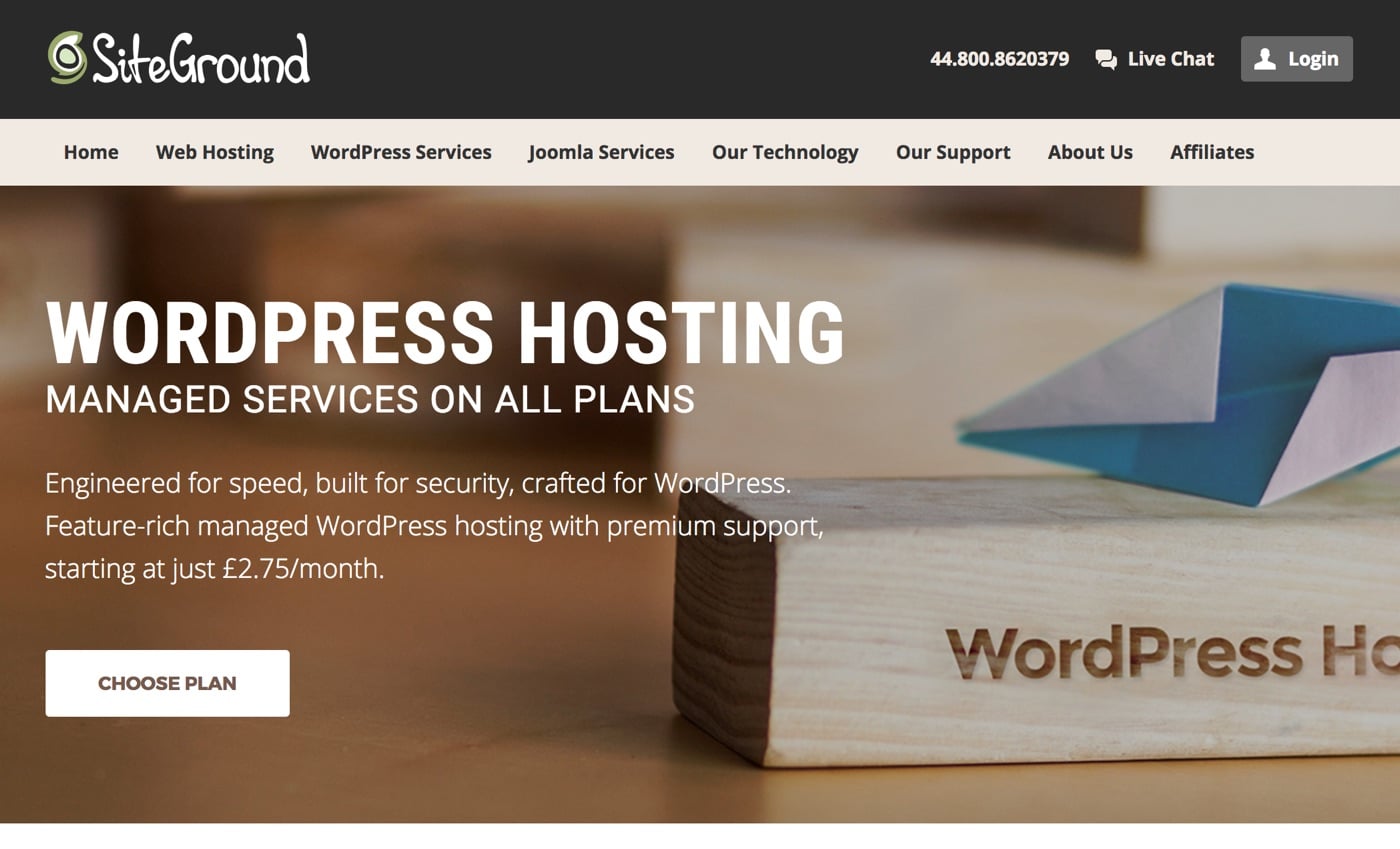
If you're just getting started, there's arguably no better host than SiteGround. They offer excellent service and an unparalleled feature set for the money — which is why, for the purposes of this guide, we'll be showing you exactly how to set your site up with them. If you're a more advanced user, with a much larger budget and really want the best managed hosting right from the start however, consider using WP Engine. For details on why we specifically recommend these two hosts, have a quick read of our guide to the best WordPress hosting.
You’re now ready to purchase some hosting and get your WordPress blog started! Hooray! First, you'll need to choose your domain name. This is a really important step and worth investing some significant time in. Hopefully, your blog will be around for a long time, so you’ll want to make sure you choose a name you’re happy with.
This step is complicated by the fact that more than 150 million domain names are registered already. This greatly reduces the pool of good domain names available, so you need to be patient and a little bit creative; most obvious names aren’t available, so be prepared to try a lot of different options.
Choosing a good domain name involves following a couple of rules and then using a tool to bulk-find available domain names that meet your criteria. Here are the rules you should follow:
- Choose the
.com. There are many domain extensions available (extensions are the.somethings— for example.net,.co.uk,.io) — but.comis the most recognizable and the most future-proof. For that reason, use it. - Short domains are best. Try to keep it under 11 characters.
- Include a keyword people will search for to find your site, if possible. Is your blog about golf? Then try to incorporate 'golf' into the domain name. The only caveat here is if the keyword is a trademark. You should not include other people’s trademarks in your domain names (WordPress is trademarked, so that’s why you’re reading
winningwp.comrather thanwinningwordpress.com). - Do not use the definite article. Did you know Facebook started out as
thefacebook.com? They dropped thethebecause it makes for a bad domain name. - Do not include any characters other than letters. Hyphens and numbers create ambiguity; people won’t know whether they should be spelled out or not.
- Similarly, your domain should be brandable, spellable, and pronounceable. You need your visitors to find your site and remember it, so you need a name that is spelled how it sounds and has a 'ring' to it. A little bit of alliteration (i.e.
winningwp.com) can be helpful here. - Check the history of the domain name. Somebody else may have owned your domain in the past, so check what was on the site! You can use archive.org for this: Type in the name, check for results, and, if you don’t like what you see, avoid using the name.
- Finally, double check you can't form any unwanted other words with your name! This avoids any embarrassment later on.
These rules are remarkably simple in practice: You can use one of a number of tools to find the available domain names for you, and, from there, you just need to ensure that your shortlisted domains follow the rules.
There are a couple of excellent domain-finding tools you can use. You don’t need to buy the domain name through these tools — we’ll do that with SiteGround later on — but you can use them to make the discovery process easier. Here are our favorites:
- Wordoid: If you’re stuck for ideas, Wordoid can generate brandable domain name ideas for you. This can be hit and miss, but the hits are so good that it’s worth trying out.
- Impossibility: This is perfect if you have a word you must use in your domain. Enter the word, and Impossibility will find available domain names with the word included.
- LeanDomainSearch: Another good option if you have a word you must include. This will generate a lot of options you’ll need to sift through.
For our new golf blog case study, having 'golf' in the domain name seems like a good idea, so we’ll start using the tools above to try to find an available .com with golf in the name.
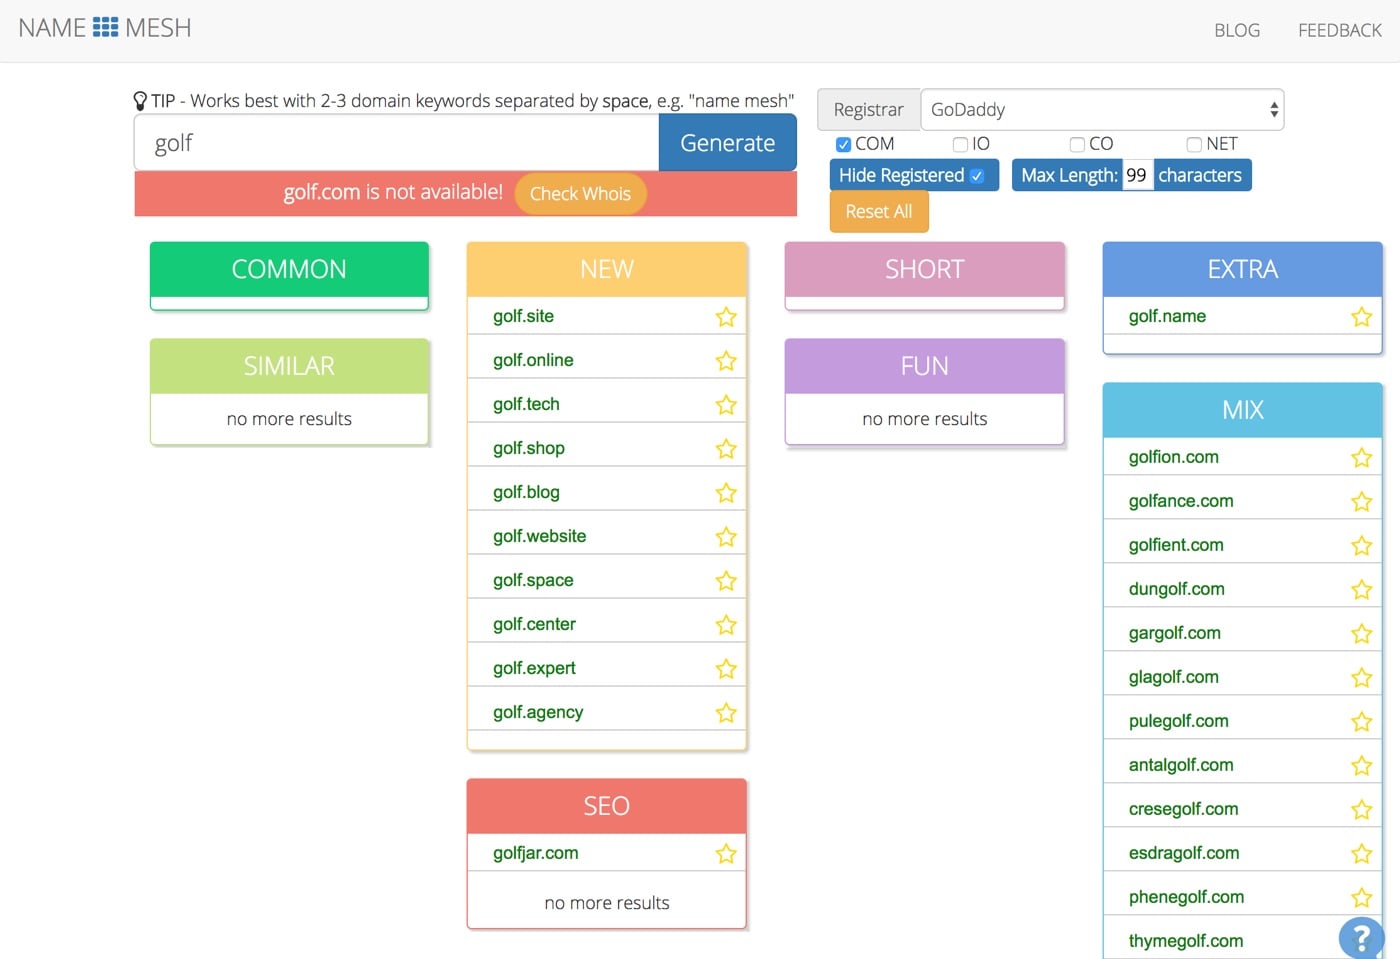
We can start by searching golf on a domain generating tool like NameMesh. We can see most names are taken, but it does give us one option: golfjar.com. This could be a winner already! The domain is short, includes the keyword, has the .com, is pronounceable, brandable and spellable, and should be future-proof. A look at archive.org shows the domain has been registered before, but it only had an 'under construction' page. This all looks good! Let’s shortlist this name and try out the other tools.
Wordoid gives us some interesting results, including golfia, but it turns out the .com isn’t available — we can only have .net. This rules the name out. The name golferated.com is fun, definitely brandable, and meets all the other criteria as well. We’ll add it to the shortlist. The other tools give us moogolf.com, golfgrad.com, and golfoftheday.com. This makes for a good shortlist! You can see how, with a little searching, even for a popular term such as 'golf', there are plenty of viable names available. Our golf blog needs to be a bit more serious, so that rules out moogolf.com and golferated.com. Unfortunately, golfjar.com feels a bit silly, so we’ll go for golfgrad.com. This name meets all of the rules and has the feel of a teaching site, which suits the aim of the blog.
Before committing to your domain name, you may want to get feedback from some friends or colleagues, or sleep on the idea. It’s incredibly important to get the name right, so you want to be certain before proceeding. You can find more information on choosing the right domain here.
Choosing Great WordPress Hosting
With a domain name chosen, you’re now ready to get your hosting set up. We’ll be walking you through the process of buying a domain and hosting with SiteGround, but if you decide to go with WP Engine instead you’ll find instructions here.
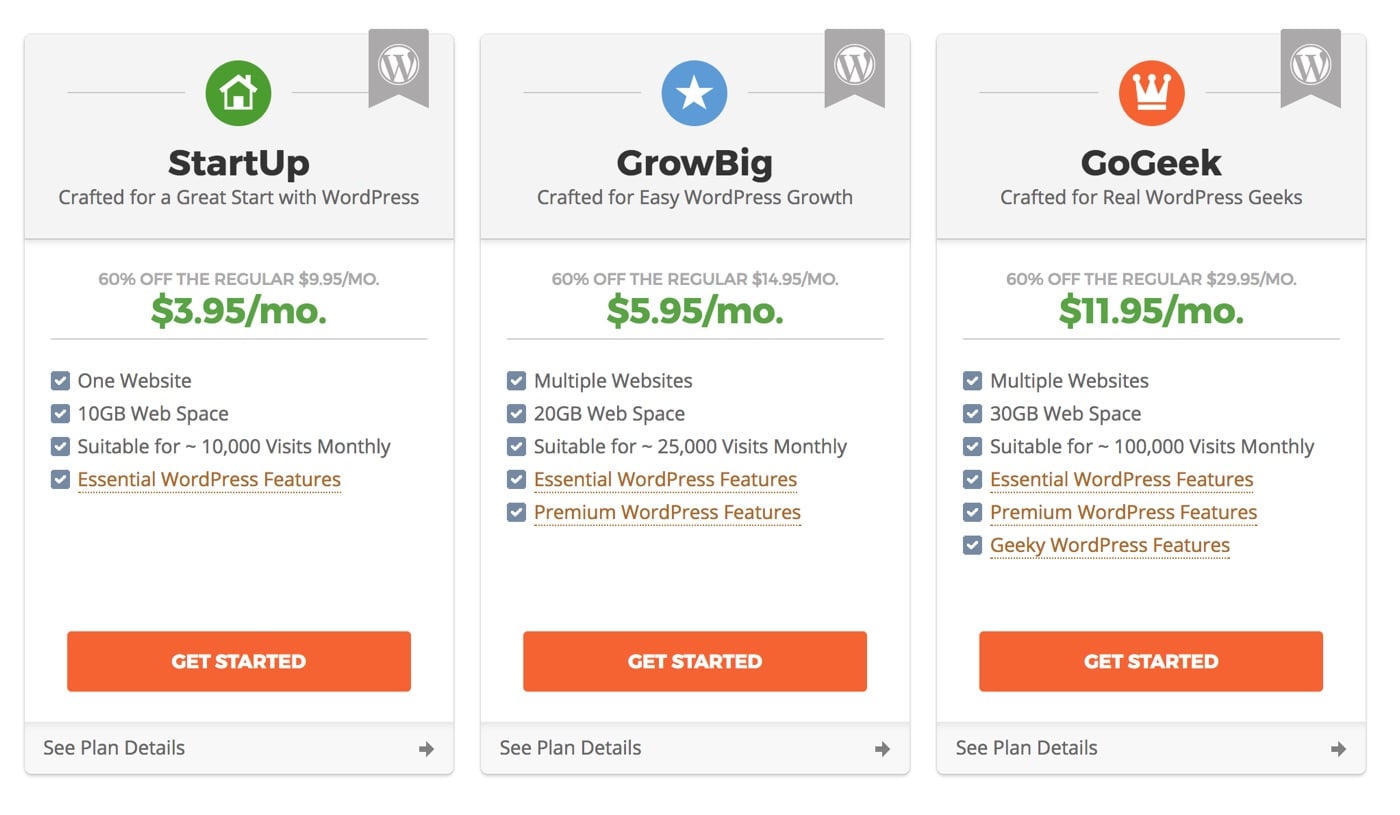
Head to SiteGround’s WordPress hosting options. You’ll find three to choose from: StartUp, GrowBig and GrowGeek. Unless you’re building a tiny site on a tiny budget, you’ll want to choose at least the GrowBig plan, as this includes some extra features you’ll want (such as better performance, better uptime, and a handful of technical features). This is the plan we’ll use for our hypothetical blog.
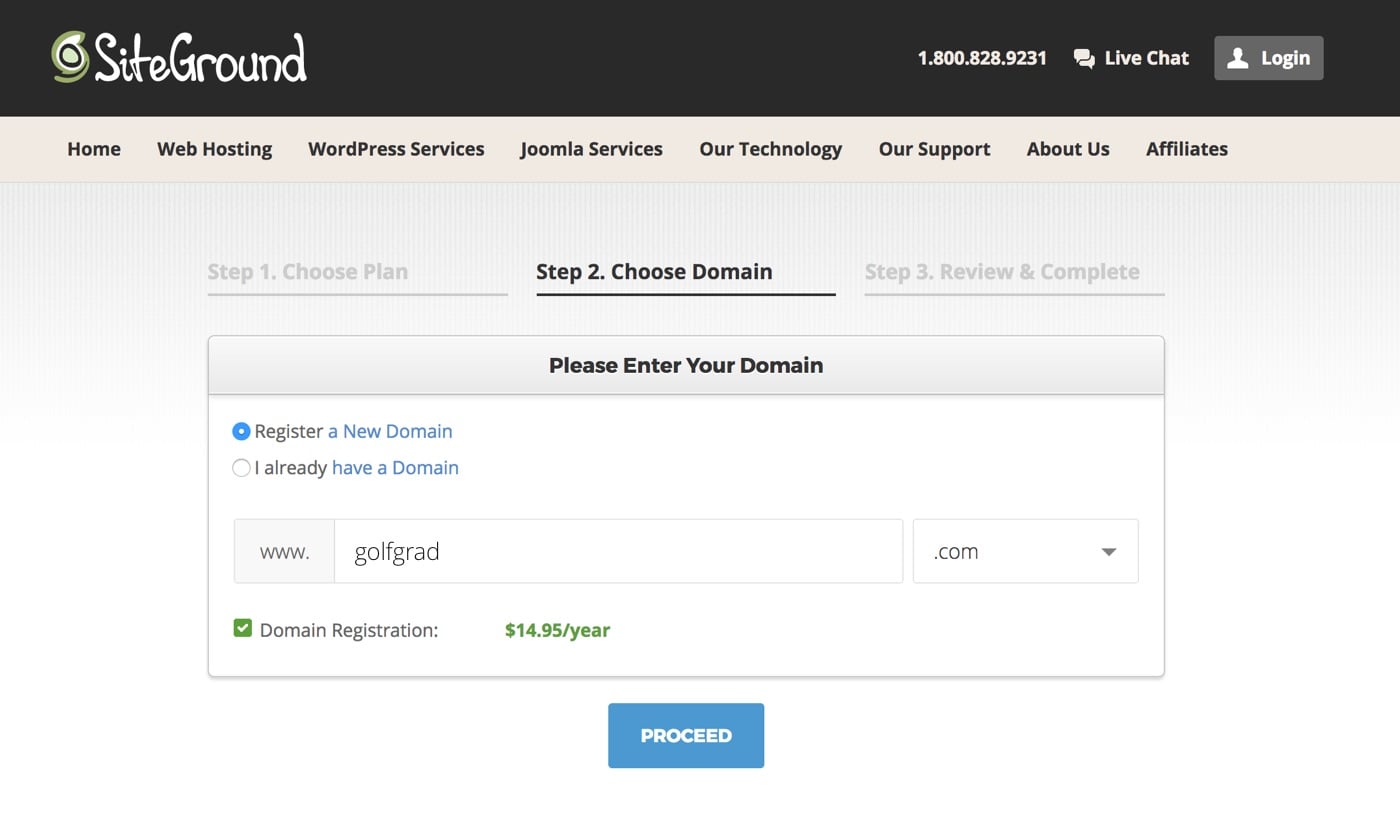
Choose the plan, and you’ll then be asked if you have a domain name already. We don’t already have a domain, so enter the name you chose in the last section, and click proceed.
Enter your billing information, and under Purchase Information check the location for your site’s data center. You want to have this set to where the majority of your visitors will come from. Unless you have a region-specific site, you’ll probably want this set to the US.
Once you’re happy with the options, click Pay Now. SiteGround will automatically create your account and set everything up for you. Follow the prompts to log in, and you’ll automatically be taken to a wizard that will install WordPress for you.
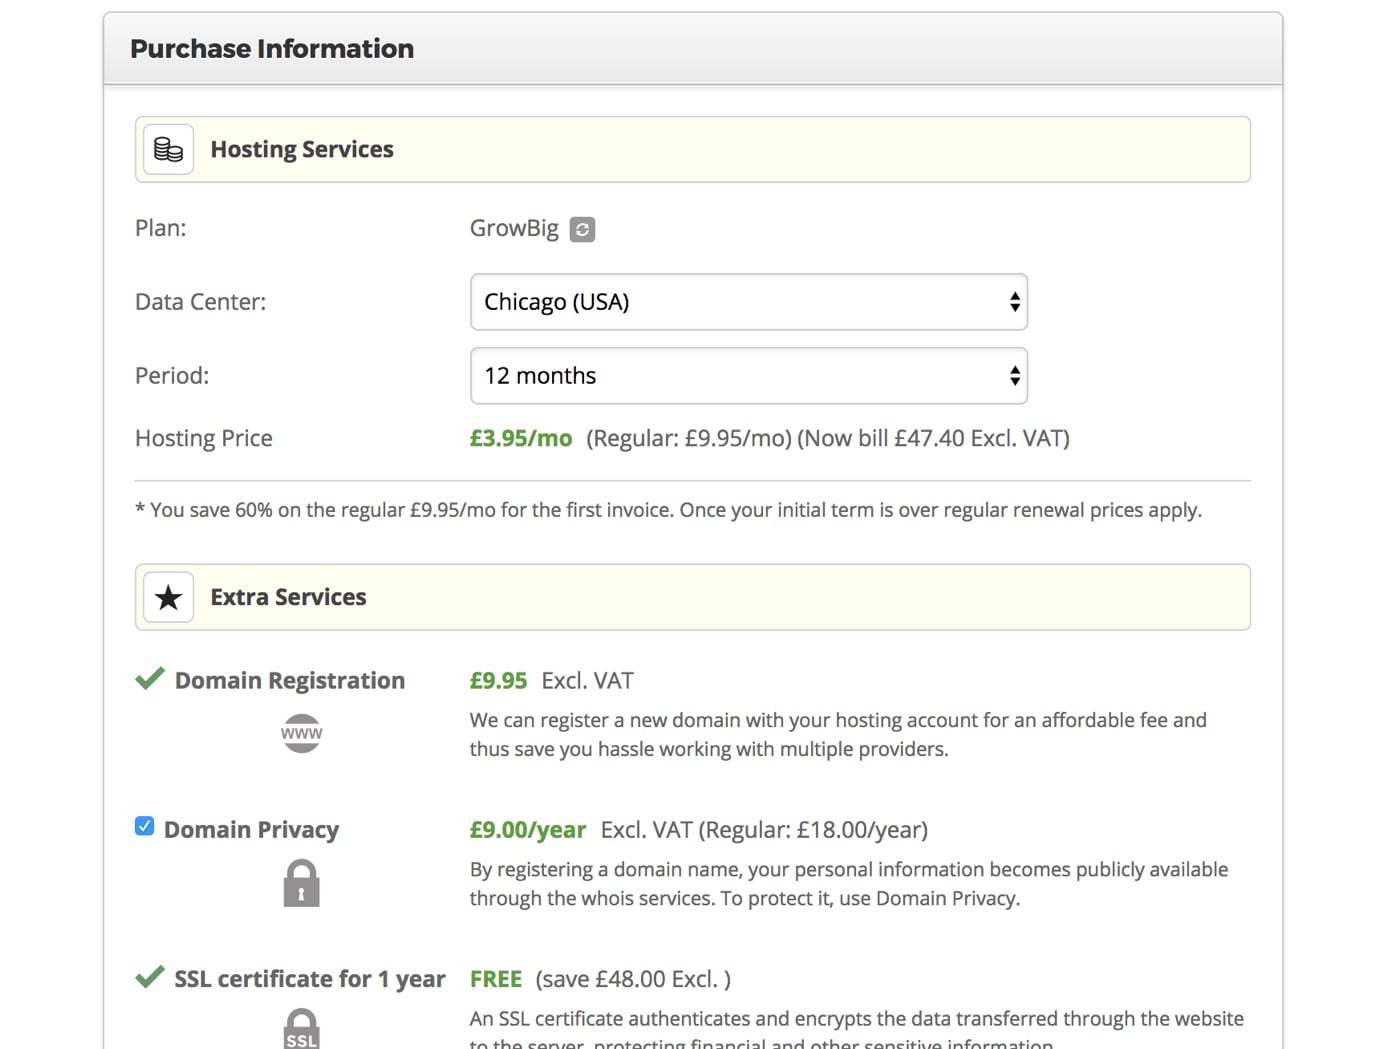
If you want to register for multiple years of hosting up front, you also have the option to do this. Finally, you can tick the Domain Privacy box to prevent your address from being publicly listed as the owner of your domain name.
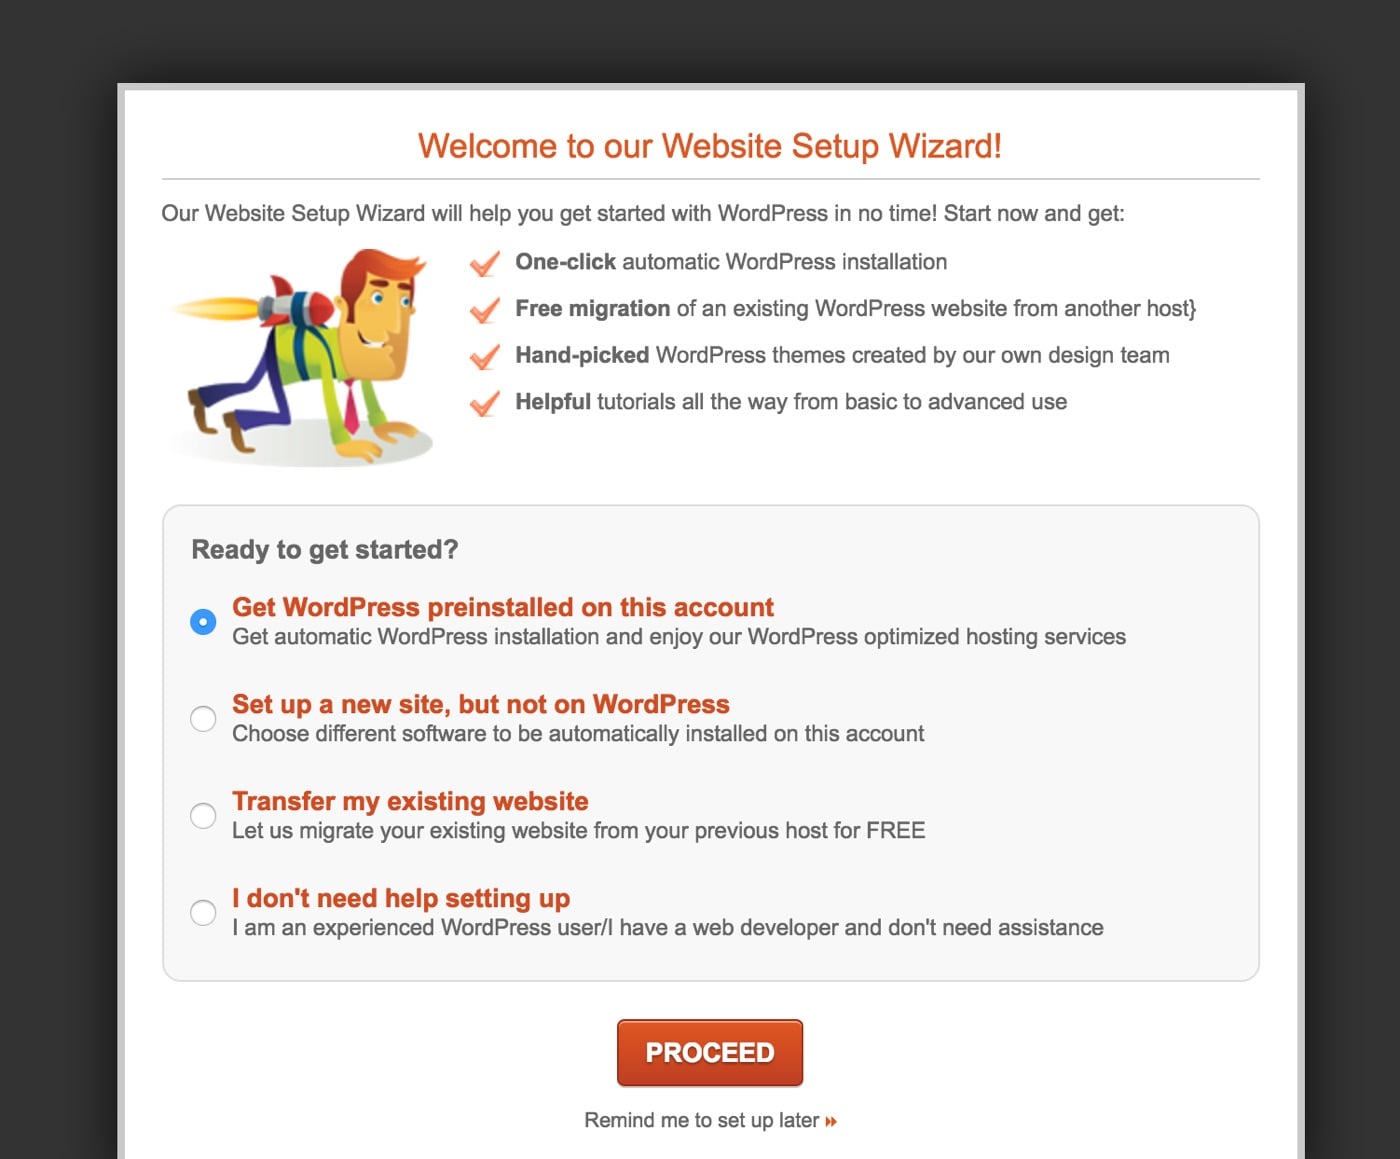
Select the radio box to 'get WordPress preinstalled on this account', and then Proceed. Enter your login details, scroll to the bottom, and click Submit. You have the option to choose a theme, but you can skip this (we’ll come back to look at themes later on in this guide).
You’ve now installed WordPress on your site! Note down your Admin URL, username and password, and then click Proceed to Customer Area. You can then click My Accounts → Go to cPanel to access the main 'control panel' for your website, also known as cPanel. We’ll make a couple of quick changes here to optimize your site.
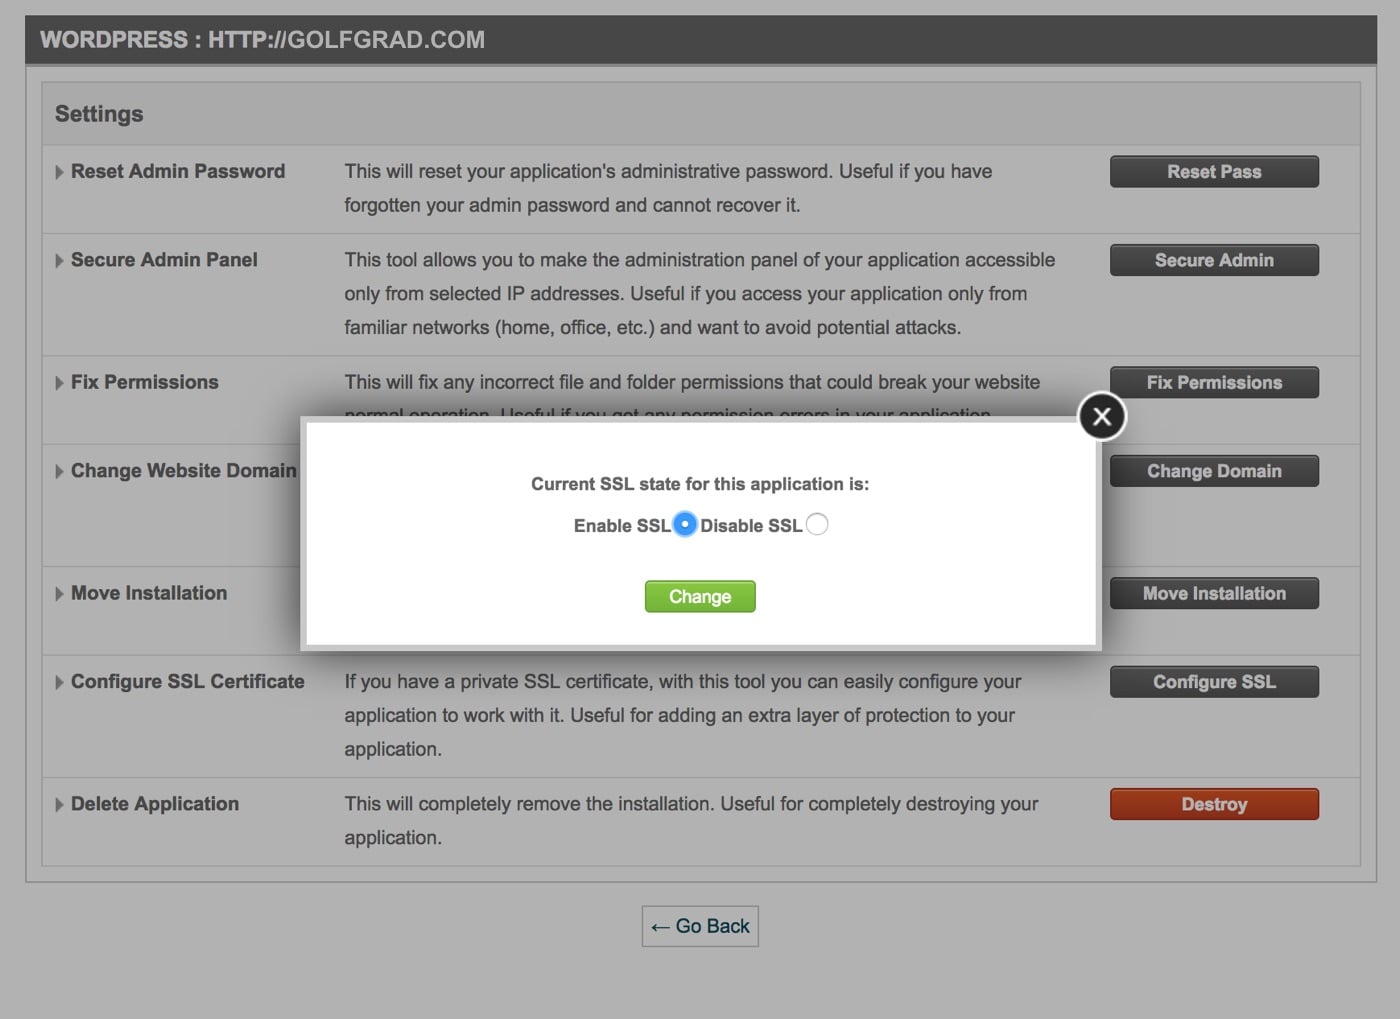
Find and click the WordPress Toolkit button, then click Manage next to your website. We want to enable an SSL certificate for your site so that data is encrypted between your visitors and the web server, adding a layer of privacy and security. Do this by clicking Configure SSL, enabling SSL, and then clicking Change. Easy!
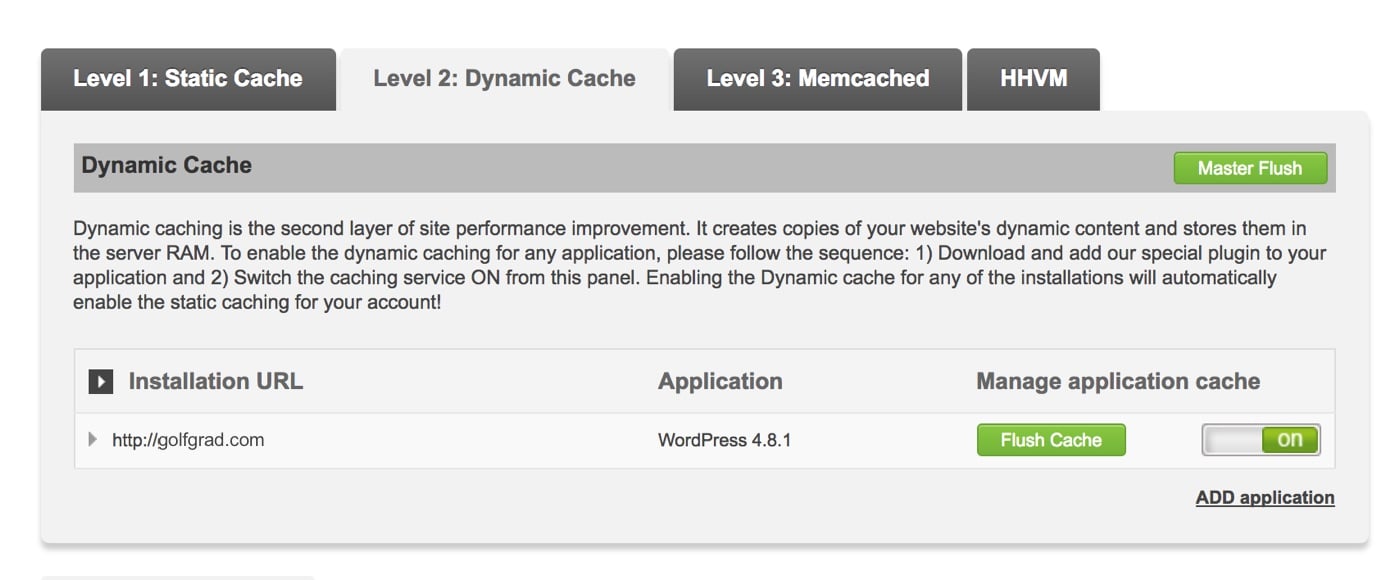
Once done, return to the cPanel main screen, and find and click SuperCacher under WordPress Tools. This will make your website faster. You should find Level 1 cache on automatically, but you can also turn on Level 2 and Level 3 caching. To do this, just click on each tab and toggle the caching on. It’s useful to understand how this works: The caching takes a snapshot of your website and then serves that to visitors, so your site doesn’t need to be generated every time you get a visitor. The snapshot is then regularly refreshed. This makes for a faster website.
You’re now ready to start using WordPress! SiteGround has automatically installed WordPress for you, so head to yoursite.com/wp-admin/ and enter the login details you created. You’ll be taken to the WordPress Dashboard, and can now start creating your new WordPress blog. We’ll give you a tour of the Dashboard in a moment.
If you've opted for WP Engine, you'll find you get WordPress automagically set up for you. You'll get an email soon after registering with details of how to log in.
We’ll wrap up this section here. By now, you should know how to choose WordPress hosting, how to choose a good domain name, and how to set up SiteGround’s WordPress hosting to run your new WordPress blog. This concludes the technical setup: From here on, we’ll be looking at WordPress itself, getting your site set up how you want, and creating your first bits of content.
Welcome to the WordPress Dashboard: Your Quick-Start Guide
The WordPress Dashboard is where you can control all of the elements of your WordPress site. You can access this at any time by going to yoursite.com/wp-admin/.
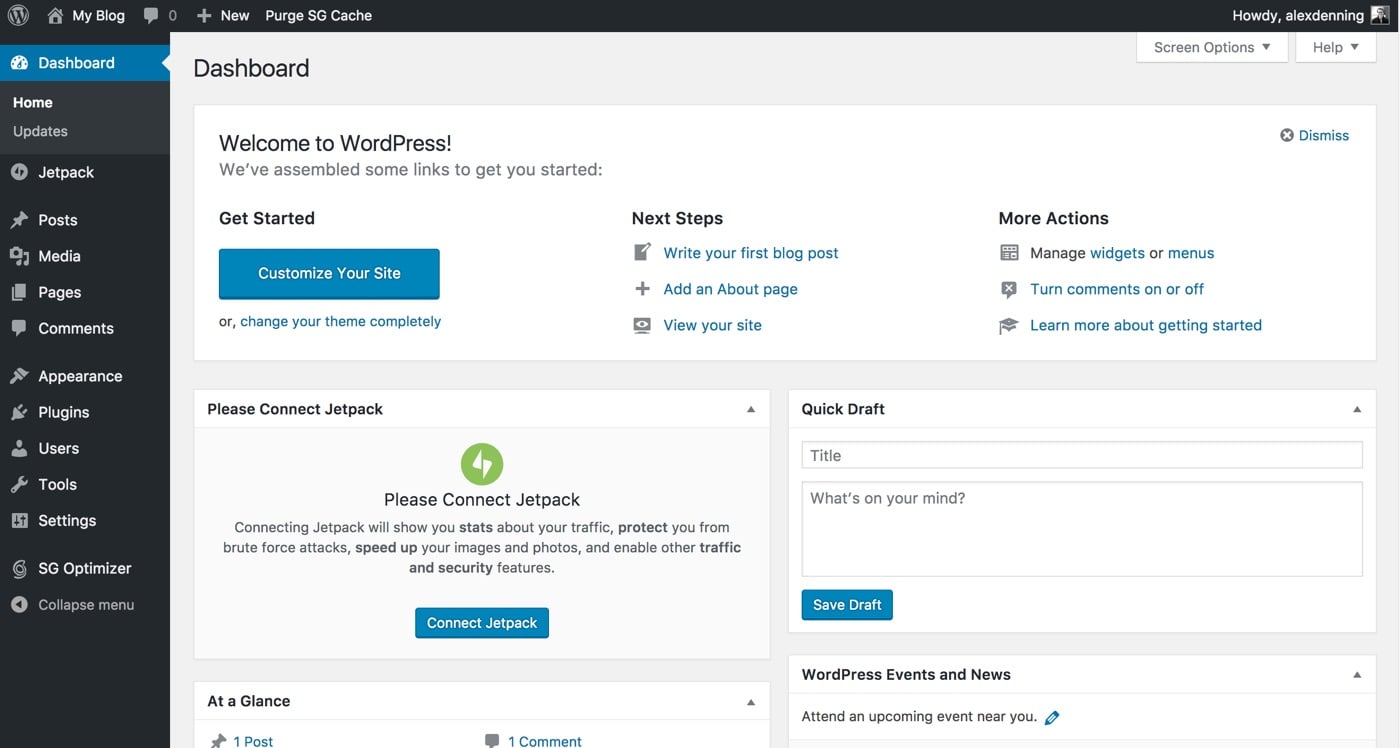
The main Dashboard screen is fairly intuitive — you’ll find the menu down the left and the main content in the middle. However, it isn’t especially useful, and WordPress’s new user 'onboarding' is fairly bad, so you’ll benefit from taking a moment to get to grips with the key terminology:
- Posts refer to blog posts. WordPress was originally blogging software, so these receive prominence.
- Pages refer to website pages. These are for 'static' content such as your about and contact pages.
- Appearance is where you can change how your site looks. This includes the Customizer, a way of changing the look of your site with a live preview of the finished result. You’ll also find widgets — prebuilt customizable modules you can drop into predefined areas such as the sidebar.
- Plugins are packages that add extra functionality to WordPress, such as a contact form, faster loading speeds, and ecommerce.
- Settings is where you’ll find general options for how you set up your site. Some plugins will also put their settings pages here.
- Jetpack is a plugin pre-installed by SiteGround that adds some 'most wanted' functionality to WordPress. Jetpack is made by Automattic, the same people who make WordPress.com, and requires a little extra setup.
- SG Optimizer is another plugin that's pre-installed by SiteGround. We’ve already turned this on in cPanel, so there’s nothing else to do. One note: There’s a button labeled
Purge SG Cachein the top menu. If you ever make a change to your site and it doesn’t show, click this to force the snapshot to refresh.
Click around the various options and pages to get a sense of how WordPress works. Click on Posts, for example, and you’ll find SiteGround has already published a post on your site. We’ll come back to creating your first post later on, but have a quick look now if you’re curious. Just get a feel for now — we’ll show you how everything works, and how to make the changes you want later on.
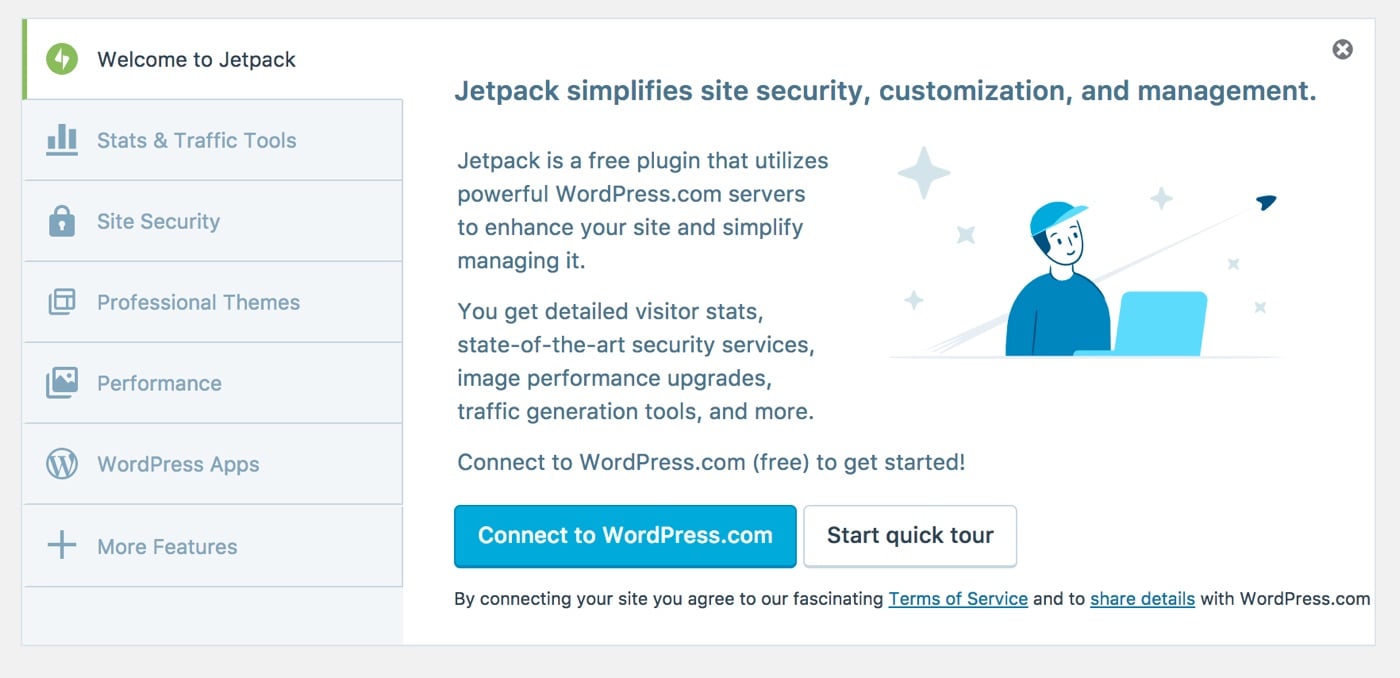
The only other quick-start setup at this stage is to connect Jetpack. Jetpack needs to be connected to a WordPress.com account to unlock its full range of features. Click the Jetpack menu item and then Connect Jetpack to start this process. You’ll be taken to WordPress.com, where you can log in or create an account if you need to. Once logged in, approve the connection of your site, choose the Free plan (this will do for now — we’ll talk about the paid plans later), and then activate the recommended features. All done!
You should now have a sense of how WordPress works, the key terminology, and how to use the Dashboard. You don't need to understand everything at this stage, but a couple of minutes getting a feel for WordPress will be very valuable. This makes us well-equipped to move on to the next section: Choosing the design of your site.
Choosing a WordPress Theme
WordPress themes are pre-made website designs that can be installed on any WordPress-powered website. These make for an incredibly affordable way of getting a professional website design. Plus, the best WordPress themes are customizable so you can integrate with your branding and tweak to get the precise look you want.
This section is going to give you all the detail you need to choose, install, and set up the perfect WordPress theme for your new WordPress blog.
Defining Your Blog's Aims and Niche
You should be prepared to spend a fair amount of time choosing the right WordPress theme. There are literally thousands to choose from, and your theme is the first thing visitors to your website will see — and judge — so it’s crucial that you get it right.
It's important to consider two questions:
- What do visitors want from your website?
- What actions do you want your visitors to take?
Our golf blog might answer these questions with the following:
- Visitors want to easily find and read golfing tips.
- We want visitors to convert to subscribers by joining our email list.
Alternatively, the golf blog could aim to get readers to read golf product reviews, so the site can make affiliate commissions as a result of purchases from the reviews. An ecommerce site would have different answers, as would a corporate blog, as would a food blog. Take some time to think about these questions and write down your answers. You can derive inspiration from similar or competitor sites if you need to. This will be very useful for eventually making the right theme choice.
WordPress themes come in fairly well-defined categories, so you should now take your analysis and fit it into one of these categories. Here’s what you have to choose from:
- Blog, including niches such as food, fashion, and recipe.
- Corporate, including niches such as academia, medicine, and construction.
- Multi-author news or magazine-style blogs.
- Portfolio, including professional portfolios and photography showcases.
- Ecommerce, including all the different types you can name!
The above cover the most common categories, but you’ll find WordPress themes in almost every niche, from wedding to nonprofit to real estate. Try to fit your site into one of the above categories, but, if it has very specific requirements — real estate, for example, requires very specific sorting features — then specify down to that particular niche. Our golf blog can happily fit into the blog category, but we'll also try out a couple of magazine-style blog themes.
WordPress themes are available free and paid. Paid themes are often called premium themes. As a general rule, you’ll find paid themes are available for around $60 a year, with this cost ensuring a higher quality design, updates to ensure compatibility with WordPress, and good one-on-one support if you need it. There are some excellent free themes available, but they rarely come with a guarantee of ongoing updates and support, so, unless you’re on an extreme budget, it’ll be worth choosing a paid theme.
Finding the Right WordPress Theme
As always, there are a couple of general rules that will help you choose the right WordPress theme for your site. We’ll run through these, and then show you where to go to find your WordPress theme.
Here are the rules you should follow:
- Pay attention to the design. This one is simple: Do you like the design? Look at the theme’s demo to see the details, and ask questions such as: How much detail does the design have? Does it meet the aims I defined earlier? Is the design good, or just stuffed with unnecessary bells and whistles? Good design is necessary, but not sufficient, for finding the right WordPress theme.
- Ascertain code quality. Does it look like the author knows what they’re doing? Is the theme fast? (This is important for visitor satisfaction and to search engines, and is generally a good indicator of high-quality code.) Run the theme demo through a speed tester (if the demo is in a frame, make sure to remove this first — you can typically do this by clicking an X along the top bar); a loading time of more than two seconds is a red flag.
- Test the support by asking a pre-sales question, however simple. Do you get a prompt answer? If you’re left waiting for hours or days for a reply, this may indicate support isn’t up to snuff.
- Look at the documentation, and see if it’s any good. Most themes will have their documentation (or manual) publicly available, so take a look. Does it have all the information you need? Are there clear images, or even video tutorials? If the documentation is obviously bad, then this should be a red flag.
- Research the author. Find out who they are! Have they been around long? Are they well established? How seriously do they take WordPress? If you find, for example, that they’ve recently sponsored or spoken at a WordPress conference (called a WordCamp), this is a good signal. Equally, if you find they sell themes on WordPress.com, the higher code standards there are another good indicator. If you can’t find anything, this should be a red flag.
The above can look daunting, but just use it as a checklist. In a moment, we'll look at places to find WordPress themes. Once you’ve found one you like, run it against the checklist.
One caveat before we proceed: You should avoid 'do it all' themes that offer all the functionality under the sun. The need to cater to everybody typically makes these themes slow and bloated, and leads to a poor user experience. It's much better, therefore, to look for a theme specifically built for the category you identified earlier.
We’re now ready to find you your perfect WordPress theme. Free WordPress themes are available from WordPress.org’s theme repository. As mentioned, you probably don’t want to go for a free theme, but, if you decide to do so, then look for the 'Twenty Something' series — usually found under the Popular tab. These are the themes that have been included with WordPress every year since 2010, and do come with excellent code quality and updates, but without support. If you must have a free theme, seriously consider one of these.
There’s no single repository for paid themes: Anyone can sell WordPress themes (which is why we need the checklist above), so you can buy from a variety of marketplaces or from sellers directly. The most popular marketplace is ThemeForest, and the biggest independent sellers are StudioPress, Elegant Themes, Themify and ThemeIsle. A number of niche sellers have excellent themes, including Anariel Design, Array, WPZOOM, ElmaStudio and Themetry. We also have a full list of where to buy WordPress themes here.
Going to individual sellers and marketplaces can be very time consuming; this is where the category of theme you identified earlier can come in handy, as this will let you quickly sift through sellers’ themes for ones potentially appropriate for you. You can also search [category name] best WordPress themes to find long lists of available themes in your desired category (although note that these lists are often driven by advertising and don’t always highlight the best choices available). It’s better, therefore, to see which themes come up multiple times on multiple lists. Given the lack of a centralized marketplace, be prepared to spend a couple of hours exhausting all of your options for paid themes.
You’ll want to create a shortlist of possible themes, and, once you’re happy with the list and options, run through the checklist we set out earlier. This should narrow your options down further. From there, choose the one you think is most appropriate for your site. You may even decide you want to purchase multiple themes, try them out, and get refunds on the ones you decide not to use. The design of your site is a big deal, so it’s very important to get it right!
Let’s run through a case study of how this would work for our golf blog. We know that we want a blog theme, possible niching down to a sport blog theme, so we’ll look at these two categories.
An initial search brings up a couple of options:
- TwentyTwelve, the default WordPress theme from 2012 (free).
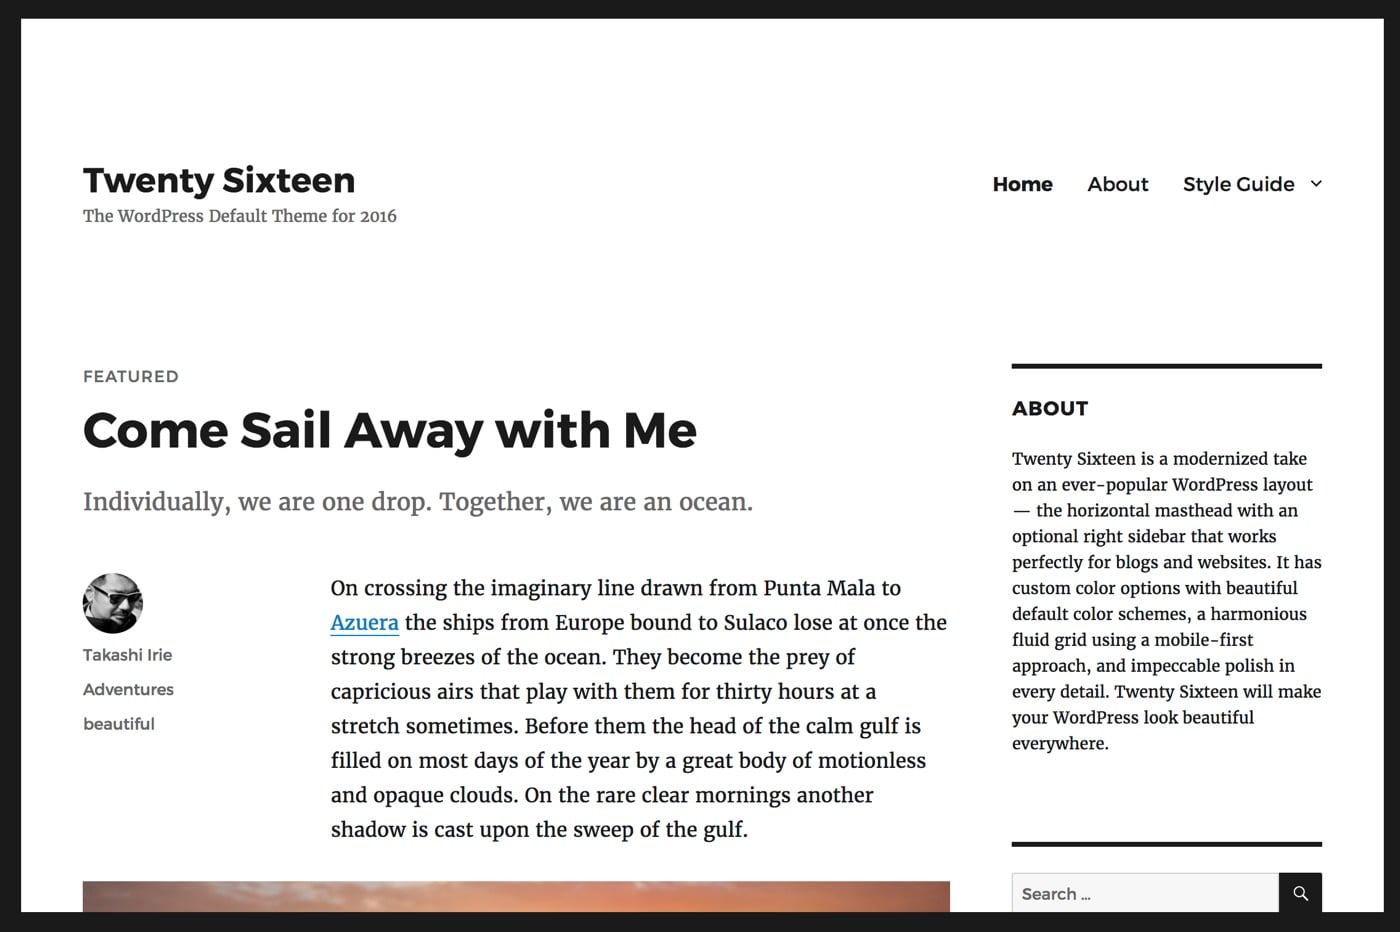
- TwentySixteen, the default WordPress theme from 2016 (free).
- Lovecraft, a typographically beautiful blogging theme by Swedish designer Anders Norén (free).
- Mixr, a simple blogging theme from Theme Hybrid (free).
- Genesis, a powerful blogging theme from StudioPress (paid).
- Indigo, a modern magazine-style blogging theme from WPZOOM (paid).
- Paperback, a beautiful magazine-style theme from Array Themes (paid).
- Cocoa, a minimal blogging theme from ElmaStudio (paid).
- MH Magazine from MH Themes — specifically, the Sport design (paid).
Running through the checklist, we can eliminate MH Magazine for being too bloated, and Cocoa is beautifully minimalist but realistically, it’s too minimalist to meet the needs of users. TwentyTwelve, TwentySixteen, Lovecraft, and Mixr are all beautiful themes, but, for the sake of argument, let’s say having professional support is a must, so this means choosing a paid theme. This may not be a deal breaker for you, but it’s useful to think about.

This leaves Indigo and Paperback to choose from. Both are very good themes, and there’s no obvious point of distinction, so this is a great example of a scenario in which you may want to purchase both and use the one you like best in practice. For brevity here, we’ll go with Indigo.
If you’re choosing a theme that’s not in the WordPress.org Theme repository (which includes some free themes and most premium themes), you should download the theme’s zip file — if you're buying, you should be presented with this conveniently after purchase. There’s no need to unzip or open the file, but save it somewhere convenient as you’ll need it for the installation. We can now move on to exactly that: Installing your WordPress theme.
How to Install and Customize Your WordPress Theme
It’s now time to install your WordPress theme! The installation process is remarkably simple, but be prepared to spend a bit of time on the setup of the theme.
You can install your theme by heading to Appearance → Themes → Add New. If you’re using a free theme that’s available from the WordPress.org Theme repository, you can install your theme by searching for its name and clicking Install → Activate. Otherwise, click Upload Theme, select the zip file you’ve downloaded, and then Install Now → Activate.
That’s all there is to the theme installation process! There is, however, a little bit more to setting up. The specifics of setting up each theme are a little different, but the general process is very similar for the vast majority of themes. We’ll walk you through setting up the theme we’ve chosen, Indigo, but focus on the points and processes that will apply to the theme you’ve chosen.
We can start with the installation of any extras your theme requires. If this is the case for your theme, you should be prompted immediately. For Indigo, we can see a notification that there are some recommended plugins to install, so we can follow the prompts to install these. You should be prompted if these plugins require further setup, and, if your theme requires plugins, it should also offer documentation that shows you how to do this.
If your theme supports this, you may also find it useful to use a quick-setup tool to import all of the settings and content found in the professional demo of your theme. This allows you to save time on initial setup, but should only be done on new blogs, as doing this imports all of the posts and pages found in the demo. You’ll need to delete this before adding your own content, so if you’ve already got your own content you should pass on this — it’ll be a pain to separate your content from the demo content later on.
Next, let’s quickly set up your menus. You can access WordPress’s menu editor by going to Appearance → Menus. The layout for this is moderately intuitive: You’ll find items you can add to the menu on the left, and the structure of the menu on the right. You’ll need to click View All on the items you want to add to the menu to see everything, then just tick the items you want and Add to Menu.

You can change the structure of your menu by dragging and dropping items. Indent an item to create a dropdown submenu, and indent multiple times to create layers of submenus. You can expand any item to change the text that displays in the menu, and this also gives you the option to remove a menu item.

Once you’re done, click Save Menu. Now, click Manage Locations, and you can apply the menu you’ve created to a menu location on your site. If your theme has space for multiple menus, you can either apply the same menu to multiple locations or click Use New Menu to create a new menu.
Once you’re done making changes to the menu, view the front end of your site, and you should see your lovely new menus in action. Easy!
The next step is to look at static front pages. The first thing to do here is to check whether your theme needs one of these. A static front page replaces the regular blog homepage with either a particular page from your site or a custom homepage template. For a new WordPress blog, it’s unlikely that your theme will require one of these, or that you’ll want one, but it’s useful to know how to use them just in case.
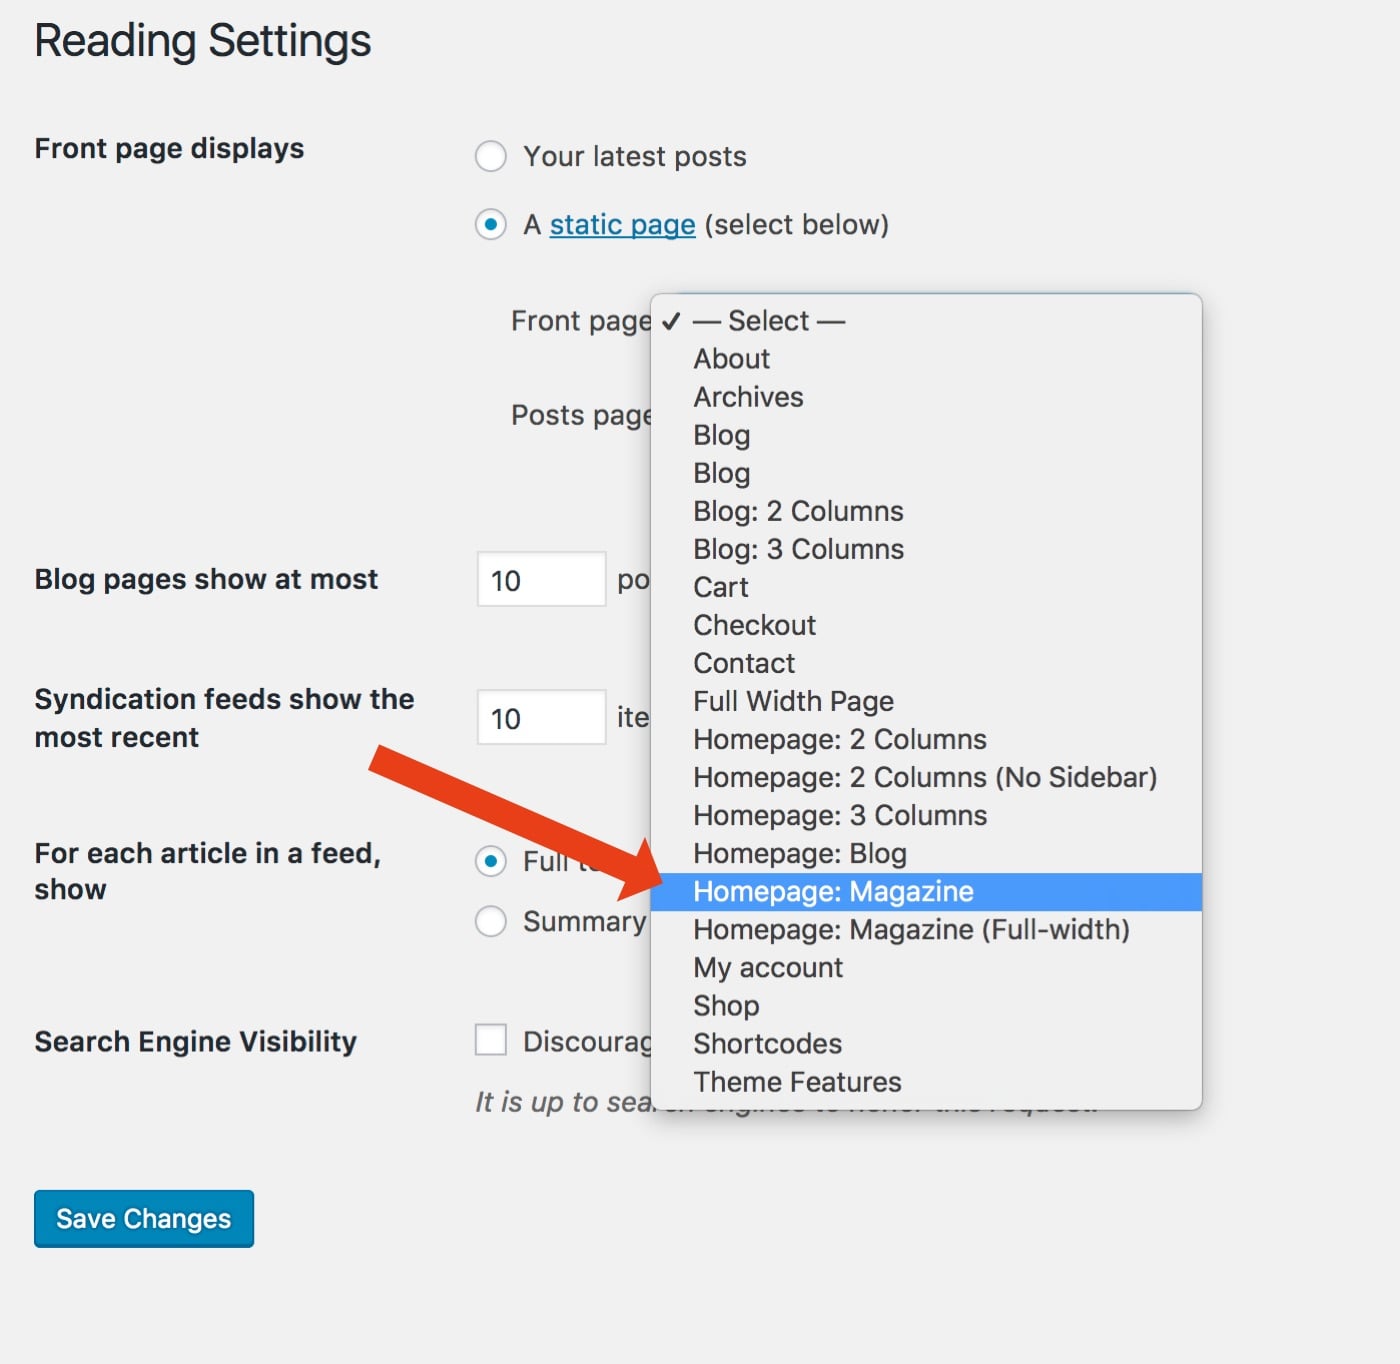
First, head to Pages → Add New, enter the title Homepage, and look for a homepage template under the Page Templates dropdown. Select this and publish the page. If you can’t find this, it means your theme does not require one of these, and you can move on. Next, head to Settings → Reading and under Front Page Displays, select the page you’ve just published. If you want to have a different page as your homepage, you can also select this here. Save Changes, and you’re done.
Finally, let’s move on to widgets. Widgets are really useful, customizable blocks that drop into predefined areas of your theme.
You can get lots of different types of widgets, including a block of your latest posts or comments, your latest tweets, or a signup form for your newsletter. WordPress has a set of widgets included by default, but you can add extra widgets via plugins (Jetpack adds some of the most popular widgets for you), and your theme may have widgets included too.

On top of all of this, widgets are really easy to use with their drag-and-drop interface. Access the widgets page by heading to Appearance → Widgets. You’ll find available widgets on the left and the widget areas (these are the predefined areas of your theme) on the right. You can add widgets by dragging and dropping an available widget into a widget area. Expand the widget to access its settings, Save, and you’re done! You can now view your site to see the fruits of your labor, or even drag and drop widgets between widget areas to change things.
Our WPZOOM theme, Indigo, has some special theme-specific widgets, with the individual widget areas telling us which widgets should be placed where. This is how we find out, for example, how to set up the nice three-column boxes on our homepage (we also have them pre-populated from the demo content import we did earlier). Customizing these is just a case of loading up the settings, making the changes we want, and clicking save. Whichever widgets you choose to add, that’s all you’ll have to do as well.
You should now have your theme installed and set up properly, which means we're ready to get started customizing your WordPress theme. This is where you can put your mark on your new WordPress blog, really getting the look you want, and building out your site’s brand.
The first stop for most customizations should be the suitably named Customizer. This is WordPress’s built-in tool for making changes to your website, with a live preview for ease of use. The Customizer, as you’d hope, is really easy to use: Find it under Appearance → Customize, click on the items on the left to access the different categories, and then start making your changes! You can then back up and make further changes, or click Save & Publish to set your changes live.

On our hypothetical golf site, for example, we may decide we want to change the description of the site to something other than the default 'My WordPress Blog'. We’ll do this by going into the Site Identify section, making the change to the tagline we wrote earlier, and publishing. It’s that easy! We’ll also quickly add a site icon, which will display in browsers and, if users bookmark our site, on their phones as well.
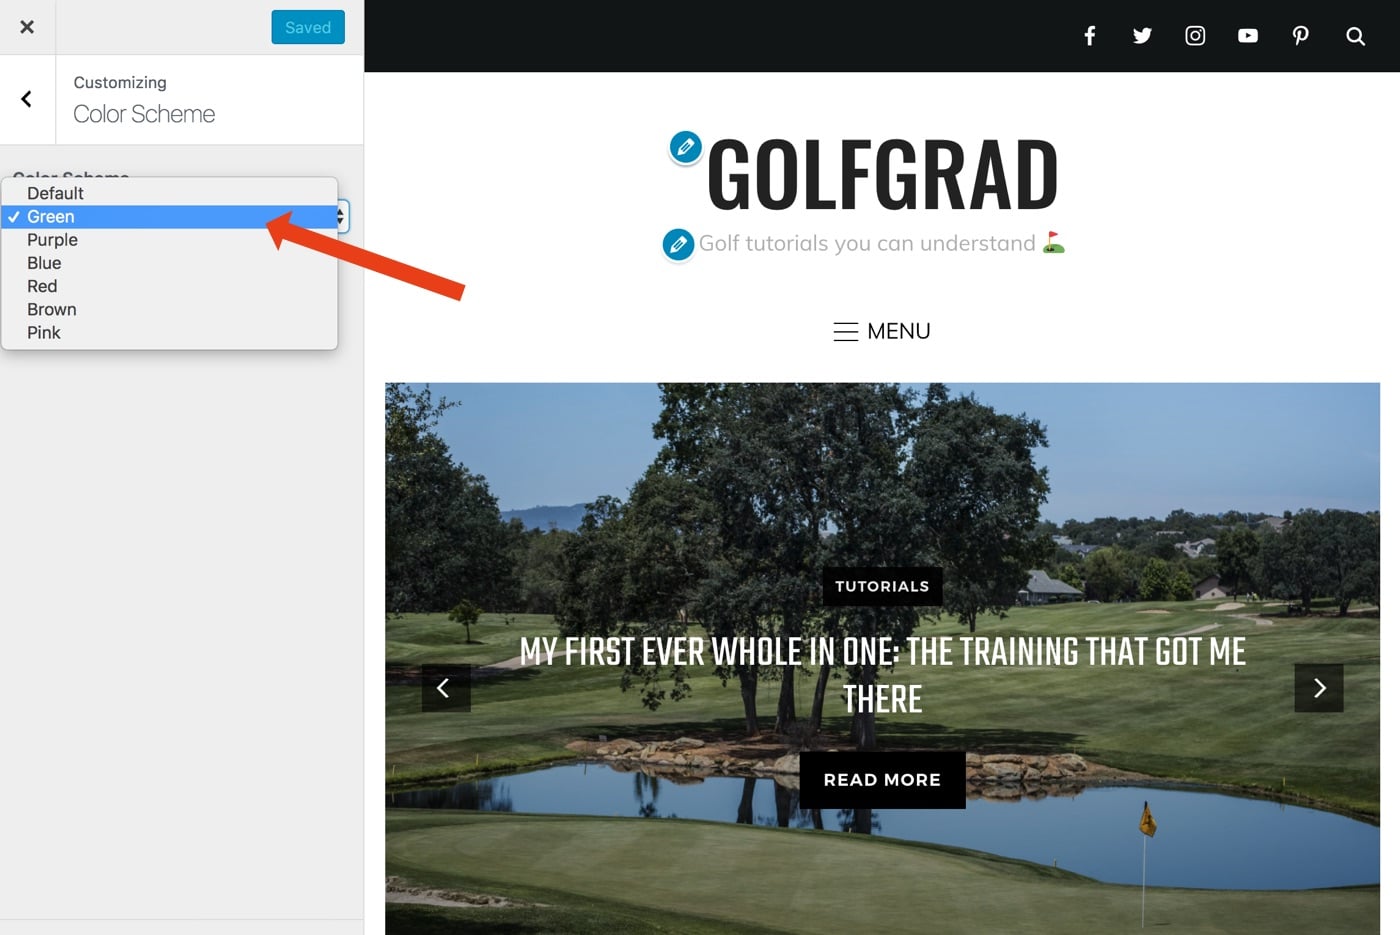
Different WordPress themes have different options available in the Customizer. Our theme has prebuilt color scheme options, so we'll switch from the default to a nice golfing green. The Customizer is extremely easy to use, so take a look through the different options available for your theme, and make changes as you see fit.
You can even customize widgets and menus from the Customizer. These give the same options as we looked at in the previous section, but with a live preview. You can, however, only change the widgets and menus you can see on each page. If you want to change a widget area that, for example, only shows on individual posts, you’ll need to click through on the live preview to an individual post.
You’ll want to spend a bit of time in the Customizer, making the right changes for your new WordPress blog. You can see how your site will look on tablets and mobile devices using the icons in the bottom left, and, once you’re done with everything, Save & Publish, then click the x in the top left to exit the Customizer.
Some WordPress themes will also include a theme options page where you can make extra customizations. In recent years, these options have moved over to the Customizer, so don’t worry if you don’t see one of these. If your theme does have an options page, you’ll either find it under Appearance → Theme Options, or as a separate item on the Dashboard menu. In our case, our WPZOOM theme has a menu item on the Dashboard. Click through to this to access the options.

Most theme options pages will let you customize layouts, what displays where, ad code, and any theme-specific extras. This is the case with our theme: We can cycle through for some general options, and to change how the homepage and how individual posts display. Your theme’s options should be fairly intuitive, so, as with the Customizer, take a look through the options, change what you want, and Save Changes when you’re done.
We’ve now covered all of the points you need to get your WordPress theme installed, set up, and customized.
We’re not necessarily done, though. One of WordPress’s great strengths is its flexibility, and this also applies to customizations: If you want to make even more changes, you can! It’s easy to get started with advanced customizations yourself (without writing any code), or you can approach a professional developer to take things on for you. You’ll find more details on how to take these next steps in our full WordPress theme setup and customization guide.
Creating Your First Blog Post
You’re now ready to start publishing! This is what WordPress, and creating the best possible WordPress blog, is all about. There are two main types of content in WordPress: Posts and pages. As we discussed earlier, posts are for updates while pages are for static content. The publishing experience is very similar for both, however, so, as you learn how to publish your first post, you’ll also learn how to publish your first page. Let’s get right to it.
You can create a post by heading to Posts → Add New from your WordPress Dashboard. This will open up the WordPress Editor, where you can write your content and change all the settings for that piece of content.
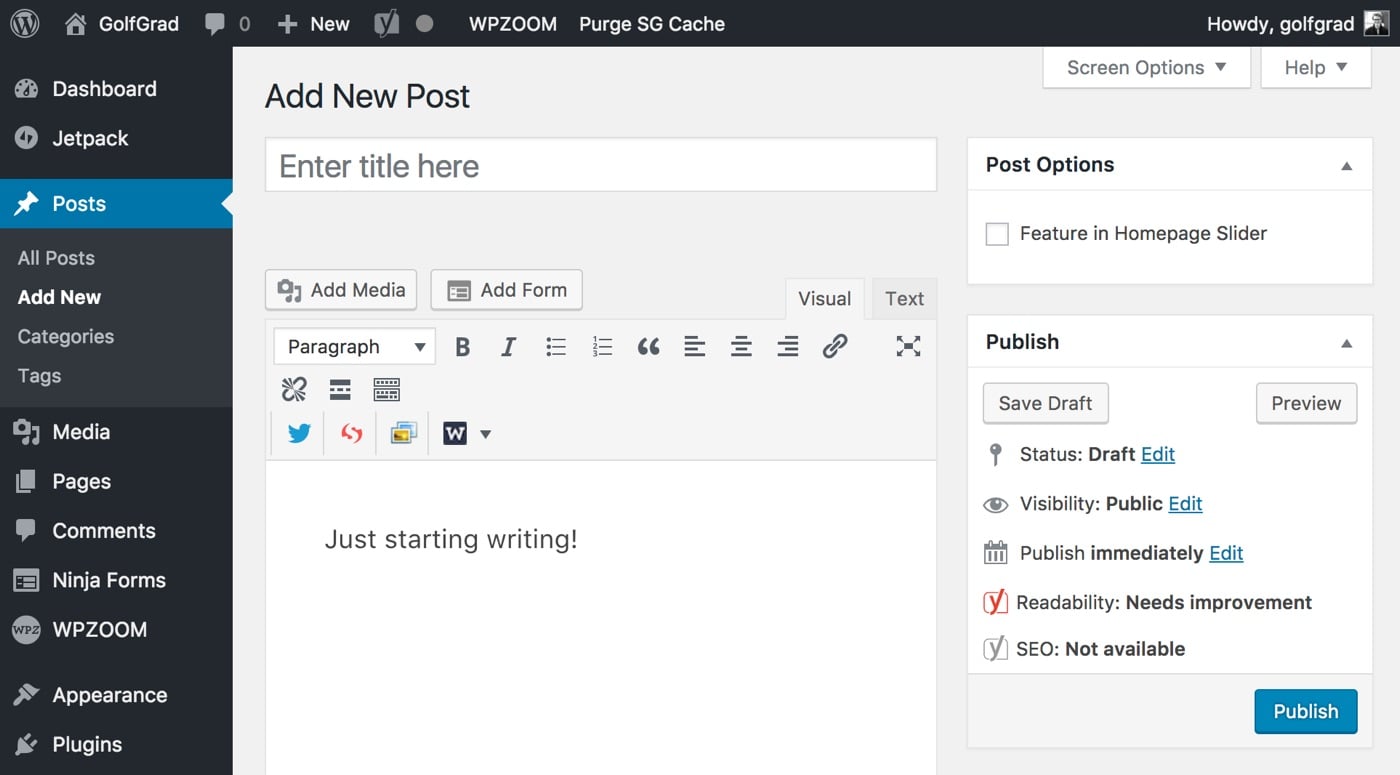
Try typing in the Editor to see how it works. You’ll find the experience very similar to Word or any other word processor, with formatting options across the top and a 'what you see is what you get' editing experience.
You can add pictures using the Add Media button, and change options related to the post such as which category the post is in, which tags the post has, and whether comments are on or off, using the boxes down the right-hand side.
As you’ve got Jetpack installed, you can even do extras such as embed YouTube videos, Google Docs, or Facebook posts, just by pasting the URL onto a new line in your post.
Once you’re done testing out the Editor, you can set your post live by clicking Publish. Don’t worry about visitors seeing this test content — you can delete it in a moment. Click View Post to see how your post looks on your site. You’ll notice that the way the content looks in the Editor isn’t precisely the same as how it looks on your site, but that’s a quirk of WordPress to get used to. You can return to the Editor by clicking Edit Post in the top bar, and, from there, if you need to make any changes you can do so — just click Update when done.
Once you’ve tested out creating and publishing some content, you can click Move to Trash from the Editor to delete your test post. You can also do this from the Posts menu on the Dashboard. If you’ve imported dummy content, you’ll find this a much quicker way of deleting the test content when your site is ready to go live.
You’ll find Pages offers a similar experience, so give it a try. You can access it from the Pages menu on the Dashboard.
Some themes support custom post types such as portfolio items, slider items, or specialized content, such as real estate listings. If your theme supports these, you’ll find them along the left-hand menu on the Dashboard next to Posts and Pages. The editing experience for these will be very similar to Posts and Pages.
You now know how to create your first bits of content! For now, try creating a couple of sample blog posts to get familiar with adding media and how your theme works, and to get your posts to look the way you want. You should also put together a couple of pages that every site needs, including an About page and a Contact page. If you want to add a form to your contact page, don’t worry: We’ll handle this in the next section.
Creating the best possible WordPress blog obviously involves creating incredible content, so you’ll want to spend a lot of time crafting this going forward. We’ll talk more about content strategy later in this guide, but next we’ll switch gears again to look at one of WordPress’s most exciting features: Plugins.
The Endless Possibilities of WordPress Plugins
WordPress plugins are prebuilt bits of functionality that you can bolt on to your WordPress site. Plugins are one of WordPress’s best features, as they let you add specifically the functionality you want for a low — or even no — cost. You’ve already got one popular plugin, Jetpack, running on your site, but there are plenty more that can add functionality from a site speed boost to security features or site visitor tracking. The possibilities aren’t quite endless, but they're close.
Knowing how to find the right plugins, what range of functionality is available, and how to set them up is your secret weapon when creating the best possible WordPress blog. This section will show you everything you need to know about plugins and how to use them on your site.
WordPress Plugins, and Where to Find Them
Similar to their theme counterparts, WordPress plugins are available in two flavors: Free and paid. Also as with themes, free plugins are available in the WordPress plugin repository, while paid plugins are available across the web. There’s no formal central marketplace, but CodeCanyon is home to a lot of WordPress plugins. There are also some excellent independent plugins sellers, some of whom we’ll recommend later.
While there are plenty of free plugins available, it’s often worth paying the modest fee for a premium version (typically $20 to $100 a year) for the guarantee of support if something goes wrong, the extra features typically available in pro plugins, and the general commitment to the future of a plugin that paying gets you. This final point is more ambiguous but especially important, as WordPress plugins tend not to be a security risk for your site per-se, provided they're kept up-to-date and compatible with the latest version of WordPress. Paying for a plugin provides some protection against your plugin being abandoned or neglected by its developer.
It’s really important to choose your plugins carefully and only use plugins from reputable sources. Because plugins are prebuilt bits of functionality, they could be running any code on your site. When used maliciously, this could open a door to hackers or spammers. Don’t be frightened by this; it’s just something to be aware of. Be careful to only install plugins from their original authors (avoid sites bundling other peoples’ plugins), look for the usual signs that a seller or developer is reputable, and look for other people recommending a plugin, and you should be fine.
One final note here: Because plugins are running extra code on your site, they can slow it down. It’s not necessarily true that more plugins results in a slower loading speed for your site, but, generally, sites with more than 20 or 30 plugins will be significantly slower than sites with five or ten. With so many plugins adding so many excellent bits of functionality, it can be tempting to install as many as possible. It’s useful to exercise some restraint here, though — only install the ones you absolutely need, and set your maximum limit to around 30 plugins.
How to Install a WordPress Plugin
Installing a WordPress plugin is really easy: Just head to your WordPress Dashboard, then click Plugins → Add New. If you’re installing from the WordPress plugin repository, search the name of the plugin you want to install, find it in the search results, and then click Install Now → Activate. You’re all done! The plugin will typically come with some extra options, which we’ll come back to in a moment.

If you’re installing a premium plugin or a free plugin from outside the WordPress plugin repository, head to Plugins → Add New, but then click Upload Plugin. Click Choose file and select the ZIP file of your plugin, then click Install Now → Activate. You’re now also done!

As with themes, while the installation process is extraordinarily simple, there’s often extra setup involved. Plugins vary in how they deal with this: Some, such as Jetpack, will automatically redirect you to an 'onboarding' new user page; others will add a banner to your WordPress Dashboard telling you how to get started; still others will quietly add an extra menu to your WordPress Dashboard’s Menu (possibly burying it under the Settings tab), leaving you to find the options yourself.
However your plugin sets itself up, it’s generally best to visit the plugin’s settings page immediately after install. Some plugins will require you do some setup or registration, others simply want you to confirm turning on the plugins, and others will work out of the box. It’s up to you to find this out, however. What to do next should be obvious, but, if it’s not, do a search for how to set up [plugin name] and you should find the answer.
Congratulations! You now know how to install a WordPress plugin. We’ll now look at some of the WordPress plugins we recommend.
WordPress Plugins We Recommend
We’re now ready to look at a handful of WordPress plugins that we recommend. These are great blogging plugins that any guide to making the best possible WordPress blog is duty-bound to include. They’ll be a great fit for most new blogs, but if you read the description and think the plugin isn't for you that’s fine. This is also not an exhaustive list. There are plenty more excellent WordPress plugins available; this is just our list of recommendations for most sites.
There are nine plugins on the list below. We’ve included a short description of each plugin, explained why you’ll want it, and noted any quirks in its setup process. Here’s our list of really great blogging plugins.
1. Akismet: effective spam comment blocking
Akismet is an excellent spam comment-blocking plugin from Automattic, who also make WordPress.com and Jetpack. Akismet protects your blog from unwanted, unsightly, and unprofessional comment spam that all WordPress blogs inevitably receive. Akismet is available from the WordPress.org plugin repository, so install from there as normal.
Once you’ve installed Akismet, you’ll find a big prompt to set up your account added to your WordPress Dashboard. Click this and you’ll be taken to the Akismet settings page, where you’ll be prompted to get an API key.
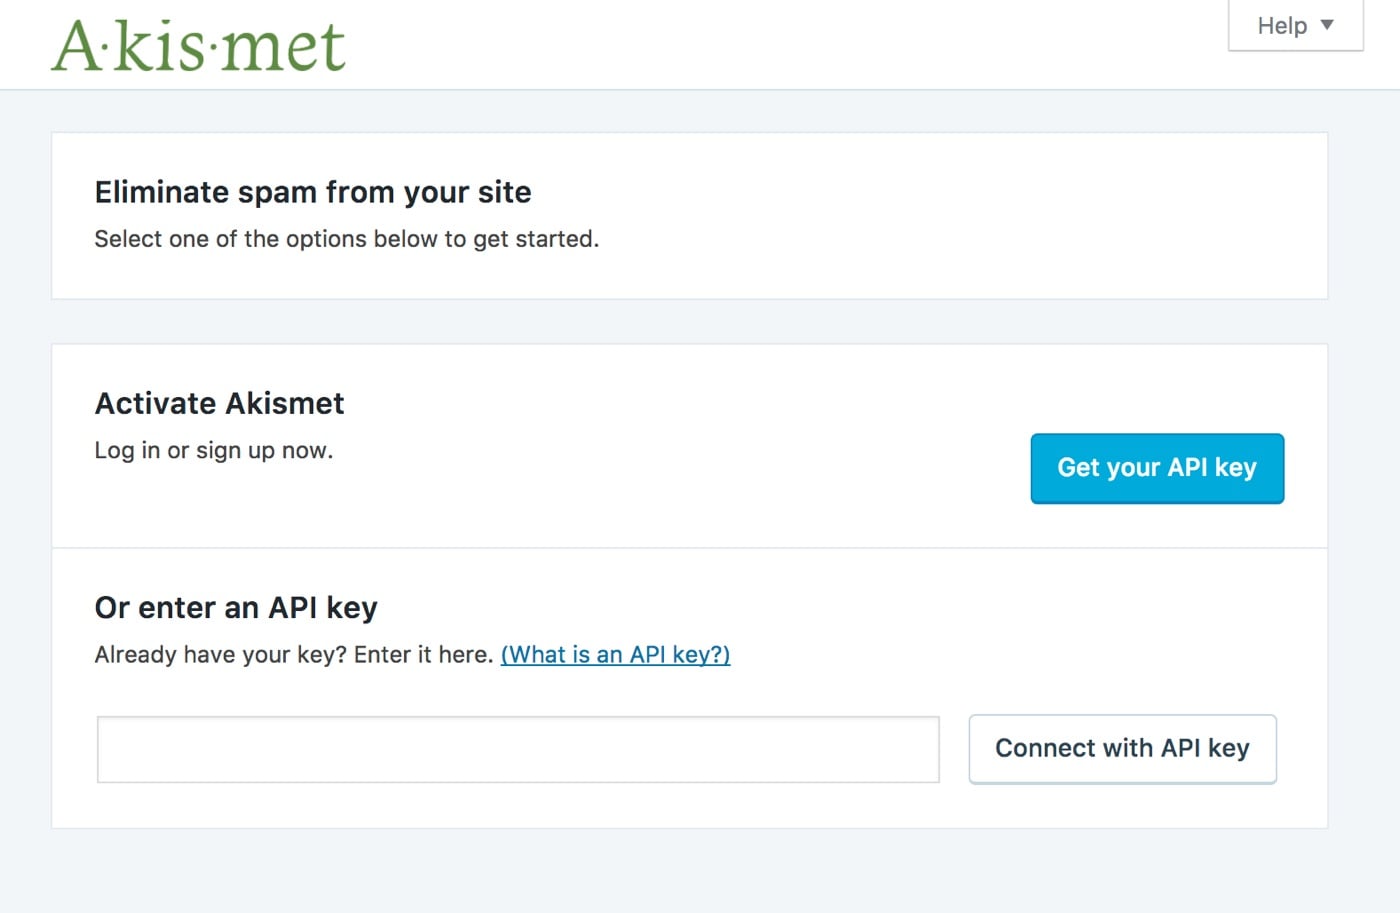
You'll need to get your own API key. Technically, Akismet is free for personal sites, with commercial sites expected to self-police choosing a paid plan ($59 a year). Recently, Automattic has added fairly aggressive 'please pay us' prompts when you sign up for a free plan, but, if you can avoid feeling guilty, you’ll find there’s no practical difference between the free and paid plans. Furthermore, it’s cheaper to pay for Jetpack ($39 a year, which we’ll discuss next) and get Akismet free, rather than pay outright for Akismet, so, either way, you shouldn’t be paying.
Once Akismet is running, it’ll capture and deal with the very worst spam itself and leave everything else it flags for you to review manually. This is an invaluable (not literally — $39 a year seems about right) and excellent plugin.
2. Jetpack: a do-it-all plugin for 'most wanted' features
Jetpack is an excellent 'kitchen sink' plugin from Automattic, which adds a host of 'most wanted' functionality to WordPress sites — from extra widgets to basic security and social media integration. Jetpack is available from the WordPress plugin repository and pre-installed for SiteGround customers.
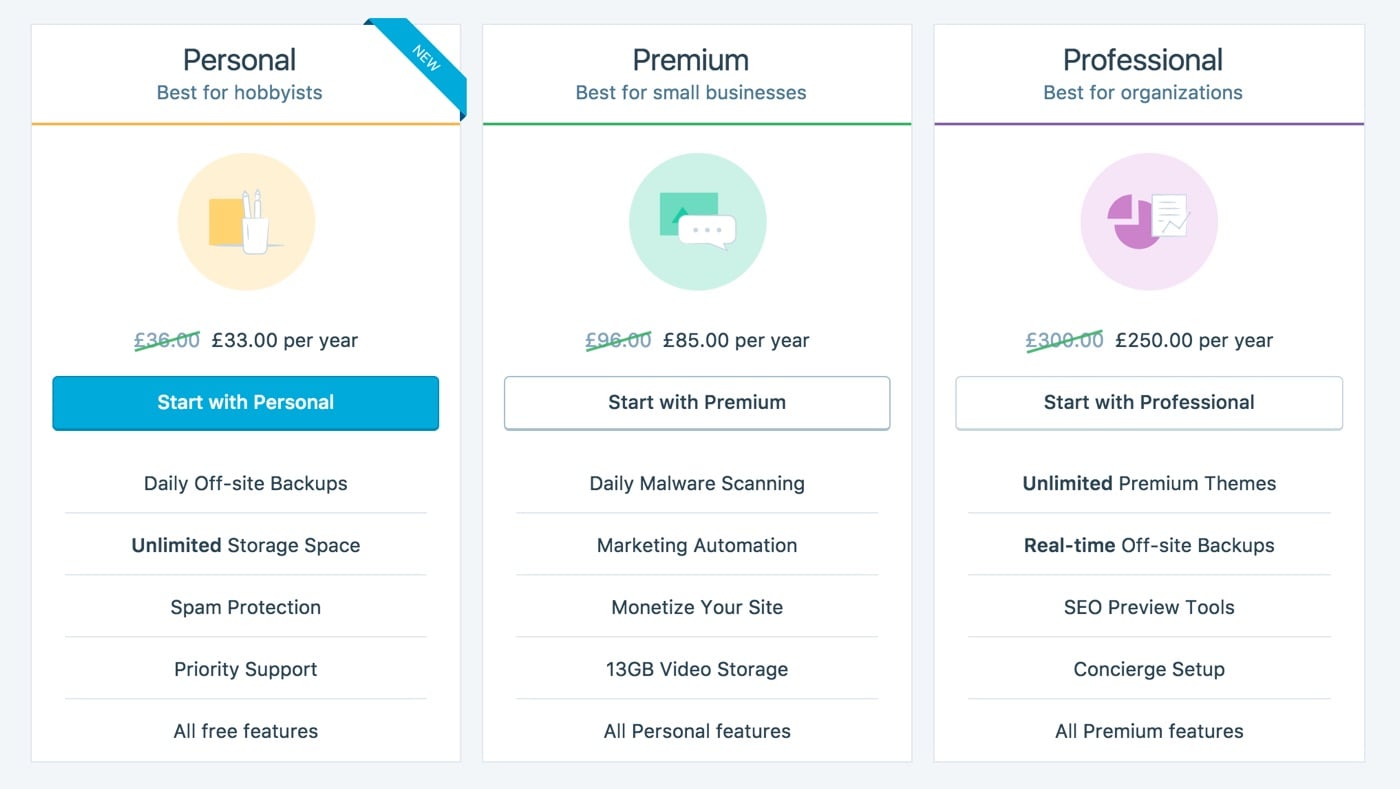
After installing Jetpack, you’ll be prompted to connect it to a WordPress.com account. You should do so, and you’ll want to choose between the Free and Personal tiers. Free is fine if you’re on a budget, but the very reasonably priced $39 a year Personal adds daily backups of your site (you want these even if your host offers backups, just in case the very worst happens with your host), alongside commercial usage of Akismet (discussed above). Most WordPress blogs should choose the Personal plan.
Once you’re connected, you should accept the option to activate the recommended features, and then take a proper look through the features available. As Jetpack is a 'kitchen sink' plugin, you’re unlikely to want all of its features, so just switch on the ones you want and disable those you don’t want.
3. WordFence: the best for basic security
WordFence is a security plugin for WordPress. It comes in two flavors: Free and paid. The free version is essentially antivirus for WordPress, while the paid version is antivirus and firewall for WordPress.
You should at the very least install the free version (unless you're using managed WordPress hosting with WP Engine, as they take care of this for you), but if you want to take security seriously you should use the paid version.
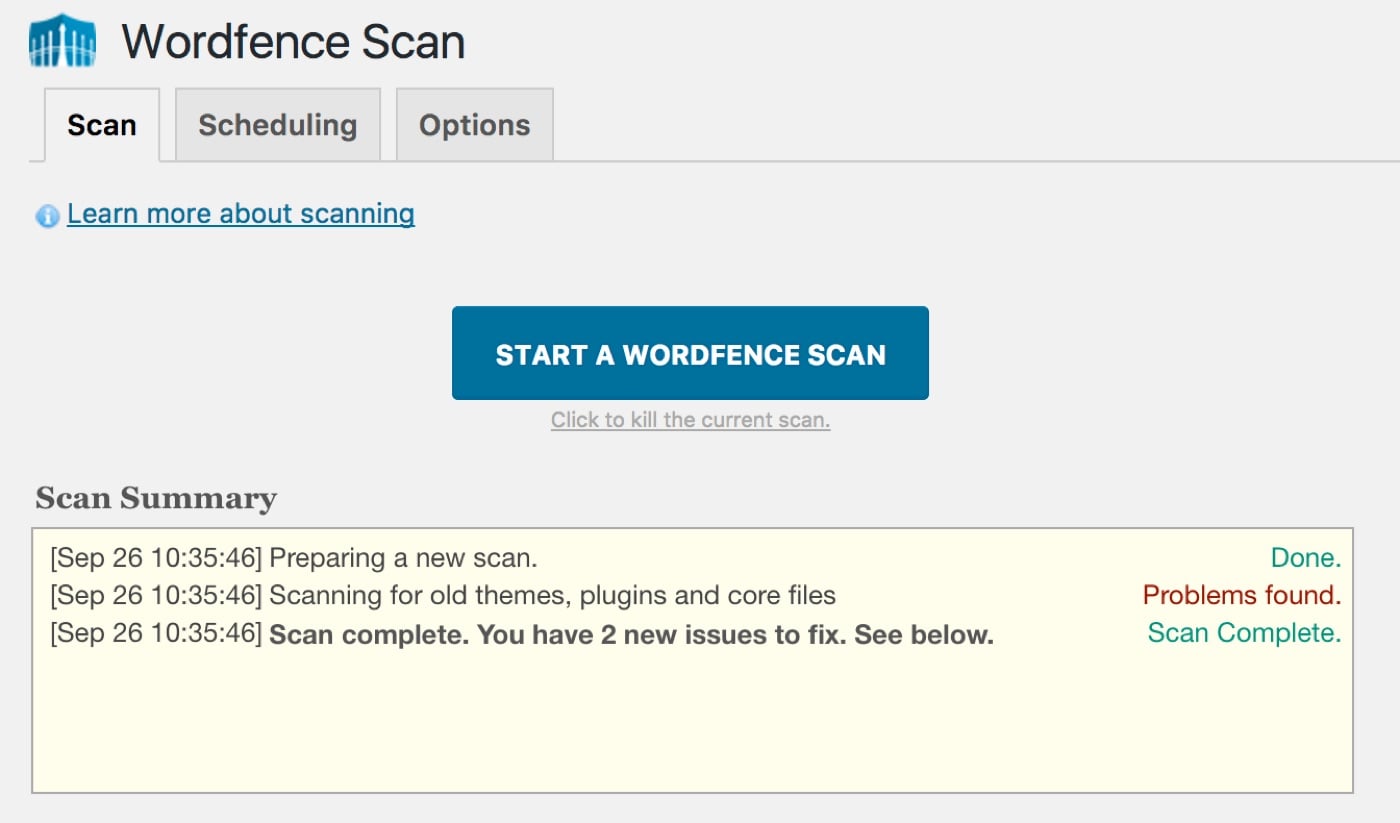
The installation process for both plugins is the same: Install and activate the WordFence Security plugin from the WordPress plugin repository. On activation, you'll be prompted to take a tour — do this to get the basics set up properly. You should run a scan from the Scan page (and address any issues), and, under the Firewall page, optimize the firewall and follow the prompts.
You'll find a prompt to upgrade to the Premium version for $99 a year from the sidebar. This gives you automated scans, a much more complete firewall, and real-time defense. Investing in security now will save headaches later, so, unless you're on an exceptionally tight budget, you'll want to make the upgrade.
4. Yoast SEO: the essential plugin for search engine optimization
Yoast SEO is the plugin for search engine optimization, a topic we’ll touch on in the next section. Yoast SEO is free and available from the WordPress plugin repository.
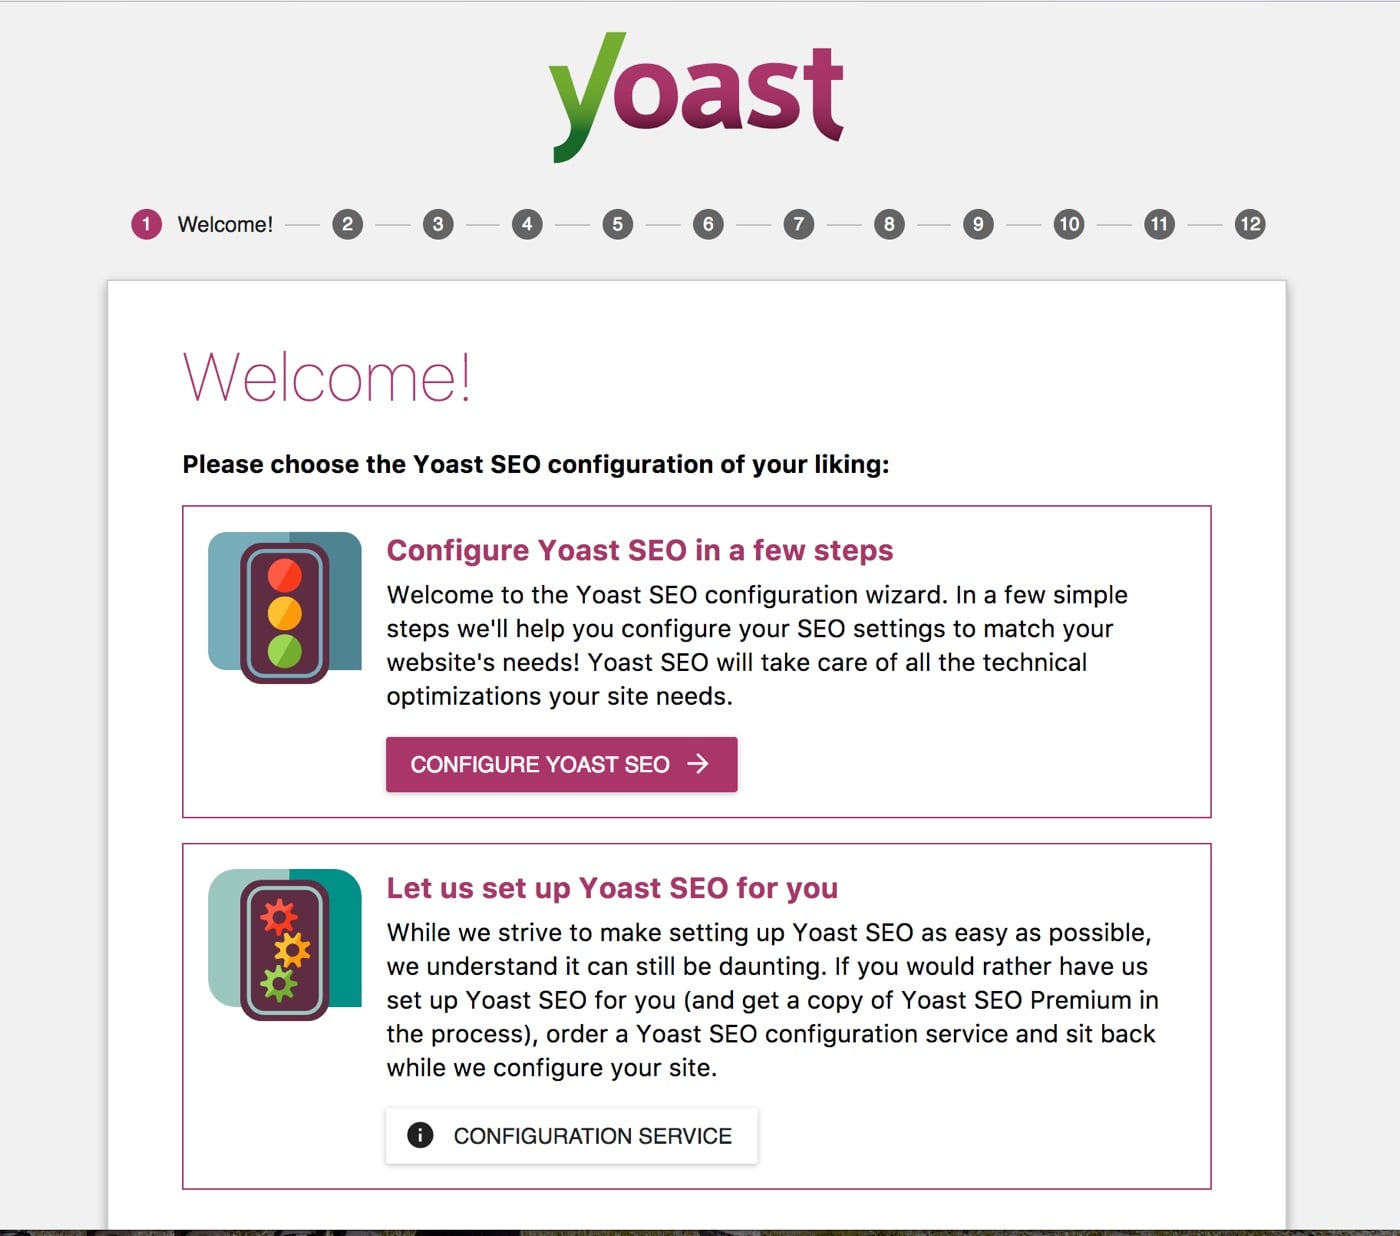
Yoast SEO is easy to set up: Click the SEO menu item from the WordPress Dashboard to reach its general settings, and then click General → Open the configuration wizard → Configure Yoast SEO. Click through the wizard, telling Yoast SEO about your site, and finish.
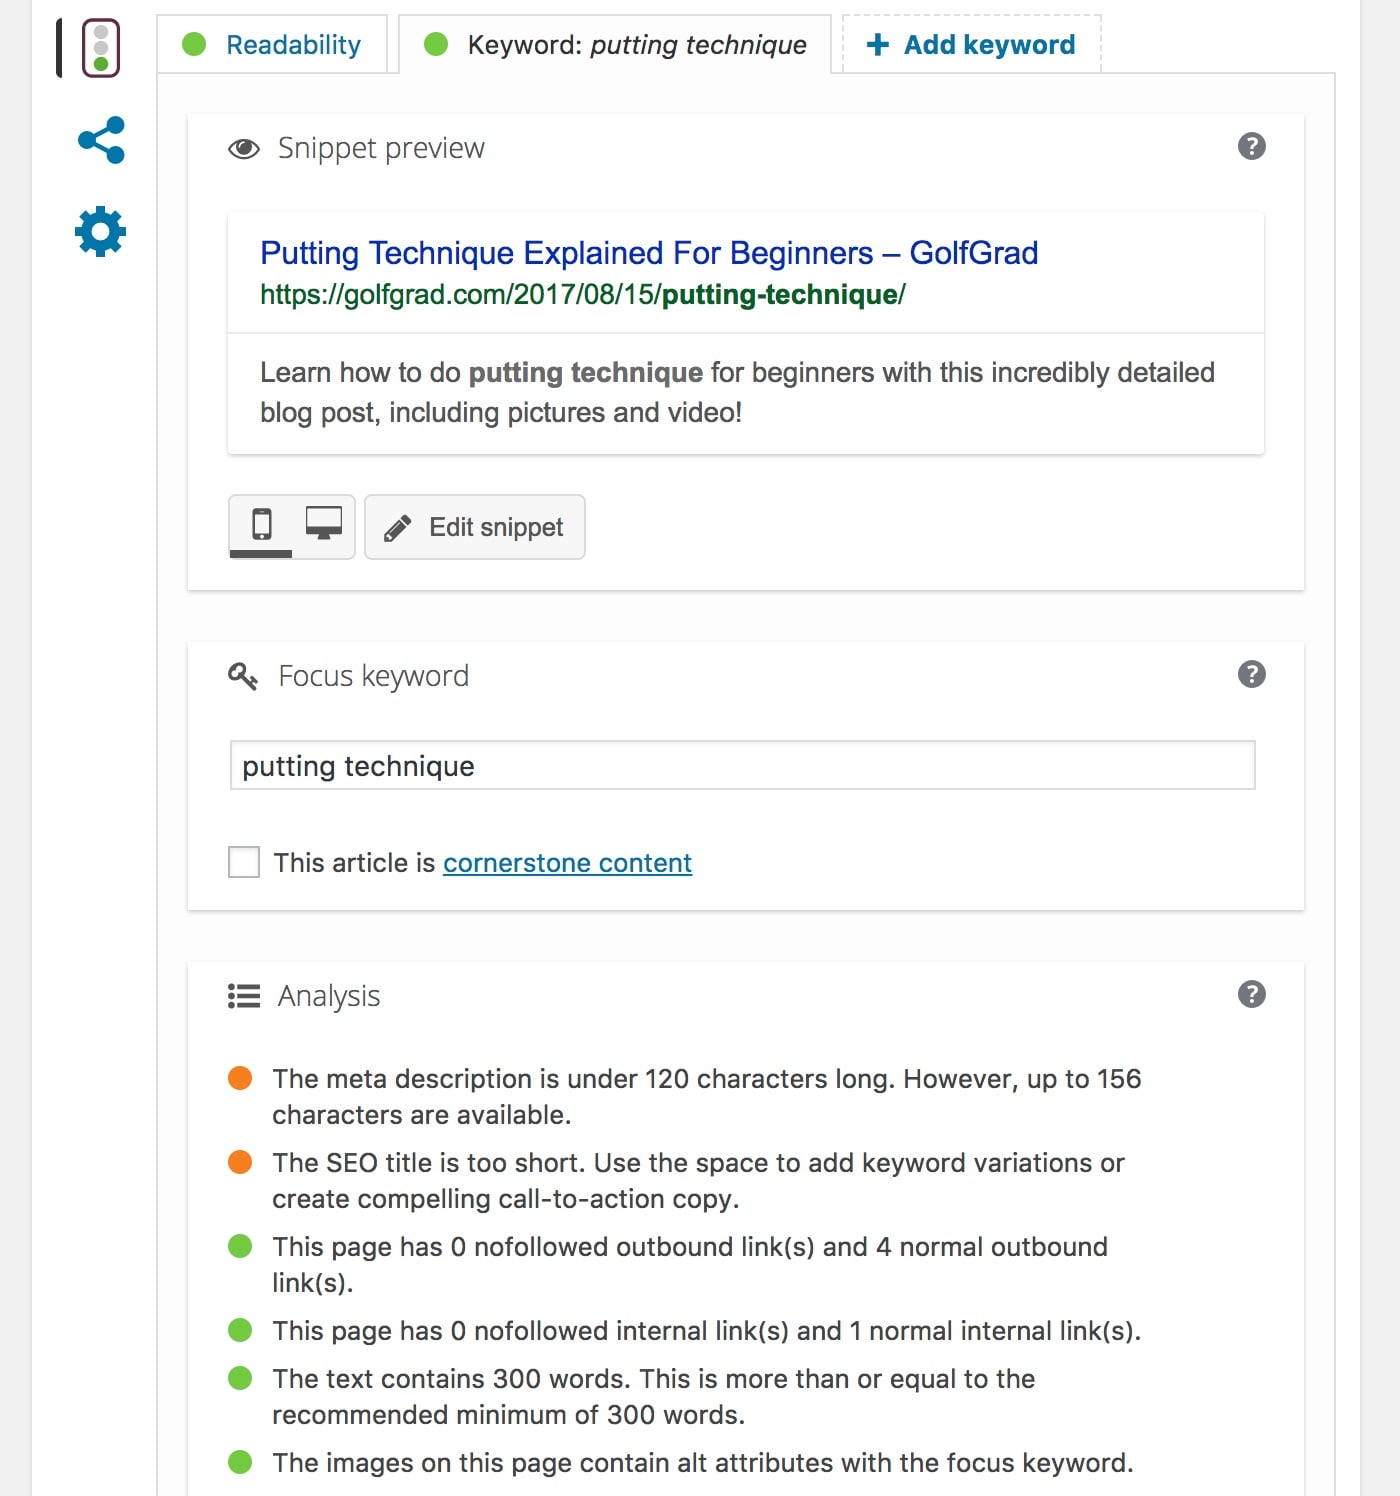
You can now use the plugin to optimize individual posts and pages for SEO. Scroll past the content box, and you’ll find a new Yoast SEO section. To use this properly, enter a focus keyword (we’ll talk more about keyword research in the next section), and then make the traffic light rating system as green as possible. You don’t have to make everything green, but, in general, the analysis section offers good basic SEO guidelines — and if it’s happy, search engines will be happy too.
5. Ninja Forms: easy and intuitive contact form builder
Want visitors to be able to contact you without the need to plaster your email address on the internet for all spammers to see? A contact form is the solution, and Ninja Forms is an easy to use, powerful, and free plugin that solves this problem for you. Ninja Forms is available from the WordPress plugin repository.
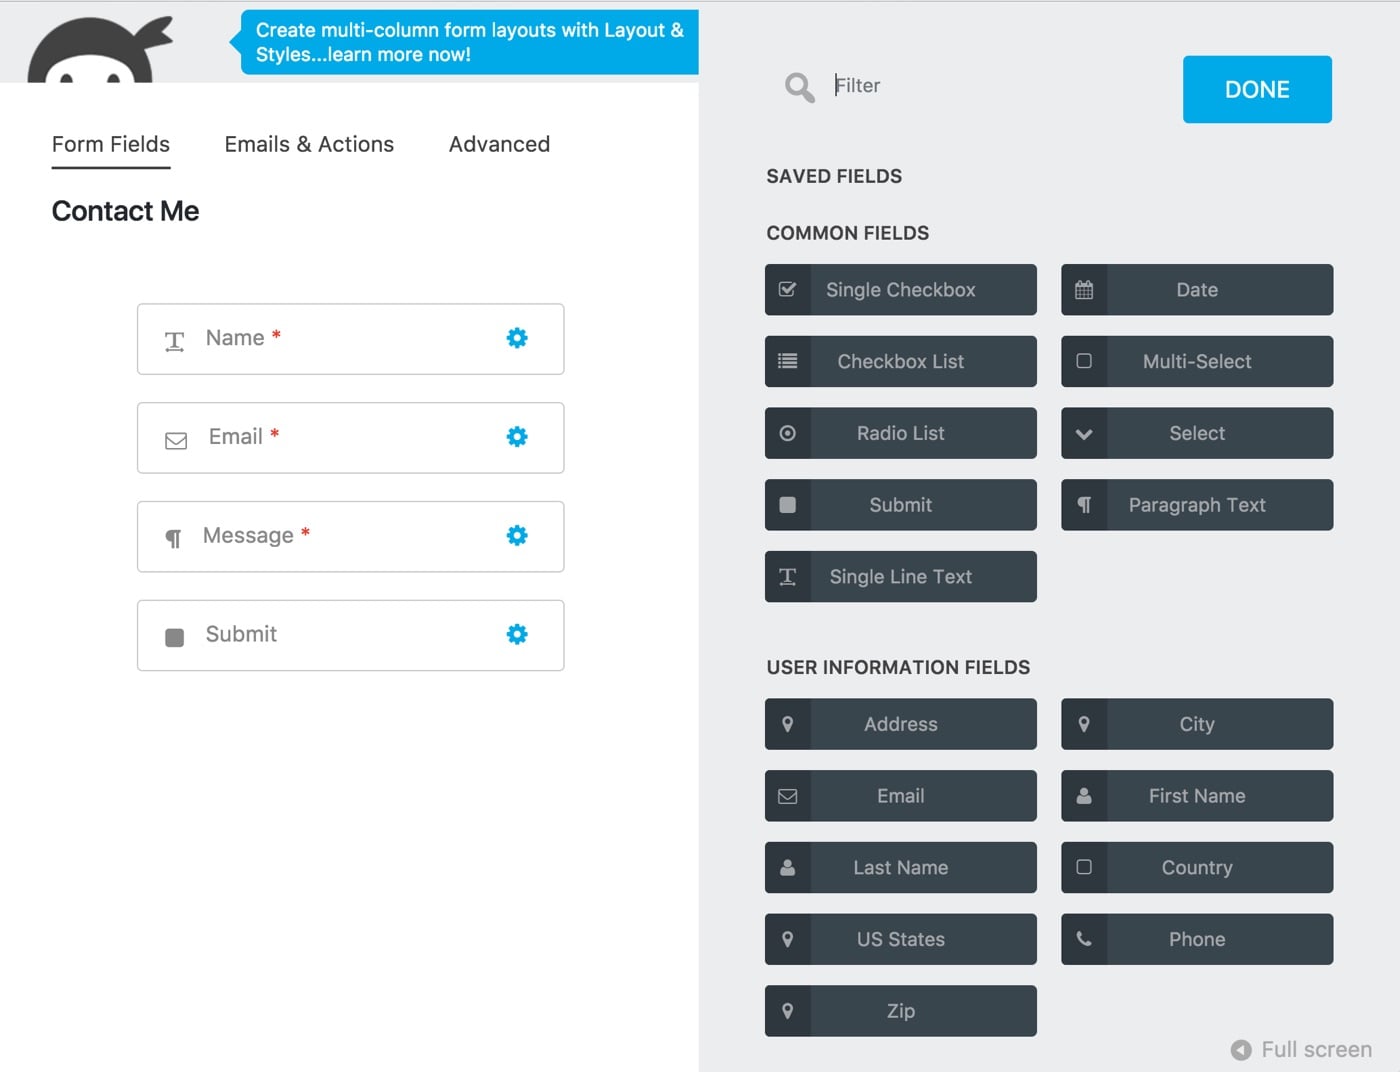
The plugin is straightforward to use: Click the Ninja Forms menu item, then add new forms (you can use one of the templates to make things easier). You can use the drag-and-drop interface to customize your form, click on any item to edit it, and click the plus button to add new fields. Other tabs give you other setup options. Once done, click Publish to set your form live, close the editor, and then copy and paste the generated shortcode into any post or page to embed your contact form. Easy!
6. Relevanssi: better WordPress search
You may not have used it on your new WordPress blog, but, as you start adding posts, you’ll quickly discover that WordPress’s search is really not very good. Relevanssi is a free plugin that fixes that. Its main innovations are to sort search results by relevancy (rather than date), and to improve the matching of search terms to content. The result is a significantly improved search, essential for any WordPress blog that needs search functionality. Relevanssi is free and available from the WordPress plugin repository.
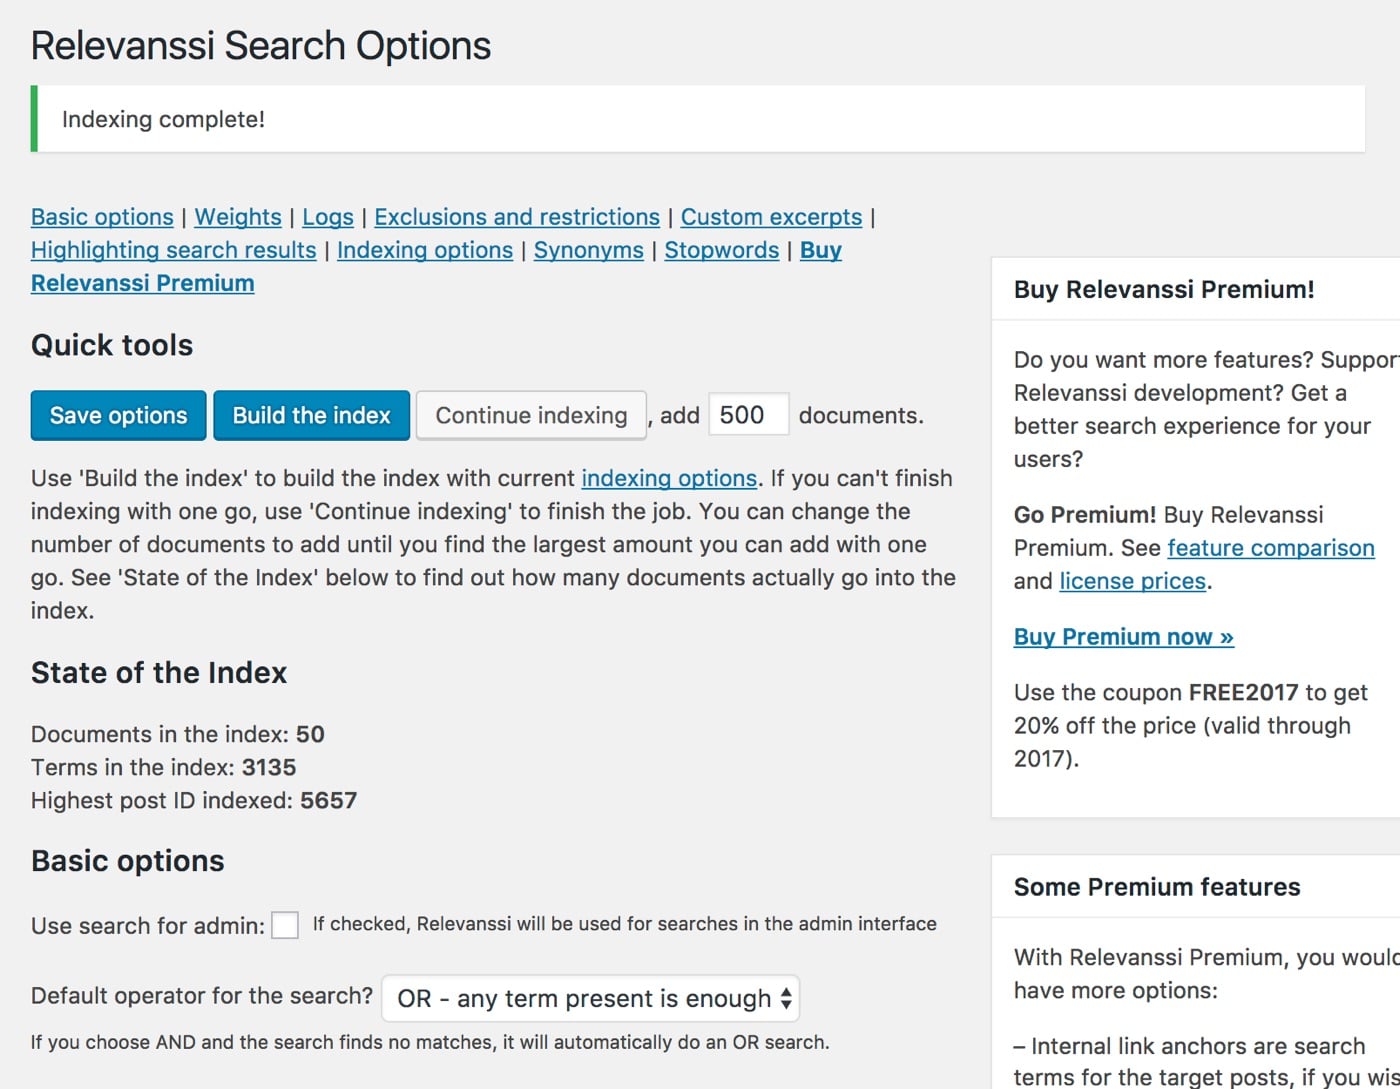
You’ll need to go to Settings → Relevanssi to access the plugin’s settings. On installation, you’ll need to click Build the Index to prompt the plugin to look through all of your posts. You can use the options to customize how the plugin orders search results, but the default options will be fine for most users. There’s no other setup required: Relevanssi replaces the regular WordPress search, so anywhere this was present will now be powered by the plugin.
7. Disqus: better comment system
A common theme with the plugins we’re recommending is they take a feature WordPress offers as standards, and make it a lot better. That’s the case with Disqus, which improves comments for WordPress. Disqus is free and available from the WordPress plugin repository, but a paid upgrade is needed to remove ads.
Set up the plugin by searching for Disqus Comment System, then installing, and activating. You'll find a new Disqus menu under the Comments tab in the WordPress Dashboard's sidebar. Follow the prompts to set up the plugin. You'll need to create an account with Disqus, at which point you can choose your plan: Free (with ads), paid ($10 a month; no ads) or non-commercial (free; low-traffic and non-commercial sites only). Follow the rest of the prompts, including the configuration options, and complete the setup.
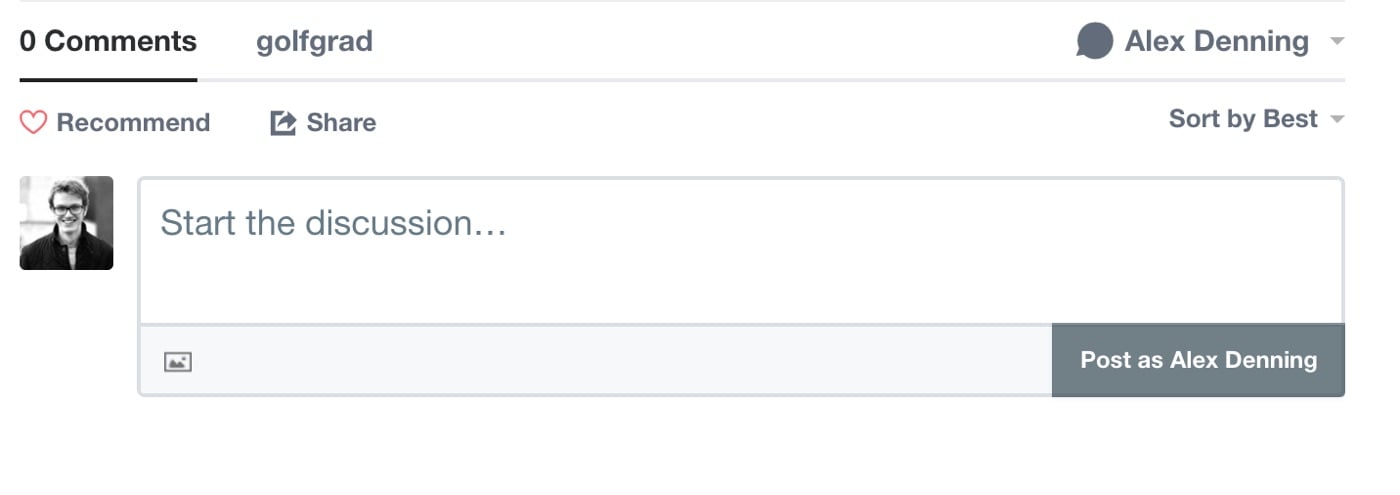
You can now return to your WordPress Dashboard, and again click Comments → Disqus. You'll need to log in with the account you just created, click through some more setup, and then, finally, you'll be done! Your visitors will now be able to enjoy an improved comments system.
8. Monarch: social media sharing
Monarch is an incredibly useful plugin for getting you extra social shares, adding a wide variety of social media sharing buttons across your site. Monarch is a paid plugin, available from Elegant Themes as part of their $89 a year subscription package (which also gives you access to all of their themes).

Start by downloading the plugin package from the Member Area. There's no need to unzip the plugin — head to your WordPress Dashboard, click Plugins → Add New → Upload Plugin. Choose the ZIP file you just dowloaded, then Install Now → Activate Plugin. Now, under Tools → Monarch Settings you can choose where your social sharing buttons get displayed, which social networks are included, and what additional information is displayed (such as your username, the total number of shares, and so on). There are a lot of customization options, so you'll want to spend some time playing around to get the precise look, feel, and functionality you want.
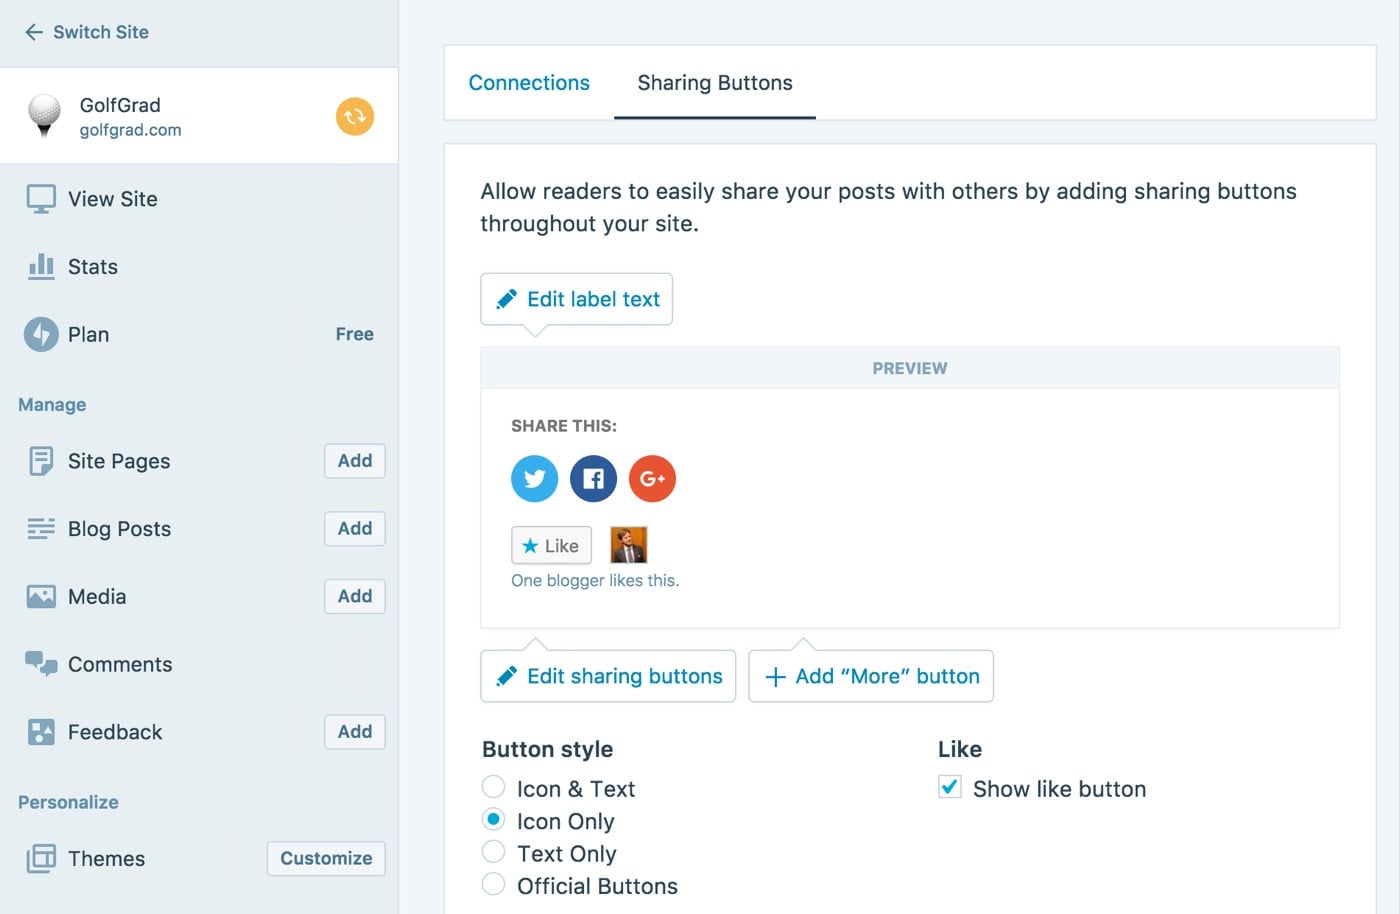
If you don’t want to pay for Monarch, you can get basic social sharing plugins as part of Jetpack. Under Jetpack → Settings → Sharing, you can enable the Sharing buttons module, and click through to an options page for customizations.
9. Google Analytics for WordPress by MonsterInsights (free)
Google Analytics is an incredibly powerful and insightful website analytics package from Google, available free to all websites. It gives you a huge amount of information about your visitors, such as which pages they’re visiting, where they’re coming from, and a whole lot more. Google Analytics for WordPress by MonsterInsights is a free plugin, available in the WordPress plugin repository, which makes it easy to add Google Analytics to any WordPress site.
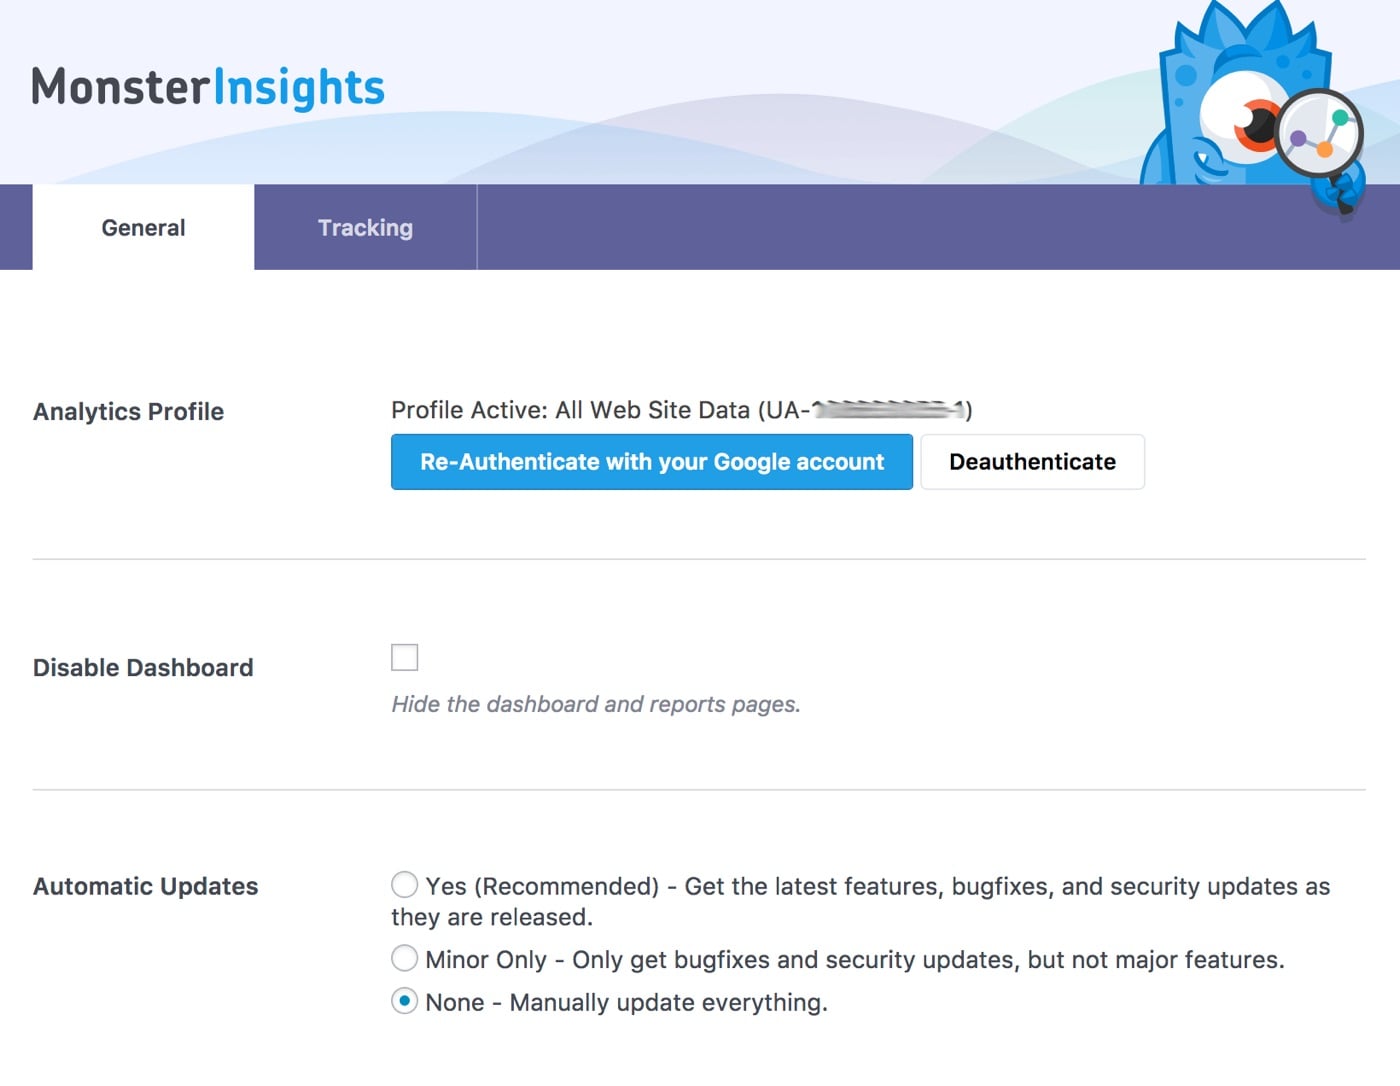
You'll (obviously) need Google Analytics to use this plugin, and you can create a free account on their website. Click Sign in → Analytics → Admin → Account → Create new account. Fill in a few details, and you're done. You don't need to worry about the tracking ID — this is what the plugin handles for you.
Install the MonsterInsights plugin as normal. You'll find a new tab in the WordPress Dashboard's menu: Insights. Click this to get to the settings. You'll be prompted to connect the plugin to Google Analytics. Do this, following the setup, and selecting your site from the dropdown. You're now connected, and Google Analytics will start collecting data! You can come back to the Insights page in 24 hours to see the first results.
These are our recommended WordPress plugins. We specifically haven’t included a caching plugin, as if you’re using one of the two WordPress hosts we recommend (i.e. WP Engine or SiteGround) they’ll have this covered for you. If you’re not with one of these hosts, we’d recommend using WP Rocket. You’ll have to pay for it, but it’s incredibly easy to use and set up, and it’s very effective.
If you want more plugins, you can see our full list of recommendations and a list of plugins used on WinningWP. Just remember what we said earlier: Plugins are incredibly useful and valuable, but don’t use too many of them.
You should now have your new WordPress blog fully themed, fully customized, and fully powered up with extra functionality. From now on, the technical WordPress setup can take a back seat, and, for the final section of this guide, we’ll refocus on the thing that really makes a blog tick: The content.
Growing Your Audience and Building a Business
How do you take your outstanding new WordPress blog and build an audience — or even a business — around it? The advice that gets thrown around when talking about this is 'make great content'. This is obviously true — a great blog needs great content — but there’s a lot more to it than just blindly following the above.
This next section will run you through all of the key points you’ll need to understand to turn your new WordPress blog into a blog with an audience, and, if you want, a business or side-project all of its own.
If you want to create a blog 'just for you', then it’ll be tempting to skip over this section. At the very least, give it a quick read as it’ll help you laser in on making sure your blog is as effective as possible.
The key point before we start here is to always remember the focus and purpose of your blog. All content you publish on your blog needs to fit comfortably under this banner. This is going to be what drives your blog forwards, and gets it to its goals.
Your first priority, then, should be creating excellent content. There's no getting away from this. You'll want to spend some time working out your style and tone of voice, and it's okay if it takes you a handful of posts to start getting that right. The important thing is to persevere, and always make sure the work you're doing fits the blog's focus and purpose.
With quality content a prerequisite, you're able to tackle growing an audience around your blog, and building a business.
Finding Your First Readers
You'll find your first readers through outreach: That is, telling people that you've written something great and that they should read it. This can be as simple as sharing on your personal Facebook and Twitter accounts, and then emailing a link to your mom, or it can be as complex as reaching out to key influencers in the space you want your blog to operate in. The important thing is to start doing this. You may find it useful to set a goal of five or ten people you want to contact after publishing each post. Doing this will get your site some initial momentum.
With your first readers on board, you can start talking to them. You'll naturally start having conversations and hearing from readers about what topics, themes or questions they want you to write about, and you should start listening to these conversations and bringing your readers what they want. If you're asked the same question multiple times, that's probably a great idea for a blog post. If you can link together common queries, you can start producing longer-form content that answers questions readers didn't even know they had.
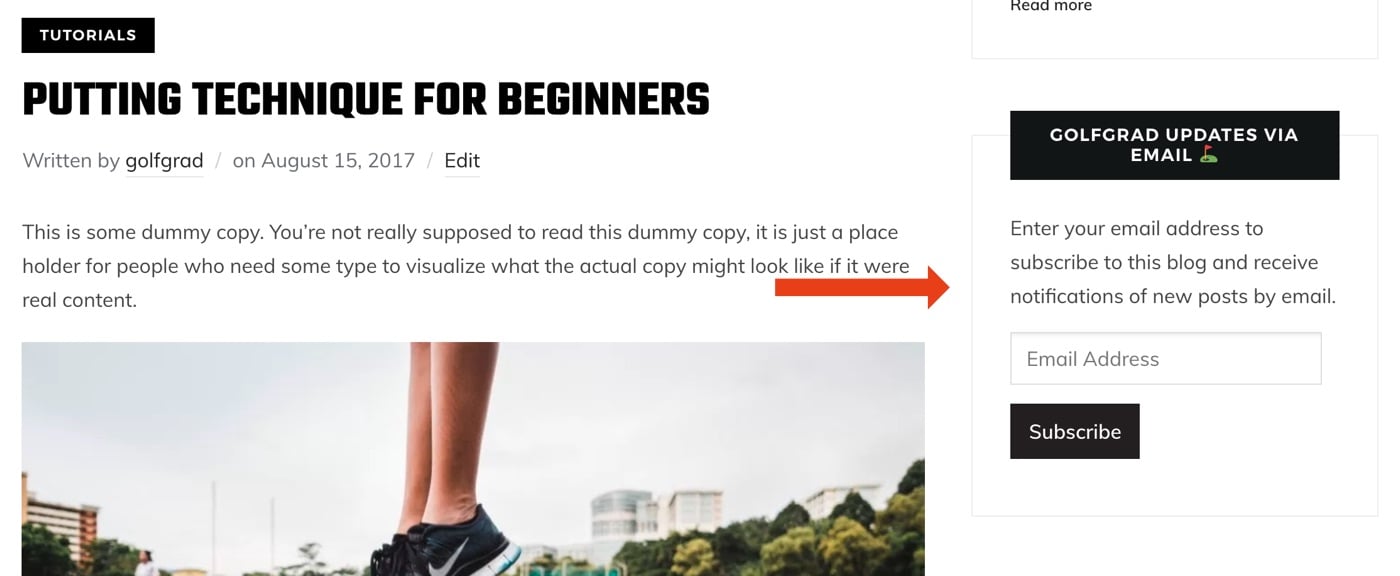
You're now going to start creating loyalty from readers who keep coming back to your site for more. You should make it easy for these readers, and convert as many as possible into subscribers. What this looks like will depend on your site, but you may want to capture email addresses to send updates of new articles, or encourage readers to follow you on social media. You could even think outside the box, and create a Facebook group for readers where a real community can be built. It's up to you, but make sure you have some method of subscribing, and that it's incredibly easy and convenient for readers to sign up.
Understanding Search Engines
With some readers finding your site and the proverbial blogging ball starting to roll, you should start to think more strategically about search engine optimization. We've already touched on how you can optimize individual posts and pages on your site using the excellent Yoast SEO plugin, but here we'll focus on a higher-level understanding of how search engines work, how you should think about SEO, and how this all feeds into growing your audience, and building a business.
There are three factors to think about here: How search engines work, how this should inform your content, and how to understand basic keyword research. We'll run through each of these in turn.
Search engines want to answer questions and solve problems for their users. They want to do this as efficiently as possible. To this end, search engines always put the needs of their users first. They want the user to trust that the first result answers their question and/or solves their problem, and they don't want the user to have to return to the search results.
Thus, search engines reward content that does answer questions and solve problems. If content can do these things completely and the user does not have to return to the search results for more information, search engines will happily reward the content even more.
In practice, this means you should be creating content that answers questions and solves problems. What's more, you should be making sure you totally cover a topic and that your content is objectively better than anything else currently available on search. Do this, and search engines will reward your content with the top spots. With users able to trust that the very top results deliver the answers they want, those top spots will become increasingly valuable — and if your blog can take them you'll be in good shape.
You can supercharge your blog's effectiveness with search engines by being strategic with keywords. This is the process of deliberately targeting specific search keywords, with a focus on those with a high quantity of searches every month, but either low competition or low-quality content currently available. You can do this with Google's Keyword Planner. Designed for use with its paid ads platform, AdWords, this tool lets you find the quantity of searches and a rough indicator of competition for any keyword.
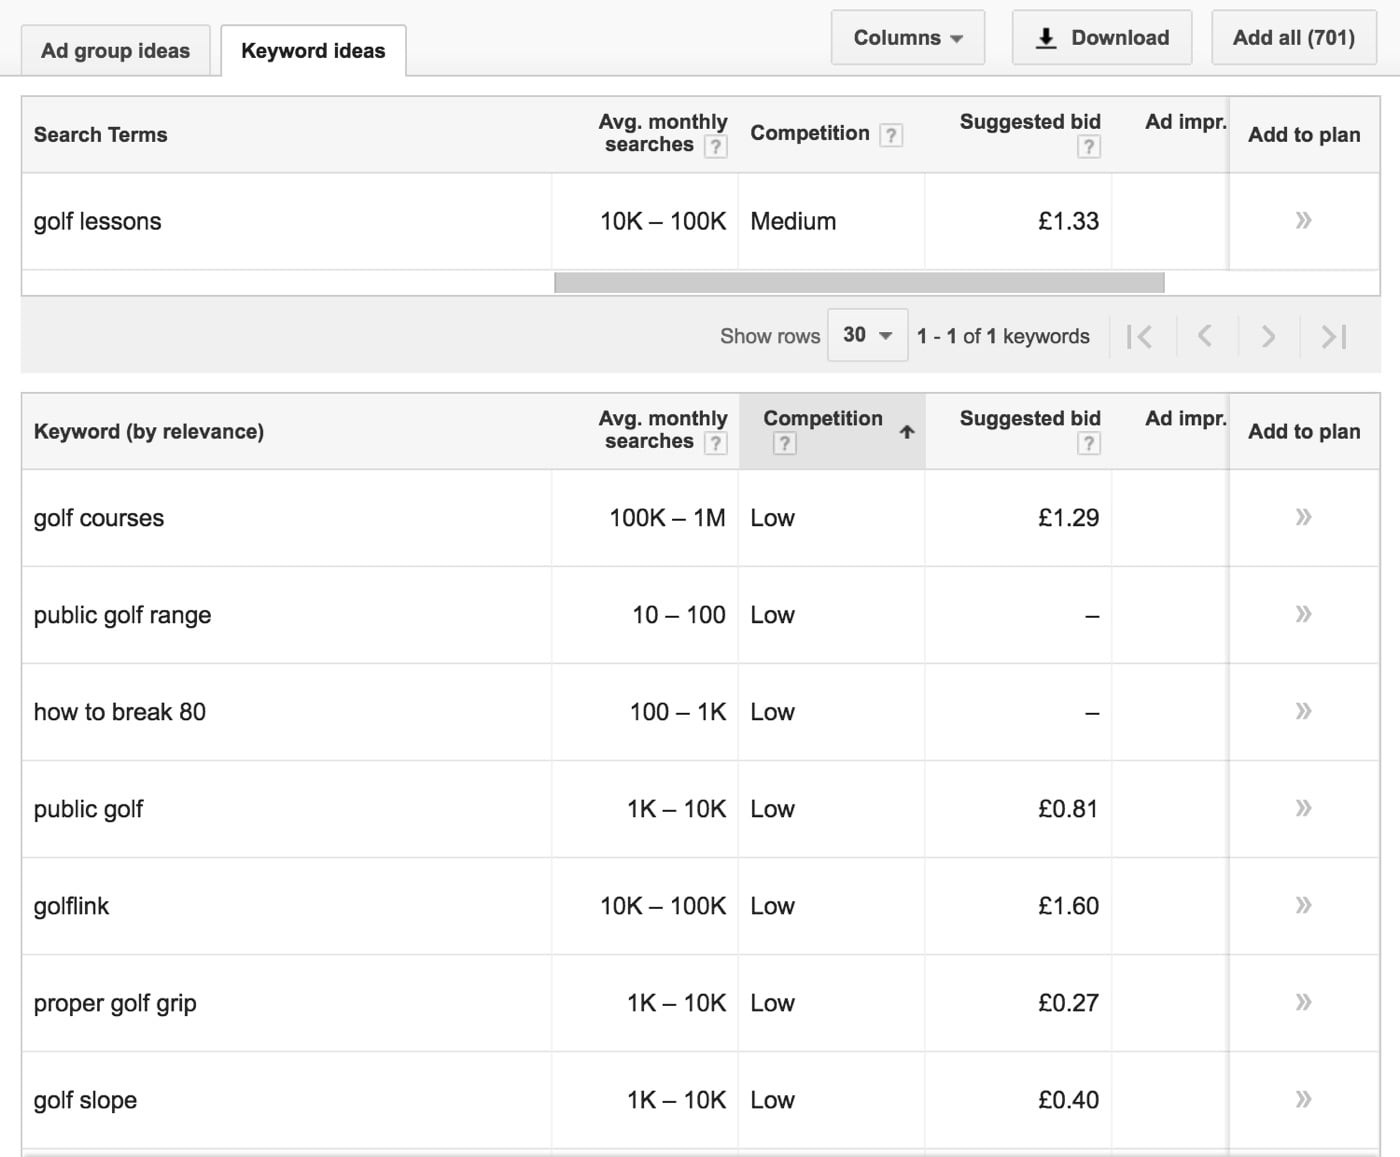
You'll want to load up the Keyword Planner, signing into AdWords or creating a free account, and then using the 'search for new keywords' option. Enter some keyword ideas — our golf blog could start with golf lessons, for example — click Get Ideas, and the Planner will take it from there. Depending on your keyword, you may want to sort by competition; if we do so for our golf blog, we can very quickly find a great handful of post ideas with thousands of searches per month and low competition. Nice! You'll want to write out the keywords you think would work as content on your site.
Once you've made a list of keywords, you should start creating content. You'll want to create one post for each keyword, and follow the guidelines set out above: Write the very best piece of content that's available on the internet, and comprehensively solve the problem or answer the question. You should then set the target keyword as your focus keyword in Yoast SEO, and make sure the Analysis section of Yoast is very happy (look for the green traffic light, as we discussed earlier).

Over time, search engines will start to recognize and reward your site's quality. People clicking on your site in search results and not returning to the search page will mean you're rewarded, as will people talking about your blog on social media or liking your content so much they link to it. These rewards start to compound over time, and you'll be able to develop a huge source of new visitors.
This is an extremely rapid overview of search engine optimization, but it paints an accurate picture: Be smart about creating exceptional content, and search engines will happily reward your blog.
Monetizing Your Blog
We've comfortably covered growing your audience, but how does this all feed into building a business? Any business, obviously, needs to be making money. You can't pay for goods and services with pageviews or social shares.
Entire books have been written about blog monetization, but the basics are remarkably simple. There are a number of well-established paths for monetizing your blog, with pros and cons for each. We'll run through the different options here, and leave it to you to decide which is best for your blog.
Here are the four most popular blog monetization options:
- Display advertising from a network. This is the simplest way of monetizing your site. Use an ad network such as Google AdSense to display ads to your visitors when they visit a page on your blog, and get paid for each visitor or each time a visitor clicks. This is also probably the least effective form of advertising, and requires a lot (hundreds of thousands-plus) of visitors to be anything close to worthwhile.
- Self-served advertising. This is a much more effective version of the above, but a lot more work! Find advertisers yourself, and offer them whatever package makes sense. This could include sponsored content or display ads across your site. This works best when you're able to work directly with companies wanting to reach your audience. The difficulty, however, lies in having to reach those companies yourself.
- Affiliate content. One of the most popular forms of blog monetization, affiliate advertising sets you out to promote other people's products, and gives you a fee (typically an agreed % value of the sale) for each customer you refer. This gives you huge control as you can choose which products to promote and how to promote them, but if you don't make any sales you don't get paid.
- Sell your own products. The most complex, but probably the most lucrative blog monetization method comes in last. This involves building your audience, listening to their problems, producing a product that solves a problem, and then successfully marketing it. The multitude of moving parts makes this a very demanding and risky task, but the very high potential payoff increases the appeal accordingly.
Our case study site golfgrad.com may, for example, run some basic display ads to start with (these could at least pay for the hosting), but then try sponsored or affiliate content as the site grows. If and when the audience is demanding more, the site could even move into creating its own educational golf products. Equally, if one of the affiliates or piece of sponsored content works incredibly well, the site could stick with those. It's perfectly acceptable to try out different options and take it from there.
Most blogs will benefit from focusing on content and quality to start with, and then turning attention to monetization. Furthermore, most blogs will benefit from trying different forms of monetization, and seeing what works. Monetization is hard; it's unreasonable to expect to get it right first time, and it will take time.
Growing an audience and building a business around a blog is difficult. You will experience hiccups on the way. The important thing is to persist. Find out what is working, find out what isn't working and make adjustments — but don't give up. If you really want to take blogging seriously, you should be prepared to stick with your site for 12 to 18 months before expecting to see anything take off. That said, if you do get everything to work, the appeal is obvious: You're in total control, you can do as much (or as little) work as you like, and you can take the blog and business in whichever direction you like.
As we said at the top of this section, if you're not interested in monetization, that's totally fine too. You will, however, benefit from taking some of the ideas discussed in this section onboard nonetheless, as the work discussed will make sure your blog is laser-focused on what it should be covering, who it should be talking to and how it needs to develop. Whichever route you take, keep this in mind and you shouldn't go too far wrong.
You're Ready to Create Your Best Possible WordPress Blog
You’re now armed with all of the detail you need to create an excellent WordPress blog! Congratulations! WordPress is highly scalable, so wherever your blog takes you next, WordPress can come with you. WordPress also gets better all of the time, so you’ll want to keep an eye on blogs such as WinningWP to keep up to speed with the latest developments.
For your convenience, here’s a recap of the key points covered in this guide, with further reading from our WordPress guides linked where appropriate:
- Choose the right WordPress hosting and a good domain name.
- Identify the right WordPress theme for your site.
- Make customizations to your site to make it truly yours.
- Create your first bits of content.
- Leverage the huge power of WordPress plugins.
- Work effectively to grow your audience.
We’ve been building our own test site, golfgrad.com, throughout this guide as a case study. This a real site! If you want to have a look, you can visit it here.
You can find more detail about how to progress with WordPress in our WordPress guides section. If you want to take the next steps with your blog, this should be your next port of call.
WinningWP Staples
There's more to us than just WordPress guides. Here's a few favorites:


Under the Hood
Wondering what plugins, tools and services we used here at WinningWP? We spill the beans...
WordPress Deals & Coupons
Save oodles of cash on some of the best hosting, themes & plugins around!
Good luck!
Making a brand new WordPress blog could be the start of something really special: and for some, it could even become an extremely profitable new business venture! It's important, however, to start off on the right foot: to get a solid foundation. By following the above guide, you should be all set for an absolutely flying start! Good luck!