

How to Move a Website from WordPress.com to a Self-Hosted WordPress.org Setup - A Beginner's Guide
How do you move from one of the most popular ways to make a free website, using WordPress.com, to the most popular way to make a website, using self-hosted WordPress? This guide will cover everything you need to know about getting your WordPress.com site fully transferred to self-hosted WordPress. (Note: For more guides in the same series, head on over to WinningWP Guides.)
-Note: WinningWP content is free to all. If you make a purchase through referral links on our site, we earn a commission (learn more).
WordPress.com is one of the most popular ways of making a website, but it comes with severe limitations. WordPress, however, is open-source software, and anyone can use it to power a website. So called 'self-hosting' WordPress opens up a wealth of options for how to use WordPress, such as adding extra functionality, and provides the underlying freedom of owning and being in control of your entire website.
Moving from WordPress.com to self-hosted WordPress is a very common desire for those wishing to exercise more control over their website. The process is systematic and easy -- once you know what you’re doing, that is. This guide will walk you through the entire process of moving from WordPress.com to self-hosted WordPress, starting with establishing the differences between the two platforms, covering the technical setup and transfer of your site, and sharing some useful tools and tips to aid your transition.
What are WordPress, WordPress.com and Self-Hosted WordPress?
What is WordPress, anyway? WordPress, WordPress.com and WordPress.org are all subtly different entities. Before moving from WordPress.com to self-hosted WordPress, it’s important to understand the precise terminology for what you’re dealing with:
- WordPress is the software: A free, open-source blogging and website platform. WordPress is created by unpaid volunteers, and anyone can download, install -- or even contribute to -- WordPress. The WordPress software and trademark are owned by the WordPress Foundation, a non-profit organization. The WordPress software is distributed at WordPress.org.
- WordPress.com offers free hosting and installs of WordPress. You get free access to a limited and modified version of the WordPress software with the option to purchase upgrades. WordPress.com is run by Automattic, a commercial company. Many Automattic employees also contribute to the WordPress software, but Automattic has no formal role in creating WordPress.
- Self-hosted WordPress means running the open-source WordPress software on your own hosting. This means you get full control and flexibility, but you'll need to install and manage WordPress and your website yourself. We’ll explain how to do this in detail later in this guide.
You don’t need to worry too much about the nuances here -- just make sure you understand the broad distinctions before proceeding, otherwise this will get confusing quickly!
When Should You Switch from WordPress.com to Self-Hosted WordPress?
What are the differences between WordPress.com and self-hosted WordPress? When should you switch between them? We’ll answer these questions next.
WordPress.com is fantastic if you're launching your first blog or website because you can get started for free and the setup process is very easy. Your account comes pre-packaged with all the tools you need to set up a simple site, so all you have to do is pick a design (referred to as a 'theme'), and you can start publishing right away.
While WordPress.com is free, to get a professional website with your own .com website address (the technical name for this is 'domain name') and without advertisements, you’ll need to purchase add-ons. These are available from $36 a year and reach $300 a year for advanced customization options.
However, while WordPress.com’s flexibility can be extended with paid add-ons, at no point do you get full control over your website. You can’t completely customize the design, add extra functionality (known as 'plugins'), or do anything other than what WordPress.com specifically supports. If you find yourself wanting any of these features, you should switch from WordPress.com to self-hosted WordPress.
Self-hosted WordPress is incredibly flexible and powerful, but requires more careful management. The main draw to self-hosted WordPress is the ability to customize your website’s theme and add as much extra functionality as you desire, including professional-level tools for growing your audience and making money from your content.
While WordPress.com is available for free, to use self-hosted WordPress you’ll need to spend money, so it’s important to be aware of the costs. Although WordPress itself is free, you’ll need to purchase a number of things:
- Hosting for your website (this is what powers your website -- we’ll discuss how to choose hosting later).
- A domain name (this is your site’s address -- we’ll talk about this later).
- You’ll need to purchase a redirect from your WordPress.com website (i.e.,
yoursite.wordpress.com) to your new self-hosted website. - Optionally, any paid-for themes or plugins.
If you’re using a free WordPress.com account, when moving to self-hosted you’ll be paying for many of the same features you previously had for free. If, however, you're paying for WordPress.com already, you’ll likely find the cost of self-hosted to be similar.
As well as these monetary costs, self-hosted WordPress requires more time and involvement from you: With WordPress.com, security, backups and updates are taken care of, but these are things you’ll have to handle yourself with self-hosted. It is possible to choose a host that will take care of these for you, but, ultimately, these are now your responsibilities. Furthermore, you’ll also need to spend time transferring your WordPress.com site to your new self-hosted site. This doesn’t take a huge amount of time -- and this guide will show you everything you need to know -- but it's worth bearing in mind.
WordPress.com offers simplicity and affordability for sites starting out. If you fit the 'starting out' description, staying with WordPress.com is a sensible choice. If, however, you’re outgrowing WordPress and looking for more flexibility, self-hosted WordPress is an incredibly appealing option. You get the same software without the limitations, and with extensive options for customizations (although potentially at a higher cost). We’ll continue the guide assuming you’re wanting to go ahead with making the switch from WordPress.com to self-hosted WordPress.
Before You Move to Self-Hosted WordPress, Get the Right Hosting
To move from WordPress.com to self-hosted WordPress, you’ll need to get the right hosting. With your WordPress.com website, WordPress.com was your host, so, as the name implies, with self-hosted WordPress, you’ll need to provide your own hosting.
Hosting is the service that powers your website, providing the storage for its files and allowing visitors from across the globe to access the public-facing pages. Getting the right host is exceptionally important; a bad host will result in a slow website with poor security at best -- or, at worst, one that doesn't load at all.
There are two types of hosting: Managed and shared hosting. Which is best for you will depend on your budget and how many visitors you expect to receive.
Managed hosting is the best choice for just about any serious website. A managed host 'manages' your site’s speed, backups, automatic updates and security for you, so you have an experience similar to WordPress.com -- but with the extra flexibility afforded by self-hosting. Managed hosts are very easy to use, and have a well-trained support staff that can assist with any problems you run into (again similar to WordPress.com). The best of the bunch, in our opinion, is WP Engine, which offers pricing plans starting at $29 a month.
Shared hosting is cheaper, but more difficult to use. Shared hosting is much more affordable than its managed counterpart, but typically comes with fewer features and more to worry about. The 'shared' name refers to a single server being shared between dozens, or even hundreds, of websites. This means heavy traffic to one site on a shared server can cause the rest of the sites to load very slowly -- or not at all.
Furthermore, while managed hosting is designed solely for running WordPress, shared hosts are designed to run all types of websites, so they're significantly less optimized. With shared hosting, you’re also responsible for backups, security and updates. Despite these caveats, shared hosting is popular because it’s cheaper. The best shared host (in our opinion) is SiteGround, which offers some of the benefits of managed hosting such as backups and automatic updates, but with pricing starting at $5 a month. Note: SiteGround offers a free domain name; make sure to read the next section before choosing this.
If you can afford managed hosting, you should use it. Managed hosting offers a very similar experience to what you’ll be familiar with from WordPress.com, and provides peace of mind from the extra security, backup and support features available.
Whether you choose WP Engine or SiteGround, once you’ve made your purchase, the next step is to install WordPress. Both hosts make this process very easy, with automatic installers available to walk you through the process. WP Engine will automatically install WordPress for you, while SiteGround offers an installer that will have WordPress installed for you in literally a couple of clicks. If you need more help, we have a full guide on how to install WordPress, so read this if you need to and return here once you’ve got WordPress installed.
Choosing a New Domain Name
A domain name is your website’s address. It consists of a name and an extension. In google.com, for example, google is the name and .com is the extension. Together, they make up the domain name. There are lots of different types of extensions available, including .org, .gov and .edu, as well as country-specific extensions such as .co.uk and .com.au. For the vast majority of sites, .com is the best extension to choose.
Domain names are registered using registrars -- companies that sell access to the central domain registry -- and you can expect to pay roughly $10 a year to own a .com domain. Note that domain names are separate from hosting; the domain name is just the website address, and you will also need hosting to power your website.
We’re going to continue this guide assuming you either have a great domain name registered, or you know the domain name you want (and that it’s available). If you don’t have a domain name registered or chosen, read our detailed guide on how to choose a great domain name to understand what you should be looking for.
If this is your first domain purchase, you may find the process of choosing a domain name slightly complicated. You’ll want to keep your new domain name as close as possible to your existing name.wordpress.com address. However, a huge number of .com domains are already taken, so this is a more difficult task than it may seem.
Here’s a quick case study to illustrate the process: I have a hypothetical WordPress.com site called beginningtoblog.wordpress.com. It’s a personal site where I share lessons learned from my blogging experience, and I need to find a new domain name. I’ve read the domain guide (linked above) and understand I should look for a .com domain, but beginningtoblog.com is already taken.
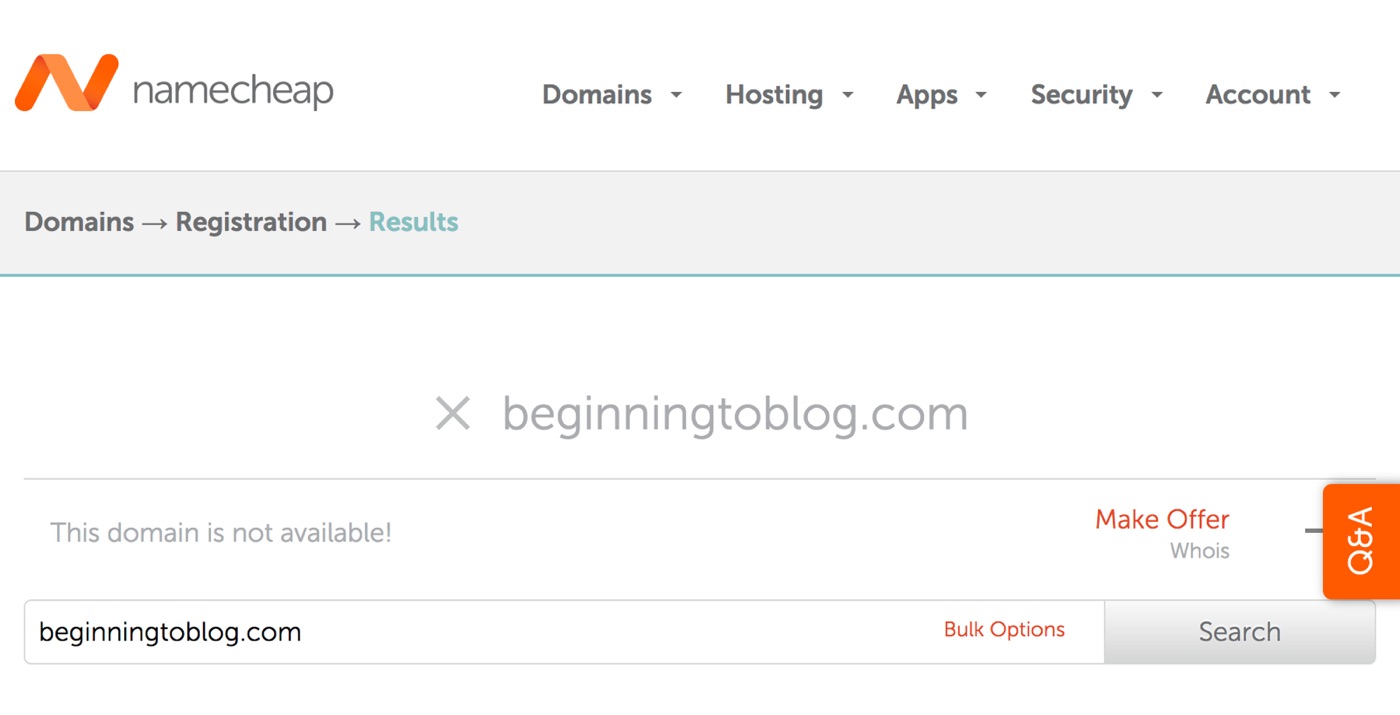
The domain is not currently in active use, so I could try to purchase the domain (the domain guide covers how to do this), but I want to move quickly, so I decide to look for a similar available domain instead.
I search on NameMesh using 'beginning to blog' as my keywords, but this shows there's no good .com option available.

I start looking for alternatives, so I take out 'to'. Bingo! beginningblog.com is available.
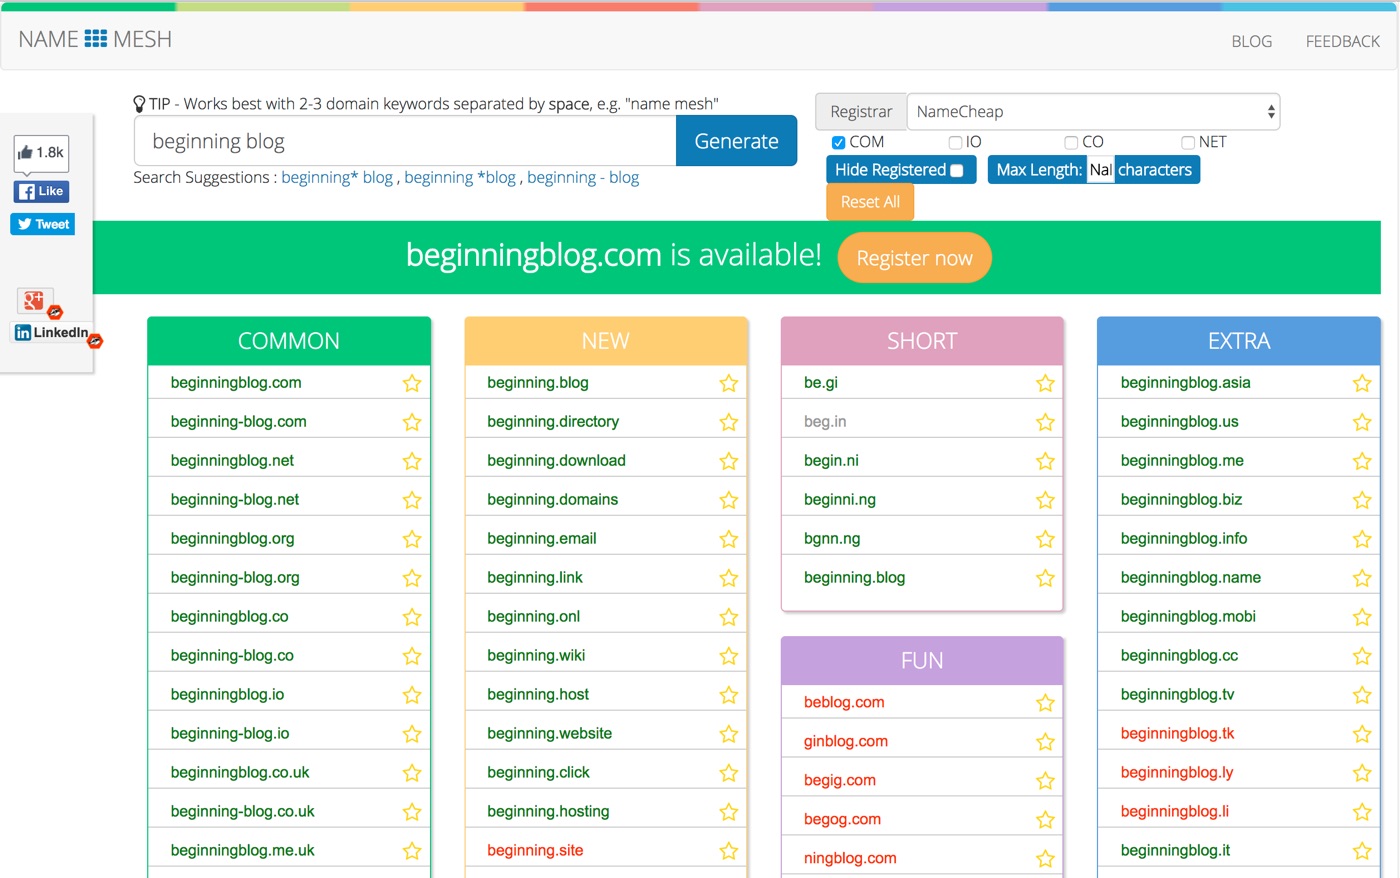
It’s not precisely the same as my WordPress.com address, but it’s similar and has a nice alliterative ring to it. I’ve decided to use WP Engine as my host, as recommended above. WP Engine just does hosting and not domain names, so I'll need to register my domain name separately with a domain registrar: Either GoDaddy or Namecheap, as recommended in the domain guide.
Take some serious time to consider the best domain name for your site and use our detailed guide to help you with this. Once you’re happy, we’ll continue with the transfer process.
Transferring Your Domain: Moving to yoursite.com
Once you've chosen your domain name, you now need make sure visitors to your existing name.wordpress.com address or existing domain name are taken to your new self-hosted site. There are three possible situations here:
- You have a free
yoursite.wordpress.comaddress and need to move to a new domain. - You purchased a domain name through WordPress.com and need to point this to your new site. You may wish to also transfer your domain from WordPress.com -- either to an external domain provider or your new web host.
- You used a domain name purchased through an external provider and had this pointed to WordPress.com. You now need to point the domain to your new site.
We’ll run through how to deal with each of these in turn.
We’ll start with moving from a free name.wordpress.com address to a new domain name. This is the most straightforward, as it only involves three steps: Registering a new domain name, connecting it to your hosting and redirecting your wordpress.com address to the new domain. How to follow these steps depends on which hosting provider you’ve chosen.
- If you’ve chosen managed hosting and are using our recommended host, WP Engine, then you should register your domain with a third-party registrar, as described in our guide on how to choose a great domain name. You’ll then need to connect your domain name to WP Engine. This is explained in our guide on how to install WordPress (scroll down to 'How to install WordPress on a managed host'). Follow these steps and then continue with this guide.
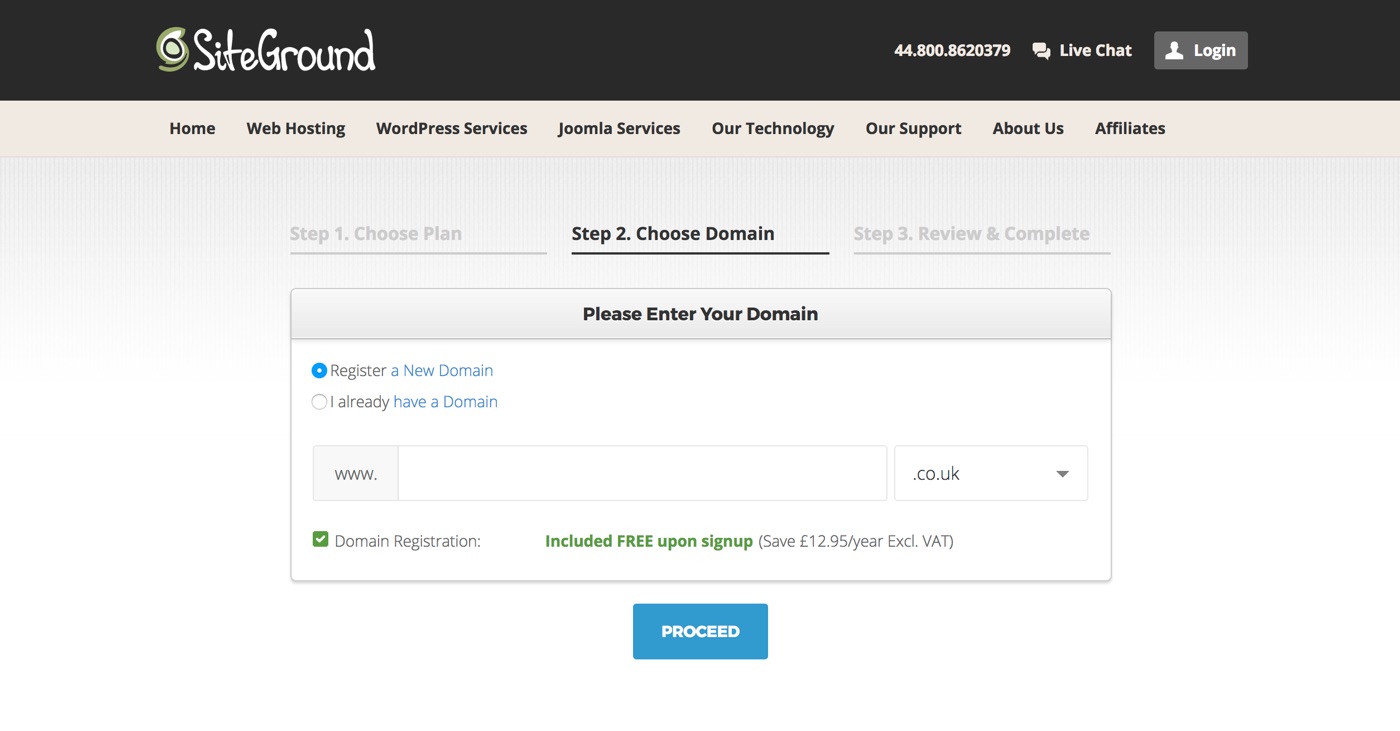
- If you’ve chosen shared hosting with SiteGround, you can register a free domain when you purchase it. As well as the cost saving (you don’t have to purchase your domain separately), you also have the convenience of having the domain name set up to work with SiteGround automatically. Note that many of the other web hosts we recommend (such as DreamHost and Bluehost) also include a free domain name in their packages, and these offer similar convenience.
Once your domain name is set up with your new hosting, you’ll be able to access your self-hosted site by typing your domain name into your browser. If your new site doesn't load, this is nothing to worry about -- you just need to wait up to 48 hours for the domain to be ready.
If you’ve purchased a domain name through WordPress.com, you need to point this to your new site. You can either do this by keeping your domain name registered with WordPress.com and telling it to load your new hosting instead of your WordPress.com site, or you can transfer your domain to a domain registrar (or, if they support domain registrations, to your new host).
You should look to eventually move your domain away from WordPress.com, as they charge nearly double the cost of other registrars for a .com. You may not wish to do this immediately, though, as domains are registered on an annual basis, and transferring a domain will require you to purchase a new year with no refund on time lost. So, if your domain still has most of its purchased registration still to run, it’s best to move it when it’s closer to expiration. If your domain is expiring within the next couple of months, however, it’s easier to move your domain at the same time as you move your hosting.
Pointing a domain registered through WordPress.com to a self-hosted WordPress site is very straightforward: Head to Domains on WordPress.com and choose your site. Click on the domain you’ve purchased, then click Name Servers and DNS, and toggle off the option to use WordPress.com’s nameservers. You now need to fill in your host’s nameservers. You can find these by searching for host name + nameservers, but, for your convenience, we’ve listed some of the most popular hosts below:
- WP Engine: Can be found here.
- SiteGround
- MediaTemple: NS1.MEDIATEMPLE.NET and NS2.MEDIATEMPLE.NET.
- DreamHost: ns1.dreamhost.com, ns2.dreamhost.com and ns3.dreamhost.com.
- Bluehost: ns1.bluehost.com and ns2.bluehost.com.
Enter all of the nameservers and save! That’s all there is to it. You’ll need to wait up to 48 hours for the change to take place, however.
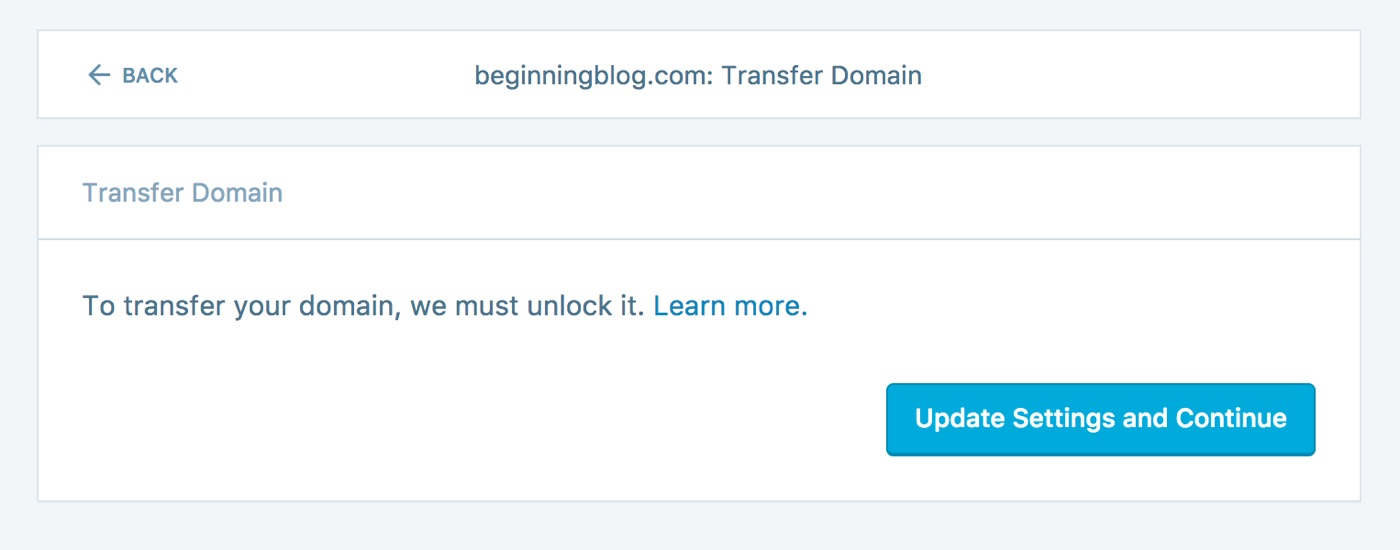
Transferring a domain registered through WordPress.com to another registrar involves a couple of steps. As with when you're changing nameservers, start by heading to Domains, and then selecting your site and the domain you wish to manage. Click Transfer Domain, and then Update Settings and Continue. This will prompt your domain to be unlocked for transfer and a transfer code to be emailed to you.
You can now go to the domain registrar you wish to use, and transfer the domain. We recommend GoDaddy and Namecheap if you’re using WP Engine. You’ll find details on how to transfer a domain to both of these registrars here and here, respectively. If you’re using SiteGround, you can transfer your domain straight to them -- and get a year’s registration free -- with details showing how to do this here. For other web hosts we recommend such as DreamHost and Bluehost, you’ll find details on domain transfer here and here, respectively.
The domain transfer process takes up to eight days to complete, so you’ll need to be patient. Once the process has finished, you’ll need to update nameservers so anyone accessing the domain name is taken to your new self-hosted site. Do this by logging into your registrar’s administrator panel and looking for options to manage your domain. Once there, find nameservers and enter the nameservers for your new host (shown above, if your host is on the list). Save your changes, and you’re done!
If you purchased a domain name with a third party and pointed it to WordPress.com, then all you need to do is update your domain’s nameservers from WordPress.com to your new host. The process for this is exactly the same as how you would do it after transferring a domain, as explained above.
There’s one final step: Make sure visitors to your name.wordpress.com site are taken to your new domain name and self-hosted site. You can do this by purchasing a Site Redirect from WordPress.com for $13 a year. This will tell visitors and search engines that your site has permanently moved (the technical term is a 301 redirect), and push all of your WordPress.com site visitors to your new site.
You should leave this redirect in place for at least two years -- in most cases, this is long enough for visitors to remember the new domain and for search engines to appreciate the domain has moved -- but if you notice traffic is still coming to your new site via your WordPress.com address you’ll need to keep it even longer. Unfortunately, there’s no way to avoid this, nor the expense it creates.
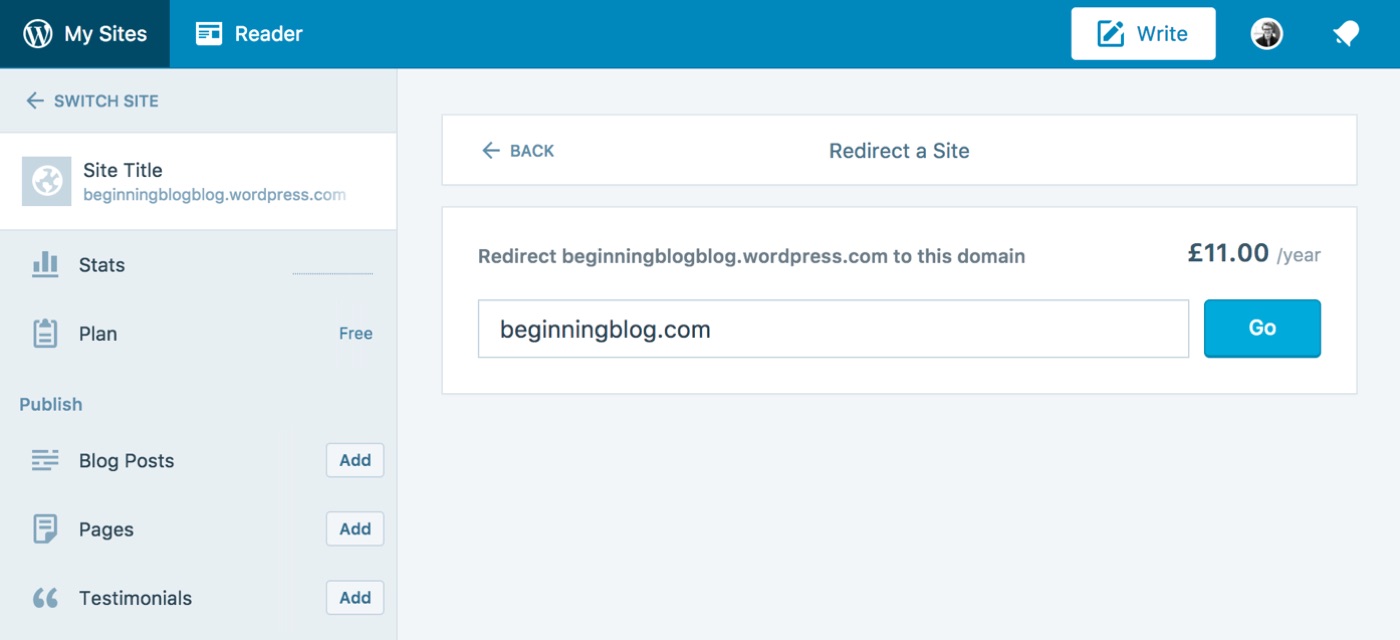
You can purchase a Site Redirect from this page on WordPress.com. Select the site to direct and enter your new domain name. Press Go, and head through the checkout process. You’ll also need to make sure the URLs on your new site match those on your old site, but we’ll cover how to do this once we’ve imported your content and become familiar with the WordPress Dashboard.
Once the Site Redirect is complete, you’re all done with domains! You should now have chosen a great domain for your site, and visitors to your old site will also be taken to the new one. Perfect!
Understanding the WordPress Dashboard and Transferring Content
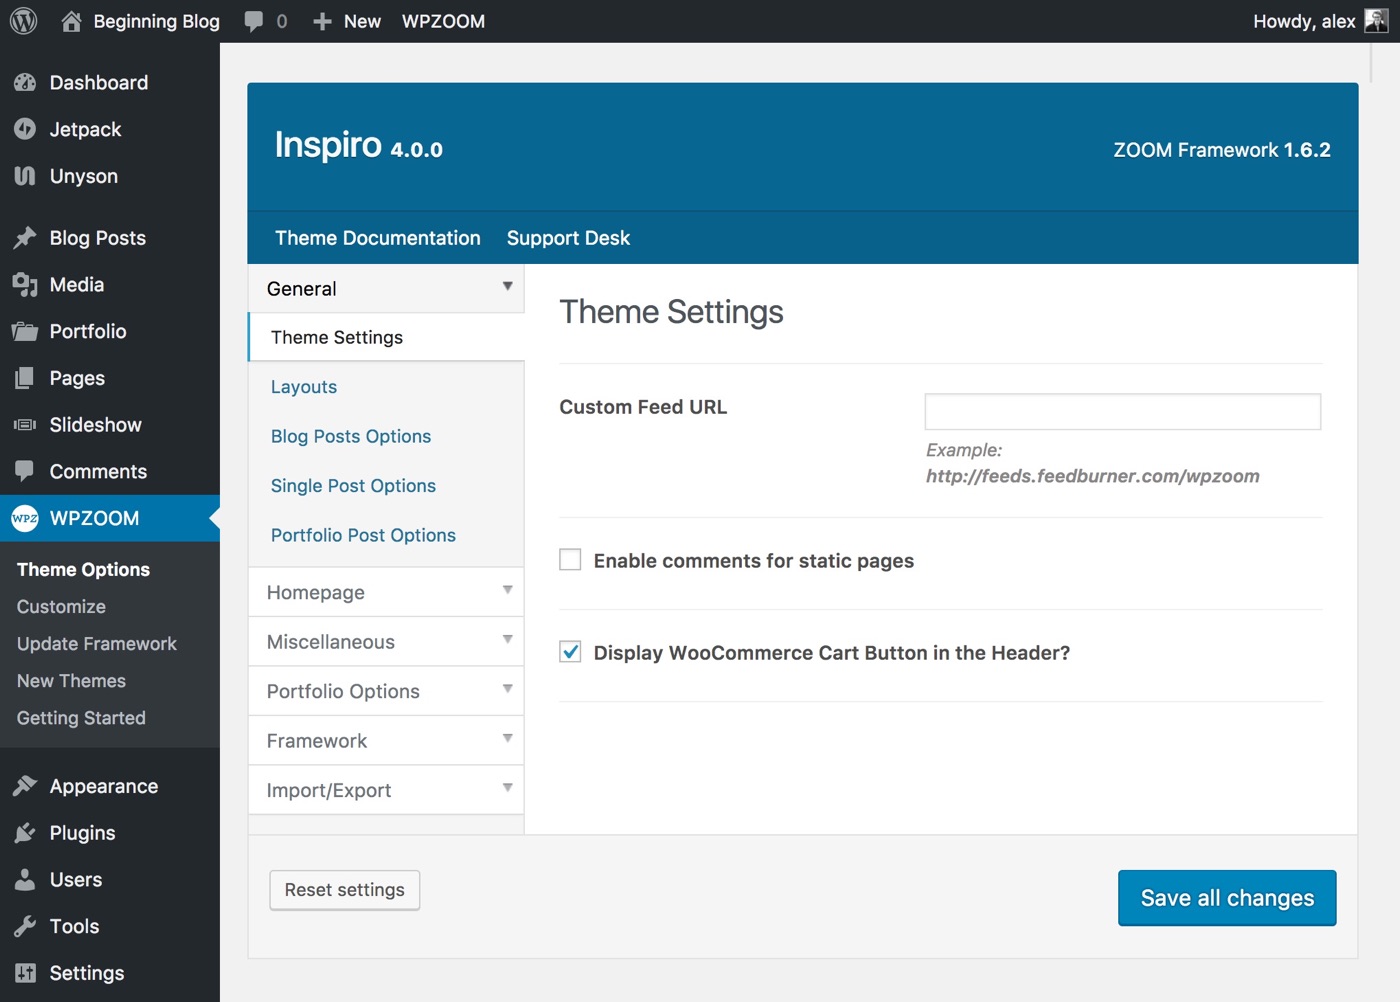
We’re now ready to start looking at the self-hosted WordPress Dashboard. The WordPress.com and self-hosted WordPress Dashboards used to be identical, but WordPress.com now uses a simplified version. Whether or not you used the old-style WordPress.com Dashboard (now available as 'WP Admin'), you’ll quickly become familiar with the new setup as they’re very similar.
The basic layout is the same: You have menus on the left and what you can do taking up most of the page on the right. Posts, pages, themes, menus, settings and the like all work in the same way (or in a similar way) to those on WordPress.com.
The main difference is with plugins. As mentioned, plugins let you add extra functionality to your site. On WordPress.com, you were limited to a single plugin, Jetpack, but with self-hosted WordPress, you have access to a humongous library of plugins, both free and paid, and you can manage and install your plugins using the Plugins menu. Click Add New to install new plugins, and you can choose from the tens of thousands of free plugins available from the WordPress.org plugin repository, or pay for and install one of thousands of premium plugins. New plugins will often add new menu items to the Dashboard, and these will be available on the left-hand menu.
You don’t want to install just any plugin, however! With all this extra functionality comes extra responsibility. How to choose (and install) new plugins is covered in this plugin guide, and we also have a list of recommended plugins to help you start.
Take a bit of time to get used to the Dashboard. Once you’re familiar, you can transfer your content from WordPress.com to your self-hosted site. Start by going to your WordPress.com Dashboard and heading to Settings. Click the Export tab and Export All. Once WordPress.com has processed your request, follow the prompt to download a zip file. Open this, save the content to your computer, and then unzip the file.

Now, head to your self-hosted WordPress Dashboard and navigate to Tools → Import. Click Install Now under the WordPress importer, and then Run Importer. Choose the .xml file from the unzipped folder and upload and import. If necessary, make sure posts from other users are attributed properly (go to Users → Add New if you need more users) and check the box to download media attachments so your images and other media import. Submit, and wait for the content to import.
Once your content is ready, head to your site’s homepage, and you should see everything copied over! Now, you’re all done with importing content.
Taking Care of Search Engines
Search engine optimization, or SEO for short, is something you had limited control over with WordPress.com, but extensive control over with self-hosted WordPress.
The first and most important thing to do here is to make sure your new site has the same link structure as your old one. Without this, the redirect we set up earlier from your old to new site won't work.
Fortunately, this is very simple to do: From the WordPress Dashboard, head to Settings → Permalinks, and, under Common Settings, select Day and name. Save Changes, and you’re all done.
It’s worth noting that the redirect setup conducted earlier will ensure that the SEO benefits accrued by your old site will be transferred to your new one, but this can take up to six months to be fully in effect. You can speed up this process, however, by telling Google you’ve changed the address of your site. To do this, you’ll need to have both your WordPress.com site and your new self-hosted site added with Google’s Webmasters. Head to Webmasters and click Add Property. Verify using alternative methods, and then head to the WordPress.com SEO page and select HTML tag. Copy and paste the HTML into the Google field on WordPress.com and Save Settings. Google can now verify you run the site.

Now, repeat with your self-hosted site. Self-hosted WordPress doesn’t have an SEO page, but you can install and activate the excellent and free Yoast SEO plugin to add as many features as you have on WordPress.com -- and more. With Yoast SEO installed, head to the new SEO menu and then click Webmaster Tools. Now, head back to Google and add your new site (with the new domain name), again verifying using Alternative methods. This time, however, select the HTML tag, but only copy the text displayed in content="text", where text would be the code to copy. Head back to self-hosted WordPress, and paste the code into the field next to Google Search Console. Save Changes, and Google can now also verify your self-hosted site.
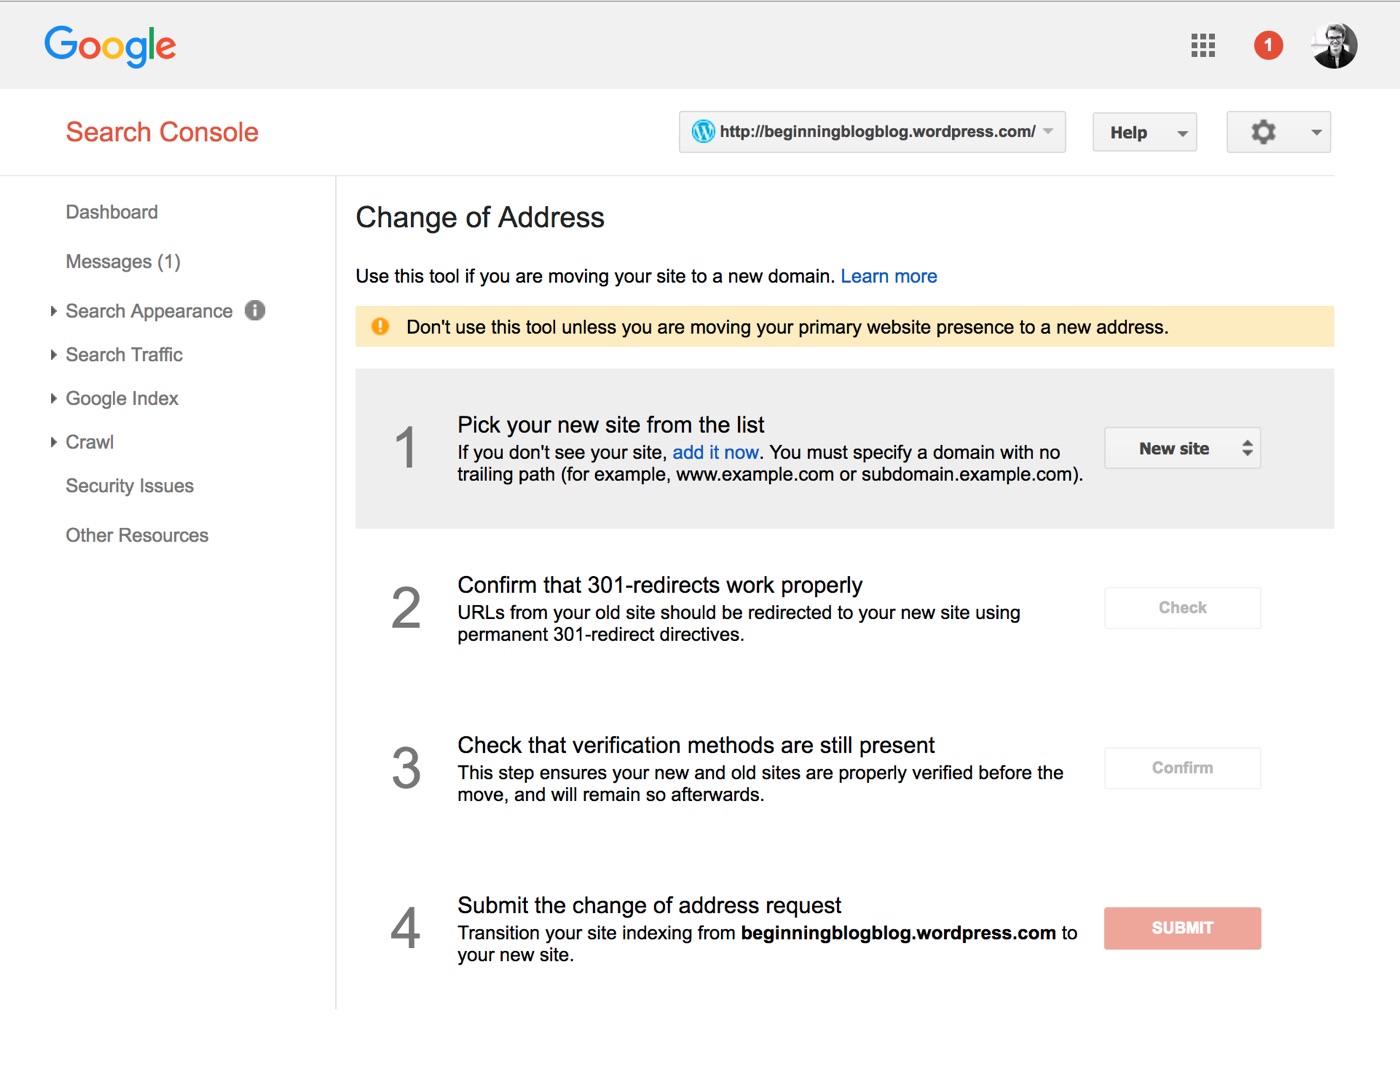
You now just need to tell Google the WordPress.com site is moving to the self-hosted site. Head back to the Webmasters Dashboard and click on your WordPress.com site. Click the gear icon, and then click Change of Address. Follow the steps as prompted: Choose your new site from the dropdown, confirm the redirects and verification work, and then submit the request. Google will now process the request, speeding up your transition with search engines.
The final thing to get in order is encrypting connections to your site. Your WordPress.com site used https, denoting connections between visitors’ browsers and your hosting was secure. When using https, you’ll also see a padlock icon in the address bar. Unless your self-hosted site also uses https, however, visitors coming to your site via a redirected URL are going to get a security warning shown in their browser. This is very bad!
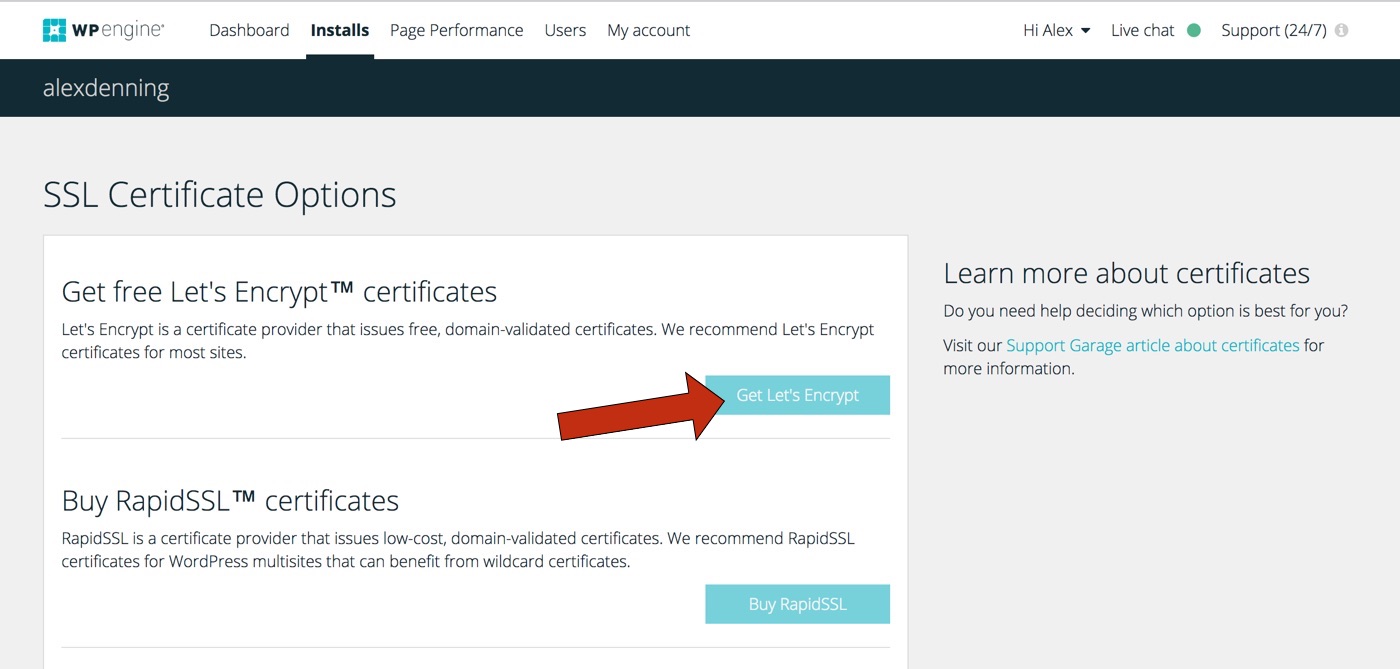
Fortunately, using our recommended hosts (WP Engine and SiteGround), setting up https is very easy. With WP Engine, head to your Dashboard, Installs and then SSL. Click Add Certificates, and then Get Let’s Encrypt. Select your domain name and save. All done!
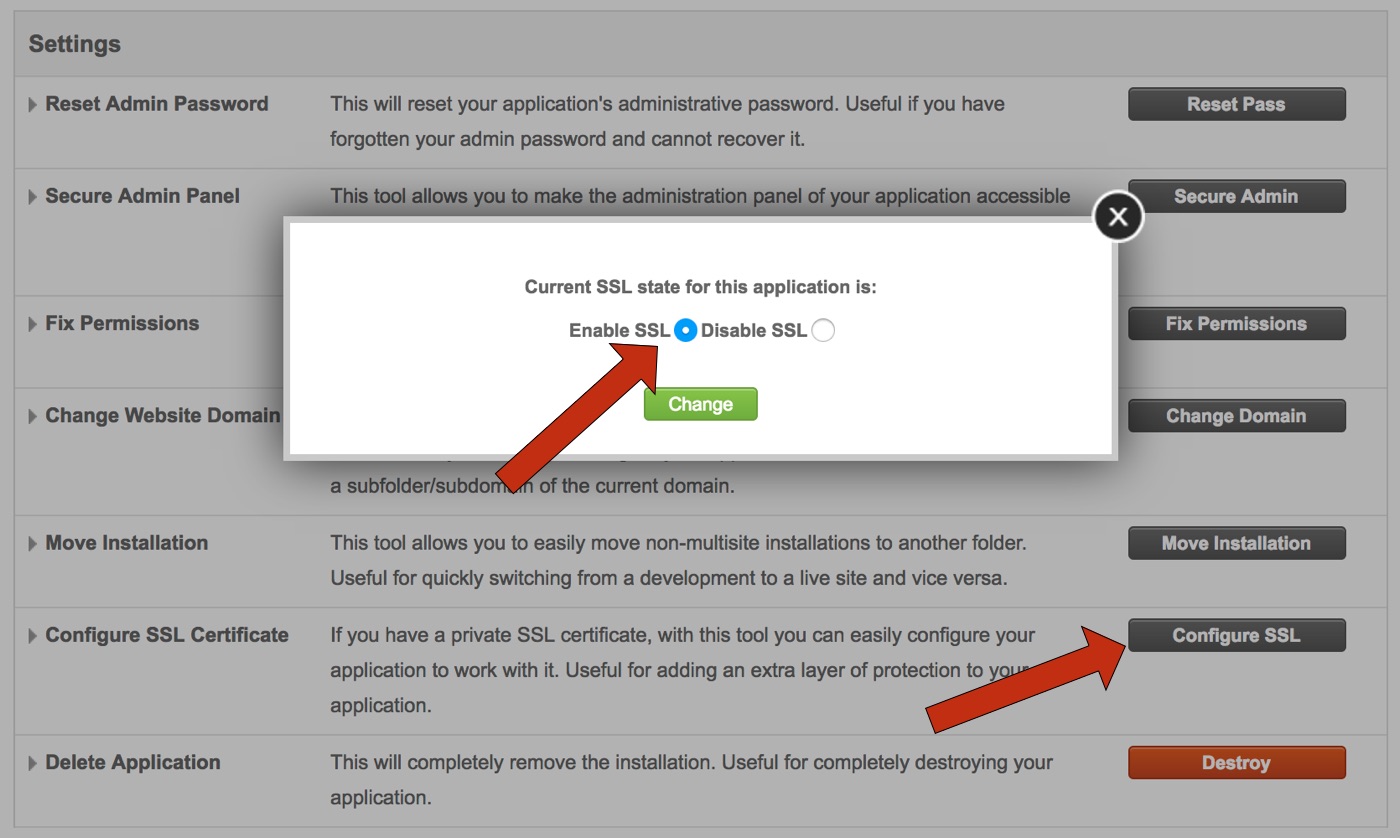
With SiteGround, this is similarly simple: Log in to the SiteGround Dashboard, select My Accounts and Access cPanel. Under WordPress Tools, select the WordPress Toolkit. Click Manage and then Configure SSL. Change the checkbox to Enable SSL, Change and you’re done!
If you’re using a host other than our recommendations, you’ll find instructions on how to add https here.
Self-hosted WordPress gives you much more control when it comes to dealing with SEO. This is great, as you can reach higher rankings, but you’ll also find it creates more work for you. Check out the WinningWP SEO category and this primer from Yoast to understand the basics.
Install Jetpack to Add the Features You Had on WordPress.com
One of the great strengths of WordPress.com is its ease of use: Most of the features you’d plausibly want -- including visitor statistics, social sharing and tools such as related posts, beautiful image galleries, and email subscriptions -- are available right out of the box. The ready availability of these features plays a significant role in making sure new users stick with WordPress, so their absence from self-hosted WordPress installs is an unfortunate negative.
Or, at least, it would be. Recognizing this weakness, Automattic (who you’ll remember from the top of the guide run WordPress.com) have released the Jetpack plugin, which adds these popular features to WordPress.com to self-hosted WordPress users. Jetpack is free with paid add-ons, but the vast majority of users will find all the features they want are included in the free version.

Jetpack adds a number of features you’ll be familiar with from WordPress.com to self-hosted WordPress, so when switching between the two, it’s an obvious choice. You can install Jetpack like any other WordPress plugin (as we discussed above), but there are a couple of extra features and tricks worth dwelling on.
After installation, Jetpack will prompt you to connect your self-hosted site to your WordPress.com account, which you'll need to do to use most of its features. With your site connected, you can head to Jetpack → Settings to access these. Only a handful of features are turned on by default, though, so you’ll want to go through and activate the ones you want -- but only the ones you’ll use, as these add to your site’s load time. We’d recommend turning on Sharing, Related Posts, Tiled Galleries, Photon and Extra Sidebar Widgets. Settings are saved as soon as you toggle on or off.
One of the biggest advantages of using Jetpack is that you can transfer your WordPress.com site’s email subscribers, followers and statistics. The WordPress.com team have created a number of tools to help you with this: The subscription migration tool will transfer your email subscribers and followers (but not the number of social media subscribers), and you can transfer statistics by contacting Jetpack support and requesting this. You’ll need to include the URL of your WordPress.com site and the URL of your new self-hosted site (with Jetpack installed) in the message. The transfer is free of charge.
Jetpack is a hugely powerful plugin, and it adds many of the features you’ll be familiar with. The free plan is very generous, so make use of it!
Install the Same WordPress Theme -- or Choose a New One
One of the great advantages of self-hosted WordPress is the option to choose any WordPress theme and then customize it precisely how you want.
While using self-hosted WordPress opens up the possibility of choosing between thousands of new themes, for the sake of consistency, you may also wish to use the same theme as you had on WordPress.com. You could, for example, decide to stick with the same theme but customize it further.
On WordPress.com, you were either using a free theme or a premium theme that you paid separately for or had access to as part of the Business add-on. If you’re unsure, you can find out the name of your theme by going to your site’s Dashboard, clicking Themes and finding the name of the Current Theme.
Transferring a free theme from WordPress.com to self-hosted WordPress is very straightforward, as virtually all free themes on WordPress.com are available for self-hosted WordPress. You can check whether this is the case with your theme by searching for its name at the WordPress.org theme repository. If it shows up, you’re good to go!
Head to your self-hosted WordPress Dashboard and navigate to Appearance → Themes and click Add New. Search for the theme’s name using the search bar in the top right, find the theme in the search results, and press Install. Wait for WordPress to load the theme onto your site and then Activate to set it live. Easy!
It’s also possible to transfer a premium theme from WordPress.com, but it may be less straightforward. Themes on WordPress.com have special requirements, so you can’t just install a WordPress.com theme on self-hosted WordPress -- instead, you need to find the self-hosted version. Most premium themes on WordPress.com are also available for self-hosted WordPress, but you’ll need to purchase the theme again to use it.
You’ll be able to find the self-hosted version of your WordPress.com premium theme by searching theme name + WordPress and looking for a result from the developer’s website. If you can’t find this, it most likely means your theme isn't available for self-hosted WordPress.
One extra note here: Before you purchase the same theme a second time, it’s worth contacting the theme’s developer and letting them know you’ve already purchased it but are now switching to self-hosted. There’s a fair amount of work involved in making two versions of a theme, so it’s unlikely you’ll just be sent a free copy, but you may be offered a discount at the developer’s discretion.
Installing a premium WordPress theme is also straightforward: Simply download the theme files from the developer’s website (these are usually available from a Member Area or Downloads section). You should get a zip file: Save this to your computer, but don’t unzip it.
Head to your WordPress Dashboard and go to Appearance → Themes. Click Add New and then Upload Theme. Select the zip file you’ve just downloaded, and click Install Now. WordPress will now upload the theme to your site. Once the theme is uploaded, click Activate, and the theme will be running on your site.
With your theme installed, you can now transfer any customizations. You can also make more customizations, as this is one of the great freedoms of self-hosted WordPress! Most WordPress.com theme customizations come in one of three areas:
- customizations with the customizer or theme options
- custom fonts
- custom CSS.
Transferring changes from the Customizer is just a case of manually copying these over: In one browser tab, load the WordPress.com Dashboard and click Customize under Themes. In a second tab, load your self-hosted site’s Dashboard and click Themes → Customize. It’s now a case of switching between the two tabs and copying over any changes you’ve made. You can copy any Custom CSS straight across, but double check that these changes still work -- the self-hosted version of your theme may use different IDs and classes.
You may find the two Customizers don’t quite match up. Where this is the case, the options have likely moved to a separate theme options page outside the Customizer. You can find the theme options from the self-hosted Dashboard by hovering over Appearance, and either clicking Theme Options or the name of your theme. For some themes, the options page can be found as a separate menu item showing either the theme name or theme developer’s name. This new options page should show any missing options -- and usually a lot extra as well!
Transferring custom fonts is possible with some themes from the Customizer or Theme Options. If you don’t see such an option available, you’ll need to head to the self-hosted Dashboard and navigate to Plugins → Add New. Search for Easy Google Fonts, click Install Now and then Activate. Now head back to the Customizer, and you’ll find a new section, Typography, that lets you set custom fonts. It’s now just a case of setting these as they were on your WordPress.com site.
These are the basics for transferring your WordPress theme, but, if you need further instruction, we have a detailed guide on installing and setting up a WordPress theme. Read this if you need further help.
You may decide switching to self-hosted WordPress is the time to also switch WordPress themes. Moving to self-hosted WordPress will give you access to significantly more WordPress themes, so you may wish to start using these instead. This is a task you should spend a significant amount of time on to come to the right decision, so, to help, we've created a full guide covering everything you need to know about choosing a new WordPress theme.
Conclusion
Congratulations! You’re now armed with all the knowledge you need to successfully transfer your WordPress.com website to self-hosted WordPress.
If you’d prefer to have a professional handle this for you, WordPress.com offers a WordPress.com-to-self-hosted transfer service, priced at $129. You’ll get everything covered here done for you, but you’ll have to adhere to certain requirements, such as choosing SiteGround as your host.
With all the step-by-step instructions in this guide, however, you should be more than prepared for moving from WordPress.com to self-hosted WordPress yourself. Make the change and enjoy the freedoms self-hosted WordPress has to offer! Remember, though, with those freedoms come additional responsibilities. We have a number of guides to help with the next steps for your self-hosted WordPress site:
- How to Backup, Secure and Optimize WordPress
- How to Choose -- and Install -- New WordPress Plugins (and Recommended WordPress Plugins)
- How to Install -- and Set Up -- a New WordPress Theme
- How to Monitor a WordPress Website
- How to Speed Up WordPress
- Finally, WordPress.com also has its own guide (that’s less detailed ;) ) on moving from WordPress.com to self-hosted WordPress.
Enjoy your new site and the freedoms of self-hosted WordPress!
WinningWP Staples
There's more to us than just WordPress guides. Here's a few favorites:


Under the Hood
Wondering what plugins, tools and services we used here at WinningWP? We spill the beans...
WordPress Deals & Coupons
Save oodles of cash on some of the best hosting, themes & plugins around!
Good luck!
So there you have it! You should now have everything up and running on your very own WordPress.org install: no more restrictions and complete freedom to do as you please!