

How To Monitor A WordPress Website (And Why It's Important To Do So)
Is your website behaving exactly as it should? Is it always online? Are you sure? What are the most popular pages? How many visitors did you have last month? How fast do the various pages load? Are they fast enough? Believe it or not, these are all important questions for the health of your website — and really shouldn't be ignored! The goal of this guide is to help ensure you're keeping track of everything you should be. (Note: For more guides in the same series, head to the main WinningWP Guides page.)
-Note: WinningWP content is free to all. If you make a purchase through referral links on our site, we earn a commission (learn more).
Monitoring is a crucial aspect of running a WordPress site, as you need to know what's happening with it, such as how many visitors it has, whether it loads fast enough, whether it's always available, and so on. Data on these things (and more) will help you to make essential decisions, leading to better performance, happier visitors and, where relevant, a better bottom line.
Monitoring is something to take very seriously and perform thoroughly. Fortunately, it’s not especially difficult once you know what tools to use and how to use them. This guide will show you everything you need to know to monitor your WordPress site. Whether you’re new to the topic or have made a start already, we’ll make sure you’re up to speed.
We’ll look at why monitoring is important, what to monitor, and the best tools for the job. All of our top recommended tools are free, with paid upgrades available for those who need additional power and flexibility. We’ll also discuss the most convenient plans for those who want everything in one place.
Ready to start learning? Let’s get to it!
Why Should You Monitor Your WordPress Site?
Monitoring your WordPress site lets you gather data that shows you whether your site is working as you’d expect. This data can help you to make better decisions about your site.
There are three things you should be monitoring:
- Visitor Statistics: Find out how many people visited your website, which pages they visited, how they got to your site, and a whole host more.
- Site Speed: Does your site load quickly? Do all pages load quickly? Monitoring site speed makes sure you know all about this, and can step in if necessary.
- Uptime: This is the amount of time your site is accessible to visitors. You want this to be 100%, or as close to that as possible. Monitoring uptime lets you see when your site is unavailable, so you can do something about it. Conversely, time your site is inaccessible is known as 'downtime'.
What are the benefits of monitoring these things? The advantages of monitoring your WordPress website are multifaceted -- here are some examples:
Monitoring uptime could demonstrate that your site is unavailable for more than the average seven hours 45 minutes, and let you know that you should switch to a better hosting provider. If your site is unavailable for extended periods of time, this will affect your search rankings, reputation, and revenue -- highly undesirable outcomes for any website.
An unexplained drop in revenue can be solved with uptime monitoring: If you’re running an ecommerce site, downtime will result in lost revenue, thus monitoring uptime will help to explain any curious drops. In 2013, Google went down for five minutes at a cost of $545,000. The International Working Group on Cloud Computing Resiliency found that downtime in 2014 cost $285 million in lost or missed business. These are serious numbers that demonstrate the scale of the problem and importance of uptime monitoring. You can work out the annual cost of your own downtime using the following formula:
(annual revenue/365/24) * hours of downtime = $ cost
This helpful equation breaks your annual revenue down into hourly revenue, and then multiplies by the number of hours your site is inaccessible to get a dollar cost. Of course, to use this accurately, you need to be monitoring your downtime. This illustrates the benefit of monitoring your site: You gather more data, which can be used to make better decisions, which can improve your website.
Monitoring visitor numbers and site speed may show you that a drop in the number of monthly visitors corresponds to a rise in the average speed of your site. Closer investigation could reveal a fall in traffic from search engines. We know site speed is one of Google’s ranking factors, so as a result of monitoring visitor numbers and site speed you could decide to make your site faster to restore the change to your search traffic.
These case studies demonstrate the importance of monitoring a WordPress site. All types of sites, whether ecommerce, blog, affiliate, business, or a simple hobby site suffer when something goes wrong, whether in lost revenue, lost reputation or lost rankings. And, as the example from Google shows, no site is immune to unwanted or unexpected problems.
Don't think this won't happen to your site: It's very important to be aware of what could go wrong so you're familiar with it if and when it does happen.
We're going to show you the tools to use to monitor your WordPress site, and make sure when things do go wrong, you can react quickly and get your site working again. You may also find our guide on updating, maintaining and troubleshooting WordPress useful here.
The Tools to Use for WordPress Monitoring
There are no shortages of apps, tools and subscriptions offering monitoring services. Most of these can do one thing really well; indeed, the best option is a dedicated tool for each of the following factors: Visitor statistics, site speed, and uptime.
While there are dozens of tools in each category, there’s often a single, market-leading service that’s cheaper (or free), has more features, and/or is better integrated with WordPress. We’re going to look in detail at the best tool for the job and then show you the alternative options.
It’s worth noting two alternative options are going to come up a lot: ManageWP and Jetpack. These two tools are WordPress-specific freemium (i.e., some features are free, some are paid) services that can do a lot of what’s needed to monitor a WordPress site. Often, they don’t do the best job, but they mostly do an acceptable (or even good) job. We’d still recommend using the outright best tools, but, if convenience is of key importance to you, these two are worth considering.
Jetpack won’t do everything you need for WordPress monitoring, and, of the things it does do, some are done well, and others aren’t great. ManageWP will do everything to a reasonable standard, but you pay for the privilege.
With this in mind, we can start looking at the very best tools for each of the WordPress monitoring jobs.
The Best Tool for Visitor Statistics: Google Analytics
Knowing more about your visitors lets you make better decisions about your website. Information such as number of page views, number of visitors, time spent on the page, visitor locations, and so on will help you to make better decisions regarding your content -- and show you whether these decisions are having a positive or negative impact.

Visitor statistics are vital for any WordPress site, so let's start there. Google Analytics is by far the best tool for visitor statistics. It’s free and tells you everything you’d possibly want to know about visitors, including:
- an at-a-glance overview of unique visitors
- the most popular pages
- the location of visitors
- ecommerce integration and tracking (included with WooCommerce)
- a breakdown of visitor data, including location, where visitors have come from, browser, device, and much more
- real-time visitor information.
All of this can be drilled down to as much detail as you want; this versatility makes Google Analytics suitable for casual users and huge organizations alike.
![]()
It’s easy to set up Analytics with a WordPress site:
- Sign up for a free Google Analytics account.
- Follow the prompts to add your site: Add its name and URL, and agree to the legal content.
- Head to your WordPress Dashboard, and install the Google Analytics Dashboard for WP plugin.
- Go to the new Google Analytics menu from the Dashboard, and authorize the plugin to connect to your Google Account. You'll need to follow the prompts to generate an access code. If you have multiple websites tracked, select the relevant site and 'lock data'.
- Once the account is authorized, head to the Tracking Code sub-menu and check Tracking Options is set to Enabled.
- Save all of your changes, and you’re done! You’ll now have your site visitors tracked with Analytics and all of the data available for your convenience from your main WordPress Dashboard.
Analytics is great for the basics, but the real gains come from more advanced usage. Take the vast quantity of data on your site and ask: How can I use this information to improve my site? You may, for example, see that visitors are only visiting one page before leaving your site, or are only spending a short amount of time on your site. This could suggest visitors aren’t getting the answers they’re looking for, or need more relevant and exciting links to related content. You may decide a related posts plugin is what’s needed to tackle this problem.
 Track the time on site and pages per visit over time to see how you can improve your site.
You can take advantage of advanced features, as well as detailed analyses of Analytics’ statistics. The most useful of these is Goals. Goals lets you track how many users access a designated page, and how they got to that page. Here are some common examples of good pages to use with Goals:
- 'Thank you' page after making an ecommerce order.
- 'Thank you' page after signing up to an email list.
- Contact page for client lead generation.
Once a Goal is set up, you’ll be able to see how visitors are completing each goal, which will give you valuable data on how to improve. You may, for example, find that one blog post converts significantly more email signups than others. You can then consider how and why this post is doing so, apply what you learn to other posts, and convert more email signups.
Analytics make setting up Goals straightforward:
- From Google Analytics, head to the Admin tab.
- Under View, click Goals.
- Click New Goal, add a name and type. You likely want a destination-based goal.
- Continue, and add the web page that constitutes your goal. We'll use the example of a 'thank you' page customers are sent to after signing up to an email list or completing a purchase. Enter this here without the full URL, so
/thank-you/rather thanexample.com/thank-you/. If visitors arrive at the goal page via specific pages (for example, via the checkout or 'join our mailing list' page), add these as a funnel. You can also assign a monetary value to each completed goal.
 Set up your Goals in Google Analytics to track conversions and revenue.
- Test that your settings are correct by verifying your goal: This will show the success rate over the past seven days.
- Save, and you’re done setting up!
- You can now view your goal under the Reporting tab and under Conversions → Goals.
- Spend a bit of time looking at the details, seeing how visitors are meeting your goals, and contemplating how this can be improved. Now act on this valuable new data!
Google Analytics gives you incredibly detailed and valuable data on who's using your site, as well as what they’re doing -- and even gives you insights on why these things are happening. This is the value of monitoring visitors on a WordPress site.
It’s worth checking Analytics briefly on a weekly basis, and in detail at least once a month. If you want to learn more about advanced features, a number of resources can help you:
- The Absolute Beginner's Guide to Google Analytics.
- Google Small Business video on Getting Started.
- Google Analytics tutorial for WordPress beginners.
Use these powerful features to learn more about your site and improve its performance.
Alternative Tools for Tracking Visitor Statistics
Google Analytics is the market leader in visitor statistics, and it’s free, so it should almost certainly be your preferred statistic tool. The dominant nature of Analytics means most alternative tools are best used as complements rather than replacements.
Here are your options:
Hotjar is a useful complement to Analytics, showing heat maps of where visitors are clicking, how they scroll, and other mouse-following statistics. This gives you information on how real visitors are using your site, which is valuable data you can use to make decisions for improvements. Hotjar is free for sites with up to 2,000 page views per day, but can get expensive quickly. If you’d be paying for Hotjar, then consider Crazy Egg, which offers similar functionality, but with some potentially cheaper plans.
Jetpack features a Site Stats module that's useful for providing a convenient overview directly on your WordPress Dashboard. This doesn’t offer anywhere near the detail found in Google Analytics, but, if you’re using Jetpack anyway, it’s a handy complement. With Jetpack installed, activate Site Stats under Settings → Engagement. Note the convenience is negated if you’re using the Google Analytics Dashboard plugin recommended above.
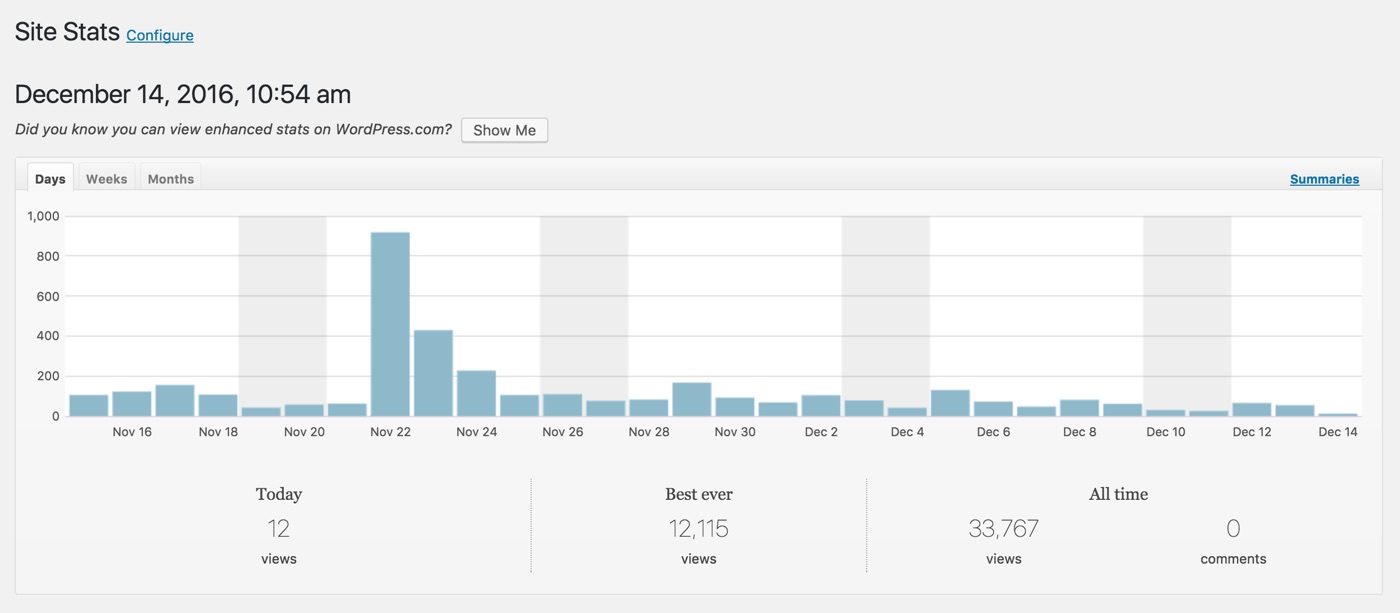 Jetpack makes it convenient to track your stats.
Piwik is an open-source, free and self-hosted alternative to Google Analytics. It doesn’t have as many features, but it's the best option if you have an aversion to Google handling your site’s data: You install it on your own server, and it runs from there. You’ll find installation details here, and there’s even a WordPress plugin available that will show the stats directly on your Dashboard.
GoSquared is another alternative to Google Analytics. Positioning itself as 'mission control for your online business', GoSquared offers analytics alongside live chat with customers, as well as customer relationship management. GoSquared offers most of the same detail as Google Analytics, but its comparative advantage is in making that information easily comprehensible. For ecommerce businesses, this is a paid option worth considering. You’ll find WordPress installation details here. A similar alternative is Woopra, which works out to be more cost-effective under some plans.
Google Analytics is undoubtedly the best option here, but it doesn’t have to be your only analytics package. Some of the other options mentioned can complement Analytics and provide you with extra detail about your visitors, which can help you to make better decisions for your site, while others provide alternatives to use if you’re uncomfortable with Google holding data on your site’s visitors. Each of these tools will have a small impact on load time, so it’s probably unwise to use them all. Consider which are best suited to what you’re trying to achieve, and take advantage of those.
Speed Monitoring for WordPress: GTmetrix
It’s imperative that your WordPress site is as fast as possible. Your visitors want your site to load very quickly: Users expect sites to load in under two seconds, and will leave your site (for a competitor) if it takes too long to load. Furthermore, Google takes site speed into account in its rankings, and a slow site could cause your search rankings -- and traffic -- to drop.
A fast WordPress site, on the other hand, prevents all of these problems.
We’re looking at monitoring here, but these tools can also help if you need your site to be faster. Read our full guide on speeding up WordPress here.
You need a speed monitoring tool to regularly check the speed of your site and alert you if your site is slow, so you can fix it and prevent the negative impacts of a slow site.
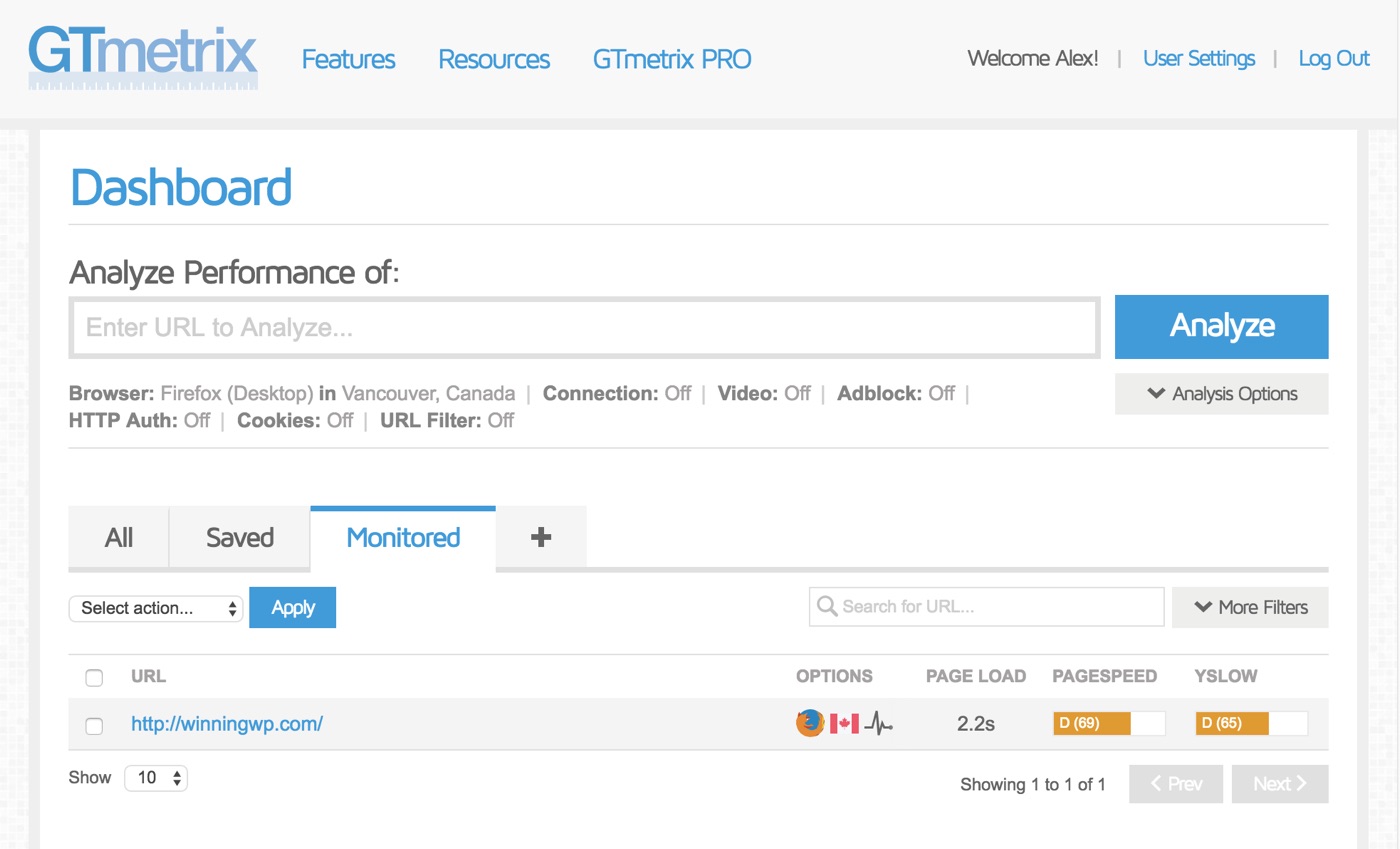
The best tool for WordPress site speed monitoring is GTmetrix. You can use it to externally test how fast your site is, check its speed daily, and alert you by email if there are any problems. You can also get a weekly digest with an overview of your site’s speed.
The generous free plan lets you do basic speed monitoring without paying, but if you have an ecommerce site where your bottom line will be affected by any deterioration in site speed you should get the $14.95-a-month paid plan. This will add hourly monitoring of your site, let you monitor more URLs from locations across the globe, and even capture a video when any problems occur.
This is a low (or no) cost, hassle-free way of monitoring one of the key statistics in WordPress site management.
GTmetrix is very easy to set up with WordPress. Here’s how to add your site for regular speed monitoring:
- Head to GTmetrix.com, and sign up for an account.
- Enter your site’s URL, and press Analyze. Wait for the analysis to process.
- You’ll see a detailed performance report for your site, including a headline page load time in seconds and a Google PageSpeed score.
- Press Monitor on the right sidebar, and select Daily (or Hourly if using the paid plan). This will have GTmetrix check the speed of your site every day (or hour).
- Close the tab, and click Set Up Alerts on the same sidebar. Tick Enable E-mail Alerts, and set the conditions to 'Page load time is greater than 2s'. If you’re using the paid plan, you can also tick Create Video. Save Settings, and GTmetrix will now email you when your site load speed is over two seconds. This will allow you to take action to improve the speed of your site when necessary.
- If you’re using the paid plan, repeat step five again, but use the Analysis Options to change the location of the test server. Use Google Analytics to find the three most popular visitor locations, and set tests for each of those.
- You can now repeat this for key pages on your site. Google Analytics can tell you what your most visited pages are, and they’re probably the best place to start for speed monitoring (For ecommerce sites, the cart and checkout may not be the most visited pages, but will be some of the most important). The free plan lets you test three pages, and the first tier of the paid plan lets you test ten pages.
For more information, check out our more detailed post on using GTmetrix and taking advantage of its analysis features. Read this if you want to find out more about the best WordPress site speed monitoring tool.
GTmetrix is easy to use and will make sure your site’s speed is properly monitored. The basic account is free, and the alert emails will make sure you only hear from it when something needs your attention, so you should definitely set it up for your site.
Alternative Tools for Monitoring WordPress Site Speed
GTmetrix is free and easy to use, but it’s not necessarily the very best option for all sites. Popular ecommerce sites will need pages checked more frequently than once every hour, while some people may simply prefer to test in browser or use an app with other features.
If GTmetrix doesn’t appeal to you, a variety of other options are available:
Pingdom: This is a paid-only service offering a lot of monitoring features, including speed monitoring. The entry level plan is less expensive than GTmetrix’s cheapest paid offering, and gets you page speed checks powered by a 60-strong network of servers every half-hour, as opposed to GTmetrix’s hourly checking on a smaller network. Unfortunately, you’re only going to be able to test one page on the entry level plan, so you’re seriously going to need more frequent checking to favor Pingdom over GTmetrix.
 Pingdom Tools is useful for one-off site speed tests.
Website speed monitoring in-browser: For one-off monitoring, a range of free tools can be installed right in your browser. While these tools don’t provide robust analytics or real-time alerts, they can be handy for performing a one-time test of the speed with which a given page loads. Test your site speed on your own computer using Page Load Time for Chrome or Page Speed Monitor for Firefox. You can also do one-off tests from external locations in-browser using Pingdom Tools.
ManageWP: One of this tool’s many services is Performance Check, a straightforward site speed tester. The free version of the Performance Check feature enables you to manually run checks at any time, but $1 a month will get you daily tests and alerts if your load time is above a designated level. GTmetrix offers better features for free, but ManageWP is sufficient for most small or medium sites, and has the convenience of its centralized dashboard on its side.
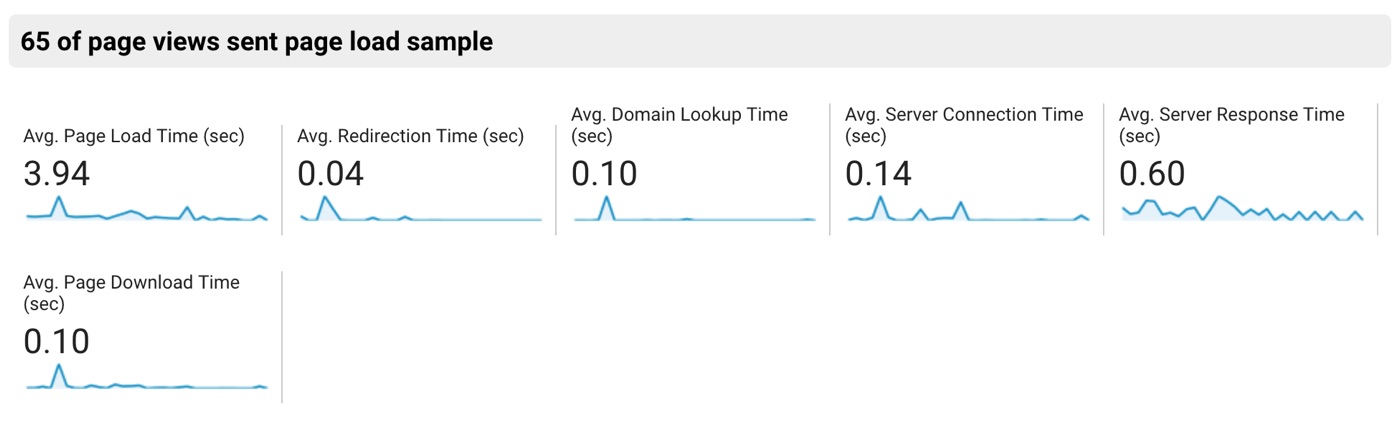 Google Analytics can also show you small samples of real-world load times.
Google Analytics: It’s worth mentioning that Google Analytics -- the best tool for monitoring the number of visitors on your site -- can also tell you how long your site takes to load for real-world visitors. This can be a useful complement to other site speed measurements, but shouldn’t be your only monitoring. You can find this data in Analytics under the Reporting tab and then Behavior → Site Speed. Sort by page, and you’ll be able to highlight any slow loading pages across your site. Other monitoring tools will only measure pages you select, whereas this monitors your whole site, so check it occasionally to add more ammunition to your monitoring arsenal.
GTmetrix is the best speed monitoring tool for most people. The free account and email alerts make it a cost-effective and convenient solution. If you specifically need more frequent monitoring, highly value having all of your monitoring in one place, or just need a one-off check, then the other options mentioned make good alternatives and/or complements. Whichever of these tools you prefer, make sure you’re using one of them!
The Best Tool for Monitoring Uptime: Uptime Robot
If your site isn't online, it’s useless. This is why you have uptime monitoring -- so you know when your site is offline, so you can get it fixed immediately. There is no shortage of tools for monitoring your site’s uptime. These all do a similar job, checking your site automatically at a timed interval to see whether it's online or not. This should be every 30 or 60 seconds for sites where uptime is mission-critical, or every five minutes for regular sites.
In 2013, Amazon.com went down for 45 minutes, costing $4.72 million. You don't have to be making hundreds of thousands of dollars a minute for downtime to be mission-critical: If you're going to lose out on any sales, then you'll want more frequent downtime monitoring.

The best uptime monitoring tool is Uptime Robot: You can get a free account that will check your site every five minutes and keep two months of logs, and will alert you via email when your site is down. From $4.50 a month, you can hold a year of logs, monitor your site at one-minute intervals, and get SMS notifications when your site is down. These are great value plans, and will suit most site owners.
A great advantage of Uptime Robot is its easy-to-understand dashboard. This gives you at-a-glance details on when your site was last down, for how long, and a headline percentage uptime figure. This last stat is especially useful, as this is how hosts measure uptime, and you can compare this figure directly to what your host guarantees or aims for. Here are some typical hosting uptime percentages translated back into minutes:
- 99% uptime is 7.3 hours a month downtime.
- 99.9% uptime is 43 minutes a month downtime.
- 99.95% uptime is 22 minutes a month downtime.
- 99.99% uptime is 4.5 minutes a month downtime.
You’ll notice the big difference between 99% and 99.9% uptime; you likely don’t want anything less than 99.9% uptime on a month-to-month basis. If uptime is consistently unsatisfactory, then it’ll be time to look for a new WordPress host.
Another advantage of Uptime Robot is the unofficial WordPress plugin. This plugin lets you see your uptime statistics from your WordPress Dashboard, or can display them anywhere on your site with a shortcode, adding to its convenience. If you’re on the go, there’s even an iOS and Android mobile app available.
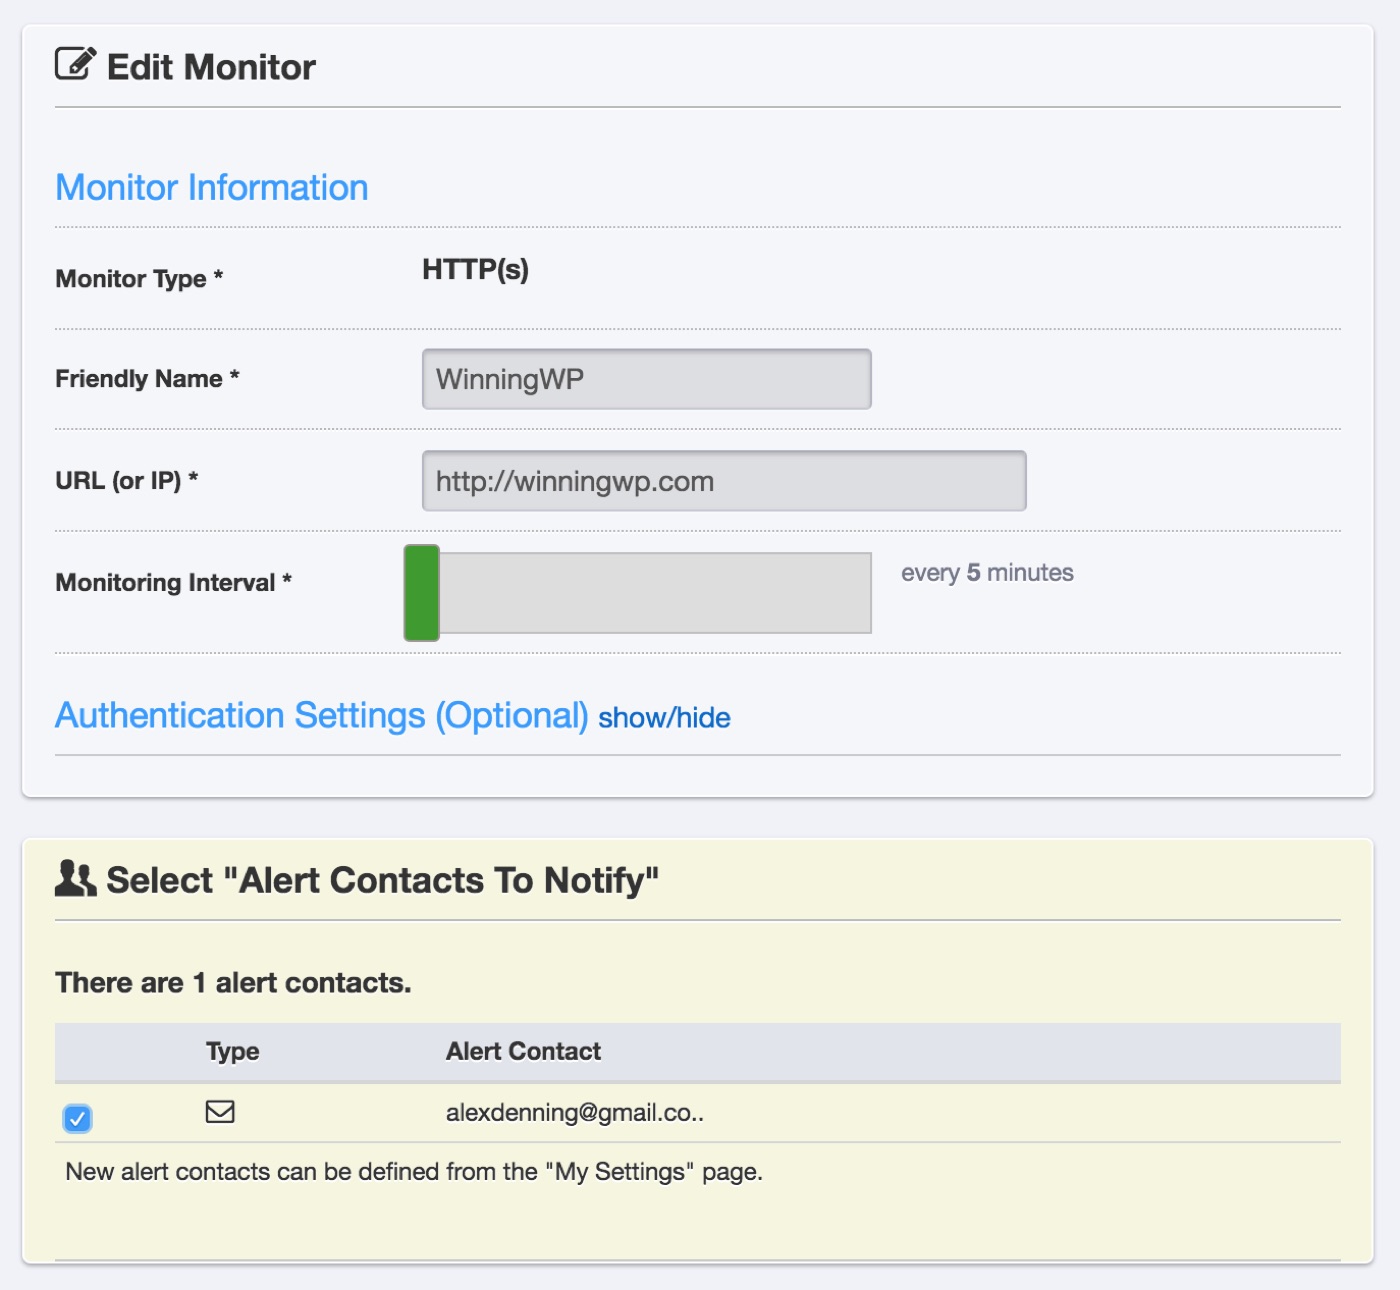
Uptime Robot is very simple to set up. Sign up for a free account, add a new monitor as HTTP(s), enter the name and URL of your site, and leave the monitoring interval at five minutes for free and one minute for paid accounts. Make sure to tick the box to get alerts sent to your email when your site is inaccessible. Create Monitor, and it’s all done.
Uptime is arguably the most important thing to be monitoring on your website. After all, as we said right at the start of this guide, your website is of no use if it doesn’t work. Uptime Robot will do a great job of monitoring when your site is offline, and between email alerts, the WordPress plugin, and mobile app, it’s extremely convenient as well.
Alternative Uptime Monitoring Services
Uptime monitoring is incredibly important, so it’s vital to be aware of what the options are. While Uptime Robot is the best choice for most people, there are a number of alternative services that will do the same job, but potentially more conveniently. We'll discuss some of your options below.
As well as offering speed monitoring, Pingdom will also tell you if your site is down. This option is packaged with Pingdom’s other features, so you’ll pay a minimum of $13.95 a month for a very similar feature set as offered by Uptime Robot. This is only worth considering if you need the other features on offer.
Jetpack has a module called Monitor that will check if your site is down. This is free, and does an acceptable job, but Uptime Monitor is a much better option. Only use this if you have Jetpack installed already and refuse to use another service.
ManageWP offers an Uptime Monitor add-on for $1 a month. It offers a very similar package to its competitor: Your site will be checked every minute, and you can get a notification by email, SMS, or Slack if it isn’t working. The monitor offers a nice overview, and can also alert clients, so this is a good option if you want a solution for a lot of client sites and are prepared to pay for the convenience. You can, however, get essentially the same features for free elsewhere.
Uptime Robot, however, is the service we recommend most highly, and is the best tool for the job. The service is feature-rich and affordable, and, unlike other monitoring services, there’s no need for complementary services. You may find competitors more convenient to use, however, and, if this is the case for your site, then go with the alternative. Otherwise, it’s time to go ahead and set up Uptime Robot.
Other Tools for Monitoring WordPress Sites
Now that we’ve covered the three most important things to monitor on a WordPress site, we can look at some of the optional extras. These aren’t a necessity, but will be desired by some people. For these, we’ll recommend just the single best, free tool that most people should be using.
Domain Name and DNS Monitoring
Domain theft or hijacking is a big problem. This is where a hacker steals your website address and transfers it to a different provider, locking you out of your own website. Once this happens, it can be extremely difficult to get your website address back.
You can mitigate the problems of domain theft with monitoring and alerts: The faster you react to incidents such as this, the better your chances are of stopping them. Ultra Tools is one such service. Sign up for a free account, and you’ll be offered a wealth of information about your domain name, including details of where you’re failing to follow best practice.
Head to the Monitoring tab, and you’ll be able to add your domain name to get email alerts whenever your DNS settings change. DNS settings connect your website name to your hosting, so they’re extremely important, and email alerts will help you to keep an eye on them.
A tool such as this will be most useful for those managing a large number of domain names, and with clients who may make unwanted changes. Given the scale of the problem with domain theft, however, it’s worth having a tool in place to monitor even a single domain.
Search Engine Ranking Positions
Your site’s search engine ranking positions -- or SERPs -- refer to how highly your site ranks for specific search results. If you search 'winningwp', for example, winningwp.com will come up as the first result, so the SERP for that search term is 1. Tracking ranking positions is extremely useful, as the higher your site is ranked for each term, the more clicks and visitors you get to your site. Working on improving these rankings is part of what's known as search engine optimization, or SEO. If you’re unfamiliar with the topic, then read this introduction to SEO before starting.
Tracking SERPs is another website monitoring niche that’s turned itself into a huge industry, but, fortunately, that means there's lots of competition, and so lots of free tools available.

You want to be using SERPlab to track your SERPs. This is a freemium tool with a very generous free plan. It’s also extremely easy to use: You enter your site’s URL once, then add the keywords you want to track your rankings for. SERPlab will then check the ranking daily, and notify you of any changes, keeping the latest, best and first rankings always visible so you can compare changes. You can also keep track of your competitors and get a convenient PDF report emailed to you at a frequency of your choosing.
If you’re not sure what search terms people are using to find your site, you can use Google Analytics to find out. Log in to Analytics, then head to Acquisition → Search console → Queries. This will show you a full list, along with the number of clicks through to your site.
Keeping an eye on your SERPs will give you the data to go out and improve them! This is a huge and complicated topic, but monitoring makes for a great, accessible first step.
Final Thoughts
Your website generates a lot of statistics, and this data should serve the basis of decisions and actions. Gathering all of this information is no good if you don't act on it, so figure out what's important for your site and how to use it to inform your strategy.
For most, making money is the goal. However, the way to increase your income isn't always to increase your user count — for example, it could be to better the experience of existing users by making the website faster and decreasing downtime. Heat maps may reveal design flaws that could yield a better user experience when fixed, while geo-data could point to lots of users from a specific country — translating your site into that language may increase sales.
Gather data, listen to what it's saying, correlate it with your goals and act on it. It doesn't matter if you make the right decisions right away, because the tools you use will show you if you're off course, so you can easily get back on track!
WinningWP Staples
There's more to us than just WordPress guides. Here's a few favorites:


Under the Hood
Wondering what plugins, tools and services we used here at WinningWP? We spill the beans...
WordPress Deals & Coupons
Save oodles of cash on some of the best hosting, themes & plugins around!
Good luck!
Like it or not, the responsibility of looking after your website falls to you, the business owner. Simply trusting in your host and/or developer (if you even have one) may not be enough. Think: "What could an underperforming website cost me?" and for the sake of a little additional effort now, actually set up a few tools and services to keep track of everything: thereby ensuring your website really is working as it should be: 24 hours a day, 365 days a year!