
Where’s the Best Place to Buy/Register a Brand New Website Domain Name?
- By
- Last updated:
- Leave your thoughts
When looking to register a domain name for a new website, there are a lot of companies you can turn to. But are any of them really any better than the others? Or, more importantly, where is the best place to buy a website domain name?
As a matter of fact, there were more than 2,900 accredited domain registrars — companies providing domain name registration services — in operation at the time of writing. And, naturally, they will all sell you a shiny new domain name quite happily. So, which is the best one?
↪️ Note: thinking of making a WordPress website and not yet decided on the ideal hosting? If you’re looking for great value, here’s another post of ours you might like: Top 7 Best Cheap WordPress Hosting Services for Personal and Small Business Websites.
I have some answers for you! In this step-by-step guide, I’m going to show you three of the best places to buy/register a website domain name, covering where to go and how to complete the registration process.
Let’s get started…
Table of Contents
The Companies Featured and Why They Were Chosen
This shortlist of domain registrars has been compiled based on a few crucial factors, including how easy it is to register a domain name with the company, pricing, market popularity, track record, and any perks that come with the domain name.
Based on the above, the companies featured in this guide are:
GoDaddy are currently leading the domain market, with a market share of ~16% and more than 54 million domain names registered. When it comes to domains, GoDaddy are the main players.
Namecheap are a lot smaller, with only a fraction of the market share, but they’re proving to be an excellent choice. This is down to affordable pricing out of the gate, cheap domain renewals (the price you pay after your initial domain registration period ends), good perks and nice web hosting offers.
SiteGround are one of the leading companies in the WordPress hosting market. While they’re not the first that comes to mind when thinking domain names, they’re actually a very efficient, hassle-free solution — especially if you want to take your new domain name and launch a WordPress website on top of it (more on that in a minute).
(Not sure what a domain name is? Here’s everything you need to know.)
Who to Choose?
Next, we’ll help you work out which of the three will be the best for your needs, and then we’ll guide you through the registration process, step-by-step.
Two possible paths:
- If budget is key for you.
- If convenience is key for you.
If budget is key for you:
When you’re just testing out a concept for a website, trying to keep your investment to a minimum is more than understandable. Luckily, the absolute minimum price you can get a domain name is sub $1 for the first year.
To get prices in this range, you will need to select either GoDaddy or Namecheap.
We have a whole separate comparison post about the two, and you can check it out here. If you don’t have the time to go through it, though, consider this TL;DR version:
- If you need a new website domain name — a cheap one — for whatever purpose, and you’re okay filling out standard website signup forms and settings panels, go for Namecheap. You can get your domain name from them for between $1 and $10.
- If you’re a beginner who would prefer to not have to deal with web forms that much, and you’d rather have some step-by-step tool at your disposal, go for GoDaddy. This will be a tiny bit more expensive than Namecheap — domain names are between $3 and $12.
Here are more detailed price comparisons between GoDaddy and Namecheap, if you really want to get to the bottom of things.
If convenience is key for you:
- If your end goal is to have a website built on WordPress with your new domain name.
- If you just want to get things done… ‘Done’ in the sense that you don’t care as much for the technical aspects of the process, but just want to have everything set up (both the domain and hosting) in the least amount of time, with the least hassle.
Then go for SiteGround.
Now, SiteGround are best known for their WordPress hosting packages, and not as much for domain name registration services.
However!
As part of the SiteGround setup process, when you’re signing up for a web hosting account, you get to choose a domain name that will be tied to that hosting account.
There are two main benefits to having both your domain name and hosting handled by the same company:
- You can have everything set up in one go — no need to play around with connecting your domain and hosting. (This is something you’d have to do if you went with a domain name from one company and hosting from another.)
- You don’t need to get involved in the technical parts of the setup — things like redirecting DNS settings, handling manual WordPress installations, and so on.
In a nutshell, SiteGround can handle everything for you, and, at the end of your signup process, you get:
- a brand new domain name
- a hosting account
- a working WordPress installation
- all of the above connected to one another and fully operational.
This path is simply way more convenient. Albeit, it comes at a price. Domain name registration with SiteGround is $14.95 per year. The cheapest WordPress hosting plan is $3.95 a month. This makes the total cost for the first year ~$62.
(If you need things clarified a bit more before making a move, here’s our post on the difference between a domain name and hosting.)
With that in mind, let’s move on to the how-to part — working with the best places to register a brand new website domain name. Pick yours:
How to Register a Domain Name with GoDaddy
Your adventure starts at GoDaddy.com.
Type the domain name you’re interested in into the search box.

GoDaddy will present you with all the versions of the domain name that are available.
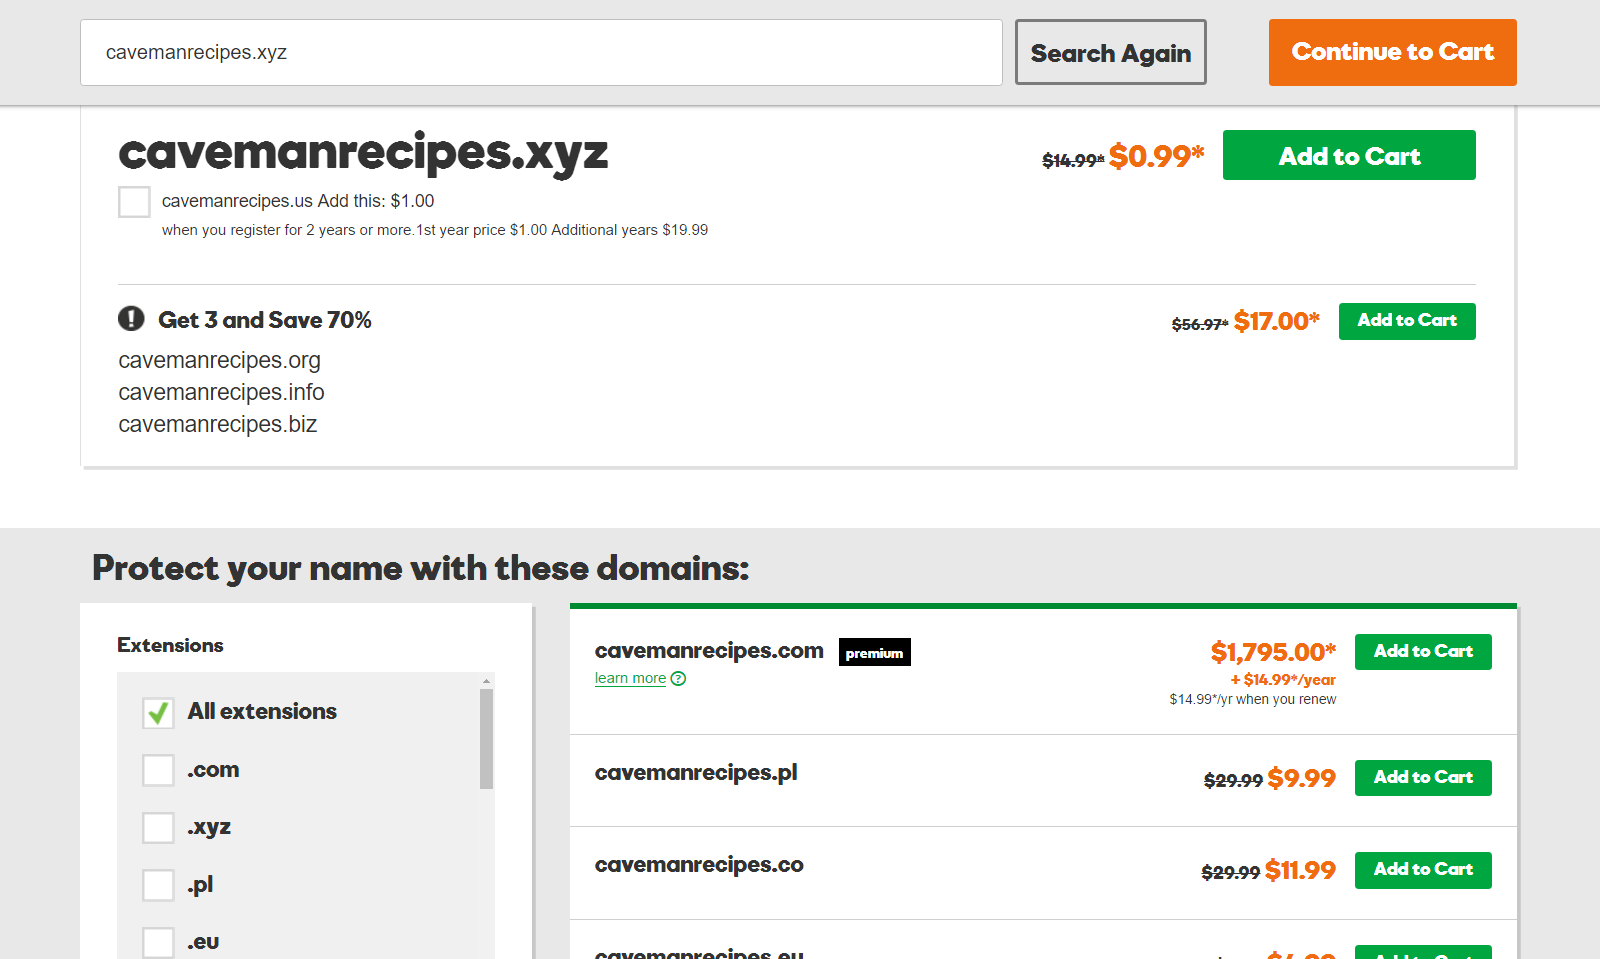
Click on ‘Add to Cart’ next to the domain you want. You’ll see a confirmation immediately.

Next, click on ‘Continue to Cart’ to finalize the purchase.
The cart screen is where you need to be very careful with GoDaddy. In simple terms, they’ll try to strong-arm you into some additional purchases that you may not need.
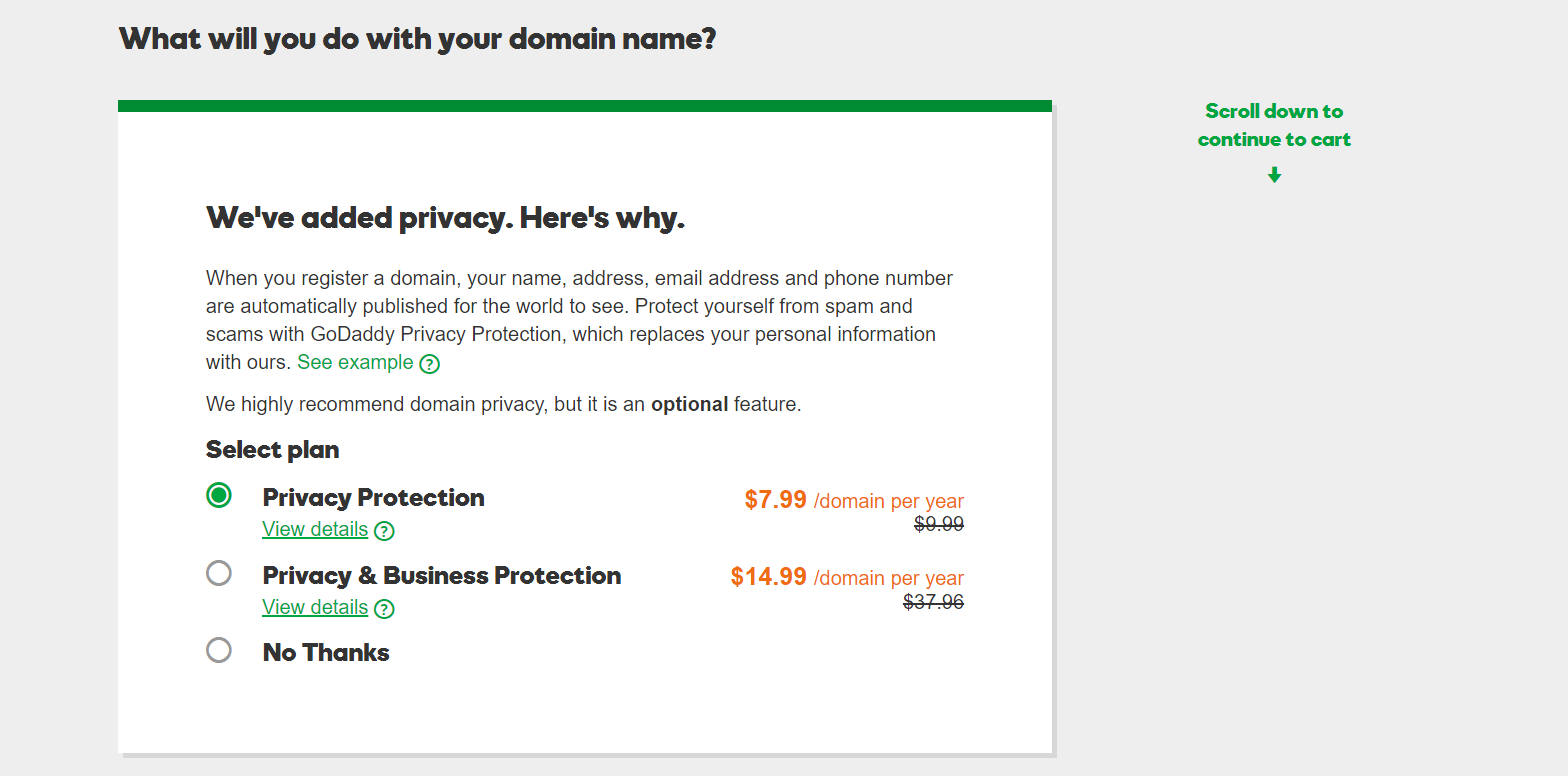
The main obstacle here is that all the upgrades are enabled by default. This means you need to go through them one by one and deselect what you don’t need. When you’re done with all that, you can proceed to the final checkout page. Here’s what it looks like:
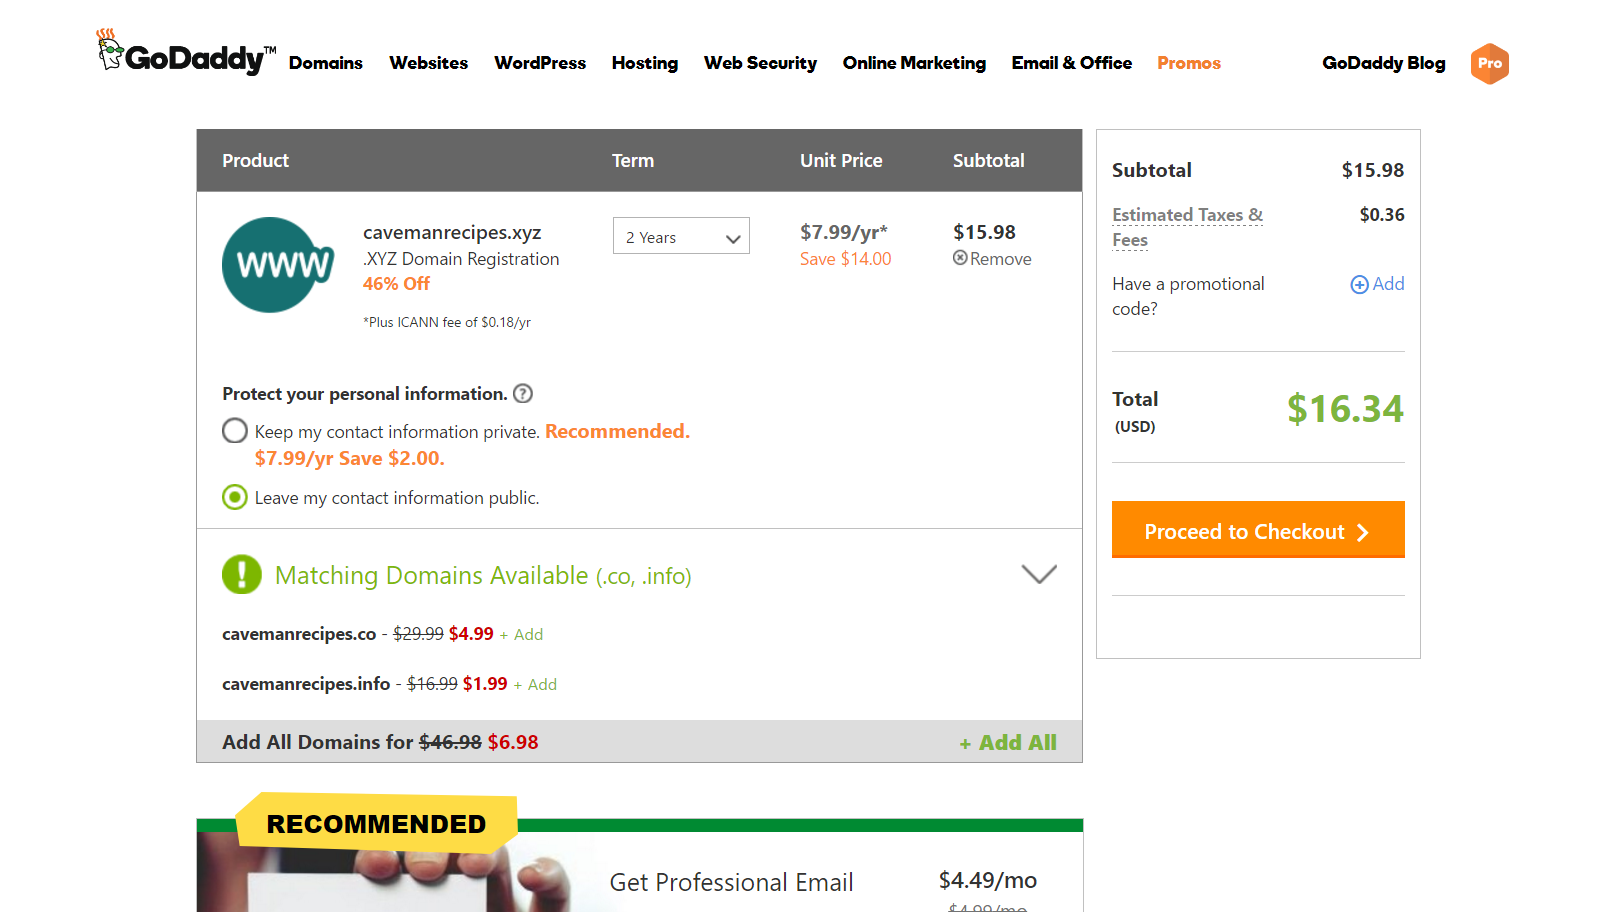
The first thing you should do here is select the ‘Term’ to be just ‘1 Year’, unless you’re okay with buying the domain for two years right away. (Going for ‘1 Year’ will bring your price down.)
If everything is fine, you can click on ‘Proceed to Checkout’.
The next step requires you to either log in to your existing GoDaddy account or create a new one. After you get the account created, you’ll be able to continue with the checkout process.

At this stage, GoDaddy will present you with a standard billing form. This is where you need to provide your personal information for the payment and select a payment method. GoDaddy enables a couple of those:
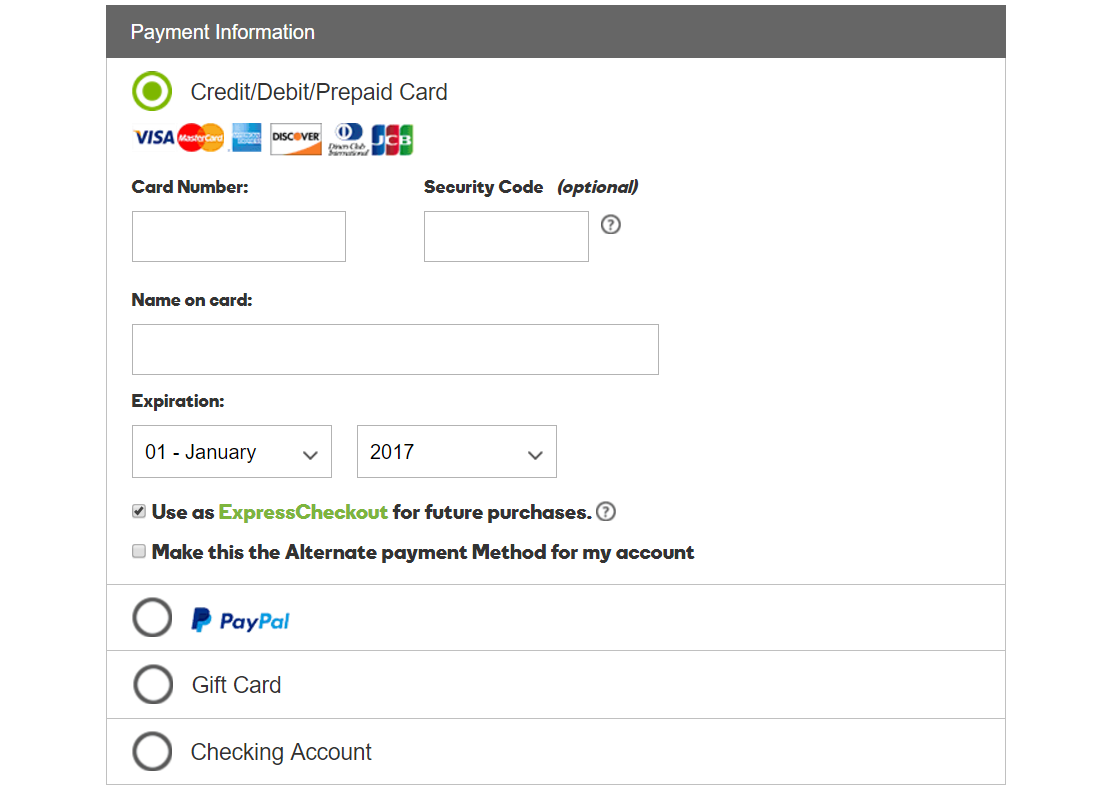
Click ‘Continue’ when you’re done filling out the payment fields.
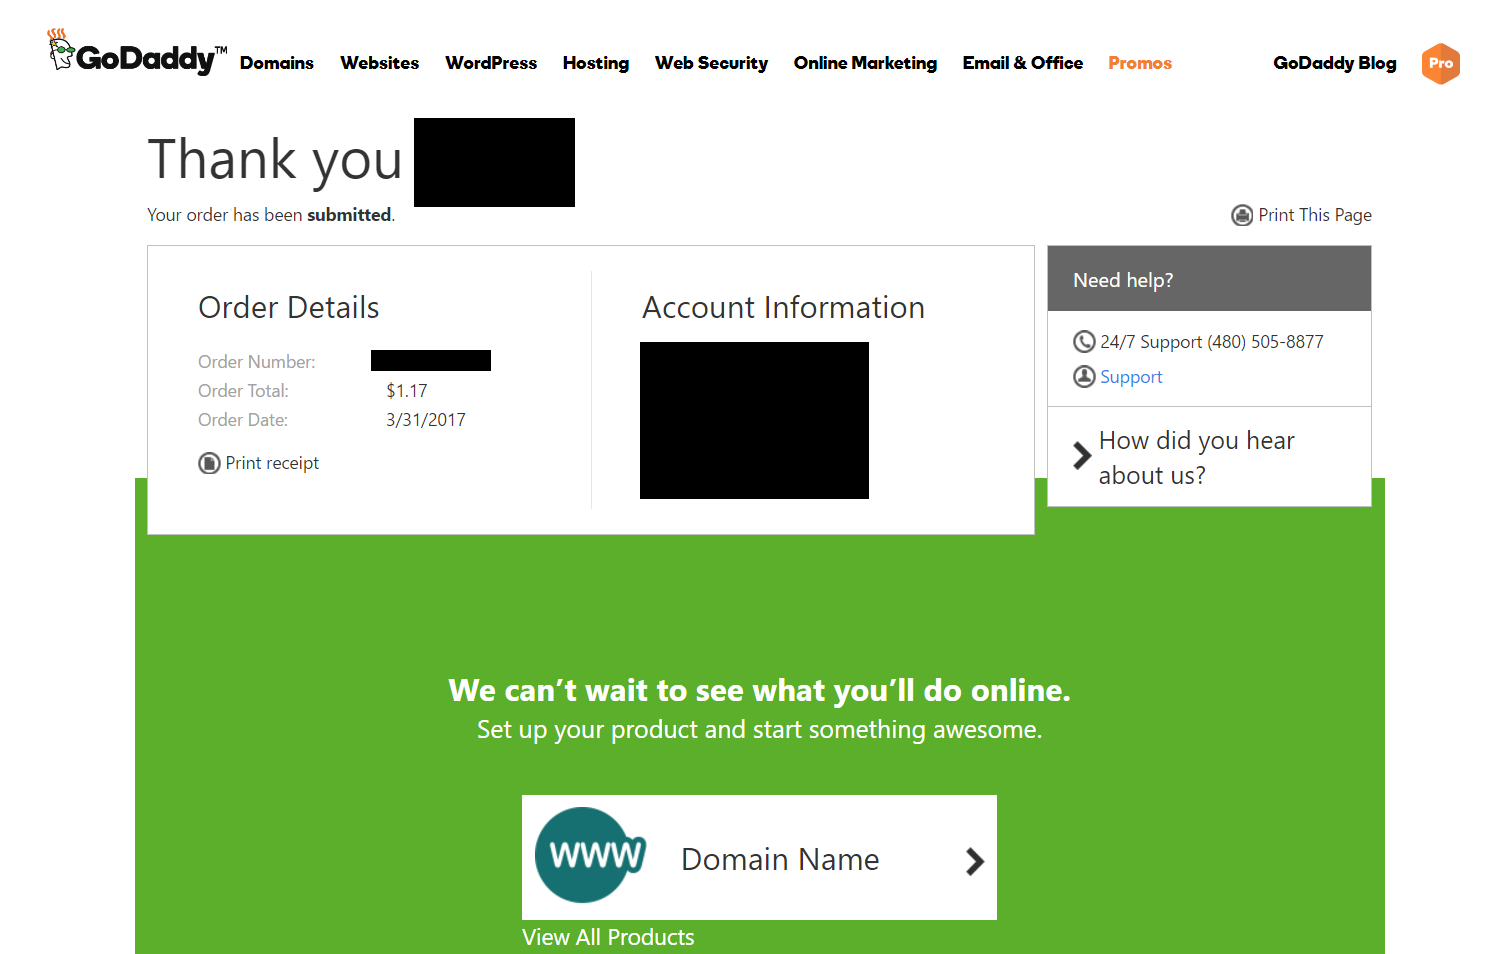
The next page you’ll see is the final order confirmation page. Review everything you see there, input the security code, and click the ‘Place Your Order’ button.

You’ve just successfully registered your own domain name with GoDaddy!
The final screen is where you can print your receipt and get some guidance on what to do next with your domain name.
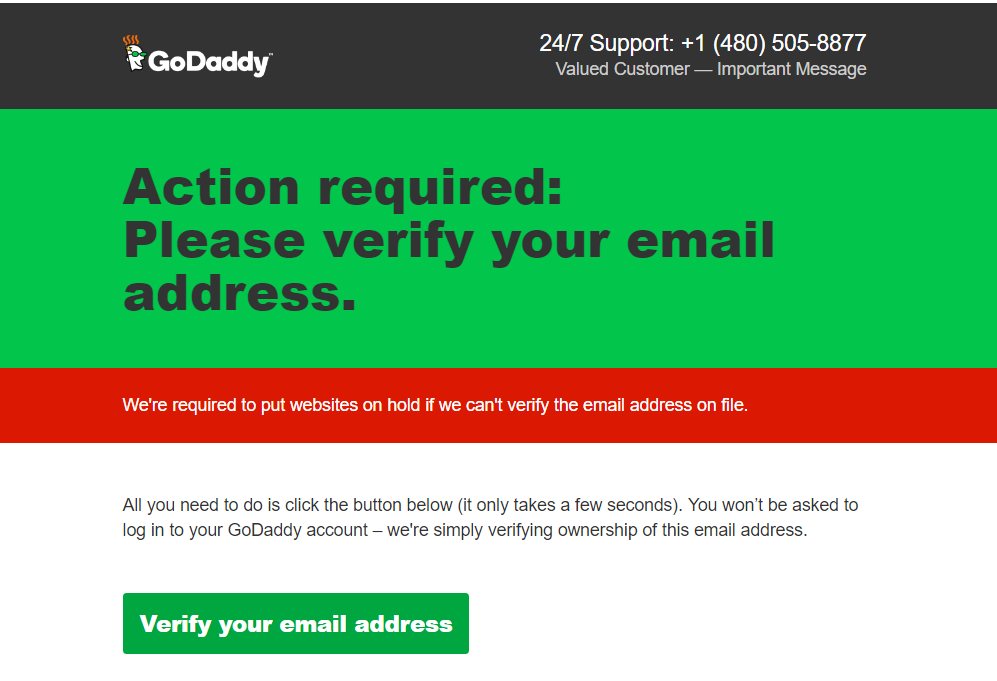
Now, although you have your domain name set up, you still need to take care of one crucial step — verifying your email address. This is a requirement by the Internet Corporation for Assigned Names and Numbers (ICANN), and you can’t do anything with your domain name until you take care of this.
GoDaddy will send you an email about the verification, so just click the confirmation link that’s in it.
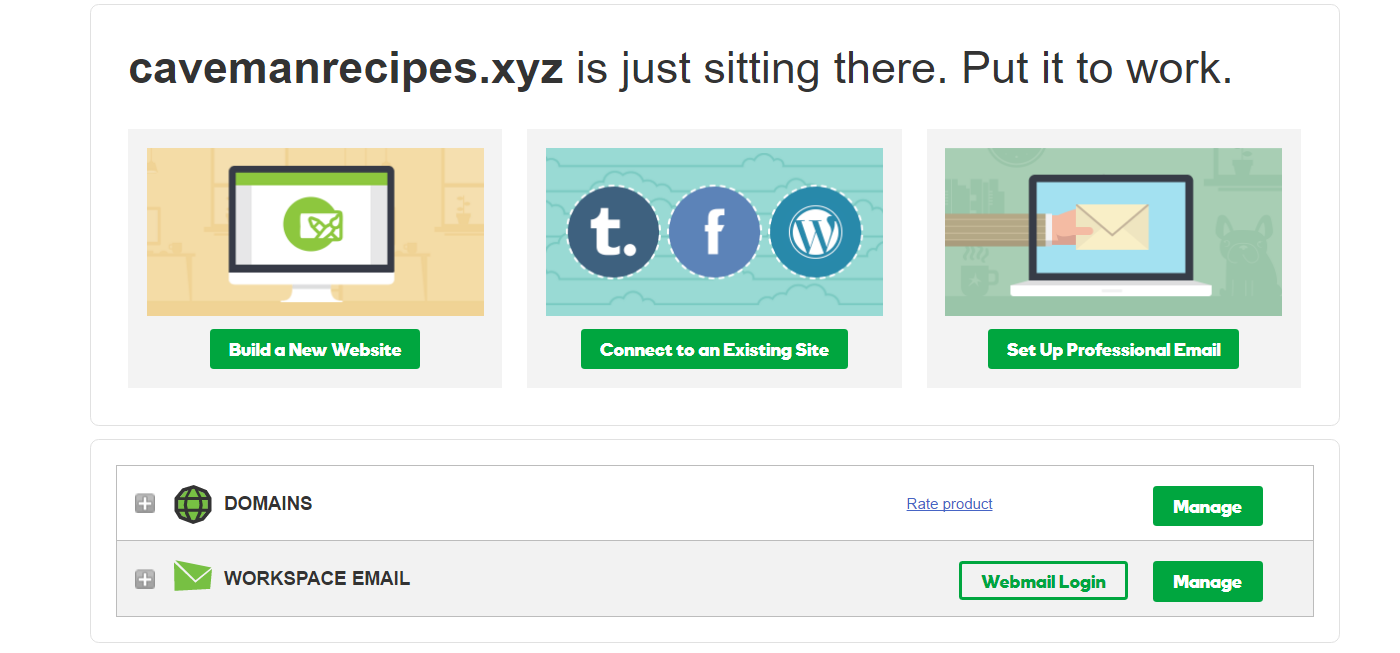
After going through all this, you can finally access your customer profile at GoDaddy and start working with your domain.
How to Register a Domain Name with Namecheap
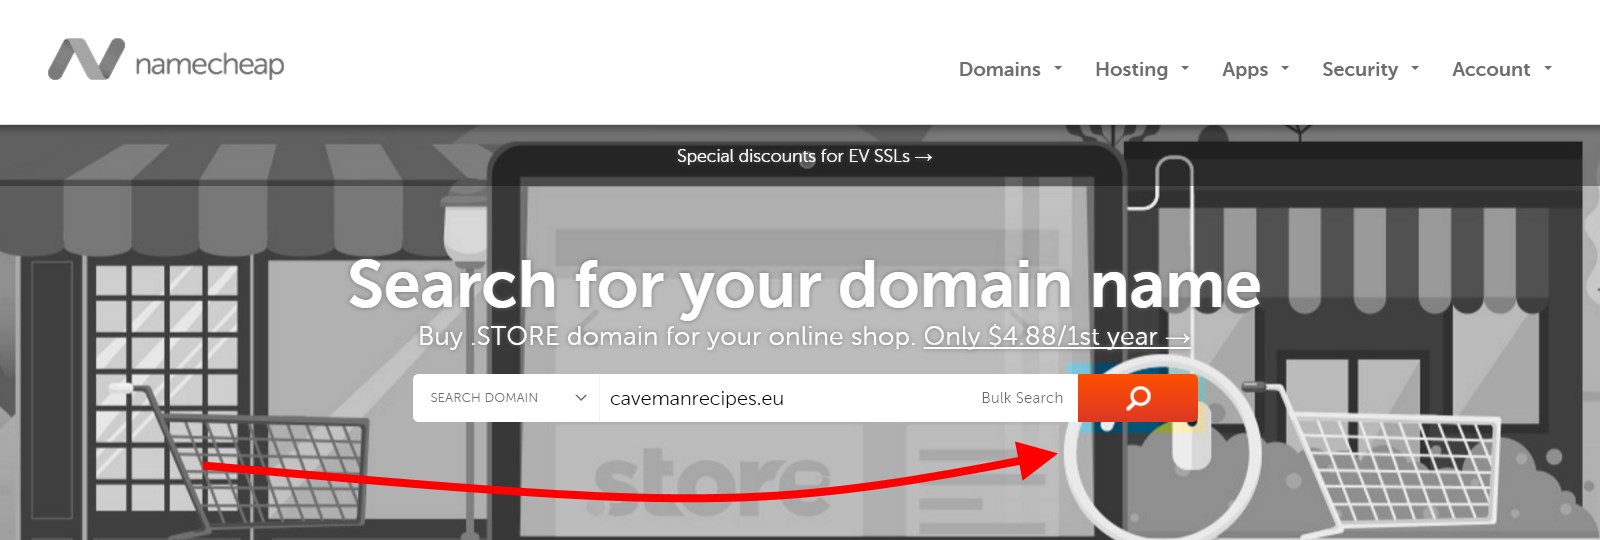
Your adventure starts at Namecheap.com.
Type the domain name you’re interested in into the search box.
Look through the versions of your domain name that are available, and pick the one you want.
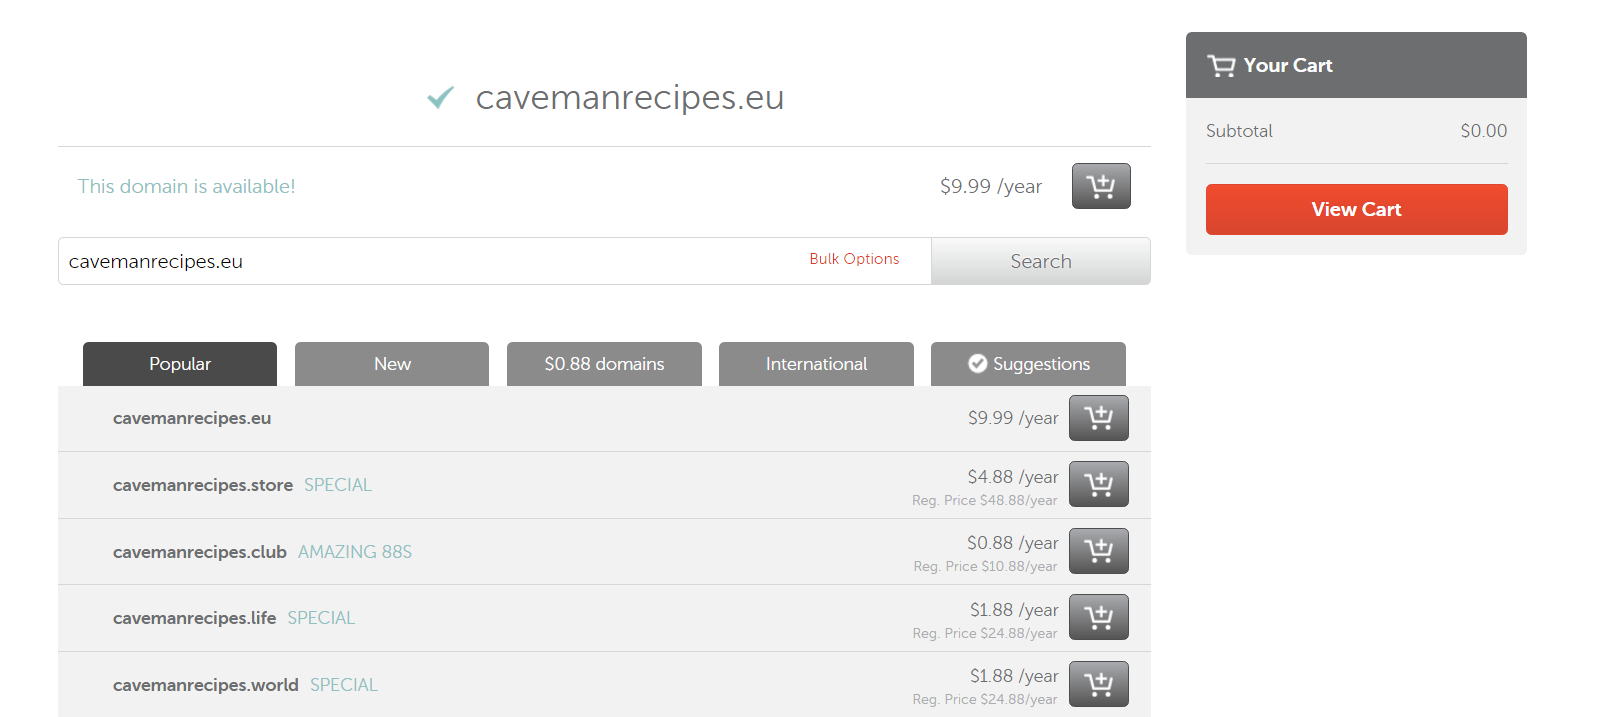
Click on the ‘Add to Cart’ icon next to that domain.
Next, click on the ‘View Cart’ button to begin checkout.
Review the checkout page and make sure everything is in order.

Click on ‘Confirm Order’ to finalize.
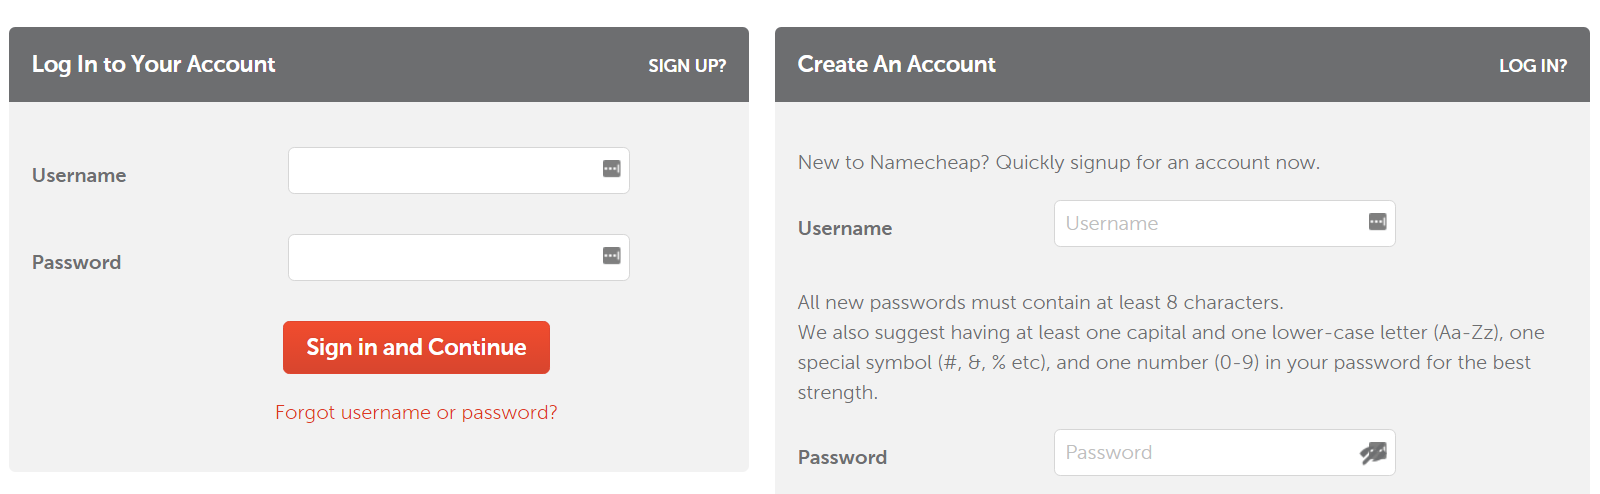
At this stage, Namecheap will ask you to either log in to your existing user profile or create a new one. This is a required step on your way to getting your domain name.
Luckily, this is just a standard signup form that you’re probably familiar with.
With your Namecheap account created, you can finalize the checkout process and pay for your domain name.
First, you need to select your method of payment.
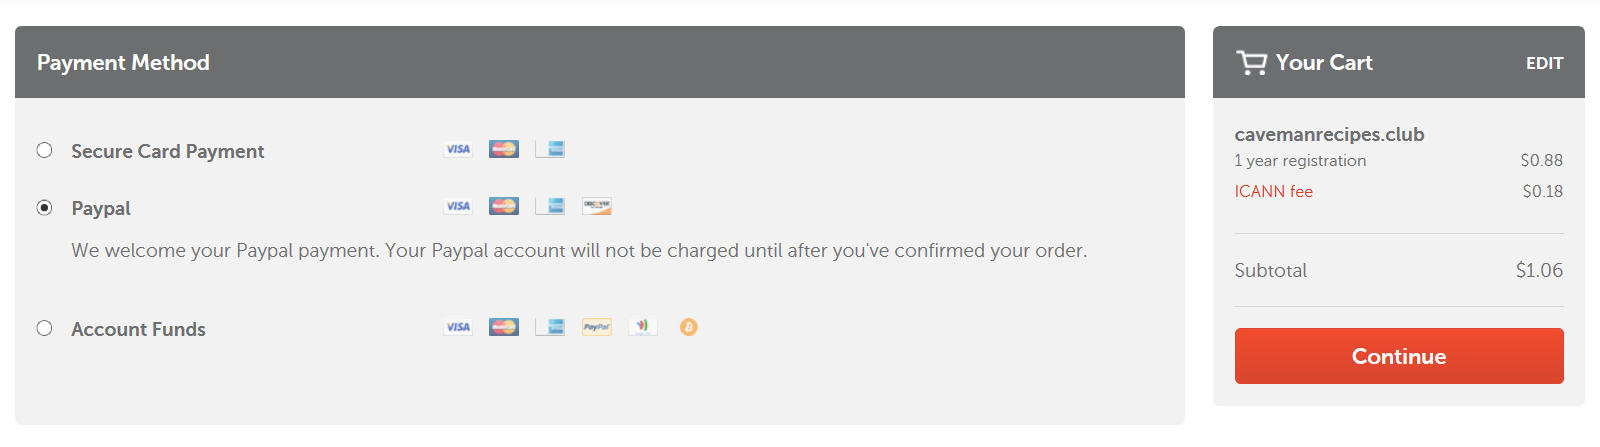
There are a handful of options available, with the most popular ones being via credit card or PayPal. Whichever you decide to go with, click on ‘Continue’ when you’re ready.
The appearance of the next screen will be different based on the payment method you’ve selected. Here’s what it looks like after picking PayPal:
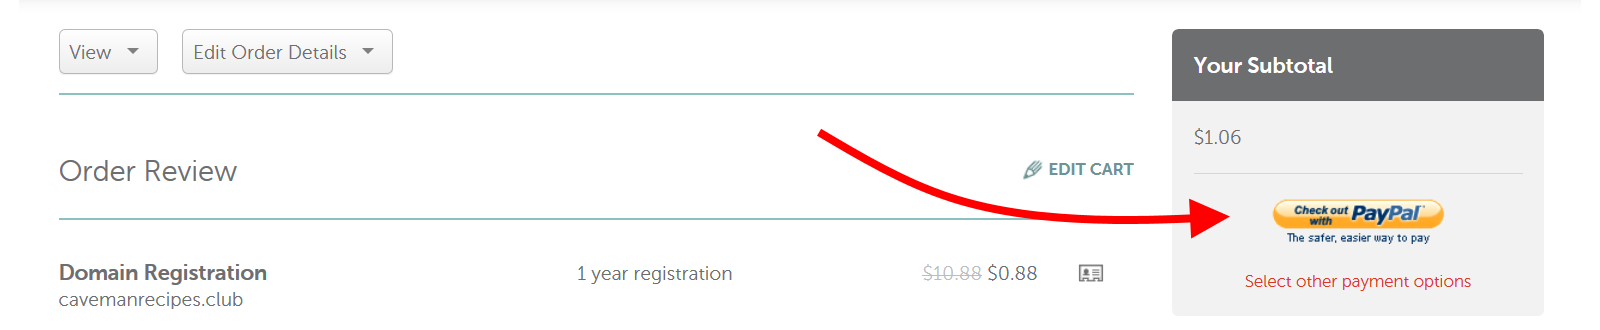
You just need to review this payment summary and authorize.
At this stage, you’ve just registered a domain name with Namecheap!
You can read the ‘Thank You’ page that’s just been presented to you, download the receipt, and start putting your new domain name to work (adjust the settings, and so on).
One final step is verifying your email address. This is a required step that’s imposed by the Internet Corporation for Assigned Names and Numbers (ICANN). Here’s how Namecheap explains this:
As of January 1, 2014, the Internet Corporation for Assigned Names and Numbers (ICANN) has mandated that all ICANN accredited registrars begin verifying the WHOIS contact information for all new domain registrations and Registrant contact modifications.
Right after your domain name registration goes through, you’ll receive a confirmation email. To verify your email address with ICANN, you just need to click the confirmation link in that email.
How to Register a Domain Name (and Get Hosting) with SiteGround
Your adventure starts at SiteGround.com. More specifically, in the WordPress hosting section. Why the WordPress hosting section? Long story short, WordPress is our number one recommended platform to build your website with. It’s versatile, free, and there’s virtually no limit as to the extent you can customize it. To learn more about the ins and outs of WordPress, feel free to check out our beginner guides to WordPress.
As I mentioned earlier in this post, getting your domain name and hosting account from the same company saves you a lot of hassle and lets you launch a website much more quickly and with less effort than when working with two separate companies (one handling your domain name and the other your hosting).
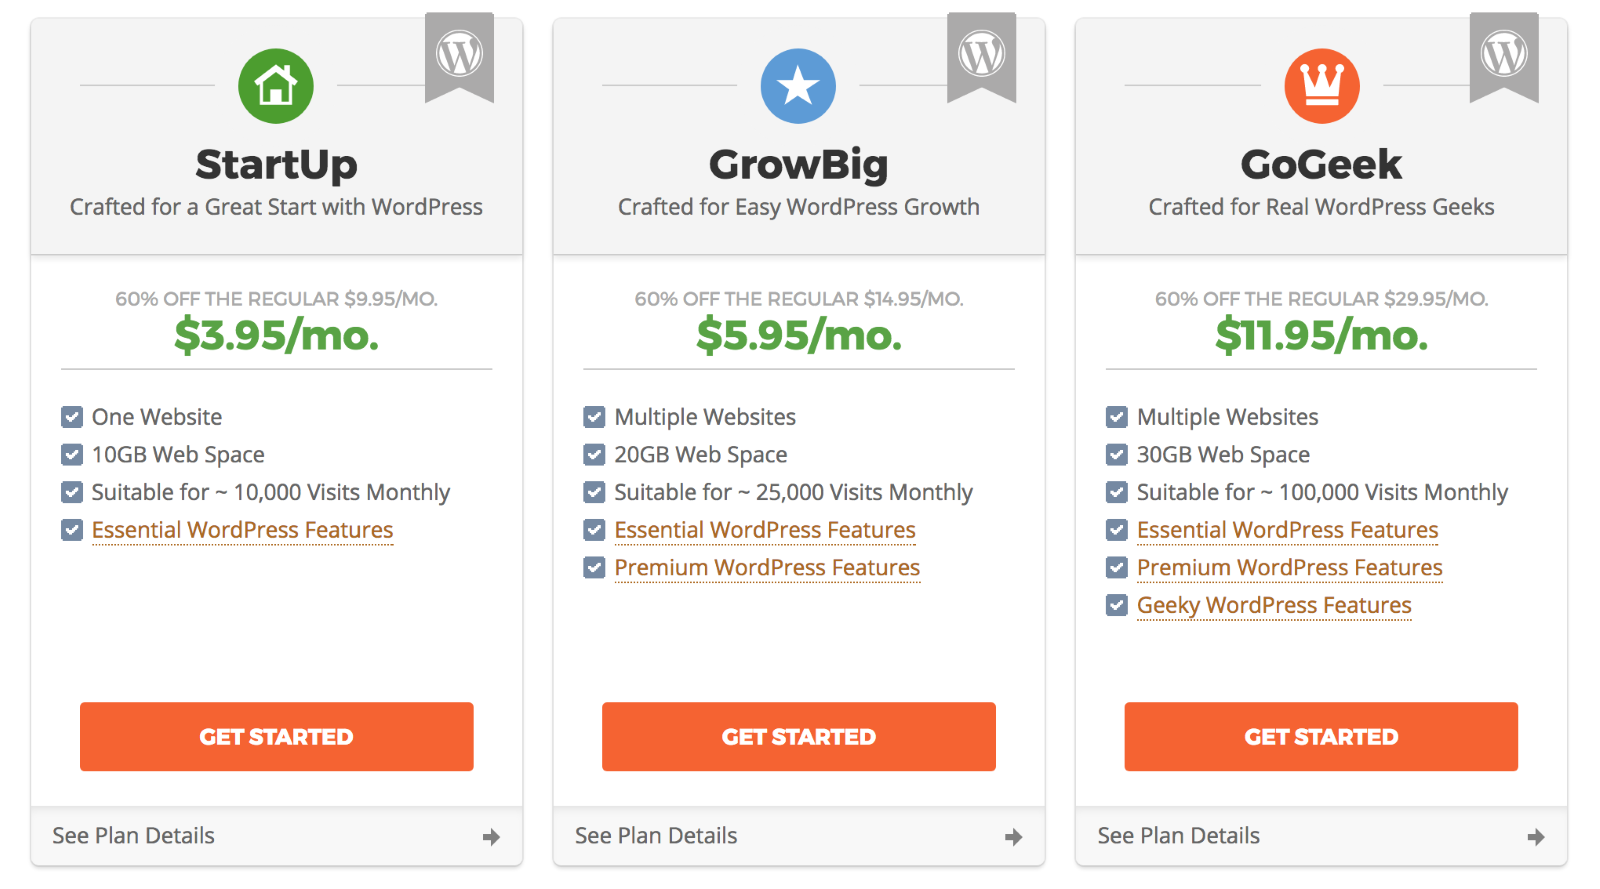
Therefore, while at SiteGround.com, start by picking your desired hosting plan. If you’re just getting started with a small website project, you can begin with the cheapest option — $3.95 a month.
Next, select the checkbox ‘Register a New Domain’ and type in the domain name you want to register.
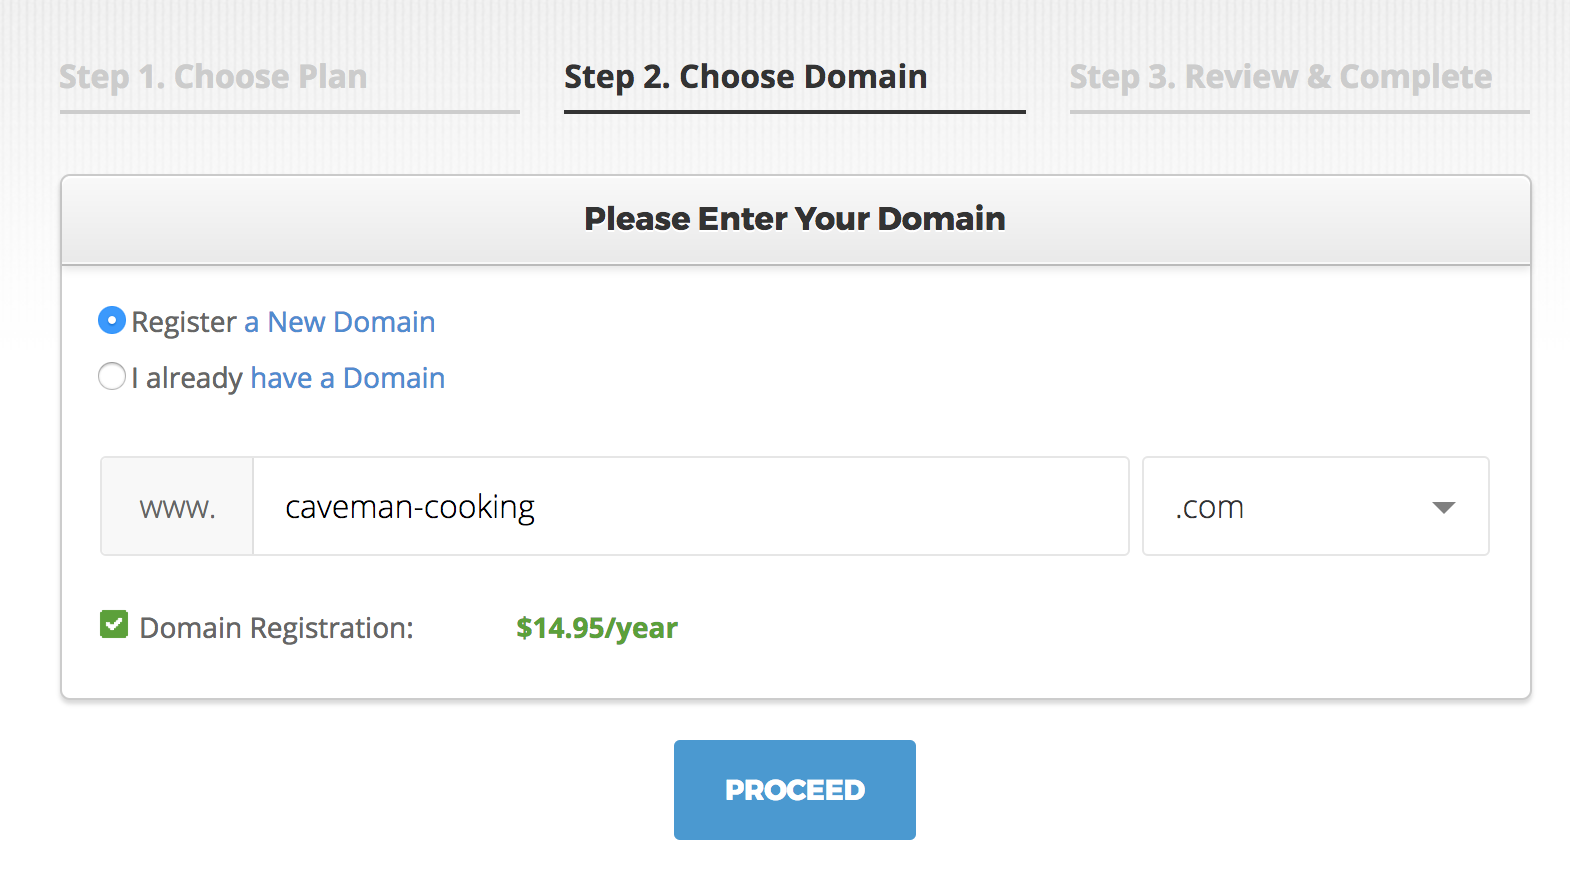
If the domain is available, you will be able to proceed. If not, SiteGround will present you with some alternatives.
The next step is about providing your contact and payment info. SiteGround have a nice, single form for all that, so you don’t need to jump from screen to screen.
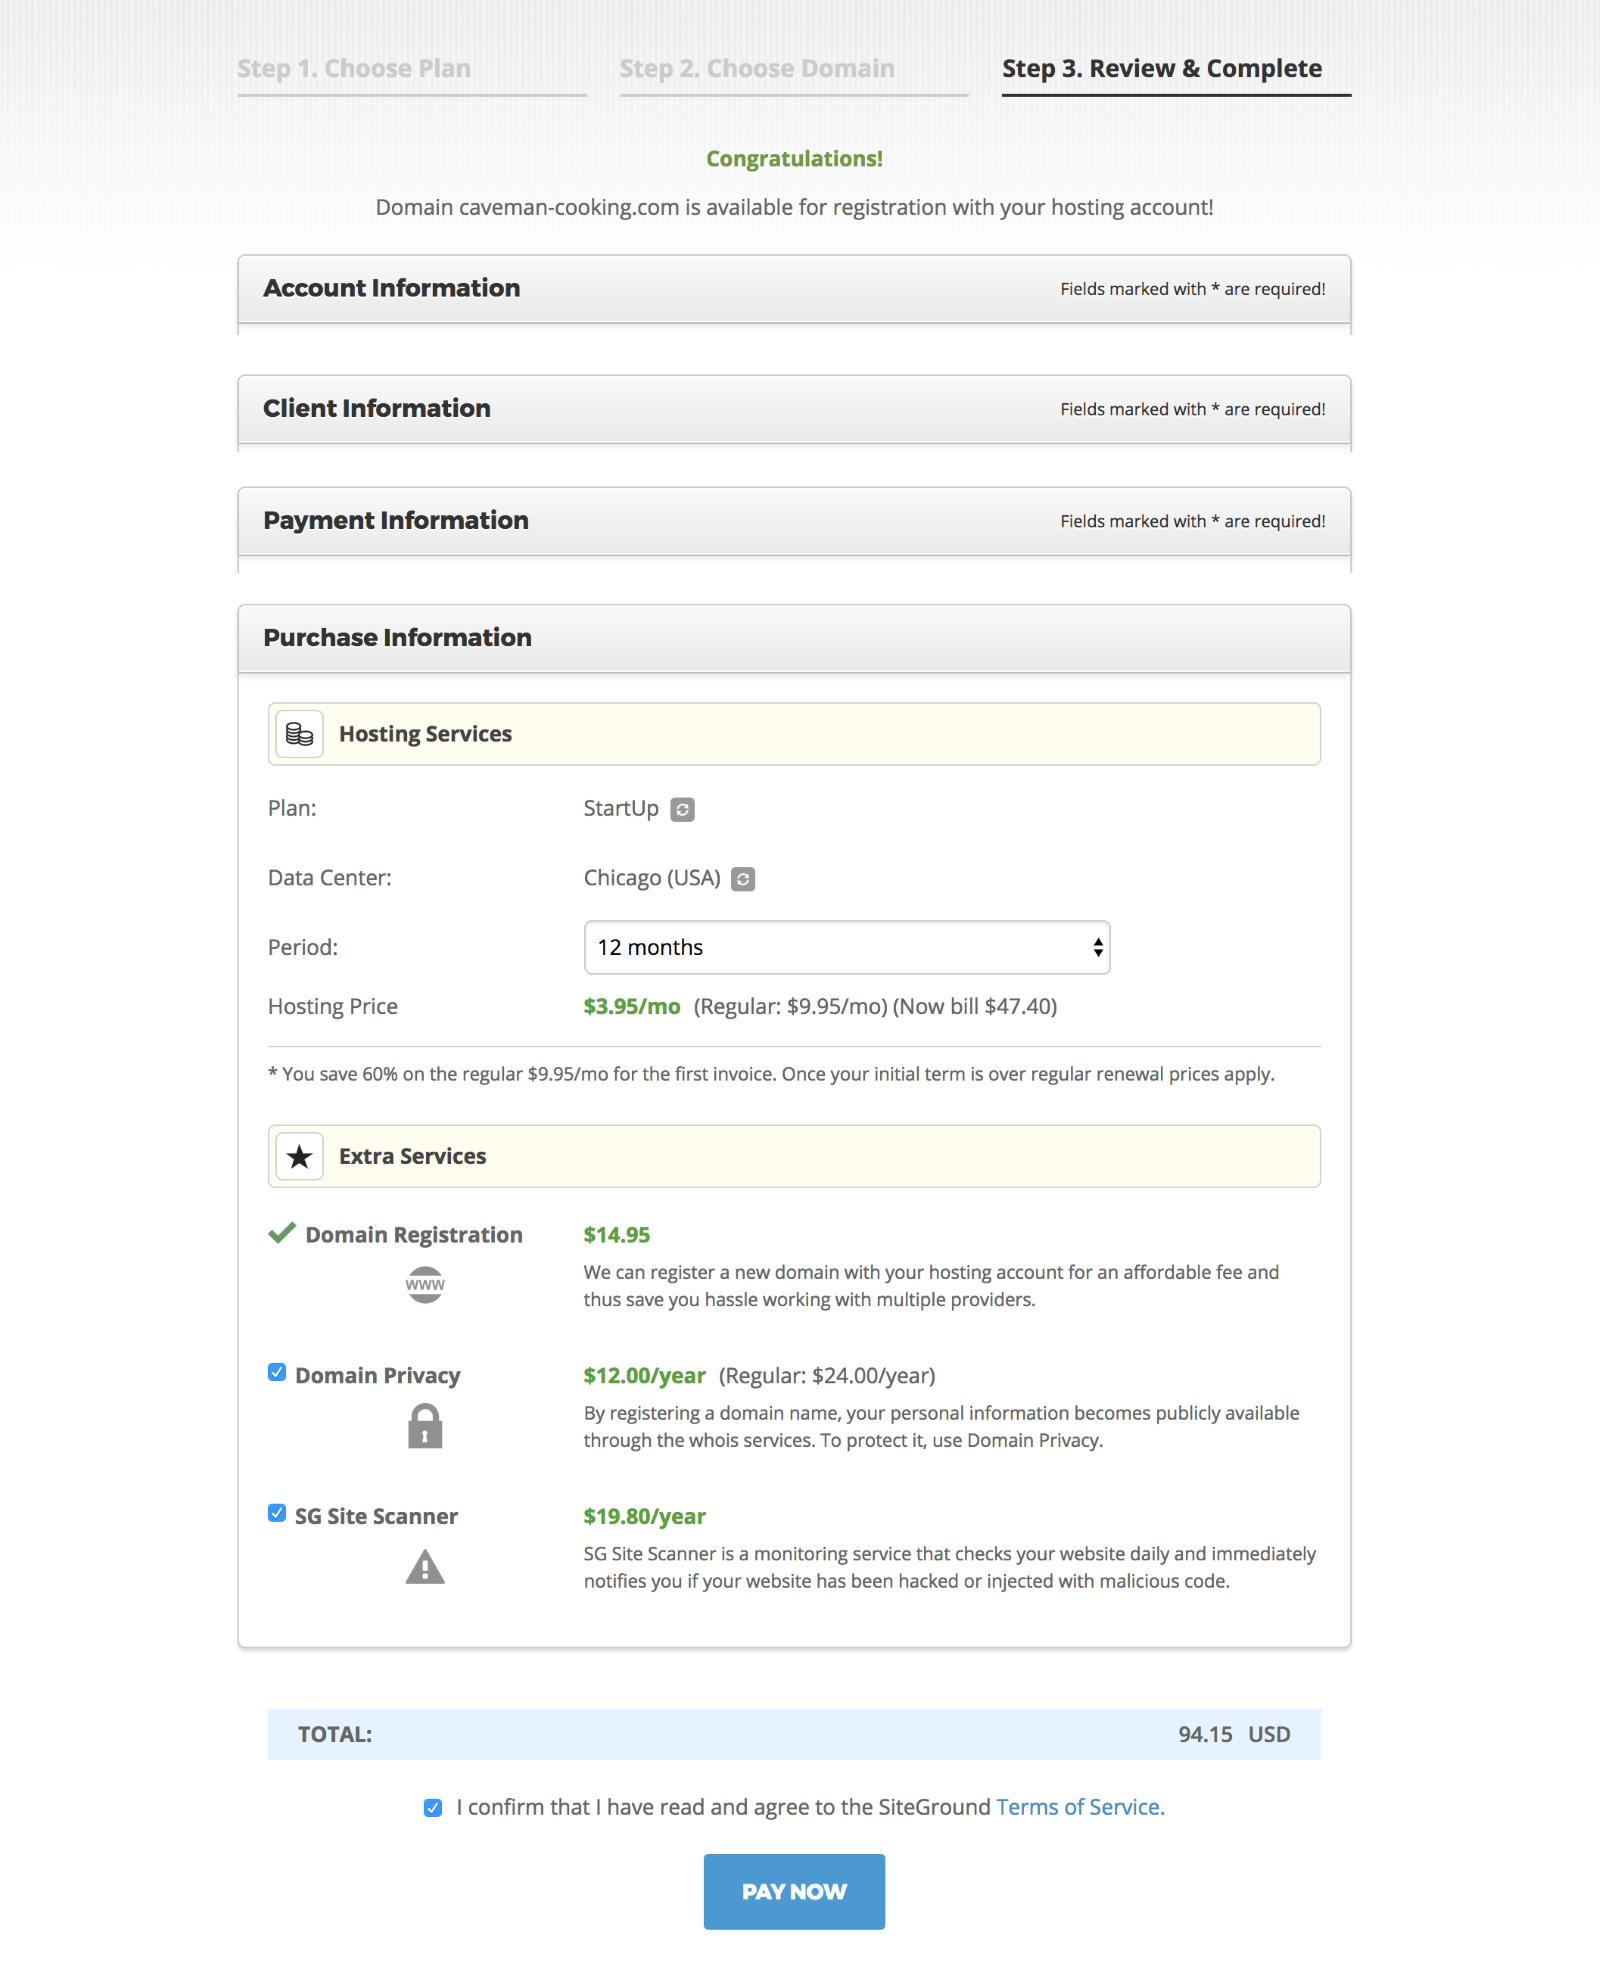
The first three sections are pretty self-explanatory: Account Information, Client Information, Payment Information (note: SiteGround allow only credit card payments).
The last one — Purchase Information — is where you need to be a little more careful:
- Hosting Services: You can review your hosting plan details here and set two crucial parameters. The first one is your data center location. It’s best practice to select the location that’s closest to your target audience. The second one is the time period — aka the length of your hosting subscription. Setting this to 12 months will give you the best deal (lowest per-month price), but it also means you’ll have to pay for the whole year up front.
- Extra Services: This is where SiteGround tries to upsell you on a couple of extras. The first one — ‘Domain Registration’ — is what you came for, so leave this one checked! The other two — ‘Domain Privacy’ and ‘SG Site Scanner’ — are not required, and you can deactivate them if you don’t want to pay the extra.
If you’ve deselected the extras, your total bill should be around $62. You can click on ‘Pay Now’.
You should see the confirmation screen (yours may look slightly different):
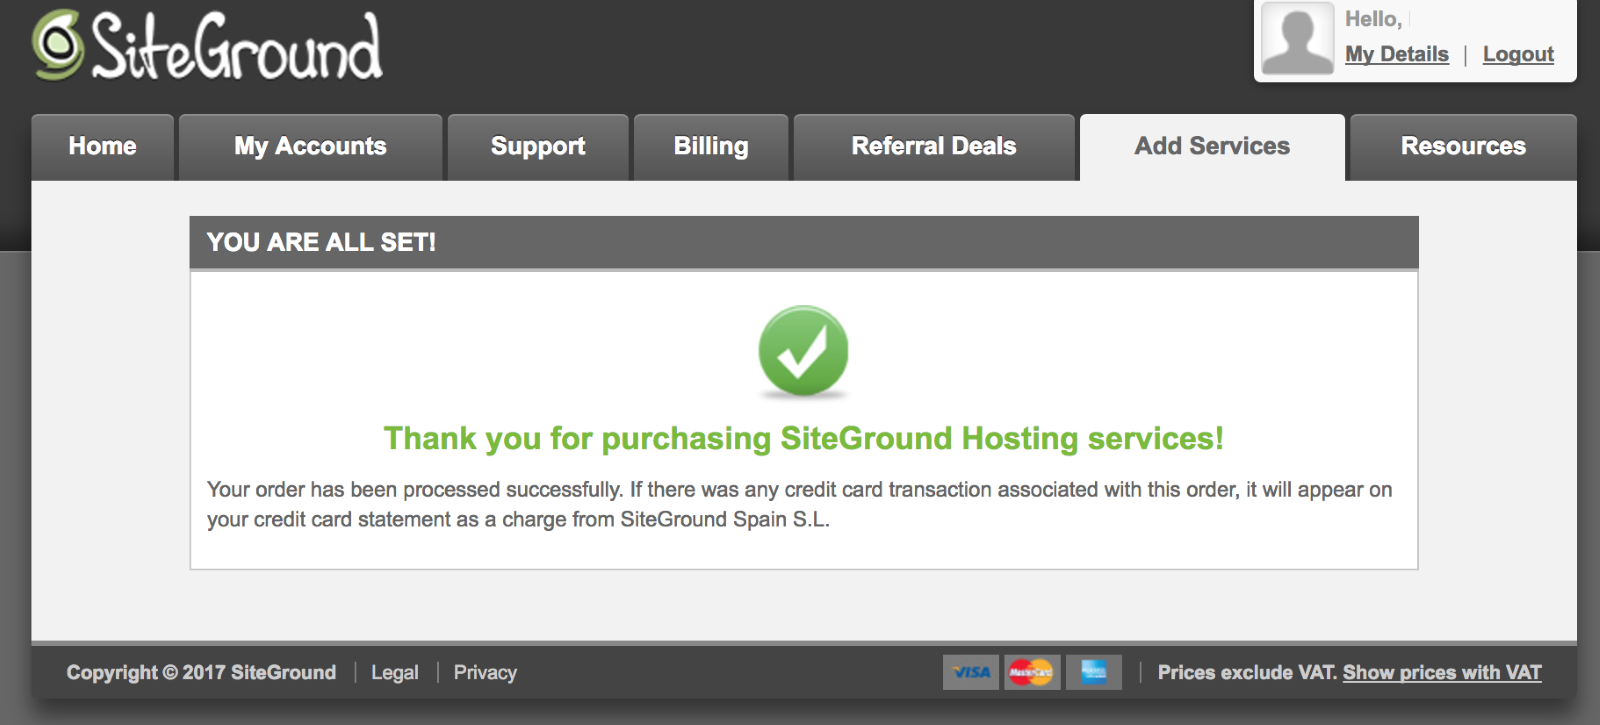
At this stage, your new domain name has been registered! But hold on, there’s one more thing to do…
The last step when it comes to making your domain name 100% enabled is to verify your email address. This is a requirement imposed by the Internet Corporation for Assigned Names and Numbers (ICANN) — the organization overseeing all domain registrations. If you don’t do this, your domain name will eventually get suspended.
SiteGround will send you a confirmation email with your custom verification link in it. All you need to do is click on it.
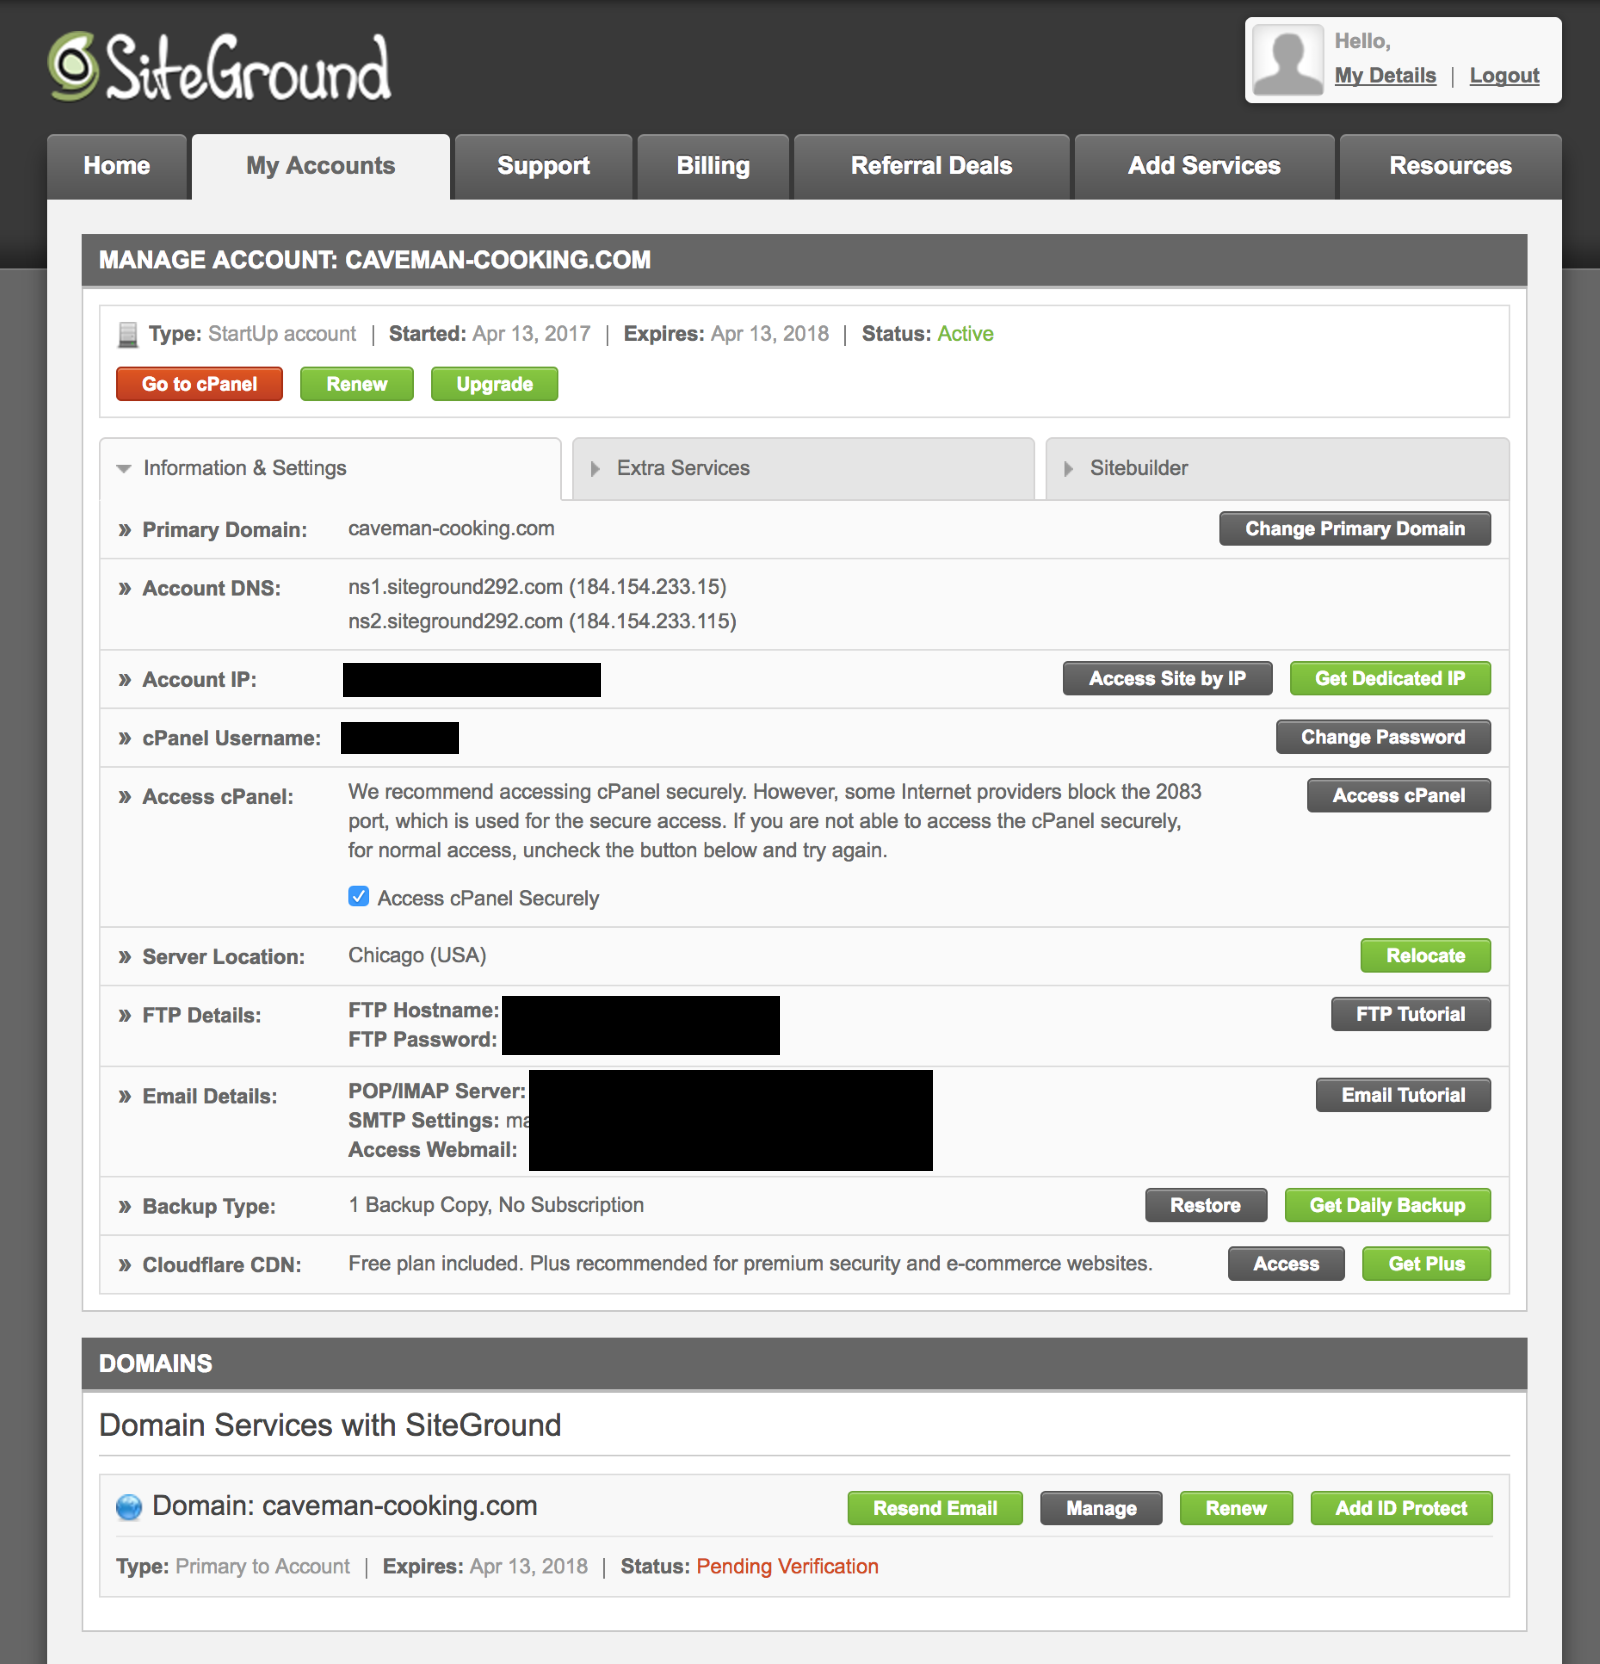
After you take care of the verification, your domain name will be fully active — and it’s already pointing to your web hosting account. All that’s needed now is to put WordPress on top of the whole setup and enjoy your new website. The great thing here is, again, that you can manage both your hosting and your domain name from one single user panel.
Here’s what that main user panel at SiteGround looks like (the domain-related details are at the bottom):
Final Thoughts
We’ve covered three of the best places to register your new website domain name: GoDaddy, Namecheap and SiteGround.
They all have their unique qualities and advantages:
- Namecheap is the cheapest solution
- GoDaddy is more beginner-friendly, but a tiny bit more expensive
- SiteGround is the absolute king of convenience, albeit noticeably more expensive (especially if we add hosting to the mix).
Used/using any of these three domain name registrars? Thoughts?
Related Reading:


All comments are held for moderation. We'll only publish comments that are on topic and adhere to our Commenting Policy.