
The Essentials of WordPress SEO – Everything You NEED to Know!
Almost everyone wants their WordPress website or blog to rank well in Google — hopefully, at the top of the first page. To do this, you’ll need to learn at least the essentials of WordPress SEO.
That’s where this resource comes into play! Welcome to the complete beginner’s guide to WordPress SEO, where we’ll go through everything you need to know — without leaving any gaps!
After reading this guide, you’ll know exactly what the essentials of WordPress SEO are, how to optimize your website for search engines and what you can do off-site to improve your chances of getting found by your desired audience.
Table of Contents
- Essentials of WordPress SEO: Two Sides of the Coin
- Chapter I: Mastering On-Page SEO
- Chapter II: Getting Started with off-Page SEO
- The essentials of WordPress SEO: Checklist
Essentials of WordPress SEO: Two Sides of the Coin
Let’s start with the biggie:
There are two elements to SEO: on-page and off-page.
You’ve probably heard these terms a couple of times, but understanding what they really mean is key to mastering the essentials of WordPress SEO.
- On-page SEO is everything you do within your WordPress website to improve its rank. This means tweaking the settings, publishing content, installing helpful SEO plugins, getting an SEO-friendly theme, and so on. Every little element contributes to your overall on-page SEO.
- Off-page SEO is everything you do outside your website. This usually involves the likes of promoting your content on social media, getting links from other sites, doing cold outreach to convince other bloggers to mention your content, and so on.
The crucial thing here is that on-page and off-page SEO are both essential to your results.
It’s something like this:
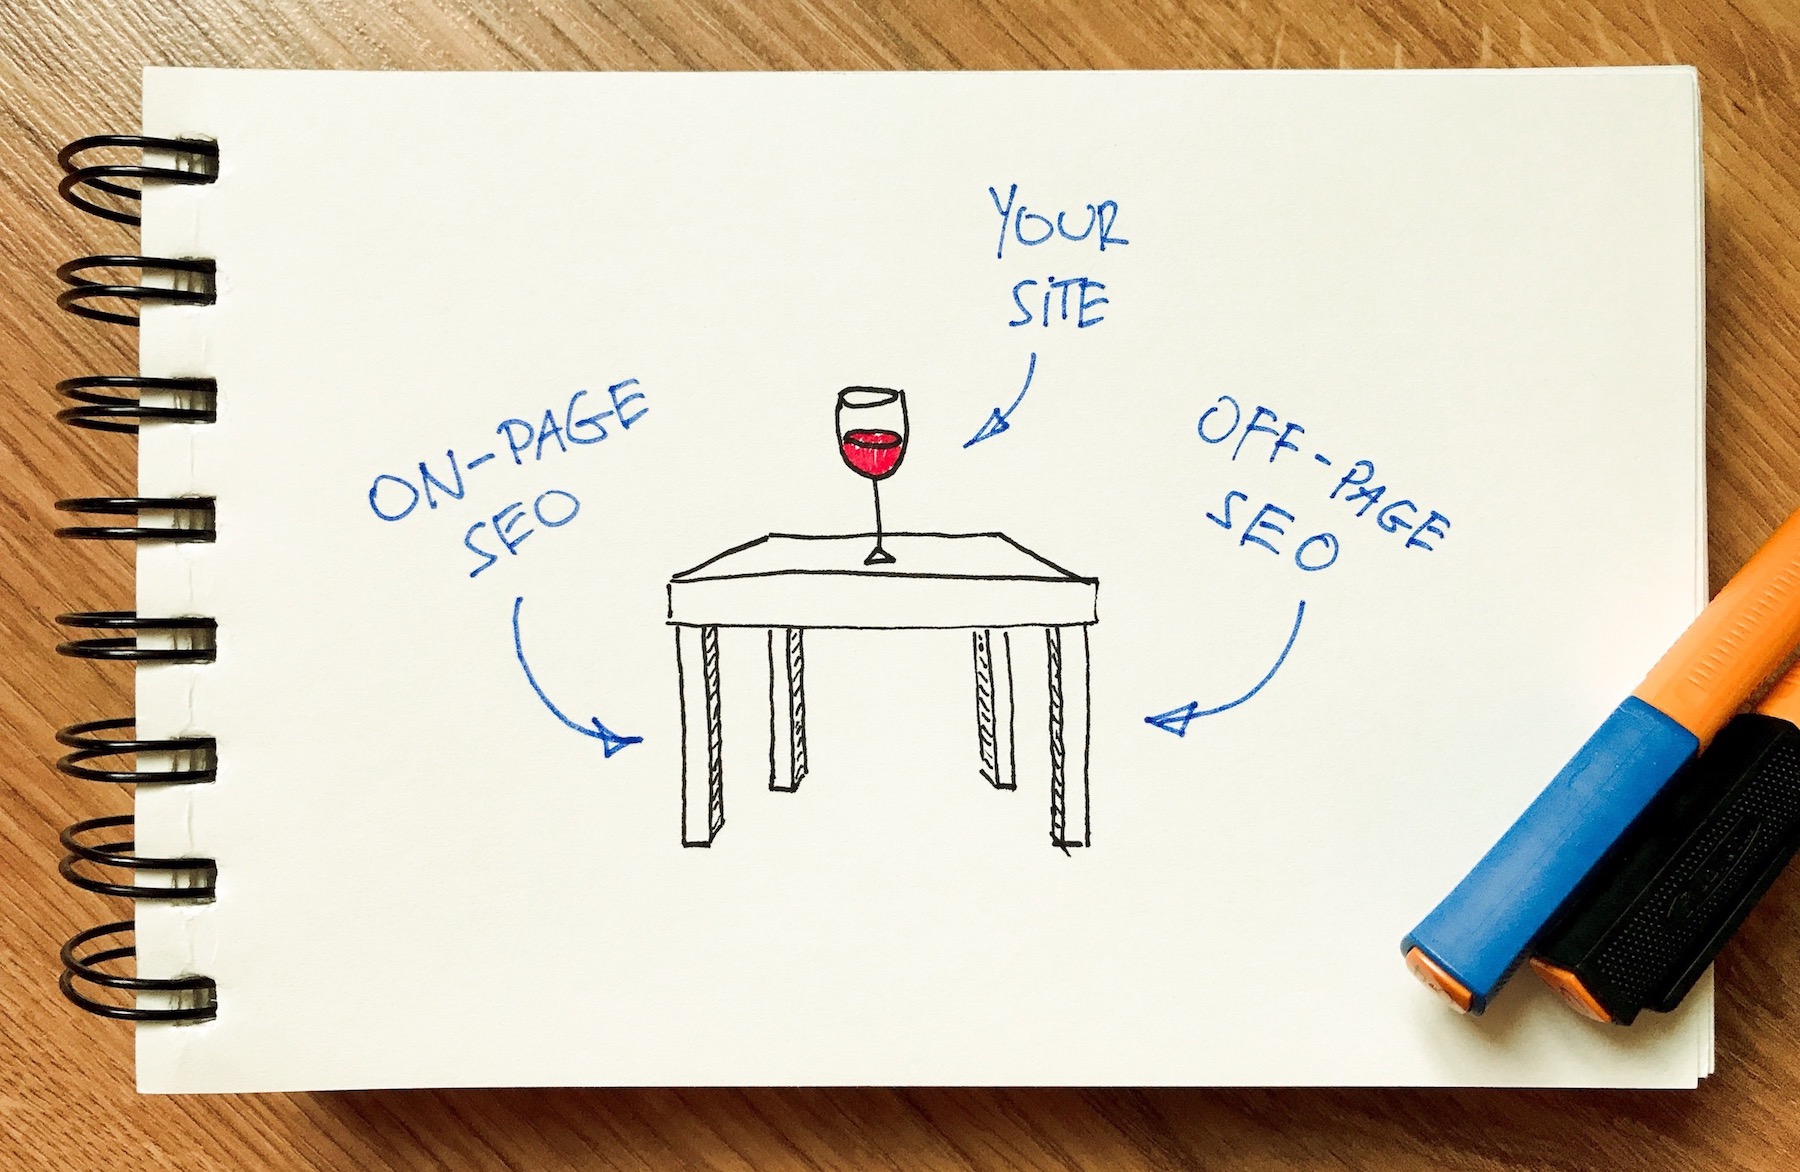
One can’t exist without the other. Not if you want to actually produce any worthwhile results.
However, if I had to pick which was slightly more important, it would be on-page SEO. Which is good, since it’s all within your control! So let’s start with that:
Chapter I: Mastering On-Page SEO
Here’s everything you can do within your WordPress website to make it rank better:
1. Start with Web Hosting ?
Web hosting isn’t a much-talked-about aspect of on-page SEO. However, it’s actually one of the most crucial elements to get right.
I’d risk saying that, even if you do manage to get everything else spot on, if you use a sub-par host your SEO will suffer a lot.
Here’s why:
- Good host = low downtime. If your site is down a lot, it won’t rank well. After all, why would Google rank a site that’s unavailable most of the time? A good host gives you good uptime — roughly in the range of 99.99%.
- Good host = good site speed. Another thing that’s an SEO factor for Google is your site speed (or load times). If your site takes a lot of time to load, Google don’t like it. Good hosts offer good performance.
- Good host = better security. The worst thing that can happen to you SEO-wise is getting a message from Google that your site has been hacked and therefore is now ‘temporarily’ removed from the Google index. I’m saying that in quotes since that temporary ban can sometimes stay with you for months. Good hosts will protect you from the common hacks, or help you to recover quickly.
- Good host = SSL for free. Google have openly stated that sites with no SSL will not rank very well. We discuss the topic of SSL in #2.
There are many more reasons to get a good host, and most of them aren’t even related to SEO. So, if you’re unsure of your host, this should be your first order of business — see our recommendations here.
2. Get an SSL Certificate ?
An SSL (Secure Sockets Layer) certificate lets your website establish an encrypted link between your web server and the visitor’s browser. This makes sure no one is eavesdropping on what the visitor is doing on your site, or the information they’re inputting (forms, e-commerce cart, and so on).
Getting an SSL for your site is a must these days for multiple reasons (security being chief of them). Google also have their own way of encouraging webmasters to get SSLs by basically penalizing the sites that don’t have them yet.
So, if you don’t have an SSL, you won’t reach your full ranking potential.
Luckily, getting an SSL usually involves $0, and the setup is simple as well.
3. Integrate Your Site with Google Search Console (GSC) ?
Google Search Console (formerly Google Webmaster Tools) is a free tool for webmasters to monitor the indexing status and visibility of their websites.
GSC is where you’ll find notifications about any SEO issues with your site, along with multiple panels where you can check various metrics and get tips on how to make things better. We highly recommend you check it out!
Here’s how to hook up your site to GSC.
3.1. Choose between a www and Non-www Website Address
With GSC integrated, it’s time to take care of your first tweak. Let’s tell Google if they should index a ‘www’ or ‘non-www’ address for your website.
This is simple enough: Just visit your website normally and see if there’s ‘www’ in the address bar.
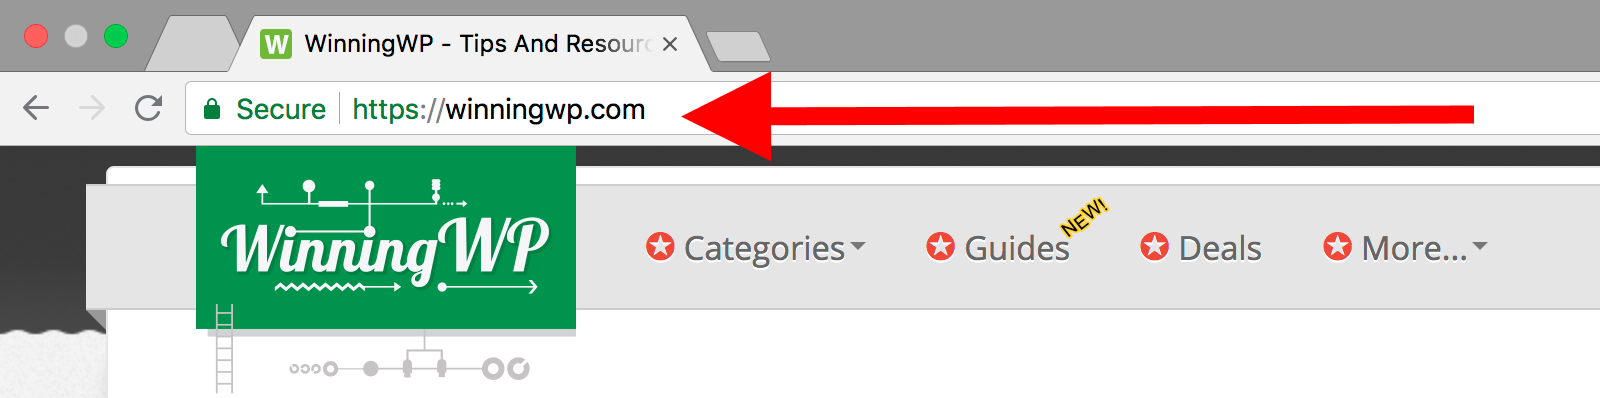
Based on what you see, go to GSC, then to Site Settings, and set your preferred domain, like so:
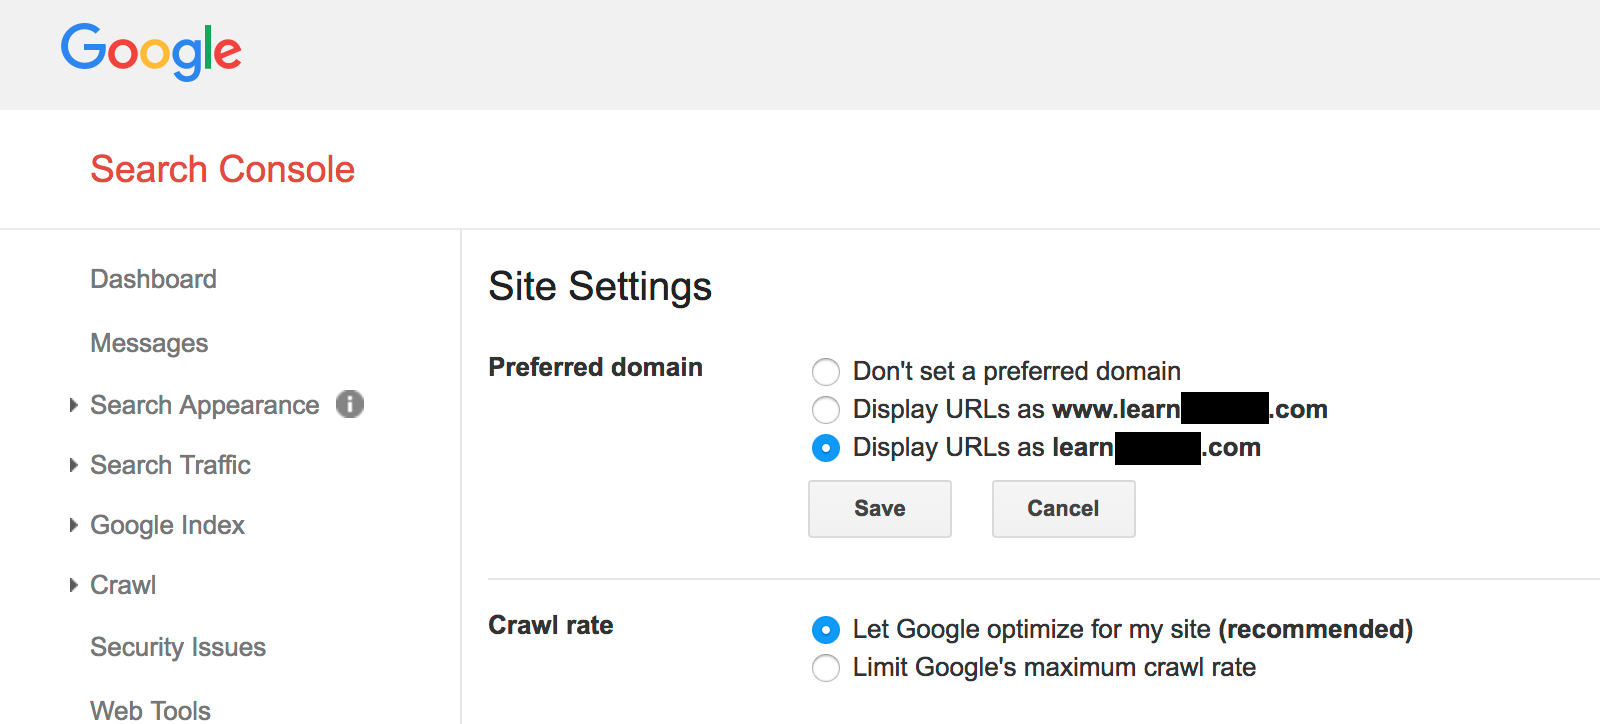
(You decided on this whole www thing back when you initially set up your site with your host. Whether you went with ‘www’ or ‘non-www’ is no different for SEO, but it is good practice to let Google know which version you prefer.)
4. Get Your Main WordPress Settings in Order ⚙️
4.1. Search Engine Visibility
From your WordPress dashboard, go to Settings → Reading. Make sure this remains unchecked:

Otherwise, Google might ignore your site completely.
4.2. Permalinks
Permalinks are the URLs (web addresses) that you see in your browser address bar when reading any post or page on your WordPress site.
For example, here’s the permalink of this very guide:
essentials-of-wordpress-seo
Not all permalinks are equal for SEO.
Ideally, you want to be able to include your post or page’s title or main keywords (more on those later on) in the URL/permalink.
Also, with the title roughly in the URL, you’re making it easier for the reader to get an idea as to what the post is about.
For that reason, a permalink like essentials-of-wordpress-seo is good, while a permalink like ?pageid=128gh6 is bad.
To set permalinks, go to your WordPress dashboard, and then to Settings → Permalinks. Select this option:
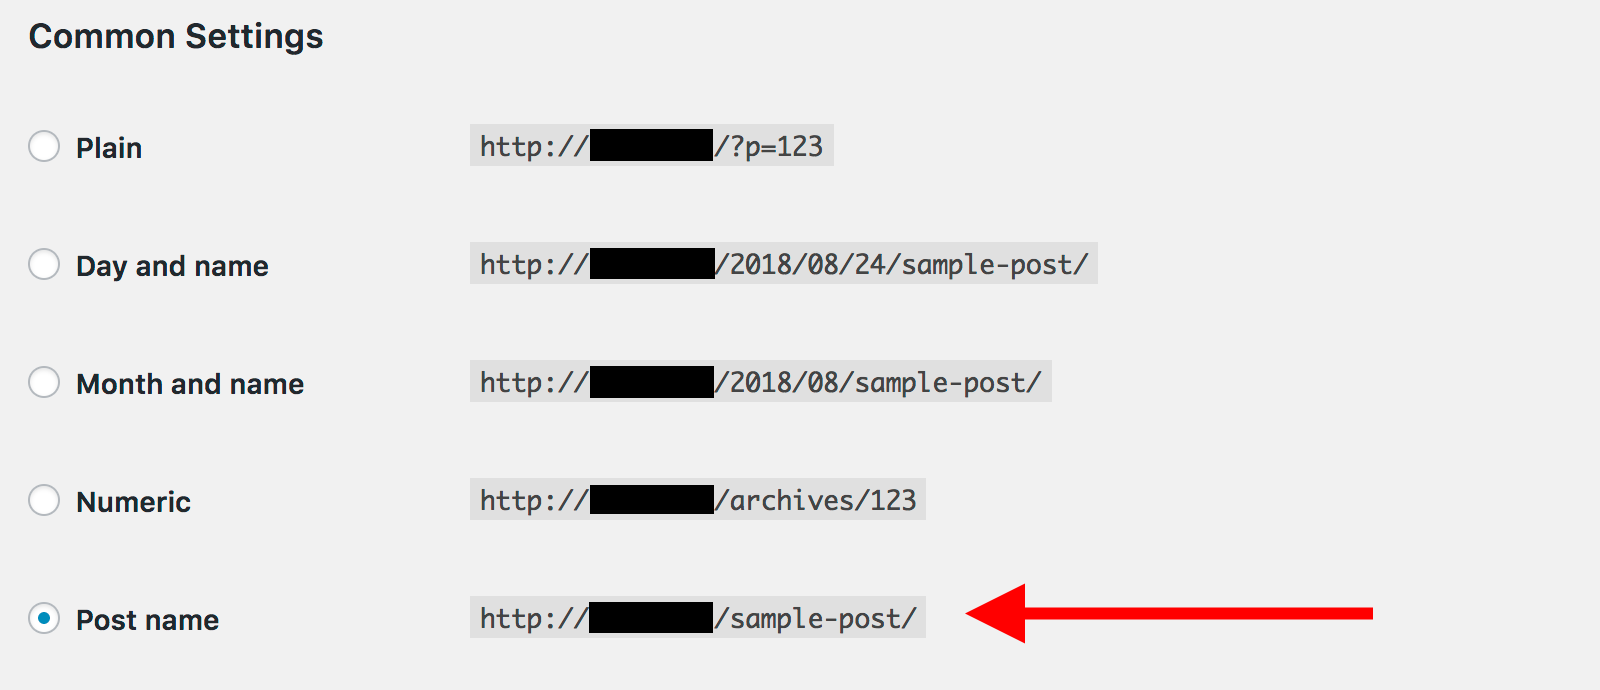
Once you’ve done that, every new post you publish will receive a URL that resembles the post’s headline.
5. Get a theme that’s SEO-ready ?
WordPress itself has an excellent out-of-the-box structure from an SEO point of view. However, it’s easy to waste all of that potential if you choose a theme that’s sub-par.
At the end of the day, Google will see mostly your theme’s HTML code and not WordPress’ own. What this means is that if you choose an unoptimized theme, your SEO will take a hit.
Therefore, what you need is a simple theme (in its code structure) — one that doesn’t use any outdated HTML structures, and that doesn’t bury your content under multiple layers of structural HTML elements.
Granted, this is difficult to check if you’re not very savvy about website coding, but there are a couple of general tips you can keep in mind when choosing your theme:
- More popular themes are usually also better optimized. This is pure economics — with a big user base, there’s more potential for bugs and problems to surface and get fixed eventually.
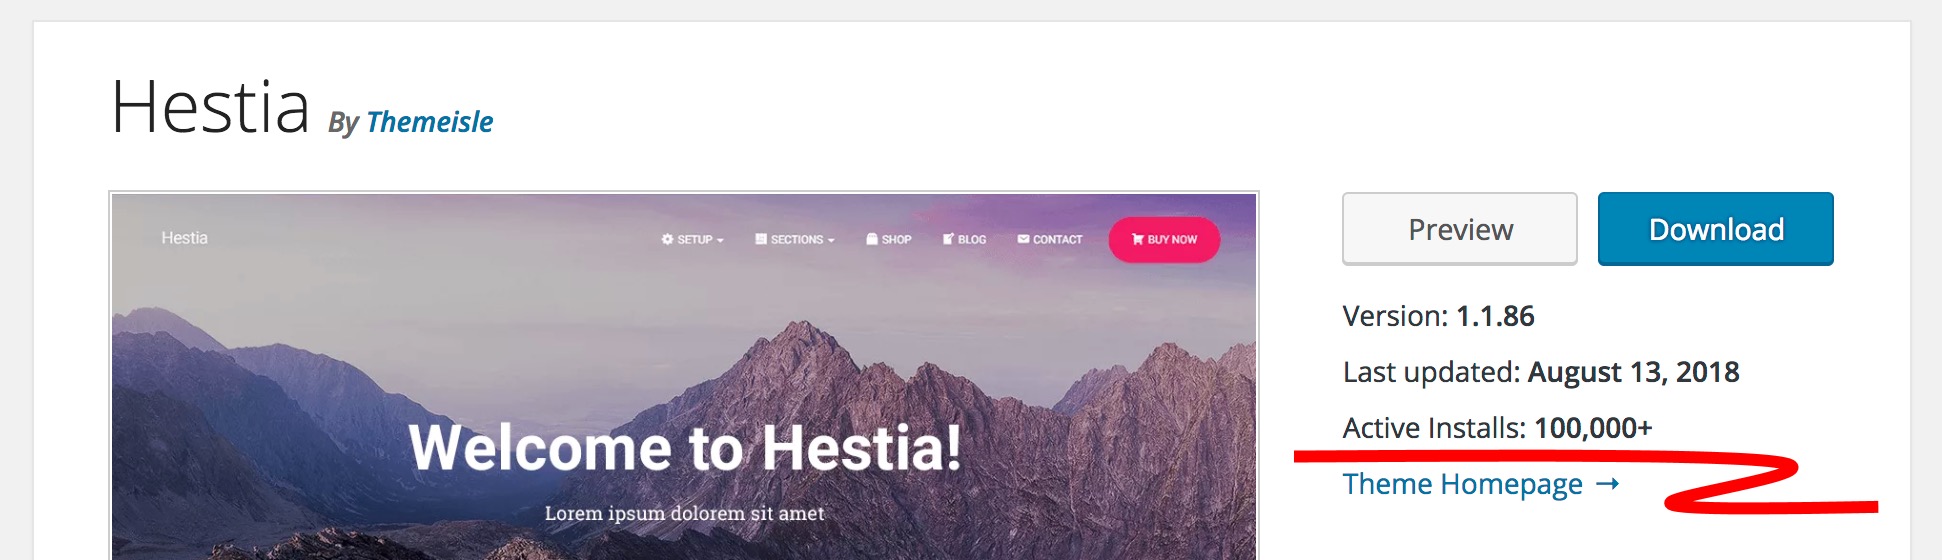
- Recently updated themes are usually better optimized. If your theme hasn’t been updated in more than a year, it’s probably a bit outdated in terms of its search engine optimization. You can check your theme’s number of active installs and the last update date at WordPress.org. Example:
- Mobile-friendly themes are usually better optimized overall. Optimizing a theme for mobile devices isn’t always easy for a developer, as mobile devices are limited in the way they handle and display content, and so require more work than for desktop viewing. Those additional optimizations are good for SEO.
Also, related to that last thing, this year, Google started favoring websites that were optimized to be viewed on mobile. Read: If your website is not mobile-optimized, your rankings will suffer.
Action point:
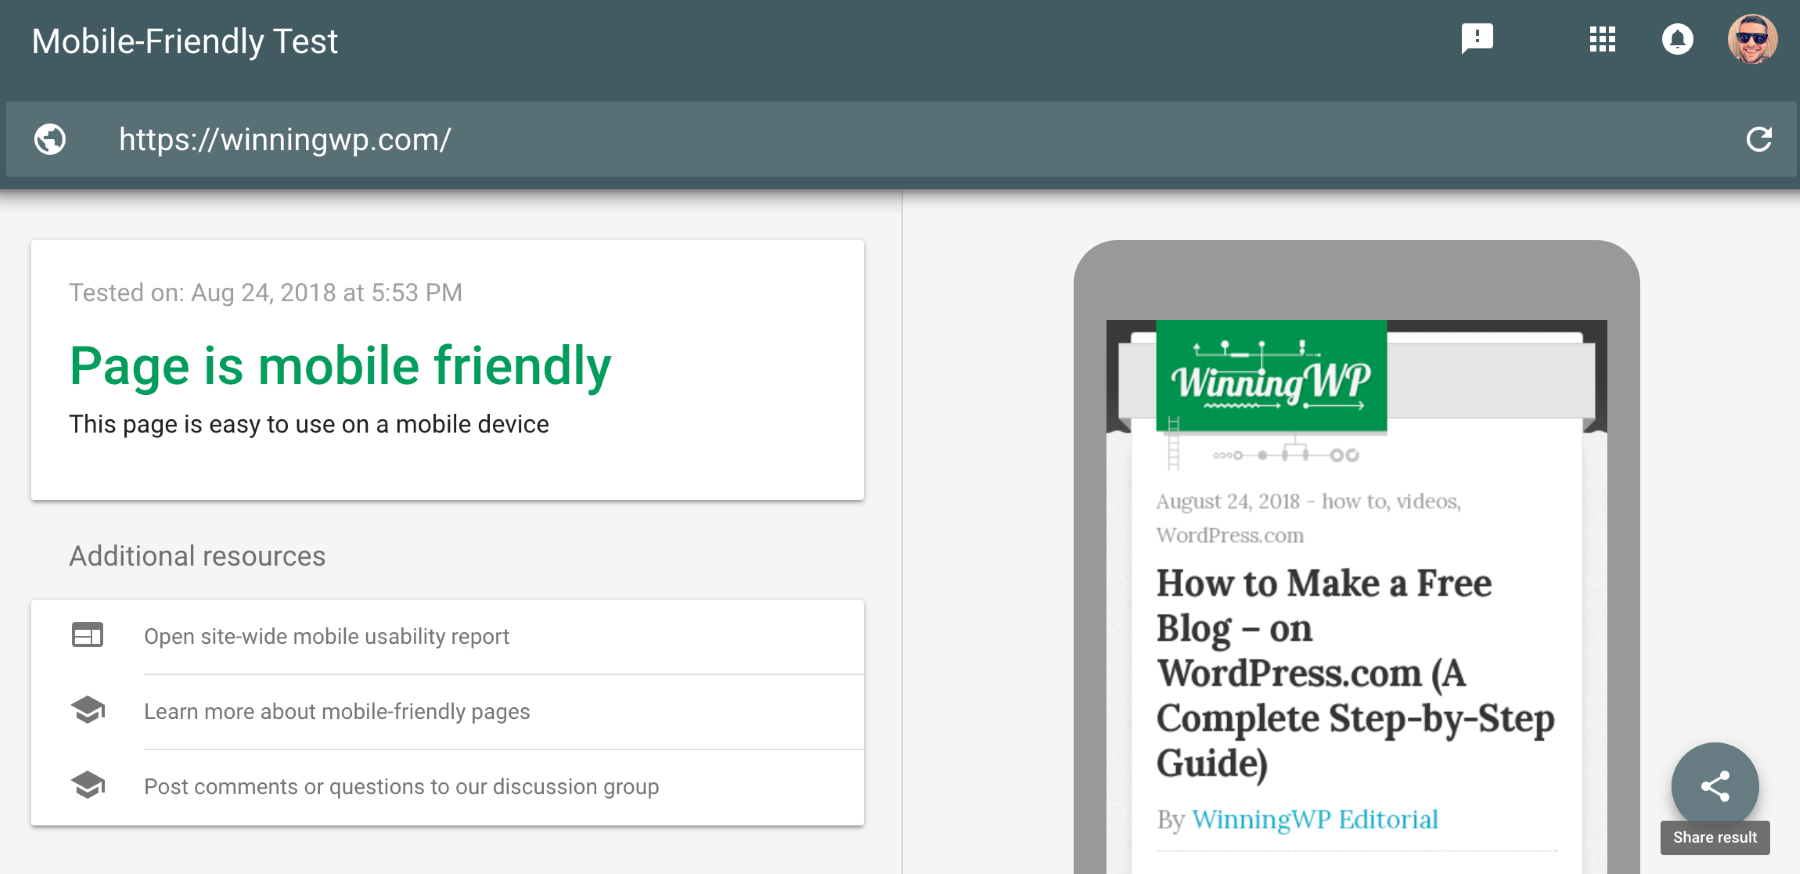
If you already have a theme selected, check the date of its last update and also how mobile-optimized it is. For that, you can use Google’s own Mobile-Friendly Test tool. If the score is low, it may be time to look for a replacement theme. Optimizing a theme that’s not mobile-friendly out of the box is usually difficult to do, so it’s easier just to get another theme.
- If you haven’t chosen a theme yet, either go to the official directory and get one of the most popular free themes, or check out our list of the most popular themes on ThemeForest.
6. Install These SEO Plugins ?
Here are the plugins you should consider installing to boost your WordPress site’s SEO — starting from the absolute must-haves:
6.1. Yoast SEO
Yoast SEO is the most popular SEO plugin — and also one of the most popular plugins overall.
It does two things for you: Helps you to learn SEO by giving you tips on what to do to make your site more optimized, and also lets you adjust certain settings of your site directly.
This is a true workhorse that takes care of nearly every little detail of your site that can be considered among the essentials of WordPress SEO.
Once you have the plugin installed (here’s how to install WordPress plugins), begin by taking care of the following:
Generate XML sitemaps
Search engines like to use sitemaps to navigate websites better and find all of their individual pages.
Yoast SEO will create a sitemap for you automatically. To enable the feature, go to SEO → General → Features tab.

Connect your site to webmaster tools
Yoast SEO can integrate your site with the most popular webmaster platforms, including GSC (as mentioned earlier), Bing Webmaster Tools, Baidu Webmaster Tools and Yandex Webmaster Tools.
To configure this, go to SEO → General → Webmaster Tools tab.
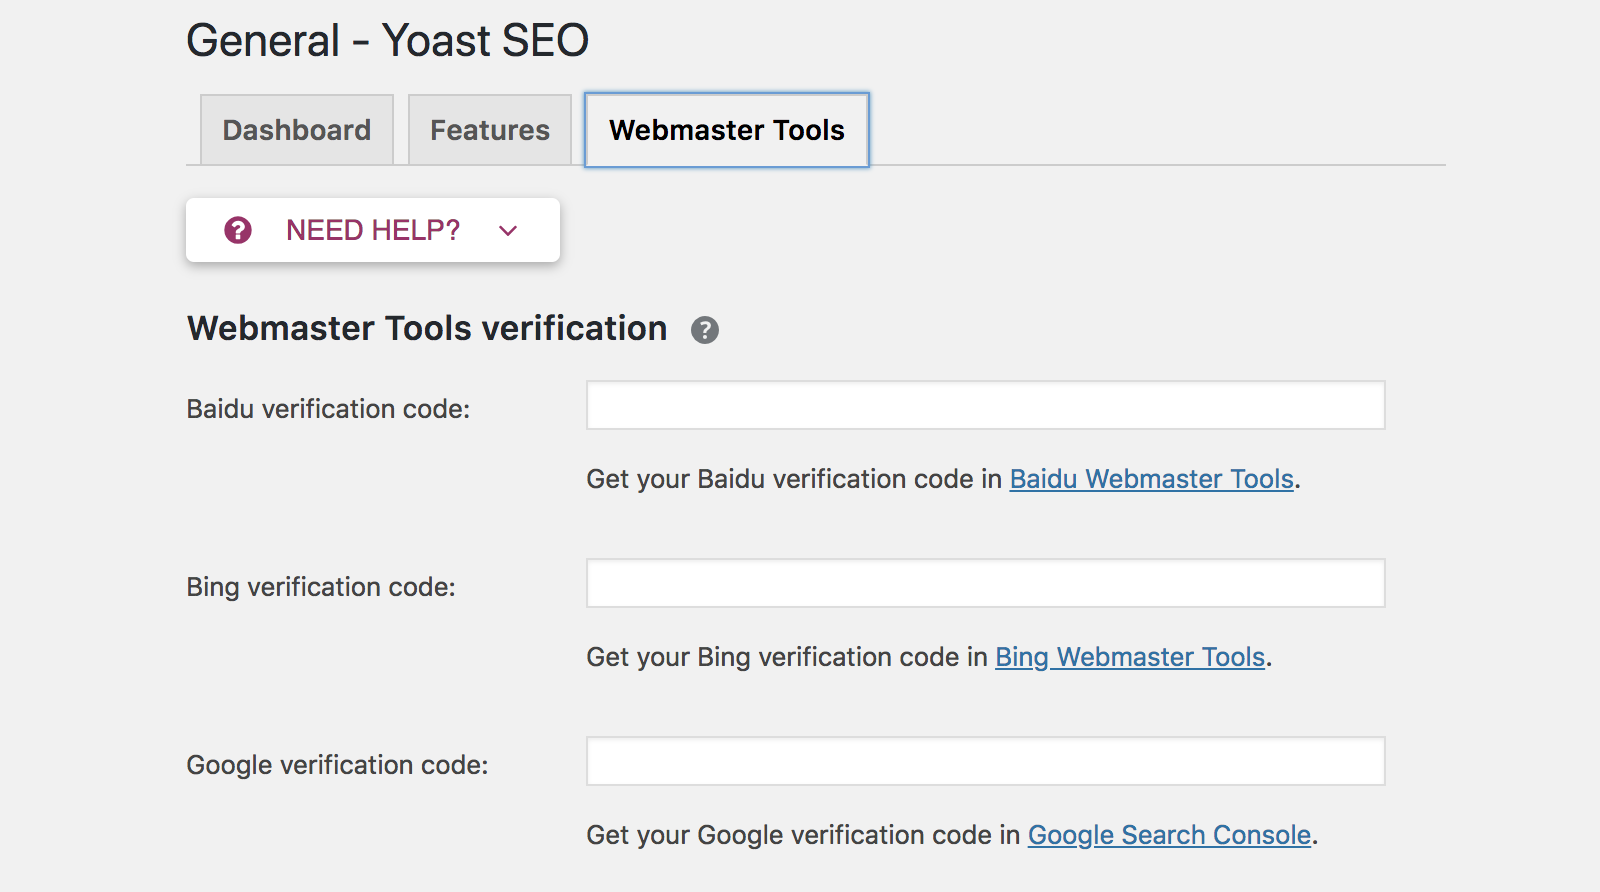
First follow the links to each of the individual tools’ signup pages and then input your verification codes into the fields in Yoast.
Apart from the actions described above, Yoast SEO also lets you optimize each of your posts, pages, and the homepage. This is the most valuable feature that Yoast has in store for you, and one you’re going to be interacting with on a daily/weekly basis. We’ll go through the whole how-to later on in this guide.
Here’s more on Yoast SEO and how to use it.
6.2. W3 Total Cache
W3 Total Cache is the top caching plugin for WordPress.
In simple terms, caching is about storing a static copy of your website and serving that to the visitor, instead of having to generate the site each time on the fly. It speeds up your loading time considerably, without detracting from the user experience.
As we said earlier in this guide, speed is a ranking factor, and Google generally prefer to rank fast-loading sites over their slower competition. Basically, the quicker you can make your site, the higher it’ll rank.
W3 Total Cache is a hands-off type of solution, meaning you can set it once, and then let it do its magic automatically.
While there are myriad settings inside W3 Total Cache, getting the minimum set up is easy.
First, you need to enable caching in the first place. To do that, go to Performance → Dashboard and make sure the plugin is enabled.

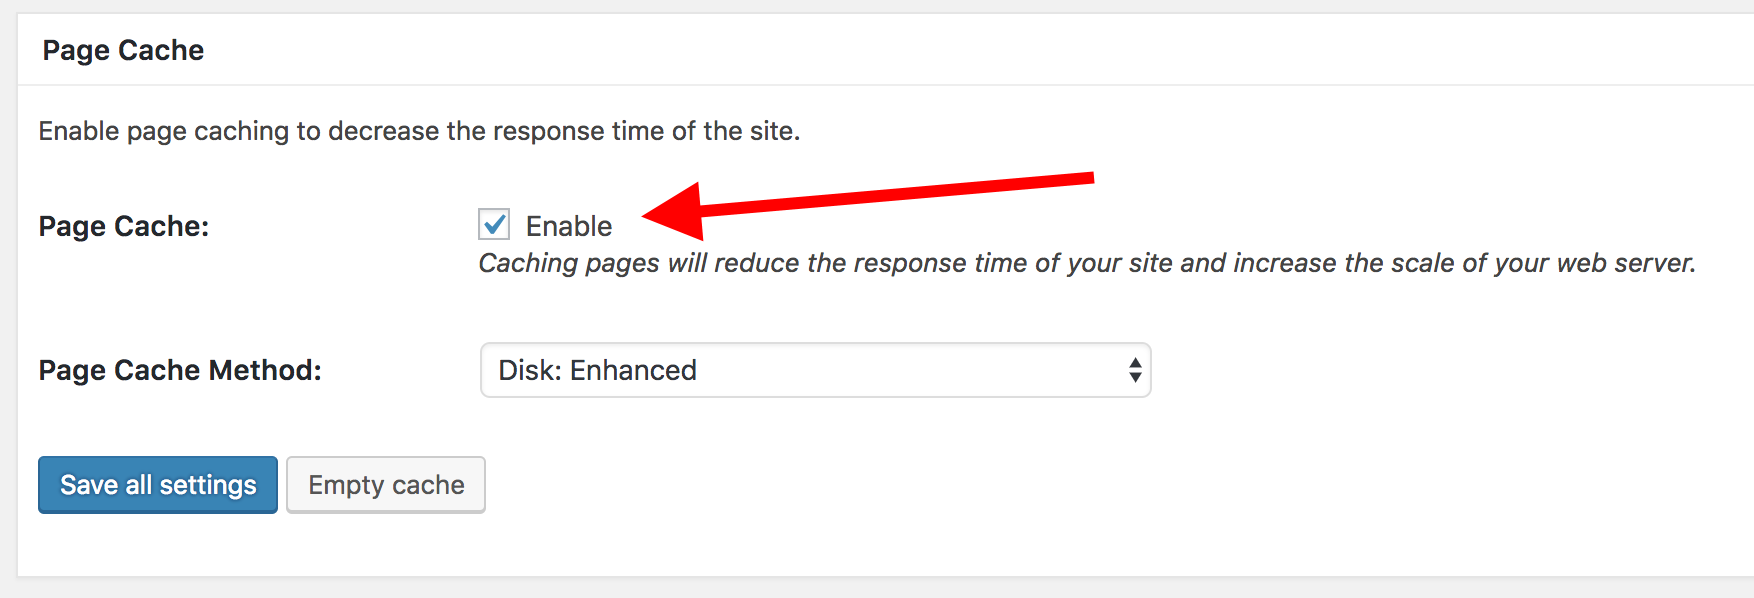
Then, go to Performance → General Settings. Start by enabling Page Cache:
Next, enable Browser Cache:
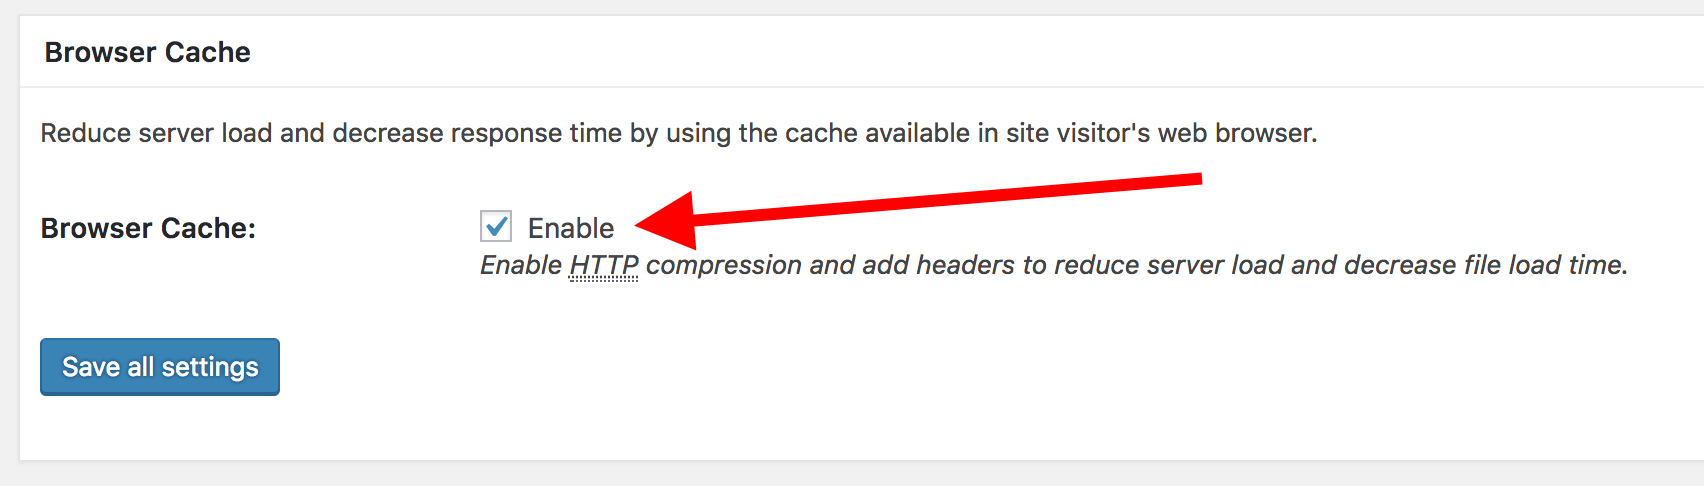
You can leave Minify, Opcode Cache, Object Cache, and Database Cache disabled for now, since they can cause trouble on some shared hosting setups.
Next, go to Performance → Page Cache and fine-tune the caching settings.
- Enable Cache posts page.
- Enable Cache feeds.
- Enable Don’t cache pages for logged-in users
The rest of the plugin’s settings you can leave at their default values.
6.3. Google Analytics for WordPress by MonsterInsights
Google Analytics for WordPress by MonsterInsights is the most popular Google Analytics (GA) plugin for WordPress.
While it won’t help you to rank better, per se, it will integrate your site with GA and thus allow you to check how your SEO efforts have been translating to views and traffic.
After you install and activate the plugin, go into Insights → Settings → General tab, and click on Authenticate with your Google account.

Then, you can go into the Tracking tab and adjust the settings to exclude certain user roles from tracking:
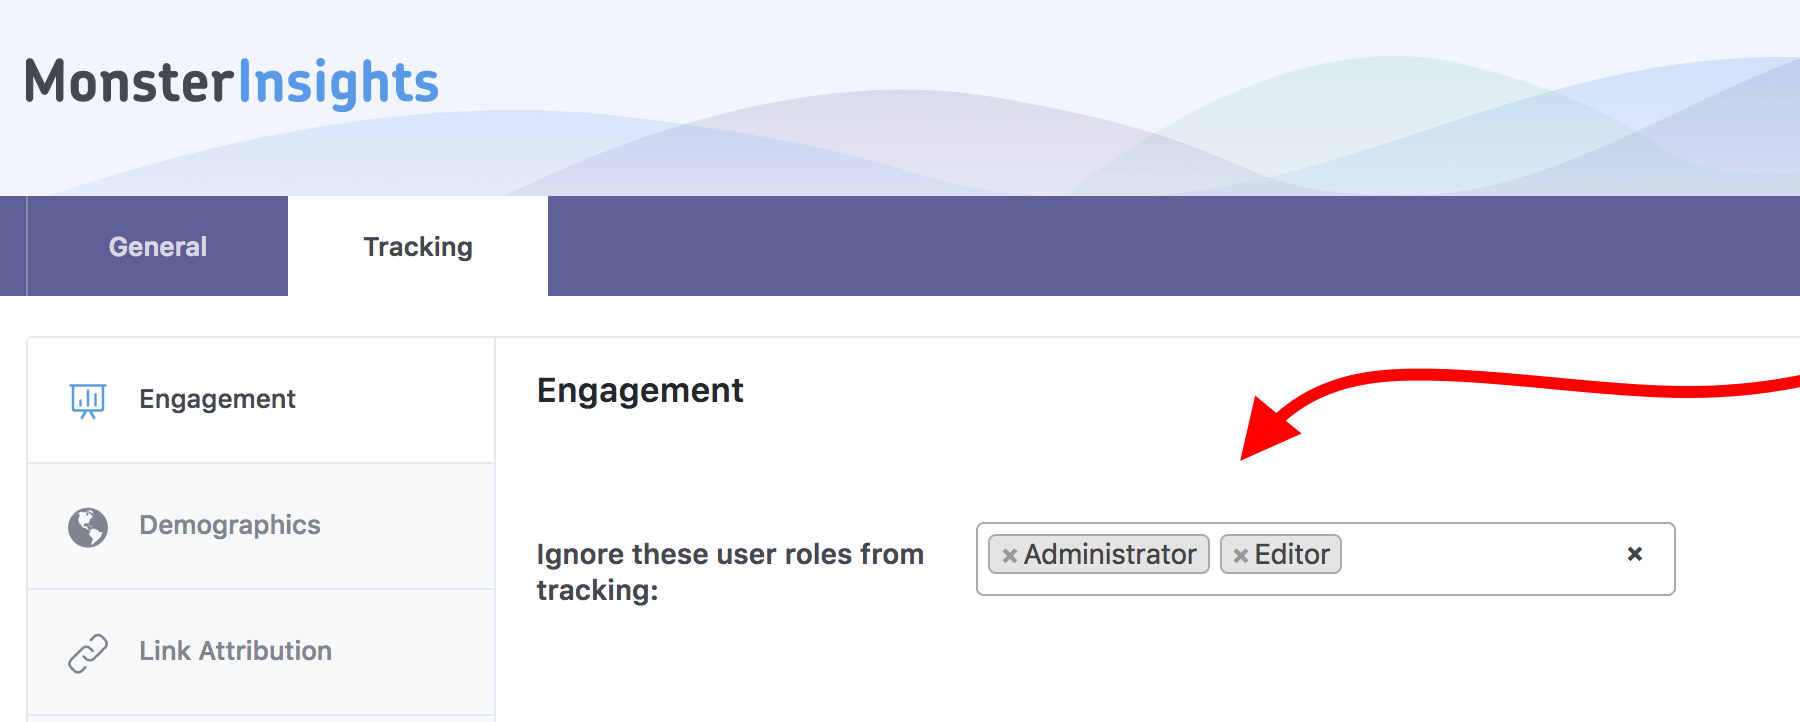
After this setup is done, you can go to GA and start viewing your site stats there.
6.4. All In One Schema Rich Snippets
All In One Schema Rich Snippets helps you to display something called rich snippets alongside your Google listings.
For instance, if you publish a review, you can indicate the star rating of whatever you’re reviewing. Then, Google will pick up on that and display that rating right next to the listing, like so:

All In One Schema Rich Snippets can be used to mark up not just reviews, but also events, people, products, recipes, software, videos and standard articles.
The main benefit here is that people are more likely to click on your listing if they see this sort of additional info.
You use the plugin directly on the individual posts/pages that you want to assign rich snippets to; there will be a new section under the area where you edit the content. We’ll discuss this later on in this guide.
6.5. Broken Link Checker
Broken Link Checker is a very helpful maintenance plugin. The idea behind it is simple — it lets you know of any broken links within your site.
While I’m sure you’re not linking to broken sites intentionally, over time, sites simply go blank or cease to exist for whatever reason, and you won’t notice this sort of thing unless you have an automated tool doing the work for you — such as the Broken Link Checker plugin.
This is important for SEO because you simply don’t want search engines to follow broken links from your site. If your site is continuously found to be linking to nonexistent web pages, then this won’t look good on your record with Google.
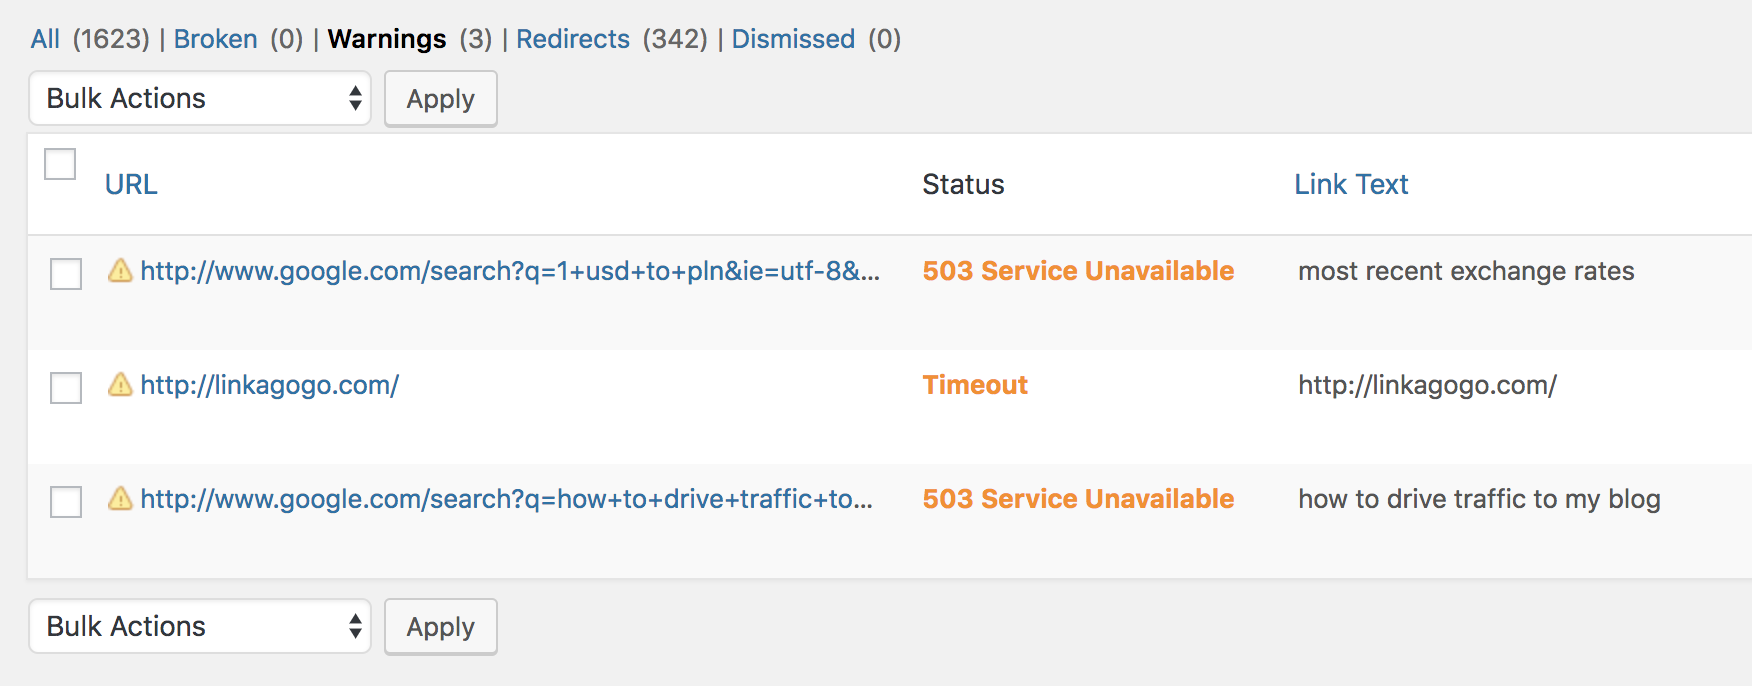
The plugin is very easy to use. It analyzes your site automatically in the background and then gives you a list of all of the pages/posts with broken links. You can then step in and fix them. Make sure to do that every month or so.
6.6. Smush Image Compression and Optimization
Smush is a plugin that optimizes your images. It takes your image files and simply makes them smaller in disk space by performing some optimization magic in the background.
Importantly, the image itself doesn’t look any different, so you’re not losing any of the quality. The file just starts consuming less of your bandwidth and server space.
Why is this important for SEO? Images make up the bulk of any web page’s size (disk space). And the larger your web page is, the longer it’ll take to load. The longer it takes to load, the worse it’ll rank. So it’s once again all about the loading speed of your site.
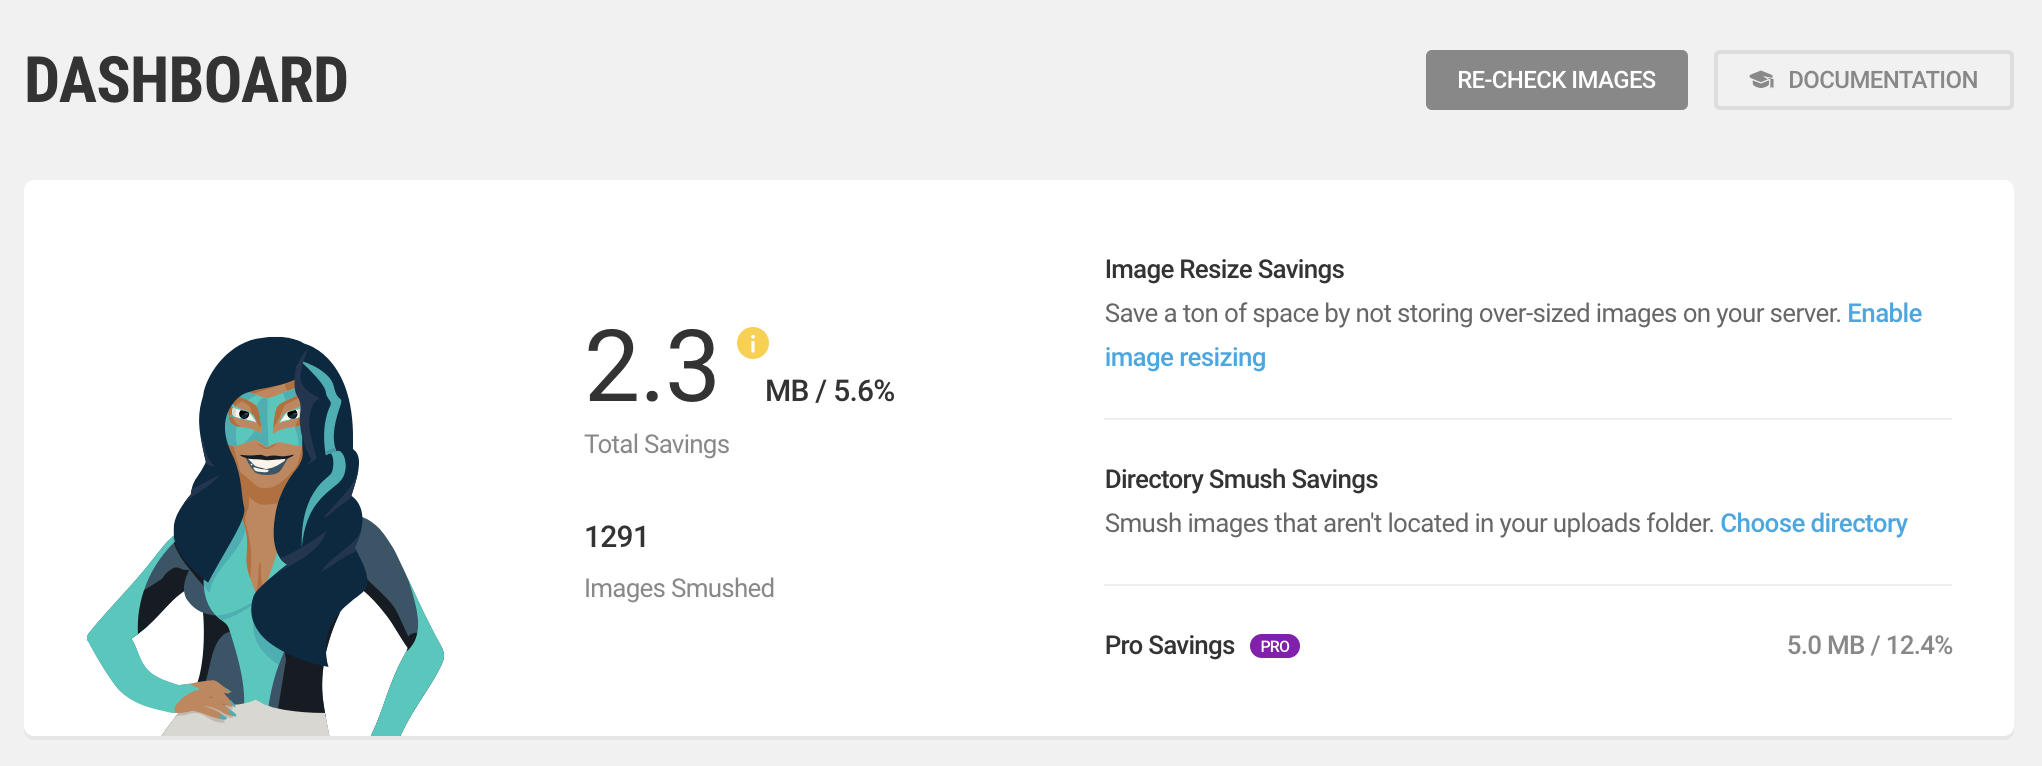
Smush works automatically, processing your images when you upload them to a post or page. You can adjust the settings if you go to Smush from your WordPress dashboard.
6.7. Share Buttons by GetSocial.io
GetSocial.io is a cool plugin that gives you some social analytics tools along with social media share buttons.
While it might not have much SEO significance directly, the social popularity of your content has impact on SEO, and therefore it makes sense to encourage your visitors to share your posts via their social media channels.
After you install and activate this plugin, you get to choose from a couple of different styles of buttons, so you’re likely to find something that fits your site.
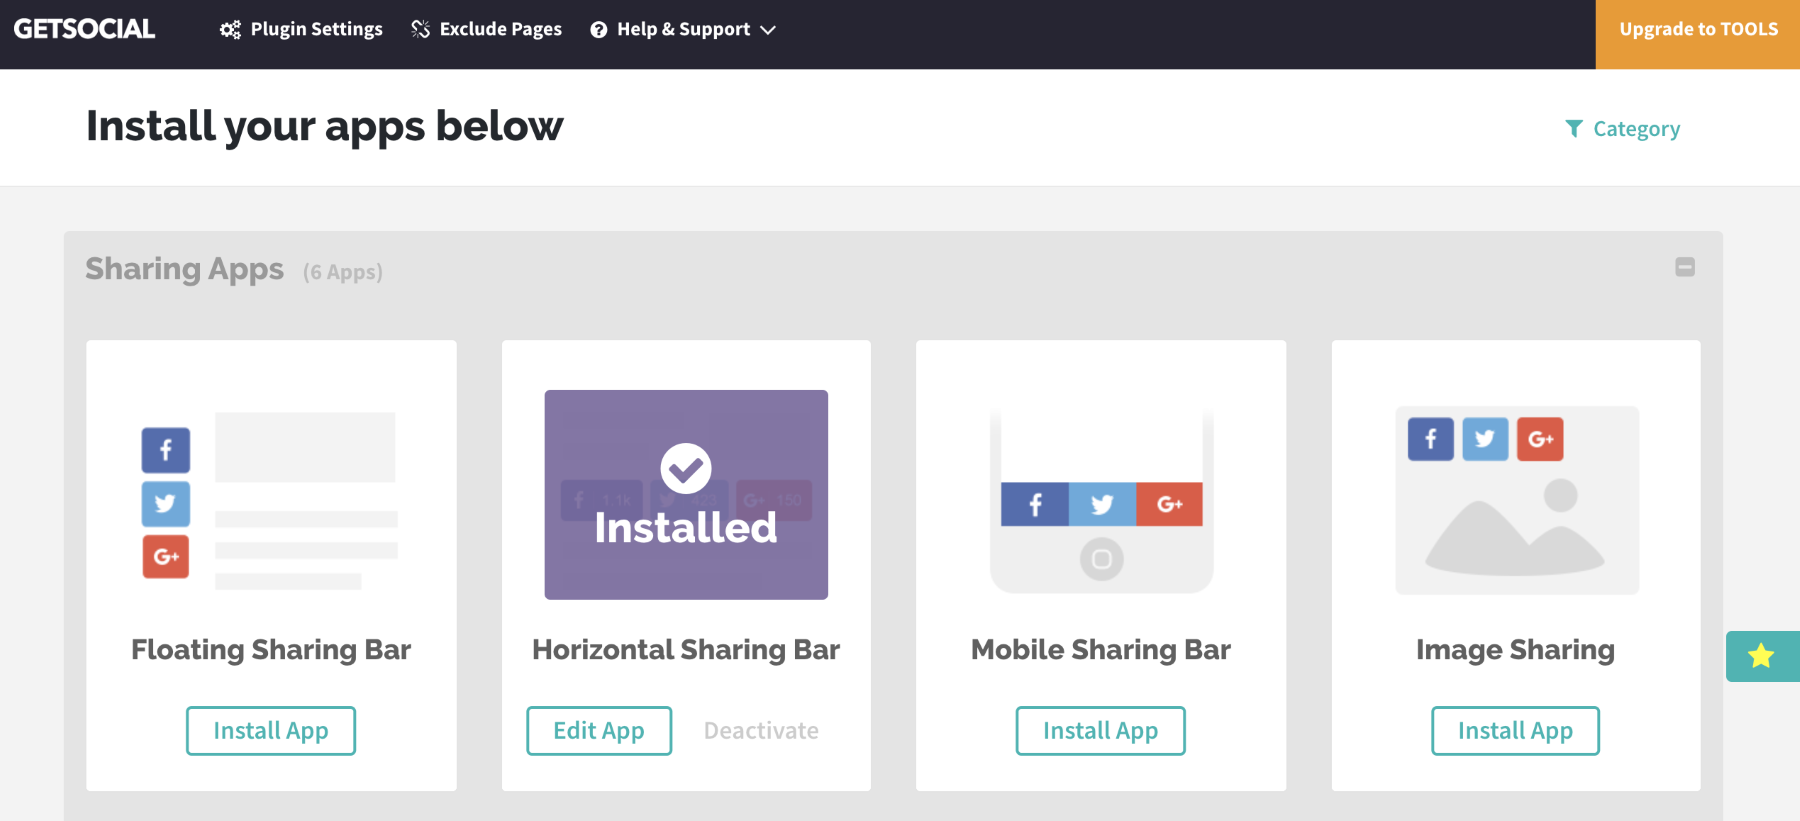
The buttons will be included automatically, so there’s no coding involved, and it should work with all themes.
7. Create Content with SEO in Mind ✍️
Apart from the standard optimizations that you can do within your WordPress admin interface and via plugins, it’s just as important to also create content that’s optimized from the get-go. Here’s how:
7.1. Always Start with Keyword Research
Every piece of content you publish should be built with a specific keyword (or key phrase) in mind.
Let me repeat this since it’s a crucial component that’s often misunderstood: You really do want to build each and every piece of content that’s on your site around a specific keyword.
A keyword, as we understand it here, is the exact phrase a person puts into Google when looking something up.
What you want to achieve is to have your content appear whenever people do searches that are relevant to your website.
For example, if you do home decor in the New York area, you may want to appear for ‘home decor new york’ — your main keyword.
The challenge is that people tend to word things differently when using Google, and it’s not always that straightforward to figure out what the most popular way of phrasing something might be.
This is why you should use keyword research tools that will help you to solve this mystery. Two of my favorite ones are the Google Keyword Planner (GKP), and KWFinder.

GKP is meant more for AdWords advertisers rather than people optimizing their websites for organic Google results, so I tend to favor the other tool — KWFinder.
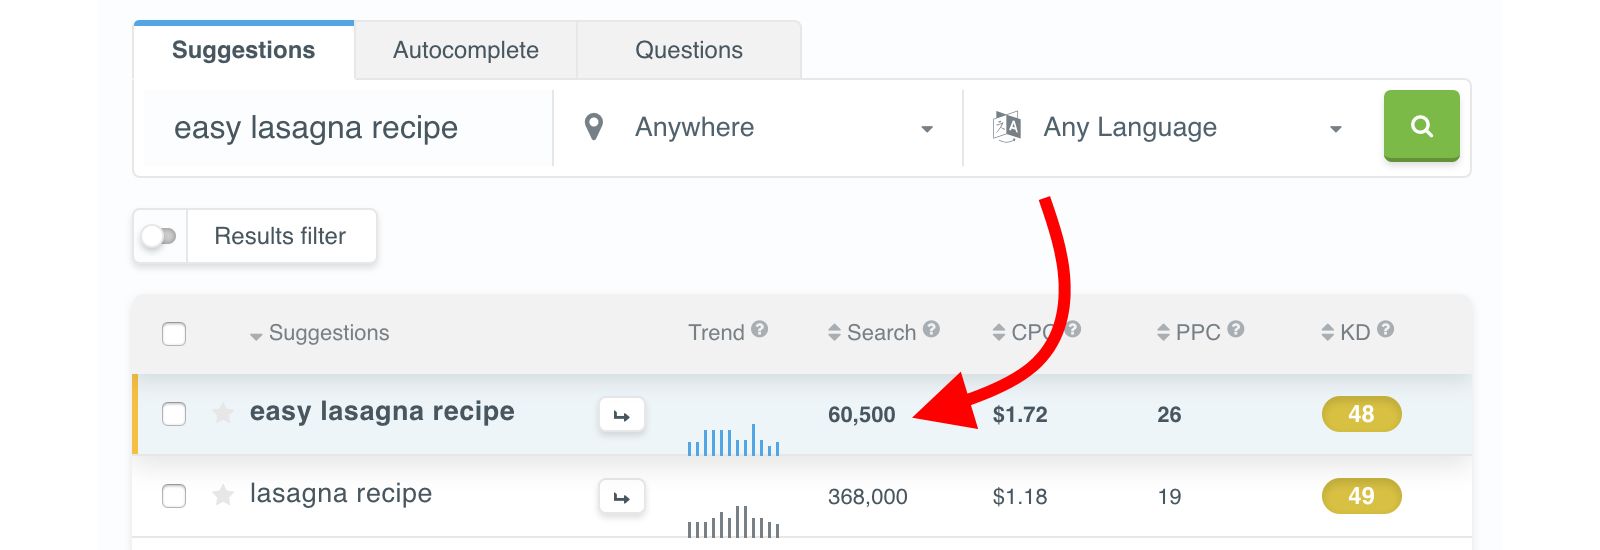
It’s pretty simple to use. Start with a seed keyword — the main topic you want to write a post about — roughly phrased, and then let KWFinder help you to figure out the best keyword for that post.
So, what makes a good keyword?
There are three main factors:
- volume
- difficulty
- user’s intent
A keyword is worth pursuing if it has 500-plus searches every month.
For a new site, it’s also good for the keyword to be rated as easy or possible to rank for.
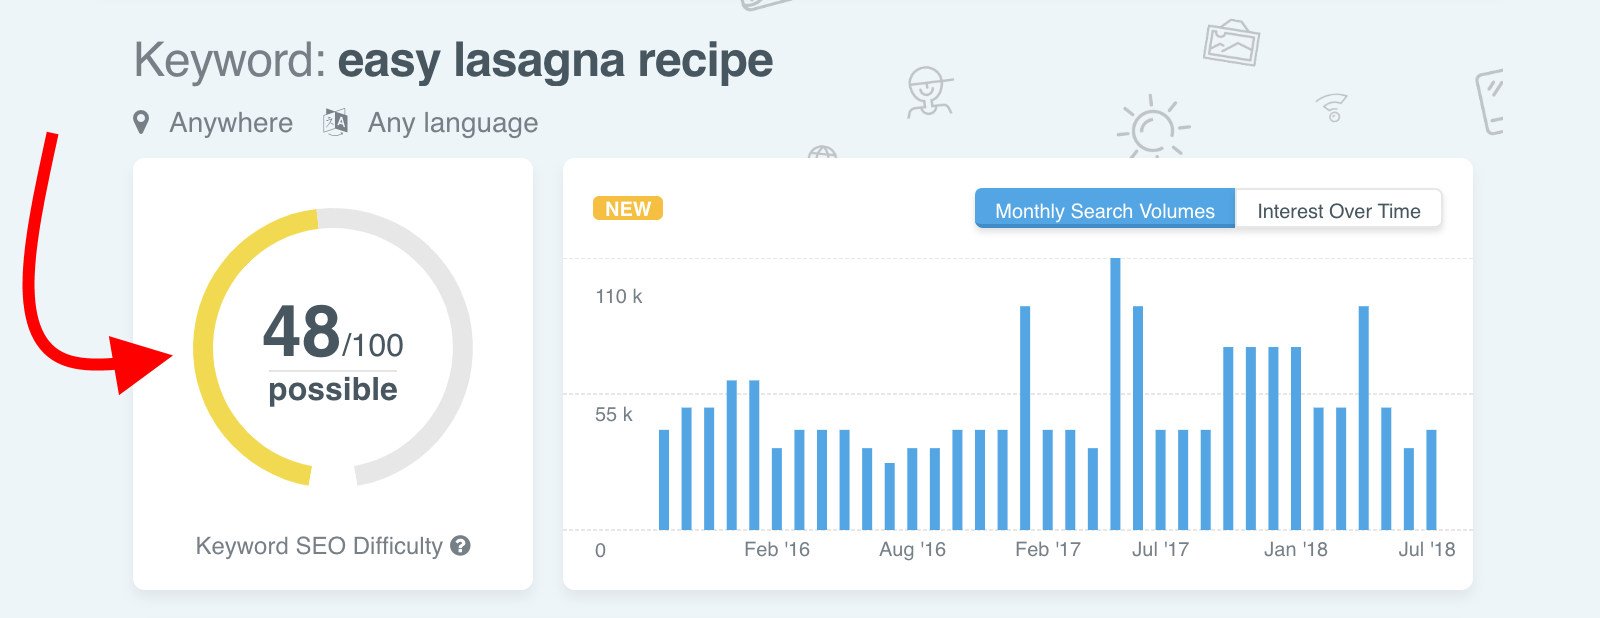
Everything higher than that, and you simply won’t be able to rank due to heightened competition for the phrase. For more competitive keywords, there are other more prominent websites that want to rank for them, and it’s near impossible to outrank them.
Next, you want to make sure the user’s intent matches your content. Meaning, this is not about just picking a valuable keyword randomly and telling yourself you’re optimizing your content for it, but about making sure your content is the best resource in its niche for that specific topic.
In other words, imagine a person looking up the keyword you’ve chosen: Is this person going to be entirely satisfied when they end up on your page?
A keyword that’s worth pursuing needs to have high enough search volume, attainable difficulty, and match user’s intent, all at the same time. You can’t have any element missing.
Since this guide is about WordPress SEO specifically, I won’t be getting into more detail on how to do keyword research step by step. For more help, check out this awesome resource.
With some keyword research experience under your belt, you can get to work:
7.2. Optimize the Title and Description of Your Homepage
On most websites, the homepage is the one you should use to target your No. 1 most valuable keyword.
To make that happen (apart from doing your keyword research and actually deciding what that No .1 keyword should be), you need to adjust your homepage’s meta title and description.
The meta title and description aren’t displayed anywhere on the actual homepage. They’re only used when viewing your site’s listing in Google.

The goal is to make sure your title and description are both interesting enough for the visitor to click on them, and also keyword-rich so that Google will highlight the phrase right in the listing (as you can see in the example above).
With the Yoast SEO plugin installed, you can adjust your homepage settings if you go to the WordPress dashboard and then to SEO → Search Appearance.
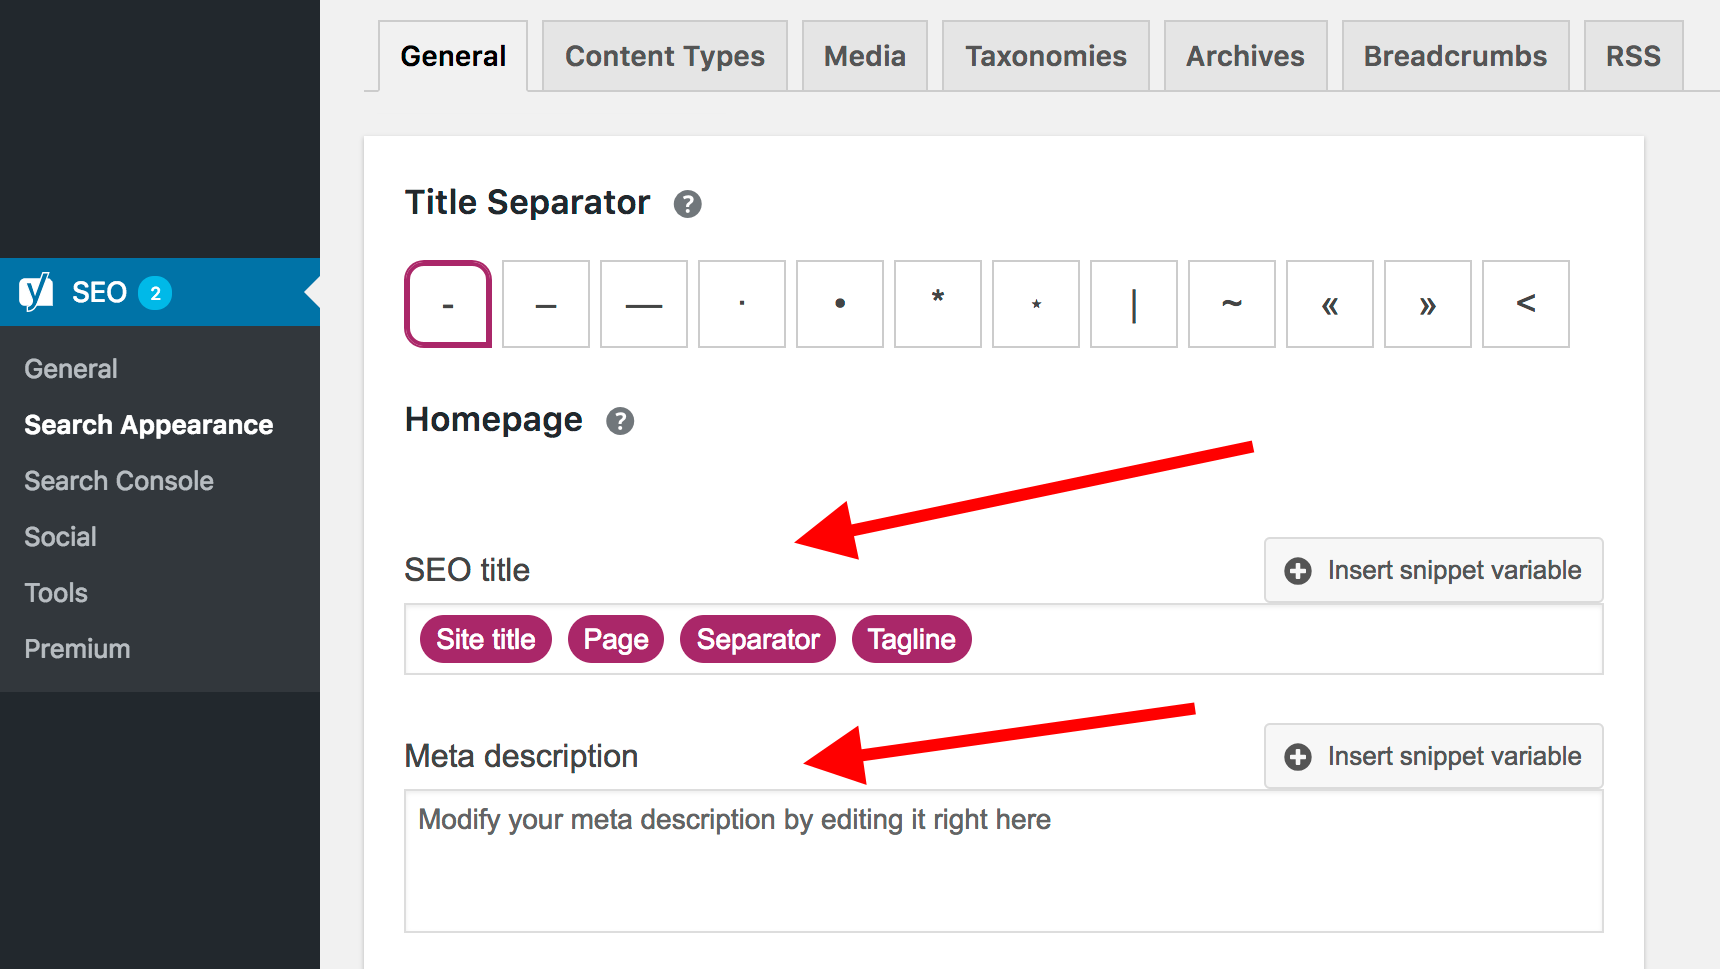
You can remove the placeholder elements that you see there (those reddish blocks) and replace them with a keyword-rich title and description.
As for what to actually put in the description, a good idea is to treat it as the tagline of your website. Use those 156 characters available to invite the reader to check out your site — tell them what’s in it for them.
Note: If you’ve set a static page to act as your homepage, you won’t see the panel presented above in your Yoast SEO settings. To adjust your homepage, you’ll need to go to your Pages menu and work on your homepage, just like with any other page within your site. Click here to fast forward to the part of this guide where I explain how to do that.
7.3. Write Content that Ranks
‘Well, duh!’
But what’s the secret to content that ranks?
First, length.
As it turns out, content that’s longer generally ranks better. There’s been a lot of research on this (such as this study, for instance), and long-form content has time and time again proven to rank better than shorter pieces.
Here’s the correlation between content length and ranking:
What’s considered long-form? Anything 1,500 words and up.
Then, there’s also depth.
Obviously, just pumping out a long piece of content for the sake of it won’t get you anywhere. You also need to make that piece valuable and helpful to whoever’s interested in the topic at hand.
Writing content this detailed won’t be a quick, before-breakfast task. You need to devote time and attention, and invest in research, outlining, writing, and then editing and publishing your article. No shortcuts.
7.4. Headlines, Headings, and Keyword Density
So you’ve chosen your keyword based on the research you did prior to writing the article. Good!
Now it’s time to optimize it for that keyword.
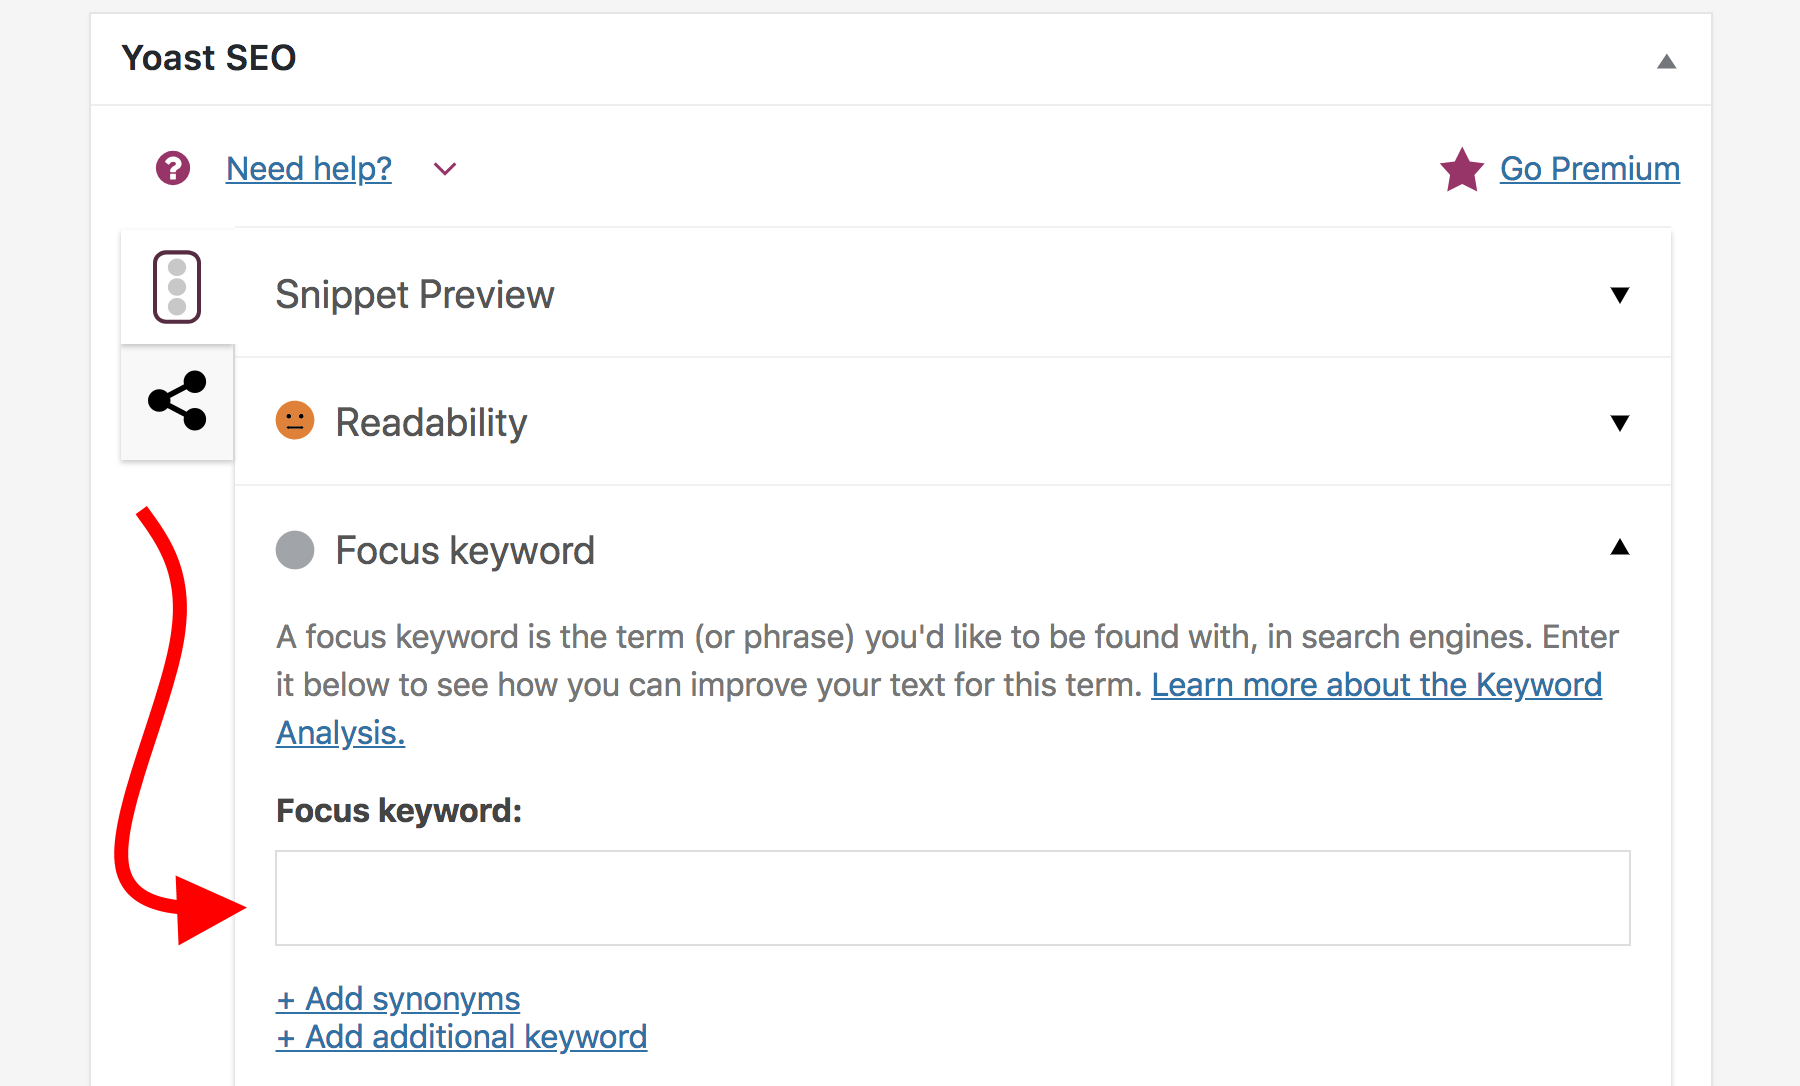
Whenever you’re working on any post or page within the WordPress interface and you have Yoast installed, you’ll get this box under the main content field:

It tells you how optimized your content is for your focus keyword.
An important note here: Always set a focus keyword for every one of your pages and posts. Without the focus keyword set, Yoast won’t be able to help you, since it doesn’t know what keyword you want to optimize for.
Once you let Yoast know the keyword you’re pursuing, the tips it’ll give you will be gold!
Yoast will take you by the hand and point out every little detail about how you can make your content more optimized for that focus keyword.
Here are some of the keyword optimizations to perform:
Keyword in the headline/title of the post
Though making it fit there might not always seem easy, it’s doable with some word gymnastics.
Take a look at this example from Backlinko.com — one of the blogs in the SEO niche itself:
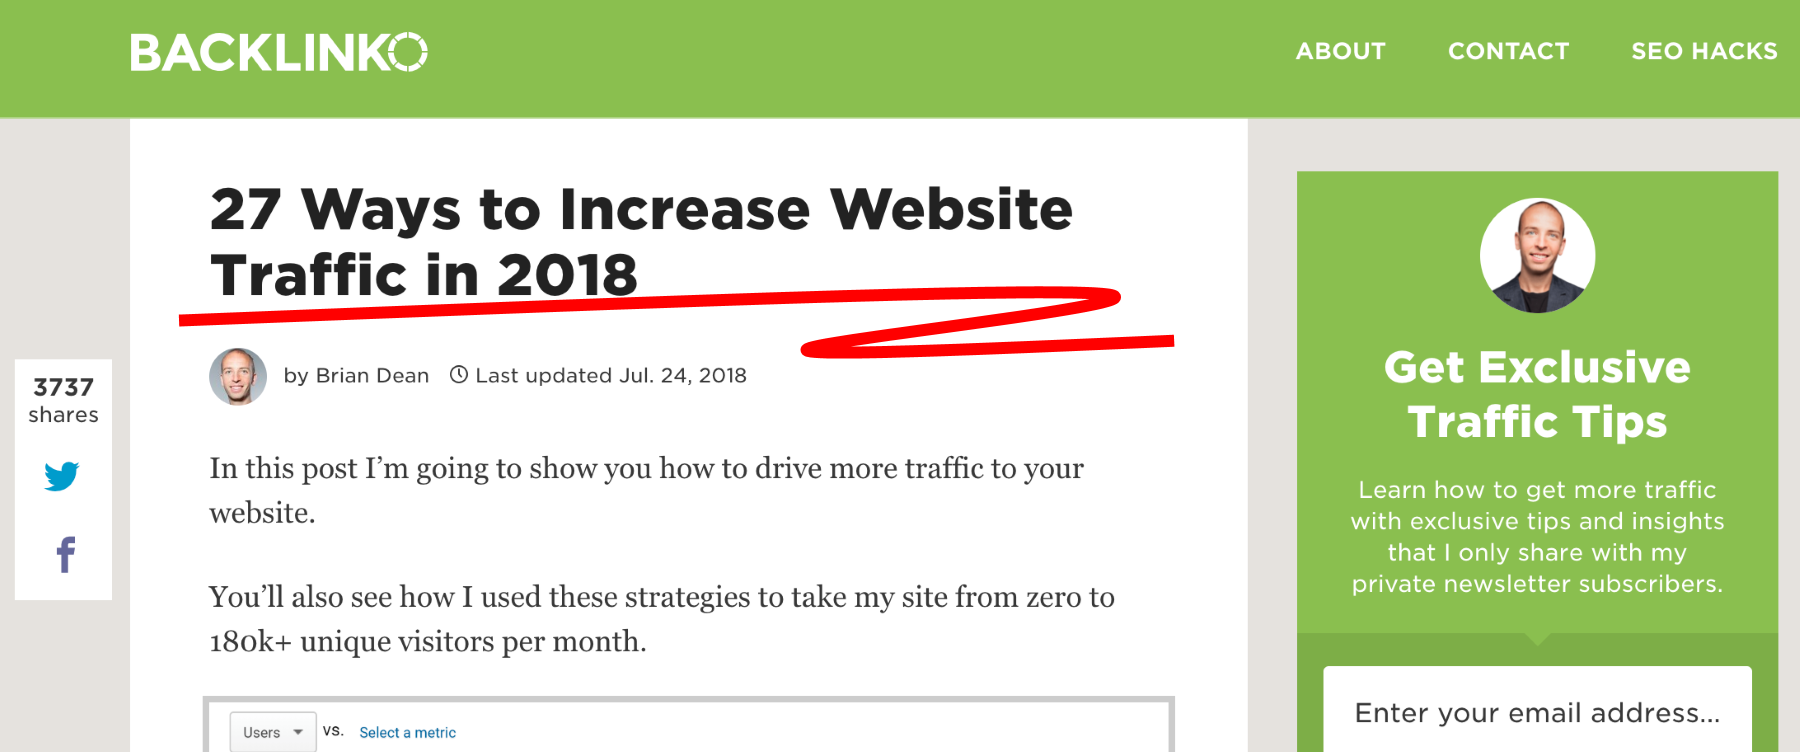
The focus keyword here is most likely ‘website traffic’. Brian — the author — has managed to fit it nicely into the headline.
- Here’s a general guide on how to write good headlines.
Keyword in the meta title & description
Yoast allows you to set a custom SEO title and description for your post/page. Those texts will only appear in the search engine listings for that piece of content.
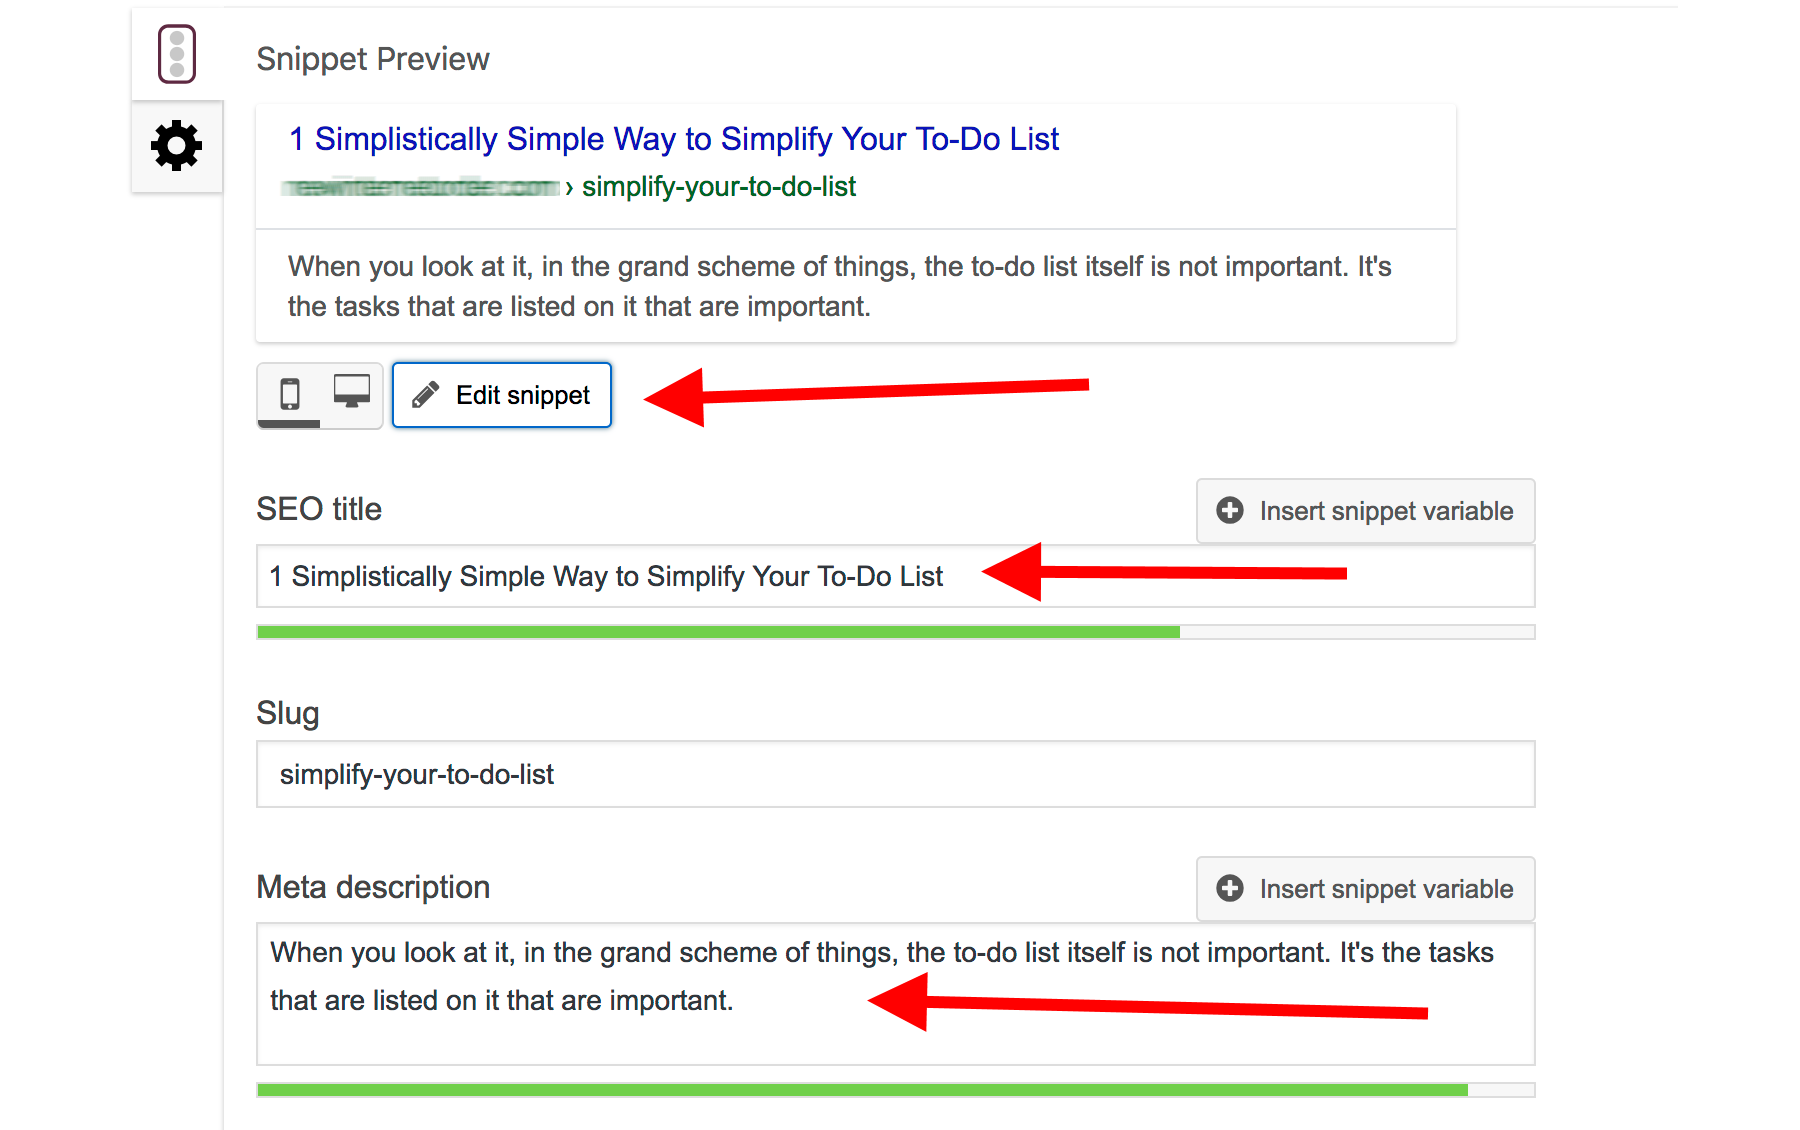
- The title should be pretty close to the headline of the post, but shortened so that it’s not longer than the 70 characters that Google allow.
- The description tends to work best as a summary of the post plus a quick reason why someone should read it.
You need your focus keyword both in the meta title and the description.
Note: This is also where you can set your homepage title and description if you’ve chosen a static page to act as your homepage.
Keyword in the subheadings
When writing content in WordPress, you get to use the heading levels from H1 to H6.

You don’t have to use all of them, though — sticking with Heading 2 and Heading 3 is more than enough. Heading 1 is usually reserved for your WordPress theme, which automatically uses it for your post titles.
What you do is divide your post into digestible chunks of roughly the same length, and place subheadings in between. Try using your keywords in those subheadings.
Keyword in the URL
When you save a post or page in WordPress, you get to tune its URL.

Include your primary keyword for that particular piece of content there.
Use short URLs in general — here’s some data on why.
Keyword in the body of the post
When you’re optimizing for a specific keyword, you should also try using that keyword as-is in the body of your article.
You don’t need to go wild here, but Yoast recommends aiming for a density range of 0.5% to 2.5%.

7.5. Use Images
Having images in your content is great for readability. Just the fact that they’re there makes your content easier to read by providing visual breaking points.
But images can also be used to get an extra SEO edge.
Google are always trying to determine how relevant your images are to the text around them, and they also use your images in Google Image Search.
So, the way you tell Google what your image is about is via something called the alt tag of the image.
You can set alt tags easily in WordPress when you upload an image:
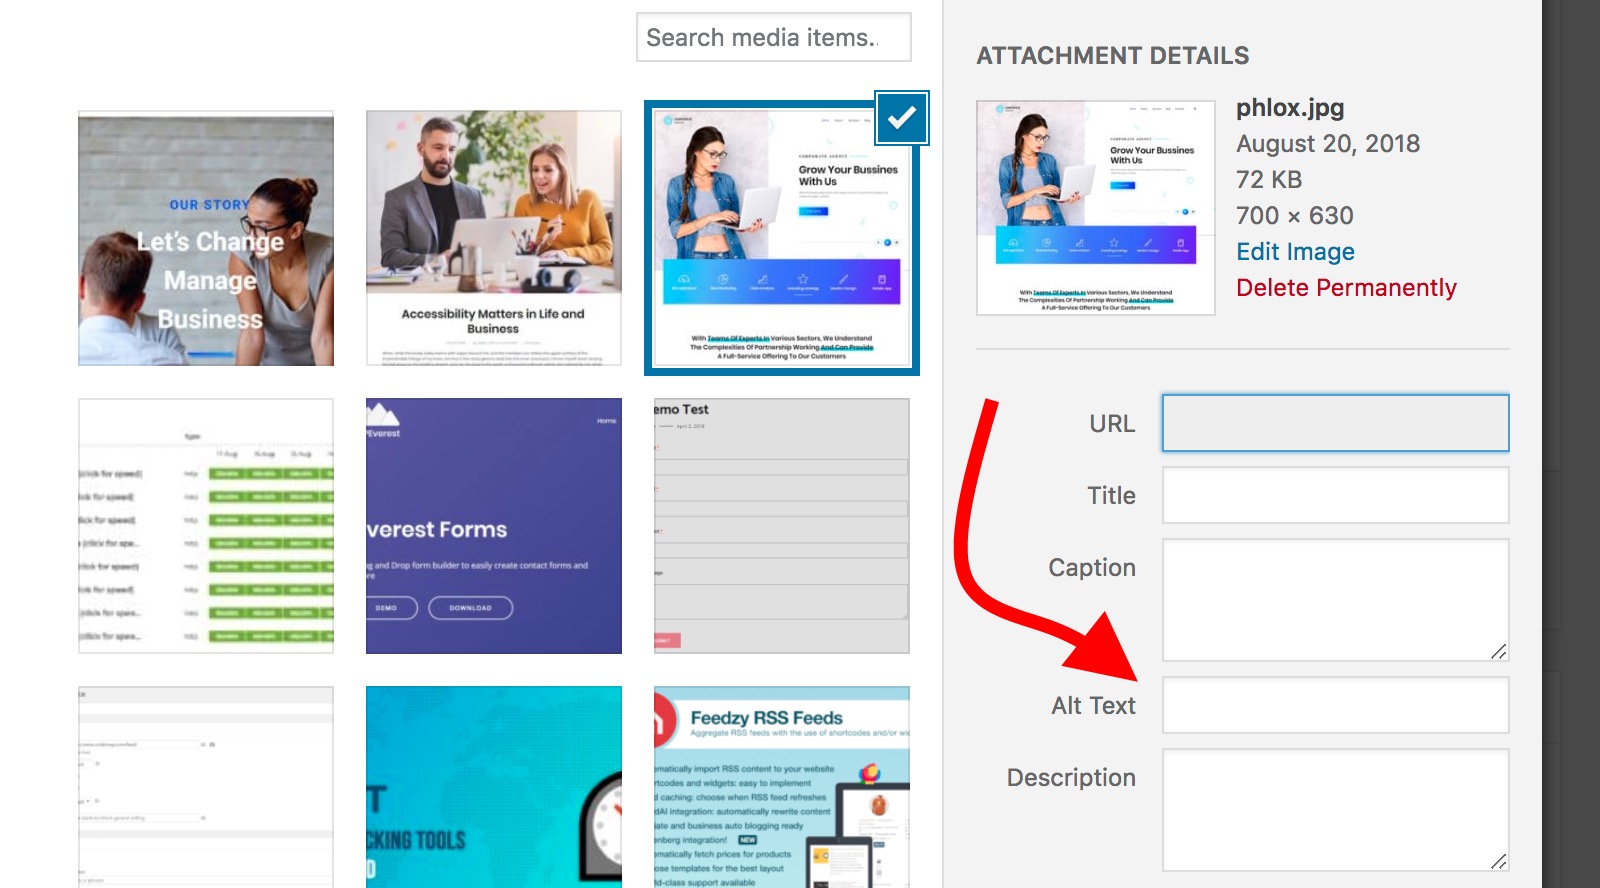
Use your keyword in at least one image alt tag.
7.6. Interlink Your Content
Internal links are links that point from one sub-page of your site to another (or to a blog post).
They’re fantastic at directing your readers to other areas of your site, which means people will simply stick around for longer (this is something Google will notice and appreciate).
Internal links also let you build a better content structure. For example, you can highlight your best content pieces by linking to them frequently, and thus making it more likely people will value them.
Lastly, Google will follow your internal links just as your readers do. The more you link to specific content pieces, the more important that content becomes from Google’s point of view.
Adding internal links is easy in WordPress. Just highlight a piece of text that you want to turn into a link, then click on the link icon, and input the URL of the target page, like so:
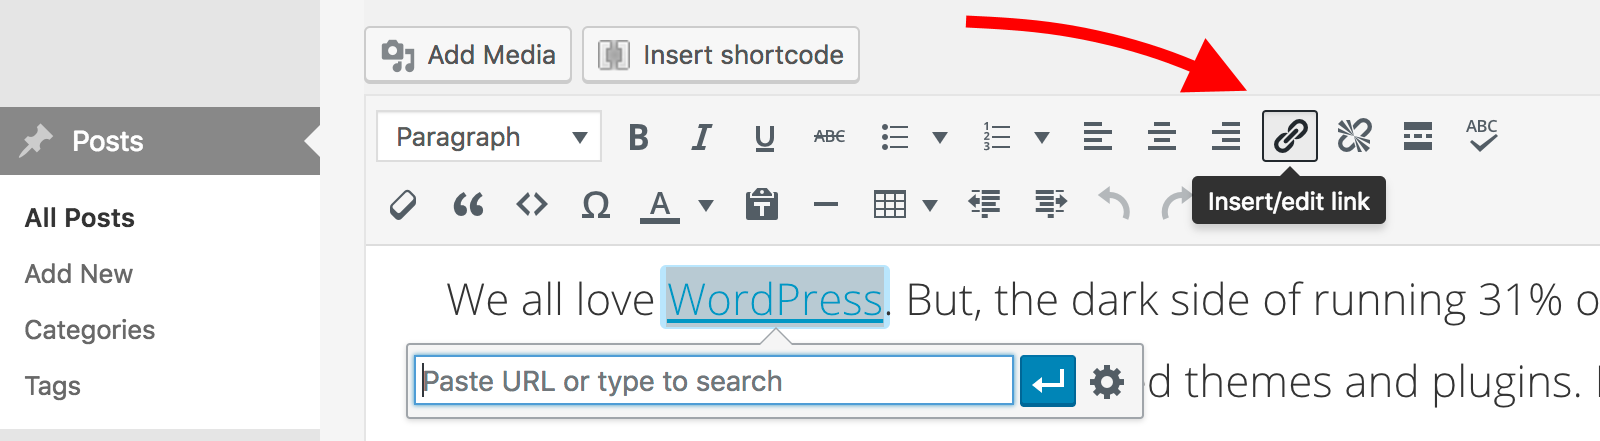
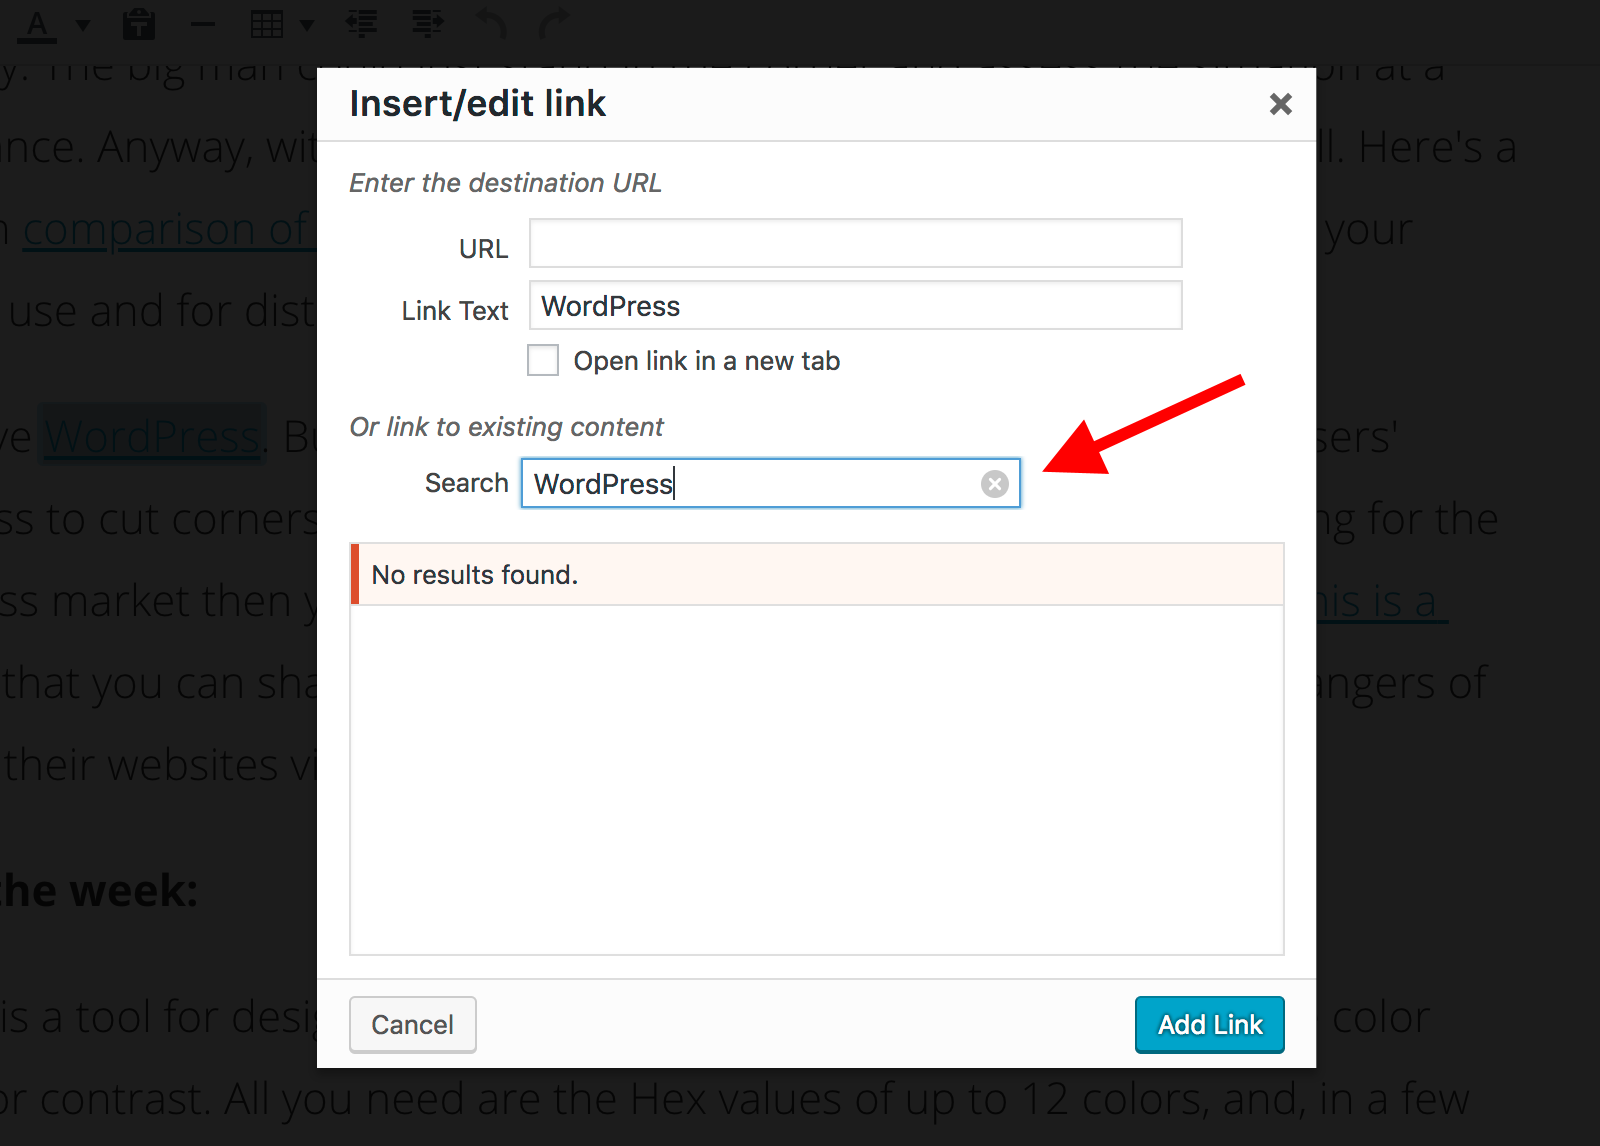
Or, instead of typing in the URL, click the gear icon and then look for a specific page via the internal search feature:
You should aim to include three to five links to your own pages per every 1,000 words of content.
7.7. Link to External Sources
Apart from internal links, you should also add a fair few links pointing to external sources.
You’re doing that to point your readers to other supporting information that they may benefit from (such as additional data, research pieces, more commentary, and so on).
Those links being in your content further improve the quality of it by making the whole message more complete and valuable to the reader. You’re simply making it possible for them to learn more than just what’s inside your post.
Google notice this and appreciate it. Also, the sites you’re linking to might notice as well, which can lead to them linking back to you and bringing you direct traffic.
7.8. Use Rich Snippets
Rich snippets can be a great way to get some additional eyeballs on your Google listing. I mentioned this when talking about the All In One Schema Rich Snippets plugin among our list of recommended WordPress SEO plugins.
With the plugin installed, you can set a rich snippet block for any post or page on your site.
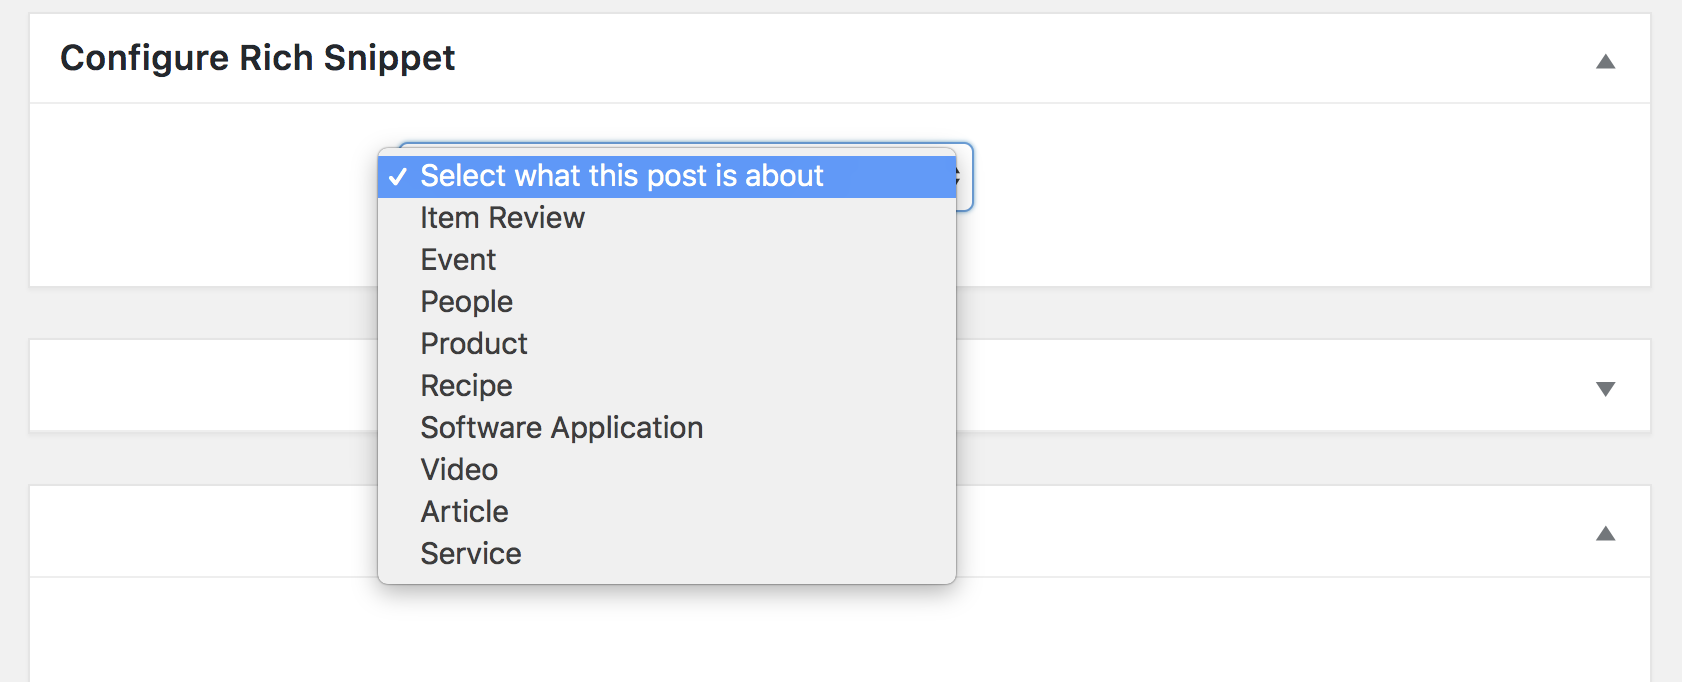
While it doesn’t make much sense to set rich snippets for all pages, it can be beneficial if what you want to publish can be classified as a review, product page, event info, recipe, software info, or service info.
All In One Schema Rich Snippets will allow you to set all of the details:
7.9. Force Crawl Important Content
Whenever you publish anything new, Google will take a while to come around to that new page and index it. This process can be sped up.
Go to Google Search Console → Crawl → Fetch as Google. Input the URL of your new page or post and click on Fetch.
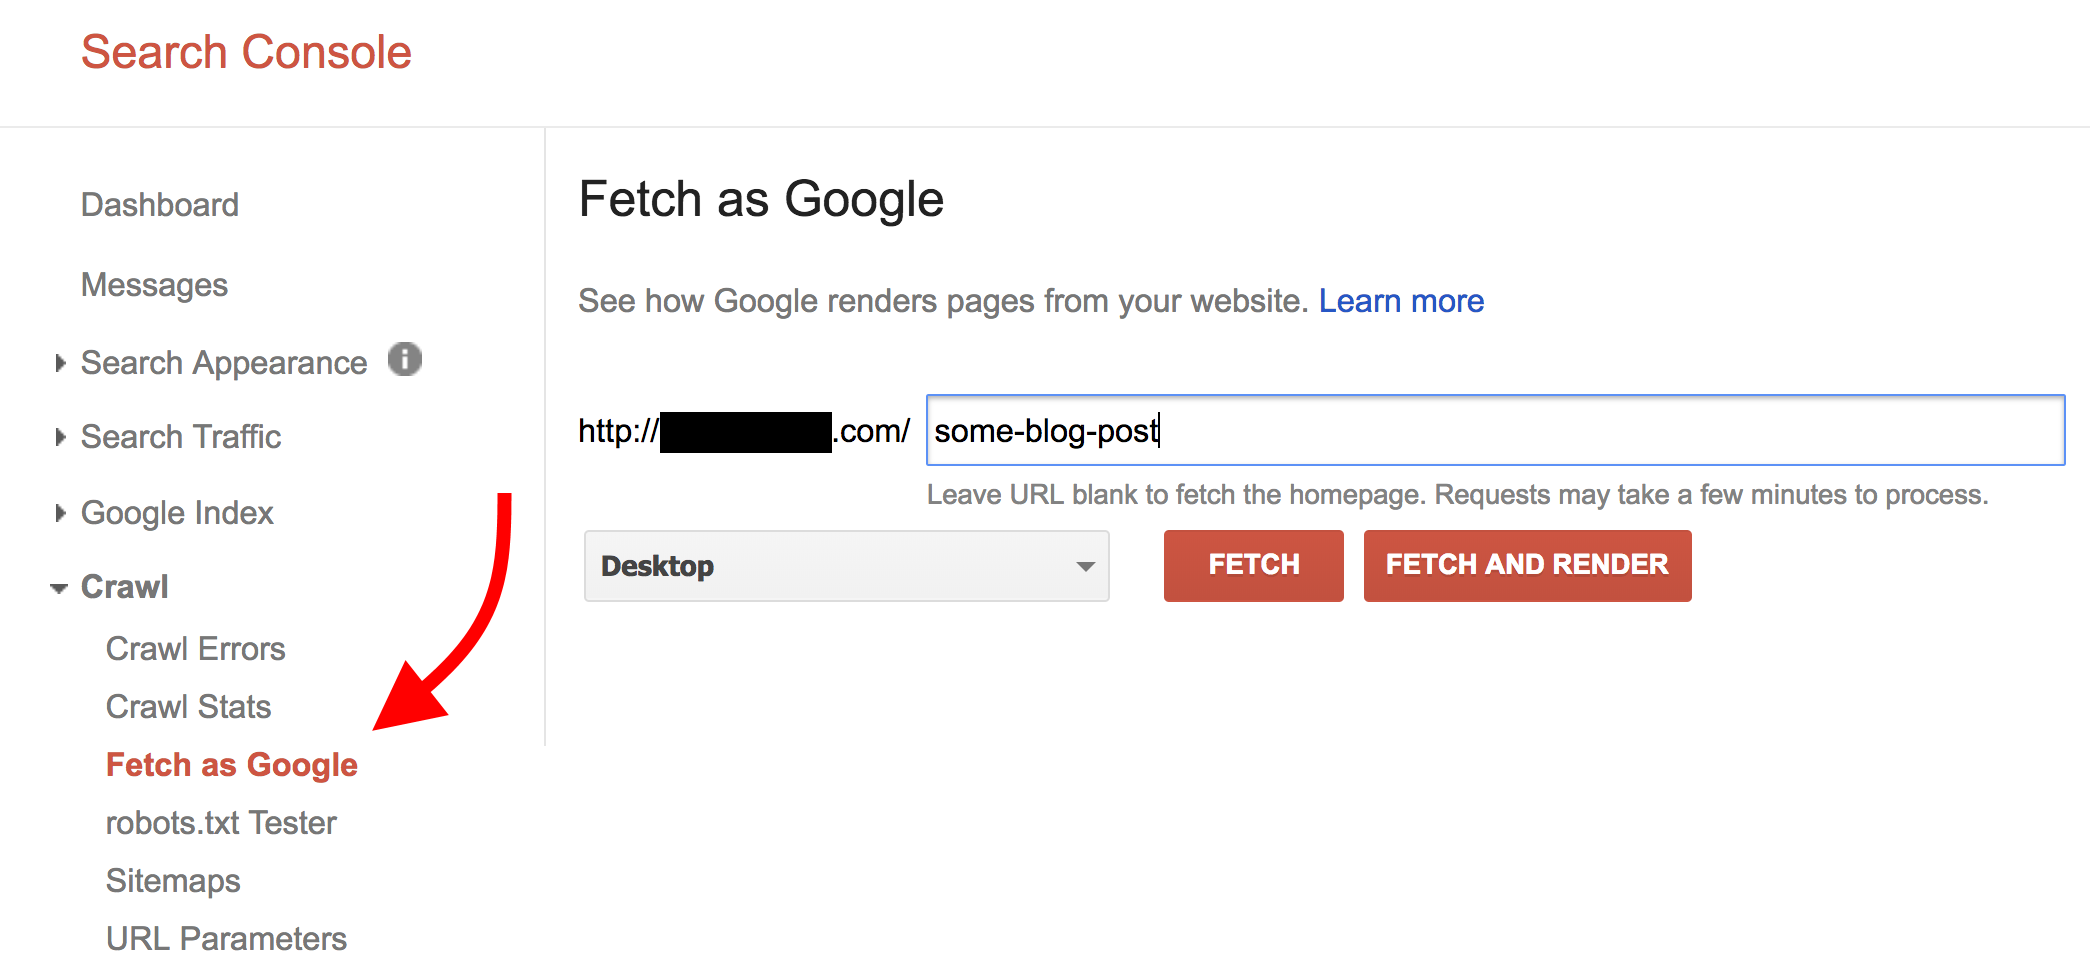
If your page is something Google have never seen, it will be indexed promptly.
8. Go the Extra Mile ?️
Here’s what else you can do to improve your on-page SEO — though it may require some more tinkering under the hood of your site.
8.1. Sign up for a CDN
CDN stands for Content Delivery Network. It’s basically a network of servers that all hold a copy of your website, and then deliver it to your readers from the nearest possible location. This usually results in a massive boost in site speed.
In a standard scenario — without a CDN — your website is hosted on a single web server that’s in some specific location, say in Atlanta, GA. If you then have a visitor from London, England, your website needs to travel overseas to get to them. This will take a couple of seconds too many.
To make the situation better, a CDN network has many servers all over the globe. So, if a UK visitor tries to reach your site, it won’t be served all the way from the US, but instead from the nearest location in Europe.
As we’ve already mentioned in this guide, site speed is significant for your WordPress SEO.
Good CDNs are usually paid-for services. You can expect to pay anything from $20 to $100 per month, although there are free options out there as well. The most notable one being CloudFlare.
8.2. Disable Blog Archives You Don’t Need
Out of the box, WordPress creates a handful of archive pages that you most likely do not need.
There are data-based archives, author archives, category archives and tag archives. While categories and tags are useful for some sites, the other two aren’t crucial.
If you run a single-author blog, the author archives generate a lot of duplicate content, which Google don’t particularly like. Date archives create much of the same problem.
The core of the issue is that all of those duplicate content archives ‘dilute’ the SEO value of your website.
Yoast SEO allows you to disable unneeded archives with a couple of clicks. To do that, go to SEO → Search Appearance → Archives tab.
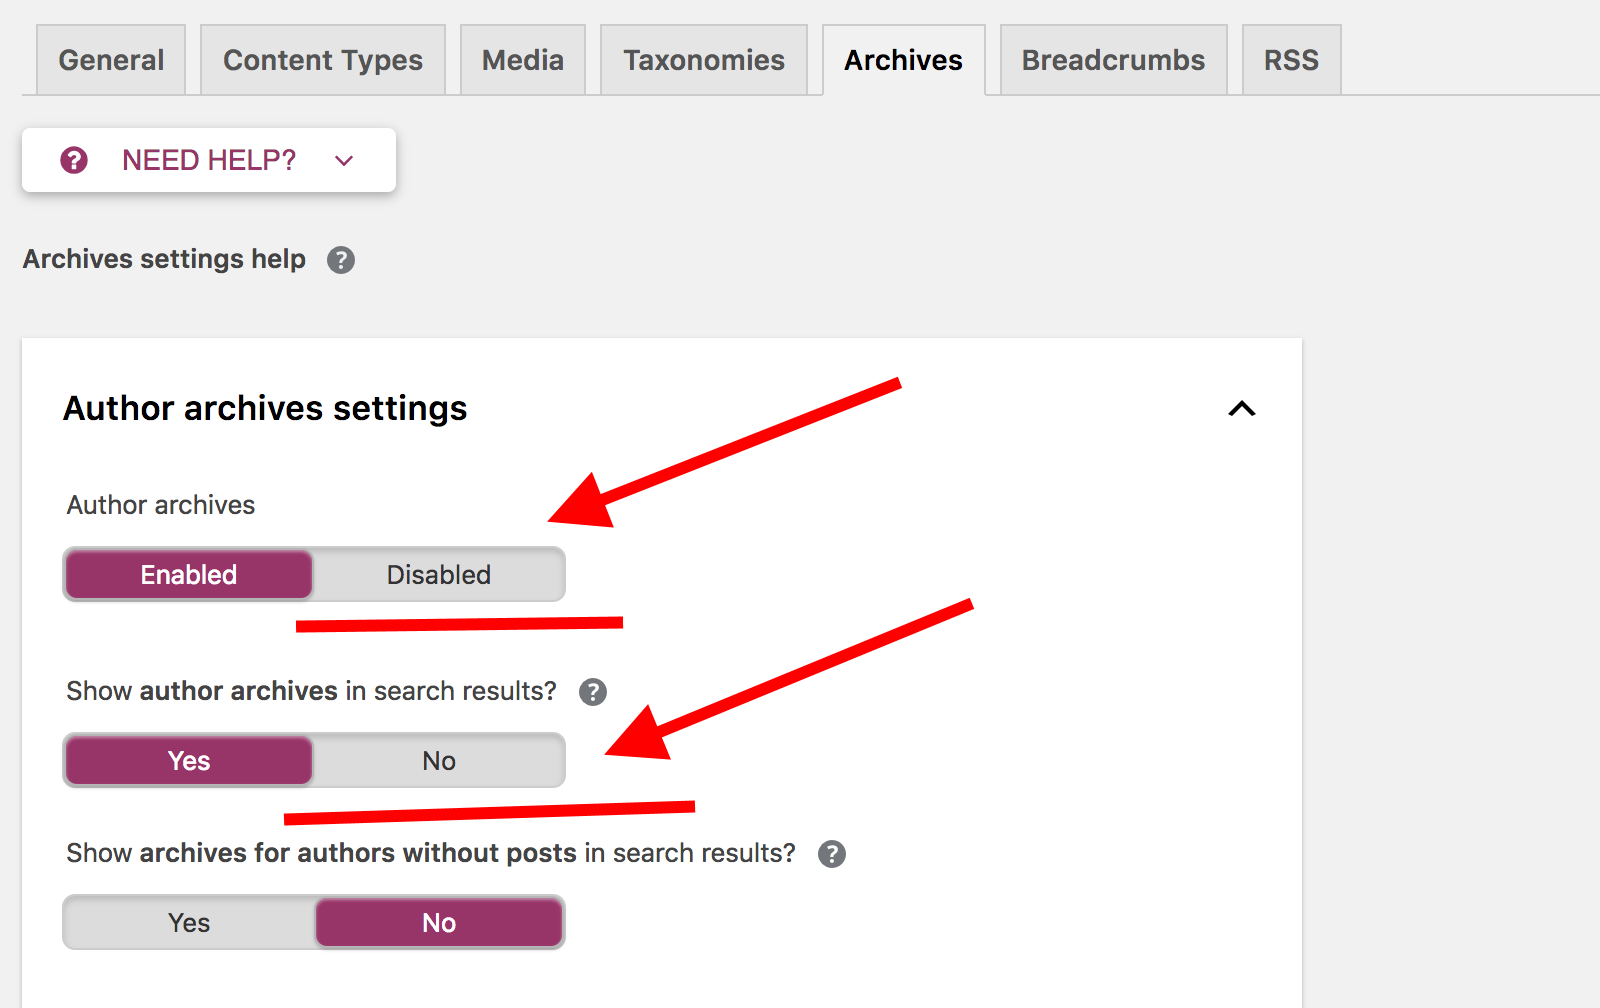
If there are more authors on your site, you may want to leave the author archives intact.
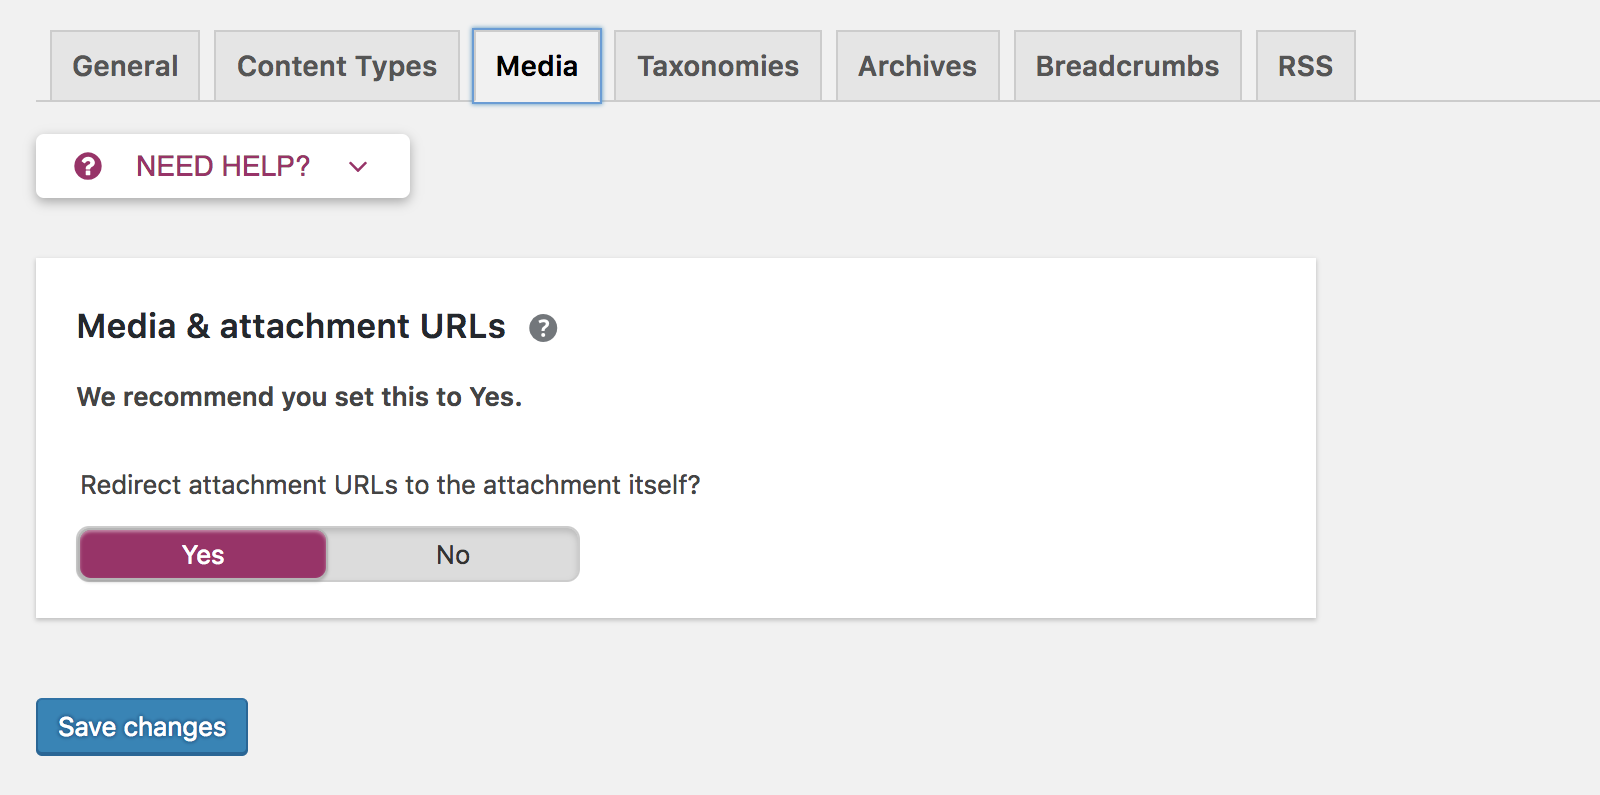
8.3. Prevent the Indexing of Image Attachment Pages
There’s a funny thing that happens whenever you upload a new image to your WordPress blog.
Apart from making the image available in the media library and letting you add it to your posts or pages, WordPress also creates a separate attachment page for that image. It’s a page that features just that image and none of your blog content around it.
The problem is that Google will index those pages. So, sometimes, when looking up relevant terms, people can end up on your attachment page and not on your blog post or page, which would be preferable.
Luckily, you can prevent indexing those attachment pages, and instead redirect all rank to their parent posts.
To do so, go to SEO → Search Appearance → Media tab, and check the following box:
8.4. Update Your Content Regularly
‘Freshness’ is now a known ranking factor. In simple terms, the more recent your piece of content is, the better it’ll rank.
Of course, with tens or even hundreds of posts live on your site, it is near impossible to keep them all updated, especially if you’re a one-person band.
Start by going to your Google Analytics and getting a list of your top visited pages/posts from the past 12 months. You can get that list if you go to Behavior → Site Content → All Pages:
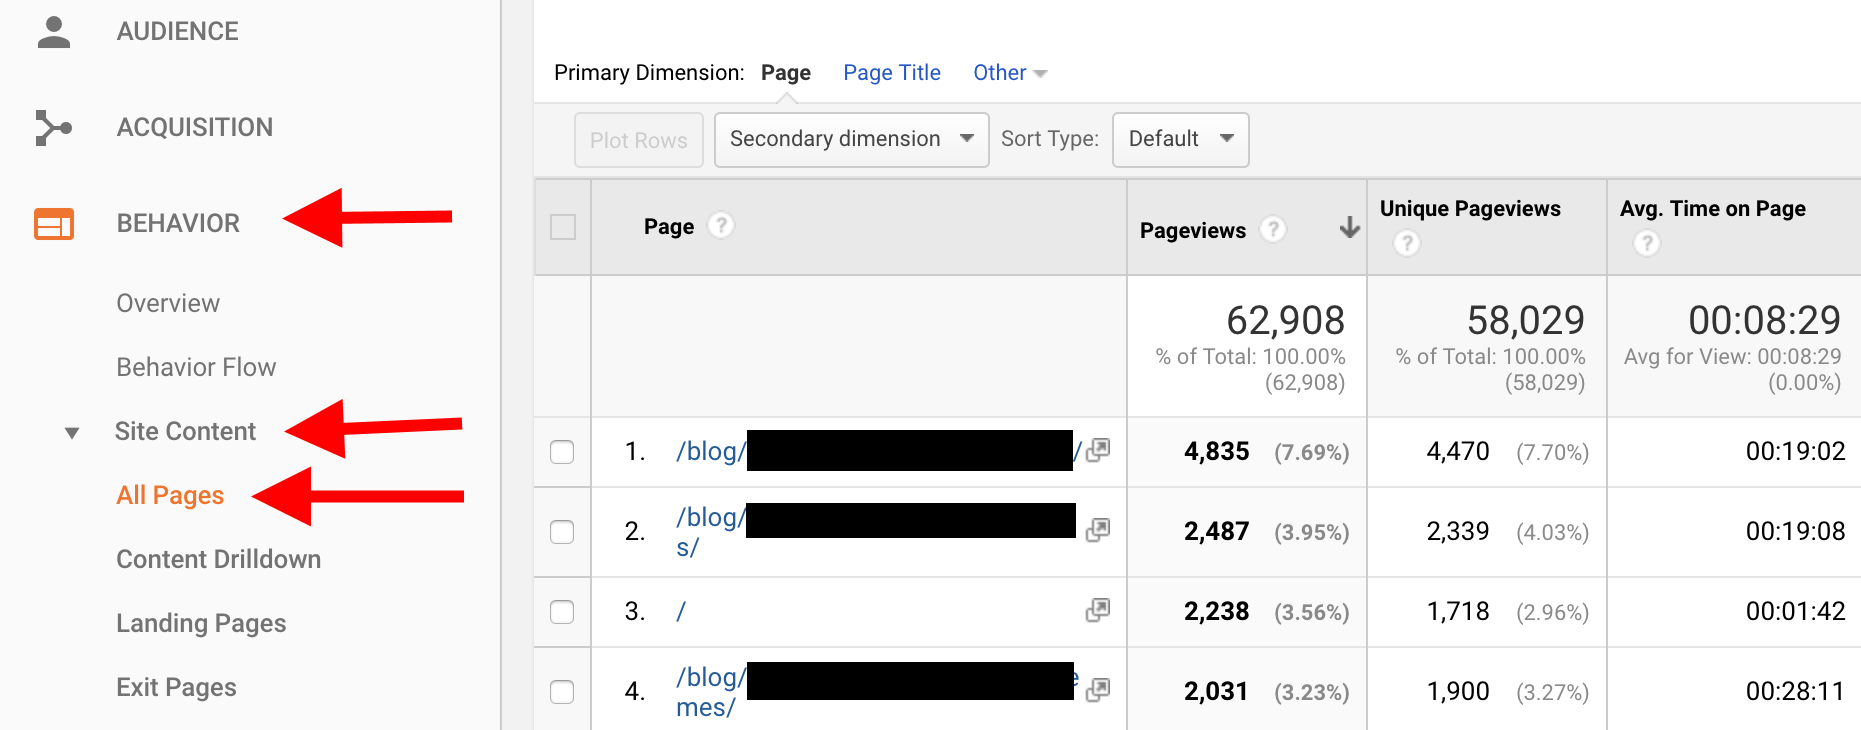
Then, go through, say, the top ten, and make an effort to update each post at least once a month.
Keeping the content fresh often gives you the edge you need to beat your competition.
8.5. Update Your Internal Links Regularly
Apart from updating your content, you should also work on improving your internal linking structure in older posts.
Quite naturally, back when you published those older posts, you only linked them to the posts that were already online at that time.
It’s a good idea to go through your archives and make sure your newer posts are linked to just as frequently.
A good starting point is to first focus on your top 20 most visited older posts (posts published more than a year ago). You can find those in GA easily.
Do this at least once every two months.
The key value here is that your better-ranking older posts can really help out your new content and boost its authority through those interlinks.
8.6. Use AMP for Mobile
AMP — Accelerated Mobile Pages — is a concept that was introduced by Google back in 2016. The idea is to optimize mobile viewing to the max by providing really simplified versions of web pages that load lightning fast and put the spotlight on content, while doing away with most of the visual elements that might otherwise be on the page.
AMP for WP is a plugin that lets you enable this on your WordPress website. It offers a range of settings and options that let you control the way your website looks through AMP.
Experiment with these settings, and see what’s possible as you go through the panels.
I once again want to emphasize that today’s SEO is all about mobile. I really can’t stress that enough. With Google’s mobile-first ranking, it’s basically impossible to get your website to rank these days if it doesn’t look good on mobile.
…
This sums up the essentials of WordPress SEO as they relate to your on-page optimizations. Next, off-page SEO:
Chapter II: Getting Started with off-Page SEO
Here’s what you can do outside of your site to make it rank better:
a) Get the Ball Rolling with Initial Shares ?
As mentioned earlier in this guide, social media popularity is a strong indicator as to how attention-worthy your piece of content is. And it makes sense — after all, if a lot of people share certain content, then it must be important, valuable, newsworthy or entertaining. Therefore, Google want to make it visible, too.
However, to get the ball rolling, you first need to share your new content yourself.
This really goes a long way and shouldn’t be underestimated.
- Tweet about your new post. Instead of just tweeting out the headline as-is, use relevant hashtags or even incorporate some popular Twitter hashtags. Here’s how to find those.
- Share your post on Facebook. Same thing here — instead of just using the headline, write a short description of what the post is and what it discusses. You can make that more elaborate on Facebook than on Twitter. Aim at striking up a conversation, and not making it look like a pitch. Adding an image or a GIF to your share can also make it more visible (more info on that).
- If your site is in a Pinterest-worthy niche, create a pin and add it to relevant boards. If you’re in DIY, cooking, beauty, health, fitness, art, or basically anything where quality visuals go a long way, use Pinterest to your advantage. Here’s more on how to use Pinterest for SEO.
The aim with this step isn’t to populate social media with your content falsely, but to plant a seed and encourage some first shares. Even a couple of shares are much better than none at all.
b) Get Links from Quora ?
Quora is my favorite questions-and-answers website. It’s a place where anyone can go and ask any question. Then, the community chips in to try to answer it.
What’s cool about Quora is that there’s also a lot of famous people there. For instance, I bet the author of this question didn’t expect Reed Hastings, Netflix CEO, to step in and answer.
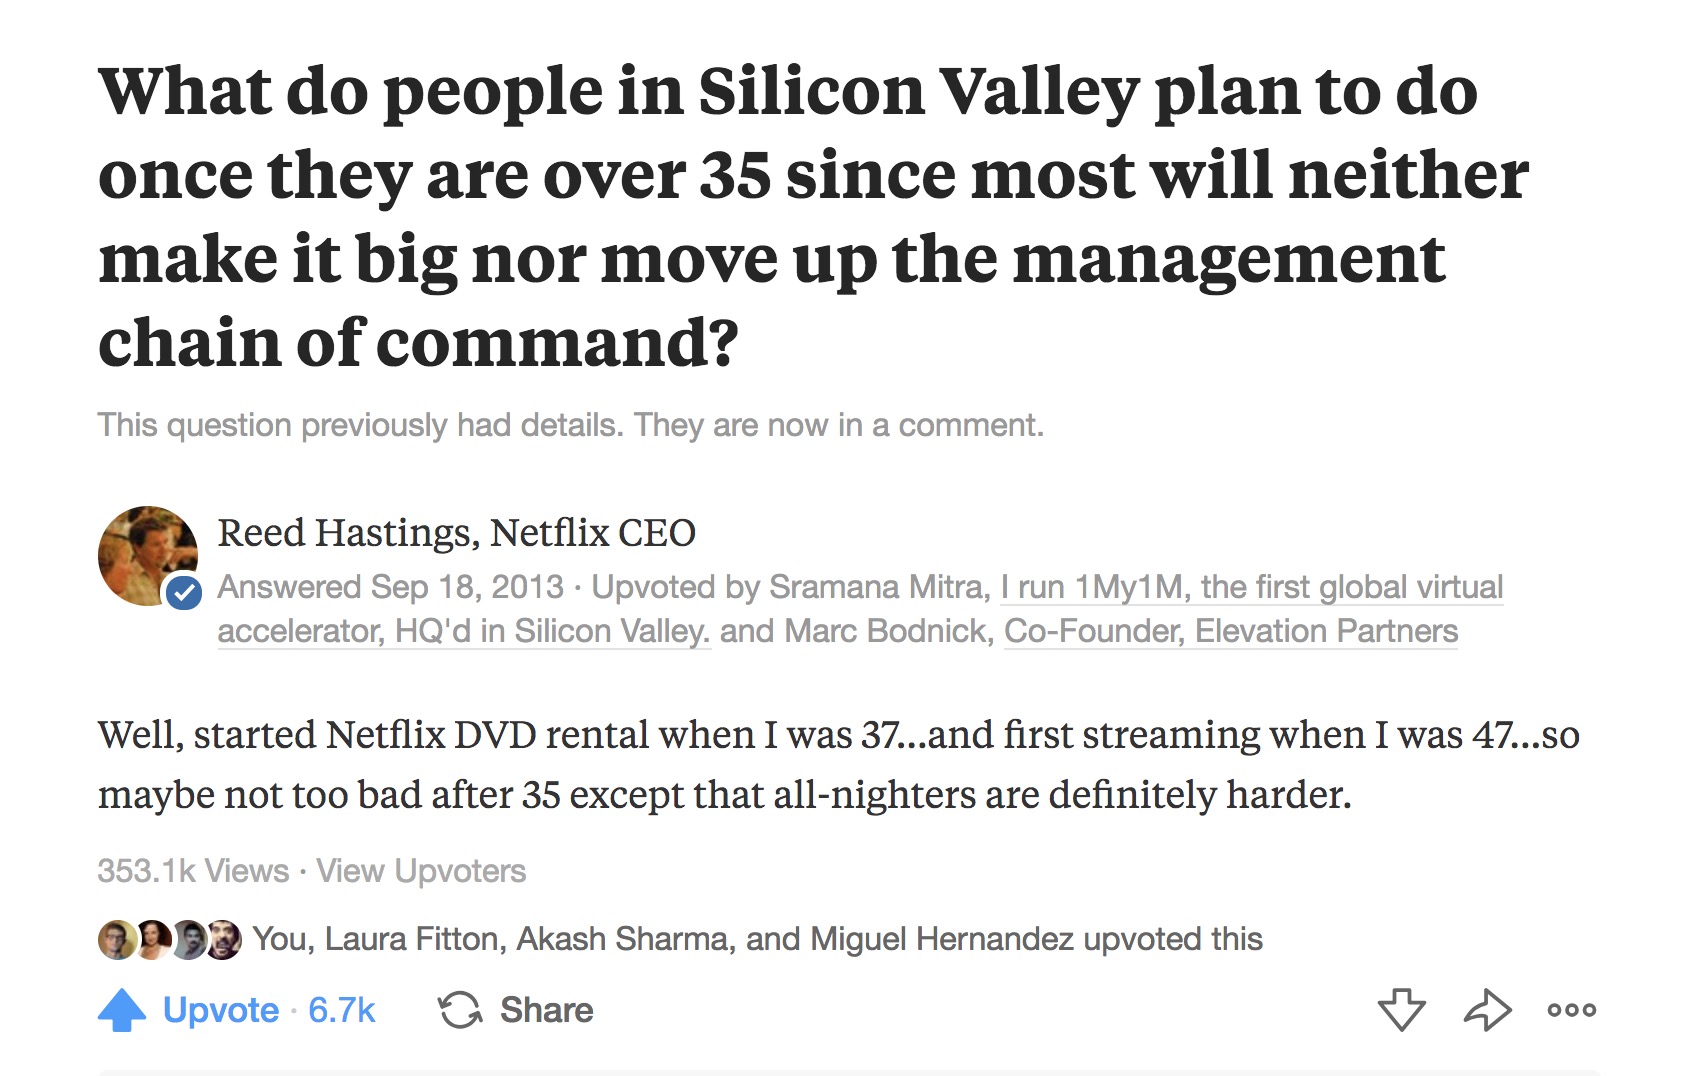
But you don’t need to be famous to use Quora for your site’s benefit.
Here’s what to do:
- Go to Quora and look for questions that are related to what your blog is about.
- Try answering the question genuinely, providing real insights.
- At the end of your answer, link to a relevant article on your site for more context.
To make your answers more visible, use images alongside.
c) Submit to Social News Sites ?️
Sites such as Hacker News, GrowthHackers, Designer News, Product Hunt, ManageWP.org and so on, can be great at getting the word out about your new content. There are sites like these in many niches, so just find the one that’s the most popular in yours and join it.
Important! Don’t use the site to only share your own content. You’ll get banned. Instead, genuinely take part in the community, read other people’s content, vote it up, and so on. Submit your stuff only every once in a while.
d) Join Facebook Groups ?
There’s a Facebook group for everything. Scratch that — there are multiple groups for everything.
For instance, interested in long-term rental in Barcelona? Here you go. Interested in Paleo recipes in Polish? Here you go.
Joining some of the top groups in your niche can do wonders for your content.
The strategy is similar to the one for social news sites. Go in, participate, share your content only rarely.
e) Reach out to People You’ve Mentioned ?
Whenever you link to an external source from within your article, reach out to that person/website on Twitter or via email and let them know about the fact.
You don’t need to be promotional or anything. Just say something like, ‘Hey, I just mentioned you in my new blog post at http://URL. Cheers!’
The simpler the message, the more likely someone will read it and be curious enough to check out your post. If they like it, they will share it with their followers.
f) Reach out to Your Network ?
If the piece of content you have at hand is a really quality one, and can be considered your cornerstone content, then you should absolutely share it with your network of contacts.
Send them a simple email, let them know about what you’ve published and invite them to check it out.
However!
Do this very sporadically. You don’t want to be emailing people about every single piece of content you publish. You’ll just get banned from their inboxes and damage the relationship.
g) Tag Influencers on Twitter ?
Every niche has its influencers. Sometimes, they’re actually influential; sometimes they’re not.
Either way, they may be worth tagging on Twitter.
For example, if there’s someone in your niche who’s a true superstar then, by all means, send out a tweet to them mentioning your new content, and also use relevant hashtags.
Here’s the kicker. Don’t actually expect that person to read or retweet — they’re far too busy. What you do want is to get the attention of their followers, so they get a chance to read your content.
h) Guest Post ✍️
This is the most labor-heavy method on the list, but also perhaps the most valuable in the long term.
Guest posting is about writing an original blog post, and then pitching it to other bloggers for publication.
Here’s how it usually plays out:
- Research the blogs in your niche and pick one with a similar audience.
- Brainstorm ideas as to what sort of post you could write for them that would be valuable to their audience.
- Ask the blogger if they’re interested in such a thing.
- Write the post and mention one of your own posts by linking to it. Make the mention natural and related to the topic.
- Send the post to the blogger.
I’m oversimplifying here a bit, sorry (here’s a better how-to on guest posting), but you get the gist.
If things go well and the blogger publishes your content, you gain at least two things:
- You get exposed to a new audience that will likely follow your link and read your content.
- You get a valuable link pointing back to your site. Google will notice this link and count it when determining where to rank your site.
You can begin slowly with this method. Doing one or two guest posts a month is an excellent start.
…
All of these off-page methods for WordPress SEO have one main goal in mind — to earn you backlinks. As in, links from other websites pointing back to yours.
Google will treats those links as votes. Basically, it’s like each site is vouching for your content by linking to it. The more votes you get, the higher you’ll rank.
The number and quality of links is still believed to be the most important ranking factor of them all.
What we’re doing here is just getting the ball rolling, so don’t expect to get a huge number of links right from the get-go. But, with time, and as your network and your following grows, you will be getting more and more links from the off-page SEO activities you’re doing.
This summarizes both the topic of on-page and off-page WordPress SEO essentials. Equipped with this new knowledge, there’s nothing left for you to do other than put it all into practice!
The essentials of WordPress SEO: Checklist
Here’s a more actionable WordPress SEO checklist — including everything we discussed in this guide:
Basics:
- Get a good host
- Get an SSL certificate
- Integrate your site with Google Search Console
- Choose between a www and non-www website address
- Set the search engine visibility setting in WP
- Use optimized permalinks
- Get a theme that’s SEO-ready
Install these plugins:
- Yoast SEO
- W3 Total Cache
- Google Analytics for WordPress by MonsterInsights
- All In One Schema Rich Snippets
- Broken Link Checker and then check for broken links regularly
- Smush Image Compression and Optimization
- Share Buttons by GetSocial.io
Content:
- Do keyword research for every new post/page you publish
- Optimize the title and description of your homepage
- Write content that’s at least 1,500 words long
- Include your keyword in: Headline, meta title & description, subheadings, URL, body of the post
- Use images with alt tags containing your keyword
- Interlink your content
- Link to external sources
- Use rich snippets where it makes sense
- Force crawl important content
Extra mile:
- Sign up for a CDN
- Disable blog archives you don’t need
- Prevent the indexing of image attachment pages
- Update your content regularly
- Update your internal links regularly
- Use AMP for mobile
Off-page:
- Get the ball rolling with initial shares
- Get links from Quora
- Submit to social news sites
- Join Facebook groups
- Reach out to people you’ve mentioned
- Reach out to your network
- Tag influencers on Twitter
- Guest post
How happy are you with your current WordPress SEO efforts? Are you struggling with anything in particular? Feel free to share in the comments.


All comments are held for moderation. We'll only publish comments that are on topic and adhere to our Commenting Policy.