
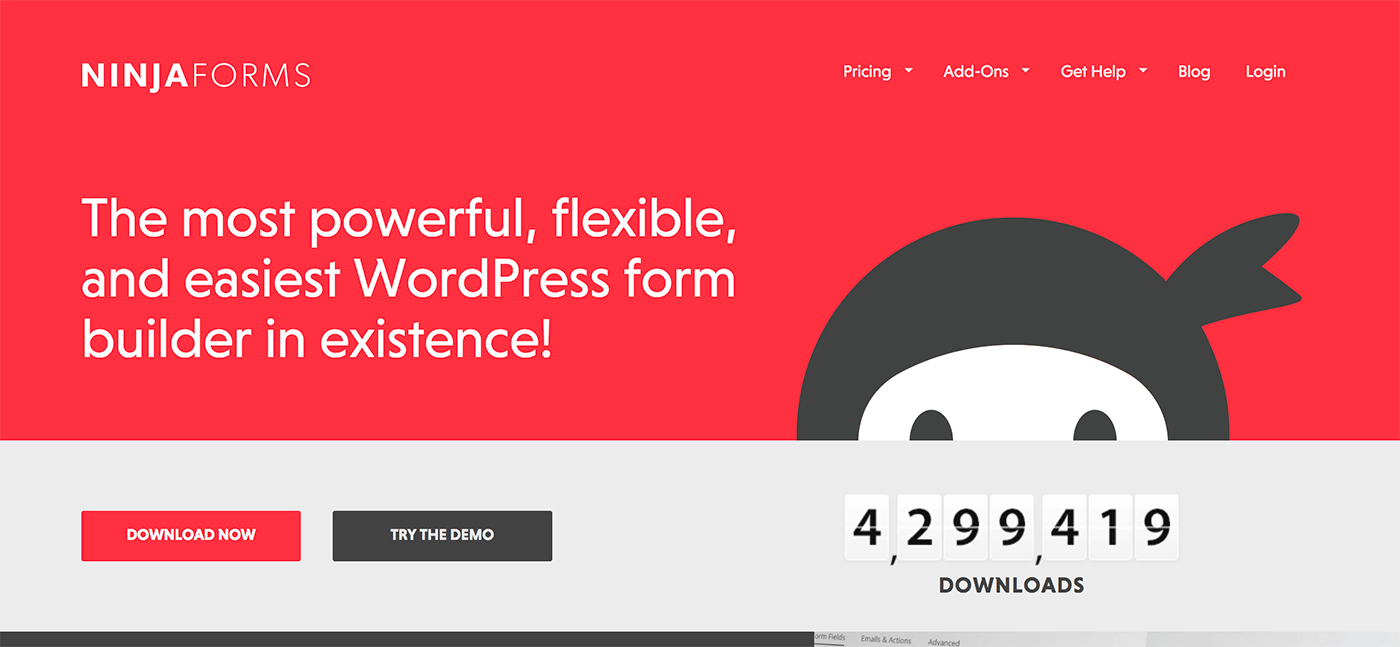
Ninja Forms Free vs Ninja Forms Premium – Is It Worth Paying Extra?
- By
- 2 Comments
If you’re looking for the best way to add forms to your WordPress website, Ninja Forms is a name you’ll almost certainly come across — if you haven’t already!
Below, we’ll be covering both the free and premium versions — comparing the two in detail and exploring their various features to see whether or not the premium version is a product worth paying for.
Table of Contents
- Ninja Forms 3 Update
- What Can Ninja Forms (Free) Do?
- Add a Contact Form to Your WordPress Website
- Publish a Quote Request Form
- Build an Event Registration Form
- Create Custom Forms with the Ninja Forms (Free) Fields
- Ninja Forms (Free) Form Customization Options
- Ninja Forms (Free) Drag-and-Drop Form Builder
- Form Submission Handling
- Form Submission Confirmation and Redirection
- Other Features of Ninja Forms (Free)
- Ninja Forms Premium Upgrade Options
- Layout and Styles Addon
- Conditional Logic Addon
- Other Ninja Forms Premium Addons
- Ninja Forms Pricing Options
- Final Thoughts
Ninja Forms 3 Update
Before we get to the real meat of the article — whether you should upgrade from the free to the premium version — it’s worth mentioning the release of Ninja Forms 3. As part of this latest major update, the Ninja Forms user interface has been completely rewritten and redesigned, introducing a new-and-improved drag-and-drop form builder, more intuitive form settings and controls, upgraded form submission options and actions, and lots more.
Because of this upgrade, if you’ve not used Ninja Forms for a while, now is a great time to reacquaint yourself with this powerful WordPress forms plugin — and if you’ve never used Ninja Forms, now is the perfect time to start!
What Can Ninja Forms (Free) Do?

With freemium plugins such as Ninja Forms — where the core functionality is available for free and paying more for commercial upgrades unlocks premium features — it’s understandable to be skeptical. Does the free version offer any real value, or is it just there to steer you towards a paid product?
The good news is that if you simply want to add a contact form to your WordPress website, the free version of Ninja Forms is more than capable. Furthermore, it’s able to do a lot more, and may well meet all your online form requirements. With Ninja Forms, another benefit of the freemium model is that you can test the user experience before you buy.
To help you decide whether you’ll need to upgrade to the premium version of Ninja Forms, before exploring the features you’ll need to pay to access, let’s look at what the free Ninja Forms plugin can do.
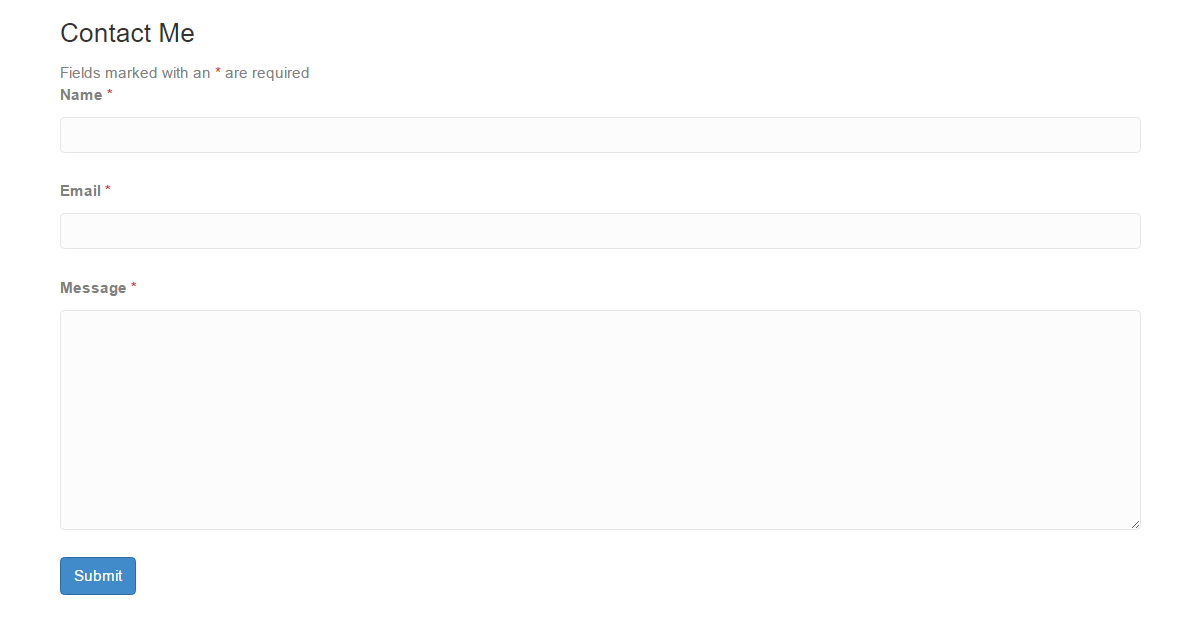
Add a Contact Form to Your WordPress Website
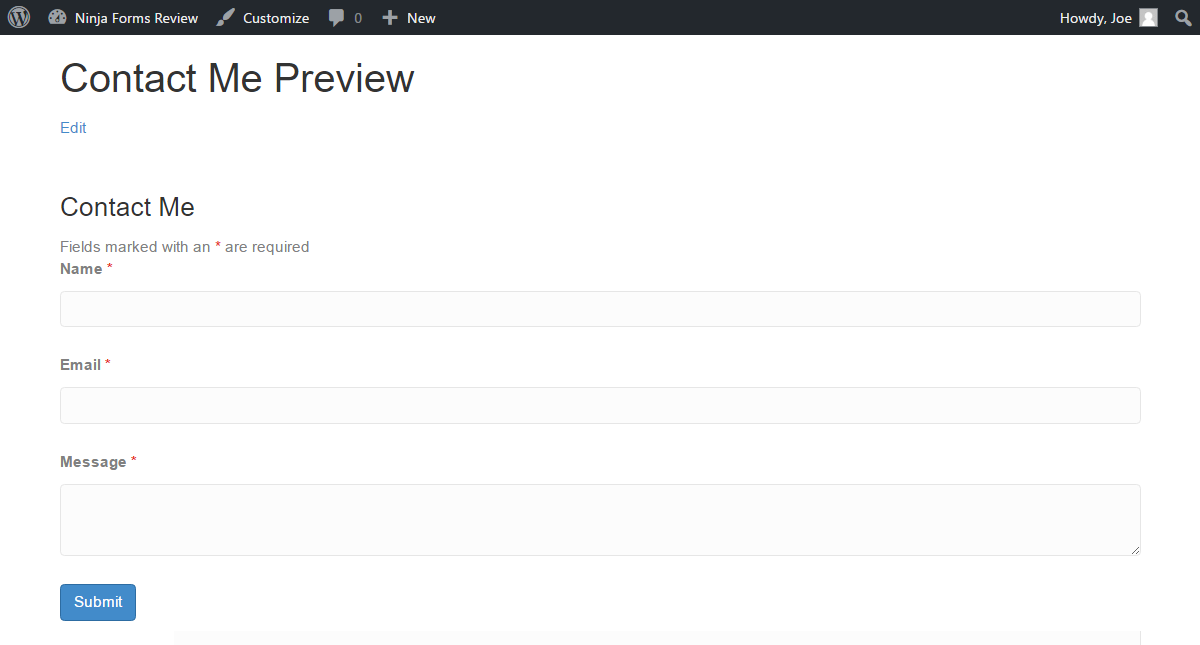
After activating Ninja Forms (Free), a prebuilt contact form is added to your WordPress website. This contact form includes the basic fields required by most forms of this type.
By default, form submissions are stored in your WordPress database for easy access through your WordPress Dashboard, and are also sent to the email address associated with your WordPress user account. We’ll cover the other actions that can be performed after a form submission in the Form Submission Handling section of this comparison. However, out of the box, the two most useful options are enabled by default.
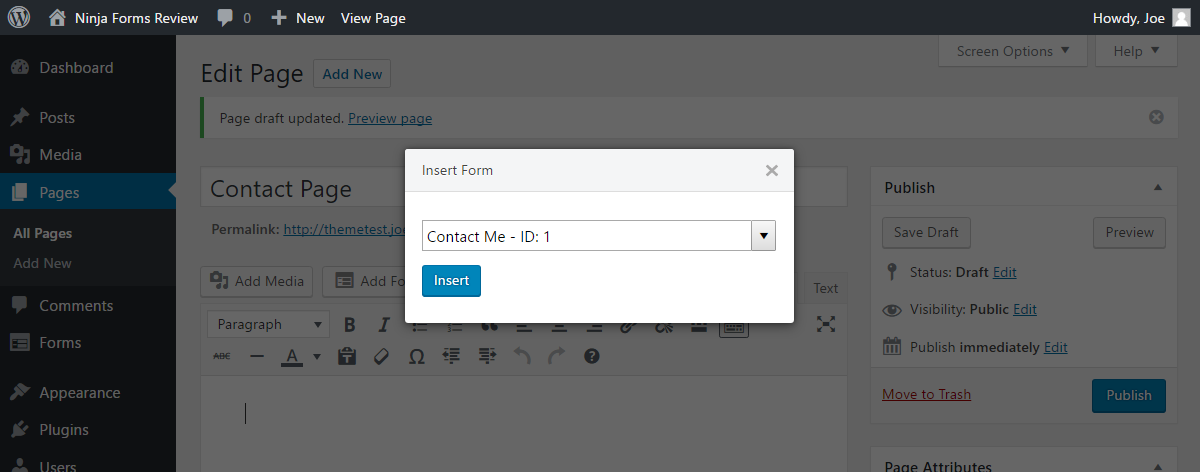
Because of the Add Form button the plugin adds to the WordPress Editor, inserting forms into your posts and pages is very straightforward.
The plugin’s ease of use and preconfigured contact form make the free version of Ninja Forms a highly recommended and efficient way to add a contact form to a WordPress website. Moreover, thanks to the features and functionality of Ninja Forms (Free), you can do a lot more with this plugin before you’ll need to upgrade to the premium options.
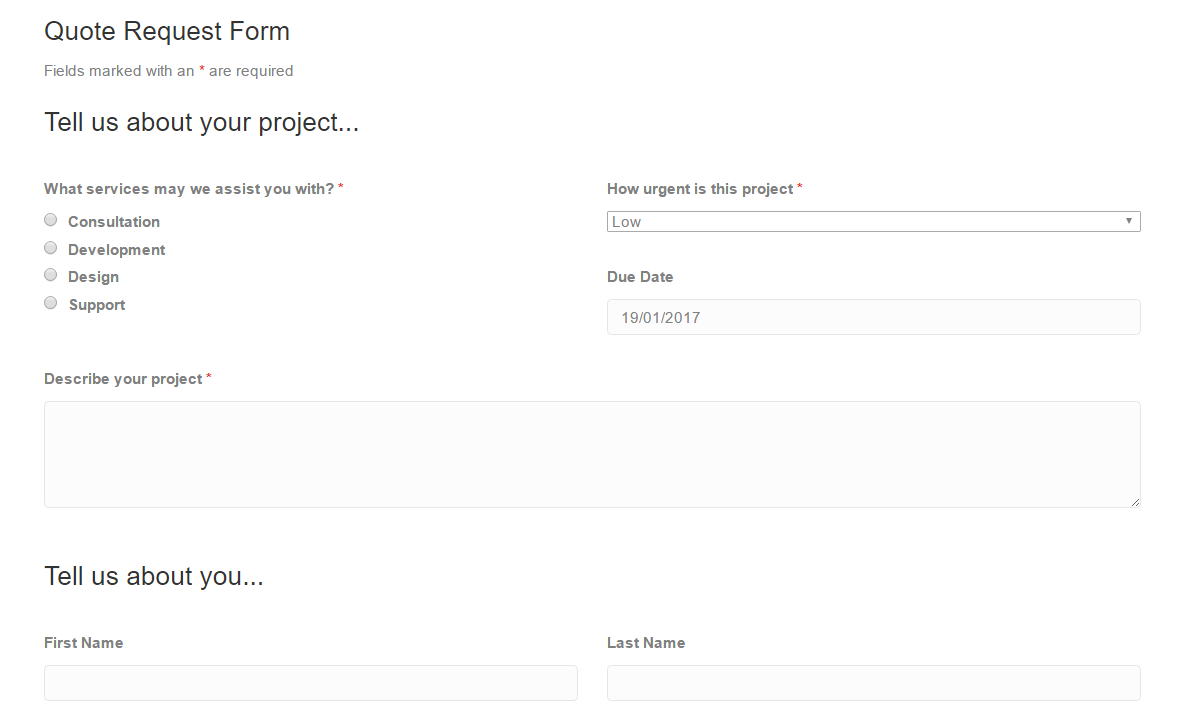
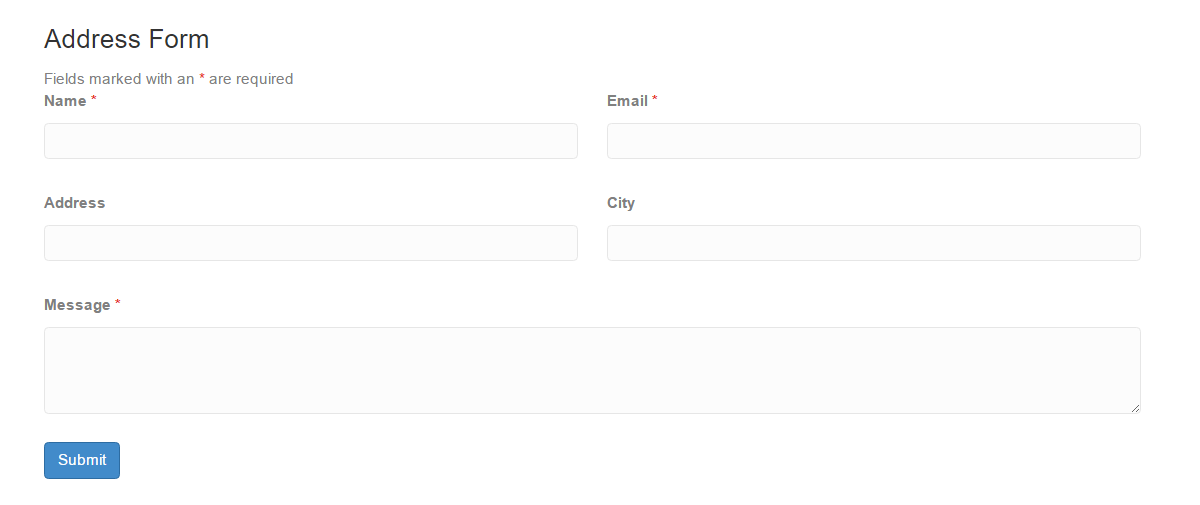
Publish a Quote Request Form
The free version of Ninja Forms also includes the Quote Request form template. If you use this template, you should have no trouble adding a quote request form to your WordPress website. Alternatively, you could use this template as a starting point for your own custom forms.
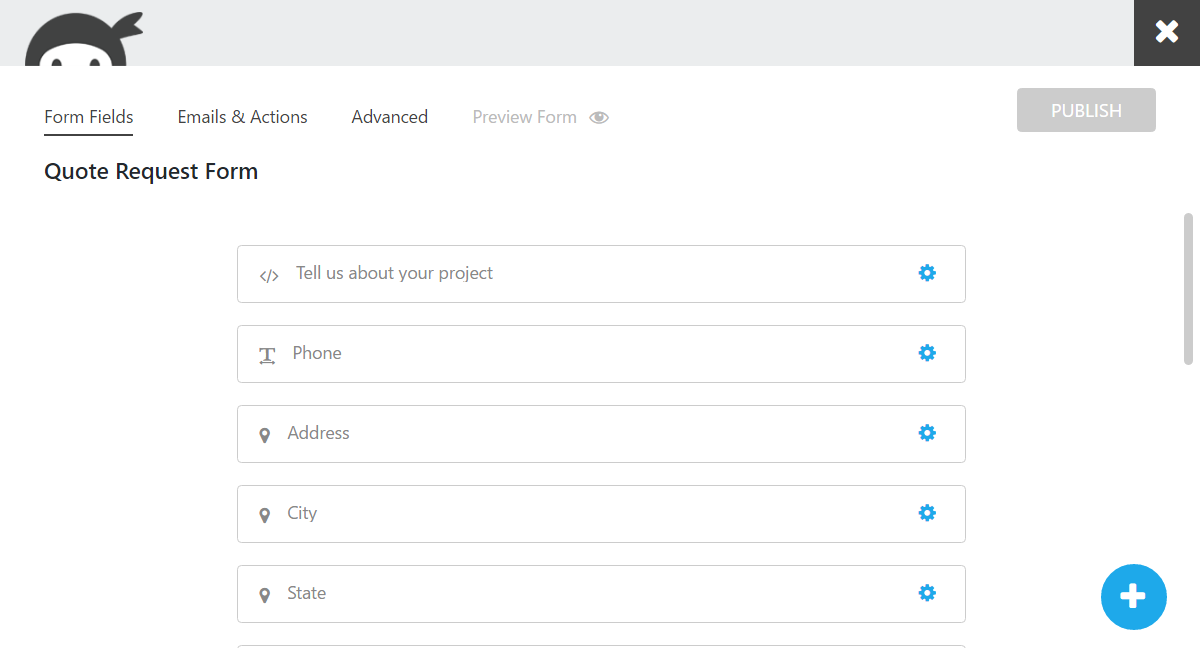
The Quote Request template will help you collect all the information you need from prospective clients and customers. This template makes great use of many of the form fields available to users of the free version of the plugin.
We’ll examine the user experience and functionality of the Ninja Forms drag-and-drop form builder soon, but, simply put, the form builder makes it very easy to add, remove, and edit the fields of the templates.
Build an Event Registration Form
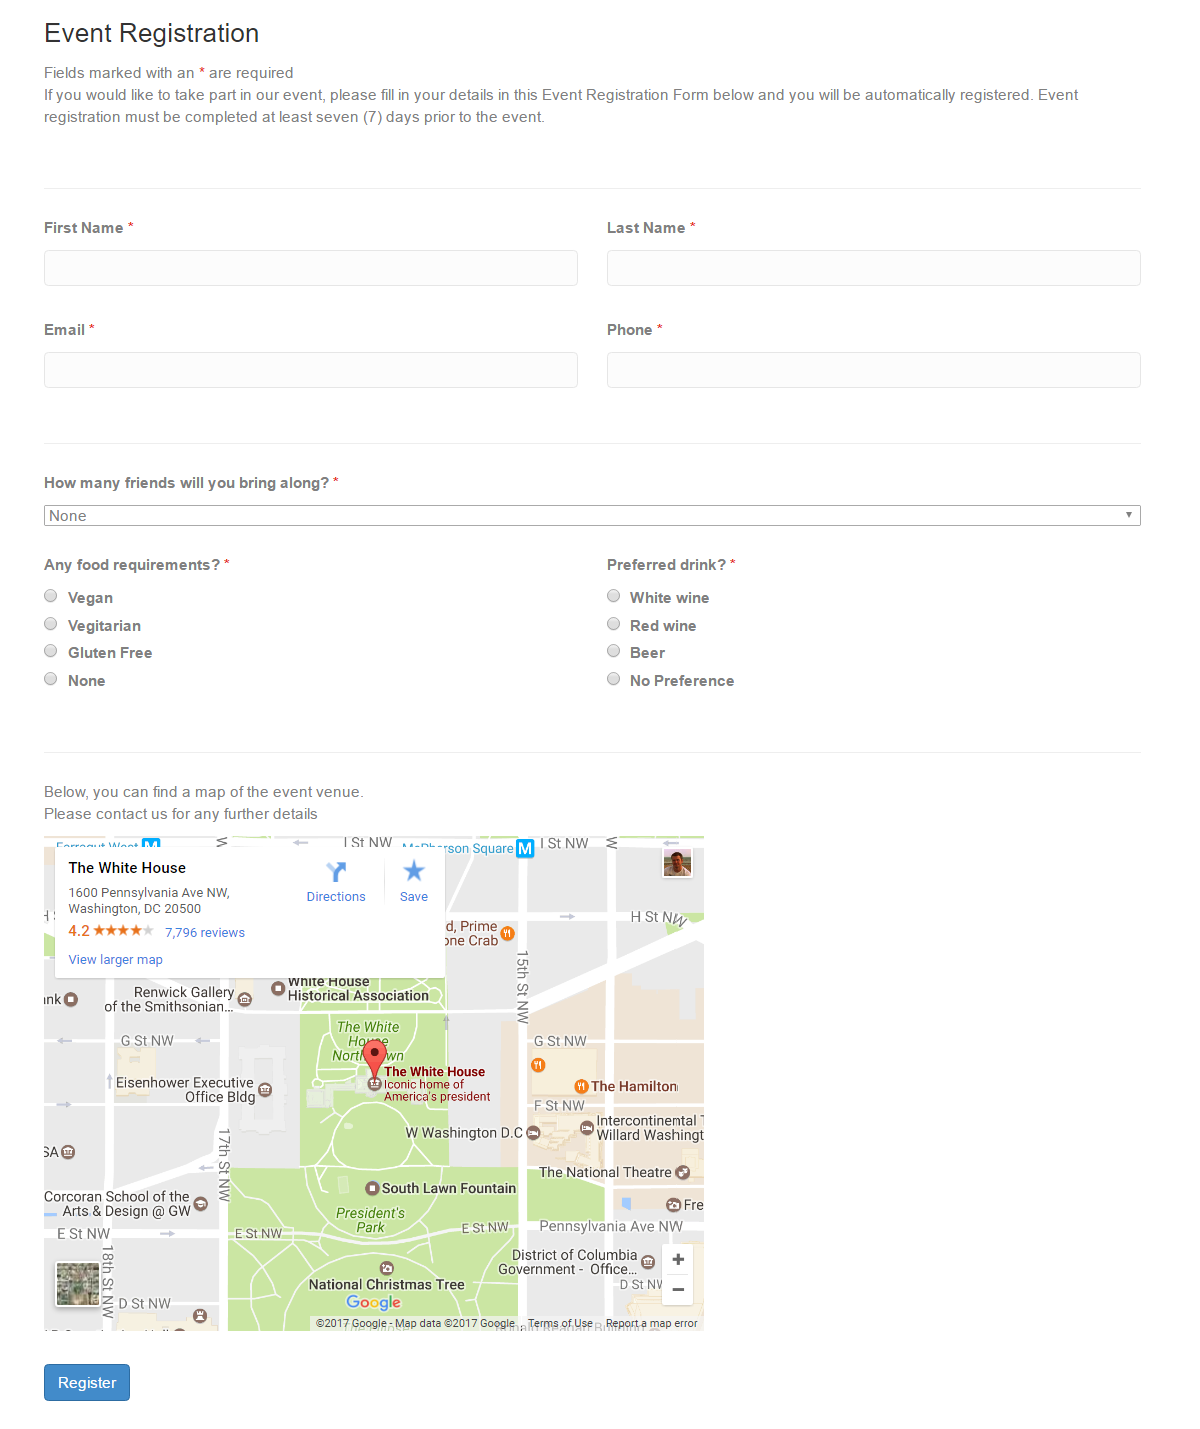
The third and final Ninja Forms (Free) template gives you a quick and easy way to add an event registration form to your WordPress website.
Like the other Ninja Forms templates, this one can also be edited through the builder, and is another great example of what the free version of Ninja Forms can do. However, if you’d like to collect payments from your visitors as part of event registration, you’ll need to purchase one of the Ninja Forms payment-related premium addons.
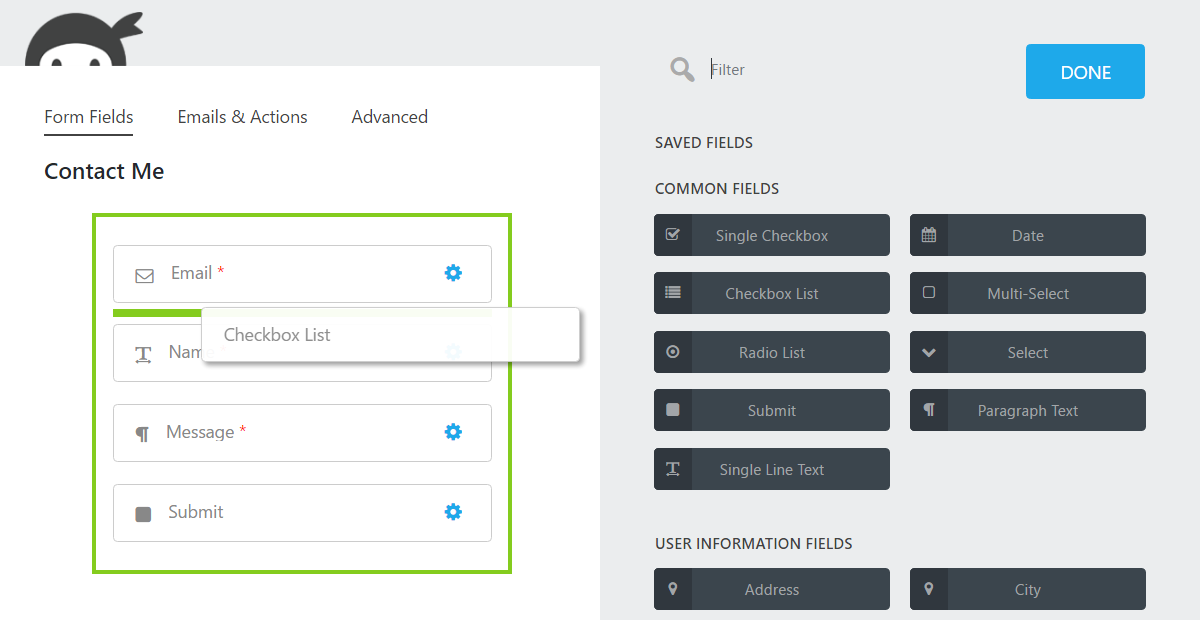
Create Custom Forms with the Ninja Forms (Free) Fields
The free version of Ninja Forms includes an impressive selection of form fields that compare well to the most popular free WordPress form plugins.
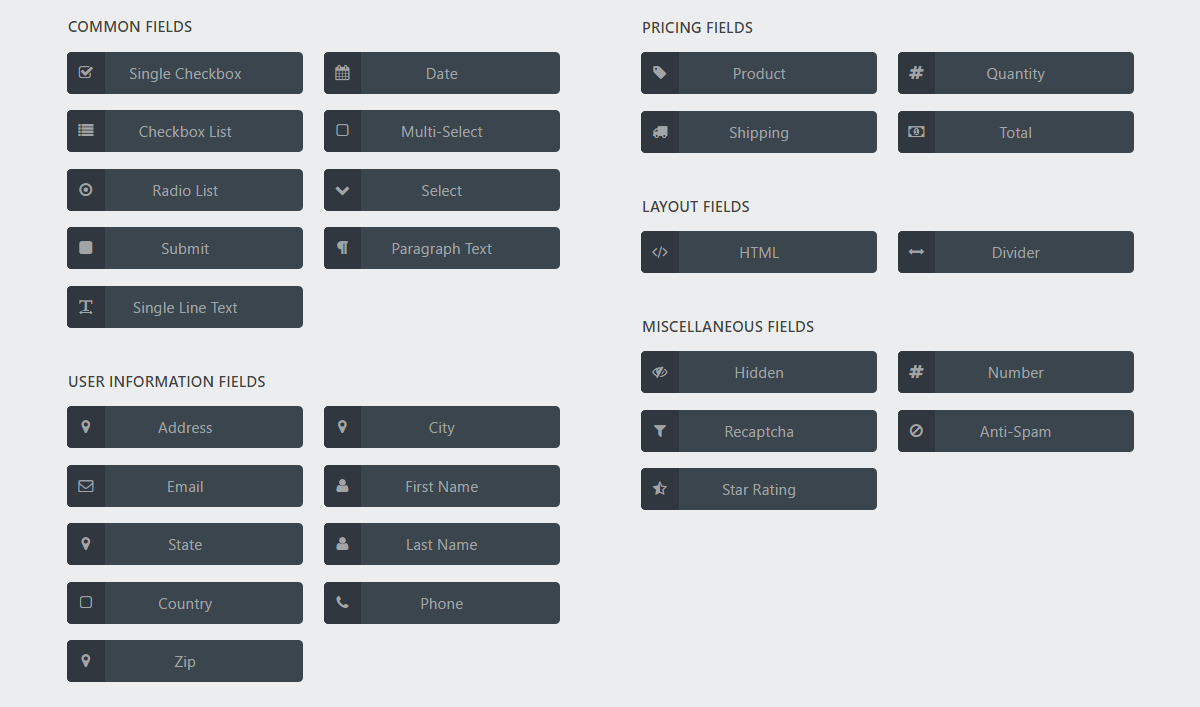
Thanks to these fields, you can easily use the free version of Ninja Forms to design some fairly advanced forms that can include checkboxes, radio lists, dropdown menus, and date pickers. Adding multi-line paragraph text fields as well as single-line text fields is very easy too. The predefined user information fields can save you a lot of time if you need to collect address-related information from your website visitors — simply drag and drop the appropriate options to add fields for city, state, zip, phone, and more.
Ninja Forms (Free) Form Customization Options
Although the good selection of form fields can help you create some varied online forms with the free version of Ninja Forms, customizing the appearance of your forms isn’t as easy.
The good news is that depending on your chosen WordPress theme, your forms should take on the basic styling of your theme and blend in with the rest of your website. However, one drawback of the free version of Ninja Forms is that, when it comes to creating multi-column forms, using custom layouts, and carrying out other changes to the default layout and styling of your forms, you’re limited in what you can do through the builder interface.
While the online documentation does explain how to create custom row and column form layouts, and add custom CSS to your forms, the simplest way to customize your forms is to upgrade and purchase the Layout and Styles extension.
We’ll soon explore the options for upgrading the free version of Ninja Forms to get more control over the appearance of your forms, but, for now, let’s take a quick look at the improved Ninja Forms 3 drag-and-drop form builder.
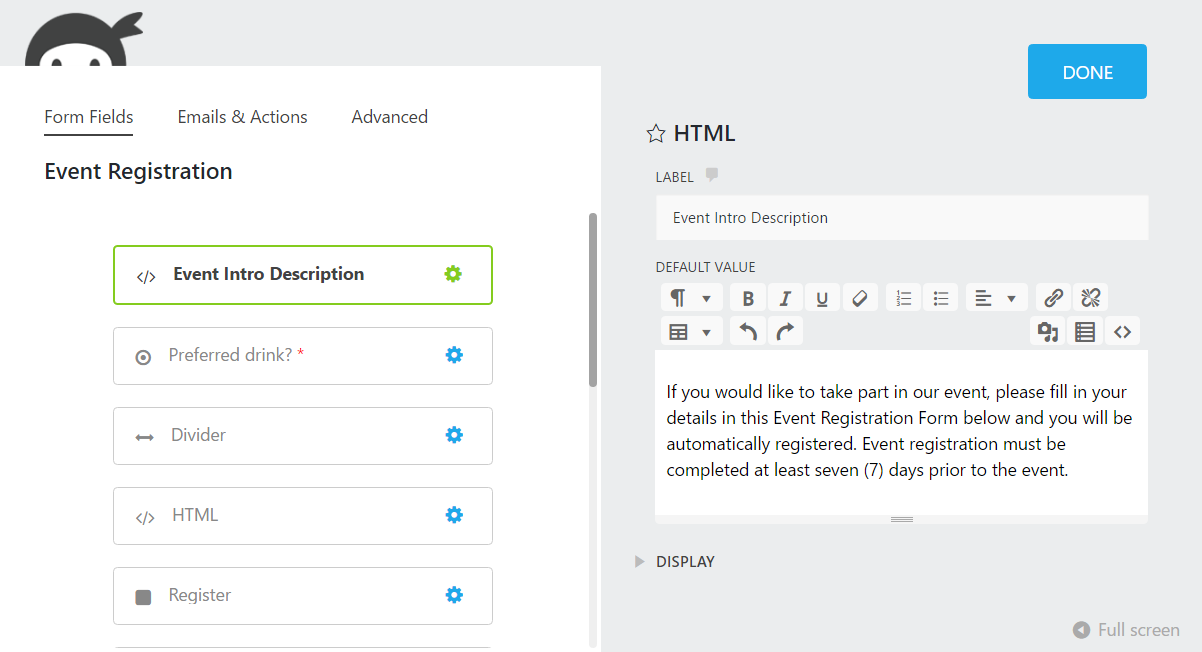
Ninja Forms (Free) Drag-and-Drop Form Builder
As mentioned, the release of Ninja Forms version 3 saw a major update to the form builder user interface. The new and improved form builder brings Ninja Forms in line with modern WordPress forms plugins, such as WPForms, and now features its own intuitive drag-and-drop form builder.
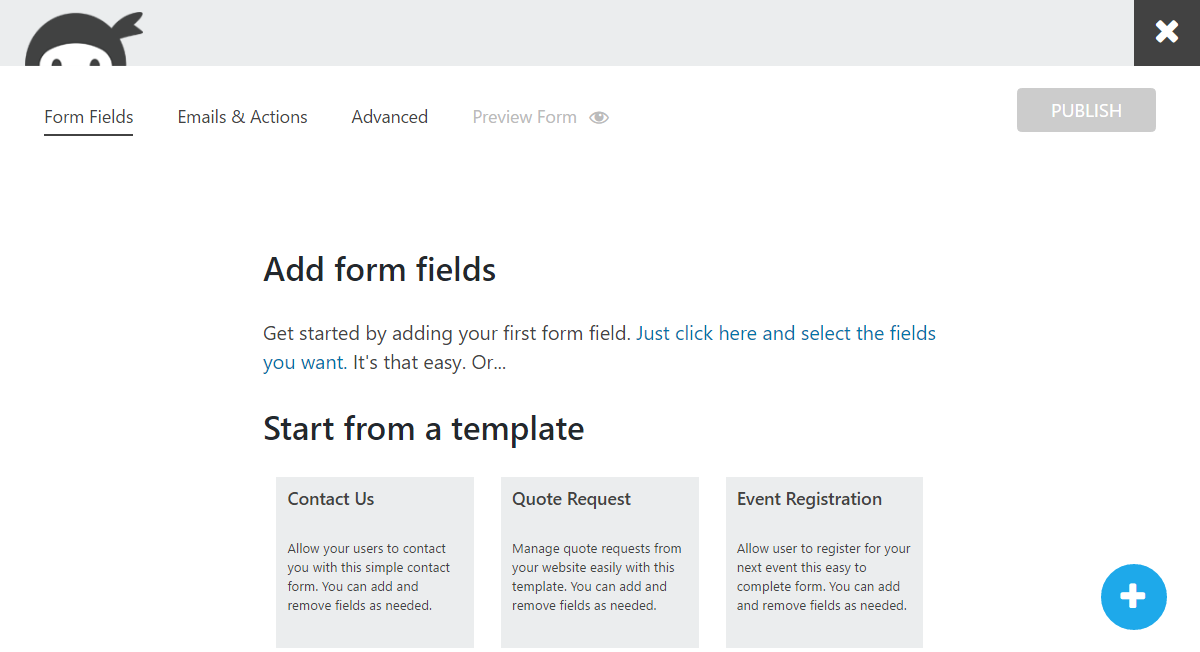
Now, as soon as you hit the Add New Form button, the WordPress Dashboard is replaced with the Ninja Forms builder interface.
At first glance, this replacement of the WordPress Dashboard area could be a little confusing for some because of the temporary disappearance of the WordPress sidebar and admin toolbar, and change of interface. However, the Ninja Forms builder has been skillfully designed, resulting in an intuitive user experience. Having the extra screen space really does make creating forms much more efficient, which makes abandoning the WordPress user interface a worthwhile tradeoff.
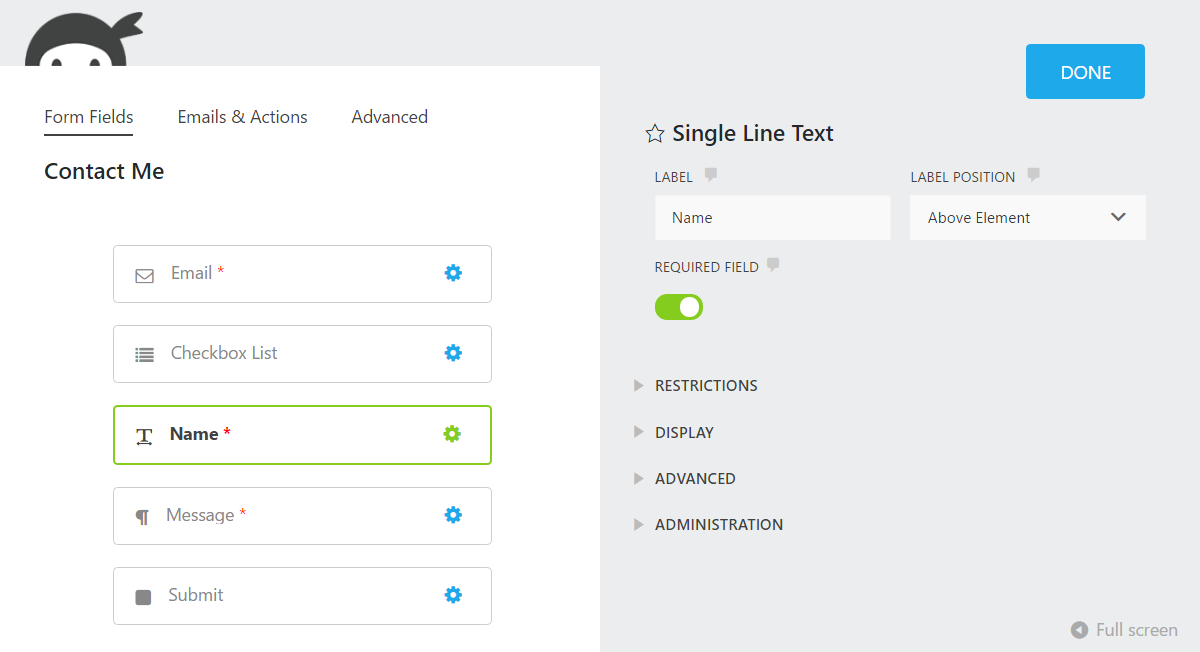
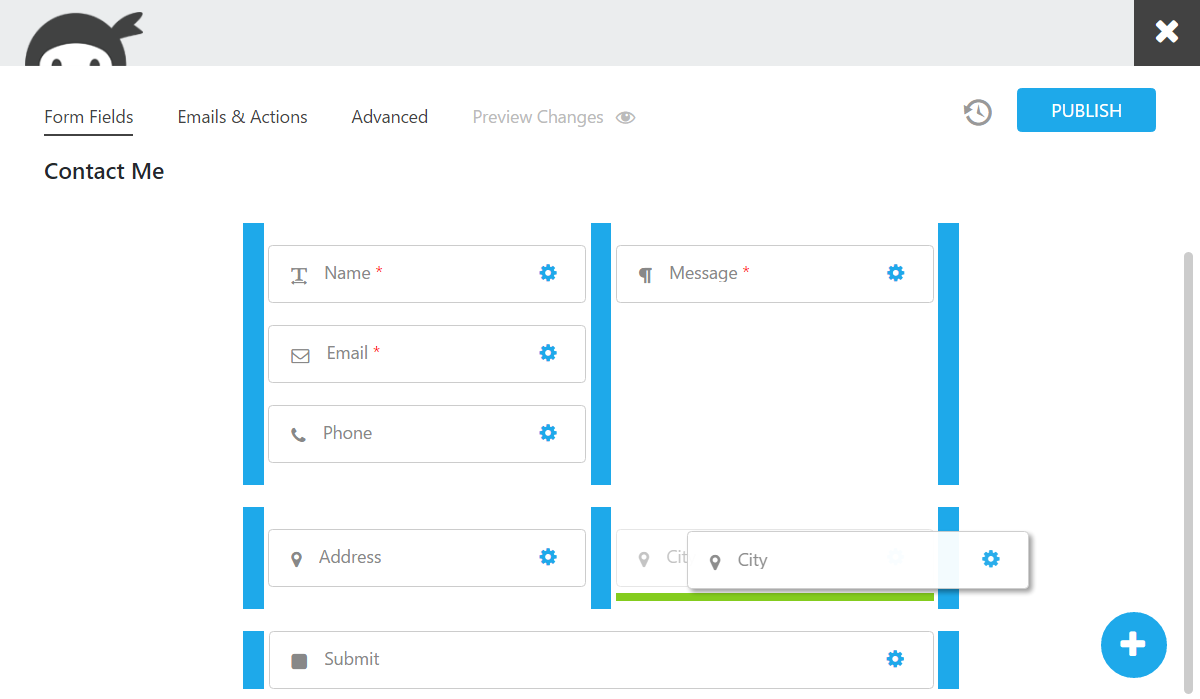
Whether you choose to use one of the templates or to start with a blank form, you’ll be able to drag and drop fields onto your form and into position.

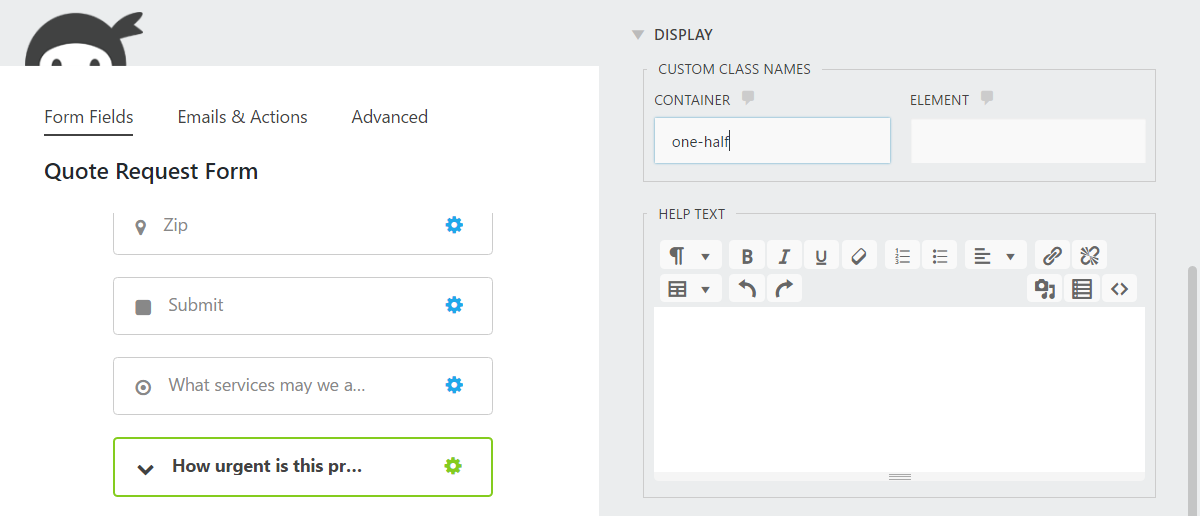
Clicking on a field displays its setting, giving you the ability to customize how it looks and functions. Although, as mentioned, if you want to customize the appearance of your forms and fields through the builder, you’ll need to upgrade to the premium Layouts and Styles addon (keep reading to find out what you can do with this extension).
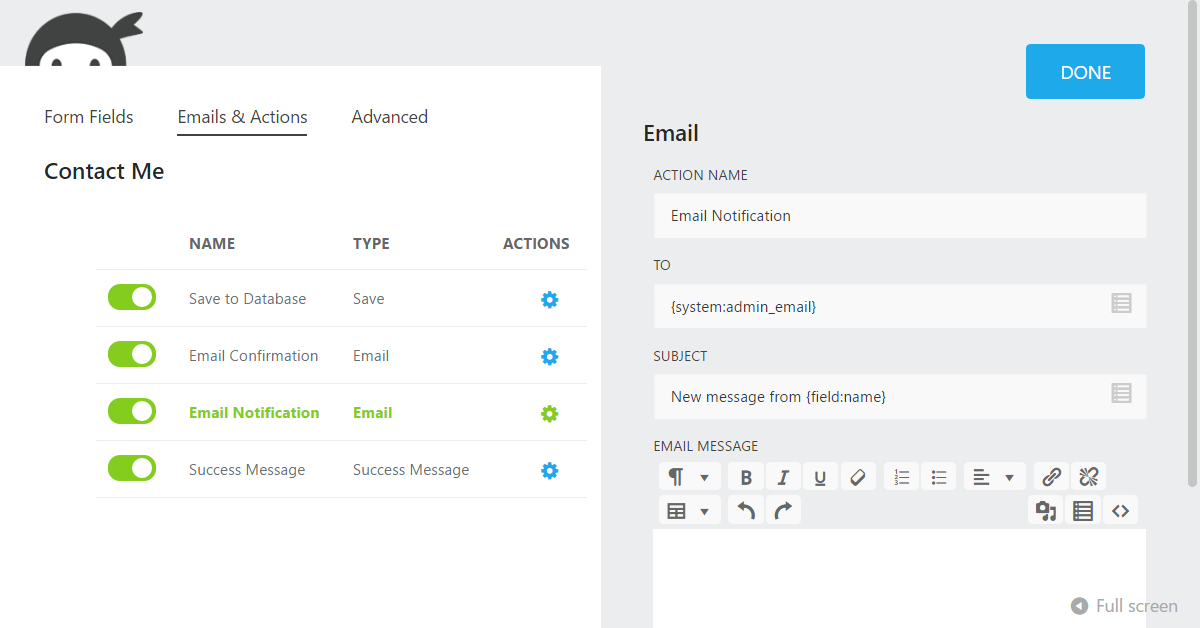
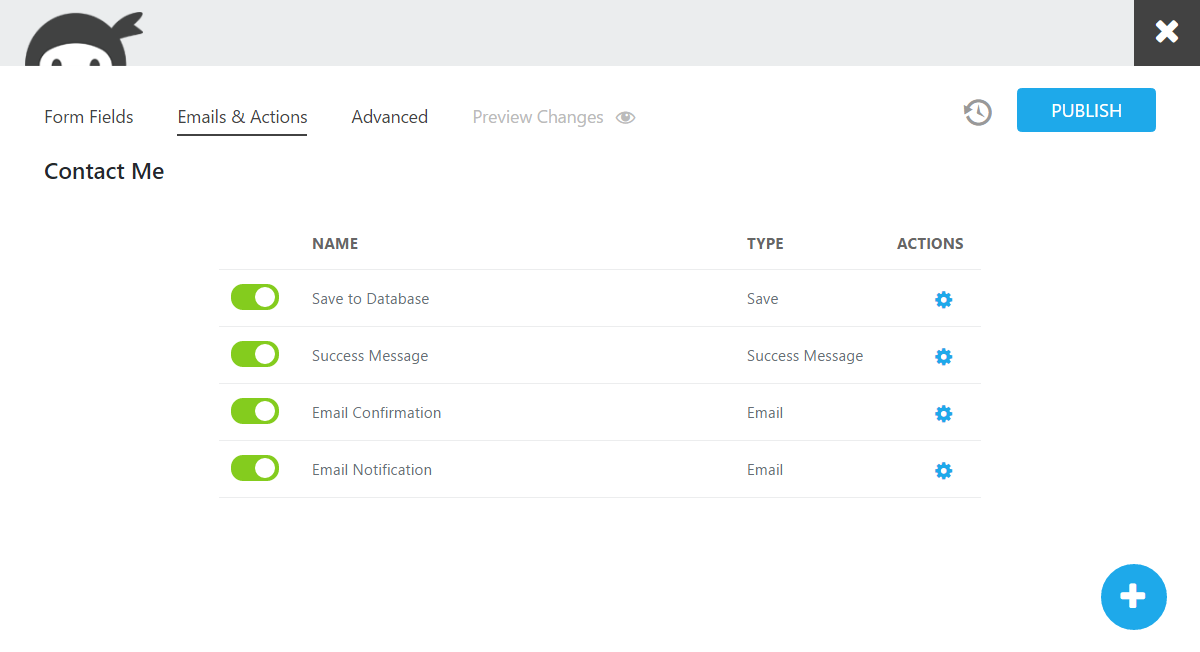
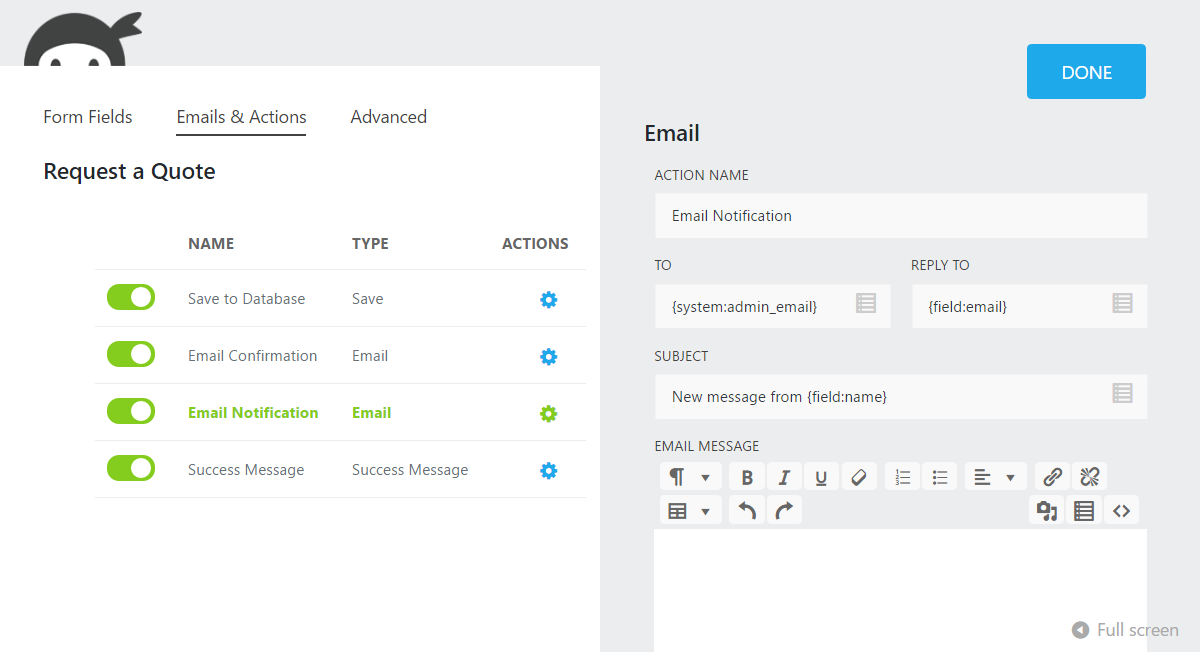
We’ll look at the form submission handling capabilities of Ninja Forms (Free) and Premium in more detail next. However, in short, the Emails and Actions section of the builder gives you a quick and easy way to define what happens once a user submits a form.
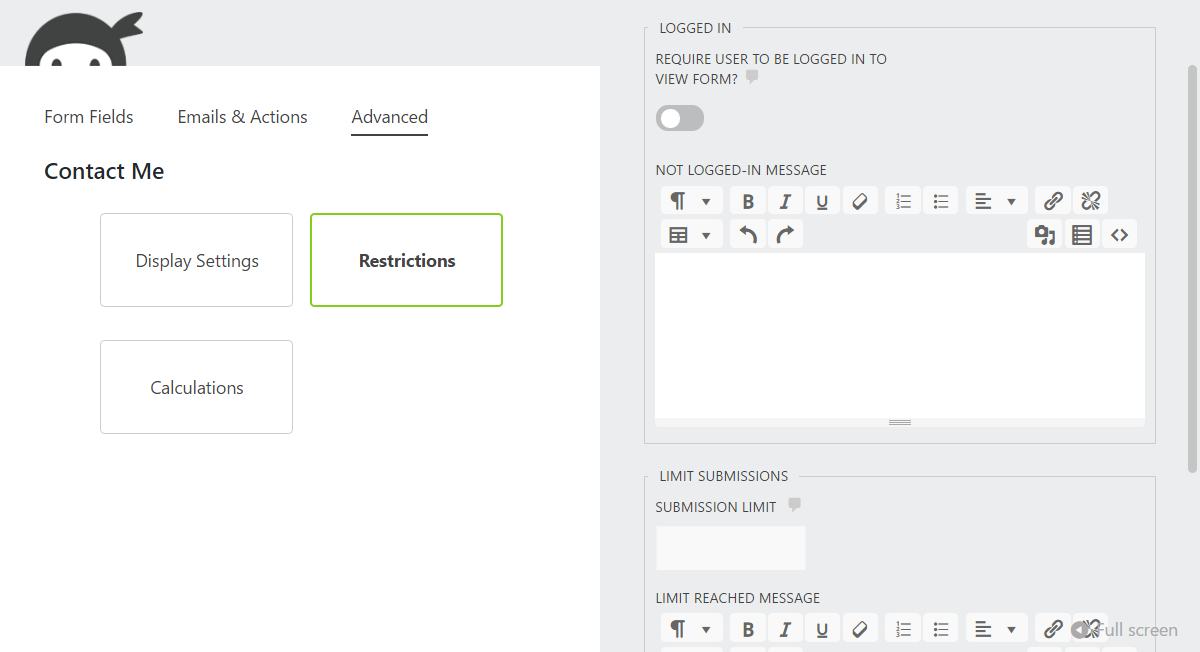
The Advanced settings section of the form builder allows you to customize how the form is displayed, covering the form title and whether to display it, as well as a few other display-related options. You can also restrict access to the form through the advanced settings, including only making the form available to logged-in users — a feature that would be useful if you were using the forms to accept post submissions from registered users — as well as limiting the number of form submissions accepted.
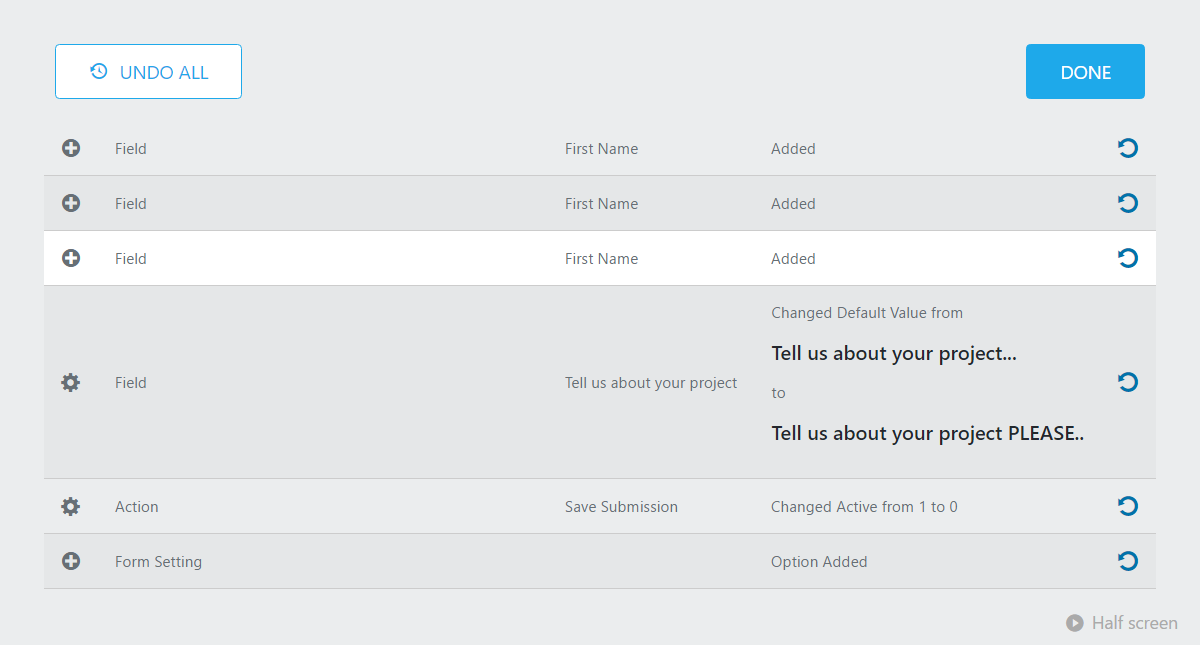
One very useful feature that was added to Ninja Forms 3 is the ability to view the changes that have been made to a form with the option of undoing individual actions.
You can preview your form at any time, giving you a quick way to see how it will look when it’s published on your website.
Once you’re happy with your form, hitting the Publish button will save it. Any instances of that form on your website will be instantly updated with the changes.
Form Submission Handling
As mentioned, Ninja Forms will automatically send form submissions to the email address associated with your WordPress website’s admin user account, meaning you don’t have to enter any contact details to get started with Ninja Forms. However, you can also choose to have form submissions delivered to other email addresses, or have a copy of the submission sent to users who have completed a form.
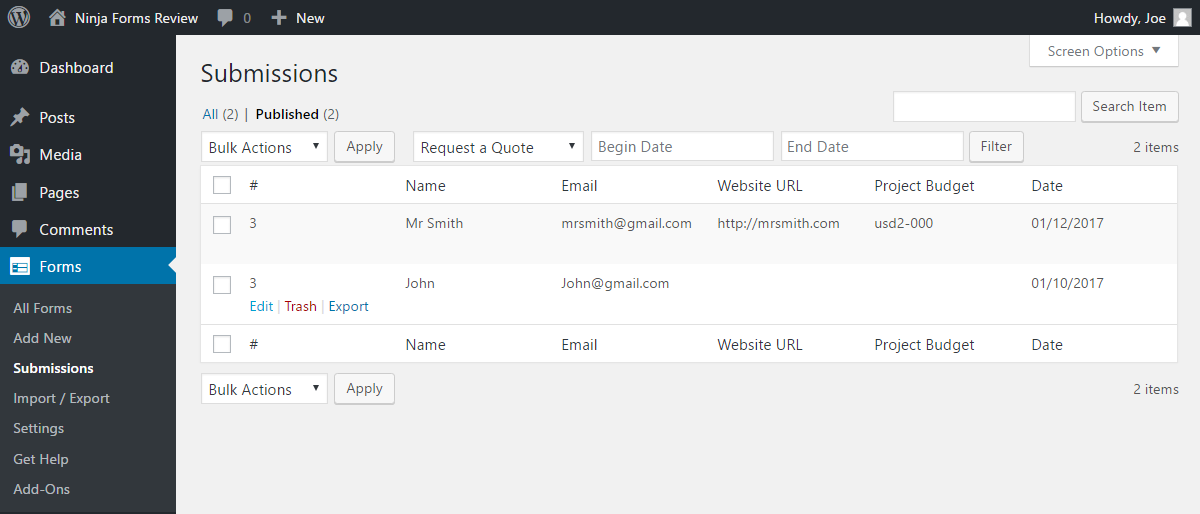
The free version of the plugin will also store form submissions in your WordPress database, making them accessible from your dashboard area.
Having form submissions accessible from within your WordPress Dashboard is a really useful feature that isn’t available with all free WordPress forms plugins. Emails can get lost or deleted, so having a central location where form submissions can be accessed can help you find and recover any missed communications.
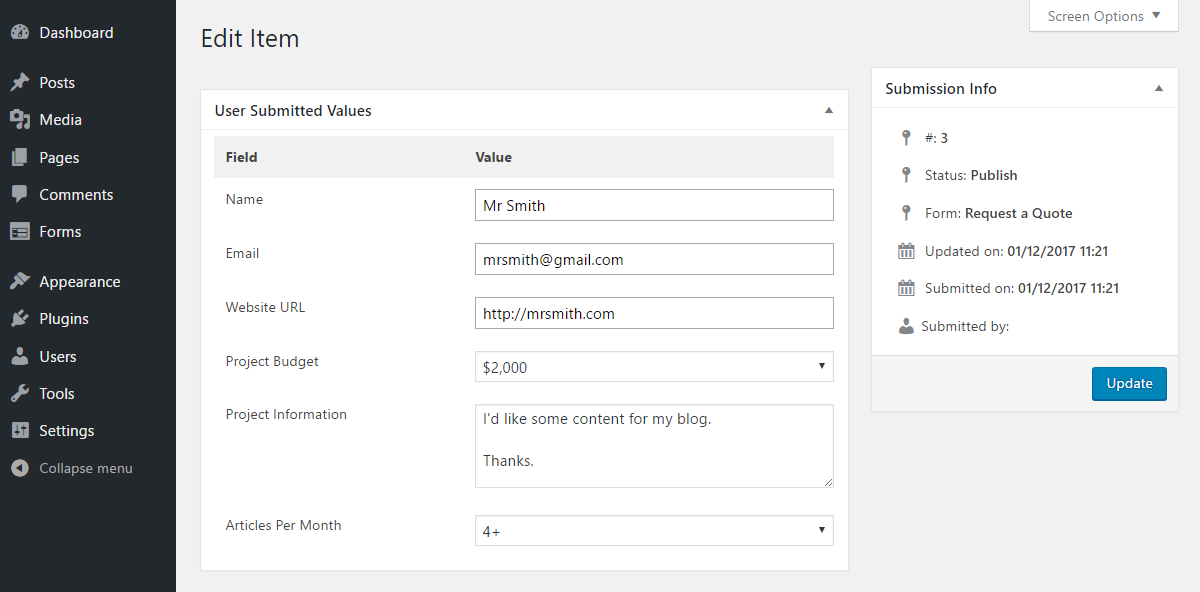
You can review the form submissions from the Submissions section of the Ninja Forms area on your WordPress Dashboard. Ninja Forms gives you the ability to filter the submissions by different forms, making it easier to find the submissions you’re looking for.
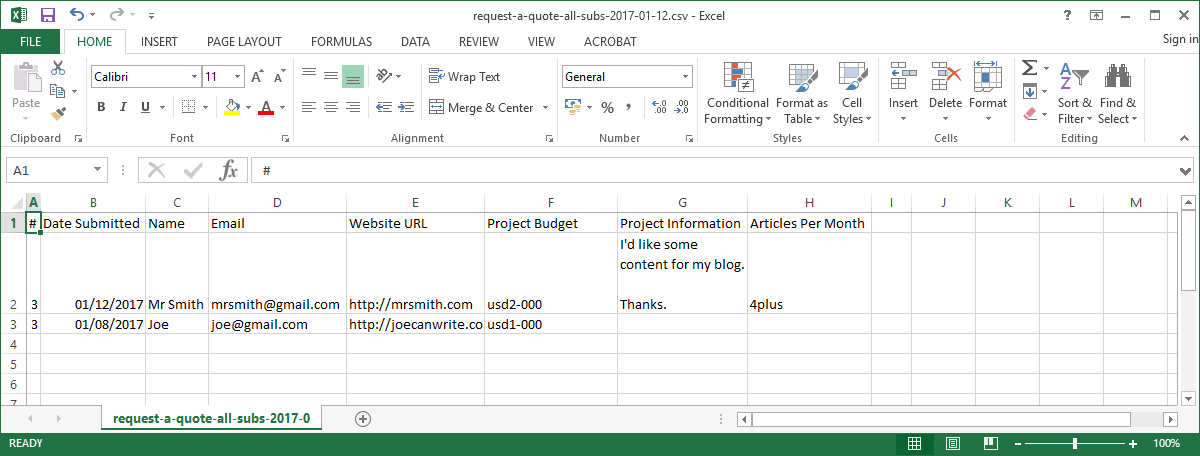
As well as having the ability to view and edit form submissions, you can also export them in CSV format. Being able to open multiple form submissions in a spreadsheet app such as Excel gives you a convenient way to analyze data from surveys and others forms you’ve created with Ninja Forms.
Form Submission Confirmation and Redirection
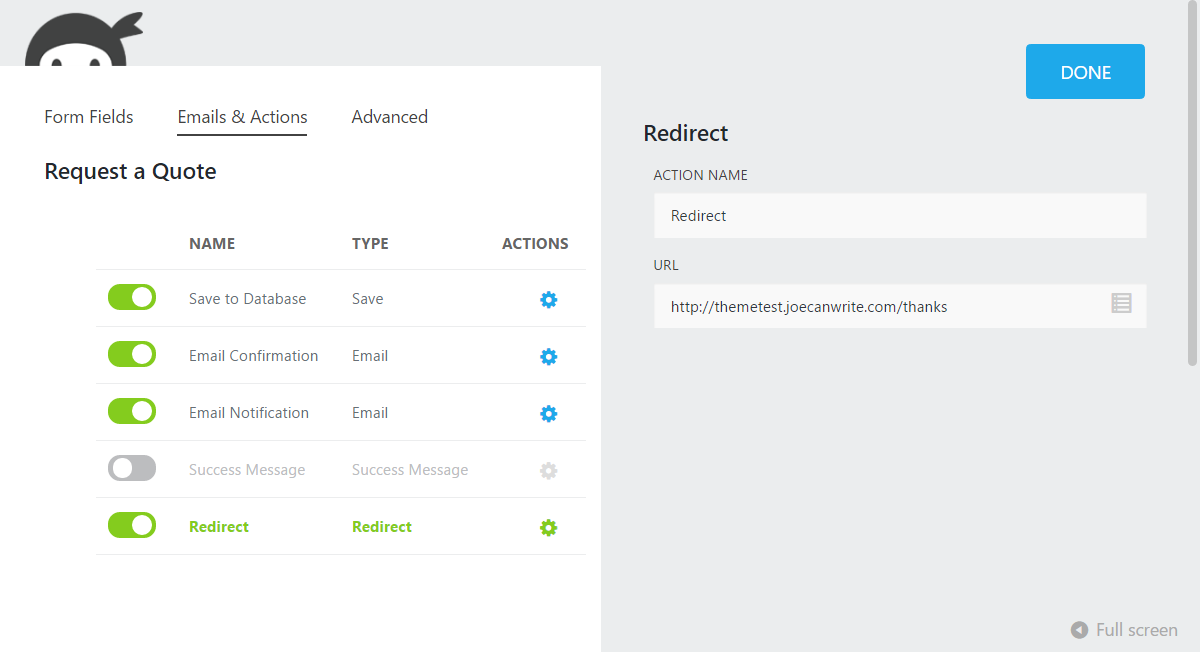
Once a user has submitted a form entry, Ninja Forms (Free) gives you the ability to either display a confirmation message or direct the user to a specific URL on your website or elsewhere. Because you can customize the confirmation message, you can take this opportunity to display links to important pages on your website or to your social media profiles.
There are a number of commercial addons available for Ninja Forms that allow other actions to be performed after a form has been submitted. These premium upgrades include:
- Turn a form submission into a post or page on your website with front-end posting.
- Add the user to your email marketing service.
- Get a custom Slack notification each time a form is submitted.
- Integrate Ninja Forms with Zapier to send form data to 300-plus web apps.
- Save form submissions and attached files to your server or the cloud.
- Receive an SMS notification on form submissions with Twillo.
- Use WebMerge to populate PDF, Word, Excel and PowerPoint documents with form data.
The above are premium addons for Ninja Forms. However, users of the free plugin can still choose which email addresses form submissions are sent to, store form submissions in the WordPress database, display custom submission messages, and redirect users to a custom URL.
Other Features of Ninja Forms (Free)
As you’ll have noticed, the free version of Ninja Forms is a powerful WordPress forms plugin. In addition to the above features and functionality of Ninja Forms (Free), you can also:
- create an unlimited number of forms
- save modified form fields as favorites for reuse on your forms
- use custom input masks to force correct data and required fields
- implement anti-spam options including Google reCaptcha, question and response fields, and honeypot fields
- avoid form submission page reloads thanks to AJAX-powered submissions.
You can view the full list of features and functionality of Ninja Forms (Free) on the plugin page at the WordPress.org directory.
Ninja Forms Premium Upgrade Options
Although you can do a lot with the free version of Ninja Forms, you can do a lot more by upgrading to the premium version of the plugin. There are a number of ways to upgrade, including purchasing addons individually or choosing a predefined package of addons. But is it worth going premium? Let’s find out.
Before we look at the different upgrade options, let’s explore some of the premium addons that are available for Ninja Forms.
Layout and Styles Addon
Available individually for $40, or as part of the Builder Pro pack for $99, the Layout and Styles addon upgrades the Ninja Forms builder. Giving you more control over the appearance of your forms, the Layout and Styles addon is ideal for anyone without CSS skills, or those who are looking for a way to create custom forms faster.
As well as creating multi-column forms and resizing the form fields, you can also customize the colors and other appearance-related settings of your forms through the drag-and-drop user interface.
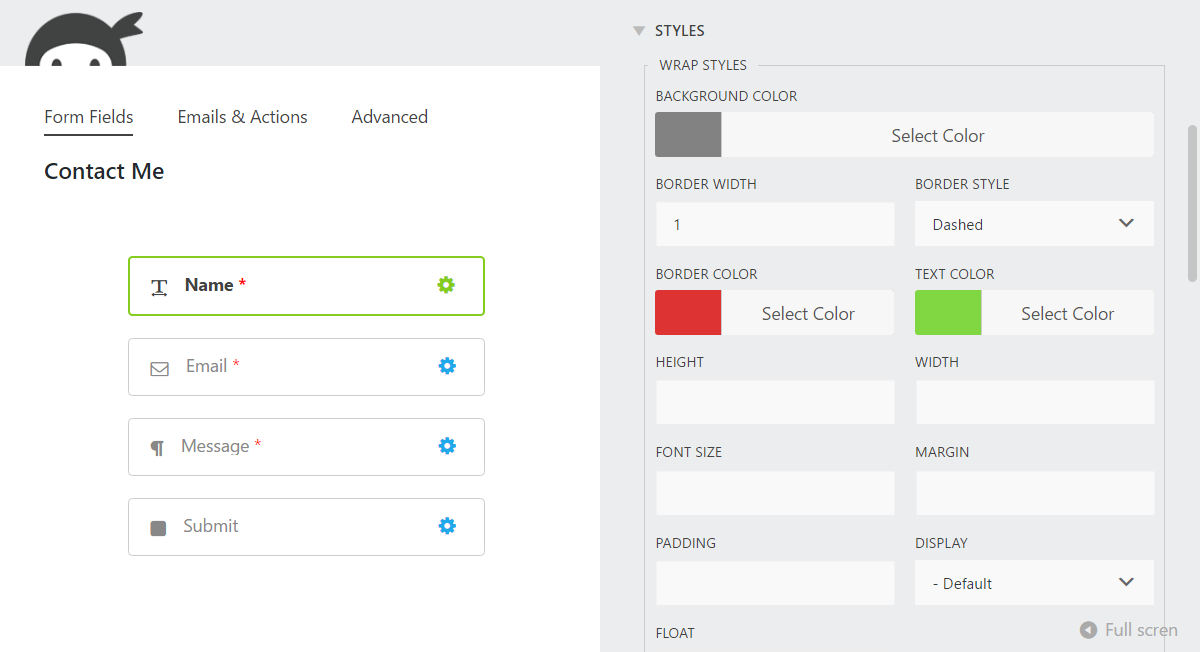
You’ll also be able to create default custom styles for all the forms and fields on your website along with the ability to export and import your preferences between websites.
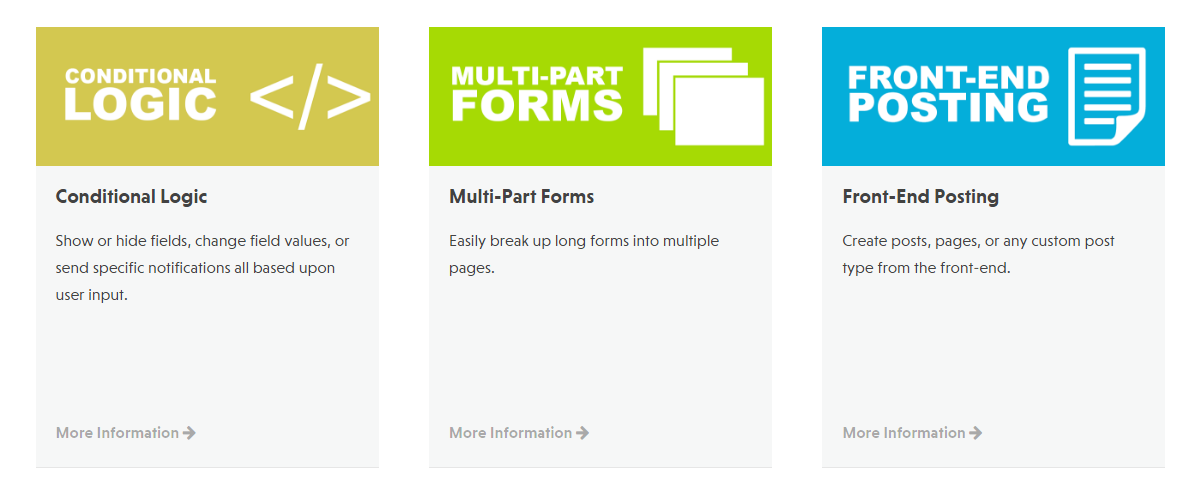
Conditional Logic Addon
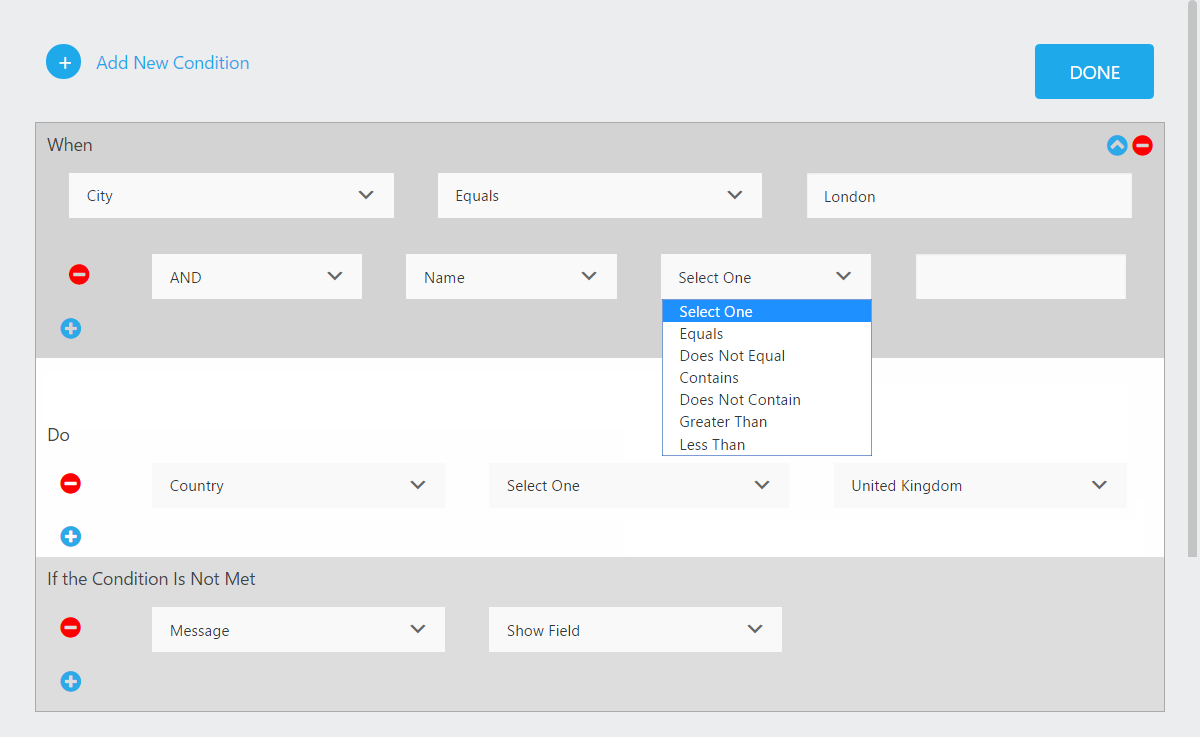
With the $49 Conditional Logic addon, you’ll be able to show or hide fields, and also list items based on user input to other form fields. You can also use conditional logic to send out specific notifications based on user input, and change field values too. This powerful addon gives you the ability to create interactive forms that adapt to user inputs.
Other Ninja Forms Premium Addons
Other notable Ninja Forms Premium addons you may want to consider include:
- Multi-Part Forms: Break up long forms into multiple pages.
- Front-End Posting: Create posts, pages, and custom post types from your front-end forms.
- File Upload: Accept file uploads via your forms and automatically transfer them to your cloud storage space.
There’s also a selection of email marketing addons for popular services such as MailChimp, AWeber, and Constant Contact. The payment gateway addons give you the ability to collect payments via your forms with PayPal and Stripe.
You can view the full list of Ninja Forms addons here.
Ninja Forms Pricing Options
There are a few different ways to upgrade from the free version of Ninja Forms and get access to the premium features:
- Buy addons individually, with prices ranging from $29 to $129 each.
- Upgrade to the Personal plan for $99 (Builder Pro addons pack for use on one site).
- Upgrade to the Professional plan for $199 (Builder Pro addons pack for use on 20 sites).
- Upgrade to the Agency plan for $499 (all addons for use on unlimited sites).
All options include one year of access to updates and support, with a 50% discount on automatic renewals. Purchasing the Personal or Professional plans also gets you a 20% or 40% discount, respectively, on the price of purchasing additional addons.
You can view the full details of the Ninja Forms pricing plans here, including the details of the 14-day money back guarantee.
Final Thoughts
As we near the end of our look at what this plugin can do and the main differences between Ninja Forms (Free) and Ninja Forms Premium, one question remains. Should you go premium?
The free version of Ninja Forms comes highly recommended. The prebuilt form templates make it very easy to add a nicely formatted quote request or contact form to your WordPress website.
Thanks to the good selection of form fields and the intuitive drag-and-drop page builder, you should be able to create a wide range of forms without upgrading to the premium version of Ninja Forms.
The form submission handling options of the free version are also very impressive. If you need access to the premium features, it’s good to have the option of purchasing addons individually, as well as through the discounted plans and bundles.
When it comes to the competition, the main alternative to Ninja Forms Premium in terms of features and reputation is Gravity Forms (read our in-depth comparison). Both plugins have similar capabilities, although Ninja Forms now has a slicker form builder interface.
The best option for you will depend on your requirements and how much you’re prepared to pay to access them.
However, regardless of the competition, Ninja Forms is without doubt one of the best form plugins for WordPress, and whether you choose the free version or decide to upgrade, you’ll be getting a solid and reliable forms solution that’s easy to use and packed with useful features.
Used/using Ninja Forms free or premium? Thoughts?
By
TOP DEALS


Leave a Reply
All comments are held for moderation. We'll only publish comments that are on topic and adhere to our Commenting Policy.
Wow great article, you went in to great depth, very useful, thanks
The free version is awesome. Thanks for this great tutorial! I can’t figure out how to delete a form and also wondering if there is a limit to how many I can create with the free version. Thank you!