

How to Move WordPress to a New Host - Everything You Need to Know!
How do you move from one WordPress hosting service to another? Whether you’ve outgrown your current host’s features or are just looking for something faster and more reliable, this guide will show you everything you need to know! (Note: for more guides in the same series, take a look at the WinningWP Guides page.)
-Note: WinningWP content is free to all. If you make a purchase through referral links on our site, we earn a commission (learn more).
Choosing the right host is an exceptionally important task for any website owner. You need a host that can reliably handle at least the number of regular visitors to your site, will ensure it loads as quickly as possible and can repel any security attacks. As your site grows, there'll almost certainly come a point where the host you originally chose no longer fulfils your requirements -- which means it’s time to move to a brand new hosting service.
The following guide shows you everything you need to know about switching your WordPress hosting service -- including how to change the necessary domain name system settings and how to avoid any unnecessary downtime.
Why Move Hosting Services?
The two main types of hosting we'll be concerning ourselves with in this guide are 'shared hosting' (a cheap and cheerful service that most folk tend to start off with), and 'managed WordPress hosting' (a much, much more capable type of hosting service that caters exclusively to WordPress-powered websites). It’s important to know the difference between these two types of service to better understand why you may want to switch -- and what exactly you’d be switching to and from.
Shared hosts — as the name suggests — 'share' limited server resources (think memory, computer processing power, and so on) between lots of websites. This means if one site on the same server as yours is using more than its fair share of resources (perhaps because of a traffic spike, because it is just generally poorly optimized, or because it has suffered from some kind of fatal security breach), your site will be adversely affected. This could mean it suddenly starts loading very slowly, or perhaps even goes entirely offline for a while. Furthermore, shared hosts are designed to run all kinds of different websites, rather than being optimized to run WordPress in particular. The main attraction of regular shared hosting is really, then, just the price: Shared hosting is cheap — with prices in the region of $5 to $10 per month. As well as the slow speeds and a somewhat unreliable service that won't withstand any large traffic spikes, shared hosting won't generally give you any WordPress-specific features, such as automatic backups and restores, WordPress-centric security measures or malware scanning.
Managed WordPress hosting, on the other hand, is designed specifically for WordPress-powered websites. It’s quite a bit more expensive, however, with plans generally starting upwards of about $30 a month for a single website. With a managed WordPress hosting company such as WP Engine (one of the best all-round managed WordPress hosting services on the market), your site will not only load a lot faster than it ever would on a regular shared hosting plan, but will also be a lot more reliable, be able to handle much larger traffic spikes and, on the whole, be considerably more secure. Managed WordPress hosting also comes with a whole host of WordPress-specific features aimed at making the task of managing your website a lot easier. These include: Automatic backups, restores and updates; automated malware scanning; and extremely well-trained support staff consisting entirely of WordPress experts (to name just a few of the main benefits).
If you've outgrown your current provider, it almost always makes sense to switch to a managed WordPress hosting service. There is, after all, no point going from one low-quality shared host to another! Managed WordPress hosting is much more reliable, significantly faster, and really just much more capable than its shared hosting counterpart. It may be pricier, but it's almost always worth the additional cost (which may well be almost immediately recouped by the speed increase your site will get)!
We’ll be continuing this guide in two parts. First, we'll show you how to move WordPress from shared hosting to fully managed WordPress hosting with WP Engine — plus, we’ll also mention moving WordPress to a number of other managed hosts. Second, we'll cover how to move a website from one shared hosting service to another. We'll show you a process that will work for switching between just about any shared hosting services, but, to demonstrate the procedure, we'll be using SiteGround -- a company who offer about the best WordPress-focused shared hosting plans available (they're so good, in fact, that they actually compete with specialist WordPress hosting in many respects).
As already mentioned, we’d pretty much always recommend managed WordPress hosting over shared (assuming your budget can stretch to it, that is). If you're not yet convinced of the benefits, however, or would just generally like more information, be sure to have a thorough read of this earlier article of ours comparing the two services in much more detail.
How to Transfer a WordPress-Powered Website to WP Engine
Moving WordPress from one host to another essentially involves transferring all of the site's data (both the data on the server in terms of regular files AND the data found within the site's database) from your old host to the new host, and then updating where on the internet (i.e., to which server) your domain name (such as winningwp.com) points to (i.e., directs your site's visitors to) when they load your site. With WP Engine, the transfer process is really quite straightforward, as they use a largely automated transfer service that actually does the vast majority of the work for you -- regardless of which host you're transferring from.
The automated transfer process starts with a plugin called WP Engine Automated Migration. We’ll first be using this, then checking to ensure the transfer has been successful, and, finally, we’ll update your domain name’s settings by editing something known as its DNS (don't worry, there'll be more on this later). The result should be no downtime (meaning your site will remain online the whole time), and, as a bonus, you'll also have the opportunity to check that everything is working properly before fully committing to the transfer.
Let’s get started...
Head to the WordPress Dashboard of your site on the hosting you wish to move from, then navigating to Plugins → Add New. Search for WP Engine Automated Migration and Install and Activate the plugin.
You’ll be taken to a screen asking for a number of details about your WP Engine site. Find these by logging into WP Engine, clicking through to Installs and then Site Migration. Copy and paste all of these details onto the plugin, generating a new SFTP password in the process (note this down as you may need it later). If your WP Engine site is password protected, you’ll also need to enter these details here. Everything on your site will be transferred, but if you’re using the Cloudflare plugin you’ll need to deactivate it before proceeding.
Once all of the details are added to the migration plugin on your old site, click Migrate! The plugin will now take a couple of minutes to transfer your site. You can close the status page — you’ll receive an email once your site is migrated.
Once you’ve got the confirmation email, visit your name.wpengine.com URL and check out your site. You should see your site loading perfectly, but with the WP Engine URL. This is the point at which you can make sure everything has been transferred smoothly; there shouldn’t be any problems, but click around posts and pages to be sure, and check that images have been transferred correctly. If you notice anything wrong, then contact WP Engine’s support team; if everything’s working properly, you can proceed.
You now need to add your domain name to your WP Engine account. There are two parts to this: First, add the domain name in the WP Engine Dashboard, and then tell your domain name it needs to take visitors to WP Engine, rather than to your old hosting.
Adding a domain to your WP Engine account is very easy: Log in to WP Engine and click on Installs. Select Domains from the menu and then Add Domain. Enter the domain name you just set up and then Add Domain. You now want to add a redirect to your name.wpengine.com address that goes to your domain name. Do this by clicking Add Redirect and selecting your domain name from the dropdown. Save changes, and you’re done. You now need to wait for the status of your domain name to be confirmed -- this can take a couple of hours, but is often completed within a couple of minutes. Once the domain is confirmed, click Set as Primary.
You now need to tell your domain name to take visitors to WP Engine. This will ensure visitors see your site hosted with WP Engine, rather than with your old host. With most hosts, you just tell the domain name to point to the host’s servers (the technical term for this is 'setting nameservers'). With WP Engine, however, you need to use a free third-party service called Cloudflare. This allows WP Engine to move your site between servers when upgrades are taking place, or when your site is being attacked by hackers.
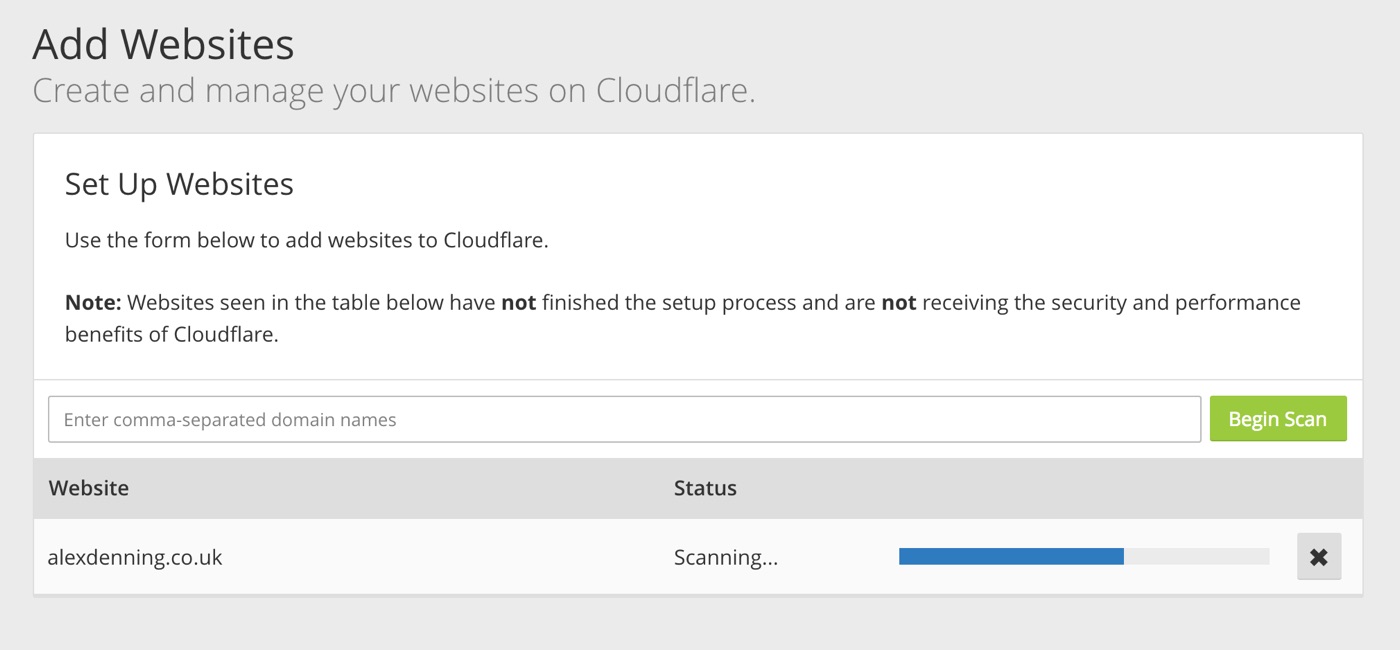
Cloudflare is free and easy to set up: Sign up for a free account and follow the prompts to add your domain name. Enter your domain name, and Cloudflare will scan your site to see what its current setup is.
Once the scan is complete, you’ll be asked to 'verify all your DNS records are listed below'. Unless you’ve changed these (you’d know if you had), click Continue, and then select the Free Website plan.

You now need to set your domain’s nameservers so they point to Cloudflare, which will then point to your WP Engine account. Do this by heading to the administrator options of the website where you registered your domain. Look for options to manage your domain, then find nameservers. In the screenshot above, the domain is registered with SiteGround, and nameservers can be changed by logging into the User Area, selecting My Accounts and Manage next to the relevant domain name.
Once you’ve found where to change your nameservers, replace the current nameservers with the two listed by Cloudflare and save. Head back to Cloudflare and click Continue. The change to the nameservers will take up to 24 hours to complete, but is often done faster than this. Click Recheck Nameservers to test whether the change has been made — if unsuccessful, return later.
Once your domain name is set up with Cloudflare, click the the DNS tab and look for the type 'A' entry that has the name of your domain name (for example winningwp.com. ) Delete this by pressing the X.
Next, add a new record using the bar at the top of the table. Select the type to be CNAME, select the Name as your domain name (i.e., winningwp.com) and select Domain Name as your WP Engine CNAME (this is the name.wpengine.com URL you used earlier). Add Record and you’re done.
The update to your domain name will take up to 48 hours to take effect, but this often happens much faster. Until your domain name updates, your old hosting will be served to visitors. You can check on the status of this by looking at the Domains page (under Installs → Domains) on your WP Engine Dashboard. Once updated, your domain will be listed as 'Proxied' and visitors will see your site with new hosting from WP Engine!
There’s one caveat: If your site has changed during the transfer period — perhaps because the transfer period was the full 48 hours and new posts or comments were published in this time — then you’ll need to run the WP Engine Automated Migration plugin again. If your site hasn't changed or the transfer completed faster, this step isn't necessary.
As you've now changed your domain name to point to WP Engine, to access your old hosting you'll need to find the IP address of your old site's server. With SiteGround, this is available under My Account → Information & Settings. With other hosts, this is often less conveniently available, but the format is typically ip.address.here/~cpanelusername/. You can usually find the IP address by logging into cPanel and looking at the left-hand sidebar. An example of this, then, would be 111.22.33.44/~winningwp. You’d then add /installer.php to the end to get 111.22.33.44/~winningwp/installer.php.
If your host uses a different looking cPanel without a left sidebar, you can usually get it back by clicking the Dashboard icon on the left and switching cPanel’s theme to x, x2 or x3. You’ll then find the sidebar with the IP address listed on the left-hand side. Add to this IP address your cPanel username with the syntax above.
Once you can access your old hosting via IP address, log in to the WordPress Dashboard and load the Site Migration tool again. Now, enter the same details as before, but with the Destination Site URL as your domain name, rather than the name.wpengine.com address. You can find the rest of the details to enter by logging into WP Engine, clicking through to Installs and then Site Migration. Use the same SFTP account as with the original migration, using the password you noted down earlier. If you’ve forgotten this, you’ll need to click Installs on the WP Engine Dashboard and then reset the password by clicking on the SFTP account name.
Once you've entered all of the details into the migration tool, click Migrate again and the migration process will kick in. As you’ve used the same SFTP details as before, the migration tool will know to transfer only files that have changed, and the process will be a lot faster this time. Once it has completed, you can visit your domain name, and your site will be fully transferred and up to date!
Transferring to WP Engine is easy, but if you do happen to run into any problems, have a quick look through their list of common errors and/or simply contact WP Engine's support team. Follow the steps in this guide, however, and you should be able to catch any problems before they show up on your live site.
We’ve focused on WP Engine here, but note that most managed hosts will actually do just about all of the transfer process entirely for you. Managed hosts offering free transfers include Flywheel (more info), Kinsta (more info), Pressable (more info) and Pagely (more info).
How to Move WordPress to a Brand New Shared Hosting Service
Moving WordPress to a brand new shared hosting service is slightly more complicated than moving to managed hosting. To do this, you can use a plugin called Duplicator, which lets you clone your entire site and then import that onto new hosting. As with the WP Engine plugin, you can then transfer your domain name to direct to your new hosting to avoid any unnecessary downtime.
We’ll be using the example here of transferring WordPress from a shared host to SiteGround, which is, in our opinion, about the best-value shared host you can get. SiteGround do offer one free transfer per account, but, even when using this, you'll still need to update your domain yourself -- something we'll be covering later in this section.
Let’s get started...
Start by installing Duplicator on your WordPress site with your old host. From the WordPress Dashboard, head to Plugins → Add New, search Duplicator and install and activate the plugin. With the plugin installed, go to the new Duplicator menu and click Packages. Create New, click Next, make sure the scan is all good, and then click Build. Duplicator will now spend a couple of minutes packaging up your entire site into a zip file.
Once the packaging is complete, download both the Installer and Archive files, and save them in an easily accessible place.
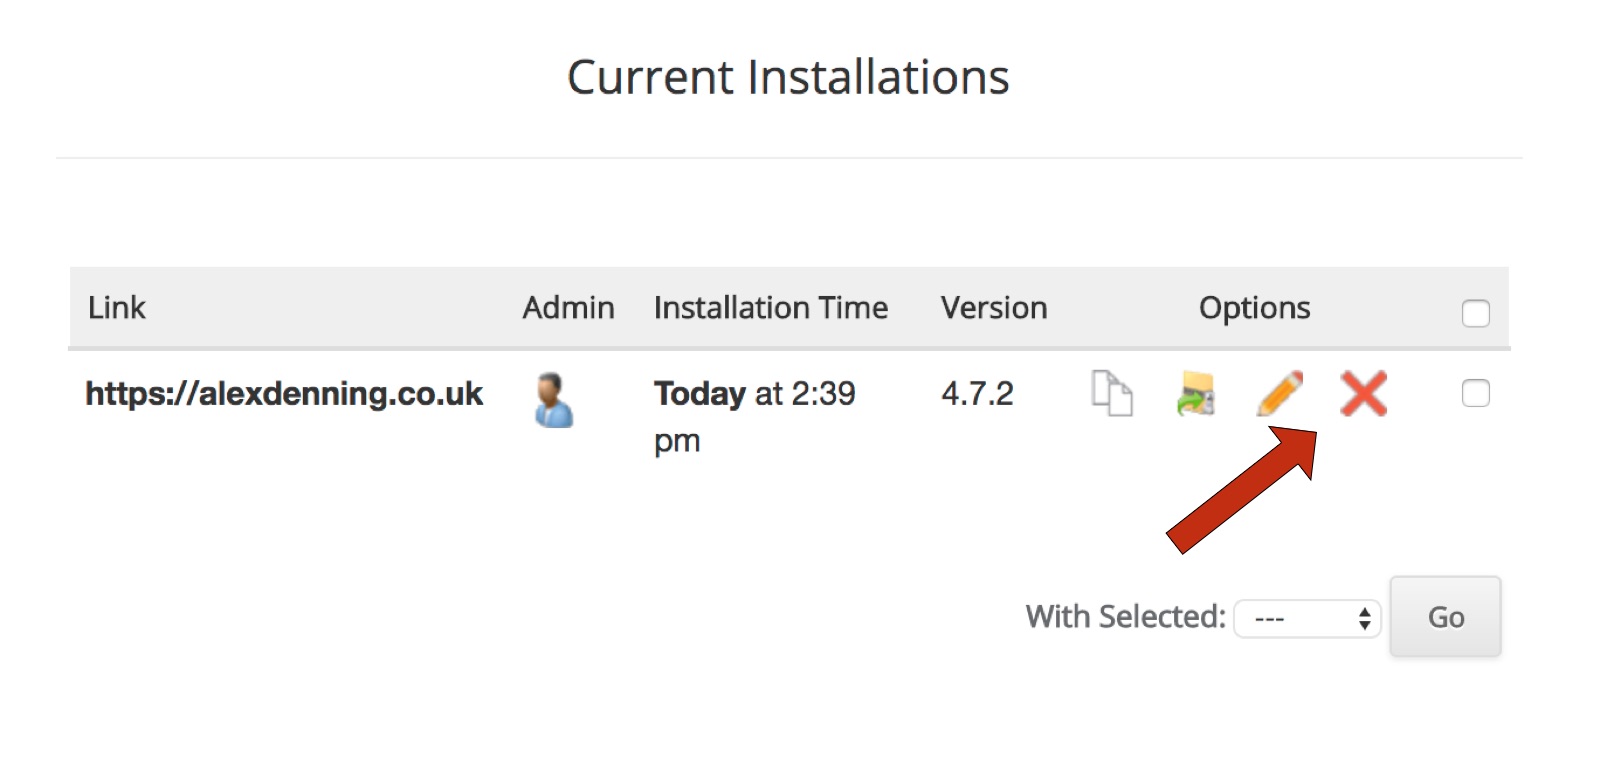
You’re now going to import the Duplicator files onto your new host. Duplicator copies everything over — including WordPress — so if you have WordPress installed already you’ll need to remove it. With SiteGround (and most hosts), this can be done by logging in, loading cPanel (under My Accounts → Information & Settings → Access cPanel) and then loading Softaculous. Click on WordPress, scroll down, and then click the X next to any installs in the directory you want to transfer your site to. This will delete the install and all content, but, as you’re transferring to this host, this is presumably only an empty WordPress install set up with your account.
To use the Duplicator installer, you need to log in to your site using an FTP client. FTP, or 'File Transfer Protocol', lets you move files between your computer and hosting server. To use this, you need an FTP client, which is just a program for your computer. The best free FTP client is FileZilla. Whether you’re a Mac or Windows user, getting FileZilla set up is very straightforward. Download the Client version of FileZilla and follow the prompts to install.
You now need to find your FTP details from your host. SiteGround display your FTP details under My Accounts → Information & Settings → FTP Details. Note the username as well as the password is the same as with cPanel. Other hosts will display this in a similar location or in cPanel under FTP Accounts (create a new account if needed).
Open SiteGround and enter your FTP details into the top bar, then press Quickconnect. Unless your host has told you otherwise, you can leave the port field blank.
Once logged in, you’ll have a display of files on your computer on the left and files on your host’s server on the right. You can move files between the two by dragging and dropping. Navigate on the left-hand pane to where you saved the two files from Duplicator, installer.php and the zip file containing your WordPress site. You may see on the right-hand pane a folder /public_html/. If so, enter this. You may then see a folder inside named yourdomain.com/. If so, enter this also. If you don't see either of these folders, don't worry! What displays here depends on how your host has things set up.
Now, drag and drop the two Duplicator files from the left-hand pane to the right. This will upload the files to your host (it may take a couple of minutes).
When the files have uploaded, you now need to access the installer.php file on your new host. You can’t, however, do this by accessing your domain name as we’ve not transferred this yet -- doing so at this stage would void the opportunity to ensure the transfer has gone okay before sending real visitors to the new site. Thus, to access your site, you’re going to need to access it directly via an IP address. An IP is a string of numbers that uniquely identifies a computer. Since these numbers are hard to remember, we use domain names that point to IP addresses to access websites. In this case, however, we’ll be using the IP address of the server your site is hosted on to access your site without the need for a domain name.
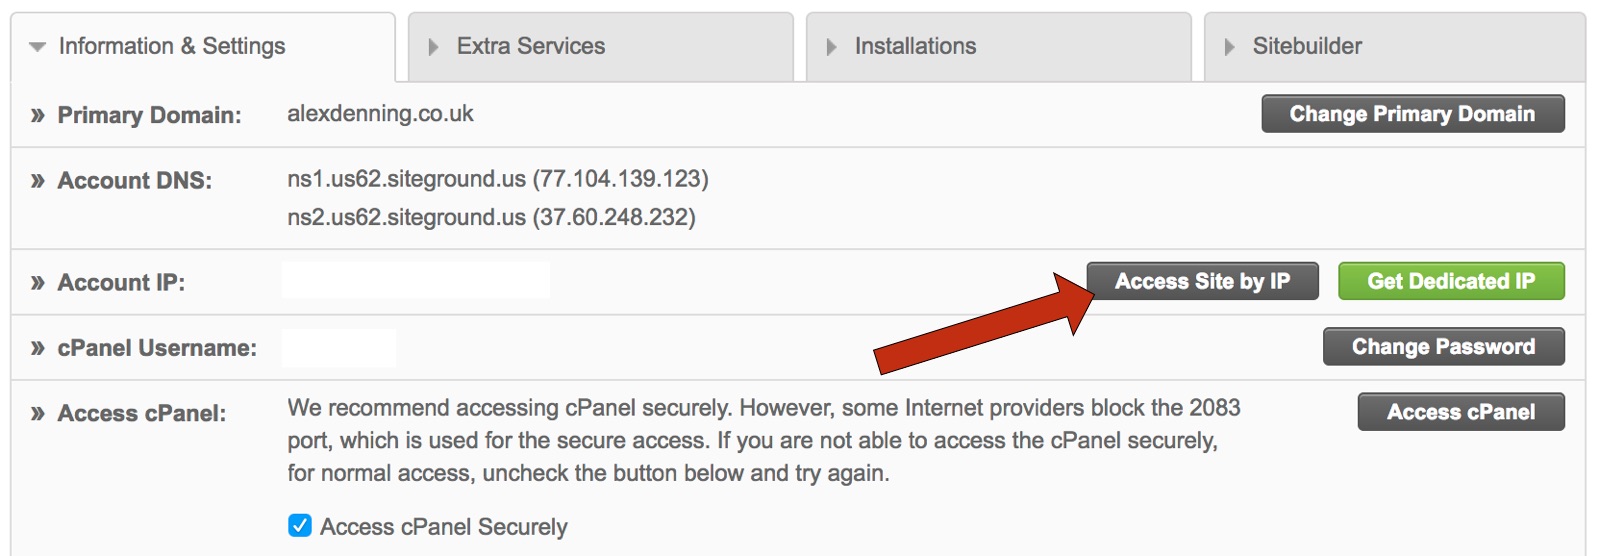
SiteGround make it easy to access your site via IP address: Once logged in, head to My Accounts → Information & Settings → Access Site via IP. You’ll need to add /installer.php to the end of the URL you’re taken to to bring up the Duplicator installer. With other hosts, follow the same steps listed above for accessing old hosting when transferring to a managed host: Log in to cPanel, find the IP address from the left-hand sidebar and then add /~cpanelusername/installer.php to the URL. If you're having trouble finding your host's IP address, see the section above.
Once you can access the Duplicator installer page, head back to cPanel on your new host. It’s time to create a new database! WordPress will use this to store all of your site’s information. Create a new database from cPanel by heading to MySQL Databases, and, under Create a New Database, add an extension for your database. A single short word, such as wordpress, will work fine here. Create Database and then add a new user. A similar single short word will do here too. Use the Password Generator to generate a strong password, making sure to make a note of the password as you’ll need this in a moment.
Once the database and user are created, finish by using the dropdown at the bottom of the page to add the user to the database, allowing All Privileges.

With the database created, return to the Duplicator installer page and enter the details you just created. Test Connection, and you should see the database is connected -- if not, double check the spelling. You can now confirm you accept the warnings, Run Deployment and then confirm. You’ll be asked to confirm your old and new settings. Do so, then Run Update.
You now have WordPress transferred to your new hosting! There are a couple of final steps: Click Save Permalinks, log in (using the username and password from your old site) and then Save Changes on the page you’re taken to. This will make sure URLs are updated. Click Test Site to confirm your site is loading as expected. If you’re still seeing a 'coming soon' page, load up FileZilla again and log in to your site. Navigate to /public_html/ or /public_html/yourdomain.com if necessary and look for files such as default.html or index.html and delete these. Load your site again and you should see it! Click around to make sure posts and images all load properly -- if anything is awry, you can fix it by logging into WordPress.

The final step is to remove the Duplicator files. From the Duplicator confirmation page, click Security Cleanup, or from any page on the WordPress Dashboard, click on the prompt. There are three buttons: Click all of them to delete all files.
We’re now done with moving files! Once you’re happy your site is looking as it should, we can transfer your domain name so that visitors see your site on the new hosting. We can do this by first adding your domain name to your new hosting and then telling your domain name to point to your new hosting. Finally, we’ll tell WordPress to load your domain rather than the temporary IP address.
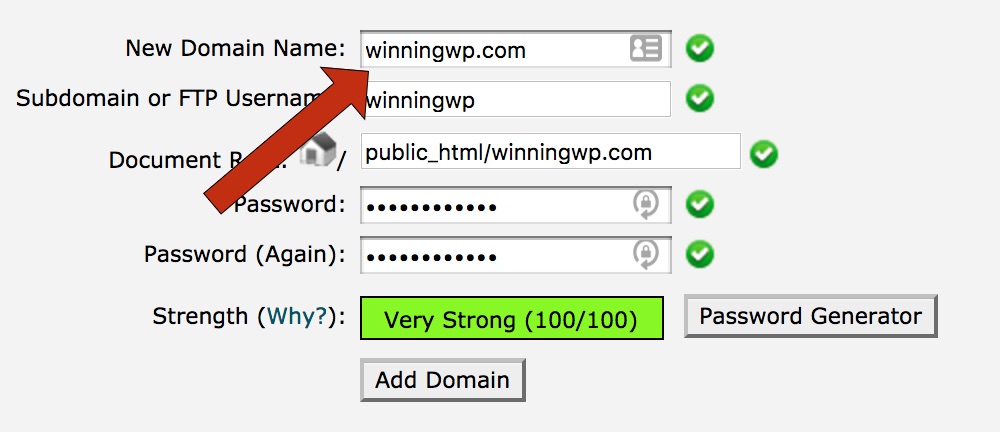
You can tell SiteGround (and most shared hosts) about your domain name by logging in and loading cPanel. Select Add Domain and enter your domain name. Generate a secure password and then Add Domain.
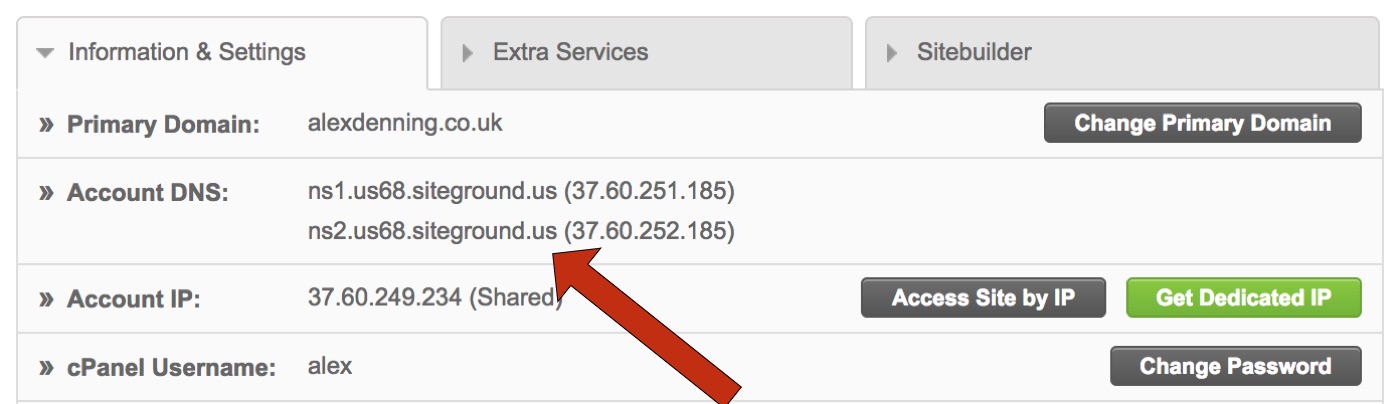
You can now tell your domain name to load your new hosting. This involves updating your domain’s nameservers. SiteGround list these under My Accounts → Information & Settings → Account DNS. Other popular shared hosts’ nameservers can be found below:
- MediaTemple: NS1.MEDIATEMPLE.NET and NS2.MEDIATEMPLE.NET.
- DreamHost: ns1.dreamhost.com, ns2.dreamhost.com and ns3.dreamhost.com.
- Bluehost: ns1.bluehost.com and ns2.bluehost.com.
Once you know what your new host’s nameservers are, load up the administration panel of the place you registered your domain name, and look for options to manage your domain. From there, find nameservers. Set these to 'custom' and then enter the nameservers required for your host. Save your changes and you’re done!
With popular domain registrar GoDaddy, for example, you can change nameservers by logging into your GoDaddy account, heading to Domains → Manage. Click the Settings icon next to the domain whose nameservers you want to change, then Manage DNS → Nameservers → Change. Toggle from Default to Custom, enter the nameservers your host requires and Save.
Changes to nameservers can take up to 48 hours to take effect, so, during this time, some visitors will see your old site and some will see your new site. Note that during this period, new comments or posts may be sent to your old site. Unlike with WP Engine’s Automated Migration plugin, there’s no easy way to sync the two sites, so your best option for updating content is to visit your old site using its IP address (use the same technique as described above), and copy over any changes manually.
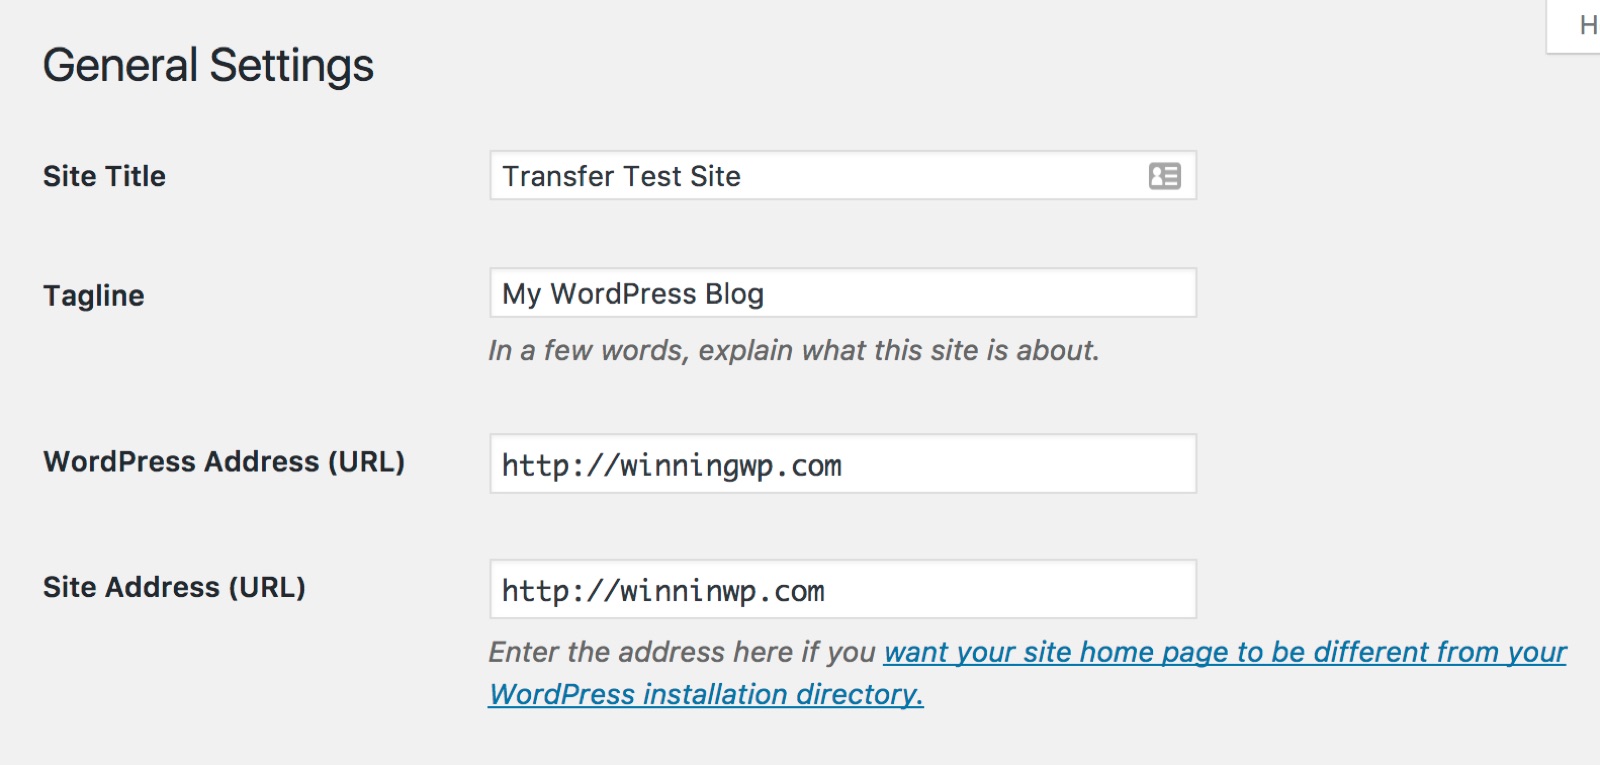
As soon as you’ve changed your domain’s nameservers, you need to tell WordPress to use your domain name rather than your host’s IP address. To do this, head to the WordPress Dashboard of your new hosting via IP address and click Settings. You now want to change your WordPress Address and Site Address to http://yourdomain.com and Save Changes. After saving, you’ll be logged out and taken to a login page at your domain, rather than at your host’s IP address. Once your domain has updated (which, as noted, can take up to 48 hours), you’ll be able to log in again and will be taken to the new hosting.
Your WordPress sites on the old and new hosting are identical, but you can tell the two apart by loading ip.address.here/~cpanelusername/wp-admin/, making a small change to your site (adding a letter to your site title under Settings → General is an easy option) and loading up yourdomain.com. If the change shows up, your domain has transferred to the new hosting. If not, you’ll need to wait longer. When you're sure the transfer has taken place, log in to the WordPress Dashboard and head to Settings → Permalinks. Click Save Changes and this will force all links on your site to update. You're now done!
Transferring your domain name is the final step in moving from one shared host to another. With this complete, you’ve moved your site without downtime, and now you just need to enjoy your new host!
Conclusion
WordPress hosting is incredibly important — and, as your site grows, you'll likely find your requirements changing to the point where it no longer makes good business sense to stay with the same hosting service (especially if that initial hosting service happens to be a particularly cheap shared hosting service). As and when this happens, you'll need to switch WordPress hosting to keep up — with the usual choice being to switch to a much more capable managed WordPress hosting service!
Moving from shared to managed hosting with a company such as WP Engine probably makes the most sense for most people looking to upgrade their hosting plan, but, if your budget doesn't yet stretch that far, you may still find yourself needing to switch between shared hosts. In either of these scenarios, working through the above guide should have you covered -- and should ensure your site does not experience any unnecessary downtime.
WinningWP Staples
There's more to us than just WordPress guides. Here's a few favorites:


Under the Hood
Wondering what plugins, tools and services we used here at WinningWP? We spill the beans...
WordPress Deals & Coupons
Save oodles of cash on some of the best hosting, themes & plugins around!
Good luck!
Moving to a new host might sound a bit daunting at first, but it really isn't that complicated – and if you even suspect it might be time to move, it probably is, because when it comes to hosting: the right choice can quite literally make or break your website!