
How To Start An Online Store (And Make It Successful) With WordPress – A Complete Step By Step Guide
- By
- 3 Comments
If you’re wondering how to start an online store — a successful e-commerce store — with emphasis on successful then you’re in the right place.
In this guide, we’ll go through the topic from top to bottom and cover every step of building your own online store — and setting it up for success.
Most importantly, this guide not only leads you through the technical setup, but also covers how to research your competition, how to get to know your customer base and how to promote your store later on. In other words, this is your complete guide to building an e-commerce operation and running it successfully.
Here are the questions we’ll answer along the way:
- 🔨 Whether you can build an online store yourself or if you’ll need to hire a designer.
- 💸 What it costs to start an online store.
- 🕵️♂️ How to spy on your competition and learn about your customer base.
- 🔧 How to set everything up.
- 💳 How to process online payments.
- 📢 How to promote your store.
Let’s take it from the top:
Table of Contents
- 1. Start with a Store Setup Sheet
- 2. Get to Know Your Competition
- 3. Get to Know Your Customer Base
- 4. Pick an Angle
- 5. Pick a Name for Your Online Store
- 6. Understand What Web Hosting Is About
- 7. Start an Online Store — Bare Bones
- 8. Add Products to the Store Catalog
- 9. Pick a Design for Your Store
- 10. Set up Your Core Pages
- 11. Extend Your Store with New Features
- 12. Test if Everything Works
- 13. Promote and Get Traffic
1. Start with a Store Setup Sheet
‘A what?’ Okay, this may sound a bit cryptic, but at least I have your attention!
Your store setup sheet is a simple doc where you answer the most fundamental questions about your future online store.
We’re going to use that doc later on when deciding on the specific features the store will need, the customer base we’re targeting, the software we’ll use, and even the marketing approach.
Here are the questions (it’s best to write the answers on a piece of paper so you can keep them in a visible spot):
Do you want to sell physical or digital products, or both?
Different types of products will need different software to make selling them possible; two of the most common scenarios are selling physical or digital products:
- Physical — simply speaking, this is everything that needs to be physically shipped to the customer
- Digital — all downloads, PDFs, ebooks, content access, software, subscriptions, memberships and so on.
Are you selling locally or internationally?
Selling outside your country complicates things on a number of levels. Starting with taxation issues, all the way to shipping internationally.
The way to think about this question is to focus on the ‘most likely scenario’. So, for instance, even though you’re probably tempted to offer your products worldwide, will that really be the core of your business right from day one? If not, go with ‘locally’ for this one.
Are you selling products or services?
Some people also like to think about this in terms of selling a thing vs selling your time.
If you’re only going to be selling services, you may not even need an e-commerce setup. A simple contact form may be enough since you’re going to handle all of the negotiations and payments later on.
In most cases, you’re going to go with ‘products’ here.
Are your orders going to be fulfilled by someone else?
In the classic model of selling online, it’s you who handles the entire process of getting the product ready and then shipping it to the customer.
But there are other options:
- Drop shipping: The customer buys a product from your website, but then the product is fulfilled by a third-party — usually, the original manufacturer. In this model, you don’t have to keep an inventory of the product, and, instead, you’re the middleman who finds the customer and sells them someone else’s product.
- Amazon FBA: ‘Fulfillment By Amazon’ is somewhat similar to drop shipping, but not entirely. In this model, it’s still you selling your own products, but this time you get Amazon to pick up, pack and ship your orders for you.
Generally speaking, most fledgling online stores will opt for the classic e-commerce model where it’s them — you — taking care of the entire fulfillment process.
What’s your primary market location?
This is about the location of your target customer base.
Some helpful questions:
- Are you going to sell to a local market — your city or county?
- Are you going nationwide?
- Are you going worldwide?
Zooming in on your target market can help you to discover unique promotion opportunities or reveal some details about your core customers that may not be visible on a larger scale.
How many products do you want to sell? (estimated)
An expression that’s common in the world of online marketing is to always start with your minimum viable product and then scale from that.
What this basically means is to start with just a couple of products that are going to make up the core of your offering. While it’s incredibly tempting to sell hundreds of products when you start an online store, this may not be the best path to take for new sellers.
A couple of reasons:
The majority of your sales are likely to come from just a few of your products anyway — not the whole catalog equally. To take it even further, there are countless successful companies that have made their name offering just a single type of product, such as Casper, the mattress company.
They managed to become a $100 million company in less than two years, offering just one kind of mattress. It’s only recently that they’ve begun offering bed frames and new lines of products.
From a practical point of view, it may not be worth it to start an online store with products that aren’t going to sell well anyway, since servicing them requires ongoing effort. This effort can be better spent on your top products instead.
Moreover, there have been countless experiments done trying to pinpoint the best number of products a store should offer, and time and time again, the conclusion has been that fewer is better. In simple terms, the less choice there is, the easier it is for the customer to make up their mind.
In the end, focus on your core products first — the products that were the entire reason behind you wanting to start an online store in the first place.
So, how many of those do you want to sell? Think in groups: Will it be one to five products, five to ten, ten to 20?
With all of these answers at your disposal, you can now move on to the other steps of building an online store.
Again, the idea behind this is to have all of the crucial details about your store in one place. We’re going to use that information later on when making decisions about things such as designs, page structures, software and so on.
2. Get to Know Your Competition
Okay, so if you think there’s no competition and you’re the first genuinely innovative entrepreneur who’s come up with whatever business idea you have, then you’re wrong, and you’re in trouble.
You never want to be first to the market.
- Facebook wasn’t first to the market. There was Friendster, and this thing called Myspace.
- Google wasn’t first to the market. There was AltaVista.
- Netflix wasn’t first to the market. There was Blockbuster.
… I can go on.
The point is that being first, while it may make you feel warm at heart, doesn’t actually pan out in practice. If you’re first to the market, this either means that:
- (a) there’s actually no market for what you want to sell
- (b) someone else tried this market in the past and failed
A better idea from a business point of view is to be ‘yet another player in an existing market’.
I know this doesn’t sound nearly as sexy, but it’s just a more viable scenario. Competition is good. It validates the market.
Let me emphasize it some more: The pure existence of some competition is a good thing when you’re about to start an online store or business. Here’s why:
- It means there’s money to be made in the niche.
- It means other people have already built/found products that resonate with customers and that those customers want to buy (and you can emulate them).
- It creates great opportunities for you to research the market and see what works.
- It gets the customers accustomed to the concept of spending money on the kinds of products you’re going to sell.
In other words, your competition can be a goldmine of information about the market, its condition and the products that are worth making the effort to sell.
In this section of the guide, we’ll learn how to spy on your competition and how to interpret the information you’re getting.
Here’s why we’re doing competitor research:
- ✅ We want to learn what works in the niche, both in terms of the products that sell well and the marketing methods that are effective and can be emulated.
- ✅ We want to learn more about the customer base, what they expect, what they like to buy and what sort of marketing messages resonate with them.
- ✅ We want to use the insights we get to then plan our online store launch.
💡 Note: I want this to be a hands-on type of guide. For that to work, I’m going to pick a niche and start an online store in it as we go through the steps. The niche I’m choosing for this is houseplants — as in, I’m going to build an e-commerce store that sells houseplants, and show you every step of creating it. That being said, the tactics showcased below can be applied to any niche — the research steps and store building steps are similar.
Let’s get started:
2.1. Identify the Competition
The first order of business is to find out who your competition actually is.
And I don’t mean in an abstract way, but specifically — with specific business names and all.
The good news is, if you’ve been actively interested in the niche yourself for any amount of time, you probably know all of those names already.
If you’re not quite sure, that’s no problem, we’re going to use some tools from the web to find everything out.
So, start by listing the companies/online stores you know of. Those can be companies you’ve bought from yourself, companies you know other people buy from, companies that are in your local area… anything goes. Next, we’re going to broaden the search to include similar businesses that can be found online.
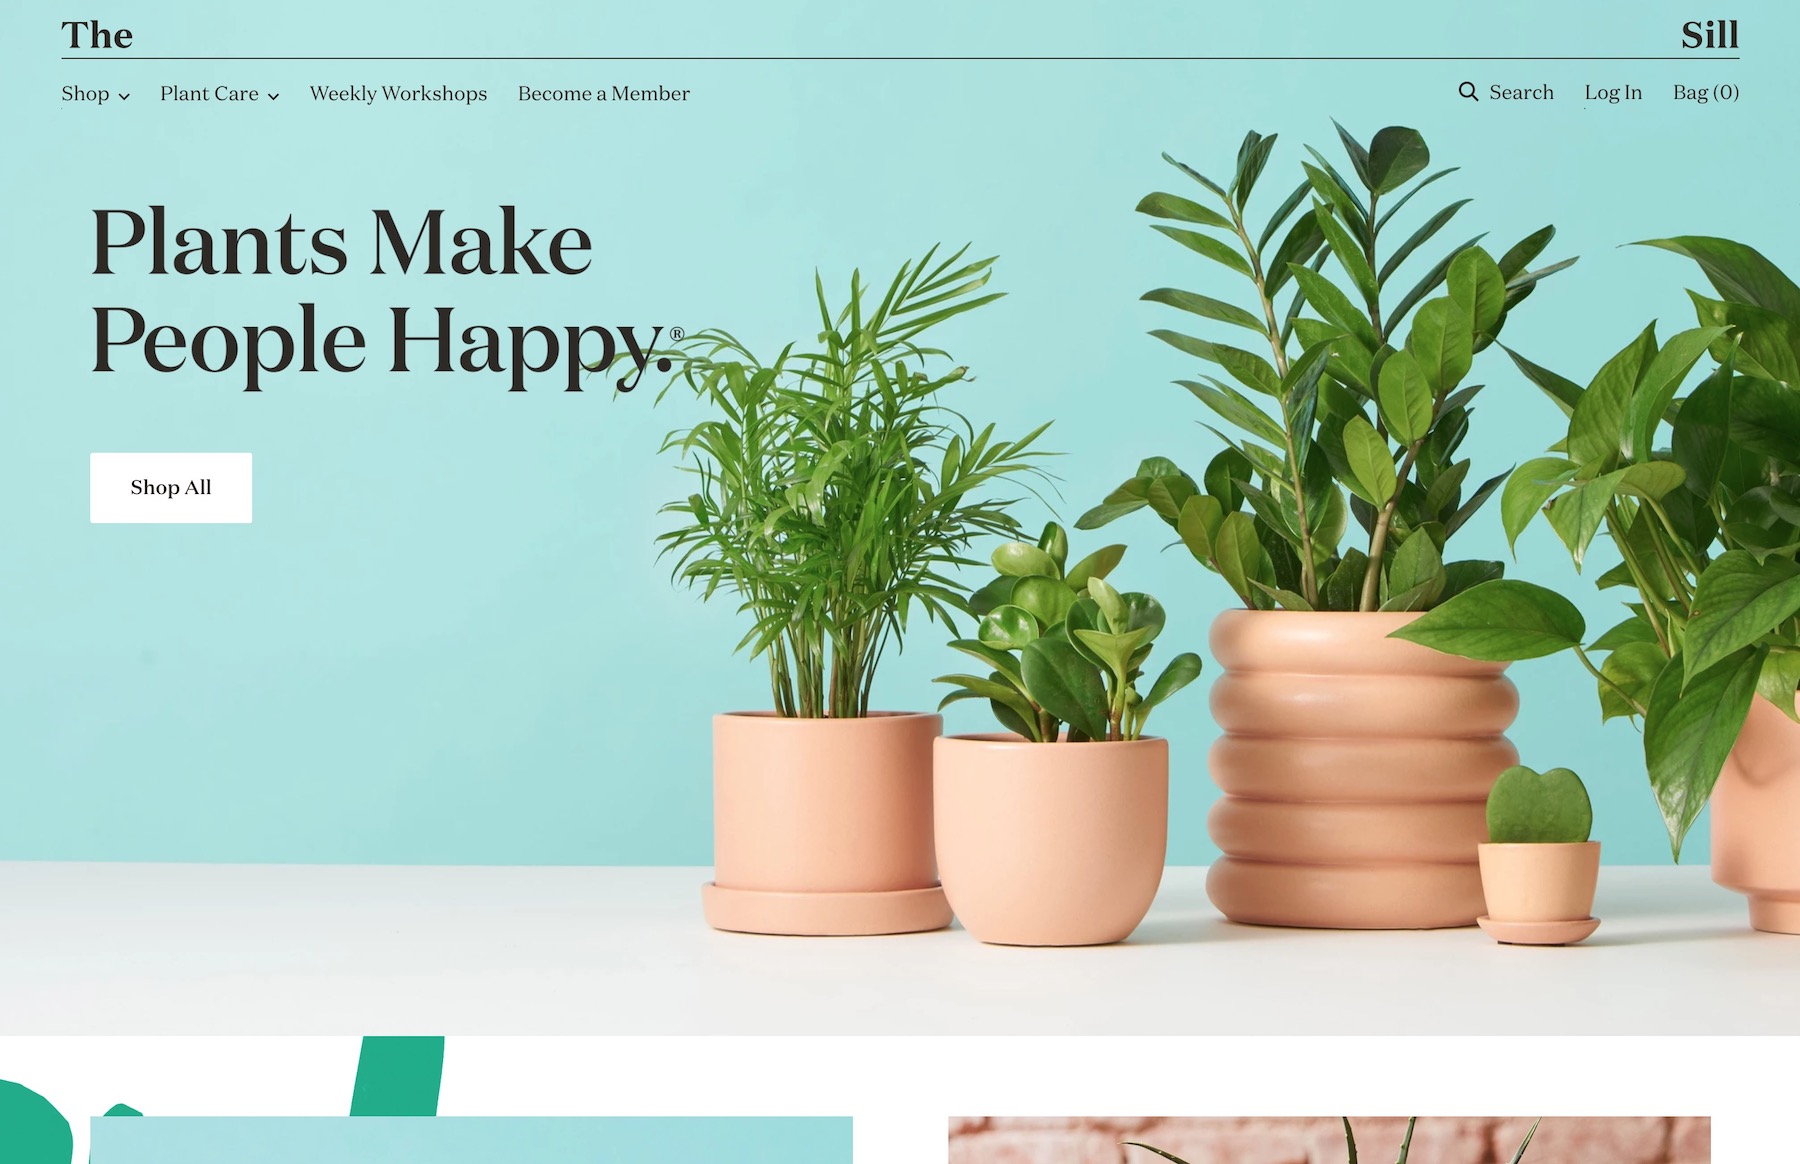
Since, in my example store, I’m going to be selling houseplants, my main competition in the niche is a nice store called The Sill. It offers pretty much the exact category of products I want to sell, and I imagine it targets a similar type of customer as well, so I begin my research there.
⚠️ Be careful when identifying your competition. Ideally, you want to look at companies that look as similar to yours as possible.
For example, The Sill sells houseplants — precisely what I want to sell. But there are also other, seemingly similar stores out there, such as Bouqs, Nature Hills, and others. While they appear to be similar, the first one actually focuses on flowers (read: Plants that are dead), while the latter sells planters for trees.
This may sound insignificant at first, but misidentifying your competition can cause a lot of problems later on. For instance, the customer for flowers isn’t at all the kind of person who buys houseplants.
Okay, back to the topic:
With a couple of your competitors listed, you can do some online research around them. The first tool we’re going to use is SEMrush, a versatile online marketing and research tool.
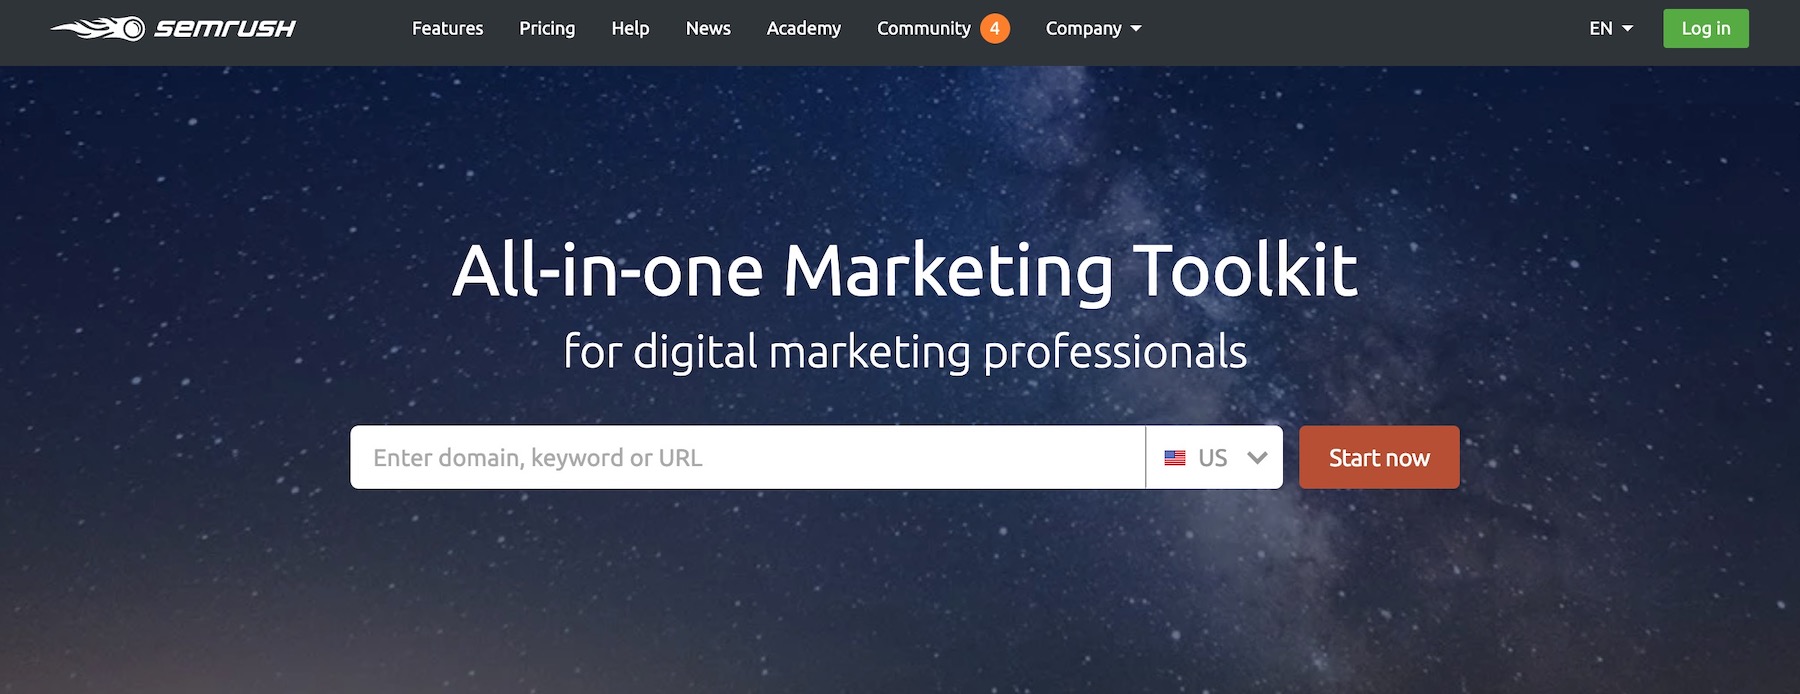
Start by inputting your competitor’s website address into the search field. You can do up to ten searches for free, which should be enough.
On the results page, you’ll find a whole range of estimated parameters about the website, the size of its traffic, the number of backlinks and more.
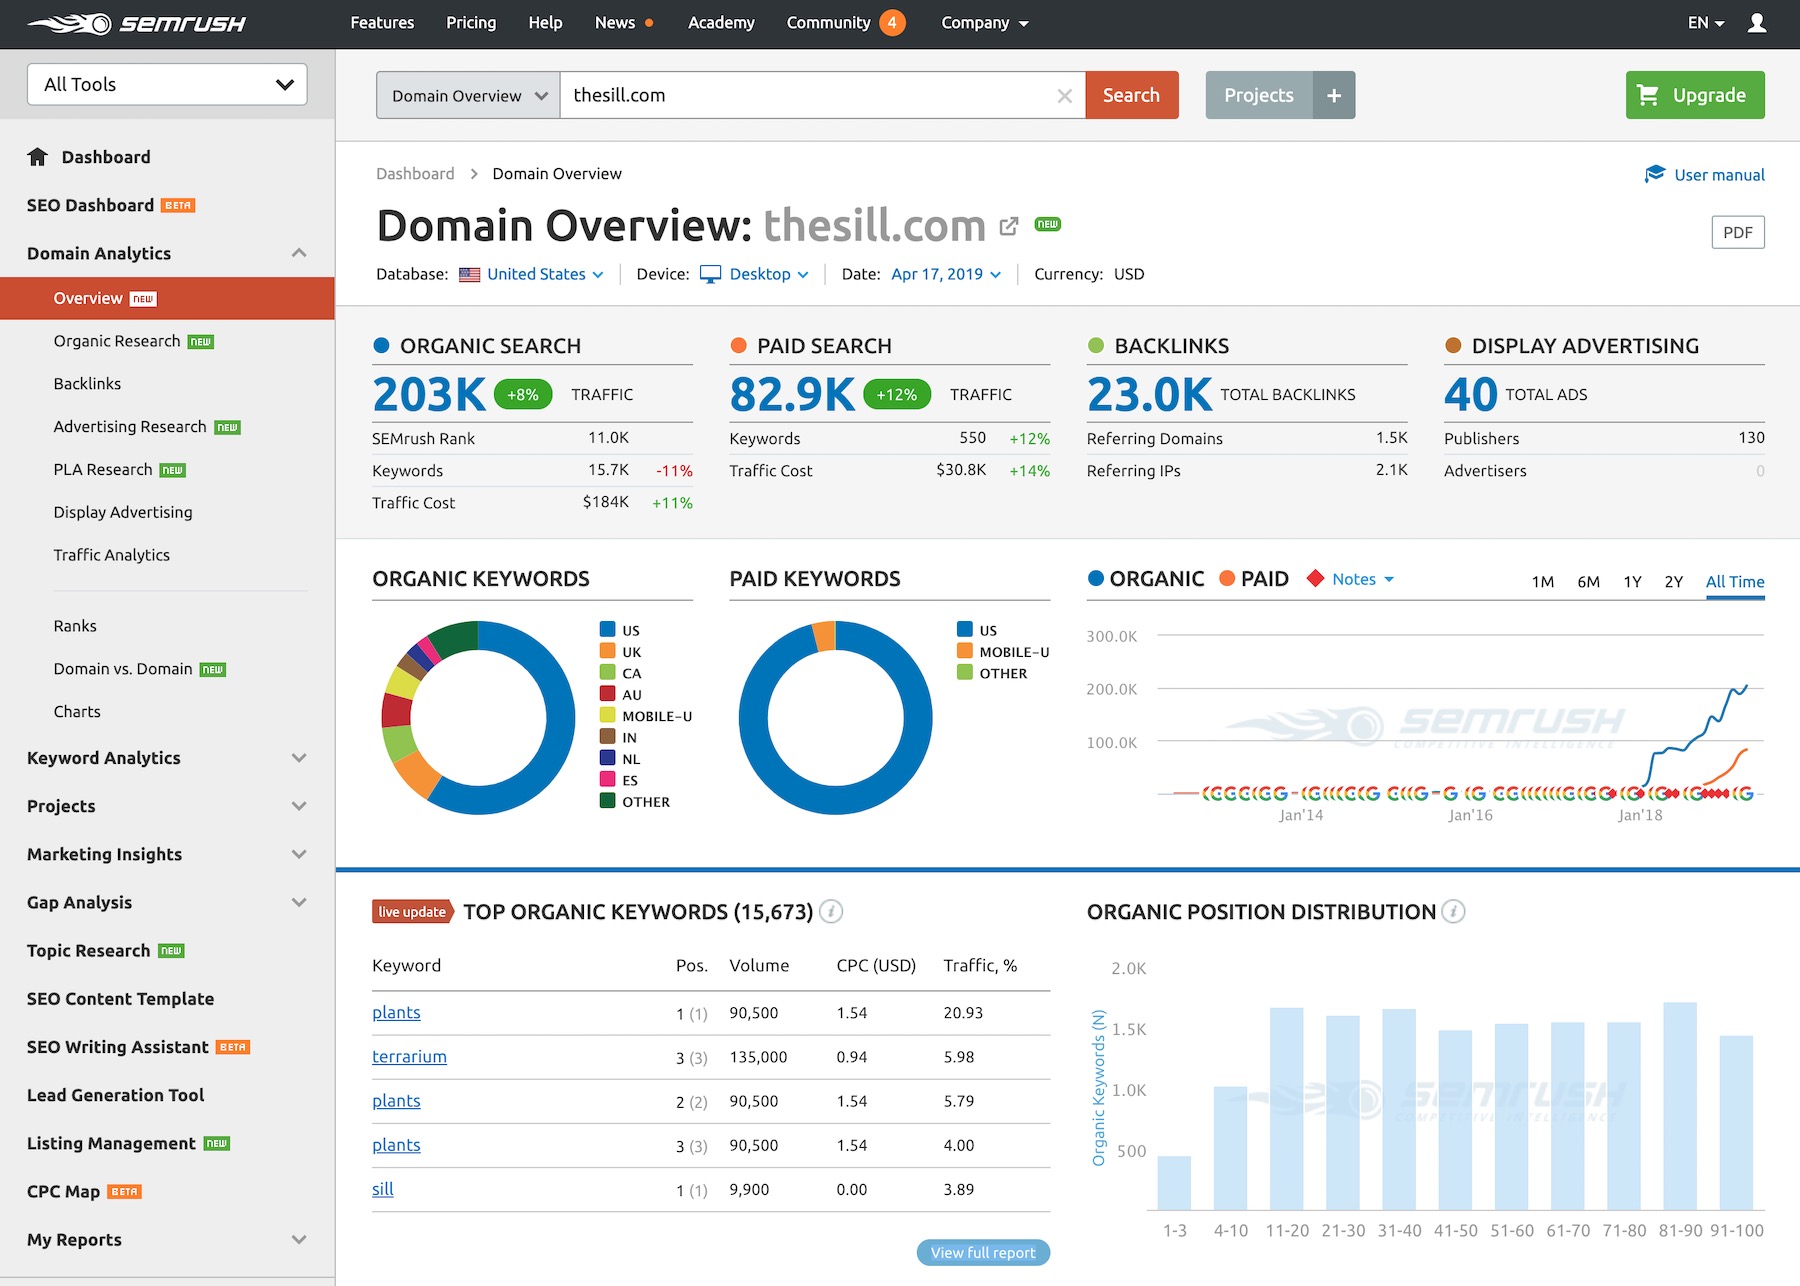
Further down the page, you’ll see a list of known competitors of that site according to SEMrush. In most cases, you’ll find some gems that will allow you to expand your list of competitors and broaden your research. In my case:
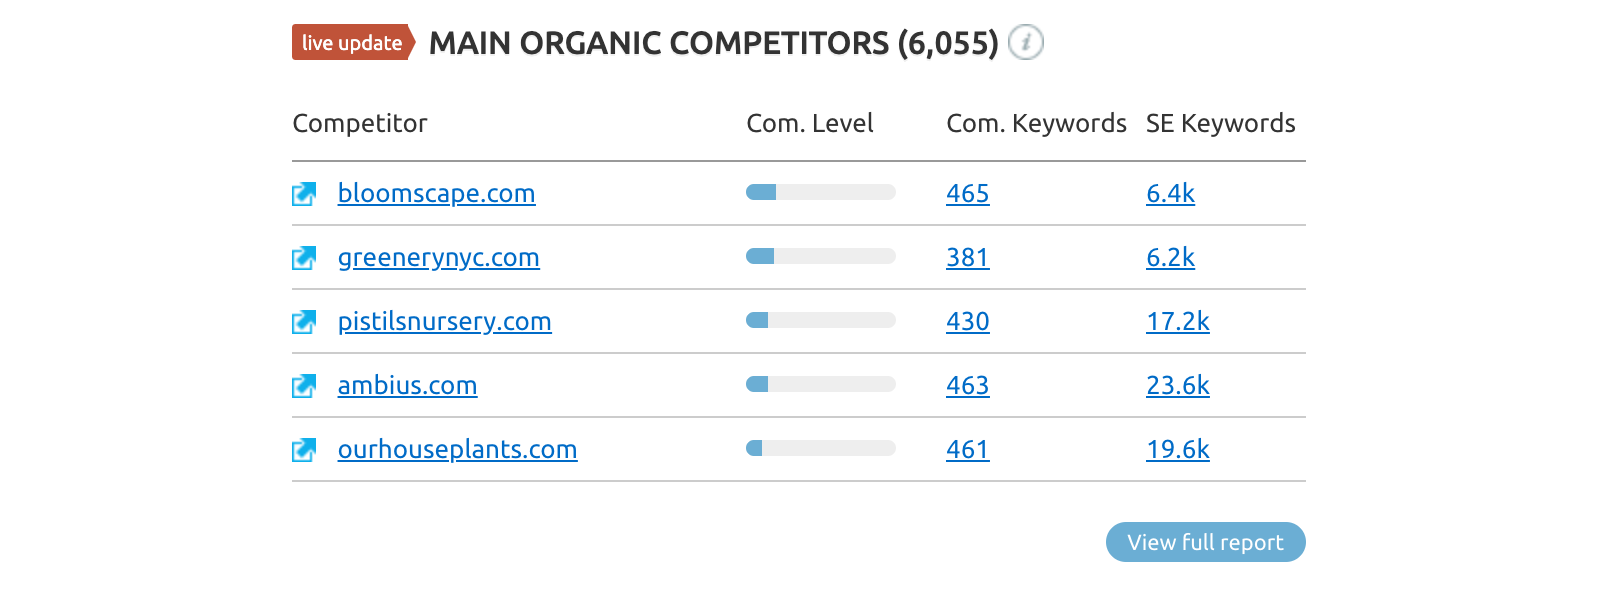
If you click on View full report, you’ll see an even fuller list:
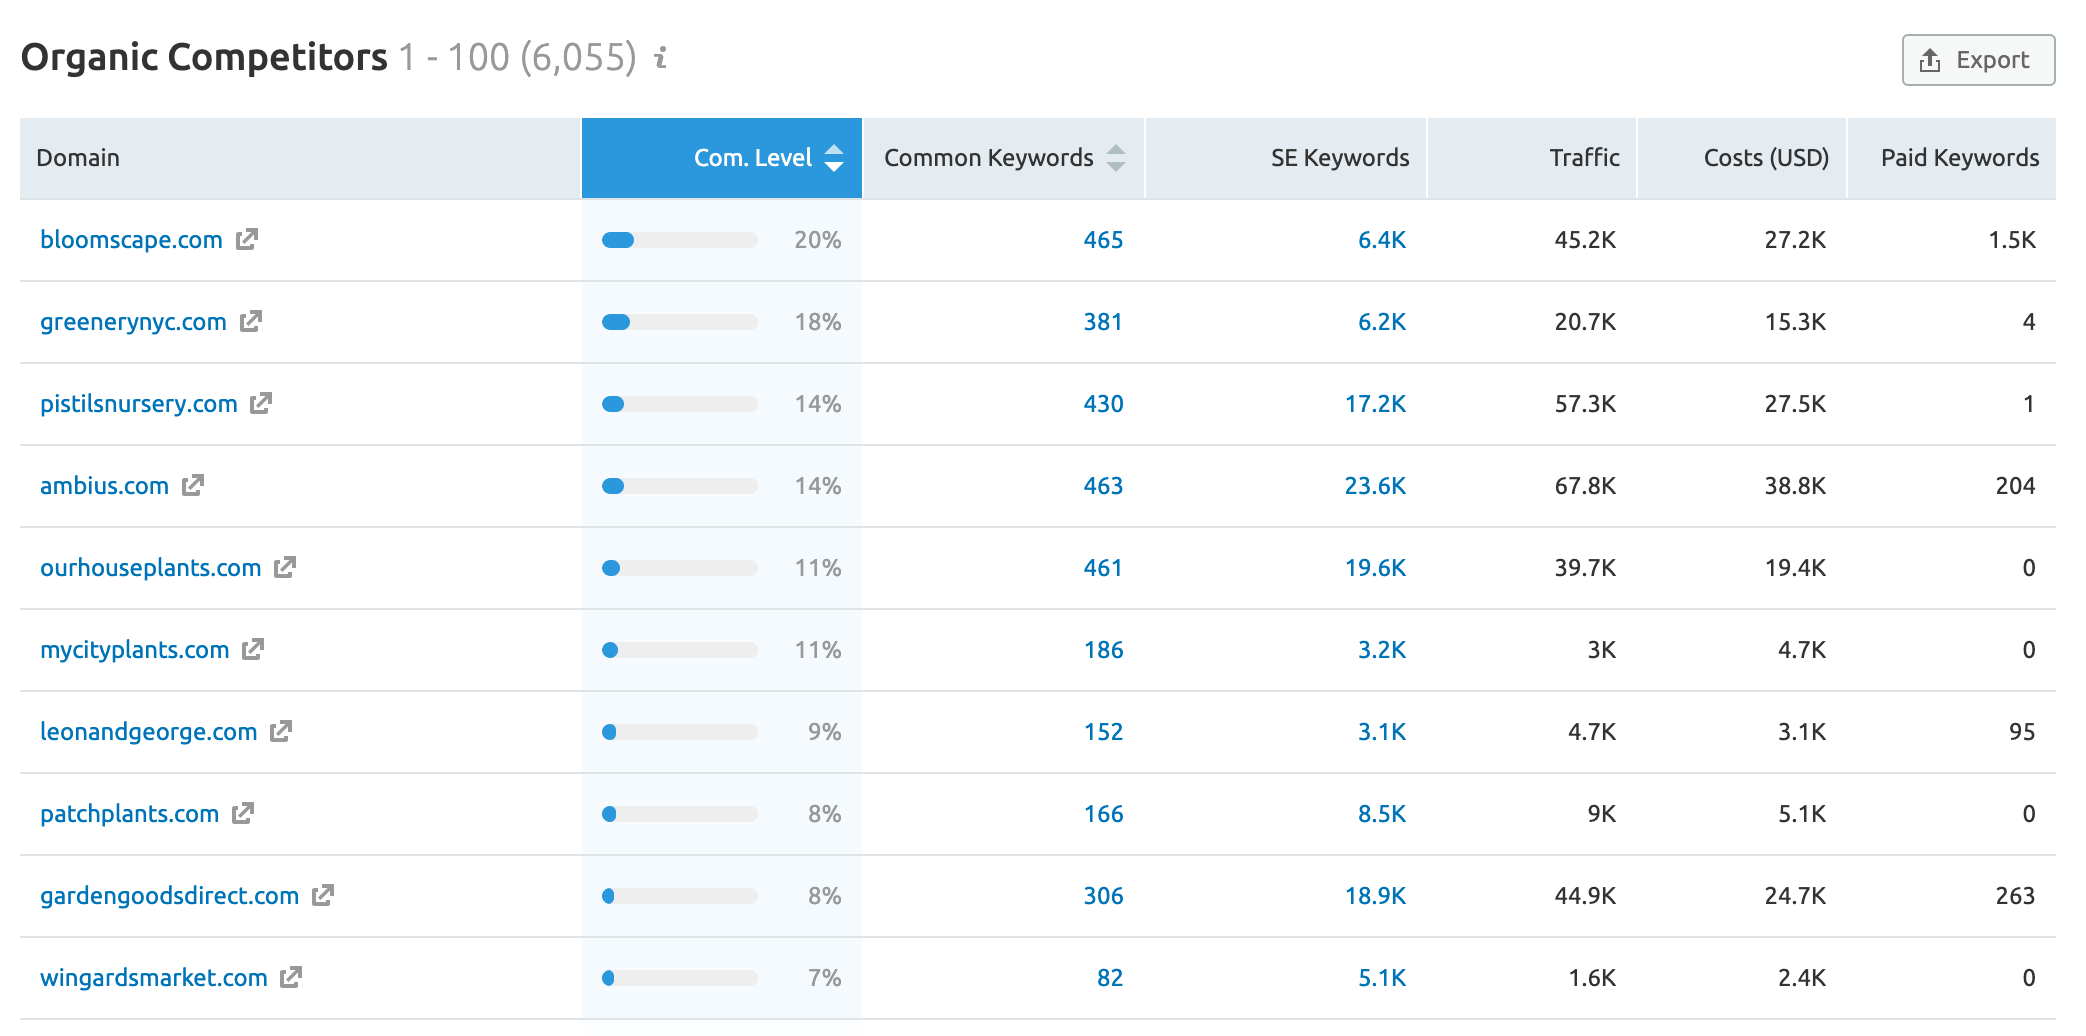
From that list, I was able to single out some additional interesting sites to look into further: Bloomscape, Greenery NYC, Patch and My City Plants.
You can expand your list even further, repeating the steps for your niche.
Generally, the more time you spend on this step and really get to know your competitors, see what their sites are like and so on, the more you’ll benefit later on when building your online store.
You should also list as many local competitors as you can. Those local competitors can become your partners, improving both your businesses along the way. Plus, learning what works in your local market can be invaluable.
✍️ List at least ten competitors.
This doesn’t only mean the sites/competitors you like — if someone appears to do well, but you don’t like what they represent for whatever reason, add them to your list anyway. Looking into what makes them successful can pay off.
2.2. See the Products They Sell
With your list of competitors at hand, now is the time to see what type of products they sell (specifically) and what makes those products attractive.
💡 One important note: As you’re going through the steps here, don’t just look at the products your competition sells, look at the way they’re presenting those products too — how the products are categorized and how they’re organized in the online store. As I mentioned before, your competition can be a true goldmine of information on what works in the niche.
The first step is, obviously, to visit each of your competitors’ e-commerce sites and spend some time in their product catalogs.
The number one thing is to decide whether the products, and, therefore, the niche, are ‘product driven’ or ‘lifestyle driven’.
Here’s what I mean by that:
- Product-driven niches are the ones where the specific product and its parameters are what sells. For example, think automotive parts. Basically, if someone needs an air filter for a 2014 Camaro then they need an air filter for a 2014 Camaro. What matters is the product, and the way that product is presented needs to be factual. Is the filter new? Does it fit the 2014 model for sure? What’s the price? Is there a warranty? Facts. Facts. Facts.
- Lifestyle-driven niches are entirely different. Think clothing. Even though each item of clothing has its parameters (such as size, price, and so on), those aren’t what sells the item. What you’re selling instead is the lifestyle associated with the product. The customer is thinking: Am I the kind of person who wears this kind of clothing?
Where these differences come to life is in the way the products are presented. Consider the following examples:
To follow my previous line of thought, here’s a store selling auto parts. Here’s one of the products, a Camaro air filter:
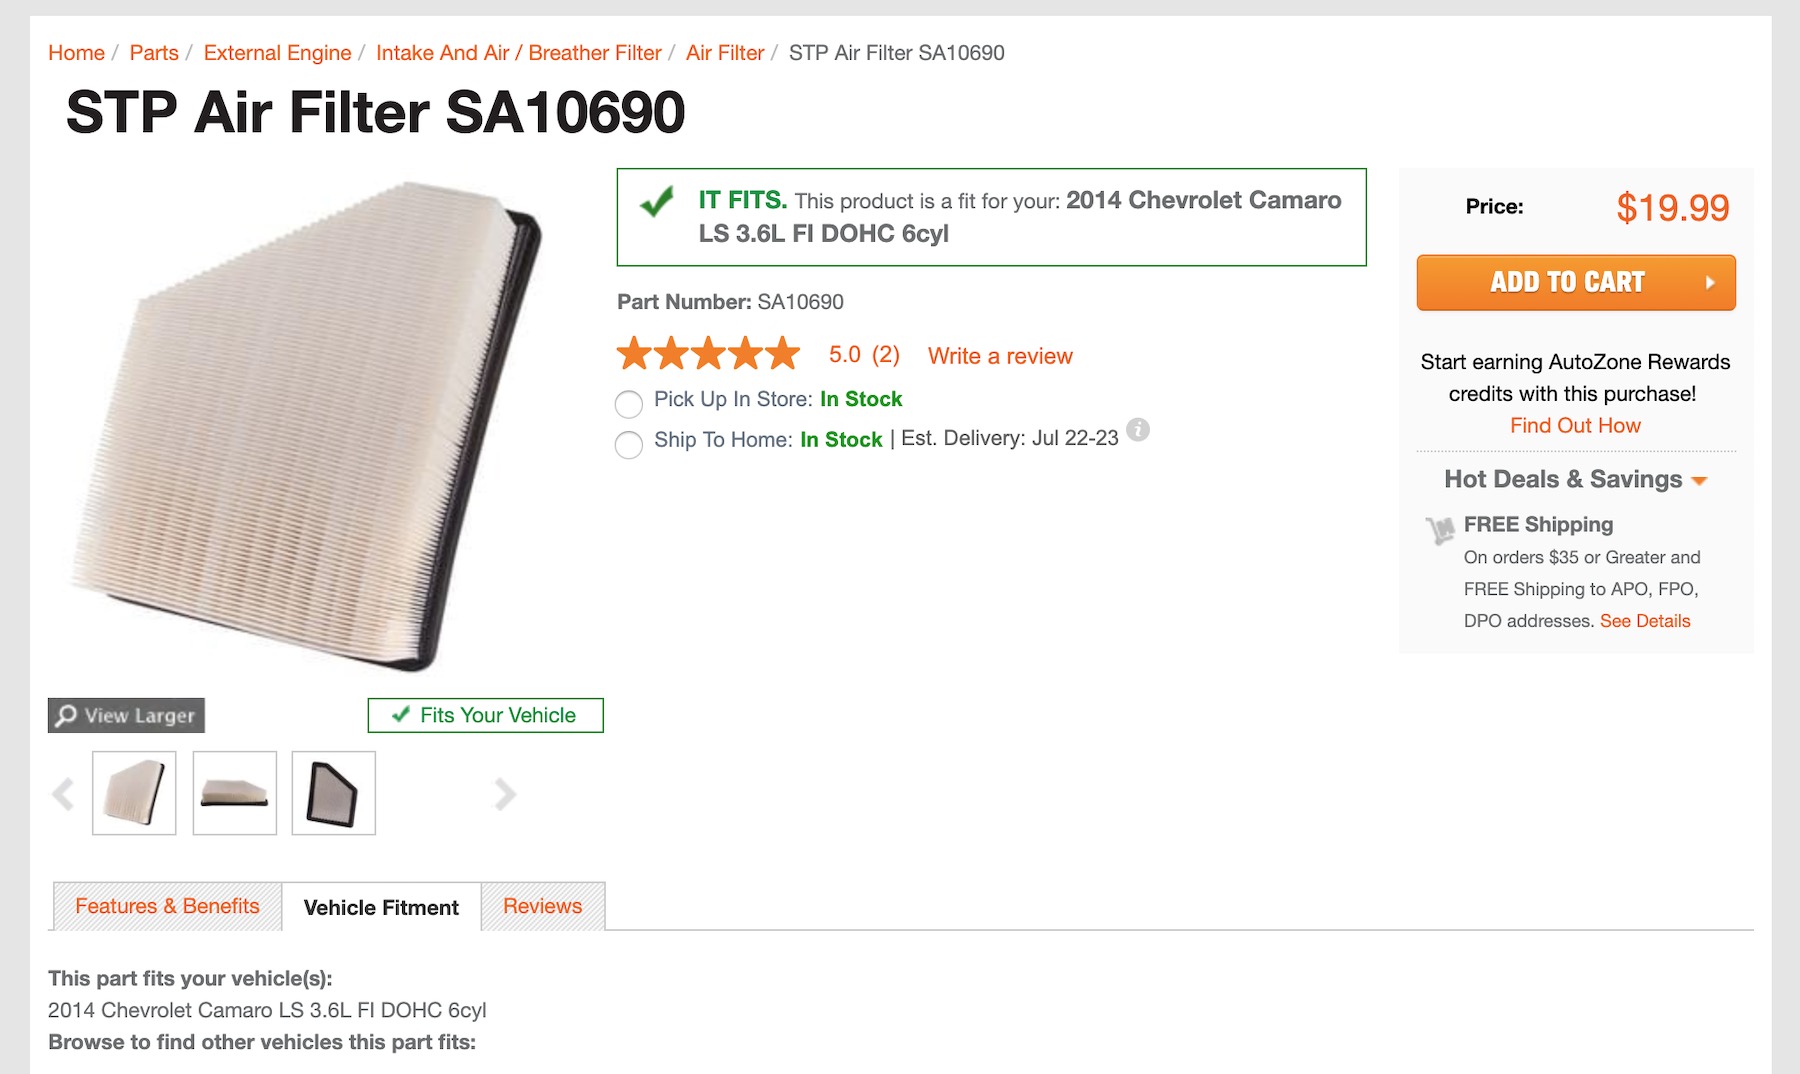
The pictures present the product on its own. There are different measurements showcased, and the description focuses on facts and vehicle fitment.
Here’s an example by Bohemian Traders — a clothing store:
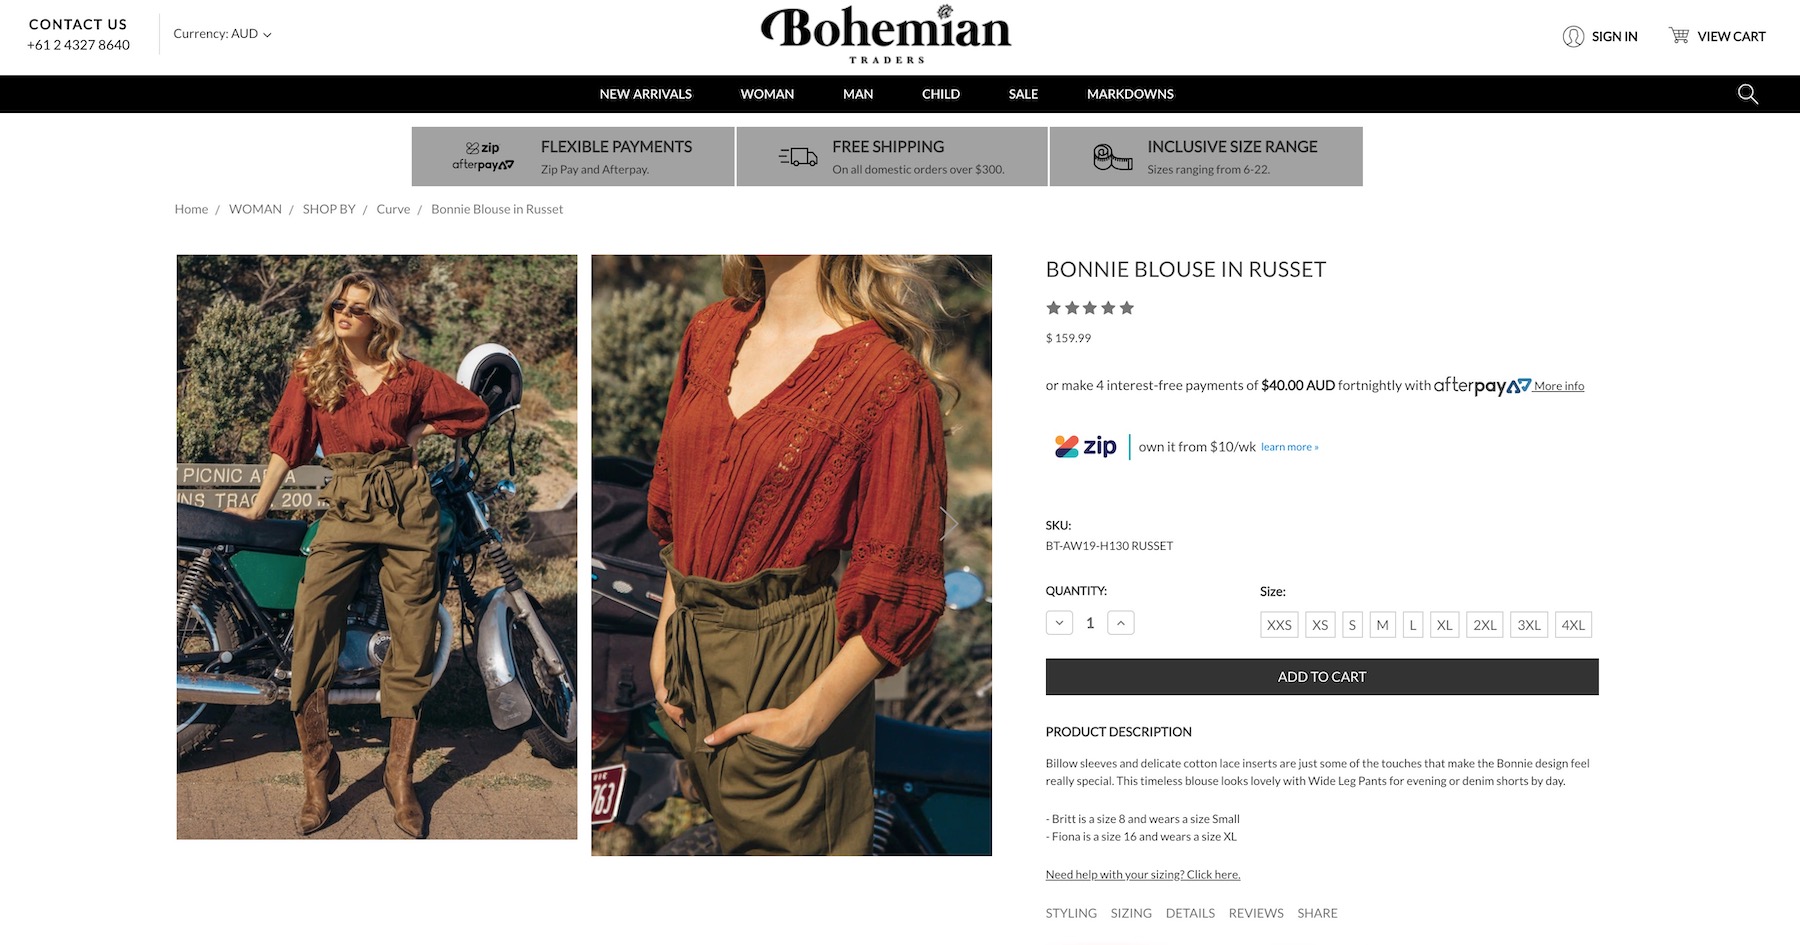
Notice how the page features pictures of a woman wearing given items of clothing. What’s being presented here is a scene. It’s a person going about their day. Happy. This company sells all of the perks associated with getting that product. What they sell is a lifestyle.
The reason I’m telling you all of this is because the lifestyle-driven vs product-driven question is one of the most important ones you need to get right when you start an online store.
Messing this up will have a huge impact on your sales.
Luckily, we can take a look at our competition and see what they’re doing. Here’s how this plays out in the case of my example store — the plant store.
The first competitor I’m going to check out is The Sill. The homepage alone gives you an idea of what they’re about.
While there are a lot of pictures of plants, as there should be, there are a couple of other details worth noticing:
- None of the plants has any identification next to them.
- Nearly all photos present multiple plants.
- The plants come in custom-looking pots — no generic stuff.
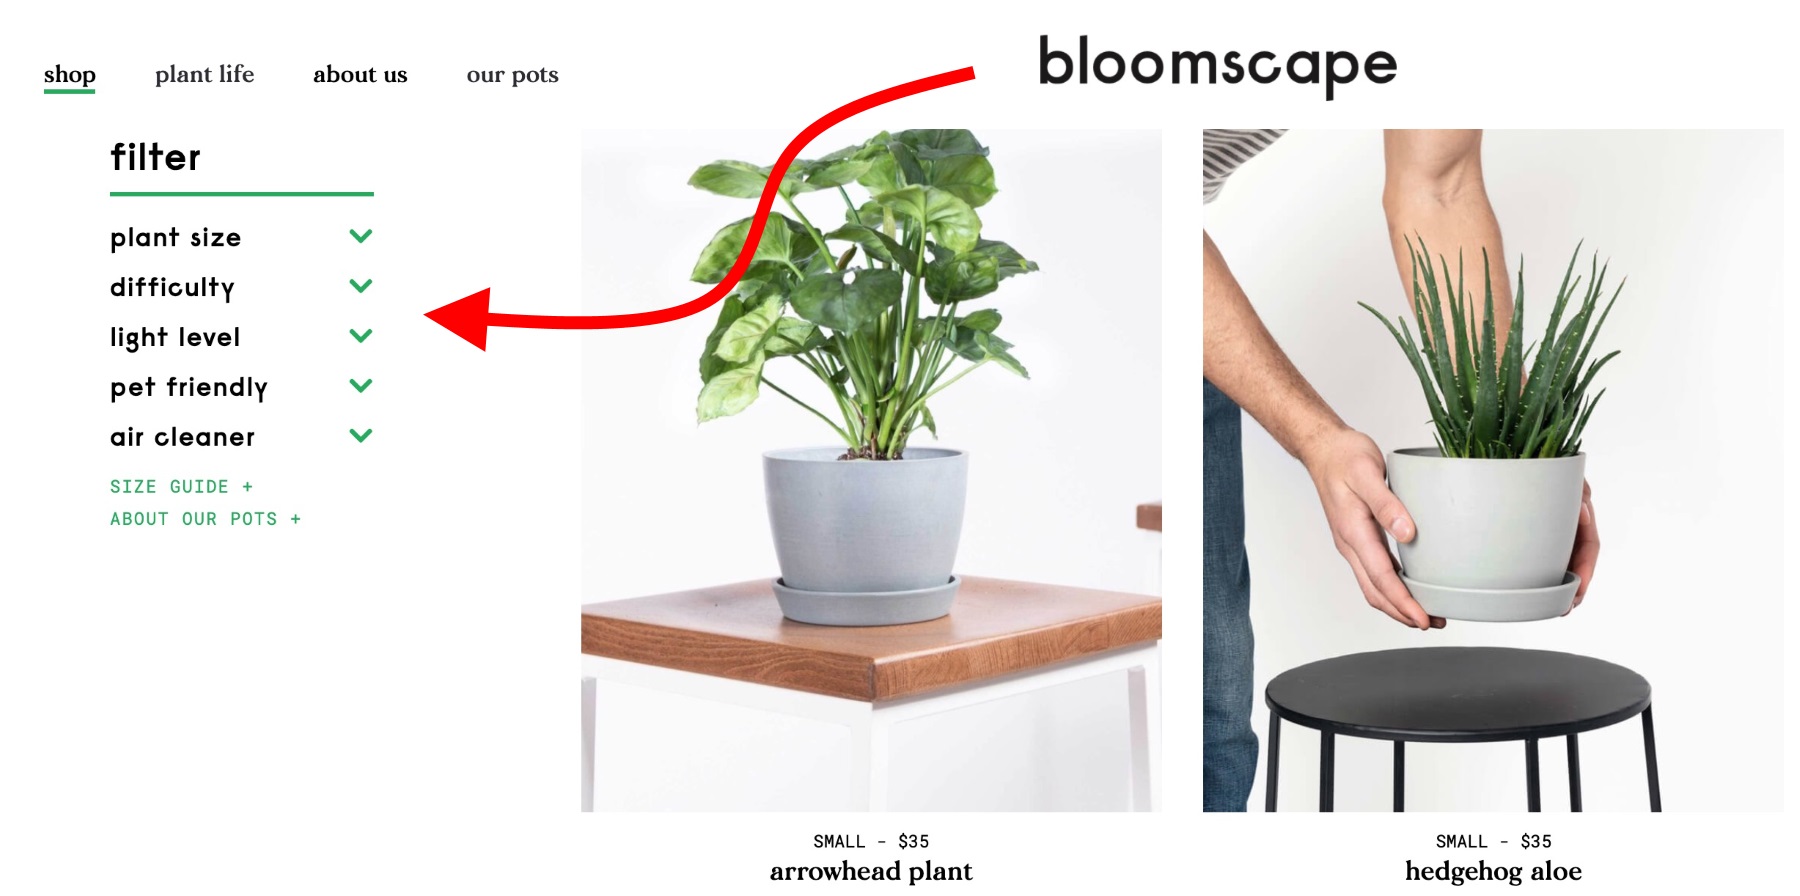
Another competitor, Bloomscape:
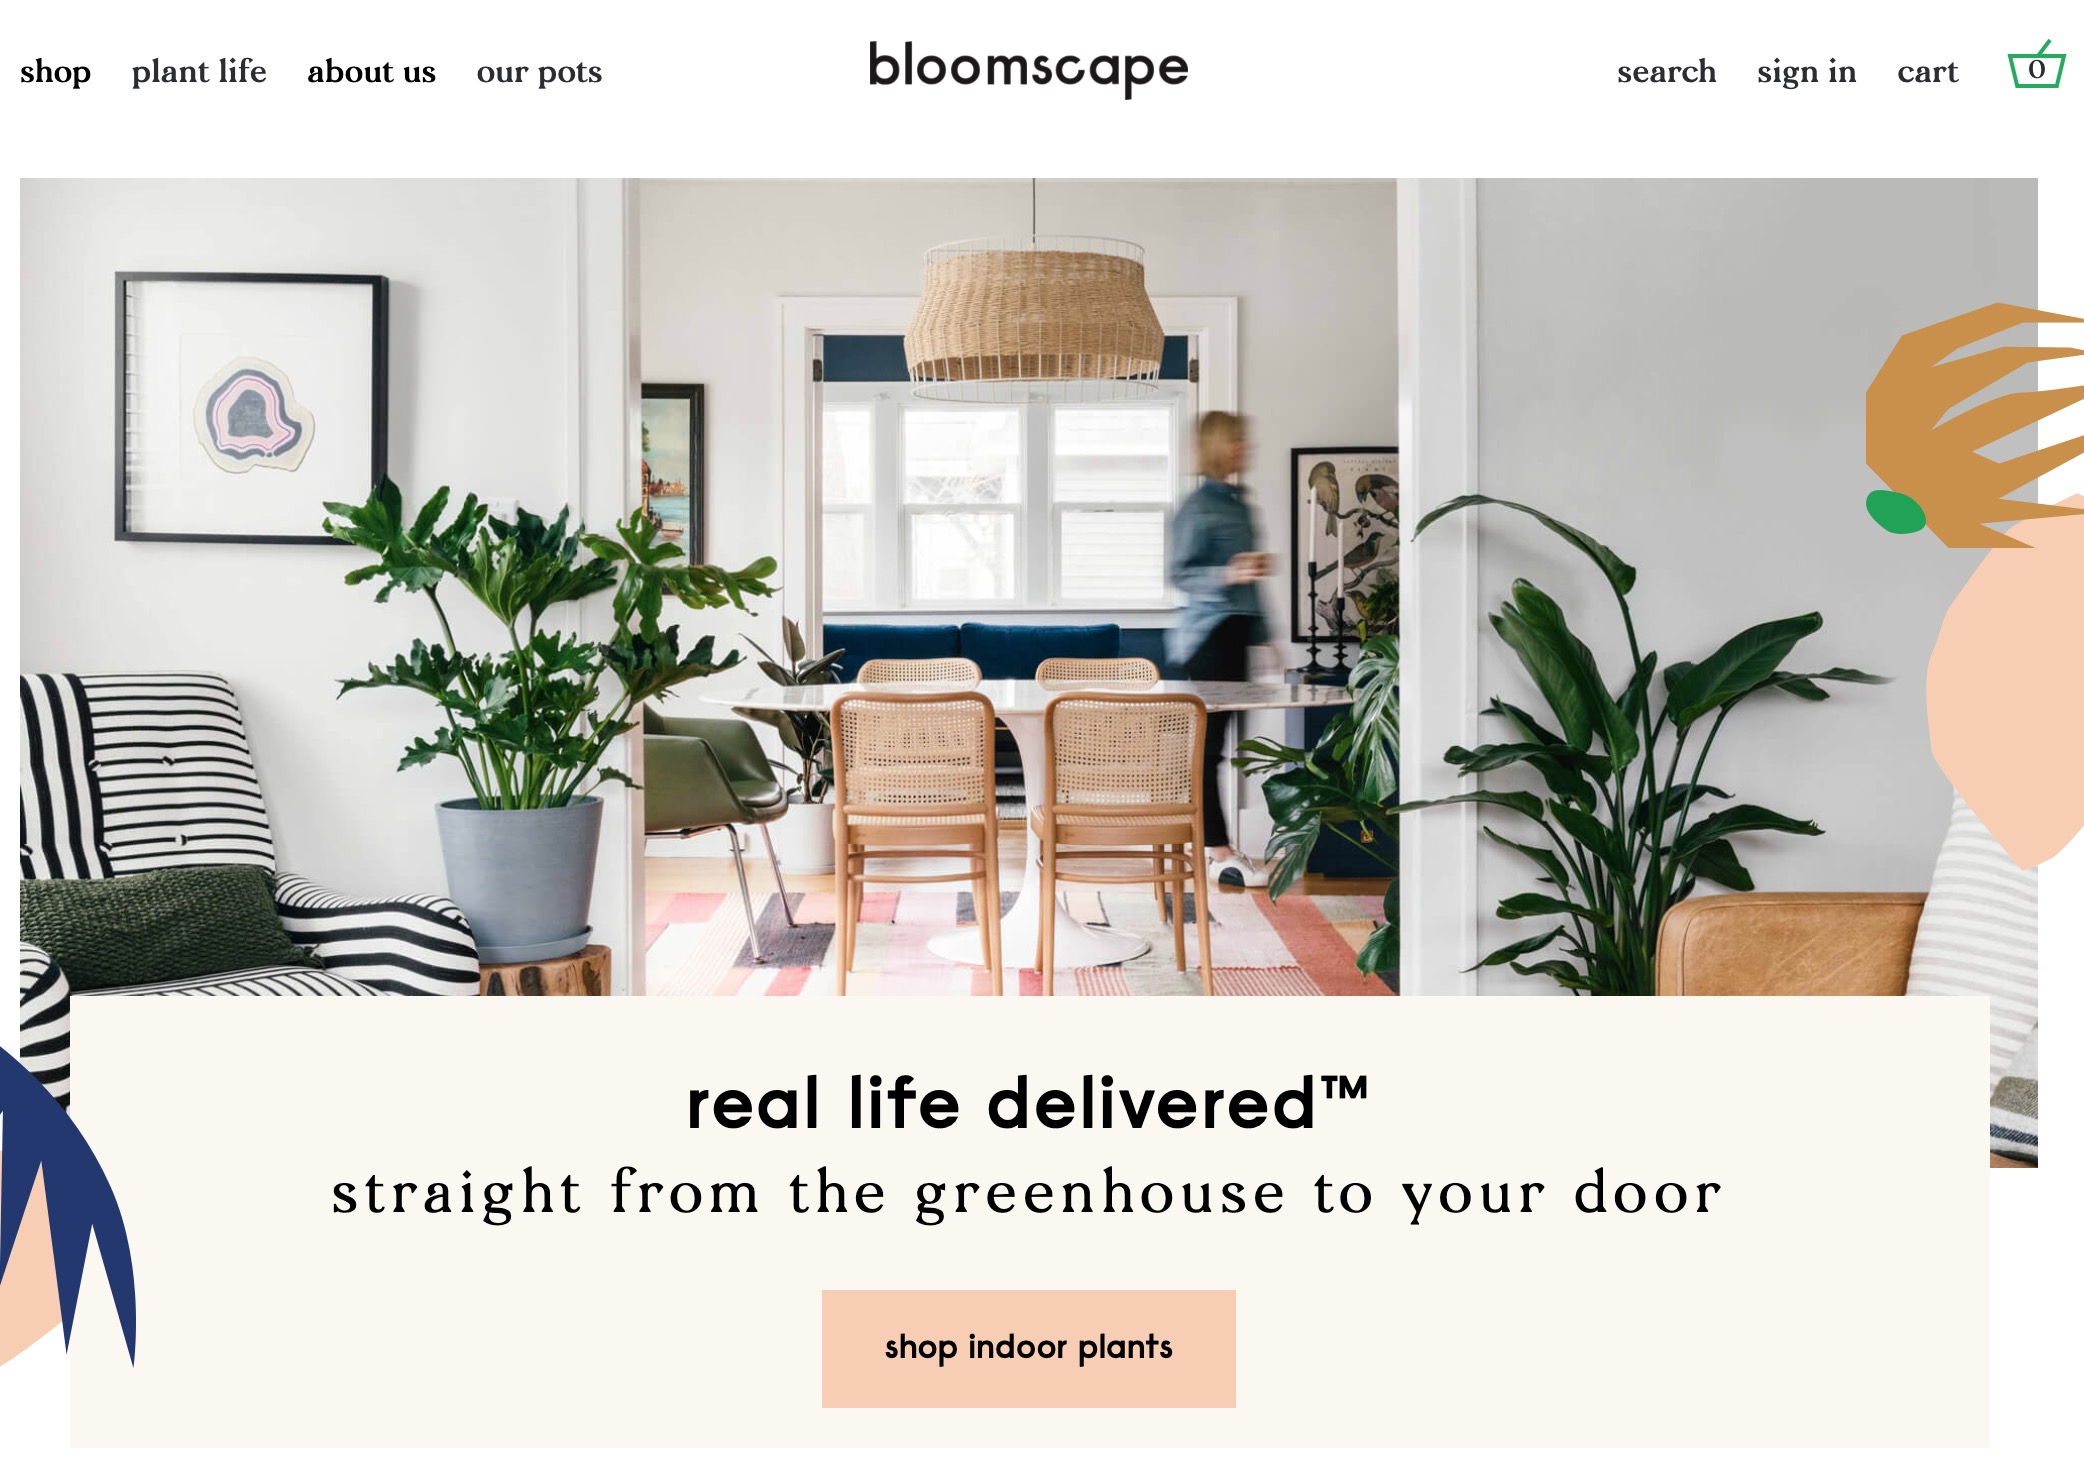
- Even less focus on individual plants.
- Pictures show whole room sets.
- The plants are always part of the photo, but not the main subject.
The above two examples suggest that this is most likely a lifestyle-driven niche.
And it makes sense. While I’m sure some people are shopping for a Fiddle Leaf Fig, most are probably interested in simply ‘a cool plant that ties the room together’. They want the lifestyle of someone who has some cool plants in the house.
Let’s now have a deeper look into the catalogs. I’m not going to analyze this to the smallest detail, since I just want to show you the principles of how this is done, but I do encourage you to spend as much time as possible on this step. Every hour spent on research will pay off hugely later on and will help you to avoid a lot of trouble.
The Sill seems to be selling all kinds of plants, and there are some details worth noticing:
- They don’t categorize the plants per se.
- The only way to filter through the store is to pick the size of the plant.
- They sell sets of plants and not just single ones.
- They offer a lot of what can be called designer plants.
- Every plant has a cool presentation and most of them come in a cool planter as well.
- Some plants come with a ‘pet friendly’ label.
- Prices are from $5 to $110.
What this tells me is that what matters most when selling plants is the price, size and presentation. The kind of plant (species) that’s being sold may also be important, but I wouldn’t bet on that.
Let’s look into an individual product page:
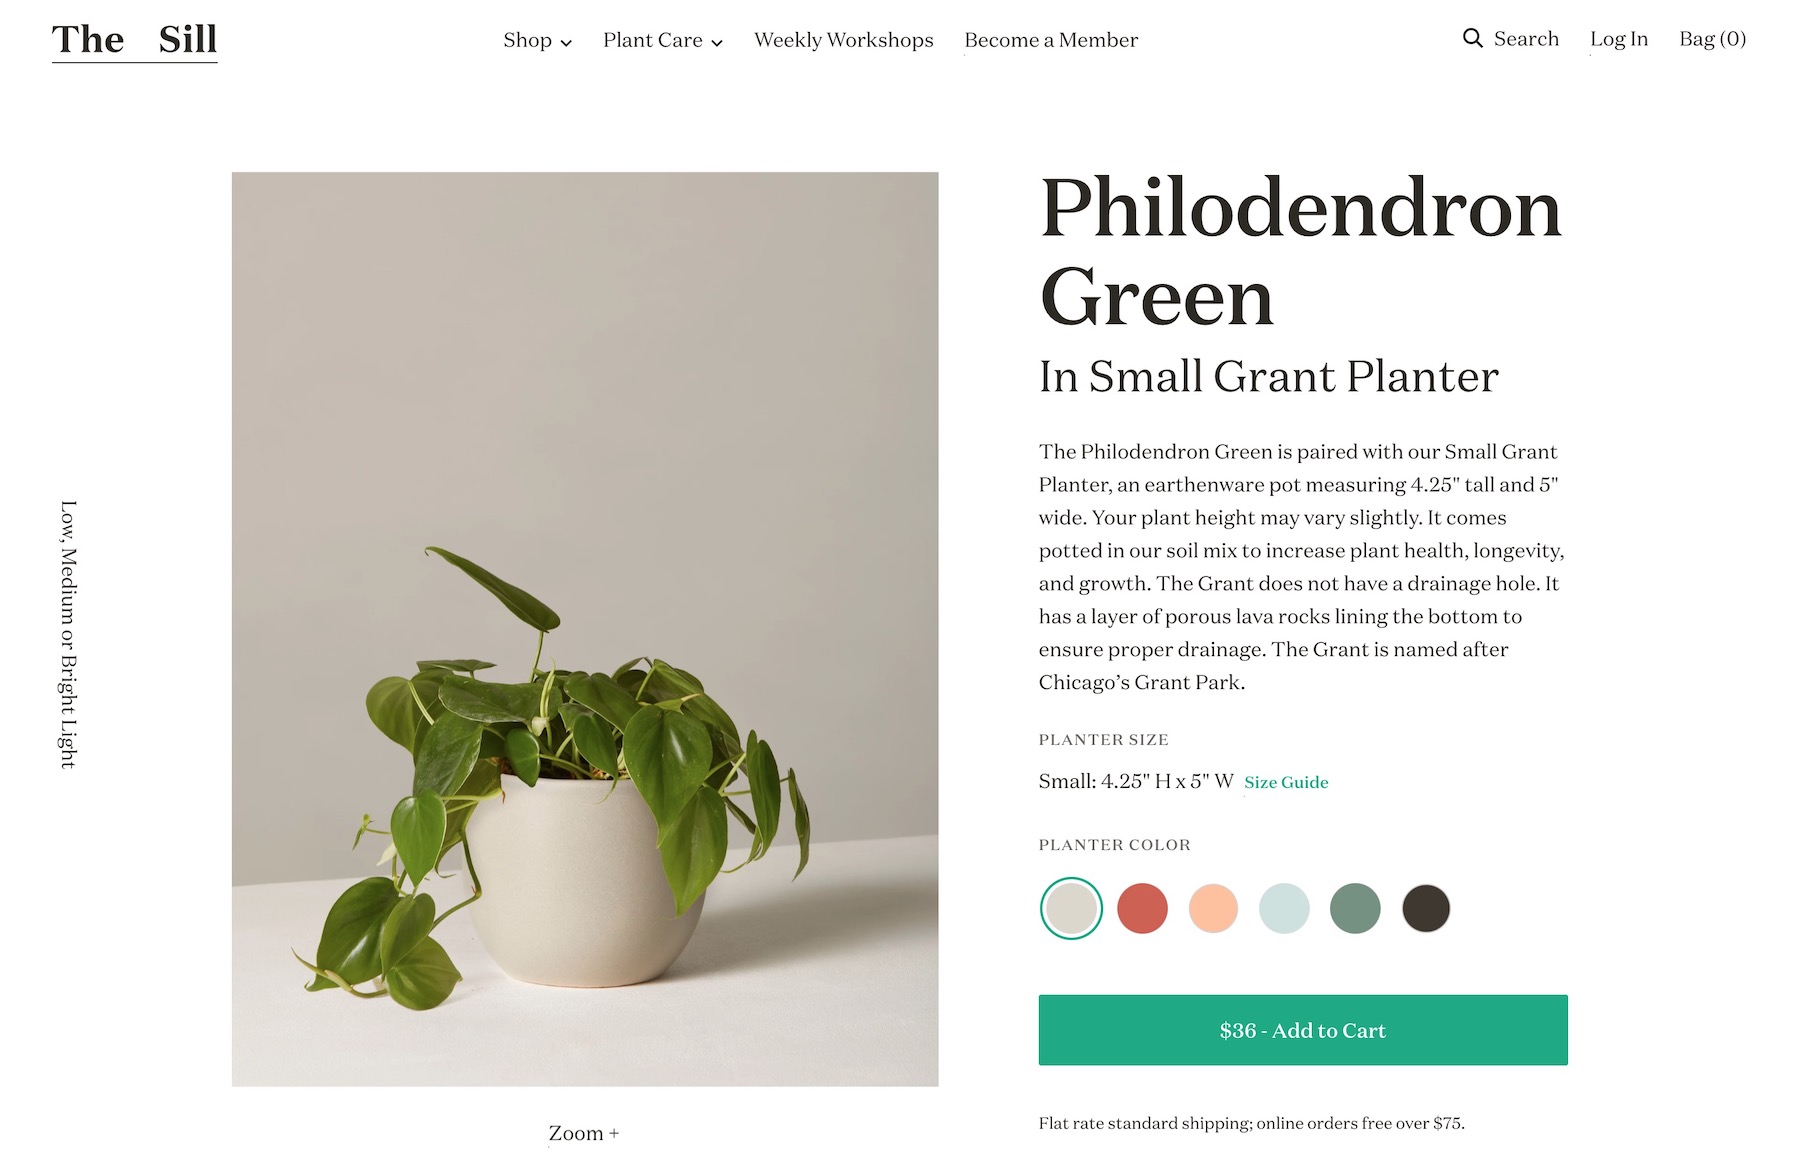
Have a look at the description. Please notice how none of the initial descriptions are actually about the plant itself — you can only see that if you scroll down to the Plant Care section. Plus, the Plant Bio is actually inside a collapsible block. This is incredible. This means the actual raw info about the product that’s being sold isn’t important at all. It doesn’t go much further into lifestyle-driven than this.
Another store, Bloomscape: Their catalog presents more filtering options, including how difficult a plant is to care for, how much light it needs, whether it’s pet-friendly or not, plus, of course, the plant’s size.
But there’s more:
- Each plant can be customized to an extent — you can pick the color of the planter.
- There’s a size guide to help beginners figure out how big the plants actually are.
- Prices are from $35 to $195.
This plant store is a bit more expensive, but that’s a good thing. This means the price isn’t a huge factor in the niche.
Looking at the individual product pages, the descriptions are very brief and don’t tell you anything about the plants. The blocks that are right beneath the descriptions are much more helpful, highlighting all of the key details a customer is likely to be interested in.
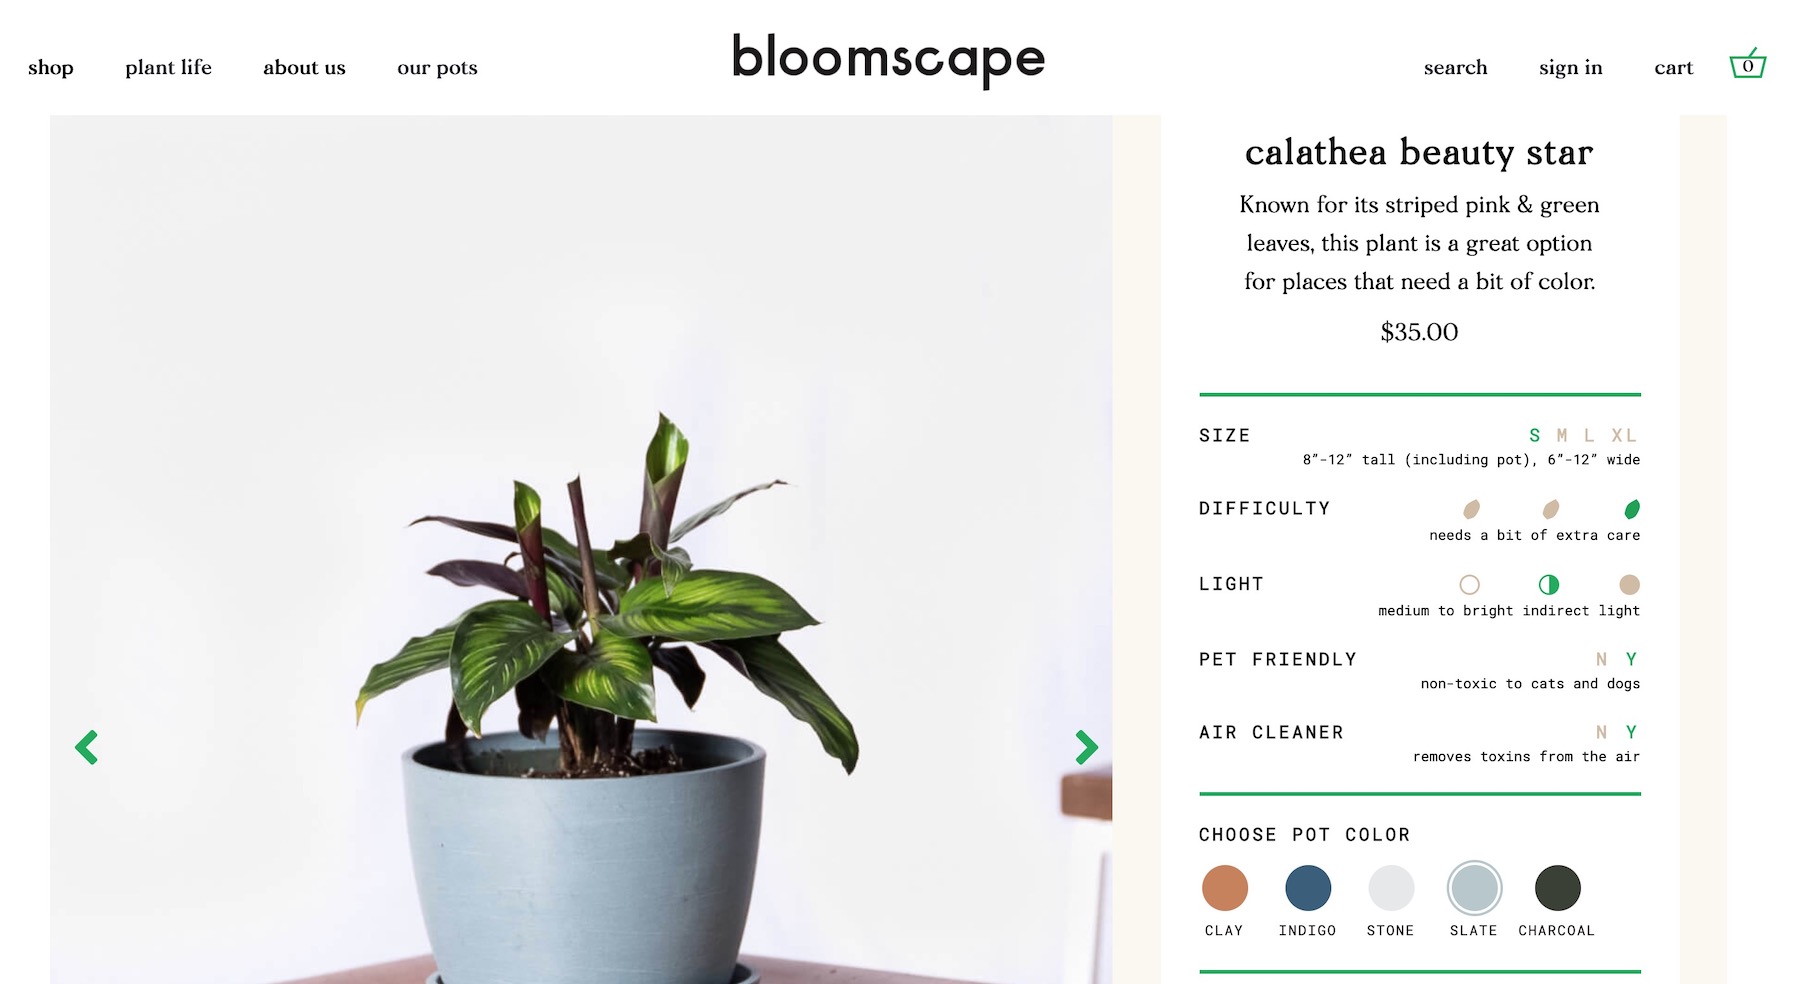
Again, you have to scroll down to get more details about the plant itself. The product page is also highly stylized.
Take notes as you’re doing this research for your niche and store. The goal is to learn as much as possible about your competitors!
What you can do next is go to the bestsellers sections in your competitors’ stores. For example, the one such section at The Sill tells me that cheaper plants generally sell better. While this information is useful, you shouldn’t decide that you’re going to sell only cheap products as well. This can backfire because you don’t actually know for sure why a given product sells best, you can only assume.
Still, looking at the bestsellers gives you an idea as to what you need to investigate more when building your catalog.
✍️ Do similar research in your niche.
- Look for the common elements that most of the competition uses.
- Examine what the average prices are.
- See how your competition categorizes its products.
- See what sells best.
- Examine what matters when describing products.
Take notes. You’ll use that info when creating your catalog further down the road.
As you’re going through these steps, also make a note of what you like/dislike about their websites/designs/offers.
For a bit more of a first-person perspective, subscribe to your competitors’ newsletters. See what kind of emails they send and which products they promote more heavily than others.
Also, buy something from your competition. See what the process is like and what’s potentially surprising about it.
Need more examples of what sells in your niche? Go to Amazon or Etsy, check related categories. Sort by bestselling. Read the descriptions and repeat the steps above.
What you should have after this step is a list of potential products that you can sell, and an idea of how you can approach selling them — all based on what your competition is doing.
3. Get to Know Your Customer Base
Now we know what’s commonly being sold in your niche, let’s learn more about to whom all of those products are being sold.
Although this may sound obvious at first, actually pinpointing your ideal customer base can take some effort.
First off, don’t make the biggest mistake of them all — thinking you can sell to everyone.
This is a common mistake. Basically, we’re used to seeing huge brands that do, indeed, sell to everyone, so we begin thinking we can be like them. This isn’t true.
And it becomes apparent when we trace back the history of some of those huge brands and see how humbly they actually began.
For example, immediately post WWII, a small Japanese company started selling small modifications to allow radios to receive all spectrum of radio waves and not just what was allowed pre WWII by the Japanese government. You don’t get much more niche than small mods for radios… This company is today known as Sony.
The fact is, if it weren’t for Sony’s early story, the brand would probably not have existed as we know it today.
You need to start small as well. Everyone starts small.
With that in mind, let’s go onto the question of the day: Who are your customers?
Let’s discover this by doing a couple of things:
3.1. Find out Who Your Competition Sells To
The first thing you can do is use online tools to get some raw data on the customer demographics your competition caters to.
The tool I like to use is SiteProfiler, which is part of a bigger suite of tools. There are limitations, but you can do a couple of searches for free once you sign up.
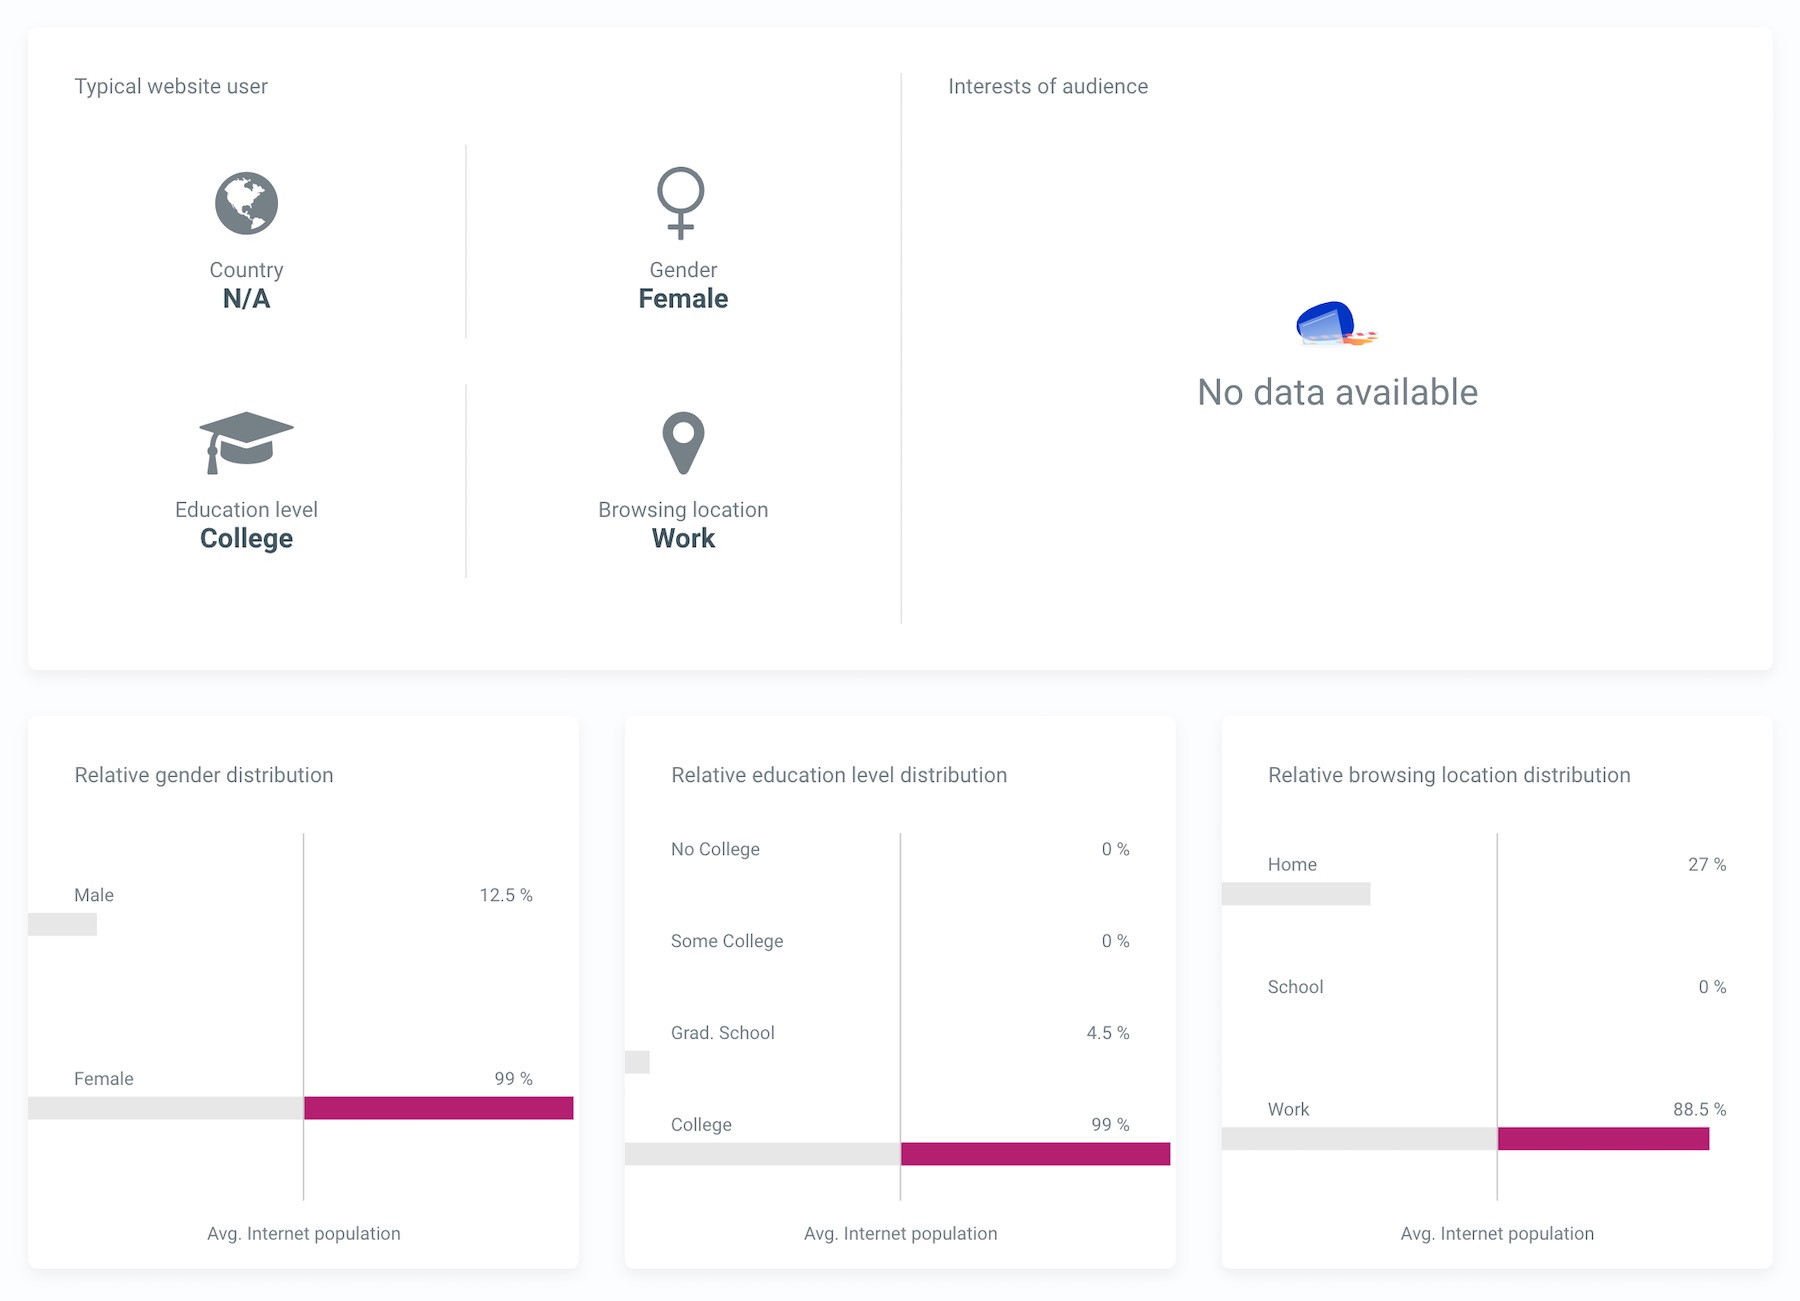
Input your competitors’ websites, scroll to the Audience section and see what results come up. Here’s what I learned when looking up The Sill:
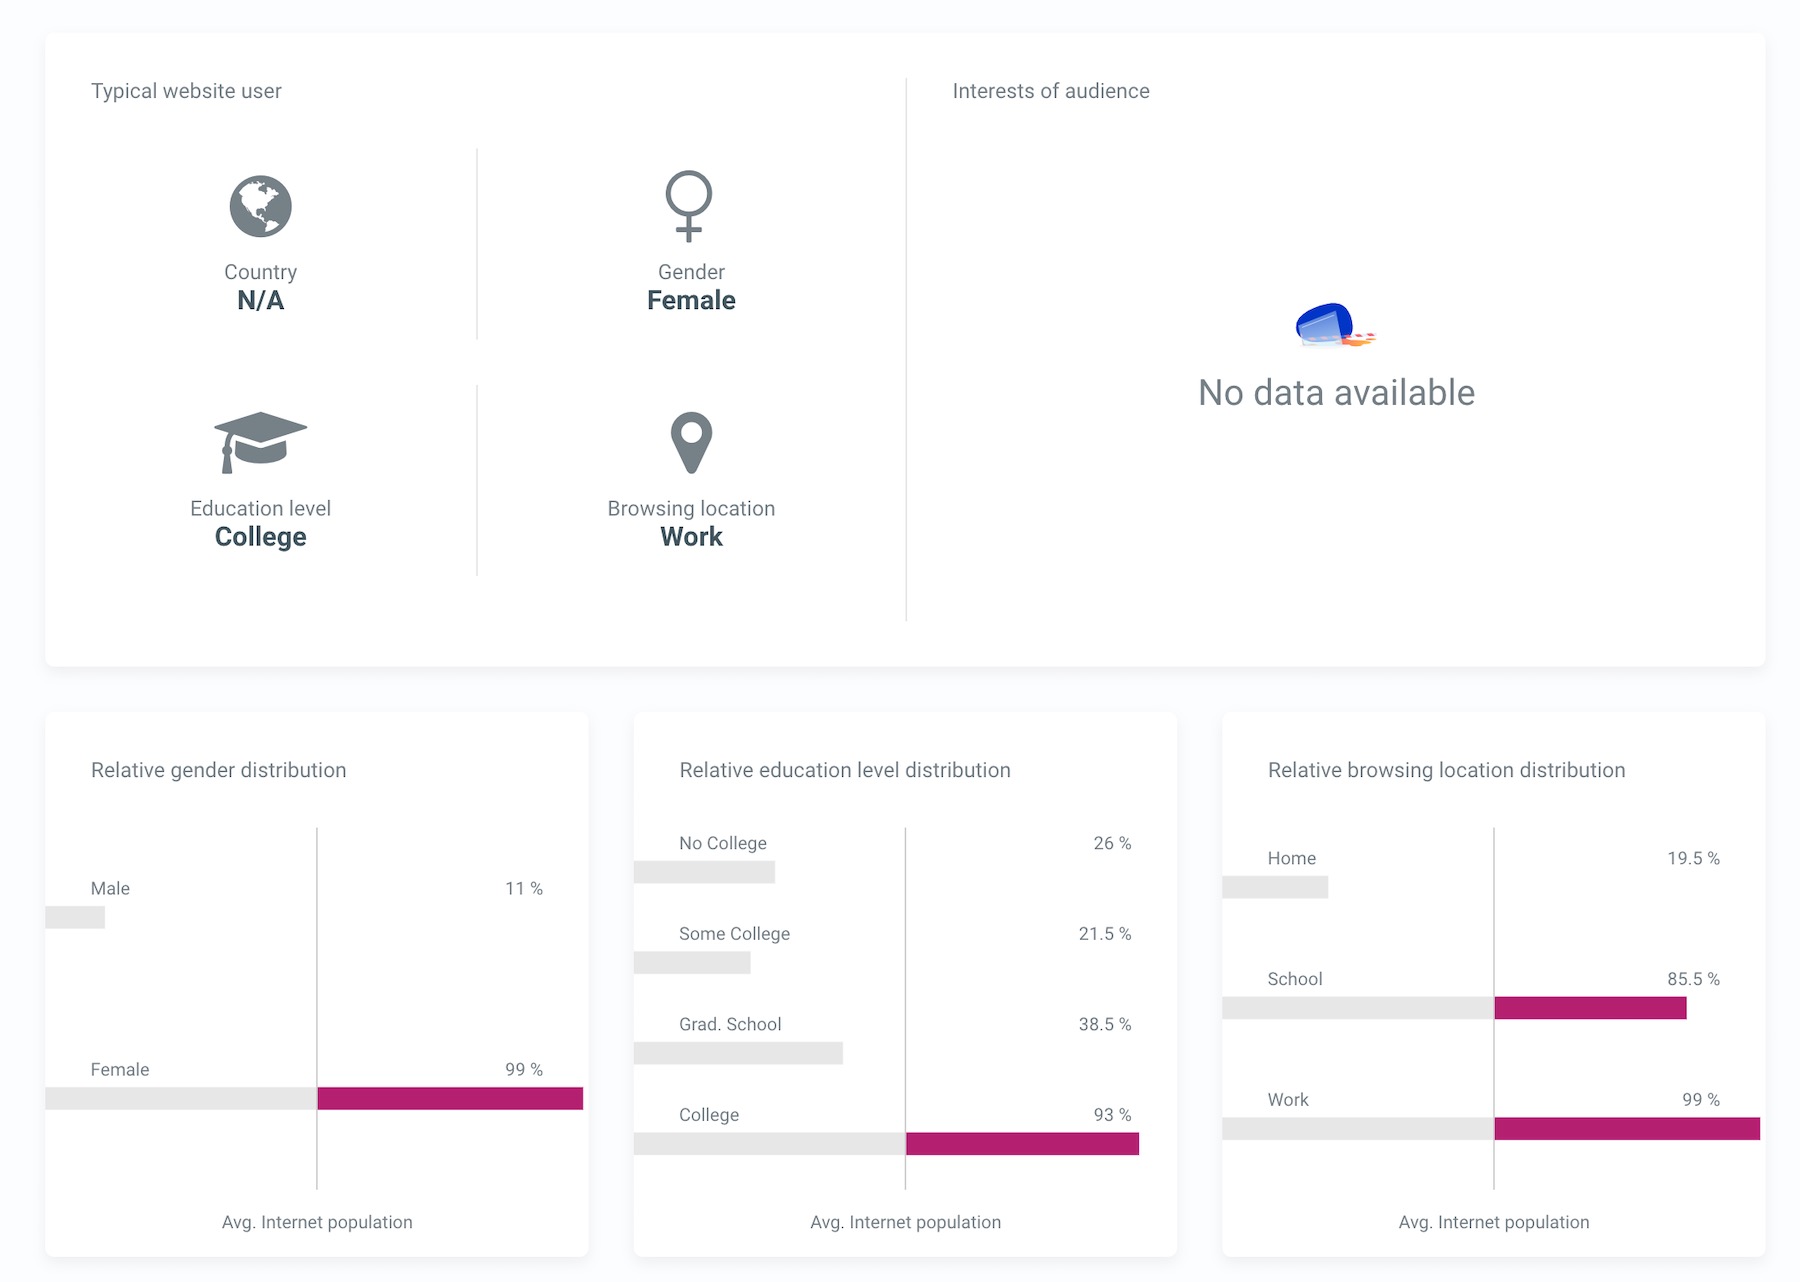
As you can see, in this case, the majority of the website’s audience is female, college educated, and they browse either from school or work.
Here’s a similar search done for Bloomscape:
Basically, it’s the same customer.
Finding similarities like this is good — it means there’s a set, specific customer base you can target.
3.2. Do Keyword Research
The goal of keyword research is to find out what’s actually popular in your niche.
But first, what’s keyword research anyway?
In simple terms, keyword research is the process of finding out the keywords people use when looking up a topic/product on Google.
Once you know what those keywords are, you can offer similar products and aim to rank for those keywords as well, thus getting people to see your website/store.
To get some initial ideas, you can go back to SEMrush and look up your main competition.
Switch to the Organic Research tab to find their popular keywords — the keywords actual viewers use before navigating to the site.
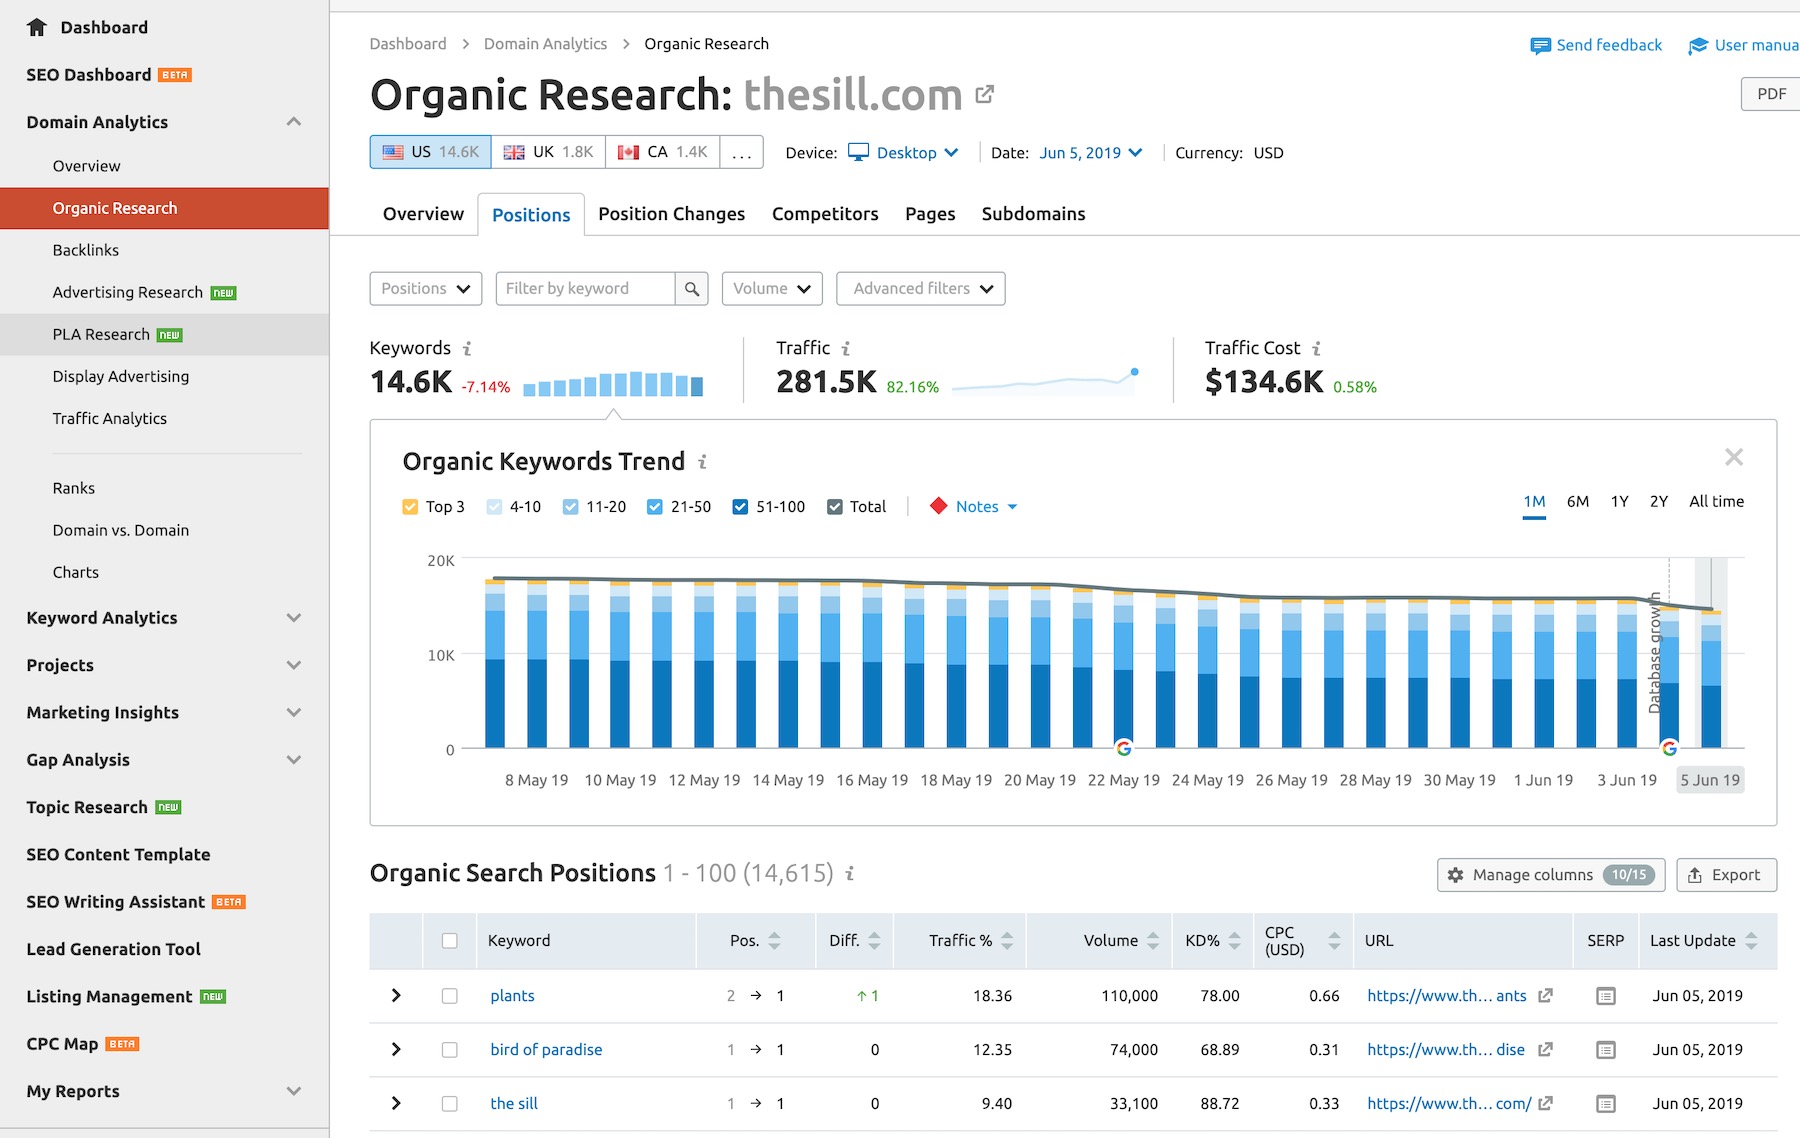
A couple of keywords stand out on the list for me:
- ‘bird of paradise’
- ‘snake plant’
- ‘zz plant’
- ‘philodendron’
- ‘money tree’
- ‘low light plants’
- ‘how to repot a plant’
- ‘plants’
A big chunk of these are specific plant names, which is good since it gives me ideas as to what I can offer specifically — these are the products actually in demand.
You’ll probably see something similar for your niche as well.
But that’s not the end of keyword research. Now, let’s dig deeper with some other tools.
Go to KWFinder, input the keywords you’ve found via SEMrush and see what comes up. Your goal is to learn the search volumes of the keywords (how many people search for them in a given month) and also find other related keywords.
Here’s what I get when looking up one of my keywords:
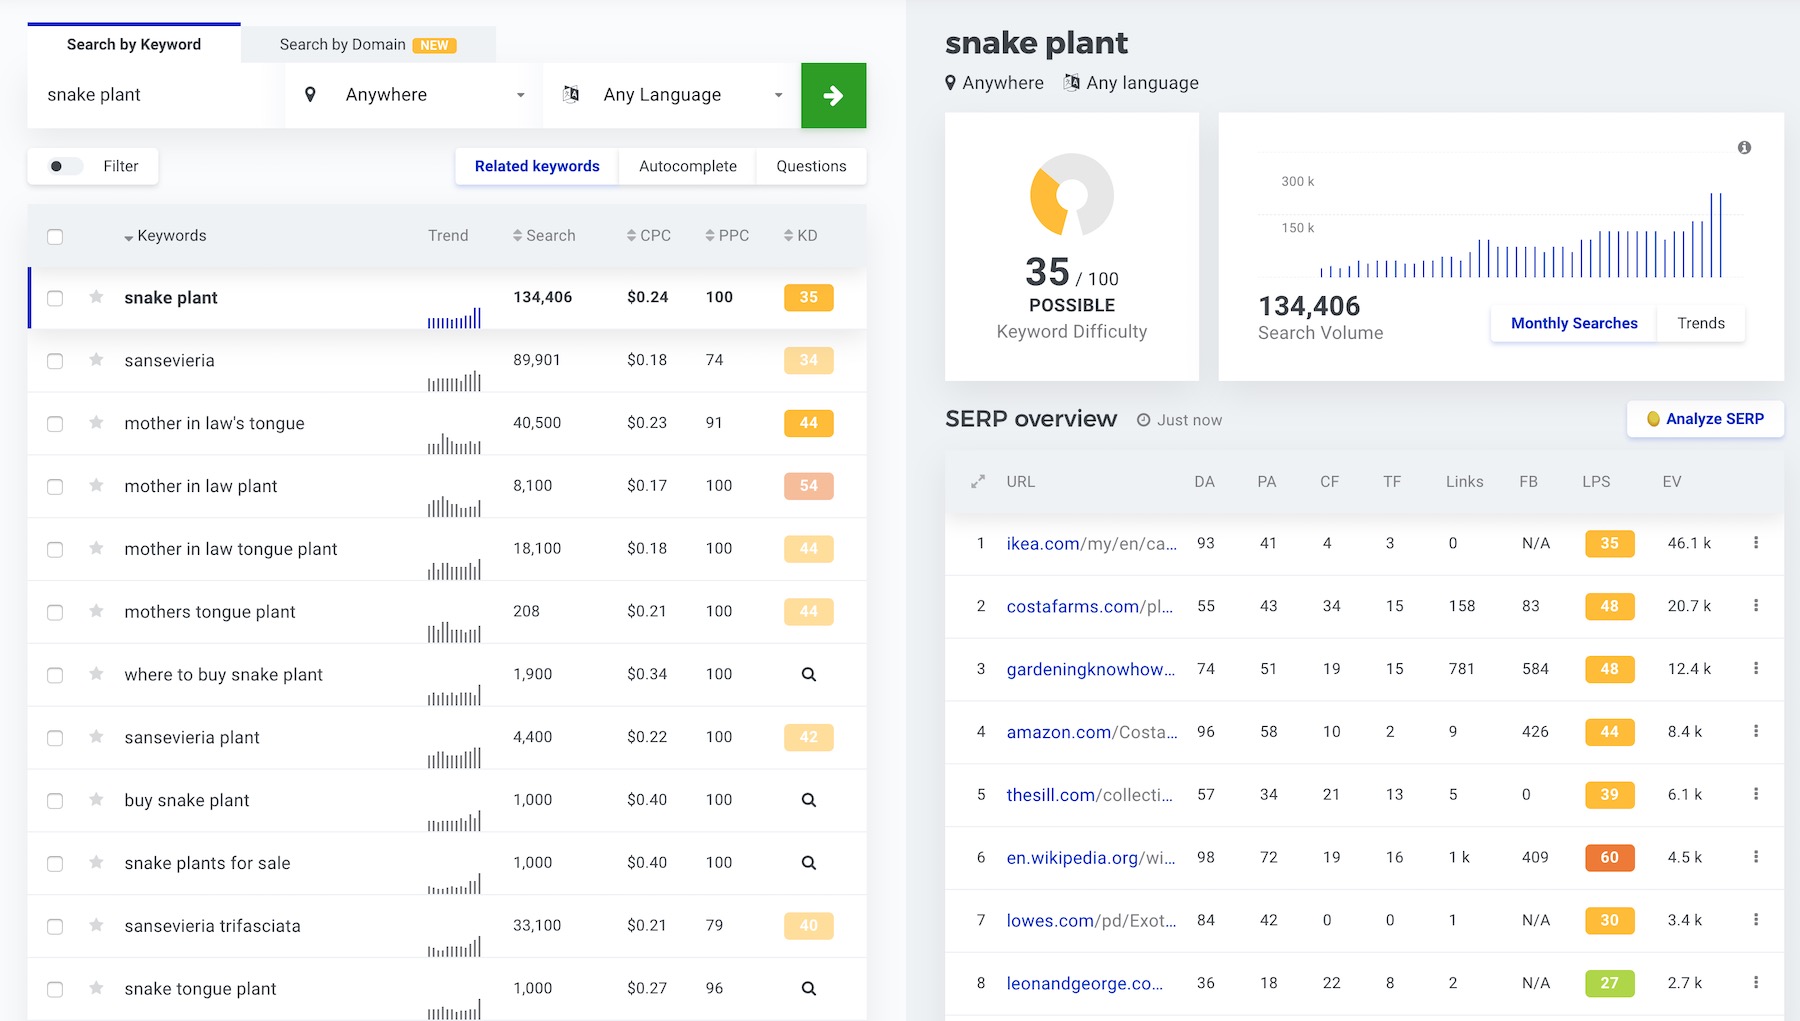
On the left-hand side, there’s a list of related keywords. On the right, you can see the top ten in Google for the current keyword.
✍️ Write down all related keywords that get at least a thousand monthly searches. While you won’t end up offering something for all of them, those are the actual things your audience is searching for.
3.3. Look up Related Facebook Groups
As much bad press as Facebook has been getting lately, it still offers us some great tools that we can use when we start an online store. For instance, Facebook groups.
There’s a Facebook group on every topic imaginable these days. Often, multiple groups. Granted, there may just be fifty to a hundred people in each of them, but that’s still a goldmine of information.
👉 So, go to Facebook and search using the keywords you identified in the previous step. If you already know the exact products you want to sell, then use those in your search as well.
If you find groups that are more than 5,000 people, narrow down your topic. You can go local for a more focused group.
Groups of around 500 to 2,000 people are great for getting ideas, since they’re big enough for specific interesting ideas to pop up, but not too big to make the overall conversation overly broad.
Join those groups and start reading. Look at the conversations, the posts people add, the pictures, the questions they ask, and so on. Just by mere exposure, you’ll start getting ideas as to what really matters to that specific audience, the things they struggle with, the products they buy and the products they’d likely buy when given a chance.
Let me give you an example. I’m a proud owner of this small motorcycle:

It’s an F.B. Mondial HPS. Of course, there’s an owners’ Facebook group. It’s a closed group (like most of them), but you can request to join, and in 99% of the cases, you’ll get accepted.
If I were to build a business around this motorcycle, just reading through this group gives me some ideas as to the things I could offer, including:
- License plate relocation kits
- Gear indicator installation kits and guides
- Rear brake fix kits
- Custom exhausts
Questions about these things come up all the time in the group.
While doing similar research in your niche, also pay attention to the websites people are mentioning (what they like to read), learn how they discover new products, and so on.
3.4. Check out What’s on YouTube
YouTube is the second largest search engine on the web. Furthermore, it’s reported that by 2022 online video will make up more than 80% of all consumer web traffic.
Chances are, you should be able to find at least a handful of channels related to your niche.
Actually, you’ve probably subscribed to many of them already. And, if not, you really should!
If it’s your first time researching stuff on YouTube, you can use some of the same keywords you discovered in the previous steps.
When looking through popular channels, try paying attention to two things:
- The number of subscribers the channel has.
- The number of views on their popular videos.
Depending on the size of the niche, those numbers can be more or less impressive, but you should be able to pinpoint the leading channels nonetheless.
Here are the results I’m getting when looking up ‘plant care’:
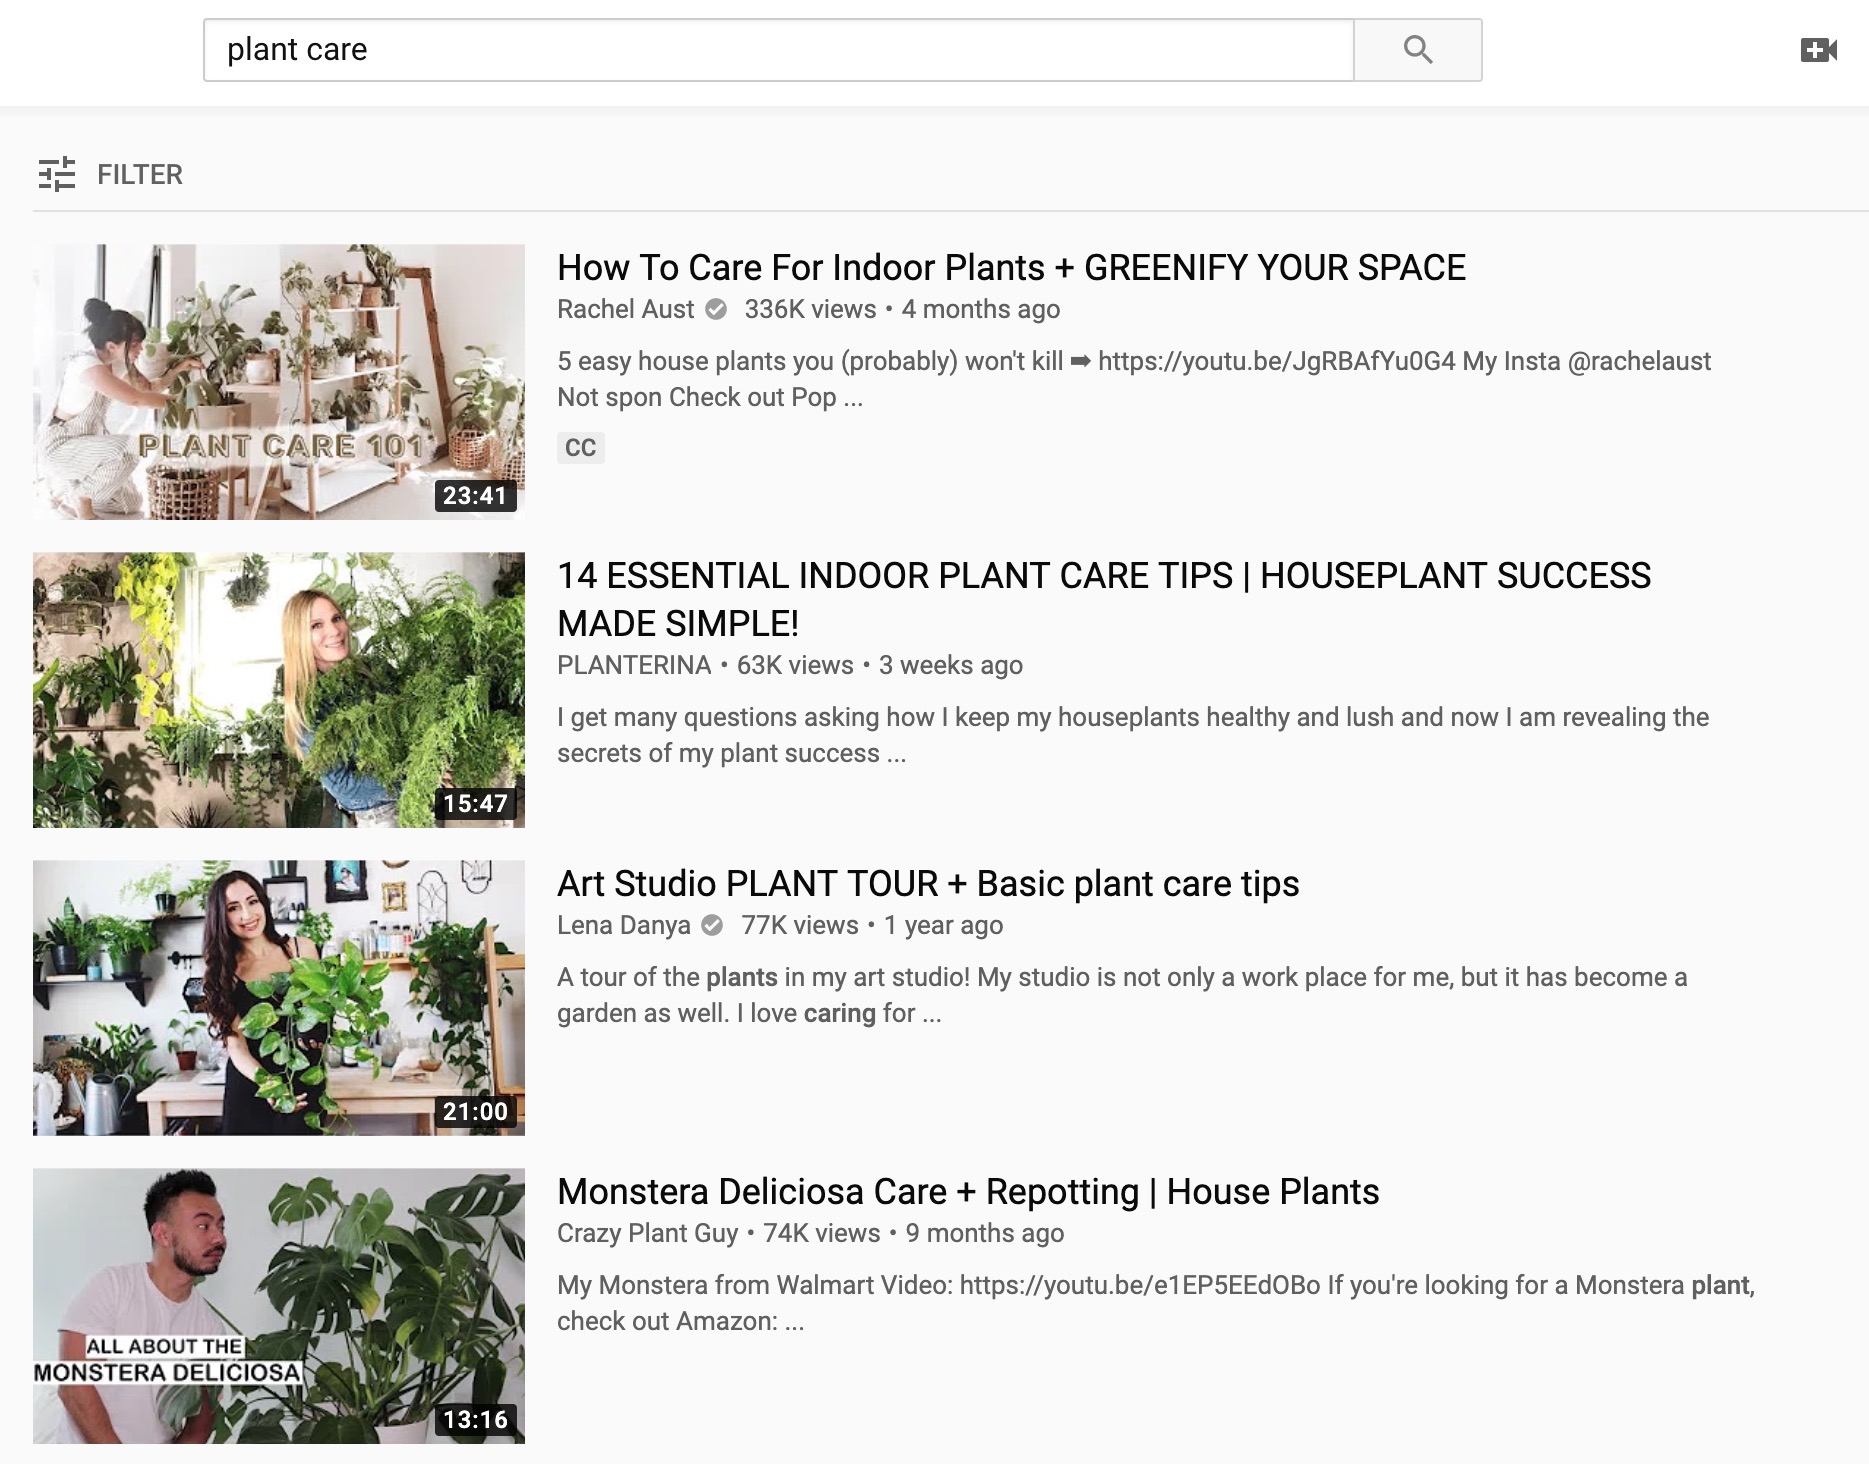
Right at the very top, there are some highly-viewed videos run by popular channels. Click on the name of the channel to see its main page.
I’m going to check out two channels for further research: PLANTERINA and Crazy Plant Guy.
Let’s go to PLANTERINA first, switch to the VIDEOS tab and then sort by most popular:
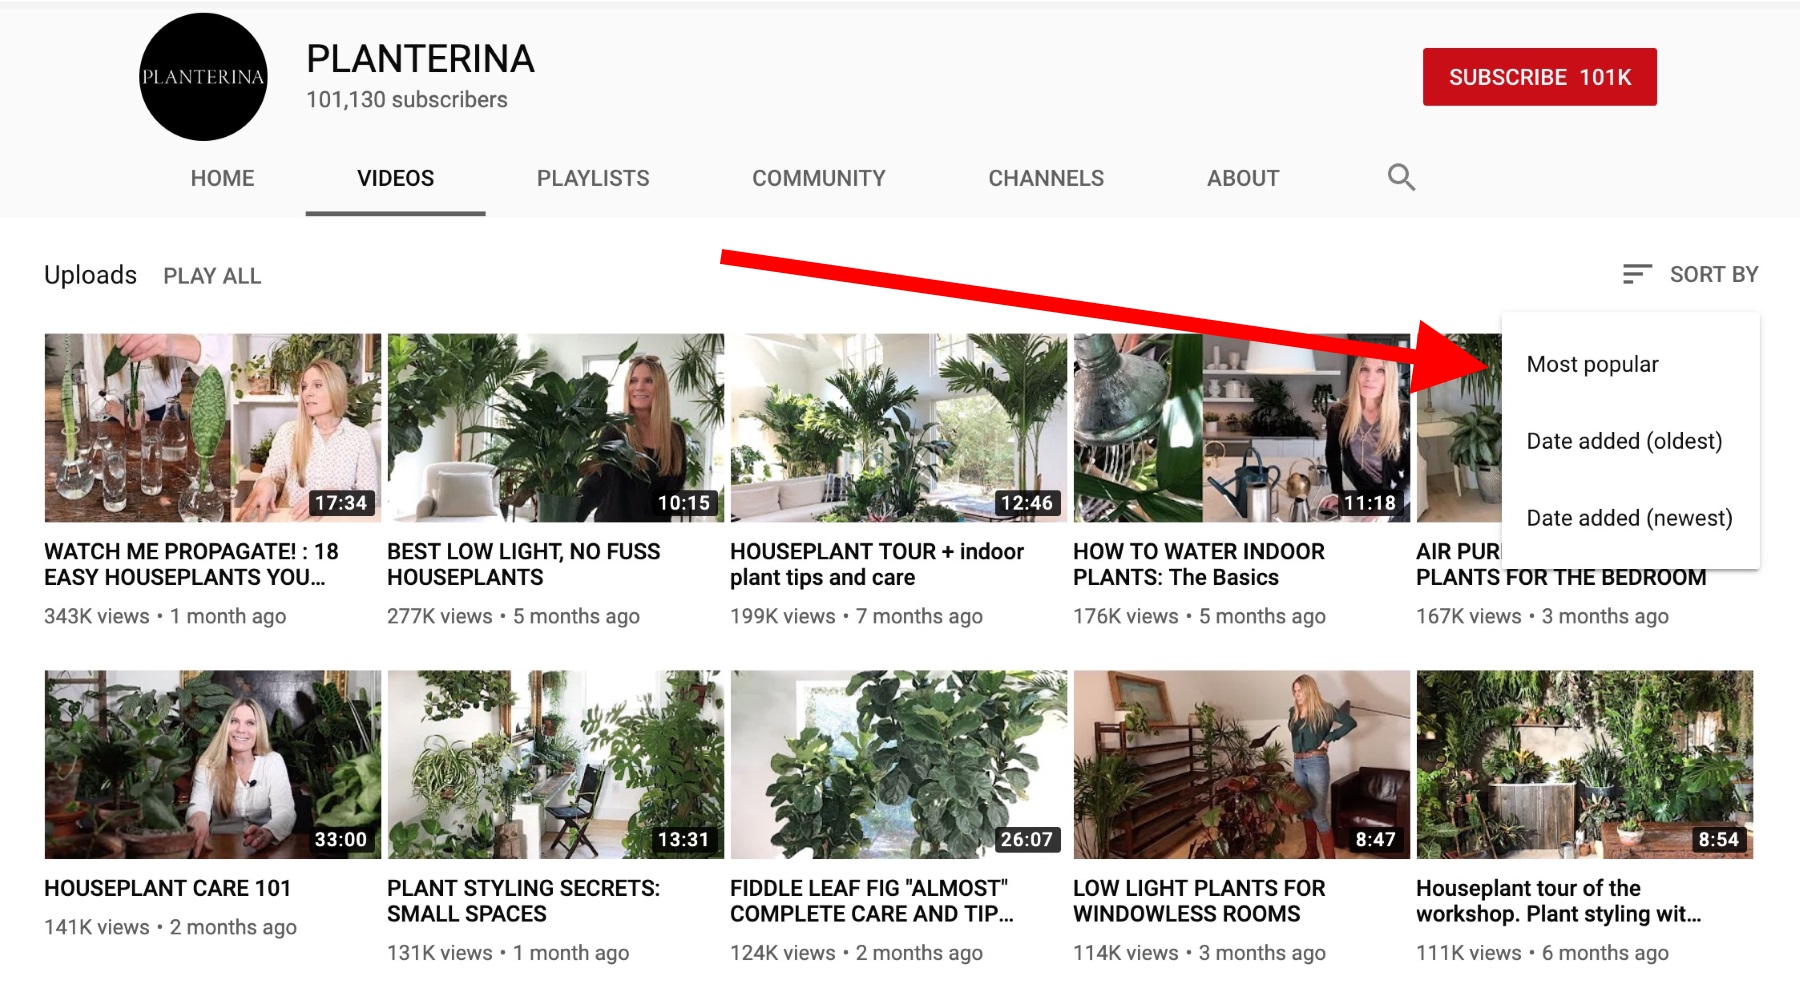
Right out of the gate, the two most popular videos are something I can use for inspiration for either products I could have in the store or content I could write later to promote my store (we’ll talk about that in a bit):
- Easy houseplants
- Best low light plants
Offering some sort of ‘beginner-friendly’ plants can be a great idea for a product.
The next channel, Crazy Plant Guy. Again, switch to VIDEOS and then sort by most popular.
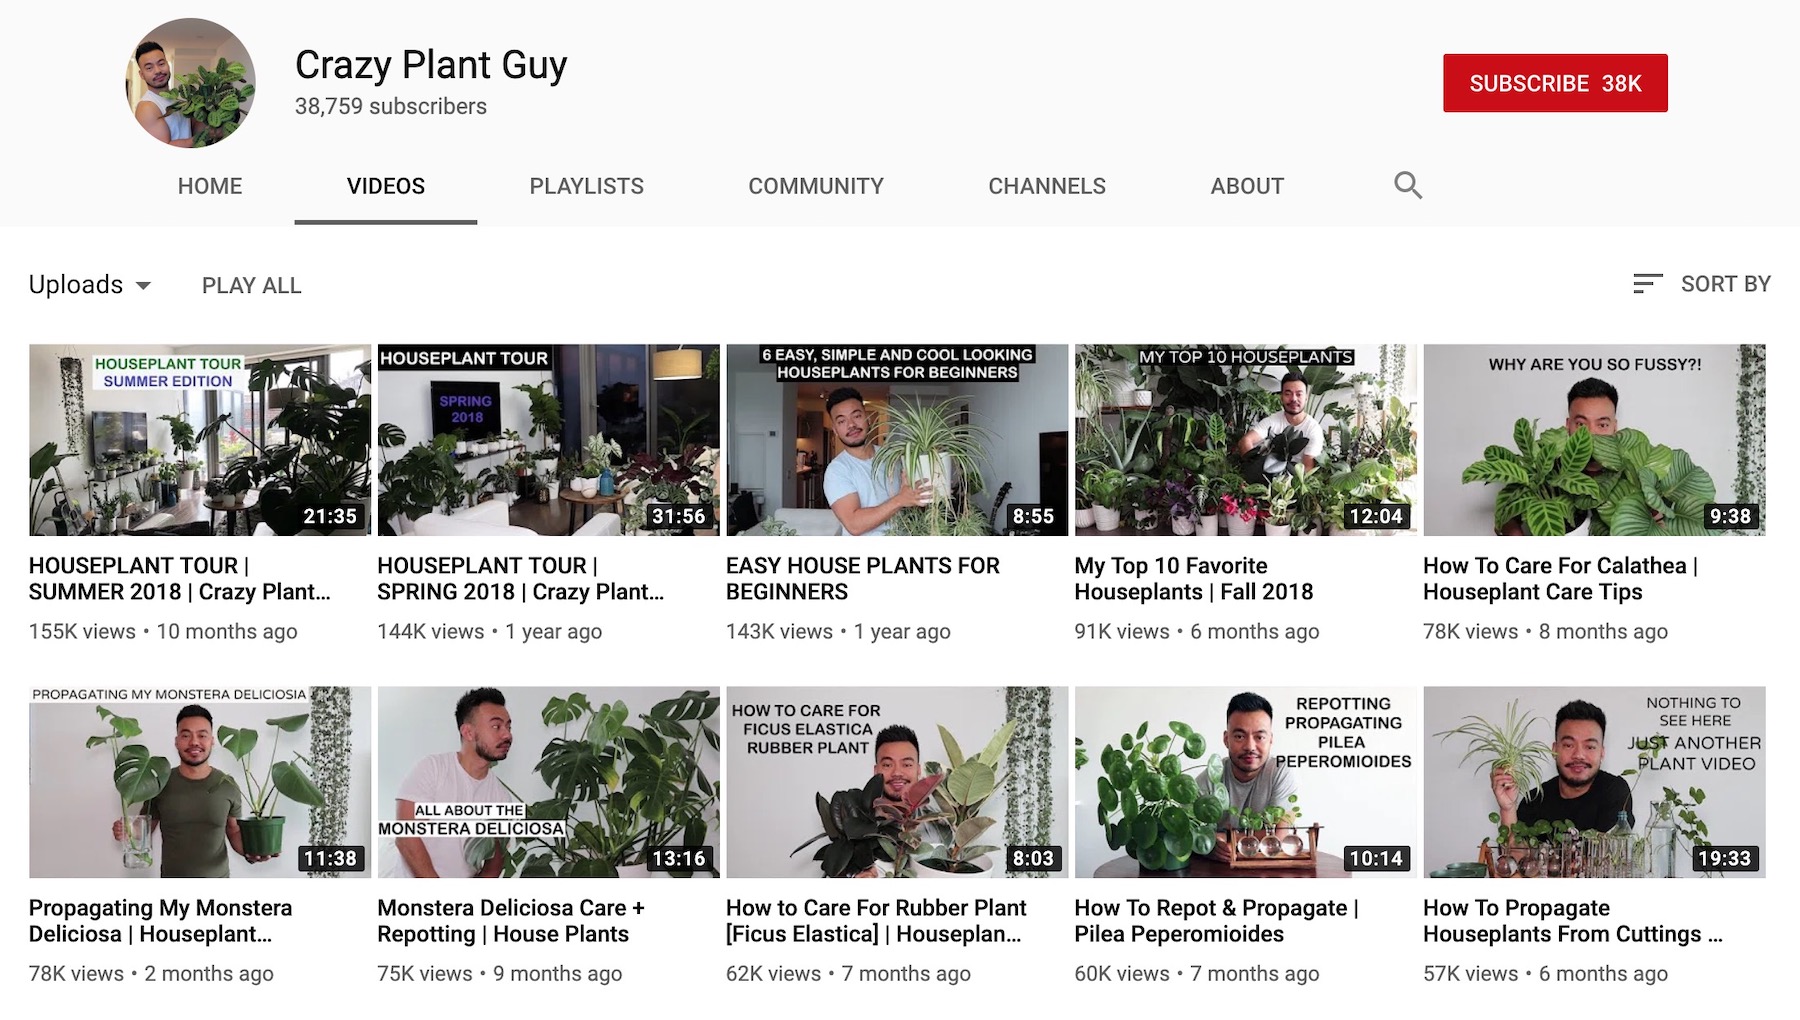
Apart from the house plant tours, the most popular video is titled ‘easy house plants for beginners’. Again, this makes me only more confident that offering plants for beginners is a great idea.
👉 Do similar research in your niche. Look for popular videos, think about what makes them popular and what you can offer in your store, or how you can present your offer to get some of the same benefits. Take note of anything that can be useful later on.
3.5. Find Popular Podcasts
The idea here is very similar. Do basically the same thing. Look up what’s out there on the podcasting stage, take note of what’s popular, what people talk about specifically, and get ideas on what you can adapt as you attempt to start an online store.
Also, take note of all of the people running these podcasts, plus the people appearing as guests. Those people can become your contacts later on.
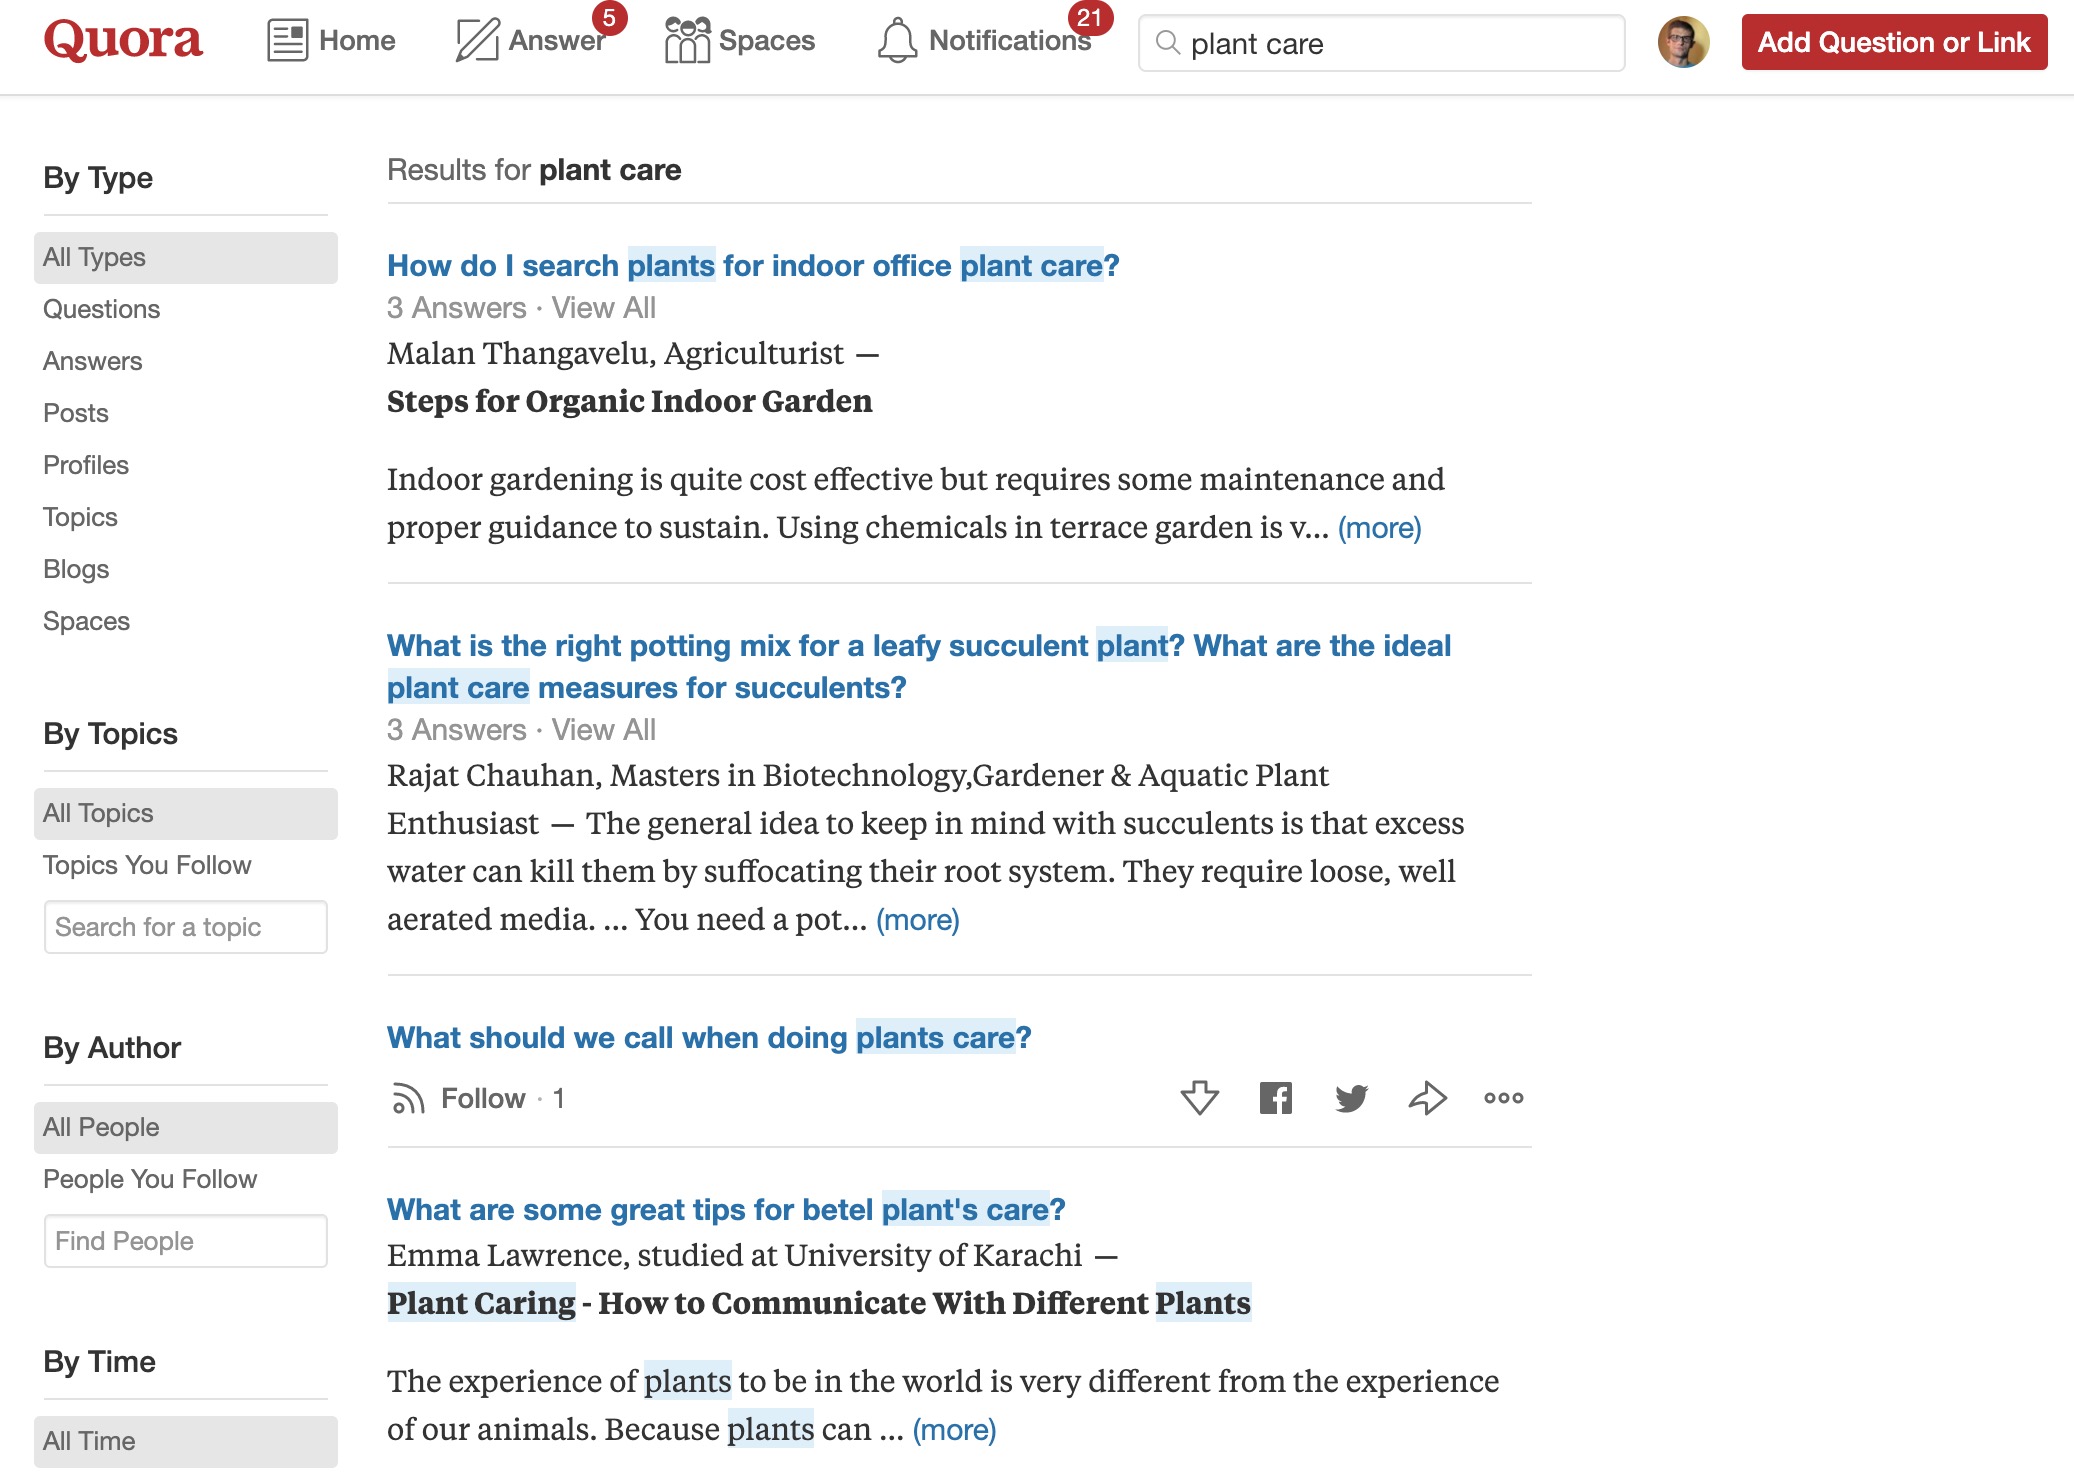
3.6. Go to Quora
Quora is my favorite place to go when I want to find out the real, up-to-date questions people ask about whatever topic.
In case you don’t know, Quora is a classic questions and answers site. Anyone can ask any question imaginable, and there will be people willing to give them an answer. And those answers are usually not spam, but quality, insightful stuff.
Again, start your search with the keywords you identified earlier.
Browsing through what’s there can give you a lot of inspiration. You can find:
- new competitors you didn’t know about
- unique problems that aren’t covered on popular industry sites
- product requests for things that don’t exist yet
- hip new product recommendations
- and, chiefly, problems and issues people are having, which you can help them to solve.
Note down everything that’s interesting. Read the questions as well as the top answers.
4. Pick an Angle
With all that research behind us, we can finally get our hands dirty and start an online store that we’re going to customize to fit our needs!
First order of business: Picking an angle!
An angle can be defined as your individual take on the niche, the customer base and how you want to cater to that customer base.
Consider the most basic example: The automotive market. There are countless companies in it. At the end of the day, they all produce four-wheel vehicles with engines in the middle. Yet, they all have their unique spot in the market and cater to different customers.
No matter what you want to sell, you need to decide on an angle as well.
The goal here is to define what you’re going to be selling specifically, to whom, and why they’ll want to buy.
With all of the market research that’s already behind you at this stage, you probably have a good idea of the kind of products you want to sell. Now’s the time to be a little more specific:
- Write down all of your product ideas and all of the things that make them unique in the niche.
- Describe your ideal customer — focus on the demographics as well as any other characteristics.
- Figure out why your ideal customer would buy from you.
For example, what The Sill and Bloomscape have going for them is they make picking plants simple, and also help customers to get started caring for their plants. They’re not just about selling you a plant and then leaving you to your own devices, which is what would happen if you bought the plant from Home Depot, they offer the whole package.
This ‘whole package’ approach is very attractive, especially if you’re a beginner to ‘plant life’ (as they call it).
This is what an angle is.
✍️ Your angle should answer these questions:
- What do you sell, specifically?
- To whom, specifically?
- Why will they buy from you?
5. Pick a Name for Your Online Store
With the angle out of the way, we can start looking at possible store names and domain names (web addresses).
First, let’s do some general brainstorming around store names.
Note: Keep in mind that your legal business name can be anything and can be different from your e-commerce store name. What we’re discussing here is the name of your store as it’s seen by the customers online.
There are two main types of website names and, therefore, e-commerce store names:
- Keyword-based
- Brand-based
Keyword-based names are, as the term suggests, based on keywords that are popular in the niche. For example, I could call my new store, ‘House Plants HQ’. In this case, ‘house plants’ is the main keyword I want to tackle.
Brand-based names are usually adapted from words that have no meaning in the real world — think a little company called Google. This is 100% a brand name. It means nothing else.
Both keyword-based and brand-based names have their pros and cons.
- Keyword-based names are great for SEO — since they have your main keyword in them already, it’s going to be easier to rank for it. On the other hand, they aren’t very brandable, and your customers can have a hard time remembering what your store name is.
- Brand-based names are more memorable by themselves, but, upon first seeing them, not everyone will be able to figure out what the name is about. Imagine me naming my plant store ‘Plantaroo’.
It’s best to start brainstorming possible store names by going back to your main keywords — the ones you discovered earlier. Think about how you can turn some of those into a store name.
For example, one of the keywords for me is ‘house plants’. This keyword can lead me to names such as:
- Plantaroo (again, the highly brandable name)
- House Plants HQ (again, highly keyword-based)
- Planted With Care
- Planted With Heart
- Planted With Soul
I probably fancy the last ones the most.
As you’re doing your own brainstorming, you can follow a similar idea and just think on some cool terms, suffixes or whole words you can add to parts of your main keywords to make up a nice-sounding name.
There’s one very cool helper tool you can use here. It’s simply called the Business Name Generator, built by Shopify, an online store software. While we aren’t going to be using Shopify in this guide, this specific tool of theirs is handy.
Next, once you have a set of possible names you like, it’s time to check which domain names are available and up for grabs.
In simple terms, a domain name is your e-commerce store’s address on the web. All websites online have their domain names. For example, this website’s domain is winningwp.com.
- Learn more about what domain names are here.
My favorite tool for checking available domain names is Domain Wheel. Visit it and enter your desired names in the box, and Domain Wheel will let you know which ones are available for registration.
👉 As a general rule, you always want to get a .com domain. Those addresses are the most intuitive and the easiest to memorize. So, basically, if the .com isn’t available, probably go for a different name.
One more important thing to keep in mind is not to violate any copyright laws while picking your name. You don’t want to infringe on any other existing brand name in the same niche or any other generally popular brand name. For example, I might get in trouble if I named my store ‘BloomScapeWorld’ since there’s already a popular brand named ‘Bloomscape’ in the niche.
Once you’ve decided on your perfect domain name (and if it’s available), you can proceed to the next step.
(Don’t register the domain just yet!)
6. Understand What Web Hosting Is About
I’ll keep this section brief since hosting is a bit of a boring topic. That said, it’s also essential to the existence of your e-commerce store. Or, to put it more bluntly:
You can’t start an online store without web hosting.
In simple terms, hosting (aka your server) is where your website is kept and from where it’s being served to your audience and customers.
A server is very similar to a standard computer that’s hooked up to the web and turned on 24/7.
Whenever a visitor goes to your store, the website is fetched from the server and the contents of it are sent to the visitor’s web browser.
As I said, boring.
But here’s what’s important:
Without quality hosting, you’ll lose sales. There’s data to back up that claim, so it’s not just me talking.
There are a couple of reasons why lousy hosting equals bad sales:
- Bad hosts may suffer from frequent downtimes — the times when your website is offline and unavailable for whatever reason. If your store is offline, then nobody can buy anything from it.
- Bad hosts offer slow performance. It’s reported that if your website takes more than two seconds to load most people don’t have the patience to wait and will leave. You need a host that offers better performance.
- Bad hosts offer poor customer support. You always want to be able to contact someone at your host if you’re having trouble with your setup. Good hosts offer multiple different ways to get support (phone, live chat, and so on), and they’re also knowledgeable enough to solve your issue in the first place.
- Bad hosts offer bad security. The topic of online security has been a popular one lately — and for a very good reason. You just never want to risk any of your sensitive information leaking online, and it gets even more severe when it’s about your online business and not just personal info. As it turns out, not only the Facebooks and Twitters can be broken into, but your small website as well. I guess you really don’t want your e-commerce store to be hacked, and all of your sales data vanishing. For that reason, you only want to work with hosts that have a good reputation and have proven to care for their customers’ security.
Okay, but how do you actually pick a quality host that checks off on all of the requirements?
First, let’s explain what the most common types of hosting are and how to avoid the ones that won’t be a good choice when you start an online store.
As soon as you start shopping for hosting, you’ll see offers as low as $2 to $4 a month. While tempting, those probably won’t be the best solution in your case.
Cheap hosts traditionally run in a setup where you share server resources with a number of other customers of your host. The server’s performance, the disk space, the bandwidth… it’s all shared across multiple accounts. On top of that, the servers are optimized to the brim to fit as many customers as possible (to keep the cost low).
Furthermore, those cheap hosts don’t offer features that are essential for e-commerce, such as:
- firewalls, threat detection
- security features
- PCI compliance — required for e-commerce stores processing credit card transactions
- automated backups and restores
- machines and configurations ready to handle heavier load and volume of traffic.
Unfortunately, to get e-commerce-worthy performance, you’ll need to spend a bit more than a couple of bucks a month.
What follows are our recommendations. Check out these three hosts and decide based on your budget and the features that speak to you:
- SiteGround GoGeek plan: $11.95 a month; suitable for up to 100,000 visits monthly; 30GB of disk space; unmetered data transfer; great security features; great support; automated backups; an overall great entry to the world of premium hosting.
- WP Engine Startup plan: $35 a month; suitable for up to 25,000 visits monthly; 10GB of disk space; 50GB of bandwidth a month; 35-plus premium website themes (designs) included; great support; possibly a better platform to grow with in the long run.
- Kinsta Business 1 plan: $100 a month; suitable for up to 100,000 visits monthly; 15GB of disk space; infrastructure runs on Google Cloud Platform; great managed hosting for maximum performance, the highest tier of quality.
- For more context, check out our up-to-date list of recommended WooCommerce hosting platforms
Going forward, we’re going to use SiteGround’s offering to demo the process when we build an online store here. This is the most popular setting because of its affordability versus the features and customer support it offers. It’s going to be able to serve most users as they launch their first e-commerce store.
7. Start an Online Store — Bare Bones
It’s about time to get our hands dirty! In this step, we’re going to build a shell of an e-commerce store and learn the basics of working with it.
First, how are we even going to build a whole functional e-commerce store without a professional or designer’s help of any kind?!
While this may sound intimidating at first, it’s all very doable, as you’ll soon find out, so no need to sweat.
The first order of business:
7.1. Pick an E-Commerce Platform/Software
The way all e-commerce stores work is by utilizing a special kind of computer software that makes the standard operations of an online store possible. Think things such as processing orders, listing items for sale, creating your product catalog, managing your customer data, and so on.
Back in the day, the only way to get your hands on this sort of software was to hire a developer and have the software built 100% from the ground up. As you can probably tell, that was expensive, like, really expensive.
Luckily, times have changed, and nowadays you can get one of the best such pieces of software… for free.
Granted, you still have to pay for web hosting (the thing we talked about in the previous section) and for a domain name, but the e-commerce software itself is 100% free.
We’re not going to get into much detail on how e-commerce software works under the hood, but here’s your primer on what you really need to know:
- Quality e-commerce software provides you with all of the tools you need to start an online store and make it run (enabling your product catalog, your orders, shopping cart, payments, the lot).
- You also get the tools you can use to create all of the other elements of your website — your pages, contact forms, user accounts, and more.
- The software can be installed on your web server and doesn’t require any coding or programming skills — you can literally build your own e-commerce store even if it’s your first time around the block.
- The software also provides you with store designs to choose from, meaning you’re not forced to settle on a single look, but can pick from hundreds if not thousands of different designs
Okay, so what’s this mysterious e-commerce software I’m talking about? We’re actually spoiled for choice here because there are many quality solutions on the web.
However! The combination we’re going for in this guide is WordPress and WooCommerce.
Here’s why:
First off, this is a combo of two software solutions. The first one, WordPress, is the most popular website platform of them all — used on more than 30% of all websites. The other, WooCommerce, is the most popular e-commerce software on the web, and it’s actually an add-on for WordPress.
In other words, you first get WordPress and then install WooCommerce on top of it. We’ll cover the specifics in a bit.
Why use WordPress and WooCommerce? There are a couple of good reasons:
- As mentioned, WordPress is the most popular website platform; more than one in three websites run on WordPress.
- Both WordPress and WooCommerce are open-source, which means they’re free and highly customizable.
- There are tons of ready-made designs (called themes) that you can choose from when building your site on WordPress and WooCommerce.
- WooCommerce has all of the necessary e-commerce store features already built in
- There’s a ton of free add-ons for WordPress and WooCommerce, which allow you to extend your store’s features further.
7.2. Buy Your Hosting and Domain Name
This is the part where you have to take out your wallet. Sorry.
As I mentioned a while ago, in this guide, we recommend SiteGround as our favorite web host for WordPress and WooCommerce sites.
To make sure your setup can handle the requirements of an e-commerce store, go for the GoGeek plan:
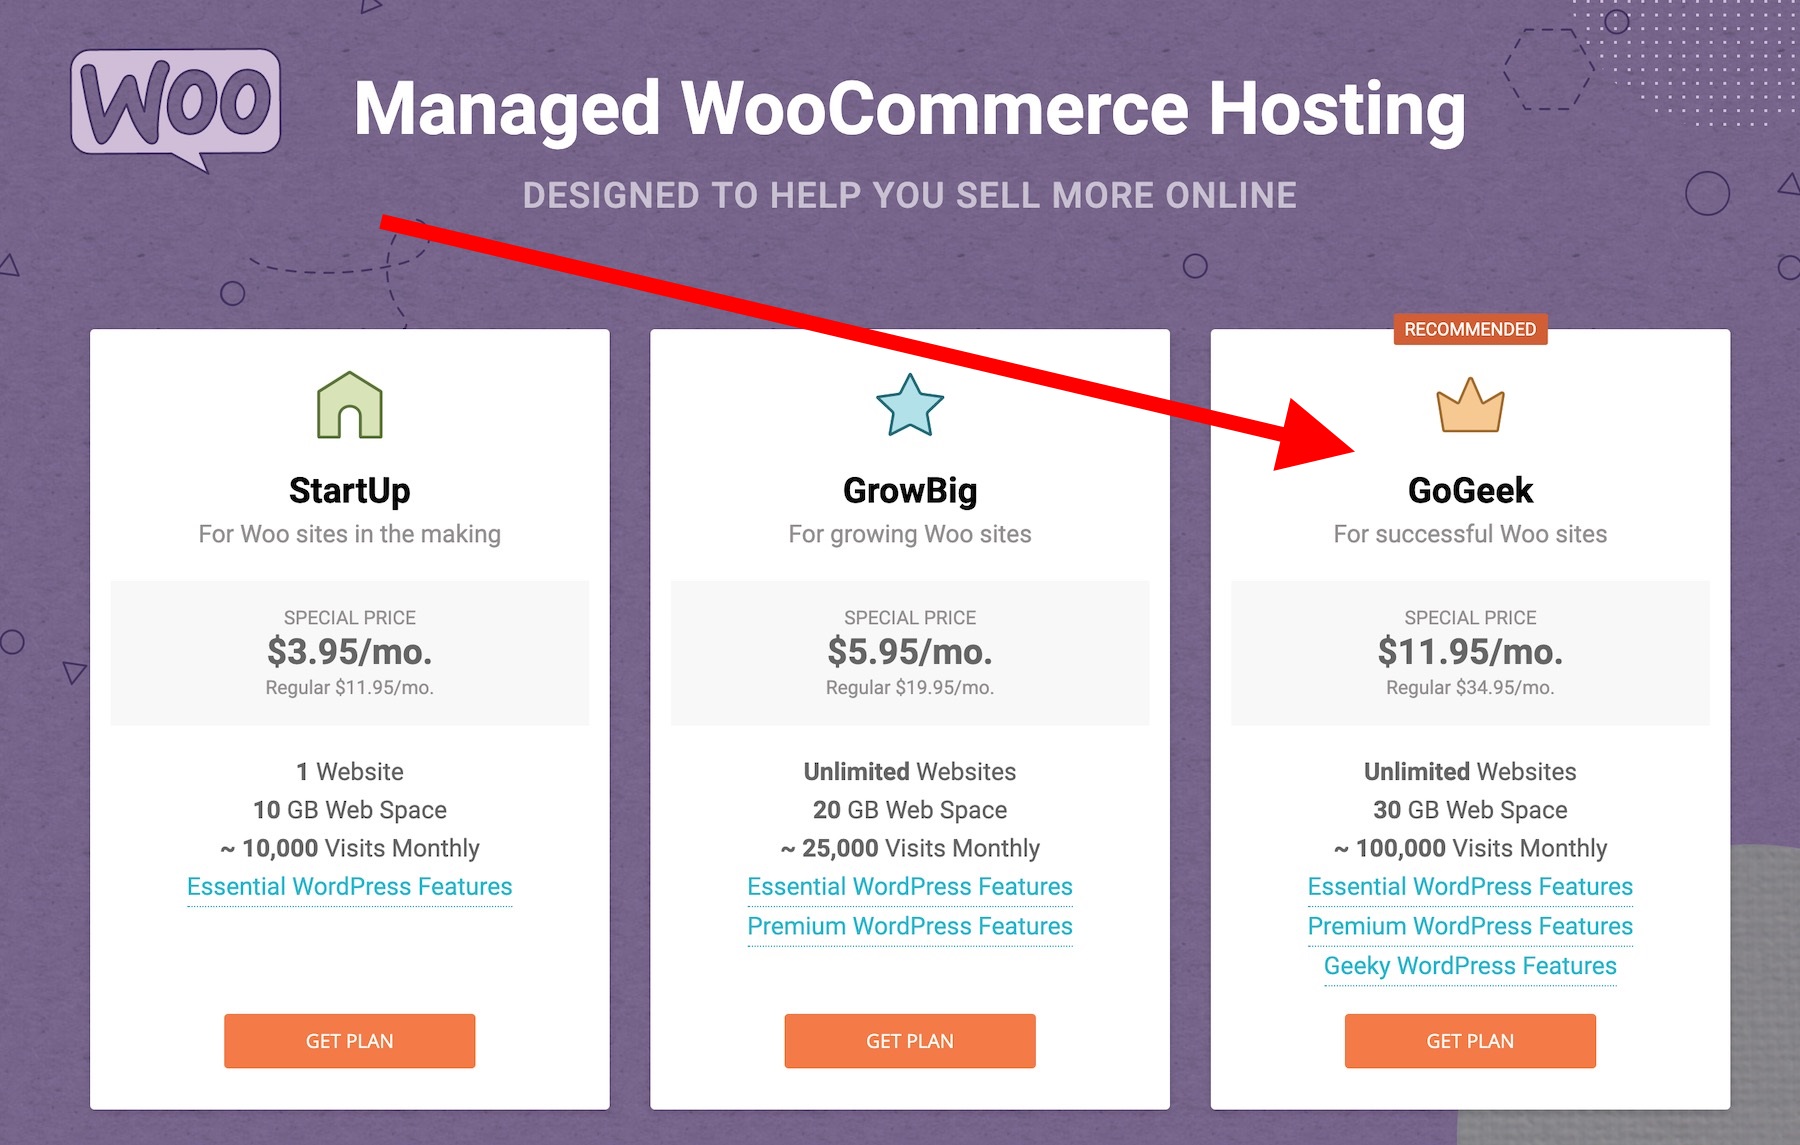
Here’s the signup form you’ll see:
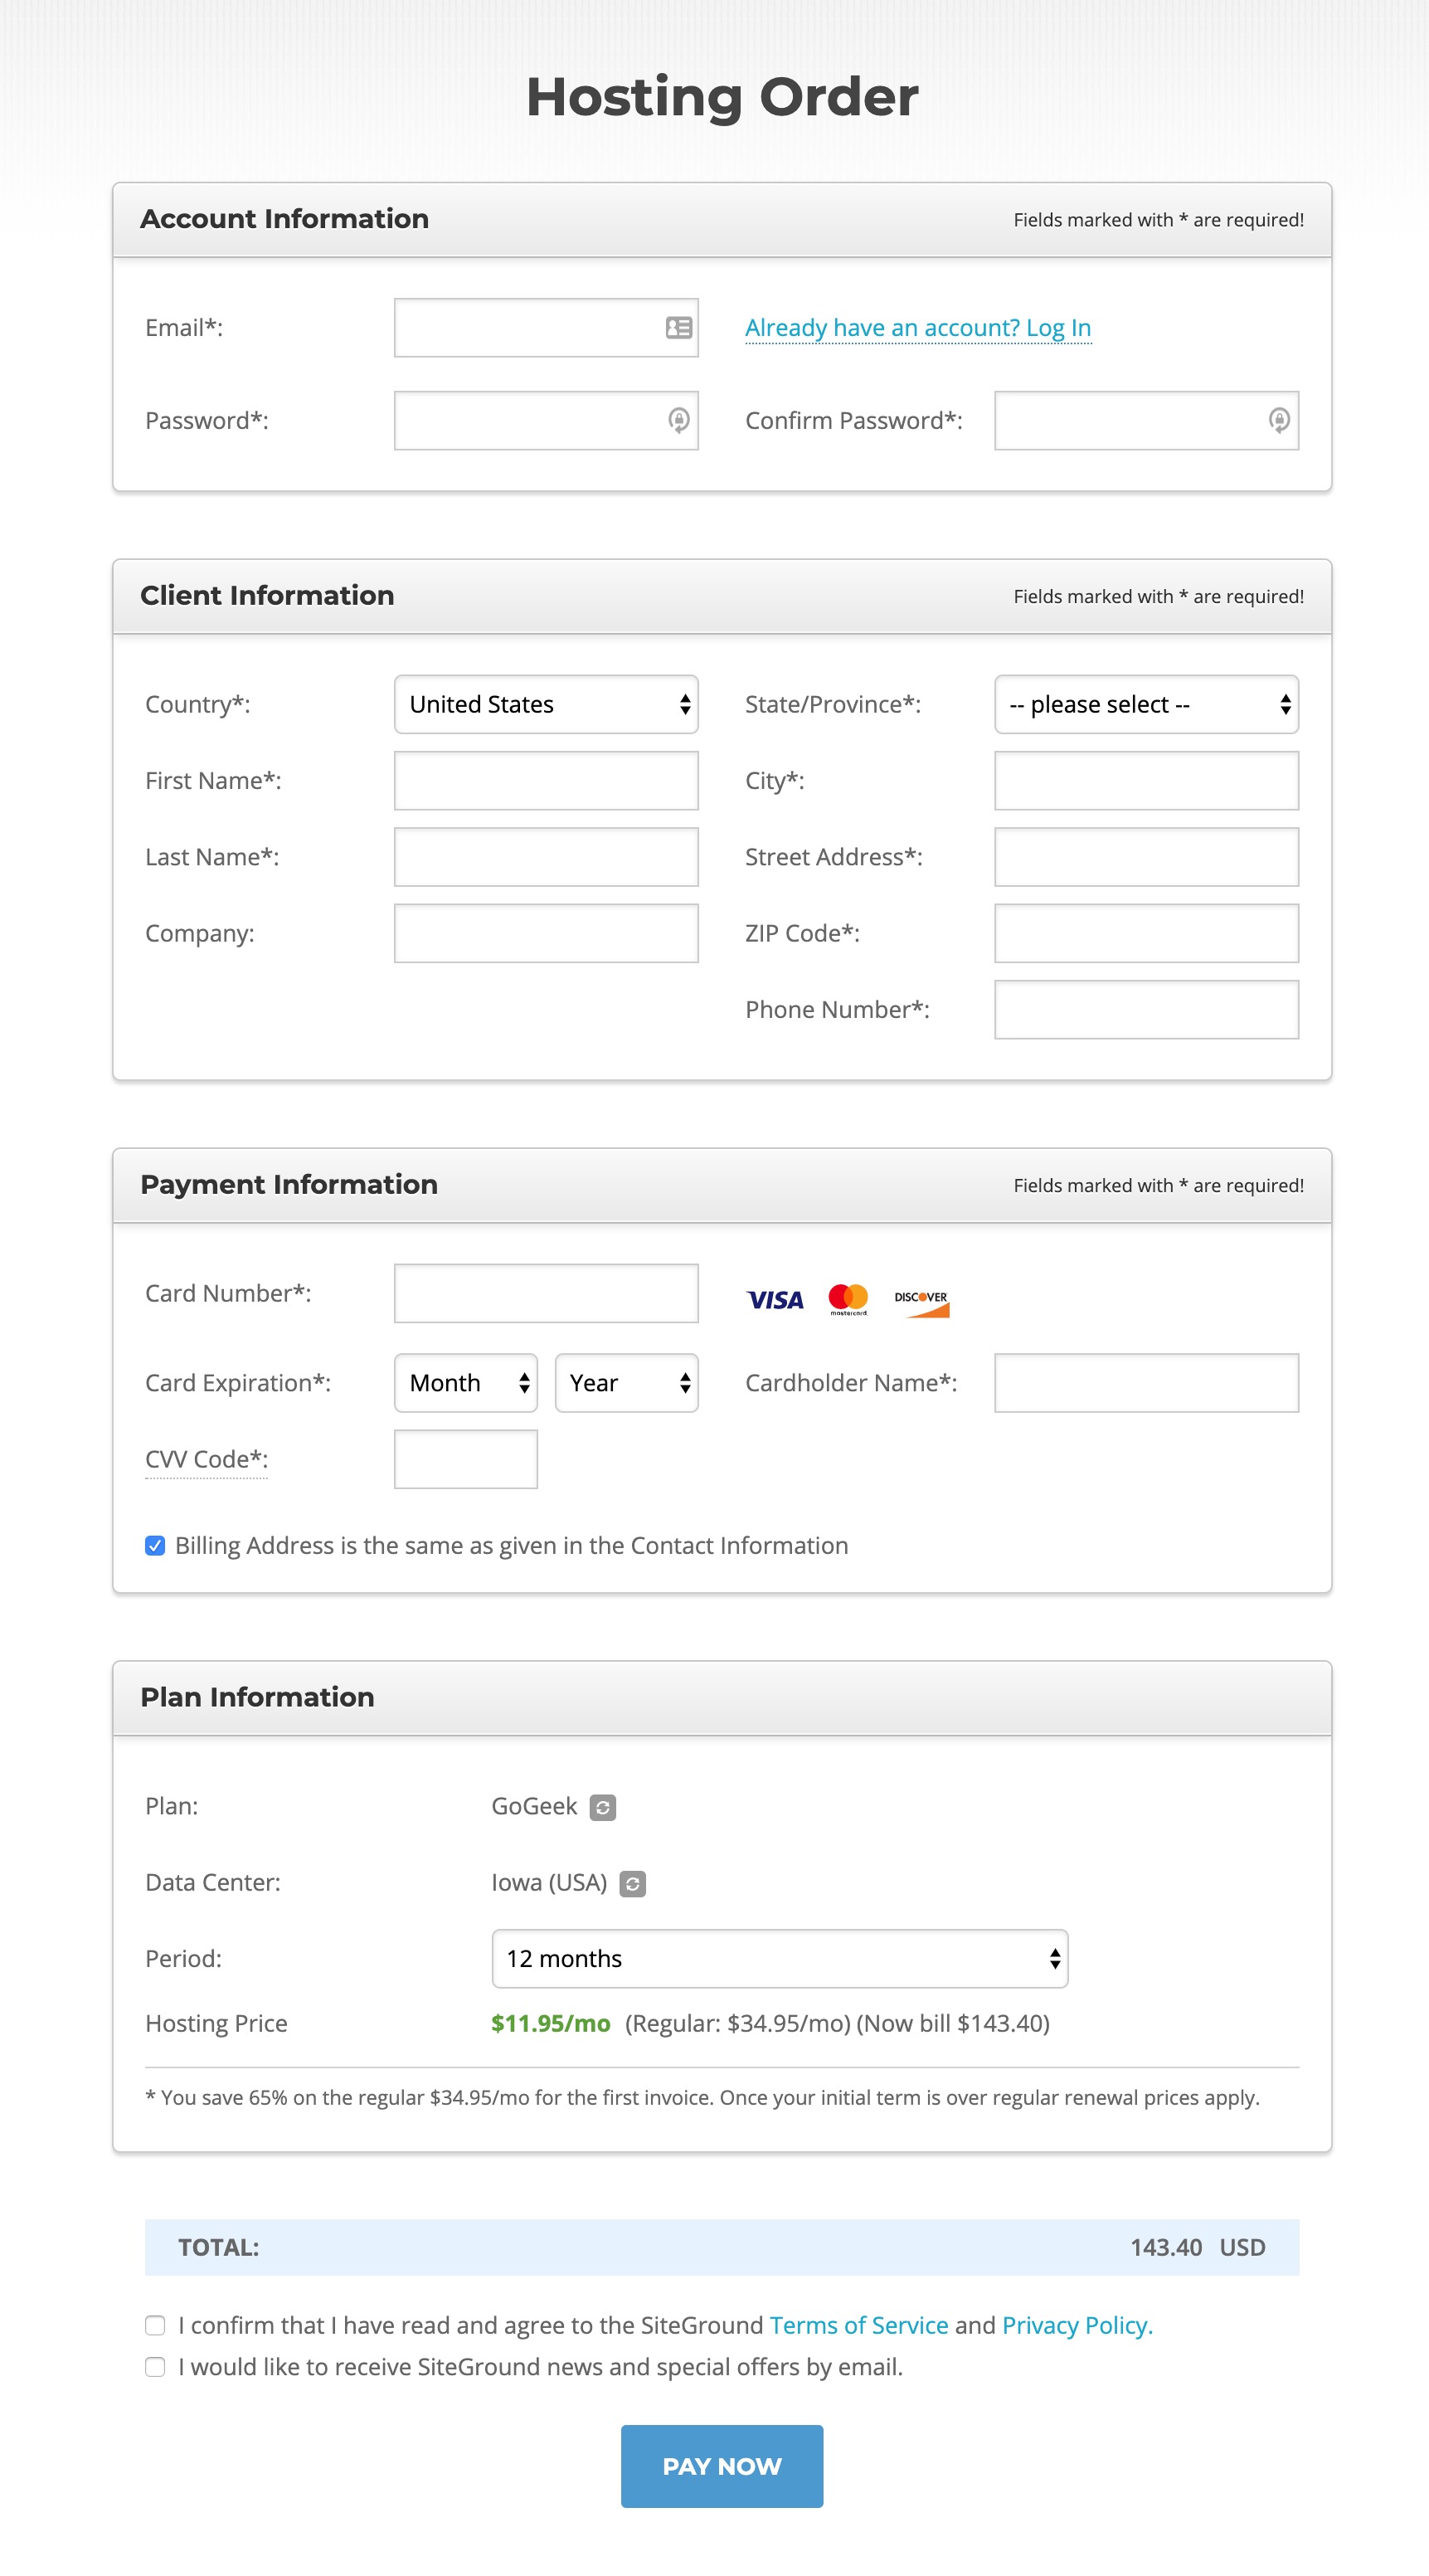
It’s fairly standard stuff, but there are some sections you should pay special attention to, namely under Plan Information:
- Plan: GoGeek
- Data Center: Pick a location that’s the closest to your target customer base (we talked about how to narrow down on your primary customer base in the previous sections)
- Period: You can go for anything between 12 and 36 months; for this initial pay period, you get the price of $11.95 a month, so it’s beneficial to pay for the whole 36 months up front; renewing your hosting plan for the second term is going to be $34.95 a month
Click on PAY NOW once you have everything filled in.
In the next step, SiteGround asks if you want to register a domain name. Yes, you do!
We discussed domain names earlier in this guide. While you certainly can buy a domain name from another company, getting both your hosting and your domain name from the same place is more straightforward. If you do this, you can be sure your domain and hosting will cooperate no problem.
Therefore, enter your desired domain name in the box:
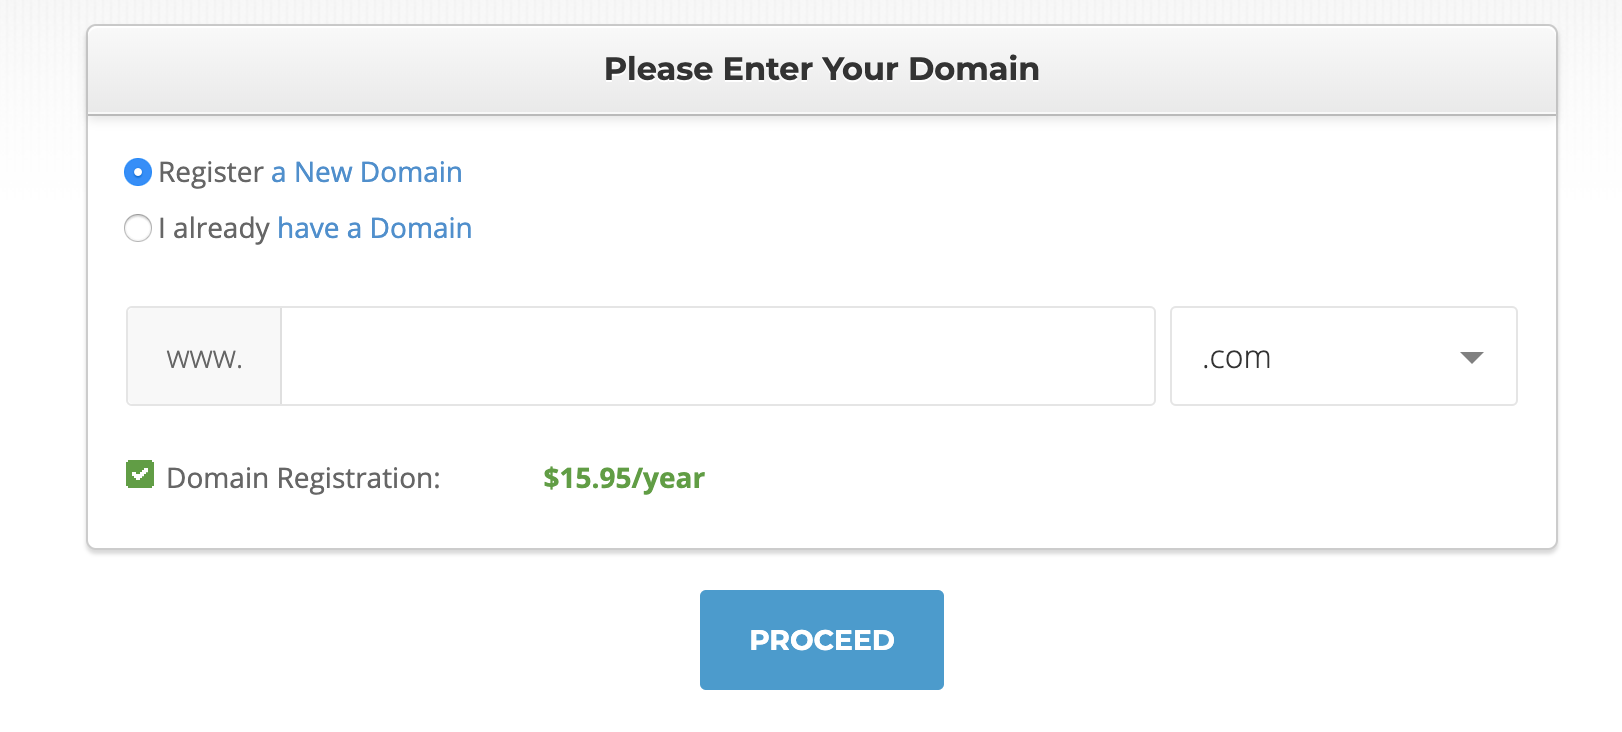
If you opt for a .com, the price is going to be around $15 a year.
When you’re done with all of the signup steps, SiteGround will send you a confirmation email with some information on how to log in to your new hosting account.
As soon as you log in for the first time, SiteGround will ask you if you want to have WordPress installed on your server. You do!
In the next couple of steps, SiteGround will guide you through the stages of having WordPress installed on the server. This is nothing complicated, and every step is explained nicely.
During this setup, you get to set the administrator account login and password for the site. When the install is done, use those credentials to log in to the backend of your site. You can find the admin panel by going to YOURDOMAIN.com/wp-admin
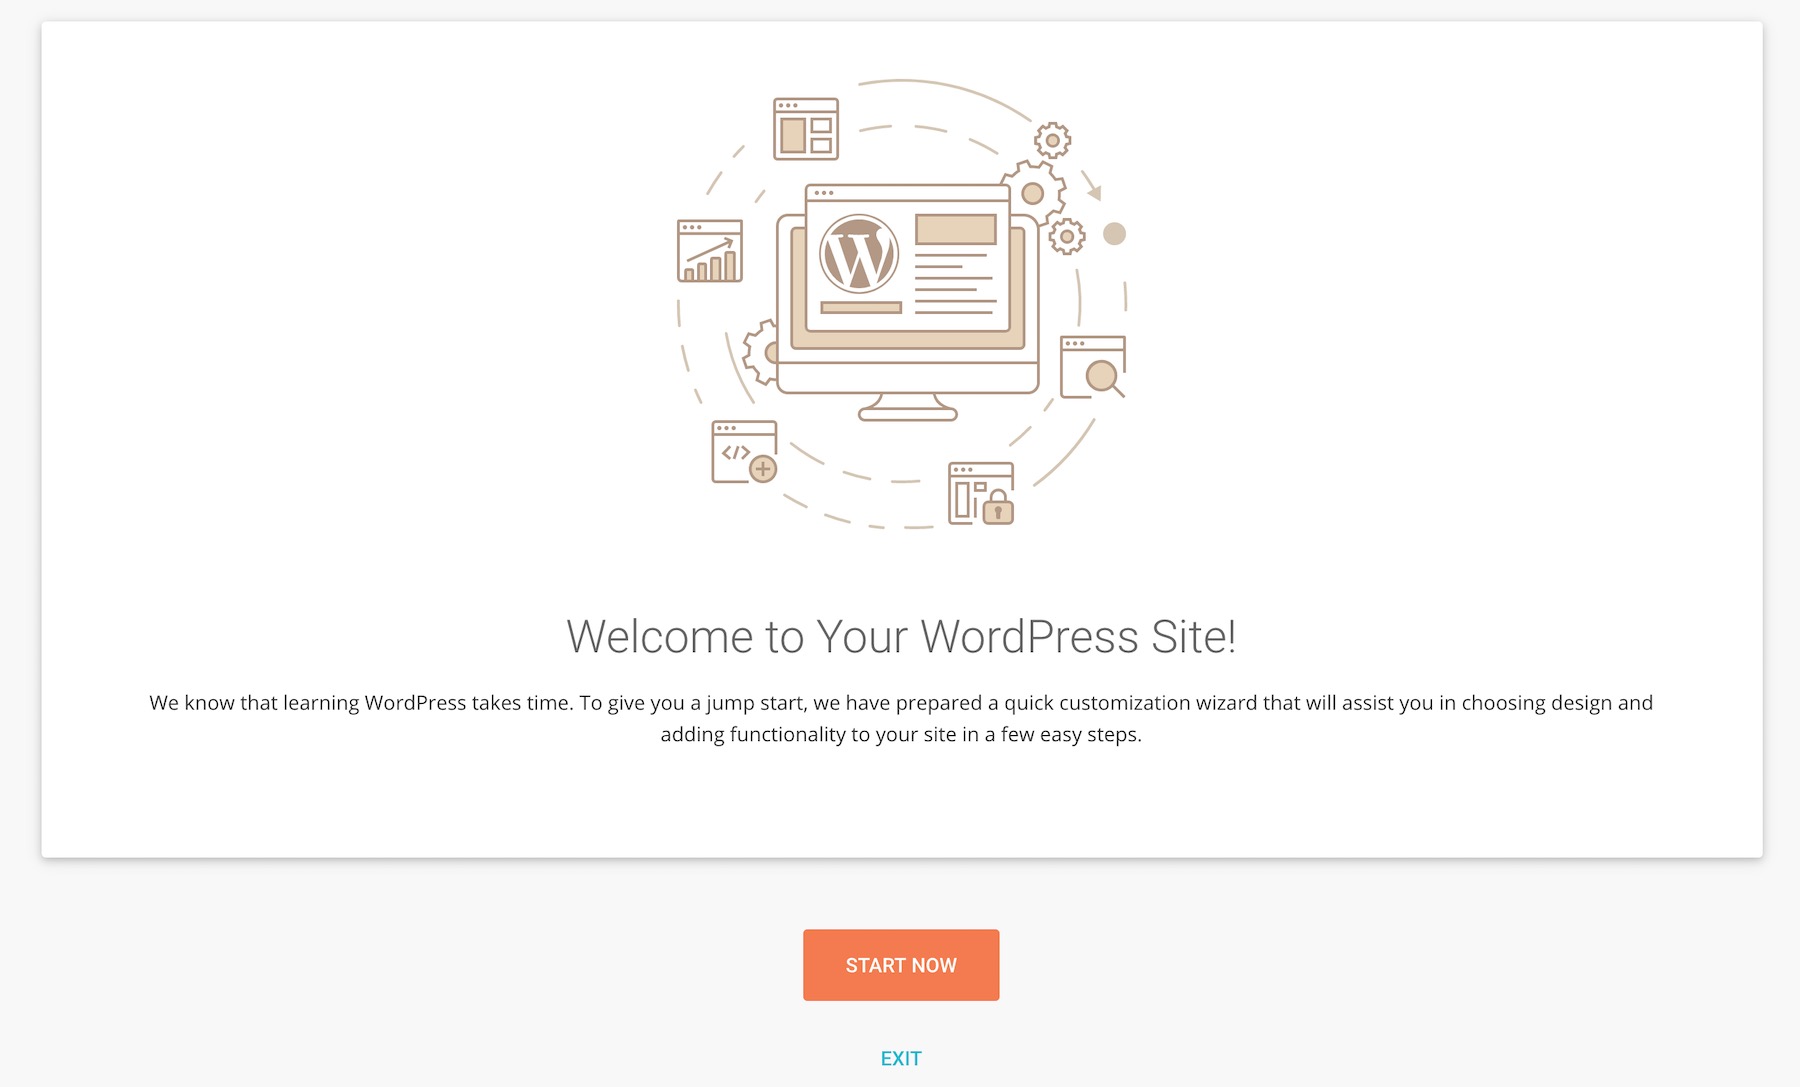
At this stage, SiteGround may display one of their site setup wizard interfaces. While those are helpful for launching a standard WordPress website, you can go ahead and skip it for the purpose we’re using WordPress here. Just click on EXIT.
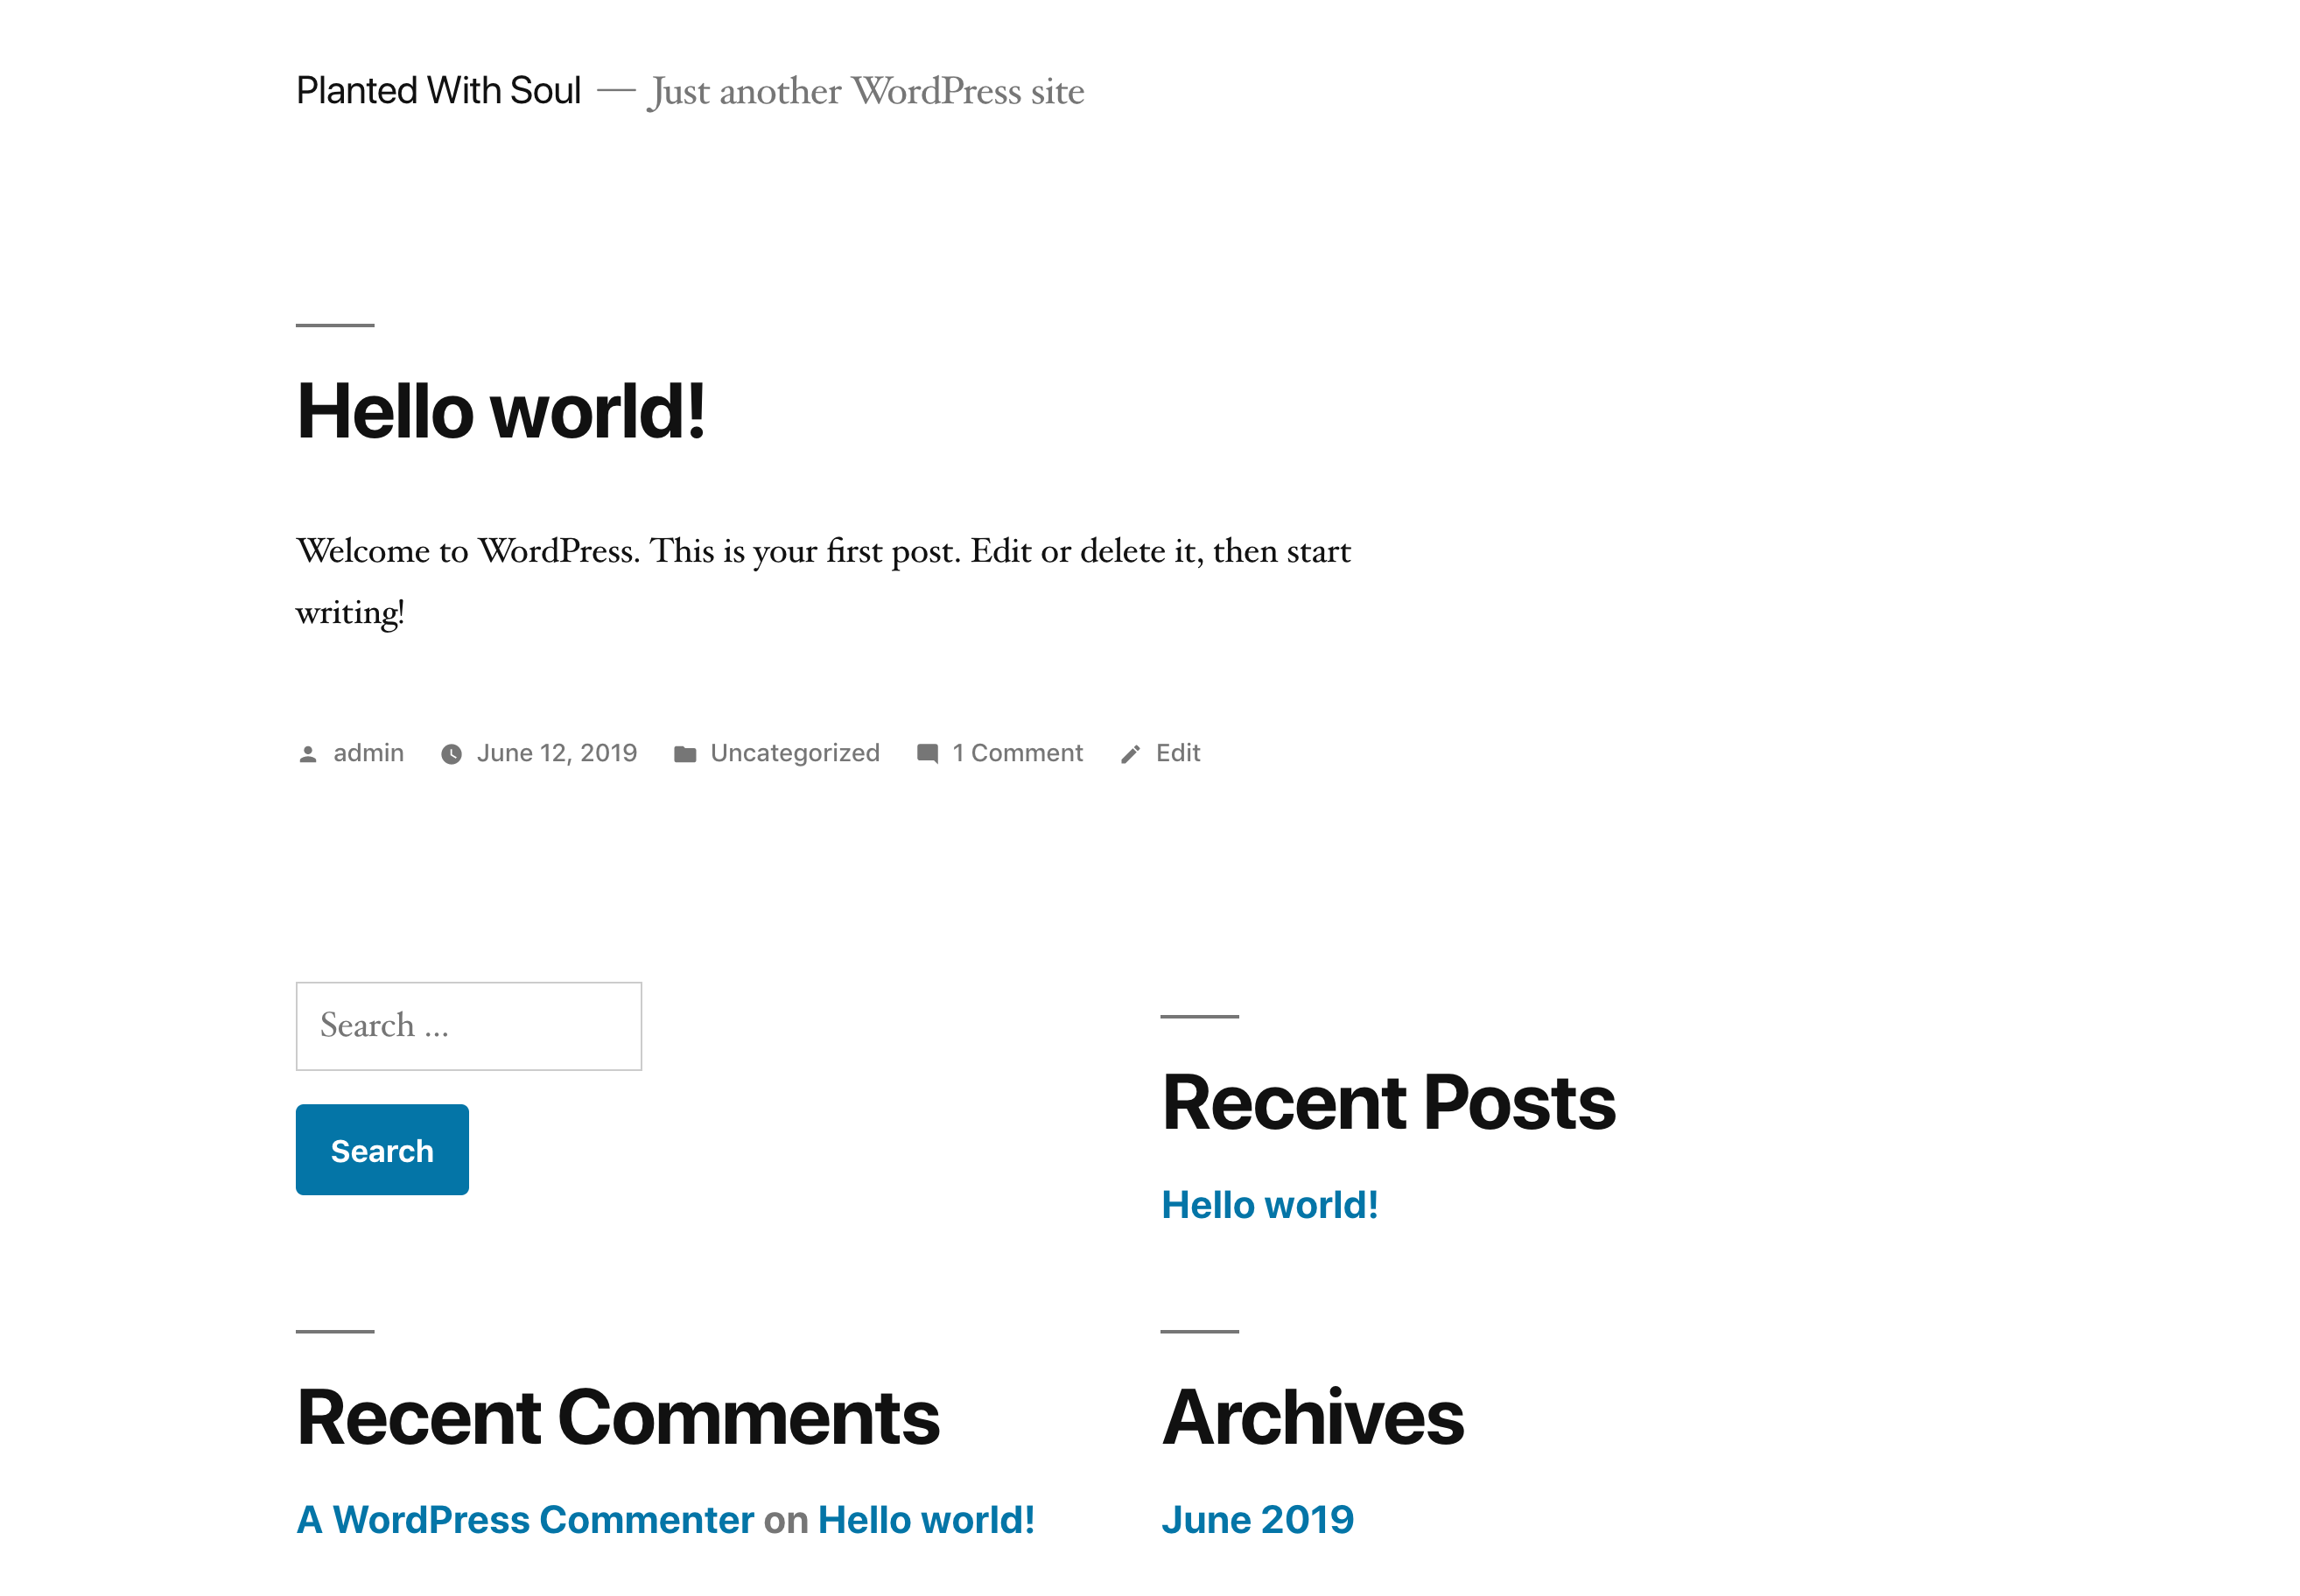
Congratulations, you’ve just got WordPress installed!
You now have a blank website that’s 100% operational. Check it out by going to your domain (e.g. YOURDOMAIN.com).
It’s going to look something like this:
7.3. Install WooCommerce to Start an Online Store
With WordPress already installed, it’s now time to turn that standard WordPress site into an e-commerce store. We’re going to use WooCommerce to do that.
Under the hood, WooCommerce is a WordPress plugin (plugins are small pieces of add-on software that you can install on WordPress to get more features).
We could spend a while talking about WordPress plugins in more depth, but that’s not really needed. All we need to know right now is that WordPress plugins can be installed with a couple of clicks, and they integrate with the standard WordPress interface seamlessly.
To install WooCommerce, click on Plugins in the primary sidebar of the WordPress dashboard and then on Add New. Enter ‘WooCommerce’ into the search field.
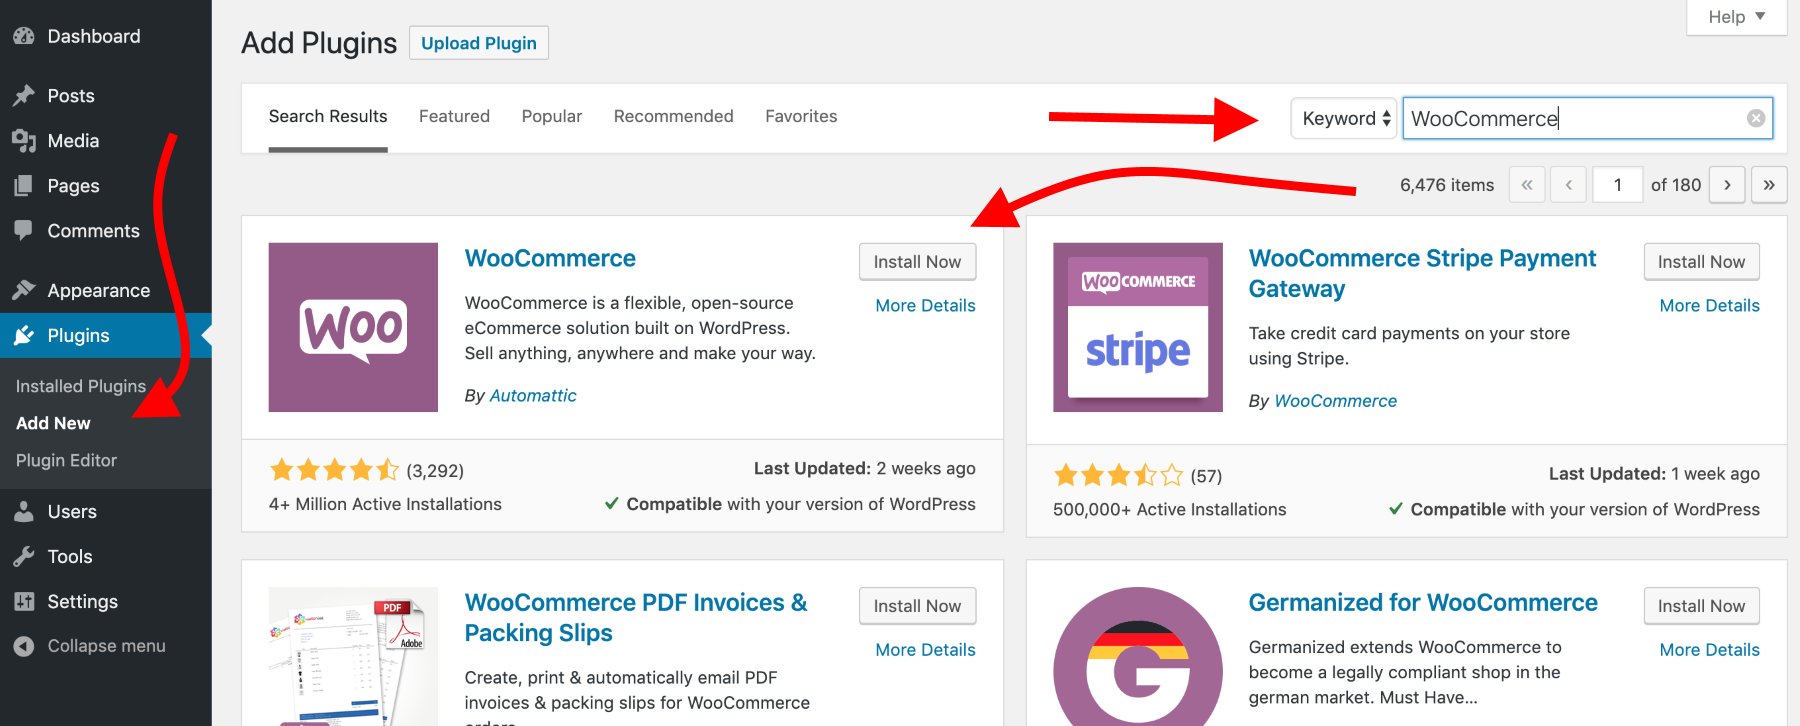
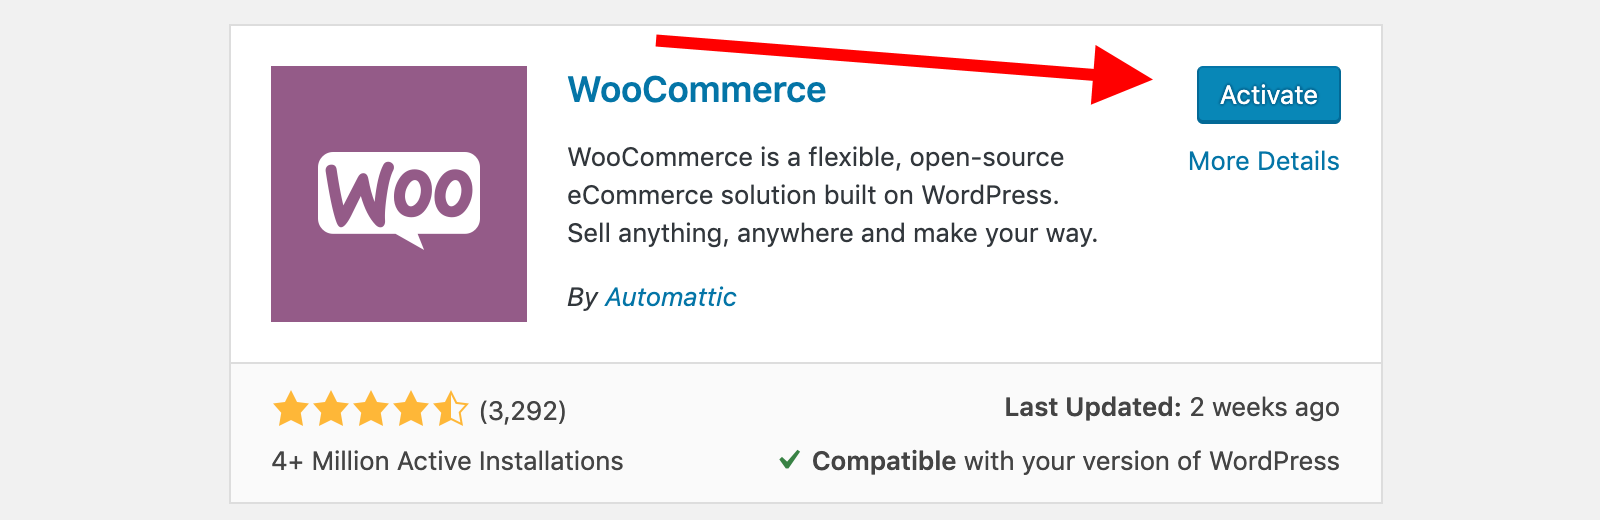
The first plugin on the list is what you need. Click on the Install Now button next to it. Then, when the installation completes, click on the Activate button.
Upon doing so, you’ll be taken to the WooCommerce configuration wizard. You’ll be taken step by step through the most important phases of configuring a new store. The whole setup can take you from five to 15 minutes, but you’ll end up with a fully functional e-commerce store at the end of it.
The first step is about the basics:
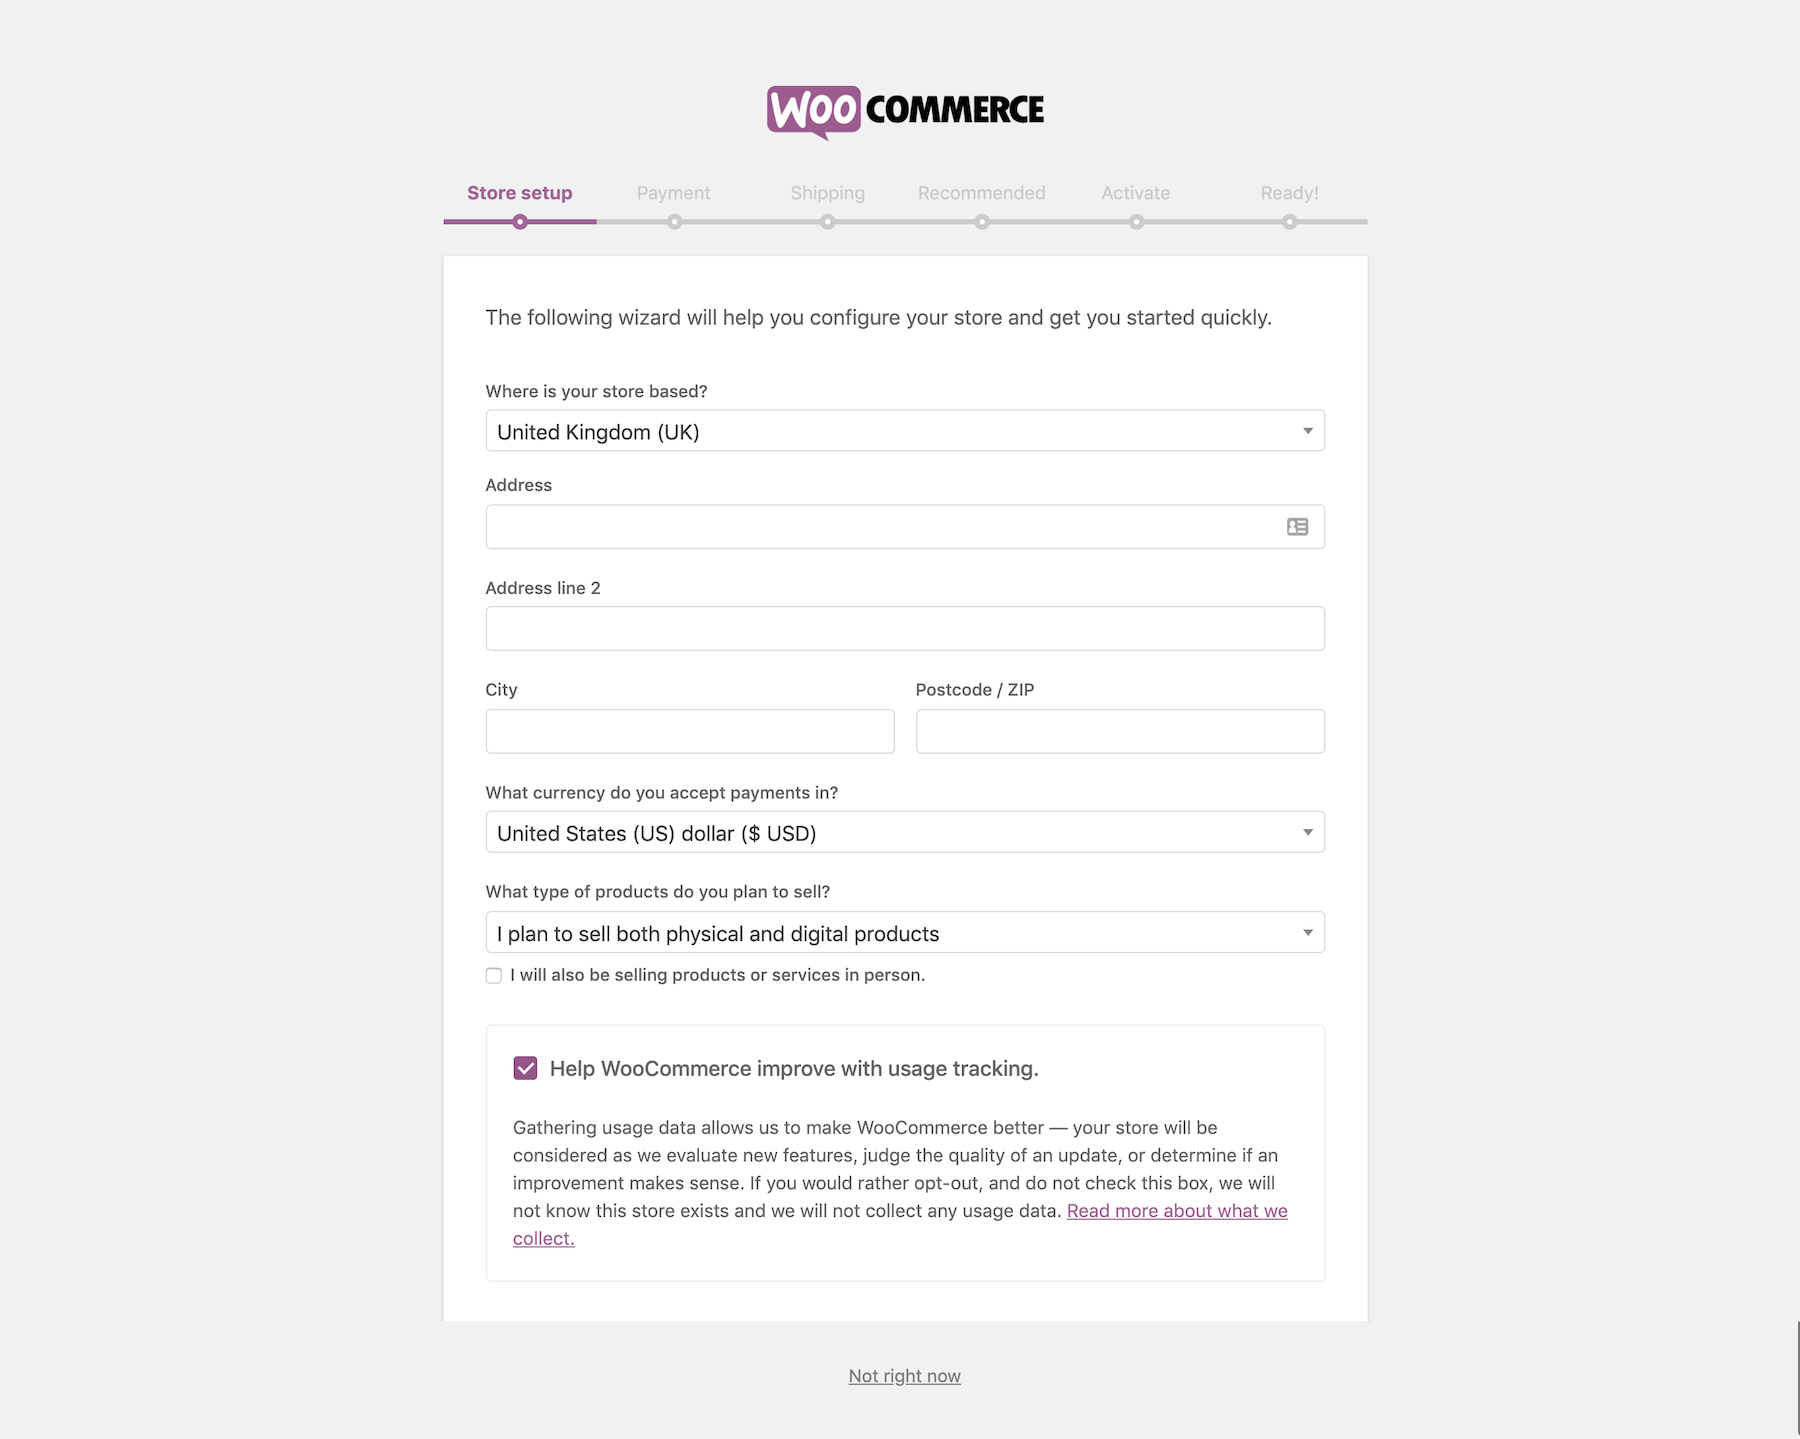
You have to decide on a couple of key things when completing this step:
- Provide your store/business information. Based on your country, you may be required by law to provide your actual business registration data.
- Set the currency you want to accept payments in. Usually your local currency, unless your target market is abroad.
- Set the type of products you want to sell. You get to set this to physical or digital products, or both. If, apart from your online store, you also have a traditional store location, check the box where it says you’re also going to be selling in person.
Click Let’s go when you’ve filled in the info.
The next step in the wizard is about basic payment settings.
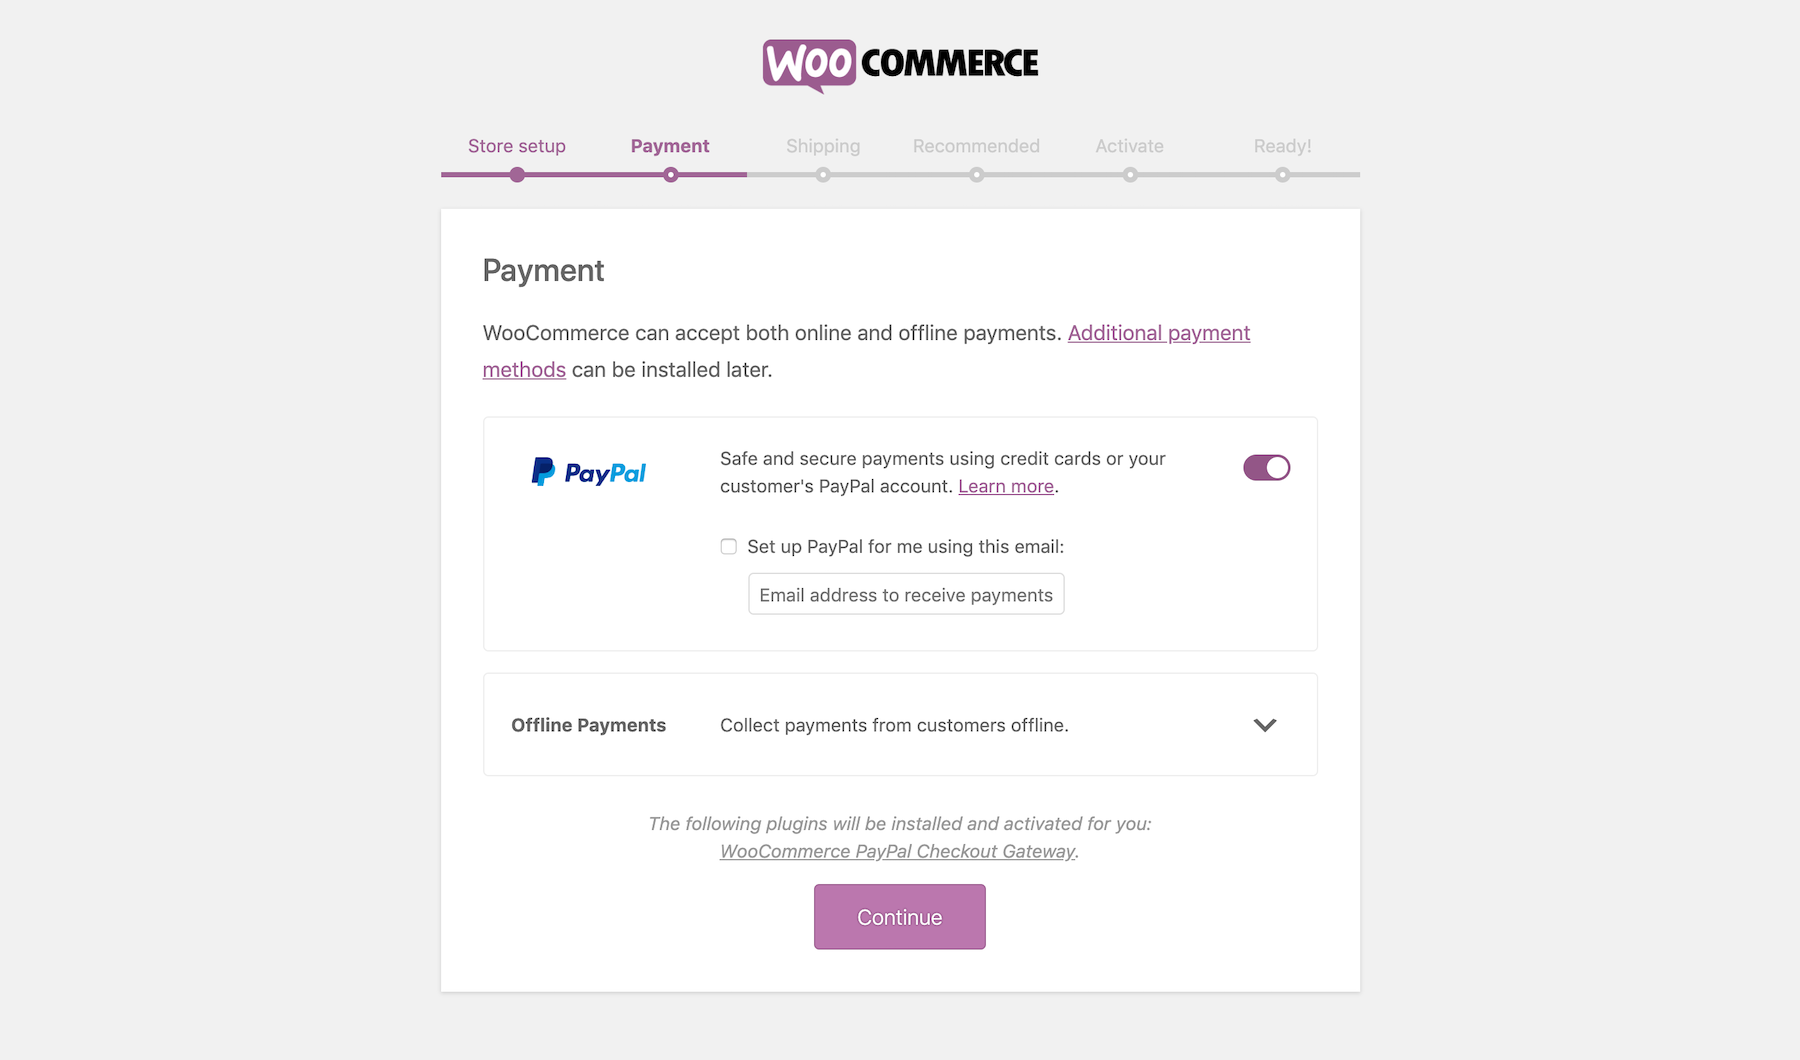
The default payment method that’s available in WooCommerce is via PayPal. PayPal is actually among the most popular payment methods on the web overall, so every e-commerce store should provide it as an option.
Make sure to enable the box next to PayPal. Later on, you’ll be able to add additional payment methods if needed, so you don’t have to worry about that right now.
You can also add options to enable offline payments, such as check payments or bank transfers. That being said, we don’t recommend this to people who start an online store for the first time. It increases workload, which can be confusing if it’s your first time building an e-commerce business.
Click Continue.
The next step is about shipping:
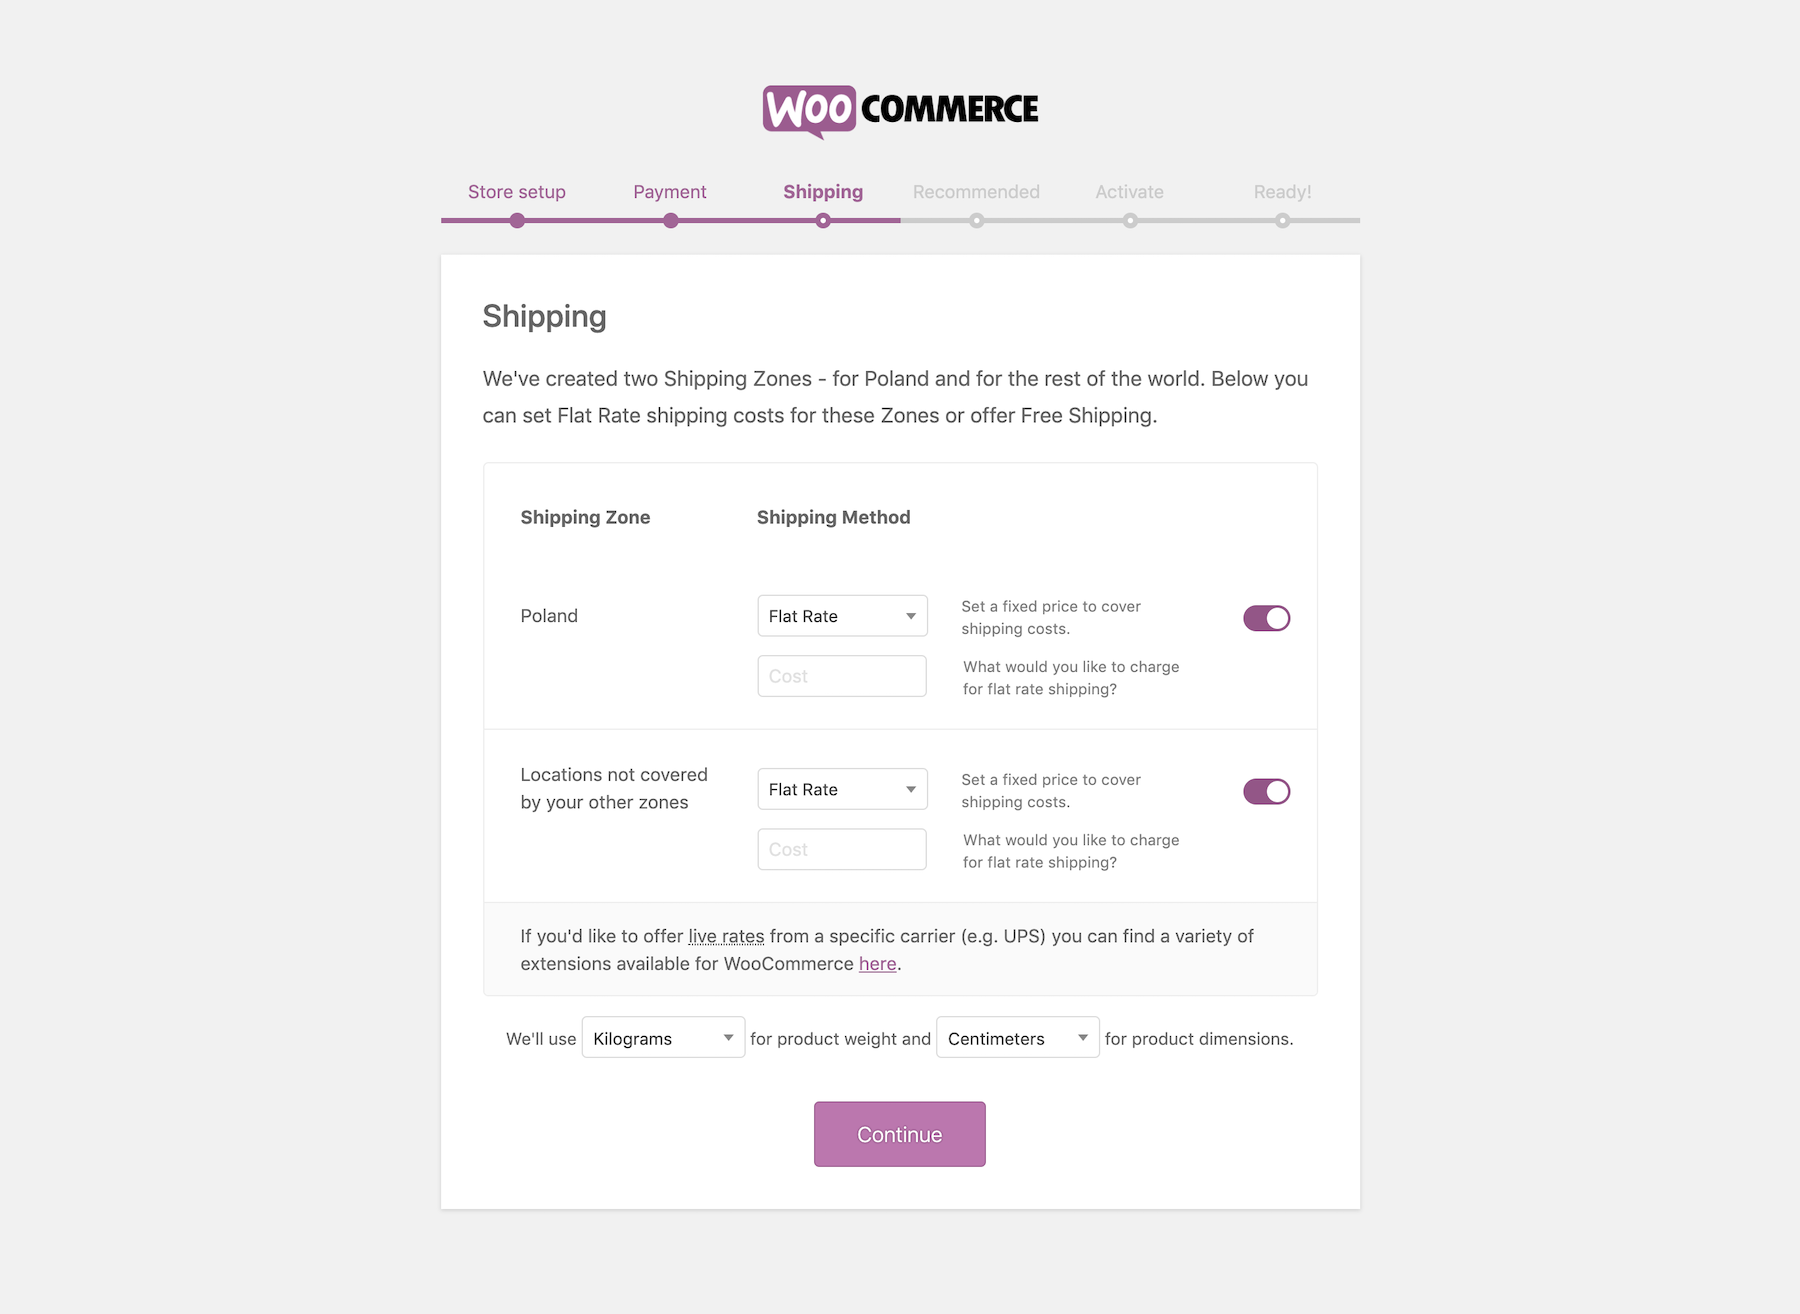
Shipping is a fairly complex process overall, and not just for e-commerce stores. If you’re running any kind of business, you’ll find that sending your products to different parts of the country or the world has very different rates.
WooCommerce attempts to make this easier by providing some getting-started options.
When you install WooCommerce, you’ll get two default shipping zones set up for you. The gist of how shipping in WooCommerce is handled is you can set multiple shipping zones — places where you’re willing to send your goods — and then set individual shipping methods for each zone. For example, in one location, you may have the postal service available and also some private courier services, but in another location only the postal service may be available. You get to set all of that in the shipping zones.
By default, WooCommerce will set one shipping zone for your whole country, and another for ‘everywhere else’.
You’ll be able to change these settings later on. Also, if you want to be working with specific carriers (such as UPS or DHL) then WooCommerce has plugins available that will fetch the live rates from those carriers. We’ll cover that later on.
For now, you can either input a rough flat rate for all deliveries in your country or set shipping to ‘free shipping’.
If you don’t plan on delivering products to anywhere else apart from the primary shipping zone, then you can toggle the button next to the other one to off.
This step is also where you decide on whether you want to use kilograms or pounds, and centimeters or inches.
Click on Continue when you’re ready.
In the next step, WooCommerce has some recommended plugins for you.
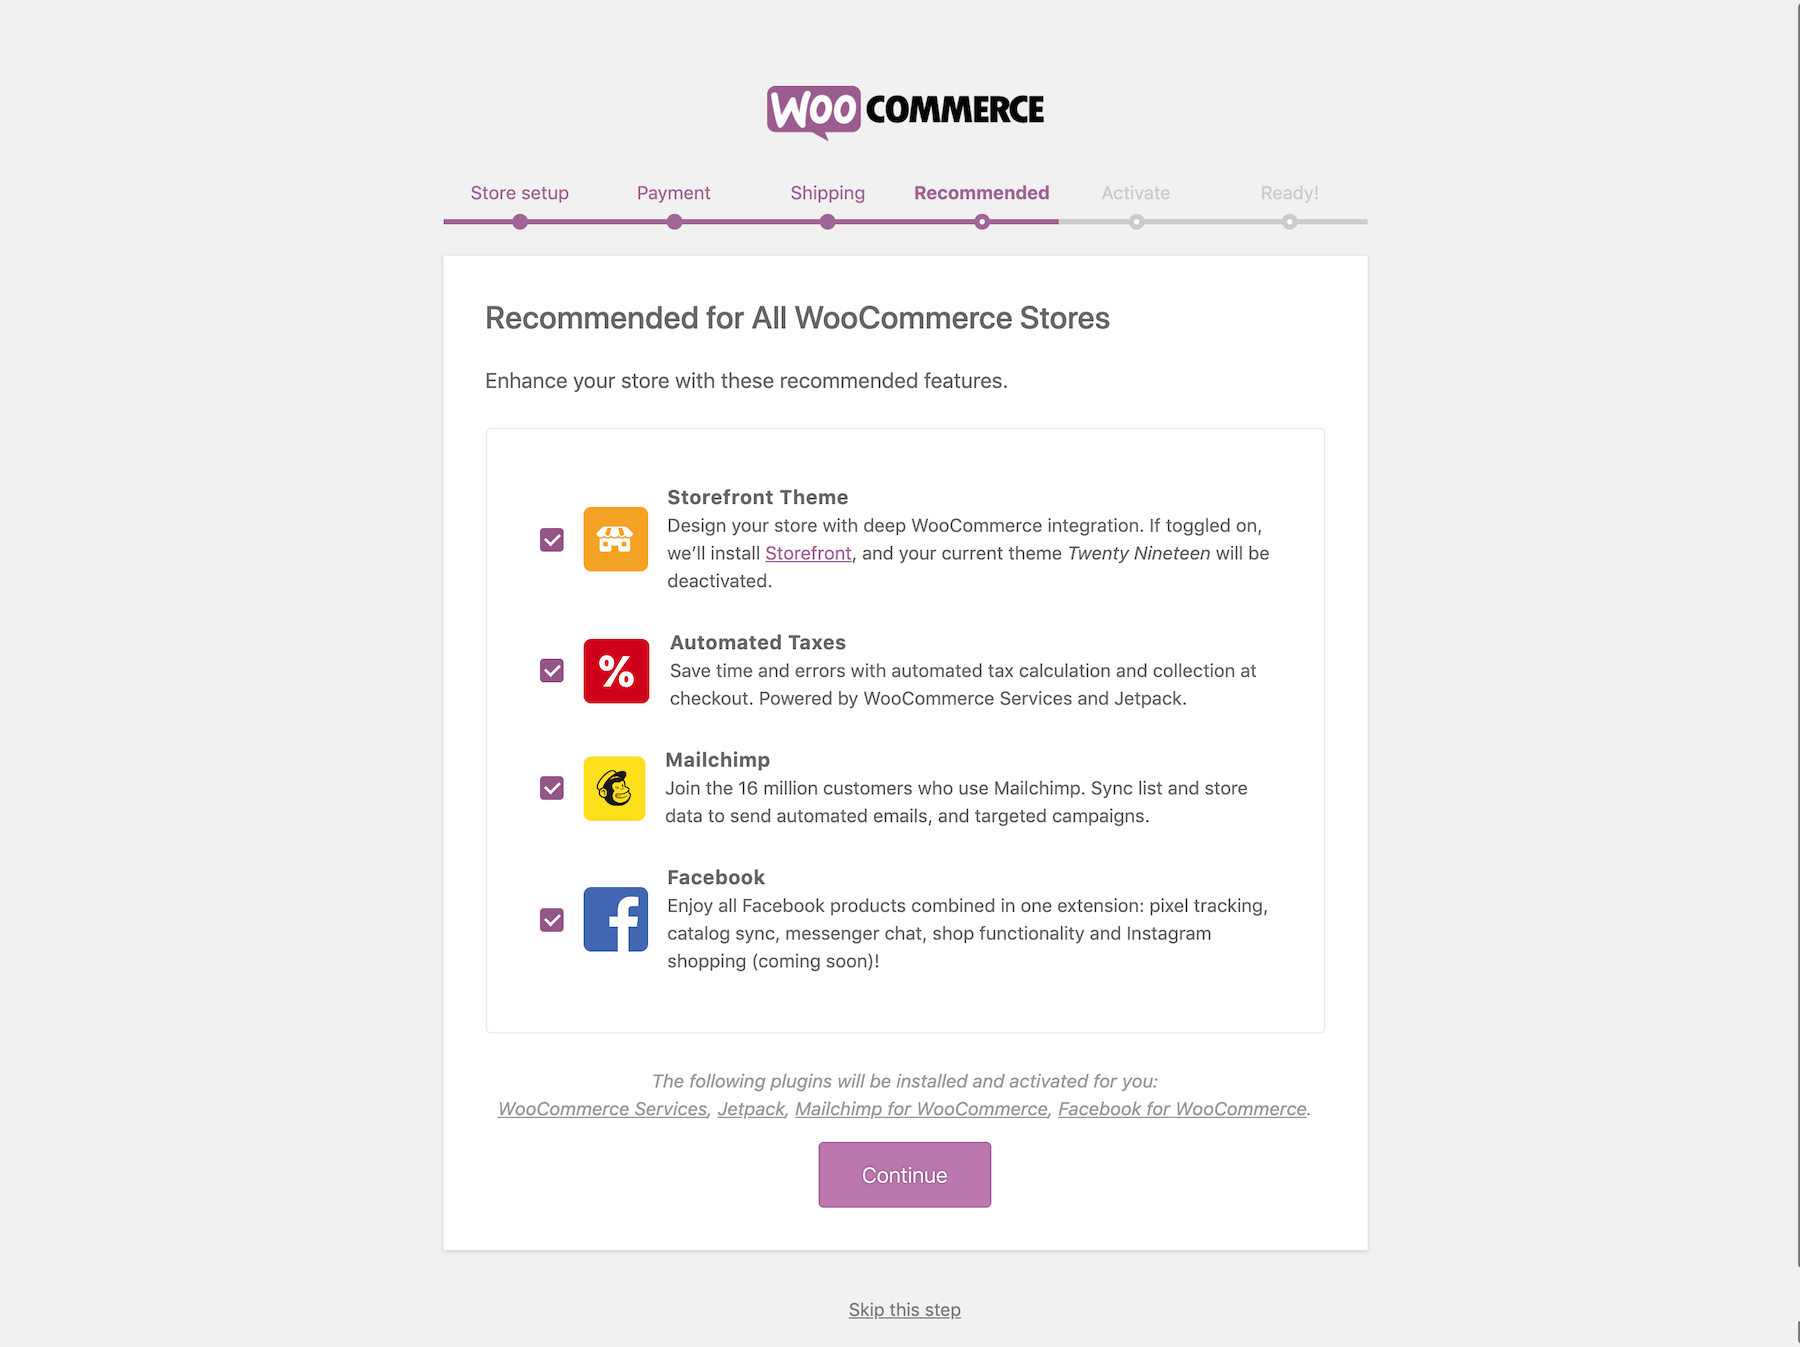
You can leave them all enabled. Click on Continue.
The next step is where WooCommerce asks you if you want to integrate your store with a service called Jetpack.
Jetpack is a toolbox of multiple smaller upgrades to WordPress and WooCommerce.
This package isn’t mandatory, but it can make your life easier in certain areas. For instance, it offers more stats, automated backups, and, perhaps most interestingly, automated taxes. That last feature is very useful if your store is based in the US.
We’re going to discuss Jetpack in a bit more depth later in this guide, but, for now, you can click Skip.
On the next screen, click Finish setting up your store to finalize the install.
You’ll see the final confirmation screen:
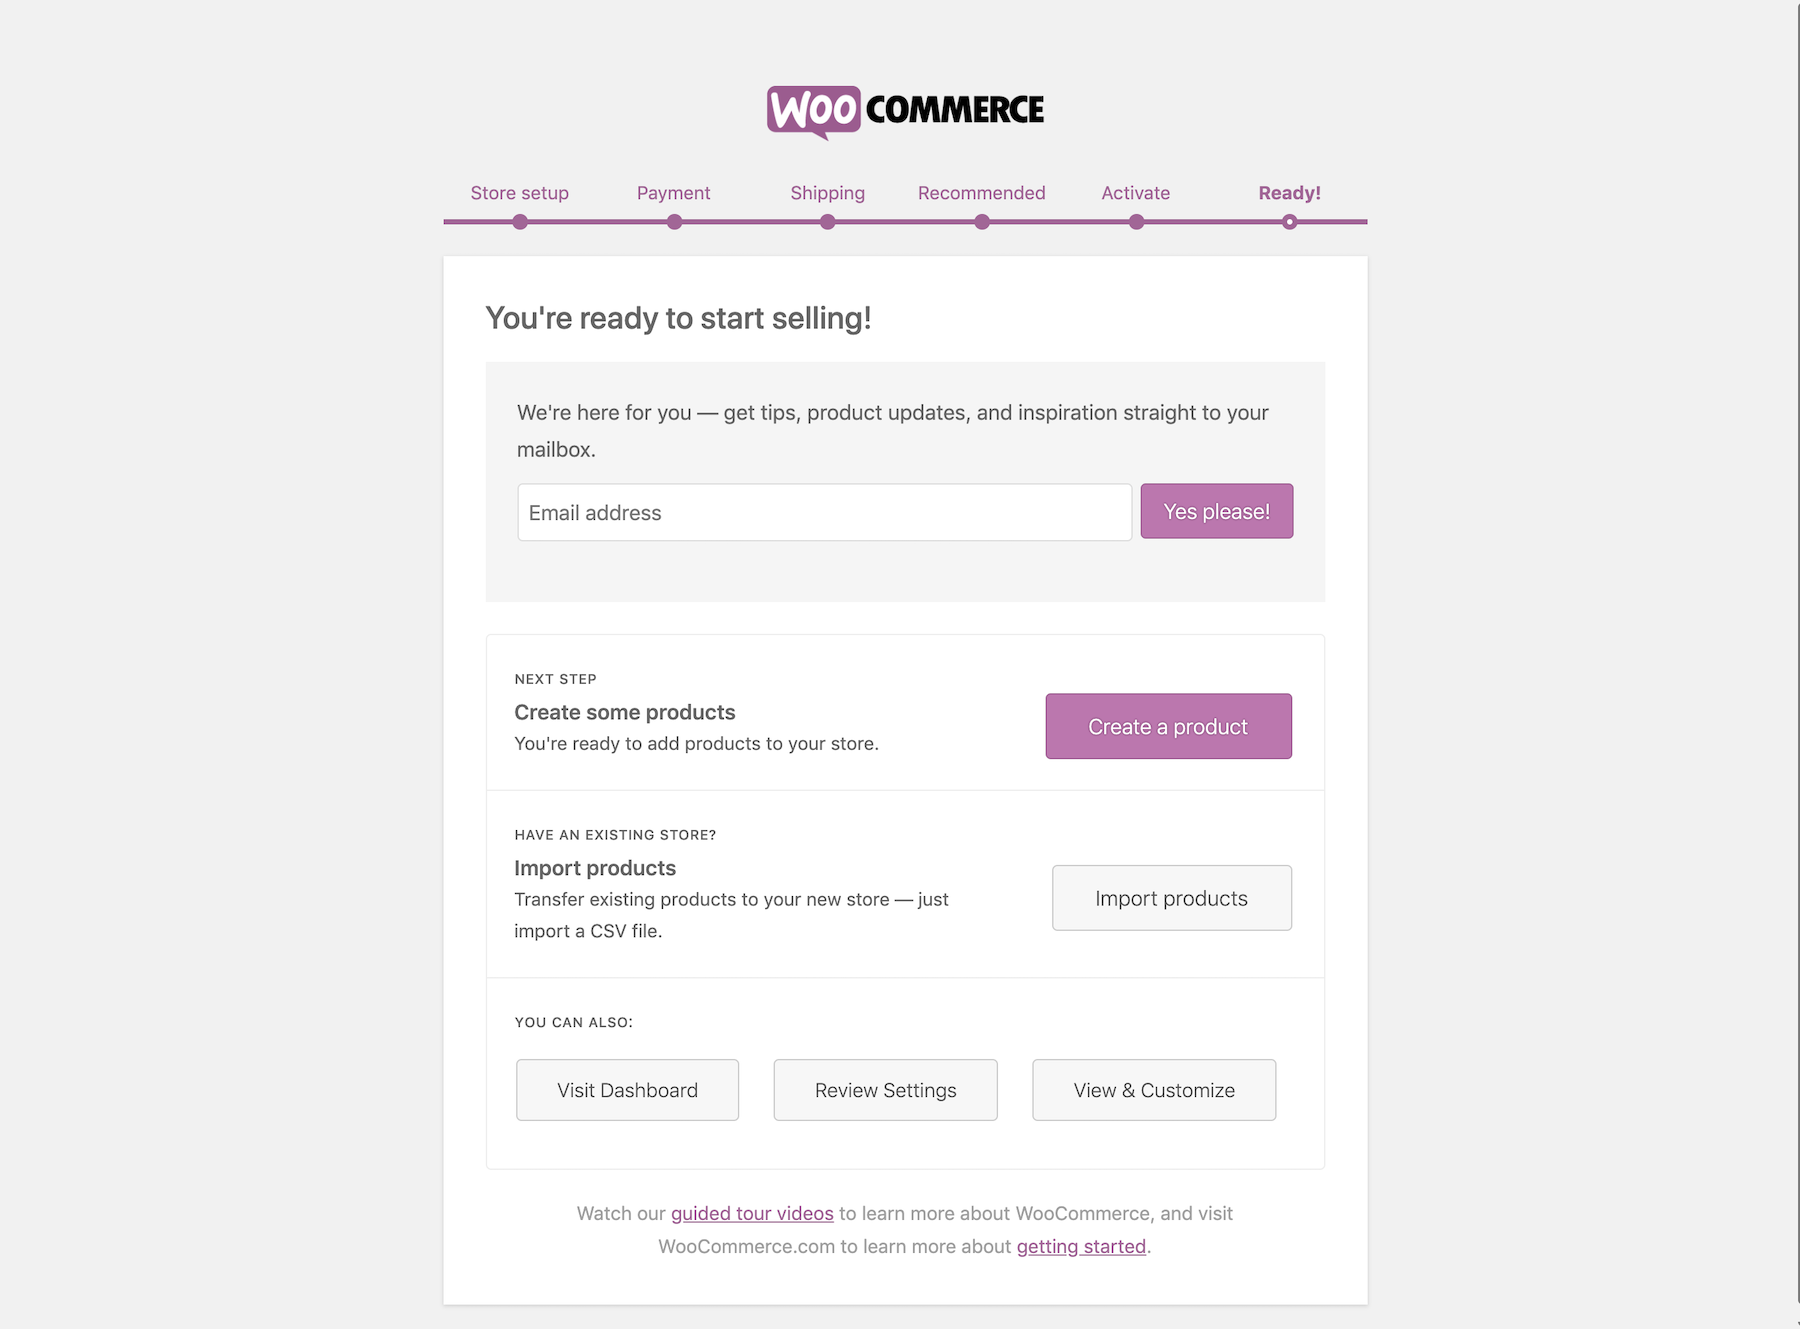
At this stage, WooCommerce has been fully installed and is ready to serve as the engine of your e-commerce store.
You can go back to the WordPress dashboard by clicking the Visit Dashboard button.
7.4. Tune up the Default Settings
From the WordPress dashboard, go to WooCommerce → Settings.
You’ll find several settings panels there, divided into tabs.

The General tab should be all right as it is, but you can double check if all the details have been fetched correctly from the installation wizard.
In the Products tab, decide whether or not you want to enable people to leave reviews under your products. For ease of setup, and when you’re just starting out, you can disable reviews by deselecting the box next to Enable reviews. Click Save changes.
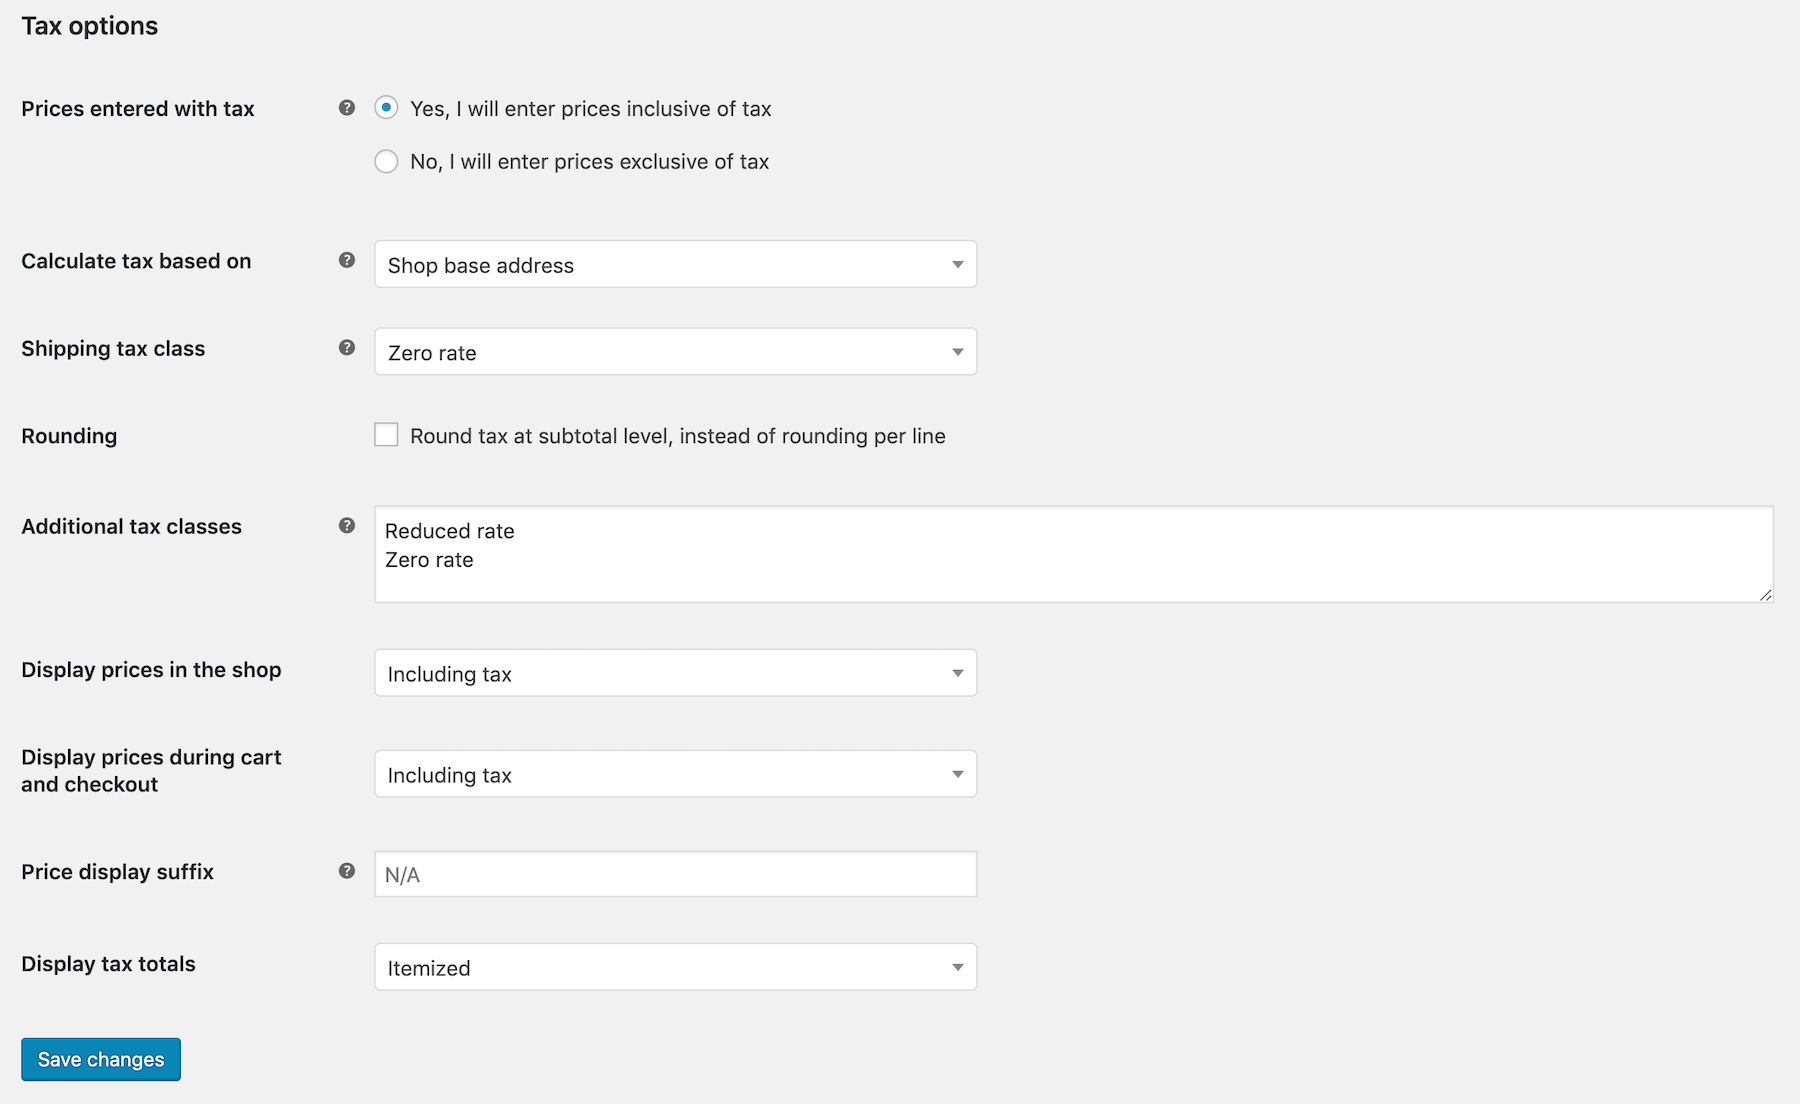
The next tab — Tax — is where all the fun starts. And by fun, I actually mean misery.
Okay, I may be overreacting, but, the fact is, the specific tax settings aren’t something I can help you figure out, I’m afraid. Each country has its laws and regulations, so you ought to check with your local authorities before setting anything in this tab.
The next tab, Shipping is where you can fine-tune all of the shipping details. You’ll see your shipping zones there (the zones you set during installation).
By clicking on each zone, you can see specific shipping methods that are possible in that zone.
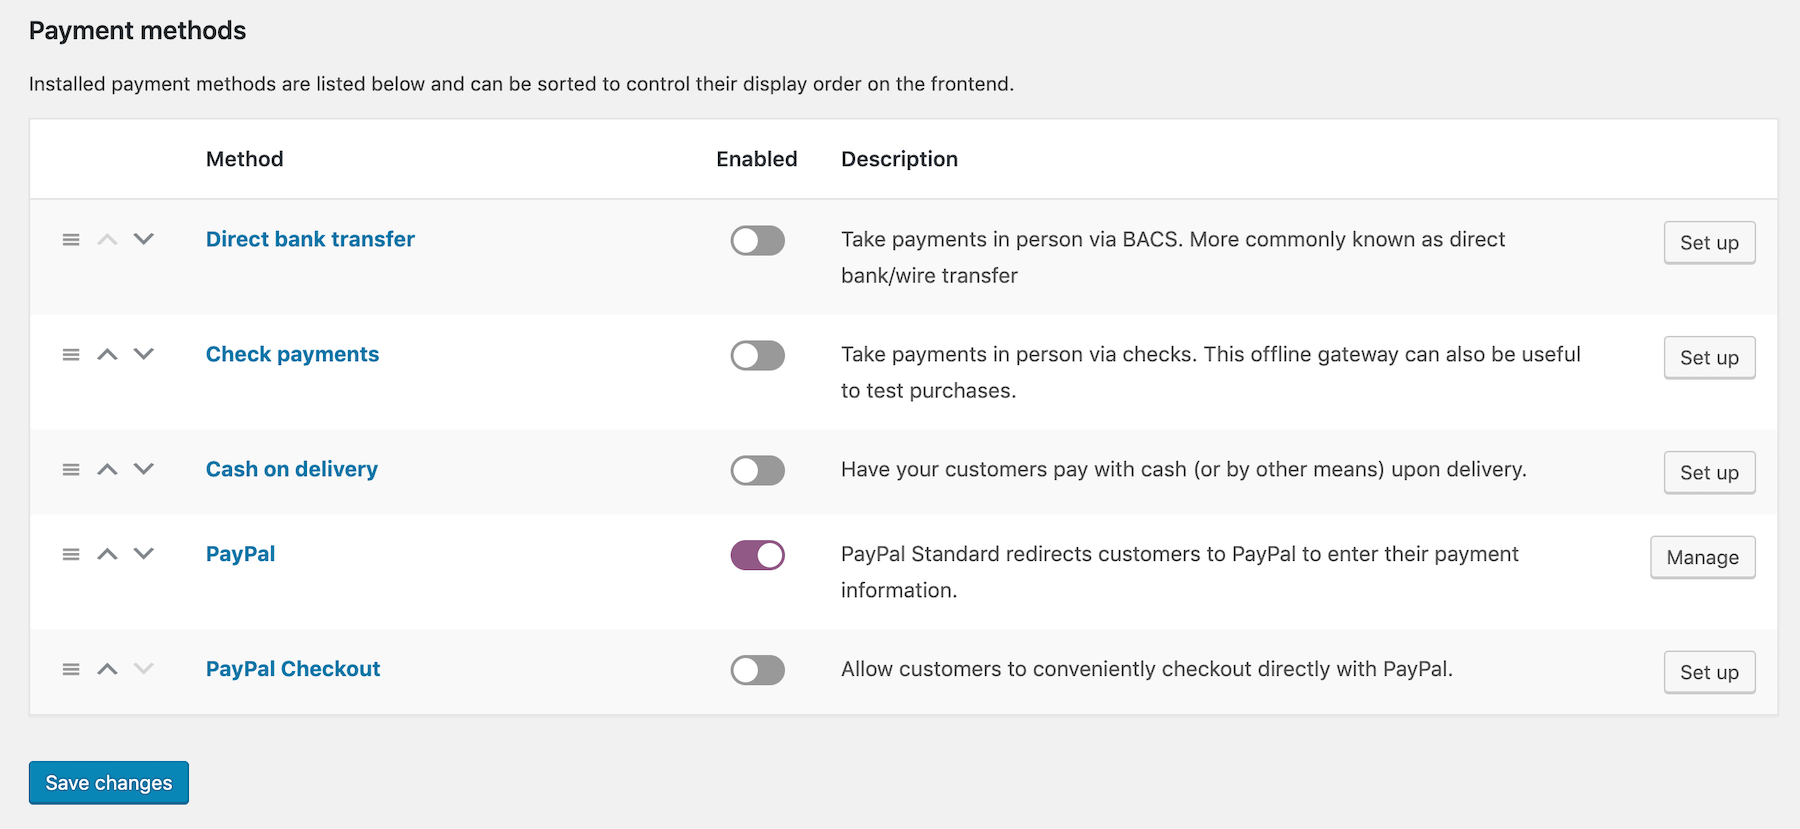
The next tab is Payments. This is where you can add all of the payment methods you want to make available for your customers. For now, just make sure PayPal is enabled. We’ll add more later.
The next tab, Accounts & Privacy is all about deciding how you want to handle your customers’ private information. In most cases, what you want to set is this:
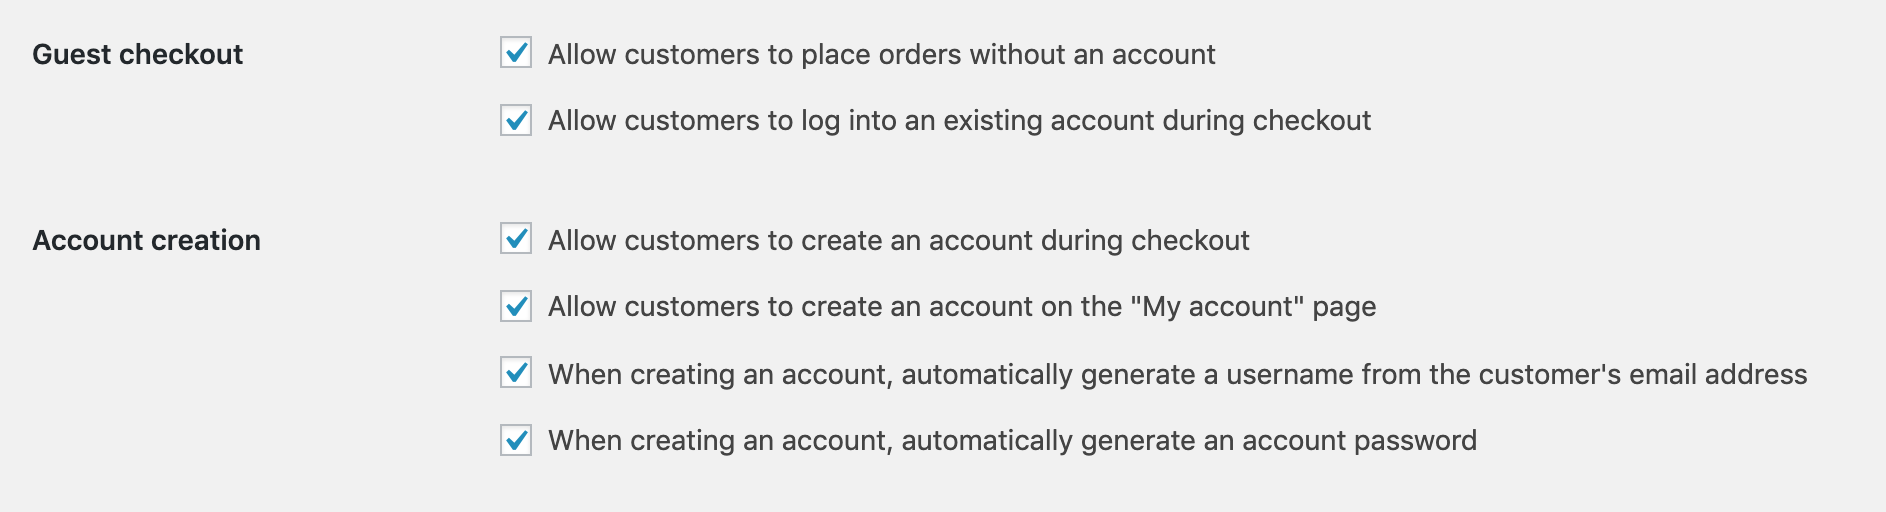
You can check out briefly what the remaining tabs are about, but you don’t have to change any settings there for the time being.
7.5. Make Sure You Have SSL
One more check you need to do is make sure you have an SSL certificate enabled on your site. SSL (Secure Sockets Layer) is an absolute must for an e-commerce store. In simple terms, SSL takes care of encrypting the communication between your store and its visitors/customers.
That encryption is crucial because of the nature of the data that’s being transmitted between an e-commerce website and its customer — payment info, credit card numbers, sensitive customer data and so on.
To check if you have SSL installed already, simply visit your website normally (go to YOURDOMAIN.com), and see if there’s https in the address bar, and if there’s a padlock icon next to the address. Example:

If there’s no padlock, contact your host’s support and simply ask them to enable SSL on your site. While you can do it by hand, asking the support team is much quicker and doesn’t require you to get your hands dirty.
8. Add Products to the Store Catalog
While adding products to your store catalog can be as easy as writing a short description and slapping on a price tag, I encourage you to invest a little more thought in it.
The following section is all about proper product presentation:
8.1. See How Your Competition Does It
Another thing that we can get from our competition is inspiration for good ways to showcase products.
✍️ Note down the following details about your competitors’ product pages:
- How do they name their products? Do they use factual/official/descriptive names or give the products unique names. When I look at my two competitors, The Sill and Bloomscape, they both use names of plant species for their products, such as the ‘Fiddle Leaf Fig’ or the ‘Peperomia Watermelon’.
- How do they structure the URLs? In other words, what do the individual product addresses look like? Both The Sill and Bloomscape use plant names in their URLs, for example
https://www.thesill.com/products/fiddle-leaf-fig-hyde-planter. Another approach is to use the main keyword for the product instead of its name. For instance, in the case of the Fiddle Leaf Fig, the URL could be something likeproducts/beginner-plant. - What kind of photos do they feature? Replicating a similar style of photos can be a good idea. In my case, clear, high-res photos of plants in good-looking planters seem to be the way to go.
- What other details do they provide on the product page? In my case, those are things such as planter colors, plant size, plant care instructions and short plant history.
- Where do they show the price? Chiefly, do they opt for a price-first approach (where the price is showcased prominently on the page) or a price-last approach? Lifestyle-driven niches tend to go with price-last.
Write down notes based on the research above. Replicating your competition’s approach to some extent is a good starting point. Why reinvent the wheel?
8.2. Do a Photoshoot
Good product photos are essential if you ever want to sell anything. We all kind of know this to be true, but we’re not really aware of the extent to which it goes.
As data suggests, 22% of product returns in e-commerce happen because an ‘item looks different from the photos’, so you really need to get that element right.
Take your products to a photographer’s studio and have a professional photoshoot. Hire a local photographer, show them your competitors’ photos and say you want something equally good-looking.
8.3. Add Your Products to WooCommerce
Once you know exactly what you want to feature on your product pages, and with your product photos at hand, you can begin adding everything to WooCommerce.
Log in to your WordPress site, and go to Products from the left sidebar. You’ll see this:
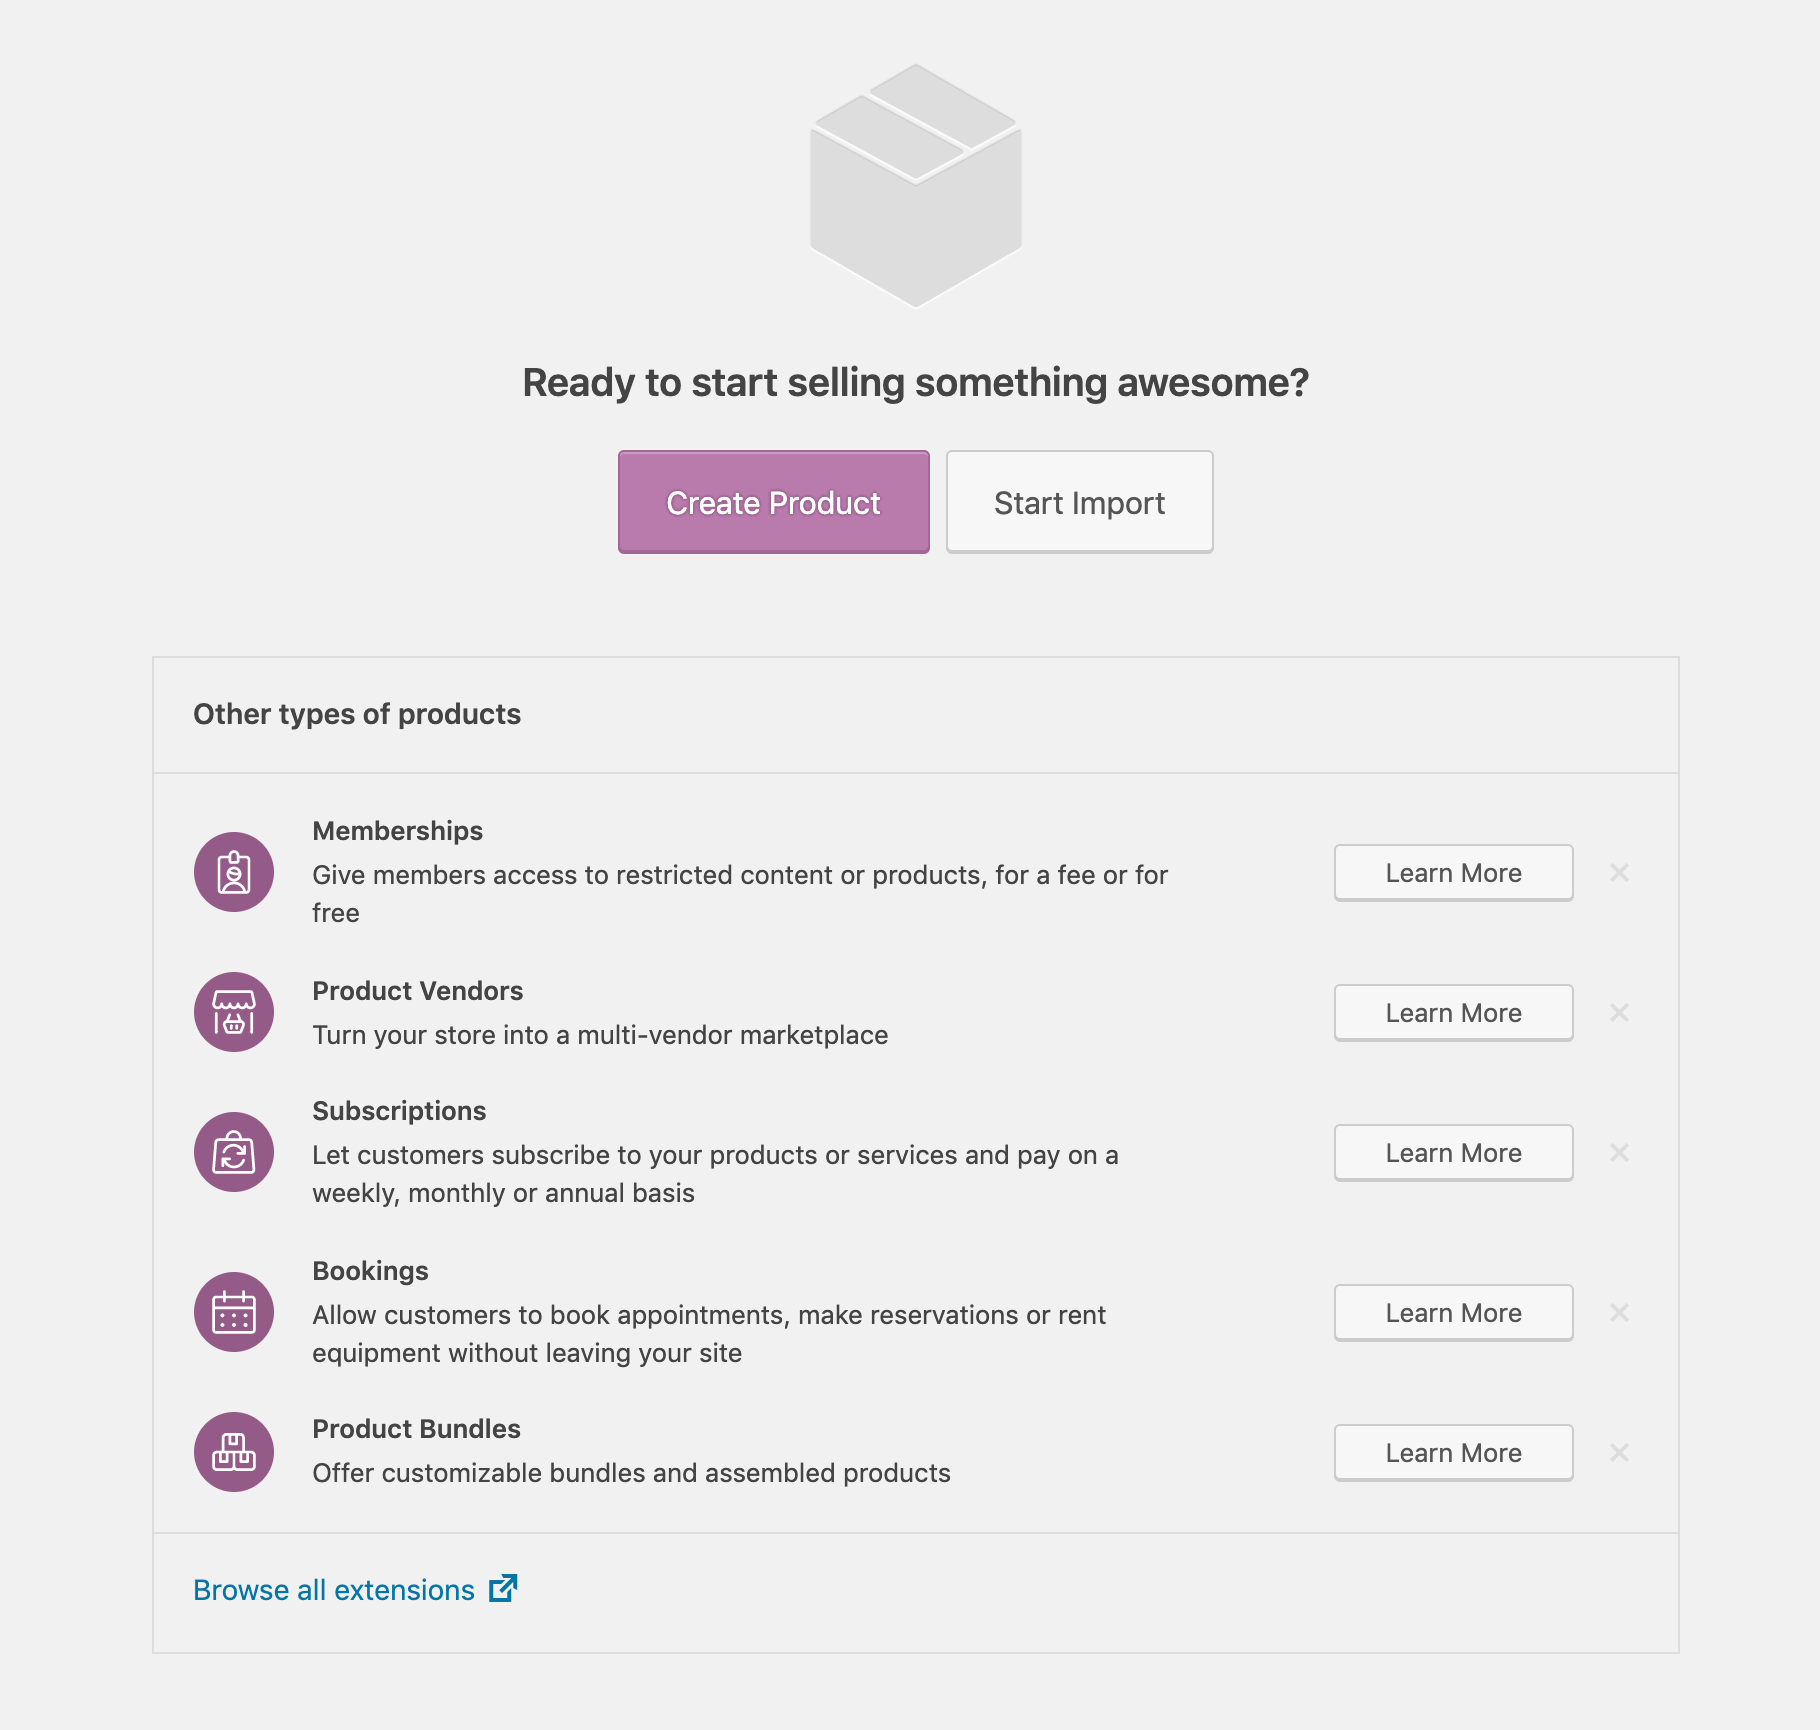
Apart from the main Create Product button, WooCommerce also gives you a couple of other options if you want to sell something non-standard. For now, we’ll stick with the basics.
Click on the Create Product button.
WooCommerce will take you through the most important elements of the panel by displaying hint boxes such as this one:
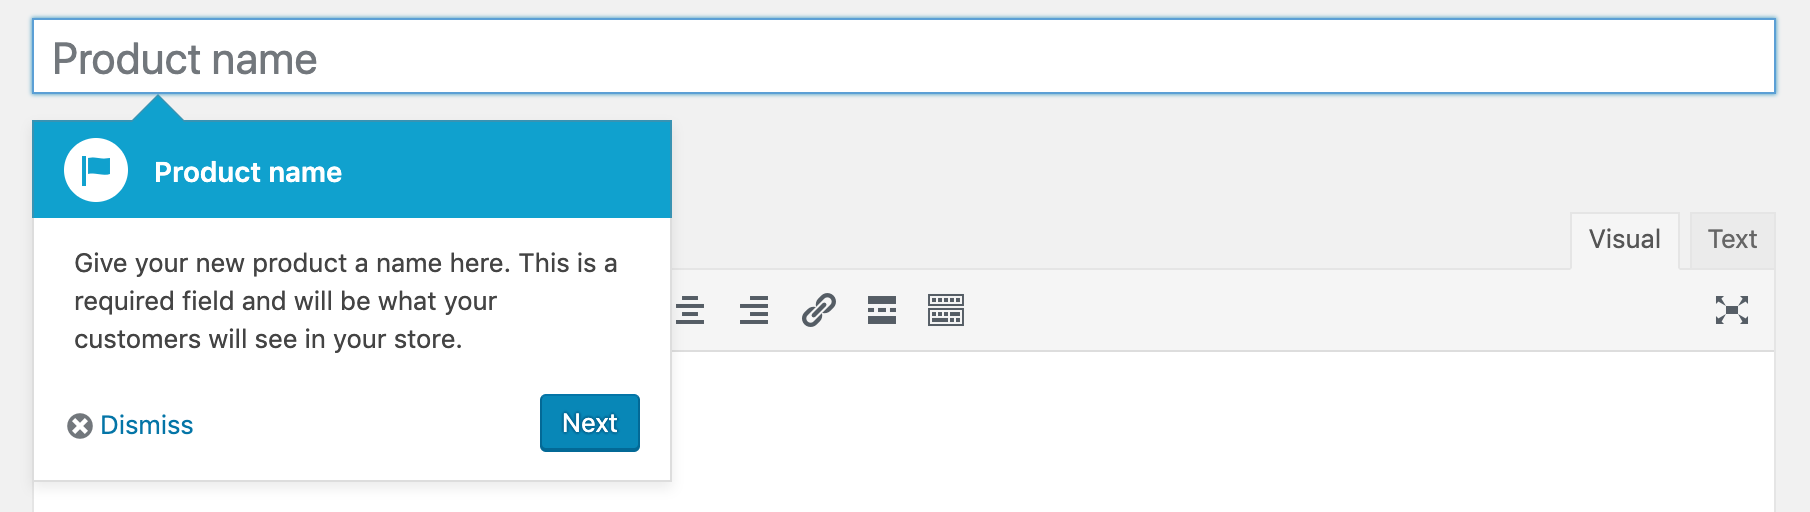
Go through them one by one to get an idea of what’s going on.
Here’s the panel for adding new products in all of its glory:
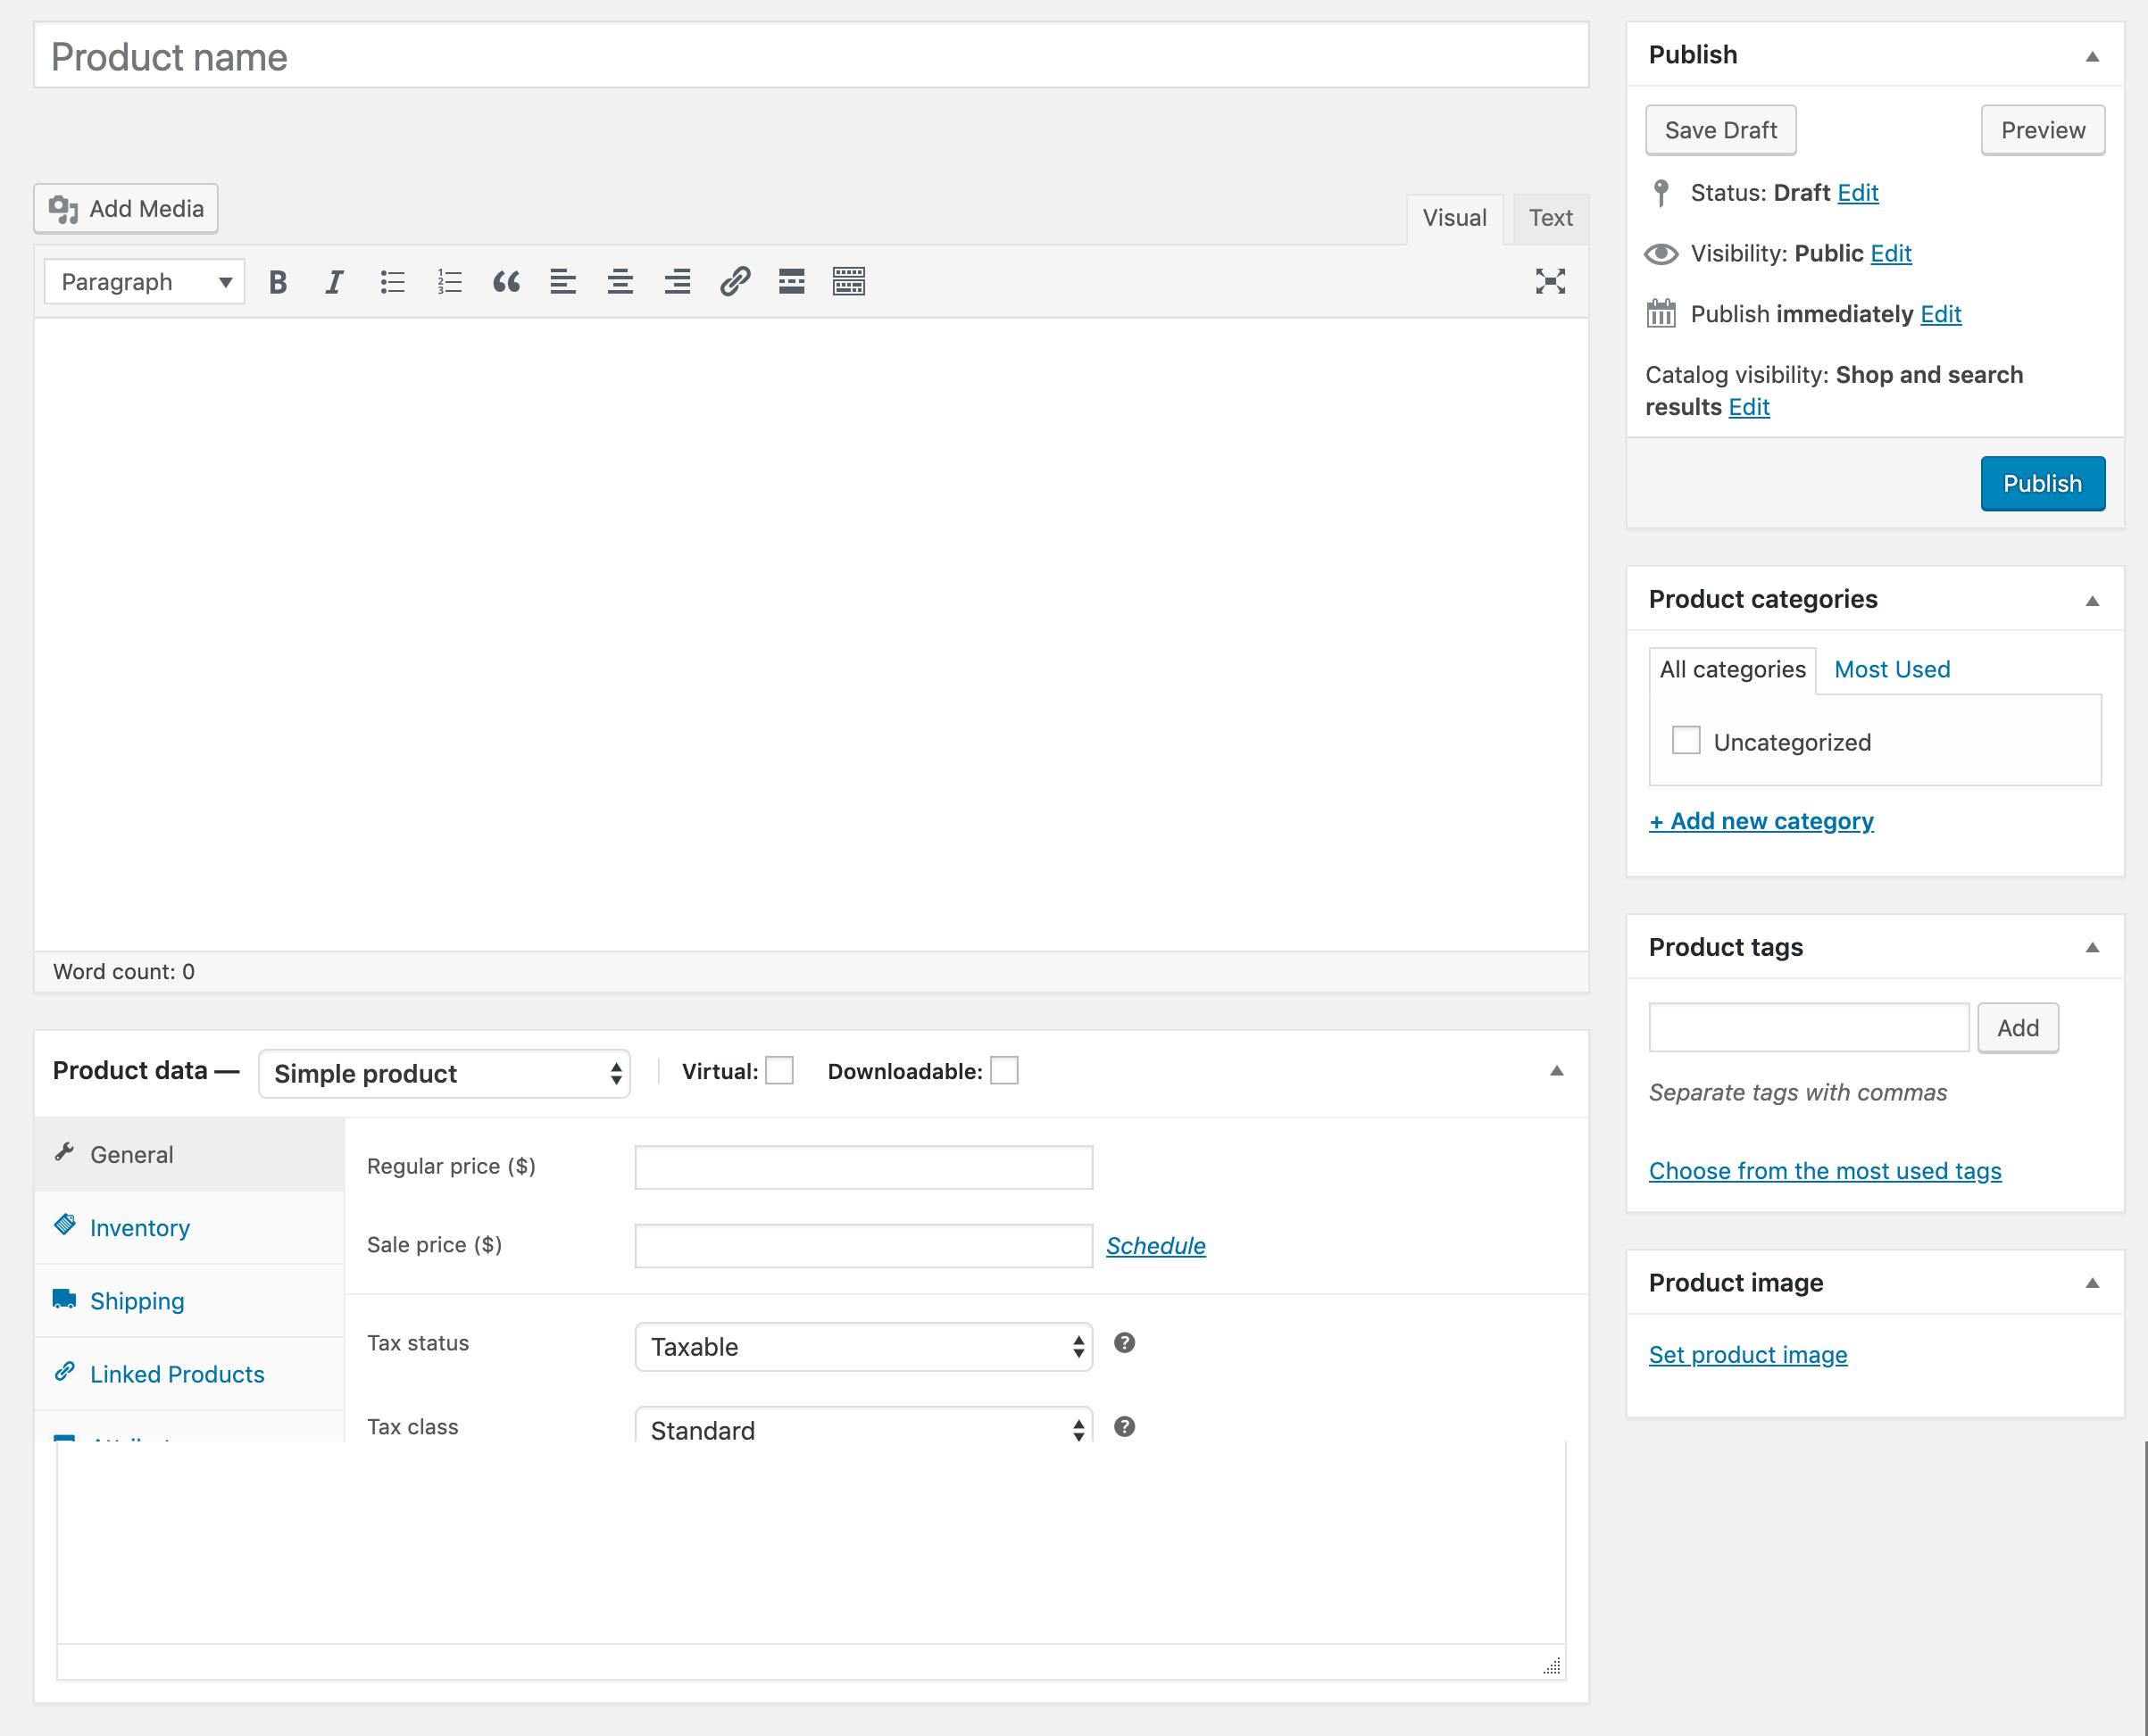
First, enter your product name where it says ‘Product name’ at the top.
Next, add your product description in the main field that’s below the product name.
Remember to add every little detail you discovered during your competitor research and brainstorming earlier on. Don’t worry about the presentation of the description too much at this stage.
You’ll notice this large field has all of the classic text editing features available — things such as text bolding, italics, lists, quotes and so on.
Next, fill in the product data box — this one:
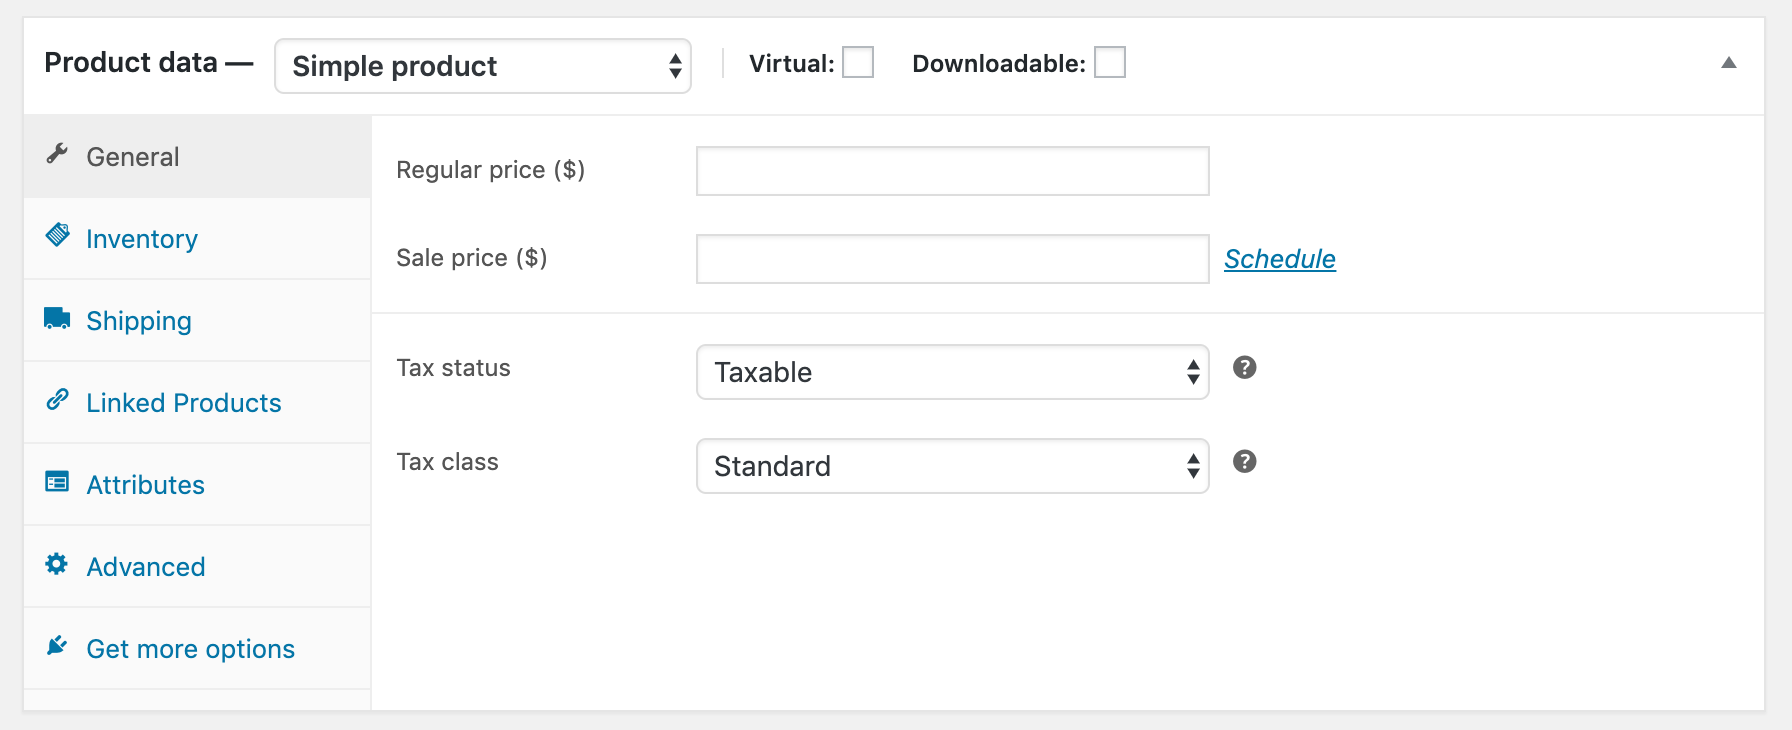
Some important details:
- Simple product — by default, WooCommerce suggests each new product to be added as simple product. There are other options to choose from, but this default one covers what your standard, single product is.
- General — the first sub-tab is called General. In it, you can set your product’s regular price, sale price (optional), and taxes.
- Inventory — this is about keeping track of what you actually have in store and how much of it.
- Shipping — this allows you to set all of the details that can be important for shipping, including weight, dimensions and shipping class.
- Linked Products — you can link the current product to others from your catalog you think will go well together. Linking products that really fit can improve your sales significantly, especially when doing so at later stages in the sales funnel. As data suggests, you’re 60% to 70% likely to sell to an existing customer versus just 5% to 20% likely to sell to a new prospect.
- You can leave the other sub-tabs be for now.
Out of all of the above, perhaps settling on a price is the most challenging step. If you’re not quite sure how to price your products, again, see what your competition is doing.
The next section on the page is Product short description.
The short description can appear in various places around your store. Most commonly, those include your product listings on the Shop page, and sometimes product widgets on other pages. The exact placements can depend on the theme you’re using (more on that later).
The best approach here is to treat this short description as the elevator pitch of the product. Make it concise and to-the-point.
With the description part taken care of, it’s now time to look into the right sidebar. You’ll find a couple of things there.
First, there’s the top section where you can publish the product — make it available for purchase (you probably want to hold off on that for now).
The next section is labeled Product Categories. Together with your first product, you can also add your first category.
To create a new category, click the Add new category link and type in the name of the category you want to assign your product to. Click Add new category when done.
Note: We discussed the topic of how to categorize your products earlier in this guide. You should already have a list of categories you want to use.
The next section in the sidebar is called Product tags. The difference between categories and tags can be rather unclear.
Basically, it all comes down to how you want to use your categories and tags.
- In most cases, categories serve as a way to group similar products. For instance, if you’re selling clothing, you can group your products into things such as shirts, pants, shoes.
- Tags, on the other hand, give you another layer of grouping that goes above or intersects with categories. Tags are also looser, and products often have more than one tag assigned to them. For example, you can tag your clothing using phrases such as summer, men, women, warm.
In the end, the exact way you categorize and tag your products is up to you. Frankly, many stores don’t even bother with tags at all.
To create a new product tag, just type in a tag in the tags field and press enter on your keyboard. You’ll see the tag appear below the field.
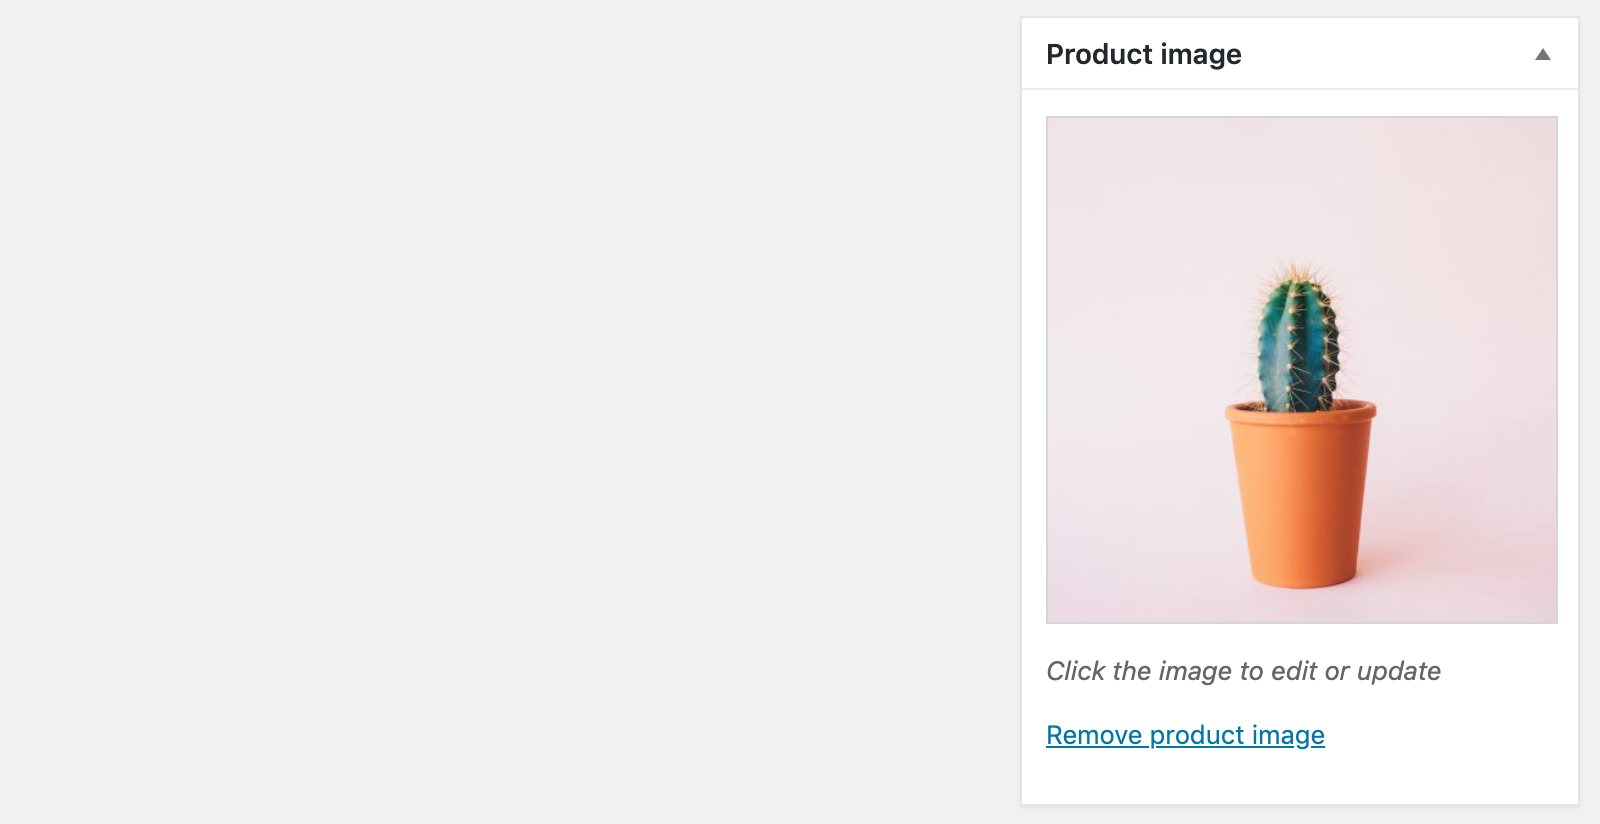
The next section handles the main image of the product. To add the image, click on the Set product image link and then select a photo from your computer. You’ll see the image assigned as the main one for the product.
The next section is labeled Product gallery and it’s where you can add more photos of the product.
Chances are that just one photo of the product is not going to be enough to get good sales. For example, fashion brands use an average of eight photos per product. The numbers vary in other niches, so you should go back to your competition again to see how they approach product photography.
This gallery section works the same as the one letting you add the main product photo. Just click the Add product gallery images link and proceed to upload a handful of product images. Click Add to gallery when done.
You’ll see them listed in the product gallery section.

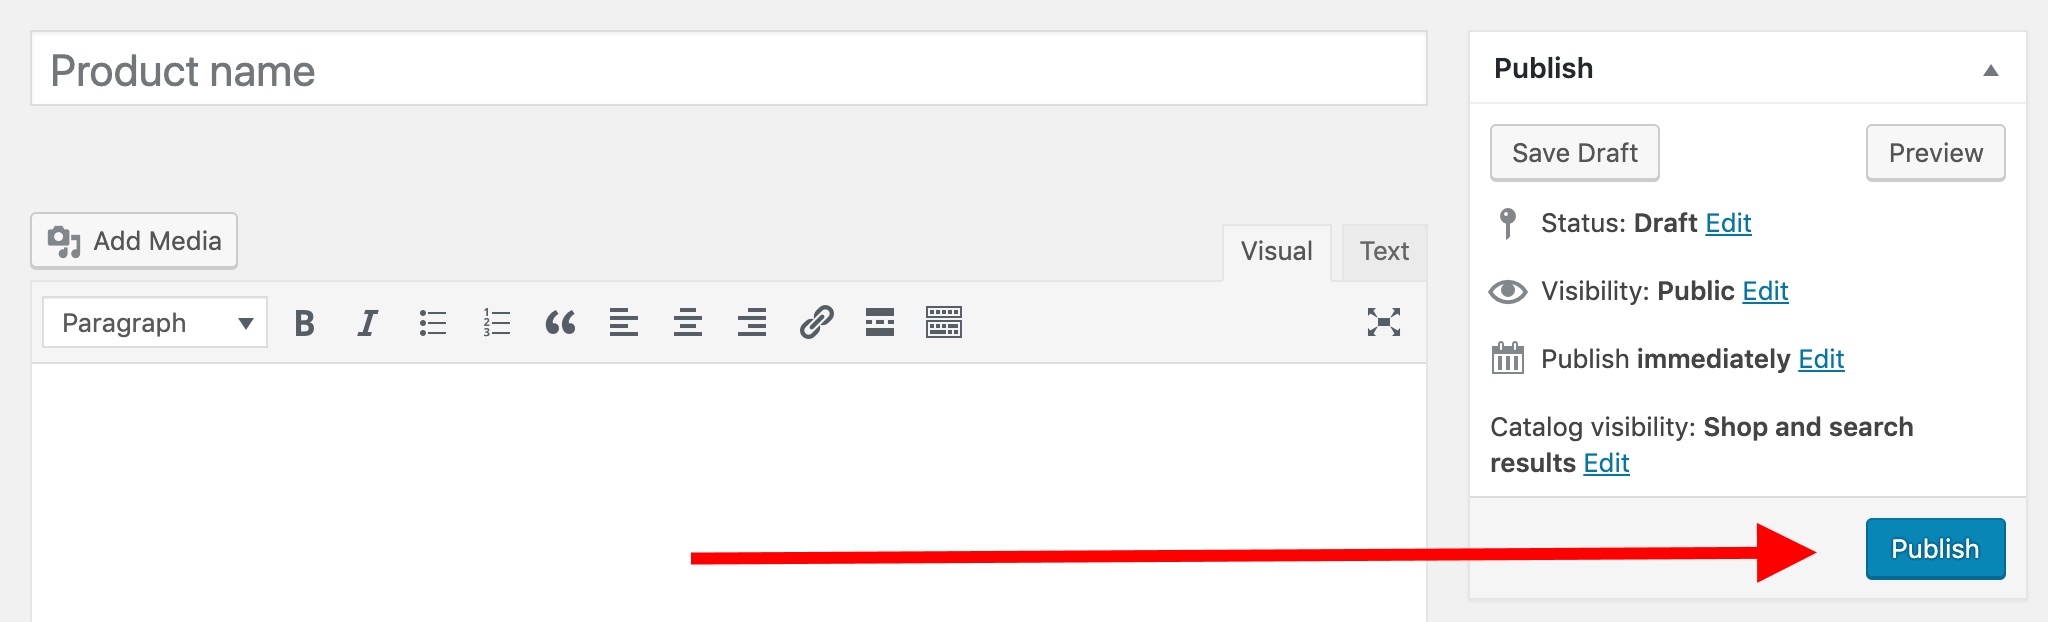
With the gallery done, you should now be ready to publish your product on the site. To do that, click on the main Publish button in the top right.
If you now go to Products → All Products in the WordPress dashboard, you’ll see your new product on the list there.
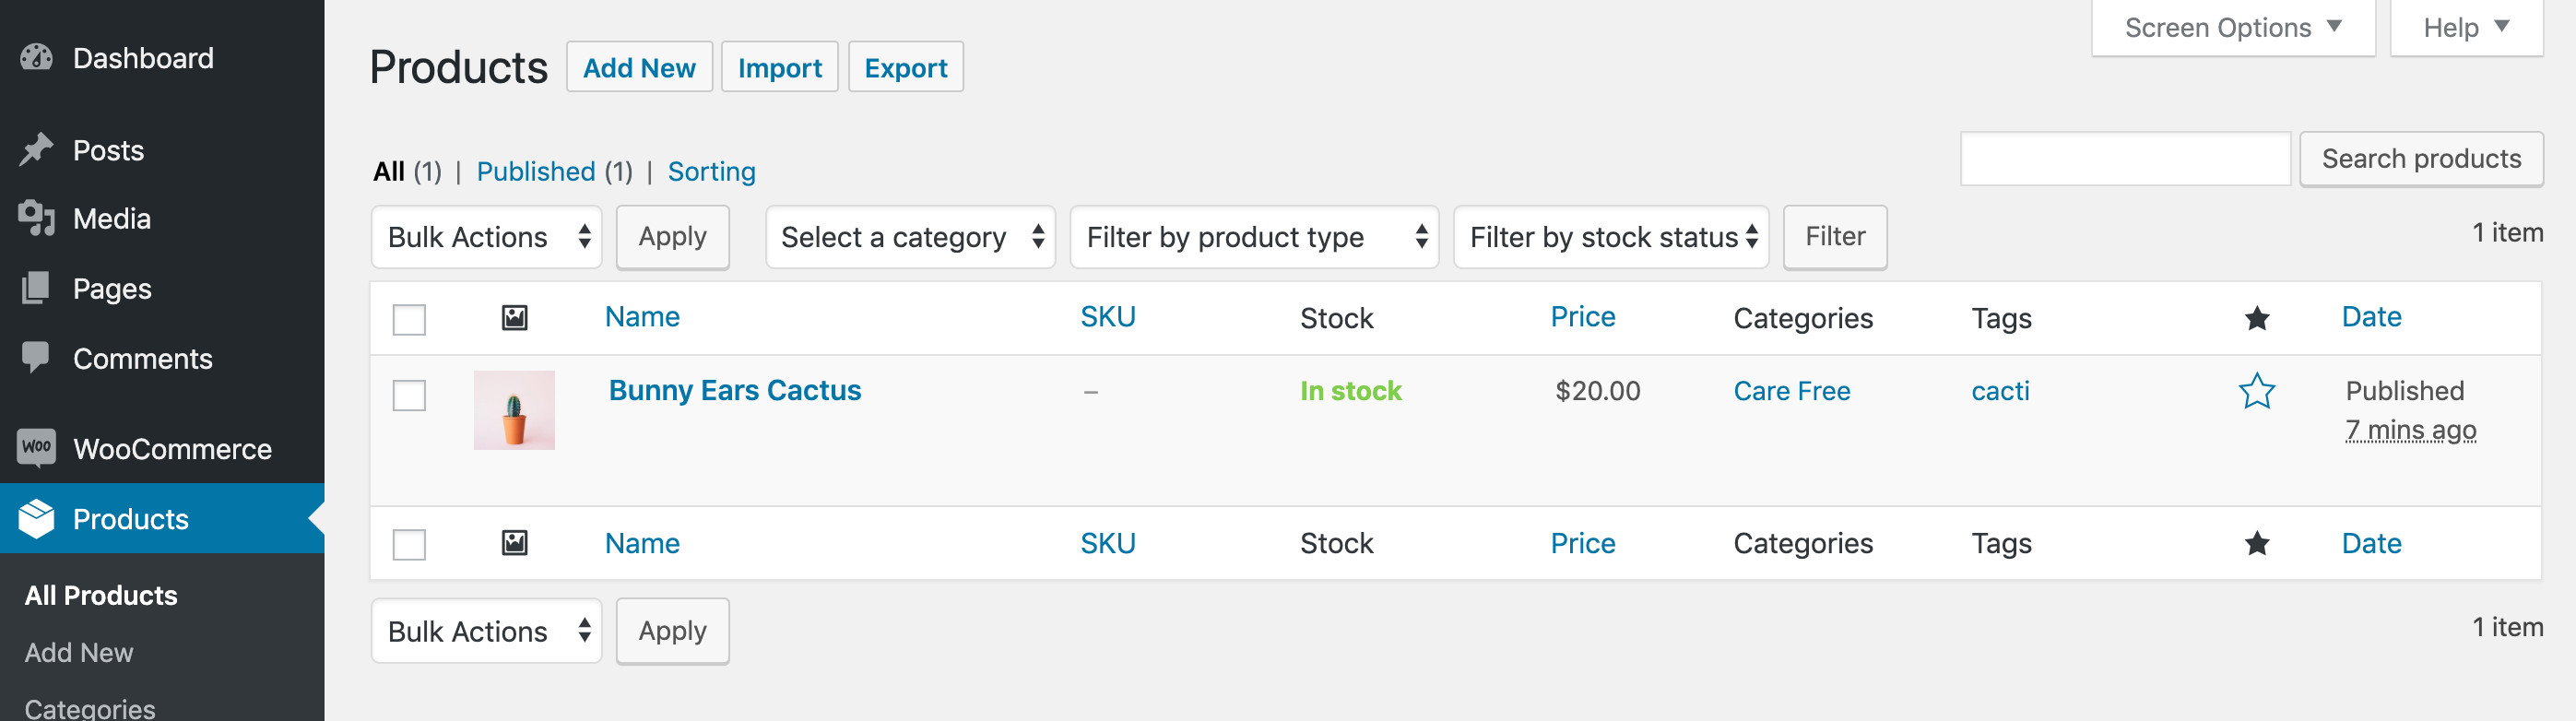
All you have to do now is repeat the process until you get all of your products added to the store. At this stage, don’t trouble yourself with how the products appear visually to your website visitors, we’re going to take care of all of that in the next step.
9. Pick a Design for Your Store
With all of your products added to the store’s database, it’s now time to handle the design of the entire store website.
9.1. Introduction to WordPress Themes
To get a custom design on to your e-commerce store, you need to install what’s called a WordPress theme.
WordPress themes are all-in-one design packages that can be installed on any WordPress website with a couple of clicks.
Changing the design itself doesn’t change the written content of the website or the products you have in the catalog. This means you can change your design later without affecting any of the content.
You can find WordPress themes either on the official website of the WordPress project — at WordPress.org — or on countless other websites.
Picking a quality theme is a skill in itself, and just googling ‘cool WordPress themes’ may get you in trouble. Not all themes are fit to handle an e-commerce store.
If you really want to get to the bottom of this, here’s a separate resource we wrote on the topic of choosing the ideal WordPress theme for your website.
However, for this guide, we’re going to stick to what we know is a quality theme a lot of people enjoy, and we’re going to use that as our demo theme going forward.
Of course, you’re free to choose whatever other theme you like, but going with the same theme will naturally make following this guide a lot simpler.
The theme we’re going to use is called Astra.
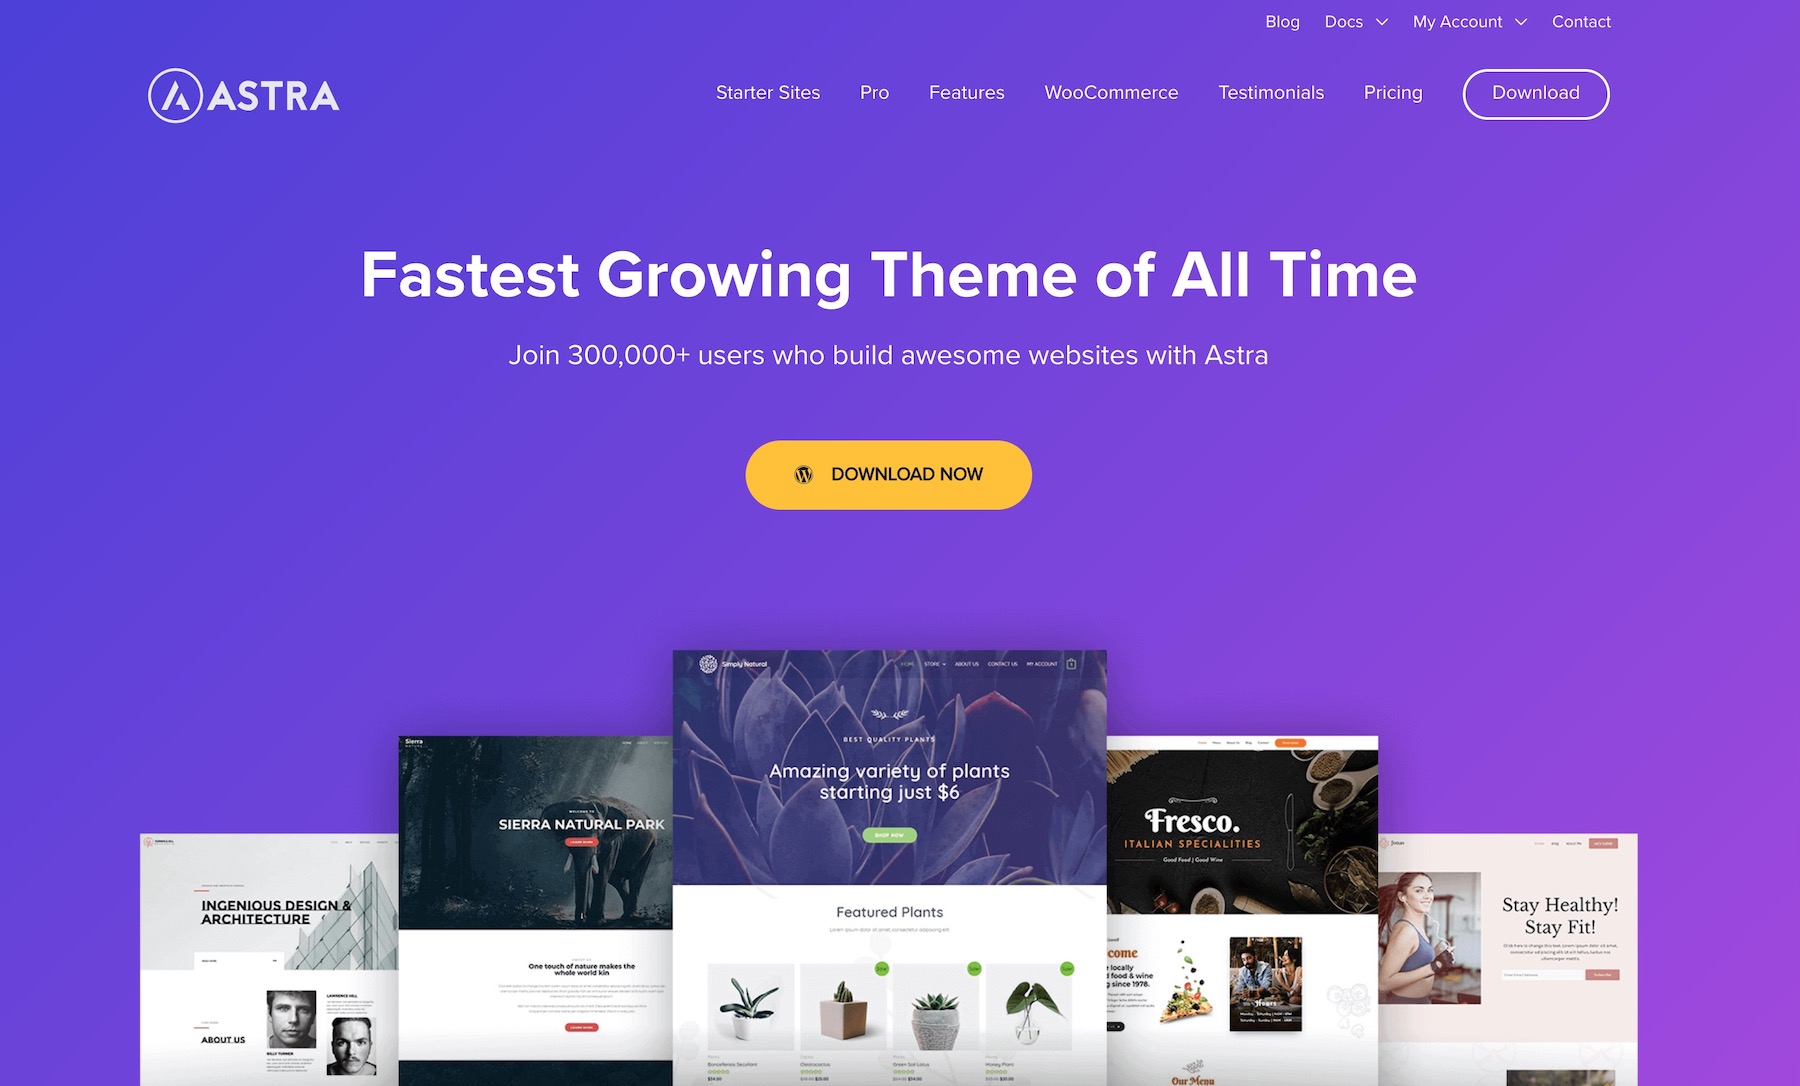
There are a couple of reasons why we consider it to be a great beginner-friendly starter theme for new e-commerce stores:
- Astra is fast and optimized to work on all devices.
- The basic version of Astra is free, and it should be enough for new stores to get started.
- An optional paid upgrade — Astra Pro — is a significant step up for those store owners who need more features, making Astra a great theme to grow with.
- Astra has starter sites. Those are installable sub-packages that change the design of the main Astra theme to fit your niche and your individual needs.
9.2. Install the Astra Theme
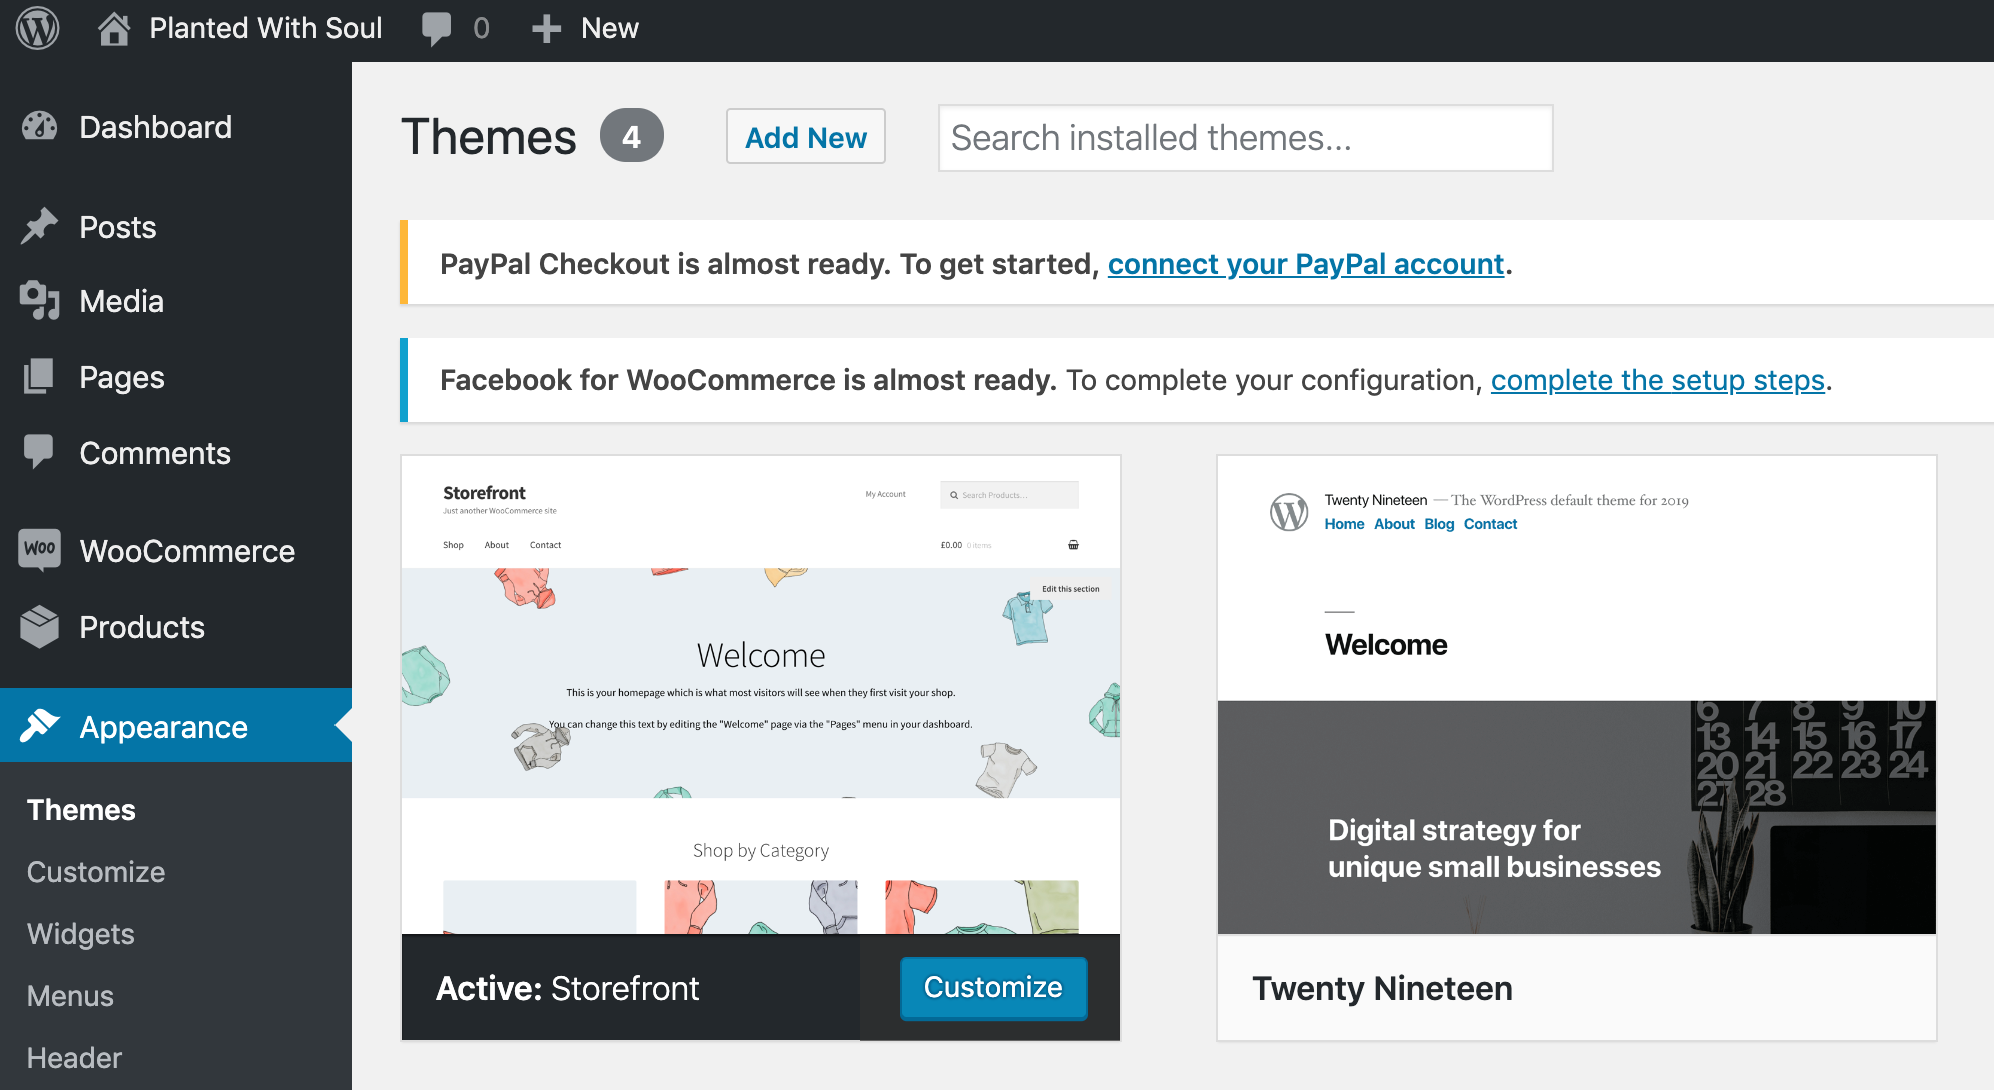
To install Astra — or any other WordPress theme — go to your WordPress dashboard, and then click Appearance → Themes from the main sidebar. Next, click the Add New button.
In the search box, enter ‘Astra’, and then install the theme by clicking its Install button.
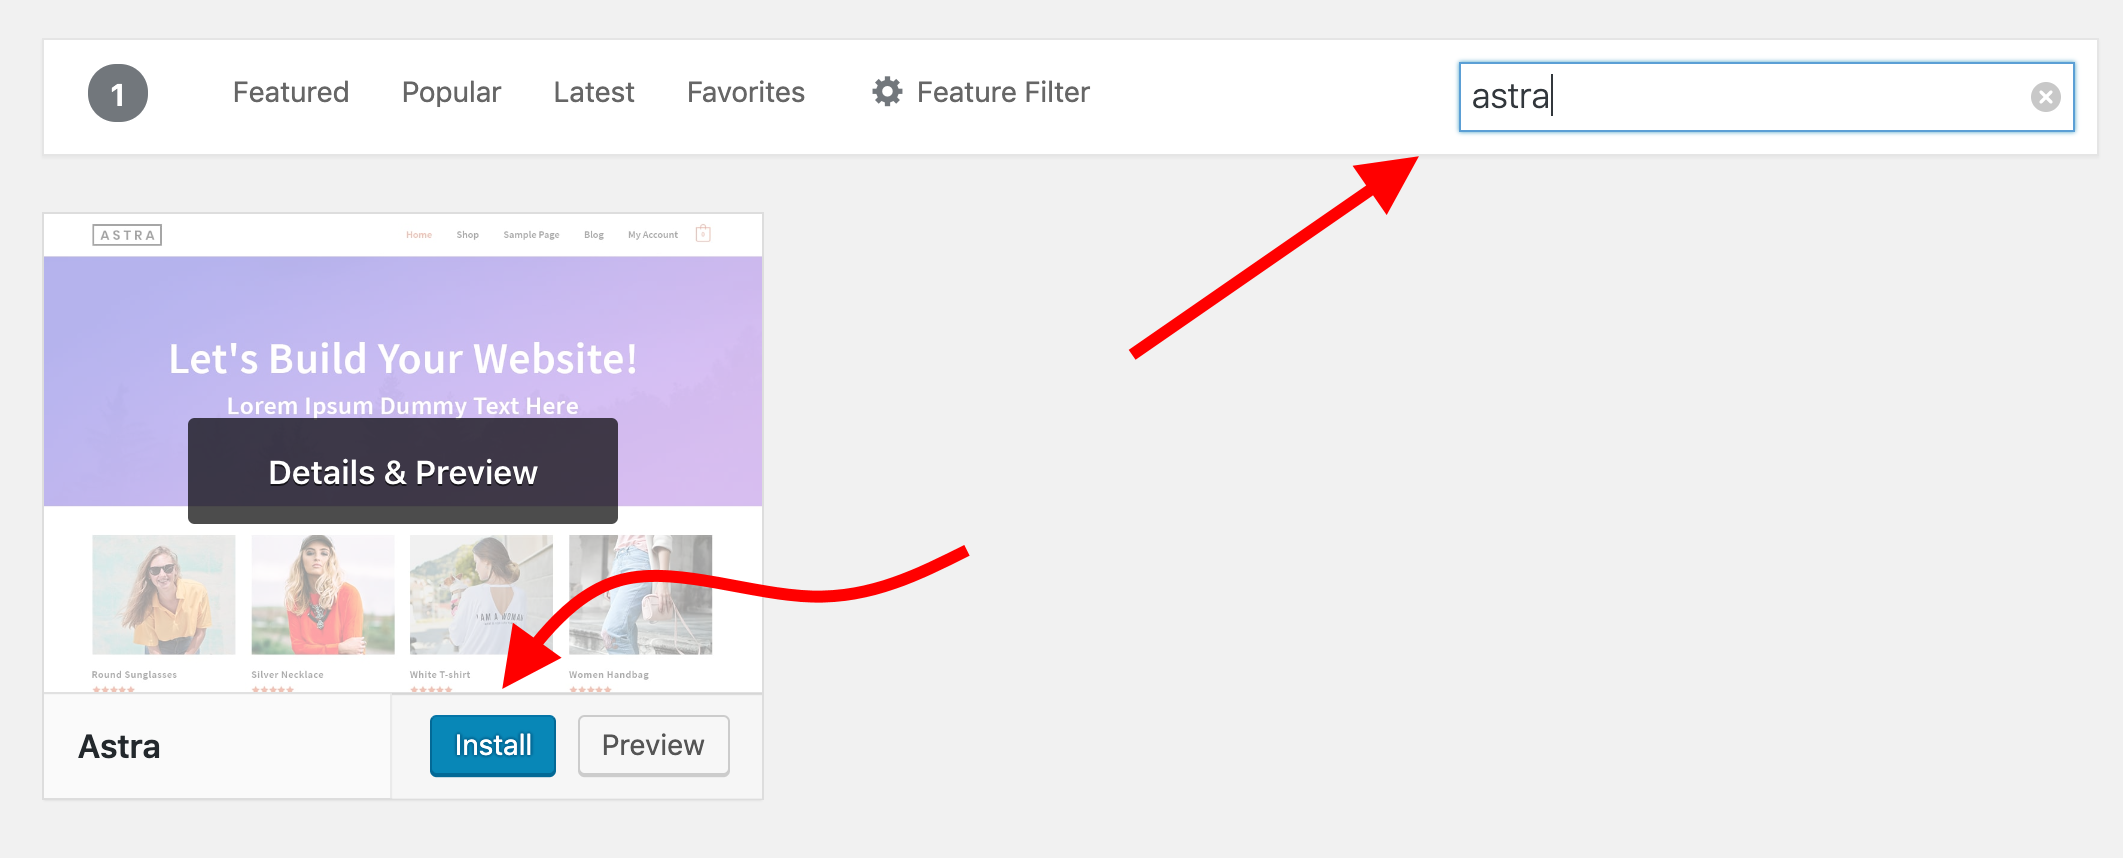
The installation can take a couple of seconds. Click Activate once the button appears.
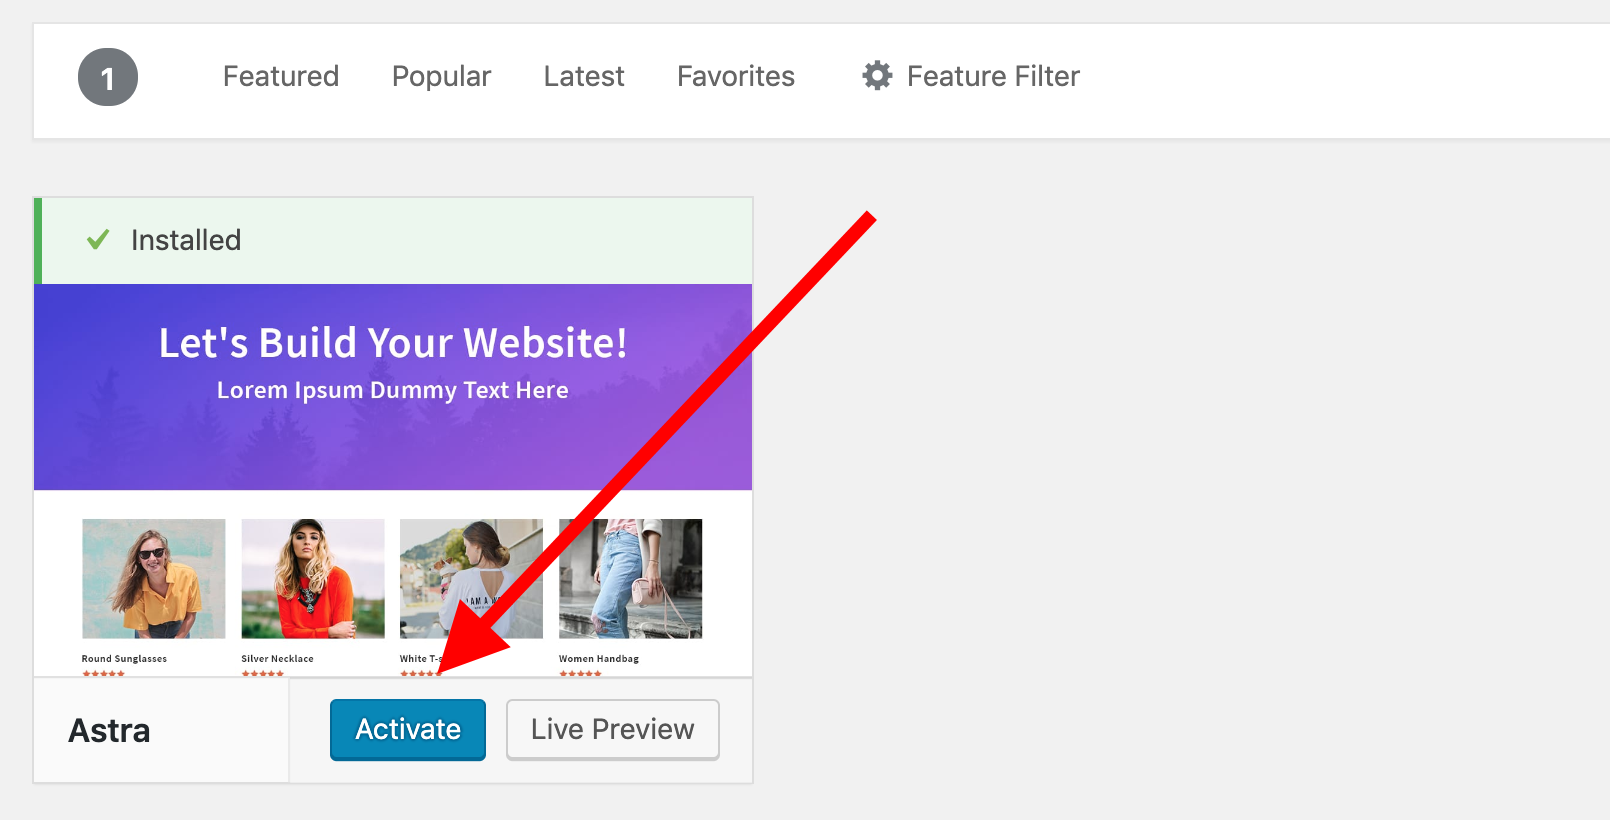
You’ll see a confirmation. Your theme has now been changed to Astra!
The next step is getting a good-looking starter site installed!
Go to Appearance → Astra Options. This is the main settings panel for Astra.
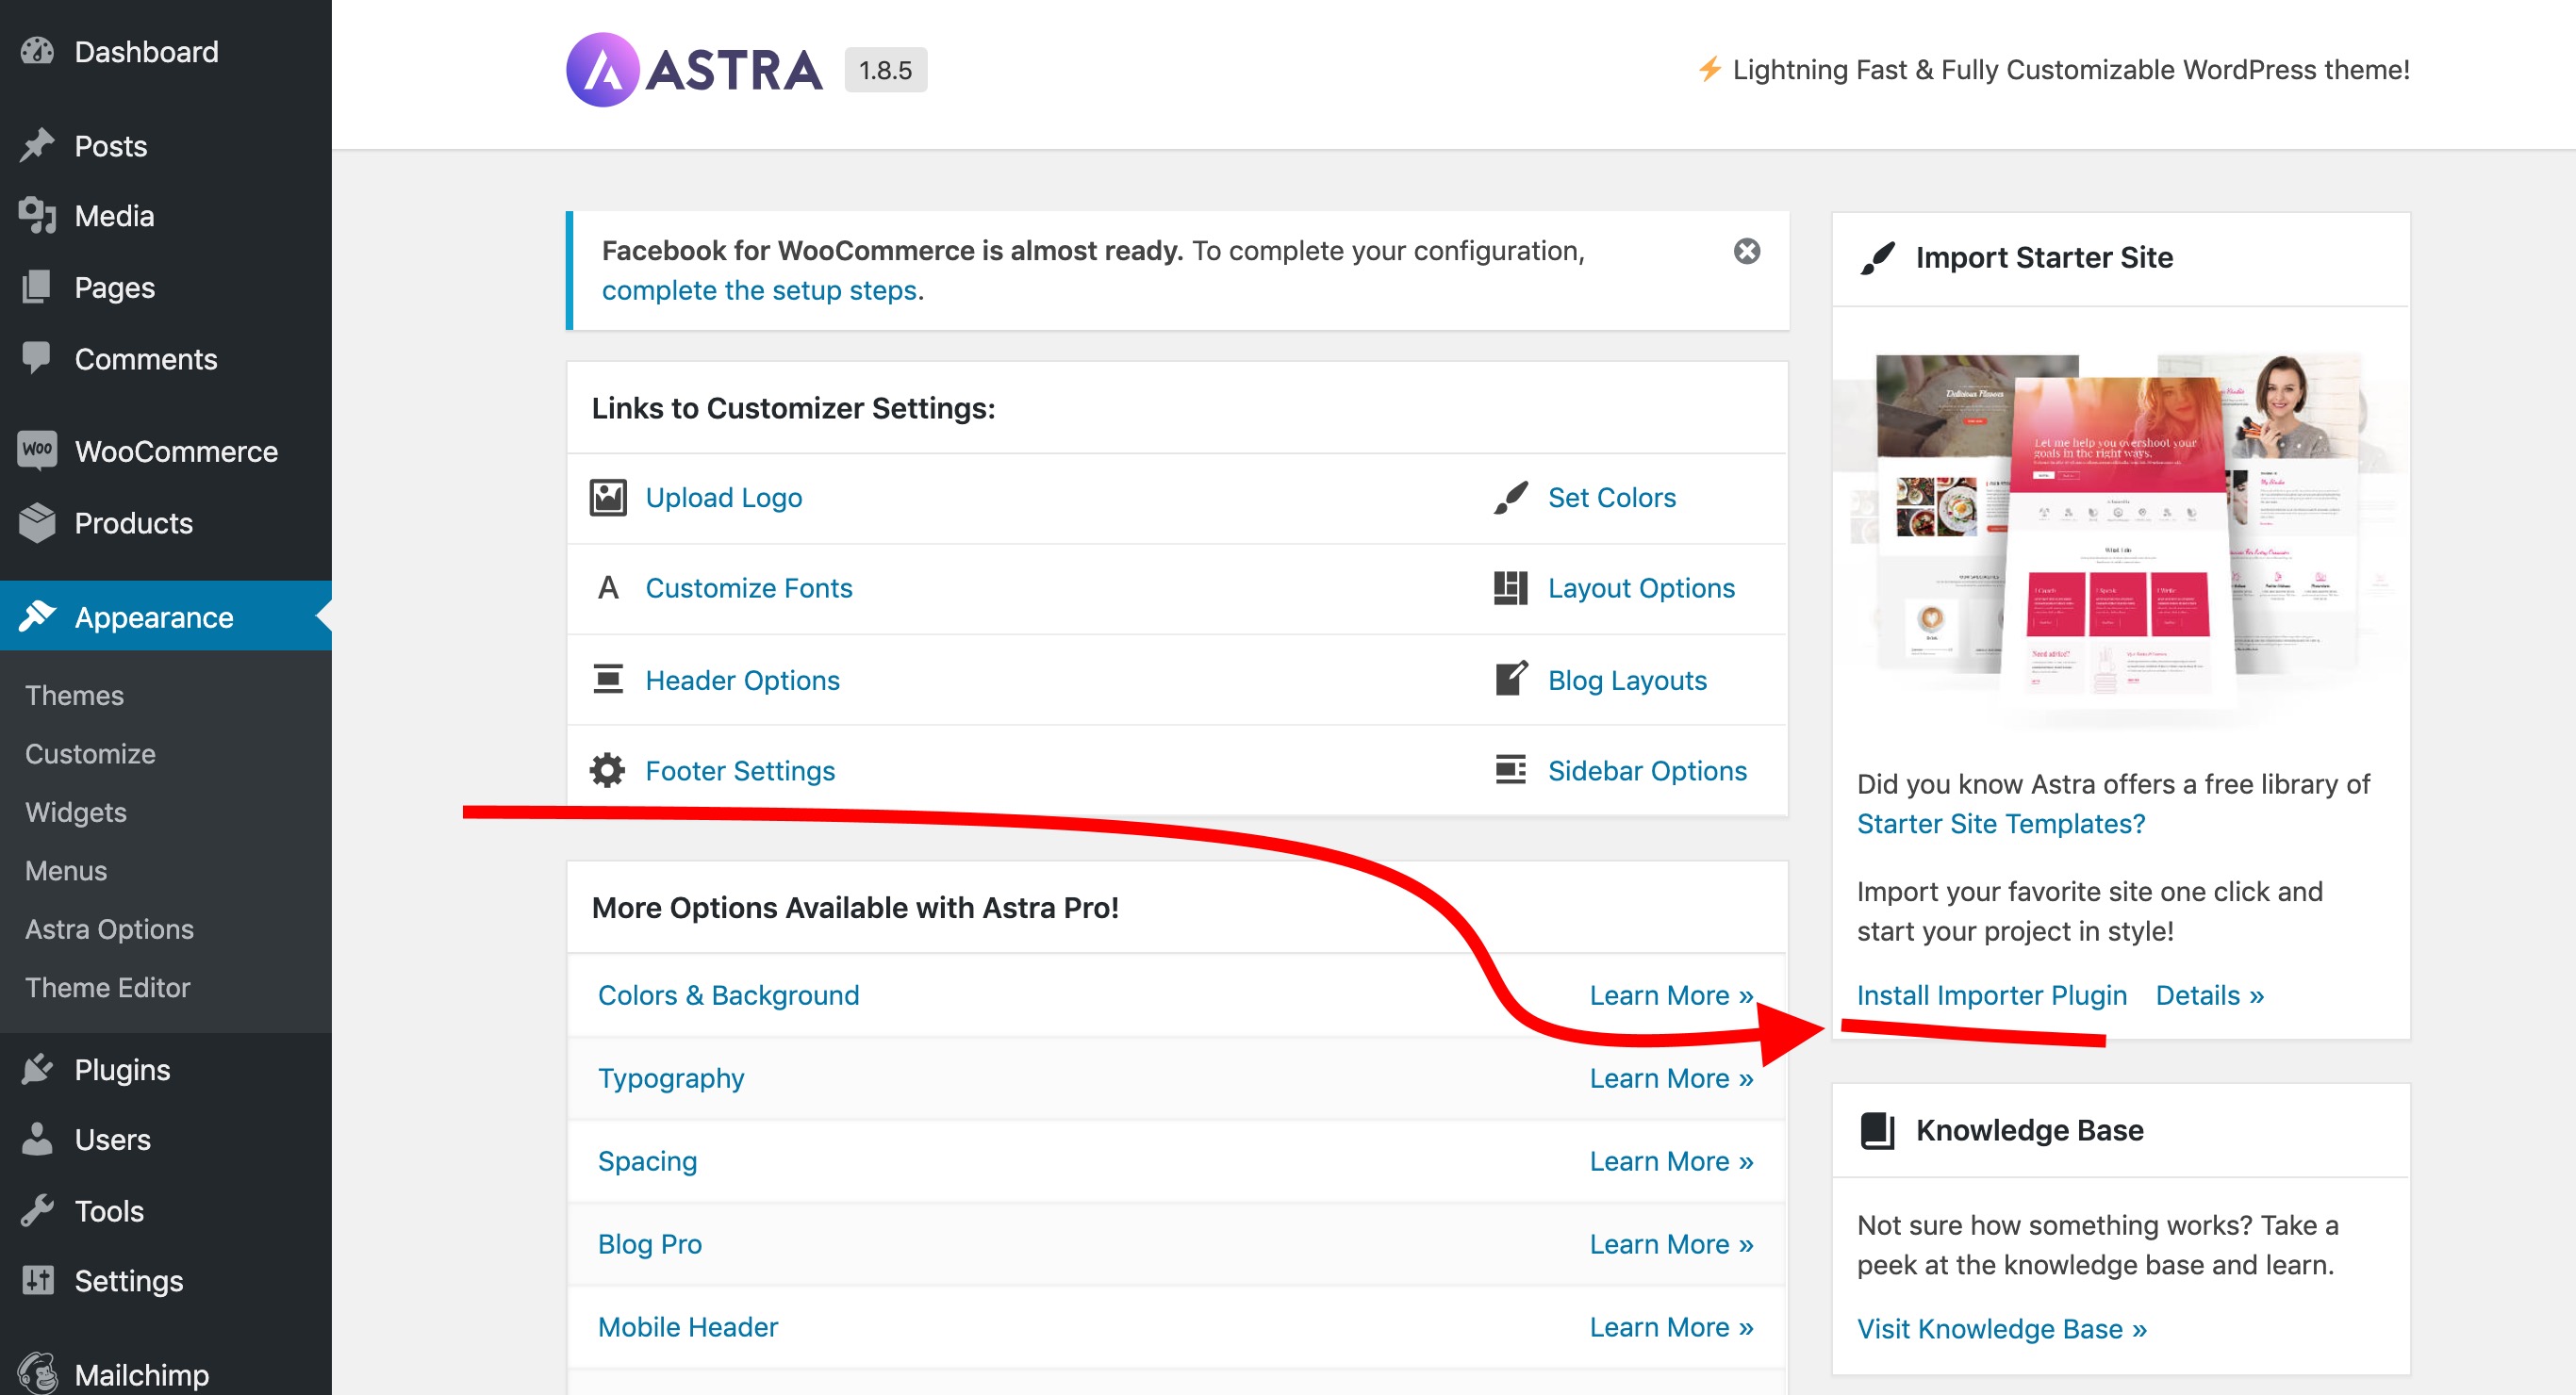
We’re going to work through most of this in a minute, but for now let’s just focus on the starter sites part. To access it, click on the Install Importer Plugin link that’s in the Importer Starter Site box in the top right.
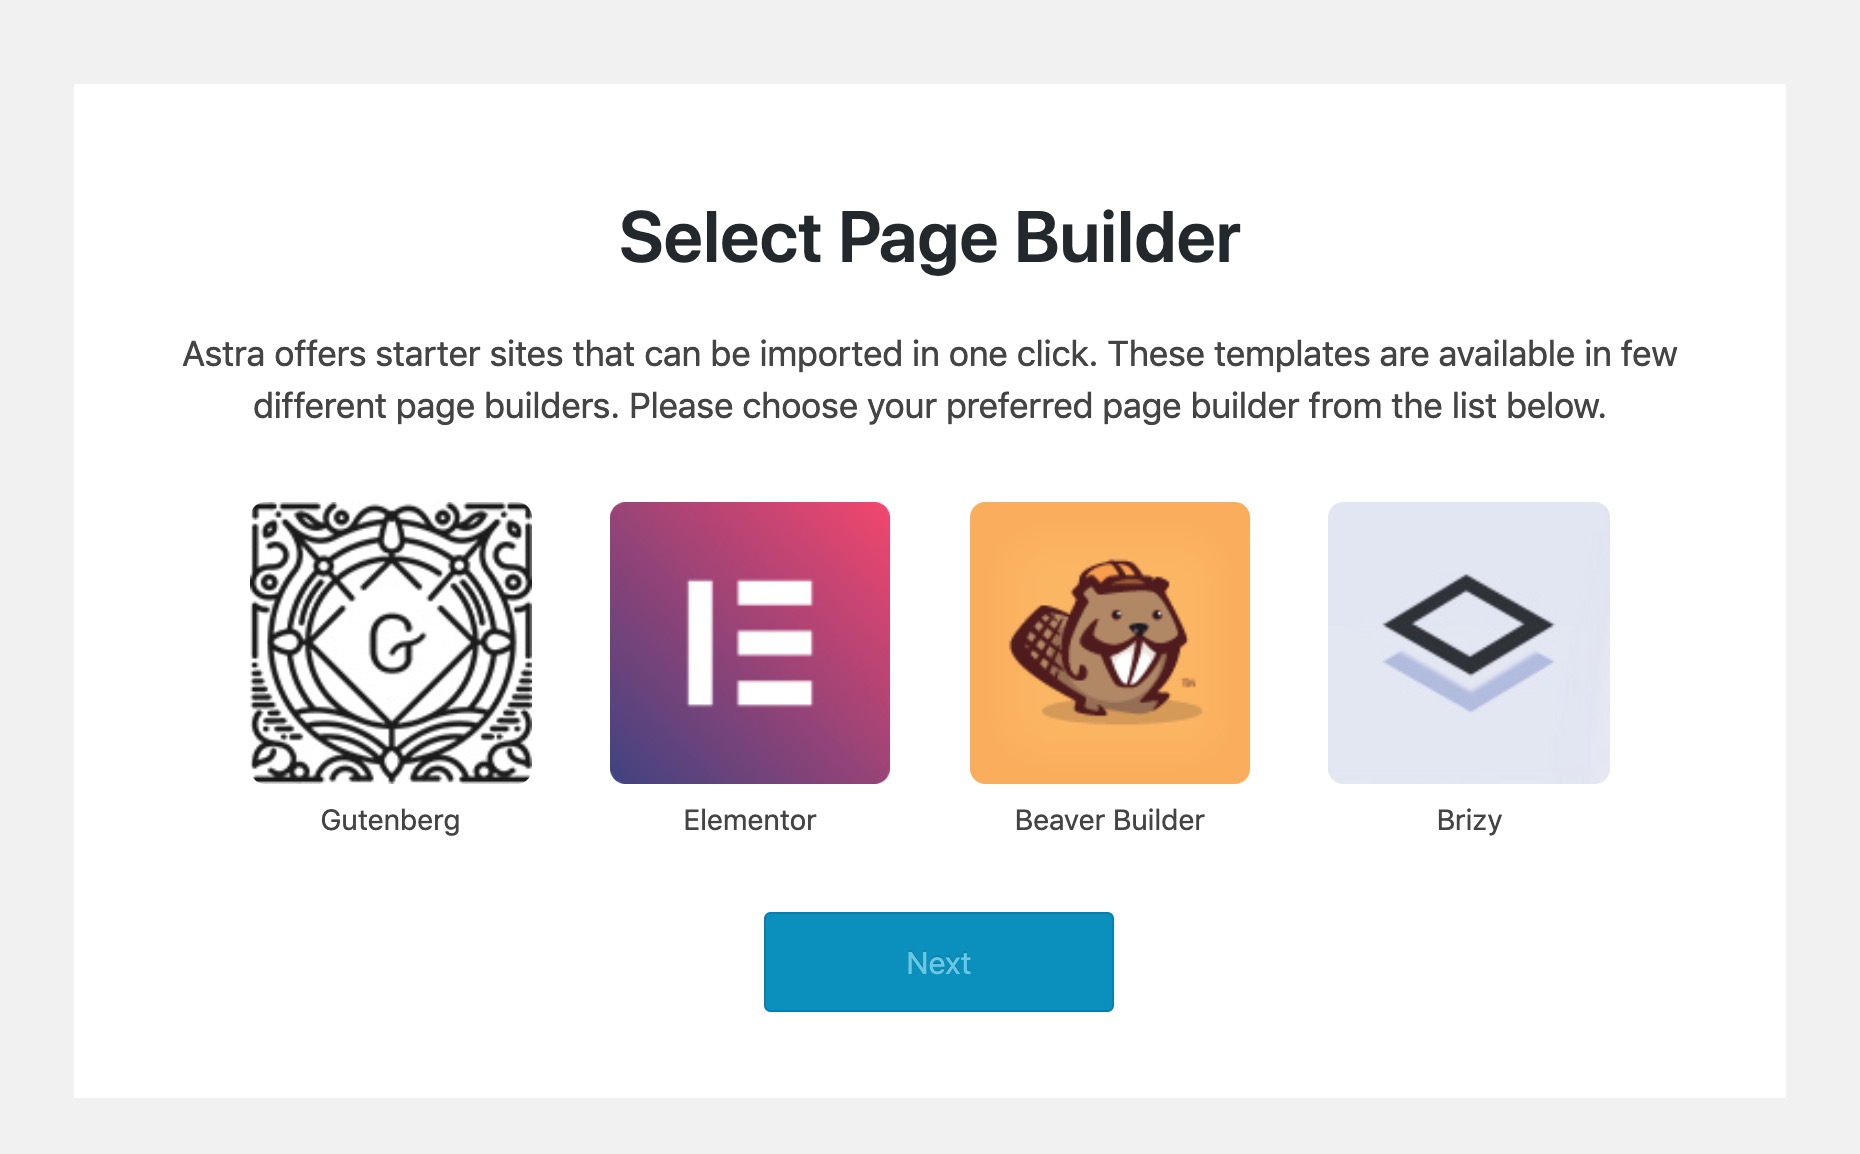
Once the process finishes, you’ll be asked to select your page builder of choice.
🤔 ‘Wait, what’s a page builder?’ Page builders are a very cool breed of WordPress plugin. Basically, they allow you to work on your site’s raw design without having to know how to code or do actual design. They offer a full DIY, beginner-friendly experience.
We’re going to go with a builder called Elementor here. We like how it compares with other builders.
In the next step, you’ll see a range of starter sites to choose from. To make things easier, let’s filter the list by Free or eCommerce:
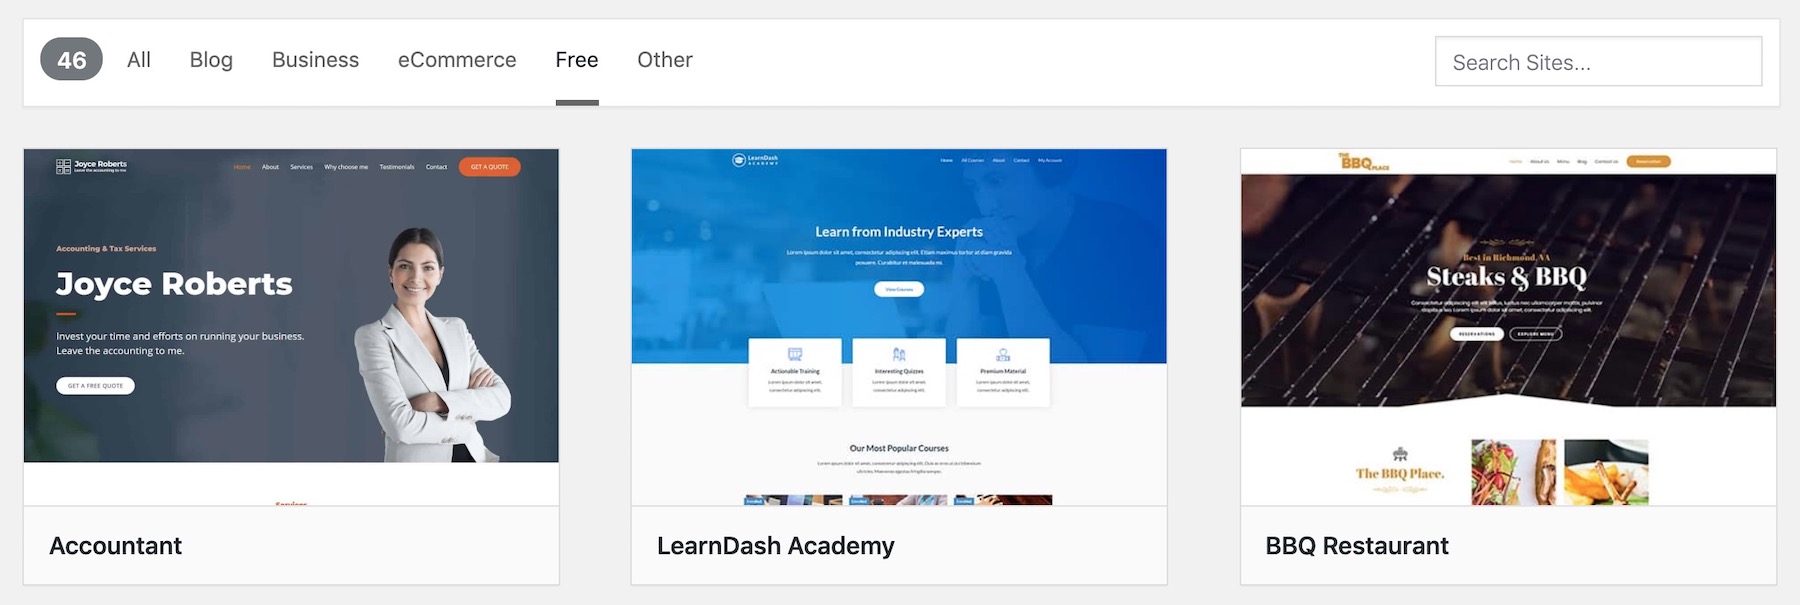
Each starter site comes with an in-depth preview.
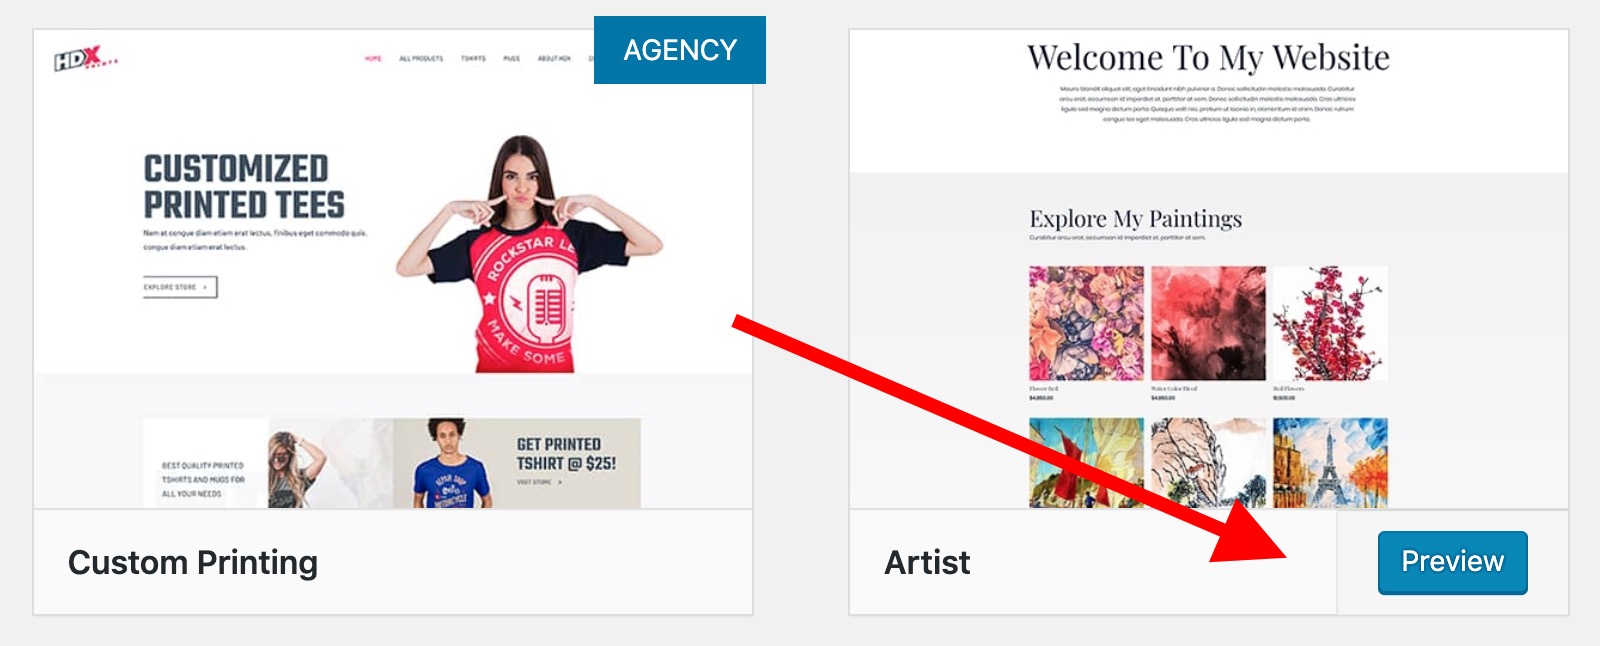
Inside the preview window, you can navigate through the demo site, check out individual pages, and get a feel for how everything works.
Once you’re positive you’ve found your design, click the Import Site button.
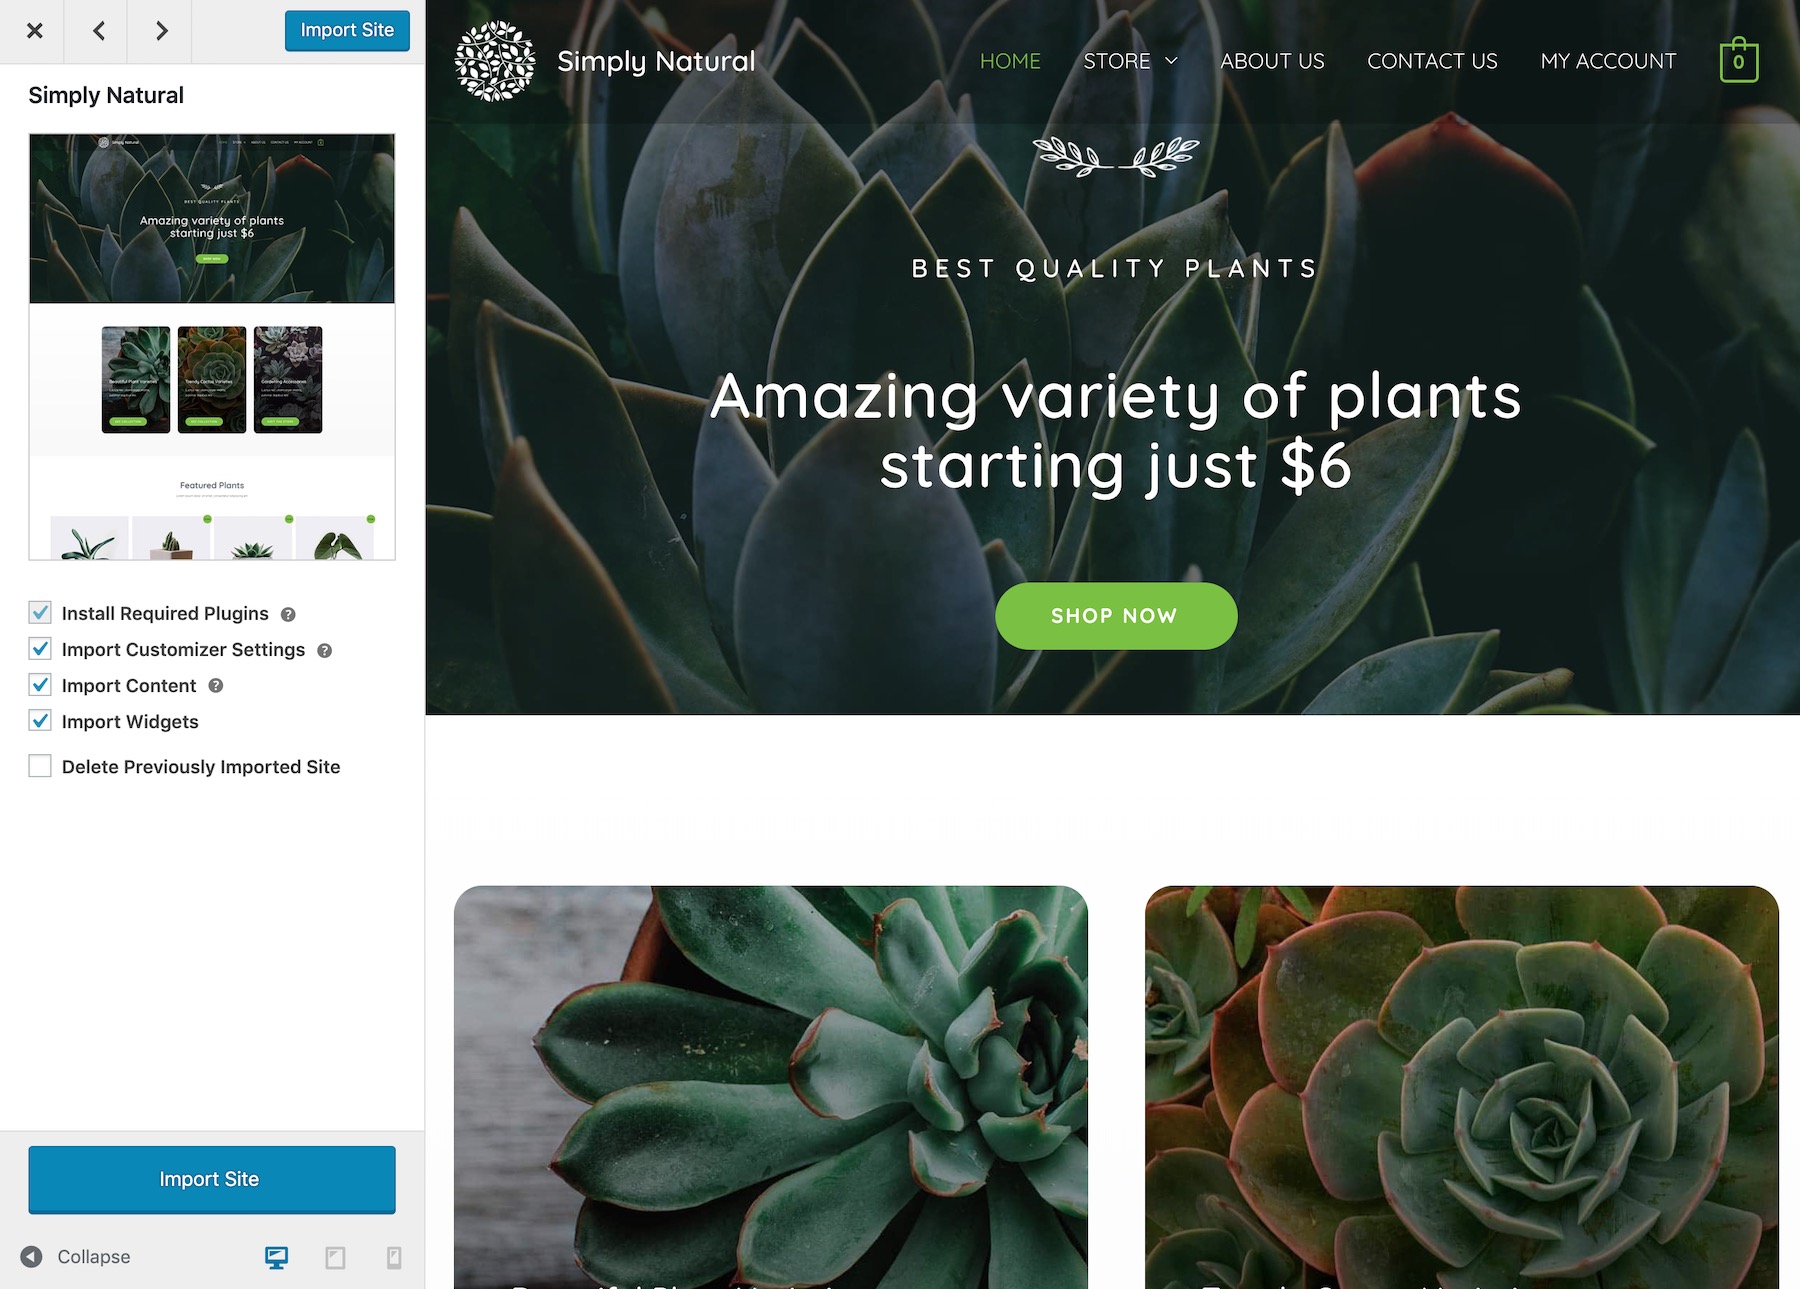
(Make sure the box labeled Delete Previously Imported Site is NOT selected.)
The starter site I’ve chosen for my store build is called Simply Natural. It’s been designed for all things green, which makes it a perfect fit for a plant store.
The import itself can take a couple of minutes, since there are a handful of elements being installed.
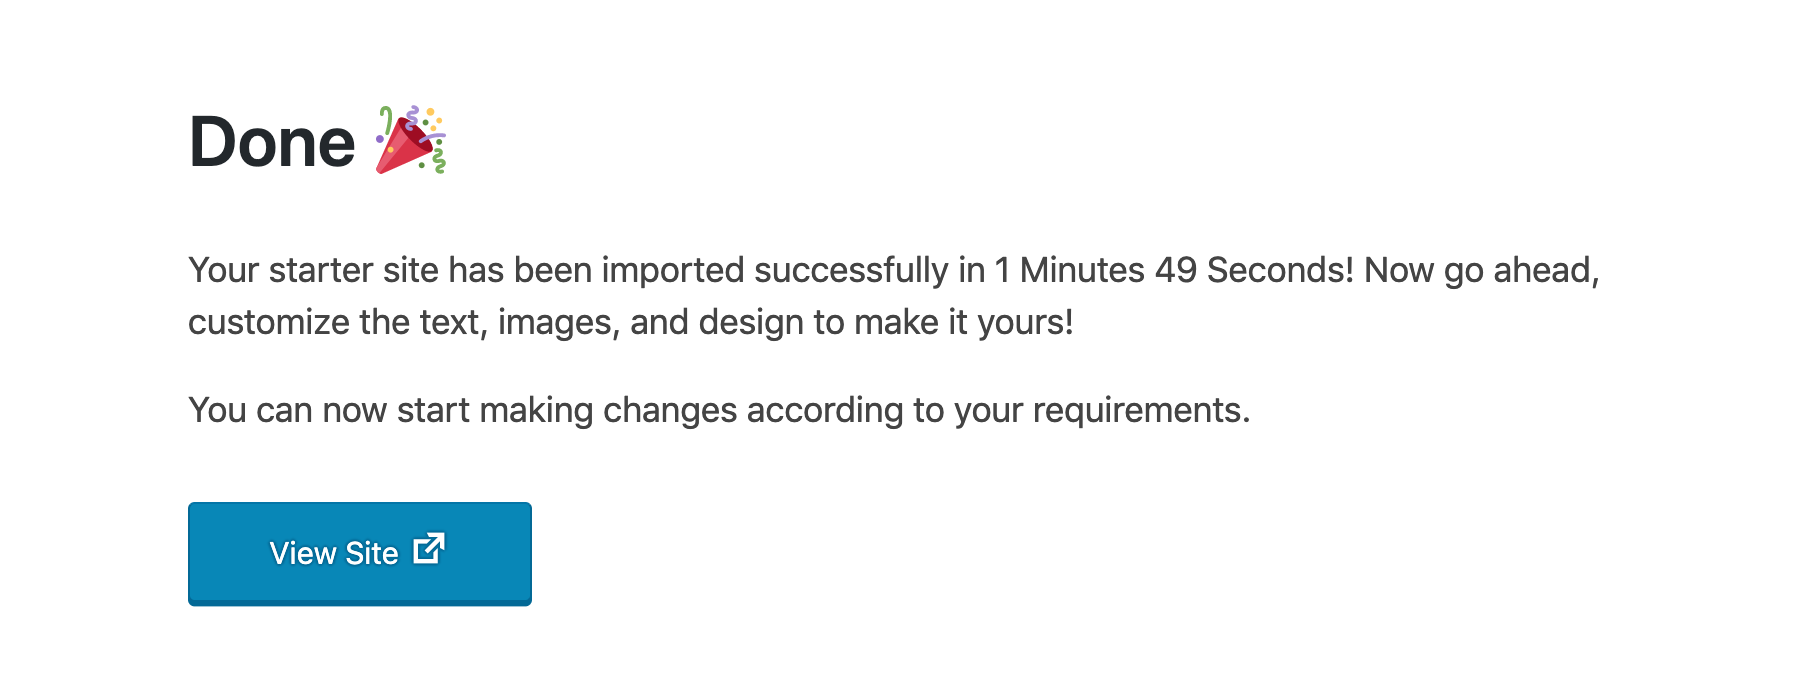
Click the big blue button to see your new store design in all its glory. At this stage, a lot of example content has been imported as well, but we’ll replace that with our own stuff.
9.3. Customize Your Astra Design
The great thing about Astra and WordPress itself is if you don’t like your current design for whatever reason, you can change things up pretty easily, and there are no coding skills involved.
First off, you can switch to another theme entirely, or just switch to a different Astra starter site (the process described above).
But, most importantly, you can fine-tune your current design to suit your needs exactly. This is what we’re going to do now.
To get this started, let’s go to Appearance → Customize.
What you’ll see is the main WordPress Customizer interface.
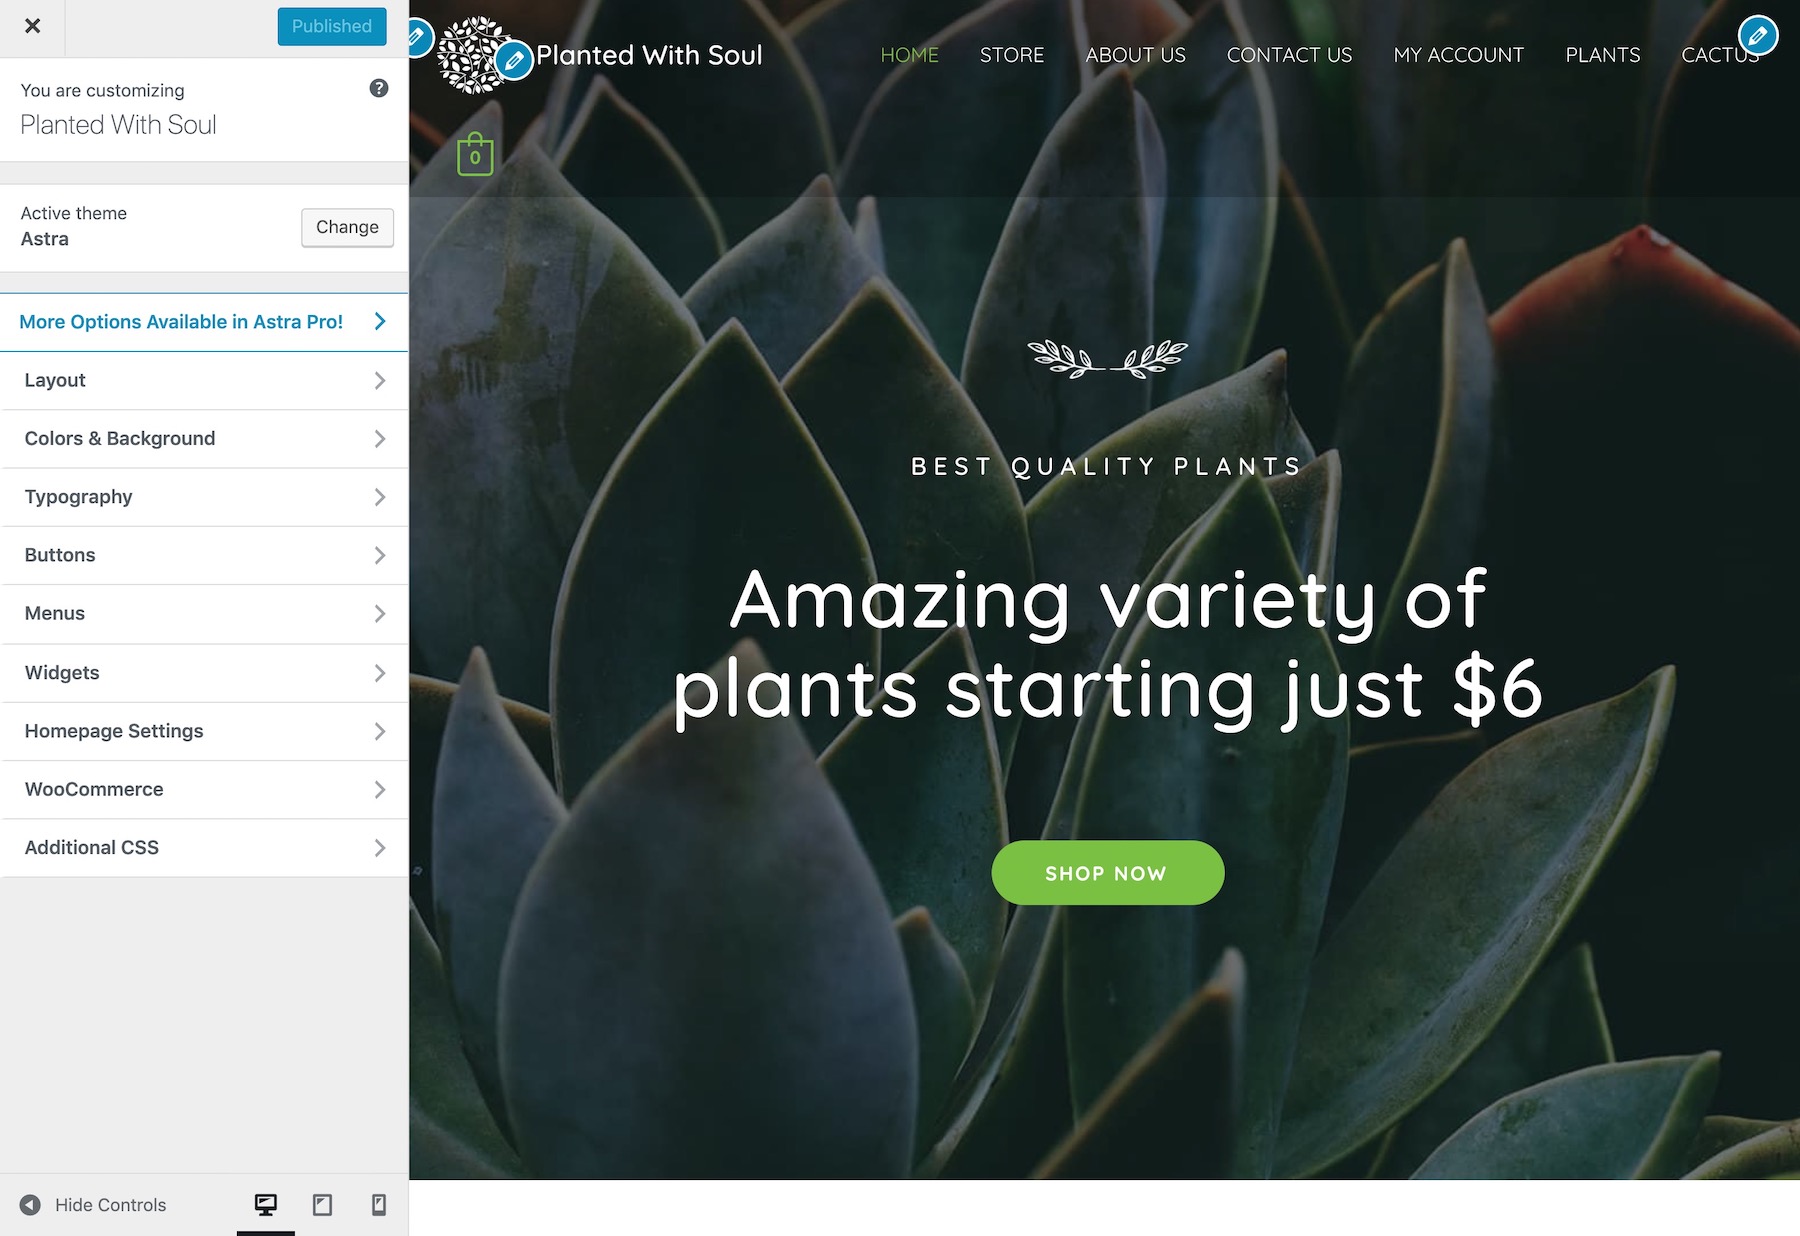
We don’t need to trouble ourselves with all that’s there — let’s just handle the must-dos for now. You can confidently come back to this panel later to do some fine-tuning.
First, we’re going to add a logo. Click Layout → Header → Site Identity. There, click Change logo and upload your own logo design. Lastly, click the blue Publish button to confirm the changes.
To also change the logo on the homepage, you need to go to Layout → Header → Transparent Header and upload your logo there as well.
The next thing you can adjust is the final bottom footer area of the design. To do that, go to Layout → Footer → Footer Bar. Adjust both text areas there to include whatever you think is suitable. This is probably a good place for your store’s tagline. Once again, click Publish when done.

As you’ve noticed, there are a lot more options in the Layout section of the Customizer.
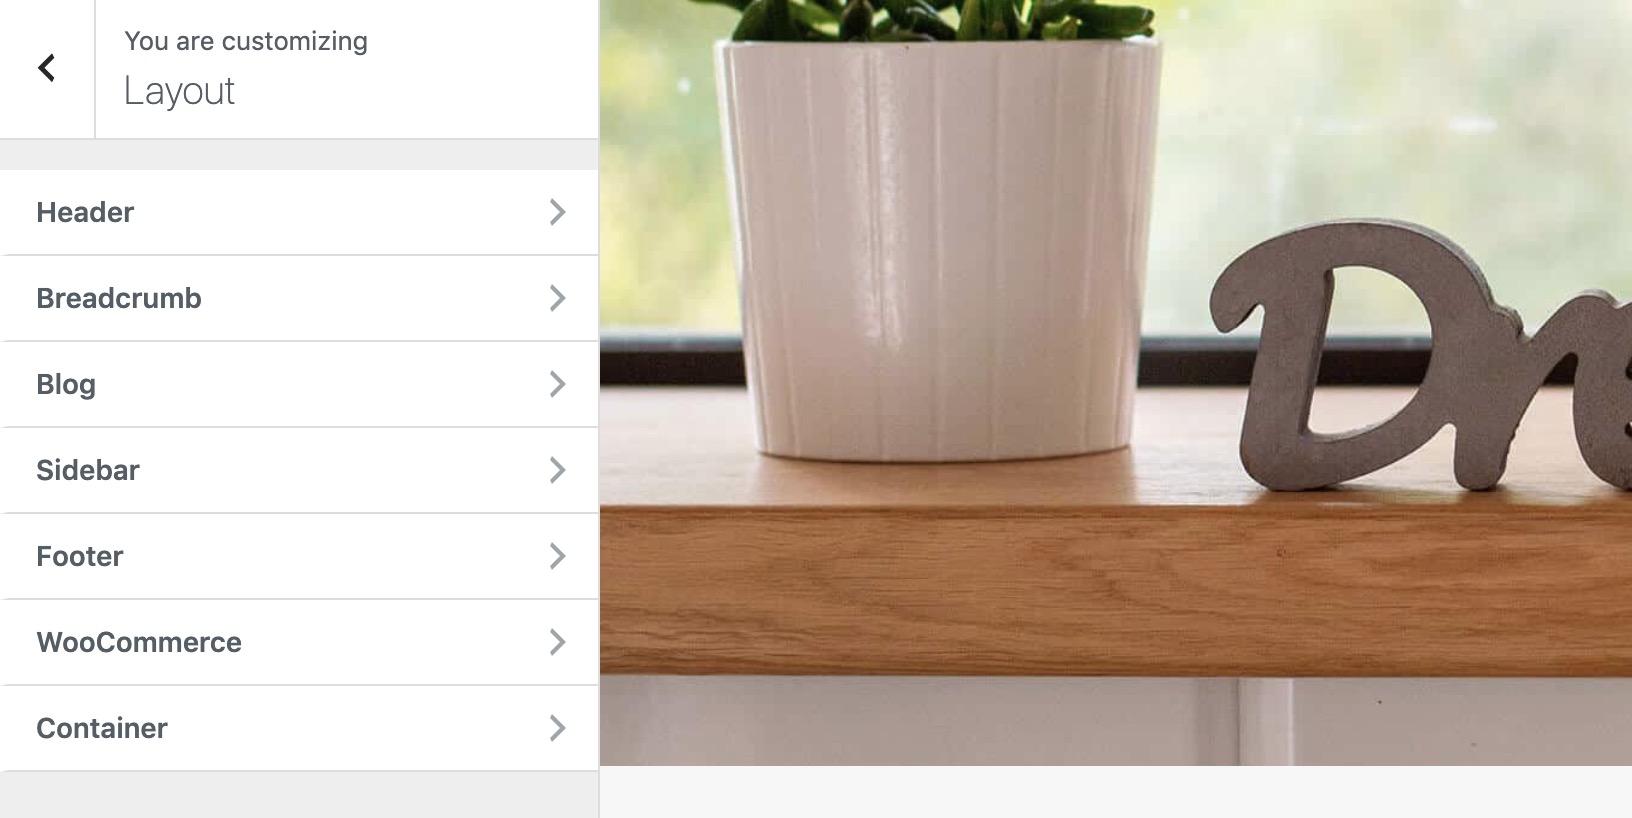
Feel free to click through all of them and see what’s there, just to get a grasp on what’s possible in terms of fine-tuning your design.
The next section you can look into is Colors & Background.
However, any changes here are entirely optional. At this stage, you may not yet have a good idea of what you want your official colors to be, so it’s best not to experiment with this just for the sake of it.
A rule of thumb is the following:
- If you have a professionally designed logo for your store and a whole visual identity sheet (most designers will give you that along with the logo), then feel free to adjust the colors according to the info from the sheet.
- If you don’t have any specific color scheme in mind, leave the default one intact.
The Astra theme allows you to adjust the colors of various elements on the site:
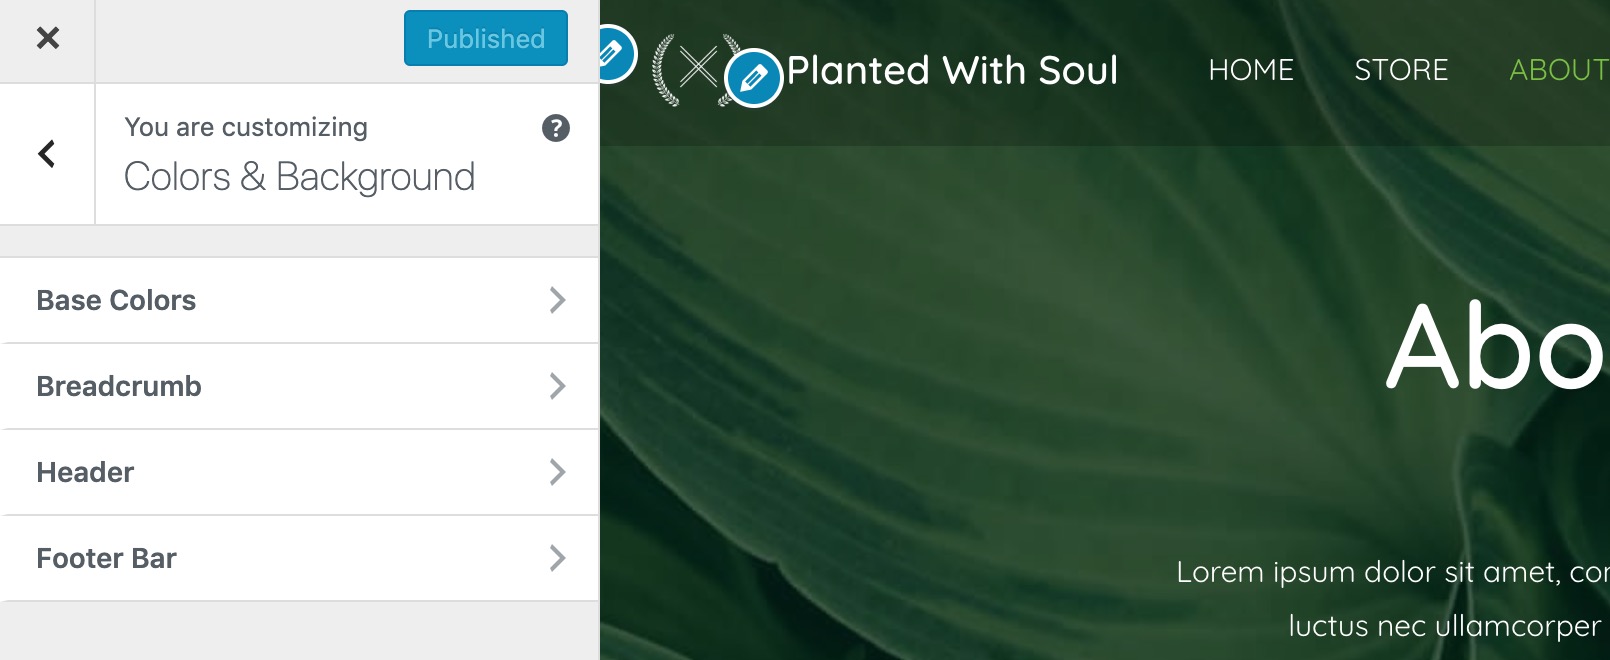
- Base Colors — the main theme color, link colors, text colors and the main background color.
- Breadcrumb — the color settings for breadcrumbs (shortcut links that can make navigating the site easier in certain scenarios).
- Header — color settings for things in the header.
- Footer Bar — colors associated with the footer.
The area you really should have a look into is Typography. This is where you can adjust the fonts used on the site — their sizes, styles, and other finer details.
Let’s go into the subsection called Base Typography.

A good idea here is to just experiment with all of the settings and see the size and spacing combinations you like the most.
An approach that generally works well is to increase the base font size to something around the 18 to 20 px mark. Font sizes smaller than that can be difficult to read for most people.
Apart from Base Typography, you can also adjust the other typography settings if you want to, but that’s not necessary at this point. You can always come back to these settings later, once you have some experience with the site and know which parts you’d like to fine-tune.
Remember to save your changes by clicking on the main Publish button before you close the Customizer. When you’re done, click the X button in the top left corner.
10. Set up Your Core Pages
No e-commerce website can do without a set of must-have pages. Those are:
- Custom homepage — a hand-crafted page that highlights your business and the main products you offer.
- Shop catalog page — the central page for all of your products.
- About — a page where you get to welcome people to your store, tell them what you’re about; your story.
- Contact us — a page where people can contact you directly.
- Privacy policy — required by law in many countries.
- Other ‘admin’ pages that make shopping possible — such as the shopping cart page, checkout page and user account page.
This may look like quite an extensive list of pages, and a lot to take care of, but I have some good news for you. You get most of these pages already done either by WooCommerce itself or by the Astra theme. As in, all you need to do is step in and fine-tune those pages to match your needs. Let’s go through them one by one:
10.1. Homepage
A homepage is every e-commerce store’s prime real estate! It’s usually the first page people see, it’s the one that establishes your brand and also the one that sets the mood for what’s to come on your other pages.
That being said, the homepages can be difficult to figure out if it’s your first time launching a website — not to mention an e-commerce website. The main question being: What do you even show on a homepage?
There are a few popular elements to consider:
- Show your logo and main menu.
- Use a nice big section — aka a hero section — to showcase your main headline or main offer.
- Highlight your top product categories.
- List your featured products (just a handful, not all of them).
- Show customer testimonials if you have any.
- Include a short description of your store.
- Highlight your current promotion or special offer.
- Invite people to join your newsletter or email list if you have one.
- Display links to your social media.
Also, this is a great moment to come back to your competition research and see what they feature on their homepages. You should at least consider including some of the same elements on yours.
While building your homepage from scratch to include all of these elements can be challenging, we’re going to use Astra’s example homepage to make it a lot more manageable.
To get started, just visit your current homepage at YOURDOMAIN.com.
In the upper row, click Edit with Elementor.

What you’ll see is the main interface of the Elementor page builder:
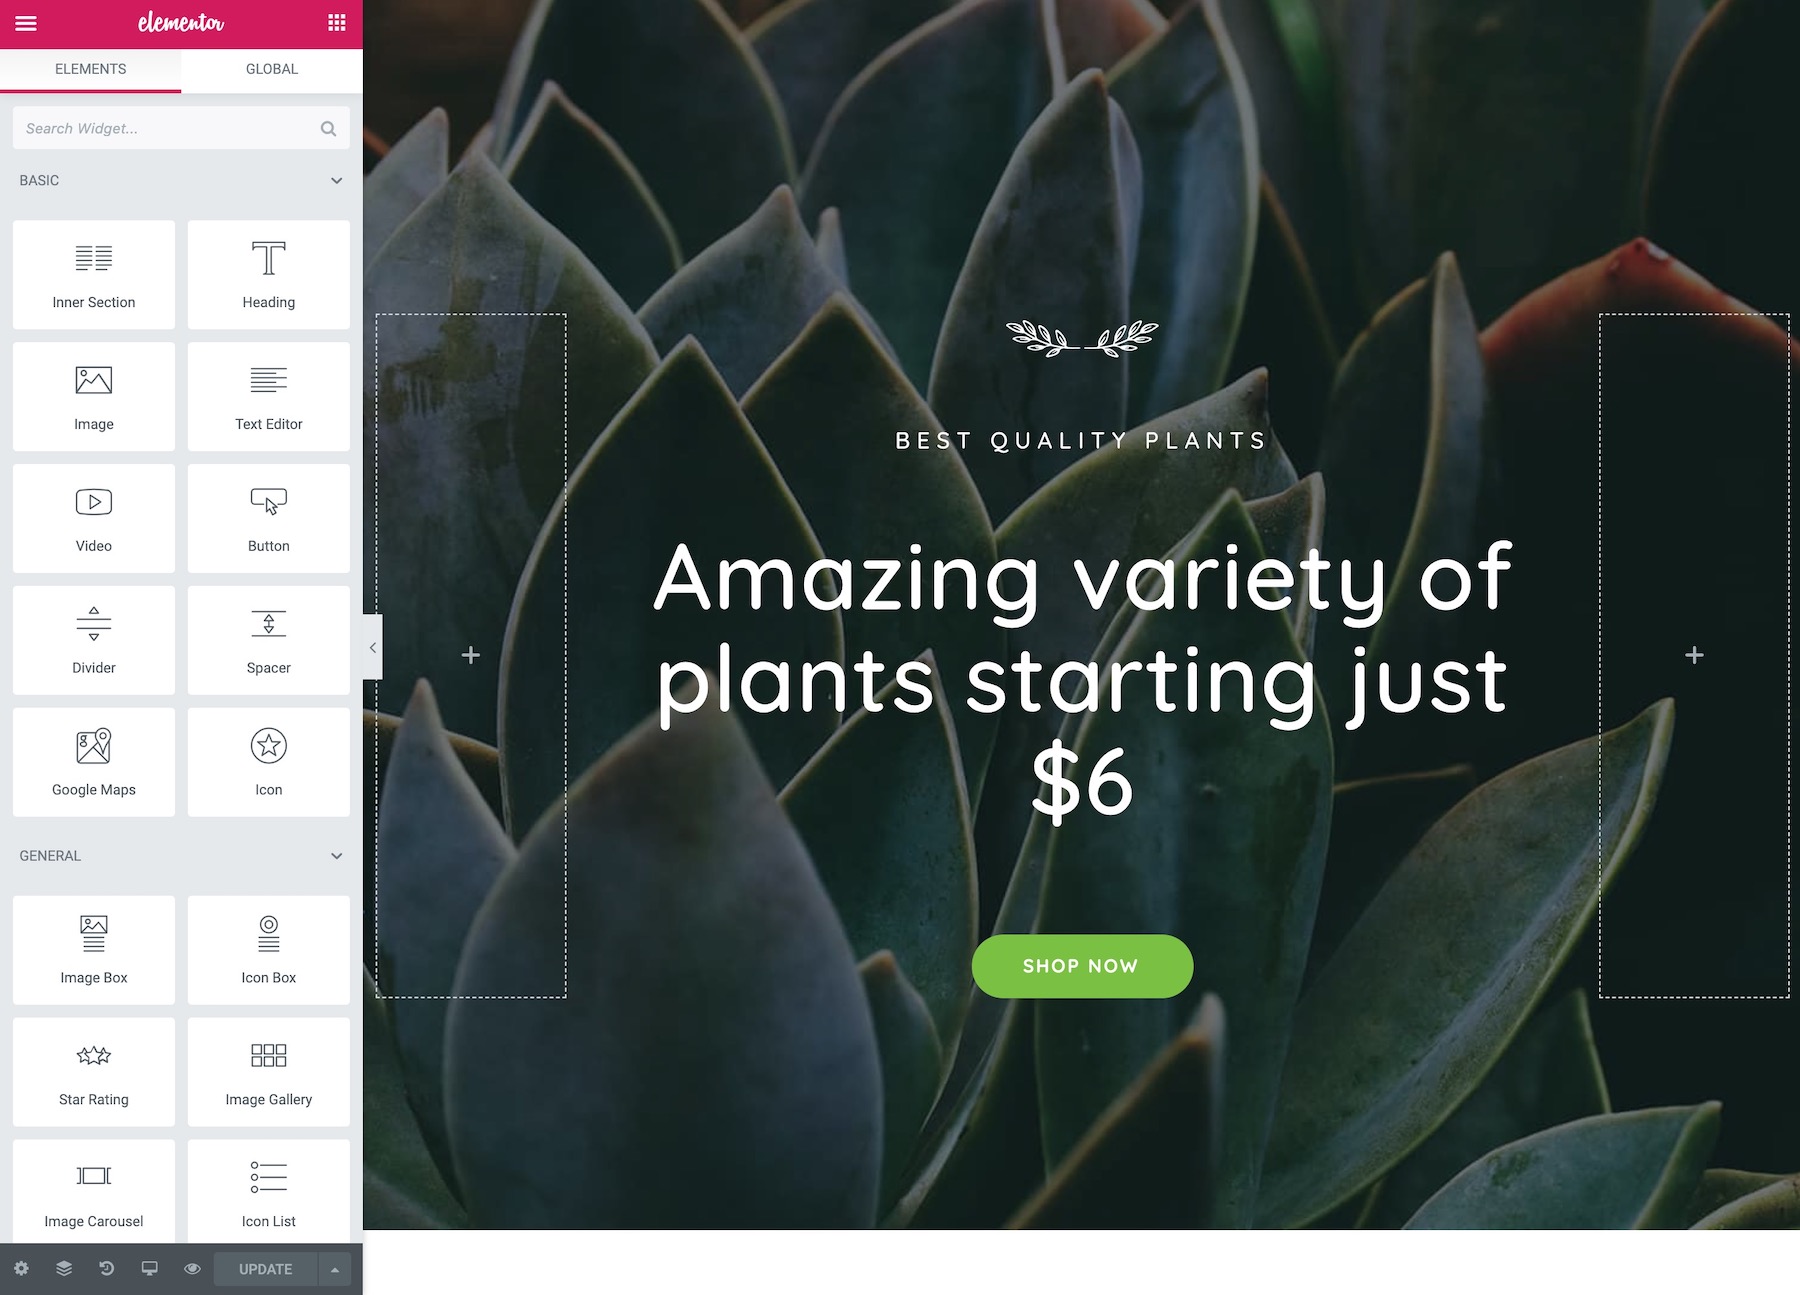
Elementor is a very easy-to-use tool. Basically, all you need to do is click the element you want to adjust/edit and then do your modifications in the left sidebar.
Let’s start with the hero section — the first part of the page design.
Click any of the text sections on the page and you’ll see a text box pop up on the left, providing you with a text field where you can adjust the content.

I’m going to place my store’s name and main tagline there. Next, I’m going to add my logo in place of the sample image. I’m also going to click the shop now button to set its destination to my product catalog page — for most WooCommerce stores, that page can be found at https://YOURDOMAIN.com/shop/.
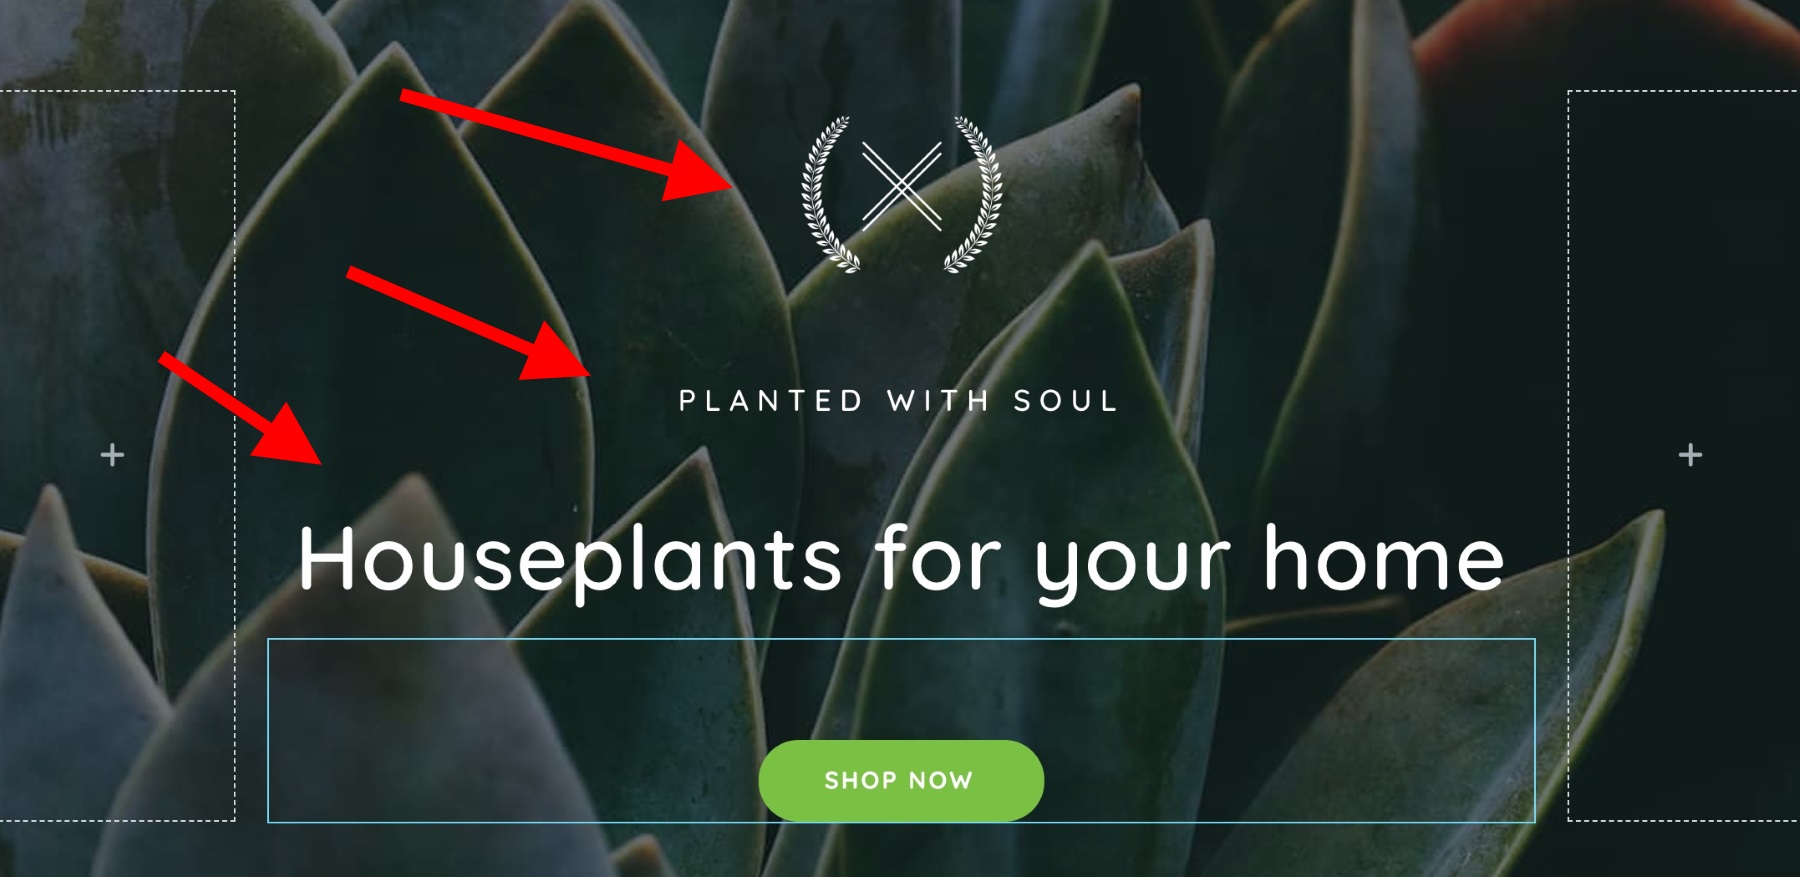
I’m going to change the background image to something of my own, too. To do that, click the dotted icon that’s on the top — you may have to hover your mouse there for a second for the icon to appear.
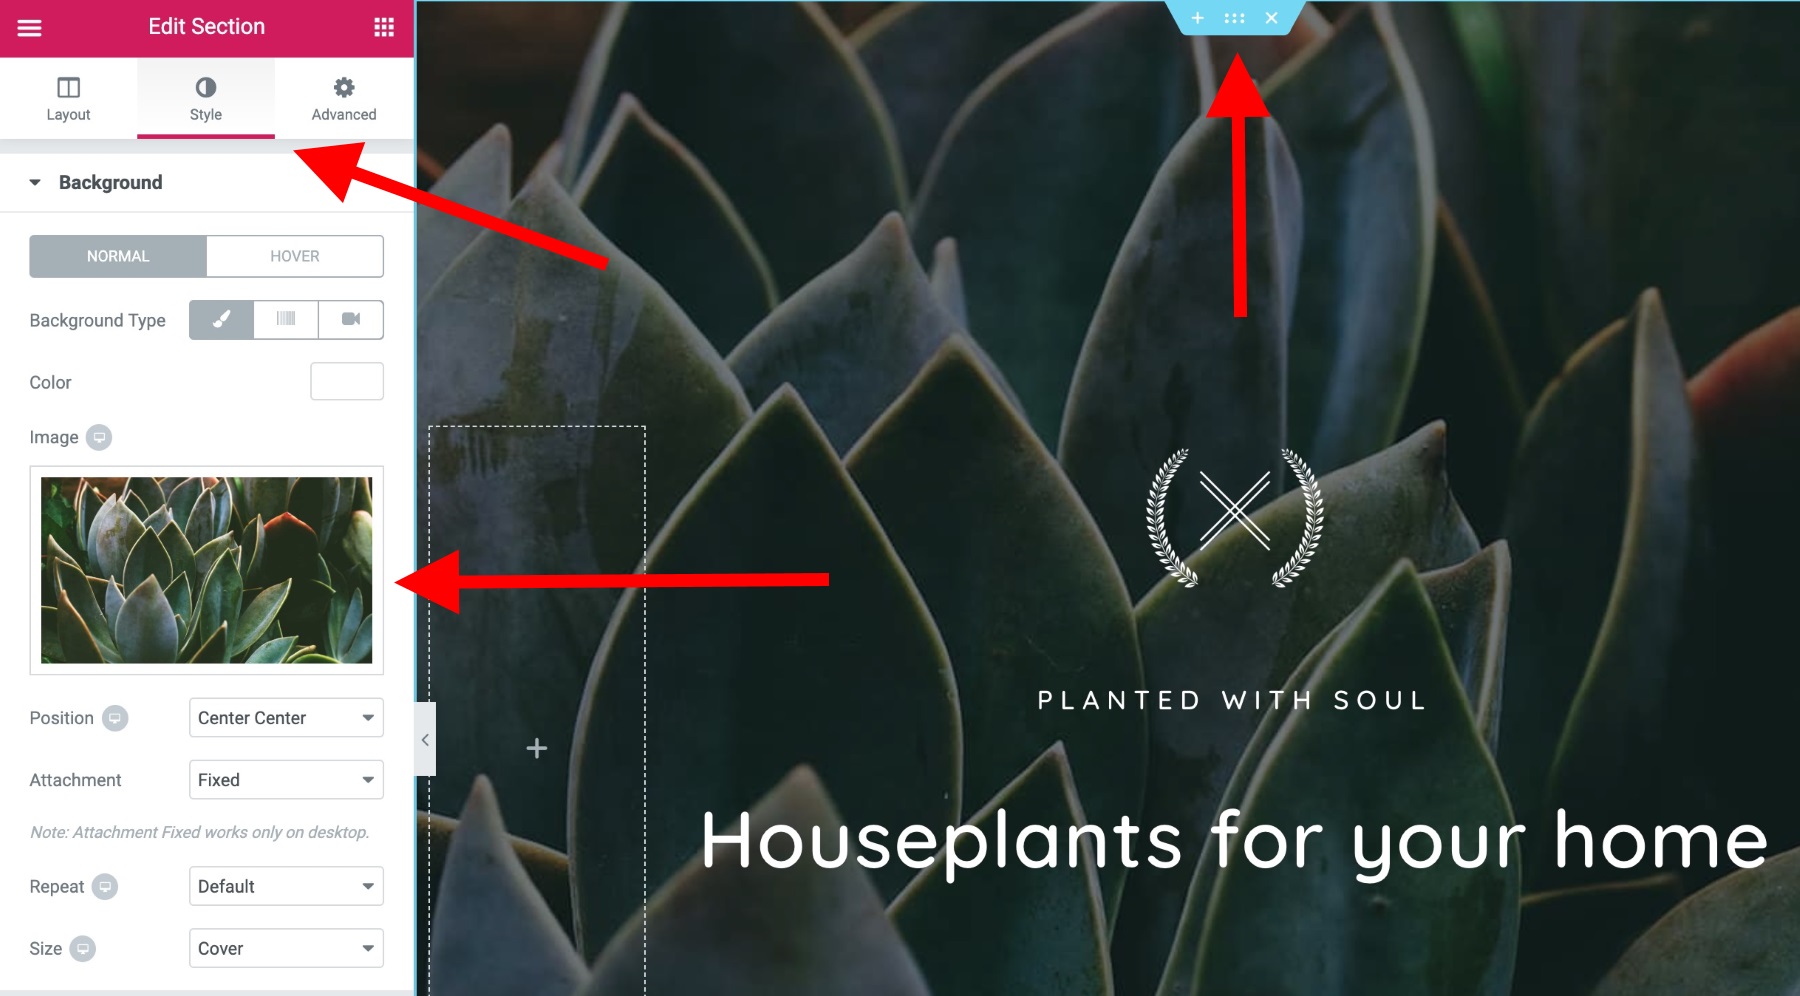
As you can see, there’s quite a lot of background options to choose from. First off, we’re going to change the image. Click the image itself and then pick a new image from your disk.
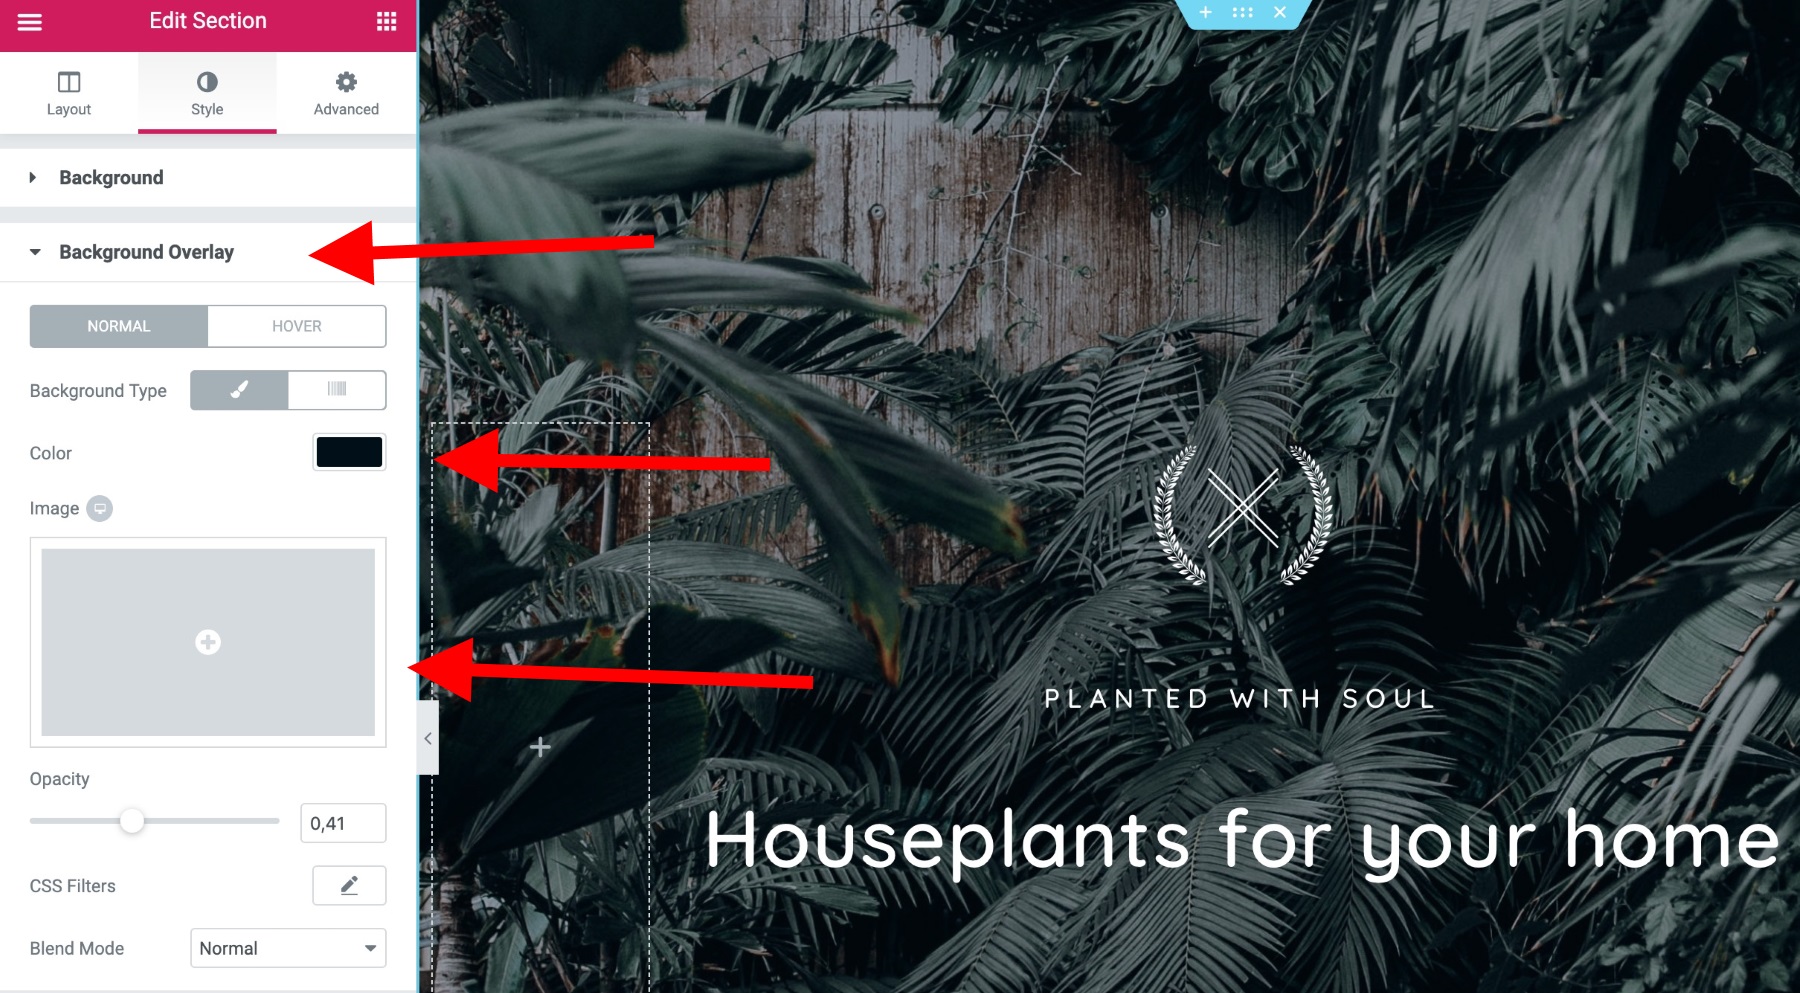
If you want to add an overlay to the image, just switch to the Background Overlay section in the sidebar and then adjust the settings.
Next order of business, your product categories or other info that may be more relevant in your scenario. What kind of ‘other info’ am I talking about? For example, Bloomscape (one of the competitors I identified during the research phase) has the following sequence of blocks that present a kind of ‘customer path’ scenario:
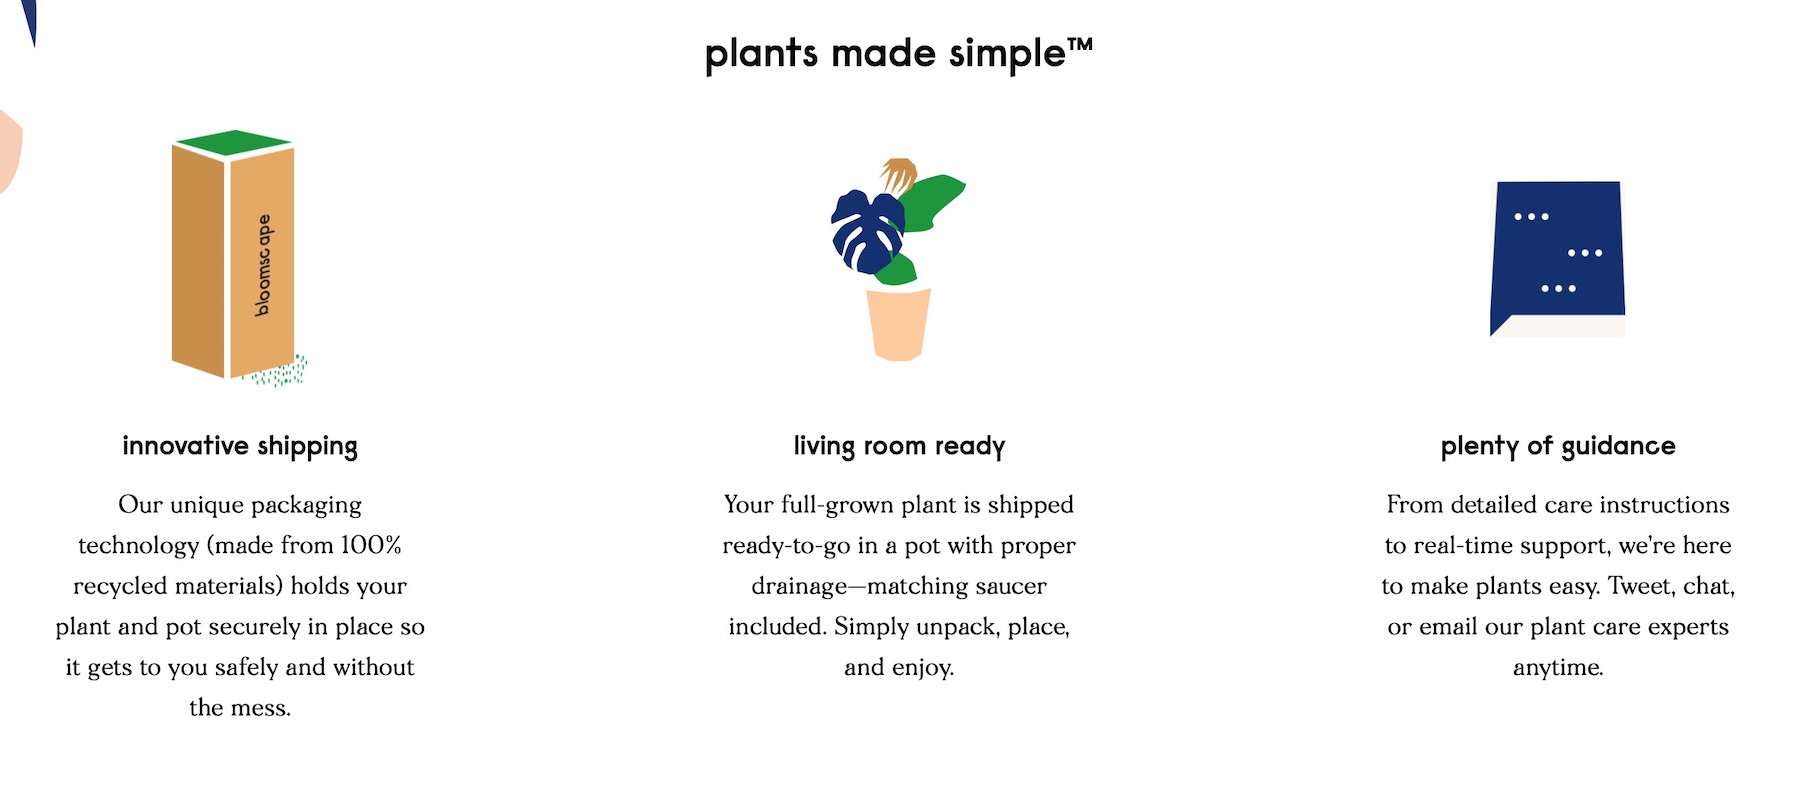
I can recreate something like that as well if I think it can resonate with my customer base. You should follow a similar thought experiment (for your niche and product line).
The idea with this whole block is to feature the kind of information your customers are likely to be interested in the most. If your product offering is straightforward, those can be your categories. If it needs a bit more explaining, you may opt to feature other information that brings the customer on board some more.
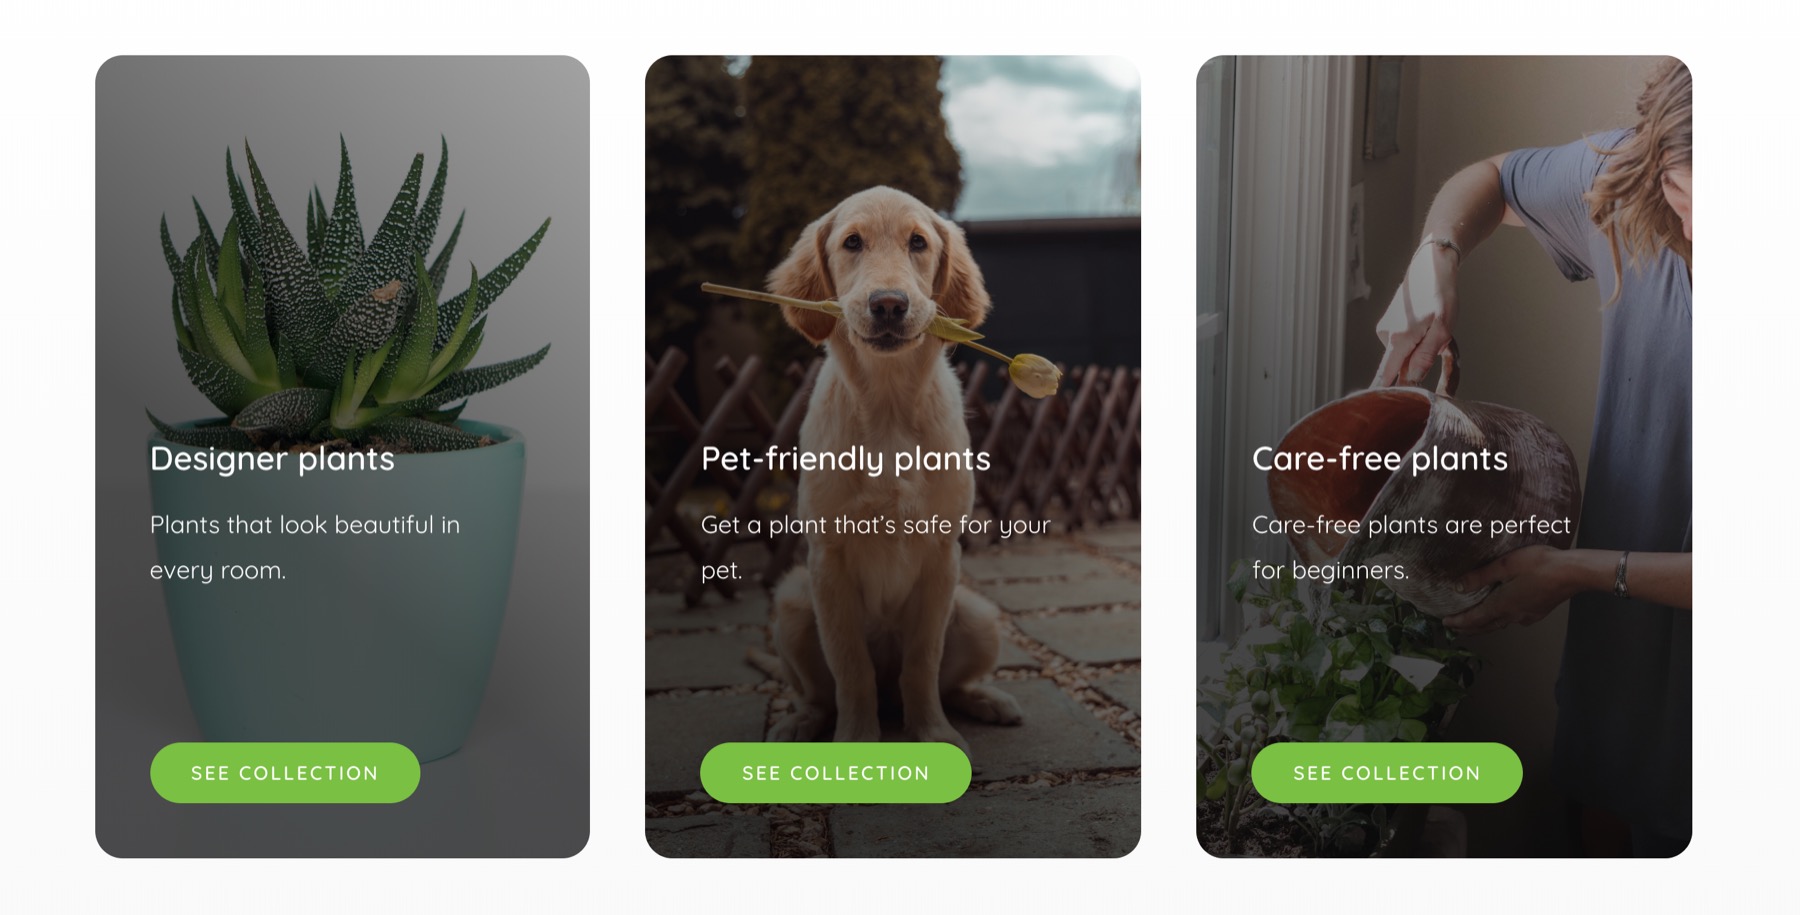
Here’s how to make the changes:
Click on the column icons next to each of the three columns that hold the images you want to change. These ones:
You’ll see a new section in the sidebar where you’ll be able to change the background and also work on the other parameters of the blocks.
Changing those elements works the same as editing the main hero section that we did a minute ago.
Go ahead and change the backgrounds of those blocks, along with the corresponding texts to match the message you want to convey.
Lastly, point the buttons to the category pages in your product catalog (those can usually be found under YOURDOMAIN.com/product-category/CATEGORY-NAME/), some other location, or remove the buttons altogether (right click on a button and then Delete).
Here are the changes I made:
The next thing we can do is showcase some of your featured products on the homepage. The way you ‘feature’ a product in WooCommerce is by going to the All Products screen in the admin panel and clicking the star icon next to the products you want to make featured.
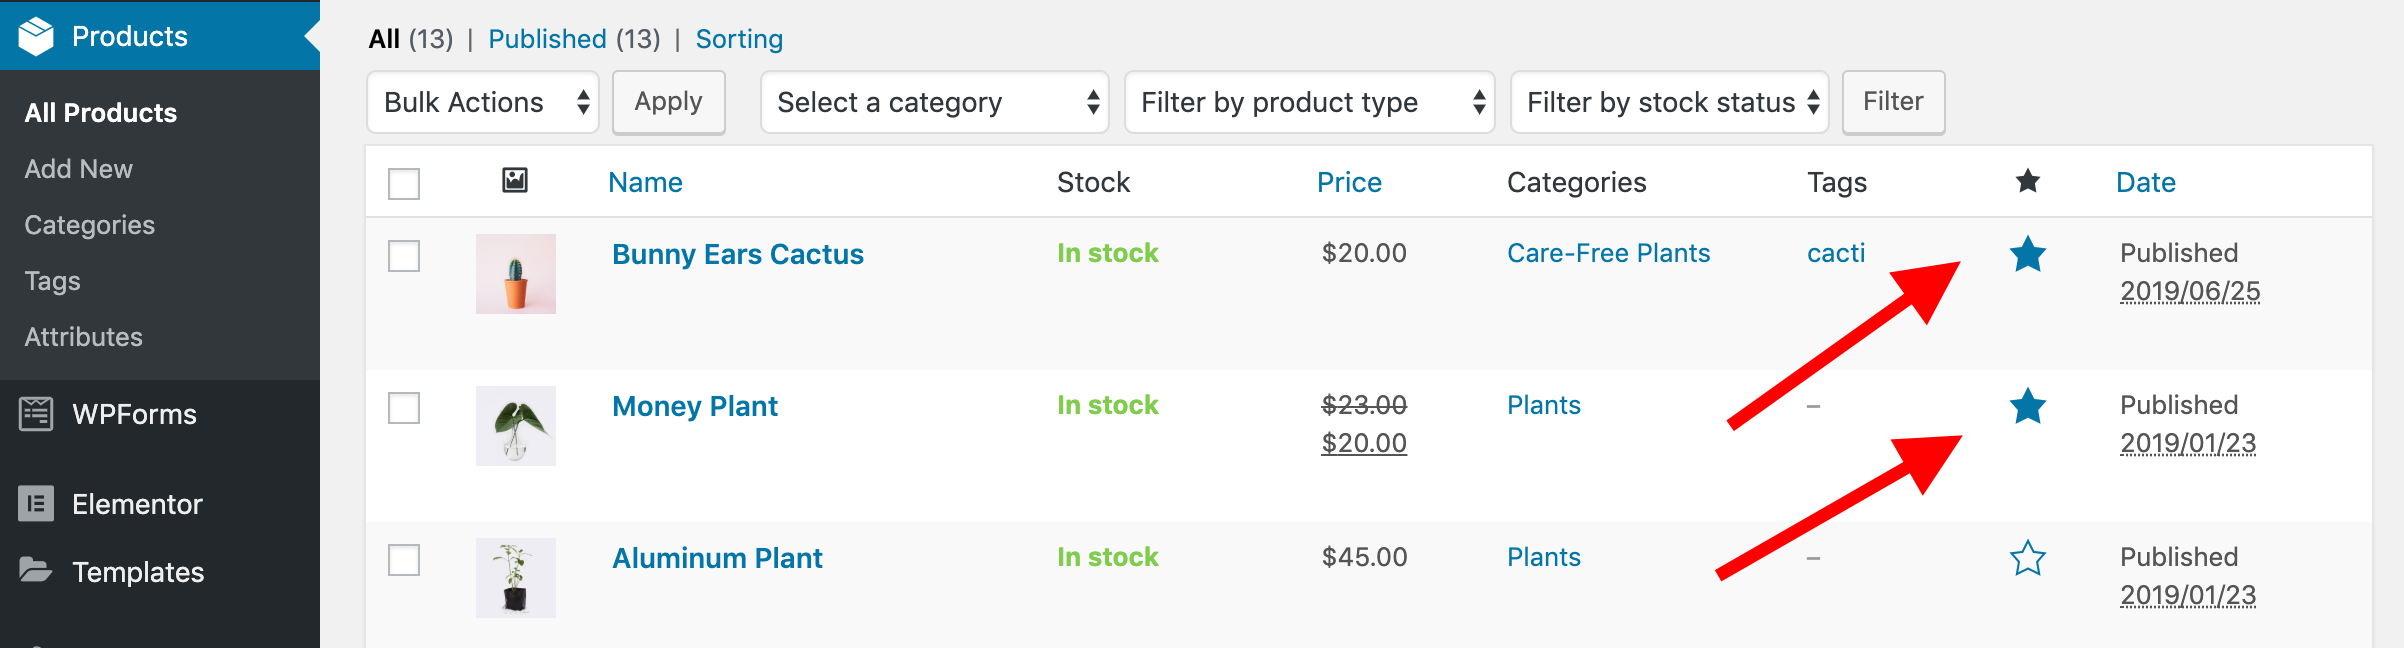
Astra already lists your featured products inside the next section of the homepage. All you need to do is adjust the number of products to be displayed and the sub-head that introduces those products.
To change the number of the products displayed, just click on the pen icon in the top right corner of the featured block and then change the values in the shortcode on the left.

The next section on the page is testimonials. If you have any testimonials, you really should add them to the page. Just replace the example testimonials that are already there.
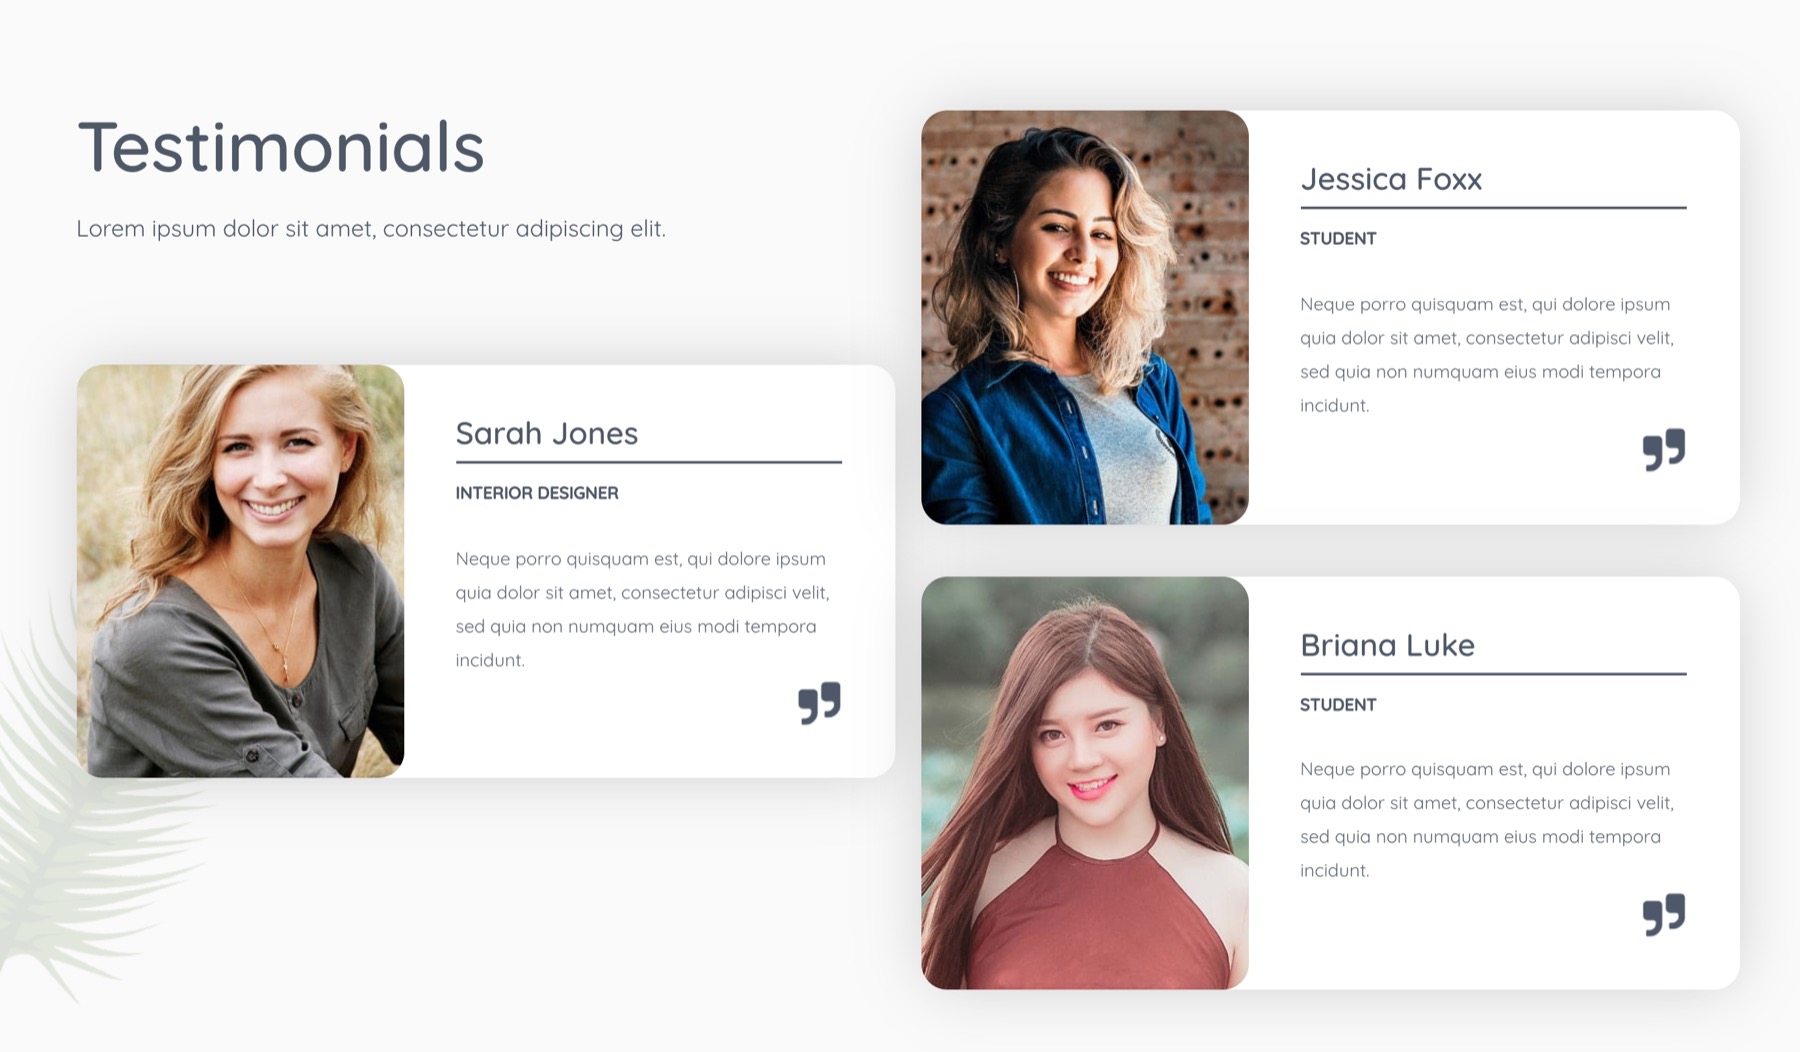
If you don’t have any testimonials yet, you can replace them with something else. For instance, since many of my competitors also like to include some links to articles on plant care, I’m going to do the same in place of the testimonials.
To make my life easier, I’m just going to change the text and images inside the current testimonial blocks to convert them to blocks that link to my articles on plant care.
After a couple of minutes changing up texts and images, here’s the result I have:
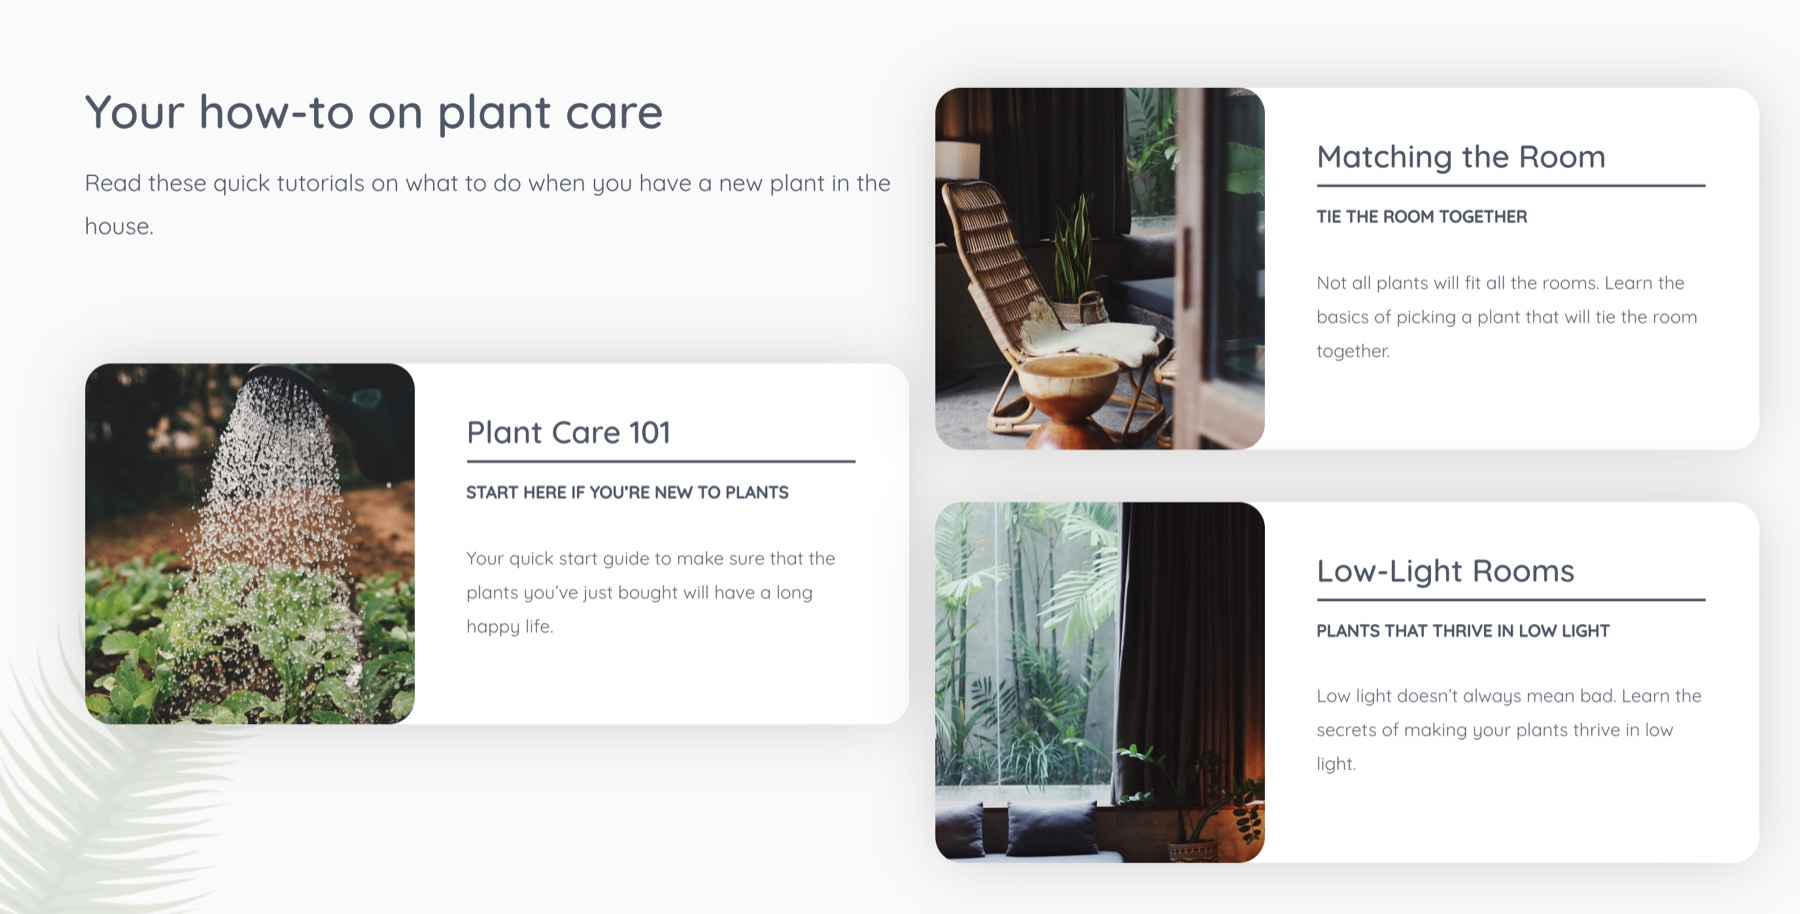
Note: If you want some info on how to create new blog posts (blog articles) on WordPress, we have a nice video tutorial on that. Click here.
If you want to take one last chance at highlighting one of your offers, you can do that in the next section on the homepage. Just edit the text and images accordingly. The process is the same as with all of the other blocks on the page. Here’s what I’ve set:
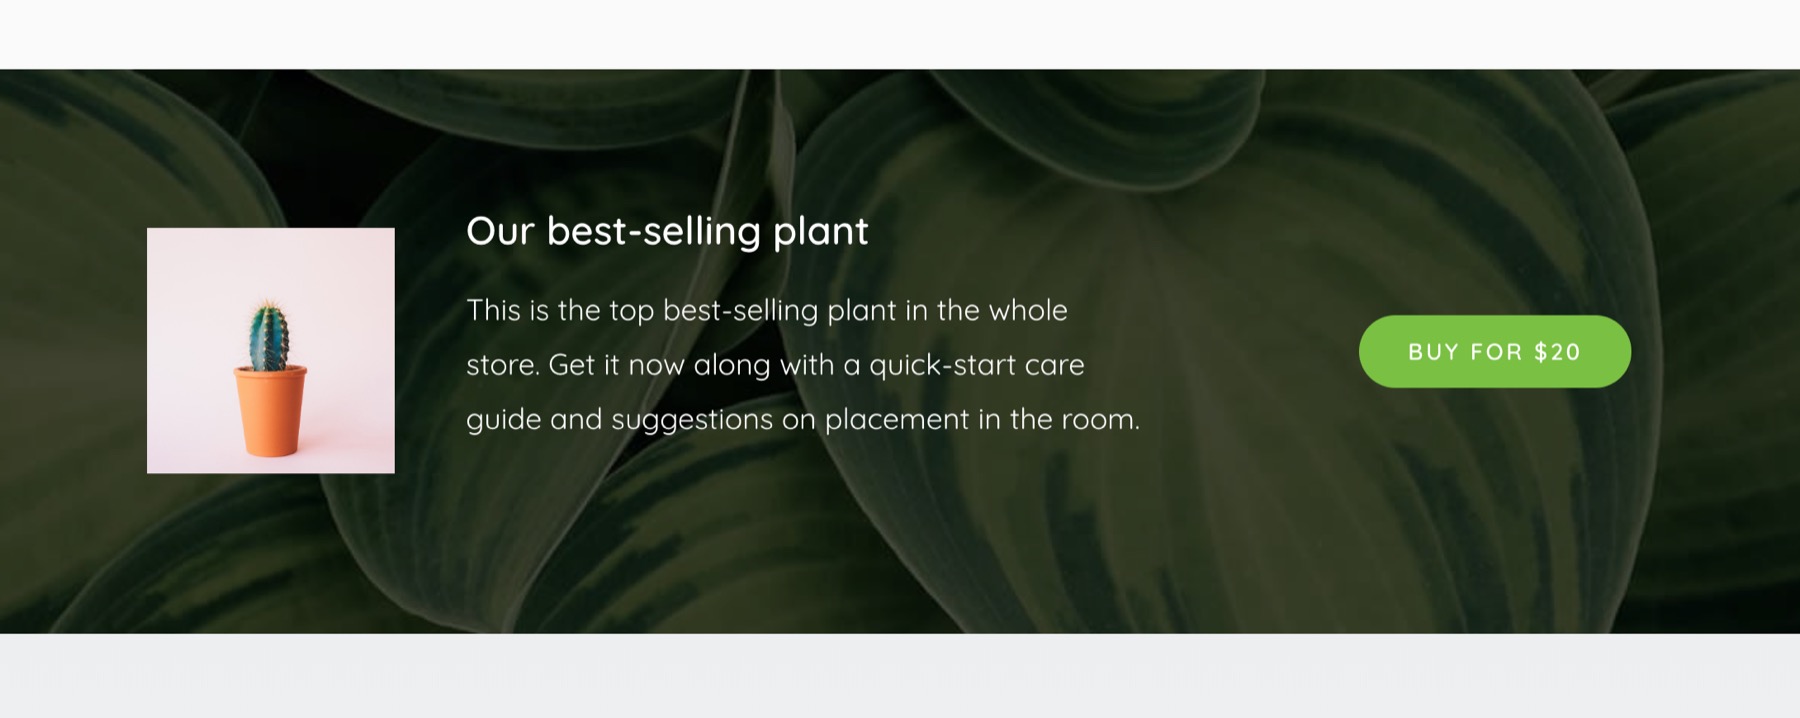
Last but not least, let’s adjust the bottom menu to feature some key links and reinforce our brand.
To do that, we first have to save all of the changes and exit Elementor. Click the Update button at the bottom left, and then come back to your homepage normally.
Hover your mouse over the Edit with Elementor link at the top, and then click on the Site Footer link that’s in the drop-down.

You’ll see the Elementor interface load up once again, but this time you’re only going to be working on the footer section.
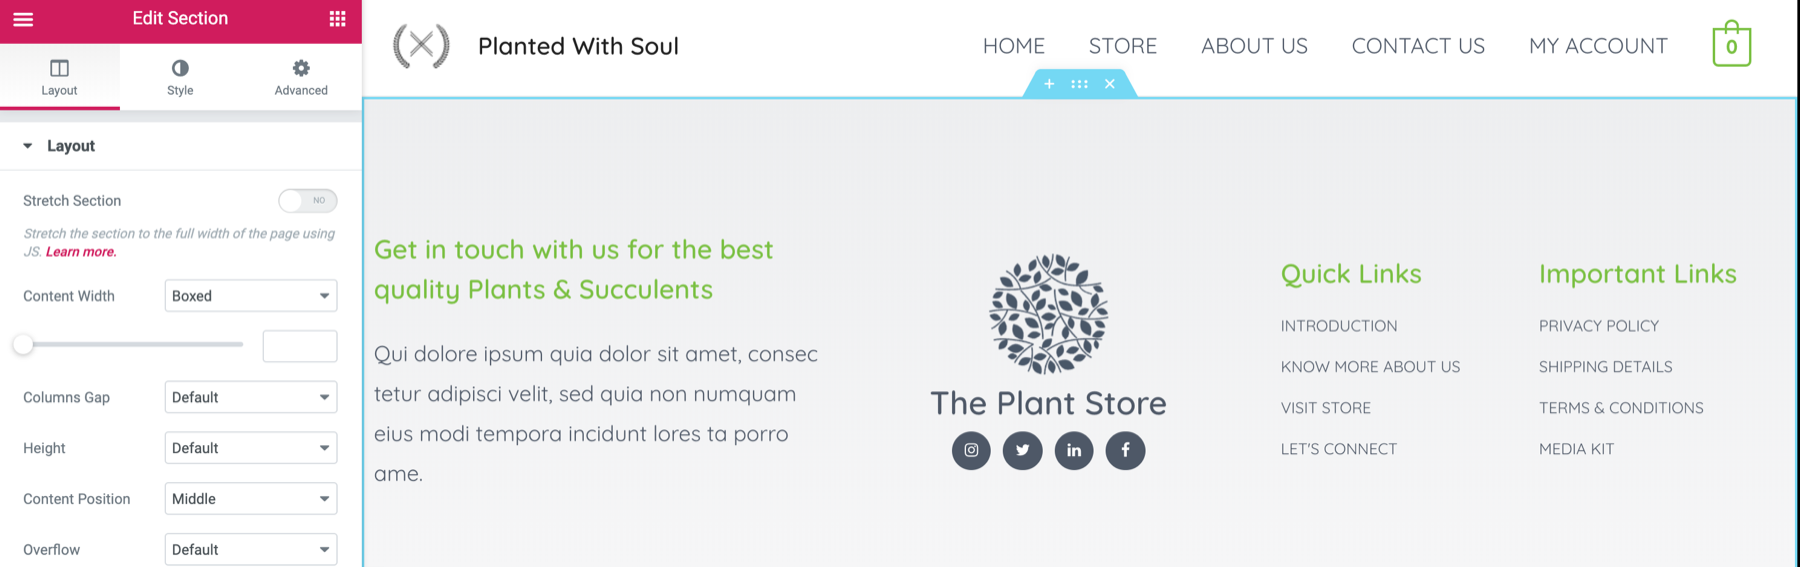
The part on the left you can use as a spot to include a quick message about your store and what you have to offer. Alternatively, you can include your contact information there along with the address of your store/business.
Just click into this block and begin changing the text normally.
In the middle section, add your store’s logo once again, and also link to your social media profiles.
On the right, you can see space for additional menus. We’re not going to trouble ourselves with this now since we don’t have all of the pages created yet. We’ll come back to it later.
Click the main UPDATE button at the bottom to save your changes.
If you come back to your homepage right now, you’ll see your new content in all its glory.
Something I really want to highlight here is even though the example e-commerce store I’m building is a plant store, you can build any store following the same principles and steps. The process isn’t different at all.
10.2. Shop Page
Your shop page is the primary product catalog page of your whole e-commerce store. This is where customers can go to browse everything you have to offer.
Luckily, WooCommerce creates a template page for you right out of the gate. All you need to do is customize it to fit your brand better.
Your shop page can be found if you go to https://YOURDOMAIN.com/shop/
Once there, click the Customize link that’s in the top bar. This will fire up the Customizer interface once more.
Go to Layout → WooCommerce → Shop. In there, you have a handful of options.
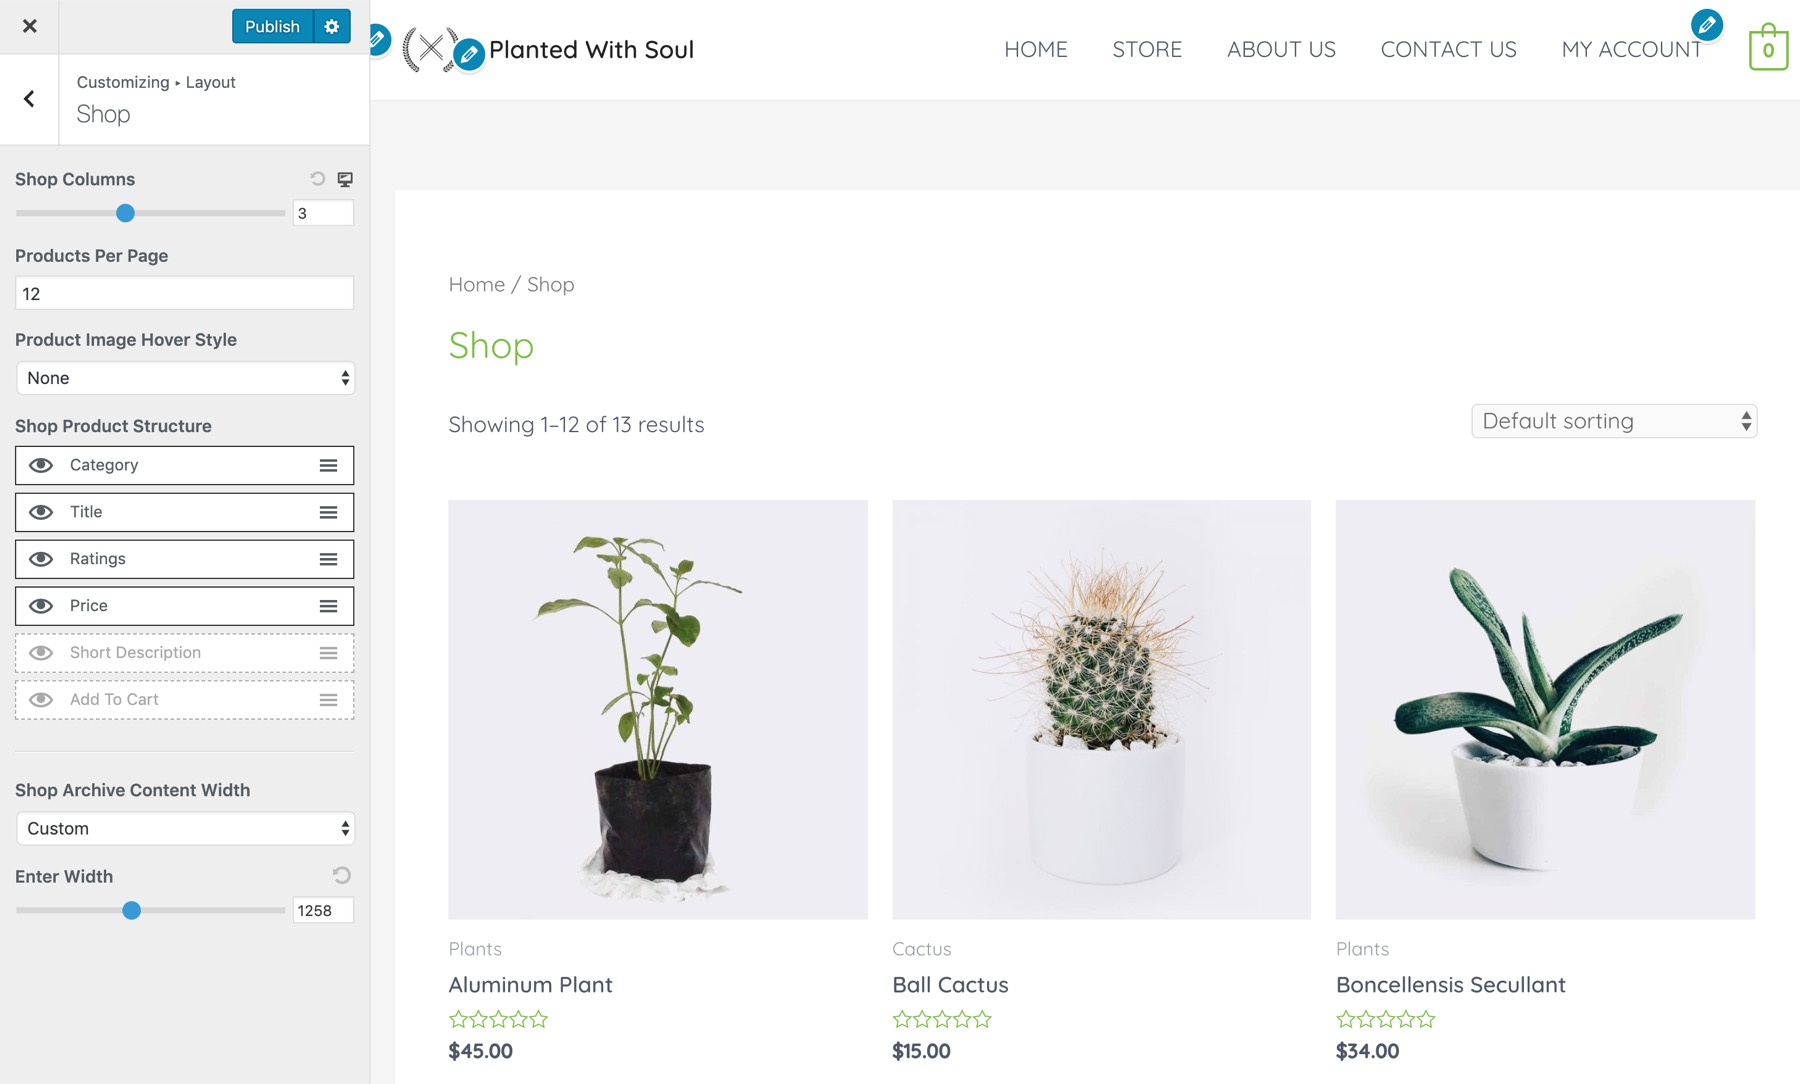
Before you set out to change any of the details here, go back to your competitor research once again. See how your competition showcases products and what they focus on the most. Consider whether emulating some of their methods will make sense for you.
First, decide how many columns you want to show on the page. In my niche, going with three seems to be a good bet.
Next, the Products Per Page setting. I advise you to set it to show all of your products if you have fewer than 20, or go for 12 to 15 if you have more. This is so you don’t clutter up the page too much.
The Shop Product Structure area is where you can drag elements around (just grab on to the three lines icon) and/or make them visible or disappear (the eye icon). Experiment with these elements until you’re happy with the result.
Click Publish when done.
10.3. Your Single Product Pages
When it comes to your individual product pages, WooCommerce’s default design is already pretty good. For instance, this is what I get with my current setup up to this point:
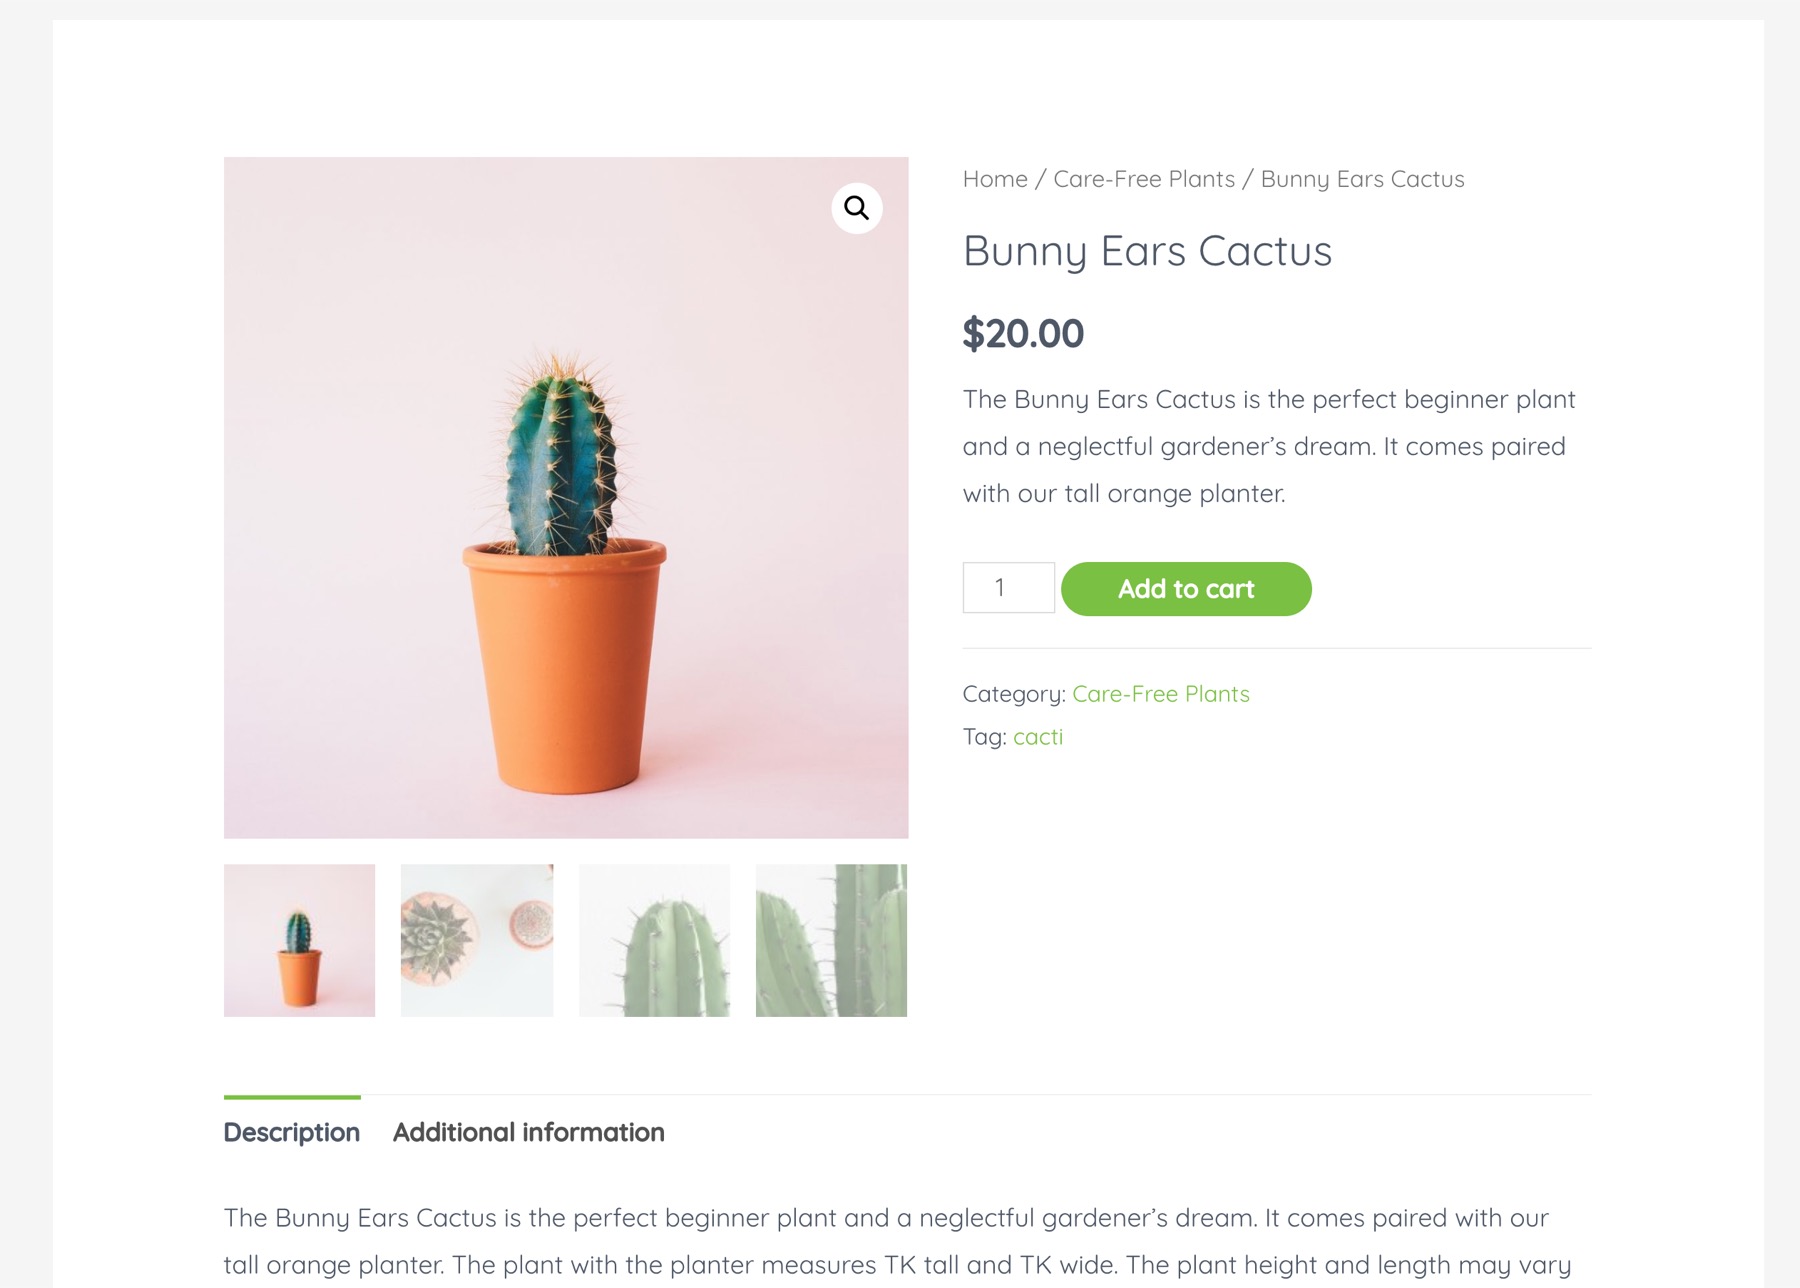
If you want to do some more hands-on customizing, you’ll need either Elementor Pro or Astra Pro packages.
- Here’s how to do it with Elementor Pro.
- Here’s how to do it with Astra Pro.
If you want to keep it simple for now, then just take advantage of all of the things you can do in the main description field of each product. Add different sub-heads and relevant descriptions, as well as images throughout.
10.4. Other Must-Have Pages
The list of must-have pages when you start an online store doesn’t end with your homepage and product pages. Apart from those, you should also create:
About
Your about page can tell the story of your business, explain why people should care, and showcase some strong points that are going to convince people to buy from you versus the competition.
Here’s a good tutorial on the copywriting element of putting together a compelling brand story and description.
As to the how-to of actually putting the page together, this is again pretty easy thanks to the Astra theme.
Astra already comes with a pre-made about page with some example content. You can find it at YOURDOMAIN.com/about-us/.
It’s already quite good-looking, and you can edit it pretty easily using Elementor (just like the homepage) — click on the Edit with Elementor link to proceed.
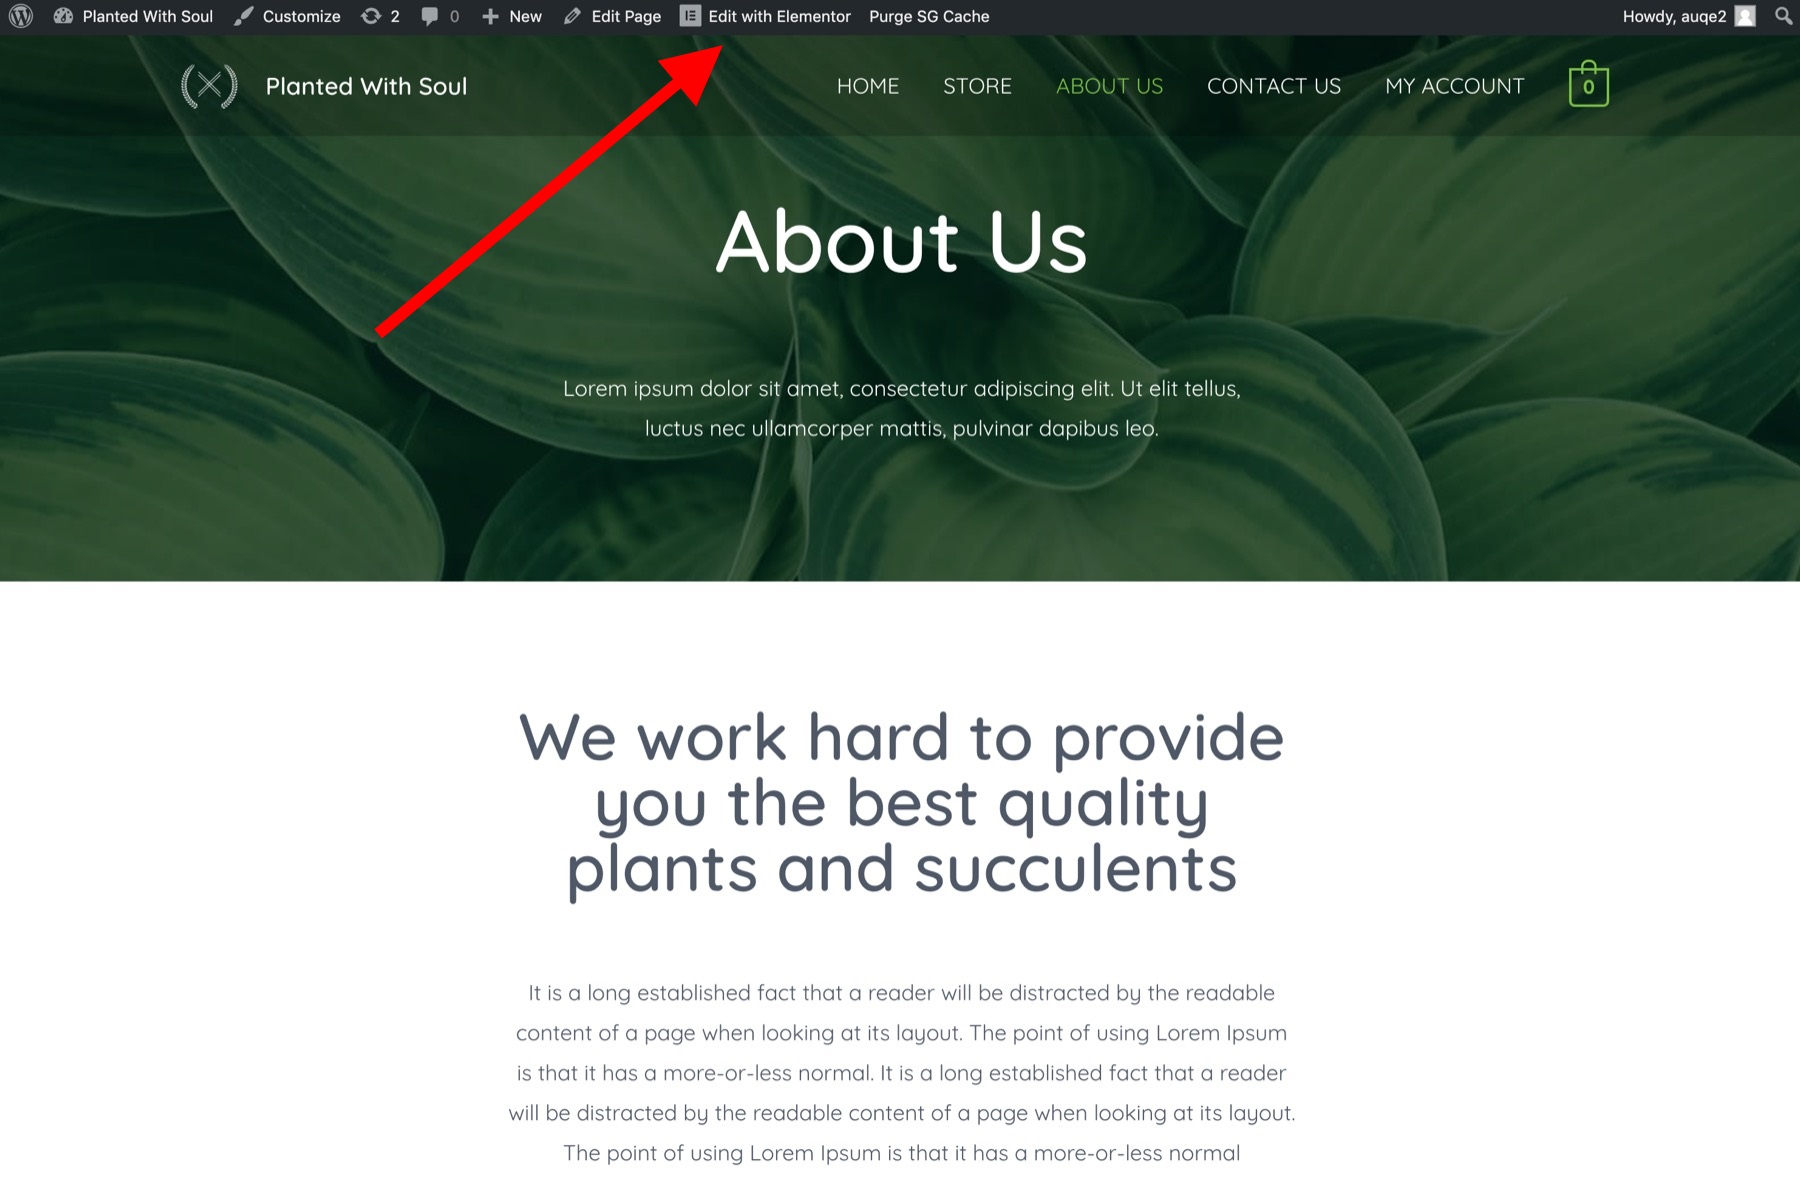
Just as we did with the homepage, proceed through each block on the page step by step, edit the text, change the images and so on, until you’re happy with the result and the way the page represents your business.
You can also include a link to your most popular offer for good measure — the same one you added to the homepage.
Contact Us
Contact Us can be a simple page. The only purpose it serves is to make it possible for people to contact you directly.
Some of the common elements to include on the page:
- The store’s street address
- Phone number
- Email address
- Official business info
- Opening hours
This probably won’t be a surprise to you at this point, but Astra includes a ready-made contact us page.
You can find it at YOURDOMAIN.com/contact-us/.
Again, you can edit it using Elementor.
One useful element that’s already on this template page is a contact form. It’s fully functional, and it’s configured to send all of the messages to the email address associated with your WordPress admin account.
Privacy Policy
This page is a requirement in many countries.
WordPress provides you with some help here. There’s already a template privacy policy page waiting for you in the pages menu. It’s a fill-in-the-blanks kind of a template.
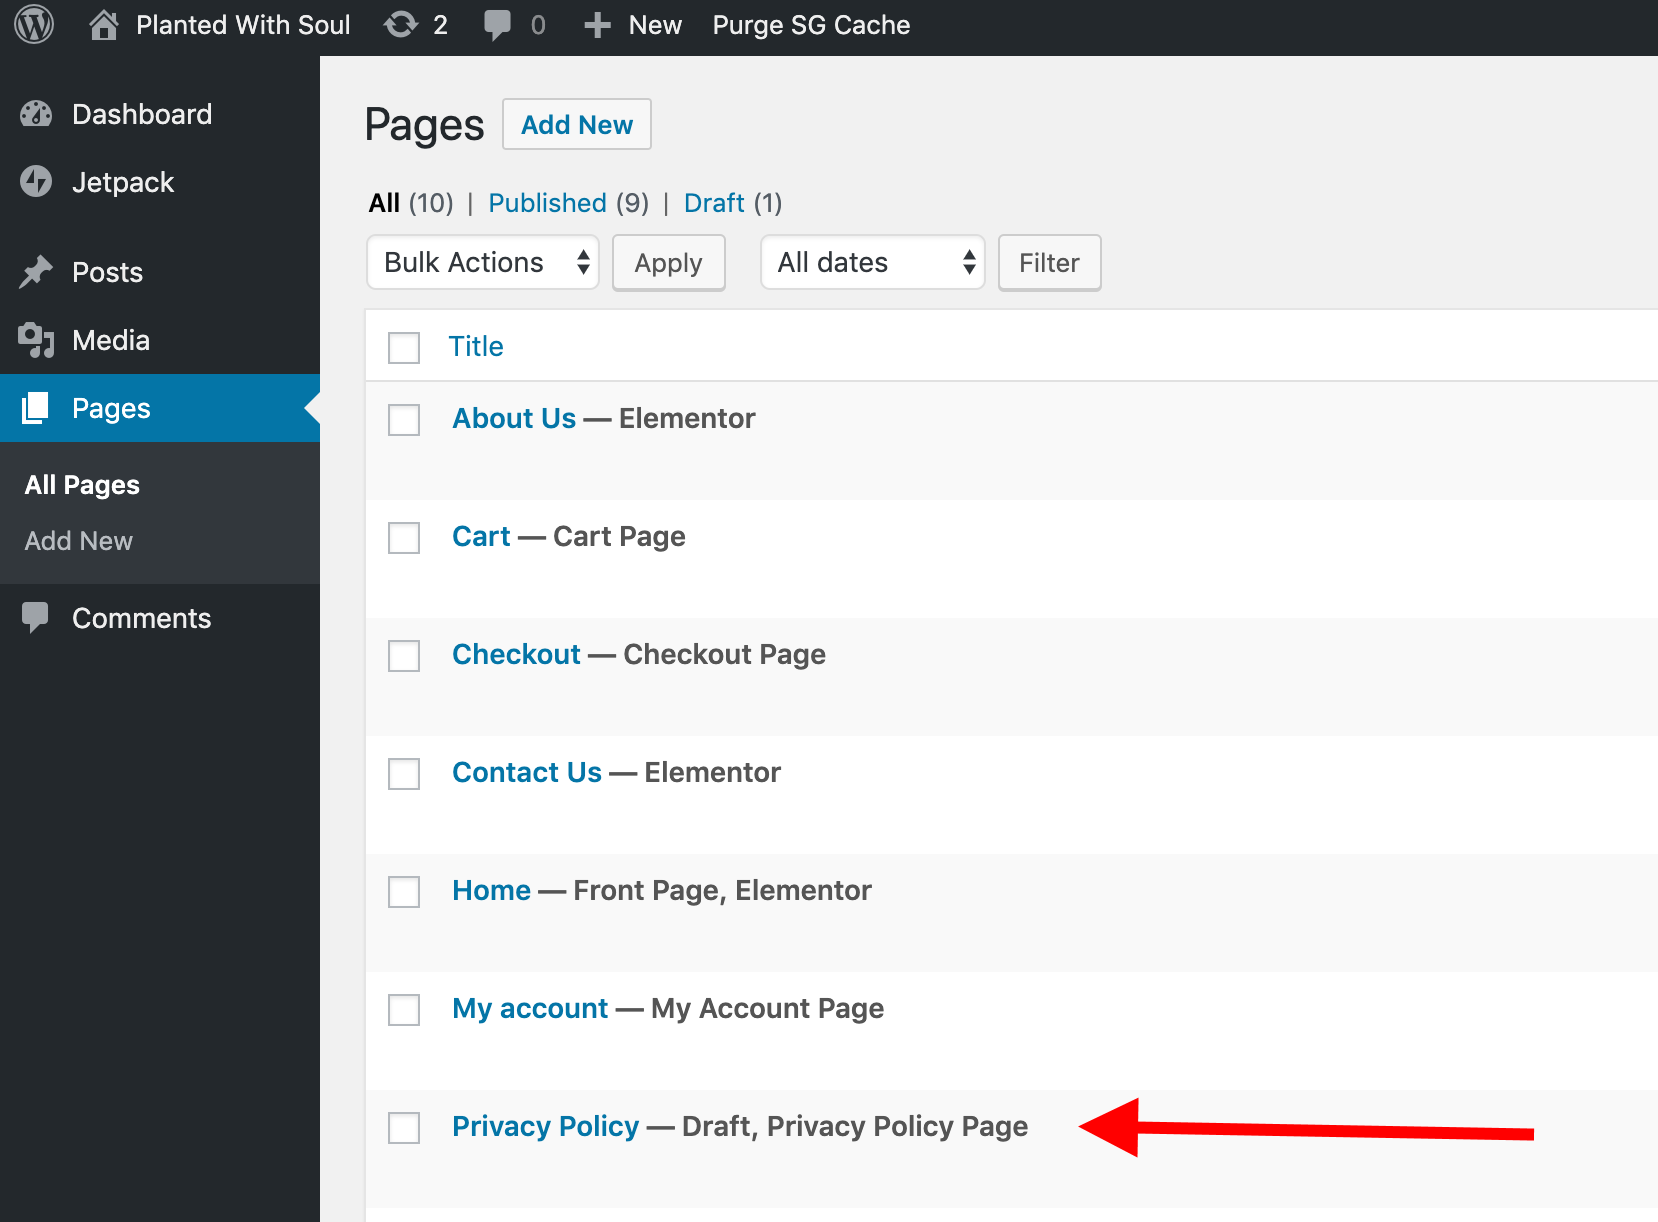
As usual with these things, I have to tell you I’m not a lawyer and you shouldn’t consider anything you read here as legal advice. Always refer back to your local authorities to get the correct guidance on how to prepare the contents of this page.
When you’re done editing the page, click the main Publish button to get it online.
Shipping Info
This is a page that’s going to be very popular among your first-time customers.
Unfortunately, the page doesn’t come as a template with WordPress, but you can create it from scratch pretty easily.
To start, let’s come back to our about page and proceed to edit it with Elementor. Don’t do anything apart from clicking this icon and then Save as Template:
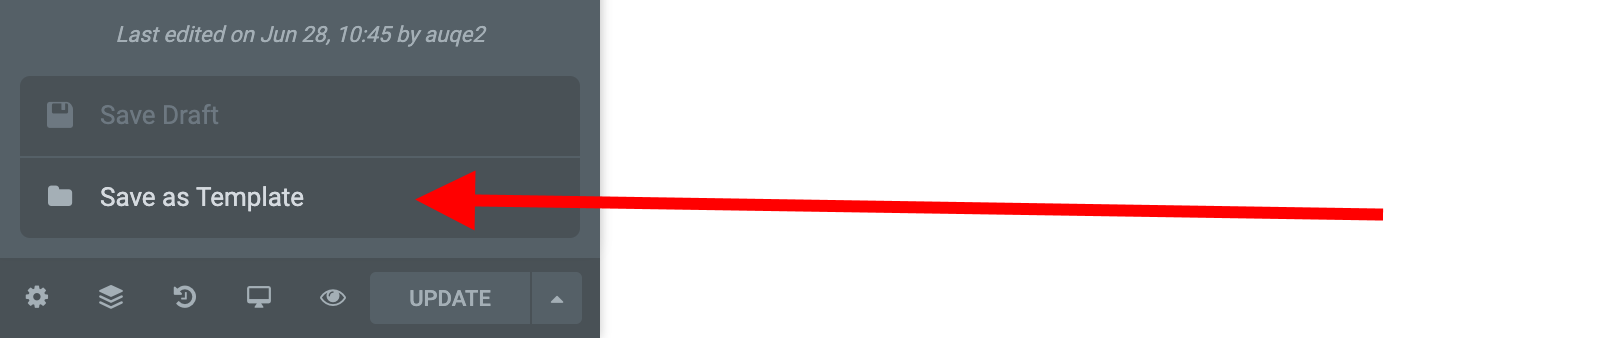
This will allow you to keep the current about page as a template for future pages. Just give it a name and click SAVE.
Now, come back to the WordPress dashboard and go to Pages → Add New. There, click the Edit with Elementor button.
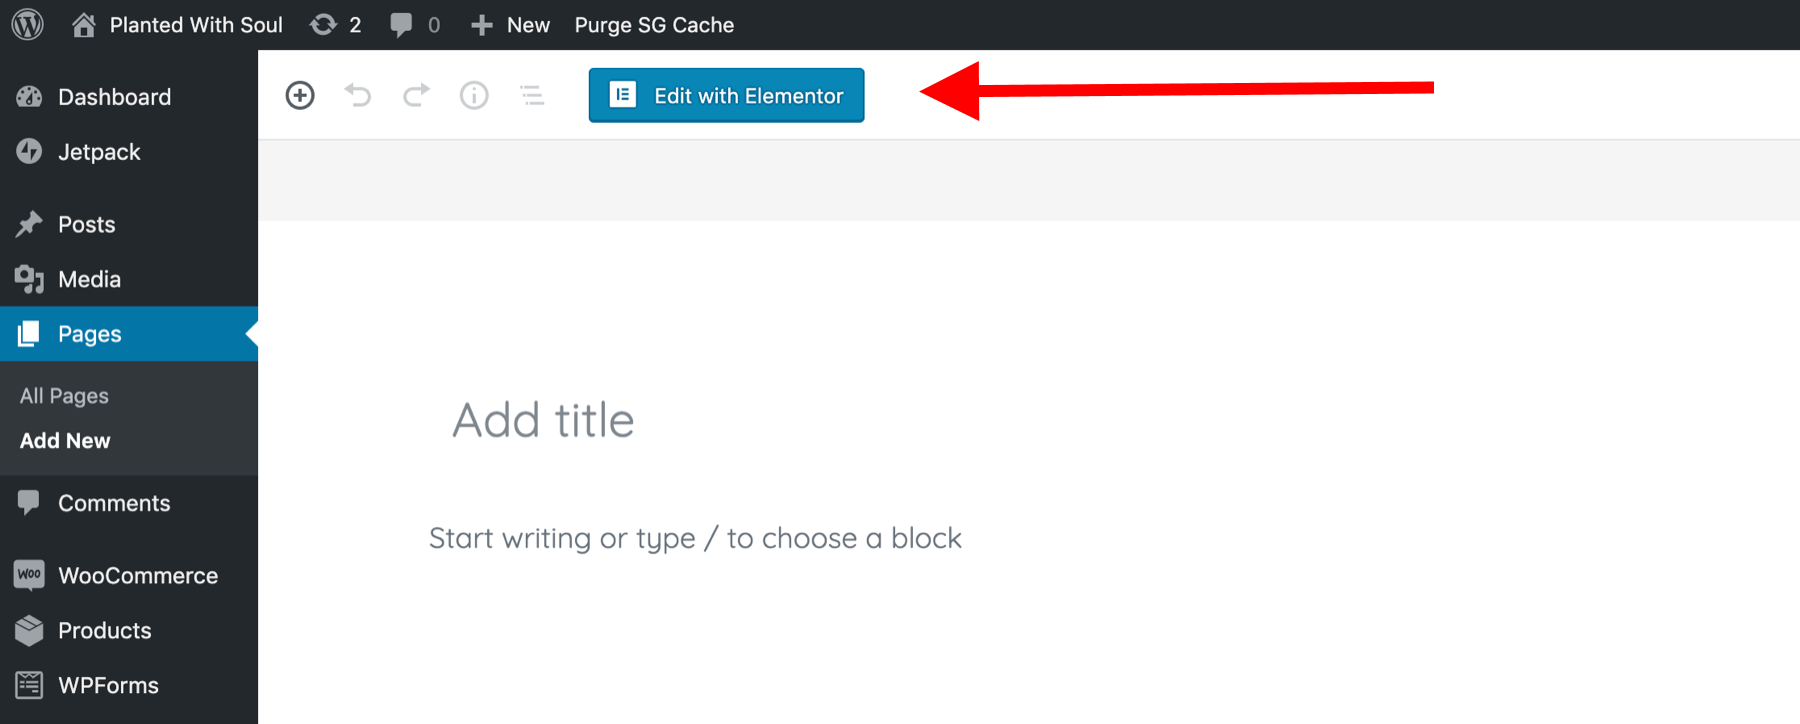
When the Elementor interface fires up, click the gray icon in the center:
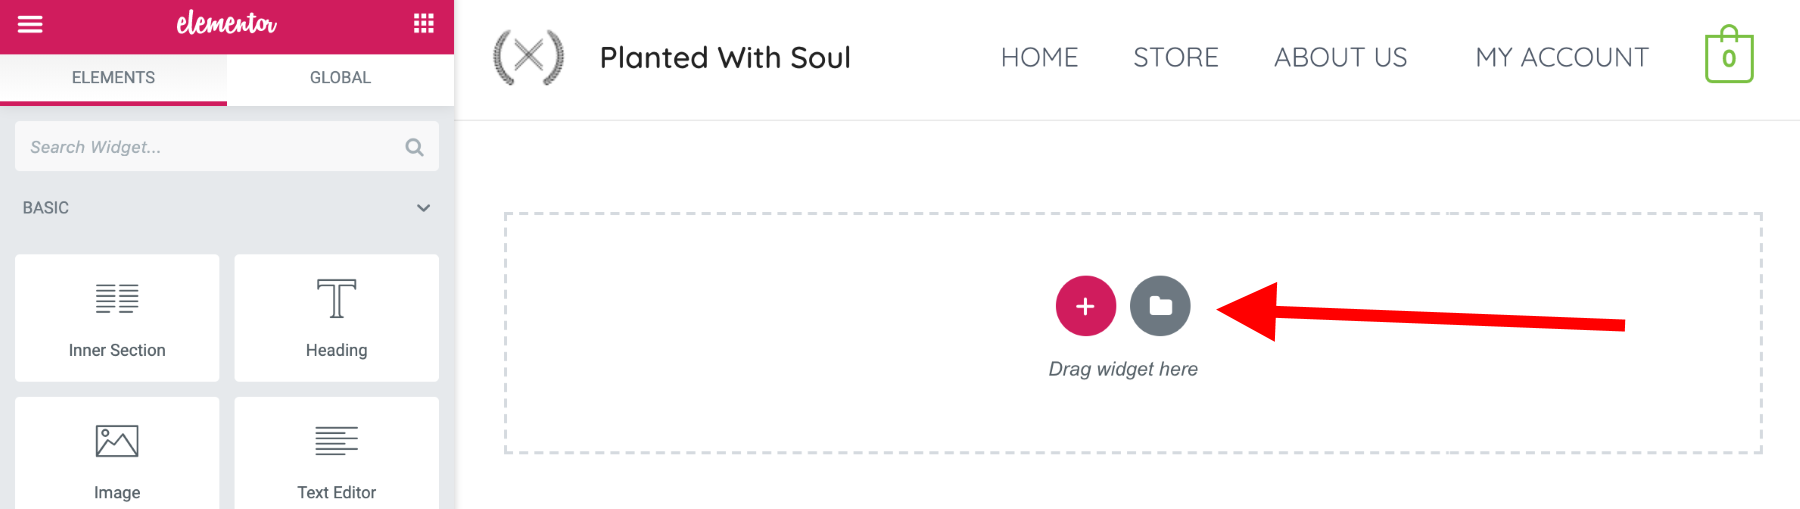
A list of some ready-made templates will appear. Switch the tab to My Templates. You’ll see your about page template there. Click to import it.
With this done, you can now use your about page design as a template for new pages.
Since you’re working on a shipping info page now, start by deleting all of the blocks you don’t need. Right-click on a section and then select Delete. Save the page when done and exit the Elementor interface.
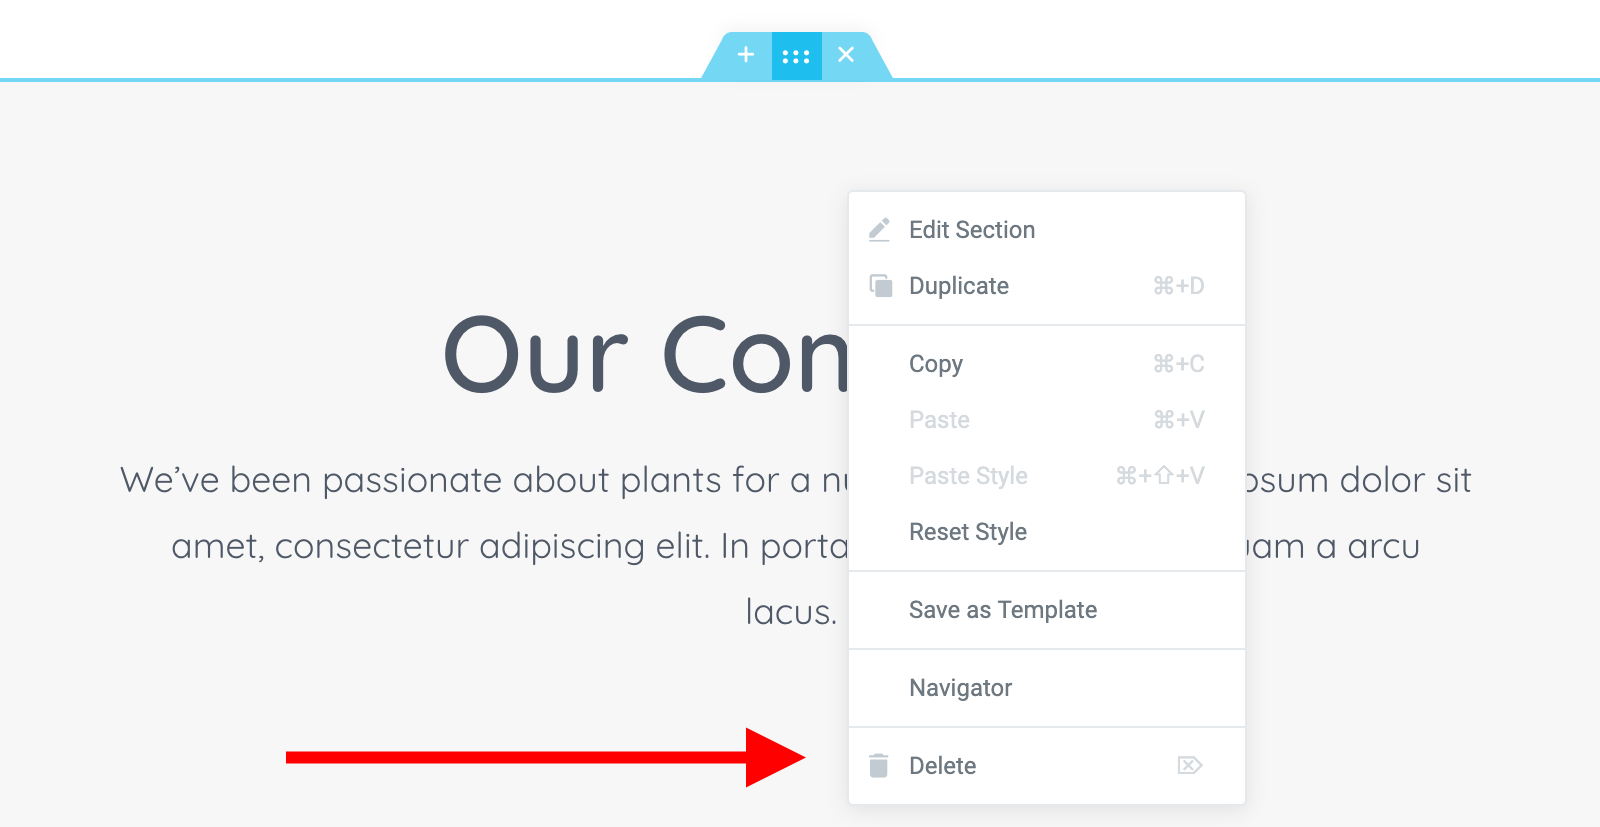
Return Policy
Pretty self-explanatory, and yet another page you have to have when running an e-commerce store.
You can follow the same process as with the shipping info page. Just create a new page, import your template and edit the contents accordingly.
10.5. Build a Menu
Now we’ve created all of the pages, we can add them to the site’s main menu — the one placed in the header, and also some footer menus for more context and more straightforward navigation.

As you’ve noticed, the Astra theme comes with some pre-made menus, but those aren’t 100% spot on. To change them, first we’re going to go to the WordPress dashboard, Appearance → Menus. What you see there is your current main menu.
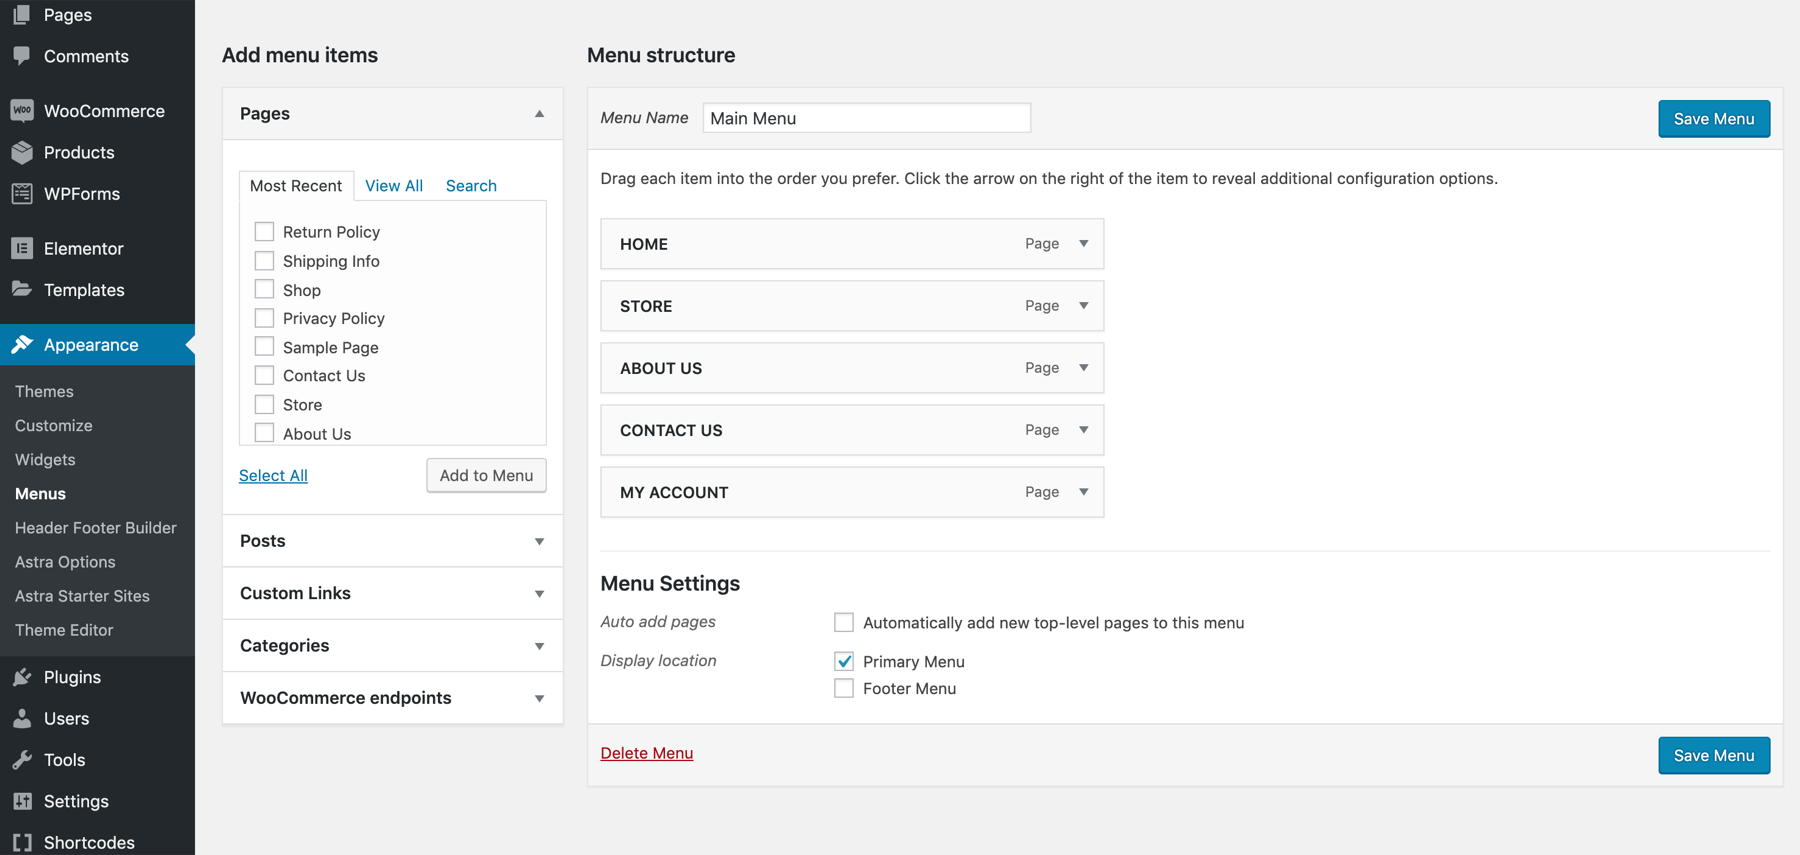
Adding and removing pages from the menu is straightforward; just click a menu item and then Remove if you want to delete it. Or, click a new menu item on the left and later click Add to Menu. Menu items can be dragged and dropped to reorder them.
The next menu we’re going to edit is in the footer. Elementor handles this one, so we’re going to go back to the homepage, and, from there, click the Site Footer link under the main Edit with Elementor link (we’ve been here before).
Add links to your key pages in the Quick Links and Important Links sections. Just click into the example links currently there and swap for your own.
Click on UPDATE when you’re done.

10.6. Consider Starting a Blog
One final step you can take to make your brand more appealing is to start a blog.
Content marketing is among the most effective methods of bringing in new sales these days. There have been multiple success stories of how brands have used content marketing to generate more buzz and sales.
In its essence, content marketing is about creating content that’s of value to your customer base and thus introduces them to your brand. Then, once they learn something from you, they may be more eager to take the next step and purchase one of your products.
In my example niche, guides and tutorials on plant care are a great example of content marketing pieces. People who want to learn about plant care are also likely to be interested in getting new plants.
Again, the best way to identify the types of content you can publish is via competition research. See what they write about and how they approach the topic.
When it comes to the technical side of things, WordPress makes building a blog super simple.
First, go to Pages again, and create a new page. Title it ‘Blog’ and publish it without adding any other content to it.
Then, go into Settings → Reading from the main sidebar. In the Posts page drop-down select ‘Blog’ — the page you created a second ago. Click on Save Changes.
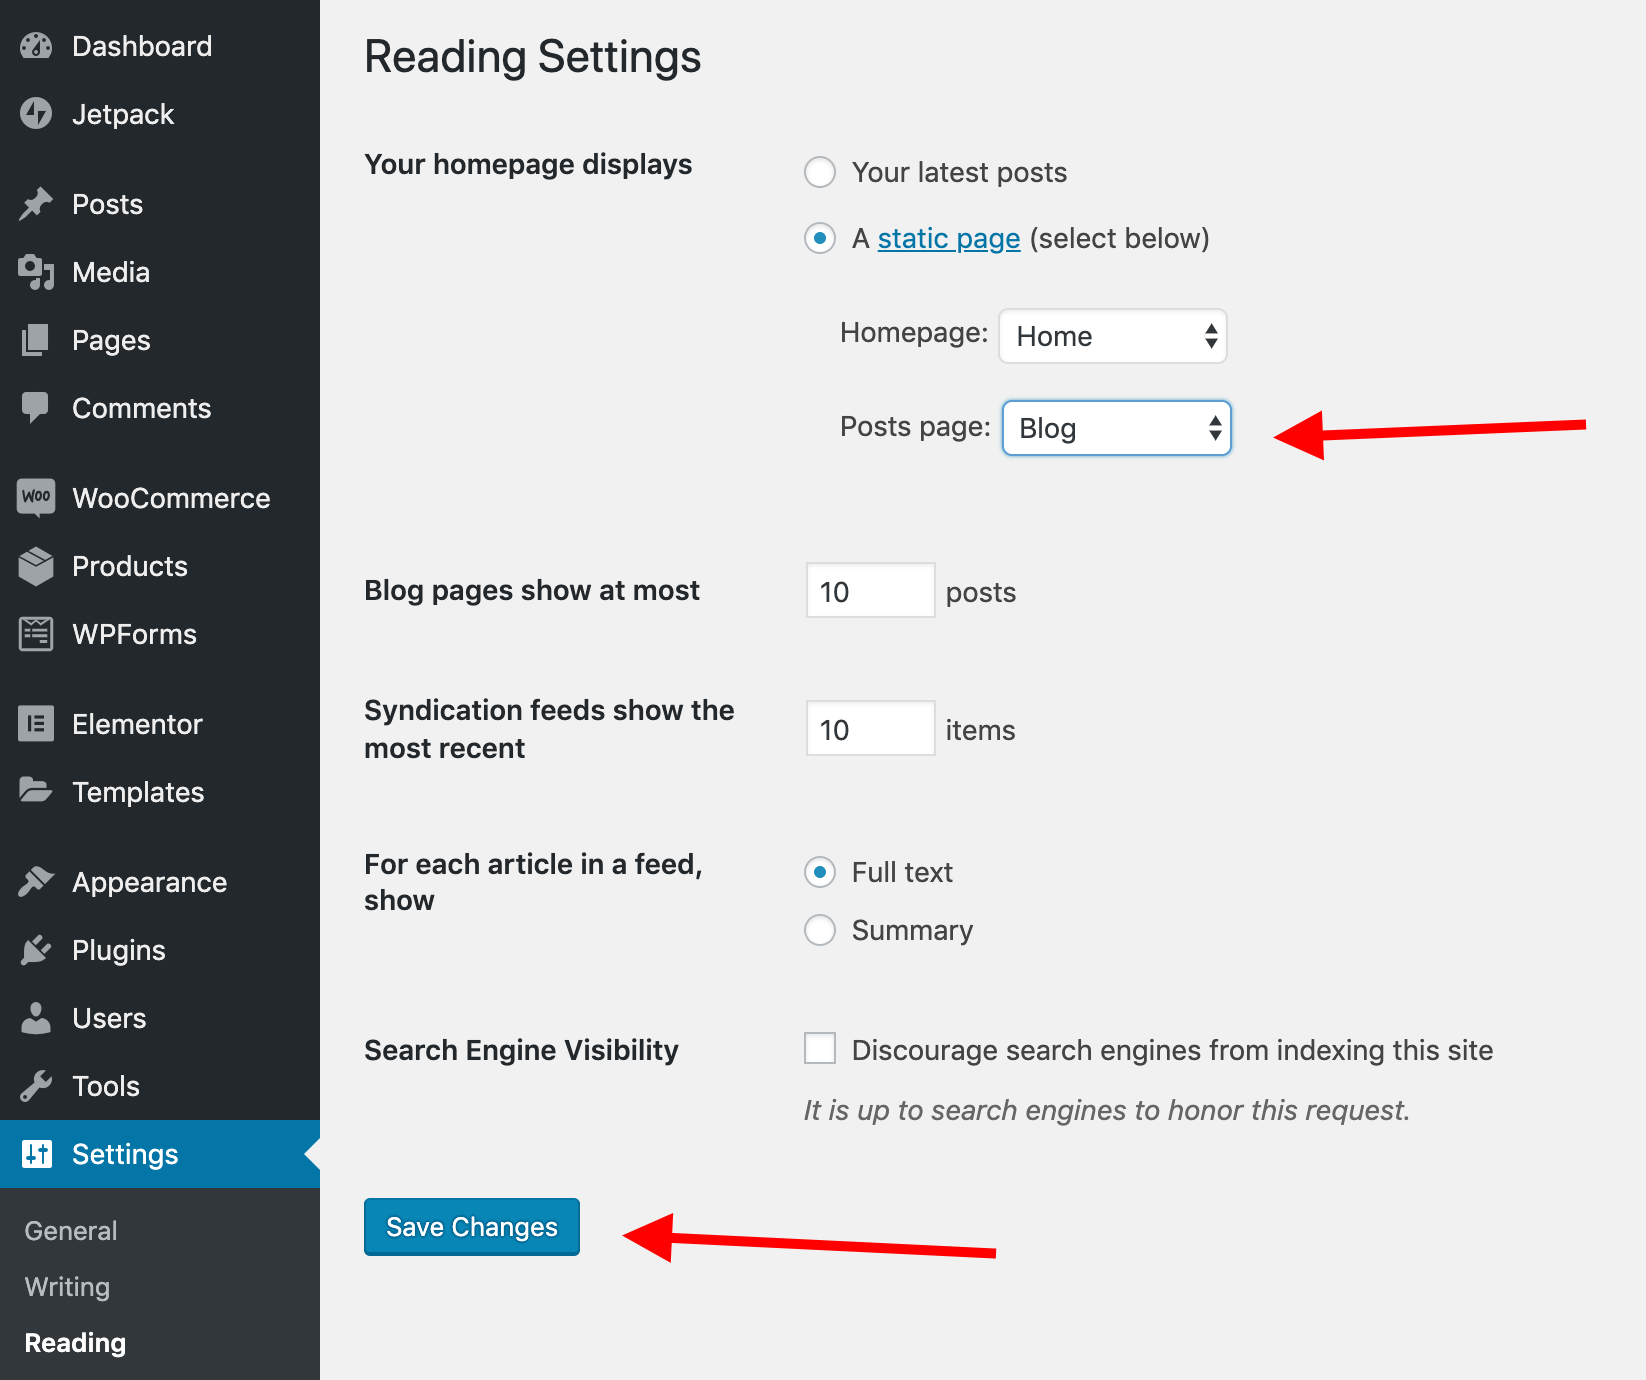
Now, when you go to YOURDOMAIN.com/blog/ you’ll see your main blog listing — a reverse chronological list of your recent blog posts.
To create new blog posts, go back to the WordPress dashboard and then to Posts → Add New. You’ll see that the interface for creating new posts is the same as for creating pages.
11. Extend Your Store with New Features
At this stage, your e-commerce store is basically functional. People can buy products from you, and you have all of the mandatory elements in place.
But we can do better! Here’s how to extend your store by adding plugins.
11.1. What’s a Plugin?
In a sentence, plugins are apps you can add to your WordPress website. They provide you with new features and don’t require any coding skills.
- Here’s a video that goes a bit more in-depth if you’re interested.
- Here’s another guide of ours on how to install WordPress plugins.
11.2. The Plugins You Need
Here are some plugins most e-commerce stores will benefit from using:
Jetpack
Jetpack is a mysteriously named plugin that I mentioned earlier in this guide. It isn’t actually a single-purpose plugin, but a multipurpose one that delivers a whole suite of features.
To enable it, click Jetpack from the main sidebar menu in the WordPress dashboard.
You’ll see a welcome screen inviting you to set everything up.
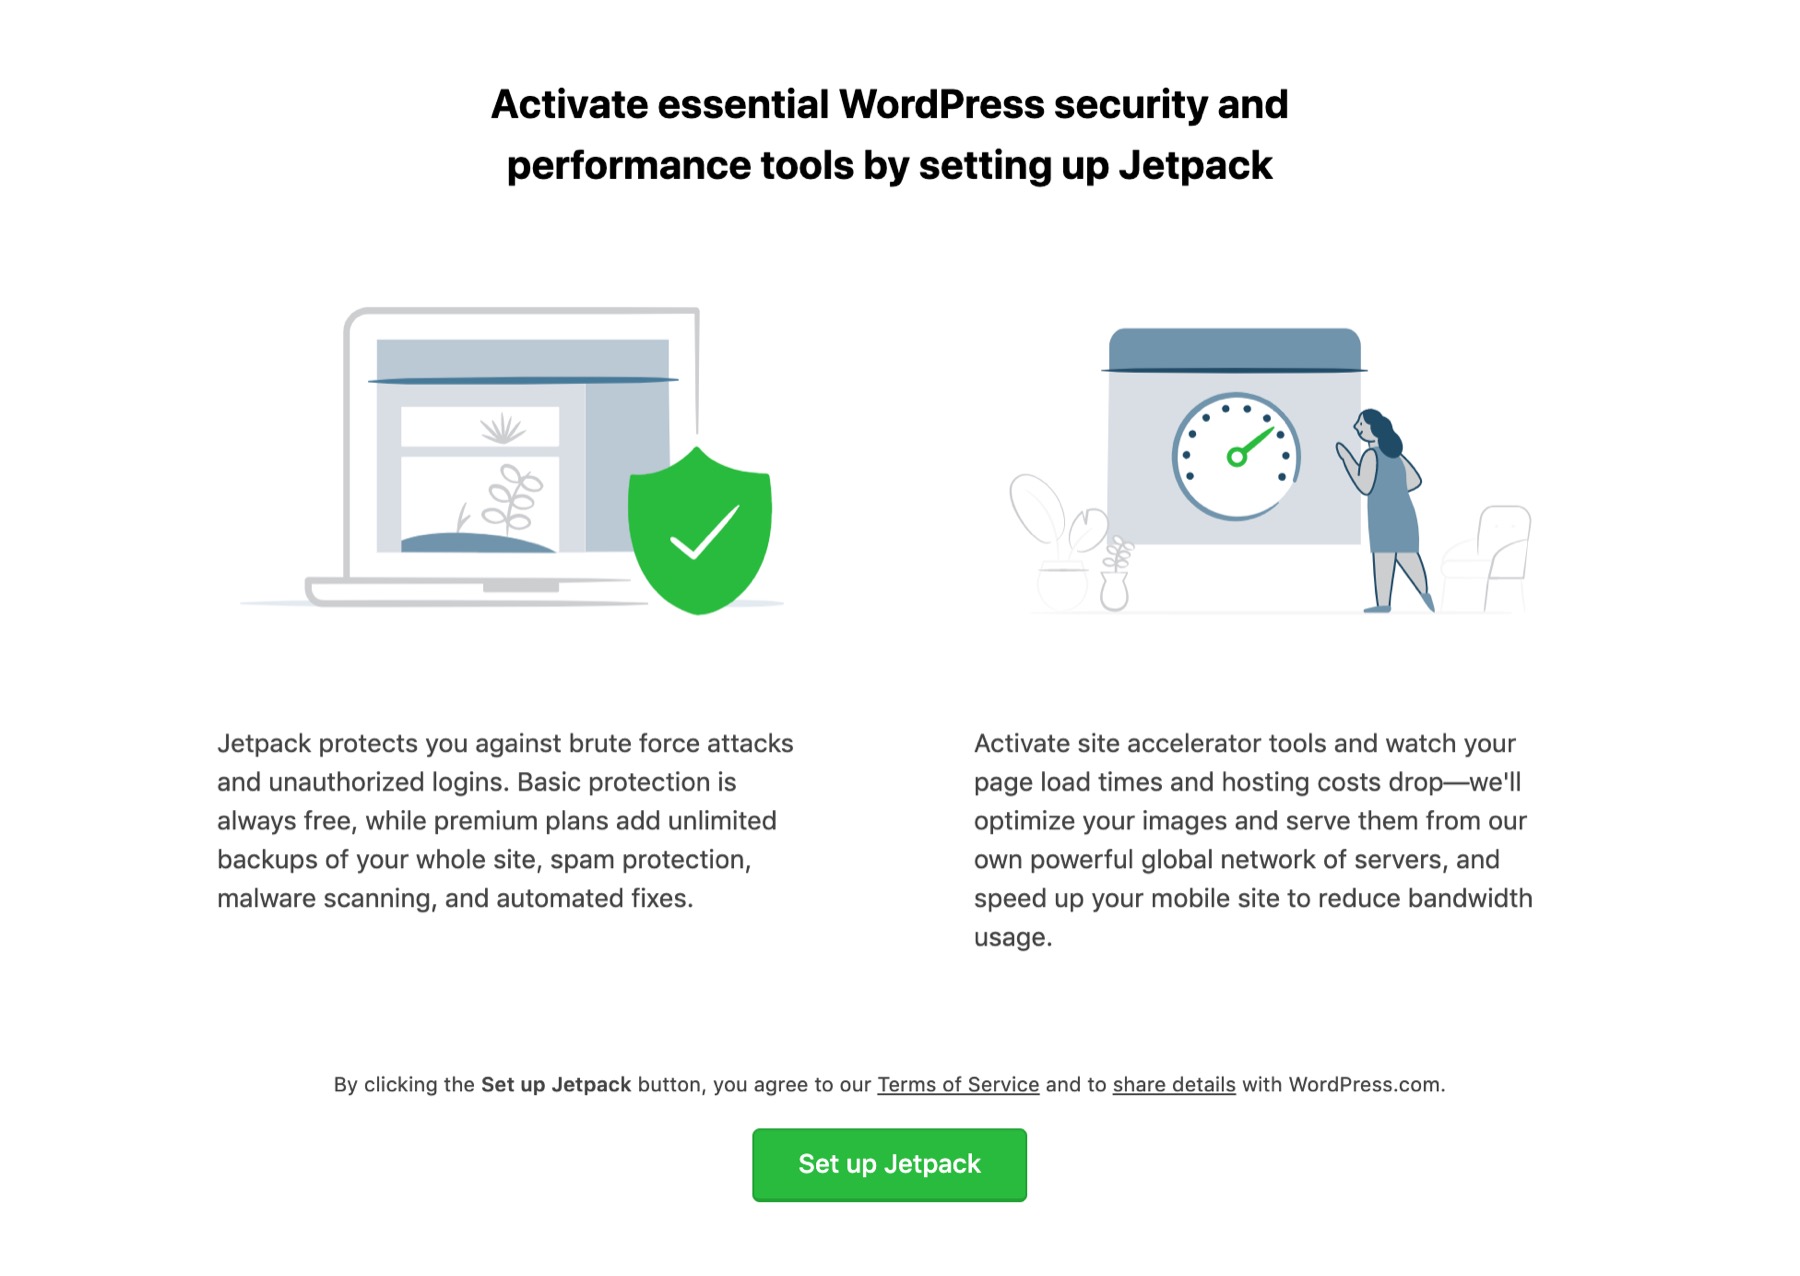
Once you click the button, you’ll get redirected to WordPress.com where you’re going to be asked to authorize the site with your WordPress.com account. If you don’t have an account, you’ll be able to create one.
On the subsequent screen, Jetpack will ask you about the profile of your site. Select ‘Online store’.

After getting through a couple of other screens, Jetpack will ask you to pick one of the available plans. The choice is up to you, but I don’t imagine most store owners would benefit from a plan above Premium. If you’re not sure, go with free for now. There’s a button labeled Start with free under the paid plans.
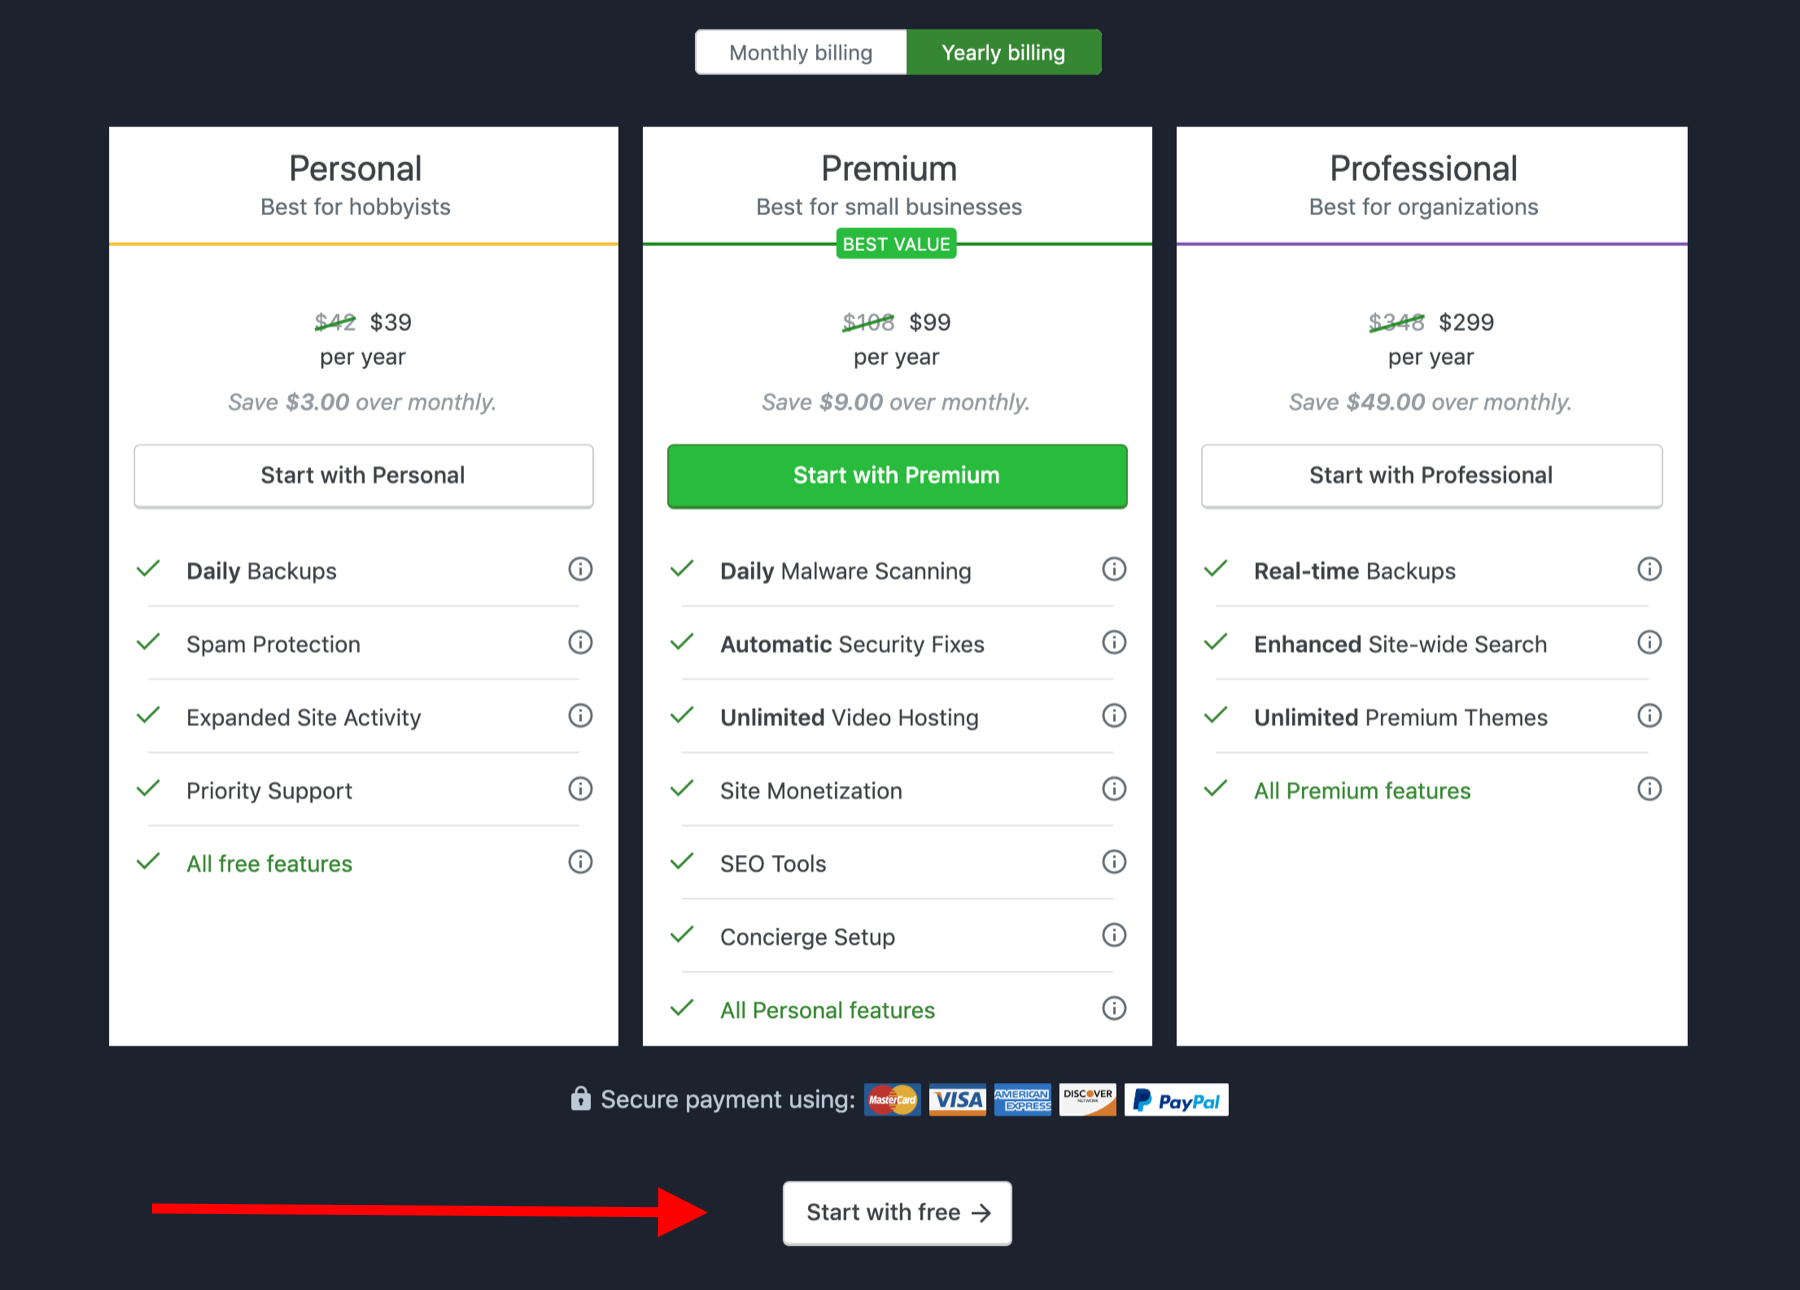
In the next step, Jetpack will show you a quick-start setup screen. Proceed step by step through each feature and enable the ones you find useful.
Here are my picks:
- Downtime Monitoring — enable — you want to be notified in case your site ever goes down.
- Automatic Plugin Updates — not needed.
- WordPress.com sign in — not needed.
- Site Accelerator — enable — this will serve all of your images through Jetpack’s servers and not your own, which will have a positive impact on your site’s performance.
- Lazy Load Images — enable — this makes sure the images on your pages will get loaded just in time for the customer to see them (more on lazy loading here).
Once you’re done with these options, click on Return to WP Admin.
Analytics and stats
While Jetpack offers you some basic stats and analytics, if you want to have a more detailed look at your site, every subpage, your products and other metrics, you should sign up for Google Analytics (GA).
GA is a free tool, and enabling it on your WordPress/WooCommerce site is really easy. We have a quick video tutorial for you here.
GA in itself is quite huge, and mastering it takes time. However, you don’t have to trouble yourself with all of the advanced stuff when you’re just getting started.
First off, you’re not going to see much insight from GA on a new site. You first need to attract some visitors to populate all of the different data brackets GA has to offer, and that takes time in itself.
Let GA work behind the curtains for a month or so, and only then come back and see what’s in there.
Backups
Depending on your hosting setup, backups may be handled by your host already, or they may not be.
If you went with the GoGeek plan at SiteGround as we recommended, you have backups taken care of.
Alternatively, if you’ve chosen to go with any of Jetpack’s paid plans in the previous step, backups are part of that as well.
Here’s a separate tutorial of ours on how to back up your site.
SEO
Aka: Search engine optimization. This is all about making your e-commerce store easier to access by the search engines, and also more optimized.
While SEO is a huge topic in itself, you only need to know the essentials to get started. Here’s our guide on the matter.
If you really want to take your e-commerce SEO to the next level, you should invest in the WooCommerce SEO plugin by Yoast. It lets you further optimize your products and make them easier to rank in Google. This is a paid plugin, costing ~$50.
Site performance
The Jetpack plugin already handles various aspects of site performance, but we can still do better.
The thing with WordPress is that, as awesome as its features are, not all of them are super optimized from the get-go. Or, I should rephrase, it’s not that there’s anything wrong with any of those features, but, in some scenarios, you simply don’t need everything WordPress comes with. If you deactivate some of the stuff you don’t need, you’ll make your site faster.
There are two things you can do to boost your e-commerce store’s performance without too much hassle:
a) Get a caching plugin
One of the most popular options in this realm is called WP Super Cache, which is a free plugin.
Here’s our separate guide on how to set it up.
b) Get a premium performance plugin
This is an optional step since it will require a small investment on your part.
The plugin I’m talking about is called perfmatters, and it costs $24.95 per year (at the time of writing).
It offers a whole suite of performance-related settings that are presented really clearly. You can use this plugin to disable the features you’re not using and thus free WordPress from having to use your server’s processing power to deliver those features, which means you’re going to make your site quicker. There’s also a handful of WooCommerce-specific settings there.
Additional payment gateways
Payment gateways are like Harley-Davidsons: You can never have too many.
If that doesn’t resonate with you, then what I’m trying to say is your customers will always look for their favorite mode of payment when buying from you. And if they don’t find it they may leave.
Chiefly, you have to make sure you’re enabling the most sought-after payment options. Those would be credit cards (preferred by 42% of shoppers according to 2017 data), electronic payments including PayPal (preferred by 39%), and debit cards (preferred by 28%).
Luckily, you can install and enable additional payment gateways pretty easily in WooCommerce — each payment gateway comes as a WordPress plugin, and can be installed in the same way as other plugins.
The most popular payment gateways include:
But there’s more. The full catalog of payment gateways is really impressive.
Also, if you’re going to be doing business internationally, you should look into the payment methods that are popular in your target market. Again, the best way to make sure you’re on the right track is to see what your competition is doing.
The specifics of setting up each of these payment gateways is a bit different, but there are guides and tutorials available from the developers who built those gateways.
Automatic tax calculation
If you’re running your business in the US then you surely know how complicated taxes can be — especially when selling across state borders.
Note: You don’t need to bother with this step if you’re only going to be selling in a single area/country where the tax rates are the same. For instance, if your store is in the UK and you’re only going to be selling to UK customers.
WooCommerce wants to make figuring out taxes easier for you with their WooCommerce Services module. To enable it, go to the WooCommerce section of the dashboard. You’ll see a banner inviting you to try these features:

Click Connect.
And, that’s it. From now on, your taxes are going to be calculated automatically.
Email marketing
Even in the age of social media, Instagram, Facebook Stories, YouTube streaming and so on, it’s email that’s still king when it comes to direct online marketing channels.
Countless businesses name email to be the most effective communication medium of them all, despite the fact it’s also one of the oldest. In fact, email marketing is reported to produce ROI in the range of 4,400%.
What this means is simple: As an e-commerce store owner, you can’t do business without making email an important component of your overall strategy.
There are many email tools available for WooCommerce, but the one we like the most is called Jilt.
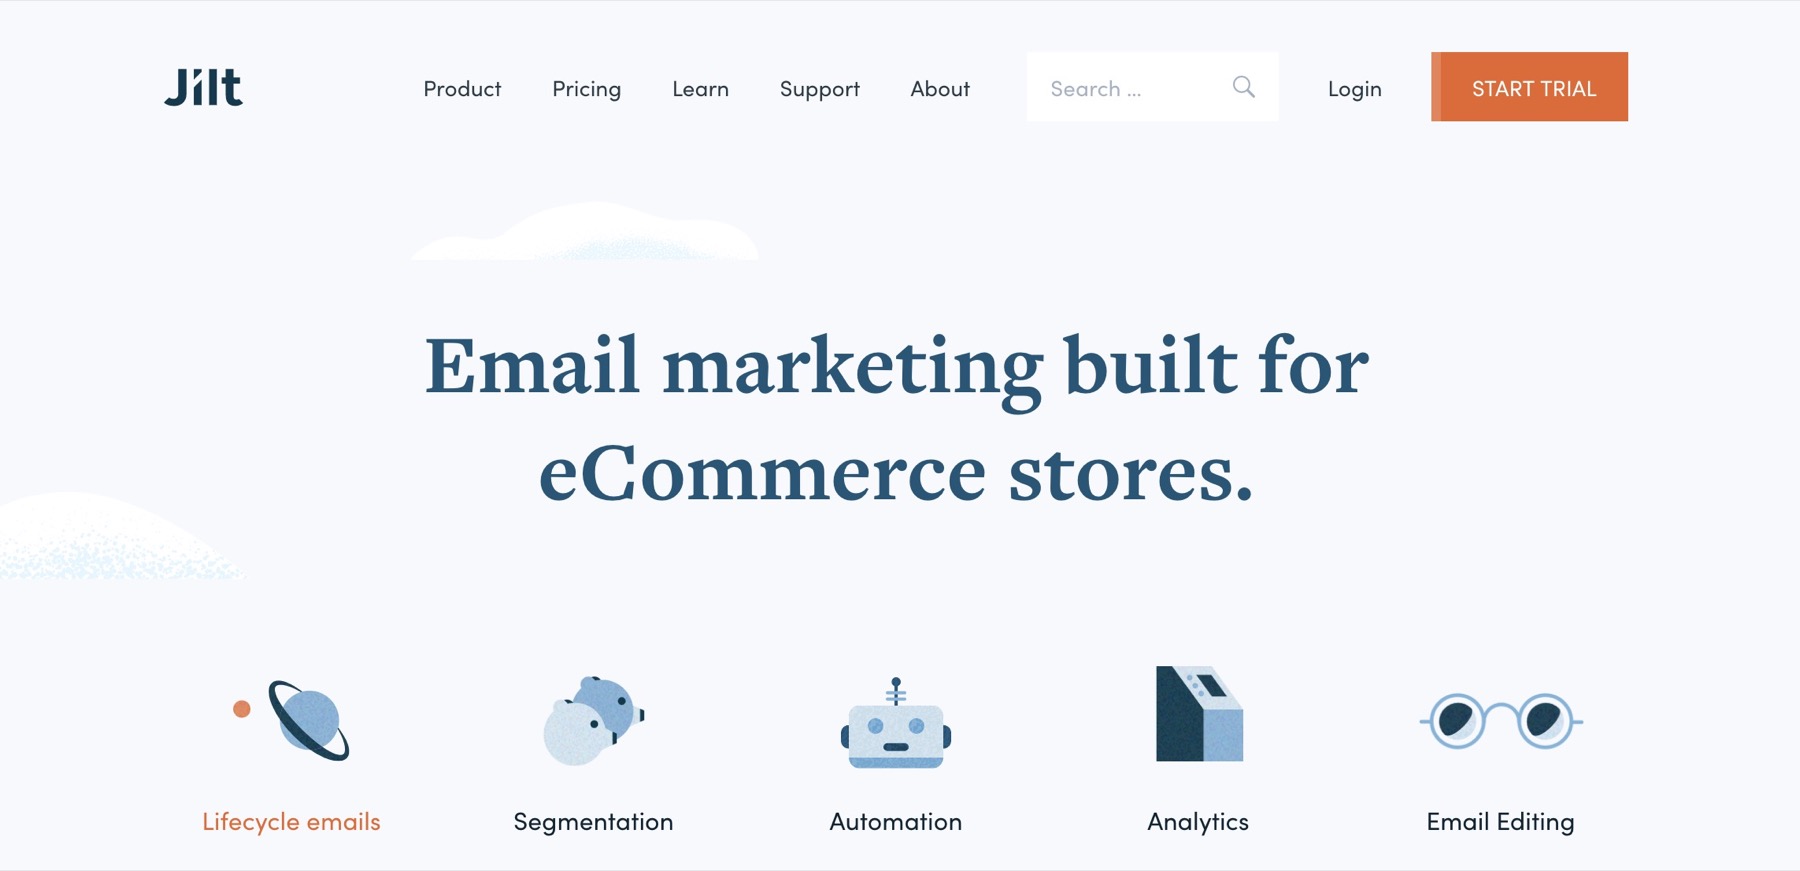
Jilt is a freemium solution. If you have fewer than 300 contacts, it’s free. Above that, some payments apply. Since you’re just getting started, you should be able to use Jilt for free at least for a little while.
Here’s what Jilt allows you to do:
- Send welcome emails to new customers.
- Send broadcast emails to all of your customers.
- Send cart abandonment emails.
- Thank repeat customers.
- Segment your contacts (based on purchase frequency and other parameters).
- Send emails automatically, based on customer activity on the site.
- Design your email messages directly in your WordPress dashboard.
To get started, simply go to Jilt and register for a new account.
The first thing you need to do is tell Jilt what software your store uses — that would be ‘WooCommerce’.
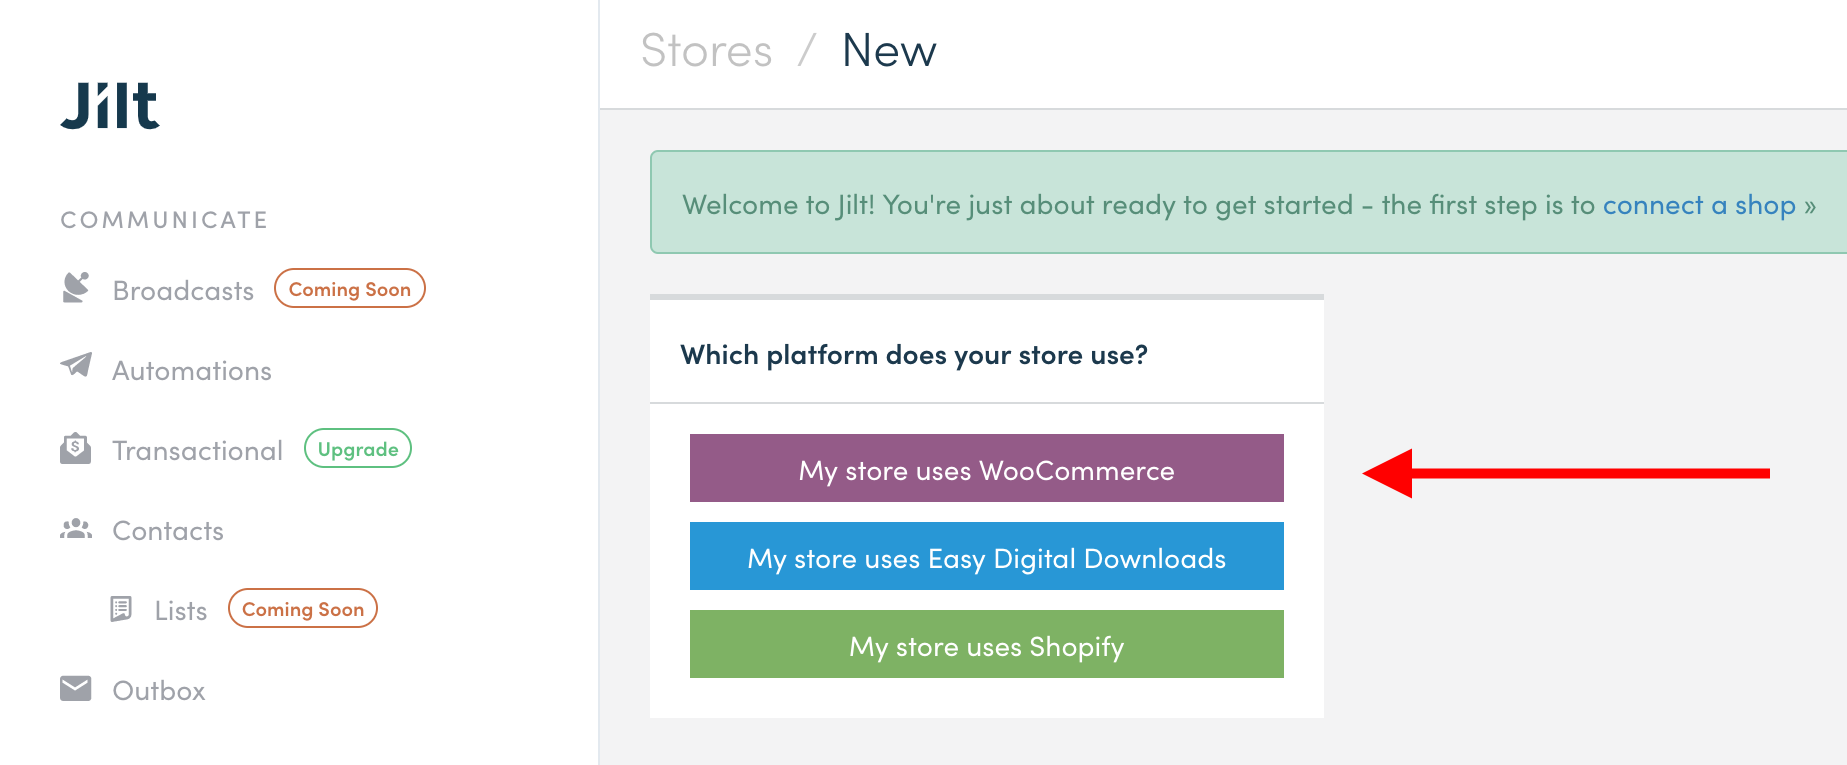
Jilt will show you the steps required to get everything running.
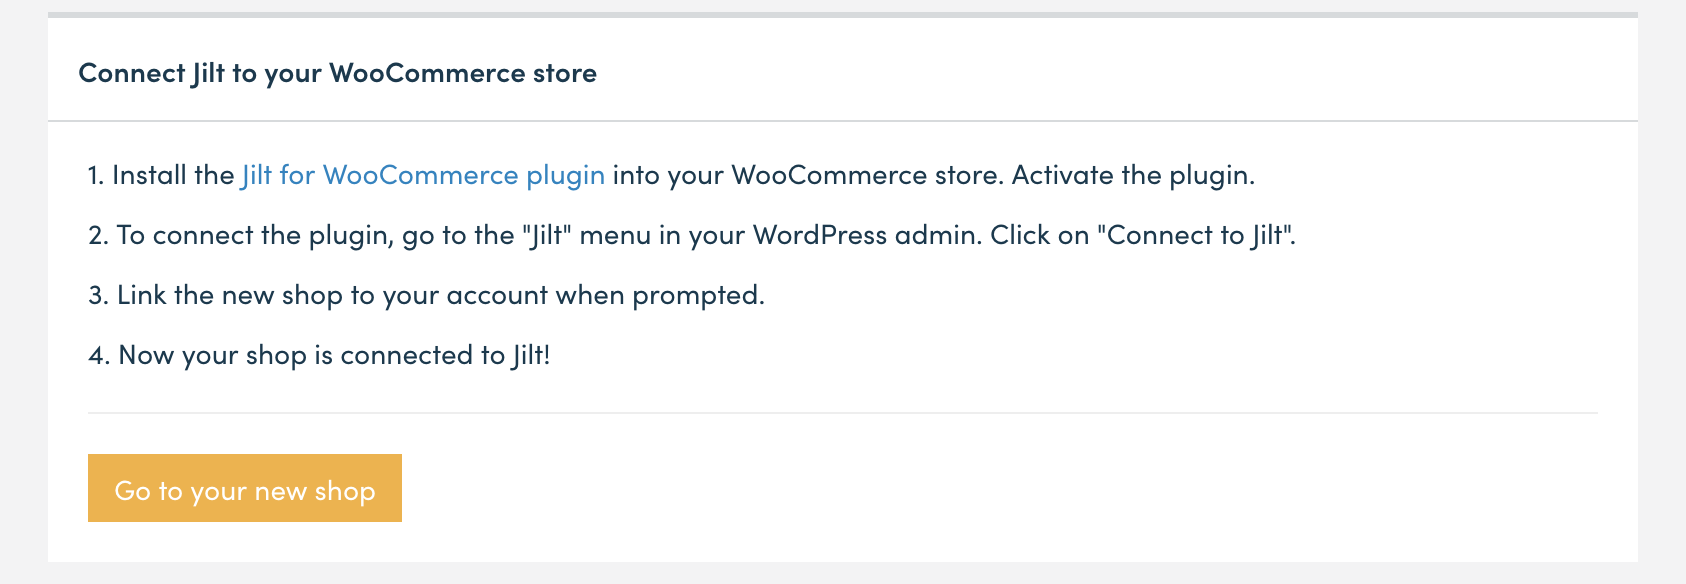
Just follow along until you have Jilt fully integrated with the store. This is what the welcome message looks like:
Click the first link to go to your Jilt dashboard, where you’ll see a quick setup wizard. Jilt needs to know a couple of details before you can start using the tool’s full arsenal.
What’s great about Jilt is that it integrates with WooCommerce seamlessly. As soon as anyone orders from your store, their email address will be added to Jilt as well. And, from there, the person can be contacted using one of your pre-made communication templates. Speaking of which, here’s how to set up your messages in Jilt:
There are a couple of main communication types you can handle via Jilt. You can see them all in the main panel:
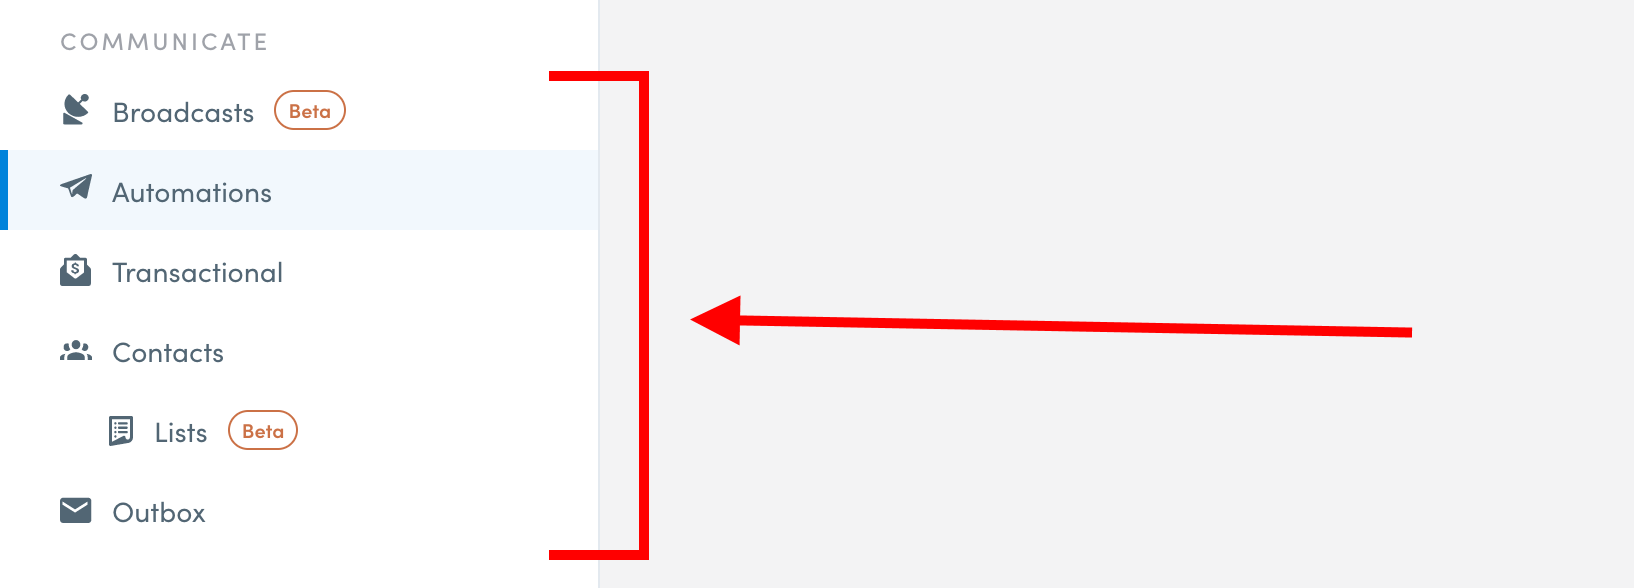
Each of these sections has its own setup panel, along with a handy quick-start wizard to get you working quickly:
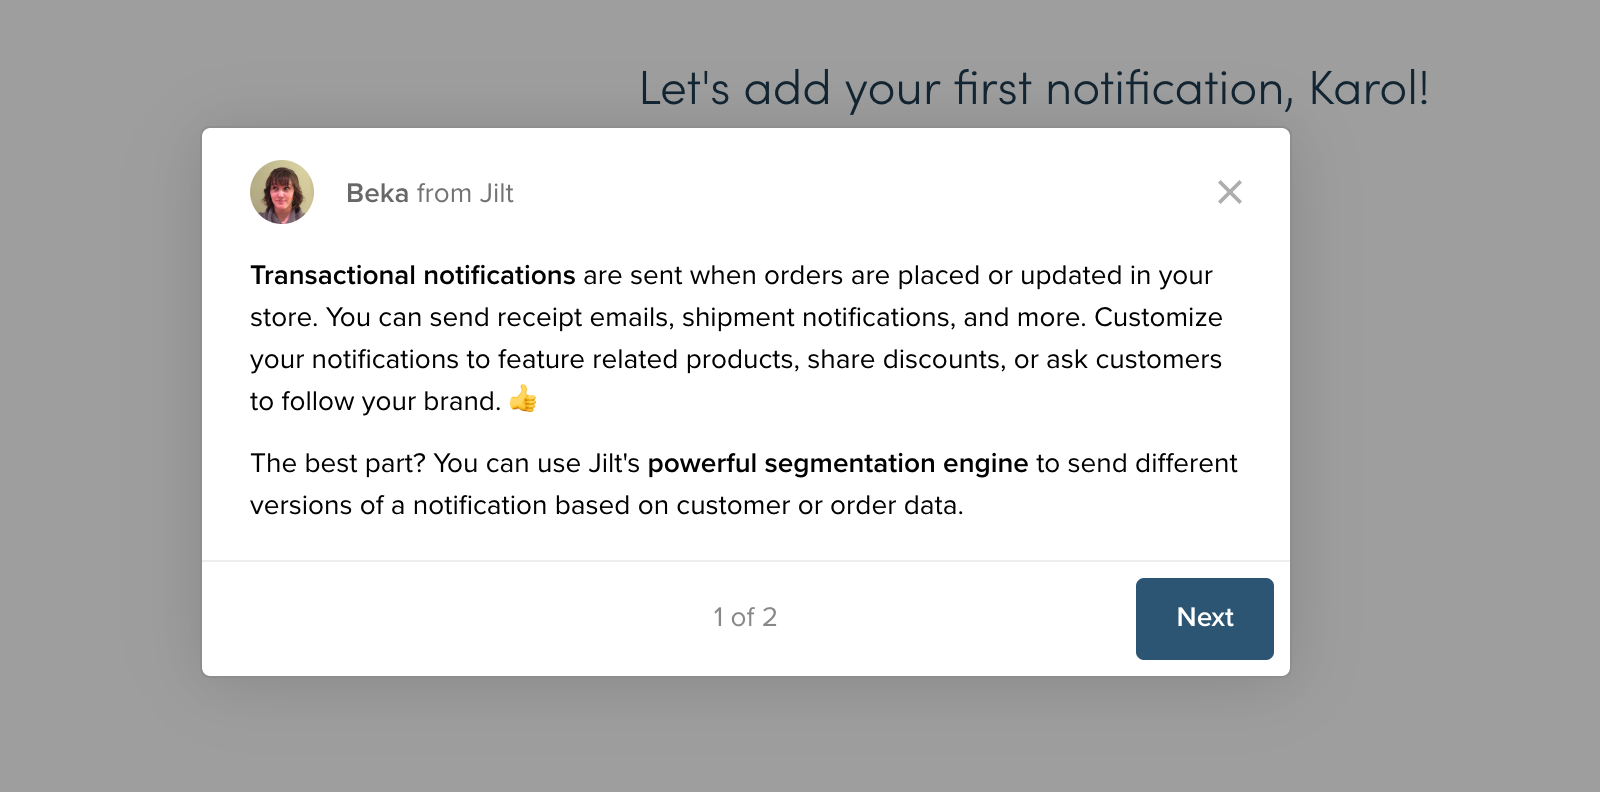
Jilt’s power lies in its automations module most of all. Using just that one, you can set up abandoned cart emails, post-purchase follow-ups, welcome first-time purchases, send thank yous, and more. Putting these sorts of automations in place can improve your sales a lot, since it adds more touch points with your customers — exactly at the time when they’re the most interested in your offer.
Jilt makes creating these automations really easy; you just need to follow the on-screen prompts.
Jilt also has some standard message templates prepared for you. For instance, once you start creating a cart abandonment campaign, it shows you three ready-made templates in a sequence. All you have to do is customize them to your liking and enable the campaign.

Speaking of customization, Jilt’s interface for email building is nice to work with as well, and intuitive. You can drag and drop things into place and edit all the text.

Okay, but what sort of campaigns should you even bother creating? This is up to you, but there are a couple of ways to figure this out:
- Again, go back to your competition. See what they’re doing. Buy something from them and see what communication is like. Build a process that’s similar.
- Go to Jilt and see what types of campaigns there are to choose from. Pick the ones that speak to you the most. Since Jilt gives you some nice templates for each campaign, you don’t even need to build those from scratch.
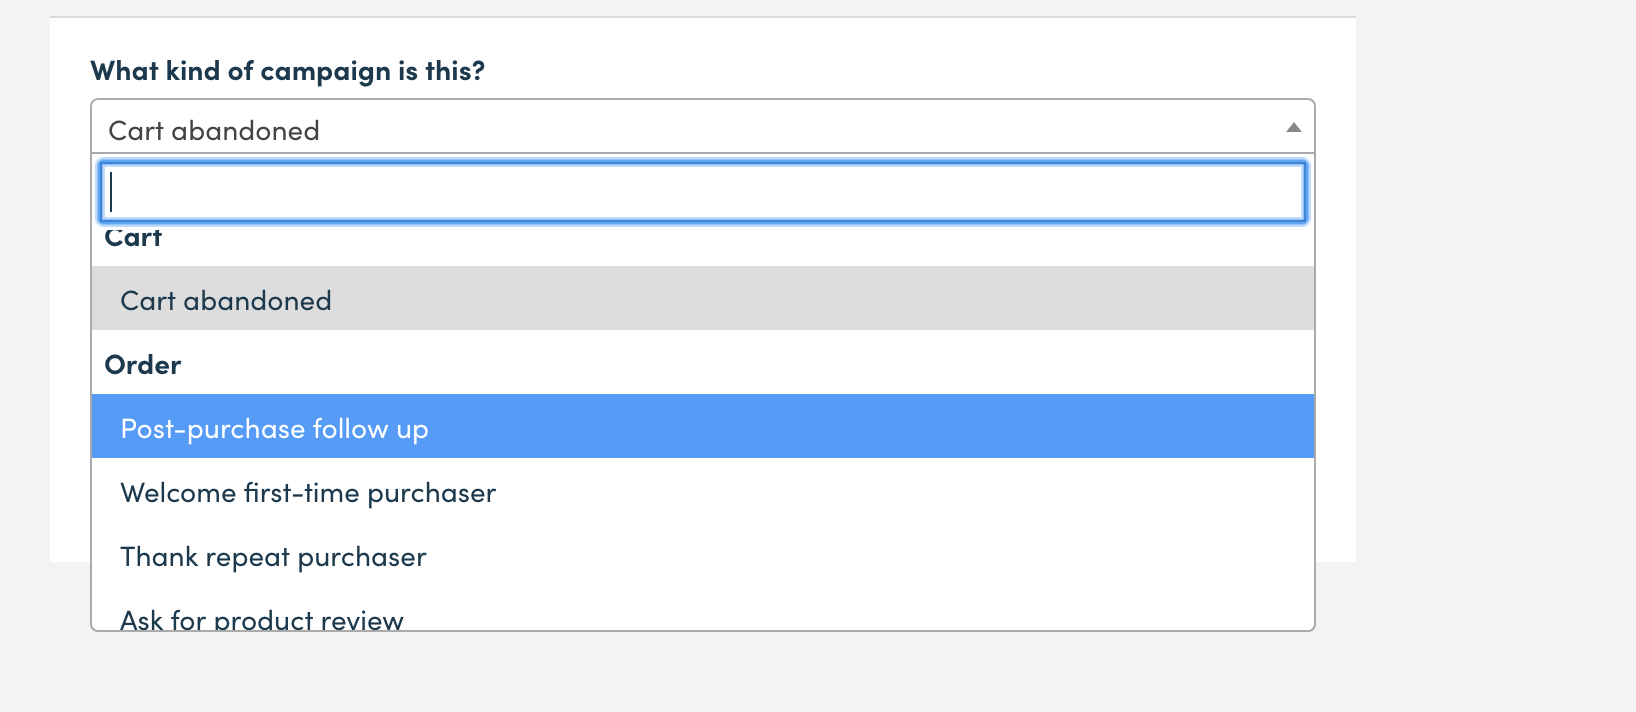
If you want to learn more about Jilt and how to use it effectively with your e-commerce store, read this comprehensive guide.
Want more?
The world of cool WooCommerce plugins doesn’t end here. There’s much more you can do and many more features you can get for your store. For example, here’s a list of ten free WooCommerce plugins to get you started. Of course, whether you really need any of them depends on your market and the type of products you offer, but the list is surely worth a look nevertheless.
12. Test if Everything Works
With the store set up and ready to go, it’s now time to test every little mechanism and make sure things work properly.
Here’s what to do:
12.1. Test Orders
Go to your store and try buying something yourself. Use another email of yours, enter all of the data. See if you can see your order in the WooCommerce panel (WooCommerce → Orders).
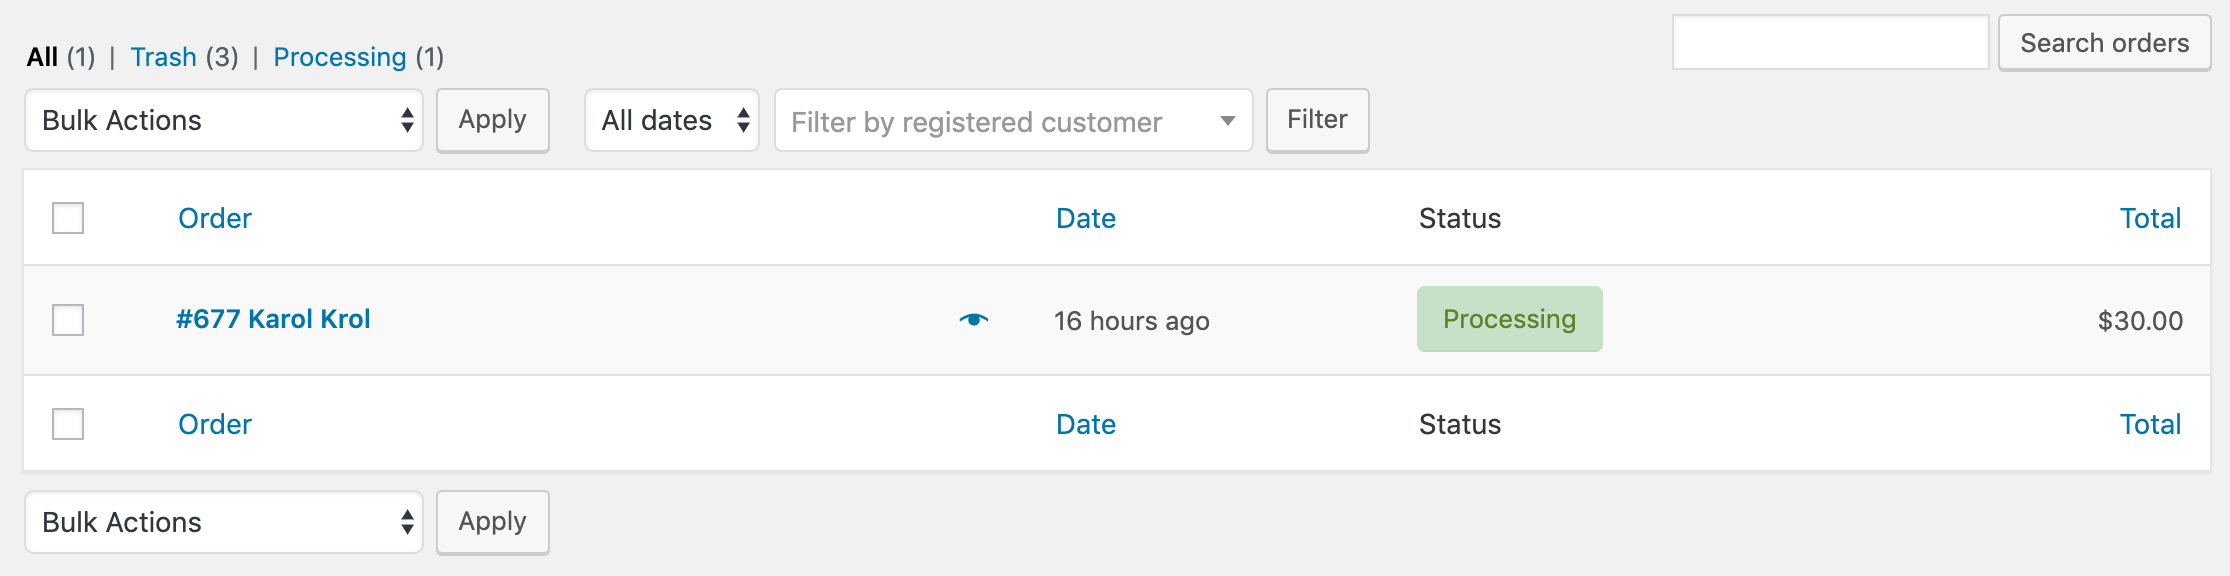
Once you click on an order, you’ll see all of the details required to fulfill it — the customer’s address, the products ordered, the payment status, and so on.
You can place a couple of orders and see how handling them in WooCommerce is done.
When you complete an order, don’t forget to change its status. Like so:
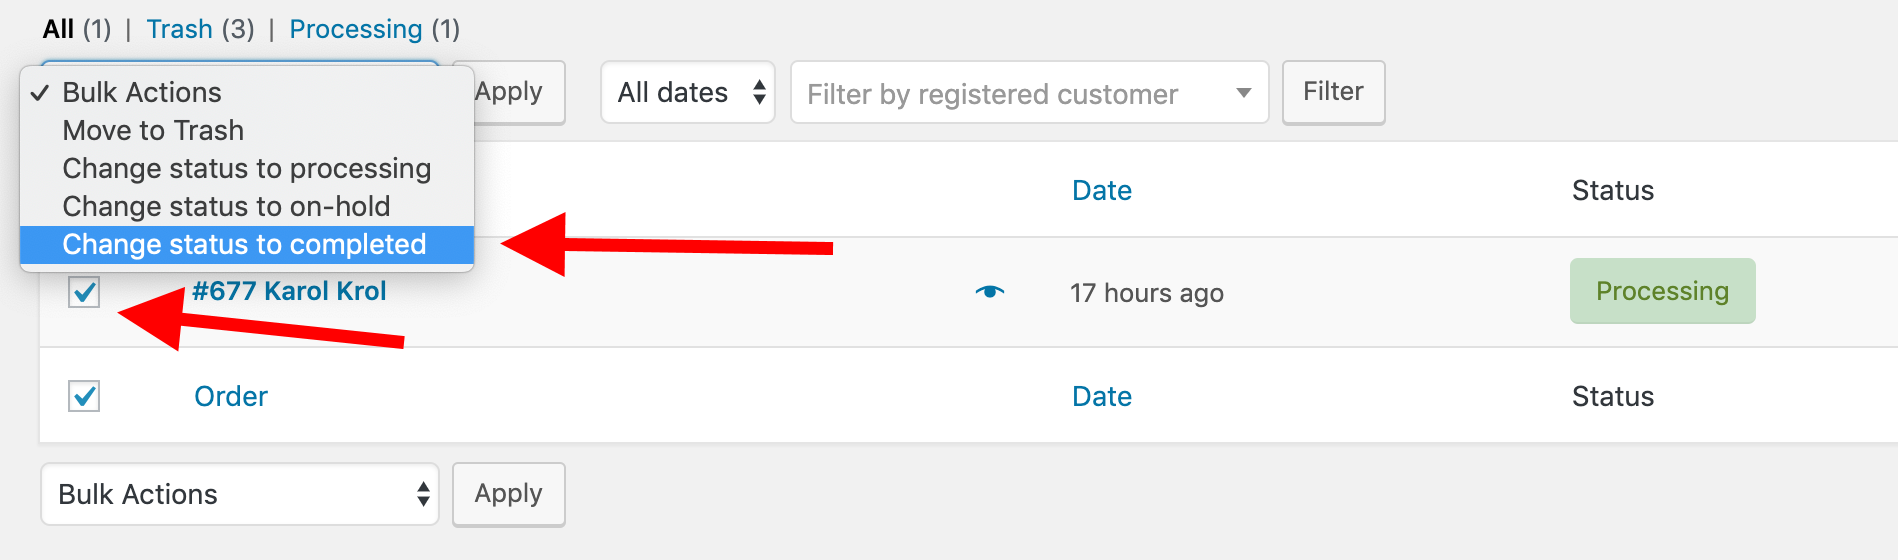
12.2. Test Payments
As you’re placing new orders, you can test if the payments are going through. To do that, go to your payment processor and enable what’s usually called either ‘test payments’ or ‘sandbox mode’. Using such a mode, you can perform a dummy payment and see how it’s received in your e-commerce store.
When you’re done with that, disable the test mode and ask a friend to order something from you for real and proceed with the payment. See if everything works on a live setup as well.
12.3. Check Emails
As you’re placing orders, check if you’re receiving email notifications.
The customer should receive an email confirming they’ve placed an order, and you should receive one as well. An email should also be sent on order status change and on actions initiated from the WooCommerce order panel (when editing individual orders).
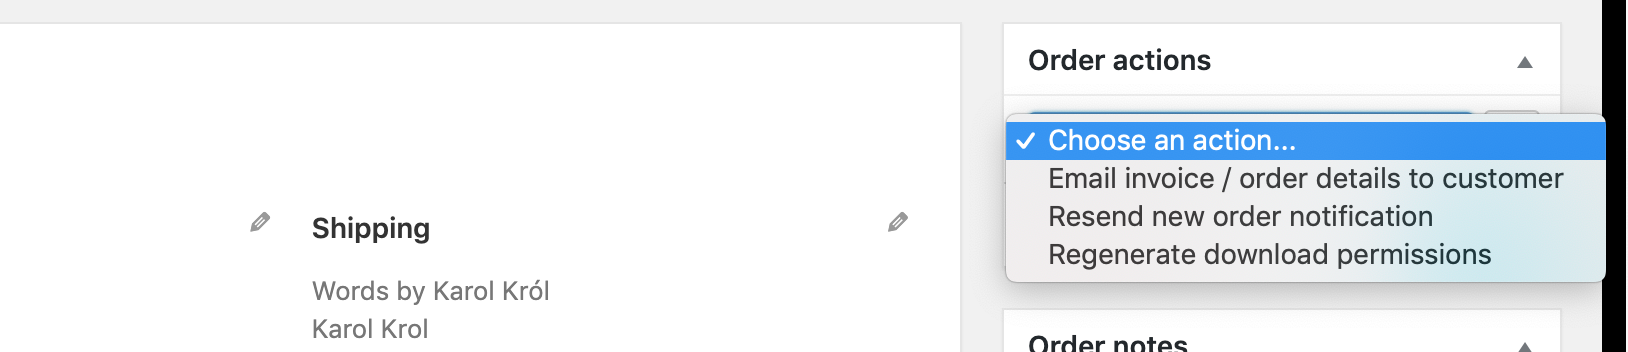
Next, go to Jilt and see if the emails from there are going out correctly.
12.4. Check Your Mobile Design and Experience
As we discussed earlier, these days more people go online on their mobile devices than on their desktops or laptops. What this means in practice is you must make sure your online store works properly on mobile.
Doing this is simple: Just take out your mobile phone and visit your store.
Go through all of the pages and make sure everything looks good. If there’s anything you’d like to change, you can go back to that given page on desktop, and click the Edit with Elementor link once again.
While in Elementor, switch to the mobile editing view. Make your changes there and save the page when done.
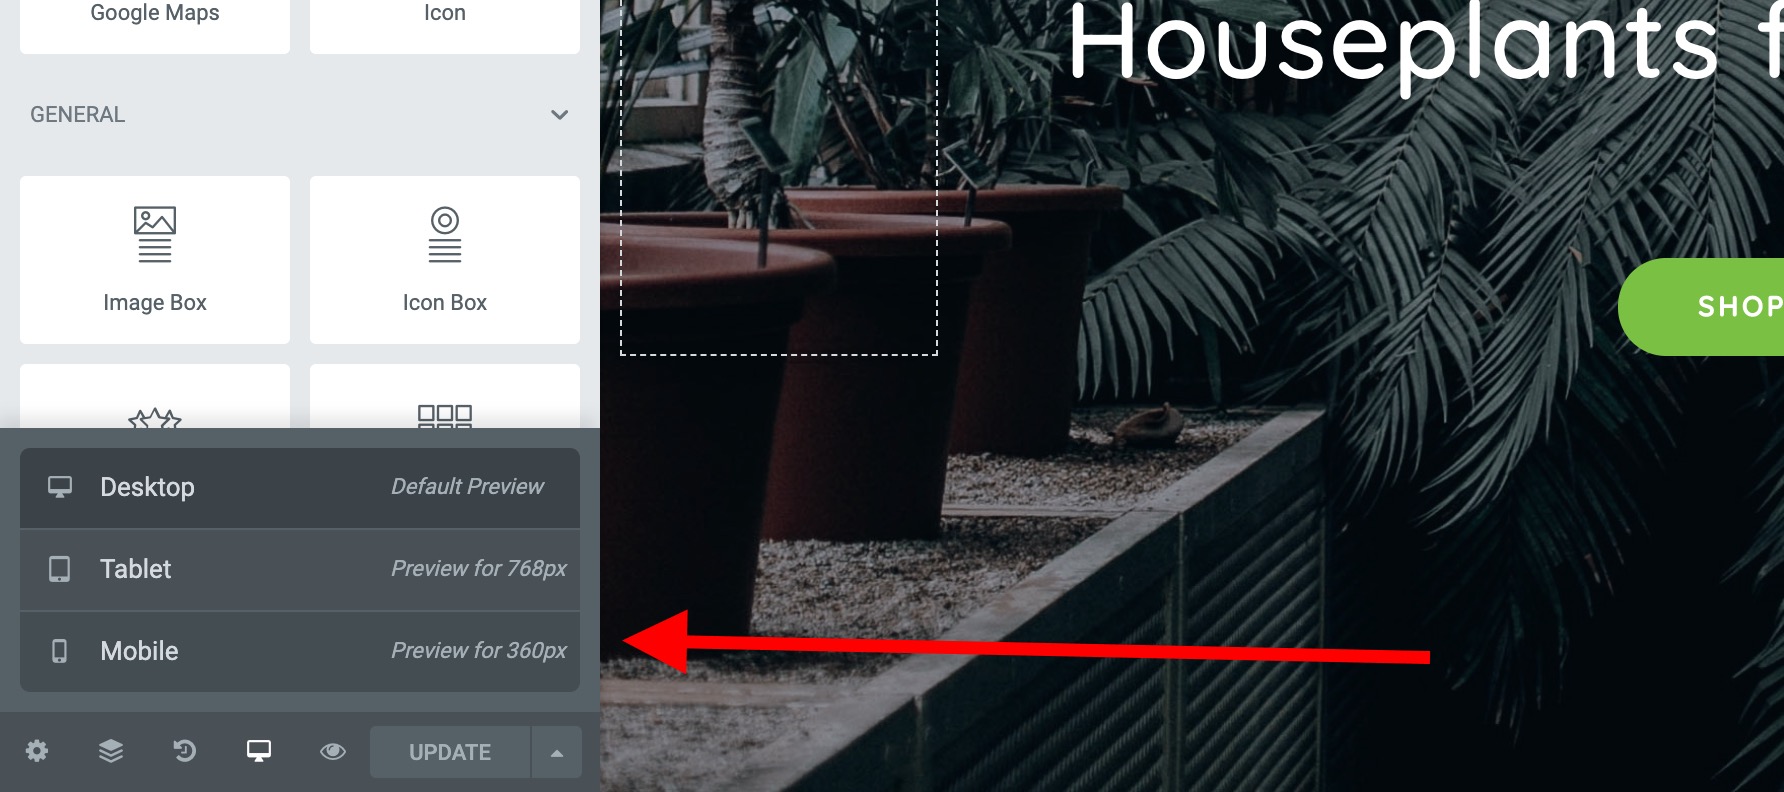
The next thing you can do to make sure everything is just all right is use Google’s Mobile-Friendly Test tool.
Enter your website’s address and see what Google has to say about it.
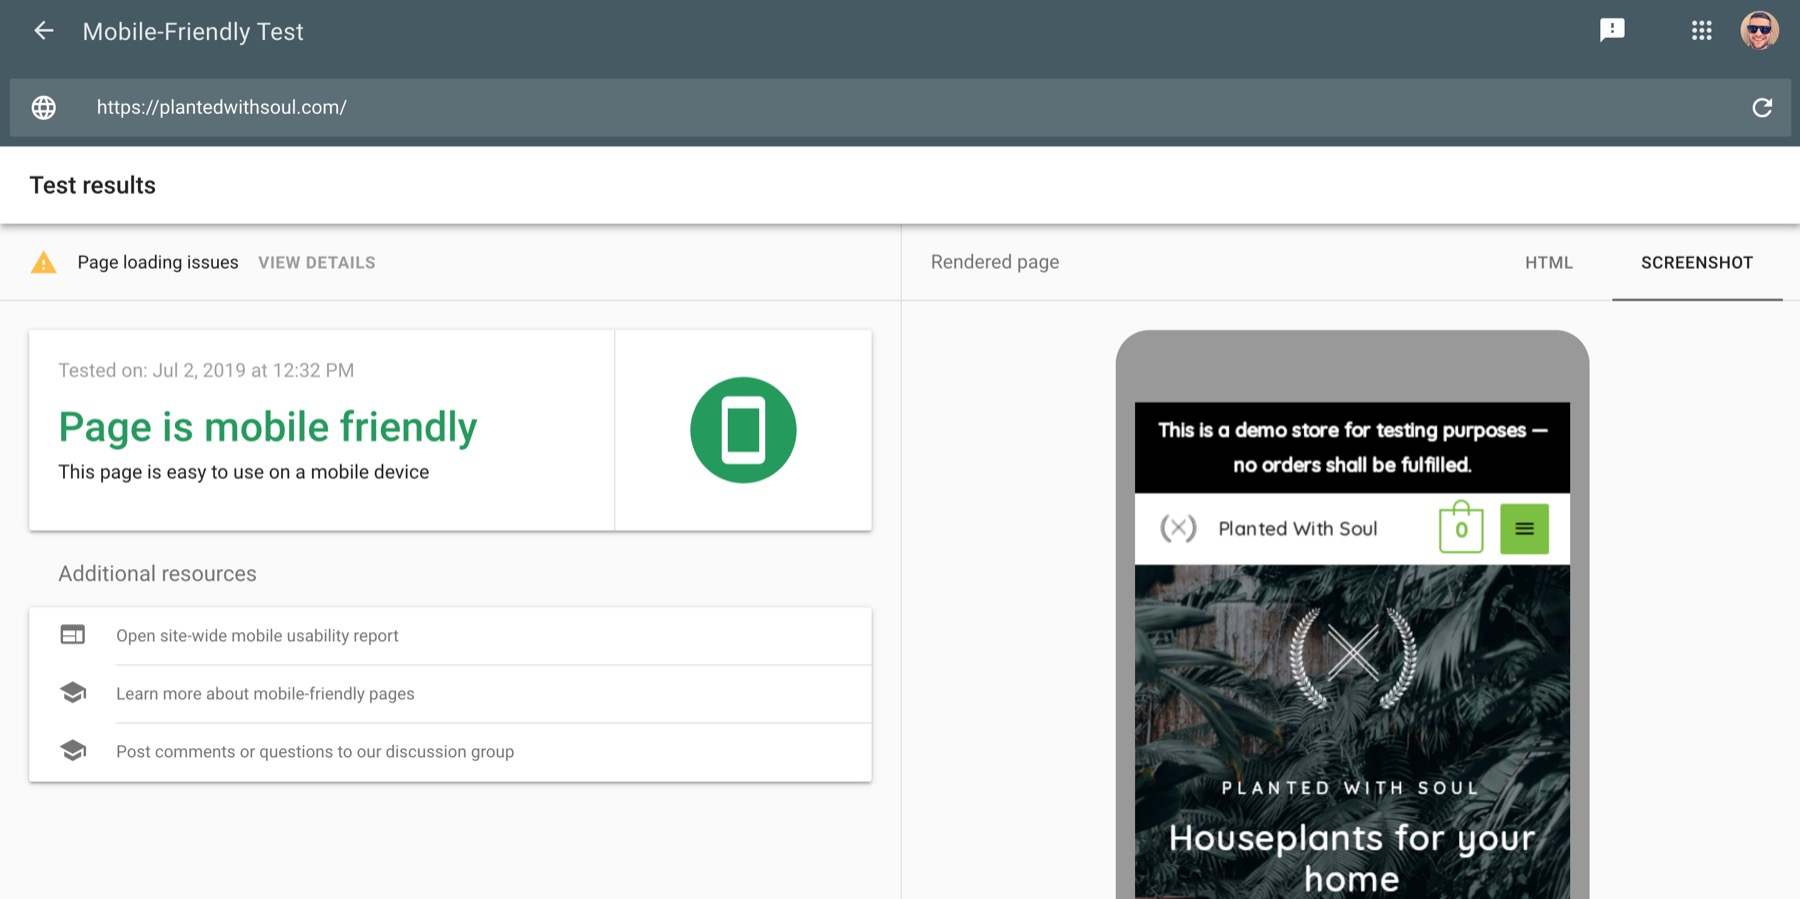
If you use Astra, you’re going to see a positive result there.
12.5. Check All Sub-Pages
Apart from the tasks listed above, also double check if all your subpages look as they should. This includes your About page, Contact page, individual product pages, product listings, product searches on the site, and every other area that can be accessed by your customers.
Also see what your site looks like on different devices, both desktops and laptops, mobile devices and tablets.
13. Promote and Get Traffic
We’re finally onto lucky number 13 — promoting your e-commerce store. This is also the most fun part of the whole project.
However, I have to start with some bad news: There’s no such thing on the web as ‘if you build it, they will come’.
On the web, no one will come if they don’t know how to find your store.
This is what promotion and marketing are all about — getting people to your store’s virtual doorstep and inviting them in.
Since e-commerce store promotion is a big enough topic for a guide of its own, we’re only going to present some basic ideas here and challenge you to get to the bottom of them on your own:
13.1. Content Marketing
I mentioned the concept of content marketing earlier in this guide. The principles are simple:
You look for content ideas that can be interesting to your customer base — content about something related to the niche or the products you’re selling.
For example, in my case, those would be articles and tutorials on plant care and related things.
To find what the popular content is in your niche, go back to your competition and see what they’re publishing.
Two tools that can help you to do this research are BuzzSumo and Ubersuggest.
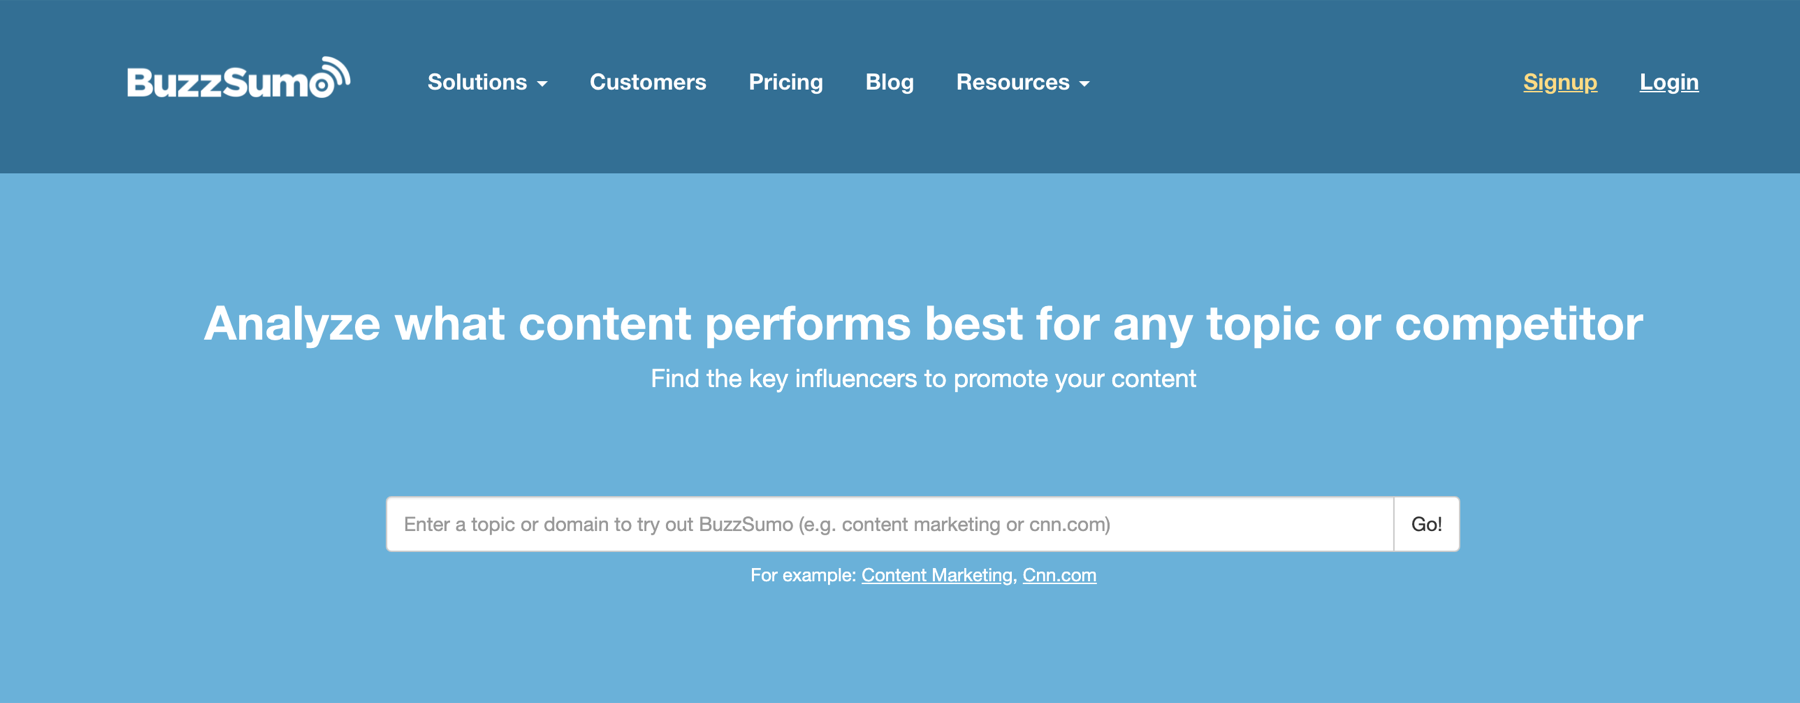
Just input your competitor’s web address into the box and see what comes up. For example, when looking up The Sill, I can see that the most popular content pages for them are:
To get started, I could write my own content on these topics, and you can do the same: Research the market → see what people are reading → write something with your own spin.
Once you get enough content out there, and your site grows in popularity, you’ll have people coming to your store through that content, and then looking at some of your products. This is what content marketing is all about.
13.2. Social media
Promoting your products on social media might seem like a straightforward enough thing, right? Well, I’m afraid things are a bit more tricky.
The challenge is that you can’t really hit your followers with constant product promotion all the time.
Rather than posting “go here buy this” updates, focus on telling stories about your products.
Again, look at your competition. Here are some social media messages from Bloomscape:

A nice, seemingly unrelated update. Still gets people to look.

Another one. Just a casual update, but you can still see a plant in the background, keeping the customer’s mind in the right place.

A similar style of an update, this time from Instagram.

And lastly, a great post that not only provides a cool nugget of information but also lightly nudges people to go check out Bloomscape’s products.
If you don’t have such good examples in your niche, go a niche above and look for inspiration there.
13.3. Active SEO Work
Getting those shiny SEO plugins in place is only half the battle — now you actually need to use them actively.
Since SEO is a huge topic, we’re not going to get into it here. Instead, check out this in-depth guide on the essentials of WordPress SEO.
13.4. Make Partnerships in the Niche
Here’s a counterintuitive point of view: Your competitors are not really your competitors.
No matter what you’re doing, you can always partner up with another clothing store, another coffee store, another plant store.
Think of what you could do together and how you could help each other’s brands. Reach out with a proposition. This can be a joint promotion or even a local event, content exchange and so on.
Aim for a brand that’s a similar size.
13.5. Sponsor Content on Niche Blogs
If there are blogs in your niche that are already popular, reach out to them and offer them content sponsorships — e.g. offer to pay for a piece of content in exchange for a brand mention.
The idea is that part of the readership of that blog will come to check you out.
13.6. Sponsor Podcasts and YouTube Videos
Podcast sponsorships have been huge lately, as have video sponsorships.
The idea is the same: You reach out to a popular podcast/YouTube channel in your niche and offer to sponsor their next episode. What you usually get in exchange is a verbal mention of your brand.
13.7. Advertise on Google AdWords and Facebook
Well, duh! Advertising on AdWords and Facebook is the most obvious thing you can do as a store owner to get more sales.
Here are two neat guides on how to get started with either platform:
13.8. Take Part in Local Events
I bet a lot is going on in your city — especially in the summertime, when multiple events are held. If you look hard enough, some of them will be fitting for your brand to sponsor or show up to.
There are a few of things you can do, including:
- show up and talk to people, wear a branded T-shirt with your logo
- sponsor the event in exchange for a mention
- sponsor the event and get your booth set up — sell directly from the booth (if allowed) and also send people over to your e-commerce store.
The idea here is to get your brand out there. Getting known locally is the first step to getting known globally. Don’t underestimate the power of local.
13.9. Always Ask People to Join Your Email List
Whenever someone buys from you, they get added to your database of email addresses. Apart from that, you should also think about other scenarios when you can get the person’s email address.
For instance:
- Collect emails when someone adds a product to the cart (you can do that with Jilt). We’re doing this because the average cart abandonment rate in the industry is ~70%, so getting the person’s email before they have a chance to abandon the cart is a good idea because it lets you contact them later.
- Ask for emails in a pop-up when someone is reading your content (you can do that by integrating your store with a tool called Sumo).
Just these two methods will grow your list of contacts significantly over time. Then, you can nurture your list by sending them tips and content related to the niche, and every once in ten emails also offer them a product deal.
Congratulations!
First of all, congrats! 🍾
You’ve just launched your own e-commerce store, and if you’ve followed along, you’ve done it all by yourself!
While getting through the steps does take a while, it’s not that difficult, and you’re saving a lot of money versus hiring someone to do all of the work for you. We’re talking in the range of $10k-plus savings!
If you’d like to go back to some of the chapters from this guide, here’s a handy summary:
- Start with Your Store-Setup Sheet
- Get to Know Your Competition
- Get to Know Your Customer Base
- Pick an Angle
- Pick a Name
- Understand What Web Hosting Is About
- Building an Empty E-Commerce Store
- Add Products to the Store Catalog
- Pick a Design for Your Store
- Set up Your Core Pages
- Extend the Store with New Features
- Test if Everything Works
- Promote and Get Traffic
Any additional tips? Feel free to help others in the comments. Thanks for reading!
By
TOP DEALS


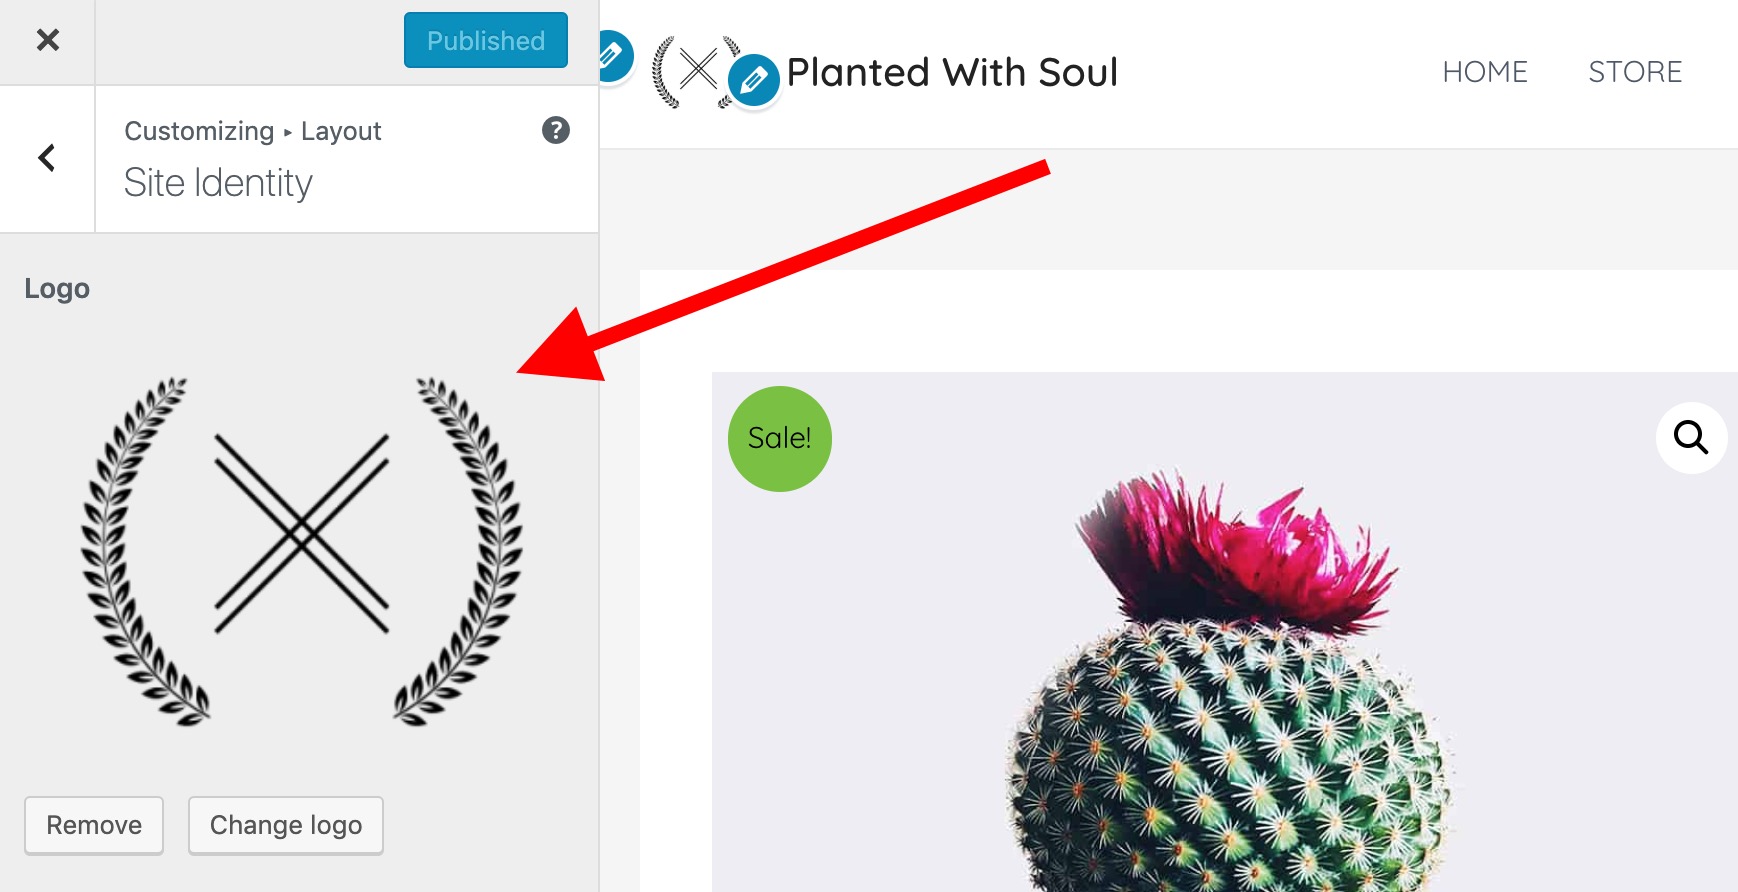
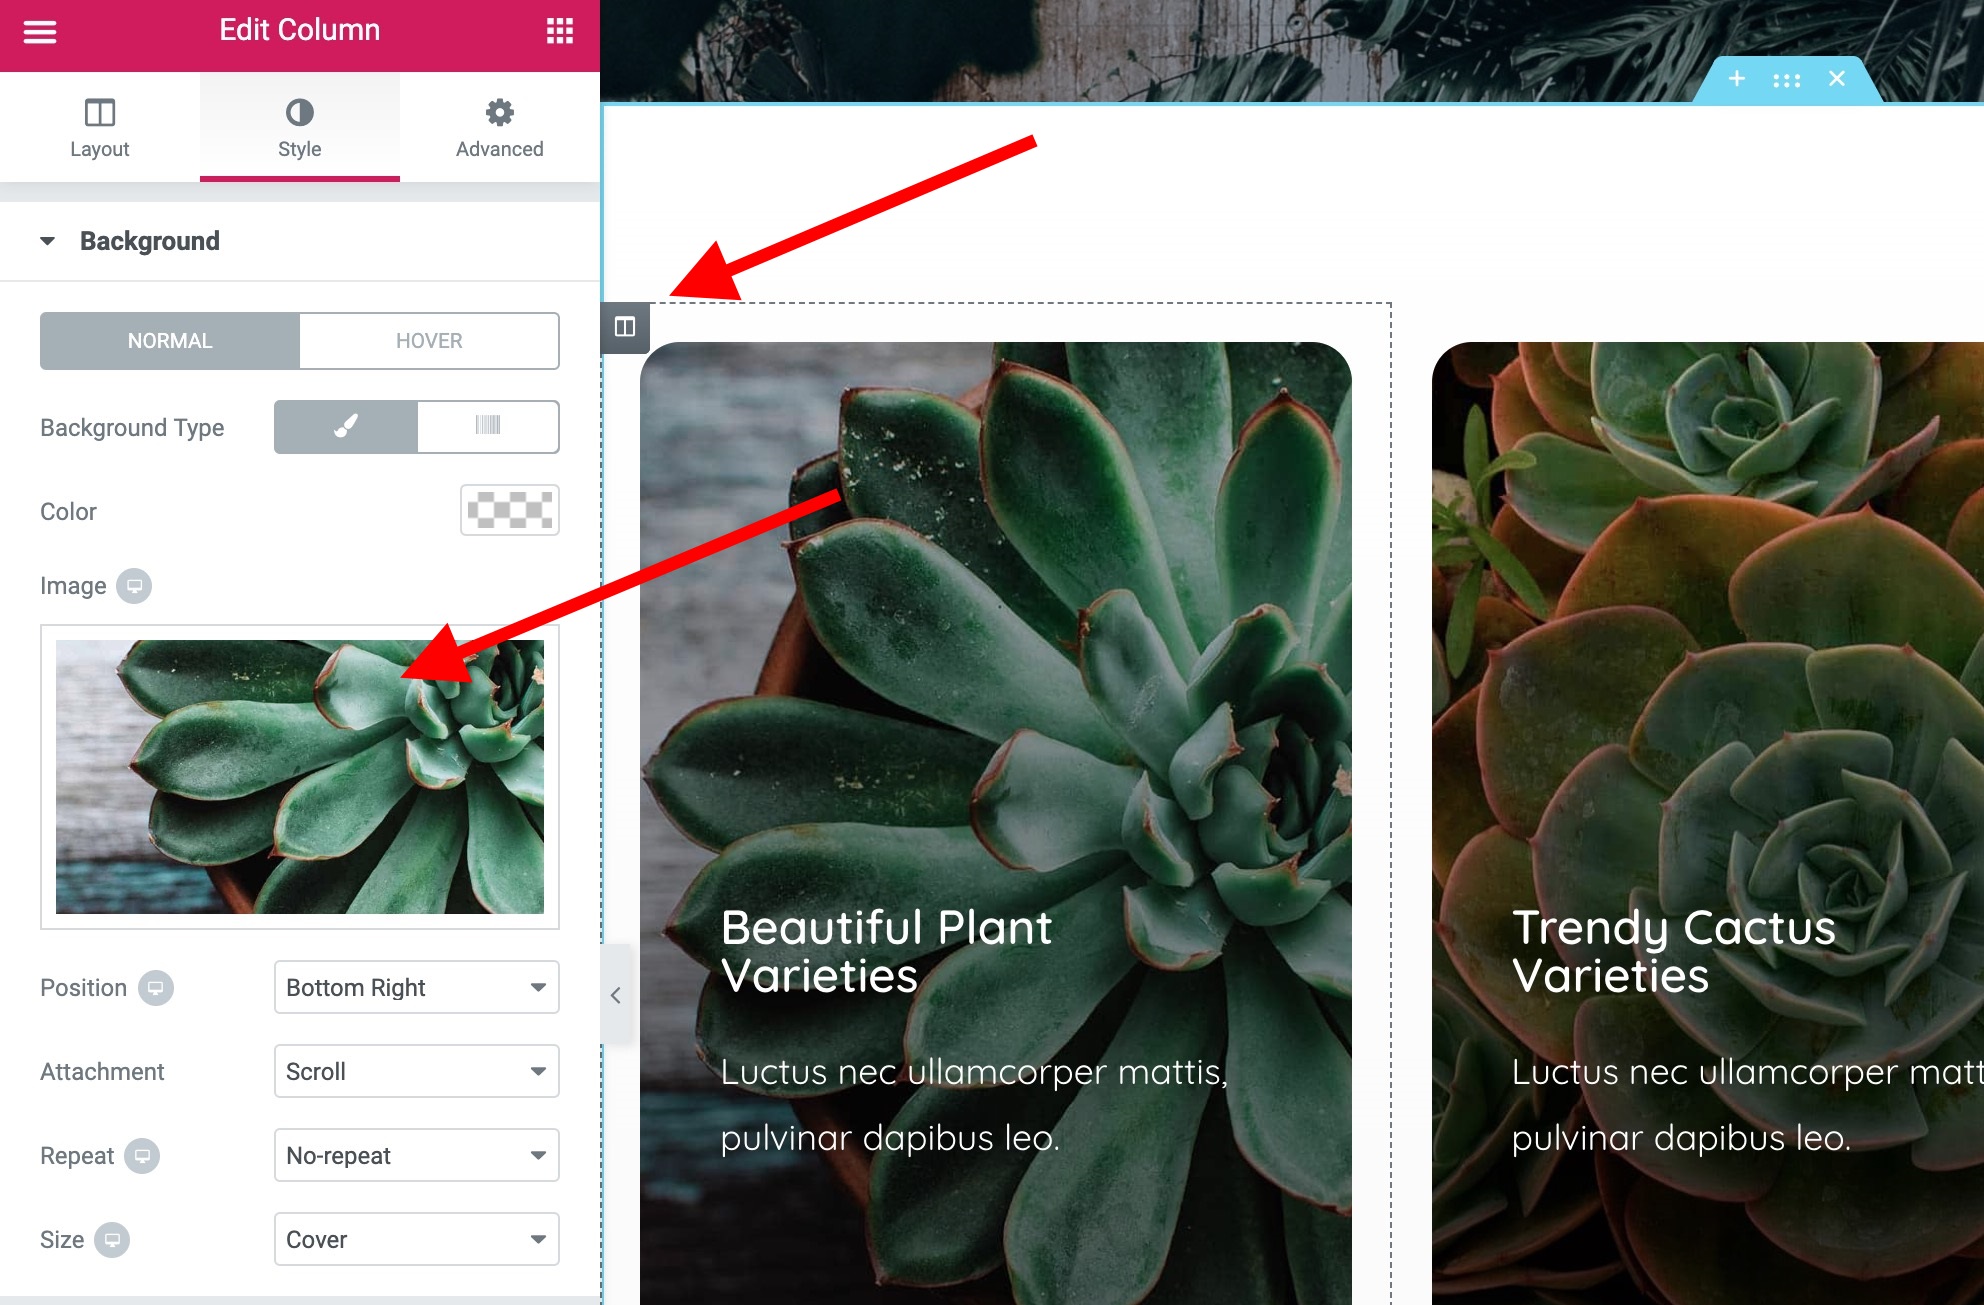
Leave a Reply
All comments are held for moderation. We'll only publish comments that are on topic and adhere to our Commenting Policy.
Thanks, Karol! Very helpful tips and a fantastic article full with detailed points. You just won a new regular reader! – Jessica
Impressed by the writing! I think that is okay for Ecommerce Business setup instruction. Thanks for sharing good experience.
I’m agree with you