
How to Enable Browser Caching in WordPress

Your website’s speed plays a vital part in providing an optimum user experience. (Note: If you’re interested in learning how to check your site’s speed, see our article on using GTmetrix.) A slow site can cause a disruption of sales, a lowering of conversions, and, in the long term, can seriously impact both customer satisfaction and the general number of visitors.
In short: Every little thing you can do to push your load times down will count. Below, we’ll be covering browser caching, including what it is, what it means for WordPress, and how you can go about enabling it on your site.
Let’s get started…
What Is Browser Caching?
A website essentially consists of a number of files that fit together to create a series of webpages. Some of these will contain text (such as the main body of a blog post), some will contain styling information for page elements (header, footer, sidebar, etc), some will be images, and so on.
Now, whenever you browse a website, you’ll likely notice a lot of common elements: All the pages are styled similarly (they all share similar colors and design elements), the logo’s always the same, the dropdown menus are always available, and the like. So, if there are common elements, why download them all every time someone loads a new page? A much better idea would be to load such common elements once, store them within the browser and then simply reuse them as required — such as when someone goes from one page to another within the site, or when someone revisits the site at a later date.
This is the essence of browser caching. Essentially, browser caching looks at whatever files you’ve defined as files that don’t change very often (more on this below) and downloads them to the visitor’s browser just once. Once downloaded to the browser cache, these files won’t be downloaded again. This means that, rather than having to be downloaded multiple times, they’ll be ready to use at a moment’s notice — thereby reducing the load on your site’s servers AND, more importantly, significantly reducing the time it takes to load subsequent pages.
Note: When a new visitor comes to your site, the speed at which the first page they visit loads will actually be the same whether browser caching is enabled or not, since, as they’ve never visited your site before, their browser can’t possibly have had an opportunity to store any of your site’s files yet. The benefits of browser caching, therefore, will only be felt when a visitor loads more than one page and/or revisits your website.
How to Leverage Browser Caching in WordPress
Enabling browser caching isn’t difficult, but, because it requires editing a slightly tricky site file (your site’s .htaccess file), it does require some preliminary knowledge.
Note: Browser caching isn’t specific to WordPress, the way to enable it is the same no matter what system you use.
There are essentially two ways of going about it.
The Super Easy Way: Talk to Your Host
To enable browser caching, you’ll need to edit — or perhaps even create — a file called the .htaccess file (read more). A typo in this file could lead to your entire website becoming temporarily inaccessible, so, if you’re in any doubt about what to do, it may be best to ask your host to do it for you — just to be safe. If you’re using a great hosting company (need a better host?), they’ll almost certainly be able to set this up for you within a few minutes (if they haven’t already).
Editing the .htaccess File on Your Own
The .htaccess file can be a scary place; it’s a classic example of “with great power comes great responsibility”, allowing you to speed up your site, create redirects, and do amazing stuff. All this power comes at a price, though — an error in this file will likely cause your whole site to go down.
Fixing it is a matter of undoing what you’ve added, but, for a beginner, it can be a daunting experience. I highly recommend experimenting on a test site before you get your hands dirty with an important live site.
The first thing you’ll need is a way to access your server’s files. The most common way to do this is via FTP (file transfer protocol — read more). The file can be a bit tricky to find because it’s a dotfile — a hidden file on a Linux-based system (what’s a dot-file?) — but most FTP editors have a ‘show hidden files’ option that should allow you to view these files. (Note: If you’re using a Mac, read our article on how to download, edit and re-upload an htaccess file without having to change any of your computer’s settings.)
The .htaccess file should be in your main WordPress folder — the same folder that contains the wp-content, wp-includes and wp-admin folders. If you can’t find it, that’s okay, it may not exist — in which case you’ll need to create it (something not covered here, I’m afraid). Once found (or created), you’ll then want to add the following code using a plain text editor, NOT a word processor!
<IfModule mod_expires.c>
ExpiresActive On
ExpiresByType image/jpg "access plus 1 year"
ExpiresByType image/jpeg "access plus 1 year"
ExpiresByType image/gif "access plus 1 year"
ExpiresByType image/x-icon "access plus 1 year"
ExpiresByType image/png "access plus 1 year"
ExpiresByType text/css "access plus 1 month"
ExpiresByType text/x-javascript "access plus 1 month"
ExpiresByType application/x-shockwave-flash "access plus 1 month"
ExpiresDefault "access plus 2 days"
</IfModule>
These lines tell a user’s browser how to cache each file type. Above, I’ve set jpg, jpeg, gif, icons and png images to be cached for a year (since these hardly ever change), and CSS, JavaScript and Flash files to be cached every month (since these are more liable to change). I’ve also set the default to two days for any files that aren’t otherwise specified.
Disabling for Development
As these files will be cached for quite some time (whatever time you’ve decided to define for each file type), development may be difficult, so I’d strongly recommend not using browser caching for websites that are still in active development. You can go to your browser’s settings and clear the cache manually each time, of course, but this will soon become tiresome (plus, it isn’t nearly as easy to clear someone else’s cache — tips below).
If you do start changing things, you’ll want to first change the cache to something much shorter, such as a single day — in which case, users will see the new resources when 24 hours have passed.
Another method developers use to refresh cached files is to add query parameters to their resources. If you’re loading script.js, for example, once cached, any changes you make to it will only be downloaded after one year (or however long you’ve set it to). To get around this, developers will often append the version of the resource to the URL. So, instead of “http://mysite.com/scripts.js” the URL becomes something like “http://mysite.com/scripts.js?version=1.0”, and when the script changes again the developer once again replaces the URL to the resource, making it “http://mysite.com/scripts.js?version=1.1”, for example.
As far as the browser’s concerned, this is technically a new resource, so it’ll be downloaded and cached anew — for another year.
Checking Your Work
There are a number of ways to check whether or not a site has browser caching enabled, with one of the easiest (and most interesting) being by using a free site-speed testing tool called GTmetrix — something we’ve already covered in depth in a previous article: How to use GTmetrix to Test a Website’s Speed — Effectively
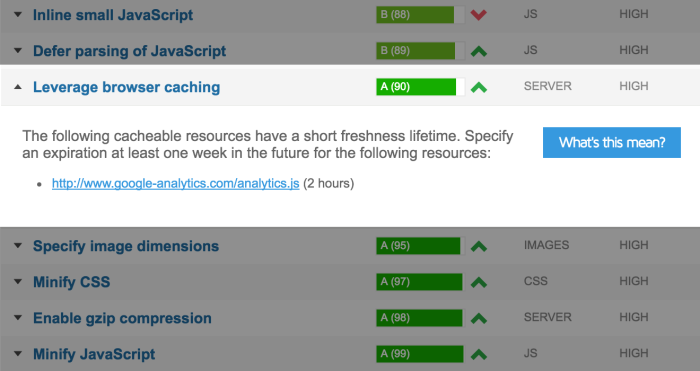
If your site scores an ‘A’, then browser caching is fine, and you’re all set for a nice speed bump!
Final thoughts
Browser caching can lead to significant speed increases, and, since it essentially means just copying and pasting a few lines of code (and has no disadvantages whatsoever — assuming you’re not intending on changing any of the defined files before they’re set to expire), enabling it is almost definitely something worth doing.
Seeing the benefits of leveraging browser caching on your site yet? Thoughts?


All comments are held for moderation. We'll only publish comments that are on topic and adhere to our Commenting Policy.